AI Voice Appointment Setter with Google Calendar

AI Voice Appointment Setter with Google Calendar

Imagine Never Saying “What Times Work For You?” Again

You know that back-and-forth dance of scheduling calls? The one that starts with “Are you free Tuesday?” and ends three days later with “Actually, can we do next week instead?” If your calendar had feelings, it would have filed a complaint by now.

This is where automation swoops in like a very polite superhero. With this n8n workflow template, your Vapi AI voice assistant can talk to your clients, collect their details, check your Google Calendar in real time, and book appointments for you. No coding, no spreadsheets, no “sorry, that slot just got taken” drama.

The result: fewer repetitive tasks for you, smoother scheduling for your clients, and a calendar that basically manages itself.

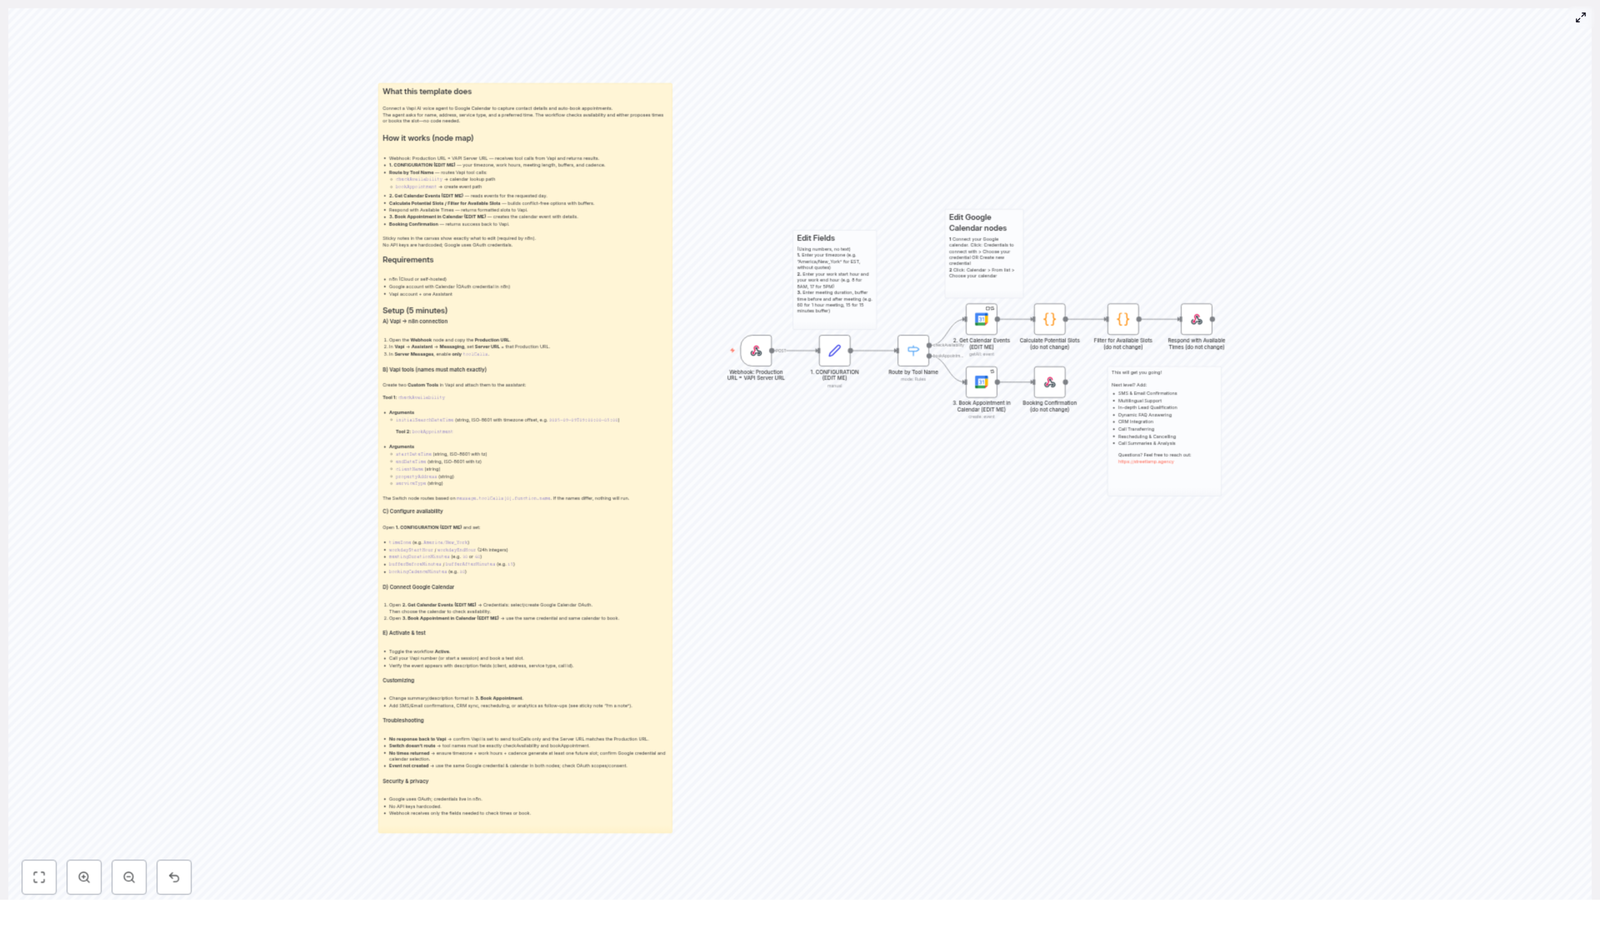
What This n8n Workflow Template Actually Does

At its core, this template connects three main players: Vapi (your AI voice assistant), n8n (your automation brain), and Google Calendar (your schedule gatekeeper). Together, they handle appointment scheduling from first “hello” to final calendar event.

Here is what the workflow is built to do, start to finish:

  • Receive a request from your Vapi voice assistant through a webhook
  • Check whether the caller wants to see available times or actually book a slot
  • Look up your real Google Calendar to avoid double-booking
  • Calculate free time slots using your working hours, meeting length, and buffer rules
  • Send those available times back to Vapi in a friendly, human-readable format
  • When the caller confirms, create a detailed Google Calendar event with all their info
  • Confirm the booking back to Vapi so the assistant can politely wrap up the call

All of this runs inside n8n using a series of nodes, each handling a specific part of the process.

Meet the Key Workflow Nodes

Here is how the workflow is organized behind the scenes. You do not have to love nodes to use this, but it helps to know who does what.

  • Webhook Node: This is the entry point. It receives incoming requests from Vapi and sends back the results like available times or booking confirmations.
  • Configuration Node: The control center. Here you set your timezone, working hours, meeting duration, buffer before and after meetings, and booking cadence. In other words, your scheduling rules.
  • Router Node: Think of this as the traffic cop. It checks what kind of request Vapi sent and routes it either to “check availability” or “book appointment.”
  • Google Calendar Integration (Get Events): This node asks Google Calendar which times are already busy so the workflow does not happily book two people into the same slot.
  • Calculate Available Slots: Using your working hours, duration, buffer times, and cadence, this node generates possible time slots and filters out anything that clashes with existing events.
  • Respond with Available Times: Packages those free slots into a human-readable format and sends them back to Vapi so the assistant can offer them to the caller.
  • Book Appointment Node: When the caller picks a time, this node creates the actual Google Calendar event, including client name, address, service type, and other details.
  • Booking Confirmation: Sends a success message back to Vapi so your AI assistant can reassure the caller that their appointment is locked in.

Quick Setup Guide: From “Cool Idea” To Working AI Scheduler

Let us walk through the setup without turning it into a part-time job. You will configure Vapi, tune your availability, hook up Google Calendar, and then test the whole thing.

Step 1 – Connect Vapi To Your n8n Workflow

First, we connect the voice assistant to the workflow so they can actually talk to each other.

  • Open the Webhook node in n8n and copy the production webhook URL.
  • In your Vapi assistant settings, paste that URL into the Server URL field.
  • In Vapi, make sure it is set to send only toolCalls in server messages so n8n gets exactly what it expects.

Step 2 – Define Your Vapi Tools (Names Matter Here)

Next, you tell Vapi which “tools” it can call in n8n. These tool names must match what the Router node is looking for, or the whole thing gets confused and just shrugs.

Create two custom tools in Vapi with these exact names and arguments:

  • checkAvailability
    Argument:
    • initialSearchDateTime – in ISO-8601 format with timezone offset
  • bookAppointment
    Arguments:
    • startDateTime
    • endDateTime
    • clientName
    • propertyAddress
    • serviceType

Make sure the names exactly match checkAvailability and bookAppointment in the switch or router node. Even a tiny typo can break the routing logic.

Step 3 – Configure Your Availability Rules

Now you tell the workflow when you actually want to work, how long your meetings are, and how much breathing room you need between them.

  • Open the node named 1. CONFIGURATION (EDIT ME).
  • Set your timezone, for example America/New_York.
  • Define your workday start and end hours in 24-hour format, for example 9 and 17.
  • Set the meeting duration in minutes, for example 30.
  • Configure the buffer before and after meetings, such as 15 minutes each, so you are not stuck in back-to-back calls forever.
  • Choose the booking cadence, which is the interval between potential start times, for example every 30 minutes.

These settings control how the “Calculate Available Slots” node generates and filters your open time slots.

Step 4 – Link Your Google Calendar

This is where your AI scheduler finally gets access to your real calendar, instead of guessing.

  • In the node 2. Get Calendar Events (EDIT ME), configure your Google credentials and select the calendar you want to check for busy times.
  • Use the same credentials and the same calendar in the node 3. Book Appointment in Calendar (EDIT ME) so that availability checks and bookings stay in sync.

Step 5 – Activate, Call, And Watch The Magic

Once everything is connected, it is time to test your new AI-powered scheduler.

  • Toggle the n8n workflow to Active.
  • Call your Vapi number or start a voice session.
  • Ask for availability or try booking an appointment.
  • Open Google Calendar and confirm that:
    • Suggested times match your rules and open slots
    • New events are created with full client details when bookings are confirmed

Going Beyond The Basics: Customization Ideas

Once the core appointment booking flow is working, you can start adding quality-of-life upgrades so your workflow feels less like a robot and more like a helpful assistant.

  • Send SMS or email confirmations after a booking so clients get instant proof that their appointment is locked in.
  • Sync with your CRM to automatically create or update leads when someone books.
  • Add multilingual support so your AI can schedule in multiple languages for a wider audience.
  • Include rescheduling or cancellation flows so clients can adjust their appointments without you lifting a finger.
  • Generate call summaries and analytics to keep an eye on call quality, booking rates, and overall performance.

Troubleshooting: When The Robots Need A Little Help

If something is not working as expected, it is usually a small configuration detail. Here are some common issues and quick checks.

  • No response from Vapi
    Check that Vapi is configured to send only toolCalls in server messages and confirm the Server URL exactly matches the webhook node’s production URL.
  • Router / Switch node not routing correctly
    Verify that your Vapi tool names are spelled exactly checkAvailability and bookAppointment. Even minor differences will prevent the switch node from matching.
  • No available time slots showing up
    Make sure your timezone and work hours are correctly set and that they actually allow for at least one future slot. Also double check your Google credentials and confirm you selected the right calendar.
  • Event not created in Google Calendar
    Confirm that the same Google credentials and the same calendar are used in both the “Get Calendar Events” and “Book Appointment” nodes, and that Google OAuth permissions are correctly granted.

Security And Privacy: What Happens To Your Data

Even while your AI is busy talking to clients, your data is handled with care.

  • Google OAuth credentials are securely stored in n8n so you are not hardcoding API keys into the workflow.
  • The webhook only receives the fields it needs to check availability or book appointments, which helps keep client information limited to what is actually required.

Ready To Retire Manual Scheduling?

If you are tired of calendar ping pong and endless “Does this time work?” emails, this n8n workflow template is your shortcut to a fully automated, AI-powered scheduling system.

Connect your Vapi assistant to Google Calendar using this template, let the workflow handle the repetitive scheduling tasks, and spend your time on work that actually needs a human brain.

Want help tailoring this setup to your business, or adding custom features on top? Reach out to Streetlamp Agency for expert support.

Gurey AI Partnership Form & Client Triage Workflow

Gurey AI Partnership Form & Client Triage Workflow

What You Will Learn

In this guide, you will learn how to use an n8n workflow template that:

  • Creates a public partnership / client intake form
  • Automatically logs every submission to Google Sheets
  • Uses an AI Agent to summarize client information for fast triage
  • Generates a personalized welcome email based on the collected data

By the end, you will understand how each node works, what credentials you need, and how the full automation fits together inside n8n.


Before You Start

Access the Workflow Template

You can explore and import the ready-made n8n workflow template here:

Optional: Book a Call

Want help implementing or customizing this workflow?

Book a call with me: Calendly Link 📞


Concept Overview: How the Workflow Works

This n8n workflow is designed to handle the full journey from lead capture to first contact. Here is the high-level flow:

  1. A public-facing form collects detailed client and partnership information.
  2. The submitted data is automatically stored in a Google Sheet for tracking and analysis.
  3. An AI Agent reads the raw form data and creates a clear, concise summary of the client.
  4. The AI output is parsed into structured JSON so it can be safely reused in other nodes.
  5. A second AI Agent uses both the raw data and the summary to draft a personalized welcome email.

This setup gives you a fast, structured way to triage new clients and respond with a professional, tailored message, without manual copy-pasting or writing.


Step-by-Step: n8n Workflow Breakdown

Step 1 – Create and Trigger the Public Form (Form Trigger Node)

The workflow begins with a Form Trigger node. This node is responsible for:

  • Acting as the trigger: It starts the workflow whenever someone submits the form.
  • Creating the public-facing URL: n8n exposes a shareable link that visitors can use to access your form.
  • Rendering the form interface: The node includes custom HTML, CSS, and JavaScript so you can provide a fast, branded lead capture experience.

Data Collected by the Form

The form is designed to gather comprehensive client details, such as:

  • Client role or position
  • Company size
  • Revenue information
  • Project goals and objectives

You can extend or adapt these fields, but the template already includes a strong baseline for partnership or client triage.

Credentials Required

  • No credentials are needed for the Form Trigger itself.

Step 2 – Log Client Data to Google Sheets

Once the form is submitted, the next step is to store the information in a central, easy-to-use place. This is handled by a Google Sheets node.

What the Google Sheets Node Does

  • Function: Appends all form submission data to a specific Google Sheet.
  • Extra field: Automatically includes the submission date so you can track when each lead arrived.
  • Operation: Uses the Append/Update Row operation to add each new entry as a separate row.

Credentials for Google Sheets

To connect n8n to your Google Sheet, you need:

Once configured, n8n can securely write each form submission to your chosen spreadsheet.


Step 3 – Use an AI Agent to Summarize Client Data

Raw form data can be long and hard to scan quickly. To make triage easier, this workflow uses an AI Agent to convert that information into a short, factual summary.

AI Agent (Node 3) – Client Data Summarization

  • Role: Acts as a Client Data Summarization Agent.
  • Input: All raw fields from the form submission (role, company size, revenue, goals, and other details).
  • Output: A concise, objective summary of the client and their needs, suitable for quick review by a human.

This makes it much faster to decide how to handle the lead, what services might fit, and how to prioritize follow-up.

Structured Output Parser (Node 4)

AI responses can vary in format, which can cause issues when you want to pass data into later nodes. To avoid this, the workflow uses a Structured Output Parser node.

  • Function: Forces the AI summary into a strict JSON structure.
  • Benefit: Ensures consistent keys and values so n8n can reliably reference fields in downstream automations.

OpenRouter Chat Model (Node 5)

Both AI-related nodes rely on a Large Language Model defined through an OpenRouter Chat Model node.

  • Function: Specifies which LLM is used by the AI Agents.
  • Usage: The template is configured to communicate with OpenRouter so you can leverage modern AI models through a single API.

Credentials for AI Features


Step 4 – Generate a Personalized Welcome Email

After the client data is summarized and structured, the workflow uses another AI Agent to write a customized welcome email.

Welcome Email AI Agent

  • Function: Drafts a warm, professional welcome and confirmation email for the new lead.
  • Inputs combined:
    • The original form submission data
    • The AI-generated summary of the client and their goals
  • Outputs produced:
    • A clear, relevant email subject line
    • A polished email body that you can send directly or route through your email provider

This step ensures that every lead receives a message that feels tailored to them, without you needing to manually craft each response.


Putting It All Together

To recap, the Gurey AI Partnership Form & Client Triage Workflow in n8n follows this sequence:

  1. Form Trigger: A public form collects detailed partnership and client information.
  2. Google Sheets: All submissions are logged with a timestamp in a central spreadsheet.
  3. AI Summarization Agent: The raw data is condensed into a clear, factual summary.
  4. Structured Output Parser: The AI summary is converted to reliable JSON for further processing.
  5. OpenRouter Chat Model: Provides the underlying LLM for AI steps using your OpenRouter API key.
  6. Welcome Email AI Agent: Generates a personalized subject line and email body for each new lead.

With this workflow, you get a complete intake and triage system that captures, organizes, and responds to leads with minimal manual effort.


Frequently Asked Questions

Do I need coding skills to use this n8n workflow?

No. The template is built with n8n nodes and preconfigured logic. You mainly need to:

  • Import the template
  • Set your Google Sheets credentials
  • Add your OpenRouter API key
  • Adjust form fields or email wording if you want to customize it

Can I change the fields in the public form?

Yes. The Form Trigger node uses custom HTML, CSS, and JS, so you can modify labels, inputs, and styling to match your brand or data needs. Just keep in mind that if you add or remove fields, you may need to update the Google Sheets mapping and AI prompts accordingly.

Is my client data stored securely?

The workflow uses secure connections provided by n8n and Google Sheets. Make sure your n8n instance and Google account are protected with strong access controls, and never share your API keys publicly.

Can I send the welcome email automatically?

The template generates the email content and structure. To send it automatically, you can connect an email node in n8n (for example, Gmail, SMTP, or another email integration) and feed it the subject and body from the Welcome Email AI Agent.


Keep Learning & Get Support

Watch More Tutorials

I regularly publish walkthroughs and tutorials on n8n, AI automation, and workflow templates.

Subscribe Here 🎬

Need Personal Help?

If you want direct help customizing this Gurey AI Partnership Form & Client Triage Workflow for your business, you can:

Book a call with me: Calendly Link 📞

How to Chat with HubSpot Contacts and Deals

How to Chat with HubSpot Contacts and Deals Using n8n

From Overwhelmed by CRM Data to Confident, Conversational Control

If you have ever opened HubSpot, stared at a long list of contacts and deals, and thought, “There has to be a faster way to find what I need,” you are not alone. Manually building filters, clicking through multiple views, and exporting spreadsheets can quickly drain your time and focus.

Now imagine a different experience. Instead of wrestling with filters, you simply ask a question like, “Show me contacts created last month in California,” or “List deals closed this quarter above $50,000,” and your system instantly responds with clean, focused results. No digging, no guesswork, just answers.

This is the shift that an n8n workflow combined with HubSpot and OpenAI makes possible. It transforms your CRM from a static database into a living, conversational partner that helps you act faster and think more strategically.

Adopting an Automation Mindset

Automation is not just about saving clicks. It is about freeing your mind from repetitive work so you can focus on building relationships, closing deals, and growing your business. When you automate the way you search and explore HubSpot data, you:

  • Reduce mental load and context switching
  • Spend less time hunting for information and more time using it
  • Make your CRM more approachable for your whole team
  • Create a foundation you can build on with more advanced workflows later

The n8n template you are about to discover is not just a tool. It is a starting point for a more automated, focused way of working with HubSpot. You can use it as-is, customize it, or extend it into a larger automation ecosystem that supports your growth.

What This n8n Template Helps You Do

This workflow turns your HubSpot CRM into a chat-friendly system powered by OpenAI. Instead of manually creating complex filters, you interact with your data using natural language. The template provides:

  • An AI-powered chat interface that understands your questions and commands
  • Dynamic searches across HubSpot Contacts and Deals, triggered by your messages
  • Smart filters generated by AI so you do not need to remember every field or operator
  • Conversation memory so you can ask follow-up questions without repeating yourself

In practical terms, this means you can type a simple message, get targeted CRM results, and stay in flow without ever leaving the chat interface.

How the n8n Workflow Actually Works

Behind the scenes, this template uses a small set of powerful building blocks in n8n. Understanding them will help you customize and grow the workflow later.

1. Start the Conversation with a Chat Trigger

Everything begins when a chat message arrives through a chat trigger node in n8n. This node acts as the entry point for your conversation. Each time you or a teammate sends a message, the workflow wakes up and processes what was said.

2. Let the AI Agent Interpret Your Intent

Next, an AI agent powered by OpenAI reads your natural language input. Instead of you having to translate your request into strict filters or query syntax, the model:

  • Understands what you are asking in plain language
  • Identifies whether you are referring to contacts, deals, or both
  • Figures out which properties and filters are needed for the search

This layer of intelligence is what turns a simple question into a precise, actionable instruction for HubSpot.

3. Run Dynamic Searches in HubSpot Contacts and Deals

Once the AI has interpreted your request, the workflow calls specialized HubSpot tool nodes inside n8n. These nodes perform live searches on your:

  • Contacts in HubSpot CRM
  • Deals and their associated details

The search filters are not hardcoded. Instead, the AI generates them dynamically based on your message. That means you can ask flexible, context-aware questions like:

  • “Show me all deals owned by Sarah that are in the negotiation stage.”
  • “Find contacts created in the last 7 days with a company size above 100.”

You get the power of advanced filters without having to build them manually every time.

4. Deliver Focused Results and Keep the Conversation Going

After the HubSpot search completes, the AI agent turns the raw data into compact, relevant answers. The workflow uses a memory buffer to retain context about the conversation. This enables you to ask follow-up questions like:

  • “Show only the ones from California.”
  • “Now filter to deals above $50,000.”

Because the context is preserved, you do not need to restate everything. This conversational memory makes your CRM feel more human and less like a rigid system.

Step-by-Step: Setting Up the Workflow Template

Setting up this n8n template is straightforward. Once you have it in your workspace, you only need a few key connections to bring it to life.

1. Connect Your HubSpot Account

First, authenticate HubSpot so the workflow can search your CRM data:

  • Open the workflow in n8n.
  • Locate the HubSpot AI tool nodes that handle Contacts and Deals.
  • Provide your HubSpot API credentials and test the connection.

This step allows the workflow to query your contacts and deals securely, using your existing HubSpot data.

2. Add Your OpenAI API Key

Next, connect OpenAI so the AI agent can understand and respond to your messages:

  • Find the chat model node in the workflow.
  • Add your OpenAI API key to enable language understanding and response generation.
  • Save and test the node to confirm the integration.

With this in place, your workflow can interpret natural language and translate it into meaningful actions.

3. Optionally Predefine Helpful Filters

To make your searches even more focused from day one, you can predefine common filters inside the workflow. For example, you might want to:

  • Limit results to specific deal stages, such as “Negotiation” or “Closed Won”
  • Filter by specific owners or teams
  • Constrain searches to certain date ranges, like “this quarter” or “last 30 days”

These optional filters can guide the AI toward more relevant results, especially in large HubSpot accounts.

Customize with Guardrails and Output Formats

Once the basic setup is complete, you can refine the workflow to match your business style and performance needs. This is where you begin to turn the template into your own automation asset.

Guardrails to Keep Searches Relevant and Fast

To keep your CRM queries efficient and on target, configure guardrails in the AI tool nodes. You can:

  • Specify which properties are allowed to be used in filters
  • Control which operators are permitted, such as “equals,” “greater than,” or “contains”
  • Set a maximum number of results per query to avoid overload
  • Define safe default queries when the user’s request is vague

These settings help the AI stay aligned with your data model and performance expectations, while still giving you the flexibility of natural language search.

Flexible Output Formats for Real-World Use

Next, decide how you want the results to appear. You can instruct the AI to format data in ways that are directly useful to you and your team, for example:

  • Tables with columns such as name, email, stage, owner, or amount
  • Short summaries that highlight only the most critical fields
  • Data prepared for export to CSV or for posting into Slack or other tools

By choosing clear output formats, you make the workflow not only smart but also easy to act on. This is where time savings turn into real business impact.

Why AI-Powered HubSpot Chat Matters for Your Growth

Integrating n8n, HubSpot, and OpenAI is about more than convenience. It changes how you and your team relate to your CRM data:

  • You remove friction from everyday questions like “Who should I follow up with today?”
  • You help non-technical teammates access powerful searches without learning complex filters
  • You gain faster insight into deals and contacts so you can respond quickly and strategically

Instead of spending energy on mechanics, you direct your attention toward actions that grow revenue, deepen customer relationships, and strengthen your operations.

By simply typing questions such as “show me contacts created last month in California” or “list deals closed this quarter above $50,000,” you tap into the natural language understanding of OpenAI. The AI interprets your requests, runs the right HubSpot searches, and returns answers almost instantly.

Use This Template as a Stepping Stone

Think of this template as your starting line, not your finish line. Once you see how powerful a conversational interface for HubSpot can be, you can expand from here. For example, you might:

  • Trigger follow-up emails based on the results returned
  • Send summaries of key deals to Slack channels automatically
  • Combine this workflow with other n8n automations to create end-to-end sales or support processes

Each small improvement compounds over time. As you experiment, learn, and iterate, your automated workflows become a quiet engine that supports your growth in the background.

Take the Next Step: Try the n8n HubSpot Chat Template

You do not need to rebuild this from scratch. The template is ready for you to explore, customize, and make your own. All it takes is connecting your HubSpot account and OpenAI API key, then starting your first conversation.

If you are ready to:

  • Spend less time searching and more time engaging with customers
  • Give your team a smarter, faster way to access CRM data
  • Begin a broader journey into n8n-powered automation

then this is a simple, high-impact place to start.

Bringing It All Together

By combining n8n workflows, HubSpot APIs, and OpenAI’s language models, you create more than a technical integration. You create an intuitive, conversational interface to your CRM data that respects your time and amplifies your focus.

This setup helps you move faster, think clearer, and uncover new ways to analyze and act on your business information. Start with this template, make it your own, and let it be the first step in a more automated, more intentional way of working with HubSpot.

Automate Weekly HubSpot Lead Reports to Slack

Automate Weekly HubSpot Lead Reports to Slack

What You Will Learn

In this guide, you will learn how to use an n8n workflow template to:

  • Schedule a weekly automation that runs at a specific time.
  • Fetch contacts from HubSpot and identify which ones became leads in the last 7 days.
  • Count those new leads and send a summary report to a Slack channel.
  • Optionally, pull closed-won deals from HubSpot for the same period and sum their values.
  • Customize the workflow to match your team’s reporting needs.

This tutorial is designed as a step-by-step learning path, so you can understand not only what to configure in n8n, but also why each node is used.


Concepts You Need Before You Start

1. What This n8n Workflow Does

This n8n template automates a weekly report based on your HubSpot data and delivers it to Slack. At a high level, it:

  • Runs once a week using a Schedule Trigger.
  • Retrieves all contacts from HubSpot.
  • Filters those contacts to find only the ones that became leads in the last 7 days, using the property hs_v2_date_entered_lead.
  • Counts how many leads match that condition.
  • Sends a Slack message such as: “Last week we generated X leads.”
  • Optionally, follows an additional branch that:
    • Gets deals from HubSpot.
    • Filters for deals that are closed-won in the last week.
    • Sums their values and includes that total in the Slack report.

2. Key HubSpot Property Used

The workflow relies on one important HubSpot contact property:

  • hs_v2_date_entered_lead – This property indicates when a contact entered the lead lifecycle stage. The workflow uses it to determine which contacts became leads in the last 7 days.

3. How the Date Filter Works

The date filtering logic is simple but important:

  • We only want contacts whose hs_v2_date_entered_lead value is between:
    • Today minus 7 days (the start of the reporting window)
    • Today (the end of the reporting window)
  • This gives you a rolling 7-day window, which works perfectly for a weekly report.

4. Optional Deals Branch

The optional branch of the workflow focuses on revenue insights:

  • It fetches deals from HubSpot.
  • Filters for deals that are closed-won in the last week.
  • Sums the monetary value of those deals.
  • Lets you include that total in your Slack report, so your team sees both lead volume and revenue impact.

Step-by-Step Setup in n8n

Follow these steps in order. Each step corresponds to one or more nodes in your n8n workflow.

Step 1: Connect Your HubSpot Account

First, you need to give n8n permission to read your HubSpot data.

  1. Open the template in n8n.
  2. Locate the HubSpot nodes (for contacts and, if you use it, deals).
  3. In a HubSpot node, click to configure credentials.
  4. Authorize n8n to access your HubSpot account so it can:
    • Fetch all contacts, including the hs_v2_date_entered_lead property.
    • Optionally fetch deals, if you enable the deals branch.

Step 2: Connect Your Slack Account

Next, allow n8n to send messages into Slack.

  1. Find the Slack node that sends the weekly report.
  2. Open the node and choose or create Slack credentials.
  3. Authorize n8n with your Slack workspace.
  4. Select the specific channel where you want the report to be posted, for example #sales or #marketing.

Step 3: Configure the Schedule Trigger

The Schedule Trigger controls when the workflow runs.

  1. Open the Schedule Trigger node.
  2. Set the trigger type to run on a weekly basis.
  3. Choose your preferred day and time, for example:
    • Day: Monday
    • Time: 7:00 AM
  4. Save the node so the workflow will automatically start each week at the chosen time.

Step 4: Get All Contacts From HubSpot

Now you will pull in HubSpot contacts so that n8n can filter new leads.

  1. Open the Get Contacts HubSpot node.
  2. Configure it to retrieve all contacts that you want to consider for your report.
  3. Make sure the property hs_v2_date_entered_lead is included in the fields returned by this node. This property is required for the next filtering step.

At this point, the workflow has a list of contacts, each with its lead entry date.

Step 5: Filter Contacts Added as Leads in the Last Week

The next node filters only those contacts that became leads in the last 7 days.

  1. Open the Filter (or similar conditional) node that follows the Get Contacts node.
  2. Add a condition based on the contact property hs_v2_date_entered_lead.
  3. Configure the condition so that:
    • hs_v2_date_entered_lead is greater than or equal to “today minus 7 days”.
    • hs_v2_date_entered_lead is less than or equal to “today”.
  4. Save the node. Only contacts that meet this date range will move forward in the workflow.

This filtered set of contacts represents your new leads for the last week.

Step 6: Count the Number of New Leads

Once you have the filtered list, the next step is to count how many leads are in it.

  1. Use a node that can summarize or count items, such as an Item Lists or Function node, depending on the template implementation.
  2. Configure the node to:
    • Take all filtered contacts as input.
    • Output a single value representing the total count of leads.

The result will be a numeric value that you can reference when building the Slack message, for example {{ $json.totalLeads }} depending on how the node is set up.

Step 7: Send the Weekly Report to Slack

Now you can send your summary to Slack using the lead count.

  1. Open the Slack message node.
  2. Select the channel you configured earlier, or adjust it if needed.
  3. Write a message that includes the lead count from the previous node. For example:
    • Last week we generated {{ $json.leadCount }} new leads.
  4. Test the node to confirm that the message appears correctly in Slack with a real number in place of the placeholder.

Once this is working, your team will automatically receive a weekly update on new leads without any manual reporting.


Optional: Add Closed-Won Deals and Revenue to the Report

Step 8: Get All Deals From HubSpot (Optional Branch)

If you want your report to include revenue, enable and configure the optional deals branch.

  1. Locate the deals branch in the workflow, which usually runs in parallel after the Schedule Trigger.
  2. Open the Get Deals HubSpot node.
  3. Configure it to fetch all deals relevant to your reporting, typically all deals or those with certain stages.

Step 9: Filter Deals to Closed-Won in the Last Week

Next, narrow down the deals to only those that were closed-won in the same 7-day window as your leads.

  1. Open the filter or condition node that follows the Get Deals node.
  2. Set conditions to:
    • Include only deals whose stage is closed-won.
    • Restrict to deals where the close date is between “today minus 7 days” and “today”.

This gives you a list of deals that were successfully closed in the last week.

Step 10: Sum the Value of Closed-Won Deals

To calculate weekly revenue, you need to sum a monetary field from these deals.

  1. Use a node that can perform aggregation or a small code snippet, depending on the template.
  2. Configure it to:
    • Take all filtered closed-won deals as input.
    • Sum the value field (for example, the deal amount or a similar numeric property).
    • Output a single total, such as totalRevenue.

You can then reference this total in your Slack message, along with the lead count.

Step 11: Include Deal Revenue in the Slack Message

Finally, extend your Slack report to mention closed-won deals and revenue.

  1. Return to the Slack node that sends the weekly report.
  2. Update the message text to include both metrics. For example:
    • Last week we generated {{ $json.leadCount }} new leads and closed deals worth {{ $json.totalRevenue }} {{ $json.currency }}.
  3. Make sure the values from the deals branch are correctly passed into the Slack node, either by merging branches or using a common node that combines the data.

Customization Ideas for Your Workflow

1. Track Different Lifecycle Stages or Segments

You are not limited to leads only. You can:

  • Swap hs_v2_date_entered_lead for another lifecycle property if you want to track a different stage.
  • Use custom properties from HubSpot to focus on specific segments, such as MQLs, SQLs, or a custom lead type.

2. Personalize the Slack Message

Make the report more engaging and relevant to your team:

  • Add custom emojis that your team uses for celebrations.
  • Mention specific team members or roles using Slack mentions (for example, @sales-team).
  • Include both lead count and optional deal totals in a short, clear summary.

3. Display Currency and Formatting for Deal Values

When reporting revenue, clarity matters:

  • Include the currency code or symbol along with the total deal value.
  • Ensure that the field you sum is stored consistently in HubSpot, so the total is accurate.

Why This Automation Is Valuable

  • Reduces manual work: No more pulling weekly HubSpot reports by hand or copying numbers into Slack.
  • Keeps your team aligned: Everyone in the Slack channel sees the latest lead and deal numbers at the same time.
  • Easy to extend: You can add more metrics, such as conversion rates or other lifecycle stages, without changing your core process.
  • Flexible for your organization: Adjust properties, filters, and message content so the workflow reflects how your sales and marketing teams actually operate.

Quick Recap

To automate weekly HubSpot lead reports to Slack with n8n, you:

  1. Connect HubSpot and Slack accounts in n8n.
  2. Set a weekly Schedule Trigger, for example Monday at 7 AM.
  3. Use a HubSpot node to get all contacts, including hs_v2_date_entered_lead.
  4. Filter contacts to those that became leads in the last 7 days.
  5. Count the filtered leads.
  6. Send the count to a Slack channel as a weekly summary message.
  7. (Optional) Fetch deals, filter closed-won deals from the last week, sum their values, and include that total in the Slack message.

FAQ

Can I change the reporting period?

Yes. Adjust the date conditions in your filter nodes. For example, instead of “today minus 7 days”, you could use a different range to match your reporting cycle.

Do I have to include the deals branch?

No. The deals branch is optional. You can run the workflow with only contact-based lead reporting if that is all you need.

What if my lead property is different from hs_v2_date_entered_lead?

If your HubSpot setup uses a different property, simply update the filter node to use that property instead. The rest of the workflow logic stays the same.

Can I post the report in multiple Slack channels?

Yes. You can duplicate the Slack node or add more Slack nodes that send the same or slightly modified messages to other channels.


Get Started With the Template

You are now ready to set up your own automated weekly lead report in n8n. Connect your HubSpot and Slack accounts, customize the filters and message content, and let the workflow handle your reporting every week.

AI-Powered Cold Email Icebreakers Workflow Explainer

AI-Powered Cold Email Icebreakers Workflow Explainer

What This n8n Workflow Actually Does (In Plain English)

If you’ve ever stared at a spreadsheet full of leads thinking, “How on earth am I going to write something personal for all of these people?”, this workflow is for you.

This n8n template automatically turns raw lead data in Google Sheets into short, personalized cold email icebreakers using AI. It researches each company in real time, cleans up awkward company names, and then writes a casual, human-sounding opening line you can drop straight into your outreach.

The best part: it does this in batches, at scale, for just a couple of cents per lead.

When You’ll Want To Use This Template

This workflow is a great fit if you:

  • Run cold email campaigns and want higher reply rates without hiring an army of SDRs
  • Work with B2B or high-ticket offers where even a small bump in responses really moves the needle
  • Already store leads in Google Sheets and want to plug in automation instead of manual research
  • Like the idea of AI helping you, but still want the output to sound like a real human

In short, if you’re doing any kind of outbound and you care about personalization at scale, this workflow makes your life a lot easier.

How The Workflow Flows (High-Level Overview)

Here is the big picture of what the n8n template does, start to finish:

  1. Pulls a batch of leads from a Google Sheet that still need icebreakers
  2. Cleans and standardizes company names so they sound natural in conversation
  3. Uses the Perplexity Sonar AI model to research each company in real time
  4. Feeds that research into Claude Sonnet to write a one-line, casual icebreaker
  5. Writes the icebreaker and cleaned company name back into your Google Sheet
  6. Repeats for the next batch of leads

Everything runs in batch mode, with 25 leads processed per execution, so it is built to scale as your list grows.

Step 1 – Get Your Google Sheet Ready

Before you hit run in n8n, you’ll want your data source in good shape. The template expects a specific structure in Google Sheets so it knows exactly where to read and write information.

Create (or adapt) a Google Sheet with these columns:

  • id – a unique identifier for each lead
  • first_name
  • last_name
  • title – your lead’s job title
  • organization_name – the raw company name
  • Icebreaker – set this to no data for new leads
  • company_name_cleanup – this will store the polished company name

The workflow only processes rows where Icebreaker is set to no data. That means you can safely re-run the workflow without accidentally generating multiple icebreakers for the same person.

Before you start, make sure you have:

  • Google Sheets (OAuth2) credentials connected in n8n
  • OpenAI API credentials
  • OpenRouter API credentials (for accessing models like Perplexity Sonar and Claude Sonnet)

Step 2 – Pulling Leads From Google Sheets

Once your sheet is set up, the workflow uses Google Sheets as the main data source. It looks for all rows where the Icebreaker column still says no data and selects them for processing.

To keep things predictable and scalable, the batch size is fixed at 25 leads per run. That gives you a nice balance between speed and control, and you can trigger the workflow as often as you like.

Step 3 – Cleaning Up Company Names So They Sound Human

Raw company names can sound clunky in a sentence. You probably don’t want to say, “I’ve been following Sharp Guys Web Design Agency for a while now” in a casual opener, right?

This workflow automatically standardizes company names into something more natural. For example:

  • Sharp Guys Web Design Agency becomes Sharp Guys

The cleaned version goes into the company_name_cleanup field. That way, when the AI writes your icebreaker, it sounds like something you’d actually say in conversation, not like a scraped database entry.

Step 4 – Real-Time Company Research With Perplexity Sonar

Now comes the part that makes the icebreakers feel specific instead of generic.

The workflow uses the Perplexity Sonar model to research each company on the web in real time. It passes along helpful context like:

  • The founder’s full name
  • The lead’s job title
  • The current date

This gives the AI enough background to pull in relevant, up-to-date details about what the company is doing. Those details then become the raw material for a more meaningful icebreaker, instead of the usual “Love what you’re doing at [Company]!” fluff.

Step 5 – Writing the Icebreaker With Claude Sonnet

Once the research is ready and the company name is cleaned up, the workflow hands everything off to Claude Sonnet.

This model is instructed to generate one-line icebreakers that:

  • Use a casual, low-fluff tone, like a relaxed bar conversation
  • Avoid hype, exaggeration, and cheesy sales clichés
  • Stay specific to the company and role, using the research from Perplexity Sonar

The result is a short, punchy opener that feels like you actually looked them up, even though the workflow did all the heavy lifting behind the scenes.

Step 6 – Writing Everything Back to Your Spreadsheet

After generating the icebreaker and the cleaned company name, the workflow updates your original Google Sheet.

It uses the unique id column to match each result back to the correct row, then:

  • Fills in the Icebreaker column with the generated line
  • Updates company_name_cleanup with the standardized company name

Because the workflow only selects rows where Icebreaker was no data, you avoid overwriting anything you have already reviewed or edited.

What It Costs To Run (And Why It’s Worth It)

One of the nice things about this setup is that it is surprisingly affordable, especially for B2B campaigns where each booked call is valuable.

Approximate Cost Per Lead

  • Rough cost per lead: $0.02

Model Cost Breakdown

  • GPT-4o-mini: about $0.0001 per lead
  • Perplexity Sonar: about $0.005 per lead
  • Claude Sonnet 4: about $0.015 per lead

Scaling Examples

  • 100 leads: around $2
  • 1,000 leads: around $20

For high-ticket B2B offers, even a 1% bump in response rate can easily deliver a 100x to 1000x return on that spend. You are essentially buying time, personalization, and better first impressions for a few cents per contact.

Why This n8n Workflow Makes Your Life Easier

So why go through the trouble of setting this up instead of just blasting generic templates?

  • Personalization at scale – You get tailored icebreakers for hundreds or thousands of leads without doing manual research or writing each one by hand.
  • Human-like tone – Claude Sonnet is guided to write in a casual, conversational style that feels natural, not like a stiff AI-generated line.
  • Data-driven outreach – Real-time research from Perplexity Sonar means your openers reference real, current information about the company.
  • Familiar tools – Everything runs off Google Sheets, so you can manage, filter, and review your leads in a tool you already know.

The end result is simple: better first lines, less grunt work, and more time to focus on actual conversations with the people who reply.

Getting Started With the Template

Once your sheet and API credentials are ready, you can plug in the template and start experimenting with your first batch.

To avoid interruptions, double-check that:

  • Your Google Sheets OAuth2 connection is active and has access to the correct spreadsheet
  • Your OpenAI and OpenRouter API keys are valid and have enough quota
  • The column names in your sheet match exactly what the workflow expects

From there, you can tweak, review the first outputs, and then scale up as you get comfortable with the results.

Ready To Upgrade Your Cold Email Icebreakers?

If you are tired of sending the same generic opener over and over, this n8n workflow gives you a smarter way to do outreach. You keep control over your messaging, but offload the heavy lifting of research and writing to AI.

Set it up once, keep your Google Sheet clean and up to date, and let the workflow quietly generate personalized icebreakers in the background.

For a more detailed look at the setup, check out the workflow diagrams in n8n and make sure your API credentials are configured correctly before running it at scale.

Automate Hiring: AI HR Agent for Screening & Interview Questions

Automate Hiring: AI HR Agent for Screening & Interview Questions

What You Will Learn

In this guide, you will learn how to use an n8n workflow template to:

  • Collect candidate applications through a web form
  • Store resumes in Google Drive for record-keeping
  • Use an AI qualification agent to screen applicants against open roles
  • Automatically score and shortlist candidates
  • Generate tailored interview questions with AI
  • Log all results in Google Sheets and notify your HR team via Telegram

By the end, you will understand each part of the workflow and how to adapt it to your own hiring process.

Why Automate Your Hiring With an AI HR Agent?

Modern hiring requires both speed and quality. Manual screening of resumes and preparing interview questions can be slow and inconsistent. This n8n workflow template uses AI to:

  • Streamline the early stages of recruitment
  • Evaluate candidate qualifications against your open roles
  • Create personalized interview questions for each applicant

It is ideal for HR teams, recruiters, and hiring managers who want to use automation and AI to improve candidate evaluation and save time.

Key Concepts Before You Start

1. Candidate Application Form

The workflow starts with a web form where candidates submit their information. This form captures:

  • Full name
  • Email address
  • Phone number
  • Job role they are applying for
  • CV or resume as a PDF upload

This data becomes the input that the rest of the n8n workflow uses.

2. Google Drive & Google Sheets Integration

The workflow uses two Google services:

  • Google Drive to store uploaded CVs for documentation and future reference.
  • Google Sheets to manage:
    • A list of open positions
    • A log of received applications, scores, and interview questions

Your Google Sheet should include at least two tabs:

  • Open_Positions – contains your current job openings and requirements
  • Applications – stores candidate details, scores, and generated questions

3. AI Qualification Agent

The core of the workflow is an AI assistant, referred to as the Qualification Agent. Using your OpenAI GPT-4 API key, this agent:

  • Matches the candidate’s desired role with your open positions in Google Sheets
  • Checks if the role is currently available
  • Compares the candidate’s skills and experience from the CV to the job requirements
  • Assigns a qualification score on a scale of 1 to 5
  • Shortlists candidates who meet or exceed the criteria for open roles

4. Dynamic Interview Question Generator

For candidates who pass the qualification step, a second AI agent creates personalized interview questions. It uses:

  • The candidate’s resume content
  • The job description and requirements from the Open_Positions tab

The agent can also generate probing questions about:

  • Employment gaps
  • Potential red flags or unclear parts of the CV

5. Notifications and Tracking

All processed information is stored and shared automatically:

  • The Applications tab in Google Sheets is updated with:
    • Candidate data
    • Qualification score
    • Generated interview questions
  • The HR team receives a Telegram notification when a new qualified candidate is ready for review.

How the n8n Workflow Works – Step by Step

Step 1 – Candidate Profile Submission

The process begins when a candidate fills out your application form. In n8n, this is typically triggered by a form submission node or a webhook.

The form collects:

  • Personal details (name, email, phone)
  • The job role they are applying for
  • A PDF version of their CV or resume

Once the form is submitted, n8n receives the data and passes it to the next steps in the workflow.

Step 2 – Save CV and Extract Resume Data

After submission, the workflow performs two main actions:

  1. Store the CV in Google Drive
    The uploaded PDF file is saved to a specific Google Drive folder. This ensures every application has a stored copy for compliance and future reference.
  2. Extract key details from the PDF
    The system reads the resume content and extracts important information such as:
    • Skills
    • Experience
    • Education
    • Relevant achievements

    This structured data is prepared so the AI agents can evaluate the candidate automatically.

Step 3 – AI Qualification Agent Screening

Next, the Qualification Agent evaluates the candidate. In this part of the workflow, n8n:

  1. Looks up the candidate’s desired job role in the Open_Positions tab of your Google Sheet.
  2. Checks if the position is marked as open or closed.
  3. Feeds the job requirements and the extracted resume data into the AI model.

The AI Qualification Agent then:

  • Compares the candidate’s qualifications with the job requirements
  • Determines how well the candidate fits the role
  • Assigns a score from 1 to 5, where higher is a better match
  • Decides whether the candidate should be shortlisted for that position

Candidates who do not meet the requirements can be logged but not advanced, while qualified candidates move to the next step.

Step 4 – Dynamic Interview Question Generation

For shortlisted candidates, the workflow triggers the Dynamic Question Generator Agent. Using the candidate’s resume and the job description, the AI:

  • Creates a tailored set of interview questions specific to:
    • The candidate’s skills and experience
    • The responsibilities and requirements of the role
  • Adds follow-up questions where:
    • There are employment gaps in the CV
    • Information appears inconsistent or unclear
    • Potential red flags are detected

The result is a list of practical, targeted questions that your HR team or hiring manager can use directly in interviews.

Step 5 – Record Results and Notify HR

Finally, the workflow updates your tracking tools and alerts your team:

  1. Update Google Sheets
    The Applications tab is updated with:
    • Candidate details from the form
    • Qualification score from the AI agent
    • Generated interview questions

    This turns your Google Sheet into a simple applicant tracking system.

  2. Send Telegram Notification
    A Telegram message is sent to your HR or recruiting channel, informing the team that a new qualified candidate is ready for review, along with key details.

Setting Up the Workflow Template in n8n

1. Customize the Application Form

Start by adjusting the form that collects candidate data:

  • Add or remove fields to match your company’s hiring process
  • Ensure there is a field for the job role the candidate is applying for
  • Confirm that the form supports PDF uploads for CVs

In n8n, connect this form to the workflow trigger so that each submission starts the automation.

2. Connect Google Drive and Google Sheets

Next, authenticate your Google services inside n8n:

  • Set up credentials for Google Drive so the workflow can upload and store CVs in your chosen folder.
  • Set up credentials for Google Sheets and link the workflow to your application management spreadsheet.

Make sure your Google Sheet has the following tab names exactly:

  • Open_Positions
  • Applications

Fill Open_Positions with your active roles, including titles, requirements, and an availability status column that indicates whether the role is open.

3. Integrate OpenAI (GPT-4)

To enable the AI agents, you need to connect your OpenAI account:

  • Obtain your OpenAI GPT-4 API key from your OpenAI dashboard.
  • Add this key as credentials in n8n.
  • Confirm that the Qualification Agent and Dynamic Question Generator nodes are configured to use these credentials.

This integration allows n8n to send resume and job data to GPT-4 and receive structured evaluations and interview questions in response.

4. Activate and Test the Workflow

Before using the workflow in production, run a few tests:

  1. Submit a sample application through the form.
  2. Check that:
    • The CV is stored correctly in Google Drive
    • Data appears in the Applications tab
    • The AI generates a reasonable score and relevant interview questions
    • The Telegram notification is delivered to the right channel
  3. Adjust prompts, scoring rules, or question styles in the AI nodes if needed.

Once you are satisfied with the results, activate the workflow in n8n to start automating your recruitment process.

Adapting the Template to Your Tools

Although this workflow uses Google Sheets as a simple application management system, you can adapt it:

  • Replace Google Sheets with another spreadsheet tool or CRM system
  • Sync data to your existing ATS using additional n8n nodes
  • Adjust the structure of the Open_Positions and Applications data to match your internal processes

The key idea is that the AI agents need access to structured job requirements and candidate data, regardless of which storage tool you use.

Benefits of Using This AI HR Agent Workflow

  • Time savings – Reduce manual resume screening and question preparation.
  • More consistent evaluation – Candidates are assessed using the same criteria and scoring scale.
  • Better candidate experience – Faster responses and more relevant interview conversations.
  • Improved hiring accuracy – AI highlights the best matches based on your defined requirements.

Quick FAQ

Do I have to use Google Sheets?

No. The template uses Google Sheets as an example, but you can replace it with any CRM or database that n8n can connect to. You will just need to adjust the nodes that read and write data.

Can I change the scoring system?

Yes. The default scale is 1 to 5, but you can modify the AI prompt or post-processing logic in n8n to use a different scoring method or to add more detailed labels.

What if I have multiple job openings?

The Open_Positions tab can contain multiple roles. The Qualification Agent checks the candidate’s chosen role against this list and evaluates them only for positions that are marked as open.

Is this suitable for non-technical roles?

Yes. The workflow is role agnostic. You simply need to provide clear job requirements in your Open_Positions sheet so the AI can compare them with each candidate’s CV.

Get Started With the Template

If you are ready to modernize your recruitment process, this n8n workflow template gives you a practical starting point. Customize the form, connect your Google services, plug in your OpenAI GPT-4 key, and activate the workflow to begin automated candidate screening and interview preparation.

Synchronize JotForm Orders with Telegram – Complete Guide

Synchronize JotForm Orders with Telegram – Complete Teaching Guide

What You Will Learn

In this guide, you will learn how to build and understand an n8n workflow template that:

  • Listens to new JotForm order submissions
  • Sends order confirmation messages to customers on Telegram
  • Saves orders to an n8n Data Table for tracking
  • Logs customer and order data in a Google Sheets CRM
  • Creates invoices automatically in Zoho CRM

By the end, you will not only know how to use this template, but also how each node in the workflow contributes to the automation.


Concept Overview: How the Automation Works

This n8n workflow connects four main tools:

  • JotForm – where customers place orders via a form
  • Telegram – where customers receive order confirmations
  • n8n Data Table – where orders and chat IDs are stored
  • Google Sheets & Zoho CRM – where CRM data and invoices are managed

The workflow follows this general process:

  1. A customer submits an order using a JotForm.
  2. n8n receives the form submission via a webhook and organizes the data.
  3. The workflow generates a unique order ID and stores the order in an n8n Data Table.
  4. The system waits for the customer to contact your Telegram bot so it can capture their chat ID.
  5. Once the chat ID is known, the workflow:
    • Sends a confirmation message on Telegram
    • Creates an invoice in Zoho CRM
    • Logs the order in a Google Sheets CRM

Next, we will walk through the workflow nodes in a teaching-friendly order so you can clearly understand each part.


Step-by-Step Workflow Walkthrough in n8n

1. Capturing Orders from JotForm

JotForm Trigger Node

The workflow begins with the JotForm Trigger node. This node is configured with a webhook URL that JotForm calls every time a form is submitted.

When a customer places an order:

  • JotForm sends the submission data to n8n via the webhook.
  • The JotForm Trigger node receives customer details, product selections, total amounts, and any other form fields.
  • This event starts the rest of the workflow automatically.

2. Cleaning Data and Creating a Unique Order ID

Organize & Generate Order ID Node

After the trigger, the next important step is to structure the raw form data so it is easier to use later.

This node:

  • Parses and cleans the JotForm submission payload.
  • Extracts key information such as:
    • Customer name and contact details
    • Product list and quantities
    • Total order amount and any other relevant fields
  • Generates a unique order ID using:
    • A configurable prefix (for example, {{ $order_id_prefix }})
    • A timestamp to ensure uniqueness
  • Builds a pre-formatted order summary that will later be used in Telegram messages, Google Sheets, and Zoho invoices.

This step ensures that all later nodes work with clean, consistent data rather than raw form submissions.


3. Storing Orders in an n8n Data Table

Insert Order Data into n8n Data Table

Next, the workflow saves the organized order data into an n8n Data Table. This table acts as a central storage and tracking system.

The node stores:

  • Customer information
  • The generated order ID
  • Order details such as products and totals
  • A column for the Telegram chat ID, which is initially empty

By saving the order here, the workflow can later match the order to the correct Telegram chat when the customer messages your bot.


4. Checking Whether the Telegram Chat ID Exists

Get Order Row to Check Chat ID

After inserting the order into the Data Table, the workflow needs to know if the Telegram chat ID for this customer is already known.

The Get Order Row node:

  • Looks up the row corresponding to the current order ID in the Data Table.
  • Reads the value of the chat ID field for that order.

Switch (Chat ID Check)

The Switch node then evaluates what to do based on the chat ID value and whether the workflow has already waited once.

It typically checks two conditions:

  • No chat ID and not yet waited: The workflow should wait to give the customer time to message the Telegram bot.
  • No chat ID but already waited: The workflow should avoid waiting indefinitely and move on or handle the case differently.

5. Giving Customers Time to Contact the Telegram Bot

Wait 5 Minutes and Mark as Waited

If the chat ID is missing and the workflow has not waited yet, it moves to a Wait step.

This node:

  • Pauses the workflow for 5 minutes.
  • Gives the customer a chance to send a message to your Telegram bot.
  • Marks the order as “waited” so the workflow knows not to pause again for the same order.

During this waiting period, a separate part of the workflow is listening for incoming Telegram messages to capture new chat IDs.


6. Capturing Telegram Chat IDs from Customers

Telegram Trigger (Get Chat ID)

The Telegram Trigger node is an independent entry point in the same workflow. It is not started by JotForm, but by Telegram messages.

This node:

  • Listens for incoming messages to your Telegram bot.
  • Captures the chat ID whenever a customer sends a message.

Get Empty Chat ID Rows & Update Chat ID

Once a chat ID is captured, the workflow needs to link it to the correct order in the Data Table.

This part of the workflow:

  • Searches the Data Table for rows (orders) that have an empty chat ID.
  • Updates those rows with the new chat ID that was just received from Telegram.

This mechanism allows the system to connect orders with customers’ Telegram accounts even if the chat ID was not known at the time of form submission.


7. Proceeding Once the Chat ID is Known

Get Chat ID Row(s) & If Chat ID Found

After the chat ID has been stored in the Data Table, the workflow retrieves the final order data to continue processing.

The relevant nodes:

  • Get Chat ID Row(s) – fetches the order rows that now have a valid chat ID.
  • If Chat ID Found – checks again to confirm that the chat ID exists before sending notifications or creating CRM records.

Only when the chat ID is successfully found does the workflow continue to the messaging and CRM steps.


8. Preparing Data for Telegram and CRM Systems

Set Chat ID and Products Nodes

Before sending messages or creating invoices, the workflow formats the data into user friendly structures.

These nodes:

  • Format and set the Telegram chat ID in the correct field for the Telegram node.
  • Build a readable product list, such as a bullet list or formatted text that can be used in:
    • Telegram messages
    • Zoho invoices
    • Google Sheets descriptions

This ensures that both customers and CRM tools receive clear, organized information about the order.


9. Creating an Invoice in Zoho CRM

Create Zoho Invoice

Once the data is ready, the workflow calls the Zoho CRM integration to generate an invoice.

This node:

  • Sends the product details, including names, quantities, and prices.
  • Includes the order totals and any relevant customer information.
  • Creates a formal invoice record inside Zoho CRM for accounting and follow-up.

This step removes the need to manually create invoices for each order.


10. Logging Orders in a Google Sheets CRM

Append/Update CRM Sheet

The workflow also maintains a simple CRM view using Google Sheets.

This node:

  • Appends or updates a row in a configured Google Sheet.
  • Logs key information such as:
    • Customer details and contact info
    • Shipping or billing addresses
    • Timestamps for when the order was placed
    • Order description and summary
    • The generated order ID

By keeping all order data in a spreadsheet, you get a quick overview of your sales pipeline and customer history.


11. Sending the Final Telegram Order Confirmation

Send a Text Message (Telegram Notification)

The last step in the workflow is to send a confirmation message directly to the customer on Telegram.

This node:

  • Uses the stored Telegram chat ID to target the correct user.
  • Sends a customized, clearly formatted message that may include:
    • Order ID
    • Customer name
    • Product list and totals
    • Any additional instructions or thank you text

At this point, the customer receives instant feedback, your CRM is updated, and your invoice is created, all from a single JotForm submission.


Practical Setup Guide

Now that you understand how the workflow works conceptually, let us go through the key setup steps to get it running.

Step 1: Connect JotForm to n8n with a Webhook

  • Log in to your JotForm account and open the form you use for orders.
  • Go to the form Settings section.
  • Navigate to Integrations and search for Webhooks.
  • Copy the webhook URL from the JotForm Trigger node in your n8n workflow.
  • Paste this URL into the Webhook integration in JotForm.
  • Save and activate the webhook so that new submissions are sent to n8n.

Step 2: Enable JotForm API Key Access

  • In your JotForm account, go to Account Settings.
  • Generate a new API key with Full Access permissions.
  • Open the JotForm Trigger node in n8n.
  • Enter the generated API key in the node credentials so n8n can securely interact with your JotForm account.

Step 3: Configure All Required IDs and Placeholders in n8n

The template uses placeholders that you must replace with your own IDs and values.

  • Open the workflow in n8n and look for placeholders such as:
    • {{ $form_id_placeholder }}
    • {{ $datatable_id }}
    • {{ $google_sheet_document_id }}
    • {{ $order_id_prefix }}
  • Replace each placeholder with:
    • Your actual JotForm form ID
    • The ID of your n8n Data Table
    • The document ID of your Google Sheet
    • Your preferred order ID prefix (for example, ORD-)
  • Review and customize:
    • Template messages used in Telegram notifications
    • Product mappings or field mappings for Zoho and Google Sheets

Once these values are set, run a test JotForm submission and a test message to your Telegram bot to ensure the full flow works end to end.


Quick Recap

  • JotForm submissions trigger the workflow through a webhook.
  • Data is cleaned, formatted, and assigned a unique order ID.
  • Orders are stored in an n8n Data Table, which also holds Telegram chat IDs.
  • The workflow waits if needed, while a Telegram Trigger node captures new chat IDs when customers message your bot.
  • Once a chat ID is linked to an order, the workflow:
    • Formats the order data
    • Creates an invoice in Zoho CRM
    • Logs the order in a Google Sheets CRM
    • Sends a confirmation message to the customer on Telegram

This integration helps you save time, reduce manual data entry, and provide fast, professional communication to your customers.


FAQ

Do I need to know how to code to use this n8n template?

No, you do not need to write code. You only need to configure nodes, credentials, and IDs inside n8n, plus set up the webhook and API key in JotForm.

What happens if a customer never messages the Telegram bot?

If the chat ID is never captured, the workflow will not be able to send the Telegram confirmation. However, the order is still stored in the Data Table and can still be logged in Google Sheets and invoiced in Zoho, depending on how you handle the branch after the wait step.

Can I customize the Telegram message and invoice details?

Yes. You can edit the text templates in the nodes that format products and send Telegram messages, as well as the fields sent to Zoho CRM and Google Sheets.


Get Started with the Template

Automating your order workflow from JotForm to Telegram and your CRM tools helps you:

  • Save time on manual tasks
  • Reduce errors in data entry
  • Improve customer experience with instant confirmations and professional invoicing

Set up this workflow template in n8n, connect your tools, and start delighting your customers with real-time order updates.

Video Transcription + Q&A Pipeline with Google Drive & VLM Run

Overview

This n8n workflow template delivers an end-to-end pipeline for video transcription and question answering, built on top of Google Drive, VLM Run, Google Sheets, and OpenAI. It automatically ingests video files, transcribes them asynchronously, centralizes the outputs in a structured data store, and exposes the resulting knowledge through a chat-based Q&A interface.

Designed for automation engineers, operations teams, and content-heavy organizations, this workflow turns raw video assets into a searchable, interactive knowledge base that can support training, support, documentation, and content reuse at scale.

Architecture and Core Components

The pipeline is organized into four primary stages, each implemented with dedicated n8n nodes and integrations:

  • Ingestion: Automated capture of new video files from Google Drive.
  • Transcription: Asynchronous processing via VLM Run with callback handling.
  • Storage: Structured persistence of transcripts in Google Sheets for easy querying.
  • Q&A: A chat agent that answers natural language questions using OpenAI, grounded strictly in the stored transcripts.

The following sections detail how each stage operates and how the nodes interact to deliver a robust, production-ready automation.

Stage 1 – Automated Video Ingestion from Google Drive

The workflow starts with continuous monitoring of a designated Google Drive folder. This ensures that any new video dropped into the folder automatically enters the transcription pipeline without manual intervention.

Google Drive Trigger Configuration

  • Trigger node: Google Drive Trigger.
  • Polling interval: Every 1 minute, or another interval suitable for your workload.
  • Scope: A specific folder that serves as the input location for new video files.

When a new file is detected, the workflow:

  • Identifies the new video in the watched folder.
  • Downloads the file as binary data to preserve fidelity and prepare it for API upload.

Supported formats: The pipeline is designed for common video formats that VLM Run can transcribe. Large files are supported through asynchronous processing, with results delivered via a callback mechanism.

Best Practice – Input Management

  • Use a dedicated Google Drive folder exclusively for processing-ready videos.
  • Adopt consistent naming conventions for videos to improve traceability in later stages.

Stage 2 – Asynchronous Video Transcription with VLM Run

Once the video binary is available, the workflow submits it to VLM Run for transcription. VLM Run is optimized for video understanding and can return either full transcripts or structured segments, depending on configuration.

VLM Run Execute Agent

The VLM Run integration is designed for asynchronous operation, which is essential for handling long recordings and variable audio quality reliably.

  • Async submission: The video file is uploaded and a transcription job is created.
  • Status management: The job status is tracked via a callback URL rather than through blocking, synchronous calls.
  • Scalability: Long videos and heavy workloads are handled without blocking the main workflow, improving resilience and throughput.

Callback Handling via Webhook

When VLM Run completes processing, it sends a callback to a public-facing webhook endpoint managed by n8n. This webhook receives structured JSON that includes the transcription output and relevant metadata.

  • The callback webhook node acts as the re-entry point to the workflow.
  • The payload contains the transcript text or segmented data, along with identifiers such as job ID and video reference.

Operational Recommendations for Transcription

  • Log job IDs and callback events to avoid duplicate processing and to support auditability.
  • Implement validation checks to ensure the transcript payload is complete before continuing.
  • Add retry logic at the webhook-processing stage for transient errors or temporary API issues.

Stage 3 – Structured Transcript Storage in Google Sheets

After the transcription is received via the webhook, the workflow persists the results in a Google Sheet. This sheet functions as a centralized, queryable knowledge base that subsequent Q&A operations can leverage.

Google Sheets as a Knowledge Store

The workflow uses a Google Sheets node to append new rows for each completed transcription job.

  • Columns: At minimum, the sheet should include Video Name and Data (transcript text). Additional fields like timestamps or tags can be added as needed.
  • Write operation: Each callback triggers an append operation that writes a new row with the video identifier and its transcript.
  • Single source of truth: This sheet becomes the authoritative data source for the Q&A agent, ensuring that all responses are grounded in stored transcripts.

Data Modeling and Retrieval Considerations

  • Include unique identifiers (for example, Drive file ID or job ID) to facilitate traceability and debugging.
  • Consider storing timestamps or segment-level data to enable more precise retrieval for long videos.
  • Validate that transcript content is present before appending to avoid empty or partial rows.

Stage 4 – Chat Q&A Agent on Top of Transcripts

The final stage exposes the stored transcripts through a conversational interface. Users can submit natural language questions, and the workflow responds with accurate, context-aware answers drawn exclusively from the transcript data.

Chat Trigger and Query Flow

  • Entry point: A chat trigger or incoming message node initiates the Q&A workflow whenever a user sends a question.
  • Data lookup: The workflow queries the Google Sheet to retrieve transcript rows that are relevant to the user query. This might involve filtering by video name, keywords, or other metadata.
  • Context construction: Relevant transcript segments are assembled into a context payload for the LLM.

OpenAI Chat Model for Answer Generation

The OpenAI Chat model is then used to generate the final answer, with strict instructions to rely solely on the retrieved sheet content.

  • The model receives user question plus the transcript context as input.
  • Responses are constrained to information present in the transcript data, which improves reliability and reduces hallucinations.
  • The output can include references back to the source video or specific transcript segments, depending on how prompts are configured.

Q&A Best Practices

  • Enforce prompting guidelines that instruct the model to only use content from the Google Sheet.
  • Structure transcripts with clear separators or markers for sections to improve retrieval quality.
  • Consider incorporating timestamps into the responses to help users jump directly to the relevant part of the video.

Key Use Cases and Benefits

This workflow template is suitable for a wide range of professional scenarios where video content contains critical knowledge that must be easily accessible.

  • Team knowledge capture: Convert recorded meetings, internal briefings, and customer calls into a searchable knowledge base.
  • Course and webinar indexing: Index educational content and enable learners to query specific topics from long-form recordings.
  • Content creators: Automatically turn published videos into structured notes, FAQs, and source material for derivative content.
  • Support and success teams: Use demo recordings and tutorials as a live reference source for answering customer questions.

Prerequisites and Setup Checklist

To deploy this n8n template successfully, the following components must be in place:

  • Google Drive: OAuth2 credentials configured in n8n, with access to the folder that will be monitored for new video uploads.
  • VLM Run: API access for the video transcription domain, including an endpoint that supports asynchronous processing.
  • Webhook endpoint: A public-facing webhook URL in n8n to receive VLM Run callback notifications.
  • Google Sheets: OAuth2 credentials for reading and writing data, plus a prepared sheet with at least Video Name and Data columns.
  • OpenAI: An OpenAI Chat model configured and connected to the AI Agent node that powers the Q&A responses.

Implementation Tips for Reliability

  • Introduce logging for each critical step: file detection, job submission, callback receipt, and row append operations.
  • Use retry and error handling nodes around external API calls to mitigate transient failures.
  • Ensure idempotency for callback handling by checking whether a given job ID has already been processed.
  • Regularly back up the Google Sheet or mirror it into a database if you expect very high volume.

Conclusion and Next Steps

This n8n workflow template provides a complete, production-ready pattern for transforming video assets into an interactive Q&A knowledge system. By orchestrating Google Drive, VLM Run, Google Sheets, and OpenAI in a single pipeline, it eliminates manual transcription work and makes video content instantly searchable and actionable.

To get started, configure your Google Drive folder trigger, connect VLM Run and OpenAI, and point the workflow at your target Google Sheet. Once in place, every new video becomes a structured, queryable knowledge source available through natural language interaction.

Automate AI Company Enrichment for HubSpot Contacts

Automate AI Company Enrichment for HubSpot Contacts

Overview

Maintaining accurate, up-to-date company information for every contact in HubSpot is critical for effective segmentation, reporting, and personalized outreach. Performing this enrichment manually is not only time-consuming, it also introduces inconsistencies and human error.

This article presents a production-ready n8n workflow template that automates company enrichment for newly created HubSpot contacts. The workflow combines HubSpot, Google Gemini, and SerpAPI to research company data from a contact’s email domain, then writes structured enrichment data directly back into HubSpot.

Use Case and Core Concept

The workflow is designed for organizations that capture leads through forms, signups, or imports into HubSpot and want to automatically enrich each business contact with reliable company information. By leveraging AI and web search, the workflow can:

  • Identify the company behind a contact’s email domain.
  • Retrieve key firmographic data such as company name, size, website, and industry.
  • Store this information directly in HubSpot contact properties for downstream use.

The result is an automated enrichment pipeline that runs on a schedule, processes only fresh contacts, and filters out low value or non-business email domains when required.

High-Level Workflow Architecture

The n8n workflow follows a clear, modular structure that aligns with automation best practices:

  1. Trigger and scheduling – A daily trigger initiates the enrichment process.
  2. Data retrieval from HubSpot – The workflow fetches recently created or updated contacts via the HubSpot API.
  3. Filtering and qualification – Contacts are filtered by creation time and email domain to focus on relevant business leads.
  4. AI-based company research – Google Gemini and SerpAPI are combined to research the domain and extract structured company metadata.
  5. Writeback to HubSpot – Enriched attributes are mapped back to HubSpot contact properties and updated automatically.

Key Components and Nodes

1. Daily Trigger

The workflow uses a scheduler as the entry point:

  • Trigger type: Time-based, configured to run once per day.
  • Purpose: Ensures the workflow processes only the most recent contacts at a predictable cadence, which improves performance and avoids reprocessing the same records.

2. HubSpot Contact Retrieval

After the trigger fires, the workflow calls the HubSpot API via the HubSpot node to pull recent contacts:

  • It retrieves contacts that were created or updated within a specific time window.
  • The time window is configured to align with the daily schedule, typically the last 24 hours.

Access is granted through OAuth2, which provides secure, revocable access to your HubSpot account without embedding credentials in the workflow.

3. Filtering and Qualification Logic

To maintain data quality and avoid unnecessary API calls, the workflow applies a set of filters to the retrieved contacts:

  • Time-based filter: Only contacts created within the last 24 hours are included by default. This can be adjusted if your process requires a different interval.
  • Freemail exclusion: Contacts with email addresses from free email domains such as gmail.com are excluded to focus on business contacts where company enrichment is more meaningful.

These filters are implemented using n8n’s expression and conditional logic capabilities, which allows you to adapt the criteria to your own lead management strategy.

4. AI Company Research Agent

For each qualified contact, the workflow extracts the domain from the contact’s email address and passes it to an AI-powered research agent built from two key integrations:

  • Google Gemini – Provides advanced natural language and reasoning capabilities. Gemini interprets and synthesizes information from search results to produce coherent, structured company profiles.
  • SerpAPI – Performs real-time web searches based on the email domain and related queries, returning up-to-date information from public web sources.

The AI agent combines these tools to generate a structured dataset, typically including:

  • Company name
  • Industry
  • Headquarters city
  • Headquarters country
  • Estimated employee count or company size
  • Official website URL
  • Company LinkedIn URL
  • Short company description or summary

This approach ensures that enrichment is both context-aware and based on current information available online.

5. HubSpot Contact Update

Once the AI agent returns the enrichment payload, the workflow maps these values back into HubSpot:

  • Standard fields such as company name, website, city, country, and company size are updated directly.
  • Social and context fields such as LinkedIn URL and company description are written into the corresponding properties, which can be default or custom fields in HubSpot.

The HubSpot node handles the update operation for each contact, ensuring that your CRM always reflects the latest company context without manual intervention.

Configuration and Setup

To deploy this workflow template in n8n, complete the following configuration steps:

  • HubSpot connection:
    • Configure OAuth2 authentication on the HubSpot nodes.
    • Grant the required scopes for reading and updating contact records.
  • Google Gemini API key:
    • Obtain an API key via Google AI Studio.
    • Add the key as credentials in n8n so the Gemini node or HTTP requests can access the model for natural language processing.
  • SerpAPI key:
    • Create a SerpAPI account and generate an API key.
    • Configure this key in n8n to enable real-time web search queries from within the workflow.
  • Schedule configuration:
    • Set the trigger node to run on a daily schedule.
    • Align the time window filter in the HubSpot query with the schedule interval to avoid duplicates.

Customization and Extension Options

Adjusting Filters and Scope

  • Time window: Modify the default 24-hour filter if you need more frequent or less frequent processing. For example, an hourly schedule with a 1-hour window can support near real-time enrichment.
  • Freemail handling: If your business regularly works with freelancers, consultants, or small businesses using free email providers, you may choose to include domains like gmail.com in the enrichment process.

Expanding Enrichment Fields

  • Additional firmographics: Extend the AI prompt and mapping logic to capture industry, revenue range, or other attributes relevant to your scoring and routing models.
  • Custom HubSpot properties: Create custom fields in HubSpot, such as “AI Company Description” or “AI Industry Category”, and map the AI output to these properties for fine-grained segmentation.

Alternative Data and Search Providers

  • Search tooling: While this template uses SerpAPI, you can substitute it with another search or data provider that better matches your budget or data requirements.
  • Data enrichment APIs: You can augment or replace the AI research with dedicated B2B enrichment APIs if you already have contracts with third-party data vendors.

Benefits of AI-Driven Company Enrichment

Implementing this AI-powered enrichment workflow in your HubSpot environment delivers several strategic advantages:

  • Higher data accuracy: AI agents combine multiple sources and current web information, which reduces outdated or inconsistent company records.
  • Operational efficiency: Manual research and data entry are automated, allowing sales and marketing teams to focus on engagement, qualification, and closing deals.
  • Scalable enrichment: The scheduled workflow processes new contacts continuously, without adding headcount or manual overhead as lead volume grows.
  • Stronger CRM foundation: Enriched company context in HubSpot supports better segmentation, more accurate reporting, and highly targeted campaigns.

Next Steps

To implement this automated company enrichment workflow in your own stack, start by connecting your HubSpot account and configuring your Google Gemini and SerpAPI credentials in n8n. Then tailor the filters, schedule, and field mappings to align with your lead management and data governance policies.

By integrating AI-driven enrichment directly into your HubSpot pipeline, you can significantly improve data quality, streamline marketing and sales operations, and build a more intelligent, context-aware CRM.

Automated ICT 2025 Trading Bot Using Smart Money Concepts

Automated ICT 2025 Trading Bot Using Smart Money Concepts

Institutional-grade trading increasingly depends on automation, data quality, and consistent execution. This guide presents a professional-grade ICT (Inner Circle Trader) 2025 trading bot that operationalizes Smart Money Concepts using an n8n workflow. The solution combines session-aware signal validation, Coinbase market data, and GPT-4o analysis to create an end-to-end pipeline for trading signal intake, evaluation, execution, and reporting via Telegram and Notion.

Architecture Overview: ICT Smart Money Workflow in n8n

The workflow is implemented as a modular n8n template that connects messaging, market data, AI analysis, and execution services. It is designed for automation professionals who require a transparent, auditable, and extensible trading system.

At a high level, the workflow performs the following functions:

  • Receives ICT-based trading signals from Telegram
  • Extracts and normalizes all key signal parameters
  • Validates signals against ICT kill zones and session logic
  • Enriches signals with real-time Coinbase market data
  • Runs an AI-driven ICT analysis using GPT-4o
  • Applies quality and session filters before execution
  • Places trades on Coinbase when conditions are met
  • Logs trades and rejected signals to Notion
  • Sends structured Telegram notifications to the user

This design separates concerns across multiple nodes, which simplifies maintenance, testing, and future enhancements.

Core Nodes and Data Flow

1. ICT Telegram Signal Trigger

The workflow starts with an ICT Telegram Signal Trigger. This node listens to a specified Telegram channel or bot and captures incoming ICT trading signals in real time. These signals typically include:

  • Technical indicators (e.g. RSI, MACD, volume)
  • Trading symbol or pair
  • Intended action (BUY or SELL)
  • Entry or reference price
  • Timestamp of the signal

By centralizing the trigger on Telegram, the workflow can be integrated with existing ICT signal providers or proprietary signal-generation systems.

2. Extract ICT Signal Data

The Extract ICT Signal Data node parses the raw Telegram message and structures it into a clean, machine-readable format. This parsing step typically includes:

  • Extracting indicators such as RSI, MACD, and volume
  • Capturing the trading symbol and direction (BUY or SELL)
  • Normalizing price and time values
  • Preparing a standardized payload for downstream nodes

Standardization at this stage is critical for reliable validation, AI analysis, and execution logic.

3. ICT Session Validator

The ICT Session Validator node applies ICT-style session logic using GMT-based kill zones. It classifies the signal based on whether it occurs within high-probability trading windows, such as:

  • Asian session
  • London session
  • New York session

In addition, this node enriches the signal with metadata such as:

  • Session label (e.g. London, New York)
  • Session strength or relevance
  • Session priority for risk management and AI evaluation

This structured session context is essential for ICT Smart Money Concepts, since many setups are highly session-dependent.

4. Get Coinbase Market Data

The Get Coinbase Market Data node connects to Coinbase and retrieves real-time information for the target symbol. Typical data points include:

  • Current market price
  • Recent price movements and volatility context
  • Order book or relevant market metrics (depending on your implementation)

By enriching the signal with live market data, the workflow enables more accurate AI analysis and more informed trade execution decisions.

5. ICT AI Analysis (GPT-4o)

The ICT AI Analysis node leverages GPT-4o to perform a structured, ICT-focused assessment of the signal. Using the parsed signal, session metadata, and Coinbase data, the AI produces:

  • Signal quality classification (HIGH, MEDIUM, LOW)
  • Confidence score on a 0-100 scale
  • Risk level and directional recommendation (BUY, SELL, HOLD)
  • Evaluation of key ICT Smart Money factors, such as:
    • Session alignment with ICT kill zones
    • Market structure and trend context
    • Liquidity grabs and stop hunts
    • Fair value gaps and imbalances
    • Institutional or smart money sentiment

This node effectively acts as an AI-based ICT analyst that standardizes decision-making and reduces discretionary variance.

6. ICT Quality & Session Filter

The ICT Quality & Session Filter node is a decision gateway that applies strict criteria before any trade is allowed to progress to execution. Typical checks include:

  • Minimum AI confidence threshold
  • Required signal quality (for example, only HIGH or MEDIUM)
  • Valid and active ICT session alignment

Only signals that meet both quality and session requirements continue to the trade execution path. All others are routed to a rejection and logging flow. This enforces disciplined trading behavior and supports robust risk management.

7. Execute ICT Trade

When a signal passes the filters, the Execute ICT Trade node interacts with Coinbase via its API to place an order. In a typical configuration, this node:

  • Places a market order aligned with the recommended direction
  • Uses predefined position sizing or quantity parameters
  • Respects your configured risk parameters

Execution is fully automated, which eliminates latency and manual errors that frequently occur during volatile market conditions.

8. Create ICT Trading Record (Notion)

Every executed trade is recorded by the Create ICT Trading Record node in a Notion database. The log generally includes:

  • Signal parameters and indicators
  • Session metadata
  • AI analysis summary and confidence score
  • Executed trade details from Coinbase
  • Timestamps and any additional notes

This persistent record supports transparency, performance review, backtesting of decision criteria, and compliance reporting where needed.

9. Generate ICT Notification & Send Telegram Alert

To keep traders informed in real time, the Generate ICT Notification & Send Telegram Alert node formats a professional, human-readable message summarizing the action taken. This notification can include:

  • Symbol, direction, and execution price
  • Session classification and quality rating
  • AI confidence and risk summary
  • Links or references to the Notion record

The message is then dispatched via Telegram, enabling rapid situational awareness without the need to manually monitor the workflow.

10. Log ICT Rejected Signal

Signals that do not pass the quality or session filters are not discarded silently. Instead, the Log ICT Rejected Signal node stores them for future analysis. This archive can be used to:

  • Refine filter thresholds and criteria
  • Identify patterns in low-quality or poorly timed signals
  • Improve upstream signal generation logic

Systematically logging rejections is a best practice for continuous improvement of automated trading systems.

Benefits of Automating ICT Smart Money Trading with n8n

Implementing this ICT 2025 trading bot as an n8n workflow delivers several advantages for professional traders and automation engineers:

  • Operational Efficiency
    Automated parsing, validation, and execution eliminate manual handling of signals and reduce timing errors, especially around session opens.
  • Consistent Application of ICT Principles
    Rules are applied uniformly, without emotional bias, which is particularly important for Smart Money Concepts that depend on disciplined execution.
  • Data-Enriched Decision-Making
    The combined use of real-time Coinbase market data and GPT-4o analysis results in richer, more context-aware trade decisions.
  • Structured Risk Management
    Quality and session filters prevent low-confidence or off-session trades from being executed, which supports capital preservation.
  • Real-Time Transparency
    Telegram notifications and Notion logging provide clear visibility into every decision, both executed and rejected.
  • Extensibility and Control
    Built on n8n, the workflow can be customized, versioned, and integrated with additional tools such as dashboards, CRMs, or analytics platforms.

Implementation Guide: Getting Started with the Template

To operationalize this ICT Smart Money workflow, follow these steps:

  1. Deploy the Workflow in n8n
    Import the provided template into your n8n instance. Review each node to understand its purpose and ensure it aligns with your infrastructure and compliance requirements.
  2. Configure Coinbase Advanced API Access
    Set up secure credentials for Coinbase Advanced in n8n. Confirm that your API keys have the appropriate permissions for market data retrieval and trade execution, and store them using n8n’s credentials management for security.
  3. Set Up Telegram Integration
    Create or configure a Telegram bot and connect it to the relevant channel for receiving ICT signals. In n8n, configure the trigger and notification nodes with your bot token and chat IDs for both input and output messages.
  4. Define Risk and Position Parameters
    Adjust quantities, trade sizes, and any risk-related parameters in the execution node. Align these settings with your overall risk management framework and account size.
  5. Customize Filters and AI Thresholds
    Tune the ICT Quality & Session Filter node to match your tolerance for risk and preferred trading conditions. This may include setting minimum confidence scores or restricting trades to specific sessions.
  6. Monitor Logs and Optimize
    Regularly review Notion trade records and rejected signal logs. Use these data points to refine your filters, AI prompts, and session definitions as market conditions and your strategy evolve.

Strategic Perspective and Next Steps

Combining ICT 2025 Smart Money Concepts with AI-driven analysis and real-time exchange data represents a significant evolution in algorithmic trading workflows. By automating signal intake, evaluation, and execution in n8n, you gain:

  • Higher precision in timing and execution
  • Improved consistency in applying ICT rules
  • Actionable insight from structured logs and AI outputs

If you are ready to operationalize ICT Smart Money Concepts with a production-grade automation stack, this template provides a robust foundation. Integrate it into your environment, align it with your risk parameters, and iteratively refine it using real performance data.

Leverage advanced trading automation to stay ahead of the market, reduce operational friction, and make more informed, data-driven trading decisions.