Automate Personalized Email Outreach with HubSpot & AI

Email Outreach Drafter with HubSpot and AI: Step-by-Step Learning Guide

This guide walks you through an n8n workflow template that combines HubSpot, Gmail, and Google Gemini AI to automate highly personalized email outreach.

Instead of manually researching each contact and writing emails from scratch, this workflow:

  • Finds the right contacts in HubSpot
  • Analyzes past email conversations from Gmail
  • Builds a detailed customer persona with AI
  • Generates a tailored sales email for each contact
  • Saves the emails as Gmail drafts so your team can review and send

What You Will Learn

By the end of this tutorial-style article, you will understand how to:

  • Set up OAuth2 connections for HubSpot and Gmail in n8n
  • Configure an n8n workflow to fetch decision makers from HubSpot
  • Retrieve and use previous email threads from Gmail as AI input
  • Use Google Gemini (PaLM) in n8n to build customer personas
  • Generate personalized sales emails based on those personas
  • Store the results as Gmail drafts for review or further automation
  • Customize prompts, targeting, and workflow behavior for your use case

Core Concepts Before You Start

1. n8n Workflow Overview

In n8n, an automation is built as a workflow made up of nodes. Each node performs a specific task, such as:

  • Pulling data from HubSpot
  • Reading email threads from Gmail
  • Sending prompts to Google Gemini AI
  • Creating email drafts in Gmail

The nodes are connected so that data flows from one step to the next, eventually producing a personalized email for each contact.

2. Tools Used in This Template

  • HubSpot – CRM where your contacts and decision makers are stored
  • Gmail – Email account used to fetch previous conversations and create drafts
  • Google Gemini (PaLM) – AI model that builds personas and writes emails
  • n8n – Automation platform that connects all of the above

3. What the Workflow Actually Automates

This n8n template is designed for scenarios like:

  • Sales reps reaching out to decision makers with tailored pitches
  • Marketing teams running personalized outreach campaigns
  • Consultants offering AI partnership or AI implementation services

The example product in this template is AI partnerships consulting packages that help clients start and succeed with AI projects in a cost-effective way, but you can adapt the product details to your own offer.

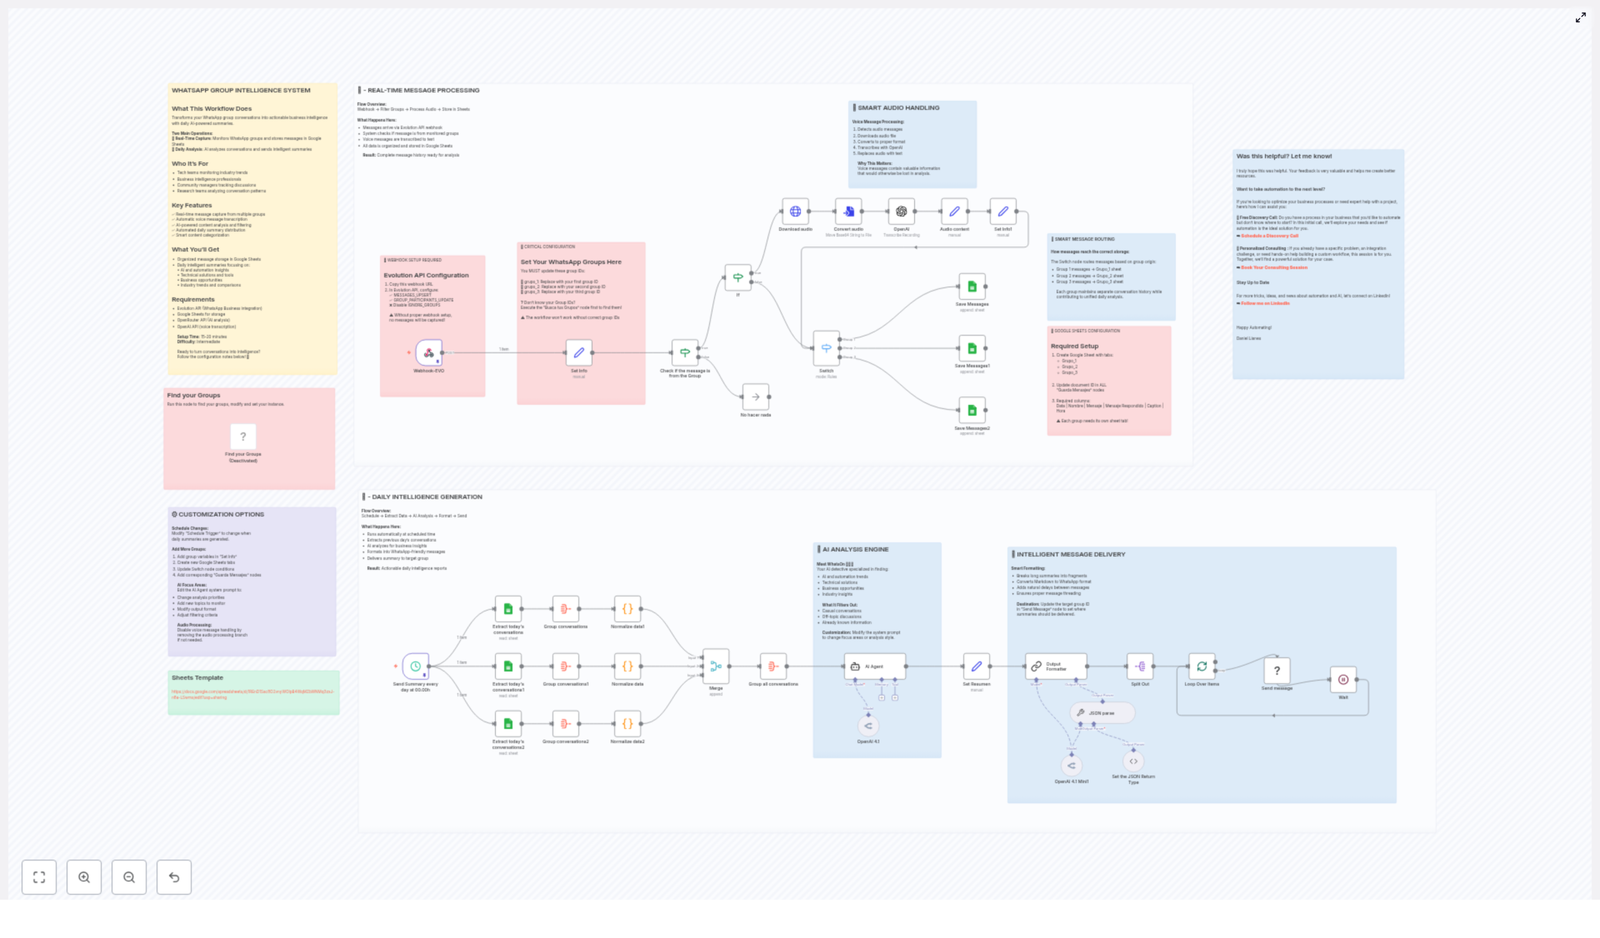
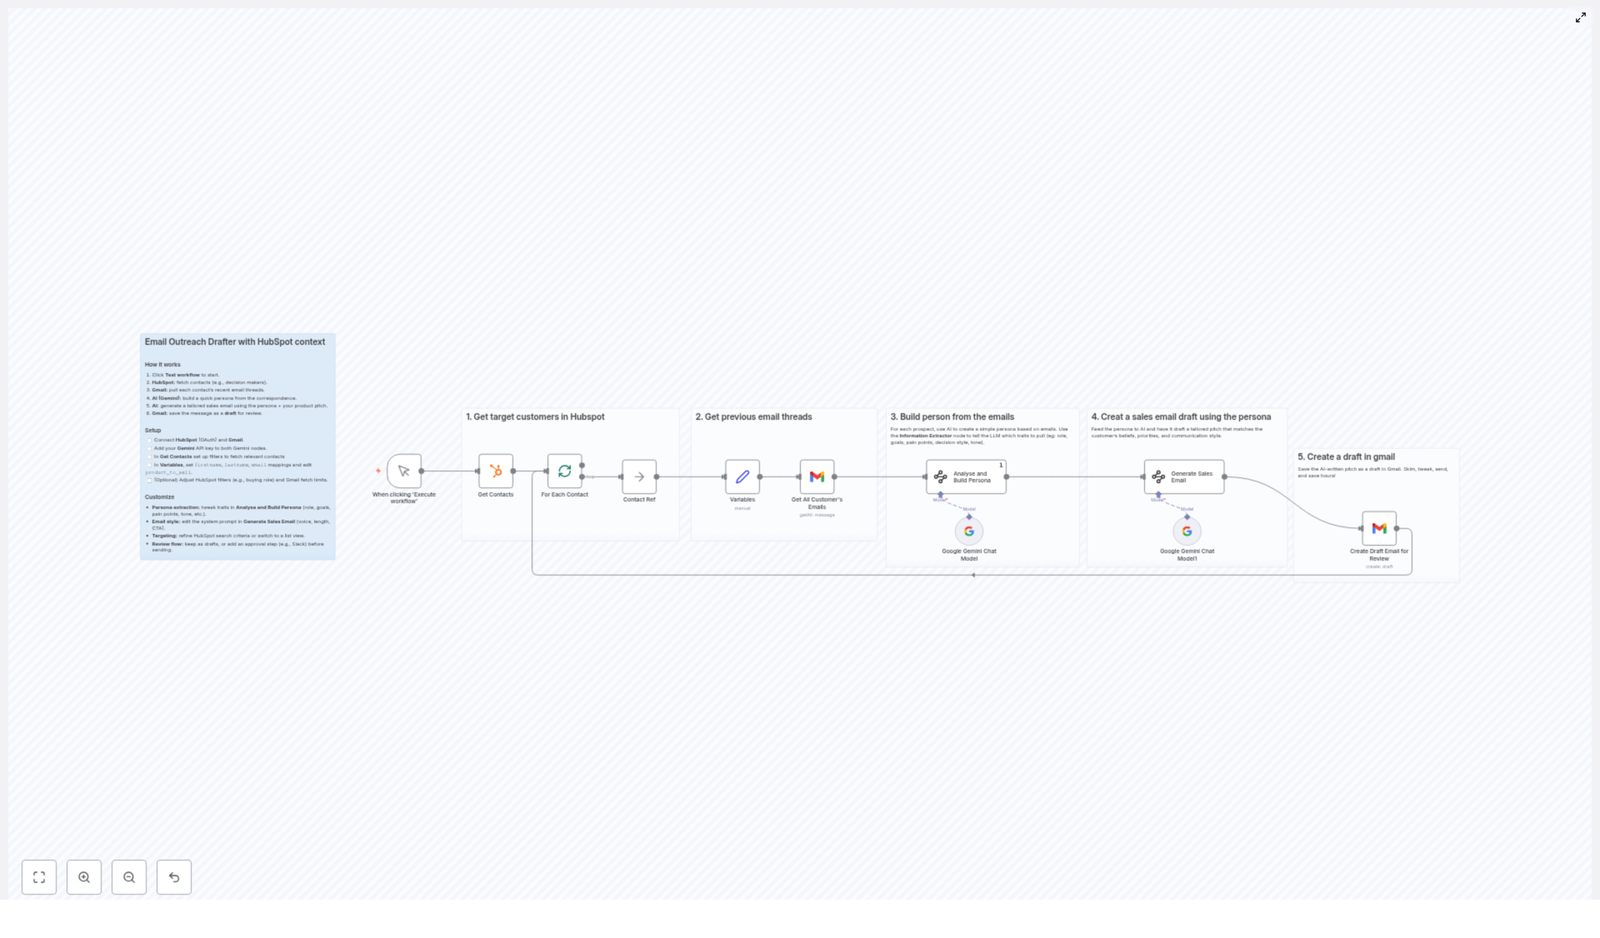
How the Workflow Works in n8n

Let us walk through the main stages of the template so you can see how data flows from HubSpot to Gmail via AI.

Step 1 – Fetch Target Contacts from HubSpot

The workflow starts with a HubSpot Get Contacts node.

This node:

  • Uses OAuth2 authentication to securely connect to your HubSpot account
  • Pulls contacts that match specific filters, for example:
    • Decision makers
    • People in certain roles or job titles
    • Leads with particular scores or segments

For each selected contact, the node makes their key details available to the rest of the workflow. Typical fields you will use as variables include:

  • firstname
  • lastname
  • email
  • Any other custom fields you want to reference in your messaging

Step 2 – Retrieve Recent Email Threads from Gmail

Next, the workflow uses a Gmail node to gather context about each contact.

For each HubSpot contact, the Gmail node:

  • Looks up the contact by their email address
  • Fetches a defined number of recent email threads involving that contact
  • Provides the email content as input to the AI step

You can optionally configure how many emails to fetch per contact. For example, you might only want the last 3 to 5 relevant conversations to keep the AI prompt focused and efficient.

Step 3 – Build a Customer Persona with Google Gemini AI

Once the workflow has the contact details and email history, it passes this information to a Google Gemini (PaLM) node that is responsible for persona analysis.

In this step, the AI:

  • Analyzes the language and content of previous emails
  • Extracts a wide range of traits and insights, such as:
    • Decision-making style
    • Communication preferences
    • Key pain points and challenges
    • Professional goals and priorities
    • Work style and personality traits
    • Buying behavior and budget sensitivity
    • Business culture and company values
    • Industry awareness and level of technical understanding

The result is a structured persona description that captures how this specific contact thinks, talks, and makes decisions. This persona is then used as the foundation for the personalized sales email.

Step 4 – Generate a Personalized Sales Email

The next AI step is an additional Google Gemini node (or a separate prompt within the same node) that focuses on email generation.

This node takes as input:

  • The persona data from the previous step
  • The contact’s basic details (name, role, company if available)
  • Your product_to_sell information, for example:
    • AI partnerships consulting packages
    • How they help clients start and scale AI projects
    • The cost-effective benefits and outcomes

Based on this, the AI drafts a customized sales email that:

  • Matches the contact’s tone and communication style
  • Emphasizes the pain points and goals discovered in the persona
  • Aligns with their business culture and industry context
  • Includes a relevant call to action tailored to that persona

Step 5 – Create Gmail Drafts for Review

Finally, the workflow uses another Gmail node to create email drafts.

For each contact, the node:

  • Builds a new draft email in your Gmail account
  • Uses the AI-generated content as the email body
  • Sets the contact’s email address as the recipient

The drafts appear in your Gmail Drafts folder, so your sales or marketing team can:

  • Review the message
  • Make small edits or add personal touches
  • Send the email manually

If you prefer, you can later extend the workflow to send emails automatically or to notify the team via Slack when drafts are ready.

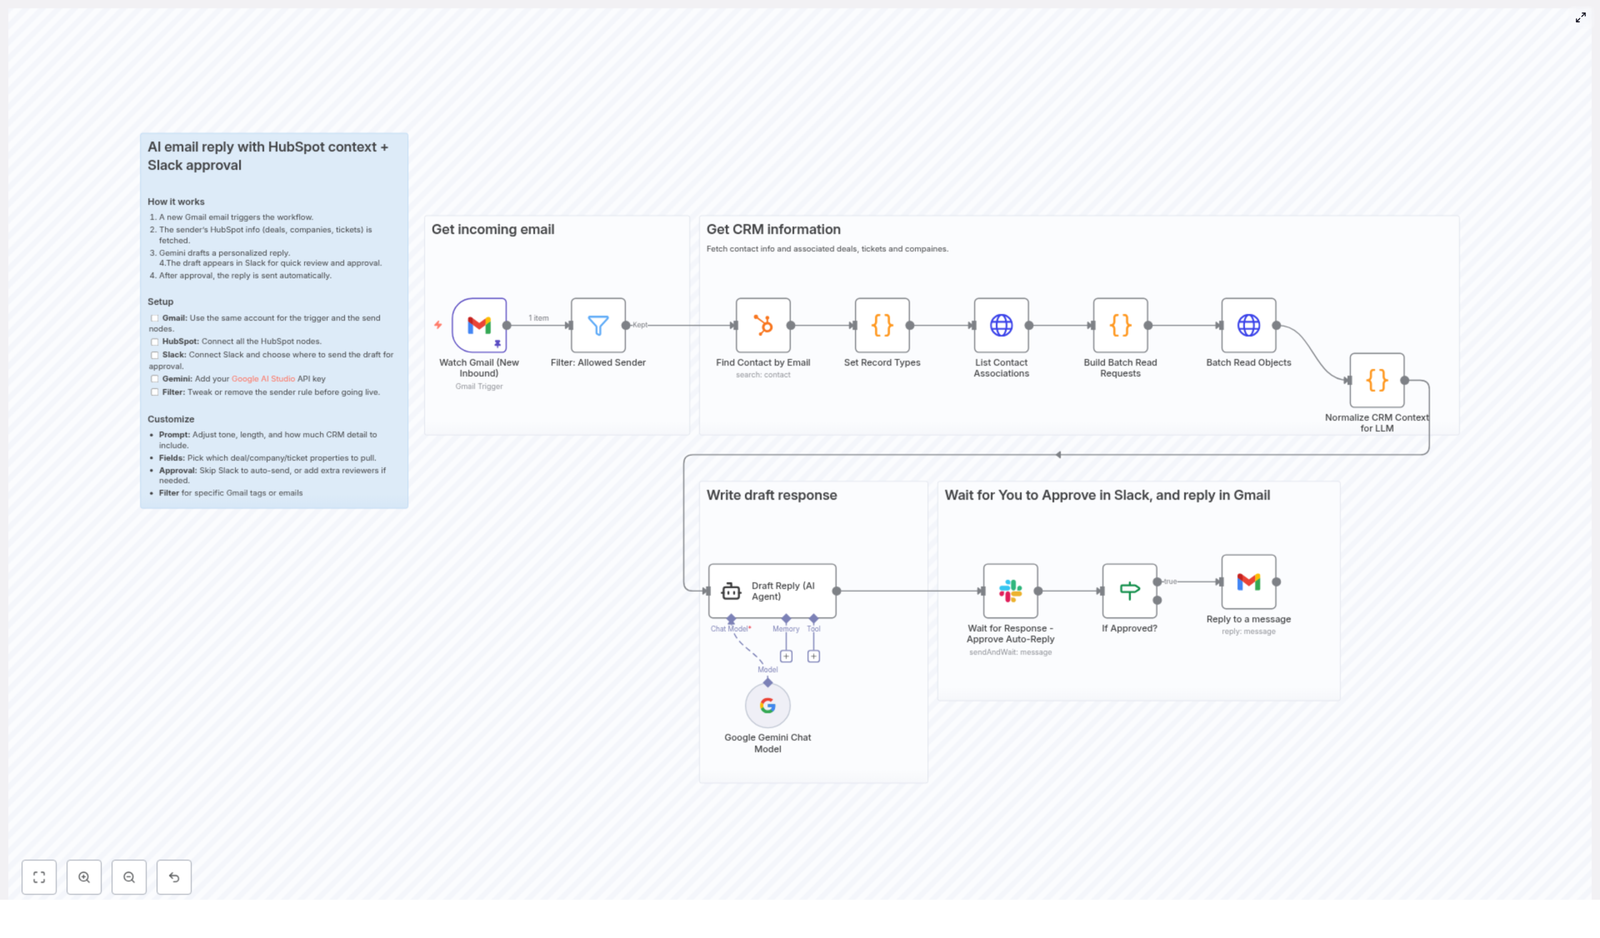
Setting Up the Workflow in n8n

1. Connect Your Accounts

Before running the template, you need to connect the required services inside n8n.

  • HubSpot via OAuth2
    • Open the HubSpot node in the workflow
    • Choose OAuth2 as the authentication method
    • Authorize n8n to access your HubSpot CRM
  • Gmail account
    • Open the Gmail nodes used for fetching threads and creating drafts
    • Connect your Gmail account using OAuth2
    • Verify that n8n can read emails and create drafts
  • Google Gemini (PaLM) API
    • Set up your Google Gemini or PaLM credentials in n8n
    • Paste your API key or configure the credential as required
    • Link these credentials in the AI nodes that perform persona analysis and email generation

Security tip: Make sure your HubSpot, Gmail, and Google Gemini credentials are stored securely in n8n and not hard coded into the workflow.

2. Configure Contact Targeting in HubSpot

Next, adjust the Get Contacts node in the workflow so that it pulls the right people from your CRM.

Typical configuration steps:

  • Open the HubSpot node in the editor
  • Set filters for:
    • Role or job title (for example “Head of Operations”, “CTO”)
    • Decision maker flags or lifecycle stage
    • Lead score, industry, or other segmentation fields
  • Test the node to see which contacts are returned

The goal is to ensure the workflow only processes relevant buyers or decision makers, not every contact in your database.

3. Define Variables for Each Contact

Within the workflow, you will reference certain fields as variables, such as:

  • firstname
  • lastname
  • email
  • product_to_sell (a description of your offer)

Make sure these variables are mapped correctly from the HubSpot node output to the AI prompts and Gmail nodes. This ensures that each email is accurately personalized.

4. Tune Email Thread Retrieval in Gmail

In the Gmail node that retrieves previous emails, you can:

  • Specify how many emails to fetch for each contact
  • Filter by label, folder, or search query if needed

This step is optional but useful if you want to limit the AI input to the most recent or most relevant conversations.

5. Configure Google Gemini AI Prompts

Persona Analysis Node

In the Analyse and Build Persona node, you control what the AI extracts from the email threads.

You can refine the prompt to emphasize particular attributes, for example:

  • Decision-making style (data driven, consensus based, fast or cautious)
  • Industry specific challenges or regulatory concerns
  • Preferred communication style (brief, detailed, formal, informal)
  • Level of technical or AI familiarity

Adjusting this prompt helps you generate personas that are truly aligned with your sales process.

Sales Email Generation Node

In the Generate Sales Email node, you define how the AI should write the email.

Within the prompt, you can control:

  • Tone – friendly, professional, consultative, or more direct
  • Formality – casual or formal language depending on your audience
  • Length – short outreach, medium pitch, or more detailed explanation
  • Call to action – book a meeting, reply with a question, try a pilot project, and so on

By testing and iterating on this prompt, you can optimize open and response rates for your specific market.

6. Decide How Emails Are Reviewed and Sent

In the base template, the workflow creates Gmail drafts only. This gives you full control over what gets sent.

You have two main options:

  • Manual review only
    • Keep the workflow as is
    • Sales reps open the drafts, make edits, and send them manually
  • Extended automation
    • Add steps to notify your team via Slack when drafts are ready
    • Or add a conditional step that automatically sends emails if they meet certain criteria

Customization Tips for Better Results

1. Improve Persona Extraction

To get more actionable personas, you can:

  • Ask the AI to output structured sections, for example:
    • “Pain points”
    • “Goals”
    • “Preferred communication style”
    • “Objections likely to arise”
  • Focus on traits that matter most to your sales cycle, such as budget sensitivity or risk tolerance

2. Adapt Email Style to Your Brand

Use the email generation prompt to align with your brand voice.

  • Specify whether you want short subject lines or more descriptive ones
  • Define how you introduce your AI partnerships consulting packages or other offers
  • Control how strong or soft the call to action should be

3. Fine Tune Targeting in HubSpot

Better targeting usually leads to better results. In your HubSpot filters, you can:

  • Limit outreach to specific industries where your AI services have strong fit
  • Target only contacts above a certain lead score
  • Focus on roles that typically sign off on AI projects

4. Optimize Your Review Process

Decide how your team will work with the drafts created by the workflow:

  • Create internal guidelines on what to check before sending (accuracy, tone, offer)
  • Use labels or tags in Gmail to organize drafts by campaign or rep
  • Optionally, extend the workflow to send Slack or email notifications when new drafts are available

Benefits of Automating Email Outreach with n8n, HubSpot, and AI

  • Time savings – Automate persona building and email drafting so reps spend more time selling and less time writing.
  • Higher engagement – Personalized, AI crafted messages are more likely to be opened, read, and answered.
  • Consistent quality – Every email follows a thoughtful structure while still being tailored to each contact.
  • Human oversight – Emails are saved as drafts so your team can review, adjust, and approve before sending.
  • Unified workflow – HubSpot, Gmail, and Google Gemini are connected in one n8n automation for a smooth sales process.

Quick FAQ

Do I have to send emails automatically?

No. By default, the workflow only creates Gmail drafts. You keep full control over what is sent and when. You can later add automatic sending if it suits your process.

Can I use this for products other than AI consulting?

Yes. The template uses AI partnerships consulting packages as an example, but you can update the product_to_sell details and prompts to match any product or service.

Is previous email history required?

The workflow works best when there are existing Gmail threads with the contact, because the AI can analyze their communication style and needs. If there is no history, you can still generate emails using CRM data and generalized personas, but the personalization will be less deep.

Is my data secure?

n8n uses your configured credentials to connect to HubSpot, Gmail, and Google Gemini. Make sure you store these credentials securely in n8n and follow your organization’s security policies.

WhatsApp Group Intelligence System Workflow Guide

WhatsApp Group Intelligence System Workflow Guide

From Noise To Clarity: Turning WhatsApp Groups Into Daily Intelligence

Your WhatsApp groups are full of ideas, insights, questions, and opportunities. Yet most days, those messages rush by like a river you do not have time to cross. You scroll, skim, and promise yourself you will come back later, but later never comes.

This is where automation becomes more than a productivity trick. It becomes a way to reclaim your focus, protect your time, and turn scattered conversations into structured knowledge you can actually use.

The WhatsApp Group Intelligence System is an n8n workflow template designed to do exactly that. It quietly listens to your groups, organizes everything in Google Sheets, and every day delivers a clear, AI-powered summary of what truly mattered.

Think of it as your personal analyst that never sleeps, never misses a message, and hands you a concise briefing every morning so you can make better decisions with less effort.

Why This Workflow Matters For You And Your Team

If you are part of active WhatsApp groups, you already know the problem:

  • Important links and ideas get buried in casual chat
  • Voice notes hold valuable context that is hard to search later
  • Team members are in different time zones and miss key conversations
  • There is no single, structured place to review what happened in a day

This workflow helps you step out of reactive mode and into a more intentional, data-driven way of working.

Who Will Benefit Most

This n8n template is especially powerful for people and teams who live in group conversations:

  • Tech teams monitoring industry trends and new tools
  • Business intelligence professionals tracking signals and patterns
  • Community managers who need to understand what members really care about
  • Research teams analyzing conversation themes and questions over time

If you have ever thought, “There is so much value in these chats, but I cannot keep up,” this workflow is your next step toward a more automated, focused workflow.

What This n8n Workflow Actually Does

At its core, the WhatsApp Group Intelligence System has two main operations working together:

  • Real-time capture of WhatsApp messages into Google Sheets
  • Daily AI analysis that turns those messages into clear summaries

The result is a living, structured knowledge base plus a daily intelligence report you can read in a few minutes.

Key Features That Unlock The Transformation

  • ✅ Real-time message capture from multiple WhatsApp groups
  • ✅ Automatic transcription of voice messages using OpenAI
  • ✅ AI-powered content analysis and smart filtering of noise
  • ✅ Automated daily summary delivery back into WhatsApp
  • ✅ Smart categorization of content into themes and opportunities

What You Receive Every Day

All your group conversations are stored in Google Sheets, ready for deeper analysis or reporting. On top of that, you get daily AI summaries focused on:

  • AI and automation insights shared in the group
  • Technical solutions, tools, and workarounds
  • Potential business opportunities and leads
  • Industry trends, comparisons, and useful references

Instead of guessing what you missed, you get a curated overview that lets you move forward with clarity.

Before You Begin: What You Need To Set Up

You can build this system in about 15-20 minutes if you already use n8n and have the required tools ready. The difficulty level is intermediate, which makes it a great project if you want to stretch your automation skills without going too deep into complexity.

Required Services & Integrations

  • Evolution API for WhatsApp Business integration
  • Google Sheets as your structured storage
  • OpenRouter API for AI analysis
  • OpenAI API for voice message transcription

With these four pieces in place, your n8n workflow can listen, store, analyze, and report automatically.


Part 1: Real-Time Message Processing – Capturing The Conversation Stream

Your journey with this workflow begins at the moment a WhatsApp message is sent. From there, n8n takes over and ensures nothing valuable slips through the cracks.

High-Level Flow

Flow overview:
Webhook → Filter Groups → Process Audio → Store in Sheets

What Happens Behind The Scenes

  • Messages arrive through an Evolution API webhook
  • The workflow checks whether each message comes from one of your monitored groups
  • If it is a voice message, it is automatically transcribed into text
  • All structured data is then saved into Google Sheets

The outcome is a complete, searchable message history that is ready for AI analysis and long-term reference.

Critical Step: Setting Your WhatsApp Group IDs

To make the system work for your own groups, you must tell the workflow which groups to track. This is done by updating the group IDs:

  • grupo_1: Replace with your first WhatsApp group ID
  • grupo_2: Replace with your second WhatsApp group ID
  • grupo_3: Replace with your third WhatsApp group ID


If you do not know your group IDs yet, run the “Find your Groups” node first. It will help you retrieve the IDs you need.


Important: The workflow will not function correctly without valid group IDs.

Webhook Configuration With Evolution API

For n8n to receive messages in real time, you need to configure the webhook in Evolution API.

  1. Copy the webhook URL from your n8n Webhook node
  2. In Evolution API, enable the following:
    • MESSAGES_UPSERT
    • GROUP_PARTICIPANTS_UPDATE
    • ❌ Disable IGNORE_GROUPS


Without proper webhook setup, no messages will be captured, so take a moment to verify this step carefully.

Smart Audio Handling: Never Lose A Voice Note Again

Voice messages are often where people share the most context, nuance, and detail. This workflow treats them as first-class data, not as unsearchable noise.

Voice message processing sequence:

  1. Detects when an incoming message is an audio file
  2. Downloads the audio from WhatsApp via Evolution API
  3. Converts the file to the correct format if needed
  4. Uses OpenAI to transcribe the voice message into text
  5. Replaces the audio content with the transcribed text for storage and analysis

This means your AI analysis later can include the full content of voice notes, not just typed messages.

Smart Message Routing: Keeping Each Group Organized

If you track multiple groups, it is important to preserve context. This workflow uses a Switch node in n8n to route messages into the correct sheet.

  • Messages from Group 1 → saved into the Grupo_1 tab
  • Messages from Group 2 → saved into the Grupo_2 tab
  • Messages from Group 3 → saved into the Grupo_3 tab

Each group keeps its own conversation history, while still feeding into a unified daily intelligence report later on.

Google Sheets Setup: Building Your Conversation Database

Before you run the workflow, prepare your Google Sheets document so n8n has a clear structure to work with.

  1. Create a Google Sheets file with the following tabs:
    • Grupo_1
    • Grupo_2
    • Grupo_3
  2. Copy the document ID and update it in all the “Save Messages” nodes in your n8n workflow
  3. In each tab, create these required columns:
    Data | Nombre | Mensaje | Mensaje Respondido | Caption | Hora


Each group must have its own dedicated tab so the system can store and reference messages correctly.


Part 2: Daily Intelligence Generation – Turning History Into Insight

Once your messages are flowing into Google Sheets, the second part of the journey begins. This is where your system transforms raw conversation logs into meaningful, daily intelligence that supports better decisions.

High-Level Flow

Flow overview:
Schedule → Extract Data → AI Analysis → Format → Send

What The Daily Workflow Does

  • Runs automatically at a scheduled time you define
  • Extracts the previous day’s conversations from your Google Sheets tabs
  • Uses AI to identify key insights, themes, and opportunities
  • Formats the findings into WhatsApp-friendly messages
  • Sends the final summary to a target group of your choice


End result: A concise, actionable daily intelligence report delivered right where you already work – in WhatsApp.

Meet Your AI Analyst: WhatsOn

At the heart of the analysis is an AI agent called WhatsOn, designed to act like a detective that scans your group conversations for what truly matters.

WhatsOn focuses on:

  • AI and automation trends mentioned in your groups
  • Technical solutions, tools, and tips that people share
  • Potential business opportunities, leads, or ideas
  • Industry insights, benchmarks, and comparisons

What it filters out by default:

  • Casual small talk and off-topic chatter
  • Repeated or already well-known information
  • Messages that do not contribute to learning or decision making

You can customize the AI agent’s system prompt to adjust its focus, tone, or output format, which makes this workflow a flexible foundation for many use cases.

Intelligent Message Delivery Back To WhatsApp

Once the analysis is done, the workflow takes care of presenting the results in a way that feels natural in WhatsApp.

Smart formatting features:

  • Splits long summaries into shorter message fragments
  • Converts Markdown-style text into WhatsApp-friendly formatting
  • Adds natural delays between messages so they are easier to read
  • Maintains proper message threading for better context

To control where these summaries go, update the target group ID in the “Send Message” node. This can be a dedicated “Daily Summary” group, a leadership group, or any channel where decisions are made.


Customization: Make The Workflow Your Own

One of the biggest advantages of building this in n8n is that you are not locked into a rigid, one-size-fits-all tool. You can evolve this workflow as your needs, team, and ambitions grow.

Adjusting The Schedule

Use the “Schedule Trigger” node to decide when your daily summaries are generated. You might:

  • Send a briefing first thing in the morning
  • Generate an end-of-day wrap-up
  • Run multiple summaries for different time zones

Adding More WhatsApp Groups

If you want to track more than three groups, simply extend the existing structure:

  1. Add new group variables in the “Set Info” node
  2. Create additional tabs in your Google Sheets document
  3. Update the Switch node conditions to route new groups correctly
  4. Create matching “Save Messages” nodes for each new group

Refining AI Focus Areas

You can shape your AI summaries by editing the AI Agent system prompt. For example, you can:

  • Emphasize certain topics like sales opportunities or product feedback
  • Change the tone to be more concise, more narrative, or more technical
  • Ask for bullet points, sections, or specific output formats
  • Adjust how aggressively it filters out non-essential content

Managing Audio Processing

If your groups rarely use voice notes, or you prefer a simpler setup, you can disable voice message handling by removing or deactivating that branch of the workflow. The rest of the system will continue to function normally.

Google Sheets Template

To speed up setup, you can start from this ready-made Google Sheets structure:


Google Sheets Template Link


Taking The Next Step In Your Automation Journey

Implementing this workflow is more than just “setting up a template.” It is a mindset shift. You are choosing to let automation handle the repetitive work so you can spend your energy on strategy, creativity, and meaningful decisions.

You do not have to get it perfect on day one. Start with the basic setup, let it run for a few days, then refine:

  • Tweak the AI prompt to match your priorities
  • Add or remove groups as your needs evolve
  • Experiment with different summary times

Each small improvement compounds over time, and soon you will have a custom intelligence system tailored to the way you and your team work.

Was This Helpful? I Would Love To Hear From You

Your feedback helps shape better tools and clearer guides. If this workflow helped you reclaim time or uncover insights you would have otherwise missed, let me know.

Want To Take Your Automation Even Further?

If you are ready to go beyond this template and design deeper automations for your business, here are two ways I can support you:

  • 🚀 Free Discovery Call: Have a process you want to automate but are not sure where to begin? In this initial call, we will explore your use case and see whether automation is the right solution.
    Schedule a Discovery Call
  • 💡 Personalized Consulting: Already know what you want to build and need expert guidance or hands-on help? This session is for specific problems, integrations, or custom n8n workflows.
    Book Your Consulting Session

Stay Connected And Keep Learning

If you enjoy experimenting with automation, AI, and n8n templates, let us stay in touch. I regularly share ideas, examples, and insights on how to automate real-world processes.

Streamline Email Replies with HubSpot AI & Slack Approval

Streamline Email Replies with HubSpot AI & Slack Approval

What You Will Learn

In this guide, you will learn how to use an n8n workflow template that:

  • Automatically detects new customer emails in Gmail
  • Pulls relevant customer data from HubSpot CRM
  • Uses Google Gemini AI to draft a personalized reply
  • Sends the draft to Slack for human review and approval
  • Sends the approved reply back to the customer via Gmail

By the end, you will understand each step of the workflow, how the tools connect, and how to customize it for your own email automation process in n8n.

Why Use This n8n Email Automation Workflow

Responding to customer emails quickly while keeping replies personal and accurate is hard to scale. This n8n workflow template solves that by combining:

  • Gmail for receiving and sending emails
  • HubSpot CRM for customer and deal context
  • Google Gemini AI for drafting professional replies
  • Slack for a human approval checkpoint

The result is a semi-automated email reply system that keeps humans in control, but removes most of the manual work.

Core Concepts Before You Start

1. Trigger-based automation in n8n

n8n workflows usually start with a trigger node. In this template, that trigger is a new inbound Gmail email. Each time a new email arrives in your Gmail inbox, the workflow starts and runs through all the following steps automatically.

2. Filtering which emails to automate

Not every email should be handled by automation. For example, internal messages or system notifications might not be suitable. This workflow uses a filter step to allow only approved senders to continue, such as real customers or leads.

3. Using HubSpot CRM for personalization

To avoid generic responses, the workflow looks up the sender in HubSpot and retrieves:

  • Their contact profile
  • Associated deals
  • Linked companies
  • Related tickets

This gives the AI model rich context so it can craft replies that feel informed and specific.

4. Drafting with Google Gemini AI

The workflow uses the Google Gemini AI Chat model to generate a draft email reply. It combines:

  • The customer’s original email content
  • Data pulled from HubSpot
  • A carefully designed prompt that defines tone and style

This makes the reply sound professional, concise, and consistent with your brand voice.

5. Human-in-the-loop via Slack

Instead of sending AI replies directly to customers, the workflow adds a Slack approval step. The AI draft is posted to a specific Slack channel, where a team member can:

  • Review the suggested reply
  • Approve it to send as is
  • Optionally edit or adjust the text before approval

This keeps quality and compliance under human control while still saving time.

Step-by-Step: How the n8n Workflow Runs

Step 1 – Trigger on new incoming Gmail email

The workflow begins with a Gmail trigger node:

  • It listens for new inbound emails arriving in your chosen Gmail account.
  • When a new email is detected, the workflow is activated and the email content is passed to the next node.

In this template, the same Gmail account is used both to receive incoming messages and to send replies, which simplifies setup and access control.

Step 2 – Filter out internal or unwanted emails

Next, a filter step checks if the sender should be processed by automation:

  • Emails from internal domains, such as n8n.io, are excluded.
  • Only messages from external or approved senders move forward.

You can customize this filter to:

  • Exclude or include specific domains
  • Limit automation to certain customer segments
  • Apply rules based on tags or email patterns

This prevents the workflow from replying to internal messages or sensitive email types.

Step 3 – Fetch customer context from HubSpot

For each email that passes the filter, the workflow uses the sender’s email address to query HubSpot CRM:

  • It looks up the corresponding contact record.
  • It retrieves any associated deals to understand ongoing opportunities.
  • It pulls related companies for account-level context.
  • It fetches tickets to see existing support conversations.

All of this data is compiled into a structured context object that will be passed to the AI node. This enables replies like:

“I see you are currently working with us on Deal X” or “I noticed your open ticket about Y.”

Step 4 – Generate a draft reply using Google Gemini AI

With the email content and HubSpot context ready, the workflow calls the Google Gemini AI Chat model:

  • The AI node is configured with your Google AI Studio API key.
  • A prompt explains how the AI should respond, including tone, style, and length.
  • The customer’s original message and relevant CRM details are included as input.

The AI then returns a concise, professional draft reply that:

  • Uses a friendly but consistent tone
  • References the customer’s context from HubSpot
  • Avoids unnecessary length or complexity

You can customize the prompt and which data fields are passed to the AI to match your business needs.

Step 5 – Send the AI draft to Slack for approval

Instead of sending the AI reply immediately, the workflow posts it to a specific Slack channel:

  • The draft reply text is included in the Slack message.
  • The original customer email can also be included for quick comparison.
  • Team members can review the draft in context.

The Slack node is configured using your Slack integration, so replies and approvals can happen within your existing team channels.

Step 6 – Approve and send the reply via Gmail

Once someone approves the draft in Slack, the workflow proceeds to the final step:

  • The approved message is passed to a Gmail send node.
  • Gmail sends the email back to the original sender as the official reply.

This step completes the loop: the customer receives a quick, personalized response that has been checked by a human, but required minimal manual typing.

How to Set Up and Customize the Template

1. Configure Gmail in n8n

  • Connect your Gmail account in n8n credentials.
  • Use this same account for:
    • The trigger node that listens for incoming emails
    • The send node that replies to customers

This keeps authentication simple and ensures replies are sent from the same address that received the email.

2. Connect HubSpot CRM

  • Set up a HubSpot credential in n8n.
  • In the workflow, configure the HubSpot nodes to:
    • Find contacts by email address
    • Fetch associated deals, companies, and tickets

Confirm that the properties you need (such as deal names, ticket status, or company details) are available and correctly mapped.

3. Integrate Slack for approvals

  • Connect your Slack account in n8n.
  • Choose the Slack channel where draft replies will be posted.
  • Optionally, define how approval is captured, for example:
    • Using reaction emojis
    • Using a specific reply keyword

The template is designed to support a simple review and approval flow so your team can keep control of outbound communication.

4. Set up Google Gemini AI

  • Obtain your Google AI Studio API key.
  • Add it as a credential in n8n.
  • Configure the Google Gemini AI Chat node to:
    • Use the correct model
    • Include the customer’s email and HubSpot context in the prompt
    • Apply your preferred tone, style, and reply length

You can adjust the prompt to emphasize things like empathy, brevity, or technical detail depending on your audience.

5. Customize email filters for your needs

  • Review the filter logic that excludes internal domains like n8n.io.
  • Add or remove domains based on your organization.
  • Optionally, restrict automation to:
    • Specific customer groups
    • Certain email subjects or labels
    • Particular tags or patterns in the sender address

Fine-tuning the filter helps you control exactly which conversations are automated.

Key Features of This n8n Workflow Template

  • Real-time personalization using live HubSpot data, including contacts, deals, tickets, and companies.
  • AI-generated replies that maintain a consistent, friendly, and professional tone.
  • Human approval in Slack as a built-in safeguard against accidental or inappropriate replies.
  • Highly customizable prompts and fields so you can adapt the workflow to your business context and voice.
  • Flexible filtering and approval controls to support compliance, quality assurance, and internal policies.

Benefits for Your Team

  • Save time by automating the drafting of routine email responses.
  • Keep personalization through CRM-aware replies that reflect customer history and context.
  • Reduce errors by keeping a human review step before sending AI-generated messages.
  • Unify your tools with seamless integration between Gmail, HubSpot, Google Gemini AI, and Slack inside n8n.

Quick Recap

This n8n workflow template creates a guided path from incoming email to approved reply:

  1. New email arrives in Gmail.
  2. Workflow filters out internal or unwanted senders.
  3. HubSpot is queried for contact, deal, company, and ticket context.
  4. Google Gemini AI drafts a personalized, professional reply.
  5. The draft is sent to Slack for human review and approval.
  6. Once approved, Gmail sends the final reply to the customer.

This structure lets you scale customer communication without sacrificing quality or oversight.

FAQ

Do I have to use the same Gmail account for receiving and sending?

In this template, yes. It is designed to use the same Gmail account for both triggering on incoming emails and sending replies. This keeps configuration simpler and avoids confusion for customers.

Can I change which emails are processed by the workflow?

Yes. The filter configuration is fully customizable. You can adjust domain rules, add tags, or apply other logic to control which messages the workflow handles.

Is the AI reply sent automatically without human review?

No. The template includes a mandatory Slack approval step. A human must review and approve the AI draft before it is sent to the customer.

Can I modify the AI prompt and the data used in replies?

Yes. You can edit the Google Gemini AI node to change the prompt, tone, and which HubSpot fields are passed into the model. This is one of the main customization points of the workflow.

What if a sender is not found in HubSpot?

You can adjust the workflow logic to handle missing contacts, for example by generating a more generic reply or creating a new contact in HubSpot. The template is flexible and can be extended to match your process.

Get Started

This integrated n8n workflow is ideal if you want to scale customer email replies while maintaining personalization and control. By combining HubSpot insights, Google Gemini AI drafting, and Slack approvals, your team can respond faster with confidence and consistency.

Ready to optimize your email replies? Set up this workflow now in n8n and start improving customer engagement and efficiency.

Create Viral Ads with NanoBanana & Seedance

Create Viral Ads with NanoBanana & Seedance: Turn Ideas into an Automated Growth Engine

From Overwhelmed Marketer to Confident Creator

If you have ever stared at a blank screen wondering how to keep up with social media content, you are not alone. Planning visuals, writing captions, editing videos, finding music, and then posting everywhere can quickly eat up your day. It is easy to feel like you are always behind instead of building the kind of campaigns that actually grow your brand.

Automation offers a different path. With the right mindset and tools, you can turn scattered tasks into a streamlined system that works for you in the background. Instead of manually handling every step, you design a repeatable workflow once, then let it handle the heavy lifting while you focus on strategy and creativity.

This is where an n8n workflow powered by NanoBanana, Seedance, Suno, Fal.ai, and Upload-Post comes in. It is more than a technical setup. It is a stepping stone toward a more focused, automated way of working, where your best ideas become viral-ready ads with minimal friction.

Shifting Your Mindset: From One-Off Posts to a Repeatable System

Before we dive into the specific steps, it helps to think about this workflow as a system, not just a one-time project. Each part of the process – from collecting ideas to publishing ads – is a building block you can reuse, refine, and expand over time.

With n8n, you are not just creating a single viral ad. You are building an automation template you can:

  • Run every time you have a new product or promotion
  • Adapt for different brands, audiences, or campaigns
  • Improve with data, testing, and iteration

The goal is simple: spend less time on repetitive work and more time on what actually grows your business, like creative direction, product strategy, and audience insights.

The Vision: An Automated Viral Ad Machine with n8n

This n8n workflow template connects several AI-powered tools into one smooth journey:

  • NanoBanana to generate realistic, UGC-style product images
  • Seedance to turn images into dynamic product videos
  • Suno to create custom background music
  • Fal.ai to merge video and audio into a polished final ad
  • Upload-Post to publish across platforms like Instagram, X, Facebook, TikTok, and YouTube

All of this is orchestrated through n8n so you can trigger the workflow, step back, and let automation carry your idea from concept to live social media content.

Step 1: Capture Ideas and Assets in One Place

Every strong workflow starts with organized inputs. Instead of hunting through chats, emails, or folders, this n8n template helps you centralize everything at the start.

You can receive creative ideas through a platform like Telegram, then feed them into your workflow. From there, you upload your:

  • Product images
  • Video prompts and ideas
  • Text overlays and ad copy concepts
  • Music prompts and style preferences

Store these in a central hub such as Google Drive. In the n8n workflow, these assets are parsed and prepared so every downstream tool has exactly what it needs. This single step alone can transform chaos into clarity and sets the stage for scalable content creation.

Step 2: Turn Prompts into Viral-Ready Product Images with NanoBanana

Once your inputs are collected, the workflow moves into visual creation. Here, NanoBanana, an AI-based image generation tool, brings your product to life in realistic, user-generated content style scenes.

Using the prompts you provided, NanoBanana generates images that look like authentic snapshots, not sterile studio shots. This is powerful for social media where audiences respond to content that feels real and relatable.

What NanoBanana Brings to Your Workflow

  • Casual, handheld style that simulates real user photos
  • Natural lighting, slight motion blur, and imperfections that add authenticity
  • Precise product details with exact text and packaging preserved

In your n8n template, NanoBanana becomes a repeatable step. Each time you run the workflow, you get fresh, high quality images that are ready to become the foundation of your viral ads.

Step 3: Instantly Share Your Images on Instagram and X

Instead of downloading, uploading, and manually posting, your automated workflow can publish the generated images directly to key platforms.

After NanoBanana creates your product image, n8n can trigger caption optimization tailored for platforms like TikTok and Instagram. Captions are rewritten to:

  • Respect character limits
  • Stay engaging and on-topic
  • Align with your brand voice and call to action

Then, using the Upload-Post integration, the workflow pushes your content straight to Instagram and X (formerly Twitter). What used to be a multi-step manual process becomes a single automated stage in your system, freeing you to focus on the next campaign instead of the next upload.

Step 4: Transform Static Images into Dynamic Videos with Seedance

Still images are powerful, but motion is what often catches attention in crowded feeds. That is where Seedance enters your n8n workflow.

Seedance uses your generated images and video prompts to create dynamic product videos filled with:

  • Polished visual effects
  • Smooth transitions
  • Ad-style enhancements designed to boost engagement

Within the template, you can configure Seedance parameters so your videos are optimized for each platform, including:

  • Resolution for clarity and professional quality
  • Duration to match attention spans and platform norms
  • Aspect ratio for feeds, stories, or vertical formats

Once set up, this becomes another automated step. Every time you run the workflow, Seedance turns your assets into scroll-stopping videos without you opening a video editor.

Step 5: Add Emotion with AI-Generated Music from Suno

Great ads do more than show a product, they create a feeling. Background music is one of the fastest ways to shape that emotion, and your workflow integrates this too.

Using Suno, an AI music generation platform, the template produces royalty-free tracks that match the mood of your ad. You simply provide a style prompt that can include:

  • Genre, such as classical, pop, or electronic
  • Mood, such as uplifting, calm, or energetic
  • Instrumental preferences

Suno then generates music tailored to your video, so you do not have to search through libraries or worry about licensing. In your n8n flow, this is another automated step that enriches your content without adding extra work.

Step 6: Merge Video and Audio into a Polished Final Ad

With your Seedance video and Suno audio ready, the workflow moves into final production. The goal here is simple: one cohesive, professional ad that feels like it came from a full creative team.

Using a service like Fal.ai, your n8n template merges the video and audio streams into a single, finished file. This process ensures:

  • Audio and visuals are properly aligned
  • The ad feels seamless and high quality
  • You are ready to publish without any manual editing

At this point, what once might have taken hours of editing and exporting is completed automatically as part of your workflow.

Step 7: Publish Your Final Ad Across Social Media, Automatically

The final step turns your finished ad into real visibility and reach. Instead of uploading to each platform one by one, your n8n workflow uses the Upload-Post API to handle distribution for you.

Your fully produced video ad can be posted across multiple platforms, including:

  • Facebook
  • TikTok
  • YouTube
  • Instagram
  • X

This integrated approach means your viral-ready content can reach a broad audience with minimum manual effort. You design the system once, then let it keep working for every new campaign.

Practical Tips to Get the Most from This n8n Template

As you start using and adapting this workflow, a few guiding principles can help you grow faster and smarter:

  • Keep the style authentic Use casual, relatable visuals and videos that feel like real user content, not stiff ads.
  • Write concise, powerful captions Focus on clear benefits, strong calls to action, and platform-friendly length.
  • Track and iterate Log ad details, performance metrics, and variations so you can refine prompts, visuals, and copy over time.
  • Adapt for each platform Adjust video length and aspect ratios to align with what works best on each social network.

Remember, this template is not a rigid system. It is a starting point. You can customize nodes, add new branches, or connect extra tools as your needs grow.

Turning Automation into Growth

By combining NanoBanana for image creation, Seedance for video generation, Suno for music, Fal.ai for merging, and Upload-Post for publishing, this n8n workflow template gives you an end-to-end engine for viral ad creation.

The impact is real:

  • Manual work drops dramatically
  • Your creative output increases
  • Time-to-market for new campaigns shrinks

Most importantly, you gain mental space. Instead of constantly managing files, exports, and uploads, you can focus on strategy, storytelling, and testing new ideas.

Your Next Step: Experiment, Improve, and Own Your Automation

You do not have to rebuild everything from scratch to benefit from automation. This n8n template gives you a working foundation that you can run today, then gradually customize as your skills and needs grow.

Use it to:

  • Launch your first fully automated viral ad workflow
  • Test different prompts, visuals, and music styles
  • Discover which combinations resonate most with your audience

Every run is a chance to learn, refine, and move closer to a marketing engine that scales with you instead of holding you back.

Ready to turn your ideas into automated, viral-ready ads with n8n? Explore this workflow, make it your own, and let automation support the growth you are aiming for.

Automate Range Trading with Uniswap & n8n

Automate Range Trading with Uniswap & n8n

What You Will Learn

In this guide, you will learn how to use an n8n workflow template to automate range trading on Uniswap for the ETH/USDC pair. By the end, you should understand:

  • What range trading is and why automation helps
  • How the workflow uses TWAP (Time-Weighted Average Price) from Uniswap
  • The role of each key node in n8n: configuration, data fetching, decision logic, and execution
  • How to connect 1Shot API, Uniswap, and Telegram inside n8n
  • How to set up, run, and safely test the template

Concepts Behind the Workflow

Range Trading on Uniswap

Range trading is a strategy where you define a price band and buy when the market is below a certain level and sell when it is above another level. This workflow focuses on ETH/USDC on Uniswap and automates those actions based on a predefined range.

Why Use TWAP Instead of Spot Price

The workflow relies on TWAP (Time-Weighted Average Price) from the Uniswap pool, not just a single spot price. TWAP is calculated from a series of observations over a time window. This helps smooth out short spikes or dips and makes your trading decisions more stable and less sensitive to momentary volatility.

How n8n, Uniswap, and 1Shot Work Together

  • n8n – Orchestrates the entire automation, scheduling checks every 30 minutes, running logic, and sending notifications.
  • Uniswap – Provides the on-chain ETH/USDC liquidity pool and the actual swaps.
  • 1Shot API – Acts as the bridge to the blockchain. It reads pool data and executes smart contract calls like approvals and swaps from within n8n.

Why Automate Range Trading?

Manual range trading requires constant monitoring and quick reactions when price moves in or out of your range. Automation helps you:

  • React consistently whenever price crosses your thresholds
  • Avoid emotional decisions and stick to the strategy
  • Reduce the chance of missing opportunities while away from the screen
  • Keep a clear, auditable process with notifications and confirmations

How the Workflow Operates in n8n

High-Level Workflow Overview

The n8n workflow runs on a schedule and follows this loop:

  1. Trigger every 30 minutes.
  2. Fetch TWAP observations from the Uniswap ETH/USDC pool using 1Shot API.
  3. Calculate the TWAP and liquidity with a JavaScript function node.
  4. Compare the TWAP to your configured upper and lower price boundaries.
  5. Decide whether to buy, sell, or hold.
  6. If a trade is needed, request Telegram confirmation from you.
  7. On confirmation, approve tokens and execute the swap on-chain via 1Shot API.
  8. Send success or error notifications through Telegram.

Step-by-Step: Understanding Each Key Node

1. Initial Wallet Setup

When the workflow starts, it first ensures that your wallet environment is ready in 1Shot:

  • Checks if a wallet already exists in your 1Shot account.
  • If it does not find one, it creates a new wallet.
  • Verifies that the required Uniswap smart contract methods are imported so that the workflow can call functions like approvals and swaps.

This step is essential for seamless automated interactions with Uniswap later in the workflow.

2. Swap Configs Node – Defining Your Strategy

The Swap Configs node is where you define how the strategy behaves. It initializes all important parameters, including:

  • Trade size – How much USDC to spend per trade.
  • Price range – Your upperPrice and lowerPrice boundaries for ETH in terms of USDC.
  • Slippage tolerance – The maximum price deviation you accept during a swap.
  • TWAP window sizesecondsAgo defines how far back to look when calculating TWAP.
  • Wallet details – Addresses and configuration for interacting with your funds.
  • Telegram settings – Chat ID and bot details for sending you messages and confirmations.

By editing this node, you can tailor the trading strategy to your risk level and market view. For example, you can tighten the price range for more frequent trades or widen it to focus on larger swings.

3. Fetch Pool TWAP Observations

Next, the workflow uses the 1Shot API to query the Uniswap ETH/USDC liquidity pool. This node:

  • Calls the pool contract to fetch observation data needed for TWAP.
  • Retrieves historical data points that represent how price evolved over time.

These raw observations are not directly human-readable prices yet, but they are the foundation for computing TWAP.

4. Calculate TWAP with JavaScript

The Calculate TWAP node is a JavaScript function node that converts the raw Uniswap data into a usable average price and liquidity figure. Inside this node:

  • Observation data from the previous step is processed.
  • Token decimals are taken into account so that the final price matches ETH/USDC units.
  • BigInt arithmetic is used to handle high precision calculations and mimic on-chain math accurately.
  • The result is a time-weighted average price for ETH in USDC over your chosen window, plus liquidity information.

This calculated TWAP is what the rest of the workflow uses for all trading decisions.

5. Trade Decision Logic – Buy, Sell, or Hold

After TWAP is calculated, the workflow reaches a decision point. A switch node compares the TWAP with your configured price bounds and routes the flow accordingly:

  • If TWAP is below your lower price, the logic may trigger a buy path.
  • If TWAP is above your upper price, the logic may trigger a sell path.
  • If TWAP is within the range, the workflow will typically hold and take no trading action.

This node ensures that trades only occur when the market is outside your target range, which is the core idea of range trading.

6. Preventing Redundant Trades

To avoid unnecessary or repeated transactions, the workflow includes logic that:

  • Tracks recent trades based on the same parameters.
  • Prevents executing the same buy or sell action multiple times in quick succession for the same conditions.

This helps reduce gas costs and keeps your trading behavior more controlled and intentional.

7. Approval and Execution on Uniswap

When a buy or sell path is triggered and confirmed, the workflow performs two critical on-chain steps using 1Shot API:

  1. Token approval
    • It calls the token contract (for example, USDC) to approve the Uniswap SwapRouter contract.
    • This approval allows SwapRouter to spend your tokens up to a specified amount for the trade.
  2. Swap execution
    • It calls the appropriate Uniswap function to perform the swap (ETH to USDC or USDC to ETH).
    • It uses your configured slippage tolerance to calculate the minimum output amount that you are willing to accept.
    • If the expected output falls below this minimum, the transaction will revert, protecting you from excessive slippage.

Both of these steps are automated but still follow your predefined parameters from the Swap Configs node.

8. Telegram Confirmations and Notifications

To keep you in control and informed, the workflow integrates with Telegram at multiple points:

  • Pre-trade confirmation
    Before a swap is executed, the workflow sends a detailed message describing the proposed trade, such as:
    • Whether it is a buy or a sell
    • The amount of ETH or USDC involved
    • The current TWAP and your configured thresholds

    You can then confirm or reject the trade via Telegram.

  • Post-trade updates
    After execution, you receive a message showing whether the transaction succeeded or failed, along with any relevant details like transaction hash or error message.
  • Error alerts
    If anything goes wrong during approval, execution, or data fetching, the workflow sends an error notification so you can investigate quickly.

Additional Features for Reliability

  • Dynamic minimum output calculation – The workflow computes the minimum tokens you should receive based on your slippage setting, helping protect you from poor execution.
  • Comprehensive error handling – Failures in API calls, contract interactions, or logic branches are caught and reported to you via Telegram.
  • Embedded tutorial support – The original template includes a YouTube tutorial to walk you through setup visually, which you can follow alongside this written guide.

How to Set Up and Use the Workflow in n8n

Step 1 – Connect 1Shot API in n8n

  1. Open your n8n instance.
  2. Add your 1Shot API credentials as a new credential type if you have not already.
  3. Verify that n8n can successfully authenticate with your 1Shot account.

Step 2 – Configure the Swap Configs Node

  1. Open the Swap Configs node in the workflow.
  2. Set the amount of USDC you want to use per trade.
  3. Define your lowerPrice and upperPrice boundaries for ETH/USDC.
  4. Adjust slippage tolerance to match your risk preference.
  5. Set the TWAP window using secondsAgo to control how far back the average is calculated.
  6. Enter your wallet details that will be used for trading.

Step 3 – Set Up Telegram Integration

  1. Create a Telegram bot if you do not have one yet and obtain its API token.
  2. Get your Telegram chat ID where you want to receive messages.
  3. In n8n, configure the Telegram nodes in the workflow with your bot token and chat ID.
  4. Test sending a simple message from n8n to confirm that notifications are working.

Step 4 – Schedule the Workflow

  1. Locate the trigger node (for example, a Cron node) in the workflow.
  2. Set it to run every 30 minutes or adjust the interval if you want more or less frequent checks.
  3. Enable the workflow so that it starts running at the configured schedule.

Step 5 – Monitor and Confirm Trades via Telegram

  1. When the workflow detects a buy or sell signal, you will receive a Telegram message with all relevant details.
  2. Review the proposed trade and confirm or decline directly in Telegram (according to the template’s interaction design).
  3. After confirmation, watch for the follow-up notification with the result of the transaction.

Step 6 – Start Small and Iterate

Important: Always begin with small trade amounts to test the full cycle end to end. Verify:

  • That TWAP values look reasonable compared to market data.
  • That approvals and swaps succeed on-chain.
  • That your Telegram confirmations and notifications behave as expected.

Quick FAQ

Is this template suitable for beginners?

Yes. While it interacts with on-chain contracts, the heavy lifting is handled by the n8n nodes and the 1Shot API. As long as you follow the configuration steps carefully and test with small amounts, it can be used by both beginners and experienced traders.

Can I change the trading pair?

The template is designed around the Uniswap ETH/USDC pool. Adapting it to another pair would require updating pool addresses, token decimals, and possibly parts of the TWAP calculation and configuration. This is possible but involves more advanced customization.

Why use TWAP instead of the latest price?

TWAP averages price over a chosen window, which helps filter out short-lived volatility. This leads to more stable and disciplined trading signals, especially for automated strategies.

How often should I run the workflow?

The default is every 30 minutes, which balances responsiveness and resource usage. You can adjust the schedule based on how actively you want to trade and how quickly you want to react to price movements.

Conclusion

This n8n and 1Shot-powered workflow gives you a structured way to automate range trading on Uniswap for the ETH/USDC pair. By using TWAP as the main indicator, it helps you capture price movements within a defined range while reducing manual effort and emotional bias.

With clear configuration options, Telegram confirmations, and robust error handling, the template is suitable for traders who want both automation and control. Whether you are just starting with DeFi automation or already experienced, this workflow can serve as a solid foundation for your range trading strategy.

Ready to start automated range trading?

Connect your wallet, configure the workflow, and deploy it in n8n to begin automating your ETH/USDC swaps.

Important: Always test with small amounts and make sure you fully understand the risks of automated trading and on-chain interactions before scaling up.

Resources

Automate Gmail with GPT-4 for Smart Email Drafts

Automate Gmail With GPT-4 For Intelligent Email Drafts

Why Automate Your Gmail With n8n And GPT-4

High-volume inboxes are a persistent bottleneck for operations, customer success, and leadership teams. Manually triaging, prioritizing, and drafting responses consumes time that could be spent on higher-value work. By combining the n8n automation platform with GPT-4, you can implement a structured, repeatable process that classifies incoming messages and generates high-quality draft replies in a fully automated way.

This article describes a production-ready n8n workflow template for Gmail that uses GPT-4 to categorize emails and create context-aware drafts that you can quickly review and send. It is designed for automation professionals and power users who want to operationalize AI within their existing email workflows.

Solution Architecture Overview

The workflow runs on a scheduled basis using a Gmail Trigger node, retrieves new messages from your inbox, and passes each email through a GPT-4 classification step. Based on the classification result, the workflow assigns the appropriate Gmail label and calls GPT-4 again to generate a tailored draft response. These drafts are then stored as Gmail drafts on the corresponding threads, ready for human review.

At a high level, the automation implements the following pattern:

  • Detect new inbound emails in Gmail at a fixed interval.
  • Classify each message into a predefined business category using GPT-4.
  • Apply the corresponding Gmail label for downstream prioritization and reporting.
  • Generate a category-specific draft reply with GPT-4, following consistent tone and structure.
  • Save the generated content as a draft reply in the original email thread.

Key Workflow Components

1. Gmail Trigger Node

The workflow starts with the Gmail Trigger node, which monitors your inbox on a recurring schedule. In this template, the trigger is configured to check for new emails every 15 minutes. This interval can be adjusted according to your operational needs and API limits.

Best practice is to:

  • Scope the trigger to the specific mailbox or label you want to automate.
  • Ensure you have appropriate access rights and that the connected account is dedicated to business workflows when possible.

2. GPT-4 Email Category Classifier

Once a new email is captured, the workflow calls GPT-4 to categorize the message. The Gmail Category Classifier step uses the email subject and body as input and returns one of several predefined categories, for example:

  • High Priority
  • Inquiry
  • Finance/Billing
  • Other or fallback categories as configured

This classification enables structured routing and prioritization. It also drives the logic for how the reply draft should be written, including tone, level of detail, and information requested.

3. Label Assignment In Gmail

After the category is determined, the workflow maps that category to a specific Gmail label. This is handled by a label assignment step that updates the email with the appropriate label ID. To ensure the workflow operates correctly, you must replace the placeholder values with your own label identifiers.

Configuration requirement:

  • Replace each instance of YOUR_LABEL_ID_XXX with the real label ID from your Gmail account.

You can obtain these IDs via the Gmail API List Labels endpoint or by using the Gmail web interface and inspecting label metadata. Once configured, labels provide a clear visual and programmatic signal for priority handling and reporting.

4. GPT-4 Draft Generation By Category

The core of the workflow is the GPT-4 draft generation logic. For each classified email, GPT-4 generates a reply that is aligned with the category-specific communication style. The template includes tailored guidance for three primary categories:

  • High Priority
    Drafts follow a concise, executive-style format. They aim to quickly acknowledge the issue, provide any available provisional answers, and request necessary clarifications without unnecessary verbosity.
  • Inquiry
    Replies are written in a polite, comprehensive customer support tone. GPT-4 summarizes the sender’s questions, clarifies context where needed, and outlines clear next steps or actions the recipient can expect.
  • Finance/Billing
    Responses are precise and transactional. Drafts confirm billing details, request any missing documentation, and clearly state payment terms, due dates, or follow-up requirements.

By encoding these patterns in the workflow, you enforce consistent communication standards across your organization while still allowing for human review before sending.

5. Saving Drafts Back To Gmail

Once GPT-4 returns the generated content, the workflow uses Gmail nodes to create a draft reply on the original email thread. The drafts are not sent automatically, which aligns with best practices for AI-assisted communication in sensitive or high-stakes contexts.

This approach allows your team to:

  • Quickly scan and approve AI-generated drafts.
  • Make minor edits for nuance or context before sending.
  • Retain full control over final outbound communication while still benefiting from automation.

Configuration And Setup In n8n

1. Connect Your Gmail Account

In the n8n Credentials section, configure a new Gmail credential and complete the authentication flow. Once connected, the workflow can securely read new messages, apply labels, and create drafts in your mailbox.

2. Add Your OpenAI API Key

To enable GPT-4-based text generation, add your OpenAI API key in the n8n Credentials area. The workflow references this credential when calling GPT-4 for both classification and draft creation.

Ensure that:

  • Your OpenAI key has access to the GPT-4 model you intend to use.
  • Usage limits and cost controls are aligned with your expected email volume.

3. Configure Gmail Label IDs

The workflow uses label IDs to tag emails according to their category. Before running the template in production, update all placeholder label IDs:

  • Locate each instance of YOUR_LABEL_ID_XXX in the workflow.
  • Replace it with the corresponding label ID from your Gmail configuration.

Use descriptive label names in Gmail, such as High Priority – AI or Finance – Review, so that your team can immediately understand how the automation is classifying messages.

Operational Benefits And Best Practices

Efficiency And Time Savings

By automating both classification and draft creation, this n8n workflow significantly reduces the time your team spends on low-level inbox management. Routine responses are prepared in advance, and manual work is limited to quick review and final approval.

Consistent, High-Quality Responses

GPT-4 enables standardized language and structure across your communications. The workflow ensures that every reply adheres to your specified tone, whether it is executive-level brevity, customer support thoroughness, or finance-oriented precision.

Improved Prioritization And Triage

Systematic labeling of emails as High Priority, Inquiry, or Finance/Billing helps teams focus on the most critical items first. This is especially valuable in environments where response time for certain categories has direct business impact.

Scalability And Extensibility

The template is designed to be easily extended:

  • Add more categories and labels as your use cases evolve.
  • Integrate additional systems, such as CRMs, ticketing tools, or internal databases, using other n8n nodes.
  • Adapt prompts and reply structures to reflect your organization’s communication guidelines and regulatory requirements.

Getting Started With The Template

To deploy this workflow in your environment:

  1. Prepare your Gmail and OpenAI credentials.
  2. Import the n8n workflow template into your n8n instance.
  3. Configure Gmail and OpenAI credentials in the workflow nodes.
  4. Update all Gmail label IDs with your actual label identifiers.
  5. Run initial tests on a limited set of emails and refine prompts or labels as needed.

Once validated, you can enable the workflow to run continuously and start realizing significant gains in email productivity and operational consistency.

Implement this Gmail and GPT-4 automation in n8n today and transform how your team manages high-volume inboxes.

Culinary Companion: 30-Step Telegram & Google Sheets Recipe Workflow

Culinary Companion: 30-Step Telegram & Google Sheets Recipe Workflow

1. Overview

This n8n workflow template implements a 30-step, Telegram-driven recipe assistant that uses Google Sheets as a structured recipe database and Language Learning Models (LLMs) as an AI layer for intelligent assistance. It allows users to list, search, create, and modify recipes directly from Telegram, while the workflow orchestrates data retrieval, formatting, and AI reasoning in the background.

The automation combines:

  • Telegram for real-time chat-based interaction
  • Google Sheets as the persistent recipe store
  • LLM-based agents (OpenAI Chat, Google Gemini Chat) for semantic search, recipe ideation, and guidance
  • LangChain-style memory for contextual, multi-turn conversations

This reference-style guide explains the architecture, node responsibilities, configuration details, and how data flows between components, so you can reliably deploy, adapt, and extend the template for advanced culinary automation scenarios.

2. High-Level Architecture

At a high level, the workflow follows a request-response pattern initiated by Telegram messages. Each user message is:

  1. Captured by a Telegram Trigger node.
  2. Routed by a Command Router node into one of several functional branches.
  3. Processed by Google Sheets nodes and function nodes for data operations and formatting.
  4. Optionally passed to an AI agent for semantic reasoning or recipe generation.
  5. Returned to the user through a Telegram Send node as a formatted message.

2.1 Core Functional Paths

The Command Router dispatches incoming commands into distinct flows:

  • Main menu display – shows available actions to the user.
  • Recipe listing – reads recipe names from Google Sheets and sends a formatted list.
  • Detailed recipe retrieval – fetches a single recipe based on user selection and returns full details.
  • AI-assisted search – extracts search terms and uses an LLM agent to find or suggest recipes.
  • Recipe creation / modification – prepares user input and uses AI support to create or adjust recipes before persisting them.

2.2 Technologies and Node Types

  • Telegram nodes:
    • Telegram Trigger – entry point for user messages and commands.
    • Telegram Send – sends formatted responses back to the chat.
  • Google Sheets nodes:
    • Read – retrieves recipe lists or single rows.
    • Write / Update – persists new or modified recipes.
    • Tool nodes – used for more advanced spreadsheet manipulations where applicable.
  • Function nodes:
    • Custom JavaScript logic for parameter extraction, data shaping, and message formatting.
  • Control nodes:
    • Switch / Router – implements the Command Router to branch based on user input.
  • LangChain AI nodes:
    • Recipe AI Agent – coordinates LLM calls and tools.
    • Language models – OpenAI Chat, Google Gemini Chat for natural language understanding and generation.
    • Memory buffers – maintain conversational context across turns.
    • Think tool – supports structured reasoning and multi-step AI processing.

3. Data Flow: From Telegram Message to Recipe Response

3.1 User Interaction via Telegram

The workflow begins when a user sends a message or command in Telegram. Typical patterns include:

  • Menu commands (for example: /menu).
  • List-related commands (for example: /list).
  • Selection inputs (for example: a number or ID representing a recipe).
  • Free-text search queries (for example: “pasta with mushrooms”).
  • Creation or modification instructions (for example: “Create a vegan version of recipe 3”).

The Telegram Trigger node captures the raw message payload, including chat identifiers, message text, and metadata. This payload is then forwarded to the Command Router.

3.2 Command Routing Logic

The Command Router is typically implemented using a Switch or equivalent routing node. It inspects the content of the Telegram message and dispatches execution into one of several branches:

  • Main menu branch – when the user requests help or a menu.
  • Recipe listing branch – when the user wants to see available recipes.
  • Detailed recipe branch – when the user selects a specific recipe from a list.
  • AI search branch – when the input is treated as a search query.
  • Creation / modification branch – when the user wants to create or update a recipe.

Each branch is responsible for extracting the relevant parameters, interacting with Google Sheets or AI nodes, and then returning a Telegram response.

4. Node-by-Node Breakdown

4.1 Telegram Layer

4.1.1 Telegram Trigger

The Telegram Trigger node:

  • Listens for incoming updates from the Telegram Bot API.
  • Requires a configured Telegram bot token in n8n credentials.
  • Outputs message text, chat ID, and user details used in downstream nodes.

Configuration notes:

  • Ensure the bot is set up in Telegram and added to the target chat or group.
  • Webhook or polling mode must be correctly configured in n8n for consistent triggering.

4.1.2 Telegram Send Nodes

Multiple Telegram Send nodes are used for different response types:

  • Telegram Send Recipe List – sends a formatted list of recipe names.
  • Telegram Send Full Recipe – sends the complete recipe details.
  • Telegram Send AI Response – returns AI-generated suggestions, search results, or modification proposals.

Each send node:

  • Uses the chat ID from the trigger node output.
  • Receives a preformatted text payload from function or AI nodes.

4.2 Google Sheets Integration

4.2.1 Read Recipe Names

The Read Recipe Names node queries the Google Sheets document that acts as the recipe database. It:

  • Reads a defined range or entire sheet containing recipe metadata.
  • Typically retrieves columns such as recipe ID and recipe name.

This node is the primary data source for the recipe listing feature.

4.2.2 Lookup Recipe Row

The Lookup Recipe Row node retrieves detailed information for a single recipe. It:

  • Uses a key from the user selection (for example, an ID or row index) extracted by a function node.
  • Fetches the corresponding row from Google Sheets.
  • Outputs structured fields such as ingredients, steps, and notes.

4.2.3 Write / Update Nodes (for creation / modification)

For recipe creation or modification, Google Sheets Write/Update nodes:

  • Receive structured recipe data prepared by the AI agent or function nodes.
  • Append a new row for new recipes or update existing rows for modifications.

These nodes rely on consistent column naming and indexing in the sheet to avoid data misalignment.

4.3 Parsing & Formatting Functions

4.3.1 Extract Select Param

The Extract Select Param node is typically a function node that:

  • Parses the user message to determine which recipe has been selected from a previously sent list.
  • Extracts a parameter such as a numeric index or recipe ID.
  • Normalizes this value for use in the Lookup Recipe Row node.

4.3.2 Extract Search Term

The Extract Search Term node:

  • Isolates the free-text portion of the user input that represents the search query.
  • Prepares this text to be passed into the Recipe AI Agent for semantic search or suggestion generation.

4.3.3 Format List Message

The Format List Message node:

  • Takes the raw array of recipe names from Read Recipe Names.
  • Builds a user-friendly Telegram message, for example, a numbered list of recipes.
  • Ensures the output string is concise and readable within Telegram message length constraints.

4.3.4 Format Full Recipe

The Format Full Recipe node:

  • Receives a single recipe row from Lookup Recipe Row.
  • Constructs a detailed, human-readable recipe message, including title, ingredients, and steps.
  • Applies simple formatting (line breaks, section headings) to optimize readability in Telegram.

4.4 AI Layer: Recipe AI Agent & LLMs

4.4.1 Recipe AI Agent

The Recipe AI Agent node orchestrates calls to LLMs and tools to provide:

  • AI-powered recipe search using keywords and natural language queries.
  • Assistance in creating new recipes from user prompts.
  • Guidance in modifying existing recipes, such as adjusting ingredients or dietary constraints.

It uses:

  • OpenAI Chat and Google Gemini Chat nodes as language model backends.
  • Memory buffers to maintain conversation context, enabling follow-up questions and iterative refinement.
  • A Think tool to support more structured reasoning or analysis steps where configured.

4.4.2 Telegram Send AI Response

After the AI agent processes the query or instruction, the resulting text is passed to the Telegram Send AI Response node. This node:

  • Sends AI-generated explanations, recipe ideas, or modification suggestions back to the user.
  • Can be combined with additional function nodes if you need to post-process or truncate AI output.

5. Functional Flows in Detail

5.1 Recipe Listing Flow

  1. User sends a command in Telegram to list recipes.
  2. Telegram Trigger captures the message.
  3. Command Router routes to the “list recipes” branch.
  4. Read Recipe Names node fetches available recipes from Google Sheets.
  5. Format List Message transforms the raw sheet data into a numbered or otherwise structured list.
  6. Telegram Send Recipe List sends the formatted list back to the user.

5.2 Detailed Recipe Retrieval Flow

  1. User selects a recipe from the list (for example, by sending a number or identifier).
  2. Telegram Trigger receives the selection message.
  3. Command Router detects that this is a selection input and routes to the detailed recipe branch.
  4. Extract Select Param parses the user input and extracts the selection parameter.
  5. Lookup Recipe Row uses this parameter to retrieve the corresponding recipe row from Google Sheets.
  6. Format Full Recipe converts the row into a readable recipe description.
  7. Telegram Send Full Recipe delivers the formatted recipe to the user.

5.3 AI-Powered Search & Assistance Flow

  1. User sends a free-text query or instruction (for example, “Find a spicy chicken recipe” or “Create a gluten-free version of my favorite pasta”).
  2. Telegram Trigger captures the message.
  3. Command Router identifies this as an AI-related request.
  4. Extract Search Term isolates the relevant query text.
  5. Recipe AI Agent processes the query using:
    • LLMs (OpenAI Chat, Google Gemini Chat) for language understanding and generation.
    • Conversation memory to keep context across multiple messages.
    • Optionally, tools that interface with Google Sheets if the agent is configured to read or reference existing recipes.
  6. Telegram Send AI Response sends the AI-generated answer, suggestions, or draft recipe back to the user.

5.4 Recipe Creation & Modification Flow

For recipe creation or modification, the workflow uses a similar pattern to the AI search flow, but with the additional step of persisting changes:

  1. User describes a new recipe or modification request via Telegram.
  2. Telegram Trigger receives the message.
  3. Command Router routes it into the creation/modification branch.
  4. Function nodes prepare or structure the user input where needed.
  5. Recipe AI Agent helps refine or generate a consistent recipe specification.
  6. Google Sheets Write/Update nodes store the new or updated recipe in the sheet.
  7. Telegram Send AI Response confirms the operation and can present the final recipe to the user.

6. Configuration Notes

6.1 Credentials

  • Telegram:
    • Create a bot via @BotFather and obtain the bot token.
    • Configure the token in n8n as Telegram credentials.
    • Ensure the bot is added to the relevant chat or group and has permission to read and send messages.
  • Google Sheets:
    • Set up Google credentials with access to the target spreadsheet.
    • Share the sheet with the service account or OAuth user used in n8n, if required.
    • Verify the sheet ID and range configuration in each Google Sheets node.
  • LLMs (OpenAI, Google Gemini):
    • Configure API keys for OpenAI and Google Gemini in n8n credentials.
    • Select appropriate models within the AI nodes based on your cost and capability requirements.

6.2 Sheet Structure

To ensure reliable operation:

  • Keep column names and order consistent with what the workflow expects.
  • Reserve specific columns for ID, name, ingredients, and instructions if referenced by the nodes.

Automated KlickTipp to Gmail: Send Transactional Emails

Automated KlickTipp to Gmail: How One Marketer Finally Fixed Their Transactional Email Headache

By the time Lena opened her laptop each morning, her inbox was already full of small fires.

Customers waiting for order confirmations that had not arrived. Webinar registrants asking if their login link was correct. Trial users wondering whether their account was really activated. Every missed or delayed email chipped away at trust, and every manual follow-up stole time from the work Lena actually wanted to do: growing the business.

She had KlickTipp handling her contacts and tags, Gmail for day-to-day communication, and a growing list of transactional messages that needed to go out instantly and on-brand. What she did not have was a reliable way to connect it all without living in her inbox.

That changed the day she discovered an n8n workflow template that automated transactional emails from KlickTipp to Gmail.

The Problem: Manual Emails In A Fast-Paced World

Lena was the marketing lead at a small SaaS company. KlickTipp managed their contacts and tags, and every action in KlickTipp was supposed to trigger a specific email:

  • New customer signups needed personalized welcome messages
  • Tag-based automations had to send confirmations and updates
  • Support events required quick follow-ups and status notifications

In theory, it was simple. In reality, Lena was copying and pasting email templates, personalizing them by hand, and hoping she did not miss anyone.

Branding was inconsistent. Some emails looked polished and on brand, others looked rushed. Tracking was almost impossible. If a customer said, “I never got that email,” Lena had to dig through Gmail, cross-check KlickTipp, and guess what went wrong.

She needed transactional email automation that could:

  • Send immediate, personalized emails based on KlickTipp events
  • Use consistent HTML templates aligned with their brand
  • Track delivery status back in KlickTipp so the team could see what happened at a glance

After yet another morning of manual follow-ups, Lena decided she was done patching the problem. She opened n8n and went looking for a better way.

The Discovery: An n8n Template That Connects KlickTipp To Gmail

Inside the n8n template gallery, one workflow caught her eye: an automation that sends transactional emails from KlickTipp to Gmail and then writes the delivery status back to KlickTipp.

On paper, it promised exactly what she needed:

  • Trigger on KlickTipp outbound events
  • Generate a personalized HTML email using contact data
  • Send through Gmail using OAuth
  • Update the contact in KlickTipp with a “Sent” or “Failed” status, plus the original HTML

If it worked, it would replace hours of manual work with a single automated flow. Lena decided to try it.

How The Workflow Actually Works (From Lena’s Perspective)

Instead of starting from a blank canvas, Lena imported the ready-made n8n workflow template. As she clicked through each node, the story of the automation unfolded.

The Trigger: When KlickTipp Speaks, n8n Listens

At the start of the workflow sat the KlickTipp Outbound Trigger. This node was the bridge between KlickTipp and n8n.

Whenever KlickTipp fired an outbound event, such as a tag being applied to a contact, the trigger would wake up the workflow. It pulled in exactly what Lena needed for her emails:

  • The recipient’s email address
  • Custom fields like first name, website, and phone

In other words, every time KlickTipp tagged someone, n8n would instantly know who that person was and what details to use in the email.

The Heart Of The Story: Generating A Personalized HTML Email

Next, Lena opened the node that would decide how her emails looked: Generate HTML Template.

This was an HTML node configured with a branded template. Inside, she saw placeholders for contact information, such as:

  • {{ $json["firstName"] }} for the customer’s first name
  • {{ $json["website"] }} for their website
  • {{ $json["phone"] }} for their phone number

The node used templating variables to dynamically insert contact data from KlickTipp. That meant every recipient would get a message that felt written just for them, while Lena only had to design the HTML once.

She swapped in her company’s colors, logo, and typography, then saved the node. For the first time, her transactional emails would be both personalized and fully on brand.

The Delivery Engine: Sending Through Gmail With OAuth2

With the HTML ready, the next step was actually sending the email. That is where the Gmail node came in.

This node was configured to use OAuth2 for secure authentication. After creating and authorizing a Gmail OAuth credential, Lena could set:

  • The sender name (for example, “Acme Support”)
  • The subject line (for example, “Your Account Is Ready”)
  • A reply-to address so responses went to the right inbox

The node also supported advanced options like CC, BCC, and attachments, which gave her room to grow later if she wanted to send invoices or additional documents.

Most importantly, the HTML body from the previous node flowed directly into the Gmail node. No more copy-paste, no more formatting errors.

The Turning Point: Knowing What Happened To Every Email

Before this workflow, Lena had one nagging fear: “What if customers do not get the email, and I never know?”

The template solved that with a neat final step. After the Gmail node attempted to send the message, the workflow branched into two possible paths, each handled by its own KlickTipp node.

If The Email Was Sent

On success, the workflow used a KlickTipp node to:

  • Update the contact with a delivery status of “Sent”
  • Save the original HTML content along with the status

This gave Lena and her team full transparency. They could open a contact in KlickTipp and see not only that an email had been sent, but also what it looked like.

If The Email Failed

If something went wrong, the other KlickTipp node kicked in. It would:

  • Mark the delivery status as “Failed”
  • Log error details to help with troubleshooting

Instead of guessing why a message did not arrive, Lena could read the error information and fix the underlying issue, such as a misconfigured field or invalid email address.

Why This Automation Changed Lena’s Day-To-Day Work

Once the workflow was clear in her mind, the benefits became obvious.

  • Immediate, personalized communication The moment KlickTipp applied a tag, the workflow triggered. Customers received confirmations, announcements, and transactional emails within seconds, with their own first name, website, and phone number woven into the content.
  • Consistent branding across every message The reusable HTML template ensured every email matched the company’s style. One template, many personalized outputs.
  • Clear visibility into delivery status With “Sent” or “Failed” saved back to KlickTipp, Lena finally had a single source of truth. Support could check status without digging through Gmail.
  • Flexibility for future use cases The same framework could handle more than just transactional emails. Different tags could trigger different templates, from onboarding sequences to event reminders.

How Lena Set Everything Up In n8n

Putting the workflow into action was less about coding and more about connecting the right pieces. Here is how Lena did it, step by step.

Step 1 – Enable KlickTipp Community Nodes

First, she enabled the KlickTipp community nodes in n8n, then authenticated them with her KlickTipp API credentials. This allowed n8n to receive outbound events and update contacts directly.

Step 2 – Create A Gmail OAuth Credential

Next, she set up a Gmail OAuth2 credential in n8n and authorized it with the company’s Gmail account. This let the Gmail node send emails securely on behalf of the business.

Step 3 – Import And Adjust The HTML Template

In the Generate HTML Template node, Lena imported her branded HTML layout. She added or adjusted placeholders for:

  • First name
  • Phone number
  • Website

The HTML node used these templating variables to inject data from KlickTipp dynamically.

Step 4 – Map KlickTipp Fields Correctly

To make sure the right information flowed into the email, she checked the field mappings. The custom fields from KlickTipp, such as first name, phone, and website, needed to match the variables used inside the HTML template.

Step 5 – Activate The Workflow

Once everything looked correct, Lena saved and activated the workflow. From that point on, every relevant KlickTipp outbound event would automatically trigger the process.

The First Test: From Tag To Inbox

To see if it really worked, Lena created a test contact in KlickTipp and applied the tag that should start the workflow.

  • Trigger: The KlickTipp outbound rule fired and activated the n8n workflow.
  • Email arrival: Within moments, a fully branded, personalized email appeared in her Gmail inbox.
  • Status check: Back in KlickTipp, the contact now showed a delivery status of “Sent”, along with the HTML content.

For good measure, she tested an invalid email scenario to confirm the failure path. The workflow correctly marked the status as “Failed” and logged the error, confirming that troubleshooting would be straightforward.

After a few small adjustments to field mappings, she was confident enough to roll it out to real customers.

How She Customized The Workflow For Her Business

Once the core automation was running, Lena started to adapt it to different needs.

  • Different templates for different tags She swapped email templates depending on the type of message, such as onboarding, password reset, or event reminders.
  • Additional recipients and attachments For some messages, she used CC or BCC to keep team members in the loop, or attached PDFs like invoices or guides.
  • Plain-text version for deliverability She added a plain-text part to the emails to improve deliverability and accessibility for recipients who prefer non-HTML emails.

The workflow became a flexible backbone for their email communication, not just a one-off fix.

The Resolution: From Inbox Chaos To Calm Automation

A few weeks after turning on the automated KlickTipp to Gmail workflow, Lena noticed something unusual: her mornings were quiet.

Customers were getting their confirmations on time. The support team could see exactly what had been sent. The marketing team trusted that every tag in KlickTipp would trigger the right, branded message without manual work.

Instead of chasing down missing emails, Lena could focus on strategy, campaigns, and growth, knowing that transactional communication was handled by a reliable, transparent n8n workflow.

Set Up Your Own KlickTipp To Gmail Automation

If you recognize yourself in Lena’s story, you do not have to keep fighting your inbox. This n8n workflow template gives you a clear, tested way to:

  • Trigger emails from KlickTipp outbound events
  • Generate personalized HTML messages using contact data
  • Send them through Gmail with OAuth2
  • Write “Sent” or “Failed” status back to KlickTipp for full visibility

Install the template, plug in your credentials, adjust the HTML to match your brand, and let n8n handle the rest.

Ready to streamline your customer communications and reduce manual work to almost zero? Start using this automated KlickTipp to Gmail workflow today and turn every tag into a timely, personalized email that your customers can rely on.

How to Convert XML to JSON Using n8n Workflow

How to Convert XML to JSON Using an n8n Workflow Template

Overview: XML to JSON in Modern Automation Architectures

XML and JSON remain two of the most widely used formats for system-to-system data exchange. XML is a structured markup language that is verbose yet highly expressive, while JSON is a compact, human-readable format that aligns closely with modern API and web application patterns.

In contemporary integration and automation projects, JSON is typically the preferred payload format. However, many enterprise and legacy systems still expose XML-based interfaces. Bridging this gap efficiently is essential for robust automation pipelines.

Why Automate XML to JSON Conversion with n8n?

Enterprise environments often include:

  • Legacy SOAP or XML-based APIs that cannot be easily modernized
  • Third-party systems that only support XML responses
  • Internal tools or middleware that produce XML for historical reasons

At the same time, downstream consumers such as microservices, web frontends, and analytics tools generally expect JSON. Automating XML to JSON conversion enables:

  • Seamless integration between legacy XML systems and modern JSON-based services
  • Improved performance and easier parsing in client applications
  • Cleaner data handling in automation workflows, especially when chaining multiple APIs

Using n8n for this task allows you to standardize the transformation step, reduce manual intervention, and reuse a single configuration across many different XML payloads.

n8n as a No-Code XML to JSON Transformation Layer

n8n is an open-source workflow automation platform that enables complex data flows between systems without writing custom code. Its node-based approach is particularly suitable for repeatable transformations such as XML to JSON conversion.

This article explains a minimal yet production-relevant workflow template that:

  • Accepts an XML string
  • Transforms it into a structured JSON object
  • Exposes the JSON for downstream processing in the same workflow

Workflow Architecture

The XML to JSON template in n8n is intentionally simple so it can serve as a building block in larger automations. It consists of three core nodes:

  • Manual Trigger – Used to initiate the workflow on demand during setup and testing.
  • Set Node – Holds the XML payload in a dedicated field.
  • XML Node – Performs the actual XML to JSON conversion with configurable parsing options.

In production, the Manual Trigger can easily be replaced by other trigger nodes such as Webhook, Cron, or a specific app trigger, while the Set node can be replaced by an HTTP Request or any other data source.

Step-by-Step Implementation in n8n

1. Configure the Trigger Node

Start by adding a Manual Trigger node. This node is ideal for initial configuration, testing, and validation of the workflow.

  • Once the workflow is built, click Execute on the Manual Trigger to start a run.
  • In a production scenario, you can swap this for another trigger that receives XML automatically, for example from an external API or message queue.

2. Add and Configure the Set Node

Next, insert a Set node to define the XML payload that will be converted. This node creates a field that stores the raw XML string.

In the Set node:

  • Add a new field of type string.
  • Name the field xml (this will be referenced by the XML node).
  • Paste your XML content into the value field. For example:
<?xml version="1.0" encoding="utf-8"?>
<ORDERS05>  <IDOC BEGIN="1">  <EDI_DC40 SEGMENT="1">  <TABNAM>EDI_DC40</TABNAM>  </EDI_DC40>  </IDOC>
</ORDERS05>

This sample represents a typical structured XML document. In real workflows, this XML would usually come from an external system instead of being hardcoded.

3. Configure the XML Node for Conversion

Finally, add an XML node, which will parse the XML string and output JSON. Connect it to the Set node so it receives the xml field.

In the XML node configuration:

  • Set the Input Field to xml, matching the field name defined in the Set node.
  • Adjust the parsing options as follows:
  • Attribute key: $
  • Merge attributes: false
  • Explicit root: true

These options control how XML attributes and the root element are represented in the resulting JSON structure. Using $ as the attribute key keeps attributes clearly distinguishable from element content, which is often preferable for downstream processing and mapping.

Best Practices for Using This Template in Larger Automations

  • Abstract the conversion step: Treat this XML to JSON workflow as a reusable sub-process that can be called from multiple other workflows or integrated as a common pattern.
  • Validate upstream XML: Ensure that the incoming XML is well-formed before conversion, especially when consuming external APIs or untrusted sources.
  • Standardize field naming: Keep the input field name (xml) and the structure of the resulting JSON consistent across workflows to simplify maintenance.
  • Chain downstream operations: Once converted, use the JSON output in additional nodes such as HTTP Request, IF, or database nodes for routing, enrichment, or storage.

Key Benefits of This n8n XML to JSON Workflow

  • No-code implementation: All configuration is performed through the n8n UI, without custom scripts.
  • Reusable and adaptable: Replace the XML sample in the Set node with any XML payload, or feed XML from other integrations without changing the core logic.
  • Integration-ready JSON output: The resulting JSON can be consumed immediately by other nodes in the same workflow, enabling end-to-end automation chains.
  • Consistent transformation layer: Centralizing XML to JSON conversion in n8n reduces duplication of parsing logic across services.

Next Steps: Deploy the Template in Your n8n Instance

To operationalize XML to JSON conversion in your environment:

  1. Import or recreate this workflow in your n8n instance.
  2. Test the configuration with the Manual Trigger and sample XML.
  3. Replace the Manual Trigger and Set node with your actual XML source, such as an HTTP Request node, Webhook, or app-specific node.
  4. Extend the workflow by adding downstream nodes that consume the JSON output for further processing, routing, or storage.

This approach enables you to integrate legacy XML-based systems into modern, JSON-centric architectures with minimal friction.

Conclusion

By leveraging n8n’s XML node in combination with a simple trigger and Set node, you can create a robust, reusable XML to JSON transformation workflow without writing any code. This pattern is ideal for automation professionals who need to normalize data formats across heterogeneous systems and build reliable, maintainable integration pipelines.

Adopting this template as a standard component in your workflows will help reduce errors, accelerate development, and ensure consistent handling of XML payloads across your automation landscape.

Automated Facebook Ad Cloning with AI & n8n

Automated Facebook Ad Cloning with AI & n8n

What You Will Learn

In this guide, you will learn how to use an n8n workflow template to:

  • Automatically scrape competitor ads from the Facebook Ad Library
  • Analyze their design and messaging using Google Gemini
  • Generate new ad creatives that keep the original style but feature your own product
  • Save both the reference ads and the AI-generated versions to Google Drive
  • Customize and extend the workflow for your own campaigns

This article is organized as a step-by-step teaching resource, so you can understand how the template works and then confidently adapt it to your needs.

Concept Overview

This n8n template connects several tools into one automated ad-creation pipeline:

  • Facebook Ad Library URL – You provide a URL that lists competitor ads.
  • Your product image – You upload an image that clearly shows your branding and packaging.
  • Apify Facebook Ad Library Scraper – Extracts up to 20 ads from the provided URL.
  • Google Gemini 2.5 Pro – Analyzes both the competitor ad image and your product image to build a detailed cloning prompt.
  • Google Gemini 2.5 Flash – Generates new ad images that copy the style but replace the product with yours.
  • Google Drive – Stores all original competitor ads and the generated clones in organized folders.

The result is an automated workflow that lets you adapt successful competitor creatives for your own product, while keeping a consistent visual style and messaging approach.

Key Use Cases

This n8n template is especially useful if you want to:

  • Adapt proven competitor ad creatives for your own products
  • Test high-performing ad formats without designing from scratch
  • Quickly generate multiple ad variations inspired by successful brands
  • Scale ad creative production using competitor insights and AI
  • Run A/B tests on different visual approaches used by market leaders

Important Details Before You Start

  • The workflow processes up to 20 ads from the Facebook Ad Library URL you provide.
  • Image generation with Gemini typically takes about 10 to 30 seconds per ad.
  • Generated ads aim to preserve the original style while swapping in your product branding and packaging.
  • All competitor reference ads and the AI-generated clones are automatically stored in Google Drive.
  • Gemini’s image generation may sometimes flag content as prohibited. The workflow already includes logic to detect and handle such cases.

Prerequisites and Requirements

To run this Facebook ad cloning automation in n8n, you will need:

  • Apify account with access to the Facebook Ad Library Scraper.
  • Google Gemini API account for both analysis (Pro) and image generation (Flash).
  • Google Drive account to store original and generated ad images.
  • A valid Facebook Ad Library URL that lists accessible competitor ads.

High-Level Workflow: How the Template Works

Here is the full process from input to final output, broken into clear stages.

1. Collecting Inputs via Form

The workflow starts with a form trigger in n8n:

  • You open a form URL provided by the template.
  • You enter a Facebook Ad Library URL that shows competitor ads you want to study.
  • You upload your product image, ideally with clear branding and packaging visible.
  • Submitting the form triggers the rest of the workflow automatically.

2. Preparing Your Product Image

Once the form is submitted:

  • The workflow takes the product image file you uploaded.
  • It converts the image to base64. This format is required so that the Gemini model can process the image content as part of the prompt.

3. Scraping Competitor Ads with Apify

Next, the workflow calls Apify’s Facebook Ad Library Scraper:

  • It uses the URL you provided to scrape the ad listing.
  • The scraper extracts data for up to 20 ads, including image URLs.
  • These results are then passed into n8n for further processing.

4. Setting Up Iteration for Each Ad

After scraping, n8n sets up a loop:

  • Each ad from the scraper is handled one by one.
  • This iteration ensures that every competitor ad is processed separately, including image download, analysis, and generation.

5. Downloading and Encoding Competitor Ad Images

For each individual ad in the loop:

  • n8n downloads the competitor ad image using the image URL from Apify.
  • The image is then converted to base64, similar to your product image.
  • This base64 version is used as visual input for Gemini’s analysis.

6. Saving Original Reference Ads to Google Drive

Before any cloning happens, the workflow saves the original ads:

  • The downloaded competitor ad image is uploaded to a Google Drive folder dedicated to reference ads.
  • This gives you a clear archive of which ads were used as inspiration.

7. Building a Detailed Cloning Prompt with Gemini 2.5 Pro

Now the AI analysis begins:

  • Gemini 2.5 Pro receives both images:
    • The base64-encoded competitor ad image.
    • The base64-encoded your product image.
  • Gemini analyzes the competitor ad’s:
    • Visual layout and composition
    • Color scheme and style
    • Branding placement and key elements
  • Based on this analysis, it generates a detailed prompt that describes how to recreate the ad while inserting your product instead of the competitor’s.

This prompt is then used as instructions for the image generation step.

8. Generating New Ad Images with Gemini 2.5 Flash

With the prompt ready, the workflow calls Gemini 2.5 Flash:

  • Gemini Flash uses the prompt and your product image reference to generate a new ad image.
  • The goal is to preserve:
    • The overall style and layout of the original ad
    • The visual impact and messaging structure

    while replacing the product and branding with your own.

9. Handling Content Filters and Prohibited Outputs

Sometimes Gemini may flag certain content as prohibited or unsafe:

  • The workflow includes a content filter check.
  • If a generated image is flagged, the workflow handles it gracefully instead of failing silently.
  • This helps you understand which ads could not be cloned due to policy restrictions.

10. Uploading Generated Ads and Looping

For each successfully generated ad:

  • The new image is uploaded to a Google Drive folder dedicated to generated ad creatives.
  • Once that ad is processed, the workflow continues to the next competitor ad in the list.
  • This loop continues until all scraped ads (up to 20) have been processed.

How to Use the Template Step by Step

Follow these steps to run the template from start to finish:

  1. Open the form URL provided by the n8n template to access the submission form.
  2. Paste a Facebook Ad Library URL that lists the competitor ads you want to clone or learn from.
  3. Upload your product image, making sure the branding and packaging are clearly visible.
  4. Submit the form and let the workflow run. Depending on the number of ads, this may take several minutes.
  5. Check your Google Drive:
    • One folder will contain the original competitor reference ads.
    • Another folder will contain the AI-generated cloned ads featuring your product.
  6. Review and select the best creatives for your campaigns, and use them for testing and optimization.

Customization Tips and Advanced Ideas

Once you understand the default behavior, you can tailor the template to your workflow.

Control How Many Ads Are Scraped

  • Adjust the scrape_ads node in n8n to change the maximum number of ads pulled from the Facebook Ad Library URL.

Refine the AI Prompt for Your Style

  • Edit the build_prompt node to emphasize:
    • Specific design styles (minimalist, bold, premium, etc.)
    • Preferred color schemes or brand colors
    • Text emphasis, such as focusing on offers, benefits, or social proof

Organize Google Drive More Effectively

  • Change the target folders in the Google Drive nodes to:
    • Group ads by campaign name
    • Separate folders by product line or region

Add Text Overlays and Messaging

  • Extend the workflow to generate headline or CTA text overlays.
  • You can use Gemini to propose ad copy and then combine it with the generated images using additional tools or nodes.

Score and Filter Generated Ads

  • Implement a quality scoring step to:
    • Evaluate each generated ad based on certain criteria
    • Automatically keep only the highest scoring creatives

Notifications and Monitoring

  • Add notification nodes to:
    • Alert you when the workflow finishes
    • Warn you about errors or content filter issues

Extract Metadata for Deeper Insights

  • Include metadata extraction from the scraped ads to:
    • Analyze which formats, placements, or messages are used most often
    • Feed this data into your broader marketing analytics

Quick Recap

This n8n template lets you:

  • Input a Facebook Ad Library URL and your product image
  • Automatically scrape up to 20 competitor ads with Apify
  • Analyze and clone their style using Gemini 2.5 Pro and Flash
  • Generate new ads that feature your product while mimicking proven designs
  • Store everything in Google Drive for easy review and selection

By combining automation with AI, you can rapidly test ad concepts inspired by top performers and scale your creative production.

FAQ

How many ads can this workflow process at once?

The template is configured to handle up to 20 ads from a single Facebook Ad Library URL. You can adjust this limit in the scrape_ads node.

How long does the whole process take?

Image generation with Gemini typically takes around 10 to 30 seconds per ad. Overall runtime depends on the number of ads you scrape and your n8n environment.

What happens if Gemini flags content as prohibited?

The workflow includes a content filter check. If an image is flagged, the workflow handles it automatically so it does not break the whole run. You may see fewer generated ads than scraped references in such cases.

Can I change where files are stored in Google Drive?

Yes. You can edit the Google Drive nodes to point to different folders, or to create a more detailed folder structure by campaign, product, or date.

Is this template only for Facebook ads?

The template is designed around the Facebook Ad Library, but the general approach of scraping reference creatives, analyzing them with AI, and generating similar ads could be adapted to other channels with the right data sources.

Get Started

If you want to streamline your Facebook ad creative process and use competitor insights more effectively, this n8n template gives you a complete, automated workflow. Provide a Facebook Ad Library URL and your product image, then let AI and automation do the heavy lifting for you.