Automate Slack Message Summaries with n8n and Claude AI

Automate Slack Message Summaries with n8n and Claude AI

Overview

This guide describes a production-ready n8n workflow template that summarizes Slack channel activity on demand using a Slack slash command and Claude AI. The automation retrieves recent messages from a specified Slack channel, prepares a structured prompt for Claude, receives a concise summary with suggested replies, and returns the result to Slack as an ephemeral message visible only to the requesting user.

The reference is written for users already familiar with n8n, Slack APIs, and basic HTTP-based integrations. It focuses on node configuration, data flow, and integration details so you can confidently deploy, audit, and extend the workflow.

Solution Architecture

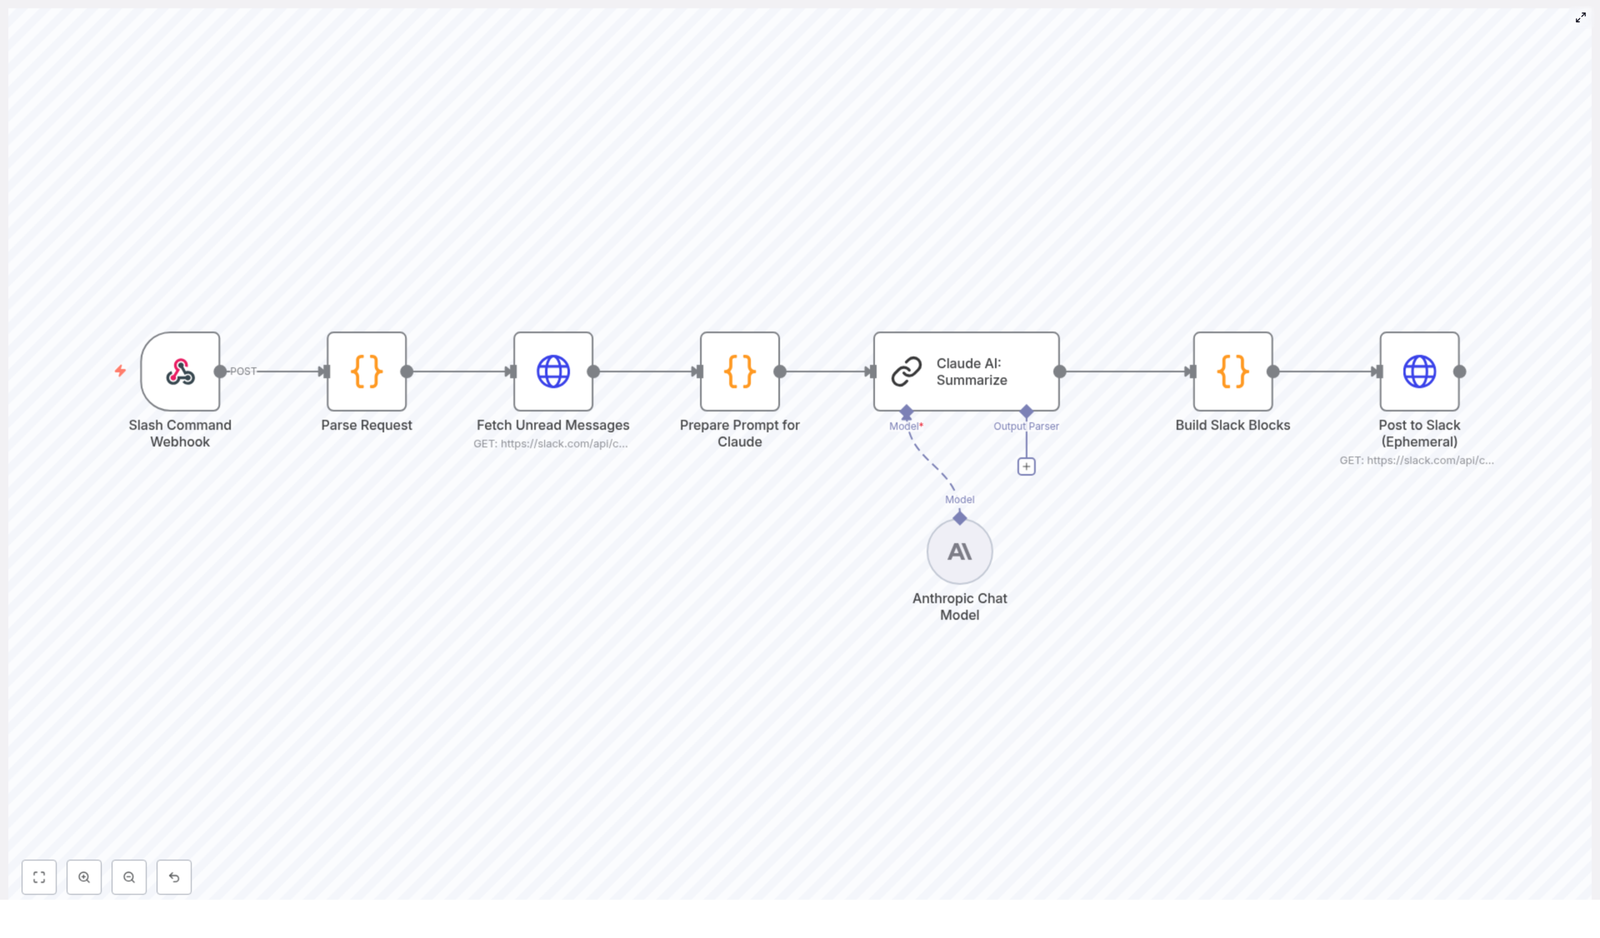
The workflow is event-driven and starts when a user invokes a custom Slack slash command, for example /summarize. The command triggers a webhook in n8n, which then orchestrates the following sequence:

  • Receive and validate the incoming Slack slash command payload via webhook.
  • Extract key parameters such as channel_id, user_id, and OAuth token.
  • Query the Slack conversations.history API to fetch up to 20 recent messages from the target channel.
  • Normalize and format the messages into a single prompt string for Claude AI, including timestamps and user attribution.
  • Call Claude AI with a summarization prompt that requests grouped threads, concise summaries, and 2-3 suggested replies per thread.
  • Transform Claude’s response into Slack Block Kit JSON suitable for a rich ephemeral message.
  • Post the blocks back to Slack using chat.postEphemeral, scoped to the user who issued the command.

The workflow is fully contained in n8n and uses a combination of Webhook, HTTP Request, Code, and Claude AI nodes (or equivalent custom HTTP nodes if you are calling Claude’s API directly).

Node-by-Node Breakdown

1. Webhook Trigger for Slack Slash Command

Node type: Webhook (Trigger)

Purpose: Entry point for the workflow. It receives the HTTP POST request that Slack sends when a user runs the configured slash command.

Key behaviors:

  • Method: POST
  • Expected payload: Standard Slack slash command payload including fields such as token, team_id, channel_id, channel_name, user_id, user_name, command, and text.
  • Security: Slack should be configured to call the public URL exposed by this webhook. Optionally, you can validate the Slack verification token or signing secret in a downstream node for additional integrity checks.

2. Parse Request Payload

Node type: Code or Function

Purpose: Extracts the fields needed for subsequent Slack API calls. This includes the channel where the command was invoked and the identity of the requesting user.

Typical extracted fields:

  • channel_id – used to scope the message history query and the ephemeral reply.
  • user_id – used as the target user for chat.postEphemeral.
  • token – OAuth access token that authorizes Slack API requests. This can be passed in the payload or mapped from stored Slack credentials in n8n.

If you are using n8n’s Slack credentials system, you may not need to forward the token directly from the payload. Instead, you can map the OAuth token from your credential configuration. The workflow as described, however, assumes the token is available and used in the HTTP headers for the Slack API calls.

3. Fetch Unread / Recent Messages

Node type: HTTP Request

API endpoint: https://slack.com/api/conversations.history

Purpose: Retrieve recent messages from the specified Slack channel. The workflow requests up to 20 of the latest messages to keep context manageable for Claude while still covering a meaningful time window.

Key configuration:

  • HTTP method: GET or POST with appropriate query/body parameters.
  • Parameters:
    • channel: set from the parsed channel_id.
    • limit: typically set to 20 to cap the number of messages.
  • Headers:
    • Authorization: Bearer <token> using the OAuth token extracted earlier or from n8n credentials.
    • Content-Type: application/x-www-form-urlencoded or application/json depending on your request configuration.

Access scope: With a valid token and appropriate scopes (for example, channels:history, groups:history, im:history, or mpim:history), the node can retrieve messages from both public and private channels where the app is installed.

Edge cases:

  • If the token does not have access to the channel, the API returns an error. You should handle this in a subsequent node by checking the ok field in the response and returning a user-friendly error message to Slack.
  • If the channel has fewer than 20 messages, Slack simply returns all available messages.

4. Prepare Prompt for Claude AI

Node type: Code or Function

Purpose: Convert the raw Slack message list into a single structured prompt string suitable for Claude. Each message is formatted with a timestamp and user attribution so that the language model can infer conversation structure and context.

Typical processing steps:

  • Iterate over the message array returned by conversations.history.
  • Extract fields such as user, text, and ts (timestamp).
  • Optionally sort messages by timestamp to ensure chronological order.
  • Build a human-readable transcript, for example:
    [2024-01-01 10:15] @U12345: Message text
    [2024-01-01 10:16] @U67890: Reply text
    ...

The final output of this node is a single string containing the conversation context, which is passed as part of the prompt to the Claude AI node.

5. Claude AI Summarization

Node type: Claude AI (or HTTP Request to Claude API)

Purpose: Generate a structured summary of the Slack conversation. The workflow instructs Claude to group related messages into threads, produce short summaries for each thread, and suggest 2-3 replies per thread that the user could send back in Slack.

Prompt design:

  • Include the formatted conversation transcript from the previous node.
  • Provide clear instructions, for example:
    • Group messages into logical threads.
    • Provide a brief summary for each thread.
    • Generate 2-3 concise, actionable reply suggestions per thread.

Output: Claude returns a textual summary, often structured with headings or bullet points. The exact structure depends on the prompt design, but the workflow expects a format that can be parsed or directly embedded into Slack Block Kit sections.

6. Build Slack Block Kit Message

Node type: Code or Function

Purpose: Transform Claude’s response into a Slack Block Kit JSON payload suitable for an ephemeral message. This ensures the summary is rendered in a clear, readable layout inside Slack.

Typical structure:

  • blocks array containing:
    • section blocks for each thread summary.
    • Optional divider blocks between threads.
    • Text formatted with mrkdwn for bolding, lists, and inline formatting.

This node takes the raw text from Claude and either:

  • Uses simple string concatenation and mrkdwn formatting, or
  • Parses the output into a more structured representation before mapping it into Block Kit objects.

The result is a JSON object that the next node can pass directly to Slack’s chat.postEphemeral method.

7. Post Ephemeral Message Back to Slack

Node type: HTTP Request (or Slack node, if used)

API endpoint: https://slack.com/api/chat.postEphemeral

Purpose: Deliver the summary and suggested replies to the user who invoked the slash command, without exposing the content to the entire channel.

Key configuration:

  • HTTP method: POST
  • Body parameters:
    • channel: the channel_id from the original request.
    • user: the user_id of the requesting user.
    • blocks: JSON string of the Block Kit payload built in the previous node.
  • Headers:
    • Authorization: Bearer <token> using the same Slack OAuth token.
    • Content-Type: application/json

Behavior: The message appears only to the triggering user inside the target channel. This preserves privacy and avoids cluttering the channel with summaries that are primarily for individual consumption.

Configuration Notes

Slack Setup

  • Create or configure a Slack app with the proper scopes to access channel history and post ephemeral messages.
  • Define a slash command (for example /summarize) and point its Request URL to the public URL of the n8n Webhook node.
  • Ensure your OAuth token has access to the channels where the command will be used, including private channels if necessary.

n8n Credentials and Security

  • Store the Slack OAuth token in n8n credentials wherever possible rather than passing it directly in the payload.
  • Optionally add validation logic in the Parse Request node to check Slack’s verification token or signing secret before proceeding.
  • Limit access to the n8n instance and its webhook URL using HTTPS and appropriate network controls.

Claude AI Integration

  • Configure your Claude API credentials in n8n or in the HTTP Request node used for the summarization call.
  • Keep prompts deterministic and explicit so that the output is predictable enough to map into Slack blocks.
  • Monitor token usage and rate limits on the Claude side, especially if the workflow is used heavily across teams.

Advanced Customization

Adjusting Message Volume and Context

The workflow currently fetches up to 20 recent messages. You can modify the limit parameter in the conversations.history request to increase or decrease the context window. Keep in mind that longer transcripts increase the prompt size and can affect Claude’s latency and cost.

Multi-Channel or Filtered Summaries

The template is designed around a single channel specified by channel_id from the slash command. Developers can extend the workflow to:

  • Accept additional parameters via the slash command text to select different channels or time ranges.
  • Filter messages in the Code node by user, keyword, or timestamp before building the prompt.

Error Handling and User Feedback

For a robust implementation, consider adding:

  • Conditional checks after each Slack API call to handle ok: false responses.
  • Fallback ephemeral messages that explain when the summary cannot be generated, for example due to missing permissions or empty conversations.
  • Logging nodes to capture request and response metadata for debugging.

Benefits of This n8n + Claude Automation

  • Time savings: Automatically condenses long Slack threads into concise summaries, reducing the need to manually scroll through conversations.
  • Improved communication: Thread-based summaries help users quickly understand ongoing discussions and their current status.
  • Actionable suggestions: Claude’s 2-3 suggested replies per thread accelerate response drafting and help maintain consistent communication tone.
  • Privacy-preserving: Ephemeral messages ensure that only the requesting user sees the AI-generated summary and suggestions.

Getting Started

Integrate this workflow template into your Slack workspace via n8n to streamline how your team processes message-heavy channels. The template is straightforward to adapt for more advanced use cases, such as multi-channel reporting or experimenting with alternative AI models, while keeping the same core pattern of:

  1. Trigger via slash command.
  2. Fetch recent Slack messages.
  3. Summarize with Claude AI.
  4. Respond with an ephemeral Block Kit message.

Deploy the template and start transforming Slack message overload into clear, actionable insights.

Conclusion

By combining n8n’s flexible automation platform with Claude AI’s natural language processing capabilities, you can build a powerful Slack summarization workflow that fits neatly into existing collaboration patterns. This solution lets teams stay focused on high-value work while offloading the cognitive load of catching up on dense Slack conversations to an automated, AI-driven process.

Automate QuickBooks Sales Receipts from Stripe Payments

Automate QuickBooks Sales Receipts from Stripe Payments and Free Your Focus

The Hidden Cost of Manual Accounting

Every time a Stripe payment comes in and you open QuickBooks to type out a new sales receipt, you are spending energy that could be going toward strategy, growth, or creativity. Manually copying amounts, customer names, and emails does not just take time, it also introduces small risks: a misplaced digit, a missing customer, a forgotten receipt.

If you are processing more than a handful of payments, this routine can quietly turn into a daily drain. The good news is that this is exactly the kind of repetitive work that automation, and especially n8n, can handle for you with confidence and consistency.

Shifting Your Mindset: From Manual Tasks to Automated Systems

Automation is not about replacing you, it is about creating space for you. When you build workflows in n8n, you are designing systems that keep your business moving while you stay focused on what matters most. Each automated workflow is like a small teammate that never forgets a step, never gets tired, and always follows your rules.

This Stripe to QuickBooks sales receipt workflow is a powerful example of that mindset. It turns a routine accounting chore into a fully automated, reliable process. Once you set it up, every successful payment in Stripe can flow into QuickBooks as a clean, accurate sales receipt, with matching customer data and the correct amounts.

Think of this template as a starting point. You can use it as-is, then gradually customize, refine, and expand it as your business grows and your automation skills evolve.

What This n8n Template Helps You Achieve

This n8n workflow template connects Stripe and QuickBooks so that:

  • Each successful Stripe payment automatically triggers a workflow in n8n.
  • The workflow checks whether the customer already exists in QuickBooks.
  • If needed, a new customer record is created in QuickBooks using Stripe data.
  • A sales receipt is then generated in QuickBooks with the correct payment amount.

The result is a smoother, more reliable accounting process, less manual data entry, and more time to focus on higher-value work.

Before You Begin: What You Need in Place

To set up this automated Stripe to QuickBooks workflow in n8n, make sure you have the following ready:

  • Stripe Setup: In your Stripe account, configure a webhook for the payment_intent.succeeded event. This webhook will be the trigger that starts your n8n workflow every time a payment succeeds.
  • QuickBooks Setup: Connect your QuickBooks account to n8n using OAuth2 credentials. Ensure that your connection has permission to access customer data and create sales receipts.
  • n8n Configuration: In your n8n instance, connect:
    • Stripe credentials to the webhook and customer-related nodes.
    • QuickBooks credentials to the customer and sales receipt nodes.

Once this foundation is in place, you are ready to turn a manual process into a dependable automated system.

Your Automation Journey: From Stripe Payment to QuickBooks Sales Receipt

Step 1 – Capture the Payment with a Webhook

Everything starts with the moment a customer pays you. In this workflow, the Stripe webhook node listens for the payment_intent.succeeded event. When a payment succeeds, Stripe sends a payload to your webhook, and n8n picks it up instantly.

This webhook node becomes the entry point for the entire workflow. It captures crucial information such as:

  • Customer ID
  • Payment ID
  • Amount
  • Status

From here, the workflow can automatically process and transform this data without you needing to log in or copy anything by hand.

Step 2 – Convert the Stripe Amount into a QuickBooks-Ready Value

Stripe typically sends amounts in the smallest currency unit, such as cents. QuickBooks expects a standard currency format. To bridge that gap, the workflow uses a custom JavaScript code node to convert the raw Stripe amount into a human-readable value.

For example, an amount like 7101 from Stripe becomes $71.01 for QuickBooks. This small but essential transformation ensures that your financial records are precise and consistent across both systems.

Step 3 – Pull Accurate Customer Details from Stripe

Next, the workflow uses the customer ID from the Stripe payment event to retrieve detailed customer information. A Stripe customer node fetches data such as:

  • Customer name
  • Email address

By relying on Stripe as the source of truth for customer details, you make sure that the information that lands in QuickBooks is accurate and up to date, which is especially helpful as your customer base grows.

Step 4 – Search for the Customer in QuickBooks

Now that the customer details are available, the workflow checks whether this customer already exists in QuickBooks. A QuickBooks customer node queries QuickBooks using the customer name retrieved from Stripe.

This step is important for keeping your QuickBooks customer list clean and avoiding duplicates. Instead of manually checking and comparing records, the workflow does it automatically every time a payment comes in.

Step 5 – Decide: Existing Customer or New One?

At this point, an IF node evaluates the result of the QuickBooks customer search. It checks if a QuickBooks customer ID was found:

  • If the QuickBooks ID field is empty, the workflow treats the customer as new and moves forward to create a new customer in QuickBooks.
  • If the ID exists, the workflow knows the customer is already in QuickBooks and skips the creation step.

This conditional logic keeps your database tidy and ensures that only genuinely new customers are added.

Step 6 – Create a New Customer in QuickBooks When Needed

When the IF node determines that the customer does not exist, a QuickBooks customer creation node steps in. It uses the information pulled from Stripe, such as name and email, to create a new, fully formed customer record in QuickBooks.

Instead of manually copying details or risking incomplete entries, the workflow builds a consistent customer profile for you every single time a new customer pays.

Step 7 – Merge Customer Data into a Single Stream

After handling both existing and newly created customers, the workflow needs a unified path forward. A Merge node combines:

  • Customers that already existed in QuickBooks
  • Customers that were just created by the workflow

This creates a single, consistent stream of customer data that feeds into the final step. Regardless of the path taken, the workflow now has one clear set of customer details to work with.

Step 8 – Automatically Create the Sales Receipt in QuickBooks

With the customer confirmed and the payment amount converted, the workflow reaches its destination. A QuickBooks sales receipt node uses the merged customer data and the parsed payment amount to create a new sales receipt record in QuickBooks.

The result is a real-time, accurate reflection of your Stripe revenue in QuickBooks. Every successful Stripe payment can now appear as a properly formatted sales receipt, without you lifting a finger.

How This Automation Supports Your Growth

By putting this n8n template to work, you are doing more than just speeding up accounting. You are building a foundation for scalable, resilient operations.

  • Less manual entry, fewer errors: Automated sales receipts reduce the risk of typos, missing records, and inconsistent data.
  • Aligned customer data: Stripe and QuickBooks stay in sync, so your customer profiles are more reliable across systems.
  • Timely revenue tracking: Stripe payments appear in QuickBooks quickly, helping you stay on top of cash flow and financial reporting.
  • Ready for higher volume: As your transaction volume grows, the workflow scales with you, handling more payments without adding to your workload.

Each of these benefits adds up to more clarity, more control, and more time to focus on strategy and service instead of repetitive tasks.

Taking the Next Step: Experiment, Customize, and Build

This Stripe to QuickBooks workflow template is a strong starting point, not a rigid solution. Once you have it running, you can:

  • Add extra logic for different product types or payment methods.
  • Trigger notifications to your team when high-value payments come in.
  • Tag or categorize receipts based on metadata from Stripe.

As you experiment and improve the workflow, you will deepen your understanding of n8n and open the door to even more automation opportunities across your business.

Start Automating Your Stripe to QuickBooks Workflow Today

You do not need to rebuild everything from scratch. This n8n template gives you a practical, ready-made path to automate a key part of your financial operations. Connect your Stripe and QuickBooks accounts, plug in your credentials, and let n8n handle the repetitive work.

Use this as your first or next step toward a more automated, focused workflow where tools do the busywork and you stay focused on growth.

Automate RSS Feed to MongoDB with Webhook Integration

Automate RSS Feed to MongoDB with Webhook Integration

The Day Maya Hit Her Breaking Point

Maya stared at the spreadsheet on her screen, eyes blurring over rows of links and headlines. As a content marketer for a fast-growing real estate and restaurant SaaS startup, her job was to track industry news, spot relevant articles, and feed them into the company’s internal dashboard.

Every morning started the same way. Open a handful of RSS feeds. Skim through dozens of articles. Copy the ones that mentioned realtors, real estate, or anything about restaurants. Check if the link was already in MongoDB. If not, paste it in. Then send a notification to the team via a custom webhook endpoint so the dashboard could refresh.

It was repetitive, fragile, and painfully easy to mess up. Some days she missed articles. Other days she accidentally added duplicates. And when she took a day off, the whole system fell apart.

That morning, after catching a third duplicate article in the database, she finally said out loud, “There has to be a better way.”

Discovering n8n and a Ready-Made Template

Maya had heard developers around her talk about n8n, a workflow automation tool that could connect services, process data, and run on a schedule. She had always assumed it would be too technical, but frustration is a strong motivator. So she opened her browser and searched for something that could automate RSS feeds into MongoDB.

That search led her to an n8n workflow template: an automation that could read an RSS feed, filter content by keywords, prevent duplicates in MongoDB, and send notifications via a Webhook.

It sounded like everything she had been doing manually, packaged into a single repeatable workflow.

Setting the Stage: What the Workflow Actually Does

Before she imported the template, Maya wanted to understand the big picture. The description broke it down clearly:

  • Fetch RSS feed items automatically on a schedule or on demand
  • Filter articles by specific keywords, like “realtors”, “real estate”, or “restaurant(s)”
  • Process each article one by one, so checks and inserts are reliable
  • Check MongoDB to see if an article already exists based on its link
  • Insert only unique articles into a MongoDB collection
  • Send a POST request via Webhook whenever a new article is stored

It was exactly her current workflow, just automated and much more reliable.

The First Run: Triggers, Feeds, and Filters

Maya imported the template into her n8n instance and began to trace the path of an article through the workflow.

1. Cron & Manual Trigger – The Workflow’s Starting Point

At the top of the canvas, she saw two familiar-looking nodes: Cron and Manual Trigger.

The Cron node was configured to run every hour, which meant n8n would automatically start the workflow without her lifting a finger. The Manual Trigger was there for those times when she wanted to run it instantly, like during a big product launch or industry event.

“So this replaces my morning routine,” she thought. “No more opening feeds manually.”

2. RSS Feed Read – Pulling in the Latest Articles

The next node was RSS Feed Read. It was already set to use the URL:

https://www.feedforall.com/sample.xml

In the template, this feed was just an example, but the behavior was exactly what she needed. The node fetched the latest articles from the feed and passed them along to the rest of the workflow.

“So instead of me scrolling through a feed reader,” Maya realized, “this node is doing it for me, every hour.”

Rising Action: Teaching the Workflow What Matters

Of course, not every article was relevant. Maya only cared about pieces related to realtors, real estate, or restaurants. That was where the IF nodes came into play.

3. Conditional Checks – Filtering by Keywords

The template used a set of IF nodes to inspect each article’s title. Under the hood, these nodes used regex matching to find specific keywords:

  • Titles containing “realtors” or “real estate”
  • Titles mentioning “restaurant” or “restaurants”

Articles that matched the first condition flowed down one branch. Those that did not match were passed to the next IF node, which checked for restaurant-related terms.

Anything that failed both checks was quietly sent toward an End node, effectively filtered out of her process.

Maya smiled. “So the workflow is literally reading headlines and deciding if I would care.”

4. SplitInBatches – One Article at a Time

Next, she noticed the SplitInBatches nodes. These nodes were responsible for taking the filtered articles and handling them one by one.

Instead of trying to process an entire feed at once, the workflow split the items into batches and processed each article individually. That made it easier to check for duplicates, insert into MongoDB, and send notifications without confusion.

It also meant the workflow could scale to larger feeds without becoming unwieldy.

The Turning Point: MongoDB & Webhook in Action

The real test of the template came when Maya followed the path into the database layer. This was where her manual process had always been the most fragile and time-consuming.

5. MongoDB Find – Avoiding Duplicate Articles

For each article, the workflow used a MongoDB Find node. Its job was to look in her MongoDB collection and see if an article with the same link already existed.

The check used the article’s link property, matching it via regex. If a match was found, the article was considered a duplicate and did not need to be inserted again.

If no match was found, the article continued forward as a candidate for insertion.

6. Merge Nodes – Keeping Only the New Content

To coordinate this logic, the template relied on Merge nodes. These nodes combined the outputs of previous steps so that only genuinely new articles – those not found in the MongoDB search – proceeded to the insertion stage.

In Maya’s old world, this was where she would manually scan the database or trust her memory. Now, the workflow did it deterministically, every hour, without mistakes.

7. MongoDB Insert – Storing New Articles

Once an article passed the duplicate check, it flowed into a MongoDB Insert node. Here, the workflow inserted the article into the articles collection.

Each unique item was stored with its link and other relevant fields, ready to be used by internal tools, dashboards, or reporting systems.

8. Webhook – Notifying the Rest of the System

The final step for each new article was a Webhook node. This node sent a POST request to a specified URL with the article’s link in a JSON payload.

That meant that as soon as a new article was inserted into MongoDB, the rest of the system knew about it. Dashboards could refresh. Alerts could be triggered. Other automations could pick up the new content and run with it.

Articles that were not new, or that failed the keyword checks, were routed to an End node. Their journey stopped there, cleanly and quietly.

The Resolution: From Manual Chaos to Automated Flow

After watching the workflow run once, Maya checked her MongoDB collection. There they were: only the relevant articles, no duplicates, each one neatly inserted. Her webhook logs showed successful POST requests for every new link.

What used to take her an hour of manual work every day was now handled automatically, every single hour, whether she was at her desk or not.

Benefits Maya Saw Immediately

  • Automated content ingestion: The RSS feed was read on a schedule via the Cron node, with the option for manual execution when needed.
  • Smart filtering: IF nodes with regex checks ensured only articles about realtors, real estate, or restaurants made it through.
  • No more duplicates: MongoDB Find and conditional logic prevented repeated entries based on the article link.
  • Scalable processing: SplitInBatches handled large feeds by processing items one at a time.
  • Real-time notifications: Webhook POST requests alerted downstream systems as soon as new content was stored.
  • Flexible execution: Cron scheduling covered routine runs, while the Manual Trigger gave her on-demand control.

How She Tailored the Template to Her Own Needs

Once the base workflow was running, Maya realized how easy it was to adapt it to different projects and feeds.

  • Changing the RSS source: She swapped the sample URL in the RSS Feed Read node with her own industry feeds.
  • Adjusting keyword filters: She updated the regex patterns in the IF nodes to include additional terms her team cared about.
  • Tuning batch sizes: For heavier feeds, she modified the SplitInBatches configuration to control performance.
  • Customizing MongoDB: She pointed the workflow to different MongoDB collections and added extra fields for richer data.
  • Routing to different webhooks: By changing the Webhook URL, she could notify different services or environments.

What started as a single use case for real estate and restaurant news quickly became a reusable pattern for any type of content her team needed.

Bringing It All Together

Maya’s story is not unique. Many marketers, founders, and developers wrestle with the same problem: keeping data fresh, relevant, and deduplicated without drowning in manual work.

This n8n workflow template offers a clear path out of that loop. It automates fetching RSS feeds, filters content by the keywords that matter, checks MongoDB for duplicates, inserts only new articles, and sends webhook notifications for real-time updates.

Instead of chasing feeds and spreadsheets, you can let automation handle the heavy lifting and focus on what to do with the information, not how to collect it.

Ready to turn your own manual RSS process into a reliable automation?
Set up this template in your n8n instance and start simplifying your RSS feed processing today.

Streamline Sprint Reviews: AI-Powered Summaries & Archives

Streamline Sprint Reviews: A Story Of AI-Powered Summaries & Archives

The Sprint Review That Broke The Camel’s Back

By the end of another long Friday, Maya, a product manager at a fast-growing startup, stared at a 90-minute sprint review recording sitting in her inbox. The team had switched to recording all ceremonies and auto-generating transcripts so no one would miss details. In theory, it was great. In practice, it meant Maya now had a wall of text to comb through before she could share a clear update with stakeholders.

The leadership team wanted concise summaries. Engineers wanted a checklist of action items. Designers needed an easy way to revisit decisions from previous sprints. Maya had transcripts, but not time. She tried skimming, copying snippets into a document, and highlighting key moments. Every sprint review recap took hours.

As the backlog of “to be summarized” meetings grew, she knew this was not sustainable. She needed a way to turn raw sprint review transcripts into structured, searchable summaries without spending her evenings rewriting what had already been said in the meeting.

The Search For A Better Sprint Review Workflow

Maya’s team already used automation tools, and she had heard colleagues mention n8n as a flexible way to connect different apps and services. One evening, while searching for “automated sprint review summaries n8n,” she stumbled across an n8n workflow template for AI-powered sprint review summaries and archives.

The promise sounded almost too good to be true: upload a sprint review transcript, let AI summarize it into a clean Markdown report, and automatically archive everything in Google Sheets for long-term tracking. No more manual formatting, no more hunting through random files to remember who said what three sprints ago.

Curious, Maya clicked through to view the template and started imagining how it might fit into her team’s Agile ceremonies.

What The Template Actually Does

Before adopting anything, Maya wanted to be sure she understood how the workflow worked. As she walked through the template, she realized it addressed every pain point she had been facing.

1. A Simple Way To Capture Input

First, the workflow introduces a user-friendly form. Instead of juggling multiple tools, Maya could use this form as the entry point for each sprint review:

  • Upload the sprint review transcript file (VTT or plain text)
  • Enter the sprint name
  • Specify the domain or team (for example, “Mobile,” “Platform,” or “Growth”)

This meant every transcript would arrive with the right metadata attached, ready for tailored summarization and proper archiving. No more guessing which team a transcript belonged to weeks later.

2. Turning Messy Transcripts Into Clean Text

Maya knew how messy auto-generated transcripts could be. Different tools used different timestamp formats, speaker labels, and sometimes no labels at all. The template handled this with a transcript parsing stage.

The workflow normalizes incoming text into a predictable structure like:

[HH:MM:SS] Speaker: text

It supports both WebVTT and simpler timestamp or speaker line formats, which made it compatible with the variety of tools her team used. By the end of this step, the transcript was no longer a chaotic block of text. It was a standardized conversation, ready for AI to process.

3. Letting AI Do The Heavy Lifting

The heart of the template is AI-powered summarization using an OpenAI language model. Instead of Maya manually skimming and rewriting, the model transformed the normalized transcript into a structured Markdown summary.

The output included several key sections that mapped perfectly to what her stakeholders had been asking for:

  • Concise opening summary that captured the essence of the sprint review in a few sentences
  • Executive summary bullets with 3 to 5 clear highlights so leadership could scan in seconds
  • Presentation recap table listing timestamps, presenters, and topics for quick reference
  • Action items checklist with clearly defined tasks and owners whenever the transcript identified them

Instead of Maya trying to remember every detail, the AI turned the meeting into a digestible, structured story that anyone on the team could understand at a glance.

4. Seeing The Summary Before It Goes Live

Maya did not want a black-box system. She needed to review what the AI produced, especially the first few times. The template included a preview generation step that showed the Markdown summary in a custom-styled UI.

The preview used a monospace font and white-space: pre-wrap styling so line breaks, tables, and checklists were preserved. This made the content easy to scan and gave Maya confidence that the structure would remain intact when shared or archived.

If something looked off, she could adjust prompts or formatting in the workflow. Over time, she expected to trust the output enough to skip manual edits entirely.

5. Automatic Archival In Google Sheets

The final piece solved one of her biggest frustrations: scattered meeting notes. The workflow automatically appended or updated a row in a Google Sheets sprint archive with:

  • The AI-generated summary
  • The original transcript
  • Date of the sprint review
  • Domain or team
  • Sprint name
  • File name

Over time, this would become a searchable history of sprint reviews. Need to know when a decision was made? Filter by topic, sprint, or team. Need to audit commitments from past reviews? Browse the action item checklists. Everything lived in one familiar place instead of scattered across docs, emails, and chat threads.

The Turning Point: First Live Test In A Real Sprint

The next sprint review was the real test. Maya set up the n8n workflow template, connected her OpenAI credentials, and pointed the archival step to a new Google Sheets document named “Sprint Review Archive.”

After the meeting, she exported the transcript, opened the input form, and filled in three simple fields: sprint name, domain, and transcript file. She hit submit and watched the workflow run.

Within minutes, she had a neatly formatted Markdown summary ready to preview. The opening summary captured the core narrative of the sprint. The executive bullets highlighted exactly what leadership cared about: shipped features, blocked items, and risks. The presentation recap table listed each presenter and topic with timestamps, so anyone could jump straight to the relevant part of the recording. The action item checklist was already structured, with owners pulled from the transcript wherever possible.

She opened the Google Sheets archive and saw a new row waiting for her, complete with the summary, transcript, and all associated metadata. No copy-paste. No manual formatting. Just a clean record of the sprint review.

How The Workflow Changed Her Team’s Sprint Reviews

Within a few sprints, the impact was obvious.

  • Time savings were dramatic. Maya no longer lost hours reading and rewriting transcripts. The AI summarization step slashed her manual effort down to a quick review and occasional tweak.
  • Consistency improved. Every sprint review now had the same structure, format, and level of detail. New team members could easily read summaries from past sprints and understand the pattern.
  • Accessibility increased. With everything stored in Google Sheets, the team had a searchable, shareable sprint history. Stakeholders could self-serve, filtering by sprint, team, or date.
  • Communication became clearer. Leaders received executive-level bullets. Engineers got action item checklists. Designers could quickly revisit decisions. The sprint review stopped being a one-time meeting and became a durable artifact.

Most importantly, Maya reclaimed her Friday evenings. Instead of wrestling with transcripts, she could focus on planning, strategy, and supporting her team.

Adopting The Same Workflow For Your Agile Team

If Maya’s story feels familiar, you are not alone. Many Agile teams record sprint reviews but struggle to turn that raw material into something usable. The n8n AI-powered sprint review summary and archival template gives you a repeatable way to solve that problem.

To follow a similar path, you can:

  1. Gather your sprint review transcript files (VTT or text) and decide on the metadata you want to track, such as sprint name and domain or team.
  2. Use the template’s input form to capture transcripts plus metadata in a consistent way.
  3. Let the workflow parse and normalize transcripts into a standard format with timestamps and speaker labels.
  4. Leverage the OpenAI-powered summarization step to generate structured Markdown summaries, including opening summary, executive bullets, recap table, and action item checklist.
  5. Review the preview UI to confirm the summary looks right and refine prompts if needed.
  6. Archive everything automatically into Google Sheets to build a long-term, searchable sprint review history.

From Overwhelm To Clarity

What started as a frustrating backlog of unread transcripts turned into one of Maya’s most valuable Agile assets. With an automated workflow for sprint review summaries and archives, her team gained time, consistency, and transparency.

Your team can follow the same journey. Instead of treating sprint reviews as a one-time conversation that quickly fades, you can preserve them as clear, actionable summaries that support better planning and alignment.

Explore integrating AI with your Agile ceremonies and experience streamlined sprint reviews that work for everyone on your team, from engineers to executives.

Try The n8n Template Yourself

If you are ready to automate your sprint review summaries and build a reliable archive, you can start from the same workflow template that transformed Maya’s process.

Automate Task Creation in Onfleet on Google Drive File Update

How One Operations Manager Stopped Manually Creating Onfleet Tasks With a Simple n8n Workflow

The Late-Night Spreadsheet Problem

By 8:47 p.m., Maya was still at her desk.

As the operations manager for a growing local delivery service, her evenings had started to look the same. A shared Google Drive spreadsheet would fill up during the day with new delivery details, address changes, and special instructions. Drivers relied on Onfleet to know where to go next, but there was one fragile link in the chain:

Maya.

Every time the team updated the Google Drive file, she had to open it, scan for changes, and then manually create or adjust tasks in Onfleet. If she missed something, a delivery could be delayed or misrouted. If she worked too slowly, drivers sat idle waiting for their next task.

She knew what the real problem was. The workflow between Google Drive and Onfleet was completely manual. It depended on her attention and her time. And both were running out.

Discovering a Different Way to Work

One morning, after a particularly chaotic evening of last-minute changes, Maya searched for a better way to connect Google Drive and Onfleet. She did not want another tool to manage. She wanted automation that quietly handled the repetitive work in the background.

That is when she found n8n and a simple workflow template that promised exactly what she needed:

Automatically create an Onfleet task whenever a specific file in Google Drive is updated.

The idea was straightforward, but powerful. Instead of watching the file herself, a Google Drive trigger in n8n would do the monitoring. Instead of manually creating tasks, an Onfleet node would do it instantly whenever a change occurred.

For the first time in months, Maya felt like she might be able to step out of the critical path.

How the n8n Workflow Works Behind the Scenes

Before she trusted automation with live delivery tasks, Maya wanted to understand what was happening under the hood. The n8n template turned out to be built from just two core components that worked together in a tight loop:

  • Google Drive Trigger that watches a specific file for changes, checking every minute.
  • Onfleet Node that creates a new delivery task whenever the trigger detects an update.

It sounded simple, but that simplicity was exactly what made it reliable.

Rising Tension: The File That Everyone Depends On

The heart of Maya’s process was a single Google Drive file. Her team updated it constantly with:

  • New delivery orders
  • Address corrections
  • Priority flags and time windows

Every change in that file needed to be reflected in Onfleet as fast as possible. If the file was the source of truth, then the automation had to be tightly linked to it.

So the first step in the n8n workflow was to tell the Google Drive trigger to watch that exact file and nothing else.

Turning Point: Teaching n8n to Watch Google Drive

Configuring the Google Drive Trigger

Inside n8n, Maya opened the template and started with the Google Drive Trigger node. She configured it to monitor a single file by using its unique file ID. This ID told the workflow exactly which file to track, so it would not react to any other documents in the Drive.

The key part of the configuration was the polling mode. Instead of waiting for a manual refresh, the trigger checked the file automatically using the everyMinute mode.

{  "mode": "everyMinute",  "triggerOn": "specificFile",  "fileToWatch": "<file_id>"
}

That small block of configuration changed everything. It meant:

  • No more refreshing the file to see what changed
  • No more constant mental load of remembering to check
  • A predictable, automated rhythm of updates every minute

Once the trigger was in place, the workflow knew exactly when something in that file changed. The next question was what to do with that information.

From File Change to Delivery Task

Creating Tasks Automatically in Onfleet

Before using n8n, Maya used to copy details from the Google Drive file into Onfleet by hand. With the template, the second part of the workflow took over that job.

Whenever the Google Drive trigger detected an update, it passed that event directly to the Onfleet node. That node had one clear job: create a new delivery task.

In the configuration, the operation was set to create:

{  "operation": "create"
}

This meant that each time the watched file changed, the workflow automatically generated a new task in Onfleet using the data coming from Google Drive. No copying, no pasting, no manual entry.

From Maya’s perspective, it felt like Onfleet had finally learned to listen to Google Drive on its own.

What Changed After the Automation Went Live

On the first day she activated the workflow, Maya watched the logs in n8n like a hawk. Her team updated the Google Drive file with a new batch of delivery details. Within a minute, new tasks appeared in Onfleet, exactly as expected.

There were no frantic messages from drivers asking for their routes. No missing tasks. No late-night spreadsheet sessions.

What had been a fragile manual process was now a reliable automated flow:

  1. The Google Drive file was updated.
  2. The n8n Google Drive trigger detected the change.
  3. The Onfleet node created a new task automatically.

Key Benefits Maya Noticed

After a week, the impact of the workflow was obvious. The benefits matched exactly what the template promised, but now they were visible in her daily work.

  • Real-time task creation The moment the file in Google Drive was updated, a corresponding Onfleet task appeared. There was no gap between planning and execution.
  • Improved efficiency Routine delivery assignments that used to demand constant attention were now handled by automation. Maya could finally focus on exceptions and strategy instead of data entry.
  • Scalability As the business grew, she realized the same pattern could be expanded. The template could be adapted to monitor additional files or enriched with more advanced task details, without adding more manual work.

Why This Simple n8n Template Matters

Maya did not set out to become an automation expert. She simply needed a way to connect Google Drive and Onfleet so that her team could move faster without sacrificing accuracy.

The n8n template gave her exactly that:

  • A Google Drive Trigger that watches a specific file by file ID in everyMinute polling mode.
  • An Onfleet Node configured with the create operation to generate new tasks whenever an update is detected.

Together, they formed a lightweight but powerful automation that removed a bottleneck from her operations.

Resolution: From Firefighting to Flow

Weeks later, Maya’s evenings looked different. She still checked Onfleet, but now it was to review performance, not to rescue missing tasks. The Google Drive file remained the single source of truth, but n8n handled the constant translation from updates to tasks.

The stress of “Did I miss something in the spreadsheet?” was gone.

In its place was a simple, dependable automation that quietly worked in the background, keeping Google Drive and Onfleet in sync.

Start Your Own Google Drive to Onfleet Automation

If you recognize yourself in Maya’s story, you do not have to keep manually creating tasks every time a file changes. With n8n, you can connect Google Drive and Onfleet using this ready-made workflow template and let automation handle the repetitive work.

Integrate Google Drive with Onfleet, automate task creation, and give yourself back hours every week.

Building Slack AI ChatBot: Context-Aware Replies in DMs & Mentions

Building a Context-Aware Slack AI ChatBot for DMs & Mentions

Why a Smart Slack AI ChatBot Is So Useful

Imagine dropping a quick question into a Slack channel or DM and getting a thoughtful, context-aware reply in seconds. No hunting through threads, no repeating yourself, no “what were we talking about again?” moments. That is exactly what this n8n workflow template helps you build.

With this setup, you get a Slack AI ChatBot that understands where and how it was contacted, remembers previous messages, and responds in the right place, whether that is a direct message or a public channel mention. All of it is powered by n8n, LangChain, and OpenAI, wrapped in a workflow you can customize as much as you like.

What This n8n Slack AI ChatBot Actually Does

At a high level, this template listens to Slack messages, sends them to an AI agent with memory and tools, then replies in the most appropriate way. Here is what it is designed to handle:

  • Detect when someone DMs the bot or mentions it in a channel
  • Map Slack message data into a clean format for the AI to understand
  • Use an OpenAI Chat Model with memory and tools to generate smart replies
  • Decide whether to respond in a DM or directly in the public channel
  • Optionally tap into Slack channel history or external vector stores for deeper context

In short, it is a context-aware Slack assistant that feels a lot more like a helpful teammate than a simple bot.

When You Should Use This Template

This workflow is a great fit if you want to:

  • Give your team a Slack-based AI assistant that can answer questions in real time
  • Handle support or internal FAQs directly in Slack without switching tools
  • Keep conversations coherent across multiple messages or threads
  • Let people interact with AI naturally, either in DMs or in public channels

If your team already lives in Slack and you want to add a smart AI layer without building everything from scratch, this n8n template is a nice shortcut.

How the Slack AI ChatBot Workflow Is Structured

Let us break down the core building blocks first, then we will walk through how a message flows from Slack to AI and back.

Core Components in the Workflow

  • Slack Trigger – Listens for new messages that mention the bot or arrive as direct messages.
  • Data Mapping Node – Cleans and structures the incoming Slack data so the AI agent gets exactly what it needs.
  • AI Agent – Uses the OpenAI Chat Model plus memory and tools to generate context-aware responses.
  • Conditional Router – Uses an “If” condition to decide where the reply should go: DM or public channel.
  • Response Nodes – Actually send the reply back to Slack, either as a direct message or a channel message.

Step-by-Step: How a Message Flows Through the Bot

Let us walk through what happens from the moment someone types a message to your bot in Slack.

1. Slack Trigger Node – Listening for Messages

Everything starts with the Slack Trigger node. This node is configured to fire whenever:

  • Someone sends a direct message to your bot, or
  • Someone mentions your bot in a public Slack channel

This trigger is the entry point to your n8n workflow. It passes along the message text, who sent it, where it came from (DM or channel), and other useful metadata.

2. Mapping the Slack Data for the AI Agent

Raw Slack events are a bit messy to feed directly into an AI. That is where the Data Mapping node comes in. This node:

  • Extracts the important bits of the Slack event, like message content, user, and channel
  • Structures the data in a format the AI agent expects
  • Makes sure metadata is available so the agent can understand the context

Think of this step as translating “Slack speak” into a clean, AI-friendly input.

3. The AI Agent – Where the Intelligence Lives

Now we get to the fun part: the AI Agent. This is where your chatbot gets its brains, thanks to LangChain and OpenAI. The agent is built from a few key pieces:

  • OpenAI Chat Model
    This is the language model that actually reads the user’s question and generates a human-like response. It takes into account the mapped input and any extra context you pass in.
  • Simple Memory
    The memory component lets the agent keep track of previous messages in the conversation. That means your bot can remember what was said earlier, follow up on previous questions, and respond more naturally instead of treating every message as a brand new request.
  • Think Tool
    Sometimes the agent needs to “think” a bit more or call additional tools. The Think Tool allows it to perform extra reasoning steps or tool-based operations if needed, which can improve the quality of replies for more complex queries.
  • Slack Channel History Tool
    This tool is especially useful for context-aware replies in public channels. It lets the agent access prior messages in a Slack channel so it can understand what the current conversation is about, refer back to earlier points, and avoid out-of-context answers.

All of these pieces work together so your Slack AI ChatBot can give responses that feel relevant, aware of the conversation, and tailored to the current user and channel.

4. Conditional Routing – DM or Public Reply?

Once the AI has generated a response, the workflow needs to decide how to send it back. That is where the Conditional Router (an “If” node) comes in.

This node checks whether the original message came from a DM or a public channel mention. Based on that, it routes the reply down one of two paths:

  • Reply to DM – If it was a direct message, the response is sent back as a private DM to the user.
  • Reply to Public Mention – If the bot was mentioned in a channel, the response is posted directly in that channel, so everyone in the conversation can see it.

This simple decision point is what makes the bot feel natural in Slack. It always responds in the context where it was contacted, without you having to manually manage routing logic.

5. Response Nodes – Sending Messages Back to Slack

Finally, the workflow uses dedicated Response Nodes to send the AI’s message back to Slack. There are typically two separate nodes here:

  • One node for sending direct messages
  • Another node for sending channel replies

Each node uses the appropriate Slack API method for that type of message and includes the AI-generated text as the reply content.

Optional Advanced Features You Can Turn On

The template also includes some more advanced pieces that are initially deactivated. You can enable them when you are ready to level up your bot’s abilities.

  • Embeddings with OpenAI
    By using embeddings, you can give your bot a semantic understanding of text. This is great for more advanced context retrieval, like searching through documents or long histories based on meaning rather than exact keywords.
  • Pinecone Vector Store
    Pinecone acts as a vector database for those embeddings. You can store and query large amounts of information so your bot can tap into long-term memory and answer questions more accurately, even when the relevant information is not in the immediate Slack history.

These extensions are perfect if you want your Slack AI ChatBot to handle more complex knowledge bases, internal documentation, or long-running project discussions.

Why This Slack AI ChatBot Makes Life Easier

So what do you actually gain by setting this up with n8n and this template?

  • Context-aware conversations – Your bot understands whether it is in a DM or a public channel and replies accordingly.
  • Instant, relevant answers – Team members can ask questions in Slack and get helpful responses right where they are already working.
  • Better use of Slack history – With channel history and optional embeddings, the bot can reference previous messages and deeper context.
  • Flexible reply modes – Private, sensitive questions stay in DMs, while general discussions can happen in public channels.

All of this reduces friction, keeps communication flowing, and lets your team lean on AI without leaving Slack.

How to Get Started With the Template

Ready to try this out in your own workspace? Here is a simple way to move forward:

  1. Connect your Slack workspace to n8n.
  2. Import the Slack AI ChatBot template from the link below.
  3. Configure the Slack Trigger to listen for DMs and mentions to your bot.
  4. Set up your OpenAI credentials for the AI Agent.
  5. Optionally enable the embeddings and Pinecone nodes if you need advanced context retrieval.
  6. Test in a private channel or DM, then roll it out to your team.

Bring Your Own AI Assistant Into Slack

You do not need to build a chatbot from scratch to get something powerful and context-aware. This n8n workflow template gives you a solid starting point that you can tweak, extend, and integrate with the rest of your stack.

Call to Action: Connect your Slack workspace today and deploy this intelligent, context-aware bot for your team. If you want help customizing it or integrating with other tools, feel free to reach out for expert support and tailored automation.

Generate Images & Blog Articles via Telegram Bot

Generate Images & Blog Articles via Telegram Bot

Imagine creating content without ever leaving Telegram

Picture this: you are chatting with someone on Telegram, get a sudden idea for a blog post, or need a quick image for social media. Instead of opening a dozen tabs, you just type a message to a bot and it creates everything for you – images and full blog articles – right there in your chat.

That is exactly what this n8n workflow template does. It turns a simple Telegram bot into your personal AI content assistant, powered by Pollinations AI for images and Google Gemini 2.5 (via LangChain) for long-form writing. You stay in Telegram, and the bot quietly handles the heavy lifting in the background.

What this Telegram bot workflow actually does

This template connects several tools so they work together smoothly inside n8n:

  • Telegram Bot – your main interface, with an easy main menu and buttons.
  • Pollinations AI – generates images from text prompts.
  • Google Gemini 2.5 via LangChain – writes full blog articles based on your title and chosen style.
  • Google Sheets – stores logs of everything the bot generates.
  • Google Drive – keeps all created images in a dedicated folder.

So instead of juggling tools, you just talk to Telegram. The workflow takes care of generating, storing, and logging your content for you.

When you would want to use this template

This n8n workflow is perfect if you:

  • Create content regularly and want to draft ideas quickly from your phone.
  • Need AI images for posts, thumbnails, or quick mockups.
  • Write blog posts and want AI to help you with first drafts in different tones.
  • Like having all actions and content automatically logged in Google Sheets.
  • Want a low-friction, chat-based way to trigger AI tools.

Whether you are a blogger, marketer, designer, or developer, this bot helps you move from idea to content with almost no friction.

Key features at a glance

  • Telegram bot with a simple main menu and clear buttons.
  • AI image generation from descriptive prompts, powered by Pollinations AI.
  • AI blog article creation by sending just a title or topic.
  • Choice of writing style: Formal, Relaxed, or News.
  • Automatic logging of all prompts, styles, and outputs in Google Sheets.
  • Automatic upload of every generated image to a specific Google Drive folder.
  • Input validation and basic error handling for smoother user experience.

How the Telegram bot behaves in chat

Once the workflow is set up and your bot is running, it listens to what users send and reacts differently depending on the type of input. Under the hood, the workflow classifies messages like this:

  • Start command
    When a user sends /start, the bot responds with the main menu. From there, they can tap buttons to:
    • Generate an image
    • Write a blog article
    • Get help or instructions
  • Callback queries
    Whenever someone taps one of those inline buttons, Telegram sends a callback query. The workflow reads that and:
    • Switches the mode to image generation, blog writing, or help.
    • Guides the user with specific instructions, depending on what they picked.
  • Text commands
    The bot also understands text that starts with certain keywords. It validates and parses messages that begin with:
    • image for image generation
    • blog for blog article creation

    If the format is not right, the workflow returns a helpful error message instead of failing silently.

From prompt to picture: how image generation works

When a user wants an image, they simply write something like:

image a futuristic city at sunset with neon lights

Behind the scenes, the workflow:

  1. Validates the message to confirm it starts with image and includes a description.
  2. Builds a prompt-based URL for Pollinations AI using the text after image.
  3. Sends a request to that URL and downloads the generated image.
  4. Returns the image directly in the Telegram chat as a photo.
  5. Uploads the same image file to a specific folder in Google Drive.
  6. Logs the prompt, metadata, and any relevant details in Google Sheets.

The result: the user gets their image instantly in Telegram, and you still keep a tidy record of what was created and when.

From title to full article: how blog generation works

Blog content starts just as simply. A user sends something like:

blog How automation can save time for small teams

The workflow then guides them through the process and uses Gemini to create the article. Here is what happens step by step:

  1. The workflow checks that the message starts with blog and that there is a valid title or topic.
  2. The bot invites the user to optionally choose a writing style:
    • Formal – structured and professional.
    • Relaxed – conversational and casual.
    • News – informative and news-like.

    If no style is chosen, you can still proceed with a default tone.

  3. The workflow sends the title and chosen style to Google Gemini 2.5 using LangChain to structure the request.
  4. Gemini returns a structured JSON response that includes the full blog article.
  5. n8n parses this JSON and extracts the article content.
  6. The bot sends the finished blog post back to the user in the Telegram chat.
  7. At the same time, the workflow logs:
    • The original blog prompt or title.
    • The selected style.
    • The full generated article text.

    All of this is stored in Google Sheets for later review or reuse.

This makes it incredibly easy to brainstorm, draft, and store blog content whenever inspiration hits, even if you are away from your laptop.

What you need before setting it up

To get this n8n Telegram bot workflow running, make sure you have the following ready:

  1. Valid credentials for:
    • Telegram API (for your bot).
    • Google Sheets OAuth (to log all actions and outputs).
    • Google Drive OAuth (to store generated images).
    • Google Gemini (PaLM) API (for blog article generation via LangChain).
  2. A Google Sheets document where you want to log:
    • User prompts and actions.
    • Generated content details.
    • Any metadata you care about for analytics.
  3. A dedicated Google Drive folder that will collect all generated images.
  4. All placeholder tokens in the template replaced with your real API keys, IDs, and URLs.

Once those pieces are in place, importing and running the template in n8n is very straightforward.

Security best practices for this workflow

Since this template touches multiple external services and APIs, it is worth taking a moment to set it up securely. A few simple habits go a long way:

  • Use n8n’s credential manager to store sensitive information like API keys and OAuth tokens.
  • Avoid hardcoding any API keys directly in HTTP Request nodes or function nodes.
  • Keep your Google Sheets and Google Drive URLs private and do not expose them publicly.

Handled correctly, you get the power of multiple APIs without compromising security.

Ways you can customize and extend this template

The workflow works great out of the box, but you can easily adapt it to your style or use case. Here are a few ideas:

  • Add more article styles
    Go beyond Formal, Relaxed, and News. You could introduce:
    • SEO-focused articles.
    • Storytelling or narrative blog posts.
    • Product review style content.

    Just update the logic that handles style selection and the prompt you send to Gemini.

  • Integrate more image models
    If you want flexibility, you can connect additional AI image generation services and let users choose which model to use for each request.
  • Improve analytics in Google Sheets
    Add columns for categories, tags, user IDs, or campaign names. This makes it easier to track which prompts and content types perform best over time.
  • Enhance error handling
    Expand the validation logic so the bot:
    • Gives clearer feedback when the prompt is incomplete.
    • Handles timeouts or API errors more gracefully.
    • Offers quick suggestions on correct input format.

Because it is an n8n workflow, you can keep iterating on it as your content needs grow.

Why this makes your life easier

Instead of treating AI tools as something you need to log into and manage separately, this template brings them into a space you already use daily: Telegram. You get:

  • Fast idea capture and content generation from your phone or desktop.
  • Automatic organization of images and articles in Google Drive and Sheets.
  • A simple, chat-based interface that anyone on your team can understand.

It is a small automation that can quietly remove a lot of friction from your content creation process.

Ready to try it?

If you are looking for a practical way to blend AI image generation, AI writing, and chat-based workflows, this template is a great place to start. Set up the credentials, connect your Google Sheets and Drive, and you are ready to generate images and blog posts directly in Telegram.

Whether you are drafting your next article, prepping social media visuals, or just experimenting with automation, this n8n Telegram bot can quickly become one of your favorite tools.

Automate Product Comparison Pages with AI & Google Sheets

Automate Creating SEO Product Comparison Pages Using AI & Google Sheets

This n8n workflow template automates the creation of large-scale, SEO-focused product comparison pages (for example, “Product A vs Product B”) by combining structured data in Google Sheets with GPT-4o via LangChain. It is designed for teams that need to publish and maintain hundreds or thousands of comparison pages without manual copywriting or page assembly.

Workflow Overview

The automation performs the following high-level tasks:

  • Reads product data from a structured Google Sheet that acts as a control panel.
  • Generates all unique product comparison pairs programmatically.
  • Uses GPT-4o (via LangChain inside n8n) to create section-by-section comparison content.
  • Combines all generated sections into a single HTML document per comparison.
  • Publishes each comparison page to a CMS via API (example: Dorik CMS).
  • Runs manually or on a schedule to keep content fresh and updated.

The result is a fully automated pipeline that transforms tabular product data into live, SEO-optimized comparison pages.

Architecture & Data Flow

At a high level, the workflow consists of the following logical stages:

  1. Data Source: Google Sheets provides product-level metadata and attributes.
  2. Pair Generation: A Code node creates all unique “A vs B” combinations.
  3. AI Content Generation: LangChain + GPT-4o nodes generate each content section.
  4. HTML Assembly: A final Code node merges sections into full-page HTML.
  5. Publishing: An HTTP/API node sends name, slug, and htmlContent to the CMS.
  6. Execution Control: A trigger (manual or scheduled) starts the workflow.

Data flows from Google Sheets into n8n, is transformed and enriched by AI, then is pushed out to the CMS as complete, formatted pages.

Google Sheets Configuration

The Google Sheet is the single source of truth for product information and is used by the workflow to generate all comparisons. Configure it with clearly defined columns:

  • All Products: A canonical list of all products to be included in comparisons.
  • Product Overview: Short, high-level descriptions or blurbs for each product.
  • Features Data: Structured or semi-structured feature lists that highlight each product’s strengths.
  • Product Pricing: Pricing details, tiers, and models (for example, freemium, subscription, enterprise plans).
  • Product User Reviews: Aggregated review data or sentiment summaries that indicate user satisfaction and popularity.

The workflow does not require you to predefine every “A vs B” pair. Instead, it consumes the “All Products” list and automatically creates all unique product combinations programmatically.

Configuration Notes

  • Ensure that each row represents a single product and that columns are consistently populated.
  • Use stable product identifiers or names so that the pairing logic can reliably generate comparison labels and slugs.
  • Keep text fields (such as features or reviews) concise but informative to give the AI enough context without overwhelming it.

Product Pair Generation (Code Node)

After reading the product list from Google Sheets, the workflow passes the data into a Code node that generates all unique “vs” pairs. This node constructs:

  • Human-readable comparison name: For example, Zapier vs Make.
  • SEO-friendly slug: For example, zapier-vs-make.

The logic ensures that each pair is unique and that order is consistent, so “Zapier vs Make” and “Make vs Zapier” are not duplicated as separate pages unless you explicitly change the logic.

Typical Pair Output

  • Truely vs Zapier
  • Make vs IFTTT

Each pair is represented as an item in n8n, containing references to both products’ data along with the generated name and slug. These items are then processed downstream by the AI content generation nodes.

Edge Cases & Considerations

  • Duplicate products: If the sheet contains duplicate product names, the code node may generate redundant pairs. Clean the source sheet to avoid this.
  • Self-comparisons: The pairing logic should skip “Product A vs Product A” cases. Verify that the code node filters these out.
  • Slug generation: Ensure that the slug creation logic lowercases, trims, and replaces spaces or special characters to avoid invalid URLs.

AI Content Generation with GPT-4o & LangChain

For each generated product pair, the workflow invokes GPT-4o via LangChain inside n8n to create structured comparison content. The AI nodes use the product data from Google Sheets along with the pair metadata to generate multiple sections that will later be merged into a single page.

The typical sections generated include:

  • Intro: A context-setting paragraph that introduces both products, explains the comparison scenario, and highlights target audiences or core strengths.
  • Feature Table: A structured, row-based comparison of key features and capabilities for each product.
  • Pricing Summary: A concise comparison of pricing tiers, billing models, and overall value positioning.
  • Activation Guide: Step-by-step or high-level guidance on how to get started or activate each product.
  • User Ratings: A summarized view of user sentiment and review highlights, often formatted in a table or bullet list.
  • FAQs: Frequently asked questions that help undecided visitors choose between the two products.

The prompts are designed to produce a friendly yet professional tone, suitable for SaaS buyers or similar audiences who need to quickly understand trade-offs and make a decision.

LangChain & n8n Integration Details

  • Model: GPT-4o is used as the underlying model through LangChain.
  • Context: Product overview, features, pricing, and review data from Google Sheets are passed as input variables.
  • Section-by-section generation: Each content block (intro, feature table, pricing, etc.) can be generated by separate nodes or separate calls, which allows granular control and easier debugging.

Error Handling & Quality Considerations

  • If the AI returns incomplete or malformed content for a section, you can:
    • Introduce validation logic in n8n to check for required keys or patterns.
    • Fallback to a default template or skip publishing that particular comparison.
  • Ensure that rate limits and token usage for GPT-4o are monitored, especially when generating thousands of pages.
  • Regularly spot-check generated content for factual consistency with your Google Sheets data.

HTML Assembly (Final Code Node)

Once all content sections for a given pair are available, a final Code node assembles them into a single HTML document. This node typically:

  • Wraps each AI-generated section in appropriate HTML tags (for example, <h2>, <p>, <table>).
  • Combines the sections into a coherent page layout.
  • Prepares the final payload fields required by the CMS:
    • name – The comparison page title, such as “Zapier vs Make”.
    • slug – The SEO-friendly URL path, such as “zapier-vs-make”.
    • htmlContent – The fully assembled HTML string for the page body.

HTML Structure Considerations

  • Use semantic headings (H2/H3) to clearly separate sections like “Features”, “Pricing”, and “FAQs”.
  • Ensure that tables are valid HTML so that your CMS and front-end render them correctly.
  • Include internal anchors or structured markup if your CMS or theme benefits from it.

Publishing to CMS (Dorik Example)

After assembling the HTML, the workflow publishes each page to your CMS using its HTTP API. In the reference template, Dorik CMS is used as the example target. The API request typically includes:

  • name – The title of the comparison page.
  • slug – The URL-friendly identifier for the page.
  • htmlContent – The full HTML content generated by the workflow.

n8n sends this data via an HTTP Request node (or a dedicated Dorik integration if available), which creates or updates the corresponding page in your CMS.

Integration Notes

  • Configure authentication credentials in n8n for your CMS API (for example, API key or token).
  • Map the name, slug, and htmlContent fields to the correct request body structure as required by your CMS.
  • Handle non-2xx responses by logging errors or routing failed items to a separate branch for manual review.

Execution & Automation Strategy

The workflow supports both manual and scheduled executions:

  • Manual trigger: Run the workflow when you add new products or significantly update existing product data in Google Sheets.
  • Scheduled trigger: Use a Schedule node to execute the workflow at fixed intervals, such as every 10 minutes, to continuously sync new or updated data into freshly generated comparison pages.

This flexibility ensures that your comparison content remains aligned with your latest pricing, features, and user review data without ongoing manual effort.

Scheduling Considerations

  • Adjust the schedule frequency based on how often your product data changes.
  • When generating a very large number of pages, consider batching or rate limiting to respect API quotas for both GPT-4o and your CMS.

Benefits & Use Cases

  • Scalability: Programmatically generate hundreds or thousands of unique “Product A vs Product B” comparison pages from a single Google Sheet.
  • SEO Optimization: Clean, keyword-rich URLs and structured, relevant content help improve search visibility for comparison queries.
  • Time Savings: Eliminate manual page creation, formatting, and copywriting for each new comparison.
  • Data-Driven Content: AI-generated copy is grounded in your Google Sheets data, keeping pricing, features, and reviews accurate and up to date.
  • CMS Flexibility: While the template demonstrates Dorik CMS, the same pattern can be adapted to other CMS platforms with HTTP APIs.

Advanced Customization Ideas

Once the base workflow is running, you can extend it in several ways:

  • Custom prompt tuning: Adjust LangChain prompts for different tones, verticals, or levels of technical depth.
  • Selective publishing: Add filters to only generate comparisons for specific products or to skip low-priority pairs.
  • Metadata enrichment: Include additional columns in Google Sheets (for example, categories, target audience, or integrations) and feed them into the AI prompts.
  • Multi-language support: Duplicate branches to generate localized versions of the same comparison pages, if supported by your CMS and AI configuration.

Getting Started

To implement this automation:

  1. Prepare your Google Sheet with the required columns for product data.
  2. Import the n8n template and configure your Google Sheets and AI credentials.
  3. Set up your CMS API integration (for example, Dorik) and map name, slug, and htmlContent.
  4. Run the workflow manually for a small subset of products to validate output quality.
  5. Enable scheduled runs to keep your comparison pages continuously updated.

If you want to scale your product comparison content and improve SEO without manually writing each page, this AI-powered Google Sheets and n8n workflow provides a robust, automation-first approach.

Automate Blog Creation from Reddit Questions

Automate Blog Creation From Reddit Questions With n8n

From Content Overwhelm To Content Flow

If you create content regularly, you know the feeling. There are always more ideas to explore, more questions to answer, and never quite enough time to turn everything into polished, SEO-friendly articles. You scroll through Reddit, see brilliant questions from real people, and think, “That would make a great blog post,” then move on because your day is already full.

Automation gives you a different path. Instead of manually collecting ideas, drafting outlines, and writing from scratch every time, you can build a system that works alongside you. A system that listens to your audience, organizes their questions, and turns them into ready-to-use blog drafts.

This is exactly what this n8n workflow template does. It connects Reddit, Google Sheets, and OpenAI models to automatically transform community questions into structured, SEO-optimized blog content. Once you set it up, you can spend less time on repetitive tasks and more time refining, publishing, and growing your brand.

Shifting Your Mindset: From Manual Creator To Automation Architect

Before we dive into the steps, it helps to see this workflow as more than a single automation. It is a starting point for a new way of working. Instead of treating content creation as a series of one-off tasks, you can design a repeatable system that:

  • Continuously listens to real user questions on Reddit
  • Automatically captures and organizes the best ideas
  • Uses AI to polish and enhance those ideas
  • Builds full blog post drafts that are ready for your human touch

You are not removing yourself from the process. You are elevating your role from “doer of every step” to “designer and editor of a powerful content engine.” This n8n template is one building block in that engine, and you can expand or customize it as your needs grow.

How The n8n Workflow Works At A Glance

Here is the journey your content takes inside this automation:

  1. Fetch new posts from a specific subreddit, such as the n8n subreddit.
  2. Filter those posts to keep only real questions that people are asking.
  3. Store the selected questions in Google Sheets for tracking and batching.
  4. Use AI to paraphrase and enhance the questions while preserving their meaning.
  5. Generate a full blog draft, including slug, introduction, step-by-step guide, and conclusion.
  6. Save the finished draft back to a central Google Sheet, ready for review, editing, or publishing.

Let us walk through each stage so you can see exactly how to use this template and where you might customize it for your own workflow.

Stage 1 – Capturing Reddit Questions Automatically

The journey begins in Reddit, where your audience is already sharing what they care about. Instead of browsing manually, the workflow uses an n8n node to fetch the latest posts from a chosen subreddit. In the example template, it targets the n8n subreddit and pulls in the newest 30 posts so your content ideas are always fresh.

From there, the workflow applies a simple but powerful filter. It keeps only posts that look like questions, based on:

  • The presence of a question mark
  • Common question words such as “what”, “why”, “how”, and similar terms

This filter helps you focus on content that answers real user queries, which is exactly the kind of material that tends to perform well in search and build trust with your audience.

Stage 2 – Turning Raw Posts Into Organized Data

Once the questions are identified, the next step is to store them somewhere you can manage at scale. The workflow sends the filtered Reddit posts into a Google Sheet, appending new entries as they come in.

This Google Sheet becomes your central repository. It systematically stores the question text and titles so you can:

  • Review which questions are being picked up
  • Batch process content instead of working one item at a time
  • Maintain a history of ideas and articles you have already used

By putting Google Sheets in the middle of the workflow, you gain visibility and control. You can sort, filter, or annotate entries while n8n keeps feeding in new opportunities from Reddit.

Stage 3 – Enhancing Questions With AI

With your questions neatly stored, the workflow moves into its first AI-powered phase. Instead of using the raw Reddit wording directly, the template processes the questions in batches using an AI agent.

This AI step is designed to:

  • Paraphrase each question
  • Refine the language while keeping the original intention intact
  • Make the questions clearer, more engaging, and more suitable for use in blog content

The goal is not to change what users are asking, but to present their questions in a way that is easier to build strong, readable articles around. This is where you start to see the transformation from scattered community posts to structured content inputs.

Stage 4 – The “Article Factory” For Blog Generation

Once the questions are enhanced, the workflow enters what you might think of as your personal “Article Factory”. This is where the n8n template, combined with OpenAI models, builds out a complete blog draft for each question.

In this phase, the workflow generates several key components:

  • SEO-friendly slug
    The automation creates a clean, search-friendly URL slug from the blog title, such as best-website-builder. This helps you maintain consistent URL structure and SEO best practices without manual effort.
  • Engaging blog introduction
    An AI chat model writes a concise, reader-friendly introduction that hooks your audience and sets the context for the article. This saves you from staring at a blank page, wondering how to start.
  • Step-by-step guide or explanation
    The workflow then generates a detailed yet simple step-by-step section. This part focuses on answering the original question or providing a practical guide related to the topic, which is essential for helpful, actionable content.
  • Clear conclusion
    Finally, the automation drafts a conclusion that wraps up the article, reinforces key takeaways, and leaves the reader with a sense of clarity.

Each of these elements is powered by dedicated AI chat models with memory buffers. Those memory buffers help maintain consistency in tone, style, and context across the different parts of the article, so the final draft feels like one coherent piece instead of a collection of disconnected outputs.

Stage 5 – Compiling, Saving, And Scaling Your Content

After the individual components are generated, the workflow brings them together. The slug, introduction, step-by-step guide, and conclusion are merged into a full blog post draft.

This complete article is then appended to another Google Sheet that is dedicated to storing finished blog content. This sheet becomes your content backlog, where you can:

  • Review drafts before publishing
  • Track which posts have been edited or posted
  • Export or connect to other tools for scheduling and distribution

The workflow is designed to loop, so it can handle multiple posts efficiently. As new Reddit questions appear, your system is ready to capture, process, and generate fresh articles without additional manual setup.

Why This n8n Workflow Can Transform Your Content Process

Beyond the technical steps, this template opens up a different way of working with content. Here are some of the key benefits you gain when you put it into action:

  • Efficiency and time savings
    You automate the entire journey from question discovery to blog draft creation. Instead of manually searching Reddit, copying questions, and starting from scratch, you let n8n and AI handle the repetitive parts so you can focus on editing and strategy.
  • Built-in SEO optimization
    The workflow generates SEO-friendly slugs and engaging introductions by default. That means every draft begins with solid technical and structural foundations for search visibility.
  • Scalability from day one
    Because the workflow uses batching and looping, you can process multiple questions in one run. As your content needs grow, the system grows with you, without a matching increase in manual work.
  • Consistent quality and tone
    AI memory buffers help keep your style and tone aligned across different posts and sections. You get consistent structure and voice, which makes your content feel more professional and cohesive.

Using This Template As A Stepping Stone

This workflow is ready to use as is, but it is also a flexible foundation. Once you are comfortable with it, you can extend or customize it to fit your goals. For example, you might:

  • Add extra AI steps to generate social media captions from each blog post
  • Connect the final Google Sheet to your CMS or publishing tool
  • Introduce additional filters to focus on specific tags, keywords, or post lengths
  • Trigger notifications when a new draft is ready for review

Think of this template as your first automated content assistant. As you see how much time it saves and how many ideas it surfaces, you can keep building on it to create a more complete content automation system around n8n.

Start Your Automation Journey Today

Reddit is already full of questions your audience is asking. With this n8n workflow template, you can turn those questions into a steady stream of SEO-optimized blog drafts, without spending hours on manual research and formatting.

By connecting Reddit, Google Sheets, and OpenAI models, you create a smooth pipeline from community insight to publishable content. You free yourself to do the work that only you can do: shaping the message, adding your expertise, and building relationships with your readers.

If you are ready to automate more of your content creation and reclaim your time, set up this n8n workflow and start turning questions into quality blog posts today.

Efficient Automation: Solve N8N Scheduling Issues

Efficient Automation: Solve N8N Scheduling Issues

The Nightly Struggle Of A Tired Marketer

By 9:45 PM, Mia’s apartment was quiet, but her laptop was not. As the solo marketer at a growing SaaS startup, she had fallen into a nightly routine that felt more like a trap than a job.

Every evening, she opened her content calendar, brainstormed a fresh topic, wrote a short post about automation and N8N, hunted for an image, then manually queued posts for LinkedIn, Twitter (X), and Facebook. If she got distracted or a meeting ran late, the whole schedule slipped. Some nights she forgot to post entirely.

Her boss wanted consistent, educational content about automation and N8N. Mia wanted her evenings back.

She tried basic scheduling tools, but they still needed her to come up with topics, write the copy, and upload visuals. The real problem was not just posting, it was the entire content workflow – from idea to image to analytics – happening at the wrong time of day and in the wrong place.

Then one morning, while searching for “solve N8N scheduling issues” and “automate social media with AI,” she stumbled on an N8N workflow template that sounded almost too perfect: a daily automation that generated ideas, wrote posts, created images, stored everything in Google Sheets, and published to social platforms automatically.

The Discovery Of An N8N Scheduling Workflow

Mia already knew that n8n was a powerful automation tool that connected apps and services into flexible workflows. What she had not fully used yet was its scheduling power combined with AI and social media integrations.

The template she found promised to solve a very specific scheduling pain point:

  • Trigger at the same time every day.
  • Ask an AI model for a fresh, problem-focused N8N topic.
  • Turn that topic into a social post ready for multiple platforms.
  • Generate a custom anime-style image to match.
  • Log everything in Google Sheets for tracking.
  • Publish automatically to LinkedIn, Twitter (X), and Facebook.

It was not just about “posting later.” It was about building a fully automated content engine that ran like clockwork while she did anything but work.

Rising Action: Designing A Workflow That Never Forgets

Mia opened the template in her N8N instance and walked through each node, imagining how it would change her evenings.

The Heartbeat: A Schedule Trigger At 10 PM

The workflow started with a simple but powerful piece: the Schedule Trigger.

Instead of Mia sitting at her laptop at 10 PM, the trigger would quietly activate the workflow at that exact time every day. No reminders, no alarms, no guilt. Just a reliable, automated start.

The trigger was set to:

  • Activate daily at 10 PM so the content was ready by the next morning.

The Brain: AI-Generated N8N Topics

Once the schedule fired, the next node took over: Message a Model (AI). This step used GPT-4 to generate a specific automation-related topic focused on real N8N pain points.

Instead of Mia trying to think of “one more idea about automation,” the AI would generate a title such as:

  • “How to fix N8N scheduling conflicts without breaking existing workflows”
  • “Reducing manual posting errors with N8N schedule triggers”

The key was that the AI was guided to stay tightly focused on N8N issues and solutions, which kept the content relevant to her audience.

The Voice: Turning Topics Into Social Posts

The next node, called Message a Model 1, took the generated topic and transformed it into a tweet-style post.

Inside this node, GPT-4 received a prompt to:

  • Use solution-oriented language.
  • Highlight the benefit of fixing N8N scheduling issues.
  • Add relevant hashtags for discoverability.

The result was short, clear, and ready for social media. Mia realized she could adapt the same text or slightly tweak it per platform if needed, but the template already gave her a strong, consistent baseline.

The Visual Hook: Anime-Style Images On Autopilot

Next came the part that used to take Mia the most time: visuals.

The Generate an Image node created a Japanese anime style image based on the AI-generated topic. The prompt combined the theme of N8N automation with an engaging anime aesthetic that stood out in crowded feeds.

For Mia, this meant no more stock photo searches, no more last-minute Canva sessions. Every night, a fresh, on-theme image would be generated and attached to the content.

The Memory: Logging Everything In Google Sheets

Before any post went live, the workflow saved all key data using the Append or Update Row in Google Sheets node.

This step stored:

  • The AI-generated topic or title.
  • The social post text.
  • Any relevant metadata, such as date, time, or platform.

Over time, this built a living content calendar and performance record. Mia could sort by date, filter by topic, and review what had already been published. No more guessing what she posted last week or which angles performed best.

The Finale: Cross-Platform Social Media Posting

Finally, the workflow handled the part that used to keep Mia awake: publishing.

With Social Media Posting nodes connected to LinkedIn, Twitter (X), and Facebook, the workflow automatically created and published posts to all three platforms.

In one automated pass, the content went live across:

  • LinkedIn for professional reach and B2B visibility.
  • Twitter (X) for quick, real-time engagement.
  • Facebook for broader community presence.

What used to require three separate logins and manual uploads was now a single automated action.

The Turning Point: From Manual Chaos To Scheduled Confidence

The first night Mia turned on the workflow, she felt oddly nervous. At 9:59 PM she watched the N8N dashboard. At 10 PM, the Schedule Trigger fired.

Within seconds, the AI produced a new N8N scheduling topic. A moment later, a concise, solution-focused tweet appeared in the workflow data. The image node generated an anime-style visual that matched the theme. Google Sheets updated with a fresh row. Then the posts appeared in her LinkedIn, Twitter, and Facebook queues.

She refreshed her feeds. The content was live, on brand, and consistent with her strategy. And she had not typed a single word that evening.

Why This N8N Scheduling Workflow Matters

As the days went by, Mia realized the template did more than just save time. It changed the way she worked.

Key Benefits Of The Workflow

  • Automated content generation The AI nodes created topics and posts automatically, all centered around real N8N pain points and solutions. No more nightly brainstorming.
  • Cross-platform posting The workflow published to LinkedIn, Twitter, and Facebook at once, which cut her manual posting time to zero and increased consistency.
  • Reliable record keeping Google Sheets became a living content log. She could track what was posted, when it went out, and how it aligned with her broader automation strategy.
  • Custom visual content The anime-style images gave her brand a recognizable look that stood out in feeds and kept her visuals consistent without extra design work.

Who This Workflow Helps

Mia soon realized she was not alone. This kind of N8N scheduling automation is ideal for:

  • Marketing teams that want a predictable social media pipeline.
  • Social media managers tired of repetitive, manual posting tasks.
  • Content creators who want to focus on strategy instead of daily execution.
  • Founders or solo operators who need a constant presence without a full-time marketer.

In each case, the combination of N8N scheduling, AI content generation, image automation, and cross-platform posting solves the same core problem: manual, error-prone, and inconsistent workflows.

Resolution: A New Routine Powered By Automation

A few weeks later, Mia’s evenings looked very different. At 10 PM, she might be out with friends, reading, or already asleep. Yet her brand still published smart, consistent content about N8N automation every day.

By leveraging n8n’s Schedule Trigger with AI, Google Sheets, and social media integrations, she had solved the specific issue that used to drain her energy: tedious, manual scheduling and posting.

The workflow had become a quiet teammate that:

  • Generated new, relevant ideas.
  • Wrote solution-focused social posts.
  • Produced unique anime-style visuals.
  • Logged everything in a structured spreadsheet.
  • Published across platforms with perfect timing.

Her automation was not just efficient, it was consistent. Her social presence improved, and she had more time for higher-level strategy and experimentation.

Take The Next Step: Make This Story Yours

If you see yourself in Mia’s story, you do not have to keep fighting the same nightly battle. You can use the same N8N scheduling template to build your own automated content engine.

Set up the workflow in your N8N instance, connect your AI, Google Sheets, and social accounts, and let the schedule trigger handle the rest. Watch as your content becomes more consistent, your analytics become clearer, and your evenings become your own again.

If you need guidance tailoring the workflow to your exact stack or strategy, our consulting team is ready to help you design a reliable automation system that fits your business.