Automated Faceless AI Video Workflow Explained

Automated Faceless AI Video Workflow Explained – As a Real Story

The Marketer Who Could Not Be Everywhere At Once

On a quiet Tuesday night, Mia stared at her content calendar and felt that familiar knot in her stomach. She was a solo marketer for a fast-growing personal brand, and her founder wanted one thing:

“Short, viral faceless videos on every platform, every day.”

Instagram, Facebook, LinkedIn, Threads, TikTok, YouTube, Twitter, Pinterest – the list kept getting longer. Mia knew faceless AI videos were performing incredibly well, but creating them manually was a nightmare. She had to:

  • Brainstorm ideas that might actually go viral
  • Write scripts that fit 15 seconds without sounding robotic
  • Generate videos with a consistent style and voice
  • Upload and publish to every social media platform individually

By the time she finished one video, the day was gone. Consistency was slipping, and so was reach.

That night, while searching for a way to automate faceless AI video creation, she stumbled across an n8n workflow template built around Blotato’s API and AI agents. It promised something that sounded almost too good to be true:

From idea to published faceless AI video across multiple platforms, all on autopilot.

Discovering the n8n Faceless AI Video Template

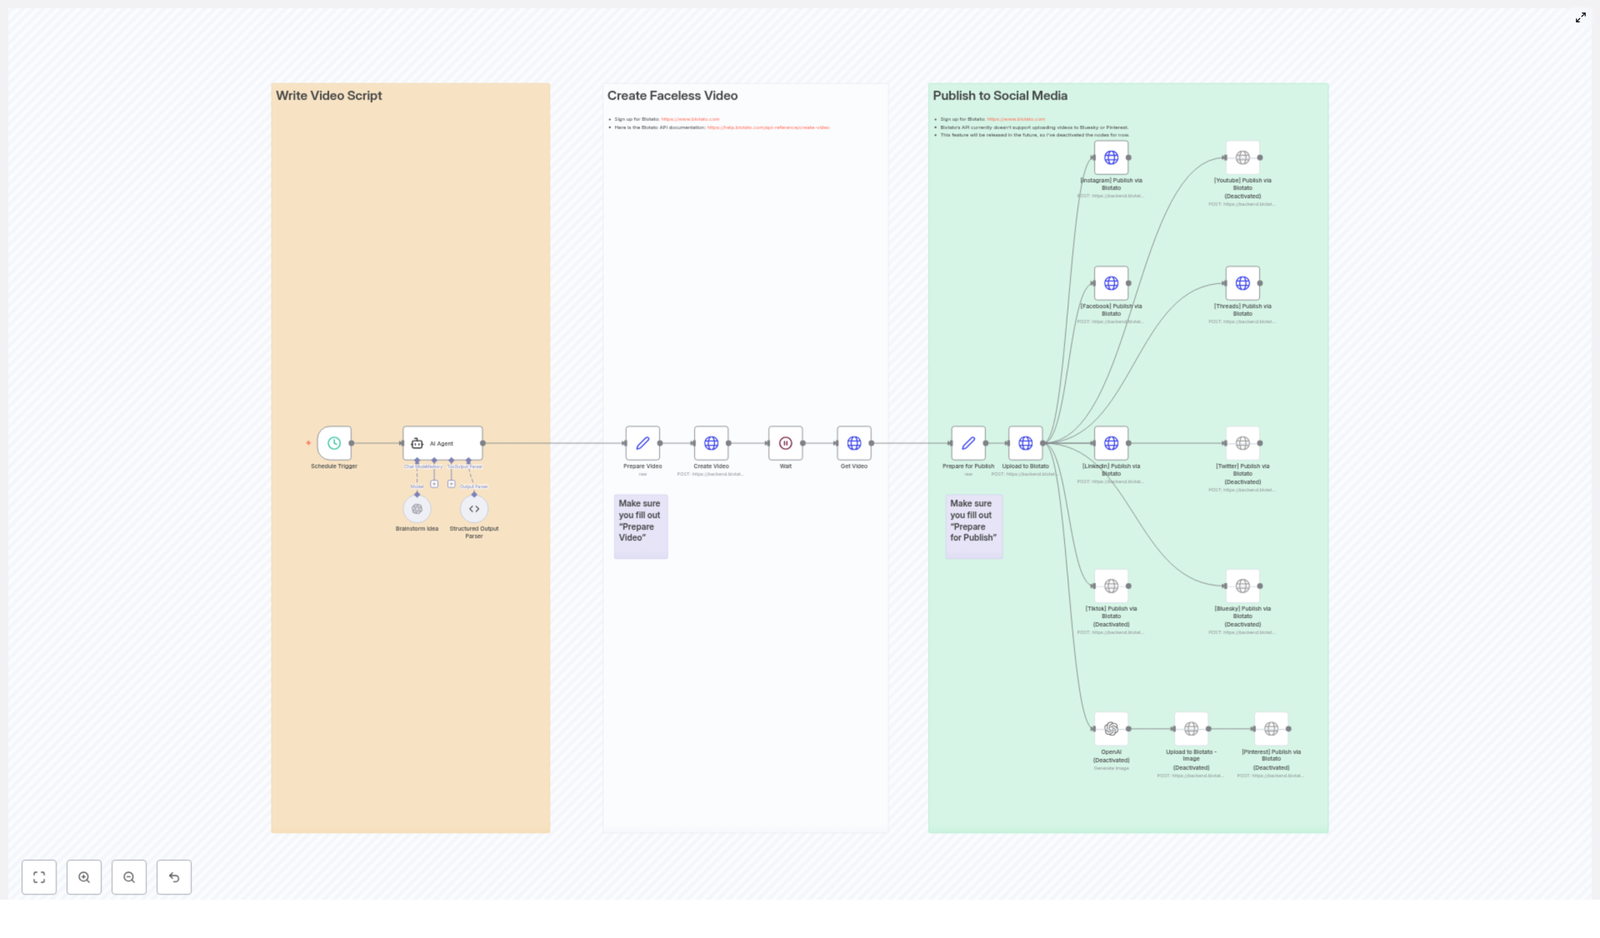
Mia opened the n8n template, and at first glance, it looked like a colorful map of her dream workflow. The nodes were visually grouped and color-coded into three main sections:

  • Orange – Write Video Script
  • White – Create Faceless Video
  • Green – Publish to Social Media

Instead of a messy collection of automations, this template was built like a clear story of its own. It walked from brainstorming and scripting, to generating the video with Blotato’s API, then finally to publishing across social media.

For Mia, it felt like finding a production team hidden inside her browser.

Rising Pressure, Rising Automation

The next week was critical. Her founder had a campaign planned around “little known history facts about famous people.” They wanted daily short-form videos, all faceless, all on multiple platforms.

Mia decided to bet on the n8n workflow template.

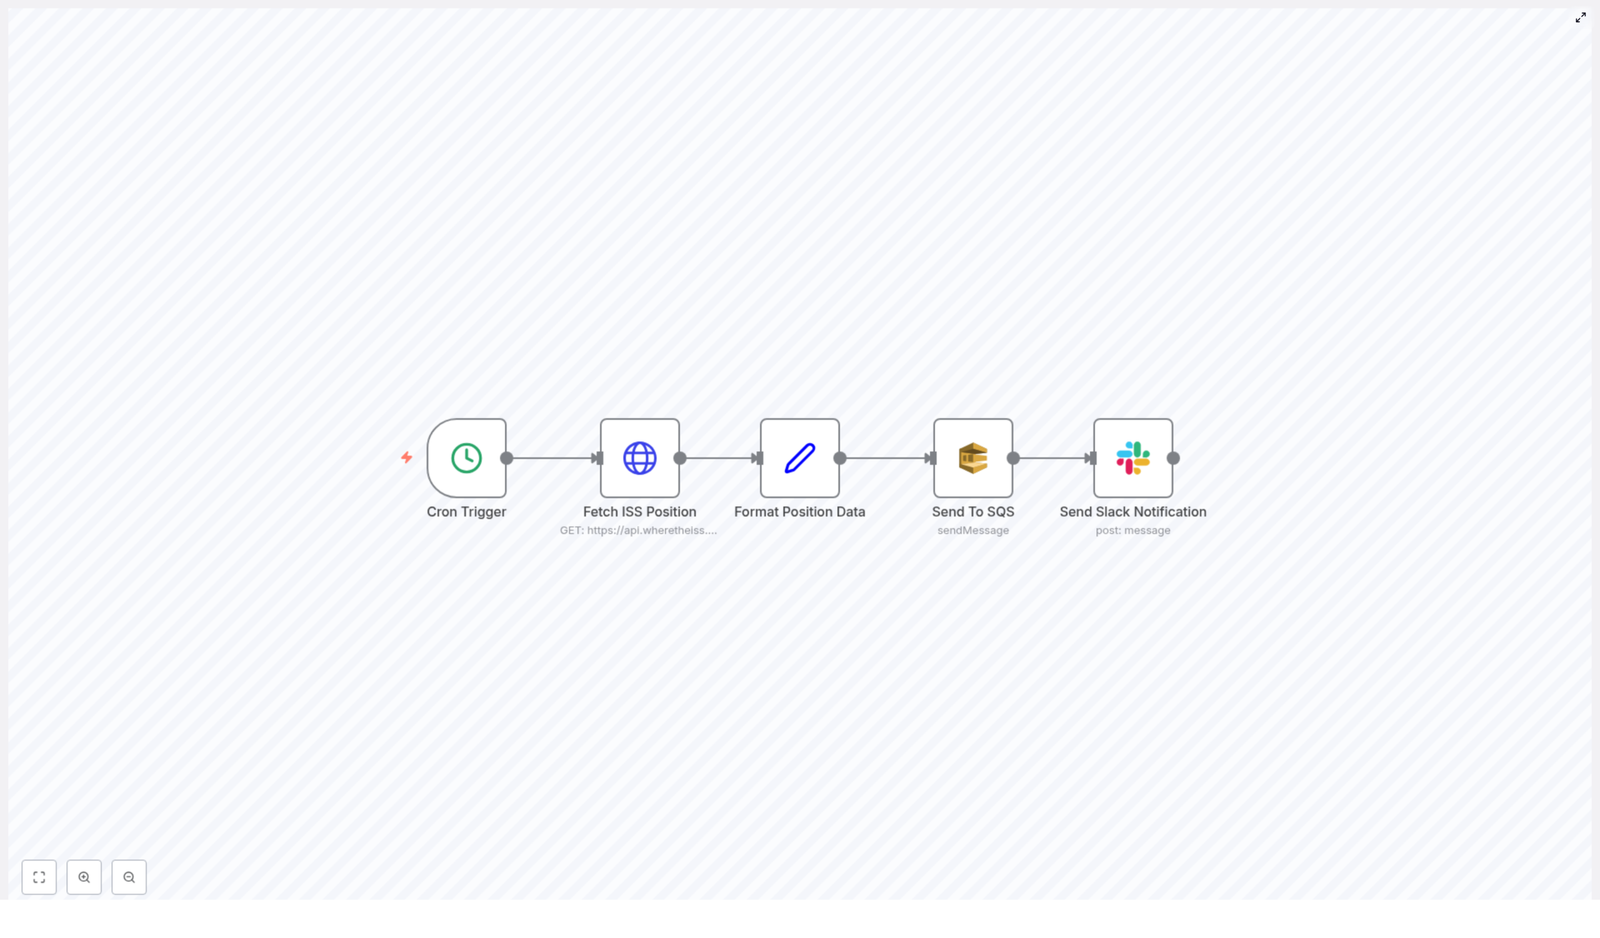
Step 1 – Letting the Workflow Think for Her

The first thing she noticed was the scheduled trigger node.

Instead of manually starting anything, the workflow could be set to run at a specific time every day. Mia scheduled it for early morning, long before she even opened her laptop.

At the scheduled time, the workflow would wake up and move into the orange section: Write Video Script.

Step 2 – Brainstorming at Scale With an AI Agent

Inside the orange group, the magic began. The template used OpenAI’s GPT-4o model combined with an AI Agent to do exactly what Mia used to spend hours on.

The agent was configured to:

  • Generate 50 viral faceless video ideas around a themed topic, in this case: “Little known history facts about [famous person]”
  • Randomly select one of those ideas so every day felt fresh and unpredictable
  • Research relevant data about that idea
  • Write a concise 15-second video script and an accompanying caption

Instead of Mia sweating over ideas and word counts, the workflow handled it. On top of that, the template used structured output parsing so the AI’s response was clean, predictable, and ready for automation. No messy copy-paste, no manual formatting.

Step 3 – Getting Ready For Video Creation

Once the script and caption were generated, the workflow shifted toward production.

In the preparation step, the template bundled together:

  • The final script
  • Caption text
  • Voice settings
  • Style and animation preferences

All of this was packaged for Blotato’s video creation API. Mia only needed to configure these options once in the “Prepare Video” node. After that, every run would follow the same brand-consistent style.

The Turning Point – Letting Blotato Do the Heavy Lifting

The real turning point in Mia’s workflow came when she looked at the white section: Create Faceless Video.

Step 4 – Generating the Faceless Video With Blotato

The scripted content and settings were handed off to Blotato’s video creation API. Instead of Mia opening an editor, choosing assets, and aligning audio with visuals, the API handled everything autonomously.

The n8n workflow did not just send the request and hope for the best. It also:

  • Waited for Blotato to finish generating the video
  • Checked the status so it did not move ahead too early
  • Fetched the final video URL once the video was ready

In practical terms, this meant Mia could be in a meeting, asleep, or working on strategy while a fully produced faceless AI video was being created in the background.

Step 5 – Preparing to Publish Everywhere

With the video URL in hand, the workflow moved into the green section: Publish to Social Media.

Before posting, the template prepared all the data needed for publishing:

  • Social media account IDs
  • The final caption text
  • Any additional metadata required by the platforms

This happened in the “Prepare for Publish” node, where Mia had to fill in key fields like:

  • Her Blotato API key
  • Account IDs for Instagram, Facebook pages, LinkedIn profiles, and more

The template clearly marked where these values needed to go, so she did not have to guess. Sticky notes in the workflow even pointed to helpful resources, such as where to sign up for Blotato and how to manage usage.

From One Upload to Many Platforms

Step 6 – Upload & Publish With a Single Flow

Once everything was prepared, the final steps felt almost unfairly simple.

The workflow:

  • Uploaded the video URL to the Blotato media endpoint
  • Triggered simultaneous posts across multiple social media platforms supported by Blotato’s API

Instead of Mia manually logging into each platform, resizing, re-uploading, and rewriting captions, the workflow handled everything in a single automated motion.

Supported Platforms in Mia’s New Workflow

Within this template, Mia saw support for:

  • Instagram
  • Facebook (with page ID)
  • LinkedIn
  • Threads
  • TikTok (currently disabled)
  • YouTube (currently disabled)
  • Twitter (currently disabled)
  • Bluesky (currently disabled)
  • Pinterest (currently disabled, for image posts)

The disabled nodes were not dead ends. They were hints of what was coming. As Blotato’s API evolved, Mia knew she could easily expand her reach by enabling more platforms without rebuilding her automation from scratch.

For image-based content on Pinterest, the template even allowed for optional AI-generated images, so her faceless video strategy could extend into static visual posts later.

Resolution – What Changed For Mia

Within a few days of setting up the n8n faceless AI video template, Mia’s daily routine changed dramatically.

Instead of:

  • Spending hours on ideation and scripting
  • Manually producing faceless videos
  • Uploading and publishing to each network one by one

She now:

  • Configured the workflow once with her API keys, account IDs, and style preferences
  • Let the schedule trigger start the process automatically
  • Reviewed results and performance while the system kept producing new content

Every morning, a new faceless AI video, built around “little known history facts about [famous person],” appeared on her brand’s social channels. The AI agent handled the research and script, Blotato’s API handled the video, and n8n orchestrated the entire journey from idea to multi-platform publication.

The tension that used to come from staring at an empty content calendar was replaced by something else entirely: a reliable, automated content engine.

How You Can Follow the Same Path

If you are a marketer, founder, or creator who wants to scale content without burning out, Mia’s story can be yours too. This n8n workflow template is built specifically for:

  • Automated faceless AI video creation
  • AI-powered brainstorming and scripting
  • Cross-platform social media publishing

To get it running smoothly, you will need to:

  • Fill in your API keys and account IDs in the “Prepare for Publish” and “Prepare Video” nodes
  • Connect your Blotato account and social profiles
  • Review the sticky notes for helpful links, signup info, and usage tips

From there, the template handles the rest, from idea generation with GPT-4o and AI agents, to video creation with Blotato’s API, to automated posting on your chosen social media platforms.

Start Your Own Automated Faceless Video Story

If you are ready to turn your content workflow into a story of automation and scale, now is the time to act.

Streamline your content production, automate faceless AI video creation, and maximize your social reach with Blotato and n8n.

Sign up at Blotato, connect your accounts, and customize this workflow template to fit your brand and voice.

Then plug it into your n8n instance and let the system generate and publish viral-ready faceless videos while you focus on strategy, creativity, and growth.

Automate ISS Position Alerts with n8n Workflow

Automate ISS Position Alerts with n8n Workflow

Why automate ISS tracking in the first place?

If you like space, data, or just clever automations, keeping an eye on the International Space Station (ISS) is surprisingly fun. But doing it manually, refreshing a website or running a script every few minutes, gets old fast.

That is where this n8n workflow template comes in. It automatically:

  • Grabs the ISS current position from a public API
  • Formats the data into a clean JSON payload
  • Sends it to an AWS SQS queue
  • Notifies your team in Slack that new ISS data is available

So instead of asking “Where is the ISS right now?” every few minutes, you can let n8n quietly handle it in the background and push updates wherever you need them.

What this n8n ISS workflow actually does

At a high level, this workflow keeps a steady stream of ISS position data flowing through your stack. Every minute, it:

  1. Triggers automatically on a schedule
  2. Calls a public API to get the ISS current position
  3. Extracts key fields like latitude, longitude, timestamp, and name
  4. Publishes that data to an AWS SQS queue
  5. Sends a Slack alert to let your team know new data has been sent

It is a simple chain of five nodes, but together they give you a neat, production-ready automation that plugs into both AWS and Slack.

When should you use this ISS position template?

This workflow is great if you:

  • Are building a dashboard or internal tool that visualizes satellite or ISS data
  • Want to teach automation, APIs, or event-driven systems in a classroom or workshop
  • Need a real-time-ish data stream to test your AWS SQS consumers
  • Just enjoy space-related side projects and want automated ISS alerts

Because it uses standard pieces like HTTP APIs, AWS SQS, and Slack, you can also treat it as a learning template for building other n8n automations that follow the same pattern.

Workflow overview: the 5-node setup

The workflow is built from five key n8n nodes connected in sequence:

  • Cron Trigger – kicks off the workflow every minute
  • Fetch ISS Position – calls the public ISS position API
  • Format Position Data – cleans up and restructures the response
  • Send To SQS – pushes the formatted JSON into an AWS SQS queue
  • Send Slack Notification – posts a message to a Slack channel

Let us walk through each piece so you know exactly what is happening and where you can tweak it.

Step-by-step breakdown of the n8n ISS workflow

1. Cron Trigger – keeping your data fresh

Everything starts with the Cron Trigger node. It is configured to run every minute, which means:

  • You always fetch near real-time ISS position data
  • You do not have to think about manually starting the workflow
  • Your downstream systems get a steady, predictable stream of messages

If every minute feels too frequent for your use case, you can easily adjust the schedule in the Cron node settings. For example, you might set it to every 5 or 10 minutes if you want fewer updates.

2. Fetch ISS Position – calling the public API

Next up is the node that actually talks to the ISS API. This node sends a request to:

https://api.wheretheiss.at/v1/satellites/25544/positions

The workflow uses the current timestamp so that each call returns the most recent position of the ISS. The API responds with data that includes things like latitude, longitude, timestamp, and the object name.

In n8n, this is typically done with an HTTP Request node configured to hit that endpoint and pass along the current time. The result is a raw response that we will clean up in the next step.

3. Format Position Data – preparing clean JSON

The API response contains more fields than you might need. To keep things tidy and easy to consume, the workflow uses a Set node to extract just the important bits:

  • latitude
  • longitude
  • timestamp
  • name

This node restructures the response into a simplified JSON object. That makes it perfect for queuing, logging, or feeding into other automations. By the time the data leaves this node, it is clean, compact, and ready for AWS SQS or any other service you might want to plug in later.

4. Send To SQS – handing data off to AWS

Once the data is nicely formatted, the workflow sends it to an AWS Simple Queue Service (SQS) queue. This is where the automation becomes really powerful.

By pushing ISS position updates into SQS, you can:

  • Trigger downstream processing, like storing records in a database
  • Feed analytics pipelines or visualization tools
  • Integrate with any microservice that consumes messages from SQS

The node is configured with your AWS SQS credentials and the queue you want to use. From there, every run of the workflow adds a new message to that queue, which your other systems can handle at their own pace.

5. Send Slack Notification – keeping the team in the loop

To round things off, the final node sends a Slack message whenever new ISS data is successfully queued.

This node posts to a designated channel, for example #alerts, and includes details like:

  • The ISS name
  • The timestamp associated with the position data

That way your team knows the automation is running, data is being sent to SQS, and everything is working as expected. You can also customize the Slack message to include the coordinates if you want to make it more informative or fun.

Why this n8n ISS workflow makes life easier

So what are the real benefits of setting this up instead of doing everything manually?

  • Efficiency – No more copy-pasting from API responses or refreshing websites. n8n handles the entire flow from fetching data to sending notifications.
  • Integration – You tie together a public API, AWS SQS, and Slack in a single, visual workflow. It is a great pattern you can reuse for other automations.
  • Real-time style updates – With a Cron schedule of every minute, your systems and your team get timely ISS position data without any extra effort.
  • Scalability – SQS is built for scaling. As you add more consumers or more processing steps, the queue can handle the load without changing this workflow.

In short, you get a lightweight, real-time ISS tracking pipeline that fits neatly into modern, event-driven architectures.

How to start using this ISS automation template in n8n

Ready to try it out in your own n8n instance? Here is the basic setup flow:

  1. Open your n8n instance and import the workflow template.
  2. Configure your AWS SQS credentials in n8n and select the queue you want to use.
  3. Set up your Slack credentials or bot token and choose the channel where alerts should be posted, such as #alerts.
  4. Review the Cron Trigger schedule and adjust the frequency if needed.
  5. Activate the workflow and watch the messages start flowing.

From there, you can customize it as much as you like, for example by changing the message format, adding logging, or sending the data to additional services.

Want to tweak or extend the workflow?

If you are curious about more automation ideas, you can build on this template by:

  • Storing ISS positions in a database for historical tracking
  • Visualizing the ISS path on a map in a dashboard
  • Triggering alerts only when the ISS is above a certain region

If you get stuck or want to share what you have built, the n8n community is a great place to ask questions and swap ideas.

Try the ISS position workflow template

Give this workflow a spin in your own setup and see how easy it is to automate ISS position tracking with n8n, AWS SQS, and Slack working together.

Have questions or want to customize the template further? Drop a comment or connect with the n8n community to explore even more automation possibilities.

SEO Analysis and Content Strategy for AI Overview

SEO Analysis and Content Strategy for AI Overview

Ever look at Google’s AI Overview and think, “How on earth do I create content that actually fits into this?” You are not alone. The good news is that there is a clear pattern in how Google structures AI-related information, and you can absolutely use that to your advantage when planning your SEO content and strategy.

In this guide, we will walk through what Google’s AI Overview is really doing, how to mirror its structure in your own articles, and how to turn that into a practical, repeatable SEO workflow. Think of this as your friendly blueprint for ranking better on AI-related queries.

What Google’s AI Overview Is Really Telling You

When you run a typical AI-related search, Google’s AI Overview is not just spitting out random text. It is giving you a sneak peek into how Google understands the topic, what users want to know, and how information should be organized for maximum clarity.

Here is what is happening behind the scenes:

  • Clear structure: Google breaks topics into distinct sections so users can quickly grasp the big picture.
  • Entity-focused: Specific tools, concepts, and subtopics (called entities) are highlighted and explained in context.
  • Depth plus organization: Users are not just looking for a definition of AI. They want definitions, applications, comparisons, and recent developments, all laid out in a way that is easy to follow.

Those first AI Overview paragraphs usually read like a thesis statement. They summarize the heart of the query in a couple of lines, then branch out into related angles. That is your first big clue about how your own content should be structured.

Understanding User Intent Through Categories

Google’s AI Overview tends to group information into what you can think of as “sub-intents” or mini-goals within the main query. These show you what users really want to accomplish when they search.

Typically, those sub-intents fall into three main categories:

1. Topic Understanding and Definitions

This is where users are asking things like “What is this?” or “How does it work?” For AI-related queries, that might be definitions of models, techniques, tools, or general concepts.

2. Applications and Implications

Once users understand the basics, they want to know what they can do with it. Here, the focus is on use cases, real-world applications, and the broader impact on industries or daily workflows.

3. Comparative Analysis or Recent Developments

Finally, users often want to compare options or stay updated. This includes “X vs Y” comparisons, pros and cons, and the latest news, trends, or updates in the AI space.

When you see these categories appear in an AI Overview, treat them like a roadmap for your own article. They tell you exactly which angles to cover if you want to fully satisfy search intent.

How To Structure Content That Ranks With AI Overview

So how do you turn all of this into a content strategy that actually ranks? The trick is to align your article structure with those AI Overview categories, while still sounding like a real human and not a robot.

Use Categories As Your Main Headings

Start by turning those sub-intents into your primary headings (your <h2>s). For example, your article could be broken into sections like:

  • What [AI Topic] Is and How It Works
  • Key Use Cases and Applications of [AI Topic]
  • [AI Topic] vs Alternatives and Recent Developments

Each section should dive deep into that specific angle, not just skim the surface. You want your content to feel like a complete resource, not a quick overview.

Cover All Mentioned Entities in Detail

When Google’s AI Overview mentions specific tools, models, companies, or subtopics, that is a signal. Those entities matter for the query. Make sure you:

  • Explain each entity clearly
  • Show how it connects to the main topic
  • Use examples or scenarios where relevant

You can even borrow some of the phrasing or angles from the AI Overview snippets. You are not copying, you are aligning your language with what Google already recognizes as helpful and relevant.

Match the Tone and Depth Google Prefers

Look at how the AI Overview talks: it is usually clear, neutral, and user-focused. Use that as a model. Aim for:

  • Short, readable paragraphs
  • Direct answers to common questions
  • Logical flow from basics to advanced details

By mirroring this style and structure, you are making it easier for Google to see your content as a strong candidate to satisfy the same user intent.

Learning From the Competitive Landscape

Now let us talk about the other big piece of the puzzle: the websites that already dominate those AI-related results. Google often leans on a handful of authoritative sources, and those sites share some patterns too.

Why Top Sources Rank So Well

The top 3 to 5 sources that Google frequently cites tend to have:

  • Strong topical relevance in AI and related fields
  • A history of being referenced, linked, or quoted
  • Content formats that users clearly respond well to

When you look at their article titles, you will probably notice some familiar formulas.

Proven Content Formats That Work

Many high-ranking AI articles use tried and tested structures, such as:

  • Top 10 lists – for tools, techniques, or use cases
  • Ultimate guides – for deep, evergreen explanations
  • Comparisons – like “X vs Y” or “Best tools for [use case]”

These formats align nicely with what users are already looking for: clarity, options, and guidance. Adding a current year to titles where appropriate can also signal freshness, which can help with click-through and SEO performance.

Building an Actionable SEO Strategy Around AI Overview

Let us pull it all together. How do you turn these insights into a practical SEO strategy you can use again and again for AI-related topics?

1. Use AI Overview as Your Structural Guide

Start with the AI Overview for your target query and treat it like a content outline. Ask:

  • What main categories or sub-intents are present?
  • Which entities are mentioned repeatedly?
  • How does the overview move from one idea to the next?

Then design your article to match that structure, while expanding and enriching it with your own expertise and examples.

2. Go Deeper Than the AI Overview

Your goal is not to copy the AI Overview. It is to beat it. To do that, you need to:

  • Cover every category the overview touches on
  • Explain all the mentioned entities in more depth
  • Add practical advice, context, or frameworks users can act on

Think of the AI Overview as the table of contents and your article as the full book.

3. Align With Authoritative Sources Without Cloning Them

Use the top authoritative websites as benchmarks. Look at:

  • How they structure their guides and comparisons
  • The level of detail they offer
  • The questions they answer that others ignore

Then aim to be more helpful, more up to date, and more user-focused. Reference these sites when appropriate to build trust, but always bring your own angle and clarity.

Make Your Content Authoritative, Actionable, and Human

At the end of the day, Google wants what users want: content that feels trustworthy, useful, and easy to understand. When you combine the structure of AI Overview with proven content formats and your own expertise, you get exactly that.

So here is your friendly nudge:

Start your SEO journey now by crafting a detailed guide based on these insights. Use the categories you see in AI Overview as your framework, cover every key entity thoroughly, and weave in the language and structure that Google already favors for AI-related queries.

Do that consistently and you will not just be chasing rankings. You will be building a strong, sustainable presence in AI search results that actually helps people make sense of a complex topic.

How to Get DNS Entries Using n8n Workflow

How a Stressed DevOps Engineer Stopped Copy-Pasting DNS Checks With One n8n Workflow

The Night Everything Broke

At 11:47 p.m., Alex stared at the screen for what felt like the hundredth time that week. Another domain migration, another round of DNS checks, and the same old ritual of opening a browser, running manual lookups, copy-pasting records into tickets, and hoping nothing slipped through the cracks.

Managing DNS records was part of Alex’s job as a DevOps engineer, but it was also the part that kept piling up. Every new domain meant checking A, AAAA, MX, TXT records, sometimes repeatedly, and always under time pressure. It was tedious, error prone, and worst of all, completely manual.

Alex knew there had to be a better way to manage DNS entries. Something automated, repeatable, and fast. That search is how Alex stumbled on an n8n workflow template that promised exactly what was needed: a way to automatically get DNS records for any domain.

Discovering n8n and a Different Way to Work

Alex had heard of n8n before, but only in passing. This time, the description caught attention.

n8n is an extendable workflow automation tool that lets you connect apps and APIs and automate tasks without writing a full application. You build workflows visually, link nodes together, and let n8n handle the execution.

For someone drowning in repetitive DNS lookups, that sounded like a lifeline.

As Alex read further, a specific template stood out – an n8n workflow that retrieves DNS entries for a domain using the Uproc API. It was simple, focused, and exactly aligned with the problem at hand.

From Manual Chaos to a Simple Automated Plan

Alex sketched out the current process on a notepad:

  • Type domain into a DNS lookup tool
  • Wait for results
  • Copy A, AAAA, MX, TXT records into a document
  • Repeat for the next domain

It was embarrassingly manual.

The n8n template, on the other hand, broke the job into three clear automated steps:

  • Manual Trigger – start the workflow when needed
  • Create Domain Item – define the domain to query
  • Get DNS Records – call the Uproc API and fetch all DNS entries

Instead of juggling browser tabs and tools, Alex could click one button and get structured DNS data instantly. That was the moment the decision was made: this workflow had to be tested.

Setting Up the Workflow: The Turning Point

Step 1 – A Trigger That Replaces the Old Routine

Alex opened n8n, imported the DNS template, and saw the first node: Manual Trigger.

This node did one simple but powerful thing. It initiated the workflow whenever Alex clicked execute. No scheduling needed, no complex conditions. Just a clean way to say “I want DNS records for a domain right now.”

That alone felt more controlled than the old browser-based chaos.

Step 2 – Teaching the Workflow Which Domain to Check

Next was the Create Domain Item node, implemented as a FunctionItem node. This was where the domain name was prepared as input for the DNS lookup.

Inside the node, Alex found a tiny piece of JavaScript that suddenly made the whole workflow click:

item.domain = "n8n.io";
return item;

This line added a JSON key called domain with the value "n8n.io". In other words, it told the workflow, “Here is the domain you are going to query.”

Alex realized how flexible this could be. Today it might be n8n.io, but tomorrow it could be any domain, supplied dynamically from another node, a form submission, or even a CSV file. For now, though, keeping it simple was enough.

Step 3 – Letting Uproc Handle the Heavy Lifting

The final node was where the magic happened: Get DNS Records.

This node used the getDomainRecords tool from the Uproc API to actually fetch the DNS entries. The domain value did not need to be typed again. It was dynamically taken from the output of the Create Domain Item node, which meant the workflow passed data cleanly from one step to the next.

There was one important requirement though. Alex needed to have Uproc API credentials configured in n8n before this node could work. That setup took just a few minutes, and once the credentials were in place, the node was ready.

With all three nodes connected and configured, the workflow was complete. It was time to test.

The First Run: From Click to Complete DNS Overview

Alex took a breath, clicked Execute Workflow, and watched the nodes light up one after another.

The Manual Trigger fired. The FunctionItem node prepared the domain n8n.io. The Uproc node called getDomainRecords and returned a structured response.

On the screen, n8n displayed exactly what used to take Alex several minutes per domain:

  • A records
  • AAAA records
  • MX records
  • TXT records
  • And other relevant DNS entries

All in a single, organized output.

No more jumping between tools, no more copy-paste glitches, no more missed records because of late night fatigue. The workflow had turned a messy, manual task into a repeatable, reliable automation.

Why This Simple n8n Template Changed Alex’s Workflow

As the next week rolled in, Alex started using the DNS retrieval workflow for every new domain, and the benefits became obvious.

1. Manual Work Vanished

Instead of running separate DNS lookups by hand, Alex could trigger the workflow and get complete DNS records in one go. The time saved added up quickly, especially during migrations and audits.

2. Dynamic Domain Queries Became Easy

Because the workflow relied on a domain field in JSON, it was naturally ready for dynamic input. Alex started imagining future improvements:

  • Pull domains from a database
  • Read them from a spreadsheet
  • Trigger DNS checks after a deployment completes

The core structure was already in place. Only the input needed to change.

3. The Workflow Was Simple to Extend

n8n’s node based design meant Alex could easily chain additional steps after the DNS lookup:

  • Send DNS results to Slack for the team
  • Store records in a monitoring system
  • Log them in a database for audits

The original template was small, but it became a foundation for a richer automation system.

From One Template to a Better Way of Working

Looking back, Alex realized that the biggest win was not just getting DNS records faster. It was the shift in mindset. Tasks that once felt like unavoidable manual chores were now seen as automation opportunities.

With n8n and Uproc, DNS record retrieval turned into a simple, efficient workflow instead of a late night headache. The same pattern could be applied to other repetitive parts of network and domain management.

Ready to Automate Your DNS Checks Too?

If you find yourself repeating the same DNS lookups, copying the same records into tickets, or double checking domains by hand, you are in the same place Alex was before discovering this template.

Using n8n, you can:

  • Automate DNS queries for any domain
  • Retrieve A, AAAA, MX, TXT, and other DNS records in one execution
  • Extend the workflow with notifications, logging, or integrations

All it takes is a simple three node workflow and configured Uproc API credentials.

Call to Action: Try this n8n DNS entry retrieval workflow yourself and start turning your repetitive DNS checks into a smooth, automated process.

N8N Discord Workflow Setup & Management Guide

N8N Discord Workflow Template – Turn Your Server Into An Automated Powerhouse

Imagine your Discord server running smoothly in the background, messages handled, questions answered, and updates shared, while you stay focused on the work that really moves you or your business forward. That is the promise of automation with n8n and a well designed Discord workflow.

This guide walks you through that journey. You will start from the common pain points of manual Discord management, shift into a more empowered automation mindset, then use a practical n8n Discord workflow template to build your own AI powered assistant. Along the way, you will see how each step lays the foundation for more time, more clarity, and more space to grow.

From Manual Discord Management To Scalable Automation

Running an active Discord community can be incredibly rewarding, but it also demands constant attention. Repetitive questions, routine announcements, and basic support can quickly eat up your time and energy. It is easy to feel like you are always reacting instead of leading.

Automation with n8n changes that dynamic. By connecting your Discord server, a custom bot, and OpenAI, you can:

  • Respond to messages consistently, even when you are offline
  • Automate recurring updates and announcements
  • Centralize AI powered assistance inside your existing channels
  • Scale your community without scaling your workload

The n8n Discord workflow template you are about to set up is not just a technical tool. It is a starting point for a more focused, intentional way of managing your community and your time.

Adopting An Automation Mindset With n8n

Before you dive into the setup, it helps to approach this template with the right mindset. Think of n8n as your flexible automation studio. Each workflow you build is a small system that saves you time, reduces errors, and frees your attention for higher value work.

This Discord workflow template is your first step toward:

  • Delegating repetitive tasks to an AI agent
  • Designing clear processes instead of improvising every day
  • Experimenting with automation, then refining as you learn

You do not need to build everything at once. Start with a simple, working setup. Then gradually customize the AI behavior, expand to more channels, and introduce smarter logic. Each improvement compounds, and your Discord server becomes more self managing over time.

What You Need Before You Start

To turn this template into a working Discord AI assistant, make sure you have these essentials ready:

Prerequisites

  • n8n account to host and run your workflow
  • Discord bot created in the Discord Developer Portal
  • OpenAI API key to power the AI responses
  • Discord server access with permission to add and configure bots

Once you have these in place, you are ready to build a system that works alongside you, not against your time.

Step 1 – Create And Configure Your Discord Bot

Your Discord bot is the visible face of your automation. It is how your community interacts with the AI powered workflows you define in n8n. Setting it up is straightforward, and once done, you rarely need to touch it again.

Create The Bot In Discord

  • Open the Discord Developer Portal
  • Create a new application for your bot
  • Generate a bot token that n8n will use to connect
  • Add the bot to your server using the OAuth2 URL

Set The Right Permissions

To function correctly, your bot needs access to specific Discord permissions. At minimum, enable:

  • Send Messages
  • Read Message History
  • View Channels

These give your workflow the ability to read incoming messages, generate AI responses, and post them back into the correct channels.

Gather Key IDs For Your Workflow

n8n will need to know exactly where to listen and respond inside your server. Make sure you have:

  • Guild (Server) ID
  • Channel IDs such as:
    • AI tools or assistant channel
    • Free guides or resources channel

With your bot ready, you can now connect Discord and OpenAI directly into your n8n environment.

Step 2 – Connect Your Credentials In n8n

Credentials are the secure bridge between n8n and your external services. Setting them up correctly ensures your workflow runs reliably and safely.

Discord Bot Credentials

  • In n8n, go to the Credentials section
  • Create a new credential of type “Discord Bot API”
  • Paste in your Discord bot token
  • Give it a clear name, for example “Motion Assistant”

This tells n8n which bot to use when sending or reading messages from your server.

OpenAI API Credentials

  • In the same Credentials area, create a new “OpenAI API” credential
  • Enter your OpenAI API key
  • Name it something recognizable, such as “OpenAI Account”

With both credentials configured, your workflow can now act as a bridge between Discord and OpenAI, turning raw messages into helpful, AI powered responses.

Step 3 – Shape Your AI Agent Inside The Workflow

This is where your automation starts to feel personal. You are not just wiring tools together, you are designing the behavior of your Discord AI assistant.

AI Agent Configuration

  • Customize the system message to match your Discord management style. You can instruct the AI to behave like a helpful moderator, a friendly tutor, or a concise assistant.
  • Define character limits so responses stay readable inside Discord. A typical setting is a maximum of 1800 characters per message.
  • Specify text formatting that fits Discord, such as code blocks, bold, italics, or structured bullet points, so answers look clean and professional.

These small choices add up. They help your bot feel aligned with your brand, your tone, and your community values.

Step 4 – Choose How Your Workflow Gets Triggered

The same n8n Discord workflow template can support different ways of working, depending on how you want to interact with it. You can trigger it from other workflows, or directly from chat messages.

Main Trigger Types In The Template

  1. Workflow Execution Trigger
    Use this when you want to call the Discord AI workflow from another n8n workflow. You pass in a task or message string, and the template handles the AI processing and Discord response.
  2. Chat Message Trigger
    Use this when you want users to interact with the bot directly in Discord. A webhook receives the incoming chat message, then sends it into the workflow for AI processing.

Both modes unlock different possibilities. One supports behind the scenes automation, the other supports live, conversational interaction in your server.

How The Workflow Operates In Practice

Once your triggers are in place, the workflow can run in two primary modes. Each mode serves a different style of automation and can be expanded as your needs grow.

Mode 1 – Workflow Trigger For Automated Tasks

  • Another n8n workflow executes this Discord workflow and sends it a task or message string.
  • The AI agent processes the input, generates a response, and posts it to the relevant Discord channel.
  • This is ideal for:
    • Automated messaging and announcements
    • Scheduled updates or reminders
    • Notifications triggered by external events or tools

In this mode, your Discord bot becomes part of a larger automation system, reacting to events across your entire stack.

Mode 2 – Chat Trigger For Direct Conversations

  • A webhook receives an incoming message from your Discord channel.
  • The AI agent analyzes the message and generates a tailored response.
  • The workflow uses buffer memory to maintain conversational context, so replies feel like part of an ongoing dialog, not isolated answers.

This mode turns your Discord bot into a live AI assistant inside your community, available at any time and able to remember context across multiple turns.

Customize The Template To Match Your Vision

The real power of n8n is that nothing is fixed. This template is a starting point, and you are encouraged to adapt it so it fits your unique use case, audience, and growth plans.

Key Customization Options

  • AI system message Adjust the tone, role, and priorities of your assistant so it reflects how you want your community managed.
  • Message length limits Fine tune the maximum character count per message to match your channel style and keep conversations concise.
  • Multi channel behavior Configure how the workflow interacts with multiple Discord channels, for example one for tools, one for guides, and others for support or announcements.
  • OpenAI model choice Select the OpenAI model that best fits your needs, such as a suitable GPT 4 variant for higher quality responses.

Each adjustment brings your automation closer to the ideal assistant you have in mind.

Grow Your Automation With Enhancements

Once your basic workflow is running, you can gradually enhance it to handle more complex scenarios. Think of this as leveling up your automation skills over time.

Potential Enhancements To Explore

  • Error handling Add nodes that detect and manage failures gracefully, so your community experience stays smooth even if an external API has issues.
  • Richer conversation memory Extend the buffer memory logic to support longer, multi turn dialogs, especially for deeper support or mentoring conversations.
  • More channel specific tools Create specialized flows for different Discord channels, such as FAQ handling, content recommendations, or onboarding guidance.
  • Filtering and moderation Introduce message filters or moderation steps to maintain quality, safety, and alignment with your community guidelines.

Each enhancement you add increases the value of your automation and reduces the manual work you need to do every day.

Troubleshooting So Your Workflow Stays Reliable

As you experiment and iterate, you may run into small issues. A quick checklist can help you diagnose most problems fast and keep your automation dependable.

  • Check bot permissions Confirm your Discord bot has the correct permissions to view channels, read message history, and send messages.
  • Verify API credentials Make sure your Discord and OpenAI credentials in n8n are accurate and still active.
  • Validate character limits If messages appear cut off, review your configured character limits to avoid unintended truncation.
  • Confirm IDs Double check that all channel IDs and the guild (server) ID used in the workflow match your actual Discord setup.

With these checks in place, your workflow can run smoothly in the background while you focus on strategy, creation, and connection.

Your Next Step – Turn This Template Into Your Own Automation System

You now have a clear path from manual Discord management to a more automated, scalable, and focused way of running your community. The n8n Discord workflow template is your practical tool for making that shift real.

Start simple. Set up your bot, connect your credentials, choose your trigger mode, and let the AI handle a small part of your workload. Then iterate. Refine the system message, expand to more channels, and explore new automations that support your goals.

Each improvement gives you back time and mental space, and each workflow you build with n8n becomes another building block in a more intentional, automated workday.

Ready to experience intelligent Discord automation in your own server?

Set up the template, experiment boldly, and keep evolving your automation. Your future workflows – and your future time freedom – start here.

Automate Slack to Linear Bug Reporting Workflow

Automate a Slack to Linear Bug Reporting Workflow with n8n

Why Automate Bug Reporting Between Slack and Linear

For engineering teams that rely on Slack for day-to-day communication and Linear for issue tracking, manually copying bug reports from one system to the other is inefficient and prone to mistakes. Important details are often lost, formatting is inconsistent, and developers spend time on administrative work instead of resolving issues.

This article explains how to implement a robust n8n workflow that converts a simple Slack slash command into a fully structured Linear issue. The workflow also sends automated reminders in Slack so reporters can enrich the ticket with key diagnostic information.

Workflow Architecture at a Glance

The solution uses n8n as the automation layer between Slack and Linear. At a high level, the workflow performs the following actions:

  • Slack Slash Command – Team members submit a bug using /bug followed by a short description.
  • Webhook Node – n8n receives the HTTP POST payload from Slack and parses the bug text and metadata.
  • Issue Defaults Node – The workflow enriches the incoming data with required Linear attributes such as team ID and label IDs.
  • Linear Issue Creator Node – n8n calls the Linear API to create a new issue with a standardized, templated description.
  • Slack Reminder Node – After the issue is created, the workflow posts a follow-up message in Slack that tags the reporter and prompts them to add more detailed information.
  • Helper Nodes – Additional nodes assist with discovering Linear team and label IDs during initial configuration.

This architecture keeps the user interaction in Slack extremely lightweight while ensuring that issues in Linear are created with consistent structure and metadata.

Step 1 – Configure the Slack App and Slash Command

Begin by creating and configuring a Slack app that will power the /bug command. This app authorizes n8n to receive commands and send messages back to users.

  1. Navigate to https://api.slack.com/apps, click New App, then choose an appropriate name and the target workspace.
  2. In the app configuration, open OAuth & Permissions. Under Scopes in the Bot Token Scopes section, add the chat:write permission so the app can post messages in Slack.
  3. Go to the Slash Commands section and create a new command named /bug. This is the entry point for users to submit bug reports.
  4. In the command configuration, set the Request URL to the test URL provided by the n8n Webhook node that will receive the Slack payload.
  5. Add a clear description and usage hint so users understand how to use the command, for example, “Report a bug to Linear, usage: /bug <short description>.”
  6. Install the app into your Slack workspace so the command becomes available to your team.

Once configured, every invocation of /bug will trigger an HTTP request to your n8n workflow.

Step 2 – Prepare Linear Configuration with Helper Nodes

Linear requires specific identifiers for teams and labels when creating issues via the API. To simplify setup, the workflow includes helper nodes that query these values directly from Linear.

  • List Linear Teams – This node uses the Linear API to retrieve all teams associated with your account. Review the output to identify the team where new bug reports should be created.
  • Set Team – Once you select the correct team, this node stores the chosen team ID so it can be reused consistently across the workflow.
  • List Linear Labels – After the team is set, this node queries the labels available for that team. You can then select the appropriate label IDs to tag bug reports (for example, “Bug,” “Regression,” or “High Priority”).

By using these helper nodes during initial configuration, you avoid manual lookups and ensure that your Linear team and label references are accurate.

Step 3 – Main Workflow Execution Flow

With Slack and Linear configured, the main n8n workflow handles the end-to-end process of converting a Slack command into a well-structured Linear issue.

1. Capture the Slack Slash Command

When a user types /bug <description> in Slack, Slack sends an HTTP POST request to the n8n Issue Webhook node. This node:

  • Receives the full payload from Slack, including the text after the command, user information, and channel details.
  • Parses the bug description that will be used as the Linear issue title or part of the issue content.

2. Apply Default Issue Metadata

The Issue Defaults node enriches the raw Slack data with the necessary Linear configuration. It typically:

  • Assigns the predefined Linear team ID obtained from the helper nodes.
  • Applies one or more label IDs to categorize the issue as a bug or according to your internal taxonomy.
  • Prepares a payload structure that is compatible with the Linear GraphQL API.

This step ensures every issue created from Slack adheres to your team’s standards for project, team, and labeling.

3. Create the Issue in Linear via API

The Linear Issue Creator node performs the actual issue creation. Using the enriched data from the previous step, it sends a GraphQL mutation to Linear. The node typically:

  • Sets the issue title based on the initial Slack description or a processed variant.
  • Applies the configured team and label IDs.
  • Builds a templated description that includes structured sections, for example:
    • Expected behavior
    • Actual behavior
    • Steps to reproduce
    • Version or environment information

This template encourages reporters and developers to collect consistent diagnostic data for every bug, which improves triage and resolution times.

4. Notify the Reporter in Slack

After Linear confirms that the issue has been created, the Slack Reminder node sends a follow-up message back to the original reporter. This message typically:

  • Mentions the user who submitted the bug via Slack.
  • Includes the URL of the newly created Linear issue.
  • Prompts the user to add or refine details such as reproduction steps, expected versus actual behavior, and any relevant version or environment notes.

This automated feedback loop keeps the conversation in Slack while ensuring that the canonical record of the bug in Linear is fully documented.

Best Practices for Using This Automation

  • Standardize your templates – Adjust the Linear issue description template so it matches your team’s debugging workflow. Clear sections reduce back-and-forth questions.
  • Refine labels and teams – Use the helper nodes periodically to review and update team and label assignments as your Linear configuration evolves.
  • Educate your team – Provide short internal documentation on how to use the /bug command and what information is expected in follow-up comments.
  • Monitor usage – Track how often the workflow is triggered and whether additional fields or validations would improve data quality.

Get Started With the Slack to Linear Bug Reporter Template

Connecting Slack, n8n, and Linear transforms an ad hoc bug reporting process into a disciplined, low-friction workflow. Your team can capture issues directly from conversations, while n8n handles the structured creation of Linear issues and automated reminders for complete documentation.

Customize the template by adjusting team IDs, labels, and message copy to fit your environment and governance standards. Once deployed, this automation reduces manual overhead and aligns communication channels with your issue tracking system.

If you would like further guidance or a walkthrough of the setup, reach out and explore how to scale your development workflow with n8n-driven automation.

Automated Crypto News & Sentiment Analysis Bot

Automated Crypto News & Sentiment Analysis Bot – A Story Of One Overwhelmed Trader

When The Crypto Firehose Became Too Much

By the time the New York trading session opened, Alex already had twelve tabs of crypto news open.

Cointelegraph on one screen, Coindesk on another, Telegram groups buzzing, Twitter feeds flying past, and still, Alex could not answer a simple question with confidence:

“What is the actual market sentiment around Bitcoin today?”

Every headline seemed urgent, every article claimed to be critical. Some were bullish, some were bearish, and some were pure noise. Alex was a serious crypto trader, not a casual hobbyist, and missing the real mood of the market meant missing trades or taking on unnecessary risk.

What Alex wanted was simple:

  • One place to ask about a coin or topic
  • A quick, clear summary of the latest news
  • A trustworthy sentiment analysis based on multiple sources
  • No more drowning in clickbait headlines

Scrolling through Twitter one evening, Alex stumbled on something that sounded almost too good to be true: an n8n workflow template for an automated Crypto News & Sentiment Analysis Bot that runs directly inside Telegram.

Curious and slightly desperate, Alex decided to give it a try.

The Discovery: Turning Telegram Into A Crypto Intelligence Hub

Alex already used Telegram constantly to follow signals and communities, so the idea of getting curated crypto news and sentiment analysis right inside a Telegram chat felt natural.

The description of the n8n template was straightforward. It promised to:

  • Aggregate news from major crypto outlets
  • Use AI to extract the right keyword from any question
  • Filter and summarize only the relevant articles
  • Analyze market sentiment using GPT-4o
  • Deliver everything back to Telegram in a concise format

If it worked, Alex could stop juggling multiple sites and start asking one simple question at a time, such as “Bitcoin” or “NFT regulation”, and get a solid overview in seconds.

Setting Up The Bot: The Calm Before The Turning Point

On a quiet Saturday morning, Alex sat down with coffee and opened n8n.

Step 1 – Meeting @BotFather

The first task was to create a Telegram bot. Alex opened Telegram, searched for @BotFather, and followed the usual steps to create a new bot. Within minutes, a fresh bot token was ready.

Back in n8n, Alex connected this token to the Telegram node in the template. This would allow the workflow to listen to incoming messages and capture the chat id for each conversation, which is crucial for session management and keeping the context of the conversation intact.

Step 2 – Plugging In The AI Brain

Next, Alex provided OpenAI credentials so the workflow could use the GPT-4o model. This model would later handle the summarization and sentiment analysis part of the process.

With Telegram and OpenAI connected, the skeleton of the bot was ready. What remained was the content pipeline that would feed it fresh crypto news.

Step 3 – Choosing The News Sources

The template came preconfigured with a strong selection of crypto news outlets. Alex recognized many of them immediately:

  • Cointelegraph
  • Bitcoin Magazine
  • Coindesk
  • Bitcoinist
  • Newsbtc
  • Cryptopotato
  • 99Bitcoins
  • Crypto Briefing
  • Crypto.news

Alex liked that this list could be customized easily. More feeds could be added later, or some removed, depending on preference. For now, the default selection already covered a wide spectrum of perspectives, from breaking news to educational content.

Rising Action: Watching The Workflow Come To Life

With the setup complete, Alex opened Telegram and stared at the new bot. It was time for the first real test.

Telegram Integration In Action

Alex typed a simple message to the bot:

“Bitcoin”

Behind the scenes, the n8n workflow woke up. The Telegram integration captured the message, stored Alex’s chat id for session continuity, and passed the query into the next stage of the flow.

AI Keyword Extraction: Finding The Signal

Instead of trying to process the entire raw message, the workflow used an AI-powered agent to extract the core keyword. For a short message like “Bitcoin” this was trivial, but Alex knew that sometimes queries get more complex, such as:

“What is the current sentiment around Ethereum ETFs?”

In those cases, the AI keyword extraction would identify the most precise term, like “Ethereum ETF”, and use that to filter relevant news more effectively. It was a small detail, but it meant the system could stay focused even when the human input got messy.

Comprehensive News Aggregation

With the keyword in hand, the workflow moved on to news aggregation. It pulled the latest articles from all the configured sources, including Cointelegraph, Coindesk, Bitcoin Magazine, and the rest of the list.

Alex imagined this like a team of researchers fanning out across the internet, grabbing every recent article that might matter, and dropping them into a shared inbox.

Filtering The Noise

Of course, not everything was relevant. Some articles were general market overviews, some were about unrelated tokens, and some just mentioned the keyword in passing.

The workflow handled this by filtering the collected articles. It checked whether the extracted keyword appeared in the:

  • Title
  • Snippet or preview text
  • Full content

Only the articles that truly matched the topic moved forward in the pipeline. For Alex, this was the crucial shift from chaos to clarity. Instead of reading twenty tabs, the workflow would pay attention only to the pieces that actually mattered for the question at hand.

The Turning Point: GPT-4o Delivers The Verdict

Now came the part Alex was most curious about: could an AI model really summarize all this news and give a meaningful sentiment overview?

AI-Powered Summarization And Sentiment Analysis

The filtered articles were combined into a structured prompt and sent to the GPT-4o model. The instructions were clear:

  • Produce a concise summary of the current news landscape for the keyword
  • Analyze the overall market sentiment, based on the aggregated articles
  • Include reference links to the original news sources

Within moments, Telegram lit up.

The bot responded with a short, well-structured message:

  • A clear summary of what had happened recently around Bitcoin
  • A balanced sentiment analysis, highlighting whether the tone was bullish, bearish, or mixed
  • A list of links to the original articles, in case Alex wanted to dig deeper

Instead of twenty tabs and conflicting opinions, Alex now had a single, AI-curated snapshot of the market mood, backed by multiple reputable sources.

The Resolution: From Overwhelm To Confident Decisions

Over the next few days, Alex kept using the bot for different queries:

  • “Ethereum”
  • “NFT”
  • “Solana outage”
  • “Bitcoin halving”

Each time, the same pattern repeated. The bot:

  1. Listened to the Telegram message and captured the chat id
  2. Extracted a precise keyword with AI
  3. Aggregated news from top crypto outlets
  4. Filtered only the relevant articles
  5. Used GPT-4o to summarize the news and analyze sentiment
  6. Returned everything as a compact message with links

Real Benefits In Daily Trading

As the workflow became part of Alex’s routine, the advantages became obvious.

  • Time-saving – No more hopping between Cointelegraph, Coindesk, Bitcoin Magazine, and others. The bot delivered curated summaries straight into Telegram.
  • Accurate sentiment insight – Instead of guessing from a few loud headlines, Alex got a consolidated market mood analysis based on multiple articles.
  • Instant updates – Whenever something felt uncertain, a quick query to the bot brought back a fresh overview.
  • Customizable coverage – Alex could add or remove RSS feeds in n8n to tailor the sources to personal preferences or new niches.

For a trader, investor, or even a curious crypto enthusiast, this was more than a neat automation. It was a way to regain control over information overload.

How You Can Follow The Same Path

If you find yourself in Alex’s position, juggling countless news sites and chats just to understand what is going on, you can set up the same n8n Crypto News & Sentiment Analysis Bot in a few steps.

Quick Start Guide

  1. Create a Telegram bot with @BotFather and grab the bot token.
  2. Open n8n and import the Crypto News & Sentiment Analysis Bot template.
  3. Connect the Telegram node using your bot token so the workflow can receive messages and manage chat sessions.
  4. Provide your OpenAI credentials so the GPT-4o model can perform summarization and sentiment analysis.
  5. Review and customize the RSS feeds from sources like Cointelegraph, Coindesk, Bitcoin Magazine, and others. Add or remove feeds to match your preferred coverage.
  6. Activate the workflow, open Telegram, and send a query such as “Bitcoin” or “NFT”.

Within seconds, you will receive a concise summary of the latest news, an overview of the current sentiment, and direct links to the original articles, all in a single Telegram message.

Why This n8n Template Matters In The Crypto Space

The crypto market moves quickly, and missing a key shift in sentiment can be costly. This automated n8n workflow combines:

  • Trusted crypto news sources
  • AI-powered keyword extraction
  • Smart article filtering
  • GPT-4o summarization and sentiment analysis
  • Instant delivery through Telegram

The result is a practical, real-world tool that turns scattered information into actionable insight. Instead of spending your energy collecting data, you can focus on making better crypto decisions.

Take The Next Step

If you are ready to stop drowning in tabs and start getting clear, AI-driven crypto insights directly in your Telegram chat, you can use the same template that changed Alex’s workflow.

Set up your own Automated Crypto News & Sentiment Analysis Bot, connect it to Telegram, and let n8n handle the heavy lifting of news aggregation and sentiment analysis. Whether you trade daily or simply want to stay ahead as an investor or enthusiast, this workflow helps you stay informed, focused, and one step ahead in the crypto market.

How to Build a Crypto News & Sentiment Analysis Bot

How to Build a Crypto News & Sentiment Analysis Bot in n8n

Overview

This guide explains how to implement a crypto news and sentiment analysis bot in n8n using a workflow template. The automation collects cryptocurrency news from multiple RSS feeds, uses OpenAI to extract a relevant keyword and generate a summary with sentiment, then delivers the result to users via a Telegram bot.

The documentation-style breakdown below is aimed at technical users who are already familiar with n8n concepts such as triggers, nodes, credentials, and data mapping.

Workflow Architecture

The workflow is designed as an event-driven Telegram bot that processes each user message as an independent execution, while still maintaining user context through a session identifier. At a high level, the data flow is:

  1. Telegram Trigger receives a user message.
  2. Session handling captures the user’s chat ID as a sessionId.
  3. OpenAI node analyzes the message and extracts a single keyword.
  4. Multiple RSS Feed nodes fetch the latest crypto news from several sources.
  5. Merge / Code node combines all articles into one list and filters by the keyword.
  6. Prompt construction builds a structured input for the summarization model.
  7. OpenAI GPT-4o node generates a news summary and sentiment analysis.
  8. Telegram Send node formats and returns the response to the correct user chat.

Node-by-Node Breakdown

1. Telegram Bot Setup & Trigger

Purpose: Receive crypto-related queries from Telegram users and initiate the n8n workflow.

  • External prerequisite: Create a Telegram bot using @BotFather.
    • Run /newbot in Telegram with @BotFather.
    • Follow the prompts to define the bot name and username.
    • Copy the bot token provided at the end. This token is required as n8n credentials.
  • n8n node type: Telegram Trigger (or equivalent Telegram node configured as a webhook listener).
  • Credentials: Configure a Telegram credential in n8n using the bot token from @BotFather.
  • Core parameters:
    • Update type: typically Message, so the workflow runs when a user sends a text message.
    • Webhook URL: automatically set by n8n if using the Telegram Trigger node.

The trigger node exposes the incoming Telegram payload, including the chat.id and text fields. These are used in later nodes for session tracking and keyword extraction.

2. Session Initialization

Purpose: Maintain per-user context so that each response is routed back to the correct Telegram chat and can be treated as an individual session.

  • Data used: chat.id from the Telegram Trigger output.
  • Session identifier: Store the user’s chat.id as sessionId.

This can be done using a Set node or a Code node:

  • Set node approach:
    • Create a new field, for example sessionId.
    • Map it to the expression {{$json["message"]["chat"]["id"]}} (exact path may vary depending on the Telegram node output).

The sessionId is later referenced when sending the reply so that the response is always delivered to the same user who initiated the request. This pattern allows the workflow to handle multiple concurrent users safely, since each execution carries its own sessionId value.

3. Keyword Extraction with OpenAI

Purpose: Interpret the user’s natural language query and derive a single, relevant keyword that will be used to filter news articles.

  • Node type: OpenAI (Chat or Completion model, depending on your n8n version).
  • Model: OpenAI GPT model configured for keyword extraction (for example, a GPT-4 or GPT-3.5 variant, according to your account).
  • Credentials: OpenAI API key added as an n8n credential.

Input: The user message text from Telegram, for example via an expression like {{$json["message"]["text"]}}.

Prompt design: The node should instruct the model to return exactly one keyword, such as a cryptocurrency symbol or topic, that will serve as the filter for news articles. For instance, if the user writes “What is happening with Bitcoin and ETFs today?”, the model should return a single keyword like Bitcoin.

This constraint is important, since the downstream filtering logic expects a single term, not a list. If the user sends a vague query with no obvious crypto-related term, you may want to handle that case by returning a generic keyword, but the template focuses on the core path where a meaningful crypto keyword is identified.

4. RSS Feed Aggregation

Purpose: Collect the latest news articles from multiple cryptocurrency news outlets to ensure broad and diverse coverage.

  • Node type: One or more RSS Feed Read nodes (or equivalent HTTP Request nodes configured for RSS URLs).
  • Sources: The template uses multiple leading crypto news sites, for example:
    • Cointelegraph
    • Bitcoin Magazine
    • Coindesk
    • Bitcoinist
    • NewsBTC
    • Cryptopotato
    • 99Bitcoins
    • Cryptobriefing
    • Crypto.news

Each RSS node typically outputs fields such as title, link, and content or snippet, depending on the feed structure. The template assumes that at least the title and link are available for all sources.

5. Merging & Filtering Articles

Purpose: Combine all fetched articles into a single list, then keep only those that are relevant to the extracted keyword.

5.1 Merge Articles

  • Node type: Merge node or a Code node, depending on how the template is structured.
  • Operation: Join items from multiple RSS nodes into one unified collection.

After this step, the workflow has a consolidated array of articles from all configured news feeds.

5.2 Filter by Keyword

  • Node type: Commonly a Code node using JavaScript, or a combination of IF nodes and expressions.
  • Input:
    • The merged list of articles.
    • The extracted keyword from the OpenAI keyword-extraction node.

Filtering logic: For each article, check if the keyword is present in one or more of the following fields:

  • title
  • snippet or description (if provided by the RSS feed)
  • content or any full-text field if available

Only articles that contain the keyword in at least one of these fields are kept. The result is a subset of the overall news feed focused on the topic requested by the user.

If no articles match the keyword, the filtered list may be empty. The base template focuses on the main success path, but in production you may want to handle this edge case by returning a fallback message to the user indicating that no recent articles were found for that topic.

6. Prompt Construction for Summarization

Purpose: Build a structured prompt that provides the AI summarization model with all relevant articles and clear instructions on how to respond.

  • Node type: Set node or Code node to assemble the prompt string.
  • Input: The filtered list of articles, including at least their titles and links.

The prompt should include:

  • The extracted keyword or topic.
  • A list of article titles with their URLs.
  • Instructions for the model to:
    • Provide a concise summary of the latest news related to the keyword.
    • Analyze the overall market sentiment (for example, bullish, bearish, neutral) based on the articles.
    • Return or reference the links to the original articles.

The template specifically instructs the AI to output:

  • A summary of the news.
  • Market sentiment analysis.
  • Links to reference news articles.

This structured prompt ensures that the summarization model has enough context to generate usable, actionable insights from the filtered news data.

7. Summarization & Sentiment Analysis with GPT-4o

Purpose: Convert the filtered raw news articles into a human-readable summary with sentiment analysis tailored to the user’s keyword.

  • Node type: OpenAI node configured for chat completion or text completion.
  • Model: GPT-4o, used to generate a concise, coherent output.
  • Credentials: Same OpenAI API key used earlier, or another valid OpenAI credential.

Input: The constructed prompt string that includes article titles and links, plus the instructions for summary and sentiment.

Output: A single AI-generated text block that typically includes:

  • A short overview of what is happening around the requested crypto topic.
  • A sentiment assessment, for example indicating if the tone of recent news is mostly positive, negative, or mixed.
  • References to the main articles, often with inline or listed URLs.

This step is where the workflow transforms scattered news items into a condensed, user-friendly report.

8. Formatting & Telegram Response

Purpose: Prepare the AI output in a Telegram-friendly format and send it back to the correct user chat.

8.1 Extract and Format the AI Response

  • Node type: Set or Code node to shape the final message string.
  • Input: The text output from the GPT-4o node.

Typical formatting steps include:

  • Extracting the main response text from the OpenAI node output.
  • Optionally adding basic formatting such as line breaks or bullet points that display well in Telegram.

8.2 Send Message to the User

  • Node type: Telegram node (Send Message operation).
  • Credentials: Same Telegram bot credential used in the trigger.
  • Key parameters:
    • Chat ID: Use the sessionId captured earlier, for example {{$json["sessionId"]}} or the equivalent path.
    • Text: The formatted summary and sentiment analysis from the previous node.

It is important to replace any placeholder chat ID in the template with the actual sessionId value, otherwise the message will not be routed to the correct user. Once configured, the bot will send the summarized crypto news and sentiment analysis directly into the user’s Telegram chat as a standard message.

Configuration Notes

Telegram Bot Integration

  • Create your bot via @BotFather and store the token safely.
  • In n8n, create a Telegram credential using that token.
  • Attach this credential to both the Telegram Trigger node and the Telegram Send node.

OpenAI Credentials & Models

  • Add your OpenAI API key in n8n as an OpenAI credential.
  • Use this credential for:
    • The keyword extraction node.
    • The GPT-4o summarization node.
  • Select an appropriate model for each step. The template uses GPT-4o for summarization, while the keyword extraction can also run on a lighter GPT model if desired.

RSS Feeds Customization

  • The template comes with a predefined set of crypto RSS feeds, including:
    • Cointelegraph
    • Bitcoin Magazine
    • Coindesk
    • Bitcoinist
    • NewsBTC
    • Cryptopotato
    • 99Bitcoins
    • Cryptobriefing
    • Crypto.news
  • You can:
    • Add more RSS nodes to broaden coverage.
    • Remove sources that are not relevant to your audience.
    • Adjust polling or fetch logic depending on how you want to handle frequency and volume.

Usage & Testing

  • Deploy the workflow in n8n and ensure the Telegram webhook is active.
  • Open your Telegram client and search for your bot by its username.
  • Send crypto-related queries such as:
    • Bitcoin
    • ETH
    • NFT
    • Solana news today
  • Observe the response, which should contain:
    • A concise news summary.
    • A sentiment overview.
    • Links to the original articles.

Advanced Customization

Prompt Tuning & Output Control

You can refine the behavior of the summarization and sentiment analysis by adjusting the prompt text used for GPT-4o:

  • Change how detailed the summary should be.
  • Request more granular sentiment descriptions.
  • Specify a maximum length or structure for the response.

Keyword Extraction Behavior

The keyword extraction step currently focuses on returning a single keyword. Depending on your use case, you might:

  • Allow multiple keywords and adjust the filtering logic accordingly.
  • Introduce validation to handle queries that are not clearly crypto-related.
  • Add a fallback keyword or generic “crypto market” summary when no specific coin is detected.

Filtering & Relevance Logic

The article filtering can be extended by:

  • Applying case-insensitive matching or simple normalization of the keyword.
  • Prioritizing newer articles or limiting the number of items sent to the summarization model.
  • Adding additional conditions, such as only including articles from specific domains or categories.

Error Handling Considerations

Automate Expenses Extraction to Google Sheets

How One Founder Stopped Copy-Pasting Receipts And Let n8n Handle It

The Late-Night Spreadsheet Problem

On a Thursday night, long after her team had logged off, Maya was still staring at a Google Sheet.

She was the founder of a small but fast-growing agency, and like many founders, she wore too many hats. One of them was “unofficial bookkeeper.” Every week she dug through her inbox, opened dozens of receipt emails, and copied amounts, dates, and descriptions into a spreadsheet.

Some receipts were PDFs, others were blurry images. A few had confusing subjects like “Your order is on the way” or “Thanks for your purchase.” She tried to be careful, but every so often she would transpose digits, miss a receipt, or forget to categorize an expense. Her accountant would then ping her at the end of the month with questions she did not have time to answer.

That night, after pasting yet another receipt into her Google Sheet, she caught herself thinking: “There has to be a better way to track expenses from email to spreadsheet.”

The Search For An Automation That Actually Works

Maya had experimented with automation tools before, but most of them felt fragile. They worked until an email format changed or a receipt came in as an attachment instead of in the body of the message.

What she really wanted was simple:

  • Read new emails from her inbox
  • Detect which ones were receipts or expense related
  • Extract key data like date, amount, currency, and category
  • Send everything neatly into specific columns in Google Sheets

While browsing for “expense automation to Google Sheets,” she discovered an n8n workflow template that claimed to do exactly this. It promised to automate expense extraction from emails to Google Sheets using a combination of email filters, AI-based OCR, and a ready-made integration with Google Sheets.

Curious and slightly skeptical, she opened the template.

Meeting The n8n Expense Extraction Template

The template description read like a checklist of her pain points. It explained that the workflow would:

  • Continuously check for new emails in her inbox
  • Set up variables with keywords like “expenses” or “receipt” to identify relevant messages
  • Filter email subjects using regex to catch only the right emails
  • Read receipts from attachments with an AI-powered OCR tool
  • Format the data into columns such as Date, Description, Category, Currency, and Amount
  • Append everything straight into a Google Sheet

It was exactly the flow she had been trying to cobble together with manual copy-paste. The difference was that this template already had the logic built in, and it used tools designed for accuracy instead of relying on her tired eyes at 11 p.m.

Rising Action: Turning Chaos Into A Workflow

Step 1 – Letting n8n Watch The Inbox

The first step in the template was simple but powerful. An email node, configured with IMAP credentials, would monitor her inbox for new emails. For Maya, that meant connecting her Gmail account securely so n8n could scan incoming messages without her ever opening them.

Instead of her scrolling through a cluttered inbox, the workflow would quietly check for new messages in the background, ready to act whenever a receipt arrived.

Step 2 – Teaching The Workflow What “Expense” Means

Next, the template introduced a variables setup step. Here, Maya defined the keywords that typically appeared in her receipt emails, such as “expenses” and “receipt.”

These variables became the foundation for how the workflow would recognize relevant emails. She realized she could expand this list later with other patterns like “invoice” or “payment confirmation” if needed.

Step 3 – Filtering Subjects With Regex

The real turning point came with the subject check node. Instead of scanning every email, the workflow used regular expression (regex) pattern matching on the subject line.

If the subject contained any of the defined keywords, the email passed the filter and moved on to the next step. If not, the workflow simply ignored it.

This one check meant her personal emails, newsletters, and random notifications would never clutter her expense sheet again.

Step 4 – Reading Receipts With AI

Of course, recognizing a receipt email was only half the battle. The real challenge was extracting structured data from attachments.

That was where the template’s receipt reading step came in. It used Mindee’s AI-powered OCR to process attachments like PDFs or images. The tool extracted key information automatically, including:

  • Date of the expense
  • Total amount
  • Currency
  • Category-related details from the receipt

Maya no longer had to squint at pixelated receipts or retype numbers. The workflow handled recognition for her with an accuracy that quickly outperformed her late-night manual work.

Step 5 – Shaping Data For Google Sheets

Once the receipt data was extracted, the workflow moved into a data formatting step. Here, the template transformed the raw output into a structure that matched her Google Sheet.

It set specific fields, including:

  • Date – taken from the receipt
  • Description – often derived from the email subject so she could recognize the expense later
  • Category – based on the receipt data
  • Currency – captured directly from the receipt
  • Amount – the total cost of the transaction

Everything was lined up to match the columns she was already using. No extra mapping in her head, no guessing which number belonged where.

Step 6 – The Moment It Hits Google Sheets

The final step was where the magic became visible. Using Google Sheets integration with OAuth2 API authentication, the workflow securely connected to her chosen spreadsheet.

Every time a relevant email arrived, the workflow would append a new row to the Google Sheet with all the formatted data. Maya watched as, in real time, her sheet updated itself without her touching a single cell.

The Turning Point: From Dread To “Done”

A week later, Maya noticed something strange. Her weekly “expense admin” session had quietly disappeared from her calendar. There was simply no need for it anymore.

Instead of digging through her inbox, she opened her Google Sheet and saw a clean, chronological list of expenses, each with date, description, category, currency, and amount already filled in. Receipts from different vendors and currencies were captured without her intervention.

For the first time in months, she handed her accountant a complete, accurate report without spending hours the night before.

What Changed For Maya With This n8n Template

Time Saved Every Single Week

The most obvious change was time. The workflow had automated manual data entry across all her expense emails. What used to take an hour or more each week now happened continuously in the background.

Accuracy Without Extra Effort

By relying on AI-based receipt recognition rather than manual typing, the number of mistakes dropped dramatically. No more missing receipts, mis-typed amounts, or forgotten currencies.

Better Organization In Google Sheets

Her expense data was now neatly stored in Google Sheets, ready for filtering, reporting, or sharing. She could quickly slice expenses by category or date, and everything was already in the correct columns.

Room To Grow And Scale

As her agency expanded, Maya realized she could easily adapt the workflow. She could connect additional email accounts, add more keywords, or even incorporate other data sources into the same expense tracking system. The template was not just a quick fix, it was a scalable backbone for her financial tracking.

Resolution: From Manual Chore To Reliable Automation

What began as a late-night frustration with spreadsheets turned into a reliable automation that quietly handled one of Maya’s most annoying recurring tasks. She no longer dreaded the end-of-month expense review. Instead, she trusted that her n8n workflow template was catching new receipts, extracting the data, and logging everything into Google Sheets with minimal oversight.

Her inbox was still busy, but her spreadsheet was always up to date.

Set Up The Same Workflow For Your Expenses

If you recognize yourself in Maya’s story, you do not need to rebuild her solution from scratch. You can use the same n8n automation template to:

  • Connect your email inbox and check for new messages automatically
  • Define variables and keywords like “expenses” or “receipt” to detect relevant emails
  • Filter subjects with regex so only real receipts are processed
  • Use AI-based OCR to read receipt attachments and extract structured data
  • Format that data into columns for Date, Description, Category, Currency, and Amount
  • Append each expense as a new row in your Google Sheet using secure OAuth2 authentication

Set it up once, then watch your expense tracking run itself while you focus on actual work instead of copy-pasting numbers.

Automate Expense Tracking from Emails to Google Sheets

Automate Expense Tracking from Emails to Google Sheets

From Inbox Chaos to Clear Financial Overview

Your inbox is probably full of receipts, invoices, and payment confirmations. Each one represents money spent, yet tracking them often turns into a stressful, manual task. You open an email, download the attachment, copy amounts, dates, and descriptions into a spreadsheet, and repeat this over and over.

It is easy to postpone this work, and even easier to make mistakes when you finally sit down to do it. The result: scattered information, delayed reporting, and a constant feeling that your finances are never quite up to date.

Now imagine a different reality. Every time a receipt lands in your inbox, it is automatically read, understood, and added to a clean Google Sheet. No more copy-paste, no more digging through emails, no more late-night reconciliation sessions. Just a living ledger that quietly updates itself in the background while you focus on work that actually grows your business.

This is exactly what this n8n workflow template helps you achieve. With n8n, Mindee Receipt API, and Google Sheets, you can turn a tedious chore into a reliable automated system that supports smarter decisions and long-term growth.

Adopting an Automation Mindset

Automation is not just about saving a few minutes. It is about reclaiming mental space, reducing friction, and building systems that work for you around the clock. When you automate something as routine as expense tracking, you free up capacity for planning, strategy, and creativity.

This workflow template is a practical starting point. You do not need to be a developer to use it, and you do not have to automate everything at once. Think of it as your first building block toward a more streamlined, focused way of working. Once you experience what it feels like to have expenses handled automatically, you will start seeing other areas you can optimize too.

The Tools Behind the Transformation

To bring this automation to life, the workflow connects three powerful tools:

  • n8n – The automation platform that orchestrates the entire workflow and connects all services.
  • IMAP Email – Used to watch your inbox for new messages and pull in relevant emails and attachments.
  • Mindee Receipt API – An OCR and document parsing service that reads receipts and extracts key expense details.
  • Google Sheets – Your always-available, cloud-based expense ledger that stores and organizes the extracted data.

Each part plays a specific role, and n8n ties them together into a clear, repeatable process that runs whenever a new receipt email arrives.

How the n8n Expense Workflow Actually Works

Let us walk through what happens step by step, so you can see how your messy inbox turns into structured financial data.

1. Watching Your Inbox for New Expense Emails

The journey starts in your email inbox. The workflow uses IMAP to monitor incoming messages. Whenever a new email appears, n8n pulls in the message details, including:

  • Subject line
  • Metadata
  • Attachments (such as receipt PDFs or images)

This gives the workflow everything it needs to decide whether an email is relevant for expense tracking.

2. Defining Smart Filters With Subject Patterns

Not every email in your inbox is an expense, so the workflow sets up a helpful filter. It defines a variable called subjectPatterns that contains keywords such as "expenses" and "reciept". The misspelling is intentional so that common typos are also captured.

These patterns are used as a regular expression to identify which emails are likely related to expenses or receipts. This is where you start teaching your automation how to think about your inbox.

3. Passing Only Relevant Emails Forward

Next, the workflow checks each email subject against the subjectPatterns regular expression. If the subject line matches one of the patterns, the email is treated as an expense-related message and moves forward in the process.

Emails that do not match are ignored for this workflow, which keeps your automation focused and efficient.

4. Extracting Receipt Data With Mindee Receipt API

For emails that include receipt attachments, the workflow calls the Mindee Receipt API. This is where the magic of OCR and document parsing comes into play.

Mindee reads the attached receipt image or PDF and extracts key financial details, such as:

  • Date of the transaction
  • Category of the expense
  • Currency used
  • Total amount paid

Instead of you squinting at a receipt and typing numbers into a spreadsheet, the API does this work automatically, consistently, and at scale.

5. Structuring the Data for Google Sheets

Once Mindee has extracted the information, n8n prepares it for your spreadsheet. The workflow maps the parsed fields into a clear structure with columns such as:

  • Date
  • Description (parsed from the email subject)
  • Category
  • Currency
  • Amount

This step is about turning raw data into something that is easy to scan, filter, and analyze. Your Google Sheet becomes a simple, reliable overview of your expenses, line by line.

6. Appending a New Row to Google Sheets

Finally, the workflow appends the structured data as a new row in your chosen Google Sheet. Each time an expense email is processed, your ledger grows automatically, no manual input required.

Over time, this creates a complete, continuously updated record of your expenses, directly sourced from your inbox.

Why This Workflow Is a Game Changer

Automating expense tracking is more than a convenience. It can reshape the way you relate to your finances and your time.

  • Save hours of manual work No more copying values from emails into spreadsheets. The workflow does it for you, every single time.
  • Improve accuracy Automated extraction reduces the risk of typos, missed entries, and inconsistent formatting.
  • Scale without extra effort Whether you receive a handful of receipts or dozens per day, the workflow handles them at the same pace.
  • Stay cloud-first and connected Email, OCR, and Google Sheets all work together through n8n, so your data is available wherever you are.

Most importantly, this system frees you from repetitive admin work so you can focus on clients, strategy, and growth.

Making the Template Your Own

This workflow template is ready to use, but it is also meant to be customized. As your processes evolve, your automation can evolve with them.

Adjusting Email Subject Filters

You can modify the subjectPatterns variable to better match the way your vendors, tools, or team label expense emails. Add or change keywords to capture different subjects, such as "invoice", "payment receipt", or your company-specific terms.

Connecting Your Own Google Sheet

The workflow uses a Google Sheets integration that you can point to any spreadsheet you own. To adapt it:

  • Update the Google Sheet ID to target your own document.
  • Make sure the connected Google account has permission to access and edit that sheet.
  • Confirm the column order so that the data maps correctly to Date, Description, Category, Currency, and Amount.

With OAuth2 access properly configured, the workflow can safely write new rows whenever it processes an email.

Adding Extra Data Processing Steps

If you want to go further, you can extend the workflow by:

  • Including more fields from the Mindee Receipt API, such as vendor name or tax amount.
  • Triggering notifications when expenses above a certain amount are detected.
  • Splitting expenses into different sheets based on category or team.

This template is a solid foundation, and n8n makes it easy to experiment, iterate, and refine your automation as your needs grow.

Take the Next Step Toward a More Automated Workflow

Every powerful automation journey starts with one simple, useful workflow. By turning your email receipts into structured rows in Google Sheets, you are not just saving time. You are building a habit of designing systems that support you, instead of relying on constant manual effort.

Once this is in place, you will see new opportunities to connect tools, automate reports, and remove friction from your daily operations. This template is your invitation to start that journey.

Ready to automate your expense tracking, reduce busywork, and focus on what really matters? Start with this n8n workflow template and transform your email receipts into organized, actionable data.