Automate Todoist Daily Tasks with n8n

Automate Todoist Daily Tasks from a Template with n8n

Every day you sit down to work, you already know how it starts: opening Todoist, recreating the same routine tasks, setting times, and double checking that nothing slipped through the cracks. It is familiar, but it quietly drains your focus and energy.

What if that part of your day simply took care of itself?

With this n8n workflow template, your daily Todoist tasks can be generated automatically from a single template project. The workflow reads simple scheduling rules from each task description, creates the right tasks for the right days, keeps your Inbox free from duplicates, and sends Slack notifications so you and your team stay aligned. It is a small automation that can open the door to a calmer, more intentional workday.

From repetitive setup to intentional focus

Manual task creation feels harmless, yet it adds up. Each minute you spend recreating “check metrics”, “plan day”, or “follow-up emails” is a minute you are not doing the work that actually moves your goals forward.

Automating Todoist with n8n helps you:

  • Stop re-creating the same daily routines over and over.
  • Use one Todoist template project as your single source of truth.
  • Control due days and times with a simple, readable description format.
  • Keep your Inbox clean by avoiding duplicate daily tasks.
  • Stay informed with realtime Slack alerts whenever tasks are created.

Instead of starting your day by setting up work, you can start by doing the work that matters.

Shifting your mindset: automation as a growth habit

This workflow is more than a handy shortcut. It is a practical first step toward a more automated, scalable way of working. By investing a few minutes in setup, you create a system that quietly supports you every morning.

Think of it as a foundation you can build on. Once you see how easy it is to turn a recurring routine into an automated flow, you will start noticing other opportunities to simplify your processes with n8n. Today it is daily Todoist tasks, tomorrow it might be client onboarding, reporting, or content publishing.

Let us walk through how this specific template works, then you can adapt it to your own style and needs.

How the n8n Todoist template works behind the scenes

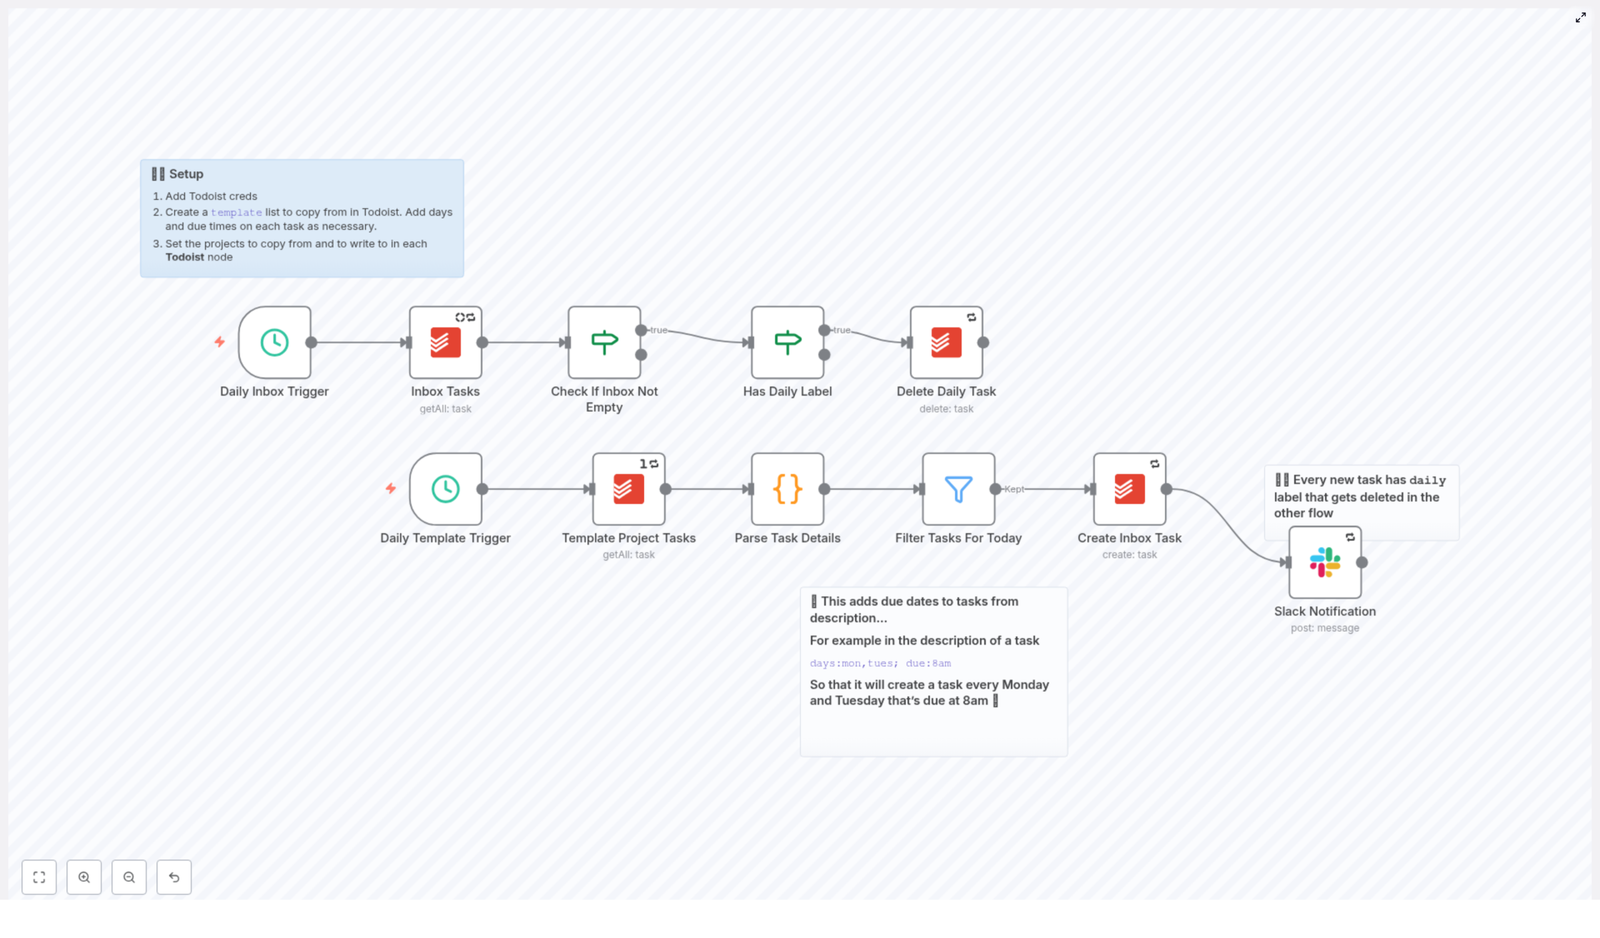
The workflow is built around two coordinated sub-flows that run on a schedule:

  • Inbox cleanup flow – Clears out yesterday’s “daily” tasks so your Inbox never fills with old routines.
  • Template creation flow – Reads tasks from a Todoist template project, interprets scheduling instructions from the description, and creates fresh tasks in your Inbox for the current day, with Slack notifications for visibility.

Both flows run at the same configured time, for example at 05:10 in the morning. First, the cleanup removes outdated daily tasks. Then the template flow adds new ones, tailored to the current weekday and due time. You wake up to a clean, ready-to-go task list.

Core building blocks of the workflow

Schedule Trigger: your daily automation heartbeat

The automation starts with two Schedule Trigger nodes in n8n, both set to the same run time. One trigger launches the Inbox cleanup, the other launches the task creation from your template project.

By running both on a consistent schedule, you ensure that:

  • Old daily tasks are removed first.
  • New tasks are created immediately after, without any overlap.

This rhythm keeps your Todoist Inbox lean and predictable every single day.

Todoist getAll: reading from your template project

The Todoist: getAll node pulls in all tasks from your chosen template project. This project is where you design your ideal daily routines once, instead of rebuilding them every day.

Each template task includes simple metadata in its description to tell the workflow when it should appear, for example:

days:mon,tues; due:8am

This line tells n8n to create that task on Monday and Tuesday, due at 8:00 AM. You can list multiple days with commas and keep the format human friendly so it is easy to maintain.

Code node: parsing the task details into something Todoist understands

The heart of the template is a Code node that parses each task’s description and converts it into structured data. It does three key things:

  1. Extracts the task content and description.
  2. Splits the description by semicolons into key-value pairs like days and due.
  3. Converts a human-friendly time string (for example 8am or 1.30pm) into a UTC timestamp that Todoist accepts as dueDateTime.

Here is the time parsing function used inside the node:

function parseTimeString(timeString) {  const regex = /^(\d{1,2})(\.)?(\d{2})?([ap]m)$/i;  const match = timeString.match(regex);  if (!match) {  throw new Error("Invalid time format");  }  let hours = parseInt(match[1], 10);  let minutes = match[3] ? parseInt(match[3], 10) : 0;  const period = match[4].toLowerCase();  if (hours === 12) {  hours = period === 'am' ? 0 : 12;  } else {  hours = period === 'pm' ? hours + 12 : hours;  }  if (minutes < 0 || minutes >= 60) {  throw new Error("Invalid minutes");  }  const now = DateTime.now().set({ hour: hours, minute: minutes, second: 0, millisecond: 0 });  return now.toUTC();
}

This code uses the Luxon DateTime object that is available in n8n code nodes. It sets the time on today’s date in your server’s local timezone, then converts it to UTC. The result is a clean dueDateTime value that Todoist’s API can use directly.

Filter node: choosing only the tasks for today

Once each task has parsed metadata, a Filter node checks whether the days value includes today’s weekday token, such as mon, tues, wed, and so on.

Only tasks that match the current day move forward in the workflow. Everything else is skipped until its scheduled day comes around. This is how a single template project can power your entire weekly routine without manual intervention.

Todoist create: turning templates into real Inbox tasks

The Todoist: create node is where your templates become real tasks in your Inbox. For each filtered item, it:

  • Sets content as the task title.
  • Copies the original description (including metadata) into the task.
  • Maps dueDateTime to the ISO UTC timestamp from the parsing function.
  • Applies a temporary daily label so the cleanup flow can find it later.

The result is a fresh set of daily tasks, correctly timed, labeled, and ready for action, without you lifting a finger each morning.

Slack notification: sharing visibility with your team

To close the loop, a Slack node sends a simple message to a chosen channel after each task is created. You can include the task name, due time, and any context that helps your team know what has been added.

This is especially powerful if your routines affect others, for example daily standups, reporting, or shared checklists. Everyone can see what is scheduled without needing to ask.

How the workflow keeps duplicates out of your Inbox

One of the most satisfying parts of this setup is how clean it keeps your Todoist Inbox. The workflow uses a straightforward two-phase strategy:

  1. Cleanup phase – The Inbox cleanup flow runs first, finds all tasks that still have the daily label from previous runs, and deletes them.
  2. Creation phase – The template flow then creates new tasks for the current day, each with the daily label applied again.

This pattern prevents duplicates and keeps only the tasks that are relevant for today. If you prefer to keep a history of daily tasks, you can adjust the delete node or change how labels are used, but the core idea remains the same: your Inbox should support your focus, not fight it.

Setting everything up in n8n and Todoist

The workflow is ready to import and customize. Here is how to get it running quickly:

  1. Import the workflow JSON into your n8n instance.
  2. Add Todoist credentials in n8n using your API token, then select the correct project IDs in:
    • The Todoist: getAll node for your template project.
    • The Todoist: create node for your Inbox project.
  3. Prepare your template project in Todoist. For each template task, add metadata in the description, for example:
    days:mon,tues; due:8am

    You can include multiple comma separated days in the days field.

  4. Set your schedule triggers to the time you want the workflow to run each day, such as early morning before you start work.
  5. Connect Slack by adding your credentials and selecting the channel that should receive notifications, if you want alerts.
  6. Run a test by manually triggering the template flow once, then check your Todoist Inbox and Slack channel to confirm everything looks right.

In just a few minutes, you will have a daily routine that runs itself.

Description metadata format: simple rules that unlock smart scheduling

To keep the parser reliable and easy to maintain, use a consistent description pattern:

days:mon,tues; due:8am

Some practical examples:

  • days:mon,wed,fri; due:7.30am – Create tasks on Monday, Wednesday, and Friday at 7:30 AM.
  • days:tues; due:1pm – Create a task every Tuesday at 1:00 PM.
  • days:mon,tues,wed,thurs,fri; due:9am – Create a weekday morning reminder at 9:00 AM.

Once you get comfortable with this pattern, you can quickly adjust your weekly routines just by editing descriptions in your template project.

Ideas to customize and grow this workflow

This template is intentionally simple, but it is also a powerful base to experiment and learn from. As you get familiar with it, you can extend it in many ways, such as:

  • Beyond daily routines – Enhance the parser to support date ranges, weekly or monthly schedules, or even custom recurrence rules.
  • Multiple timezones – Map tasks to specific timezone offsets if you coordinate with people in different regions.
  • Advanced filters – Only create tasks with certain tags, labels, or priorities from the template project.
  • Resilience and error handling – Add error catching nodes and Slack alerts when a task fails to be created.
  • Richer metadata – Extend the description format with keys like project: or priority: and map those fields in the Todoist create node.

Each small improvement is another step toward a workflow that reflects exactly how you and your team like to operate.

Troubleshooting and refining your setup

Tasks are not being created

If tasks do not appear in your Todoist Inbox, check the following:

  • Verify that your Todoist API credential in n8n is valid.
  • Confirm that the template project ID is correctly set in the Todoist: getAll node.
  • Ensure the description format follows the pattern with days: and due:.
  • Look at the Code node logs for parsing errors, such as invalid time formats.

Task times look incorrect

The parser builds a datetime for the current day in the server’s local timezone, then converts it to UTC. If tasks show at the wrong hour:

  • Review the server timezone configuration.
  • Adjust the parsing logic to use a specific timezone, for example:
    DateTime.now().setZone('America/New_York')

Duplicates are still appearing

If you notice duplicates, focus on the timing of the two sub-flows:

  • Confirm the cleanup flow runs before the creation flow.
  • Make sure the daily label is applied to all newly created tasks.
  • Consider adding a short delay between cleanup and creation triggers if needed.

Security and maintenance: keeping your system reliable

As your automation becomes part of your daily rhythm, it is worth treating it like any other important system:

  • Store Todoist and Slack credentials securely in n8n’s credential manager.
  • Limit access to the template project so only the right people can change routine tasks.
  • Monitor n8n execution logs and consider setting up alerts if these tasks are critical for your business.

A little care here ensures your automation remains dependable as your workload and team grow.

Where this template can take you next

With this n8n template, you can:

  • Automate the creation of daily Todoist tasks from a single template project.
  • Use simple description metadata to schedule tasks by day and time.
  • Prevent duplicate clutter in your Inbox with a reliable cleanup and creation pattern.
  • Keep everyone informed through Slack notifications.

More importantly, you give yourself permission to step away from repetitive setup work and move toward a more focused, strategic way of working. Each morning, your tasks will already be waiting for you, so you can start with clarity instead of configuration.

Try it now: Import the workflow JSON into n8n, connect your Todoist and Slack credentials, and run a test. Watch your Inbox populate itself, then imagine what else you could automate.

If you would like help customizing the parser, adding timezone support, or extending this into a broader automation system, feel free to reach out or book a consultation. This template is just the beginning.

Want more automation guides like this? Subscribe for weekly tips and ready-to-import n8n templates that help you reclaim time and focus.

Automate Slack Ideas to Notion with n8n

Automate Slack Ideas to Notion with n8n

Every day, your team shares ideas in Slack that could shape your product, improve your processes, or unlock new opportunities. Yet many of those insights disappear into long threads, forgotten by next week. What if every promising idea, no matter how quickly it was typed, automatically landed in a structured Notion database, ready to be refined and acted on?

This is exactly what this n8n workflow template helps you do. With a simple Slack slash command, a webhook, and a Notion integration, you can turn casual suggestions into organized, trackable items. Think of it as a small but powerful step toward a more focused, automated workflow where your tools quietly handle the admin work and your team stays in the flow.

From lost ideas to a reliable system

Slack is where conversations happen fast. Notion is where ideas grow into plans, specs, and documentation. When these two tools stay disconnected, you rely on memory and manual copy-paste to move ideas from chat to a place where they can be tracked.

Connecting Slack to Notion with n8n changes that dynamic. It creates a simple intake system that works in the background, so your team can keep sharing ideas in Slack while n8n does the organizing for you.

Why connect Slack and Notion with n8n?

By linking Slack and Notion through an automated workflow, you unlock several practical benefits that compound over time:

  • Centralized idea management – no more digging through channels and threads to recover that great suggestion from last week.
  • Faster triage and prioritization – ideas are instantly visible in Notion, ready to be tagged, assigned, and discussed.
  • Clearer context – each idea carries the submitter and message text so follow-ups are easy and attribution is obvious.
  • Less manual work – confirmations and follow-up prompts in Slack are automated, so nothing depends on someone remembering to respond.

Instead of treating idea capture as a chore, you can turn it into a smooth experience that encourages contribution and keeps your backlog organized with almost no extra effort.

Shifting your mindset: automation as a growth tool

This workflow is more than a convenience. It is a mindset shift. When you automate something as simple as capturing ideas, you begin to build a culture where:

  • Everyone knows their suggestions will be seen and tracked.
  • Your tools work together instead of in silos.
  • You reclaim time that used to be spent on repetitive admin work.

n8n makes this possible without needing to be a developer. You can visually connect Slack and Notion, test your setup, and iterate on it over time. This template can be your starting point, a small experiment that shows how much value you can unlock by automating the “little things.”

How the n8n workflow works behind the scenes

The template is intentionally lightweight, but it covers the full journey from Slack message to Notion page and back to Slack confirmations. At a high level, the workflow:

  1. Receives a Slack slash command payload via an Incoming Slack Webhook node.
  2. Stores your target Notion database URL in a Set node so new pages are created in the correct place.
  3. Uses a Switch node as a Command Router so you can support commands like /idea and potentially more in the future.
  4. Creates a Notion database page with the slash command text as the title and the Slack user as the Creator property.
  5. Sends a follow-up message back to the user in Slack via the response_url, inviting them to add more details and linking to the Notion page.
  6. Posts a confirmation message in the original Slack channel so the team sees that the idea has been captured.

In practice, this means someone can type something like:

/idea Add a new onboarding checklist

and within seconds, that idea is safely stored in Notion with clear ownership and a path to action.

What you need before you start

Before you dive into the setup, make sure you have these pieces in place. Getting them ready upfront will make the whole process smoother and faster.

  • An n8n instance (cloud or self-hosted) with access to the workflow editor.
  • A Slack workspace and permission to create a Slack App with slash commands.
  • A Notion account with a database where you can add pages.
  • A Notion integration that has access to that database.
  • Notion API credentials (integration token) added to n8n as credentials for the Notion node.

Your step-by-step journey to automation

Let us walk through the setup as a guided path. You can follow these steps in order, test as you go, and adjust where needed. Once you complete this once, you will find it much easier to build your next automation.

Step 1 – Create a Slack App and slash command

Start by giving your team an easy way to submit ideas directly from Slack.

1. Visit Slack API: Apps and create a new app in your workspace.
2. In the app configuration, go to OAuth & Permissions and add the chat:write scope under bot token scopes so your bot can post messages back to Slack.
3. Open the Slash Commands section and create a new command, such as /idea.
4. In the command’s Request URL field, paste the test webhook URL from the Incoming Slack Webhook node in your n8n workflow.
5. Install the app to your Slack workspace so the command becomes available to your team.

At this point, you have created the front door for ideas. Next, you will connect it to Notion.

Step 2 – Set up the Notion database and integration

Now you will prepare the place where all ideas will live. This is where structure and clarity start to emerge.

1. In Notion, create a database (either a Table or a Database Page) with at least these properties:

  • Name (title)
  • Creator (person or rich_text)

2. Go to Notion Integrations and create a new integration, then grant it access to the database you just created.
3. Copy the integration token and add it to n8n as credentials for the Notion node. This token is what allows n8n to create pages in your database.

With this in place, you have a dedicated, structured space where every Slack idea can land automatically.

Step 3 – Configure the n8n workflow template

Now you will connect everything inside n8n. This is where the automation comes to life.

1. Import or recreate the template in your n8n instance. Then configure these key nodes:

  • Incoming Slack Webhook – verify that the webhook path matches what you used in the Slack slash command’s Request URL. Make sure the node is active when you test.
  • Configure Notion URL – update the placeholder Notion URL with your actual database URL. This allows the Create Notion Page node to correctly resolve the databaseId.
  • Create Notion Page – map the title to {{$json.body.text}} so the slash command text becomes the page title, and map the Creator property to {{$json.body.user_name}} so you know who submitted the idea.
  • Send Slack Followup – configure this HTTP request to post back to the response_url from Slack. Use it to send a friendly prompt and, if desired, a direct link to the Notion page. To include a public URL, adjust the JSON from the Notion node to surface the page link.
  • Post Slack Confirmation – keep this node if you want a visible confirmation in the channel using the bot token, mentioning the user and confirming that the idea was captured.

Once these nodes are configured, you have a complete loop: Slack to n8n to Notion and back to Slack.

How the data flows, step by step

To understand the power of this workflow, it helps to visualize the journey of a single idea:

  1. A team member types /idea Add a new onboarding checklist in Slack.
  2. Slack sends a POST request with the command payload to the n8n Incoming Slack Webhook node.
  3. n8n extracts the text and user metadata from the payload and passes it through the Command Router (Switch node). This design also leaves room for future commands.
  4. The Create Notion Page node uses that data to create a new page in your Notion database, setting the page title to the idea text and the Creator property to the Slack user.
  5. n8n sends a private follow-up message through the response_url, inviting the user to add more details or update the Notion page.
  6. Finally, the workflow posts a confirmation message to the original Slack channel, mentioning the user and signaling to the team that the idea is safely stored.

All of this happens in the background, usually in just a few seconds, without anyone needing to copy, paste, or manually log anything.

Customize and extend the workflow for your team

This template is intentionally simple so you can get value quickly, but it is also a foundation. As your needs grow, you can extend it to match your processes and priorities. Here are some ways to build on it:

  • Split title and body – let users send commands like /idea title | details, then use a Function node to separate the title and details and map them to different Notion properties.
  • Automatic tags or priority – use a Switch or IF node to look for keywords in the idea text and set tags or priority levels in Notion.
  • Handle attachments or images – extract file URLs from the Slack payload and add them as blocks or properties on the Notion page.
  • Trigger other tools – send notifications or create items in Trello, Jira, or email when certain criteria are met.
  • Track analytics – count submissions per user or topic, then populate a Notion dashboard to see which themes or contributors are most active.

Each small improvement saves more time and makes your idea pipeline clearer and more actionable.

Troubleshooting as you iterate

As you experiment and refine the workflow, you might run into configuration issues. That is a natural part of building automations. Use these checks to quickly get back on track:

  • Notion node errors – verify that your integration token has access to the target database and that the databaseId is correct.
  • Slack-related issues – if you add signature verification, confirm that the x-slack-signature and timestamp are being handled correctly, or rely on Slack’s built-in app verification.
  • No response from the slash command – confirm that the Incoming Slack Webhook node is active and that the webhook path exactly matches the Request URL in the Slack slash command configuration.
  • Inspecting payloads – use n8n’s execution logs and the pinned example payload in the workflow to see exactly how Slack is sending fields.

Each troubleshooting step deepens your understanding of n8n, which pays off as you build more automations.

Security and permissions to keep in mind

As you connect tools, it is important to keep security and access in focus. A few simple practices go a long way:

  • Limit your Notion integration to only the databases that need write access.
  • Use scoped Slack permissions and only the minimal bot scopes required, such as chat:write for posting messages.
  • If your workflow is accessible from outside your organization, implement verification of incoming requests to ensure they really come from Slack.

With these safeguards in place, you can confidently automate more of your workflows.

Example: splitting idea title and details with a Function node

If you want to give your team more structure without making the command harder to use, you can allow them to send both a title and details in a single line, then split it in n8n before creating the Notion page.

// In a Function node before Create Notion Page
const raw = $json.body.text || '';
const parts = raw.split('|').map(p => p.trim());
const title = parts[0] || 'Untitled idea';
const details = parts.slice(1).join(' | ');

return [{  json: {  body: $json.body,  title,  details  }
}];

After this node, map title to the Notion Name property and details to a Description or Notes property in your database. This small enhancement can make your Notion pages much more useful without changing how people naturally share ideas.

Building momentum with automation

This n8n template is a simple, maintainable way to capture ideas from Slack and turn them into structured Notion entries. It gives you:

  • A lightweight setup that you can complete in a short session.
  • An easy path to extend and adapt as your team’s needs evolve.
  • A reliable system that preserves context and saves time on every idea submitted.

Whether you are collecting product ideas, bug reports, feedback from retrospectives, or internal improvement suggestions, this workflow helps you move from scattered conversations to an organized, actionable backlog.

Ready to take the next step? Treat this as your starting point for a more automated workspace. Import the template into n8n, set up your Slack app and Notion integration, and run your first test with /idea. Notice how quickly an unstructured message becomes a structured item in Notion.

From here, you can keep iterating: add fields, connect more tools, or build dashboards. Each improvement frees up a bit more time and mental energy for the work that really matters.

Call to action: Import the workflow now, test it with /idea in Slack, and share your experience with your team or automation lead so you can roll it out across your workspace and keep building on it.

Lead Qualification from Form (n8n Template)

Lead Qualification from Form: Let n8n Score Your Leads While You Sip Coffee

Picture this: your form is happily collecting leads all day, your inbox is overflowing, and your sales team is trying to guess which ones are worth a call. Meanwhile, you are stuck copy-pasting emails into tools, checking if they are real, then deciding who gets what. Again. And again. And again.

That is exactly the kind of repetitive task that makes automation look like a superhero. This n8n template, “Lead Qualification from Form”, takes your form submissions, verifies emails with Hunter, scores leads with MadKudu, and pings your team on Telegram and Slack when someone looks seriously promising.

No more manual triage, no more guessing who is “hot” and who is “meh”. Just a clean, low-code workflow that quietly does the boring parts for you.


What this n8n lead qualification template actually does

Under the hood, the workflow connects your form to a smart qualification pipeline. Here is the short version of what happens every time someone hits “Submit”:

  1. Form Trigger – Your form sends data to an n8n webhook. It can be Typeform, Google Forms (via webhook), a custom HTML form, or any tool that posts JSON.
  2. Hunter Email Verification – The workflow checks if the email address is deliverable using Hunter. No more chasing fake inboxes like test123@nowhere.com.
  3. MadKudu Lead Scoring – If the email is valid or deliverable, n8n calls MadKudu to get enrichment and a customer_fit.score for the lead.
  4. Customer Fit Check – The template compares that score against a threshold. By default it is set to 60, but you can tweak it for your own ICP.
  5. High-fit Leads – If the score passes the bar, n8n sends notifications to your Telegram and Slack channels with the key MadKudu signals so sales has instant context.
  6. Low-fit or Invalid Leads – These are quietly ignored (or routed to nurture if you extend the flow) so your team is not spammed with noise.

In other words, the template builds you a mini lead ops assistant that never sleeps and never forgets to notify the team.


Why bother automating lead qualification at all?

If you have ever tried to manually sort leads, you already know the answer. But for the record, here are the key reasons to automate this with n8n:

  • Faster response to hot leads – High-intent prospects do not wait around. Instant scoring and notifications help your team jump in quickly.
  • Cleaner data – Hunter keeps your database from turning into a graveyard of undeliverable emails.
  • Scalable triage – You can handle more inbound volume without hiring a small army to sort spreadsheets.
  • Better sales context – MadKudu’s company fit signals give reps the “why this lead matters” before they even say hello.

So instead of spending hours filtering, tagging, and guessing, you can let n8n do the heavy lifting while you focus on strategy and conversations.


Quick setup guide: from form to fully automated lead scoring

The template is ready to go, you just need to plug in your tools and preferences. Here is a simplified walkthrough of the setup.

Step 1: Add your credentials in n8n

First, connect the services that this workflow uses:

  • Hunter – Your email verifier API key.
  • MadKudu – Your API key or HTTP header configuration.
  • Telegram – Bot token for sending notifications.
  • Slack – Workspace token or app credentials for posting messages.

Store everything in the n8n credential manager. Do not hardcode secrets directly in nodes unless you enjoy security audits.

Step 2: Connect your form with the Form Trigger

The template ships with a demo form trigger. Swap that out for your real form:

  • Use the Webhook node URL that n8n gives you.
  • Configure your form tool (Typeform, Google Forms via webhook, custom HTML form, etc.) to POST JSON to that URL.
  • Make sure the payload includes at least the email field and any other details you want to pass to MadKudu.

Once this is wired up, every new submission will automatically kick off the workflow.

Step 3: Tune email verification and scoring logic

Next, you control which leads are allowed to move forward.

Hunter verification checks:

  • MX records
  • SMTP response
  • Disposable email detection

In the template, only leads where Hunter’s status is valid or deliverable are passed on. Others can be safely ignored or routed elsewhere if you extend the flow.

MadKudu scoring then enriches the lead with company data and a customer_fit.score. The template checks if this score is greater than 60 by default. You can adjust that threshold to better match your ideal customer profile (ICP).

Step 4: Configure Telegram and Slack notifications

This is the fun part where your sales team starts getting “hot lead” alerts instead of cold spreadsheets.

  • In the Telegram node, set the chat ID to your sales group or channel.
  • In the Slack node, choose the channel where you want lead alerts to appear.

The notifications include:

  • The lead’s email address
  • Top MadKudu signals, such as funding, location, industry, or company size

That way, reps instantly see why the lead is worth their time instead of asking “Where did this come from?” in the channel.


Smart ways to pick thresholds and use signals

You do not need to nail your scoring strategy on day one. Start simple and refine over time.

  • Begin with a moderate threshold – A range of 50-60 is a good starting point while you learn what “good fit” looks like for your pipeline.
  • Use top signals for messaging – MadKudu’s signals, like funding round, industry, or geography, are perfect for tailoring outreach.
  • Do not waste borderline leads – Instead of dropping them, route medium-fit leads into a nurture sequence or separate list.

Over time, you can increase the threshold as your volume grows or your ICP becomes more precise.


Where this workflow really shines

This n8n template is especially useful if:

  • You are a SaaS startup trying to reply quickly to high-intent signups.
  • Your marketing team is generating lots of inbound leads and needs a scalable way to qualify them.
  • Your sales team wants richer context before reaching out so calls feel informed, not random.
  • Your operations team is tired of manual lead triage and wants to automate the repetitive bits.

Basically, if you have more leads than time, this template helps you focus on the ones that actually matter.


Customizing and extending the template

The workflow is designed to be a starting point, not a rigid system. You can easily adapt it to your stack and process.

  • Swap the form source – Replace the default Form Trigger with Typeform, Google Forms, or a CMS webhook.
  • Add more enrichment – If you are not using MadKudu or want additional data, plug in tools like Clearbit or FullContact.
  • Push to your CRM – Send high-fit leads directly into HubSpot, Salesforce, Pipedrive, or your CRM of choice.
  • Advanced routing – Use conditional branches to assign very high-priority leads by region, potential ARR, or segment.
  • Log everything – Store lead activity in Google Sheets or a database for analytics, reporting, or audit trails.

With n8n’s visual editor, you can experiment without writing a full backend service every time you want to change your lead flow.


Testing your workflow before going live

Before you unleash this on your real traffic, give it a proper test run.

  1. Use Test Workflow mode in n8n and submit sample form entries with different types of emails to validate Hunter responses and MadKudu scores.
  2. Check your notifications to confirm that Telegram and Slack messages arrive in the correct channels with the expected content.
  3. Verify low-fit behavior so that leads below your threshold either follow the no-op path or your chosen nurture route.

A few test leads now can save you from a lot of “Why did this one not show up?” questions later.


Security and compliance tips

Automation is great, but you still need to keep data safe and compliant.

  • Protect your API keys by storing them in n8n credentials and rotating them regularly.
  • Handle PII carefully and make sure your lead forms and storage respect GDPR, CCPA, and any other relevant regulations.
  • Limit sensitive data exposure by anonymizing or hashing fields if you store them outside tightly controlled systems.

That way you get all the benefits of automation without unexpected legal “surprises”.


Troubleshooting common issues

If something is not working as expected, here are some quick checks:

  • No webhook hits – Confirm your form is posting to the correct public webhook URL and that the n8n workflow is activated.
  • Weird Hunter results – Check your Hunter quota and test with known good and bad emails to see if the behavior is consistent.
  • MadKudu errors – Make sure the API key and endpoint are correct. Inspect the response object in n8n to debug missing properties.
  • No notifications – Double check Telegram bot tokens and chat IDs, and ensure your Slack app has permission to post in the selected channel.

Most issues come down to credentials, permissions, or misconfigured URLs, so start there.


Real-world example: from form fill to “hot lead” ping

Here is how a typical run looks in practice:

A visitor fills in your marketing signup form and hits submit. The workflow:

  1. Receives the submission through the n8n webhook.
  2. Uses Hunter to verify the email is valid.
  3. Calls MadKudu, which returns a customer_fit.score of, say, 81, along with signals like funding amount, industry, and company size.
  4. Sees that 81 is above your threshold, so it fires off messages to your sales Telegram group and Slack channel.

The notification might look something like:

“⭐ New hot lead: [email] – ✔ Company raised $13.5M, ✔ Located in Germany, …”

Your sales team gets a clear, enriched snapshot of why this lead is exciting, and can prioritize outreach accordingly.


Wrapping up: let n8n handle the boring parts

Manual lead qualification is one of those tasks that feels important, but also endlessly repetitive. With this n8n template, you automate the entire flow:

  • Capture leads from your form
  • Verify email deliverability with Hunter
  • Enrich and score with MadKudu
  • Notify your team instantly on Telegram and Slack

That leaves you and your sales team free to do what humans are actually good at: building relationships and closing deals, not sorting rows.

Try it now:

Import the “Lead Qualification from Form” n8n template, add your Hunter, MadKudu, Telegram, and Slack credentials, set your score threshold, and activate the workflow. If you get stuck, loop in your ops team or check the n8n docs for specific node details.

Import the Template

Want to plug this directly into your CRM or design a more advanced routing logic? Reach out and we can help you build a tailored n8n automation that fits your sales process perfectly.

Automated HubSpot Follow-Up Workflow (n8n + Gmail)

Automated HubSpot Follow-Up Workflow with n8n and Gmail

Picture this: you open your CRM, see a wall of contacts you meant to follow up with “last week,” and your soul quietly leaves your body. Rewriting the same “just checking in” email for the 47th time is nobody’s dream job.

That is exactly where this n8n + HubSpot + Gmail workflow comes in to save your sanity. It hunts down the right contacts to follow up with, checks their previous engagement, sends a personalized email, logs everything neatly in HubSpot, and even pings your team in Slack so everyone looks incredibly on top of things.

All of this runs automatically on a schedule, which means fewer awkward “Oops, I forgot to follow up” moments and more time for actual selling, building, or, you know, coffee.

What this n8n HubSpot follow-up workflow actually does

At a high level, this automated follow-up workflow:

  • Runs every day at 9 AM (or whenever you prefer)
  • Searches HubSpot for contacts who have been contacted before
  • Filters out anyone who was contacted in the last 30 days
  • Checks the contact’s engagements to make sure there was exactly one prior outreach
  • Builds a personalized follow-up email
  • Sends the email via Gmail
  • Logs the engagement back into HubSpot
  • Notifies your sales or growth channel in Slack

The result: consistent follow-ups, no double-pinging fresh leads, and a CRM that actually reflects reality.

Why automate follow-ups instead of suffering in silence?

Manual follow-ups sound simple until you have more than 10 leads. Then it becomes a full-time job you did not apply for. Automation helps you:

  • Stay consistent – Follow-ups go out at the same time every day, not “whenever you remember.”
  • Avoid duplicate outreach – No one likes getting three “just bumping this to the top of your inbox” emails in a week.
  • Keep HubSpot clean – Every outreach is logged, so your CRM stays accurate.
  • Customize logic – With n8n, you control the filters, timing, and message templates instead of being stuck with rigid defaults.

n8n sits in the middle, connecting HubSpot, Gmail, and Slack, and gives you a visual, flexible way to tweak the workflow anytime your process changes.

Step-by-step: how the workflow runs

Let’s walk through how this n8n workflow behaves once it is live. Think of it as your little robot assistant doing the boring parts in the background.

1. Schedule Trigger – your robot alarm clock

The workflow starts with the Schedule Trigger node. In the example, it is configured to run every day at 9 AM. You can adjust the schedule to match your timezone and team rhythm.

Once the time hits, the workflow wakes up and begins scanning your HubSpot contacts.

2. Search HubSpot Contacts – finding people worth nudging

Next up, an HubSpot node searches for contacts that have a known last-contacted date. You are specifically using the notes_last_contacted property so you know these people have already heard from you at least once.

Key configuration details:

  • Authentication: HubSpot OAuth2 (follow the n8n docs, and make sure your OAuth scopes are an exact match)
  • Sort By: notes_last_contacted
  • Direction: Ascending (oldest first, so the most neglected souls rise to the top)
  • Properties: Include at least firstname, lastname, email, and the last contact date

This gives you a list of contacts who have been contacted before and can be safely considered for a follow-up.

3. Filter Contacts by Last Contact Date – no spammy behavior

Now it is time to draw a line between “reasonable follow-up” and “borderline spam.” An IF node checks each contact’s notes_last_contacted value and compares it to the current date minus 30 days.

The logic is simple:

  • If the last contact date is more than 30 days ago, the contact moves forward in the workflow.
  • If it is more recent than that, they get filtered out and are not contacted again yet.

This protects both your reputation and your reply rates by not hammering people with too many emails.

4. Fetch Contact Engagements – checking the relationship status

Before you send anything, the workflow checks how much engagement there has been with that contact. Using HubSpot’s associations API, a node fetches the contact’s engagements so you can see prior activity.

This is where you decide what “follow-up worthy” means. In the sample template, the idea is to follow up only if there was exactly one prior outreach email. That way you are not hitting someone who is already in an active conversation or still in the “first contact” stage.

5. Filter Single Engagement – avoiding over-contacting

Another IF node then checks the number and type of engagements that came back from HubSpot. In this example workflow, the condition is:

results.length === 1

If that is true, the workflow continues. If not, the contact is skipped.

This logic:

  • Prevents sending a follow-up to a brand new contact with zero prior outreach
  • Avoids bombarding active leads who already have multiple ongoing engagements

In other words, it focuses your automation where it makes the most sense.

6. Compose Email Payload – writing the “just checking in” so you do not have to

Once a contact passes all the filters, n8n uses a Set or Function node to build the email payload. This is where personalization happens using HubSpot contact properties like firstname and any relevant context you have stored.

Example plaintext template:

Hey {{ $json.properties.firstname }},

Just want to follow up on my previous email since I haven’t heard back. Have you had a chance to consider n8n?

Cheers,
Your Name

You can tweak this message to match your tone, brand, or level of enthusiasm. The main point is that the template is dynamic and uses real contact data instead of sending the same “Dear Customer” email to everyone.

7. Send Outreach Email with Gmail – actually hitting send

With the payload ready, the workflow hands things off to the Gmail node to send the email. You define the subject, body (HTML or plaintext), and sender details here.

Recommended configuration:

  • Use a verified sender name and email address
  • Disable any appended attribution so your email looks clean and professional
  • Add rate limiting if you are sending to a large list, to keep your deliverability and API usage healthy

At this point, your follow-up email is out in the world, and you did not have to copy-paste anything.

8. Record Engagement in HubSpot – keeping your CRM honest

After sending the email, the workflow is not done yet. It uses the HubSpot engagement resource to create a new engagement record tied to that contact.

Typically you will include metadata like:

  • Subject
  • HTML or plaintext body
  • Recipient email
  • Associated contact ID

This updates the contact’s last contact date and ensures they will not show up again in your follow-up workflow until the timeframe you choose, which in this example is one month.

9. Slack Notification – letting the team know the robots are working

Finally, a Slack node posts a short message to your sales or growth channel. Something like:

Follow up email sent to: contact@example.com

This creates a lightweight audit trail, keeps everyone in the loop, and gives your team the pleasant illusion that you personally remembered every single follow-up.

Setup tips, OAuth fun, and common gotchas

OAuth Scopes – tiny settings, big headaches

Both HubSpot and Gmail use OAuth, which means you will need to configure credentials correctly in n8n. Pay close attention to the scopes:

  • Follow the n8n documentation exactly for both HubSpot and Gmail
  • Make sure the scopes you request match what the workflow needs

Missing scopes are a classic source of “why is this not working” errors when searching contacts or creating engagements, so double-check this part early.

Rate limits and deliverability – be kind to APIs and inboxes

When you start scaling this workflow, keep two things in mind:

  • API rate limits: HubSpot and Gmail both limit how many requests you can make in a given period. If you are processing big lists, consider throttling or queue logic in n8n.
  • Email deliverability: Personalize your messages, avoid spammy phrases, and keep an eye on bounce rates to protect your sender reputation.

Automation is powerful, but it should still feel human on the receiving end.

Testing strategy – do not unleash it on your entire database yet

  1. Start with a single staged contact in HubSpot and a personal or test Gmail account.
  2. Check that the engagement is created in HubSpot and that notes_last_contacted updates as expected.
  3. Verify your Slack notification arrives and the formatting looks good.

Once all that works, you can gradually open the floodgates.

Advanced enhancements to level up your automation

Once the basic follow-up flow is running smoothly, you can start adding extra logic and experiments.

  • Filter by engagement type: Skip follow-ups if there have been recent calls or meetings so you do not double up on communication.
  • A/B test subject lines: Branch the workflow so half of the contacts get subject A and half get subject B, then track opens and replies.
  • Unsubscribe logic: Check for a custom property like “Do not contact” before sending, and bail out if it is enabled.
  • Backoff strategy: If someone has repeatedly not replied, flag them for manual review instead of continuing automated follow-ups forever.

These tweaks help you keep the workflow effective, respectful, and aligned with your sales or customer success style.

Security and privacy considerations

Since this workflow touches contact data and email, treat it with care:

  • Store OAuth credentials in the n8n credentials manager and restrict access.
  • Make sure your outreach complies with regulations such as CAN-SPAM and GDPR.
  • Always include a clear way to opt out or unsubscribe in your emails.

Good automation respects both your leads and the law.

Pre-launch checklist before going to production

Before you let this workflow loose on your real contact list, run through this quick checklist:

  • HubSpot and Gmail OAuth credentials are configured and validated
  • Test contact created and verified in HubSpot
  • Rate limiting or throttling in place for larger runs
  • Personalization tokens like {{ $json.properties.firstname }} are working correctly
  • Slack channel is set up and receiving notifications

Once all of these are green, you are ready to automate follow-ups with confidence.

Conclusion & next steps

This n8n workflow gives you a practical, repeatable way to follow up with HubSpot contacts using Gmail, without relying on your memory or a sticky note system. It improves timing, keeps your CRM accurate, and creates a visible audit trail through HubSpot engagements and Slack notifications.

To get started:

  • Clone the workflow into your n8n instance
  • Configure and validate your OAuth scopes for HubSpot and Gmail
  • Test with a sample contact
  • Iterate on your subject lines and message copy until it fits your brand and audience

Call to action

If you would like a copy of this workflow or help tailoring it for your team, reach out to get a downloadable n8n workflow file, or subscribe for more automation recipes, n8n templates, and best practices.


Keywords: n8n, HubSpot follow-up workflow, Gmail outreach, automated follow-up, sales automation, HubSpot automation template, n8n workflow.

Enrich HubSpot Contacts with ExactBuyer & n8n

Enrich HubSpot Contacts with ExactBuyer & n8n: A Workflow Story

By the time Emma opened her laptop that Monday morning, her sales team had already sent three frantic messages.

“This lead has no job title.”

“Is this company even real?”

“Can someone please find a phone number before my call?”

Emma was the marketing operations manager at a fast-growing SaaS company, and HubSpot was her team’s lifeline. But every week the same problem returned: new contacts were flooding in with half-empty records. Missing company names, no job titles, no phone numbers, barely any location data. The sales team was wasting hours researching LinkedIn and company websites, and marketing could not segment properly for campaigns.

Emma knew one thing for sure. If she did not fix their contact enrichment problem, their funnel would stay leaky and their revenue would suffer.

The Pain Of Incomplete HubSpot Contacts

Emma’s dashboards looked promising at first: lead volume was up, form submissions were steady, and HubSpot was capturing emails reliably. But when she drilled into individual contacts, the reality was obvious.

  • Leads were missing job titles, so lead scoring was guesswork.
  • Company information was sparse or inconsistent, which broke account-based campaigns.
  • Phone numbers and locations were often blank, making outbound outreach slow and clumsy.

Her team tried manual research, spreadsheets, and one-off enrichment uploads, but it never kept up with the pace of new leads. The more the company grew, the more obvious the gap became.

Emma needed a way to automatically enrich every new HubSpot contact with reliable company and person data, right when they entered the system, without adding more tools for her team to babysit.

Discovering n8n And ExactBuyer

One afternoon, while searching for “automate HubSpot contact enrichment,” Emma stumbled on an n8n workflow template that promised exactly what she needed: a way to enrich HubSpot contacts with ExactBuyer using a fully automated flow.

The idea was simple but powerful:

  • Listen for new HubSpot contacts with an n8n trigger.
  • Fetch the full contact record from HubSpot.
  • Use the contact’s email to call ExactBuyer’s enrichment API.
  • Write the enriched fields back into HubSpot.
  • Alert the team in Slack if enrichment failed or returned nothing.

This was more than a script. It was a reusable n8n workflow template designed to keep HubSpot contact records rich, accurate, and always up to date. Exactly what her sales and marketing teams had been begging for.

Setting The Stage: What Emma Needed First

Before she could turn the template into a working automation, Emma gathered the essentials.

  • An n8n instance, either cloud-hosted or running on her company’s own infrastructure.
  • A HubSpot account with a developer app and OAuth credentials, configured with the correct scopes.
  • An ExactBuyer API key for the enrichment endpoint.
  • A Slack webhook or Slack API credential for sending alerts to her team (optional but highly recommended).
  • Basic familiarity with how n8n nodes and expressions work.

She also took a moment to read n8n’s HubSpot documentation. One important detail stood out: the HubSpot trigger and the HubSpot get/update nodes might require different scopes or even separate OAuth credentials, depending on how the HubSpot app is set up. She made a note to handle those as separate credentials if needed.

Rising Action: Building The Automated Enrichment Flow

Emma opened n8n, imported the template, and began walking through each node. Instead of feeling like she was wiring up a random collection of steps, she started to see a clear story in the workflow itself.

1. The Moment A Lead Enters: HubSpot Contact Trigger

Everything began with the HubSpot Trigger node. Emma configured it to fire on the contact creation event. Whenever a new contact was created in HubSpot, HubSpot would send a webhook payload to n8n.

She connected her OAuth2 credential to the trigger and configured the webhook in her HubSpot developer settings. Now, n8n would “hear” every new lead entering their CRM in real time.

2. Getting The Full Picture: Retrieve HubSpot Contact

The next step in the workflow was a standard HubSpot node set to the get operation. It used the contactId from the trigger payload to fetch the full contact record from HubSpot.

In the example template, the contactId was pinned in the workflow so Emma could test against a known contact. That helped her validate the flow before she pointed it at live traffic. Once it was working, the node would always pull the latest properties for each new contact.

3. Preparing The Data: Extract Contact Keys

Next came a Set node, which Emma realized was the bridge between HubSpot and ExactBuyer. This node was responsible for extracting the key pieces of data that downstream nodes would depend on, especially the HubSpot internal id and the contact email.

Inside the Set node, the template used n8n expressions like:

user_id = {{$json.vid}}
email = {{$json.properties.email?.value}}

By isolating user_id and email early, Emma could keep the rest of the workflow cleaner and avoid repeating complex property paths later.

4. A Critical Gate: Check Email Present

Emma knew that ExactBuyer’s enrichment depended on having an email. So the workflow included a guardrail: an If node that checked whether the email field was present and not empty.

If the email existed, the flow continued to the enrichment step. If not, the workflow could either stop or send a notification for manual review. That meant no wasted API calls and no mysterious failures caused by missing primary identifiers.

5. The Turning Point: ExactBuyer Enrichment Request

This was the moment Emma had been waiting for. The HTTP Request node called ExactBuyer’s enrichment endpoint using the email that had just been extracted.

She configured the node with a generic HTTP header credential to pass her ExactBuyer API key, then set the URL to the enrichment endpoint, for example:

https://api.exactbuyer.com/v1/enrich

The workflow used query parameters like:

?email={{ $json.email }}&required=work_email,personal_email,email

One detail in the template made Emma breathe easier: the node was set to continue on error. In n8n terms, that meant using onError: continueErrorOutput. Instead of crashing the workflow when ExactBuyer returned no result or a non-2xx response, the flow would keep going and handle the situation gracefully.

This was the turning point in her story. For the first time, new HubSpot contacts would automatically get enriched with company and person data, or if something went wrong, her team would be notified instead of being left in the dark.

6. Writing Back Rich Profiles: Update HubSpot Contact

When ExactBuyer responded with enrichment data, the workflow moved to another HubSpot node configured for upsert or update. Here, Emma mapped ExactBuyer’s fields into HubSpot properties using n8n expressions that referenced the HTTP Request result.

Examples from the template looked like this:

gender = {{$json.result.gender}}
school = {{$json.result.education?.[0]?.school?.name}}
country = {{$json.result.location?.country}}
jobTitle = {{$json.result.employment?.job?.title}}
lastName = {{$json.result.last_name}}
firstName = {{$json.result.first_name}}
companyName = {{$json.result.employment?.name}}
companySize = {{$json.result.employment.size}}
phoneNumber = {{$json.result.phone_numbers?.[0]?.E164}}

She also made sure that HubSpot knew exactly which contact to update. Instead of relying on a fresh lookup, she reused the email captured earlier from the “Extract contact keys” node:

{{$('Extract contact keys').item.json.email}}

With this mapping in place, every successful ExactBuyer response would instantly transform a barebones HubSpot record into a detailed, sales-ready profile.

7. When Things Go Wrong: Handling Missing Enrichment & Notifications

Of course, Emma knew that not every contact would match in ExactBuyer. Some emails would be too new, too obscure, or simply not present in the enrichment database.

The template handled that reality head-on. If ExactBuyer returned an error or an empty result, the workflow routed to a NoOp (or similar handling node) and then into a Slack node.

In Slack, the message would land in a channel like #alerts with key details such as:

  • The contact’s email address.
  • The HubSpot contact id.
  • Any relevant error information.

That way, her team could quickly review edge cases, decide whether to enrich manually, or adjust their data strategy. No more silent failures, and no more wondering why a contact looked incomplete.

Staying Safe And Stable: Error Handling & Best Practices

Before Emma flipped the switch to production, she hardened the workflow using a few best practices that the template recommended.

  • Fail-safe behavior: She kept the HTTP Request node set to continue on error, so failed ExactBuyer calls would not crash the entire flow. Instead, they would be logged and optionally sent to Slack for review.
  • Rate limits: She checked ExactBuyer’s API rate limits and made a plan to implement batching or queuing if lead volume spiked. n8n’s flexibility made it easy to add rate-limit handling later.
  • Retry logic: For transient 5xx errors, she added a small Retry or Wait pattern so the workflow would reattempt the request a few times before escalating to her team.
  • Separate HubSpot credentials: To avoid scope issues, she used distinct OAuth credentials for the webhook trigger and for the HubSpot get/update operations, aligned with her HubSpot app’s configuration.
  • Logging: She configured logging of response payloads and status codes into an audit store, which helped with debugging, reporting, and compliance reviews.

Respecting Privacy: Compliance In The Enrichment Flow

As the person responsible for marketing operations, Emma also had to think about data protection. Enriching personal data is powerful, but it comes with obligations.

She documented how the workflow aligned with GDPR, CCPA, and other relevant regulations, making sure they only enriched and stored data for which they had a lawful basis.

  • Recording consent where required, especially for EU contacts.
  • Maintaining an audit log of enrichment events and their purpose.
  • Limiting the storage of sensitive personal data and focusing on fields that were necessary for sales and marketing operations.

By building these considerations into the workflow design, Emma avoided future headaches with compliance and internal reviews.

Testing The Flow Before Going Live

Emma refused to let a half-tested automation touch production contacts. She followed a structured testing path before flipping the final switch.

  1. She used a staging HubSpot app and a test ExactBuyer key where possible, isolating experiments from real customer data.
  2. She manually created test contacts in HubSpot to trigger the webhook and watched each run in n8n’s execution log.
  3. She inspected the HTTP Request node’s response to ensure the field mappings were correct and that the right data was flowing into HubSpot.
  4. She enabled a “dry run” mode by temporarily routing enriched data to a log or test node instead of updating live HubSpot contacts, until she was completely confident.

Only after several successful test runs did she connect the workflow to the production HubSpot app and ExactBuyer credentials.

Leveling Up: Advanced Improvements Emma Considered

Once the basic enrichment workflow was running smoothly, Emma started thinking about how to make it even smarter.

  • Multiple emails: Some of their contacts had both personal and work emails. She planned to add logic to choose the best email for enrichment, prioritizing work over personal when available.
  • Caching enrichments: For stable attributes like company and job, she considered adding a cache layer. If ExactBuyer had already enriched a particular email recently, the workflow could reuse stored results and avoid extra API calls.
  • Triggering on updates: Instead of enriching only on contact creation, she thought about adding a trigger for key property changes, such as email updates, to keep profiles fresh.
  • Standardized field mappings: Before rolling out to more teams, she worked with RevOps to standardize HubSpot custom properties so that every enrichment field had a clear and consistent destination.

With these enhancements, the workflow would grow from a simple enrichment tool into a core part of their customer data foundation.

The Resolution: What Changed For Emma’s Team

A few weeks after deploying the n8n workflow template, the tone in Emma’s Slack channels changed.

Instead of complaints about missing data, sales reps were sharing screenshots of perfectly enriched contact records. Marketing campaigns were segmented by job title, company size, and country with confidence. SDRs had phone numbers and locations ready before the first outreach.

The once chaotic “Who owns this lead?” conversations were replaced by focused strategy discussions. Manual research time dropped sharply, and the team’s conversion rates began to climb.

All of that came from a workflow that quietly listened for new HubSpot contacts, enriched them with ExactBuyer, and kept everyone informed when something needed attention.

Put This Story To Work In Your Own Stack

This n8n workflow template is more than a technical example. It is a dependable, automated bridge between HubSpot and ExactBuyer that keeps your contact profiles rich, accurate, and ready for action.

By adopting it, you can:

  • Reduce manual enrichment work for sales and marketing teams.
  • Improve segmentation, personalization, and lead qualification.
  • Catch enrichment failures early with Slack alerts instead of hidden errors.
  • Maintain data quality and compliance as your lead volume grows.

Ready to follow Emma’s path? Import the n8n workflow template into your own instance, add your HubSpot OAuth credentials and ExactBuyer API key, and start by testing in a staging HubSpot portal.

If you want help customizing the flow, you can extend it with retries, batched enrichment, advanced rate limiting, or additional GDPR controls tailored to your organization.

Further reading: ExactBuyer enrichment docs · n8n HubSpot Trigger docs

Call to action: Import this template into n8n and start enriching your HubSpot contacts today, or subscribe to our newsletter for more automation recipes and workflow templates.

Enrich HubSpot Contacts with ExactBuyer & n8n

Enrich HubSpot Contacts with ExactBuyer & n8n

Ever created a new contact in HubSpot, stared at their lonely little email address, and thought, “Cool, but who are you?” If you are tired of copy-pasting names, job titles, and company info from LinkedIn or email signatures, this workflow is your new best friend.

In this guide, you will learn how to use a ready-to-go n8n workflow template that automatically enriches new HubSpot contacts using ExactBuyer’s contact enrichment API. No more manual data entry, no more detective work, just clean, useful CRM data delivered on autopilot.

We will walk through what the workflow does, how to set it up, how each node is configured, and how to handle errors without losing your sanity. You will also get tips for testing, monitoring, and customizing the automation for your own CRM setup.


What this n8n + HubSpot + ExactBuyer workflow actually does

Here is the big picture: every time a new contact appears in HubSpot, this n8n template quietly springs into action.

  • It listens for new HubSpot contacts using a HubSpot Trigger node.
  • It grabs the full contact data using a standard HubSpot node.
  • It extracts the contact’s ID and primary email with a Set node.
  • It checks if an email exists and only continues if it does, using an If node.
  • If there is an email, it calls ExactBuyer’s enrichment endpoint via an HTTP Request node.
  • It then maps the enriched data back into HubSpot contact properties and updates the record.
  • If ExactBuyer returns no enrichment data, it can notify a Slack channel and follow a no-op or error branch.

The end result: your HubSpot contacts get automatically filled in with useful details like job title, company name, phone number, and more, without you doing any repetitive copy-paste gymnastics.


Why bother enriching HubSpot contacts at all?

Because “email only” contacts are not very helpful, and your sales and marketing teams deserve better.

Contact enrichment adds missing attributes such as:

  • Job title
  • Company name and size
  • Phone numbers
  • Location
  • Education, gender, and other profile details

Using n8n automation with ExactBuyer means:

  • Less manual data entry and fewer boring admin tasks.
  • Faster time-to-value for new leads, since you get context immediately.
  • Better segmentation, lead scoring, and personalization in your CRM workflows.
  • More accurate and complete HubSpot data that powers reliable automation.

In short, this workflow trades repetitive work for a one-time setup and ongoing peace of mind.


Before you start: what you need in place

To use this n8n template without frustration, make sure you have the following:

  • n8n running, either cloud or self-hosted.
  • A HubSpot account with developer OAuth credentials and the right webhook scopes.
  • An ExactBuyer API key that can access the enrichment endpoint.
  • Optional but recommended: a Slack webhook or API credential for notifications when enrichment fails.

HubSpot OAuth scopes to pay attention to

HubSpot can be picky about scopes, so make sure they match what n8n expects. This workflow typically needs:

  • Read permissions for contacts.
  • Write permissions for contacts.

In many setups, one credential is used for the webhook trigger and a separate OAuth credential is used for the HubSpot nodes that read or update contacts. The template calls this out as a best practice for security and operational separation. Just make sure both sets of credentials are correctly configured in n8n.


Quick setup walkthrough: from template to working automation

Here is a simplified flow of how to get this template running. After this overview, we will go node by node with configuration tips.

  1. Import the provided n8n workflow template into your n8n instance.
  2. Configure HubSpot OAuth credentials for both the trigger and the contact operations.
  3. Add your ExactBuyer API key in n8n credentials and connect it to the HTTP Request node.
  4. Optionally, plug in Slack credentials or a webhook URL for enrichment failure alerts.
  5. Run through the testing checklist to confirm everything works end to end.

Once that is done, you can lean back and let the workflow clean up your contact data for you.


Node-by-node configuration guide

1. HubSpot Trigger – listen for new contacts

Start with the HubSpot Trigger node. This is what wakes your workflow up when a new contact appears in HubSpot.

  • Subscribe to contact.creation events.
  • Use your developer credentials for the webhook subscription.
  • Double check that:
    • The webhook is marked as active in HubSpot.
    • The portalId and subscription details are valid.

Once this is set, every new contact will automatically trigger the workflow, so no more “did I remember to run that script?” moments.

2. Retrieve HubSpot contact details

Next, use a standard HubSpot node to fetch the full contact data that the trigger event refers to.

  • Set the operation to get.
  • Pass in the contactId from the webhook payload.
  • Use the separate OAuth2 credential mentioned in the template, not the same one as the trigger, if you are following the security separation pattern.

This gives you the complete contact record so you can extract the email and other keys needed for enrichment.

3. Extract contact ID and email with a Set node

Now it is time to create clean variables for the values you care about. Use a Set node to pull out the contact ID and email.

Example expressions from the template:

  • user_id = {{ $json.vid }}
  • email = {{ $json.properties.email?.value }}

These variables are then used when calling the ExactBuyer enrichment endpoint.

4. Check that an email exists (If node)

Enriching a contact without an email is like trying to look someone up with only their favorite color. So the workflow uses an If node to verify that an email is present before calling the API.

  • Perform a simple notEmpty string validation on the email field.
  • If the email is missing, the workflow skips the enrichment call and can follow a different branch.

This keeps you from wasting API calls and avoids unnecessary errors.

5. Call ExactBuyer’s enrichment endpoint (HTTP Request node)

Now for the fun part: enriching the contact. Use an HTTP Request node to call the ExactBuyer API.

Endpoint:

https://api.exactbuyer.com/v1/enrich

Configuration tips:

  • Use HTTP header auth with your ExactBuyer API key stored in n8n credentials.
  • Send the email as a query parameter.
  • Include required fields to narrow results. Example from the template:
?email={{ $json.email }}&required=work_email,personal_email,email

To handle failures gracefully, configure the node to:

  • Continue on error using onError: continueErrorOutput.

This lets you branch into a “no enrichment found” path or send alerts instead of crashing the whole workflow.

6. Update the HubSpot contact with enriched data

Once ExactBuyer responds, the workflow uses another HubSpot node to update the contact record with the new information.

Example mappings from the template:

  • firstName: {{ $json.result.first_name }}
  • lastName: {{ $json.result.last_name }}
  • jobTitle: {{ $json.result.employment?.job?.title }}
  • companyName: {{ $json.result.employment?.name }}
  • companySize: {{ $json.result.employment.size }}
  • phoneNumber: {{ $json.result.phone_numbers?.[0]?.E164 }}
  • country: {{ $json.result.location?.country }}
  • gender: {{ $json.result.gender }}
  • school: {{ $json.result.education?.[0]?.school?.name }}

Important: only update fields that are actually present in the response. Make sure your mapping logic avoids overwriting existing HubSpot values with null or empty values. That way, enrichment adds value instead of accidentally deleting useful data.


Error handling, Slack alerts, and staying sane

Even the best APIs sometimes come back with “sorry, nothing found” or temporary errors. The template includes a simple but effective error handling pattern so you know what is going on.

There is a no-op branch labeled something like “Handle missing enrichment,” which connects to a Slack node that sends a notification when ExactBuyer returns no data.

Recommended best practices:

  • Send a Slack message with:
    • The contact’s email.
    • The HubSpot contact ID.
    • Optionally, a short note that enrichment data was missing.
  • Log failures in a persistent store (like a database or log index) for later analysis.
  • Implement retries with exponential backoff for transient HTTP 5xx or 429 rate limit errors.
  • Respect ExactBuyer API rate limits and consider batching or queueing enrichment if you are processing large volumes.

This keeps your automation robust and gives you visibility when enrichment is not available instead of quietly failing in the background.


Testing checklist before going live

Before you unleash this workflow on your production HubSpot portal, walk through this quick testing list:

  • In HubSpot, confirm the webhook subscriptions show delivered events for contact.creation.
  • Create a test contact in HubSpot using an email that you expect ExactBuyer to resolve.
  • In n8n, verify that the HTTP Request node returns a result object with the expected fields.
  • Check in HubSpot that the contact properties are:
    • Correctly updated with enriched values.
    • Not overwritten with nulls where enrichment did not provide data.
  • Test the missing-enrichment path by creating a contact with an unknown email and confirming that:
    • The Slack notification is sent.
    • The workflow behaves as expected without breaking.

Once everything looks good, you can safely move from test contacts to real leads.


Security and compliance: handling PII responsibly

Since this workflow deals with personally identifiable information (PII), it is important to keep security and compliance in mind.

  • Store all API keys and OAuth tokens in n8n credentials, which are encrypted at rest.
  • Limit HubSpot and ExactBuyer credentials to the minimum scopes necessary.
  • Maintain data retention and deletion processes in HubSpot to satisfy GDPR and CCPA requests.
  • Document consent sources for enriched contacts where required by your legal or compliance team.

This way you get the benefits of enrichment without creating headaches for your legal department.


Customization ideas to level up your automation

Once the basic contact enrichment flow is running, you can extend it in several useful ways.

  • Company enrichment: call ExactBuyer’s company endpoints and update HubSpot Company records alongside contacts.
  • Selective enrichment: only enrich high-value leads, for example based on:
    • Lead source.
    • Lifecycle stage.
    • Company size.
  • Audit trail: store raw ExactBuyer responses in a separate table or store for data quality checks and historical snapshots.
  • Workflow segmentation: use enrichment confidence scores or specific enriched attributes to drive branching logic in HubSpot workflows.

n8n’s modular design makes it easy to add new branches, filters, or additional integrations as your process matures.


Monitoring and maintenance tips

Even automated workflows need a bit of occasional care. To keep this integration healthy in the long run:

  • Track enrichment success rate and the volume of Slack alerts related to missing data.
  • Monitor ExactBuyer API usage and costs so you do not accidentally surprise your finance team.
  • Rotate API keys periodically and verify that new credentials are working.
  • Review your field mappings every quarter or whenever HubSpot properties change.

A bit of monitoring now saves you from mysterious “why is nothing updating?” moments later.


Wrapping up: from manual busywork to automated enrichment

Using this n8n workflow template to enrich HubSpot contacts with ExactBuyer gives you richer lead profiles, better personalization, and fewer repetitive tasks clogging up your day.

The workflow is modular and easy to extend. You can add rate limiting, extra validation, company enrichment, or more advanced branching logic with minimal changes. With proper credential management, testing, and monitoring, it will run reliably in production and quietly keep your CRM in good shape.

Next steps:

  • Import the workflow template into your n8n instance.
  • Configure your HubSpot OAuth credentials and ExactBuyer API key.
  • Run through the testing checklist and then let the automation handle new contacts for you.

Get the n8n template or contact us if you want help adapting it to your specific CRM processes.

Call-to-action: Import this workflow into n8n, connect your HubSpot and ExactBuyer credentials, and start enriching new contacts so your sales outreach feels smart instead of guessy.

Automate Cold Email Reply Qualification with n8n

Automate Cold Email Reply Qualification with n8n

Qualifying cold email replies by hand slows down your sales team. With this n8n workflow template, you can automatically read replies from Gmail, check matching contacts in Pipedrive, use OpenAI to assess interest, and create deals for qualified leads. The result is a repeatable system that saves SDRs hours every week and makes sure no valuable reply is missed.

What you will learn in this guide

In this step-by-step tutorial, you will learn how to:

  • Understand the full cold email reply qualification workflow in n8n
  • Connect Gmail, Pipedrive, OpenAI, and Slack in a single automation
  • Configure each node so replies are qualified and turned into deals automatically
  • Write and improve an OpenAI prompt that returns clean JSON
  • Test, debug, and safely customize the template for your sales process

Why automate cold email reply qualification?

When you run outbound campaigns, your team often spends a lot of time:

  • Opening each reply manually
  • Deciding whether it is positive, negative, or neutral
  • Checking if the sender is in your CRM and in the right campaign
  • Creating deals and notifying the right SDR

This manual triage is slow, inconsistent, and expensive. Automation with n8n lets you:

  • Qualify replies consistently using clear rules and AI
  • Focus human effort on high-value conversations instead of inbox sorting
  • Create Pipedrive deals and notify sales in real time
  • Reduce errors from missed or misclassified replies

The workflow described below combines Gmail, Pipedrive, and OpenAI so that every relevant reply is checked, scored, and turned into an actionable next step.

How the n8n cold email reply workflow works

At a high level, the workflow follows this logic:

  1. Watch one or more Gmail inboxes for new replies.
  2. Extract and normalize the email content into a consistent field.
  3. Look up the sender in Pipedrive and fetch their details.
  4. Check if the person is part of the outbound campaign.
  5. Send the reply text to OpenAI to assess interest.
  6. Parse the AI response into structured data.
  7. If the lead is interested, create a Pipedrive deal.
  8. Optionally send a Slack notification to your sales channel.

Main components used in the template

  • Gmail Trigger (primary and secondary) – watches inboxes for incoming replies
  • Set node (Extract Email) – standardizes the email body into a named field
  • Pipedrive Search & Fetch – finds the person and retrieves custom fields
  • If node (Campaign Check) – filters to people in your outbound campaign
  • OpenAI (Assess Interest) – analyzes the reply text
  • Code node (Parse AI Response) – converts AI output into clean JSON fields
  • If node (Interest Condition) – checks if the lead is interested
  • Pipedrive Create Deal – opens a new deal for qualified leads
  • Slack node – notifies your sales team when a new deal is created

Before you start: setup checklist

Make sure you have the following ready before configuring the workflow:

  • n8n instance with access to:
    • Gmail credentials
    • Pipedrive credentials
    • OpenAI credentials
    • (Optional) Slack credentials
  • A Pipedrive person custom field, for example in_campaign, that indicates if a contact is in your outbound campaign (TRUE/FALSE or similar)
  • At least one Gmail inbox used for outbound campaigns and replies

Later, you will also:

  • Adjust Pipedrive deal fields (title, owner, stage) to match your pipeline
  • Test and refine the OpenAI prompt so it returns valid JSON consistently

Step-by-step: building the workflow in n8n

Step 1 – Watch replies with Gmail Trigger

The Gmail Trigger node starts the workflow every time a new email that matches your criteria arrives.

Configuration tips:

  • Add one or more Gmail Trigger nodes if you monitor multiple inboxes (for example, primary SDR inbox and a shared team inbox).
  • Set a reasonable polling interval, such as every minute, while keeping Gmail API quotas in mind.
  • In the node settings:
    • Uncheck the “Simplify” option so you get the full raw message data.
    • Select the Inbox label (or another label you use for campaign replies) so only relevant messages trigger the workflow.

With “Simplify” disabled, you preserve rich context and ensure that later nodes can extract the email body reliably.

Step 2 – Normalize the email content (Set node)

Different Gmail messages may store the body text in slightly different fields. To make the rest of the workflow easier, you standardize this into a single field.

Use a Set node (often named Extract Email) right after the Gmail Trigger and:

  • Create a new field, for example email or text.
  • Map this field from the correct part of the Gmail payload that holds the email content.

This step ensures that every downstream node can simply reference something like {{$json.email}} instead of dealing with Gmail-specific structure.

Step 3 – Find the sender in Pipedrive (Search & Fetch)

Next, you connect the reply to the right person in your CRM.

Use two Pipedrive nodes:

  1. Search Person CRM
    • Search for the person by email address from the reply.
    • This node returns the matching person if they exist in Pipedrive.
  2. Fetch Person CRM
    • Once a person is found, fetch their full details.
    • Include any custom fields, such as in_campaign or qualification flags.

By the end of this step, your workflow knows exactly which Pipedrive contact sent the reply and what campaign or status they belong to.

Step 4 – Filter by campaign (If node)

Not every reply in your inbox belongs to your current outbound campaign. You likely want to qualify only those that are part of a specific sequence.

Use an If node, often named Campaign Check, to:

  • Inspect the in_campaign custom field (or your equivalent field) on the Pipedrive person.
  • Continue the workflow only if this field is set to TRUE or the value you use for “in campaign”.

Replies from people who are not part of the campaign can be ignored or routed to a different branch for manual review. This avoids clutter and keeps the AI analysis focused on the right audience.

Step 5 – Assess interest with OpenAI

Now you pass the reply text to OpenAI so it can determine whether the lead is interested.

Add an OpenAI node (or a dedicated “Assess Interest” node configured with OpenAI) and:

  • Use the standardized email field from the Set node as the input text, for example {{ $json.email }} or {{ $json.text }}.
  • Provide a clear prompt that:
    • Explains the task: classify whether the reply shows interest.
    • Instructs the model to return only JSON.
    • Defines the exact JSON structure expected.

Example prompt snippet for the Assess Interest node:

Analyze the following email reply and return only JSON:
{"interested":"yes" or "no","reason":"one-sentence justification"}

Reply:
"{{email_text}}"

Replace {{email_text}} with the field that contains your extracted email body. Keeping the format strict reduces parsing errors later.

Step 6 – Parse the AI response (Code node)

The OpenAI node returns text that should be valid JSON. To safely use it in conditions and deal creation, you convert it into structured fields.

Add a Code node, often named Parse AI Response, and:

  • Write a small JavaScript snippet that:
    • Reads the raw response from OpenAI.
    • Parses it with JSON.parse() into an object.
    • Exposes fields like interested and reason on $json.
  • The workflow expects something like: {"interested":"yes"|"no","reason":"..."}

You can also add simple trimming or cleanup here if the AI occasionally includes extra whitespace around the JSON.

Step 7 – Check interest and create a Pipedrive deal

Once the AI output is parsed, you can decide what to do based on the interested value.

Interest Condition (If node)

  • Add another If node, usually called Interest Condition.
  • Configure it to check if interested equals "yes".

Create Deal in Pipedrive

For replies where the lead is interested:

  • Add a Create Deal Pipedrive node after the “yes” branch.
  • Set a clear deal title, for example:
    • {{ $json.person_name }} - Reply from outbound campaign
  • Configure:
    • Pipeline and stage
    • Owner (SDR or team member)
    • Priority or other custom fields relevant to your process

This step turns qualified replies into actionable deals without any manual data entry.

Step 8 – Notify the team on Slack (optional)

To ensure fast follow up, you can notify your sales team as soon as a new deal is created.

Add a Slack node after the Pipedrive Create Deal node and:

  • Send a message to a dedicated sales or SDR channel.
  • Include key information, for example:
    • Contact name and email
    • Deal link in Pipedrive
    • Short summary of the AI “reason” field

This keeps everyone aligned and reduces response times to hot leads.

Improving your OpenAI prompt for better results

A strong prompt is critical for reliable automation. To reduce JSON errors and improve accuracy:

  • Be explicit about the output format. Clearly state that only JSON should be returned, and show the exact structure.
  • Provide examples. Include short examples of positive, neutral, and negative replies and how they should be classified.
  • Limit the response length. Ask for a short answer to minimize the chance of extra commentary or hallucinations.

You can start with the example snippet above and gradually refine it using real replies from your campaigns.

Testing and debugging the workflow

Before going live, it is important to test each part of the workflow with realistic data.

  • Use a test inbox. Send yourself sample replies (interested, not interested, out of office, etc.) and verify how the workflow behaves.
  • Check execution logs in n8n. Inspect the output of each node, especially the OpenAI node and the Parse AI Response node, to confirm the JSON structure is correct.
  • Handle malformed JSON. If the AI occasionally returns invalid JSON, enhance the Code node with:
    • Trimming of leading or trailing text
    • Basic validation before parsing

Security, privacy, and compliance considerations

Because this workflow sends email content to third party services, you should review your data handling practices.

  • Review OpenAI data policies. Check how data is stored and processed, and opt out of data logging if your compliance requires it.
  • Redact sensitive data when possible. If replies contain personal or confidential information, consider masking or removing it before sending it to OpenAI.
  • Minimize stored data in Pipedrive. Only keep fields that are necessary for your sales process and remove test data regularly.

Customization ideas for advanced workflows

Once the basic template is running, you can extend it to match your exact sales motion.

  • Interest scoring. Instead of a simple yes/no, ask OpenAI to return a score from 0 to 100 and route high scoring leads differently.
  • Automatic meeting scheduling. When the reply suggests times, integrate with a calendar API to propose or book meetings automatically.
  • Follow up sequences for “maybe” replies. For ambiguous or “not now” responses, automatically send a personalized follow up email from n8n.

Common issues and how to fix them

AI returns invalid JSON

If the OpenAI node sometimes returns extra text or malformed JSON:

  • Tighten the prompt to say “return only JSON, no explanation”.
  • Add trimming and validation logic in the Parse AI Response Code node.
  • Include concrete examples of correct JSON in the prompt.

Pipedrive person not found

If the workflow cannot match the sender to a Pipedrive contact:

  • Confirm that the Search Person CRM node is using the correct email field.
  • Check that the inbound reply includes the original outbound email address you used for the campaign.
  • Consider adding secondary matching, such as name or company, if email addresses differ.

Recap and next steps

This n8n workflow template transforms cold email reply handling from a manual process into a consistent, automated system. By watching Gmail, checking Pipedrive, using OpenAI to assess interest, and creating deals plus Slack notifications, your SDRs can focus on conversations instead of inbox triage.

To put this into practice:

  1. Import the workflow into n8n.
  2. Connect your Gmail, Pipedrive, OpenAI, and optional Slack credentials.
  3. Verify the in_campaign field or equivalent is set up in Pipedrive.
  4. Test with a small batch of real replies and refine your OpenAI prompt.
  5. Roll out gradually and iterate on deal creation rules and routing.

Ready to automate your reply qualification? Set up the template, run a controlled test, and then adapt it to your specific CRM fields and sales cadence. For deeper customization, work with your automation specialist or consult the n8n community for best practices.

Call to action: Import the workflow now

Automate Cold Email Replies with n8n & OpenAI

Automate Cold Email Replies with n8n & OpenAI

Cold email campaigns generate valuable replies, but manually reading and qualifying each response is slow and inconsistent. This n8n workflow template converts every inbound reply into a structured qualification event. It listens to Gmail, looks up and updates people in Pipedrive, sends the reply content to OpenAI for intent classification, creates Pipedrive deals for interested leads, and notifies your sales team on Slack.

This reference-style guide explains how the workflow operates, how data flows between nodes, how to configure each integration, and how to adapt the template for more advanced use cases without changing its core behavior.


1. Workflow overview

1.1 Purpose

The workflow automates cold email reply qualification using n8n. It is designed for teams that:

  • Send outbound emails via Gmail
  • Track contacts and deals in Pipedrive
  • Use Slack for sales notifications
  • Want OpenAI to classify replies as interested or not interested

Instead of manually reading each reply, the workflow:

  1. Detects new replies in one or more Gmail inboxes
  2. Extracts the message body
  3. Finds the corresponding person in Pipedrive
  4. Checks whether that person is part of an active outreach campaign
  5. Sends the reply text to OpenAI for interest assessment
  6. Parses the OpenAI response into structured fields
  7. Creates a Pipedrive deal if the lead is interested
  8. Sends a Slack notification with the deal and context

1.2 High-level architecture

The template is built as a linear but conditional pipeline. At a high level, the node sequence is:

  • Gmail Trigger (Primary & Secondary) – watches inboxes for replies
  • Extract Email (Set node) – normalizes and exposes the email body
  • Search Person CRM (Pipedrive) – locates the person by email address
  • Fetch Person CRM (Pipedrive) – retrieves full person details
  • Campaign Check (IF node) – verifies the person is in an active campaign
  • Assess Interest (OpenAI) – evaluates the reply content for intent
  • Parse AI Response (Code node) – parses the JSON-like result into fields
  • Interest Condition (IF node) – branches based on the interest flag
  • Create Deal Pipedrive – opens a new deal in Pipedrive for interested leads
  • Slack Notification – posts a message to a Slack channel about the new deal

Execution is event-driven by the Gmail Trigger nodes. Subsequent nodes run only for new messages that satisfy the trigger configuration.


2. Node-by-node breakdown

2.1 Gmail Trigger nodes (Primary & Secondary)

Role: Entry point for the workflow. These nodes poll specific Gmail inboxes for new replies.

  • Type: Gmail Trigger
  • Credentials: Gmail (OAuth or service-based, depending on your n8n setup)
  • Label Names: Set to Inbox
  • Simplify: Disabled (unchecked) to preserve full raw email structure
  • Polling Interval: Typically every 1 minute in the template

The template includes two separate Gmail Trigger nodes labeled “Primary” and “Secondary” so you can monitor multiple inboxes (for example, separate SDR mailboxes). You can:

  • Remove one if you only use a single inbox
  • Duplicate the node to monitor additional inboxes
  • Adjust each node’s polling interval to manage API usage and responsiveness

Data output: Each trigger emits a message object that includes headers, subject, sender, and raw body content. Since Simplify is disabled, you retain full control over how you parse and interpret the message downstream.

2.2 Extract Email node (Set)

Role: Normalize and expose the email body for downstream processing.

  • Type: Set node
  • Input: Message data from the Gmail Trigger
  • Output: Fields such as body or text that will be passed to OpenAI

This node typically selects or renames properties from the Gmail Trigger output so that later nodes have a consistent field name for the email content. For example, it might map the raw Gmail field to email_body or similar.

At this stage you can also implement basic preprocessing such as trimming whitespace or removing obvious boilerplate, although the template focuses primarily on extraction rather than heavy cleaning.

2.3 Search Person CRM node (Pipedrive)

Role: Match the email sender to an existing person record in Pipedrive.

  • Type: Pipedrive node
  • Operation: Search for a person by email
  • Credentials: Pipedrive API key or OAuth credentials configured in n8n
  • Input: Email address from the Gmail Trigger output

The node queries Pipedrive using the email address from the incoming message. If a matching person exists, the node outputs that person record. If no match is found, the output will be empty or contain no items for subsequent nodes.

Downstream handling of “no person found” is covered in the troubleshooting section. By default, the template assumes the person exists and will not automatically create a new record.

2.4 Fetch Person CRM node (Pipedrive)

Role: Retrieve full person details, including custom fields, from Pipedrive.

  • Type: Pipedrive node
  • Operation: Get person by ID
  • Input: Person ID from the Search Person CRM node

This node loads the complete person object from Pipedrive. The workflow relies on this step to access the custom field that indicates whether the contact is part of an active campaign.

Without this full fetch, the IF node that checks campaign membership would not have access to the in_campaign flag described later.

2.5 Campaign Check node (IF)

Role: Filter out replies from contacts who are not part of your current outreach campaign.

  • Type: IF node
  • Condition: Custom person field in_campaign is set to TRUE
  • Input: Full person object from the Fetch Person CRM node

The IF node branches workflow execution into two paths:

  • True branch: Person is in an active campaign. Processing continues and the reply is evaluated by OpenAI.
  • False branch: Person is not in an active campaign. The workflow typically stops processing for this item, avoiding unnecessary API calls and deal creation.

For this check to work correctly, you must configure the custom field in Pipedrive as described in the configuration section below.

2.6 Assess Interest node (OpenAI)

Role: Use OpenAI to classify the reply as interested or not interested and capture a short reasoning string.

  • Type: OpenAI node
  • Model: GPT-4 by default in the template
  • Input: Extracted email body from the Extract Email node
  • Output: A short JSON-like string with fields interested and reason

The node sends a prompt that instructs GPT-4 to return a minimal JSON object in the following format:

{  "interested": "yes" | "no",  "reason": "..."
}

For example:

{  "interested": "yes",  "reason": "They asked to schedule a call next week."
}

The prompt is crafted so that the output is deterministic and easy to parse. Temperature is typically kept low to reduce variability and avoid malformed JSON, as discussed later.

2.7 Parse AI Response node (Code)

Role: Convert the OpenAI text output into structured fields that can be used by IF and Pipedrive nodes.

  • Type: Code node
  • Language: JavaScript
  • Input: Raw text string from the OpenAI node
  • Output: Fields such as interested and reason

The Code node typically:

  1. Reads the text returned by OpenAI
  2. Parses it as JSON using JSON.parse or a similar approach
  3. Exposes the interested flag and reason as top-level properties in the item

If OpenAI returns invalid JSON, this node is where parsing errors will surface. Handling those cases is described in the troubleshooting section.

2.8 Interest Condition node (IF)

Role: Decide whether to create a deal and send a Slack notification based on the AI classification.

  • Type: IF node
  • Condition: Parsed field interested equals "yes"
  • Input: Parsed AI response from the Code node

The node routes items as follows:

  • True branch: AI marked the lead as interested. The workflow proceeds to Pipedrive deal creation and Slack notification.
  • False branch: AI marked the lead as not interested. The workflow usually ends for this reply, although you can extend this branch for nurturing or logging.

2.9 Create Deal Pipedrive node

Role: Automatically create a new deal in Pipedrive when a lead is classified as interested.

  • Type: Pipedrive node
  • Operation: Create deal
  • Input: Person ID from earlier Pipedrive nodes, plus any contextual information

This node typically sets fields such as:

  • Deal title (for example, based on the contact name or email subject)
  • Associated person
  • Pipeline or stage (depending on your Pipedrive configuration)

To avoid duplicate deals, you can add idempotency checks before this node, as described in the troubleshooting section.

2.10 Slack Notification node

Role: Notify the sales team in real time when a new interested lead is detected and a deal is created.

  • Type: Slack node
  • Operation: Send message to channel
  • Input: Deal details, person information, and AI reason text

The Slack message usually includes:

  • Contact name and email
  • Link to the Pipedrive deal
  • Brief summary of the AI reason, such as “Asked to schedule a call next week”

This immediate notification allows SDRs or AEs to follow up quickly, which can significantly improve conversion rates.


3. Configuration and setup

3.1 Credentials configuration

Before running the template, configure the required credentials in your n8n instance:

  • Gmail credentials: Used by the Gmail Trigger nodes to read new messages from your inboxes.
  • OpenAI credentials: API key for GPT-4, used by the Assess Interest node.
  • Pipedrive credentials: API key or OAuth credentials, used by all Pipedrive nodes.

In n8n:

  1. Navigate to Credentials
  2. Create or configure entries for Gmail, OpenAI, and Pipedrive
  3. Assign each credential to the corresponding nodes in the workflow

The template includes two Gmail Trigger nodes. You can use the same Gmail credential for both, or different credentials if monitoring separate accounts.

3.2 Pipedrive custom field: in_campaign

To ensure that only relevant contacts are processed, the workflow relies on a custom field in Pipedrive:

  • Field name: in_campaign
  • Level: Person-level field
  • Type: Single option with values TRUE / FALSE (or equivalent boolean representation)

Steps in Pipedrive:

  1. Create a new custom field on the Person entity
  2. Name it in_campaign (or a name that you then reference consistently in n8n)
  3. Configure the field as a TRUE/FALSE style flag
  4. Set this field to TRUE for contacts who are part of your active cold email campaigns

The Campaign Check IF node reads this field to decide whether to continue processing a reply.

3.3 Gmail Trigger configuration

For each Gmail Trigger node:

  • Label Names: Select Inbox so that only messages in the Inbox are considered.
  • Simplify: Uncheck this option. Disabling simplification preserves the raw email payload, which is useful for custom parsing and robust integration with OpenAI.
  • Polling Interval: The template uses “Every minute” as a starting point. You can increase this interval to reduce API calls or decrease it for faster reaction time, depending on your Gmail API limits and workload.

Make sure that the inboxes are receiving the cold email replies you want to process. If you use labels or filters in Gmail, adjust the trigger configuration accordingly.

3.4 OpenAI prompt tuning

The Assess Interest node sends the email body to OpenAI with a prompt that:

  • Asks the model to determine if the sender is interested in your offer
  • Requires a structured JSON response with interested and reason keys
  • Specifies allowed values for interested (for example, "yes" or "no")

Example expected response:

{  "interested": "yes",  "reason": "They asked to schedule a call next week."
}

To keep outputs consistent and easier to parse:

  • Use a low temperature (for example, 0.0 to 0.4) for deterministic behavior
  • Be explicit in the prompt about the JSON structure and field types
  • Include brief examples of both positive and negative replies in the prompt, if needed

4. Best practices for OpenAI classification

4.1 Prompt design guidelines

To achieve reliable JSON output from OpenAI in n8n:

  • Define a strict schema: Clearly describe the JSON keys (interested, reason) and allowed values.
  • Require JSON only: Include an instruction such as Respond with only

GDPR Data Deletion Workflow with n8n

GDPR Data Deletion Workflow with n8n

Imagine this: it is 4:59 p.m., you are mentally halfway out the door, and a GDPR data deletion request pops into your inbox. You sigh, open five different tools, copy-paste the same email over and over, hope you do not miss anything, and silently pray no regulator ever asks for an audit trail.

Now imagine instead that you type a simple command, walk away, and an automated n8n workflow quietly does all the boring stuff for you. It deletes data across Paddle, CustomerIO, and Zendesk, logs everything neatly in Airtable, and even posts a friendly update in Slack. That is what this GDPR data deletion workflow template is built to do.

In this guide, we will walk through how the n8n workflow works, how it keeps you compliant and sane, and how you can plug it into your own setup without needing a week-long automation retreat.

Why bother automating GDPR data deletion?

Under GDPR, data subject requests are not “nice-to-have” tasks, they are legal obligations. Every time a user asks you to delete their data, you have to:

  • Find that user across multiple tools and services
  • Delete or anonymize their data correctly
  • Make sure you did not miss a system
  • Be able to prove you did it, later, if needed

Doing this manually is slow, repetitive, and extremely easy to mess up. It is also painful to audit later. An automated GDPR data deletion workflow in n8n helps you:

  • Reduce human error by standardizing the process
  • Respond faster to deletion requests
  • Keep a clear, auditable log of what happened and when
  • Respect privacy by only storing hashed identifiers instead of raw emails

In short, the workflow does the boring bits on repeat so you do not have to.

What this n8n GDPR deletion workflow actually does

This template is a complete, end-to-end GDPR data deletion workflow built with n8n nodes wired together for security, automation, and auditability. At a high level, it:

  • Accepts deletion requests through a Webhook Trigger (for example, from Slack or an internal admin UI)
  • Validates that the request is authorized using a Token Validation step
  • Parses the incoming command to extract the operation and email address
  • Routes the request based on the operation using an Operation Switch
  • Runs deletion sub-workflows for Paddle, CustomerIO, and Zendesk
  • Builds an audit log entry summarizing what happened
  • Hashes the email with SHA256 so you do not store plaintext personal data
  • Appends the hashed record to Airtable for your compliance trail
  • Sends a Slack notification back to the requester with the result and a link to the log

The design balances three things that do not usually like each other: automation, auditability, and privacy.

The journey of a GDPR deletion request

Let us walk through what happens from the moment someone types a command like:

/gdpr delete user@example.com

All the way to “OK, this is logged and done.”

1. Webhook receives the request and checks the token

Everything starts with the Webhook Trigger node. It accepts POST requests, for example from Slack, and receives a payload that looks roughly like this:

{  "token": "foo",  "text": "delete user@example.com",  "response_url": "https://hooks.slack.com/..."
}

Right after that, the workflow runs a Token Validation step. It checks whether the token in the payload matches your expected secret. If it does not match, the workflow does not even try to delete anything.

Instead, it returns a 403 via an Unauthorized Responder node and stops there. No valid token, no deletion. This keeps random internet strangers from “helping” you clean your database.

2. Parse the command into operation and email

Once the token is confirmed, the workflow moves on to the Parse Command node. This node:

  • Splits the text field into two parts: the operation and the email
  • Normalizes the operation to lowercase, for example delete
  • Checks that an email address is actually present

If the token was invalid earlier, you already got a 403 and nothing else happens. If the token is fine but the command is malformed, the workflow will handle that in the next steps.

3. Route the operation and handle bad commands

Next up is the Operation Switch node. This is where the workflow asks: “What are we trying to do here?”

If the operation is not recognized, for example it is not delete, the workflow triggers an Invalid Command Response node. That node sends a friendly message like:

“Sorry, I did not understand your command. You can request data deletion like so: /gdpr delete <email>.”

So instead of silently failing or doing something weird, it guides the user back to the right format.

4. Check for an email and acknowledge the request

Even if the operation is valid, the workflow still needs a target. If no email is provided, it sends back a Missing Email Response with clear instructions on how to fix the command.

If an email is present, the workflow immediately sends an Acknowledge Response to the requester. This is a short confirmation like “On it!” sent via the original response_url.

The key idea is that this acknowledgment happens before any long-running deletion tasks finish. The user gets instant feedback, and your workflow can take its time doing the actual cleanup behind the scenes.

5. Run the actual deletions in Paddle, CustomerIO, and Zendesk

Once the request is validated and acknowledged, the workflow triggers three Execute Workflow nodes, one after another:

  • Paddle Deletion
  • CustomerIO Deletion
  • Zendesk Deletion

Each of these executes a focused sub-workflow that:

  • Finds the user by their email address in the respective service
  • Issues the relevant delete or anonymize API calls

Some services do not truly delete accounts and instead only allow suspension or anonymization. In those cases, you can standardize what “deletion” means in your policy and have the sub-workflow map to that action.

Design tip: Make each sub-workflow idempotent. That means if you run the same deletion request multiple times, it does not break anything or perform duplicate work. If the user is already deleted or anonymized, the workflow should simply confirm that state instead of throwing errors.

6. Build a structured audit record

Once all the service-specific deletions are done, the workflow uses a Build Log Entry function node to summarize what happened. It collects the results from Paddle, CustomerIO, and Zendesk, then produces fields such as:

  • Result – for example Done or Error
  • Notes – service messages concatenated into a readable summary
  • Processed – an ISO timestamp of when the deletion completed

This gives you a clean, standardized record for every deletion request, instead of scattered logs and guesswork.

7. Hash the email for privacy-first logging

Before anything gets stored, the workflow passes through a Hash Email node. This node takes the user’s email and applies SHA256 hashing, then stores only the hash, not the plaintext email.

Why this matters:

  • You can still link multiple audit records for the same user by matching the hash
  • You avoid keeping raw personal data sitting in your logging system
  • You maintain traceability without building an accidental side-database of user emails

It is a neat way to keep your logs useful and your legal team less nervous.

8. Append the record to Airtable for your audit trail

With the hash and summary ready, the workflow uses an Airtable Append node to store the log entry in a dedicated Log table. The record typically includes:

  • The hashed email identifier
  • The deletion outcome (Done or Error)
  • The timestamp of processing
  • Any service-specific messages or notes

Because the email is hashed, the Airtable log provides traceability while minimizing stored PII. If you ever need to demonstrate compliance, you can show exactly what happened and when, without revealing user emails in your audit table.

9. Notify the requester in Slack

Finally, the workflow sends a status update through a Notify Slack HTTP Request node. It posts a concise message back to the original response_url that includes:

  • The overall status, for example OK or Error
  • A link to the Airtable audit record

The requester gets a clear “this is done” message, along with a direct path to the log if they need more detail. No one has to wonder whether the deletion actually happened.

Error handling and monitoring so nothing slips through

GDPR deletion workflows are not a place for silent failures. This template includes patterns you should keep and extend:

  • Fail fast on bad inputs Return early with clear responses for:
    • Invalid tokens
    • Missing emails
    • Unrecognized commands
  • Log per-service responses Collect the outcome of each third-party deletion (Paddle, CustomerIO, Zendesk) and include that in the audit record so you can see exactly which services succeeded or failed.
  • Use retries for flaky APIs When talking to third-party APIs, implement retries and exponential backoff for transient errors. Internet hiccups should not derail your compliance.
  • Alert humans when things go wrong If a deletion fails repeatedly, alert a human operator or a support channel so someone can step in and resolve the issue.

Best practices for a safe, privacy-friendly workflow

Security tips

  • Keep your webhook token secret and rotate it periodically
  • Expose the webhook over HTTPS-only endpoints
  • Restrict inbound IPs where possible
  • Limit who can trigger deletions, for example with Slack app scopes, admin UI roles, or mTLS

Privacy tips

  • Hash emails with SHA256 or otherwise pseudonymize identifiers before storing them in logs
  • Record only what you need for compliance: timestamps, actions taken, and outcomes

Operational tips

  • Make deletion workflows idempotent so repeated requests are safe and do not cause errors
  • Have a human review path for tricky edge cases or contested deletions
  • Log request and response payloads temporarily for debugging, then rotate or redact them on a schedule

How to test and deploy this n8n GDPR template

Before you unleash this workflow on real users, run it through a proper test cycle.

Testing checklist

  • Use a staging environment for n8n
  • Set up test accounts in Paddle, CustomerIO, and Zendesk
  • Confirm that:
    • Token mismatches return a 403 and do not run any deletions
    • Malformed commands return helpful guidance instead of cryptic errors
    • Successful delete flows create a hashed audit record in Airtable
    • Slack receives both the initial acknowledgment and the final status message

Deployment tips

When everything looks good in staging:

  • Deploy the workflow on a secure n8n instance
  • Keep an eye on logs for early failures or misconfigurations
  • Optionally, add a scheduled job that periodically checks that your Airtable audit records match the actual account states in your services

Wrapping up: less manual work, more reliable compliance

Automating GDPR data deletion with n8n turns a messy, manual chore into a repeatable, auditable process. By:

  • Validating every request
  • Coordinating deletions across Paddle, CustomerIO, and Zendesk
  • Hashing email addresses before logging anything
  • Storing outcomes in Airtable with timestamps and notes
  • Notifying requesters through Slack

You get both speed and clear evidence of compliance, without living in constant fear of the next deletion request.

Want to skip the “build from scratch” phase? Grab the n8n template, plug in your credentials, customize the service deletion sub-workflows to match your own stack, and test everything in staging before going live.

Next steps and how to get help

If you would like help adapting this GDPR data deletion workflow for your specific tools, adding extra compliance controls, or wiring in RBAC, reach out to our team or drop a comment. We are happy to help you spend less time on repetitive deletion tasks and more time on work that is actually interesting.

Happy automating!

Automate Email Campaigns from LinkedIn Interactions

Automate Email Campaigns from LinkedIn Interactions with n8n

Using LinkedIn engagement as a source of leads is powerful, but doing it by hand is slow and inconsistent. With n8n, you can turn every like and comment on your LinkedIn posts into a structured, scalable email outreach pipeline.

This guide walks you through an n8n workflow template that:

  • Collects LinkedIn likers and commenters with Phantombuster
  • Enriches their contact data with Dropcontact
  • Deduplicates and stores contacts in Airtable
  • Triggers email campaigns in Lemlist and updates HubSpot
  • Notifies your team in Slack as contacts are processed

You will learn how each part of the automation works, how to configure it in your own n8n instance, and how to keep it reliable and compliant.


Learning goals

By the end of this tutorial, you should be able to:

  • Explain the full LinkedIn-to-email automation flow in n8n
  • Configure Phantombuster, Dropcontact, Airtable, Lemlist, HubSpot, and Slack inside one workflow
  • Map and enrich contact data for better personalization and deliverability
  • Set up deduplication so you do not repeatedly message the same person
  • Troubleshoot common errors and stay compliant with data privacy rules

Why automate LinkedIn interactions?

When a LinkedIn user likes or comments on your post, they are signaling interest. The challenge is capturing that interest before it goes cold.

Manual workflows usually look like this:

  • Copy profile URLs from LinkedIn
  • Search for emails and company details
  • Paste data into a spreadsheet or CRM
  • Hand off to a sales or marketing tool

This approach is slow, error-prone, and almost impossible to scale.

Automating the process with n8n lets you:

  • Respond quickly to engaged prospects while the interaction is still fresh
  • Keep a single, reliable source of truth in Airtable or your CRM
  • Automatically enrich contacts for better personalization and higher deliverability
  • Trigger email campaigns at scale without any copy-paste work

Conceptual overview of the workflow

Before diving into configuration, it helps to understand the overall flow. At a high level, the n8n template runs in this sequence:

  1. Cron Trigger starts the workflow on a schedule.
  2. Phantombuster agents scrape LinkedIn likers and commenters.
  3. A Short Wait node gives Phantombuster time to complete.
  4. Phantombuster Get Output nodes pull the scraped profile data.
  5. Dropcontact enriches each profile with email and other fields.
  6. Airtable checks if the email already exists.
  7. Update or create the contact in Airtable.
  8. Lemlist and HubSpot receive the contact for campaigns and CRM.
  9. Slack sends a notification for each processed contact.

Think of it as a pipeline:

LinkedIn engagement → Scraping → Enrichment → Deduplication → Storage → Outreach → Notification


Key n8n nodes and what they do

Now let us break down the main building blocks of the template. Understanding these will make the setup steps much easier.

Cron Trigger – schedule the automation

The Cron node starts the workflow automatically on a regular schedule, for example every hour or a few times per day. This ensures you continuously capture new likers and commenters without manual intervention.

Phantombuster: LinkedIn Commenters & LinkedIn Likers

Two Phantombuster agents are used:

  • LinkedIn Likers – collects profiles of people who liked a given post
  • LinkedIn Commenters – collects profiles of people who commented

In the n8n workflow, you trigger these agents via Phantombuster nodes. After triggering them, the workflow uses a Short Wait node so the agents have time to run and upload their output.

Phantombuster Get Output – retrieve scraped profiles

Once Phantombuster finishes, dedicated Get Output nodes fetch the result files. These nodes return lists of LinkedIn profiles, which are then passed downstream to enrichment.

Dropcontact Enrich – add emails and firmographic data

Dropcontact receives each profile (typically name and LinkedIn URL) and attempts to find:

  • Professional email addresses
  • Phone numbers
  • Company name
  • Website and related company data

The workflow then maps Dropcontact fields into Airtable and CRM entries. A typical expression used in n8n to access the primary email looks like:

={{$node["Dropcontact Enrich"].json["data"][0]["email"][0]["email"]}}

It is important to check the actual JSON structure returned by your Dropcontact account, since APIs can change over time. If the structure differs, you will need to adjust the expressions accordingly.

Airtable List & Record Exists (If) – deduplicate contacts

To avoid sending multiple campaigns to the same person, the workflow uses Airtable as a central database:

  • Airtable List retrieves existing contacts from your Contacts table.
  • A downstream If node (often named Record Exists) compares the enriched email from Dropcontact with existing emails in Airtable.

Depending on the result, the flow decides whether to update an existing record or create a new one.

Prepare Update / Prepare New – map data into Airtable fields

Two Set nodes (commonly labeled Prepare Update and Prepare New) handle the data mapping:

  • Prepare New builds a complete record for new contacts, including fields like Name, Account, Company website, Email, Phone, and LinkedIn URL.
  • Prepare Update formats only the fields you want to refresh for existing contacts.

This is where you align the output from Dropcontact and Phantombuster with your Airtable column names.

Airtable Create & Airtable Update – store contacts

After data is prepared:

  • Airtable Create appends a new row when the contact does not yet exist.
  • Airtable Update modifies an existing row using the Airtable record ID captured earlier in the flow.

Both nodes can be configured to use typecast so that Airtable correctly interprets the data types for linked records, select fields, etc.

Lemlist Add Lead & HubSpot Create Contact

Once a contact is stored in Airtable, the workflow hands it off to your sales and marketing tools:

  • Lemlist Add Lead adds the email address to your Lemlist account so you can enroll them in email campaigns.
  • HubSpot Create Contact creates or upserts the contact in HubSpot CRM, keeping your pipeline updated.

The Lemlist node is configured with continueOnFail=true, which means that if Lemlist is rate-limited or returns an error, the rest of the workflow continues instead of stopping completely.

Slack Notification – keep your team in the loop

Finally, a Slack node posts a message to a chosen channel for each new or updated contact. This can include key details like name, email, company, and whether the record was created or updated.


Step-by-step setup in n8n

The sections below guide you through turning the template into a working automation in your own environment.

Step 1: Import the workflow template

  1. Download or copy the provided n8n JSON template.
  2. Open your n8n instance and go to the Workflows area.
  3. Use the Import option and paste or upload the JSON.
  4. Save the workflow and give it a descriptive name, for example, LinkedIn Engagement to Email Campaign.

Before running the workflow, make sure you have access to all needed services:

  • Airtable
  • Phantombuster
  • Dropcontact
  • Lemlist
  • HubSpot
  • Slack

Step 2: Configure Phantombuster agents for LinkedIn

In your Phantombuster account, you will need two agents targeting the same LinkedIn post:

  • LinkedIn Post Likers Scraper (or equivalent)
  • LinkedIn Post Commenters Scraper

For each agent:

  1. Set the target LinkedIn post URL.
  2. Configure the agent to output data through the Phantombuster API (not only CSV or Google Sheets).
  3. Note the agent ID and confirm that the API key you will use in n8n has access.
  4. Run a manual test in Phantombuster to confirm you get a clean list of profiles.

Back in n8n, open the Phantombuster nodes that trigger these agents and:

  • Select your Phantombuster credentials.
  • Enter the correct agent IDs.
  • Verify that the output format matches what the template expects (profile URLs, names, etc.).

Step 3: Add and connect API credentials in n8n

In n8n, go to Settings > Credentials and create entries for each service used in the workflow.

  • Airtable – API key (or personal access token), base ID, and table name for your Contacts table.
  • Phantombuster – API key associated with your agents.
  • Dropcontact – API key for enrichment.
  • Lemlist – API key for your Lemlist account.
  • HubSpot – API key or OAuth app connection.
  • Slack – Bot token with permission to post to the target channel.

After creating each credential, open the corresponding nodes in the workflow and select the right credential from the dropdown. Run a quick test on a single node (for example, Airtable List) to confirm connectivity.

Step 4: Map and validate fields for Airtable and CRMs

Field mapping is where you adapt the template to your specific schema.

Focus on these nodes:

  • Prepare New (Set node)
  • Prepare Update (Set node)
  • Airtable Create
  • Airtable Update
  • Lemlist Add Lead
  • HubSpot Create Contact

For each Set node:

  1. Open the node and review each field being set (Name, Email, Company, Website, Phone, LinkedIn URL, etc.).
  2. Update the field names to match the column names in your Airtable base or CRM properties.
  3. Check the expressions that pull data from Dropcontact and Phantombuster. For example:
    ={{$node["Dropcontact Enrich"].json["data"][0]["email"][0]["email"]}}

    Adjust these if your Dropcontact JSON structure is different.

For Lemlist and HubSpot nodes, make sure you:

  • Map the contact email correctly.
  • Optionally map additional fields such as first name, last name, company, or LinkedIn URL to custom properties.

Step 5: Tune timing and rate limits

The workflow relies on external services that may take time to respond or may impose rate limits.

Key considerations:

  • Short Wait node after triggering Phantombuster:
    • The template uses a default of around 30 seconds.
    • If your posts get a lot of engagement or your Phantombuster plan is slower, increase this delay.
    • Alternatively, you can implement a polling loop that checks for output readiness instead of a fixed delay.
  • Cron Trigger frequency:
    • Do not run the workflow too frequently, or you may hit API rate limits on Phantombuster, Dropcontact, Lemlist, or HubSpot.
    • Start with a modest schedule, such as once per hour or a few times per day, and adjust based on volume.
  • Lemlist continueOnFail:
    • The Lemlist node is set to continueOnFail=true so that temporary Lemlist issues do not block the entire pipeline.

After you adjust timing, run a small test with a few contacts before moving to production volume.


Best practices for a stable and effective workflow

  • Respect platform rules – Follow LinkedIn terms of service and Phantombuster usage limits. Avoid aggressive schedules that might flag your account.
  • Use deduplication – Rely on Airtable and the Record Exists logic to avoid adding the same email repeatedly to Lemlist or HubSpot.
  • Validate emails – If possible, add an email verification step before sending campaigns to protect your sender reputation.
  • Control Cron frequency – Balance responsiveness with rate limits and data volume.
  • Enable logging and alerts – Use n8n’s Execution List and consider adding Slack or email alerts for errors so you can react quickly.

Troubleshooting common issues

If something does not work as expected, use n8n’s execution logs to inspect each node’s input and output JSON. Here are some typical problems and checks:

  • No emails from Dropcontact
    • Confirm that LinkedIn profile URLs or names are being passed correctly to Dropcontact.
    • Check the Dropcontact dashboard or API logs for any rate limit or quota issues.
  • Airtable records not updating
    • Verify that the Airtable record ID is correctly passed into the Airtable Update node.
    • Ensure the field names in the Update node match Airtable column names exactly.
  • Lemlist node fails
    • Keep continueOnFail=true so the workflow continues for other contacts.
    • Check Lemlist rate limits or API key validity and retry later.
  • Unexpected data structure errors
    • Inspect the raw JSON output of Phantombuster and Dropcontact nodes.
    • Update your expressions in Set nodes if the API responses have changed.

Security, privacy and compliance