Automating Job Application Parsing with n8n & Pinecone

Automating Job Application Parsing with n8n & Pinecone

Hiring teams are drowning in resumes, cover letters, and emails. Manually reading every single application is slow, inconsistent, and honestly, pretty exhausting. So why not let an automation workflow do the heavy lifting for you?

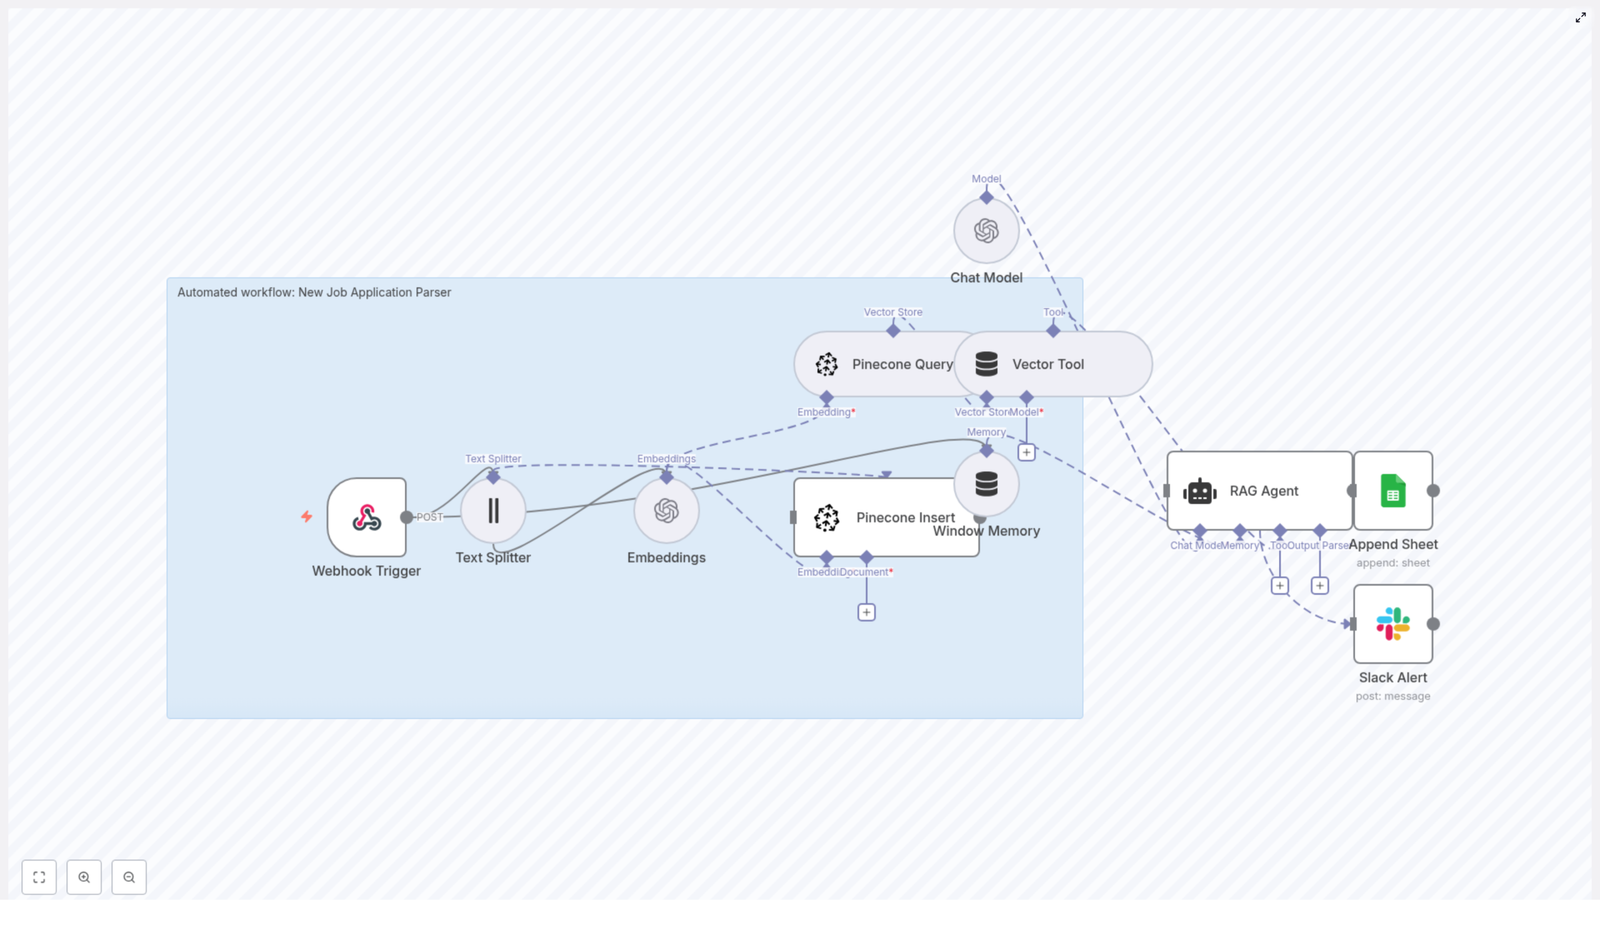
In this guide, we’ll walk through a production-ready Job Application Parser built with n8n, OpenAI embeddings, Pinecone, and a RAG agent. It automatically extracts key candidate details, stores them for semantic search, and logs everything in a friendly format your team can actually use.

Think of it as a tireless assistant that reads every application, remembers the details, and neatly organizes them for you.

What this n8n Job Application Parser actually does

Let’s start with the big picture. This workflow:

  • Accepts incoming job applications through a Webhook Trigger in n8n.
  • Splits long resumes or cover letters into manageable chunks with a Text Splitter.
  • Uses OpenAI embeddings to convert those chunks into vectors.
  • Stores and searches those vectors in Pinecone using a dedicated index.
  • Uses a RAG Agent powered by an OpenAI Chat Model to summarize and extract structured candidate info.
  • Logs the parsed output to Google Sheets for easy review.
  • Sends a Slack alert if anything goes wrong so you’re never in the dark.

The result is an automated pipeline that turns messy, unstructured text into searchable, structured data your team can filter, analyze, and act on.

Why bother automating job application parsing?

If you’ve ever opened a folder full of resumes and felt your heart sink, this is for you.

By automating the parsing step, you:

  • Speed up screening so you can respond to strong candidates before competitors do.
  • Standardize evaluation with consistent fields like skills, experience, and suitability scores.
  • Make search useful with semantic vector search across resumes, cover letters, and emails.

Using embeddings and Pinecone vector search, you can:

  • Extract and index text from resumes, cover letters, or even email applications.
  • Search semantically for specific skills, tech stacks, or experience levels.
  • Log results directly to Google Sheets or your ATS, and get notified if something breaks.

In short, you get more time for real conversations with candidates and less time copy-pasting from PDFs.

What’s inside the workflow: the tech stack

Here’s the core stack that powers this job application parser:

  • n8n as the workflow automation platform and orchestrator.
  • Webhook Trigger to accept new applications via a POST endpoint.
  • Text Splitter with chunkSize=400 and chunkOverlap=40 to prepare text for embeddings.
  • OpenAI embeddings using text-embedding-3-small to generate dense vectors.
  • Pinecone as the vector database with an index named new_job_application_parser.
  • RAG Agent combined with an OpenAI Chat Model for context-aware parsing and summarization.
  • Window Memory to keep recent conversation context available to the agent.
  • Google Sheets (Append Sheet) to log parsed results in a “Log” tab.
  • Slack Alert to notify your team if the workflow fails or the RAG Agent throws an error.

How the architecture fits together

Let’s walk through how everything flows from a new application to a structured log entry.

  1. A new application arrives at the n8n Webhook Trigger via a POST request.
  2. Text Splitter breaks the raw text into overlapping chunks that work well for embeddings.
  3. Embeddings node calls OpenAI to turn each chunk into a vector.
  4. Pinecone Insert writes those vectors into the new_job_application_parser index along with metadata.
  5. When you want to parse or query a candidate, a Pinecone Query pulls back the most relevant chunks.
  6. Vector Tool wraps those results so the RAG Agent can use them as external context.
  7. Window Memory and the Chat Model help the RAG Agent generate structured summaries and extractions.
  8. Append Sheet writes the agent’s output to a Google Sheet in a “Log” tab.
  9. If something fails along the way, a Slack Alert is triggered from the RAG Agent’s error output.

Once this is set up, new applications flow through the pipeline automatically, with all the heavy analysis handled for you.

Step-by-step: building the workflow in n8n

1. Set up the Webhook Trigger

Start with a Webhook node in n8n:

  • Method: POST
  • Path: /new-job-application-parser

This is where your applicant data lands, whether it’s resume text, a cover letter, or the body of an application email.

Make sure you secure the webhook, for example by:

  • Requiring an API key in the headers, or
  • Using an IP allowlist so only trusted systems can call it.

2. Split long documents into chunks

Next, add a Text Splitter node. Configure it with:

  • chunkSize = 400
  • chunkOverlap = 40

Chunks of around 400 characters tend to strike a good balance between:

  • Preserving enough context for embeddings to be meaningful, and
  • Keeping token and cost usage under control.

The 40 character overlap helps avoid cutting important entities right in the middle of a sentence, which makes retrieval and summarization more accurate.

3. Generate embeddings with OpenAI

Now add an Embeddings node and connect it to OpenAI. Use:

  • Model: text-embedding-3-small

For each chunk, the node will create a dense vector representation. Whenever possible, batch these embedding calls to:

  • Reduce the total number of requests.
  • Lower API overhead and cost.

4. Insert vectors into Pinecone

Attach a Pinecone Insert node and configure it in insert mode targeting your index:

  • Index name: new_job_application_parser

Alongside each vector, store useful metadata such as:

  • candidate_id or candidate email.
  • source_type (for example: resume, cover_letter, email).
  • filename if applicable.
  • created_at timestamp.
  • The original text chunk.

This metadata makes it much easier to trace results back to the original document and build downstream actions like candidate timelines or audit logs.

5. Query Pinecone and power the RAG flow

When you want to summarize a candidate or answer questions about them, you:

  1. Use a Pinecone Query node to fetch the most relevant chunks from the index.
  2. Pass those results into a Vector Tool that the RAG Agent can consume as context.
  3. Use Window Memory to store recent exchanges so the Chat Model has continuity.

The RAG Agent then has everything it needs: the query, the context from Pinecone, and recent conversation history.

6. Parse, summarize, and log to Google Sheets

The RAG Agent uses the OpenAI Chat Model plus the retrieved chunks to produce a structured summary of each candidate, for example:

  • Name and contact details.
  • Key skills and tech stack.
  • Total years of experience.
  • Notable roles or employers.
  • A short written summary.
  • A suitability score, such as 0 to 100.

Once the agent returns this data, connect it to a Google Sheets – Append Sheet node and configure:

  • documentId set to your Google Sheet ID.
  • sheetName set to Log.

Each parsed application becomes a new row in your “Log” tab, ready for your team to filter, sort, and review.

7. Handle errors and send Slack alerts

Things go wrong sometimes, and that’s fine as long as you know when it happens.

Wire the onError output of the RAG Agent (or any critical node) to a Slack Alert node. Configure a simple message template that includes:

  • The error message.
  • A candidate identifier, such as email or candidate_id.

This way, your hiring team can quickly spot issues, fix them, and re-run affected applications if needed.

Key design choices and practical recommendations

Choosing chunk size and overlap

The values chunkSize=400 and chunkOverlap=40 work nicely for most resumes and cover letters. That said, you might want to tweak them based on your data:

  • If your inputs are typically very short (like social profiles or brief emails), try smaller chunks.
  • If you deal with complex CVs that include tables or dense formatting, consider pre-processing first to flatten bullet points and strip out visual noise.

Selecting the embedding model

The model text-embedding-3-small offers a strong balance between quality and cost, which makes it a good default for production workflows.

If your use case depends on very fine-grained semantic matching, such as differentiating between similar but distinct skill sets, you can upgrade to a larger or more advanced embedding model at a higher cost.

Designing your metadata and vector schema

A thoughtful metadata schema pays off later. Consider storing:

  • candidate_id or email for linking all vectors to a person.
  • source_type to distinguish resumes vs cover letters vs emails.
  • filename to help with audits or candidate support requests.
  • created_at for retention policies and time-based analytics.

With this information in place, you can easily filter queries, clean up old data, and build more advanced reporting.

Security, privacy, and compliance

Because you’re dealing with personal data, security and privacy are not optional.

  • Keep sensitive credentials like your OpenAI key, Pinecone API key, and Google OAuth tokens encrypted and restrict access to your n8n instance.
  • Redact or hash Personally Identifiable Information (PII) if you plan to store data long term. A common pattern is to keep minimal identifiers in Pinecone and store full documents in a secure object store.
  • Define a clear data retention policy. For example, automatically delete vectors from Pinecone after a certain period to comply with GDPR or other local regulations.

Testing, monitoring, and observability

To keep this workflow reliable in production, you’ll want some basic testing and monitoring in place.

  • Create a small set of “canonical” resumes and cover letters and use them as test fixtures. This lets you quickly confirm that parsing and summarization are consistent over time.
  • Log key metrics such as:
    • Embeddings generated per minute.
    • Pinecone index size.
    • Average query latency.
  • Use Slack alerts for critical failures and optionally set up a daily health check summary for your team.

Scaling and keeping costs under control

As your candidate volume grows, you’ll want to make sure the system scales without surprising bills.

  • Batch embedding calls so you send fewer requests and take advantage of bulk endpoints where available.
  • Monitor your Pinecone index size and cost, and define a pruning strategy:
    • Keep only the latest version of each candidate’s data, or
    • Use time-to-live (TTL) for data that only needs to live for a short period.
  • Cache frequent queries if your team often asks similar questions, to reduce load on the Chat Model.

Ideas for next steps and improvements

Once the basic workflow is running smoothly, you can layer on more features over time.

  • Convert the agent’s free-text output into structured JSON with fields like:
    • name
    • email
    • skills
    • total_experience_years
    • summary
  • Build a scoring model that ranks candidates by fit for a specific job description.
  • Integrate with your ATS so new candidate records are created automatically and screening steps can be triggered without manual input.
  • Add OCR preprocessing so the workflow can handle PDF resumes and image-based CVs.

Example prompt for the RAG Agent

Clear instructions to the model make a big difference. A good system message might look like this:

“You are an assistant for New Job Application Parser. Extract structured fields: name, email, phone, skills, years_experience, notable_roles, short_summary, and a suitability_score (0-100). Use the provided context only.”

Then you feed the retrieved Pinecone chunks as context and tell the model to return a JSON object. This makes it trivial for the workflow to log the results into Google Sheets or forward them to other systems.

Wrapping up

By combining n8n, OpenAI embeddings, and Pinecone, you get a powerful and cost-effective Job Application Parser that:

  • Cuts down manual screening time.
  • Improves consistency in how candidates are evaluated.
  • Gives you a flexible foundation for ATS integrations, scoring models, and more advanced automation.

With proper error handling, privacy controls, and monitoring in place, this setup is ready for production use in real hiring pipelines.

Ready to try it? Export the n8n workflow, plug in your OpenAI and Pinecone credentials, and deploy the

Automated Job Application Parser with n8n & RAG

Automated Job Application Parser with n8n & RAG: Turn Hiring Chaos Into Clarity

From Inbox Overload To Insightful Hiring

Most hiring teams know the feeling: a flood of resumes and cover letters arriving from different sources, each with its own format, length, and structure. Important details hide in long paragraphs. Great candidates slip through the cracks. Manual screening eats up hours that could be spent interviewing, strategizing, and building a stronger team.

Automation offers a different path. Instead of wrestling with every application by hand, you can design a workflow that collects, understands, and organizes candidate data for you. The n8n job application parser workflow is built exactly for this purpose. It transforms unstructured resumes and cover letters into structured insights that your team can act on quickly.

This article walks you through that transformation as a journey: starting from the problem, shifting your mindset toward automation, then introducing a practical n8n template that ties together webhooks, OpenAI embeddings, Pinecone, a RAG agent, Google Sheets, and Slack. Along the way, you will see how this setup can become a stepping stone toward a fully automated, focused hiring pipeline.

Reframing The Hiring Workflow: From Manual To Meaningful

Automation is not just about saving time. It is about freeing your attention for the work that actually moves your company forward. When you stop copy-pasting details from resumes into spreadsheets, you create space for deeper conversations with candidates, sharper hiring decisions, and more strategic planning.

With n8n, you do not need to be a full-time engineer to build powerful systems. You can start small, experiment, and iterate. This job application parser template is a concrete first step that you can deploy quickly, then refine as your needs grow.

At a high level, the workflow will:

  • Capture incoming applications in real time with a webhook
  • Split and embed resume and cover letter text using OpenAI
  • Store embeddings in a Pinecone vector index for fast semantic search
  • Use a Retrieval-Augmented Generation (RAG) agent to parse and score candidates
  • Log results into Google Sheets for review and reporting
  • Send Slack alerts when something goes wrong so you stay in control

The result is a scalable, low-code architecture that gives your hiring team more clarity and control, with far less manual effort.

Why This n8n Architecture Unlocks Growth

As your hiring volume increases, the old way of working simply does not scale. This n8n-based architecture is designed to grow with you, while staying transparent and adaptable.

  • Scalable parsing: Large resumes and cover letters are split into chunks, embedded with OpenAI, and stored in Pinecone so you can run fast semantic searches across thousands of candidates.
  • Accurate extraction: A RAG agent combines stored context and language model reasoning to reliably pull out qualifications, intent, and other key signals.
  • Operational visibility: Parsed results land in Google Sheets for easy review, and Slack alerts keep you informed when something needs attention.
  • Low-code automation: Built in n8n, the workflow is easy to maintain, clone, and adapt to your own hiring process.

Think of this template as your automation foundation. Once it is running, you can extend it into automated routing, candidate nurturing flows, or advanced analytics, all within the same ecosystem.

The Workflow Journey: From Raw Application To Structured Insight

Let us walk through what actually happens inside the workflow, step by step. As you read, imagine how each part removes a little more manual work from your day.

1. Webhook Trigger: The Gateway For New Applications

Everything starts with an incoming POST request to the webhook path /new-job-application-parser. This endpoint receives the candidate payload, which typically includes:

  • Resume text
  • Cover letter text
  • Metadata such as job ID, source, or timestamp

Once the payload hits the webhook, n8n triggers the workflow and passes the raw content downstream. From that moment, your automation takes over and you are no longer copy-pasting data from emails.

2. Text Splitter: Preparing Content For Embeddings

Resumes and cover letters can be long and dense. To make them more manageable for the embedding model, the workflow uses a Text Splitter node. This node breaks the text into smaller chunks so that each piece preserves local context without exceeding token limits.

A typical configuration might look like this:

  • chunkSize: 400
  • chunkOverlap: 40

You can tune these values based on the length and style of your incoming documents. The goal is to capture enough context in each chunk so that embeddings remain meaningful.

3. Embeddings: Turning Text Into Searchable Vectors

Once the text is split, each chunk is converted into a vector representation using OpenAI embeddings. The recommended model is:

  • text-embedding-3-small

These vectors encode the semantic meaning of the text, which allows you to later search by similarity instead of just keywords. This is what makes talent rediscovery and nuanced candidate matching possible at scale.

4. Pinecone Insert & Query: Building Your Candidate Memory

The workflow then stores all chunks and their embeddings in a Pinecone index. A suggested index name is:

  • new_job_application_parser

This index becomes your long-term, searchable memory of candidate data. Whenever you or the RAG agent needs to answer a question or perform a parsing task, the workflow queries the same Pinecone index to retrieve the most relevant chunks.

Over time, this means you are not just parsing individual resumes, you are building a searchable talent database that your team can tap into again and again.

5. Window Memory & Vector Tool: Keeping Context Alive

When applications get complex or when reviewers ask follow-up questions, context matters. The workflow uses:

  • Window memory buffers to maintain conversational context across multi-part interactions
  • A vector tool that exposes the Pinecone index as a lookup resource for the RAG agent

This combination allows the agent to remember what has already been discussed and to pull in the most relevant candidate data as needed. The experience feels less like a one-off script and more like an intelligent assistant that understands the bigger picture.

6. RAG Agent: Parsing, Scoring, And Summarizing Candidates

At the heart of the workflow sits the RAG (Retrieval-Augmented Generation) agent. It receives:

  • The raw candidate data
  • The retrieved context from Pinecone

Using a system prompt that you define, the agent runs a structured extraction routine and outputs parsed fields such as:

  • Name and contact details
  • Skills
  • Experience summary
  • Match score
  • Potential red flags

Because you control the system message, you can standardize the output format and make it machine readable. This is what turns messy text into clean data you can filter, sort, and analyze.

7. Append Sheet: Building A Clear Review Queue

Next, the workflow appends the parsed output to a Google Sheet. A common configuration is:

  • Sheet name: Log

Each new candidate becomes a new row with structured columns that map directly to the fields extracted by the RAG agent. This simple spreadsheet view becomes your review queue and can easily connect to dashboards, reporting tools, or additional automations via Zapier or n8n.

8. Slack Alert (onError): Staying In Control

Automation should never feel like a black box. To keep you informed, the workflow includes an error path that sends a Slack alert when something goes wrong. The alert typically contains:

  • The error message
  • Basic context about the failed run

This way, your ops or hiring team can respond quickly, fix configuration issues, and keep the pipeline healthy without constantly checking logs.

Getting Ready: What You Need Before You Start

Before you import the workflow into your n8n instance, make sure you have the following in place. Treat this as your launch checklist.

  1. An n8n instance, either cloud or self-hosted.
  2. An OpenAI API key with access to embeddings (recommended model: text-embedding-3-small).
  3. A Pinecone account and index. You can create an index named new_job_application_parser or adjust the node settings to match your own index.
  4. Google Cloud OAuth credentials for Google Sheets, either a service account or OAuth client with Sheets scope.
  5. A Slack bot token with permission to post messages in your chosen channel.
  6. Environment variables or n8n credentials defined for each external service in n8n Settings > Credentials.

Key n8n Node Settings To Configure

Once your accounts and credentials are ready, review these core node settings inside n8n:

  • Webhook Trigger: Path = new-job-application-parser, HTTP method = POST
  • Text Splitter: chunkSize = 400, chunkOverlap = 40 (adjust based on document size)
  • Embeddings: model = text-embedding-3-small
  • Pinecone Insert / Query: index = new_job_application_parser
  • RAG Agent: a clear systemMessage explaining parsing rules and the required output schema
  • Append Sheet: documentId = SHEET_ID, sheetName = Log, with columns mapped to your parsed output fields

These settings give you a solid baseline. As you test and learn, you can tune them for performance, cost, and accuracy.

Designing Your Prompt & Output Schema For Clarity

The quality of your results depends heavily on the clarity of your prompt and schema. The goal is to make the RAG agent output consistent, machine readable JSON, so you can easily store and analyze it.

Suggested Output Fields

Here is a simple but powerful schema you can use as a starting point:

  • candidate_name
  • email
  • phone
  • summary
  • skills (array)
  • years_experience
  • match_score (0-100)
  • red_flags (array)

Example System Prompt Snippet

You can adapt this conceptual example to your own tone and requirements:

System: You are a parser for new job applications. Return EXACT JSON with fields: candidate_name, email, phone, summary, skills, years_experience, match_score, red_flags. Use the provided context and applicant text to populate fields.

As you iterate, you can refine the prompt to align with your hiring criteria, seniority levels, or role specific requirements.

Testing, Validating, And Improving Your Workflow

Once everything is wired up, it is time to test. Treat testing as an opportunity to learn, not just a checkbox. Run a small batch of sample resumes and cover letters through the workflow and validate:

  • Parsing accuracy: Are skills, years of experience, and contact details extracted correctly?
  • Indexing quality: Can you retrieve similar candidate segments using semantic queries against Pinecone?
  • Logging correctness: Does the parsed JSON map cleanly into the right Google Sheets columns?
  • Error handling: Do Slack alerts fire when there is a failure or misconfiguration?

Each test run gives you feedback you can use to refine prompts, adjust chunk sizes, or tweak your schema. Over time, your workflow becomes more accurate and more aligned with how your team actually evaluates talent.

Security, Privacy, And Compliance: Building Trust Into Your Automation

Hiring data is sensitive. As you automate, it is important to design with privacy and compliance in mind from the start.

  • Mask or redact sensitive personal information if required by your privacy policy or local regulations before storing vectors or logs.
  • Use least privilege credentials for all third-party integrations, including Google, Pinecone, Slack, and OpenAI.
  • Define clear retention policies for vector data and sheet logs so you remain compliant with GDPR or other HR data regulations.

By treating security as a core feature, you build a hiring system that is not only efficient but also trustworthy.

Scaling And Optimizing: Growing Without Losing Control

As your application volume grows, you will want to keep performance and costs under control. Here are some practical optimization ideas:

  • Embeddings: Batch small chunks together where possible to reduce API overhead and cost.
  • Pinecone: Choose an index dimension that matches your embedding model for optimal performance and pricing.
  • RAG Agent: Cache frequent queries or introduce thresholds so you only invoke the LLM when it is truly needed.
  • Monitoring: Add usage logging and cost alerts to catch unexpected spikes from large file uploads or test loops.

These adjustments help you maintain a smooth, predictable automation layer as your hiring needs evolve.

Real-World Ways To Use This Template

Once you see the parser in action, new ideas will start to appear. Here are a few common use cases to inspire your next steps:

  • Initial candidate screening: Automatically score and summarize applicants for each opening, so recruiters can focus on the best fits first.
  • Talent rediscovery: Use semantic search on your Pinecone index to surface past applicants who might be perfect for new roles.
  • Automated triage: Route high match candidates directly to hiring managers or specific Slack channels for rapid follow up.

Each of these use cases builds on the same core workflow. You are not just adopting a single automation, you are creating a platform for ongoing improvement.

Your Next Step: Turn This Template Into Your Hiring Advantage

This n8n based job application parser is more than a technical demo. It is a practical way to reclaim time, reduce manual work, and build a more intelligent hiring pipeline. By combining OpenAI embeddings, Pinecone vector search, and a RAG agent, you get both deep extraction and fast retrieval, all wrapped in a low-code workflow that plugs into Google Sheets and Slack.

From here, you can keep building. Add role specific scoring logic, integrate with your ATS, or create automated follow up sequences. Every improvement compounds, and every manual task you automate gives you more room to focus on what matters most: finding and supporting great people.

Start Automating Today

Ready to see it in action? Import this workflow into your n8n instance, connect your API keys, and run a test batch of resumes. Watch how raw applications turn into clean, structured insights in your Google Sheet.

If you want guidance on customizing the RAG prompt, tuning the Pinecone index, or scaling this setup into production, you can reach out for support or follow our step by step resources to take this parser live.

Build a Visa Requirement Checker with n8n & Weaviate

Build a Visa Requirement Checker with n8n & Weaviate

This guide explains how to implement a scalable, conversational visa requirement checker using n8n workflow automation, Cohere embeddings, a Weaviate vector database, Anthropic’s chat model, and Google Sheets for logging and analytics. The solution accepts requests via webhook, transforms and indexes policy content into a vector store, and orchestrates an AI agent that answers user questions with traceable references.

Use Case: Why Automate Visa Requirement Checks?

Visa and immigration rules are dynamic, often changing with little notice. Manually tracking these changes and responding to user queries does not scale. By combining vector search with a conversational AI agent, you can:

  • Provide fast, contextual answers sourced from your latest policy documents
  • Reduce manual workload for support and legal teams
  • Maintain an auditable trail of queries and responses for compliance and quality control

n8n serves as the orchestration layer that connects data ingestion, vector indexing, retrieval, AI reasoning, and logging into a single automated workflow.

Solution Architecture

The n8n template brings together several specialized components into one cohesive workflow:

  • Webhook (n8n) – Entry point for incoming visa queries via HTTP POST.
  • Text Splitter – Pre-processing step that segments long policy documents into manageable chunks.
  • Cohere Embeddings node – Converts text chunks into dense vector representations.
  • Weaviate (Vector Store) – Stores embeddings and supports semantic similarity search.
  • Query node + Tool wrapper – Exposes Weaviate search as a callable tool for the AI agent.
  • Memory buffer – Maintains short-term conversational context across turns.
  • Anthropic Chat (Agent) – Large language model that reasons over retrieved context and generates responses.
  • Google Sheets – Persistent logging of inputs, outputs, and status for auditing and analytics.

The workflow can be used both for indexing new or updated policy content and for serving user queries against the existing vector index.

Workflow Implementation in n8n

1. Webhook Entry Point

Begin by configuring an n8n Webhook node to accept HTTP POST requests on a path such as /visa_requirement_checker. The payload typically contains details such as nationality, destination, and travel context:

{  "nationality": "India",  "destination": "Germany",  "travel_dates": "2025-11-01 to 2025-11-10",  "purpose": "tourism"
}

Best practices at this stage include:

  • Validating all required fields server side (e.g. nationality, destination, purpose).
  • Returning an immediate acknowledgement to the caller.
  • Optionally processing the request asynchronously if the full workflow is long running.

2. Preparing Policy Documents with Text Splitting

Visa policies are often lengthy, with complex legal phrasing and multiple sections. To optimize retrieval quality, the workflow uses the Text Splitter node to divide large documents into smaller, semantically coherent chunks.

In the template, typical parameters are:

  • chunkSize: 400
  • chunkOverlap: 40

This configuration:

  • Improves embedding quality for long documents.
  • Ensures that relevant sections are small enough to be retrieved precisely.
  • Reduces the risk of truncation or loss of context when passed to the language model.

3. Generating Text Embeddings with Cohere

Each chunk from the Text Splitter is then processed by a Cohere Embeddings node (or another compatible embedding provider). In the reference template, the embedding model is set to default. For production use, consider:

  • Selecting a multilingual model if your policy corpus spans multiple languages.
  • Storing metadata alongside each embedding, such as:
    • Document identifier
    • Source system or URL
    • Section titles or headings
    • Version or effective date

The output of this stage is a set of embeddings, one per chunk, enriched with metadata that supports transparent and auditable responses.

4. Indexing Embeddings in Weaviate

The embeddings are then inserted into a Weaviate index. In the template, a dedicated index such as visa_requirement_checker is used.

Recommended configuration patterns:

  • Store the original text chunk as a metadata field so the agent can quote or reference it directly.
  • Include a version or timestamp field for each record to:
    • Support re-indexing when rules change.
    • Filter out outdated content during retrieval.
  • Define a schema that captures key attributes, such as jurisdiction, visa type, or traveler category if applicable.

5. Vector Search and Tool Integration for the Agent

To answer user questions, the AI agent must be able to query the vector store. The workflow uses:

  • A Query node to perform similarity search in Weaviate.
  • A Tool wrapper that exposes this query capability as a callable tool for the agent.

Configure the Query node to return the top K most relevant chunks. A typical starting point is:

  • K = 3 to 5

Ensure that metadata is returned with each result, including the original text and any identifiers. This gives the agent enough context to:

  • Generate accurate and grounded answers.
  • Provide citations or references from the underlying policies.

6. Orchestrating the Agent, Memory, and Chat Model

The core reasoning component is the Agent node, which coordinates between the language model and the available tools (in this case, the Weaviate query tool). The workflow also includes:

  • A Memory buffer node that preserves recent conversation history, enabling follow up questions such as:
    • “Do I also need a visa for Schengen transit?”

    to be answered in context.

  • An Anthropic Chat node that acts as the language model producing the final response.

Provide the agent with a clear and robust system prompt that defines behavior, for example:

You are an assistant that answers visa requirement questions using retrieved policy documents. Always include the source passage and a citation. If you are unsure, say so and recommend official embassy or consulate sources.

Good prompt design should instruct the model to:

  • Use retrieved documents as the primary source of truth.
  • Avoid speculation when information is missing or ambiguous.
  • Highlight when travelers should verify with official government or consular websites.

7. Logging and Analytics with Google Sheets

Finally, the workflow appends each interaction to a Google Sheets document. Typical fields to log include:

  • Input parameters (nationality, destination, travel dates, purpose)
  • User question and any follow up queries
  • Generated answer from the agent
  • Success or failure status, including error messages if applicable
  • Timestamps and request identifiers

This logging layer provides:

  • An audit trail for compliance and internal review.
  • Data for monitoring model quality and response consistency.
  • A convenient source for usage analytics and reporting.

Operational Best Practices

Keeping Visa Data Current

Because visa rules change frequently, you should design a content management process around the vector index:

  • Schedule periodic ingestion of updated policy documents.
  • Trigger re-indexing when authoritative sources publish changes.
  • Use versioning in Weaviate to retire or filter outdated content.

This approach reduces the risk of serving obsolete guidance to users.

Prompt Engineering for Safety and Clarity

For a compliance sensitive use case such as visa guidance, prompts should explicitly enforce safe behavior:

  • Require the agent to include citations from Weaviate search results.
  • Instruct the model to acknowledge uncertainty when documents do not clearly answer a question.
  • Direct users to official resources (embassy, consulate, or government websites) when necessary.

This reduces the likelihood of overconfident or unsupported answers.

Optimizing Embeddings and Retrieval

Retrieval quality has a direct impact on answer quality. Consider:

  • Experimenting with chunk size and overlap to balance context and precision.
  • Selecting an embedding model tuned for your language coverage and domain.
  • Exploring hybrid search (keyword plus vector) or semantic reranking when exact legal wording is critical.

Iterate based on real user queries and observed failure modes.

Scalability and Error Handling

In production environments, you should harden the workflow against external dependencies and load spikes:

  • Implement retries with exponential backoff for calls to embedding providers, Weaviate, and Google Sheets.
  • Monitor job queue lengths and throttle or scale resources as needed.
  • Batch insert operations into Weaviate when re-indexing large document sets.
  • Log and alert on failed insertions or query errors for proactive maintenance.

Security, Privacy, and Compliance

Visa queries can contain sensitive personal information. When designing your workflow:

  • Ensure compliance with relevant privacy regulations such as GDPR or CCPA.
  • Avoid storing unnecessary personal identifiers in logs or the vector store.
  • Encrypt sensitive data at rest and in transit.
  • Restrict access to logs and configuration to authorized personnel only.
  • Consider anonymizing user inputs before indexing them, especially for long term storage.

Testing and Evaluation Strategy

Before exposing the visa checker to end users, invest in a structured evaluation process:

  • Create a test suite of representative queries across:
    • Common travel scenarios
    • Edge cases and exemptions
    • Multiple nationalities and destinations
  • Evaluate:
    • Accuracy of the answers against known ground truth
    • Citation correctness and relevance
    • Latency from request to response
  • Identify gaps in coverage and add targeted documents or rule based checks where the agent underperforms.

Continuous evaluation helps maintain reliability as policies and models evolve.

Example System Prompt for the Agent

The following prompt snippet can be used as a starting point for the agent’s system message:

You are an assistant that answers visa requirement questions using retrieved policy documents. Always include the source passage and a citation. If you are unsure, say so and recommend official embassy or consulate sources.

Adapt this prompt to reflect your organization’s risk tolerance, legal guidance, and tone of voice.

Conclusion and Next Steps

By combining n8n for orchestration, Cohere for embeddings, Weaviate for vector search, and an Anthropic chat model for reasoning, you can implement a robust, auditable visa requirement checker that scales with your content and user base.

Use the provided template as a foundation, then iterate on:

  • Retrieval configuration and embedding strategy
  • Prompt engineering and safety controls
  • Monitoring, logging, and evaluation processes

Call to action: Integrate your own policy documents into this n8n template to deploy a live visa requirement checker tailored to your organization. For more automation blueprints and guidance on building production ready AI assistants, consider subscribing to ongoing updates and best practices.

n8n Developer Agent: Build Workflows with AI

n8n Developer Agent: Build Workflows with AI

Every repetitive task you do is a quiet signal that something could be automated. The n8n Developer Agent template is designed to turn those signals into real, working workflows, using the power of AI to help you build faster and think bigger.

Instead of wrestling with JSON structures or manually wiring every node, you describe what you want in natural language, and the agent generates, validates, and deploys full n8n workflows for you. This guide walks you through that journey: from the frustration of manual setup, to the mindset of automation-first thinking, to a practical, step-by-step walkthrough of this template so you can start creating more time for the work that truly matters.

From manual setup to automated momentum

Most teams reach a point where their ideas for automation grow faster than the time they have to implement them. You might recognize this pattern:

  • You keep building similar workflows from scratch.
  • Non-technical colleagues have great ideas, but struggle to describe them in a way that becomes a working automation.
  • Documentation, conventions, and standards live in scattered places, so every new workflow feels like a new project.

The n8n Developer Agent template is built to break that cycle. It pairs a conversational AI interface with a workflow builder that outputs importable n8n JSON. That means you can:

  • Turn natural language prompts into working n8n workflows in minutes.
  • Automate repetitive development tasks and boilerplate creation.
  • Help non-technical teammates contribute ideas that become real automations.
  • Integrate your own documentation and memory so outputs stay consistent over time.

Think of this template as a bridge between your ideas and implementation, letting you move from “I wish this was automated” to “It is automated” much more quickly.

Adopting an automation-first mindset

Before we dive into nodes and configuration, it helps to shift how you think about your work:

  • Describe outcomes, not steps. You do not have to know every node in advance. You only need to clearly describe what you want the workflow to achieve.
  • Iterate, do not aim for perfection on the first try. Start with a simple prompt, test the result, then refine. The Developer Agent is built for experimentation.
  • Capture your standards once, reuse them forever. By connecting documentation and memory, you can teach the agent how your organization prefers to build workflows, then apply that knowledge across every new automation.

With that mindset in place, the template becomes more than a single automation. It becomes a stepping stone toward a more focused, less manual way of working.

How the n8n Developer Agent works behind the scenes

At its core, the template uses a multi-agent flow. It listens to your prompt, gathers context from models and memory, generates n8n workflow JSON using a developer tool, then creates the workflow directly in your n8n instance.

Key building blocks

  • Chat Trigger – The entry point. It starts whenever a user submits a request and forwards the natural language prompt into the agent.
  • Main Agent (n8n Developer) – The orchestrator. It interprets what you asked for, calls memory, consults AI models, and delegates to the Developer Tool to build the final JSON.
  • AI Models – GPT 4.1 mini is the primary model for reasoning and generation. Optionally, you can add Claude Opus 4 for deeper reasoning or verification. You can choose models based on cost and accuracy needs.
  • Developer Tool – The specialist. It takes the interpreted prompt and produces complete n8n workflow JSON, including nodes, connections, settings, and staticData, ready for import or direct API usage.
  • Google Drive + Extract Node (optional) – A knowledge source. It loads your guidelines or documentation from Google Drive so the agent can align with your standards.
  • n8n Create Node – The deployer. It uses your n8n API credentials to create the workflow in your instance and outputs a clickable link.
  • Memory – A simple buffer that keeps context between interactions, so the agent can remember preferences and maintain consistency across multiple runs.

Once this pipeline is set up, your main task becomes crafting prompts and refining outcomes, not wiring up every detail by hand.

Step-by-step: setting up your Developer Agent

Let us walk through the setup so you can move from concept to a working automation agent.

1. Connect your LLM provider

First, give the agent its “brain.”

  • Add your OpenRouter or OpenAI API key to n8n credentials for the primary LLM, typically GPT 4.1 mini.
  • If you want stronger reasoning or cross-checking, connect Claude Opus 4 using an Anthropic API key.
  • Configure these credentials in n8n so the agent node can call the models when needed.

2. Add n8n API credentials

Next, empower the template to create workflows on your behalf.

  • Create an n8n API credential using an API key or user token.
  • Attach this credential to the n8n Create Workflow node in the template.
  • This lets the Developer Agent programmatically spin up new workflows in your n8n instance and return a direct link for review.

3. Connect Google Drive for reusable knowledge (optional but powerful)

If you want the agent to follow your internal standards, this step is where that alignment begins.

  • Add your Google Drive credentials to n8n.
  • Copy your preferred guidelines, style guides, or example workflows into a Google Doc.
  • The template includes a node that downloads this document and uses an Extract from File node to pull out plain text.
  • The agent can then reference this text to keep generated workflows consistent with your organization’s best practices.

4. Configure the Developer Tool

The Developer Tool is the engine that turns natural language into working JSON. It needs to be precise.

  • Ensure the tool (sub-workflow or node) accepts the full natural language prompt from the agent.
  • Configure it to return a single, valid JSON object that:
    • Begins with { and ends with }.
    • Includes the top-level fields: name, nodes, connections, settings, and staticData.
  • Set it up so that when the Main Agent passes instructions verbatim, the Developer Tool produces JSON that closely matches the user’s request.

5. Test the full flow end-to-end

Now it is time to see the template in action.

  1. Trigger the workflow with a simple prompt, for example:
    “Create a scheduled workflow that fetches a CSV from Google Drive, transforms rows, and posts to Slack.”
  2. Check that the Developer Tool returns valid JSON with all required top-level fields.
  3. Confirm that the n8n Create Workflow node successfully creates a workflow in your instance.
  4. Click the generated workflow link from the output to open and inspect the created workflow in n8n.

Once this test passes, you have a repeatable, AI-assisted way to turn ideas into running automations.

Walking through the nodes: what each part contributes

To confidently extend or customize the template, it helps to understand what each node is responsible for.

Chat Trigger: when a message is received

This trigger node listens for incoming chat messages. When a user submits a prompt, the node:

  • Receives the natural language request.
  • Starts the agent workflow.
  • Forwards the content to the n8n Developer agent node.

n8n Developer (agent): the orchestrator

This is the core of the experience. The n8n Developer agent:

  • Runs the system message and user prompt together.
  • Calls the memory buffer to reuse context from earlier interactions.
  • Uses the configured language models for reasoning and generation.
  • Delegates to the Developer Tool to build the final workflow JSON.
  • Is configured to pass instructions directly to the Developer Tool when needed so the output JSON matches user intent as closely as possible.

GPT 4.1 mini and Claude Opus 4: AI reasoning partners

The template is designed to call AI models where they add the most value:

  • GPT 4.1 mini is typically the primary model for generation, prompt interpretation, and drafting workflow structures.
  • Claude Opus 4 can be added for longer-form reasoning, complex verification, or more nuanced interpretation where available.
  • You can adapt which model is used based on budget, performance, and accuracy requirements.

Get n8n Docs + Extract from File: your embedded playbook

This optional pair of nodes becomes very powerful as your automation library grows.

  • The Get n8n Docs node fetches a Google Doc that contains your standards, constraints, or examples.
  • The Extract from File node converts that document into plain text.
  • The agent then uses this text as reference material, so generated workflows align with your preferred patterns.

Developer Tool: building the workflow JSON

The Developer Tool is where ideas become structured automations.

  • It takes the interpreted prompt and any supporting context provided by the agent.
  • It builds the final n8n workflow JSON with nodes, connections, settings, and staticData.
  • It includes sticky-note annotations within the returned JSON where possible. These annotations:
    • Use appropriately colored sticky notes supported by n8n.
    • Explain key parts of the workflow.
    • Guide future editing and help teammates understand the logic quickly.

n8n Create Workflow: deploying the result

Finally, the template uses the n8n API to bring everything to life.

  • The n8n Create Workflow node receives the JSON from the Developer Tool.
  • Using your API credentials, it creates a new workflow in your n8n instance.
  • A Set node then constructs a clickable link to that workflow, so you can open it directly from the execution output.

From first prompt to live workflow, every piece is designed to save you time and help you stay focused on the bigger picture of what you are building.

Practical prompts to accelerate your automation journey

Once the template is configured, you can start exploring real-world scenarios. Here are examples you can try immediately:

  • “Create a webhook-triggered workflow that validates incoming JSON and inserts records into Airtable.”
  • “Build a scheduled ETL that downloads Google Sheets to CSV, normalizes columns, and uploads to S3.”
  • “Generate a workflow that monitors a Slack channel for messages with attachments and sends new files to Google Drive.”

The n8n Developer Agent can generate complete workflows for these use cases, including authentication nodes and error-handling branches if you instruct the Developer Tool to include them. Start simple, then layer in more detail as you gain confidence.

Troubleshooting as part of the learning process

As you experiment, you will occasionally hit friction. Treat those moments as feedback that helps you refine your prompts and configuration.

Common issues you might encounter

  • Developer Tool returns invalid JSON
    Use a JSON linter to validate the output and confirm that all required top-level fields exist: name, nodes, connections, settings, and staticData.
  • n8n API authentication fails
    Double-check your API key or token, the endpoint URL, and that your n8n instance allows API-based workflow creation.
  • Model outputs feel inconsistent
    Provide more detailed system instructions, add examples, and enrich the Google Doc used by the docs node with clear patterns and edge cases.

Quick fixes that keep you moving

  • Enable logging or run manual executions in n8n to inspect payloads and error messages.
  • Add extra validation steps inside the Developer Tool to confirm required JSON fields are present before returning a response.
  • Use the memory buffer to store organizational preferences so that model outputs become more consistent over time.

Each fix you put in place strengthens your automation platform and makes future workflows smoother to generate.

Best practices to scale with confidence

As the Developer Agent becomes part of your daily toolkit, a few habits will help you scale safely and sustainably.

  • Maintain a canonical documentation file with examples, constraints, and naming conventions. Store it in Google Drive and wire it into the docs node so every new workflow can reference it.
  • Use clear, unambiguous prompts. When moving to production, add an approval step before workflows are automatically created or activated in a live environment.
  • Limit model thinking budgets where appropriate and use verification passes to confirm JSON validity before calling the n8n API.
  • Isolate credentialed nodes in private workflows and avoid logging secrets in plaintext or in sticky notes.

Security and governance: protecting your automated future

Because this template can create runnable workflows, it is important to wrap it in sensible governance. You can still move quickly while staying secure.

  • Require a manual approval step before newly generated workflows are activated in production.
  • Restrict who can:
    • Trigger the Developer Agent.
    • Create or manage API keys for your n8n instance.
  • Regularly audit created workflows and log metadata such as creator, timestamp, and purpose to a secure location.

These safeguards let you embrace automation at scale while maintaining trust and control.

From one template to a new way of working

The n8n Developer Agent template is more than a shortcut. It is a catalyst for a more automated, focused way of working. By translating natural language into validated, importable n8n JSON, it helps you:

  • Prototype workflows rapidly.
  • Reduce friction for developers and non-developers alike.
  • Standardize how automations are designed and deployed across your team.

Each prompt you run is an opportunity to reclaim time, reduce manual effort, and build systems that support your growth.

Your next step

Set aside a few minutes to try the template end-to-end:

  1. Connect your LLM and n8n credentials.
  2. Run a simple prompt through the Chat Trigger.
  3. Click the generated workflow link and explore the result in n8n.

Here is a great first prompt to start your journey:

Try this now: “Create a webhook that saves form submissions to Google Sheets and notifies me on Slack.”

Backup n8n Workflows to Gitea

Backup n8n Workflows to a Gitea Repository and Free Your Focus

Every automation you build in n8n represents hard-won insight, experiments, and time. Losing a workflow or overwriting something that used to work is more than an inconvenience, it is lost momentum.

Imagine instead that every change you make is safely versioned, backed up, and ready to restore with a single click. No more “what did I change last week” anxiety, no more copy-pasting JSON to keep a manual history. Just a calm, reliable safety net that quietly runs in the background.

This is exactly what this n8n workflow template gives you. It automatically backs up each of your n8n workflows as a JSON file to a Gitea repository, checks for changes, and only updates what is different. Once set up, it keeps working for you while you focus on building new automations and growing your business or projects.

The Problem: Manual Backups Limit Your Growth

As your n8n usage grows, so does the risk of mistakes:

  • Overwriting a working workflow without a way to roll back
  • Manually exporting and storing JSON files in random folders
  • Unclear change history when collaborating with teammates

Manual backups are easy to skip, especially when you are moving fast. The result is a fragile setup that makes you hesitant to experiment. That hesitation slows down innovation and keeps you from fully embracing automation.

The Mindset Shift: Let Automation Protect Your Automation

One of the most powerful ways to scale your impact is to let automation protect the very systems that automation depends on. By backing up n8n workflows automatically to Gitea, you:

  • Create a versioned, auditable history of every workflow change
  • Give yourself instant rollbacks when something breaks
  • Make collaboration easier with a central Git-based source of truth
  • Reduce mental load, since backups “just happen” on a schedule

This is not just about safety. It is about freedom. When you know your workflows are securely backed up, you feel more confident to try new ideas, refactor old logic, and iterate quickly.

The Vision: A Living Library of Your Automations

With this n8n template, your Gitea repository becomes a living library of your automation logic. Each workflow is stored as a separate JSON file, neatly named and versioned. Over time you build a historical record of how your systems evolved, which is invaluable for learning, audits, and onboarding new team members.

And this template is just a starting point. Once you have reliable backups flowing into Gitea, you can plug that into CI, code reviews, or additional checks. Your automation practice becomes more professional, more robust, and far easier to scale.

How the n8n to Gitea Backup Workflow Operates

Let us look at how this workflow actually works so you can trust and extend it.

High-level flow

The n8n workflow follows a clear, repeatable sequence:

  1. A Schedule Trigger starts the workflow at regular intervals (for example, every 45 minutes).
  2. n8n fetches all workflows from your instance through its API.
  3. For each workflow, the workflow checks whether a corresponding JSON file already exists in your Gitea repository.
  4. If the file exists, the workflow encodes the workflow JSON to Base64, compares it to the existing file content, and updates it via PUT only if something changed.
  5. If the file does not exist, the workflow creates a new file via POST in Gitea.

The result is a lean, efficient backup system that avoids noisy commits and focuses only on real changes.

The Building Blocks: Key n8n Nodes in This Template

Global configuration for easy maintenance

To keep things simple and scalable, the template uses a Globals node where you define all important repository details in one place:

{  "repo.url": "https://git.example.com",  "repo.name": "workflows",  "repo.owner": "n8n"
}

Whenever you want to point backups to another Gitea instance or repository, you only need to update these values. This is a small design choice that makes the workflow easier to reuse and share across environments.

Schedule Trigger: Let backups run while you focus elsewhere

The template uses a Schedule Trigger node configured to run every 45 minutes. You can adjust this interval to match your own rhythm:

  • Every hour or few hours for active development environments
  • Daily or weekly for more stable, production-like setups

Once enabled, the trigger quietly keeps your workflows backed up without any additional effort from you.

Gitea HTTP Request nodes: Your bridge to Git-based backups

Three HTTP Request nodes interact directly with the Gitea API:

  • GetGitea: Performs a GET request on /contents/<workflow-name>.json to check if the file exists and retrieve its sha and content.
  • PutGitea: Uses PUT to update an existing file when there are changes, including the required sha of the current file.
  • PostGitea: Uses POST to create a new file if none exists yet for that workflow.

These nodes turn your n8n instance into a Git-aware system, giving you all the benefits of Gitea without leaving your automation environment.

ForEach, encoding, and comparison: Only commit what truly changed

The workflow loops through each workflow and does a careful comparison before committing anything:

  • It iterates over each workflow item using a loop (ForEach pattern).
  • It builds a pretty-printed JSON string of the workflow.
  • It encodes that JSON to Base64, since the Gitea content API expects base64-encoded content.
  • It compares the newly encoded content with what is already stored in Gitea.

If nothing changed, no commit is made. If there is a difference, an update is sent. This keeps your repository clean and your history meaningful.

Step-by-Step: Turn This Template Into Your Backup Safety Net

Now let us turn this idea into a working part of your stack. Follow these steps and you will have automated n8n workflow backups running in minutes.

1 – Create or choose a Gitea repository

  • Create a repository in your Gitea instance, for example workflows, or choose an existing one.
  • Plan to store one JSON file per workflow, using a consistent naming pattern such as {workflow-name}.json.

This structure makes it easy to find and track each workflow over time.

2 – Generate a Gitea personal access token

Next, give n8n a secure way to talk to Gitea:

  • In Gitea, go to Settings → Applications → Generate Token.
  • Generate a personal access token with repository read/write permissions.

Then, in n8n, create an HTTP header credential with:

Header name: Authorization
Header value: Bearer YOUR_PERSONAL_ACCESS_TOKEN

Make sure you include the space after Bearer. Without that space, authentication will fail.

3 – Connect credentials to the Gitea HTTP nodes

Open each of the Gitea-related HTTP Request nodes in your n8n workflow:

  • GetGitea
  • PutGitea
  • PostGitea

Assign the Gitea Token credential you created. This single step allows all three nodes to authenticate with the Gitea API and carry out the backup operations on your behalf.

4 – Configure the node that fetches n8n workflows

The workflow includes a node that retrieves workflows from your n8n instance through its API. Make sure this node has valid API credentials, via token or basic authentication, so it can access your workflows.

The workflow expects each item in the payload to contain:

  • The workflow data (the full JSON)
  • The workflow name so it can build a matching file name in the repository

This is what allows the template to create a separate JSON file for each workflow in Gitea.

5 – Test, refine, and then schedule

Before you enable scheduling, run through a simple test cycle:

  1. Run the workflow manually from within n8n and watch the execution.
  2. Check your Gitea repository to confirm that JSON files were created or updated as expected.
  3. If everything looks good, enable the Schedule Trigger so backups happen automatically on your chosen interval.

This is your moment to adjust commit messages, naming conventions, or intervals to match how you like to work.

Crafting the HTTP Body for Gitea’s Content API

Gitea’s content API usually expects at least two fields in the HTTP body:

  • content with base64-encoded JSON
  • message as a human-friendly commit message

A typical request body from n8n might look like this:

{  "message": "Backup: update workflow_name",  "content": "BASE64_ENCODED_JSON",  "sha": "existing_file_sha"  // only for updates
}

Always check your specific Gitea server’s API documentation and adjust the HTTP Request body if needed. Different versions or configurations may have small variations.

Troubleshooting: Turning Roadblocks Into Learning

As you wire everything together, you might hit a few bumps. Use them as an opportunity to deepen your understanding of n8n and Gitea.

401 Unauthorized

If you see a 401 response:

  • Double-check the token value.
  • Confirm that you included Bearer with a trailing space before the token.
  • Verify that the token has the correct repository scopes.
  • Recreate the credential in n8n if you changed the token in Gitea.

404 Not Found when checking a file

A 404 from the file endpoint usually means the file does not exist yet. The workflow is designed to handle that case and will create a new file via POST.

If you see unexpected 404s for repository-level endpoints, verify:

  • The repo owner and repo name in your Globals node
  • That the repository is accessible and visible to the token you are using

Content not updating even when workflows change

If your workflow files are not updating in Gitea:

  • Confirm that the JSON is properly encoded to Base64 before sending.
  • Make sure comparisons are done between the same formats, for example encoded vs encoded.
  • Check that the sha value you provide for updates matches the current file’s sha in Gitea.

Once these are aligned, updates should flow reliably whenever a workflow changes.

Security and Best Practices: Protect What Matters

Automated backups are powerful, so it is worth setting them up with care.

  • Use a least-privilege access token scoped only to the repository used for backups.
  • Store all credentials in the n8n credential manager. Avoid hardcoding tokens directly inside nodes.
  • Consider removing or encrypting secrets from workflow JSON before committing, especially in shared or public repositories.
  • If your backups generate many commits, define a retention strategy. You can use tags, periodic pruning, or dedicated branches.

Advanced Ideas: Turning Backups Into a Growth Engine

Once the basic backup workflow is running, you can build on it and turn your Gitea repository into a powerful automation hub.

  • Add more detailed commit messages that include the workflow ID and a timestamp for easier tracking.
  • Push backups to a dedicated branch such as backups/automated and keep your main branches protected with required reviews.
  • Use webhooks or external CI pipelines to run checks, validations, or reports whenever new backups are pushed.

Each of these enhancements deepens your automation practice and gives you more confidence to move fast without breaking things permanently.

Your Next Step: Turn This Template Into Your Daily Ally

By putting this n8n to Gitea backup workflow in place, you are not just preventing data loss. You are building a foundation that supports experimentation, collaboration, and long-term growth.

The template already includes:

  • Scheduled runs to capture changes regularly
  • Per-workflow JSON files for clear organization
  • Base64 encoding for Gitea’s content API requirements
  • Existence checks and conditional updates to avoid unnecessary commits

From here, you can refine commit messages, adjust the schedule, or extend the workflow with your own ideas. Each improvement you make is another step toward a more automated, focused, and resilient way of working.

Try it now: import the workflow template into n8n, set your Globals, configure your Gitea token, run a manual execution, and watch your workflows appear in your Gitea repository.

If you want support or inspiration, you are not alone. Join the n8n community forum or connect with your internal DevOps team and explore what else you can automate around this foundation.

Call to action: Import the template, run a manual test, enable scheduling, and then keep iterating. Share what you build, ask for help when you need it, and let this backup workflow be the first of many automations that protect your time and amplify your impact.

Automate AI Newsletters with an n8n Newsletter Agent

Automate AI Newsletters with an n8n Newsletter Agent

Introduction: From raw feeds to production-grade AI newsletters

Producing a high-quality AI-focused newsletter at scale requires more than a curated reading list. It demands a robust automation pipeline that can ingest diverse sources, eliminate duplicates, prioritize key stories, generate structured copy, and deliver a publication-ready output that still respects editorial standards.

This n8n workflow template acts as a newsletter agent that orchestrates this entire process. It pulls markdown and Twitter content from object storage, consolidates and scores candidate stories, leverages LLM-based nodes (LangChain-compatible models such as Gemini or Claude) for editorial reasoning and copywriting, enriches stories with images and sources, enables human approvals via Slack, and finally exports a complete markdown newsletter file.

Why automate an AI newsletter with n8n?

For automation professionals and content teams, a workflow-driven approach provides several tangible benefits:

  • Scalable content operations: Increase newsletter frequency or expand coverage without proportionally increasing editorial workload.
  • Consistent standards: Enforce formatting, attribution, and link policies through reusable templates and schema validation.
  • Reduced manual overhead: Offload research, drafting, and version control to a reliable, auditable automation pipeline.
  • Configurable editorial control: Introduce or adjust approval gates for editors, legal teams, or subject-matter experts with minimal rework.

High-level architecture of the newsletter agent

The n8n template is structured as a sequence of modular stages, each with a clear responsibility. At a high level, the workflow performs:

  1. Input ingestion and hygiene checks for markdown and tweet data.
  2. Aggregation of all candidate content into a single analyzable corpus.
  3. Story selection and editorial reasoning via LLM nodes.
  4. Per-story copy generation with strict formatting rules.
  5. Image extraction, validation, and deduplication.
  6. Generation of newsletter meta content (intro, subject line, preheader).
  7. Human-in-the-loop approvals through Slack.
  8. Final markdown assembly and export for distribution.

The following sections describe each stage, the key n8n nodes involved, and recommended best practices for running this in production.

Stage 1: Input ingestion and hygiene

The pipeline begins by collecting raw materials from an object store such as S3 or Cloudflare R2. The goal at this stage is to retrieve only relevant files and ensure they are valid inputs for downstream processing.

Key nodes and responsibilities

  • search_markdown_objects / search_tweets: Query object storage by date prefix or similar criteria to identify the files associated with a specific publication window.
  • filter_only_markdown: Enforce file-type hygiene by passing forward only markdown files intended for newsletter content.
  • get_markdown_file_content / extract_tweets: Load file bodies and metadata, transforming them into structured items for later aggregation.

This strict control over input scope and types is essential. By constraining the ingest to a defined time range and valid formats, the workflow avoids reusing outdated stories and minimizes the risk of duplicate coverage across editions.

Stage 2: Aggregating candidate content

Once the raw files and tweet exports are loaded, the workflow consolidates them into a single text corpus that can be efficiently analyzed by LLM nodes.

Transformation and aggregation nodes

  • prepare_markdown_content: Normalizes and cleans markdown text, removing irrelevant artifacts and preserving key metadata.
  • aggregate_markdown_content: Combines individual markdown items into a unified body of content for evaluation.
  • combine_tweet_content: Merges tweet-based content into the same candidate pool, ensuring cross-channel coverage.

The result of this stage is a consolidated, structured representation of all potential stories that can be passed to the selection logic.

Stage 3: Story selection and editorial reasoning

The core editorial intelligence of the workflow is implemented through an LLM-driven selection node. This step is responsible for deciding which stories appear in the newsletter and in what order.

pick_top_stories: LLM-based ranking and justification

  • Selects and ranks the top four stories, designating the first as the lead item.
  • Generates a structured explanation of the selection rationale, effectively a chain-of-thought that editors can review.
  • Outputs identifiers, metadata, and external-source URLs to maintain full traceability back to the original content.

This structured reasoning is highly valuable internally. It provides an auditable trail for why specific stories were chosen or rejected, which is particularly important in editorial, legal, or compliance-heavy environments.

Stage 4: Per-story content generation

After the top stories are identified, the workflow iterates through them to create newsletter-ready copy for each one.

Iteration and content resolution

  • split_stories / iterate_stories: Loop through the selected items, resolving identifiers to full text, external links, and any associated media.

LLM-driven “Axios-style” segments

For each story, a dedicated LLM node produces a structured section with a consistent, newsletter-friendly format:

  • A bolded top-line recap that summarizes the story.
  • An “Unpacked” section with bulleted details, using markdown hyphen bullets (-) for consistent rendering.
  • A concise “Bottom line” consisting of two sentences that contextualize the story.

The prompts for this node enforce strict editorial rules, including:

  • Limited use of bold formatting to avoid visual clutter.
  • Constraints on the number of links per bullet.
  • A requirement that the model only summarize or rephrase provided content, without inventing new facts or external context.

These constraints significantly reduce hallucination risk and help ensure that the generated copy remains faithful to the original sources.

Stage 5: Image extraction, validation, and deduplication

Visual consistency is critical for modern newsletters. The workflow therefore includes dedicated steps to identify and validate images that can accompany the selected stories.

extract_image_urls and validation logic

  • extract_image_urls: Parses the aggregated content and referenced external pages to discover direct image URLs.
  • Filters URLs by file extension, typically allowing .jpg, .png, .webp, and .svg.
  • Deduplicates image URLs to avoid redundant or repeated assets.

By validating file types and ensuring uniqueness, the workflow prevents broken images and generic or irrelevant thumbnails from being included in the final newsletter.

Stage 6: Intro, subject line, and meta content generation

Beyond story segments, a successful newsletter requires a compelling introduction and high-performing email metadata.

Specialized LLM prompts for meta content

  • write_intro: Produces an opening section that frames the edition, highlights key themes, and aligns with your publication’s voice.
  • write_subject_line: Generates subject lines and preheaders following strict rules about length, clarity, and tone, with the objective of maximizing open rates while maintaining brand consistency.

These prompts are highly configurable and should be versioned carefully to maintain predictable behavior across editions.

Stage 7: Human-in-the-loop approvals via Slack

Even in a heavily automated pipeline, editorial oversight remains essential. This template integrates Slack to provide a streamlined approval experience.

Approval and feedback nodes

  • share_stories_approval_feedback: Sends selected stories and the associated chain-of-thought reasoning to editors in Slack, allowing them to approve or request revisions.
  • share_subject_line_approval_feedback: Presents subject line options and preheaders for quick review and selection.

Approved content proceeds to final assembly. If editors request changes, the workflow routes those items back to targeted edit nodes, enabling controlled iteration without manual rework across the entire pipeline.

Stage 8: Final assembly and newsletter export

Once all sections and meta content have been approved, the workflow compiles the complete newsletter.

Markdown composition and distribution

  • set_full_newsletter_content: Assembles the intro, story segments, images, and closing elements into a single markdown document.
  • create_newsletter_file: Writes the final markdown file to storage, with optional subsequent steps to upload it to Slack or other systems for distribution and archiving.

The result is a production-ready markdown file that can be consumed by your email service provider or further transformed into HTML if required by your stack.

Best practices for running this workflow in production

To ensure reliability and maintain editorial quality, consider the following operational guidelines:

  • Enforce source windows: Configure the ingestion nodes to pull content only for the target publication date or defined time range. This prevents repeated coverage and keeps each edition focused.
  • Preserve identifiers and URLs: Maintain original content identifiers and external-source links in the workflow payload. This simplifies auditability, debugging, and any downstream automations that rely on these references.
  • Version prompts and schemas: Treat LLM prompts as code. Version them, document changes, and avoid ad hoc edits. Several nodes depend on stable output formats and schemas for downstream parsing.
  • Minimize hallucinations: Restrict LLM nodes to summarization and rewriting of the provided materials. Do not allow them to fetch or infer additional facts unless you explicitly supply validated external sources.
  • Implement monitoring and alerting: Track errors such as missing URLs, parsing failures, or schema mismatches. Configure notifications so editors can intervene before a newsletter is finalized.
  • Optimize the approval UX: Design Slack messages to present clear context, concise story summaries, and simple actions such as “approve” or “request edit” to minimize friction for editors.

Common pitfalls and how to mitigate them

When adapting this template, teams often encounter a few recurring issues. Address them early to avoid production incidents.

  • Broken links: Ensure that all URLs originate from the validated source set and, where possible, add a verification step before embedding them in the final newsletter content.
  • Exposing chain-of-thought: The reasoning generated for internal review should not be published. Keep chain-of-thought outputs restricted to internal channels such as Slack or internal dashboards.
  • Over-automation: While routine tasks should be automated, retain human review for critical elements such as the lead story selection and subject line approval.
  • Formatting drift: Use explicit templates and schema validation for each section. Validate markdown structure to avoid malformed bullets, headings, or bolding that could break rendering in email clients.

Customizing the newsletter agent for your organization

The template is designed to be adaptable. To align it with your brand, audience, and technical stack, focus on a few key levers.

  • Prompt templates: Adjust or replace the LLM prompts to reflect your preferred tone, whether highly technical, marketing-oriented, or more conversational.
  • Selection logic: Modify the scoring rules in the selection node or change the number of stories included per edition to match your editorial strategy.
  • Output format: If your email platform requires HTML, extend the final assembly step to render HTML instead of markdown, or introduce personalization tokens such as subscriber first name.
  • Model endpoints: Swap or augment LLM nodes to use providers such as Gemini, Claude, or any LangChain-compatible model, based on your latency, cost, and quality requirements.

Conclusion and next steps

This n8n-based newsletter agent provides a structured, repeatable pipeline that transforms raw markdown files and tweet exports into a polished AI newsletter with robust human oversight. It is particularly well suited to AI-focused publications, where strict source verification, provenance tracking, and editorial accountability are non-negotiable.

By combining deterministic automation with targeted human approvals, the workflow allows teams to scale content production while maintaining high standards of accuracy, consistency, and brand alignment.

Call to action: If you would like to go further, I can: (1) walk through the workflow step-by-step and annotate each node, (2) create a starter prompt set tuned to your brand voice, or (3) produce a migration checklist to adapt this template to your data stores and preferred LLM provider. Let me know which option you want to start with.

Build an Automated AI Newsletter Pipeline with n8n

Build an Automated AI Newsletter Pipeline with n8n

Imagine publishing a thoughtful, AI-focused newsletter every week without scrambling for links, wrestling with drafts, or staying up late to hit send. With the right automation mindset and a practical n8n workflow, that vision becomes very real.

The template described here is an n8n workflow that connects markdown and tweet ingestion, LangChain and LLM-based writing, Slack approvals, and S3 or R2 storage. It guides your content from raw sources to a polished newsletter with very little manual work. In this article, you will walk through the journey from problem to possibility, then into a concrete, step-by-step pipeline you can adapt to your own needs.

The starting point: why manual newsletters hold you back

AI news moves fast. If you are trying to keep your audience informed, you already know how much time it takes to:

  • Collect links and markdown notes scattered across tools
  • Summarize complex stories into clear, engaging sections
  • Draft subject lines, intros, and pre-headers that people actually open
  • Coordinate feedback and approvals across a team
  • Store and track what you sent, when, and why

Doing all of this by hand is possible, but it is slow, error-prone, and mentally draining. The more often you publish, the more fragile your process becomes. That is exactly where automation with n8n shines.

Shifting the mindset: from busywork to leverage

Automation is not about removing humans from the loop. It is about freeing your attention so you can focus on the parts of your work that truly require judgment, taste, and experience. For AI newsletters in particular, that means:

  • Spending more time on story selection and narrative
  • Maintaining a consistent voice and editorial bar
  • Experimenting with new formats and ideas instead of fighting with logistics

With an n8n-based AI newsletter workflow, you can turn a messy, ad hoc process into a repeatable system. The workflow becomes your assistant: it gathers inputs, drafts content, routes everything for review, and archives the final result. You stay in control of what ships, but you are no longer stuck doing all the repetitive work yourself.

From idea to system: what this n8n template actually does

The workflow template uses a modular, stage-based architecture that you can extend over time. At a high level, it:

  • Ingests markdown and tweet content from S3 or R2
  • Aggregates and deduplicates stories
  • Uses LangChain and LLM nodes to select the top stories
  • Drafts structured sections with recaps, bullets, and bottom lines
  • Generates subject lines and pre-headers
  • Pushes everything into Slack for feedback and approvals
  • Assembles the final markdown newsletter and stores it in S3 or R2

Think of this template as a foundation. Once you have it running, you can tweak prompts, add new data sources, or hook it into your email service provider. You do not have to build the whole system at once. You can start small and grow your automation as your confidence increases.

Key n8n components that power the workflow

Under the hood, the template uses familiar n8n nodes in a focused way. Here is how the main building blocks map to your newsletter pipeline:

  • Form trigger or workflow trigger – kicks off the workflow on a schedule or manually for a specific newsletter date.
  • S3 / R2 file search and download nodes – locate and retrieve markdown files and tweet JSON exports for that date.
  • HTTP Request nodes – fetch metadata about stored content, such as source types or external-source-urls.
  • Aggregate, Set, and Split In Batches nodes – group and transform content, then split stories into individual items for per-story processing.
  • LangChain / LLM nodes – select top stories, write story sections, generate intros, and craft subject lines using models like Gemini or Claude.
  • External scraping workflow (optional) – follows external URLs to pull in extra context or validate deep links.
  • Slack integration – sends stories and drafts for review, collects feedback, and manages approval loops.
  • File creation and Slack upload nodes – assemble the final markdown newsletter, export it as a file, and share or publish it.

Each of these components is configurable. As you iterate, you can adjust prompts, filters, or integration settings without redesigning the whole system.

The journey through the workflow: step-by-step

1. Ingest and organize your content

The process begins by pulling in everything you might want to consider for this edition of your AI newsletter. n8n nodes search your S3 or R2 bucket for:

  • Markdown notes and articles
  • Tweet exports in JSON format

The workflow downloads these files, extracts the text, and attaches metadata such as identifiers, external URLs, and image URLs. This metadata is essential for traceability, so you always know where a story came from and can link back to original sources.

2. Deduplicate and filter out noise

Next, the workflow cleans up your inputs so you are not overwhelmed by duplicates or irrelevant content. It:

  • Filters out previous newsletters and unwanted file types
  • Normalizes identifiers so related documents can be grouped
  • Clusters items that describe the same story into a single news item

This step creates a clean, structured pool of candidate stories that your LLM can reason about effectively.

3. Let the LLM choose the top stories

Now the automation starts to feel powerful. Using a LangChain prompt, the workflow feeds the aggregated content into an LLM and asks it to select the top four stories. The prompt enforces clear constraints, such as:

  • Only include stories for the current date
  • Avoid political topics
  • Return results as structured JSON with identifiers and source links

The LLM also generates an internal chain of thought that explains why each story was chosen. This reasoning is not sent to subscribers, but it is extremely useful when you review content in Slack and want to understand how decisions were made.

4. Draft focused segments for each story

For each selected story, the workflow resolves its identifiers, pulls in full content and any external URLs, and sends that bundle to the LLM. The model then drafts a concise newsletter section with three key parts:

  • The Recap – a short summary of what happened
  • Unpacked bullets – key details broken into clear bullet points
  • Bottom line – a closing sentence that explains why it matters

Your prompts should enforce editorial rules such as:

  • Use short sentences and active voice
  • Only rely on facts from the provided source material
  • Limit bolding and links to keep the layout clean

Because this is all defined in prompts, you can tune tone and structure over time without changing the surrounding workflow.

5. Generate subject lines, headlines, and pre-headers

Next, the workflow uses a specialized LLM prompt to generate subject lines and pre-headers. To keep your emails effective and on brand, you can instruct the model to:

  • Tease the lead story instead of summarizing everything
  • Respect strict word-count limits, for example 7 to 9 words
  • Produce multiple variants so you can choose or A/B test

The workflow also generates a pre-header that complements the subject line and follows your team’s preferred format, such as a leading “PLUS:” teaser. These details help boost open rates while keeping your style consistent.

6. Keep humans in the loop with Slack review

Automation should support your editorial judgment, not override it. That is why this template deeply integrates Slack into the review cycle. Once the LLM has selected stories and drafted sections, the workflow:

  • Sends the selected stories, chain-of-thought notes, and draft sections to a dedicated Slack channel
  • Uses interactive messages so reviewers can approve, comment, or request specific edits
  • Relies on edit-only agents to implement feedback without touching identifiers or links

This edit-only approach is important. It ensures that content IDs and external-source-urls remain intact, which keeps your pipeline auditable and safe for downstream processing.

7. Assemble, publish, and archive

Once the content is approved, the workflow assembles everything into a final markdown newsletter. n8n then:

  • Converts the markdown into a file
  • Uploads it to Slack or your CMS for distribution
  • Stores an archived copy in S3 or R2 along with relevant metadata

You can also connect this final step to your email platform so that, after approval, the workflow can trigger the send automatically. Over time, this archive becomes a searchable record of what you published, when, and with which sources.

Best practices to keep your automation reliable

As you refine this workflow, a few practices will help you get consistent, trustworthy results.

  • Invest in prompt engineering Use strict, prescriptive prompts that require the LLM to rely only on provided sources. Explicitly forbid hallucinated facts.
  • Keep outputs machine friendly Ask for structured JSON when selecting stories or generating final content. This makes downstream parsing and assembly much more robust.
  • Limit and control links Restrict deep links to 0-1 per bullet or paragraph, and require that all links come from the supplied source URLs. This prevents broken or incorrect links.
  • Preserve identifiers at all costs Treat content IDs as immutable. Any edit step should be designed to modify only text fields, not the identifiers or external-source-urls.
  • Maintain a human-in-the-loop checkpoint Automatic drafting is powerful, but always include at least one human sign-off before sending to subscribers.
  • Manage LLM costs and rate limits Batch story drafting where possible or use smaller models for less critical tasks like variant subject lines.

Common pitfalls to watch out for

As you experiment and expand your automation, keep an eye out for these issues:

  • Letting the LLM invent facts or URLs Always require it to use only the supplied metadata and links.
  • Overly loose prompts Vague instructions lead to long, rambling paragraphs. Be explicit about tone, sentence length, and bullet counts.
  • Accidentally breaking identifiers during edits Make sure your edit workflows never touch identifiers or external-source-url fields. Use dedicated edit-only transforms.

Security, compliance, and reliability in your n8n setup

As this workflow becomes part of your regular publishing process, treat it as production infrastructure:

  • Store API keys and secrets in n8n credentials, not inline in nodes
  • Use S3 or R2 policies and encryption for archived newsletters
  • Add retries and error handling around network calls and external scrapes
  • Log LLM responses and Slack approvals for audit trails and debugging

These safeguards help you scale with confidence and keep your newsletter pipeline stable as your audience grows.

Turning inspiration into action: how to get started

You do not need to perfect everything on day one. Start with a simple version of the template, then iterate. A practical path looks like this:

  1. Clone or rebuild the template in n8n Import or recreate the nodes, then connect your S3 or R2 storage and Slack credentials.
  2. Refine your LLM prompts Start with strict constraints. Feed sample content, inspect the outputs, and tweak until the tone and structure feel right.
  3. Run safe dry-runs Generate newsletters without sending them. Review drafts in Slack, test the edit loop, and confirm that identifiers and links remain intact.
  4. Measure and improve Track opens, clicks, and editorial cycle time. Use those insights to refine subject lines, story selection logic, and prompt wording.

As you gain confidence, you can extend the workflow with more sources, richer analytics, or deeper integrations. Each improvement compounds your leverage, giving you back more time to think, create, and lead.

Using this template as a stepping stone

This n8n AI newsletter workflow is more than a productivity hack. It is a concrete example of how you can turn recurring work into a system that scales with you. Once you see what is possible here, you can apply the same pattern to other parts of your business: reports, digests, summaries, or internal updates.

Automation should not replace your editorial judgment. When designed intentionally, it multiplies your ability to publish reliable, timely AI content without burning out.

Want the template to start your journey?

If you would like a head start, you can get a ready-to-import n8n workflow JSON that mirrors this pipeline, along with example prompts tuned for your preferred LLM. I can adapt it to:

  • Your chosen model (OpenAI, Gemini, or Claude)
  • Your file hosting (S3 or Cloudflare R2)

From there, you can customize, experiment, and grow the system as your newsletter evolves.

Call to action: Ready to automate your AI newsletter and reclaim your focus? Ask for the template or a one-hour walkthrough and get support setting it up end to end.

AI Logo Sheet Extractor to Airtable (n8n Workflow)

AI Logo Sheet Extractor to Airtable – Automated n8n Workflow

Imagine opening your inbox to a stack of logo sheets, comparison graphics, and market maps, then watching them quietly transform into clean, searchable Airtable records while you focus on strategy, not data entry. That is the shift this n8n workflow is designed to unlock.

This AI-powered n8n template uses a vision-enabled agent to read logo sheets, pull out product and tool names, infer attributes and similarities, then create or update Airtable records automatically. It is built for researchers, product teams, and growth marketers who live in screenshots, aggregators, and competitive landscapes, and who are ready to reclaim their time through automation.

From manual copy-paste to meaningful work

If you have ever zoomed in on a crowded logo sheet and typed names into a spreadsheet, you know how draining that work can be. It is repetitive, error-prone, and steals attention from the deeper thinking that actually moves your projects forward.

Automating logo-sheet extraction with n8n is not just about efficiency. It is about creating space for strategy, creativity, and growth. When your research pipeline runs itself, you can:

  • Focus on insights instead of formatting
  • Explore more sources and comparisons without worrying about overhead
  • Build a living, structured knowledge base that your whole team can use

This template is a practical starting point for that transformation. You can use it as-is, or treat it as a foundation to extend, remix, and adapt to your own workflows.

Why automate logo-sheet extraction with n8n?

Turning visual comparisons into structured data is a perfect candidate for automation. With this workflow, you can:

  • Save time by avoiding manual transcription of logos, categories, and relationships from images.
  • Keep structured data by converting messy visual information into well-organized Airtable records you can filter, search, and analyze.
  • Scale ingestion by sending many logo sheets through a simple public form and letting the workflow process them in the background.

Instead of treating each image as a one-off artifact, you build a reusable, evolving database of tools, attributes, and connections that compounds in value over time.

Reframing your workflow: from images to insights

Think of this template as a bridge between how you collect information today and how you want your research process to feel in the future. The journey looks like this:

  1. You or a teammate upload a logo sheet image and optional context via a form.
  2. An AI vision agent reads the image and turns it into structured JSON with tools, attributes, and similar tools.
  3. n8n cleans and normalizes that data.
  4. Airtable becomes your single source of truth, with tools, attributes, and relationships automatically linked.

Once this is in place, every new logo sheet you encounter is not a chore. It is an opportunity to enrich your database automatically.

How the n8n workflow operates behind the scenes

To help you understand and confidently extend this template, here is the high-level flow it implements:

  1. Form submission A public Form Trigger node collects:
    • The logo sheet or comparison image
    • An optional prompt or context to guide the AI agent
  2. AI vision parsing An AI Agent node (LangChain / OpenAI or another vision-enabled LLM) analyzes the image and returns a structured JSON list of tools, each with:
    • name or similar identifier
    • attributes (an array of descriptive labels)
    • similar (an array of related tools)
  3. Validation and structuring Set and Split nodes transform the AI output into individual tool items, normalize attribute strings, and prepare the data for Airtable.
  4. Attribute management in Airtable Airtable nodes ensure each attribute exists in the Attributes table, creating missing records and mapping them to their Airtable record IDs.
  5. Tool upsert with deterministic hashes A Crypto (MD5) node generates a stable hash from each tool name. This hash is used to upsert into the Tools table and avoid duplicates, while linking attributes and similar tools through Airtable record links.
  6. Similar tool mapping The workflow maps similar tools to their corresponding Airtable record IDs and finalizes the relationships.

Everything is orchestrated inside n8n, so you have full visibility and can tweak any step as your needs evolve.

Core n8n nodes that power the automation

The template is intentionally built from standard n8n components so you can learn from it and customize it. Key pieces include:

  • Form Trigger Provides a public form endpoint to upload the logo sheet image and optional prompt or context.
  • AI Agent (LangChain / OpenAI) Uses a vision-enabled model to extract structured JSON describing tools, their attributes, and similar tools arrays.
  • Set / Split nodes Convert the AI output into separate items, normalize attribute strings, and prepare the data for Airtable upserts.
  • Airtable nodes Interact with your Airtable base to:
    • Check or create Attributes records
    • Upsert Tools records
    • Link attributes and similar tools as relationships
  • Crypto (MD5) node Generates a deterministic hash based on normalized tool names for consistent deduplication and upsert matching.

Once you see this pattern, you can reuse it in other projects: AI for extraction, n8n for orchestration, Airtable for structure.

Recommended Airtable schema for this template

To make the most of this workflow, set up your Airtable base with two tables that capture attributes and tools as linked entities.

Attributes table

  • Name (single line text) – the attribute label.
  • Tools (linked records) – link back to the Tools table.

Tools table

  • Name (single line text)
  • Attributes (linked records to Attributes table)
  • Hash (single line text) – deterministic unique key used for upsert.
  • Similar (linked records to the same Tools table)
  • Optional fields: Description, Website, Category

This structure turns every logo sheet into a graph of tools and relationships that you can explore, filter, and build on.

Your setup journey: bringing the template to life

Getting from idea to working automation is straightforward. Treat this as a guided path, and feel free to iterate at each step.

1) Import the n8n workflow template

Start by importing the workflow JSON into your n8n instance. The template already wires together the key nodes and includes a public form path such as /form/logo-sheet-feeder.

Once imported, open the workflow canvas and skim through the nodes. This quick overview helps you understand how data flows and where you might want to customize later.

2) Connect your credentials

Next, configure the credentials that power the automation:

  • OpenAI / LLM credentials or your chosen vision-enabled model that will parse the images.
  • Airtable Personal Access Token with access to the base that contains (or will contain) your Tools and Attributes tables.

Once credentials are in place, the workflow can talk securely to both your AI provider and Airtable.

3) Refine the AI prompt and structured parser

The heart of extraction quality lies in the system prompt used by the Retrieve and Parser Agent and the Structured Output Parser. This is where you shape how the AI interprets your images.

Adjust the prompt and JSON schema if:

  • Your logo sheets have unique layouts or design conventions.
  • You want more granular attributes, such as pricing tiers, product categories, or integration types.
  • You need the AI to pay special attention to certain labels or groupings.

Think of the prompt as a living document. As you run more images, refine it based on what you see to steadily improve accuracy.

4) Confirm Airtable base and table IDs

Open each Airtable node and ensure it points to the correct base and tables:

  • Set the base that contains your Tools and Attributes tables.
  • Confirm the table IDs match the ones used in the workflow.
  • Verify that the Hash field in the Tools table is used for upserts.

This alignment is what allows the workflow to create new records, update existing ones, and maintain clean relationships.

5) Activate, test, and iterate

When everything is wired up, activate the workflow and run a test:

  1. Submit a logo sheet image through the public form.
  2. Wait for the workflow to complete.
  3. Inspect the resulting Airtable records:
    • Are tool names correct?
    • Are attributes meaningful and linked?
    • Are similar tools connected as expected?

If you notice missed names or awkward attributes, adjust your AI prompt, tweak the parsing logic, and try again. Each iteration brings you closer to a highly reliable, personalized automation.

Best practices to boost extraction accuracy

You can significantly improve results by optimizing the inputs and giving the AI the right context. Here are some practical tips:

  • Use high-resolution logo sheets Small or blurry logos make recognition harder. Whenever possible, upload clear, high-quality images.
  • Add a short contextual prompt Guiding the model with a phrase like “logos of agentic AI applications” or “comparison of B2B SaaS tools” helps it interpret ambiguous visuals.
  • Crop or segment crowded images If logos are very dense, consider cropping the image into sections and uploading each part separately to improve recall.
  • Validate with multiple runs For critical datasets, run the workflow multiple times with small prompt variations or add a secondary validation agent to cross-check outputs.

These small adjustments can dramatically increase the consistency and usefulness of the extracted data.

Limitations and privacy considerations

As powerful as this workflow is, it is important to understand its boundaries and how to use it responsibly.

  • Third-party AI usage The workflow uses AI vision models that may send image data to external APIs such as OpenAI or other LLM providers. Always review your organization’s data policies and ensure that the images you upload are appropriate for these services.
  • Model accuracy AI vision is not perfect. It may miss small text, misread logos, or interpret ambiguous visuals incorrectly. If you require 100 percent accuracy, include manual review steps and a validation loop.

By being thoughtful about privacy and validation, you can enjoy the benefits of automation while staying aligned with your compliance requirements.

Troubleshooting your n8n logo-sheet workflow

If something does not work as expected, you can usually resolve it with a few targeted checks.

  • No tools extracted Confirm that:
    • The image is actually reaching the AI node.
    • passthroughBinaryImages is enabled where required.
    • The input image has sufficient resolution.
  • Attributes are not linked Check that the Airtable nodes responsible for attribute creation and upsert are:
    • Running successfully.
    • Returning record IDs that are then used when creating or updating Tools records.
  • Duplicate tool records Make sure the hashing logic:
    • Normalizes tool names by lowercasing and trimming whitespace.
    • Uses this normalized string as the input to the MD5 node.
  • Rate limits or API errors If you hit API limits, add retry logic or rate limiting in n8n, and monitor your usage for both your LLM provider and Airtable.

Each troubleshooting step is also a learning opportunity that makes you more confident in building future automations.

Advanced ideas to keep evolving your automation

Once the basic workflow feels solid, you can treat it as a platform for more sophisticated experiments. Some possibilities include:

  • Validation agent Chain a secondary AI agent that re-reads the created Airtable rows and compares them to the original image to flag potential mismatches.
  • OCR integration Add an OCR step using Tesseract or a cloud OCR service before the vision model to improve extraction of textual logos or small print.
  • Analytics and dashboards Build a dashboard that tracks how many new tools and attributes are added per upload, helping you monitor coverage, quality, and growth over time.

These extensions not only improve accuracy, they also turn your automation into a richer research system.

From template to transformation

This n8n template gives you a low-maintenance pipeline to convert logo sheets into structured, searchable Airtable data. It is especially powerful for teams that collect comparison screenshots, industry maps, or competitive research visuals and want a scalable way to make sense of them.

More importantly, it is a concrete step toward a more automated, focused workflow. Each logo sheet you send through this pipeline is one less manual task and one more building block in a reusable knowledge base.

If you are ready to move beyond copy-pasting and into a more automated way of working, start with this template, learn from it, and make it your own.

Next actions:

  • Activate the workflow in n8n.
  • Connect your Airtable and LLM credentials.
  • Feed it a few logo sheets and refine as you go.

If you want help tailoring the prompt, adjusting the Airtable mapping, or extending the workflow into a broader research system, you do not have to do it alone.

Download workflow JSONRequest customization

Build a Visa Requirement Checker with n8n

Every ambitious project or life change usually starts with a simple question like this:

“Where am I wasting time that could be automated instead?”

If you work with travel, immigration, HR, or global operations, visa requirement lookups are probably high on that list. Rules change, websites differ, and every new query steals a little more of your focus.

This is where automation becomes more than a convenience. It becomes a way to reclaim your time, reduce stress, and build a more scalable, resilient workflow.

In this guide, you will walk through an n8n workflow template that turns scattered visa rules into a smart, searchable Visa Requirement Checker. Along the way, you will see how a single workflow can evolve into a foundation for broader automation across your business or personal projects.

From manual lookups to an automated visa assistant

Manually checking visa requirements can feel like a maze. Government sites, embassy pages, FAQs, news updates – each one may carry a piece of the truth, but it is your job to stitch it together.

That process is:

  • Time consuming, especially at scale
  • Error prone when rules change or links break
  • Hard to track or audit for teams

Now imagine a different reality. A user submits a simple form with their travel details. In the background, n8n receives the request, retrieves the most relevant visa rules from your knowledge base, asks an AI agent to synthesize the answer, and logs everything for future review.

The result is not just one faster lookup. It is a repeatable, auditable system that grows with every query and every new source you add.

Shifting your mindset: automation as a growth engine

Before diving into nodes and settings, it helps to see this template as more than a technical recipe. It is a mindset shift.

With n8n, you are not building a one-off script. You are creating an automation pattern you can reuse everywhere you handle complex information:

  • Collect data automatically rather than manually
  • Store and organize knowledge so it becomes searchable
  • Use AI to summarize, explain, and guide users
  • Log every interaction for learning and improvement

This Visa Requirement Checker is one concrete example of that pattern. Once you get it running, you can adapt the same approach to compliance FAQs, internal policies, or customer support knowledge bases.

What this n8n Visa Requirement Checker actually does

The Visa Requirement Checker is a production-ready n8n workflow that:

  • Accepts user questions via an n8n Webhook
  • Splits long visa documents into manageable chunks
  • Turns those chunks into embeddings using Cohere or a similar provider
  • Stores everything in a Weaviate vector database for semantic search
  • Retrieves the most relevant passages for each query
  • Uses an AI chat agent, such as Anthropic, to create a clear, user-friendly answer
  • Logs every query and response to Google Sheets for analytics and auditing

Instead of repeatedly hunting for rules, you invest once in building a knowledge base and a workflow that answers questions for you, day and night.

Why this architecture fits visa requirements so well

Visa regulations are a perfect match for vector search and AI-based automation:

  • Information is fragmented across embassy sites, government portals, and PDF documents.
  • Language is nuanced, with exceptions, conditions, and frequent updates.
  • Users ask natural questions that do not always match exact document wording.

By combining embeddings, a vector database like Weaviate, and an LLM-based agent, you get:

  • Semantic retrieval of the most relevant passages
  • Concise, human-friendly answers synthesized from multiple sources
  • Traceability through logged sources and Google Sheets records

This pattern is not limited to visas. Once you are comfortable with it, you can replicate it for any domain where rules, documents, and user questions intersect.

The journey: building your Visa Requirement Checker in n8n

Let us walk through the workflow step by step. Think of each step as a building block you can reuse in future automations.

Step 1 – Capture user questions with a Webhook

Start by creating a Webhook node in n8n. Configure it to accept POST requests at an endpoint such as:

/visa_requirement_checker

This webhook becomes your gateway. It can receive data from a web form, an internal tool, or another service. A typical payload might look like:

{  "countryFrom": "India",  "countryTo": "Germany",  "travelPurpose": "tourism",  "travelDates": "2025-12-01 to 2025-12-14",  "text": "(optional) additional notes or pasted embassy rules"
}

By standardizing this entry point, you create a single, reliable way for users or systems to ask visa questions.

Step 2 – Split long documents into meaningful chunks

Visa rules often come in long pages or PDFs. To make them searchable, you need to break them into smaller pieces without losing context.

Use the Text Splitter node in n8n with a character-based strategy. A good starting configuration is:

  • Chunk size: around 400 characters
  • Overlap: about 40 characters

This overlap keeps important context flowing from one chunk to the next, which is essential for accurate embeddings and retrieval.

Step 3 – Turn text into embeddings with Cohere

Next, send each chunk into an Embeddings node using Cohere or another embeddings provider.

For each chunk, store both the embedding and useful metadata, such as:

  • countryFrom
  • countryTo
  • travelPurpose
  • sourceUrl
  • publishedDate
  • Timestamp of ingestion

This metadata is what makes your system precise. It allows you to filter results later so that a query about tourism to Germany from India does not get mixed up with business travel to another country.

Step 4 – Store embeddings in Weaviate as your vector database

With embeddings and metadata ready, insert them into a Weaviate index, for example:

visa_requirement_checker

Weaviate lets you perform semantic searches and apply metadata filters, which is exactly what you need for visa logic.

For a robust, production-grade setup:

  • Enable backups so you do not lose your indexed documents
  • Design a schema that includes fields like countryFrom, countryTo, sourceUrl, and publishedDate
  • Use publishedDate to favor more recent documents when retrieving

Step 5 – Query Weaviate when a user asks a question

When a new question arrives through the webhook, create an embedding for that question and use it to query Weaviate.

Apply metadata filters to narrow down the search, such as:

  • Destination country (countryTo)
  • Travel purpose (travelPurpose)
  • Optional: origin country (countryFrom)

Retrieve the top N passages, typically:

  • Top-K: 3 to 7 passages

More passages can improve coverage but may increase cost and latency, so start small and adjust as needed.

Step 6 – Use an AI Agent and Memory to craft the answer

Now you have the raw material: relevant passages from Weaviate. It is time to turn them into a clear, helpful answer.

Use an Agent node connected to your chosen LLM, such as Anthropic. Plug in the retrieved context and connect a Memory node (buffer-window) to maintain recent conversation history. This enables smooth follow-up questions without losing context.

A sample system prompt might look like:

System: You are a visa assistant. Use provided passages and metadata to answer the user's question concisely, cite sources, and call out uncertainty where laws are unclear.
User: {user question}
Context: {retrieved passages}

Make sure each passage includes its source URL or document ID so the agent can reference them directly in the response. This builds trust and helps users verify information quickly.

Step 7 – Log everything to Google Sheets for learning and growth

Finally, connect a Google Sheets node and append a new row for each interaction, including:

  • User query
  • Final answer from the agent
  • Top retrieved sources or URLs
  • Timestamps

This simple logging step turns your workflow into a learning system. Over time, you can:

  • Identify common questions and optimize your prompts
  • Spot gaps in your knowledge base and add new documents
  • Review cases where the agent expressed uncertainty

Recommended settings and practical tuning tips

To get strong results from day one, start with these guidelines and refine as you learn from your data.

  • Chunk size: 300 to 500 characters, with 10 to 15 percent overlap, works well for legislative and embassy text.
  • Top-K retrieval: 3 to 7 passages per query is usually enough for high quality answers.
  • Metadata filters: Always filter at least by destination country and travel purpose when available.
  • Versioning: Use a publishedDate field so newer documents are preferred.
  • Safety: Have the agent include a short disclaimer and recommend double checking with official embassy or government sites for legal or time sensitive decisions.

Security, compliance, and responsible automation

As your automation grows, so does your responsibility to protect data and users.

Follow these practices when deploying your Visa Requirement Checker:

  • Store API keys for Cohere, Weaviate, Anthropic, and Google Sheets in n8n credentials and environment variables, not in plain text.
  • Avoid saving sensitive personal data into the vector store unless you have a clear retention policy and informed user consent.
  • If your service could be interpreted as legal advice, include appropriate terms that limit liability and direct users to official authorities.

Responsible automation builds trust and allows you to scale with confidence.

Testing, monitoring, and continuous improvement

High quality automation is not a one-time build. It is an ongoing cycle of testing, observing, and refining.

To keep your Visa Requirement Checker accurate and reliable:

  • Set up automated tests with sample queries and expected answer patterns or citations.
  • Monitor logs in Google Sheets or pipe them into an analytics system to track error rates, response times, and top queries.
  • Periodically review a sample of responses, update your sources, and re-index documents to stay aligned with current visa rules.

Each iteration makes your workflow smarter, faster, and more valuable to your users.

Ideas to take your workflow even further

Once your core Visa Requirement Checker is running, you can extend it in powerful ways:

  • Auto-scraper: Add a scheduled crawler that fetches official embassy or government pages and re-indexes them daily or weekly.
  • Multi-language support: Integrate translation before embeddings, or use language specific retrieval models to serve users in different languages.
  • Custom user interface: Build a simple front-end form that calls your webhook, then display answers with source links and a confidence indicator.
  • Feedback loop: Let users rate answers and capture that feedback in Sheets, then use it to refine prompts, adjust retrieval weights, or prioritize new sources.

These enhancements turn a single workflow into a full-fledged product or internal tool.

Example agent prompt you can adapt

Here is a practical example of a prompt template you can use or customize for your Agent node:

System: You are an expert visa assistant. Use the retrieved passages and metadata to give a short, clear answer. Cite sources.
Instructions:
- If the answer is uncertain, say so and point to the official site.
- Provide a short summary, a step list, and source links.

User question: "Do Indian passport holders need a Schengen visa to visit Germany for tourism for 10 days?"
Context: [list of 3 retrieved passages with source URLs]

Feel free to adapt the wording to match your brand voice, level of detail, or risk tolerance.

Seeing the bigger picture: a reusable automation pattern

When you zoom out, this Visa Requirement Checker is a concrete example of a powerful pattern in n8n:

  1. Webhook intake
  2. Text chunking
  3. Embeddings generation
  4. Vector database retrieval
  5. Agent synthesis with context and memory
  6. Logging and analytics

This pattern is reusable across many domains where users ask questions about complex rules or documentation. By mastering it once, you unlock a new way to build scalable, intelligent workflows for your team or business.

Your next step: start small, then keep building

You do not need to automate everything at once. Start with this template, connect your Cohere and Weaviate accounts, and index the most important embassy pages for your audience.

As you see the time savings and clarity it brings, you will naturally spot new opportunities to automate related tasks, from follow up emails to internal reporting.

Call to action: Launch the template in your n8n instance, experiment with a few real world queries, and keep iterating. If you want a ready to deploy export, tailored configuration, or guidance on agents and prompts, reach out for support or explore our deployment guides and scripts.

Disclaimer: This Visa Requirement Checker provides informational guidance only. Always verify visa requirements with official government or embassy sources before traveling.

n8n AI Newsletter Pipeline: Build & Deploy

How One Marketer Stopped Dreading Newsletter Day With an n8n AI Pipeline

Every Tuesday at 4:30 p.m., Mia’s stomach dropped.

She was a growth marketer at a fast-moving AI startup, and Tuesday was “newsletter day.” The company promised a weekly AI recap to thousands of subscribers. In theory, it was great for brand and engagement. In practice, it meant Mia spent late afternoons frantically collecting links, scanning markdown files, trying not to repeat last week’s stories, and begging colleagues on Slack to help with subject lines.

She knew there had to be a better way to turn raw content into a polished AI newsletter, but every “solution” she tried still left her copying, pasting, and double checking everything by hand.

That changed when she discovered an n8n workflow template built specifically for an AI newsletter pipeline. It did not just automate a few tasks. It orchestrated the entire journey, from content ingestion to Slack review, using LLMs and modular steps inside n8n.

The Pain: Manual Newsletter Production That Never Scales

Mia’s process looked like this:

  • Hunt through an S3 bucket and internal docs for markdown files and tweets
  • Skim everything to find top stories and avoid duplicates from previous editions
  • Write summaries and “The Recap” style sections from scratch
  • Brainstorm subject lines, then send them to a Slack channel for feedback
  • Copy the final markdown into her email platform and archive everything manually

She could feel the opportunity cost. Instead of thinking strategically about content, she was stuck in repetitive curation and formatting. Consistency suffered whenever she got busy, and the team’s “AI newsletter” sometimes went out late or not at all.

So when a colleague shared an n8n AI newsletter pipeline template that promised to turn raw markdown and tweets into a production-ready AI newsletter, Mia decided to rebuild her process from the ground up.

The Discovery: An n8n Template Built for AI Newsletters

The template she found was not a toy. It was a production-ready n8n workflow specifically designed to generate an AI-focused email newsletter from raw content. It combined:

  • Content ingestion from S3 or R2
  • Metadata enrichment and filtering via HTTP APIs
  • Top-story selection using an LLM with a structured JSON output
  • Automated section writing in a “The Recap” or Axios-like style
  • Subject-line and preheader optimization
  • Slack-based review, file export, and archival

Everything ran inside n8n, with LLMs like Gemini, Claude, or OpenAI wired in through LangChain-style nodes. The promise was simple: once configured, Mia could trigger the workflow, review the draft in Slack, and ship.

Behind the Scenes: How the Automated Newsletter Pipeline Works

Before she trusted it with a real edition, Mia walked through the architecture. The workflow followed a clear pipeline:

  • Input trigger and content discovery
  • Metadata enrichment and filtering
  • Combining markdown content and tweets
  • LLM-driven story selection
  • Iterative section writing for each chosen story
  • Subject-line and preheader generation
  • Slack review, packaging, and archival

What impressed her most was that each stage was modular. She could swap models, tweak prompts, or adjust filters without breaking the entire flow.

Rising Action: Mia Sets Up Her First Automated Edition

Step 1: A Simple Trigger That Starts Everything

On newsletter day, Mia did not open a dozen tabs. She opened a simple form trigger in n8n.

The workflow started with:

  • A form trigger where she entered the newsletter date
  • An optional field to paste the previous newsletter’s markdown, so the pipeline could avoid duplicate coverage

As soon as she submitted the form, an S3 search node sprang into action. It scanned the data-ingestion bucket (R2 or any AWS S3 compatible storage) for all markdown files matching that date or prefix. Then it downloaded each candidate file for analysis.

Step 2: Metadata Enrichment That Filters The Noise

Previously, Mia had to eyeball filenames to figure out what was worth including. Now the workflow did that thinking for her.

For each downloaded content file, n8n called an internal file-info HTTP API that returned useful metadata:

  • Content type
  • Source name
  • Authors
  • External source URLs

With that metadata, the workflow applied filters to:

  • Exclude non-markdown content
  • Skip any items that had already appeared in previous newsletters stored in the same bucket

What used to be a messy bucket of files now felt like a curated set of candidates, ready for AI to evaluate.

Step 3: Combining Markdown Content And Tweets

Mia’s newsletter did not just link to long-form articles. It also highlighted key tweets from the week.

The workflow mirrored that editorial style. Once markdown pieces passed the filters, they were assembled into a single combined corpus. In parallel, the pipeline:

  • Searched for related tweets using a prefix like tweet.<date> in the same storage
  • Extracted tweet metadata and direct URLs

All of this became the raw material that the LLM would later use to choose the top stories.

The Turning Point: Letting The LLM Decide What Matters

Step 4: LLM-Driven Story Selection

This was the part Mia was most skeptical about. Could an LLM really pick the right stories, not just the longest ones?

At the core of the template was a LangChain-style LLM node configured to use Gemini, Claude, OpenAI, or another compatible model. The prompt it used was not a simple “summarize this” instruction. It was a detailed, guarded prompt that told the model to:

  • Analyze all input content, including tweets and markdown
  • Select exactly four top stories, with the first one treated as the lead
  • Output a structured JSON object with:
    • Titles
    • Summaries
    • Identifiers that point back to the original content pieces
    • External source links

The prompt also requested detailed chain-of-thought internally and insisted on including reliable source identifiers. That way, downstream nodes could fetch the exact articles or tweets that corresponded to each chosen story.

When Mia inspected the JSON output for the first time, she saw something she had never had before: a clean, structured list of the week’s most important AI stories, with pointers back to the original data.

Step 5: Automated Section Writing In “The Recap” Style

Story selection was only half the battle. Mia still needed readable sections that matched her brand’s voice.

The template solved this with an iterative loop. For each chosen story, the workflow:

  • Split the JSON stories into batches
  • Resolved the identifiers for each story
  • Downloaded the relevant content items
  • Aggregated the text, plus any external source scrapes
  • Called an LLM writer node to produce a fully formed newsletter section

The prompt for this writer node followed an editorial style Mia recognized, similar to Axios or “The Recap” format:

  • The Recap: a short, clear overview
  • Unpacked bullet points that broke down the details
  • Bottom line: a concise takeaway

Instead of writing every section from scratch, Mia now had a draft that already felt close to her tone. She could still tweak phrases, but the heavy lifting was done.

Step 6: Smart Subject Line And Preheader Generation

Subject lines had always been a last-minute headache. She knew they were crucial for open rates, yet they often got less than five minutes of attention.

The n8n workflow treated them as a first-class step. A dedicated LLM prompt analyzed the top story and generated:

  • A subject line of 7 to 9 words
  • A complementary preheader

The node did not stop at one idea. It kept alternative options and a short reasoning field, which the workflow later surfaced in Slack. That made it easy for Mia and her team to quickly choose the best option or iterate on it.

Resolution: Review In Slack, Then Ship With Confidence

Step 7: Slack Review, Packaging, And Archival

By this point, the workflow had:

  • Selected stories
  • Written sections
  • Generated subject lines and preheaders

Now it was time for human judgment.

The final assembled markdown, complete with sections and subject line ideas, was automatically posted to a Slack channel for review. The message included interactive buttons so the team could:

  • Approve the draft
  • Add feedback or request changes

In the background, the pipeline also:

  • Created a markdown file of the final edition
  • Uploaded it to Slack as a file for easy download
  • Stored a copy in the S3 or R2 bucket for long-term archival

For the first time, Mia’s Tuesday afternoon ended with a clear “Approved” click instead of a scramble.

What Mia Had To Configure Before Her First Run

The template was powerful, but not plug-and-play out of the box. Mia spent a short setup session wiring it to her stack. Her checklist looked like this:

  • n8n credentials for S3 or R2 / AWS with access to the correct bucket and prefixes
  • Internal admin API key for file metadata calls, or adjusted nodes that pointed to her CMS instead
  • LLM credentials for Google Gemini, Anthropic, OpenAI, or another provider, plus LangChain node configuration
  • Slack OAuth credentials for the review and notification channels
  • Optional scraper workflow that handled external-source-urls, which this newsletter template could invoke as a separate workflow

Once these were in place, running the pipeline was as simple as submitting the form trigger.

Why Prompt Design Made Or Broke Her Results

Mia quickly learned that prompt design was not an afterthought. The difference between “usable draft” and “hours of cleanup” came down to the instructions baked into the template.

The workflow included specific prompt rules for:

  • Story selection constraints, like:
    • Use only content within a certain date window
    • Avoid repeats from previous editions
    • Skip political items if they were not relevant to the brand
  • Section structure, enforcing:
    • The Recap:
    • Unpacked bullets
    • Bottom line
  • Linking rules that kept things safe and clean:
    • Use only provided URLs
    • Prefer deep links over generic homepages
    • Use at most one link per bullet

When she customized these prompts for her brand’s voice, she kept the core guardrails intact. That preserved consistency, reduced legal risk, and made sure the LLM stayed within predictable boundaries.

When Things Go Wrong: Troubleshooting The Workflow

Like any production workflow, issues cropped up during Mia’s first tests. The template had built-in strategies to handle them.

  • Malformed JSON from the LLM
    She enabled the workflow’s output-parser-autofixing node and added strict schema validators to catch and correct bad responses.
  • Mysterious downstream errors
    She reduced batch sizes while testing, which made it easier to trace which specific content identifier was causing problems.
  • Need for auditability
    She configured the workflow to log responses to a temporary S3 path. That gave her a clear trail for debugging and compliance.
  • External scrapes failing
    The pipeline was configured so that if external scrapes failed, the flow continued with onError: continueRegularOutput. Mia learned to inspect the aggregated external content node to find and fix broken URLs.

Scaling The Newsletter Without Losing Control

Once Mia’s team saw how smoothly the pipeline worked, they wanted to expand it. That meant thinking about cost, governance, and safety.

For production use, they implemented a few best practices:

  • Rate limiting and quotas on LLM calls to control API costs
  • Human-in-the-loop approval for the final publish step, so nothing went out without a person signing off
  • PII audit and sanitization to ensure any personally identifiable information in source content was removed before inclusion in the newsletter

The result was a system that felt both automated and safe. The workflow did the heavy lifting, but humans still held the final say.

How Mia Adapted The Template To Her Own Use Cases

After a few weeks, Mia started to see the template as more than a single-purpose tool. It became a flexible foundation for different newsletter experiments.

Some of her favorite customization ideas included:

  • Multi-language support, by routing the same stories through different LLM prompts to generate localized editions
  • Analytics integration, using subject line variants to A/B test open rates and click rates
  • CMS publishing, wiring the final markdown into WordPress or Ghost so approved editions could be pushed automatically
  • Image selection and thumbnails, connecting to an image model or API to suggest relevant images and generate thumbnails

All of this built on the same core pipeline: ingest markdown and tweets, use LLMs for selection and writing, optimize subject lines, then review in Slack.

What This Template Ultimately Gave Her

By the time Mia’s third automated edition went out, “newsletter day” felt different. She was no longer dreading a wall of manual work. Instead, she was:

  • Confident that the pipeline would surface the best AI stories
  • Spending time on nuance and strategy instead of copy-paste tasks
  • Publishing on a consistent cadence, even when the