Automate Notion Updates with n8n & RAG

Automate Notion Updates with n8n & RAG

Imagine this: you finish a long meeting, dump all your notes into Notion, and then spend the next 20 minutes manually summarizing, tagging, and trying to remember what on earth “follow up w/ J” means. Again. For the third time this week.

If that sounds familiar, it might be time to let automation do the boring bits. This reusable n8n workflow template, “Notion API Update”, takes care of the heavy lifting for you. It ingests content, creates embeddings, stores and queries vectors in Supabase, runs a Retrieval-Augmented Generation (RAG) agent, logs results to Google Sheets, and even pings Slack when something goes wrong.

In other words: you feed it content, it feeds you smart, contextual insights, and you get to stop copy-pasting your way through life.


What this n8n Notion automation actually does

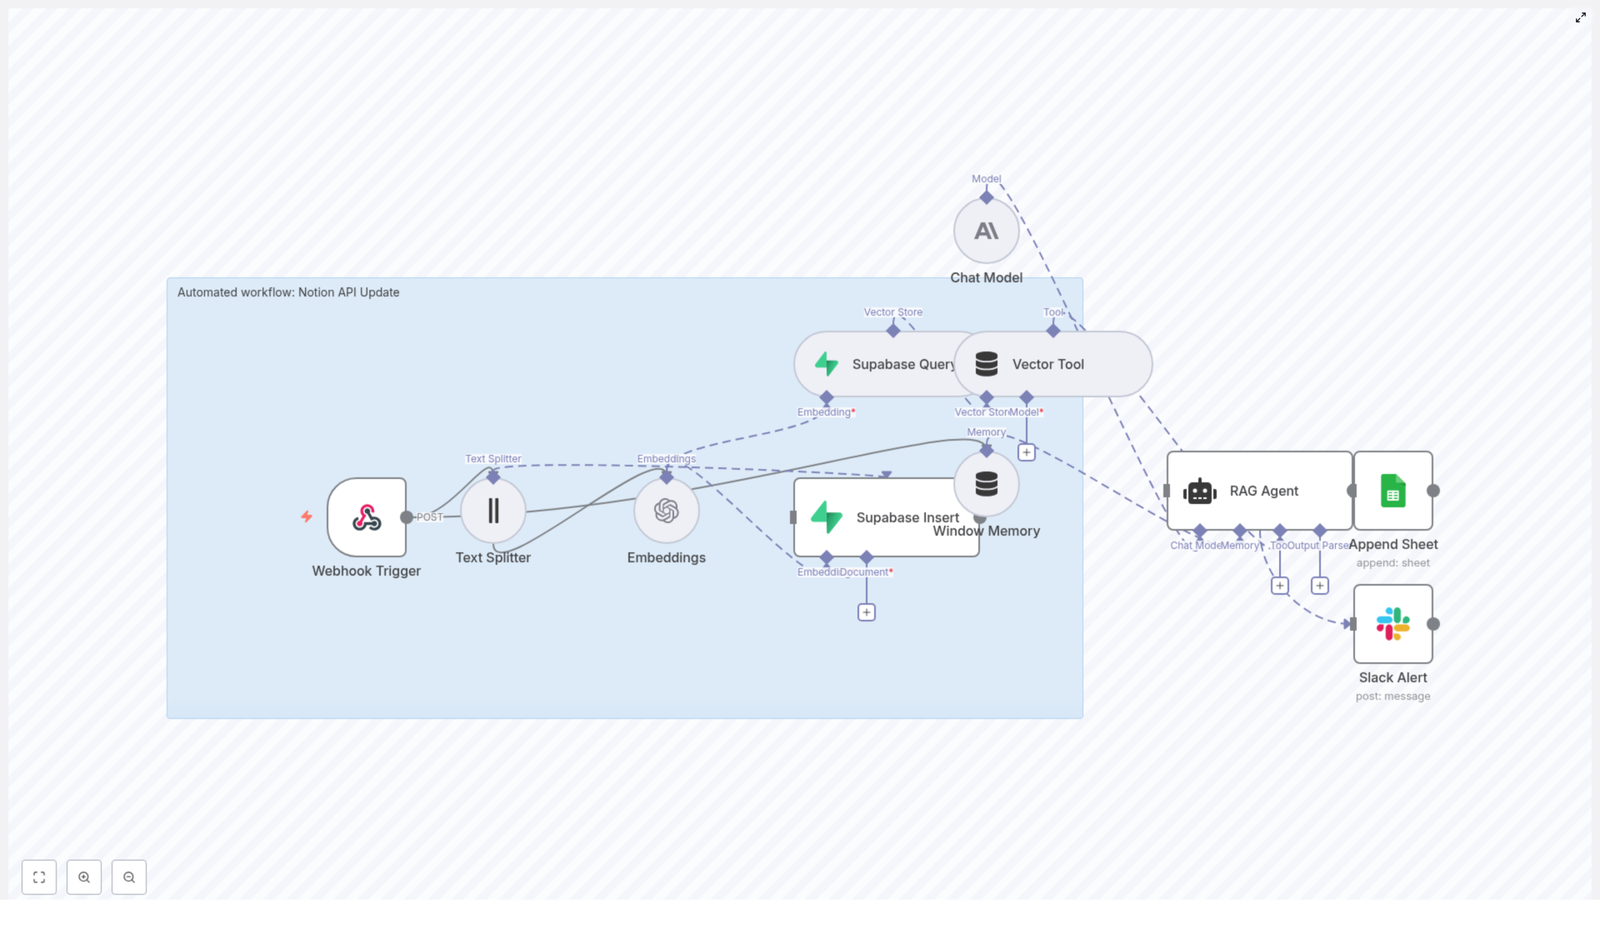
This workflow turns your Notion content into something your AI tools can understand, remember, and reason about. Behind the scenes, it uses a series of n8n nodes that work together like a small, well-behaved robot army:

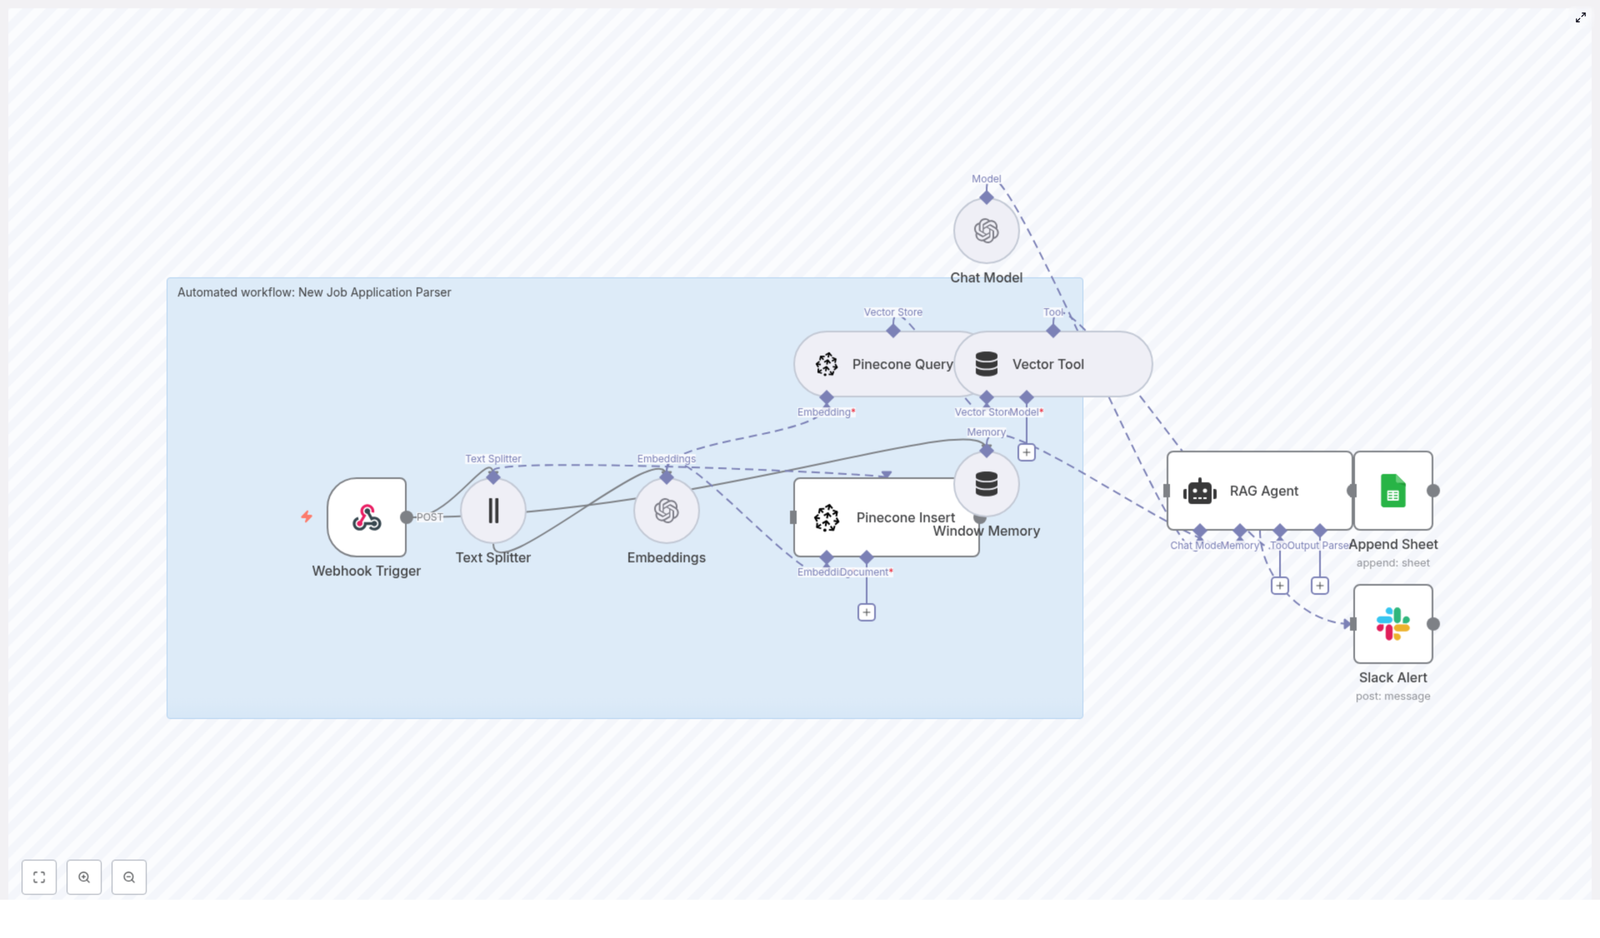
  1. Webhook Trigger – Listens for POST requests and kicks off the workflow.
  2. Text Splitter – Breaks long content into manageable chunks for embeddings.
  3. Embeddings – Uses OpenAI text-embedding-3-small to turn text chunks into vectors.
  4. Supabase Insert – Stores those vectors in a Supabase vector table (indexName: notion_api_update).
  5. Supabase Query & Vector Tool – Fetches relevant context from Supabase when the RAG agent needs it.
  6. Window Memory – Keeps recent conversation or context handy for multi-step interactions.
  7. Chat Model + RAG Agent – Uses an Anthropic chat model plus retrieved vectors to generate smart, context-aware output.
  8. Append Sheet – Logs results to a Google Sheet for tracking and review.
  9. Slack Alert – Sends error notifications to a #alerts channel if something breaks.

The result: your Notion pages can be enriched with AI-powered summaries, insights, and actions, with all the context stored in a vector database so your RAG agent does not forget what it just learned.


Why automate Notion updates in the first place?

Notion is already a favorite single source of truth for docs, meeting notes, and projects. The problem is that keeping it all up to date and context rich can feel like a part-time job. Automation with n8n and RAG helps you:

  • Enrich Notion pages with summaries, insights, and suggested next steps without manual editing.
  • Trigger updates via webhooks from other systems whenever something important changes.
  • Persist context in a vector database so your AI queries get faster and more relevant over time.
  • Track what happened with logging and error monitoring in Google Sheets and Slack.

In short, you get the benefits of AI-enhanced Notion content without the “copy, paste, tweak, repeat” routine.


How the Notion API Update workflow is wired together

Let us walk through the core building blocks of this n8n workflow so you know what is going on under the hood and where to tweak things.

1. Webhook Trigger – your workflow entry point

The workflow starts with a Webhook Trigger node that exposes an HTTP POST endpoint at:

/notion-api-update

External systems can call this endpoint whenever a Notion page changes or when you want to process some new content. You can:

  • Connect it to a Notion webhook.
  • Trigger it from another automation tool.
  • Send test payloads manually during development.

Keep it secure by protecting the webhook with an API key, secret token, or IP allowlist. You want automation, not random strangers updating your knowledge base.

2. Text Splitter – turning walls of text into bite-sized chunks

Long Notion pages are great for humans, but embeddings models work better with smaller pieces. The Text Splitter node:

  • Uses a chunkSize of 400 characters.
  • Adds an overlap of 40 characters between chunks.

This setup preserves enough context between chunks while keeping token and embedding costs reasonable. You can tune these values based on how long and structured your typical Notion content is.

3. Embeddings – giving your content a vector brain

Next, the Embeddings node uses the OpenAI model text-embedding-3-small to convert each text chunk into a vector.

Each chunk gets:

  • A vector representation for semantic search.
  • Metadata like source page ID, chunk index, and original text.

That metadata is important later when you want to trace where a specific answer or piece of context came from.

4. Supabase Insert & Supabase Query – your vector store

The workflow uses Supabase as the vector database. You will:

  • Insert new embeddings into a vector table with indexName: notion_api_update.
  • Store fields such as:
    • Document or page ID
    • Chunk text
    • Vector
    • Tags, timestamps, or other useful metadata

When it is time to answer a query, the Supabase Query node retrieves the top-k most similar vectors. This gives the RAG agent solid context to work with instead of guessing in the dark.

5. Vector Tool – making Supabase searchable for the agent

The Vector Tool node wraps the Supabase index so the RAG agent can call it as a searchable tool. Whenever the agent needs extra context, it can query the vector store directly instead of relying only on the incoming text.

6. Window Memory – short-term memory for multi-step flows

Window Memory keeps recent inputs and outputs available to the RAG agent. This is especially useful when:

  • You have multi-step interactions.
  • The webhook includes conversational context.
  • You want the agent to “remember” what just happened across a few steps.

Think of it as a small, rolling memory buffer so the agent is not constantly asking “wait, what were we talking about again?”

7. Chat Model & RAG Agent – where the magic happens

The workflow uses an Anthropic chat model inside the RAG Agent node. It is configured with:

  • A system message that defines how the agent should behave.
  • A prompt template tailored for the “Notion API Update” use case.

The RAG approach combines:

  • Retrieved vectors from Supabase.
  • The language model’s reasoning abilities.

This leads to more accurate, domain-specific responses that are grounded in your actual Notion content rather than generic internet knowledge.

8. Append Sheet – logging everything in Google Sheets

To keep an audit trail, the workflow uses an Append Sheet node that writes agent outputs to a Google Sheet with:

sheetName: Log

This gives you a simple way to:

  • Review what the agent generated.
  • Approve or reject changes before pushing them back into Notion.
  • Monitor how the workflow behaves over time.

9. Slack Alert – when things go sideways

Automation is great until an API key expires or a service hiccups. The Slack Alert node catches errors from the RAG Agent and posts them to a Slack channel, typically:

#alerts

Your engineering or ops team can then jump in quickly, fix the issue, and get your automation back on track before anyone has to manually copy-paste again.


Quick setup guide for the Notion API Update template

Here is a simplified checklist to get this n8n workflow template up and running without losing an afternoon to configuration screens.

Step 1 – Prepare your n8n environment

  • Host n8n on your preferred option:
    • n8n.cloud
    • Self-hosted
    • Other cloud setups
  • Make sure you have HTTPS and a stable domain so the webhook endpoint is reliable.

Step 2 – Configure OpenAI embeddings

  • Create an OpenAI API key.
  • In n8n, set up credentials for OpenAI.
  • Configure the Embeddings node to use:
    • text-embedding-3-small

Step 3 – Connect Anthropic or your chosen LLM

  • Get API credentials for Anthropic (or another supported LLM provider).
  • Configure the Chat Model node in n8n with these credentials.
  • Ensure the RAG Agent node is wired to this chat model.

Step 4 – Set up Supabase as your vector database

  • Create a Supabase project and table for embeddings.
  • Enable pgvector support.
  • Add Supabase credentials to n8n.
  • Ensure your table includes:
    • Document or page ID
    • Chunk text
    • Vector column
    • Optional tags or timestamps

Step 5 – Hook up Google Sheets logging

  • Set up OAuth credentials for Google Sheets in n8n.
  • Create a spreadsheet with a Log sheet.
  • Point the Append Sheet node to this sheet for logging agent outputs.

Step 6 – Configure Slack alerts

  • Create a Slack bot token with permission to post to channels.
  • Add the bot to your #alerts channel.
  • Set up the Slack Alert node to send error messages there.

Step 7 – (Optional) Let the agent write back to Notion

  • If you want full end-to-end automation, add a Notion API node after the agent.
  • Configure it to:
    • Update the relevant Notion page.
    • Respect page permissions and workspace access.

Security and best practices so your automation stays friendly

Automation is powerful, so it is worth locking things down properly.

  • Authentication – Protect the webhook with an API key or webhook secret, and rotate keys regularly.
  • Least privilege – Scope your Supabase, Google Sheets, and Notion credentials so they only have the access they truly need.
  • Data retention – Store only the necessary data in your vector store. For sensitive data, consider redaction or hashing.
  • Rate limits – Keep an eye on OpenAI, Anthropic, and Supabase usage so you do not hit rate limits at the worst possible moment.
  • Error handling – Use n8n’s onError connections, as in this template, to notify Slack and optionally retry transient issues.

Testing and validating your workflow

Before you hand real data over to your shiny new automation, run a few simple tests:

  1. Send a POST request to the webhook with sample Notion content or a Notion webhook payload.
  2. Confirm that the Text Splitter creates chunks and the Embeddings node generates vectors. You can check n8n logs or verify rows in Supabase.
  3. Run a test query to ensure the Supabase Query node returns relevant vectors.
  4. Check that the RAG agent’s output is appended to the Google Sheet and that no error messages appear in Slack.

If everything looks good and Slack stays quiet, your automation is ready for real workloads.


Optimization tips for performance and cost

Once you have the basics working, you can tune things to be faster, cheaper, and more accurate.

  • Adjust chunkSize and overlap – Try different values to balance retrieval quality and embedding costs.
  • Use metadata filters – In Supabase queries, filter by project, workspace, or tags to reduce noise and get more relevant context.
  • Cache frequent queries – If you see repeated queries, consider caching results to cut down on repeated vector searches.
  • Limit top-k results – Keep the number of returned vectors aligned with your prompt size and model capabilities so you do not overload the LLM with unnecessary context.

Real-world use cases for this Notion + n8n + RAG combo

This workflow is flexible enough to support a variety of Notion workflows that usually involve a lot of manual labor.

  • Auto-summarize meeting notes into clear action items and store the summary on the same Notion page.
  • Enhance product documentation with AI-generated troubleshooting steps while preserving links back to the original context.
  • Monitor Notion databases for important field changes and trigger alerts or updates when something critical shifts.

If you have ever thought “I wish this Notion page would just summarize itself,” this template is for you.


Where to go next with this template

The “Notion API Update” n8n template gives you a solid, production-friendly pattern:

webhook intake → chunking → embeddings → vector storage → RAG + LLM processing → logging and alerting

You can clone it, customize it, and extend it with extra steps like automatic Notion updates, approval flows, or additional tools.

To get started right away:

  • Clone the template in your n8n instance.
  • Provision the Supabase vector table.
  • Plug in your OpenAI, Anthropic, Google Sheets, Slack, and Supabase credentials.
  • Send a test POST to the webhook and watch your logs and Sheets fill up.

Call to action: Try the workflow today, import the template into n8n, connect your OpenAI and Supabase credentials, and run a test POST. Then subscribe for more automation patterns and step-by-step guides to scale AI-driven workflows in your stack.

Published by Automation Lab • Updated guides on n8n, vector search, and AI integrations.

n8n AI Agent for YouTube Insights

Build an n8n AI Agent to Analyze YouTube Videos, Comments and Thumbnails

Tired of pausing YouTube every 3 seconds to take notes, scroll through 800 comments, then squint at thumbnails to guess why one got all the clicks? This n8n workflow template politely takes all that repetitive work off your plate by combining the YouTube Data API, Apify and OpenAI into a single automated research sidekick.

Imagine this: YouTube “research” without the rabbit hole

You sit down to do some quick YouTube research. Two hours later you are deep in a comment thread argument from 2021, you forgot what you were supposed to be analyzing, and you still have no structured insights to show your team.

Creators, marketers and product teams all run into the same problem. You need fast, structured insight from video content and audience feedback, but manually reviewing videos, comments and thumbnails gets old fast. That is where an n8n AI agent for YouTube comes in. It automates the boring parts so you can focus on decisions instead of detective work.

What this n8n YouTube AI agent actually does

This workflow template acts like a YouTube research assistant that never gets tired, distracted or stuck in the recommendation loop.

At a high level, the n8n workflow orchestrates several tools to collect and analyze everything that matters about a channel or video:

  • Channel and video metadata via the YouTube Data API so you get structured info instead of endless tab hopping.
  • Video transcription using Apify or another transcription API so the AI can read the whole video instead of just guessing from the title.
  • Comment collection and analysis to extract viewer sentiment, recurring questions and preferences.
  • Thumbnail evaluation with OpenAI image analysis to assess composition, color, messaging and click-worthiness.
  • An AI agent brain powered by OpenAI that coordinates all of the above and returns concise, actionable insights.

In other words, it gathers channel details, video stats, full transcripts, audience comments and thumbnail feedback, then bundles everything into one coherent answer instead of 20 open tabs.

How the workflow is wired together

Under the hood, this template is a collection of n8n nodes that talk to each other in a fairly civilized way. Here is how the main components connect.

1. Trigger and smart routing with Switch

The workflow kicks off when a chat request or webhook hits your n8n instance. That incoming request tells the AI agent what you are trying to do, for example:

  • “Analyze this channel”
  • “Audit this specific video”
  • “Check comments for pain points”
  • “Review this thumbnail”

A Switch node then routes the command to the right toolchain. Depending on the request, it can trigger search, channel lookup, video details, comments analysis, transcription or thumbnail inspection. No more manual copy and paste of URLs into different tools.

2. YouTube Data API requests

Several nodes call the YouTube Data API to pull structured data that your agent can reason about. The main operations are:

  • get_channel_details – resolves a handle or channel URL into a channel_id and fetches the channel snippet.
  • get_list_of_videos – retrieves recent or top videos from a channel, with support for ordering by date or viewCount.
  • get_video_description – fetches snippet, contentDetails and statistics for a specific video.
  • get_list_of_comments – pulls commentThreads for a given video, with pagination support for larger discussions.

This turns the YouTube interface into clean JSON that your AI agent can analyze without needing caffeine or context switching.

3. Video transcription for deep content understanding

To understand what is actually said in the video, the workflow calls an Apify actor or another transcription service. This generates a full text transcript of the video audio.

Once the transcript is available, the AI agent can:

  • Summarize the full video in a few paragraphs.
  • Extract key topics, themes and repeated concepts.
  • Suggest repurposing ideas such as short clips, social posts or blog outlines.

No more manually scrubbing through 45 minutes of content to find that one quote you vaguely remember.

4. Thumbnail analysis with OpenAI

Thumbnails have one job: get the click. The workflow sends thumbnail URLs to an OpenAI image analysis tool that reviews the design and provides feedback.

The analysis can cover:

  • Headline placement and readability.
  • Face visibility and emotional expression.
  • Color contrast and visual hierarchy.
  • Persuasive elements that are likely to improve CTR.

Instead of arguing about colors in a meeting, you can ask the agent what might actually help people notice and click.

5. OpenAI agent with conversation memory

At the center of it all is an OpenAI-based agent. It plans which tools to call, runs them in the right order and then synthesizes the results into a human-friendly response.

To keep things context aware, the workflow can store conversation history in Postgres. This memory lets the agent:

  • Remember what you already analyzed in a session.
  • Handle follow up questions without starting from scratch.
  • Support iterative analysis, for example “Now compare that video to the previous one.”

Quick setup checklist for the template

Before your AI agent can start binge-watching for you, you need a few keys and accounts. Here is the setup checklist, minus the stress.

  1. Google Cloud Project and YouTube Data API
    Create a Google Cloud project and enable the YouTube Data API. Then generate an API key or OAuth credentials suitable for server-to-server requests.
  2. Apify account
    Sign up for Apify and grab an API token if you plan to use Apify actors to fetch transcripts or scrape content that is not directly exposed via the YouTube API.
  3. OpenAI API key
    Create an OpenAI API key to power the AI agent and the image analysis for thumbnails.
  4. n8n credentials
    In your n8n instance, configure credentials for all nodes that require them:
    • YouTube Data API authentication for queries.
    • Apify API token.
    • OpenAI API key.
    • Postgres connection details if you use chat memory.
  5. Postgres database (optional but helpful)
    Set up a Postgres DB if you want persistent session memory or to save processed results for later reuse. It is optional, but your future self will probably thank you.

How to use the workflow in real life

Once everything is wired up, you can use this n8n YouTube AI agent in several practical ways. Here are the main usage patterns.

Channel research without the manual grind

Point the workflow at a YouTube channel to:

  • Collect channel metadata and top performing videos.
  • Analyze comments at scale to find recurring viewer questions and complaints.
  • Review transcripts to uncover topics that resonate with the audience.

This is ideal for competitive research, audience analysis or planning your own content strategy based on real viewer behavior instead of vibes.

Video level audits for deeper insights

For a specific video, you can run a more detailed audit. The workflow can help you:

  • Generate a structured summary from the full transcript.
  • List viewer objections, pain points and frequently mentioned themes from comments.
  • Suggest timestamps for clips that are perfect for shorts or social media.

It is like having a content strategist watch the video and hand you a ready made brief.

Tips, best practices and a few sanity savers

To keep your workflow efficient, accurate and budget friendly, keep these practical recommendations in mind.

Filtering, pagination and cost control

  • Filter out Shorts when needed – many channel queries return short videos by default. If you need long form content, discard videos under one minute so your analysis focuses on substantial pieces.
  • Paginate comments – YouTube limits how many comments you can fetch per request. Implement pagination to capture a representative sample instead of just the first handful of replies.
  • Manage transcription and model costs – long videos plus large models can get expensive. Consider sampling sections of the video or clipping it before transcription if you only need specific segments.

Data privacy and responsible storage

  • Handle user data carefully – if you store comments or transcripts externally, be mindful of PII.
  • Mask or anonymize sensitive data – remove or obfuscate personal details in any long term storage or reporting.

What kind of outputs you can expect

Once the workflow is running, your AI agent can generate a variety of useful deliverables that beat a messy notes doc every time.

  • Channel brief that includes title, a summarized description and key audience signals based on content and comments.
  • Viewer pain point report with topic clusters derived from comments, plus suggested content angles to address them.
  • Transcript based assets such as show notes, timestamps and ideas for short clips and social posts.
  • Thumbnail critique with specific suggestions to improve CTR, including color tweaks, headline changes and face cropping adjustments.

Scaling up: from one video to entire channels

Once you trust the workflow on a single video or channel, you can scale it into a full YouTube insights system.

Some automation ideas:

  • Batch process entire playlists or channels on a schedule.
  • Store aggregated metrics and insights in a database.
  • Feed those metrics into a BI tool or send regular reports to Slack.
  • Combine insights with A/B thumbnail testing and track CTR changes over time.

That way, your YouTube analysis becomes an ongoing process instead of a one time research sprint every quarter.

Limitations and things to keep an eye on

As powerful as this setup is, it is not magic. A few constraints still apply:

  • Input quality matters – poor audio, private captions or missing comments will limit how much value you can get from transcriptions and sentiment analysis.
  • AI and sarcasm are not best friends – automated models can misinterpret jokes or sarcasm in comments, so keep a human in the loop for final editorial decisions and nuanced judgment.

Get started: from template to working AI agent

Ready to let automation do the boring YouTube work for you? Here is a simple path to get your n8n AI agent up and running.

  • Import or download the n8n workflow template into your n8n instance.
  • Replace the placeholder credentials with your own YouTube, Apify and OpenAI keys.
  • Run a test on a single channel or video and review the outputs, including comments analysis, transcript based insights and thumbnail feedback.

If you want help installing the template or tailoring it to your specific use case, you can reach out for support or watch the setup video that walks through the full configuration and a live demo.

Ready to automate your YouTube research? Import the n8n template, plug in your keys and start extracting audience insights without sacrificing your entire afternoon to the algorithm.

Note: This guide is technology agnostic, so you can swap Apify for another transcription service or replace OpenAI image analysis with a different vision model if you have specific cost, privacy or compliance requirements.

Automated Job Application Parser with n8n & RAG

Automated Job Application Parser with n8n, Pinecone & OpenAI

Imagine a hiring process where your team spends most of its time talking to great candidates, not drowning in resumes. With a bit of thoughtful automation, that shift is absolutely possible.

This guide introduces an Automated Job Application Parser built with n8n, Pinecone, and OpenAI. It ingests incoming applications, turns them into vector embeddings, stores them in a scalable vector database, and uses a Retrieval-Augmented Generation (RAG) agent to summarize and score candidates. You get a powerful, production-ready workflow that lightens your workload and gives you more space to focus on the human side of hiring.

Think of this template as a starting point for your automation journey. You can use it as-is, extend it, or customize it to match your exact hiring needs. Along the way, you will sharpen your automation mindset and build reusable skills you can apply across your business.

The challenge: manual screening slows everything down

Recruiters and hiring managers often face the same problem: too many applications, not enough time. Manually reading each resume, copying details into spreadsheets, and trying to compare candidates consistently can be exhausting and error-prone.

Common pain points include:

  • Hours spent scanning resumes for basic information
  • Inconsistent evaluations between different reviewers
  • Difficulty searching past candidates when a new role opens
  • Slow response times that cost you top talent

Automation does not replace your judgment. It amplifies it. By offloading repetitive tasks to a reliable workflow, you free yourself to focus on conversations, culture fit, and long-term potential.

From overload to opportunity: adopting an automation mindset

Before diving into the template, it helps to reframe how you see your hiring process. Every repetitive step is an opportunity to:

  • Standardize how you evaluate candidates
  • Capture richer data that stays searchable over time
  • Turn unstructured resumes into structured insights
  • Build a scalable pipeline that grows with your company

With n8n, you do not need to be a full-time developer to achieve this. You can visually orchestrate tools like OpenAI and Pinecone, test quickly, and iterate. The Job Application Parser template is one practical step toward a more automated, focused workflow.

The vision: what this n8n template helps you achieve

At a high level, this workflow helps you:

  • Extract and normalize candidate information such as skills, experience, and contact details
  • Store semantic context using vector embeddings so you can search applications intelligently
  • Generate instant summaries and match scores with a RAG workflow powered by OpenAI
  • Log every application into Google Sheets for tracking and reporting
  • Stay informed with Slack alerts when something goes wrong

Instead of manually parsing each application, your workflow runs in the background and presents you with clear, structured insights. You get a more consistent pipeline and a stronger foundation for future automation projects.

Architecture at a glance: how the pieces fit together

n8n sits at the center of this automation as the orchestrator. Around it, a set of tools work together to turn raw application data into meaningful summaries and scores.

  • Webhook Trigger – Receives job applications via POST requests
  • Text Splitter – Breaks long resumes or cover letters into manageable chunks
  • Embeddings (OpenAI) – Converts text chunks into vector embeddings
  • Pinecone – Stores and retrieves embeddings for fast semantic search
  • Vector Tool + RAG Agent – Uses retrieved context to generate summaries and decisions
  • Google Sheets – Logs results in a “Log” sheet for easy review
  • Slack Alert – Notifies you when the workflow encounters an error

Each part is configurable, so as your needs evolve, you can extend the workflow rather than start from scratch.

End-to-end flow: what happens to each application

To understand the transformation from raw resume to actionable insight, follow the journey of a single application through the workflow:

  1. A new application is submitted and hits the n8n Webhook at POST /new-job-application-parser.
  2. The Text Splitter node breaks the resume and cover letter into 400-character chunks with a 40-character overlap to preserve context.
  3. Each chunk is passed to OpenAI Embeddings using the text-embedding-3-small model to generate vector representations.
  4. The workflow inserts those embeddings into a Pinecone index named new_job_application_parser along with metadata such as applicant ID, chunk index, and source.
  5. When you need a summary or decision, a Pinecone Query retrieves the most relevant chunks, and the RAG Agent uses them with a Chat Model to produce a human-friendly output.
  6. The final summary and decision are appended to a Google Sheet called “Log”, and if anything fails along the way, a Slack alert is sent so you can respond quickly.

This flow turns each application into a structured, searchable record without demanding more of your time.

Walking through the n8n configuration

1. Webhook Trigger: your entry point for applications

Start by creating a POST Webhook in n8n with the path /new-job-application-parser. This endpoint can be connected to:

  • Your careers page form
  • Your Applicant Tracking System (ATS) webhook
  • An email-to-webhook forwarder

Here is a sample payload you might receive:

{  "applicant": {  "name": "Jane Doe",  "email": "jane@example.com",  "cover_letter": "I’m excited to apply...",  "resume_text": "...full resume text...",  "source": "LinkedIn"  }
}

This structure is flexible. You can adapt it to match the data your system already produces, as long as the follow-up nodes know where to find the text fields.

2. Text Splitter: preparing text for embeddings

Long resumes and cover letters need to be split into smaller pieces so that embeddings and retrieval stay accurate and cost-effective. Use a character-based text splitter with the following configuration:

  • chunkSize: 400
  • chunkOverlap: 40

This balance keeps enough context in each chunk while avoiding overly long inputs. If your resumes are consistently shorter or longer, you can experiment with these values later to fine-tune performance.

3. Embeddings with OpenAI: turning text into vectors

Next, configure an OpenAI Embeddings node in n8n. Use the model:

text-embedding-3-small

Make sure your OpenAI API credential is set up in n8n. The node will generate embeddings for each chunk produced by the Text Splitter. These embeddings are the foundation for semantic search and RAG, so this step is central to the workflow.

4. Pinecone Insert and Query: building your vector database

Set up a Pinecone index named new_job_application_parser. You can create a new index or reuse an existing one if it fits your architecture.

In the Insert step:

  • Store each embedding
  • Attach metadata such as:
    • Applicant ID
    • Chunk index
    • Source (for example, LinkedIn, careers site)

For retrieval, configure a Pinecone Query node that queries the same index and returns the top-k relevant chunks. These chunks will feed into the RAG Agent to provide context for summaries and decisions.

5. Vector Tool and RAG Agent: generating summaries and decisions

The next step is where automation starts to feel truly helpful. The Vector Tool wraps your Pinecone query so that a RAG Agent can call it as a tool inside n8n.

The RAG Agent combines three types of information:

  • A system prompt that defines the role, for example, a hiring assistant
  • The retrieved context from Pinecone
  • Applicant metadata from the original webhook payload

Use a Chat Model configured in n8n to generate outputs such as:

  • A concise candidate summary
  • A list of top skills and keywords
  • A recommended screening decision (Yes, Maybe, or No)

An example system message you can use:

You are an assistant for New Job Application Parser - summarize the candidate, list top skills, and recommend a screening decision (Yes/Maybe/No).

You can refine this prompt over time as you see what kind of output works best for your team.

6. Append to Google Sheets: logging and visibility

To keep a clear record of every processed application, configure a Google Sheets node to append rows to a sheet named Log. This makes it easy to review, filter, and report on your pipeline.

A typical column mapping might include:

  • Timestamp
  • Applicant Name
  • Email
  • Decision (Yes / Maybe / No)
  • Summary
  • Source

From here, you can filter by decision, track throughput, and even share the sheet with stakeholders who do not use n8n directly.

7. Slack Alert: staying ahead of issues

Automation works best when you can trust it. To keep your workflow healthy, add a Slack node that triggers on any workflow failure.

Send a message to a channel like #alerts that includes:

  • The error message
  • A reference to the applicant or payload

This way, if something breaks, you know right away and can fix it before it impacts your hiring pipeline.

Security, privacy, and cost: building responsibly

As you automate more of your hiring process, it is important to keep security and compliance in focus. The good news is that n8n and the surrounding tools give you the flexibility to do this well.

Secure your webhooks

  • Protect your webhook with a secret token or an IP allowlist.
  • Validate incoming requests so you only process trusted data.

Respect data privacy

Resumes and applications contain sensitive personal information. To handle this responsibly:

  • Define retention policies for Pinecone and Google Sheets
  • Purge or anonymize old records when they are no longer needed
  • Redact sensitive data in logs where possible
  • Comply with regulations like GDPR and CCPA where applicable

Manage costs and rate limits

Embedding generation and vector database operations are powerful but not free. To keep costs under control:

  • Batch requests where it makes sense
  • Monitor usage of OpenAI and Pinecone
  • Set rate limits on the webhook to avoid unexpected spikes

This mindset helps you build sustainable automations you can rely on long term.

Monitoring, scaling, and maintaining your workflow

Once your Job Application Parser is running, you can gradually evolve it from a helpful tool into a robust part of your hiring infrastructure.

  • Enable detailed logging in n8n and export logs to a central system like Datadog or CloudWatch.
  • Set up health checks for Pinecone and OpenAI connectivity and alert on outages.
  • Scale Pinecone resources or shard indexes if you expect high volume.
  • Use window memory sparingly in conversational flows and only persist what is needed for short-term context.

Each improvement you make here compounds over time, leading to a smoother and more resilient automation stack.

Growing beyond the basics: extensions and advanced ideas

Once you are comfortable with the core template, you can start experimenting and expanding. Here are some directions to explore:

  • OCR pipeline: Accept PDFs or images and run OCR (for example, Tesseract or a cloud OCR service) before splitting text. This lets you handle scanned resumes and attachments.
  • Structured resume parsing: Plug in dedicated parsers like Resumator or other third-party tools to extract structured fields such as education, experience, and skills, then store them as metadata in Pinecone.
  • Automated screening rules: Combine RAG outputs with deterministic filters, such as years of experience or must-have skills, to create automated pass/fail gates for initial screening.
  • Human-in-the-loop review: Insert a review step where recruiters confirm or adjust decisions before finalizing the application status, ensuring automation supports rather than replaces human judgment.

Each enhancement you add turns your workflow into a more powerful hiring assistant tailored to your organization.

Example RAG system prompt you can build on

Below is a sample system message you can use in your RAG Agent. Treat it as a starting point and refine it based on your own hiring criteria and tone.

You are an assistant for New Job Application Parser. Given the applicant metadata and retrieved resume snippets, produce:
1) A 3-sentence summary of the candidate
2) Top 5 skills and keywords
3) A recommended screening decision: Yes / Maybe / No (with short justification)

Applicant metadata: {{applicant}}
Retrieved snippets: {{context}}

As you see how the model responds, you can iterate on this prompt to better match your company’s values and expectations.

Bringing it all together: your next step in automation

Turning incoming job applications into searchable, summarized records lets your recruiting team focus on what matters most: connecting with the right people. The combination of n8n, OpenAI, and Pinecone gives you a flexible, cost-effective, and extensible stack for hiring automation.

This Job Application Parser template is more than a single workflow. It is a concrete step toward a more automated, focused, and scalable way of working. Once you see what it can do, you may find yourself looking at other processes and asking, “What else can I automate?”

Ready to try it?

  • Import the n8n workflow template
  • Configure your OpenAI, Pinecone, Google Sheets, and Slack credentials
  • Send a test POST request to /new-job-application-parser with a sample payload

From there, iterate. Adjust prompts, tweak chunk sizes, refine metadata, and layer in new steps. Each improvement moves you closer to a hiring process that is both highly efficient and deeply human.

Try the template now: import the workflow into n8n, add your API keys, and send a test POST to /new-job-application-parser. Use it as your foundation, then build the hiring automation system you have always wanted.

AI Logo Sheet Extractor to Airtable

AI Logo Sheet Extractor to Airtable – Automate Logo Sheets into Structured Data

Convert any logo-sheet image into clean, structured Airtable records using n8n and an AI-powered parsing agent. This guide walks through the full workflow design, from trigger to Airtable upsert, and explains how each n8n node, AI prompt, and data model contributes to a reliable, repeatable automation for extracting product names, attributes, and competitor relationships directly from images.

Use case and value proposition

Teams across product, research, and strategy frequently receive visual matrices of tools or vendors as a single image: slides with logo grids, market maps, or competitive landscapes. Manually transcribing these visuals into a database is slow, inconsistent, and difficult to scale.

This n8n workflow addresses that problem by combining computer vision and language models with Airtable as a structured backend. It allows you to:

  • Identify product or tool names from logo sheets.
  • Infer relevant attributes and categories from surrounding visual context.
  • Detect visually indicated similarities or competitor relationships.
  • Upsert all extracted information into Airtable in a deterministic, idempotent way.

The result is an “upload-and-forget” pipeline that transforms unstructured visual assets into a searchable, analyzable dataset.

End-to-end workflow overview

The automation is implemented as a linear n8n workflow with clearly defined stages. At a high level, it performs the following operations:

  1. Accept a logo-sheet image via a public web form.
  2. Forward the image and optional context prompt to an AI parsing agent (LangChain / OpenAI).
  3. Validate and normalize the agent’s structured JSON output.
  4. Upsert all attributes into Airtable and capture their record IDs.
  5. Map attribute IDs back to tools and resolve similar-tool relationships.
  6. Create or update tool records in Airtable, linking attributes and competitors.

The sections below detail the key n8n nodes, the Airtable schema, and best practices for prompt design, testing, and scaling.

Core n8n components

Form-based trigger: logo-sheet intake

The workflow starts with a form submission node that exposes a simple upload endpoint at /logo-sheet-feeder. This form accepts:

  • The logo-sheet image file.
  • An optional free-text prompt to provide additional context to the AI agent.

This URL can be shared internally so any team member can submit new logo sheets without touching n8n. The node is configured to pass the binary image data downstream for analysis.

AI parsing agent (LangChain / GPT)

Once the image is received, a LangChain-based agent backed by an OpenAI model processes the binary image. Binary passthrough is enabled so the image is accessible to the agent. The agent is instructed to output a deterministic JSON structure that captures tools, attributes, and similar tools.

The target JSON structure for each tool is:

[{  "name": "ToolName",  "attributes": ["category", "feature"],  "similar": ["competitor1", "competitor2"]
}]

A well-designed system prompt is crucial. It should clearly define the schema, restrict output to JSON only, and explain that the input is a logo sheet with product logos and contextual cues.

Structured Output Parser

To minimize downstream errors, the next node validates and enforces the expected JSON schema. This Structured Output Parser node:

  • Checks that the agent response is valid JSON.
  • Ensures required fields such as name, attributes, and similar are present for each item.
  • Normalizes the data shape so subsequent nodes can rely on a consistent structure.

This defensive step significantly reduces runtime failures and simplifies troubleshooting, since malformed outputs are surfaced early.

Attribute creation and deduplication in Airtable

Each attribute string returned by the agent is mapped to an Airtable record in an Attributes table. The workflow:

  • Looks up existing attributes by name.
  • Creates new attribute records if none are found.
  • Returns the Airtable record IDs for all attributes, both existing and newly created.

These record IDs are then associated with the corresponding tools. This pattern ensures that attributes are consistently reused rather than duplicated, and that tools are always linked to a canonical attribute record.

Tool creation, hashing, and linking

Tools are stored in a separate Tools table. To ensure deterministic upserts, each tool is assigned a stable hash (for example, an MD5-style hash of the tool name). The workflow uses this hash to decide whether to create or update a record:

  • If a record with the same hash exists, it is updated with the latest attributes and relationships.
  • If no matching hash is found, a new tool record is created.

During this step, the workflow also:

  • Links tools to their associated attribute record IDs.
  • Resolves and links similar tools using self-referential relationships in the Tools table.

This approach yields a consistent, de-duplicated tool catalog that can be enriched over time as more logo sheets are processed.

Recommended Airtable schema

For predictable behavior and clean relationships, configure Airtable with two main tables: Attributes and Tools.

Attributes table

  • Name – Single line text, used as the primary matching key for attributes.
  • Tools – Linked records to the Tools table.

Using a simple text field for the name allows the n8n workflow to perform reliable lookups and upserts.

Tools table

  • Name – Single line text, human readable tool name.
  • Hash – Single line text, unique key derived from the tool name (for example, MD5 hash).
  • Attributes – Linked records to the Attributes table.
  • Similar – Linked records to the Tools table (self-link to represent similar or competitor tools).
  • Description, Website, Category – Optional metadata fields for enrichment.

This schema is optimized for deterministic upserts and for building a graph of tools and their relationships that can support analysis, reporting, or downstream automation.

Prompt engineering guidelines for the agent

The reliability of the workflow depends heavily on the quality of the AI agent’s output. When designing the system and user prompts, consider the following best practices:

  • Explicitly instruct the model to output JSON only, with no natural language commentary.
  • Provide a concrete example of the expected JSON schema, including field names and types.
  • State clearly that the input is an image containing logos and contextual layout, and that the model should extract names, plausible attributes, and visually indicated similarities.
  • Expose an optional prompt field in the form so users can add context, such as the meaning of the graphic or the market segment it represents.
  • Emphasize conservative inference: when the model is uncertain, it should use generic but accurate attributes such as AI infrastructure rather than fabricating specific features.

Example agent output

A typical response, after prompt tuning, might look like this:

{  "tools": [  {  "name": "airOps",  "attributes": ["Agentic Application", "AI infrastructure"],  "similar": ["Cognition", "Gradial"]  },  {  "name": "Pinecone",  "attributes": ["Storage Tool", "Memory management"],  "similar": ["Chroma", "Weaviate"]  }  ]
}

The Structured Output Parser node then normalizes this to the internal representation used for Airtable upserts.

Testing, debugging, and quality control

Before deploying at scale, it is important to validate the workflow with a variety of logo sheets and monitor how the AI agent and Airtable integration behave.

  • Missed logos: If some logos are not detected, try higher resolution images or cropping the relevant section. Vision models perform better with clear, high-quality inputs.
  • Inspect raw agent output: Use a JSON node or similar in n8n to view the unmodified agent response. This helps distinguish between parsing issues and Airtable integration issues.
  • Structured Output Parser errors: If JSON parsing fails frequently, adjust the prompt to be more explicit about the schema and JSON-only output, or tighten validation logic.
  • Attribute normalization: Watch for near-duplicates such as capitalization variants. You can normalize attribute names in the prompt (for example, instruct the model to output lowercase) or add a preprocessing step in n8n.

Scaling, performance, and reliability

As usage grows, consider the following operational aspects.

  • Rate limits: Both the LLM provider (for example, OpenAI) and Airtable enforce API rate limits. Implement retries and exponential backoff in n8n when you expect high throughput.
  • Batch processing: For large batches of images, use a queue-based design and process logo sheets asynchronously rather than synchronously at form submission time.
  • Human-in-the-loop: For high-stakes datasets, add a review step after AI extraction. A human reviewer can approve, correct, or reject parsed results before they are upserted into Airtable.

Privacy and security considerations

Logo sheets and accompanying context may contain sensitive information. Treat these assets according to your organization’s security and compliance policies.

  • Store API keys (OpenAI, Airtable, etc.) in environment variables or n8n credentials, not in plain text.
  • Restrict access to the /logo-sheet-feeder form endpoint if the data is confidential.
  • Ensure that any third-party AI provider is acceptable under your company’s data handling standards.

Advanced enhancements

Once the base workflow is stable, you can extend it with more advanced techniques to improve recall, precision, and monitoring.

  • Multi-agent verification: Run two different prompts or models against the same image and merge their outputs. This can improve coverage and help identify discrepancies.
  • OCR and vision hybrid: Combine traditional OCR results with the vision-language agent. Use OCR to capture exact text and the agent to interpret semantics and relationships.
  • Confidence scores: Ask the agent to return a confidence value for each tool or attribute. Use this to decide which records to auto-upsert and which to route for human review.

Deployment checklist

Before putting the workflow into production, verify the following steps:

  1. Configure your Airtable base with the Attributes and Tools tables and generate an Airtable API token. Add this token as credentials in n8n.
  2. Set up OpenAI or your chosen LLM provider credentials in n8n.
  3. Refine the agent system prompt to align with your specific use case, industry terminology, and language requirements.
  4. Activate the n8n workflow and test with several representative logo-sheet images.
  5. Review the raw JSON output and Airtable records, then iterate on prompt wording and normalization rules to minimize false positives and duplicates.

Conclusion and next steps

This AI Logo Sheet Extractor workflow provides an efficient and scalable way to convert visual logo sheets into a structured Airtable database using n8n, an AI parsing agent, and a robust upsert strategy. It is particularly effective for competitive intelligence, vendor mapping, market research, and any scenario where visual tool matrices are common.

Ready to automate your logo sheets? Import the workflow into n8n, connect your Airtable and OpenAI credentials, and start sending images to the /logo-sheet-feeder endpoint. If you need a preconfigured workflow file or support with prompt tuning and schema customization, reach out for a tailored implementation.

Automate Recipe Emails with n8n & Edamam

Automate Recipe Emails with n8n & Edamam

Ever stare at the fridge thinking, “What on earth am I going to cook today?” If you’re nodding, you’re not alone. Instead of scrolling endlessly through recipe sites, you can let n8n and the Edamam Recipe Search API do the work for you.

In this guide, we’ll walk through a ready-to-use n8n workflow template called “What To Eat”. It automatically looks up recipes from Edamam based on your preferences, turns them into a neat HTML email, and sends them to you on a schedule you choose. Think of it as a personal meal planning assistant that quietly does its thing in the background.

What this n8n recipe workflow actually does

Let’s start with the big picture. Once you import and configure the template, the workflow will:

  • Run automatically on a schedule you define (for example, every morning at 10:00)
  • Use your search criteria like ingredients, diet type, health filters, time, and calories
  • Optionally randomize diet and health options so you get some variety
  • Call the Edamam Recipe Search API to find matching recipes
  • Generate an HTML email with clickable recipe links
  • Send that email straight to your inbox

In other words, you wake up, open your email, and you’ve already got a curated list of recipes waiting for you.

Why bother automating recipes at all?

So, why use an automation like this instead of just Googling “quick dinner ideas” every day?

  • Less decision fatigue – You don’t have to think about what to search for or where to look.
  • Built-in meal inspiration – New ideas land in your inbox without you lifting a finger.
  • Diet-friendly suggestions – You can filter for specific diets or health preferences and let the workflow handle the details.
  • Perfect for planning – Use it as a daily or weekly nudge to plan meals in advance.

If you’re already using n8n for other automations, this is a fun, practical workflow to add to your toolkit.

How the workflow is structured in n8n

Now let’s peek under the hood. The workflow is built from a series of nodes that pass data along step by step. From left to right, you’ll see:

  • Cron – Triggers the workflow on a schedule you set, like every weekday at 10:00.
  • Search Criteria (Set) – Stores your default settings such as:
    • SearchItem (for example, “chicken”)
    • RecipeCount and ReturnCount
    • IngredientCount
    • CaloriesMin / CaloriesMax
    • TimeMin / TimeMax
    • AppID and AppKey for Edamam
  • Set Query Values (Function) – Assembles the calorie and time ranges, and can randomize diet and health filters if you set them to “random”.
  • Retrieve Recipe Counts (HTTP Request) – Calls Edamam to find out how many total recipes match your criteria.
  • Set Counts (Set) – Stores the total recipe count and sets how many recipes you actually want to receive.
  • Set Recipe ID Values (Function) – Picks a random slice of results so you are not seeing the same recipes every time.
  • Retrieve Recipes (HTTP Request) – Makes another Edamam API call to fetch the recipes for that slice.
  • Create Email Body in HTML (Function) – Loops through the recipes and builds the HTML email content.
  • Send Recipes (Email Send) – Sends the HTML email to your chosen recipient address.

Each node has a clear job, and together they handle everything from scheduling to sending the final email.

How the Edamam query works behind the scenes

The workflow relies on the Edamam Recipe Search API. When the HTTP Request nodes run, they send a query with several parameters that control what recipes you get back.

Here are the main query parameters used:

  • q – The main search term, such as "chicken" or "pasta".
  • app_id and app_key – Your Edamam API credentials.
  • ingr – Maximum number of ingredients allowed in a recipe.
  • diet – Diet filter, for example:
    • balanced
    • high-protein
    • low-carb
    • low-fat
  • calories – A range like "100-500" to control calorie counts.
  • time – A range in minutes, such as "0-30" for quick recipes.
  • from / to – Pagination indices that select which slice of results to return.

The workflow builds these values automatically based on the options you define in the Search Criteria node, so you do not need to craft URLs manually.

Key Function nodes explained in plain language

Two Function nodes provide the “brains” of the workflow. They are written in JavaScript, but you do not have to be a developer to understand what they do.

1. Set Query Values

This Function node takes your min and max values for calories and time and turns them into the range strings that Edamam expects. It also handles the “random” options for diet and health filters.

// Builds calories/time strings and randomizes diet/health when set to "random".
items[0].json.calories = items[0].json.CaloriesMin + "-" + items[0].json.CaloriesMax;
items[0].json.time = items[0].json.TimeMin + "-" + items[0].json.TimeMax;

// If Diet == "random", pick one from a list
// If Health == "random", pick one from a large health list

So if you set CaloriesMin to 300 and CaloriesMax to 700, this node will produce "300-700" for the API. If you set diet to “random”, it will choose one option from a predefined list each time the workflow runs.

2. Set Recipe ID Values

Once the workflow knows how many recipes match your query, this Function node chooses a random starting point in that list. That way, you are not stuck seeing the same top 10 recipes every day.

// Picks a random "from" index so returned recipes vary daily
items[0].json.from = Math.floor(Math.random() * items[0].json.RecipeCount) + 1;
items[0].json.to = items[0].json.from + items[0].json.ReturnCount;

The result is simple but powerful: each run can bring you a different page of recipes, even if your search term stays the same.

Step-by-step: importing and setting up the workflow in n8n

Ready to get this running in your own n8n instance? Here is how to set it up.

  1. Import the JSON template
    Open your n8n instance, go to the workflows area, and import the JSON file for the “What To Eat” template.
  2. Add your Edamam credentials
    Open the Search Criteria node.
    Replace the placeholder values for AppID and AppKey with your real Edamam API credentials.
  3. Choose your default preferences
    In the same node, set:
    • SearchItem – for example “chicken”, “vegan”, or “salad”.
    • RecipeCount / ReturnCount – how many recipes you want in total and how many to return at once.
    • IngredientCount – to limit how complex the recipes are.
    • CaloriesMin / CaloriesMax – your calorie range.
    • TimeMin / TimeMax – how long you are willing to spend cooking.
    • Optional diet and health filters, or set them to “random” for variety.
  4. Configure email sending
    Open the Send Recipes node and:
    • Connect a valid SMTP credential (for example Gmail or another email provider).
    • Set the “To” address where you want to receive the recipes.
    • Use environment variables or n8n credentials for your SMTP login instead of hard-coding them.
  5. Test the workflow
    Run the workflow manually once:
    • Check the HTTP Request nodes to confirm Edamam is returning data.
    • Look at the output of the HTML Function node to see the email body.
    • Adjust your search term, time, and calorie ranges if the results are too narrow or too broad.
  6. Set the schedule
    Edit the Cron node to run daily, weekly, or whatever cadence works best for your meal planning.

Sample HTML email structure used in the workflow

The Create Email Body in HTML node loops through all the recipe hits and builds a simple HTML list of links. You can customize it, but a richer example might look like this:

<div>  <h2>Today's Recipes</h2>  <ul>  <li><a href="RECIPE_URL">RECIPE_TITLE</a> <img src="RECIPE_IMAGE" alt="" width="120"/></li>  </ul>
</div>

As you customize, try to:

  • Use HTTPS image URLs for better email client support.
  • Add inline styles if you want consistent formatting across different email apps.
  • Keep the layout simple so it looks good on both desktop and mobile.

Security tips and best practices

Since this workflow touches external APIs and email, it is worth setting things up securely from the start.

  • Protect your Edamam keys
    Avoid putting AppID and AppKey directly in public code or repositories. Use n8n credentials or environment variables whenever possible.
  • Respect API limits
    Check your Edamam plan and stay within the rate limits. If needed, run the workflow less frequently or reduce the number of recipes requested.
  • Send emails responsibly
    If you send recipes to other people, include:
    • A clear subject and from address.
    • Unsubscribe instructions for mailing lists.

    This helps avoid spam issues.

  • Add error handling
    Consider using the Error Trigger node or conditional checks after HTTP requests. You can:
    • Retry failed requests.
    • Notify yourself via Slack or email if something breaks.

Ideas to upgrade your recipe automation

Once the basic workflow is working, you can start to get creative. Here are some enhancement ideas:

  • Include images in the email
    Add recipe.image to your HTML email body so each recipe has a thumbnail.
  • Save your favorites
    When you find a recipe you love, extend the workflow to push it into Airtable or Google Sheets for future reference and meal planning.
  • Send to multiple people
    Fork the workflow or loop through a list of recipients so different users can get their own personalized recipe emails with unique preferences.
  • Use other channels
    Instead of email, or in addition to it, post daily recipe suggestions to Slack, Microsoft Teams, or as push notifications.
  • Let users set their own preferences
    Connect an external form, like Typeform, to capture each user’s SearchItem, diet, and health filters, then feed those into the workflow dynamically.

Troubleshooting common issues

If something is not working quite right, here are some quick checks:

  • No recipes coming through?
    Open the HTTP Request node’s output and look at Edamam’s JSON response. It may include an error message or show that there are zero hits.
  • Authentication errors?
    Double-check your AppID and AppKey, and confirm that your Edamam plan covers the Recipe Search API and the rate you are using.
  • Empty results even with no errors?
    Try loosening your filters:
    • Use a broader search term.
    • Increase the time and calorie ranges.
    • Remove some diet or health filters to see if more recipes appear.
  • Email not arriving?
    Check the Send Recipes node for any error messages, verify SMTP settings, and look in your spam folder while you are testing.

Putting it all together

This n8n + Edamam “What To Eat” workflow is a simple way to bring personalized recipe ideas into your daily routine. It:

  • Runs on autopilot using a Cron trigger.
  • Respects your time, calorie, and ingredient preferences.
  • Uses Edamam’s Recipe Search API for high quality results.
  • Delivers everything in a clean HTML email that you can open from anywhere.

If you are looking for a practical automation project that actually makes your life easier, this is a great one to start with.

Give it a try:

  • Import the workflow into n8n.
  • Set your Edamam keys and SMTP credentials.
  • Run it once manually to see your first batch of recipes.

From there, you can customize it to save favorites, post to Slack, or share tailored recipes with your team or family.

Ready to automate your meal planning? Import the template, tweak your preferences, and let n8n handle the daily “What should I eat?” question for you.

n8n Developer Agent: Auto-Build Workflows

n8n Developer Agent: Auto-Build Workflows

Imagine describing the workflow you want in plain language, then watching it appear in n8n as a fully formed, importable automation. No more staring at blank canvases, no more wiring every node by hand. The n8n Developer Agent template turns that vision into something you can use today.

This guide is your journey from manual workflow building to a more automated, focused way of working. You will see how the template works, how to set it up, and how to use it as a launchpad for bigger automation goals in your team or business.

From “I should automate this” to “It is already done”

Most teams know they should automate more. The problem is time. Designing workflows, connecting nodes, and translating ideas into JSON can feel like a second job. As a result, great automation ideas stay stuck in notes, chats, and backlog tickets.

The n8n Developer Agent template is designed to break that bottleneck. It helps you:

  • Turn natural language ideas into working n8n workflows
  • Prototype faster so you can validate ideas early
  • Free up your focus for strategy, not just configuration

Instead of asking “Do I have time to build this automation?” you can start asking “What should I automate next?”

Adopting an automation-first mindset

Before we get into the technical details, it helps to shift how you think about building workflows. With an LLM-driven builder at your side, you are no longer the sole “workflow engineer”. You become more of a designer and reviewer.

Your role evolves from:

  • Manually assembling nodes to describing outcomes and constraints
  • Rebuilding similar flows repeatedly to reusing patterns and templates
  • Doing everything yourself to delegating the first draft to an AI agent

This mindset unlocks scale. You can explore more ideas, test more automations, and build a library of reusable workflows, all without multiplying your workload.

What is the n8n Developer Agent template?

The n8n Developer Agent is a multi-agent workflow template that connects a chat trigger, language models, memory, and a developer tool into a single system that produces complete n8n workflow JSON automatically.

You write what you want in natural language, the agent interprets it, designs the workflow structure, and, when configured correctly, creates the workflow in your n8n instance via the API. It is like having a junior automation engineer who drafts workflows for you around the clock.

Core benefits at a glance

  • Rapid prototyping – Convert natural language requirements into importable n8n workflows in minutes.
  • Reusable architecture – A modular structure combining chat, LLM, memory, and a developer tool that you can extend or customize.
  • Full auditability – Every generated workflow is a complete JSON object that you can review, adjust, and approve before using.

Inside the template: how the pieces work together

To confidently use and extend this template, it helps to understand its architecture. Think of it as two collaborating “zones”: a brain and a builder.

The two main zones

  • n8n Developer Agent (the brain) – Handles chat input, reasoning, memory, and tool orchestration.
  • Workflow Builder (the builder) – Receives a specification and turns it into valid n8n workflow JSON.

Messages flow from a chat trigger into the Developer Agent, which uses LLMs, memory, and tools to plan the workflow. That plan is then passed into a sub-workflow that generates the final JSON and sends it to your n8n instance.

Primary nodes in the template

  • When chat message received – The entry trigger that listens for user requests in a chat context.
  • n8n Developer – The central agent node that accepts chat input and orchestrates tools, memory, and LLMs.
  • GPT 4.1 mini / Claude Opus 4 – “Brain” nodes for design and reasoning. Configure one or both, depending on your LLM providers such as OpenRouter or Anthropic.
  • Developer Tool – A tool node or sub-workflow that takes the natural language specification and returns a full, importable n8n workflow JSON.
  • n8n node – Uses your n8n API credentials to create a new workflow in your instance from the generated JSON.
  • Google Drive / Extract from File – Optional nodes that pull in internal documentation, such as standards or reference docs, and convert them into plain text for the agent to use.

Once you see these parts as building blocks, you can start imagining your own extensions, extra checks, and custom tools layered on top.

Setting up the template: step-by-step journey

Now let us turn this potential into something that runs in your environment. You can follow these steps to go from “template JSON” to a working Developer Agent that builds workflows for you.

Step 1 – Import the template into n8n

Start by importing the provided JSON into your n8n instance. You can either:

  • Use the import feature and upload the JSON file, or
  • Create a new workflow and paste the JSON structure directly

After import, quickly verify that the workflow name, nodes, and connections look correct in the editor. This is your base canvas for everything that follows.

Step 2 – Connect your LLM providers

The Developer Agent relies on language models to interpret your requests and design workflows. Configure the LLM nodes according to the providers you use.

  1. OpenRouter or OpenAI-compatible provider
    Connect this as the main chat model that powers the n8n Developer agent. This model will handle the bulk of the reasoning and conversation.
  2. Anthropic (optional)
    If you want an additional “thinking” model or a second opinion for design validation, configure the Claude Opus 4 node using your Anthropic credentials.

By mixing providers, you can balance cost, performance, and reliability while still keeping a single, unified Developer Agent experience.

Step 3 – Add your n8n API credentials

To let the agent create workflows programmatically, you will need to connect the n8n node to your instance via API credentials.

  1. Create an n8n API credential in your n8n instance.
  2. Open the n8n node in the template.
  3. Select the credential so the node can authenticate when calling your API.

This is the bridge that turns “ideas” into actual workflows in your n8n environment.

Step 4 – Link supporting tools and documentation

To generate higher quality, more consistent workflows, you can feed the agent your own internal knowledge. This is where the Google Drive and Extract from File nodes come in.

  • Connect the Google Drive node with appropriate credentials.
  • Store your standards, best practices, or reference docs in a Google Doc or file.
  • Use the Extract from File node to convert that content into plain text that the agent can read.

By doing this, the Developer Agent can align new workflows with your existing conventions, not just generic patterns.

Step 5 – Configure the Developer Tool

The Developer Tool or sub-workflow is where the natural language specification is translated into concrete workflow JSON. For reliable results, it needs to follow a clear contract.

Ensure that your Developer Tool:

  • Accepts the user query or specification from the Developer Agent.
  • Returns a single, valid, importable JSON object.
  • Outputs only raw JSON, with no surrounding text, markdown, or commentary.
  • Follows the n8n workflow schema with the expected top-level keys:
    • name
    • nodes
    • connections
    • settings
    • staticData

This is the heart of the auto-building capability. Once this is configured correctly, the rest of the system can operate smoothly.

Step 6 – Test safely in a sandbox

Before you let the Developer Agent touch anything important, give it a safe playground. Use a test n8n environment where you can experiment freely.

  1. Start with a simple prompt, such as:
    “Build a workflow that copies new Google Drive files into Dropbox and sends me a Slack message.”
  2. Let the agent generate the workflow JSON.
  3. Inspect the JSON carefully inside n8n before saving or enabling it.

By iterating in a sandbox, you build confidence in the agent’s behavior, refine prompts, and establish your own standards for what “good” generated workflows look like.

Keeping things safe: security and operational best practices

As you scale your use of the Developer Agent, thoughtful safeguards will let you move faster without losing control.

  • Limit credentials Use scoped service accounts and tokens that restrict what the agent can do. Prefer read-only access where possible, especially when pulling reference data.
  • Review generated workflows Always inspect the JSON before enabling workflows in production. Treat the agent like a junior developer whose work you review.
  • Logging and monitoring Enable execution and error logging in your workflow settings so you maintain an audit trail of workflow creations and updates.
  • Access control Restrict access to the Developer Agent workflow to trusted users only. This keeps your automation surface secure while still empowering the right people.

Real-world ways to use the n8n Developer Agent

Once the template is running, you can start using it to accelerate both day-to-day work and long-term automation strategy.

1. Rapid workflow prototyping

Product, operations, and automation teams can quickly turn requirements into working workflow drafts. Instead of manually building every node and connection, they describe the goal and let the agent produce a first version.

This is especially powerful when you are exploring new ideas, testing integrations, or validating whether a process is worth fully automating.

2. Standardized templates at scale

If your organization has preferred patterns, naming conventions, or compliance rules, you can capture them in reference docs that the agent reads.

By keeping a canonical set of templates and best practices in the Developer Agent’s reference documentation, you can:

  • Enforce consistent structures across teams
  • Reduce one-off variations that are hard to maintain
  • Make new workflows feel familiar and predictable

3. Training and documentation through examples

The Developer Agent is also a powerful learning companion. You can ask it to generate example workflows that demonstrate how to use specific nodes or integrations.

This turns abstract documentation into concrete, runnable examples, which can be especially helpful for onboarding new team members or exploring unfamiliar APIs.

Troubleshooting: turning bumps into improvements

As you experiment, you may run into issues. Each one is a chance to refine your setup and strengthen your automation system.

  • Non-JSON output from the Developer Tool If the tool returns text with explanations or markdown, tighten the prompt so it clearly instructs the model to output only a raw JSON object and nothing else.
  • Workflows failing to import Validate the JSON structure for missing node parameters, invalid node types, or schema mismatches. The n8n API will reject malformed objects, so use errors as clues to adjust your prompts or validation logic.
  • Model hallucinations Reduce ambiguity by adding guardrails in the system message and supplying internal documentation. The clearer the constraints and examples, the more reliable the generated workflows become.

Extending the template as your ambitions grow

The architecture of the n8n Developer Agent is intentionally modular. Once you are comfortable with the basics, you can start evolving it into a more advanced automation platform tailored to your needs.

Ideas for extending the template:

  • Swap or add LLM providers Combine OpenAI, OpenRouter, and Anthropic models to balance cost and capabilities, or to specialize different models for different tasks.
  • Add verification steps Insert a static validator sub-workflow that checks generated JSON against company policies before creating or enabling workflows.
  • Integrate CI/CD Automatically commit generated JSON to a git repository, then run tests or linting as part of your deployment pipeline.

By layering these enhancements, you transform a single template into a core part of your automation ecosystem.

Final checklist before moving to production

Before you let the Developer Agent build workflows in your production environment, walk through this quick checklist:

  1. Confirm LLM credentials are stored securely, ideally in a vault or secret manager.
  2. Test the Developer Tool with multiple prompt formats and edge cases.
  3. Enable comprehensive workflow logging and monitoring in n8n.
  4. Restrict access to the Developer Agent workflow to trusted, trained users.

Once these foundations are in place, you can scale your use of the template with confidence.

Your next step: start small, then grow

You now have everything you need to turn the n8n Developer Agent template into a powerful ally in your automation journey. The most important step is the first one.

Here is a simple path to get started:

  1. Import the n8n Developer Agent template into a test n8n instance.
  2. Connect your LLM provider and n8n API credentials.
  3. Try a few small prompts that mirror tasks you already do manually.
  4. Review the generated JSON, refine your prompts, and iterate.

As you gain confidence, you can move from simple workflows to more complex automations, from one-off experiments to a growing library of reusable flows.

Tip: Keep a quick reference Google Doc with your preferred node configurations, naming conventions, and security rules. Pass this to the agent so it generates workflows that feel like they were built by your team from day one.

If you would like help crafting a strong initial prompt for your Developer Tool or designing a validation checklist for generated workflows, paste your prompt or requirements, and we can refine them together.

Automate Pinterest Analysis & AI-Powered Suggestions

Automate Pinterest Analysis & AI-Powered Content Suggestions

Transform Pinterest from a manual reporting channel into a scalable, data-driven content engine. This article describes a production-ready n8n workflow template that automatically retrieves Pins from the Pinterest API, centralizes them in Airtable, applies AI-driven analysis, and delivers recurring content recommendations directly to your marketing inbox.

Designed for marketing operations teams, growth leaders, and automation professionals, this guide explains the end-to-end architecture, key nodes, and implementation details so you can adapt the workflow to your own stack with confidence.

Why operationalize Pinterest analytics with automation?

Most teams still monitor Pinterest performance manually, which leads to incomplete data, inconsistent reporting, and missed optimization opportunities. By implementing an automated Pinterest analytics workflow in n8n you can:

  • Eliminate repetitive data collection and spreadsheet maintenance.
  • Identify top-performing creatives and recurring patterns significantly faster.
  • Generate AI-powered content ideas grounded in real account performance.
  • Align your content calendar with audience behavior using predictable, scheduled insights.

The result is a reliable, always-on feedback loop between what you publish and what your audience responds to, without adding manual overhead.

Solution architecture: n8n workflow at a glance

The template uses n8n as the orchestration layer to connect Pinterest, Airtable, and an AI provider such as OpenAI. At a high level, the workflow performs the following sequence:

  • Trigger on a fixed schedule (for example, weekly at 8:00 AM).
  • Query the Pinterest API v5 to retrieve a list of Pins from your account.
  • Normalize and tag the data for downstream analytics.
  • Upsert records into an Airtable base that serves as a historical dataset.
  • Pass the curated data to an AI agent for trend analysis and content ideation.
  • Compile the findings into a concise summary and email it to stakeholders.

The remainder of this article walks through each component in detail, along with implementation considerations and best practices for robust automation.

Core workflow components in n8n

1. Scheduled trigger configuration

The workflow starts with a scheduled trigger node, which defines when analytics and recommendations are generated. In the template, the schedule is configured for 8:00 AM once per week. You can adjust the cadence to match your planning cycle, for example:

  • Daily runs for high-volume accounts or rapid testing cycles.
  • Weekly or biweekly runs aligned with content planning meetings.

A consistent schedule ensures that your Airtable base evolves into a reliable time series dataset, which is critical for detecting trends such as seasonality, content fatigue, or emerging topics.

2. Retrieving Pins via Pinterest API v5

Once triggered, an HTTP Request node calls the Pinterest API endpoint:

GET https://api.pinterest.com/v5/pins

The request uses a valid Bearer token associated with your Pinterest app. Ensure that:

  • The token has the necessary scopes to read pin data.
  • Authentication is handled securely using n8n credentials and not hard-coded in the workflow.

Typical fields to request and store include:

  • id
  • created_at
  • title
  • description
  • link
  • Any available metrics such as impressions, saves, or clicks

For larger accounts, incorporate pagination and respect Pinterest API rate limits to avoid throttling or failed runs.

3. Data normalization and tagging

Raw API responses are not ideal for direct storage or analysis. The template uses a JavaScript (Function) node in n8n to:

  • Map each pin to a consistent schema, for example:
    • pin_id
    • title
    • description
    • link
    • created_at
  • Add a type field with the value "Organic" to differentiate from potential paid or other sources later.

This normalization step ensures that Airtable records remain clean and consistent, which simplifies downstream querying and AI prompts.

4. Upserting records into Airtable

The normalized dataset is then written to Airtable using either the native Airtable node or the Airtable API. The recommended pattern is to upsert records using pin_id as the unique key. This approach:

  • Prevents duplicate entries when the workflow runs multiple times.
  • Builds a coherent historical dataset that can be enriched with metrics over time.

A suggested Airtable schema includes fields such as:

  • pin_id
  • created_at
  • title
  • description
  • link
  • type
  • Metric fields like views, saves, clicks, and comments if available

Well-structured historical data is what enables the AI agent to detect patterns in topics, formats, and creative elements.

5. AI-driven analysis and content recommendations

Once Airtable has been updated, an AI node (for example, OpenAI in n8n) ingests either the full dataset or a filtered subset, such as the last 30 days or top-performing Pins by engagement. The AI agent is tasked with analyzing:

  • Recurring topics and themes that correlate with high engagement.
  • Creative treatments such as color palettes, overlay text styles, and imagery that perform well.
  • CTA phrasing and posting times associated with improved metrics.

The AI then outputs prioritized, actionable suggestions, which can include:

  • New pin concepts with working titles and descriptions.
  • Recommended boards or hashtags to target.
  • Adjustments to creative or copy based on observed performance.

For best results, allow the system to collect at least 4-8 weeks of data before relying on long-term patterns and strategic recommendations.

6. Summarization and email delivery

To keep stakeholders focused on decisions rather than raw data, the workflow uses a summary LLM step to compress the AI analysis into a digestible brief. This summary might include:

  • Key performance trends since the last report.
  • Top-performing Pins and why they worked.
  • A shortlist of recommended content ideas for the upcoming period.

An Email node in n8n then sends this digest to the designated marketing owner or distribution list. Over time, this becomes a recurring intelligence report that feeds directly into content planning, without any manual compilation.

Prompt design: what to ask your AI agent

The quality of AI-generated insights depends heavily on how you frame the task. When configuring your AI node, provide explicit instructions and context. Example prompt patterns include:

  • “Identify recurring themes in Pins that reached the top 20% engagement in the last month.”
  • “Propose 5 new Pin concepts, each with a title, short description, and suggested board, optimized to drive clicks to our blog.”
  • “Highlight creative treatments, such as color palettes or overlay text formats, that correlate with higher saves.”

Include relevant context in the prompt, such as:

  • Date ranges (for example, “last 30 days”).
  • Primary success metrics (traffic, saves, sign-ups).
  • Thresholds for “top performance” (for example, “top 20% by engagement rate”).

Refine prompts iteratively if suggestions appear generic. Providing richer, more specific data and clear objectives will significantly improve output quality.

Sample AI-generated Pinterest content ideas

Below are representative examples of the type of suggestions the AI agent can generate based on your performance data:

  • Listicle-style Pins: For example, “7 Quick Kitchen Hacks”, using bold overlay text on a 2:3 vertical image, with a concise description and a clear CTA to read the full blog post.
  • Before/after carousels: Visual transformations supported by a short, story-driven caption and a direct CTA to the relevant product or service page.
  • How-to infographics: Step-by-step visuals with numbered overlays, branded color accents, and alt text optimized for relevant keywords.

The exact recommendations will vary by niche, but the underlying pattern is consistent: the AI uses historical performance to suggest content that is more likely to resonate with your audience.

Key Pinterest metrics for optimization

To evaluate the impact of your automated workflow and AI recommendations, track a focused set of Pinterest metrics inside Airtable and downstream BI tools:

  • Impressions and reach: Indicators of content exposure and distribution.
  • Saves and closeups: Signals of content interest and relevance.
  • Outbound clicks and link clicks: Direct measures of traffic generation and conversion potential.
  • Engagement rate: For example, (saves + clicks) / impressions, which normalizes performance across Pins with different reach.

Monitoring these metrics over time allows you to validate whether AI-driven suggestions are improving outcomes and where additional experimentation is required.

Operational best practices for this n8n workflow

  • Respect API rate limits: Implement pagination and conservative scheduling for large accounts to stay within Pinterest API quotas.
  • Secure token management: Use OAuth 2.0 or secure service tokens and store all credentials in n8n’s credential manager. Avoid committing tokens to version control or sharing them in documentation.
  • Schema design in Airtable: Maintain a clear, extensible schema that includes identifiers, timestamps, core metadata, and metrics. This simplifies both manual review and automated analysis.
  • Data retention strategy: Retain enough historical data to analyze seasonality and content lifecycle, while adhering to organizational and regulatory policies.
  • Evaluation window: Allow at least 4-8 weeks of consistent data collection before drawing conclusions about long-term trends or AI recommendation quality.

Security, compliance, and privacy considerations

Although this workflow primarily handles Pinterest content and performance metrics, you should still apply standard data protection practices:

  • Store only the data required for analytics and optimization.
  • Follow Pinterest platform policies and your organization’s internal governance guidelines.
  • If any user data or PII is involved, ensure compliance with GDPR, CCPA, and other relevant regulations, and use secure storage and encryption where appropriate.

Troubleshooting common implementation issues

  • Empty or partial API responses: Confirm that your access token has the correct scopes and that the Pinterest account has Pins available. Test the endpoint using tools like curl or Postman to isolate configuration issues.
  • Duplicate records in Airtable: Ensure that the Airtable node is configured to upsert based on pin_id rather than creating new rows on every run.
  • Generic or low-value AI suggestions: Improve prompt specificity, provide clear performance thresholds, and include representative samples of top Pins in the AI context. More structured data and clearer objectives typically yield better insights.

Deploying the n8n Pinterest analytics template

To operationalize this workflow in your own environment:

  1. Import the provided n8n template.
  2. Configure Pinterest credentials with the required read scopes.
  3. Create an Airtable base and table aligned with the recommended schema.
  4. Connect your OpenAI (or equivalent) API key in n8n for the AI nodes.
  5. Run the workflow manually once to validate:
    • Successful data retrieval from Pinterest.
    • Correct record creation or updates in Airtable.
    • Delivery of the email summary to the intended recipients.
  6. Adjust the schedule to your preferred cadence and monitor the first few runs for stability.

Call to action: If you are ready to convert Pinterest into a continuous source of actionable creative intelligence, import the n8n template, connect your Pinterest and Airtable accounts, and schedule your first automated report. For teams that need help with implementation details, prompt engineering, or customization, expert support is available.

Request implementation helpDownload template


Keywords: Pinterest API automation, Pinterest analytics, AI content suggestions, n8n Pinterest workflow, Airtable Pinterest integration.

Build a Visa Requirement Checker with n8n

Build a Visa Requirement Checker with n8n, LangChain & Weaviate

This guide walks you through building a practical, AI-powered Visa Requirement Checker using n8n as the automation layer, Cohere for embeddings, Weaviate as a vector database, an LLM chat model for reasoning, and Google Sheets for logging. You will learn how to go from raw visa policy documents to a working workflow that answers traveler questions and keeps an auditable history of responses.

What You Will Learn

By the end of this tutorial, you will be able to:

  • Design an n8n workflow that responds to visa questions via a webhook
  • Split long visa policy documents into chunks suitable for embeddings
  • Create and store Cohere embeddings in a Weaviate vector store
  • Query Weaviate to retrieve relevant policy snippets using semantic search
  • Use an LLM-based agent with memory to generate clear, policy-backed answers
  • Log every query and answer to Google Sheets for audits and analytics
  • Apply best practices for metadata, chunking, security, and scaling

Why Build a Visa Requirement Checker?

Visa rules change frequently and depend on many variables, such as:

  • Traveler nationality
  • Destination country
  • Passport type
  • Reason for travel
  • Planned length of stay

Manually checking embassy websites or internal documents does not scale, especially for support teams that handle many similar questions. An automated Visa Requirement Checker built on n8n helps you:

  • Provide consistent, fast answers to travelers and internal agents
  • Reduce repetitive manual research
  • Maintain a clear audit trail of what was answered and why
  • Combine structured filters (such as nationality) with semantic understanding of policy text

Conceptual Architecture

Before we configure nodes in n8n, it helps to understand how the main components work together. At a high level, the system follows this flow:

  1. A client (UI or API) sends a POST request with traveler details to an n8n webhook.
  2. Policy documents are preprocessed: split into chunks, embedded with Cohere, and stored in Weaviate with metadata.
  3. For each incoming question, the workflow embeds the query and searches Weaviate for relevant chunks.
  4. An LLM-based agent receives the retrieved context, uses memory for multi-turn conversations, and crafts an answer.
  5. The workflow logs the query and response to Google Sheets for compliance and analytics.

Main Components

  • Webhook (n8n) – entry point that receives POST requests from your application or frontend
  • Text Splitter – breaks long visa policy documents into manageable chunks
  • Embeddings (Cohere) – converts text chunks into numerical vectors
  • Weaviate Vector Store – stores vectors with metadata and supports semantic and hybrid search
  • Agent + Chat model (Anthropic or similar) – uses retrieved context to reason and answer questions
  • Memory – keeps short-term conversation history for multi-step interactions
  • Google Sheets – append-only log of questions, answers, and key details

Step-by-Step n8n Workflow Guide

In this section, we will walk through the main workflow in n8n, from the incoming request to the final logged response.

Step 1 – Configure the Webhook Node

The webhook is the public entry point into your Visa Requirement Checker.

  • Node: Webhook
  • Method: POST
  • Path: visa_requirement_checker

The payload should include all the attributes the model needs to reason about visa rules. A typical JSON body might look like:

{  "nationality": "India",  "destination": "Germany",  "passport_type": "Regular",  "travel_reason": "Tourism",  "stay_duration_days": 10
}

You can add more fields as needed, but avoid sending sensitive identifiers like passport numbers into the vector database or logs.

Step 2 – Prepare and Split Visa Policy Documents

Before you can answer questions, you must ingest your policy sources (for example embassy pages, official PDFs, or internal guidelines). This is usually done in a separate preprocessing workflow, but the logic is the same:

  • Collect raw text from policy documents.
  • Send the text into a Text Splitter node.

Typical configuration for the splitter:

  • chunkSize: 400 characters
  • chunkOverlap: 40 characters

Chunking helps:

  • Stay within embedding token limits
  • Improve retrieval quality by focusing on smaller, relevant passages
  • Avoid missing context by keeping a small overlap between chunks

Step 3 – Generate Embeddings with Cohere

Each chunk from the splitter is passed to an Embeddings node.

  • Node: Embeddings
  • Model: cohere (configure with your Cohere API key)

The node converts each text chunk into a vector representation. Along with the vector, it is crucial to attach metadata that will help with filtering later. Typical metadata fields include:

  • Country or region (for example Germany)
  • Traveler nationality or group, if applicable
  • Document type (for example embassy policy, bilateral agreement)
  • Source URL or document ID
  • Effective date or last updated date
  • Language

This metadata is stored together with the vector in Weaviate and becomes very important for precise retrieval.

Step 4 – Insert Vectors into Weaviate

Once you have embeddings and metadata, you can store them in a Weaviate index.

  • Node: Weaviate Insert
  • indexName: visa_requirement_checker

Weaviate acts as your semantic knowledge base. It supports:

  • Similarity search using embeddings
  • Metadata filters (for example country = "Germany")
  • Hybrid queries that combine keyword and semantic search

For a visa checker, hybrid and filtered searches are very helpful, for example:

  • Filter by destination_country = "Germany"
  • Filter by nationality = "India" when policies differ by origin
  • Filter by effective_date to avoid outdated rules

Step 5 – Query Weaviate When a Question Arrives

When the webhook receives a new query, you need to search Weaviate for relevant policy chunks.

  1. Take the traveler question and context from the webhook payload.
  2. Generate an embedding for that question using the same Cohere model used for document embeddings.
  3. Use a Weaviate Query node to perform a semantic search against the visa_requirement_checker index.
  • Node: Weaviate Query
  • indexName: visa_requirement_checker

Combine the query embedding with metadata filters. For example, you might filter on:

  • destination_country = "Germany"
  • traveler_nationality = "India"
  • effective_date <= today

The query returns the top matching chunks, which you pass to the agent as a tool or context input. These chunks act as evidence for the final answer.

Step 6 – Add Memory and a Chat Model

Many visa conversations are multi-step. The traveler might ask follow-up questions like:

  • “What about business travel instead of tourism?”
  • “Does this apply to multiple entries?”

To handle this, you attach a memory component to your chat model so it can reference previous turns.

  • Node: Chat (LLM)
  • Model: Anthropic or another chat LLM

The chat model receives:

  • The traveler question and attributes from the webhook
  • The retrieved policy chunks from Weaviate
  • The conversation history from the memory buffer

Its job is to generate a clear, policy-backed response. You can instruct the model to cite specific documents or chunks when needed, and to be explicit about uncertainty.

Step 7 – Orchestrate with an Agent and Log to Google Sheets

The Agent node coordinates tool calls (such as Weaviate search) and parses the final response into a structured format.

After the agent produces an answer, you log the interaction:

  • Node: Google Sheets
  • operation: append
  • documentId: SHEET_ID
  • sheetName: Log

Typical fields to log include:

  • Timestamp
  • Nationality, destination, passport type, travel reason, stay duration
  • Original question text
  • Model verdict (visa required or visa-free)
  • Short explanation
  • Confidence score
  • References or URLs used

This creates an audit trail that can be reviewed for quality, compliance, and analytics.

Sample Response Format for the Agent

To make downstream processing easier, design the agent to return a structured JSON object. For example:

  • Verdict (visa required or visa-free)
  • Short explanation
  • Relevant citations with titles, excerpts, and URLs
  • Confidence score
  • Recommended next steps
{  "verdict": "Visa required",  "explanation": "Holders of Indian passports require a Schengen visa for stays over 90 days.",  "citations": [  {"title": "German Embassy Policy", "url": "https://...", "excerpt": "Visitors from India require..."}  ],  "confidence": 0.89,  "next_steps": "Apply at the nearest German embassy or consulate."
}

You can then log this JSON directly to Google Sheets or transform it into another format for your frontend.

Key Configuration Summary

Here is a quick reference of important node settings so you can map them into your own n8n instance:

  • Webhook node: method = POST, path = visa_requirement_checker
  • Text Splitter node: chunkSize = 400, chunkOverlap = 40
  • Embeddings node: model = cohere, with Cohere API credentials
  • Weaviate Insert/Query nodes: indexName = visa_requirement_checker
  • Chat node: model = Anthropic or another chat LLM
  • Google Sheets node: operation = append, documentId = SHEET_ID, sheetName = Log

Best Practices for Accurate Visa Automation

Use Rich Metadata

Metadata is one of your strongest tools for improving accuracy. For each vector, include fields such as:

  • Destination country
  • Relevant nationality or traveler category
  • Document type (policy, FAQ, legal text)
  • Effective date and expiry date if applicable
  • Language and jurisdiction

Rich metadata helps prevent “cross-country policy leakage”, where rules for one country are mistakenly applied to another.

Choose Chunk Size Carefully

Chunk size affects both performance and quality:

  • Around 400 characters with 40 character overlap is a good starting point.
  • Smaller chunks can give more targeted retrieval but may lose context.
  • Larger chunks can preserve context but increase embedding cost and may mix unrelated rules.

Experiment with chunk sizes and evaluate retrieval relevance on real visa queries.

Combine Semantic and Exact Filters

Hybrid search is powerful for visa rules because you often know some exact attributes in advance. Combine:

  • Semantic similarity on the question text
  • Filters like nationality, destination_country, passport_type, and effective_date

This reduces the chance of retrieving unrelated but semantically similar text.

Promote Safety and Truthfulness

Visa decisions can have serious consequences. Encourage safe behavior by:

  • Including references or citations with each answer
  • Providing a confidence score when possible
  • Advising users to confirm critical decisions with an official consulate or embassy, especially when the model is uncertain

Troubleshooting Common Issues

Low Relevance or Incorrect Results

If the answers do not match the expected visa rules, check the following:

  • Embedding model consistency: Ensure you use the same Cohere embedding model for both insertion and query. Mixing models usually degrades performance.
  • Metadata filters: Add or tighten filters such as country, nationality, and date ranges to narrow down the candidate set.
  • Chunking strategy: Try different chunk sizes or overlaps. Very small or very large chunks can cause irrelevant retrieval.

Rate Limits and Cost Management

Embedding and chat model calls often dominate cost. To keep this under control:

  • Cache embeddings for frequently asked questions or common country combinations.
  • Batch vector inserts instead of sending each chunk individually.
  • Use caching with a time-to-live (TTL) for popular answers to reduce repeated LLM calls.

Security and Compliance Considerations

Visa data can be sensitive, especially when it includes personal identifiers. Follow these guidelines:

  • Store only non-sensitive information in vector stores and logs.
  • Avoid embedding or logging passport numbers,

Backup n8n Workflows to Gitea (Automated Guide)

Backup n8n Workflows to Gitea (Automated Guide)

Imagine spending hours perfecting your n8n workflows, only to lose them because of a bad update, accidental deletion, or a migration gone wrong. Not fun, right?

This is exactly where an automated backup to Gitea saves the day. In this guide, we will walk through a ready-to-use n8n workflow template that regularly exports all your workflows and commits them to a Gitea repository. You will see what the template does, when to use it, and how to set it up step by step, all in a practical and friendly way.

By the end, you will have a production-ready backup system that quietly runs in the background and keeps your workflows safe, versioned, and easy to restore.

What This n8n – Gitea Backup Template Actually Does

Let us start with the big picture. This n8n template:

  • Automatically pulls all workflows from your n8n instance using the n8n API
  • Iterates over each workflow and converts it into a JSON file
  • Checks your Gitea repository to see if that workflow file already exists
  • Creates a new file if it is missing, or updates it only when there are real changes
  • Commits everything to Git so you get a full version history of your workflows

Everything runs on a schedule you control, so once it is configured, you can mostly forget about it and enjoy automatic, versioned backups.

Why Back Up n8n Workflows to Gitea?

You might be wondering, why Gitea specifically? If you are already using Git for code, backing up n8n workflows to a Git-based system like Gitea feels very natural.

Gitea is a lightweight, self-hosted Git service that is perfect for storing workflow JSON files. Combined with this n8n automation, you get:

  • Versioned history – Every workflow change is tracked, so you can roll back or audit changes easily.
  • Automatic backups on a schedule – No more manual exports or “oops, I forgot to back that up”.
  • Self-hosted control – Keep everything on your own infrastructure with Gitea access management.
  • Team-friendly – Share, review, and protect workflows with Git workflows and permissions.
  • Cost-effective – Gitea is lightweight and great for teams that want control without heavy overhead.

In short, this template turns your n8n instance into something that behaves more like a codebase, with proper version control and safety nets.

How the Workflow Template Works Behind the Scenes

Now let us peek under the hood. The backup flow is built using standard n8n nodes plus a bit of logic to keep things efficient and clean.

High-level flow

On a regular schedule, the workflow:

  1. Triggers at the configured interval.
  2. Calls the n8n API to fetch all workflows.
  3. Loops through each workflow one by one.
  4. Builds a file name for that workflow (for example, My Workflow.json).
  5. Checks Gitea to see if that file already exists in the repo.
  6. If it does not exist, creates a new file with base64-encoded JSON.
  7. If it exists, compares the content and only commits an update if something has changed.

Core nodes and what they handle

  • Schedule Trigger – Starts the backup every X minutes or on whatever schedule you choose.
  • n8n (API Request) – Calls your n8n instance to retrieve all workflows.
  • ForEach / splitInBatches – Iterates through each workflow item so you can process them individually.
  • GetGitea – Uses the Gitea Contents API to check if a file already exists at a given path.
  • Exist (IF) – Branches the logic to either create a file or update an existing one based on the HTTP response.
  • Base64Encode (Code) – Pretty-prints the workflow JSON and encodes it in base64, which is what the Gitea API expects.
  • PostGitea / PutGitea – Sends POST requests to create new files or PUT requests to update existing ones.
  • Changed (IF) – For updates, compares the base64 content in Gitea with the new base64 content so you avoid unnecessary commits.

The result is a clean Git history with one commit per actual change, not one per run.

Before You Start: What You Need

To use this n8n workflow template effectively, you will need:

  • A running n8n instance with access to the Credentials Manager
  • A Gitea server you can reach from n8n
  • Permissions to create repositories and personal access tokens in Gitea

Once you have those, you are ready to set things up.

Step-by-step Setup Guide

1. Create a repository in Gitea

First, you need a place to store your backups.

  1. In Gitea, create a new repository, for example: workflows.
  2. Choose the appropriate owner (your user or an organization).
  3. If your workflows are sensitive, set the repository to private.

This repo will end up with one JSON file per workflow, plus any extra metadata you decide to add later.

2. Generate a Gitea Personal Access Token

The workflow will authenticate to Gitea using a personal access token.

  1. In Gitea, go to Settings → Applications.
  2. Click Generate Token.
  3. Give it a descriptive name, such as n8n-backup.
  4. Grant it repository read/write (repo) permissions.
  5. Generate the token and copy it right away. You will not be able to view it again later.

3. Store the token in n8n credentials

Never hardcode tokens in workflows. Instead, store them as credentials in n8n.

In the n8n Credentials Manager, create a new credential of type HTTP Header Auth (or a similar type that fits your setup):

Name: Gitea Token
Header: Authorization
Value: Bearer YOUR_PERSONAL_ACCESS_TOKEN

Note: Include a space after "Bearer".

You will reference this credential from your HTTP nodes that talk to Gitea.

4. Configure global repository variables

The template uses a Globals (or similar configuration) node to store values used across multiple nodes. This keeps your setup clean and easy to maintain.

Set the following variables:

repo.url = https://git.example.com
repo.owner = your-user-or-org
repo.name = workflows

Replace these with your actual Gitea URL, owner, and repository name. Other nodes can then reference repo.url, repo.owner, and repo.name instead of repeating them.

5. Wire up the workflow nodes

Now connect everything according to the provided template. While you do not have to reinvent the structure, there are a few important details to watch out for:

  • n8n API node
    Configure it to authenticate against your n8n instance and retrieve all workflows. Make sure the base URL and credentials are correct.
  • File naming
    For each workflow, build a safe file name. A simple pattern is:
    {{ $json.name }}.json

    or similar, depending on how you reference the workflow name in the node. Avoid characters that do not work well in file paths.

  • Gitea Contents API call
    To check if a file exists, use:
    GET /api/v1/repos/{owner}/{repo}/contents/{path}

    The {path} is usually your workflow JSON file path, for example My Workflow.json or a nested path like workflows/My Workflow.json.

  • Handling existing files
    When the file exists, read the content (base64-encoded) and the sha. The sha is required for updates, and the content lets you compare old vs new versions.
  • Encoding workflow JSON
    Before sending workflow data to Gitea, pretty-print the JSON and base64-encode it. This is handled by a Code node in the template, so you get readable diffs in Git.
  • Skip unchanged content
    On updates, compare the new base64 content with the existing base64 content. If they match, you can skip committing to avoid cluttering your history.

Once everything is wired and credentials are attached, your workflow is structurally ready.

Gitea API Requests Used by the Template

The template talks to Gitea using the Contents API. If you ever need to debug or extend it, it helps to know the exact endpoints.

Create a new workflow file (POST)

POST /api/v1/repos/:owner/:repo/contents/:path
Body: { "content": "<base64>", "message": "Add workflow: my-workflow.json" }

Here:

  • :owner is your user or organization
  • :repo is the repository name, for example workflows
  • :path is the file path inside the repo, like my-workflow.json
  • content is the base64-encoded JSON
  • message is the commit message

Update an existing workflow file (PUT)

PUT /api/v1/repos/:owner/:repo/contents/:path
Body: { "content": "<base64>", "sha": "<file-sha>", "message": "Update workflow: my-workflow.json" }

When updating, the sha of the existing file is required. This is why the GetGitea node first fetches the current file metadata.

How the Workflow Handles JSON Encoding

Plain JSON is not enough for the Gitea contents endpoint. It expects the file content as base64-encoded text. To make your Git diffs readable, the template does two small but important things:

  1. Pretty-prints the workflow JSON with consistent indentation (for example, 2 or 4 spaces). This makes Git diffs easy to review.
  2. Base64-encodes the UTF-8 bytes of that pretty-printed JSON string so it matches what Gitea expects.

A small Code node in the workflow is responsible for this. As long as you keep the indentation consistent, your diffs will be clean and your content comparisons reliable.

Testing Your Backup Workflow

Before you switch on the schedule and walk away, it is worth running a few quick checks.

  • Manual test run
    Execute the workflow manually in n8n and verify that a file appears in your Gitea repo for each workflow.
  • Check commit messages and timestamps
    Make sure the commit messages are informative. You can include workflow ID, name, or version in the message if you like.
  • Change detection
    Edit one of your n8n workflows, then run the backup workflow again. Confirm that:
    • A new commit is created for the changed workflow
    • Unchanged workflows do not get new commits
  • Enable the Schedule Trigger
    Once you are happy with the behavior, turn on the Schedule Trigger so the backup runs automatically.

Troubleshooting Common Issues

If something does not work on the first try, you are not alone. Here are some frequent issues and how to handle them.

  • 401 or 403 errors
    Authentication issues usually mean the token header is not quite right. Double-check that you are using:
    Authorization: Bearer YOUR_TOKEN

    and that your token has the required repo permissions.

  • 404 from GetGitea
    A 404 often just means the file does not exist yet, which is fine on the first run. If you expected it to exist, verify:
    • The filename and path match exactly what you see in the repo
    • Your repo.owner, repo.name, and repo.url are correct
  • Encoding problems
    Make sure you are base64-encoding the UTF-8 bytes of the pretty-printed JSON. If the content comparison seems off, confirm that the same formatting is used every time.
  • Very large workflows
    Gitea has file size limits. If your workflows are extremely large, consider:
    • Splitting them into smaller parts
    • Compressing or pruning non-essential data before backup
  • Rate limits with many workflows
    If you have hundreds of workflows, you might hit API throttling. In that case, try:
    • Using splitInBatches to process smaller groups
    • Adding small delays between requests

Security & Best Practices

Since this workflow touches both your automations and your Git server, it is worth setting it up with security in mind.

  • Keep tokens in credentials
    Always store your Gitea token in n8n credentials, not in plain workflow variables or code.
  • Use a dedicated service account
    In Gitea, create a user or service account specifically for n8n backups with only the repo access it needs.
  • Limit repository visibility
    Set the backup repo to private and use branch protection rules if you are working with multiple branches.
  • Rotate tokens periodically
    Regenerate your personal access token from time to time and keep track of where it is used.

Ideas for Extending the Backup Workflow

Once you have the basic backup flow working, you can easily build on top of it. Here are a few ideas:

  • Metadata index file
    Maintain an index.json file that lists workflow IDs, names, timestamps, and last commit SHAs for quick reference.
  • Use a dedicated backups branch
    Instead of committing directly to main, push changes to a backups branch and open pull requests for review.
  • Handle sensitive data carefully
    If your workflows contain secrets, consider encrypting the JSON before storing it, or better, stripping out secrets before export.
  • Notifications on failures or

AI Agent to Chat with YouTube in n8n

5minAI banner

AI Agent to Chat with YouTube in n8n

Introduction

This guide explains how to implement a production-grade AI agent in n8n that can interact with YouTube data in a conversational way. The workflow combines the YouTube Data API, Apify, OpenAI, and Postgres to deliver an end-to-end automation that:

  • Fetches and analyzes YouTube channel and video metadata
  • Transcribes video content
  • Evaluates and critiques thumbnails
  • Aggregates and interprets viewer comments
  • Maintains chat context across sessions using persistent memory

The result is an AI-powered YouTube analysis agent that creators, growth teams, and agencies can use to generate content ideas, optimize thumbnails, and understand audience sentiment at scale.

Business context and value

For most YouTube-focused teams, three operational challenges recur:

  • Audience intelligence – Identifying what viewers care about based on real comments and engagement signals.
  • Content repurposing – Turning long-form video content into blogs, social posts, and short-form formats efficiently.
  • Creative optimization – Iterating on thumbnails and titles to improve click-through rates and watch time.

This n8n-based AI agent addresses those challenges by centralizing data retrieval and analysis. It leverages:

  • YouTube Data API for channel, video, and comment data
  • Apify for robust video transcription
  • OpenAI for language understanding and image analysis
  • Postgres for chat memory and multi-session context

Instead of manually querying multiple tools, users can ask the agent questions such as “What content opportunities exist on this channel?” or “How should we improve our thumbnails?” and receive structured, actionable outputs.

Solution overview and architecture

The solution is organized into two main components:

  • The AI agent workflow – A LangChain-based n8n agent node that receives user prompts, decides which tools to invoke, and synthesizes final responses.
  • Supporting tool workflows – A collection of specialized nodes and subflows that perform concrete tasks such as API calls, transcription, comment aggregation, and thumbnail analysis.

Core components and integrations

  • n8n Agent node (LangChain Agent) – Orchestrates tool calls, interprets user prompts, and composes final answers.
  • YouTube Data API via HTTP Request nodes – Retrieves:
    • Channel details
    • Video lists
    • Video metadata and statistics
    • Comments and replies
  • Apify actor – Executes video transcription based on the video URL.
  • OpenAI (chat and image models) – Handles summarization, topic extraction, sentiment analysis, and thumbnail critique.
  • Postgres Chat Memory – Stores conversation history and contextual data across sessions.

Key capabilities of the workflow

The template is designed to support a broad range of expert-level YouTube analysis tasks. Key features include:

  • Retrieve channel details using a handle or full channel URL.
  • List videos with filtering and ordering options (for example, by date or relevance).
  • Fetch detailed video metadata, including descriptions, statistics, and runtime.
  • Collect top-level comments and replies for deeper audience analysis.
  • Transcribe video content through Apify and feed transcripts to OpenAI.
  • Evaluate thumbnails using OpenAI image analysis with structured critique prompts.
  • Persist conversation context in Postgres for consistent, multi-turn interactions.

Prerequisites and credential setup

Before importing or running the workflow, configure credentials for all external services inside n8n. Using n8n’s credential system is critical for security and maintainability.

1. Required APIs and accounts

  • Google Cloud
    • Create a project in Google Cloud Console.
    • Enable the YouTube Data API.
    • Generate an API key and store it as a credential in n8n.
  • Apify
    • Create an Apify account.
    • Generate an API token to run transcription actors.
    • Add the token as an Apify credential in n8n.
  • OpenAI
    • Create an API key with access to both chat and image models.
    • Configure the key in n8n’s OpenAI credentials.
  • Postgres
    • Provision a Postgres database instance.
    • Create a dedicated database or schema for chat memory.
    • Add connection details (host, port, database, user, password) to n8n credentials.

2. Updating core n8n nodes

The template includes preconfigured nodes that must be adjusted to match your environment and API keys. Key nodes include:

  • Get Channel Details
    • Uses the YouTube channels endpoint.
    • Accepts either a channel handle (for example, @example_handle) or a channel URL.
    • Returns channel metadata including channelId, used downstream.
  • Get Videos by Channel / Run Query
    • Uses the YouTube search endpoint.
    • Supports ordering (for example, by date) and filters such as publishedAfter.
    • Provides a list of videos for the specified channel.
  • Get Video Description
    • Calls the videos endpoint.
    • Retrieves snippet, contentDetails, and statistics.
    • Enables filtering out shorts by inspecting video duration.
  • Get Comments
    • Requests top-level comments and replies for a given video.
    • Configured with maxResults=100 for each call.
    • Can be extended with pagination logic to cover larger comment volumes.

Advanced processing: transcription, thumbnails, and comments

3. Video transcription with Apify

For long-form analysis and content repurposing, transcription is essential. The workflow uses an Apify actor to:

  • Accept a YouTube video URL as input.
  • Run a transcription job via Apify.
  • Wait for completion and return a full text transcript.

This transcript is then available as input for OpenAI to perform tasks such as summarization, topic extraction, or generating derivative content formats.

4. Thumbnail analysis with OpenAI

The workflow evaluates thumbnails by sending the thumbnail URL to an OpenAI-compatible vision model. A structured prompt is used to guide the analysis, for example:

Assess this thumbnail for:
- clarity of message
- color contrast
- face visibility
- text readability
- specific recommendations for improvement

The AI agent then returns an actionable critique, including suggested improvements and alternative concepts aligned with click-through optimization best practices.

5. Comment aggregation and insight extraction

Viewer comments are often noisy but provide high-value qualitative insight. The workflow:

  • Collects comments and replies for selected videos.
  • Aggregates them into a structured payload.
  • Passes the aggregated content to OpenAI for analysis.

Typical outputs include:

  • Common praise and recurring complaints
  • Frequently requested features or topics
  • Sentiment distribution and notable shifts
  • Potential titles or hooks derived from real viewer language

How the n8n AI agent orchestrates tasks

The LangChain-based agent node is the central controller of this workflow. It accepts a natural language input and dynamically selects the appropriate tools to execute.

End-to-end flow

For a request such as: “Analyze channel @example_handle for content opportunities and summarize top themes.” the agent typically performs the following steps:

  1. Parse the intent
    • Identify that channel analysis, video review, and comment insights are required.
    • Select tools such as get_channel_details, get_list_of_videos, get_video_description, get_list_of_comments, video_transcription, and analyze_thumbnail as needed.
  2. Execute tools in logical order
    • Resolve the channel handle or URL to a channelId.
    • List videos for that channel and optionally filter out shorts using duration.
    • Pull detailed metadata and statistics for selected videos.
    • Collect comments for key videos and, if requested, run transcription.
  3. Synthesize the response
    • Aggregate all intermediate results.
    • Use OpenAI to generate a human-readable summary, content opportunity analysis, thumbnail recommendations, and a prioritized action list.

Throughout the interaction, Postgres-backed chat memory maintains context so the agent can handle follow-up questions without re-running every tool from scratch.

Automation best practices and implementation tips

To ensure this workflow scales and remains reliable in a production environment, consider the following best practices.

  • Pagination strategy
    • YouTube search results and comment threads are paginated.
    • Implement pagination logic if you need more than 50 videos or 100 comments per request.
    • Store or cache page tokens where appropriate to avoid redundant calls.
  • Rate limiting and quotas
    • Monitor YouTube Data API quota usage, especially when running channel-wide analyses.
    • Track OpenAI consumption for both text and image endpoints to prevent cost overruns.
  • Transcription cost management
    • Transcribing long videos can be expensive.
    • Focus on high-value videos or specific segments when budgets are constrained.
    • Consider rules such as “only transcribe videos above a threshold of views or watch time.”
  • Shorts filtering
    • Use contentDetails.duration to identify short-form content.
    • Exclude videos under 60 seconds when the analysis should focus on long-form material.
  • Security and key management
    • Store all API keys in n8n credentials, not in plain text within nodes.
    • Rotate keys periodically and restrict their permissions according to least-privilege principles.

Example prompts and practical use cases

Prompt: Derive content ideas from comments

"Analyze comments from the top 5 videos of @example_handle and return 10 content ideas with example titles and 3 short hooks each."

Prompt: Thumbnail critique and optimization

"Analyze this thumbnail URL for clarity, emotional impact, and suggest three alternate thumbnail concepts optimized for CTR."

Representative business use cases

  • Content teams
    • Generate weekly topic clusters based on transcripts and comments.
    • Repurpose transcripts into blog posts, email sequences, and social snippets.
  • Creators
    • Identify which videos to prioritize for thumbnail, description, or pinned comment updates.
    • Discover new series or playlist concepts informed by viewer feedback.
  • Agencies and consultancies
    • Run competitive analysis across multiple channels to surface content gaps.
    • Produce standardized, repeatable reports for clients using the same automation backbone.

Cost model and scaling considerations

Operational cost typically comes from three primary sources:

  • YouTube Data API
    • Generally low cost and often free within default quotas.
    • Quota usage increases with the number of videos and comment threads analyzed.
  • Apify transcription
    • Costs vary by actor and total audio length.
    • Transcription is usually the most expensive component for long-form content.
  • OpenAI usage
    • Includes both chat-based analysis and image-based thumbnail evaluation.
    • Token usage scales with transcript and comment volume.

Best practice is to start with a limited sample of videos and channels, validate the insights and ROI, then gradually scale up to automated, channel-wide runs.

Extending and customizing the workflow

The template is a solid base for more advanced automation. Common extensions include:

  • Adding thumbnail A/B test suggestions and tracking click-through rate changes after implementing recommendations.
  • Integrating with content planning tools such as Google Sheets or Airtable to automatically create editorial tasks.
  • Building sentiment trend dashboards to detect emerging topics and trigger rapid-response content.
  • Developing a frontend chat interface that connects to an n8n webhook and uses Postgres-backed session history for non-technical users.

Security, privacy, and compliance

When working with user-generated content and transcripts, align your implementation with relevant policies and regulations:

  • Respect YouTube’s terms of service for data access and usage.
  • Avoid exposing personally identifiable information outside secure environments.
  • Define and implement data retention and deletion policies for comments and transcripts.
  • Ensure access control on your n8n instance and Postgres database.

Implementation checklist

  1. Create a Google Cloud project and enable the YouTube Data API.
  2. Obtain Apify and OpenAI API keys and configure them as credentials in n8n.
  3. Set up Postgres and configure the chat memory integration.
  4. Import the workflow template and replace credentials in all relevant nodes (Google, Apify, OpenAI, Postgres).
  5. Run tests against a single channel and a small set of videos to validate:
    • Channel and video retrieval
    • Comment aggregation
    • Transcription output
    • Thumbnail analysis quality
  6. Iterate on prompts, output formatting, and filters to align with your team’s reporting or decision-making processes.

Conclusion and next steps

This n8n-based AI agent provides a scalable, repeatable approach to extracting insights from YouTube channels. By automating data collection