Build n8n Developer Agent Workflows (Template Guide)

Build n8n Developer Agent Workflows (Template Guide)

This guide explains how to install, configure, and extend the n8n Developer Agent template so you can automatically generate, validate, and deploy importable n8n workflows. It covers the overall architecture, key nodes, integration patterns, setup sequence, and operational best practices for automation professionals who want to industrialize workflow creation with AI.

Overview: What the n8n Developer Agent template does

The n8n Developer Agent template is designed to turn natural-language requirements into production-ready n8n workflows. It combines:

  • A conversational chat or webhook trigger
  • LLM-based developer agents (GPT and Claude)
  • Memory for multi-turn context
  • Tooling that generates valid n8n workflow JSON
  • Optional documentation context from Google Drive
  • Automatic workflow creation through the n8n API

The result is a repeatable pattern where non-developers can describe automations in plain language, and the system produces a complete workflow that can be imported or directly instantiated in your n8n instance.

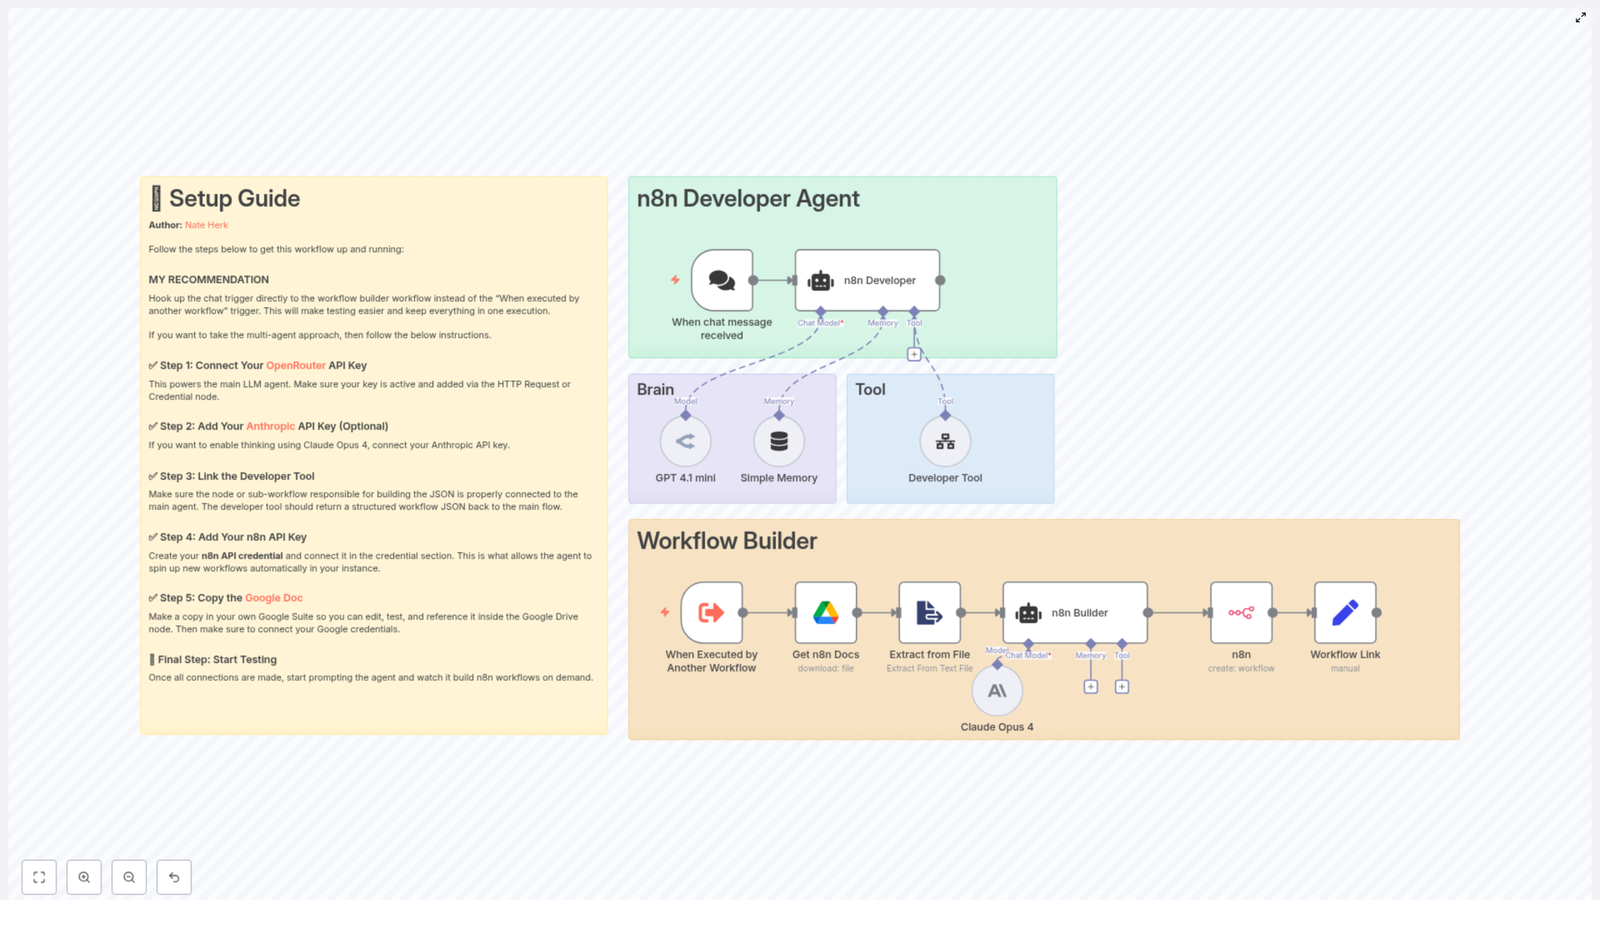
Architecture and main building blocks

The template is structured into two cooperating subsystems:

  • Developer Agent – handles interaction, reasoning, and workflow design.
  • Workflow Builder – materializes the design into a valid n8n workflow via the API.

Developer Agent subsystem

This part of the template is responsible for understanding user intent, planning the automation, and coordinating with tools that generate the final workflow JSON.

  • When chat message received – the primary entry point. This can be a chat-based trigger or webhook that accepts the user request or specification.
  • n8n Developer (Agent) – the central conversational agent node. It interprets the user prompt, maintains context, calls tools, and orchestrates subsequent steps required to produce a workflow.
  • Language models:
    • GPT 4.1 mini (OpenRouter) – configured as a core “brain” node for workflow design and generation.
    • Claude Opus 4 (Anthropic) – optionally used for deeper reasoning, deliberation, or multi-model comparison.
  • Simple Memory – a memory buffer that preserves conversational context across multiple turns, which is critical for refining complex workflows iteratively.
  • Developer Tool – a dedicated tool node or sub-workflow that receives the refined specification and outputs a complete n8n workflow as JSON.

Workflow Builder subsystem

The Workflow Builder converts the JSON produced by the Developer Tool into a concrete workflow in your n8n instance and optionally enriches the generation with internal documentation.

  • When Executed by Another Workflow – a secondary trigger that allows the Developer Agent to call the builder as an isolated execution. This supports separation of concerns between “design” and “deployment”.
  • Get n8n Docs (Google Drive) – retrieves reference material such as internal standards, reusable patterns, or template workflows from Google Drive.
  • Extract from File – converts or extracts plain text from the retrieved document so it can be used as context for the agent or builder logic.
  • n8n (API node) – interacts with the n8n REST API to create new workflow objects from the generated JSON.
  • Workflow Link (Set) – constructs a user-friendly, clickable URL that points to the newly created workflow in your instance.

Preparation and credential configuration

Before running the template in a production-like environment, you must configure all external integrations and credentials. This section outlines the recommended order.

1. Configure language model providers

The Developer Agent relies on LLMs to interpret requirements and design workflows. You can use one or both of the following:

  • OpenRouter (recommended)
    • Obtain an OpenRouter API key.
    • Open the GPT 4.1 mini node and attach your OpenRouter credentials.
    • Verify the model and endpoint settings match your OpenRouter configuration.
  • Anthropic (optional)
    • If you want to leverage Claude Opus 4 for advanced reasoning or multi-model responses, create an Anthropic API key.
    • Attach the key to the Claude Opus 4 node credentials.
    • Enable or tune any “thinking” or deliberation parameters as needed for your use case.

2. Connect the Developer Tool

The Developer Tool is the critical component that transforms a natural-language prompt into a valid n8n workflow JSON. Whether implemented as a tool node or a sub-workflow, it must:

  1. Accept the user prompt or refined specification as input.
  2. Generate a complete workflow JSON object, including:
    • name
    • nodes
    • connections
    • settings
    • staticData (if required for the workflow)
  3. Return only valid JSON that:
    • Begins with { and ends with }.
    • Contains no additional commentary, markdown, or explanatory text.

Any deviation from strict JSON output will cause failures in the subsequent API creation step, so treat this as a contract between the agent and the builder.

3. Add n8n API credentials

To allow the Workflow Builder to create workflows automatically, configure an n8n API credential:

  • Create a dedicated API token or credential in your n8n instance.
  • Attach it to the n8n (API node) within the template.
  • Verify the base URL, authentication method, and required headers align with your n8n deployment (cloud or self-hosted).

4. Set up Google Drive integration (optional but recommended)

If you want the agent to respect internal standards or reuse existing patterns, connect Google Drive so the builder can reference your documentation:

  • Configure Google Drive credentials in n8n.
  • In the Get n8n Docs node, specify:
    • The target file ID, or
    • A shared document path that contains your reference material.
  • Ensure the Extract from File node is set to convert the document into plain text for downstream use.

5. Validate locally and in staging

Before enabling automated workflow creation in any production environment:

  • Trigger the workflow via the chat or webhook entry point.
  • Inspect the generated workflow JSON in the execution logs.
  • Export that JSON and import it manually into a staging n8n instance.
  • Confirm that:
    • The workflow imports without errors.
    • All nodes, connections, and settings behave as expected.

Prompting strategy for the Developer Agent

To obtain robust, production-grade workflows, prompts should be explicit and structured. Encourage requesters to specify:

  • Trigger type – for example, Webhook, Schedule, Email, or another supported trigger.
  • Input data sources – such as Google Sheets, external APIs, databases, or SMTP.
  • Business logic – filters, transformations, branching conditions, error handling, and validation rules.
  • Target actions – for example, create a ticket, send an email, update a record, or store data in a database.

Example prompt:

“Create a workflow that triggers on a webhook, validates the payload, saves rows to Google Sheets, and sends a Slack notification when amount > 1000.”

For complex automations, consider an iterative approach: start with a minimal viable workflow, then refine the prompt with additional constraints or enhancements.

Security and governance considerations

Security best practices

  • Protect credentials – never embed production API keys directly in templates. Use n8n credentials or environment variables to manage secrets.
  • Least privilege access – configure the n8n API credential as a service account with only the permissions required to create workflows, and avoid full administrative access where possible.
  • Isolate validation – always validate generated JSON in a sandbox or staging instance before promoting workflows to production.

Operational best practices

  • Use a staging pipeline – run the Developer Agent template against a staging n8n instance until you are confident in the quality of the generated workflows.
  • Maintain a pattern library – curate a library of approved node patterns for authentication, error handling, logging, and observability. Reference these patterns in your documentation and prompt instructions.
  • Enable detailed logging – turn on saveManualExecutions and extended logging while developing or tuning the Developer Tool and builder logic, so you can quickly diagnose issues.

Troubleshooting common issues

Invalid JSON from the Developer Tool

Symptom: The n8n API node fails to parse the workflow body or returns an error about invalid JSON.

Resolution:

  • Confirm that the Developer Tool returns a single JSON object, not an array or text with commentary.
  • Ensure the output starts with { and ends with }.
  • Copy the output into a JSON linter or validator to identify syntax errors.

Workflow creation errors in the n8n API node

Symptom: The API request to create a workflow fails or returns a non-2xx response.

Resolution:

  • Verify the n8n API credential, base URL, and authentication headers.
  • Check that the JSON body includes all required top-level fields:
    • name
    • nodes
    • connections
    • settings
    • staticData (if applicable)
  • Inspect the n8n server logs for more detailed error messages.

Google Drive download or extraction failures

Symptom: The workflow cannot retrieve or parse documentation from Google Drive.

Resolution:

  • Confirm the file ID or shared path in the Get n8n Docs node is correct.
  • Check that the Google Drive credentials have read access to the file.
  • Review conversion or export settings in the node to ensure the file is returned in a format supported by the Extract from File node.

Slow or timing out LLM responses

Symptom: Language model nodes respond slowly or hit timeouts, especially for complex prompts.

Resolution:

  • Increase the timeout or “thinking” budget in the language model node configuration.
  • Use a smaller or faster model for early iterations and only switch to Claude Opus 4 or similar models for final refinement.
  • Simplify prompts or break large tasks into smaller, sequential steps.

Extending and customizing the template

The template is intentionally modular so teams can adapt it to their own governance, compliance, and domain-specific requirements. Common extensions include:

  • Domain-specific documentation – add multiple reference documents to the Get n8n Docs node, for example:
    • Finance automation standards
    • HR onboarding templates
    • IT operations runbooks

    Use these to drive context-aware workflow generation.

  • CI/CD integration – incorporate a pipeline step that runs automated tests against generated workflows before they are deployed or activated in production.
  • Approval and governance flows – insert a review step that sends the generated workflow to a Slack channel, email group, or internal portal for approval before it is created or enabled in n8n.

Go-live checklist

Before enabling this template for broader use across your organization, validate the following:

  1. All external credentials (LLMs, n8n API, Google Drive) are configured, scoped appropriately, and tested.
  2. The Developer Tool consistently outputs valid, importable workflow JSON that meets your internal standards.
  3. End-to-end tests have been executed in a staging n8n instance, including manual imports where necessary.
  4. Monitoring, logging, and alerting are in place for automated workflow creations and any API errors.

Conclusion and next steps

The n8n Developer Agent template provides a powerful pattern for scaling workflow development with conversational AI, structured memory, and automated JSON generation. By combining a disciplined prompting strategy, strong security practices, and a clear staging pipeline, teams can significantly accelerate workflow delivery while maintaining control and governance.

To get started, import the template into a staging n8n instance, connect your credentials, and test it with a well-defined automation request. Iterate on the Developer Tool logic, refine your internal documentation, and then introduce approval or CI/CD gates as you move toward production usage.

If you require assistance customizing the Developer Tool, designing approval workflows, or integrating with your existing deployment processes, consider engaging a certified n8n expert or consulting the official n8n documentation for advanced patterns.

Need a tailored implementation plan or help designing approval gates for generated workflows? Share your use case and requirements, and I will outline a custom approach for your environment.

Backup n8n Workflows to Gitea (Automated Guide)

Backup n8n Workflows to Gitea: A Story of One Broken Deploy

By the time the incident report landed in her inbox, Maya already knew what had gone wrong. She was the de facto automation owner at a fast-growing startup, and n8n was her playground. Over a year she had assembled dozens of workflows that kept marketing data in sync, enriched leads, and pinged the sales team at just the right moment.

Then one Friday afternoon, someone made a “small change” to a production workflow. A critical step was deleted, a variable misnamed, nobody remembered the exact state from last week, and the only backup was a vague hope that someone had exported a JSON file at some point.

They had not.

That weekend, while everyone else left the office, Maya stayed behind and decided something had to change. If code lived in Git, why not n8n workflows too? That decision led her to an n8n workflow template that automatically backs up every workflow into a Gitea Git repository. What started as a painful outage became the turning point for a far more robust automation setup.

The Problem: Fragile Workflows and No History

Maya’s reality was common:

  • Dozens of n8n workflows, all edited directly in production
  • No version history beyond “I think it looked like this last month”
  • No easy way to roll back a broken change
  • Zero alignment with the company’s DevOps practices

Every time a teammate asked her to tweak a workflow, she felt a quiet sense of dread. What if a change broke something subtle? What if they needed the previous version and she had no copy?

She wanted what the engineering team already had: Git history, pull requests, code review, and a reliable backup strategy. That is where the idea of backing up n8n workflows to Gitea came in.

Why Gitea + n8n Made Sense

The company already ran a self-hosted Gitea instance. Developers used it for application code, infrastructure definitions, and documentation. Maya realized that if she could get all n8n workflows into a Gitea repository, she would gain several benefits at once:

  • Version history – Every workflow change would be tracked, diffed, and restorable.
  • Secure storage – Workflows would live in a backed-up Git repository, not just inside n8n.
  • DevOps alignment – Branching, code review, and approvals could apply to automation just like application code.
  • Easy recovery – A broken workflow could be restored from a known good JSON file in seconds.

She did not just want a one-time export. She wanted a system that would:

  • Automatically export all n8n workflows on a schedule
  • Only commit when something actually changed
  • Create new files for newly created workflows
  • Run periodically, with the option to trigger it manually

That is when she found an n8n template to back up workflows to Gitea, already wired to do exactly this.

Setting the Stage: What Maya Needed First

Before she could use the template, Maya gathered a short checklist of prerequisites:

  • An n8n instance with API access and a user allowed to list all workflows
  • A Gitea server and a repository dedicated to workflow backups
  • A Personal Access Token in Gitea with repository read and write permissions
  • Basic familiarity with n8n nodes and credentials

Her plan was simple. Let n8n ask its own API for the list of workflows, then push each one into Gitea as a JSON file. The template she found already implemented this logic. She just had to wire it up correctly.

The Turning Point: Discovering the n8n Backup Template

The template came with a clear promise: automate backups of every n8n workflow into Gitea using the Gitea REST API. It handled export, comparison, base64 encoding, and file creation or update. All Maya needed to do was adapt it to her environment.

She opened the template and saw the key building blocks:

  • A Schedule Trigger to run the backup regularly
  • A Globals node to store repository information
  • An n8n API node to fetch all workflows
  • Logic to check whether each workflow already existed in Gitea
  • Nodes to create or update files only when content changed

It was exactly what she needed, but it still had to be tuned to her Gitea instance and n8n credentials.

Rising Action: Wiring the Template to Her Stack

Configuring the Repository Globals

The first thing she noticed was the Globals node. This node controlled the core Gitea repository details that other nodes would reuse.

Inside it, she set three variables:

  • repo.url – for example https://git.internal.company.com
  • repo.owner – her team’s Gitea organization
  • repo.name – the name of the backup repository, such as n8n-workflows

These values were used later by the HTTP Request nodes to construct the Gitea API URLs for listing, creating, and updating files. One change here would ripple through the whole workflow, which made maintenance easier.

Creating a Gitea Personal Access Token

Next, she logged into Gitea and navigated to:

Settings → Applications → Generate Token

She generated a new Personal Access Token with repo read/write permissions. Since this token would only be used for backups, she kept the scope as limited as possible.

Back in n8n, she created a new credential of type HTTP Header Auth named Gitea Token. She configured it like this:

  • Header name: Authorization
  • Header value: Bearer YOUR_PERSONAL_ACCESS_TOKEN

She made sure to include a space after Bearer and before the token. Missing that space is a classic source of 401 errors, and she did not want to debug something that simple later.

Connecting the Gitea Credentials to the Right Nodes

The template included several HTTP Request nodes that talked to Gitea. Each one had to use the Gitea Token credential she had just created.

She attached the credential to:

  • GetGitea – checks if a workflow JSON file already exists in the repository
  • PutGitea – updates an existing file when content has changed
  • PostGitea – creates a new file for workflows that are not yet tracked

Now, any request to Gitea from those nodes would be properly authenticated.

Allowing n8n to Read Its Own Workflows

Then came the other side of the pipeline: n8n itself. The template included an n8n API node that lists all workflows. For that node to work, it needed valid credentials with permission to read workflows.

She configured the node with either:

  • An API token for her n8n user, or
  • Basic auth credentials

The important part was that this account could list every workflow that needed to be backed up. Once that was set, the node could fetch the full catalog of workflows on demand.

Adjusting the Schedule and Running the First Test

The template shipped with a Schedule Trigger set to run every 45 minutes. That was a reasonable default, but Maya decided to start with manual runs while she validated everything.

She opened the Schedule Trigger node and confirmed the interval settings, then disabled automatic execution temporarily. With a single click on “Execute workflow” she could run a manual backup test.

Her checklist for the first run:

  • Does the workflow execute without errors?
  • Do JSON files appear in the Gitea repository?
  • Are new workflows created as new files?
  • Are existing files only updated when content changes?

When the run finished, she switched over to Gitea. A new repository full of <workflow-name>.json files greeted her. Each commit represented a snapshot of her automation universe.

Inside the Machine: How the Template Actually Works

Now that the basics were running, Maya wanted to understand the inner workings. If this workflow was going to protect her automations, she needed to trust and possibly extend it.

Node by Node: The Backup Flow

The template followed a clear flow:

  1. Schedule Trigger

    Starts the entire process at configured intervals. In Maya’s case, it would eventually run every 45 minutes, or on demand while testing.

  2. Globals

    Injects the repository URL, owner, and name into the workflow. These values are reused to construct Gitea API endpoints.

  3. n8n API node

    Calls the n8n API to list all available workflows. The result is a collection of workflow objects, each containing its JSON definition.

  4. ForEach / Split

    Splits the list into individual items so each workflow can be processed separately. This pattern lets the workflow handle any number of workflows.

  5. GetGitea

    For each workflow, this node tries to fetch a corresponding .json file from Gitea. If the file does not exist, Gitea returns a 404, which the workflow interprets as “this is a new workflow, we need to create it.”

  6. Exist (If)

    An If node checks whether the file exists or not, based on the response from GetGitea. This decision point splits the flow into “create” and “update” paths.

  7. SetDataCreateNode / SetDataUpdateNode

    Depending on the branch, these nodes prepare the payloads for the Gitea API. They set things like file path, commit message, and the content that will later be encoded.

  8. Base64EncodeCreate / Base64EncodeUpdate

    Gitea expects file content in base64 format when creating or updating files through its API. These nodes take the workflow JSON and encode it to base64 so Gitea can accept it.

  9. Changed (If)

    Before pushing an update, the workflow compares the newly encoded content with the existing file content in the repository. If they are identical, there is no need to commit anything. This avoids noisy commits and keeps Git history meaningful.

  10. PutGitea / PostGitea

    Finally, the workflow calls the Gitea REST API to either update an existing file using PUT or create a new one using POST. Each write represents a real change in the workflow definition.

Important Implementation Details Maya Noticed

As she explored, a few details stood out:

  • Files were stored as <workflow-name>.json in the repository root. If she wanted a folder structure, she could adjust the path in the HTTP Request nodes.
  • Base64 encoding was not optional. The Gitea API required it for file content, so the encoding nodes were essential.
  • The “Changed” check was what kept her Git history clean. Without it, every run would generate redundant commits even when nothing had changed.

Keeping It Safe: Security in the New Setup

As the person responsible for automation, Maya was also responsible for its security. She took a few deliberate steps to keep tokens and permissions under control:

  • She stored the Gitea token only in n8n’s credentials store, never hard coded inside nodes.
  • She gave the token the least privileges required, mainly repository read/write for the backup repo.
  • She documented a simple process to rotate the token periodically and update the n8n credential when needed.

This way, even if someone gained access to the workflow configuration, they would not see the raw token in plain text.

When Things Go Wrong: How She Debugged Early Runs

The first few runs were not perfect. A typo here, a misconfigured header there, and Maya had to debug. The template’s structure made that process manageable.

Common Issues She Encountered

  • 401 Unauthorized

    When she first wired the Gitea Token, she forgot the space in Bearer <token>. Fixing the Authorization header format resolved it.

  • 404 on GetGitea

    At first this looked like an error, but it was actually expected for new workflows. The workflow correctly followed the “create” branch when it saw the 404.

  • No files updated

    On one test, she changed a workflow but saw no new commit. It turned out the base64 comparison was not using the right field. After verifying that the Base64Encode node produced the correct string and that the “Changed” If node compared the right values, updates started to appear as expected.

Debug Techniques That Helped

  • Running the workflow manually with a smaller subset of workflows while she validated each step.
  • Inspecting node output in the n8n UI, including request and response bodies for the HTTP nodes.
  • Temporarily logging or returning intermediate values, such as the base64 string, to confirm encoding was correct.

After a couple of iterations, the workflow ran cleanly and produced exactly the Git history she wanted.

Beyond Backups: How She Extended the Workflow

Once the core backup was stable, Maya started thinking like a DevOps engineer. Backups were just the beginning. With n8n and Gitea connected, new possibilities opened up.

She considered several enhancements:

  • Branching for review

    Push workflow changes into a dedicated branch first, then open pull requests before merging to main. That way, changes to critical automations could be reviewed just like application code.

  • Date-based folders

    Store backups inside paths like backups/2025-10-14/<workflow-name>.json to keep historical snapshots by date.

  • Notifications

    Send a Slack or email notification whenever new workflows were created or existing ones were updated, giving the team visibility into automation changes.

The same pattern of “fetch, compare, encode, push” could be repurposed for many automation governance tasks.

The Resolution: From Panic to Confidence

A few weeks after setting up the backup workflow, another teammate accidentally broke a production automation. This time, nobody panicked.

Maya opened the Gitea repository, browsed to the affected workflow’s JSON file, and checked the commit history. In a few clicks, she had the last known good version. She restored it in n8n, and the incident was over before anyone outside the

n8n Job Application Parser: Automate Candidate Intake

n8n Job Application Parser: Automate Candidate Intake (So You Can Stop Copy-Pasting Resumes)

Picture this: you open your inbox on Monday morning and find 87 new job applications. By 9:15 am you are copy-pasting names into a spreadsheet, skimming resumes for the word “Python,” and wondering if this is really what your career counselor had in mind.

If that sounds familiar, it is time to let automation do the boring part. This n8n workflow template, “New Job Application Parser”, turns your incoming resumes into structured, searchable, and actually-usable data using OpenAI embeddings, Pinecone vector storage, and a RAG (retrieval-augmented generation) agent. In plain English: it reads resumes for you, remembers them, and gives you smart summaries and recommendations.

Below you will find what this n8n job application parser does, how the pieces fit together, and how to get it running with minimal drama. We will also cover customization, troubleshooting, and how not to anger your security team.

Why use n8n to parse job applications?

Traditional resume parsers can feel like a black box: expensive, rigid, and allergic to customization. With n8n, you get a workflow you actually control.

Building a job application parser with n8n gives you:

  • Full control over processing logic, data flow, and where everything ends up
  • Easy integrations with tools like Google Sheets and Slack so your team sees results where they already work
  • Semantic search and retrieval using OpenAI embeddings and Pinecone, so you can search for “5+ years Python and AWS” instead of guessing keywords
  • Modular, cost-effective automation that you can tweak, extend, and scale as your hiring grows

In short, you stop doing repetitive parsing by hand and start focusing on the part that actually needs a human brain: deciding who to interview.

What the n8n Job Application Parser workflow actually does

This template sets up an automated pipeline that:

  1. Accepts new job applications via a Webhook Trigger
  2. Splits long resumes into smaller text chunks with a Text Splitter
  3. Turns each chunk into an OpenAI embedding for semantic search
  4. Stores those embeddings in a Pinecone index with useful metadata
  5. Uses Pinecone Query and a Vector Tool to feed relevant context to a RAG Agent
  6. Lets the RAG Agent analyze and summarize the application, including fit and recommended status
  7. Logs the results into Google Sheets for tracking by your HR or recruiting team
  8. Sends a Slack Alert if something breaks so you do not find out a week later

Under the hood, it is a neat combination of vector search, prompt engineering, and good old-fashioned spreadsheets.

Quick-start setup: from zero to automated parsing

Here is the simplified flow to get this n8n job application parser working in your environment:

1. Import the template and connect your tools

Start by importing the “New Job Application Parser” template into n8n. Then plug in your credentials for:

  • OpenAI (for embeddings and the chat model)
  • Pinecone (for vector storage and retrieval)
  • Google Sheets (for logging parsed results)
  • Slack (for the onError alerts)

2. Configure the webhook that receives applications

The workflow starts with a Webhook Trigger:

  • Method: POST
  • Endpoint: /new-job-application-parser

Hook this endpoint up to your career site form, ATS webhook, or any other system that collects applications. You can send things like resume text, OCR output from PDFs, and structured fields such as name, email, and role.

3. Send a test payload

Use a sample request like this to test the webhook:

{  "applicant_id": "12345",  "name": "Jane Doe",  "email": "jane@example.com",  "resume_text": "...full resume text or OCR output...",  "source": "career_site"
}

Once this flows through the pipeline, the workflow will split the text, embed it, store it in Pinecone, analyze it with the RAG Agent, and finally log everything in Google Sheets. You can then refine prompts, chunking strategy, or metadata as needed.

How each node in the workflow pulls its weight

Now let us look at the workflow node by node so you understand what is happening and where to customize things.

Webhook Trigger: your front door for applications

The Webhook Trigger listens at POST /new-job-application-parser. It collects payloads from:

  • Career site forms
  • ATS webhooks
  • Other intake systems that can send JSON

Typical fields include applicant name, email, role applied for, and a resume_text field containing either plain text or OCR output from PDFs. This is the raw material for the rest of the workflow.

Text Splitter: breaking resumes into bite-sized chunks

Resumes can be long, repetitive, and occasionally poetic. To make them easier to embed and search, the Text Splitter node breaks the text into overlapping chunks.

In the template, the default configuration is:

  • chunkSize = 400
  • chunkOverlap = 40

This keeps enough context in each chunk for meaningful embeddings, while avoiding one giant blob of text that is impossible to search.

Embeddings (OpenAI): turning text into vectors

The Embeddings node uses OpenAI to compute semantic embeddings for each chunk. The template uses:

  • Model: text-embedding-3-small

Each chunk is converted into a vector representation so you can later search for skills, experience, or role-specific content based on meaning, not just keywords. So “Python backend engineer” and “5 years building APIs in Python” actually show up as related.

Pinecone Insert: storing embeddings with useful metadata

Next, the workflow uses Pinecone Insert to store each embedding in a Pinecone index. In the template, the index is named:

  • new_job_application_parser

Along with the vector itself, the workflow stores metadata such as:

  • applicant ID
  • source URL or channel
  • chunk index
  • original text

This metadata makes it easy to reconstruct the original context when Pinecone returns matches later.

Pinecone Query + Vector Tool: retrieving relevant context

When the workflow needs to analyze an application or answer questions about it, it uses Pinecone Query to pull the most relevant chunks. Those results are exposed to the RAG Agent as a Vector Tool.

The idea is simple: instead of sending the entire resume to the model every time, you send only the most relevant pieces. This keeps responses focused and helps control costs.

Window Memory (optional but handy)

The Window Memory node keeps a short history of recent context. This is especially useful if:

  • Applicants send follow-up messages
  • You process multi-part applications
  • You want the RAG Agent to “remember” previous steps in the conversation

It is optional, but it can make the agent feel much more coherent when dealing with ongoing candidate interactions.

RAG Agent: the brain of the operation

The RAG Agent takes:

  • The structured data from the webhook
  • The relevant chunks retrieved from Pinecone via the Vector Tool

It then runs a prompt template designed to parse and summarize the application using a chat model. Typical outputs include:

  • A short summary of the candidate
  • Extracted skills
  • Recommended status (for example: “Recommend screening”)
  • A brief reason, such as: "Recommend screening - 5+ yrs in Python and AWS."

This is where you can heavily customize prompts to match your hiring criteria and the fields your team cares about.

Append Sheet (Google Sheets): logging everything in one place

Once the RAG Agent has done its analysis, the Append Sheet node writes the results to a Google Sheets log.

You configure:

  • documentId for the spreadsheet
  • sheetName for the specific sheet tab

This creates a central log of parsed applications that HR and recruiting teams can filter, sort, and route without touching n8n.

Slack Alert (onError): your early warning system

Things break. APIs time out, quotas get hit, someone renames a Pinecone index. The template includes an onError branch that sends a message to a Slack #alerts channel whenever a node fails.

The alert can contain actionable error messages and stack traces so your ops or recruiting team can fix issues quickly instead of discovering missing candidates later.

Customizing the workflow for your hiring process

Once the basic pipeline is working, you can tune it to match your own hiring style and data requirements.

Adjust the chunking strategy

If your resumes are usually short, you might not need as many chunks. If they resemble mini novels, you might want to tweak the defaults:

  • Increase chunkSize to keep more context together in each chunk
  • Adjust chunkOverlap so important details are not split awkwardly between chunks

Bigger chunks preserve context but can reduce fine-grained search accuracy. Smaller chunks give more granular retrieval but may lose some surrounding information. Experiment based on your typical applicant pool.

Enrich and refine your prompts

The RAG Agent’s prompts are where you define what “good parsing” means for your team. You can:

  • Ask for specific fields like education, certifications, or years of experience
  • Provide examples of ideal outputs for different candidate types
  • Standardize labels for statuses like “Reject,” “Screen,” or “Move to hiring manager”

The more precise your prompts and examples, the more consistent your structured outputs will be.

Integrate with your ATS or CRM

If your team lives in an ATS or CRM, you are not limited to Google Sheets. You can:

  • Replace or supplement Google Sheets with API calls to your ATS
  • Push candidate objects into your recruiting CRM
  • Trigger additional workflows, such as sending automated follow-ups

Google Sheets is a great starting point, but the same parsed data can easily feed more advanced systems.

Troubleshooting: when automation throws a tantrum

If the workflow misbehaves, here are common places to look first:

  • Embeddings failing? Check your OpenAI API key, permissions, and quota usage.
  • Pinecone insert or query errors? Verify:
    • The index name matches your configuration
    • The API key is correct
    • The vector dimensionality is compatible with the OpenAI embedding model
  • No Slack alerts? Confirm the onError branch is connected and Slack credentials are valid.

Use the Slack Alert branch to surface error messages quickly instead of digging through logs after the fact.

Security and compliance: handling applicant data responsibly

This workflow deals with personally identifiable information (PII), so a bit of caution is non-negotiable. Follow these best practices:

  • Store API keys as environment credentials in n8n, not hard coded in flows.
  • Restrict access to your Pinecone index and limit retention for embeddings that contain PII.
  • If your region or company policies require it, add a data retention step that periodically deletes old vectors and Google Sheets entries after a defined window.
  • Use HTTPS for webhooks and configure Google Sheets access via OAuth 2.0.

Scaling and cost control for high-volume hiring

If you are processing large volumes of applications, a few tweaks can help keep things smooth and affordable:

  • Batch or queue incoming requests to handle traffic spikes more gracefully.
  • Use smaller embedding models like text-embedding-3-small for initial indexing, and reserve heavier models for targeted retrieval or complex analysis.
  • Prune Pinecone vectors related to spam, test submissions, or clear duplicates to control storage costs.

Best practices for accurate parsing

If you want your parser to feel less “random robot” and more “junior recruiter who actually reads,” keep these in mind:

  • Preprocess resumes to remove boilerplate sections and repeated headers that add noise to embeddings.
  • Use labeled examples and a validation set to test your RAG prompts and adjust them iteratively.
  • Monitor false positives and negatives for key fields like skills or years of experience, then tweak prompts or chunking when you see patterns.

Next steps: deploy, test, and iterate

To recap a practical path forward:

  1. Import the “New Job Application Parser” n8n template.
  2. Connect your OpenAI, Pinecone, Google Sheets, and Slack credentials.
  3. Send a few real applications through the webhook.
  4. Inspect:
    • The generated embeddings in Pinecone
    • The RAG Agent outputs and summaries
    • The rows appended to Google Sheets

Automate AI Newsletters with n8n: A Practical Guide

Automate AI Newsletters with n8n: A Practical Guide

Imagine sitting down each week to publish an AI newsletter that your audience loves, without losing an entire afternoon to copy-pasting links, rewriting summaries, and wrestling with formatting. That is the promise of a well-designed n8n workflow template.

This guide walks you through a real n8n automation that ingests markdown and X/Twitter content, uses LLMs to pick top stories, writes newsletter sections, builds subject lines, and publishes drafts to Slack. The result is a repeatable, auditable pipeline that gives you back time and creative energy, while keeping your output consistent and professional.

The Problem: Newsletter Work That Eats Your Week

A weekly AI newsletter can be one of your most powerful channels for influence and growth. It keeps your community engaged, showcases your expertise, and creates a predictable touchpoint with readers or customers.

Yet the process behind it often feels heavy:

  • Collecting links, markdown files, and tweets from different tools
  • Removing duplicates and low quality content
  • Summarizing, rewriting, and formatting everything by hand
  • Trying to keep structure and tone consistent from week to week

Over time, this drains editorial bandwidth and can slow down your growth. The more your audience expands, the more pressure there is to publish on time and at a high standard.

The Shift: From Manual Production To Automated Systems

Instead of treating your newsletter as a weekly “one-off task,” you can treat it as a system. With n8n, you can build that system once, refine it over time, and let it carry more and more of the workload.

Automation is not about removing humans. It is about elevating them. When repetitive steps are handled by a workflow, you are free to focus on what only you can do:

  • Choosing the right stories for your audience
  • Adding unique commentary and perspective
  • Defining the tone, voice, and editorial standards

The n8n workflow template in this guide is a concrete example of that mindset. It turns newsletter production into a reliable pipeline that you can improve week after week.

The Possibility: A Newsletter Pipeline You Can Trust

The workflow follows a clear pipeline pattern that you can understand, audit, and customize. At a high level, it:

  1. Triggers on a form submission with a date and optional previous newsletter content
  2. Ingests markdown files and X/Twitter posts from cloud storage
  3. Normalizes and aggregates all content
  4. Uses an LLM to select the top stories
  5. Uses LLMs again to write each newsletter section
  6. Generates intro, subject line, and preheader text
  7. Assembles the final newsletter and posts it to Slack for review

Every step is explicit and controllable. You can see what went in, what came out, and where to intervene. This is how automation becomes a partner in your editorial process instead of a black box.

The Template: Your Starting Point For Automation With n8n

Let us walk through the workflow node by node so you can see how it works and how you might adapt it. Think of this as a guided tour of a production-grade n8n template that you are free to customize and grow with.

1. Form Trigger – Start With Intent

The journey begins with a form trigger in n8n. Editors submit:

  • The target date for this issue
  • Optional previous newsletter content

The date anchors the entire workflow. It tells the pipeline which content to look for in storage. The previous newsletter content provides context so the system can avoid duplicating stories and apply date-specific selection rules. You remain in control, but the heavy lifting starts to move into the background.

2. Search And Download Source Files – Gather Your Raw Material

Next, the workflow uses S3 (or R2) nodes to search your bucket by a date-based prefix and list all relevant files. It then:

  • Filters to only markdown objects with a .md extension
  • Downloads the markdown content for each file
  • Captures per-file metadata such as authors, external-source-urls, and image-urls

Instead of manually hunting down articles, your system now pulls everything into one place in a structured, repeatable way.

3. Normalize Inputs – Create A Predictable Content Format

To make downstream processing reliable, the workflow normalizes each file into a canonical content item. Each item includes:

  • An identifier
  • A friendly content type
  • Authors
  • external-source-urls
  • The full markdown payload

This standard format means every later step can assume the same structure. You are building a foundation for consistent automation, not a one-off script that breaks the moment your input changes.

4. Tweet Ingestion – Bring X/Twitter Into The Same Flow

In parallel, the pipeline searches for tweet objects for the same date. It:

  • Downloads tweet data
  • Extracts metadata such as handle, id, and impressions
  • Converts tweets into the same canonical content format as markdown articles

The result is a unified pool of content, where X/Twitter posts can be evaluated alongside long-form web articles. Your workflow is now multi-channel by design.

5. Aggregate And Combine – Build A Rich Content Buffer

Once everything is normalized, the workflow aggregates all content items into a single rich-text buffer. This combined data set is what the curation LLM will analyze when choosing top stories.

Instead of scanning dozens of sources yourself, you are handing a structured, well prepared bundle of information to the model, with clear rules for what to do next.

6. Filter And Exclude – Protect Editorial Quality

Before calling the LLM for story selection, the pipeline applies lightweight filters to:

  • Exclude content types you do not want, such as previous newsletters
  • Remove items that do not meet editorial constraints

This ensures the model only sees candidate stories that are genuinely in scope. You are not just automating, you are encoding your editorial standards into the workflow.

7. Pick Top Stories With LLM / LangChain – The Curation Engine

This is the heart of the pipeline. A LangChain (or similar) node prompts an LLM with:

  • A description of the target audience
  • Clear selection rules
  • A strict output schema

The model returns a structured list of four top stories, each with:

  • An identifier
  • A concise summary
  • A source link

To keep this step reliable, the workflow uses several best practices:

  • Constrain the output to a JSON schema so it is machine-parsable
  • Optionally include a “chain of thought” or human-readable reasoning for traceability
  • Validate model outputs with an output-parser node to guard against malformed responses

Now curation becomes faster and more consistent, while you still have full visibility into why stories were chosen.

8. Iterate And Write Segments – Turn Stories Into Sections

With the top stories selected, the workflow splits them and iterates over each one. For every story, it:

  • Resolves the identifier back to the underlying content piece and downloads any referenced files
  • Aggregates the original markdown with any scraped external source material
  • Passes that combined content to an LLM along with a writing guide, for example an Axios or Rundown style with bullets and a “Why it matters” section
  • Parses the LLM output into a well structured newsletter section

This is where you feel the time savings most directly. Instead of manually rewriting each story, you guide the model once with your style and let the workflow produce consistent sections you can review and lightly edit.

9. Intro, Subject Line, And Meta – Shape The Reader Experience

Separate LLM prompts generate important framing elements:

  • A newsletter intro, such as a “Good morning, AI enthusiasts.” style opening
  • An engaging subject line
  • Pre-header text that complements the subject line
  • A short shortlist of other notable stories

Each of these outputs is constrained by maximum tokens or word counts and validated through structured output parsers. The result is a polished, on-brand experience that you can refine over time without rewriting everything from scratch.

10. Final Assembly And Publish – Deliver A Ready-To-Review Draft

In the final stage, the workflow:

  • Aggregates all written sections into a single newsletter body
  • Converts the result into a markdown file
  • Uploads the file to Slack or your CMS
  • Posts preview messages and reasoning to Slack channels for editorial review and approval

Your newsletter is now generated as a draft you can quickly scan, tweak, and approve. The system handles assembly and delivery so you can focus on judgment, not logistics.

Prompt Engineering And Governance: Make Automation Trustworthy

Real-world automation is not just about clever prompts. It is about guardrails and governance that keep your workflow stable as you scale. This n8n pipeline uses several key practices:

  • Explicit JSON schema prompts for story selection, ensuring exactly four items with identifiers and links
  • Output parser nodes that automatically fix or reject malformed LLM outputs
  • Chain-of-thought fields that are used only for internal review and never exposed to readers

These patterns help you build confidence in your automation and make it easier to share the workflow with your team.

Best Practices For A Robust n8n Newsletter Workflow

To keep your AI newsletter pipeline resilient and easy to maintain, consider these best practices:

  • Idempotency: Use file identifiers and date prefixes so you can rerun the workflow safely without creating duplicates.
  • Editorial gating: Add a human approval step, for example a Slack approve button, before final publishing.
  • Source fidelity: Always attach original source identifiers and external-source-urls to sections for traceability.
  • Error handling: Use continue-on-error for individual downloads, but flag failures for human review instead of silently skipping them.
  • Rate limits and cost: Batch LLM calls when possible and cache scraped external source content to minimize API usage.

These patterns turn your workflow from a clever demo into a production-grade system that can grow with your audience.

Troubleshooting: Keeping The Pipeline Flowing

Even with a strong design, edge cases will appear. The goal is not perfection on day one, but a workflow that is easy to debug and improve.

Malformed LLM JSON

If the LLM occasionally returns invalid JSON, use an output-parser or autofixing node to correct minor issues. When the fix fails, route the result to a human-in-the-loop review queue instead of blocking the entire pipeline. This keeps your system resilient while still surfacing problems quickly.

Missing External URLs Or Incomplete Identifiers

Maintain strict string-copy rules for identifiers. Ingest the identifier exactly as it appears in the source to avoid mismatches. If a URL is missing, the story can still be used, but mark that in the metadata and avoid adding external links in the final output for that item.

Duplicate Coverage

To prevent repeating stories, compare candidate identifiers with the previous newsletter content that was passed in via the form trigger. Filter duplicates early in the flow so your readers always get fresh coverage.

From One Workflow To A New Way Of Working

This n8n pipeline is more than a single automation. It is a blueprint for how you can combine structured ingestion, programmatic filtering, and LLM-driven curation and writing to reliably produce an insightful AI newsletter.

With a few governance rules around approval, parsers, and caching, editorial teams can:

  • Publish more consistently
  • Protect quality and brand voice
  • Free up hours each week for strategy and deep work

The real opportunity is what comes next. Once you have a working template, you can:

  • Experiment with new prompts and tones
  • Add extra content sources or channels
  • Integrate directly with your CMS or email service
  • Clone the pattern for other recurring content, like product updates or internal reports

Each improvement compounds. Over time, you build a library of automations that quietly multiply your impact.

Call to action: If you want this exact workflow exported and configured for your team, including prompts and parser templates, reach out to get a ready-to-run n8n package and onboarding support. You will be set up with a production-grade AI newsletter pipeline that you can customize and grow with.

Automated Job Application Parser with n8n & RAG

Automated Job Application Parser with n8n & RAG

Design a production-grade automation pipeline that ingests job applications, converts unstructured text into searchable embeddings, persists vectors in Pinecone, and uses a retrieval-augmented generation (RAG) agent to enrich candidate data and log results into Google Sheets.

Use case: Scalable parsing of resumes and job applications

Recruiting and talent teams routinely handle large volumes of resumes, cover letters, and application forms. Manual review does not scale, is difficult to standardize, and often leads to inconsistent candidate evaluation. An automated job application parser built with n8n addresses these challenges by:

  • Extracting key candidate attributes such as name, contact details, skills, and experience
  • Indexing application content in a vector database for semantic search and retrieval
  • Leveraging RAG to answer targeted questions about applicants and to generate structured summaries
  • Persisting results in operational systems like Google Sheets and notifying teams via Slack

This approach is particularly effective for teams that want to combine traditional applicant tracking with modern vector search and LLM-based enrichment, without building custom infrastructure from scratch.

Solution architecture with n8n and RAG

The n8n workflow template provides an end-to-end pipeline that orchestrates multiple services. At a high level, the automation performs the following operations:

  1. Accepts new job applications via an HTTP webhook
  2. Splits long documents into chunks suitable for embeddings
  3. Generates vector embeddings using an OpenAI model
  4. Stores and queries vectors in a Pinecone index
  5. Exposes retrieved vectors to a RAG agent through a Vector Tool and Window Memory
  6. Uses a chat-based RAG agent to parse, score, and summarize candidates
  7. Logs structured outputs in Google Sheets
  8. Sends Slack alerts on workflow errors

The following sections describe each component in more detail, including configuration considerations and best practices for automation professionals.

Core workflow components and triggers

Webhook Trigger: Entry point for applications

The workflow begins with an HTTP POST Webhook Trigger node. Any external system, such as a web form, ATS, or resume upload endpoint, can submit application data to this webhook.

Typical payload contents include:

  • Candidate identifiers and basic fields (name, email, phone)
  • Raw resume or cover letter text
  • Links to attachments, if documents are stored externally

Standardizing this payload schema early simplifies downstream mapping, embedding, and logging.

Text Splitter: Preparing content for embeddings

Resumes and cover letters are often lengthy and exceed typical token limits for embedding models. The Text Splitter node segments the input text into smaller, semantically coherent chunks.

A character-based splitter is recommended, for example:

  • chunkSize = 400
  • chunkOverlap = 40

This configuration balances context preservation with efficient embedding calls. Overlap ensures that important details spanning chunk boundaries are not lost.

Embedding and vector storage layer

Embeddings with OpenAI

Each text chunk is passed to an embeddings model, such as text-embedding-3-small from OpenAI. The resulting vectors encode semantic meaning, which enables robust similarity search later in the process.

Alongside the vector, it is important to attach metadata, for example:

  • Candidate ID or email
  • Chunk index or sequence number
  • Original text segment

This metadata is critical for traceability, auditability, and accurate reconstruction of context when the RAG agent performs retrieval.

Pinecone Insert and Query

After embeddings are generated, the workflow stores them in a Pinecone index, for example named new_job_application_parser. The Pinecone Insert node handles the upsert operation, persisting both vectors and associated metadata.

When the RAG agent requires context, a Pinecone Query node executes a top-k similarity search against the index. The query returns the most relevant chunks for a given candidate or question, along with their metadata. This retrieval step is central to the RAG pattern and directly influences the quality of downstream parsing and summarization.

RAG orchestration: Vector Tool, Memory, and Agent

Vector Tool and Window Memory

To expose retrieved vectors to the language model, the workflow uses a Vector Tool node. This node wraps Pinecone query results into a format that the agent can consume as contextual information.

In parallel, a Window Memory component maintains short-term context across the agent’s interactions. This is useful in multi-step flows or when iteratively refining the parsing output. Together, Vector Tool and Window Memory enable the agent to reason over both retrieved document fragments and recent conversational state.

RAG Agent (Chat Model) configuration

The RAG Agent node is configured as a chat model with a system prompt specialized for job application parsing. The agent is responsible for:

  • Extracting structured fields such as full name, email, phone number, and location
  • Summarizing professional experience and highlighting key skills
  • Optionally generating a fit score for a target role (for example, a 0-10 rating)
  • Producing a concise status string suitable for logging, for example:
    Parsed: Senior Backend Engineer - 8/10 fit

Because the agent operates in a retrieval-augmented mode, it can reference specific resume fragments that support its conclusions. This improves transparency and facilitates manual audits when needed.

Downstream logging and error handling

Append Sheet: Logging to Google Sheets

Once the agent produces a structured response, the Append Sheet node writes the results to a Google Sheets document. A common pattern is to use a sheet named Log and to treat the candidate ID or email address as the primary identifier.

Typical columns might include:

  • Candidate ID or email
  • Extracted contact details
  • Skills and summary
  • Fit score and status string
  • Timestamp of processing

This effectively creates a lightweight ATS-style log that can be filtered, sorted, and shared across the recruiting team.

Slack Alert on error

Reliability is critical in production workflows. The template includes an onError branch that sends a Slack message whenever the flow fails. The Slack node typically posts to a dedicated #alerts channel and includes:

  • The error message or stack trace snippet
  • The candidate ID or email associated with the failed run

This ensures that both engineering and recruiting stakeholders are promptly informed and can take corrective action or reprocess the application if needed.

Prompt design, schema, and validation

Example system prompt and output schema

A clear schema-oriented system prompt is essential for consistent parsing. An example configuration for the RAG agent might look like:

<System>You are an assistant for New Job Application Parser. Extract: full_name, email, phone, location, skills (comma-separated), summary (2-3 sentences), fit_score (0-10)</System>

The agent receives both the retrieved chunks from Pinecone and the original resume text as context. It should return a structured, JSON-like object that maps directly to your Google Sheets columns or any downstream system.

Validation layer (recommended)

For production use, it is advisable to add a lightweight validation step after the agent. This can be implemented as an additional n8n node that:

  • Checks for required fields such as full_name and email
  • Normalizes phone numbers or locations where necessary
  • Flags missing or malformed data for manual review

Validation helps maintain data quality and prevents incomplete records from entering your tracking systems.

Operational best practices

Chunking and retrieval configuration

  • Chunk size and overlap: Aim for chunk sizes in the 300-600 character range, with roughly 10-20% overlap, to preserve context across boundaries.
  • Top-k retrieval: Adjust the number of retrieved chunks (k) based on document length and the complexity of the questions asked of the agent. Increasing k can improve context coverage but may introduce noise.

Metadata and index hygiene

  • Metadata hygiene: Always store candidate IDs, filenames, and source URLs as metadata with each vector. This enables accurate traceability and easier debugging.
  • Index maintenance: Periodically remove withdrawn or duplicate applications to keep the Pinecone index clean and to reduce search noise.

Monitoring and iteration

Begin with a small, representative dataset of resumes and monitor the following metrics:

  • Parsing accuracy based on manual audits of extracted fields
  • Pinecone query latency and overall workflow execution time
  • False positives in similarity search that surface irrelevant chunks
  • LLM hallucinations, which can be mitigated by tightening prompts and providing only relevant retrieved context

Iteratively refine the system prompt, chunking strategy, and retrieval parameters based on these observations.

Security, privacy, and compliance

Resumes and job applications contain sensitive personal information, so the automation must respect privacy and compliance requirements:

  • Define and enforce a data retention policy for both raw documents and embeddings.
  • Store API keys and secrets exclusively in n8n credentials. Do not hard-code sensitive values in nodes or code.
  • Enable encryption at rest in your vector store and other data stores when available.
  • Provide mechanisms for applicants to opt out or request deletion of their data.

These measures help align the workflow with internal security standards and external regulatory obligations.

Deploying the n8n template

The ready-made n8n template ships with all core nodes preconfigured and connected in the following sequence:

Webhook Trigger → Text Splitter → Embeddings → Pinecone Insert & Query → Vector Tool + Window Memory → RAG Agent → Append Sheet (success) → Slack Alert (error)

To deploy in your environment:

  1. Import the template into your n8n instance.
  2. Configure credentials for OpenAI, Pinecone, Google Sheets, and Slack using n8n’s credential store.
  3. Create or reuse a Pinecone index named new_job_application_parser.
  4. Adjust the RAG agent system prompt, chunking parameters, and retrieval settings as needed.
  5. Send test application payloads to the webhook and verify that parsed results appear correctly in Google Sheets.

The architecture is intentionally extensible. You can introduce additional steps such as duplicate detection based on email, integration with a full-featured ATS via API, or automatic task creation for recruiters when high-fit candidates are identified.

Next steps

To explore this workflow in practice, download the n8n template, configure your API credentials, and test with a small set of sample resumes. This will allow you to validate parsing quality, tune prompts, and adapt the schema to your internal hiring processes.

Try it now: Import the workflow into n8n, set up your credentials, and send a sample application to the webhook. Within seconds, you should see a structured, RAG-enriched record appear in your Google Sheets log.

AI-Powered Newsletter Agent with n8n

AI-Powered Newsletter Agent with n8n

This guide documents a production-grade n8n workflow that automates the creation of an AI-focused newsletter. The workflow ingests markdown content and social posts, filters and ranks stories with LLMs, generates Axios-style sections, and packages a ready-to-send markdown newsletter, while keeping humans in the loop for approvals and final editorial judgment.

1. Workflow Overview

The newsletter agent is an n8n workflow template that:

  • Ingests content from markdown files and social posts (tweets/X) for a specific date
  • Filters and prepares items with identifiers, source URLs, and metadata
  • Uses LLM-based selection to identify the top four stories and generate a shortlist
  • Writes structured newsletter sections with strict formatting and linking rules
  • Generates intro, subject lines, preheaders, and a Shortlist section
  • Implements an approval loop in Slack before final packaging
  • Outputs a markdown file that can be sent via Slack or a CMS

The template is designed for teams that want repeatable AI newsletter production with strong editorial control, traceability, and clear data provenance.

2. Architecture & Data Flow

At a high level, the workflow is organized into the following stages:

  1. Trigger & Input – A form trigger collects the target date and optional previous newsletter content.
  2. Content Ingestion – Markdown content is loaded from object storage, and tweets are pulled for the same date.
  3. Filtering & Preparation – Non-relevant files are excluded, text is extracted, and metadata is normalized.
  4. Story Selection (LLM-assisted) – LLM chain nodes select the top stories and generate editorial reasoning.
  5. Section Generation – Each selected story is expanded into a structured newsletter section using LLM prompts.
  6. Intro & Subject Line Generation – Additional LLM calls produce the intro, subject lines, preheaders, and Shortlist.
  7. Approval Loop – Slack nodes gather editor approvals or feedback on reasoning, subjects, and content.
  8. Final Assembly & Delivery – The finished newsletter is compiled into markdown, converted to a file, and uploaded.

The workflow uses standard n8n nodes, LangChain-style LLM chain nodes, and integrations with S3/R2, HTTP APIs, and Slack. It is structured to support production usage with careful rate limiting, retries, and guardrails in prompts.

3. Node-by-Node Breakdown

3.1 Trigger & Input Handling

  • formTrigger
    Acts as the entry point for the workflow. It typically exposes:
    • date – Target newsletter date used to query content sources
    • previous_newsletter_content (optional) – Used to avoid duplicating stories that recently appeared
  • set_input
    Normalizes and stores the form input as workflow-level data. This node may:
    • Standardize date formats
    • Initialize variables or default values when previous_newsletter_content is not provided

3.2 Content Ingestion

The workflow ingests content from two primary sources: markdown files in object storage and social posts for the same date.

  • search_markdown_objects
    Queries the storage bucket (for example an S3-compatible or R2 bucket) that holds ingested content. It searches the data-ingestion bucket, typically using a date-based prefix or metadata filter to locate relevant objects.
  • S3 / R2 download nodes
    For each object returned by search_markdown_objects, a download node retrieves the binary content. These nodes:
    • Download markdown files and related artifacts
    • Return file content and basic metadata (key, bucket, size, etc.)
  • search_tweets
    Queries a tweet or X archive for the target date. This may connect to internal APIs or an external service, returning a set of social posts related to AI topics within the selected time frame.
  • extract_tweets
    Processes raw tweet data into a normalized structure, extracting:
    • Tweet text
    • Author handle
    • Permalink or tweet URL
    • Timestamps and identifiers

3.3 Filtering & Preparation

Once content is ingested, the workflow filters out non-relevant items and prepares each piece with consistent metadata.

  • Filter
    This node enforces the content selection rules before LLM processing:
    • Exclude non-markdown objects
    • Exclude items that are already newsletters
    • Exclude non-target content types that should not appear in this AI newsletter

    Filtering at this stage reduces LLM cost and avoids noise in the selection process.

  • extractFromFile
    Converts downloaded file binaries into plain text. For each markdown file:
    • Extracts the text body that will be passed to the LLM
    • Preserves a mapping between identifiers and text content
  • HTTPRequest
    When metadata or additional file information is stored behind an internal API, this node:
    • Fetches identifiers, authors, and external source URLs
    • Retrieves supplemental metadata used later for traceability and linking

After this stage, each content item typically includes:

  • A stable identifier
  • Source type (markdown, tweet, scraped page, etc.)
  • Author information
  • One or more external source URLs
  • Plain-text content used as LLM input

3.4 Story Selection (LLM Chain Nodes)

The workflow uses LangChain-style LLM chain nodes to perform editorial selection over the aggregated content.

  • LangChain / LLM chain nodes (story selection)
    These nodes:
    • Take the set of candidate stories (markdown text, tweets, and metadata)
    • Apply a prompt that asks the model to select the best four stories for the newsletter
    • Generate two key outputs:
      • top_selected_stories – A structured object containing the chosen stories and their identifiers
      • top_selected_stories_chain_of_thought – A narrative explanation of why each story was selected

    The chain-of-thought is not exposed to end readers but is critical for internal transparency and editorial review.

The top_selected_stories_chain_of_thought output is shared with editors through Slack to provide visibility into the model’s reasoning before writing begins.

3.5 Batch Processing of Selected Stories

Once the top stories are chosen, each one is processed individually in a loop.

  • splitInBatches
    Iterates over the top_selected_stories collection. This node:
    • Splits the list of stories into manageable batches
    • Ensures controlled processing for each story to avoid timeouts or rate limits
  • iterate
    For each batch, the workflow:
    • Resolves identifiers back to full source content
    • Downloads or fetches additional text if needed (for example via S3/R2 or HTTP APIs)
    • Aggregates external URLs and any related scraped pages
  • LangChain / LLM chain nodes (section writing)
    For every selected story, an LLM node generates a newsletter segment that adheres to a strict template:
    • The Recap – A concise narrative summary
    • Unpacked – Three bullet points that break down the story
    • Bottom line – Two sentences that synthesize implications or takeaways

    The output is returned in a structured format so it can be easily aggregated into the final newsletter layout.

All generated sections are collected into a single data structure representing the main body of the newsletter.

3.6 Intro, Subject Lines, and Shortlist

Additional LLM prompts are used to create supporting sections and email metadata.

  • LangChain / LLM chain nodes (intro)
    Produces the opening section of the newsletter, including:
    • A greeting
    • Two short paragraphs that set context for the edition
    • A transition phrase that leads into the main stories
    • A brief list of topics covered in the issue
  • LangChain / LLM chain nodes (subject lines & preheaders)
    Generates:
    • Multiple subject line options
    • Pre-header text for email clients
    • A reasoning block explaining why each subject/preheader combination was chosen

    This reasoning is shared with editors to support fast decision-making and A/B testing.

  • LangChain / LLM chain nodes (Shortlist)
    Creates a Shortlist section that summarizes additional notable stories that did not make the top four. These are:
    • Short, punchy summaries
    • Linked back to their source URLs, respecting the linking rules described below

3.7 Approvals & Editorial Review

The workflow includes an explicit human-in-the-loop step via Slack.

  • Slack sendAndWait
    Sends messages to a Slack channel or DM that contain:
    • The chain-of-thought for story selection
    • Subject line and preheader options with reasoning
    • Optionally, previews of story sections or the assembled newsletter

    The node is configured with inline response buttons (for example Approve / Request changes) and waits for a response before continuing.

If editors request changes, the workflow can route to an edit path where only the requested elements (such as a particular subject line or a specific story section) are regenerated. Other metadata and sections remain intact, which helps preserve consistency and avoid unnecessary LLM calls.

3.8 Final Assembly & Output

After approval, the workflow compiles all generated pieces into a single markdown file.

  • convertToFile
    Takes the final markdown string and converts it into a .md file that can be uploaded or archived.
  • upload file
    Sends the generated file to Slack or a CMS. Typical usage:
    • Upload the markdown file to a Slack channel for the editorial or marketing team
    • Optionally post a message with a permalink to where the file is stored

The workflow then posts a final Slack message indicating that the newsletter is ready, including a link to the uploaded markdown or CMS entry.

4. Content Rules & Editorial Guardrails

The template encodes strict editorial policies directly into LLM prompts to maintain consistency and reduce risk.

  • Fixed section structure
    Each main story follows the same pattern:
    • The Recap – High-level summary
    • Unpacked – Exactly three bullet points
    • Bottom line – Exactly two sentences
  • Linking rules
    To ensure traceability and legal safety:
    • Only URLs that appear in the provided sources may be used
    • URLs must be copied verbatim from the source material
    • If a URL in the source is incomplete, it is still copied as-is, and the problem is surfaced to editors
  • Language blacklists
    Prompts incorporate lists of banned words or phrases to avoid:
    • Overly hyped or sensational language
    • Excessive jargon that reduces readability
  • Traceability requirements
    LLM outputs must:
    • Include identifiers for each referenced story
    • Honor source URLs for every linked claim
    • Generate chain-of-thought reasoning that can be inspected internally

5. Configuration Notes & Production Best Practices

5.1 LLM Cost Management

  • Batch LLM calls where possible using splitInBatches and careful prompt design.
  • Cache outputs for stable inputs, particularly for repeated metadata or unchanged stories.
  • Use smaller or cheaper models for routine tasks (for example Shortlist summaries or simple transformations).
  • Reserve larger or more capable models for creative tasks like subject line ideation or nuanced recap writing.

5.2 Data Provenance & Compliance

  • Attach identifiers and source URLs to every generated segment and store them alongside final outputs.
  • Persist the full set of inputs and LLM outputs for audits, debugging, or dispute resolution.
  • If you work with PII or copyrighted snippets, ensure legal review and implement redaction or filtering rules before sending data to LLMs.

5.3 Security & Secrets Management

  • Use n8n credential nodes and environment variables for:
    • S3/R2 access keys
    • Internal admin API tokens
    • LLM provider API keys
    • Slack bot tokens
  • Apply least-privilege permissions to all keys, restricting them to only the required buckets, endpoints, and scopes.
  • Rotate credentials regularly and avoid hardcoding secrets in nodes or expressions.

5.4 Rate Limiting & Retries

  • Enable exponential backoff on HTTPRequest nodes that call external APIs (for example scraping services or internal admin APIs).
  • Configure node-level retries for transient errors like timeouts or 5xx responses.
  • Filter out empty or malformed content early in the pipeline to avoid unnecessary LLM calls.

5.5 Editorial Workflow & Approvals

  • Always surface:
    • The chain-of-thought for story selection
    • Subject line and preheader reasoning

    in Slack via Slack sendAndWait nodes.

  • Use a dedicated edit path or node to ensure that:
    • Only the requested portion (for example a specific story, intro, or subject line) is modified on re-run
    • Other sections and metadata remain unchanged to preserve consistency

6. Scaling & Monitoring

To operate this workflow at scale, add instrumentation and concurrency controls.

  • Instrumentation
    • Add logging or custom nodes to record:
      • End-to-end run times
      • LLM token usage per run
      • API latency

Automating an AI Newsletter with n8n

Automating an AI Newsletter with n8n

Producing a weekly AI-focused newsletter that is accurate, timely, and well written can quickly become a significant operational burden. This article presents a production-grade n8n workflow template that automates the end-to-end process: ingesting markdown and social content, identifying the most relevant stories with LLMs, drafting structured newsletter sections, generating subject lines and pre-headers, and routing the final draft for human review and approval.

Strategic Rationale: Why Automate an AI Newsletter?

Newsletters remain one of the most effective channels for audience retention and engagement, particularly in rapidly evolving domains such as AI. However, manual curation and writing do not scale as the volume of content and cadence of publication increase.

Automating the workflow with n8n helps you:

  • Eliminate repetitive tasks such as ingestion, scraping, and file retrieval
  • Maintain a consistent editorial structure and tone across all editions
  • Surface the most relevant and timely stories with LLM-driven selection
  • Optimize subject lines and pre-headers for improved open rates
  • Keep editorial control by embedding human review and approval steps

Architecture Overview of the n8n Newsletter Template

The template is designed as a modular, extensible workflow that can be adapted to different content sources and editorial styles. At a high level, the pipeline includes:

  • Trigger and input collection – captures the publication date and, optionally, the previous newsletter to avoid duplication
  • Content ingestion – retrieves markdown files and tweet data (for example from S3) and extracts raw text
  • Filtering and normalization – isolates candidate content for the current edition and removes irrelevant assets
  • LLM-driven story selection – uses LangChain, Gemini, Claude, or similar nodes to select top stories and propose subject lines
  • Story composition – assembles per-story context and generates structured newsletter sections
  • Intro and shortlist generation – creates the opening section and a list of additional stories
  • Human review and approval – routes drafts to Slack or other tools for editorial sign-off
  • Output and distribution – assembles final markdown and optionally uploads or schedules distribution

Detailed Walkthrough: Key Flows and Nodes

1. Triggering the Workflow and Discovering Content

The workflow starts with a form trigger node. This form typically collects:

  • The target publication date for the upcoming issue
  • Optionally, the previous newsletter content to reduce the risk of repeating stories

Using the supplied date, the workflow queries an S3 bucket (or any equivalent storage system) to find relevant markdown content and tweet data files. The search generally uses a date-based prefix or naming convention to scope the content for the specific edition.

2. Retrieving, Parsing, and Structuring Files

Once the relevant objects are identified, n8n downloads the files and converts them into plain text. During this phase, the workflow also extracts and normalizes key metadata, such as:

  • Author names and source identifiers
  • Source or publication names
  • external-source-urls for primary references
  • image-urls for potential visual assets

This structured metadata enables the downstream LLM nodes to reference original sources, link correctly, and align each story with its context.

3. Filtering Candidate Content

Before invoking any LLMs, the workflow filters out non-relevant assets. Typical filters include:

  • Excluding other newsletters or previous editions from the same bucket
  • Restricting to markdown files and tweet exports, ignoring binary or non-text assets
  • Applying date or tag filters to focus on the current cycle

The result is a curated set of candidate items that will feed into the LLM-driven selection step.

4. LLM-Driven Story Curation and Selection

A central part of the workflow is a curated LLM prompt configured via LangChain or another n8n-compatible model connector such as Gemini or Claude. This node receives the aggregated raw text and metadata from the candidate content and is instructed to:

  • Select the top four stories for the main newsletter sections
  • Produce a chain-of-thought style explanation that documents why each story was chosen

The structured output is critical for downstream automation, while the reasoning text provides editorial traceability for your team.

5. Per-Story Content Assembly and Drafting

For each selected story, the workflow executes a dedicated subflow that:

  • Resolves the story identifiers back to their source files or segments
  • Downloads and aggregates all relevant content segments for that story
  • Scrapes any referenced URLs to capture additional context, when external-source-urls are available
  • Passes all collected content, plus writing guidelines, to an LLM node

The LLM is instructed to generate a formatted newsletter block that typically includes:

  • The Recap – a concise summary of the story
  • Unpacked – three single-sentence bullets that break down the implications or details
  • Bottom line – a short, opinionated takeaway

This structure yields consistent, scan-friendly sections that are easy for readers to consume.

6. Subject Line and Pre-Header Generation

A separate LLM node focuses exclusively on subject lines and pre-headers. Its prompt is optimized to:

  • Generate multiple subject line options, typically 7 to 9 words each
  • Create a concise pre-header that complements the chosen subject line
  • Return a brief explanation of the rationale behind each option

This reasoning is useful for editors who want to quickly select or A/B test subject lines without manually brainstorming alternatives.

7. Intro Section and Shortlist of Additional Stories

Beyond the main four stories, the workflow can generate:

  • An introductory paragraph that frames the edition, highlights themes, and sets expectations
  • A shortlist of additional relevant stories that did not make it into the main sections but are still worth mentioning

These elements are also generated via LLM prompts that reference the selected content and maintain the same editorial style.

8. Human Review, Approval Loop, and Publishing

Once the newsletter draft is assembled, the workflow posts the content to a designated Slack channel (or another collaboration tool). The message typically includes:

  • The intro, main story sections, and shortlist
  • Subject line options and the proposed pre-header
  • Any reasoning or chain-of-thought text that may help with editorial decisions

Editorial stakeholders can review, comment, or approve directly in Slack. Depending on the response, the n8n workflow can:

  • Finalize the newsletter, convert it to markdown, attach files, and upload to your CMS or email platform
  • Route the draft back into an editing loop for adjustments and re-generation of specific sections

Embedded Writing Guidelines and Style Controls

To ensure that every edition maintains a consistent voice and is easy to read, the LLM prompts in this template enforce explicit style rules. Typical constraints include:

  • Axios-like brevity with clearly labeled, bolded headings for each section
  • Exactly three unpacking bullets per main story, each written as a single sentence
  • Preference for active voice and simple subject-verb-object constructions
  • Strict limitation on links, using only URLs present in the provided source materials

These rules reduce variance across issues and help prevent hallucinated links or unsupported claims.

Operational Best Practices for Running the Workflow

  • Invest in structured metadata: Ensure that your source content includes consistent identifiers and external-source-urls. This improves link accuracy, traceability, and the quality of LLM outputs.
  • Optimize model selection and cost: Use higher-capacity models for tasks that directly impact engagement, such as subject line generation, and more cost-efficient models for bulk summarization and extraction.
  • Handle rate limits and failures gracefully: Configure retry logic and exponential backoff for external scraping nodes and S3 download steps to handle transient network or API issues.
  • Maintain human-in-the-loop checkpoints: Keep the Slack approval step as a mandatory gate before publishing to reduce factual errors and ensure alignment with editorial standards.
  • Monitor performance and iterate: Track key metrics such as assembly time, LLM token usage, editorial approval latency, and downstream open rates. Use these insights to refine prompts, thresholds, and story selection heuristics.

Troubleshooting and Quality Control

  • Inconsistent LLM output: If responses vary too much in structure or quality, tighten the prompts and specify a required JSON schema for structured outputs. Providing concrete examples often stabilizes results.
  • Missing or malformed links: Ensure that prompts explicitly instruct the LLM to omit links when they are not present or are malformed, rather than inventing new URLs.
  • S3 access issues: For intermittent access problems, validate credentials, permissions, and region configuration, and configure exponential backoff on download nodes within n8n.

Security and Compliance Considerations

When running this workflow in production, treat credentials and data access as first-class concerns:

  • Store API keys, model credentials, and S3 access keys in n8n’s credentials vaults rather than hardcoding them in nodes
  • Review your organization’s privacy policy and data retention standards, especially if you ingest third-party content or user data
  • Ensure that logs and monitoring data do not inadvertently expose sensitive information

Expected ROI and Outcomes

Teams that implement this n8n-based automation typically observe:

  • Approximately 60-80% reduction in preparation time per newsletter edition
  • Significantly faster turnaround from content discovery to a publish-ready draft
  • More consistent subject line performance, supported by systematic testing and iteration

These gains free editorial teams to focus on strategy, analysis, and differentiation rather than mechanical production tasks.

How to Adopt and Customize This n8n Template

To adapt this workflow to your own brand and editorial process:

  1. Copy the template into your n8n instance and connect your S3 or other storage provider, as well as Slack or your collaboration tool of choice.
  2. Customize the LLM prompts to match your newsletter voice, compliance requirements, and any domain-specific terminology.
  3. Run several test executions and inspect the Slack posts carefully, adjusting prompts, filters, and thresholds until the output aligns with your quality bar.

Once validated, you can schedule the workflow or trigger it on demand for each newsletter cycle.

Call to action: If you would like a guided walkthrough or help tailoring this automation to your editorial process, reach out to schedule a 30-minute demo. See the workflow running end to end and learn how to reduce your newsletter production time by 50% or more.

Build an AI Newsletter Agent with n8n

Build an AI Newsletter Agent with n8n

This reference guide describes how to implement an AI-powered newsletter workflow in n8n using object storage, LLM nodes, and Slack integration. The goal is to automate story selection, copywriting, and newsletter assembly while preserving editorial control and consistency.

1. Workflow overview

The n8n workflow automates the full lifecycle of an AI-focused newsletter:

  • Ingests raw content from markdown files and tweet exports stored in S3-compatible object storage
  • Normalizes and aggregates all sources into a single structured payload
  • Uses an LLM to select top stories and generate subject lines and pre-header text
  • Generates Axios-style segments for each chosen story using dedicated prompts
  • Builds the intro and a “Shortlist” section of additional stories
  • Exports the final newsletter as markdown and sends it to Slack for review and approvals

The pipeline is designed for operators who already understand n8n concepts such as triggers, credentials, nodes, and data flows, and want a production-ready pattern for AI newsletter automation.

2. Architecture and data flow

2.1 Logical layers

The workflow is organized into clear stages:

  1. Input ingestion – Trigger the workflow, identify the target newsletter date, and locate relevant source files in object storage.
  2. Content aggregation – Normalize and merge all inputs into a unified structure for LLM processing.
  3. Story selection – Use an LLM node to choose a lead story and three additional stories, plus subject line and pre-header.
  4. Segment authoring – Iterate through selected stories and generate Axios-like segments.
  5. Intro and “The Shortlist” – Generate the newsletter intro and a curated list of additional notable stories.
  6. Approvals, export, and delivery – Assemble the final markdown, send to Slack, and optionally extract assets such as images.

2.2 High-level data flow

  • The workflow starts from a form trigger that captures metadata such as the newsletter date and optionally the previous issue’s content.
  • S3-compatible nodes search and download markdown and tweet objects using a date-based prefix.
  • HTTP Request nodes retrieve metadata and external URLs, which are used to filter and enrich content.
  • ExtractFromFile nodes convert downloaded files into raw text.
  • Set and Aggregate nodes produce a consolidated object that feeds into one or more LLM nodes.
  • LLM nodes perform both editorial decision-making (selection) and content generation (segments, intro, subject lines).
  • SplitInBatches and SplitOut nodes handle iteration over selected stories and identifiers.
  • Slack nodes push intermediate results and final outputs into a channel for human review.
  • File nodes assemble and export the final markdown newsletter for distribution or further processing.

3. Node-by-node breakdown

3.1 Trigger and input configuration

Form Trigger

  • Purpose: Capture runtime parameters for the newsletter run.
  • Typical fields:
    • newsletter_date – Target date used to locate relevant content in the object store.
    • previous_newsletter_content (optional) – Text of the previous issue, used to avoid duplicate coverage.
  • Usage: The values from this trigger are referenced downstream, especially for:
    • S3 search prefixes
    • De-duplication logic in LLM prompts

3.2 Input ingestion from object storage

S3 (search & download) nodes

  • Purpose: Find and download content candidates such as markdown articles and tweet dumps.
  • Typical configuration:
    • Operation: “List” or “Search” with a prefix based on newsletter_date.
    • Filter: Use key patterns or prefixes to target:
      • Markdown content files
      • Tweet exports
    • Download: For each matching object, use a download operation to fetch the file content.
  • Edge cases:
    • No matches for a given date prefix. In this case, consider adding a conditional path to fail early or post a Slack notification.
    • Non-text files in the same prefix. These are filtered out using metadata and file type checks.

HTTP Request nodes (metadata & external URLs)

  • Purpose: Retrieve metadata about each object, including:
    • File type
    • Draft status
    • External source URLs
  • Usage:
    • Exclude newsletter drafts and non-markdown files from downstream processing.
    • Attach external URLs to each content item for later scraping or reference.
  • Filtering logic:
    • Skip any objects flagged as drafts.
    • Skip file types that are not markdown or tweet exports.

3.3 Content extraction and normalization

ExtractFromFile

  • Purpose: Convert downloaded objects into plain text.
  • Inputs:
    • Binary data from S3 download nodes.
  • Output:
    • Text content that can be used directly in LLM prompts or further transformed.

Set and Aggregate nodes

  • Purpose: Normalize heterogeneous inputs into a consistent structure and then aggregate them.
  • Typical fields per item:
    • identifier – A unique ID or filename for the story.
    • friendly_type – Human-readable type, for example “markdown article” or “tweet thread”.
    • authors – Author names when available.
    • external_source_urls – One or more URLs associated with the story.
    • body – Full text content extracted from the file.
  • Aggregation:
    • Combine all normalized items into a single structure that the LLM node can read in one pass.
    • Preserve identifiers and links for later reference in selection and segment writing.

3.4 Story selection using LLM

LLM node (selection stage)

  • Purpose: Act as an editor that selects the top stories and generates subject line and pre-header text.
  • Model integration:
    • Can be configured with LangChain-style integration, or a direct provider such as Gemini or Claude.
  • Input:
    • Aggregated content bundle (identifiers, text bodies, URLs, types, authors).
    • Optionally, previous newsletter content to avoid duplicates.
  • Expected behavior:
    • Select exactly four stories:
      • One lead story
      • Three additional stories
    • Return short reasons for selecting each story.
    • Include the original identifiers for each selected story.
    • Produce:
      • A subject line optimized for open rates
      • Pre-header text that complements the subject line
  • Editorial constraints:
    • Enforce strict de-duplication, both within the current issue and against previous issues when provided.
    • Favor substantive, high-signal sources over trivial updates.
    • Avoid selecting the same story multiple times under different identifiers.

3.5 Segment generation for selected stories

SplitInBatches & SplitOut

  • Purpose: Iterate safely over the list of selected stories.
  • Behavior:
    • Split the LLM selection output into individual story items.
    • Process each story in isolation to avoid token overflows and to maintain clear mapping between inputs and outputs.

Story enrichment and external scraping

  • Purpose: For each selected story, gather all associated identifiers and source texts, and optionally fetch external content.
  • Steps:
    • Collect all relevant text from the normalized items that match the selected identifiers.
    • When external_source_urls are present, perform HTTP requests or scraping to retrieve additional context if needed.
  • Edge considerations:
    • Handle failed URL fetches gracefully and fall back to the existing body text.
    • Do not introduce URLs that are not present in the original metadata.

LLM node (segment writing)

  • Purpose: Generate Axios-like newsletter segments for each story.
  • Output format (enforced via prompt):
    • The Recap: A concise summary of the story.
    • An unpacked bullet list that breaks down key details.
    • A two-sentence “Bottom line” that provides clear takeaways.
  • Formatting constraints:
    • Consistent bolding for headings such as “The Recap” and “Bottom line”.
    • Short, scannable bullets.
    • Strict rules for link usage so that only provided URLs are used.

3.6 Intro and “The Shortlist” sections

LLM node (intro generation)

  • Purpose: Create the newsletter opening section.
  • Structure:
    • Dynamic greeting tailored to the issue.
    • Two short paragraphs providing context or commentary.
    • The exact transition phrase: In today’s AI recap:
    • A short bullet list summarizing the main items in the issue.

LLM node (“The Shortlist”)

  • Purpose: Compile a secondary list of notable AI stories that did not make the main segments.
  • Input:
    • Remaining content items and their associated URLs.
  • URL handling policy:
    • Only use verbatim URLs from the source metadata.
    • Do not invent new links or domains.

3.7 Approvals, export, and delivery

Slack nodes

  • Purpose:
    • Send selected stories, subject line options, and reasoning to an editorial Slack channel.
    • Share the final assembled newsletter for review and sign-off.
  • Typical usage:
    • Post a preview that includes:
      • Chosen lead and secondary stories
      • Subject line and pre-header
      • Short rationale for each choice
    • Upload the final markdown file as an attachment or link.

File export nodes

  • Purpose: Assemble the final newsletter content and convert it into a file.
  • Steps:
    • Use Aggregate and Set nodes to combine:
      • Intro section
      • Main story segments
      • “The Shortlist” section
    • Output the combined text as a markdown file.
    • Upload this file to Slack or store it back into S3-compatible storage.

Optional image extraction

  • Purpose: Extract direct image URLs for use in email builders.
  • Behavior:
    • Scan content for supported image formats such as .jpg, .png, and .webp.
    • Expose these URLs as a separate field or list for downstream tooling.

4. Core n8n nodes and configuration notes

4.1 Primary nodes used

  • Form Trigger – Captures the target date and optional previous newsletter content.
  • S3 (search & download) – Lists and retrieves markdown and tweet objects using a date-based prefix.
  • HTTP Request – Fetches object metadata and external source URLs for filtering and enrichment.
  • ExtractFromFile – Converts downloaded objects into plain text for processing.
  • LangChain / LLM nodes – Power selection, segment writing, intro creation, and subject-line generation.
  • SplitInBatches & SplitOut – Iterate over stories and identifiers in a controlled manner.
  • Aggregate & Set – Merge multiple content fragments into a single newsletter body.
  • Slack – Send previews for review and upload final files to a channel.

4.2 Prompt engineering guidelines

  • Selection prompt:
    • Make the instructions explicit:
      • Return exactly four stories.
      • Include identifiers for each selected item.
      • Provide reasons for inclusion and, when relevant, exclusion of others.
    • Reference previous newsletter content when available to avoid duplication.
  • Story-writing prompts:
    • Specify required headings and their formatting, for example bold labels such as “The Recap” and “Bottom line”.
    • Define bullet style and length constraints.
    • Include exact transition phrases where needed to keep downstream parsing trivial.
  • Hallucination control:
    • Instruct the model to use only facts that appear in the provided inputs.
    • Explicitly forbid inventing links, sources, or metrics.
    • Require that all URLs come from specified input fields such as external_source_urls.

5. Testing,

n8n Developer Agent: Setup Guide & Template

n8n Developer Agent: Setup Guide & Template

Accelerate workflow engineering with the n8n Developer Agent template, a multi-agent automation pattern that translates natural language requirements into fully importable n8n workflow JSON. This guide explains the use case, architecture, key components, configuration steps, and operational best practices so automation teams can reliably generate developer-grade workflows in minutes.

Overview: What the n8n Developer Agent Does

The n8n Developer Agent is designed for automation professionals who want to industrialize how n8n workflows are created. Instead of manually configuring each node and connection, you describe the desired automation in plain language. The agent then interprets the request, consults documentation or reference material, and outputs a complete n8n workflow definition that can be created automatically via the n8n API.

This pattern is particularly valuable for:

  • Rapid prototyping of complex workflows
  • Standardizing workflow design across teams and projects
  • Reducing manual configuration errors
  • Enabling non-developers to specify automations that result in production-ready artifacts

Key Benefits for Automation Teams

  • Natural language to workflow JSON – Convert requirements expressed in plain English into importable n8n workflow definitions.
  • Developer-grade output – Generate JSON that is structured for direct import into n8n, aligned with best practices and consistent node configuration.
  • Multi-model LLM support – Use OpenRouter as the primary model and optionally add Anthropic Claude Opus 4 for deeper reasoning or validation.
  • Integrated documentation usage – Pull in n8n documentation or internal reference files to guide accurate workflow construction.
  • Repeatable, modular pattern – Reuse the template as a standardized “developer agent” across multiple projects or environments.

Template Architecture and Core Components

The template adopts a multi-agent architecture. A primary agent orchestrates language interpretation, documentation lookup, and workflow generation, then passes the result to the n8n API for automated creation. The main building blocks are:

  • When chat message received – A chat trigger that receives human prompts and initiates the workflow generation sequence.
  • n8n Developer (agent) – The central agent node that routes user requests to the language models, memory, tools, and documentation components.
  • GPT 4.1 mini / OpenRouter – The primary LLM used for interpreting requirements, reasoning about the automation, and drafting workflow JSON.
  • Claude Opus 4 (Anthropic) – An optional second model that can be used as a “thinking” or verification stage for complex logic or high-risk automations.
  • Developer Tool – A dedicated tool or sub-workflow that receives the interpreted specification and returns the final, strictly valid n8n workflow JSON.
  • Get n8n Docs / Extract from File – Nodes that retrieve documentation or reference material, for example from Google Docs or other files, to give the agent concrete examples and constraints.
  • n8n (create) – A node that uses your n8n API credential to automatically create a new workflow in your n8n instance based on the generated JSON.
  • Workflow Link – A utility node that constructs a direct, clickable URL to the newly created workflow so you can immediately inspect and refine it.

How the Multi-Agent Flow Operates

At a high level, the Developer Agent implements a structured sequence that moves from user intent to a created workflow in your n8n instance.

Execution Sequence

  1. The user submits a natural language request via the When chat message received trigger.
  2. The n8n Developer agent parses the prompt and forwards the request to the configured language model or models.
  3. The primary LLM (via GPT 4.1 mini / OpenRouter) interprets the requirement, potentially consulting documentation via Get n8n Docs / Extract from File, and produces a draft workflow JSON.
  4. If enabled, Claude Opus 4 (Anthropic) evaluates or refines the draft, improving reasoning quality or validating complex logic.
  5. The Developer Tool receives the draft, validates structure and syntax, and enforces a strict JSON-only output that is ready for import.
  6. The n8n (create) node uses your n8n API credential to create the workflow in your n8n instance using the final JSON.
  7. The Workflow Link node builds a URL to the created workflow so you can open it directly from the execution output.

This pattern separates interpretation, generation, validation, and creation into distinct stages, which simplifies debugging and improves reliability.

Step-by-Step Setup Guide

The following configuration steps assume you have administrative access to your n8n instance and valid API keys for the external services used in the template.

1. Configure OpenRouter as the Primary LLM

OpenRouter is used as the main model for interpreting prompts and generating workflow JSON.

  • Create an OpenRouter API key.
  • In n8n, add a new credential for OpenRouter and insert the API key.
  • Open the node in the template that calls the model (for example, the GPT 4.1 mini node) and select the configured credential.
  • Ensure the model name and endpoint match your OpenRouter configuration.

2. Optionally Enable Anthropic Claude Opus 4

For workflows that involve complex logic or require additional safety checks, you can add Anthropic as a secondary reasoning layer.

  • Create an Anthropic API key.
  • Configure an Anthropic credential in n8n.
  • Enable and link the Claude Opus 4 node in the template to this credential.
  • Route the draft workflow JSON through this node if you want a verification or refinement pass.

3. Set Up the Developer Tool

The Developer Tool is responsible for producing the final, import-ready workflow JSON. It can be implemented in several ways, as long as the output conforms to strict JSON.

  • Implement it as:
    • a sub-workflow in n8n that receives the interpreted spec and returns workflow JSON only, or
    • an external API endpoint that you call from n8n, or
    • a dedicated agent configuration that is tightly constrained to JSON output.
  • Ensure the Developer Tool’s output:
    • is a single JSON object starting with { and ending with }
    • contains no markdown, backticks, or commentary around the JSON
  • Update the template node configuration so the primary agent sends the interpreted request to this tool.

4. Add and Configure the n8n API Credential

To allow the template to programmatically create workflows, you must configure an n8n API credential.

  • Create an API credential in your n8n instance with permission to create workflows.
  • Set the base URL to your n8n deployment domain (for example, https://your-n8n-domain.com).
  • Open the n8n (create) node in the template and select this credential.
  • Confirm that the API path and method used in the node match your n8n version’s API specification.

5. Connect Google Drive for Documentation (Optional)

If you want the agent to reference canonical documentation or internal standards, you can connect Google Drive and point the template to a documentation file.

  • Copy the example Google Doc referenced in the template to your own Drive, or create your own documentation file.
  • In n8n, configure a Google Drive credential with appropriate read permissions.
  • Update the Get n8n Docs / Extract from File node with:
    • your Google Drive credential
    • the file ID of your documentation
  • Verify that the node successfully retrieves and parses the document content.

6. Recommended Change for Easier Testing

For initial validation and debugging, it is often simpler to keep the entire flow in a single execution.

  • Temporarily connect the When chat message received trigger directly to the workflow builder or Developer Tool path, instead of using a cross-workflow execute trigger.
  • This approach keeps the full call chain in one run, which simplifies inspection of intermediate node outputs.
  • Once you are satisfied with the behavior, you can reintroduce cross-workflow execution if you want a more modular architecture.

Testing and Troubleshooting the Developer Agent

If the agent does not return a usable workflow or the created workflow is invalid, use the following checks.

1. Validate All Credentials

  • Confirm that the OpenRouter API key is active and correctly configured.
  • If using Anthropic, verify the Claude Opus 4 credential and quota.
  • Check Google Drive credentials if documentation retrieval is enabled.
  • Ensure the n8n API credential has sufficient permissions and the base URL is correct.

2. Inspect Developer Tool Output

  • Open the execution details in n8n and inspect the output of the Developer Tool node.
  • Verify that the response is:
    • pure JSON, with no surrounding text, markdown, or code fences
    • a single valid object that can be parsed by n8n
  • If necessary, add a node that sanitizes or strips any extraneous characters before passing the JSON to the n8n (create) node.

3. Review Logs and Intermediate Steps

  • Insert temporary debug nodes to capture raw model responses and intermediate transformations.
  • Optionally send these responses to email or log storage for offline inspection.
  • Use this data to refine system prompts, JSON schemas, or validation logic.

4. Start With a Minimal Test Prompt

  • Before attempting complex automations, test the pipeline with a simple request, such as:
    • "Create a workflow with a webhook trigger that sends the payload to an HTTP Request node, then a Set node."
  • If this simple case works, gradually increase complexity and introduce additional nodes or integrations.

Security Considerations and Best Practices

Because the Developer Agent can generate and create workflows automatically, it is important to apply standard security and governance practices.

  • Constrain model outputs – Use strong system prompts that:
    • enforce JSON-only responses for workflow definitions
    • prohibit inclusion of secrets, tokens, or passwords
  • Protect credentials – Never allow the agent to embed real API keys or private credentials in the generated workflow JSON. Use placeholders and bind credentials manually within n8n after import.
  • Review before production – Treat any generated workflow as a draft. Perform code review, run tests in a non-production environment, and validate error handling before enabling the workflow in production.
  • Version and backup workflows – Store workflow JSON in version control or a backup system so you can revert to earlier versions if needed.
  • Limit access – Restrict who can trigger the Developer Agent or modify its configuration, especially in shared or multi-tenant environments.

High-Value Use Cases

The n8n Developer Agent is particularly effective in scenarios where speed, standardization, and collaboration are important.

  • Rapid prototyping for SaaS integrations – Quickly generate working prototypes that connect SaaS platforms, APIs, and internal systems based on textual requirements.
  • Standardized onboarding and customer workflows – Encode best practices in documentation and let the agent generate consistent onboarding or lifecycle workflows across customers or business units.
  • Boilerplate ETL and data ingestion flows – Automatically create common patterns such as ingest-transform-load pipelines, scheduled syncs, or data enrichment flows.
  • Bridging non-technical and technical teams – Allow non-developers to describe the desired automation in natural language, while the agent outputs developer-ready workflows that engineers can review and refine.

Conclusion and Next Steps

The n8n Developer Agent template provides a powerful pattern for turning natural language specifications into fully importable workflow JSON. With properly configured LLM credentials, a robust Developer Tool, and disciplined security practices, automation teams can significantly reduce the time from idea to production-ready workflow.

To get started, import the template into your n8n instance, connect your OpenRouter and (optionally) Anthropic credentials, configure the Developer Tool and n8n API credentials, and run a simple test prompt such as:

"Create a webhook that saves incoming JSON to Google Sheets."

Review the generated workflow, run tests, and iterate on prompts and documentation until the output aligns with your internal standards.

If this guide was valuable, consider subscribing to our newsletter or exploring our documentation for additional n8n templates, patterns, and automation best practices. Feedback on the Developer Agent template is highly appreciated and helps refine future iterations.

Call to action: Import the template, experiment with a few real-world prompts, and share your results with your team. For deeper assistance or customization support, contact our team for a hands-on walkthrough.

Build a New Job Application Parser with n8n & Pinecone

Build a New Job Application Parser with n8n & Pinecone

Imagine never having to manually copy details from resumes into spreadsheets again. Sounds pretty nice, right? In this guide, we will walk through how to build a “New Job Application Parser” in n8n that does exactly that for you.

Using n8n, OpenAI embeddings, Pinecone as a vector store, and a RAG (retrieval-augmented generation) agent, you will be able to automatically parse, enrich, store, and log incoming job applications from your careers page or ATS. Think of it as your always-on assistant that reads every resume, organizes the important details, and makes everything searchable later.

What this n8n job application parser actually does

At a high level, this workflow:

  • Receives new job applications via a webhook
  • Splits long resume text into smaller chunks
  • Creates OpenAI embeddings for those chunks
  • Stores vectors plus metadata in a Pinecone index
  • Uses Pinecone to retrieve relevant context for a RAG agent
  • Runs a RAG agent to parse, summarize, and structure application data
  • Logs the parsed results into Google Sheets or your ATS
  • Sends Slack alerts when something goes wrong or needs attention

So instead of manually scanning PDFs, emails, and cover letters, the system does the heavy lifting and hands you clean, structured data.

Why bother with a Job Application Parser?

If you are part of a hiring team, you already know the pain: tons of applications, a mess of formats, and not enough time to go through them all carefully.

Resumes show up as plain text, PDFs, long cover letters, or even weirdly formatted exports. A job application parser helps you:

  • Extract consistent, structured details from every application
  • Enrich applications with semantic embeddings for smarter search
  • Log everything into a central place like Google Sheets or your ATS
  • Quickly filter, search, and compare candidates across time

Once the data is structured and searchable, you can ask things like “Who applied for SWE roles with 5+ years of experience and strong Python skills?” without digging through individual files.

Architecture at a glance

Here is what sits under the hood of this n8n workflow:

  • Webhook Trigger (n8n) – receives new job application POST requests
  • Text Splitter – breaks long resume text into smaller chunks
  • Embeddings (OpenAI) – converts each chunk into a vector representation
  • Pinecone Insert – stores embeddings and metadata in a Pinecone index
  • Pinecone Query + Vector Tool – retrieves semantically relevant context
  • Window Memory – keeps short-term context available for the RAG agent
  • RAG Agent (LangChain-style) – parses, normalizes, and summarizes applications
  • Append Sheet (Google Sheets) – logs parsed data into a sheet
  • Slack Alert – sends alerts or error messages to your Slack workspace

Let us break down how all these pieces work together in practice.

Step-by-step: how the workflow runs

1. Catch new applications with a Webhook Trigger

Everything starts with a webhook in n8n. You configure it to expose a POST endpoint, for example:

/new-job-application-parser

Your careers site, ATS, or intake form then sends raw application data to this endpoint. That payload might include:

  • Applicant details such as name and email
  • Resume text (plain text or extracted from a file)
  • Job ID or role identifier
  • Source information (like “careers_form”)

As soon as that POST request hits the webhook node, the workflow kicks off.

2. Break long resume content into chunks

Resumes can get pretty lengthy, especially for senior candidates. To work well with embedding models, you do not want to send the entire text as one huge block.

Instead, you use a Text Splitter node to divide the resume into smaller pieces, for example:

  • Chunk size: 400 characters
  • Overlap: 40 characters

The overlap helps preserve context between chunks so important details are not cut in half. This balance keeps you within model limits while still capturing enough meaning from each part of the resume.

3. Generate OpenAI embeddings for each chunk

Next, each chunk goes to an OpenAI embeddings model, such as:

text-embedding-3-small

These embeddings are like semantic fingerprints of each text snippet. They let you later search by meaning, not just by exact keywords. Alongside the vectors, you also store useful metadata, for example:

  • Applicant name
  • Applicant or application ID
  • Job ID
  • Timestamp

This combination of vectors plus metadata is what makes later retrieval and analysis powerful and flexible.

4. Store vectors in Pinecone

Once embeddings are created, a Pinecone Insert node writes them into a Pinecone index, such as:

new_job_application_parser

Each chunk becomes a record in Pinecone, containing:

  • The vector embedding
  • The original text chunk
  • Metadata like applicant_id, job_id, and date

This sets you up to run fast semantic similarity searches later, which is exactly what the RAG agent will rely on.

5. Query Pinecone and enrich context for parsing

When it is time to actually parse and interpret an application, you often want more context than just the raw resume. That is where the Pinecone Query node comes in.

You use it to fetch similar documents or past applications. Then a Vector Tool node converts those query results into a context tool that the RAG agent can use. This lets the agent:

  • Reference prior applications
  • Draw on domain-specific examples
  • Normalize fields more consistently

The result is a smarter, more consistent parsing process.

6. Use a RAG Agent to extract and format structured data

Now for the core of the workflow: the RAG Agent.

This node, backed by a chat model, receives:

  • The raw application data from the webhook
  • Context retrieved from Pinecone via the Vector Tool
  • Short-term context from Window Memory

With a carefully written prompt, the agent extracts structured information such as:

  • Full name
  • Email and phone number
  • Total years of experience
  • Key skills and keywords
  • Education and certifications
  • A matching score or suitability rating for the specific job

You can configure the agent to output either plain text or JSON. For automation, JSON is usually easier to work with. A consistent system prompt and a dedicated parsing prompt help you get reliable, repeatable results.

7. Log parsed results and notify the team

Once the RAG agent has done its job, you do not want that data to just sit in memory. A typical next step is to push it into a central log.

Commonly, this is a Google Sheets sheet, where you use an Append Sheet node to add each parsed application as a new row. From there, you can:

  • Filter and sort applicants
  • Share the sheet with hiring managers
  • Export to other tools or your ATS

In parallel, a Slack Alert node can send notifications when:

  • Parsing fails or returns incomplete data
  • A candidate looks especially strong or high priority

This way, recruiters stay in the loop without having to watch logs all day.

Configuration tips to get better results

To make your n8n job application parser more accurate and efficient, a few configuration details matter quite a bit.

Chunking strategy

  • Start with 400 character chunks and 40 character overlap.
  • Adjust based on your typical resume length and your embedding budget.
  • If important fields are getting split apart, increase overlap slightly.

Choosing embedding models

  • Use a cost-efficient model such as text-embedding-3-small for bulk ingestion.
  • If you need higher quality for retrieval, you can use a more powerful model specifically for RAG queries.

Metadata best practices

  • Store meaningful metadata with each vector: applicant_id, job_id, date, source.
  • This makes filtering, debugging, and downstream joins much easier.

Prompt engineering for the RAG agent

  • Use deterministic system messages that clearly describe the output format.
  • Ask the agent explicitly for a strict JSON schema.
  • Add automated checks to validate JSON before appending to Google Sheets.

Error handling and alerts

  • Connect the RAG Agent’s onError path to the Slack node.
  • Include the original payload and error details in the Slack message.
  • This makes debugging much faster when something goes off script.

Security and compliance considerations

Because you are handling applicant data, it is important to treat security and privacy seriously. A few good practices:

  • Restrict access to the webhook endpoint, for example by limiting to known IPs or using an HMAC signature to verify incoming payloads.
  • Encrypt sensitive fields in Pinecone, or avoid storing personally identifiable information (PII) in the vector store entirely.
  • Instead, keep pseudonymous IDs in the vectors and store PII in a secure database or ATS.
  • Manage all API keys and credentials through n8n’s credentials system, and rotate keys regularly.
  • Make sure your Google Sheets and any downstream storage comply with your company’s data retention and privacy policies.

Testing and validation before you fully rely on it

Before you trust the parser in a live hiring process, it is worth putting it through some realistic tests.

  • Use a variety of resume samples: multi-page PDFs, different layouts, and multiple languages.
  • Test with candidates from different roles and seniority levels.
  • Add validation logic either inside the RAG agent prompt or as an extra node that checks for required fields.
  • Flag missing or ambiguous values for human review instead of silently accepting them.

This helps you catch edge cases early and tune prompts or chunking before you go to production.

Scaling your workflow for high-volume intake

If your team receives lots of applications every day, you will want to plan for scale from the start.

  • Batch embedding requests where possible to reduce API overhead.
  • Use Pinecone namespaces or multiple indexes to partition data by job, team, or region.
  • Consider asynchronous processing:
    • Accept webhooks quickly and acknowledge receipt.
    • Store raw payloads in a queue or object store.
    • Process them in worker nodes to avoid timeouts and keep your system responsive.

Troubleshooting common issues

If something does not look right, here are a few likely culprits and fixes:

  • Missing or incorrect fields: refine the agent prompts, clarify the expected schema, and adjust chunk overlap so related information stays together.
  • Slow performance or high latency: batch embedding calls, and choose Pinecone regions that are close to your compute location.
  • Low quality retrievals: increase the number of candidates returned by Pinecone queries, or add metadata filters to narrow results.

Example webhook payload

Here is a simple example of what your webhook might receive from your careers form or ATS:

{  "applicant_id": "12345",  "name": "Jane Doe",  "email": "jane@example.com",  "resume_text": "...full resume text...",  "job_id": "swe-001",  "source": "careers_form"
}

You can customize this schema to match your own system, as long as the workflow knows where to find the resume text and key identifiers.

Next steps: putting this into your n8n instance

Ready to try this out with real candidates?

You can export the workflow from n8n and adapt it to your own environment by:

  • Adding your OpenAI and Pinecone credentials
  • Setting your Google Sheet ID or ATS integration
  • Configuring the webhook endpoint used by your careers site or form
  • Choosing your Pinecone index name and namespace strategy

Start small. Run a pilot with maybe 10 to 50 applications, then:

  • Iterate on prompts based on where the parser struggles
  • Adjust your JSON schema and validation rules
  • Tune chunk sizes and overlaps to match your resume patterns

Pro tip: Keep a human-in-the-loop review step for at least the first few hundred candidates. Have someone spot-check the parsed output, especially scoring and nuanced fields, so you can refine prompts and catch edge cases early.

If you want help tuning prompts or making the workflow production-ready, you can always reach out to a consultant or jump into the n8n community forums to see how others are solving similar problems.