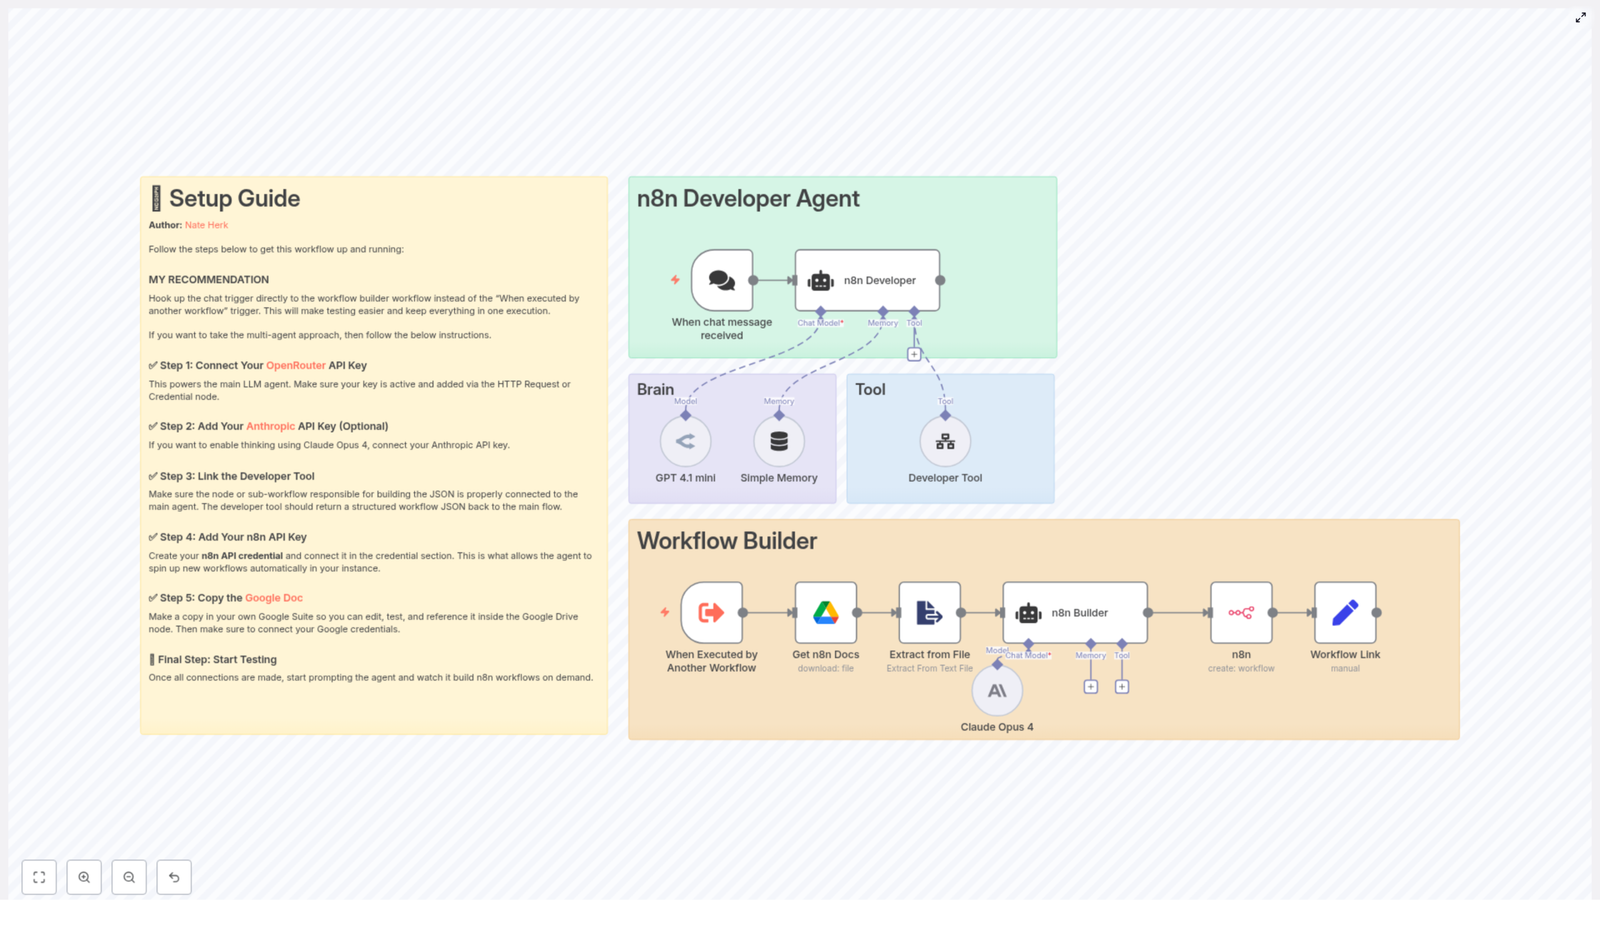
n8n Developer Agent: Setup & Workflow Builder Guide
The n8n Developer Agent workflow template provides a repeatable way to generate and deploy new n8n workflows programmatically from natural language prompts. This documentation-style guide explains the overall architecture, each node’s role, required credentials, configuration details, and common troubleshooting patterns for using the template with OpenRouter, Anthropic (optional), Google Drive, and the n8n API.
1. Overview
The n8n Developer Agent is a multi-agent, LLM-driven workflow that:
- Accepts a natural language request via a chat-based trigger.
- Uses one or more LLMs to translate the request into a complete n8n workflow definition.
- Builds a valid n8n workflow JSON, including nodes, connections, and workflow settings.
- Creates the workflow automatically in your n8n instance using the n8n API.
This template is designed for teams that want to:
- Prototype automations quickly.
- Let non-technical users describe workflows in plain language.
- Automate creation of recurring or standardized workflows.
2. Architecture and Data Flow
At a high level, the Developer Agent template consists of:
- A chat trigger that receives user prompts.
- An AI agent layer that orchestrates LLM calls and tool usage.
- A “brain and memory” component for interpretation and conversational context.
- A Developer Tool that generates final workflow JSON.
- An n8n API integration that creates the workflow and returns a link.
- (Optional) A Google Drive integration to inject documentation or examples into the context.
2.1 High-level execution sequence
- User submits a chat message describing the desired automation.
- The chat trigger node emits the prompt as input to the Developer Agent logic.
- The Developer Agent coordinates LLM calls (OpenRouter, and optionally Anthropic) and invokes the Developer Tool to build full workflow JSON.
- The n8n node calls the n8n API to create a workflow from the JSON definition.
- A Set node constructs a user-facing link to the newly created workflow and returns it to the requester.
3. Node-by-node Breakdown
3.1 Chat Trigger: Entry Point
Node type: Chat message trigger (e.g. “When chat message received”)
Purpose: Capture the user’s natural language request and pass it into the Developer Agent logic.
The chat trigger node:
- Listens for incoming chat messages from a configured channel or interface.
- Emits the raw text of the user’s message as the primary input field.
- Acts as the single source of truth for the original prompt that all downstream nodes use.
For best results, do not modify or rephrase the text between this node and the Developer Tool. This preserves prompt fidelity and ensures the generated workflow matches the user’s original intent.
3.2 n8n Developer Agent (AI Orchestrator)
Node type: AI agent / multi-agent logic
Purpose: Route the user prompt through one or more LLMs and tools, and supervise construction of the final workflow JSON.
The Developer Agent:
- Receives the prompt from the chat trigger.
- Uses OpenRouter (GPT 4.1 mini in the template) for general reasoning and workflow design.
- Optionally calls Anthropic Claude Opus 4 for deeper “thinking” or analysis steps.
- Invokes the Developer Tool node to output a fully specified n8n workflow JSON object.
OpenRouter is configured as the primary LLM provider, and Anthropic is optional. The agent can be set up so that:
- GPT 4.1 mini interprets the request, identifies necessary integrations, and outlines nodes.
- Claude Opus 4, if enabled, refines complex logic or validates the design before JSON generation.
3.3 Brain and Memory
Node types: LLM node(s) + memory buffer
Purpose: Interpret the prompt, maintain conversational state, and support iterative refinement.
In the template:
- A smaller, cost-efficient model (GPT 4.1 mini) handles immediate natural language understanding.
- An optional memory buffer stores previous messages and intermediate decisions for multi-step sessions.
Memory is not strictly required, but it is beneficial when:
- The same user iterates on a workflow (“Add another step”, “Change the trigger”, etc.).
- You want the agent to recall earlier constraints or preferences within a single session.
If you disable memory, each request is treated as a stateless, single-shot generation. This can be safer for production environments where you want strict isolation per request.
3.4 Developer Tool (Workflow Builder)
Node type: Tool node or sub-workflow
Purpose: Convert the interpreted specification into a valid, importable n8n workflow JSON.
The Developer Tool is the component responsible for returning:
- A complete JSON object that starts with
{and ends with}. - All required workflow-level settings (name, active flag, etc.).
- The full set of nodes, their parameters, and any credentials placeholders.
- Connections between nodes, including trigger relationships and data flows.
Implementation details:
- The tool must accept the exact user prompt and any relevant context as inputs.
- The output must be pure JSON with no surrounding markdown, code fences, or commentary.
- Sticky notes should be embedded into the generated workflow to explain each node and highlight credential requirements or manual configuration steps.
JSON validation is critical. The Developer Tool should verify:
- That the JSON structure is syntactically valid.
- That required keys for nodes and connections are present.
- That there is no extraneous text outside the JSON object.
3.5 n8n Node (Create Workflow)
Node type: n8n API node (create workflow action)
Purpose: Call your n8n instance API to create a new workflow from the generated JSON.
The n8n node:
- Uses an n8n API credential to authenticate against your instance.
- Receives the workflow JSON from the Developer Tool.
- Performs the “create workflow” action via the n8n REST API.
After successful creation, the node returns the newly created workflow’s metadata, such as:
- Workflow ID.
- Workflow name.
- Other API response fields relevant to your instance.
3.6 Set Node (Workflow Link Builder)
Node type: Set node
Purpose: Generate a user-friendly, clickable link to the newly created workflow.
The Set node typically:
- Reads the workflow ID and base URL of your n8n instance.
- Constructs a direct link to the workflow editor.
- Outputs this link back to the chat or calling system so the requester can open, test, and iterate on the workflow immediately.
3.7 Google Drive Node (Optional Context Provider)
Node type: Google Drive node
Purpose: Supply documentation or example workflows as additional context for the LLM.
When enabled, the Google Drive node can:
- Fetch internal documentation, such as a “n8n internal docs” file or reference workflows.
- Provide this content as context to the LLM to improve accuracy and adherence to internal standards.
This integration is optional but recommended if you want the Developer Agent to:
- Align generated workflows with internal conventions.
- Leverage existing documentation as a knowledge base.
4. Configuration and Setup
The following steps describe how to configure and run the template in your environment. Perform them in order to ensure all dependencies are satisfied.
4.1 Configure OpenRouter (Required)
Role: Primary LLM provider for GPT 4.1 mini.
- Obtain an OpenRouter API key from your OpenRouter account.
- In n8n, create a new credential for OpenRouter and add your API key.
- Attach this credential to the LLM node(s) that use GPT 4.1 mini within the Developer Agent.
Without a valid OpenRouter credential, the core reasoning and prompt interpretation will fail, and the Developer Agent will not be able to generate workflows.
4.2 (Optional) Configure Anthropic for Claude Opus 4
Role: Secondary LLM for deeper reasoning or complex “thinking” steps.
- Obtain an Anthropic API key from your Anthropic account.
- Create an Anthropic credential in n8n and store the API key.
- Assign this credential to the node configured to call Claude Opus 4.
This step is optional. If you skip it, the template can still function using only OpenRouter, but you will not be able to use Claude Opus 4 for additional analysis.
4.3 Configure the Developer Tool
Role: Generate final n8n workflow JSON.
- Set up the Developer Tool as a sub-workflow or specialized node that:
- Accepts the original user prompt and any contextual data as input.
- Outputs a single, syntactically valid JSON object representing the workflow.
- Ensure the JSON:
- Begins with
{and ends with}. - Contains all nodes, connections, and workflow-level settings required by the n8n API.
- Begins with
- Include sticky notes in the generated workflow to:
- Explain what each node does.
- Highlight any credentials that must be configured manually after creation.
Any additional text around the JSON (for example markdown, comments, or code fences) will cause the create workflow call to fail. Configure the Developer Tool to strip such content or avoid generating it entirely.
4.4 Connect Google Drive (Optional but Recommended)
Role: Provide documentation and examples as context.
- Create a Google Drive OAuth credential in n8n.
- Authorize the credential with appropriate scopes to read the relevant files (for example internal docs or example workflows).
- Attach this credential to the Google Drive node used in the template.
When configured, the LLM can reference these documents during generation to produce workflows that follow your internal best practices.
4.5 Configure n8n API Credentials
Role: Enable programmatic workflow creation in your n8n instance.
- Create an n8n API credential in your instance (for example a personal access token or API key).
- Ensure the credential has permissions to create workflows.
- Attach this credential to the n8n node configured for the “create workflow” action.
Also verify that:
- The base URL of the n8n instance is correct.
- Any HTTPS configuration, including self-signed certificates, is correctly handled in your environment.
5. Example Execution Flow
The following example illustrates how a typical request is processed by the template.
- User prompt: “Build a workflow that watches a Google Drive folder and sends a Slack message when a new file is added.”
- The chat trigger node receives this message and forwards the raw text to the n8n Developer Agent.
- The Developer Agent:
- Uses the configured LLMs (OpenRouter GPT 4.1 mini, and optionally Claude Opus 4) to design the workflow.
- Invokes the Developer Tool to generate a complete workflow JSON with:
- A Google Drive trigger node watching a folder.
- A Slack node sending a message on new file events.
- Any required intermediate nodes and connections.
- The n8n node calls your n8n API endpoint, passing the generated JSON to create the workflow in your instance.
- A Set node constructs a direct link to the new workflow in your n8n UI and returns it to the requester for immediate testing and iteration.
6. Best Practices and Operational Tips
6.1 Prompt Handling
- Prompt fidelity: Pass the user prompt to the Developer Tool exactly as received. Avoid summarizing, translating, or rewording it, as this can change the user’s intent and lead to incorrect workflow generation.
- Context enrichment: If you add extra context (for example from Google Drive docs), clearly separate it from the original prompt so the LLM can distinguish requirements from examples.
6.2 JSON Validation
- Pre-validation: Have the Developer Tool validate the JSON structure before returning it. Common issues include missing keys, malformed arrays, or incorrect connection definitions.
- Pure JSON only: Ensure the response is a single JSON object with no markdown formatting, comments, or additional text. The n8n API expects a clean JSON body.
6.3 Environment Strategy
- Staging first: Test the Developer Agent in a sandbox or staging n8n instance before enabling it in production. This reduces the risk of unexpected or unsafe workflows being created.
- Template review: Manually review generated workflows in staging, confirm node configuration and credential usage, then promote to production patterns once you are satisfied.
6.4 Access Control and Governance
- Restrict who can trigger the Developer Agent, especially in environments where workflows can perform sensitive actions or incur costs.