AI Agent to Chat with YouTube (n8n Workflow)

AI Agent to Chat with YouTube: n8n Workflow for Deep Video, Comment, and Thumbnail Analysis

Build a production-ready n8n workflow that behaves as an AI agent for YouTube. Use OpenAI, the YouTube Data API, Apify, and optional Postgres storage to turn videos, comments, and thumbnails into structured, queryable insights.

1. Solution Overview

This documentation describes a complete n8n workflow that exposes a conversational AI layer on top of YouTube data. The workflow accepts natural language chat requests, calls the YouTube Data API to retrieve channel and video information, optionally transcribes video audio, evaluates thumbnails, and aggregates comment sentiment and topics using OpenAI models. Results can be persisted in Postgres to maintain chat memory and session continuity.

The template is suitable for users who already understand n8n basics, REST APIs, and LLM-based agents, and want a repeatable pattern to query YouTube programmatically through a chat interface.

2. Architecture & Data Flow

2.1 High-Level Workflow

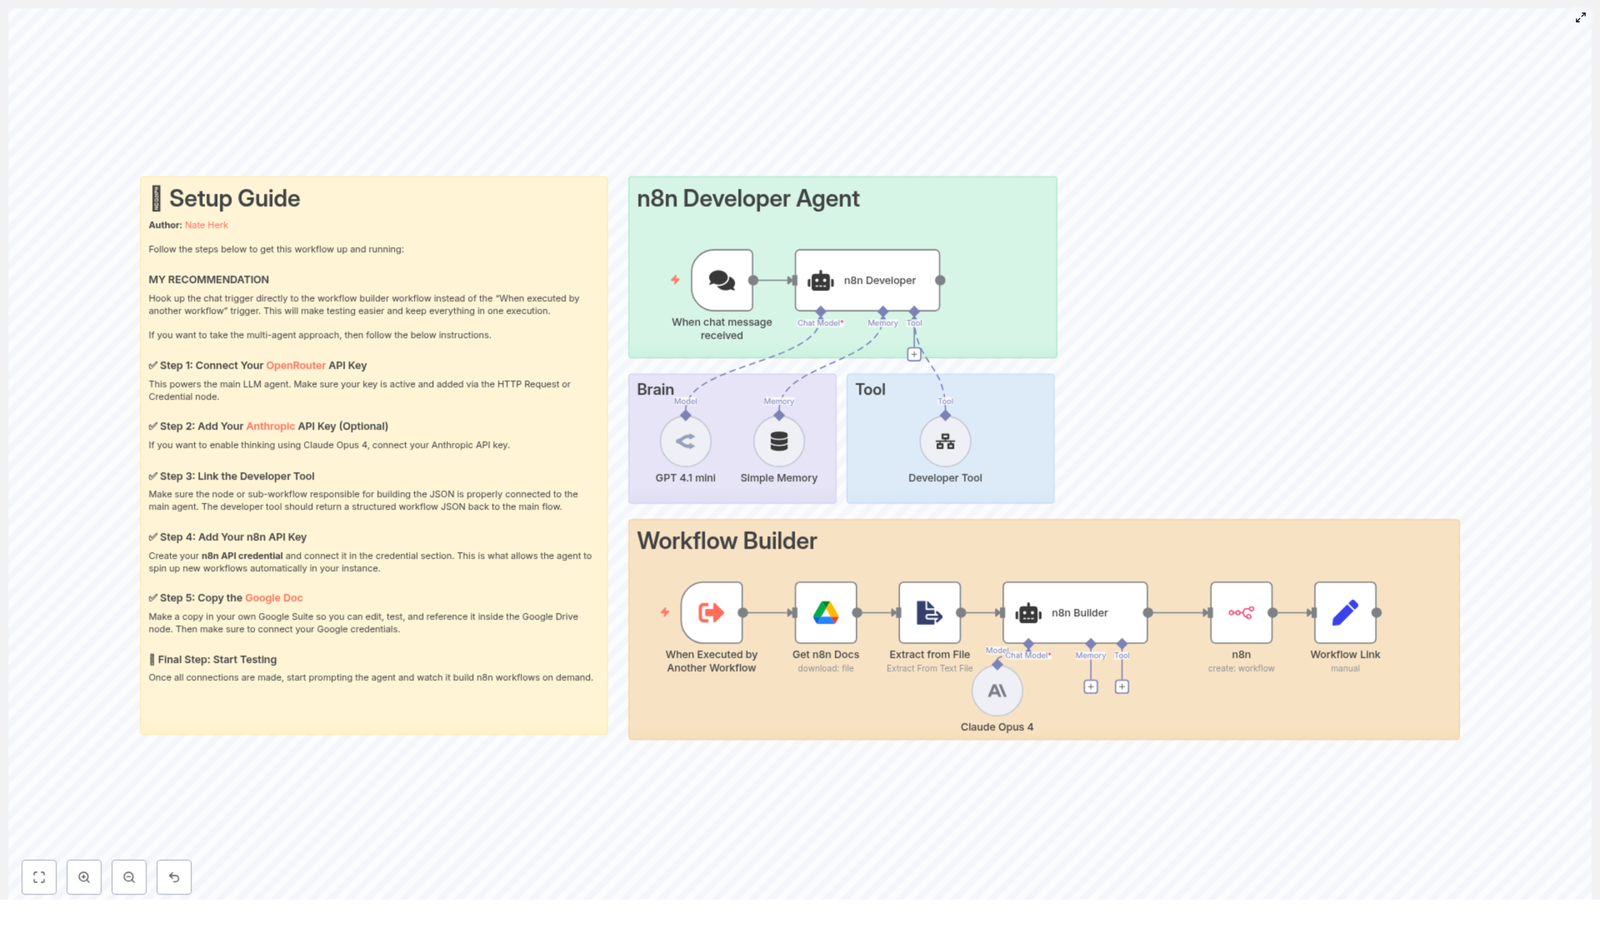
The workflow executes the following high-level sequence:

  1. Chat Trigger receives a user query (for example: “Analyze the latest video on channel @example”).
  2. AI Agent (OpenAI functions) interprets the request, determines which tools are needed, and emits a structured command.
  3. Switch node routes that command to the appropriate sub-branch:
    • Channel details
    • Video list or video details
    • Comment retrieval and analysis
    • Video transcription via Apify
    • Thumbnail image analysis
  4. YouTube Data API HTTP Request nodes fetch channel, video, and comment data.
  5. Apify optionally transcribes video audio to text for deeper content analysis.
  6. OpenAI processes transcripts, comments, and thumbnails to generate insights.
  7. Postgres (optional) stores chat memory and session context.
  8. Final OpenAI response node composes a structured answer that can be returned to the user.

2.2 Core Components

  • n8n – Orchestration layer that manages triggers, branching, HTTP calls, and integration with LLM tools.
  • OpenAI – Handles natural language understanding, summarization, comment and transcript analysis, and thumbnail critique via text and image-capable models.
  • Google YouTube Data API – Provides channel, video, and comment metadata. Requires a Google Cloud project and API key (plus OAuth if needed).
  • Apify (optional) – Used as a transcription or scraping backend when you need audio-to-text or when API access to certain data is constrained.
  • Postgres (optional) – Acts as a persistent memory store for multi-turn conversations and user-specific context.

3. Prerequisites & Setup

3.1 Required Accounts & APIs

  1. Google Cloud project
    • Enable the YouTube Data API v3.
    • Generate an API key for server-side requests.
    • Optionally configure OAuth credentials if your environment or quota model requires it.
  2. OpenAI account
    • Create an API key with access to the models you plan to use (chat and image analysis models).
  3. Apify account (optional)
    • Generate an API token if you intend to use Apify transcription actors or scraping utilities.
  4. Postgres database (optional)
    • Provision a Postgres instance if you want long-term chat memory.

3.2 n8n Credential Configuration

In n8n, configure the following credentials:

  • OpenAI – Use the built-in OpenAI credential type and store your API key securely.
  • YouTube Data API – Typically configured as an HTTP Request using Query Auth with the API key passed as a query parameter (for example key=<YOUR_API_KEY>).
  • Apify – Configure an HTTP or dedicated Apify credential with your API token.
  • Postgres – Use the Postgres credential type and set host, port, database, user, and password for the memory store.

3.3 Workflow Import

Either import the provided workflow template into n8n or recreate the logic with the following node types:

  • Chat trigger node and OpenAI agent node (functions-based).
  • Switch node for routing tool commands.
  • HTTP Request nodes for YouTube Data API and Apify.
  • OpenAI nodes for text and image analysis.
  • Postgres nodes for memory read/write (if enabled).

4. Node-by-Node Breakdown

4.1 Chat Trigger & AI Agent

Purpose: Accept user input and convert it into structured tool calls.

  • Chat Trigger Node
    • Acts as the entry point for the workflow.
    • Receives messages such as:
      • “Analyze the latest video on channel @example.”
      • “Summarize the main complaints in comments on this video URL.”
  • AI Agent Node (OpenAI functions agent)
    • Configured to use OpenAI with function calling / tools.
    • Parses the user request and maps it to one or more tool commands such as:
      • get_channel_details
      • videos
      • video_details
      • comments
      • video_transcription
      • analyze_thumbnail
    • Can request clarification from the user if critical parameters are missing, for example:
      • Missing channel handle or channel ID.
      • Missing video URL or video ID.

4.2 Switch Node (Command Router)

Purpose: Route the agent’s selected tool command to the correct processing branch.

  • The Switch node examines a field in the agent output (for example command or toolName).
  • Each case corresponds to a sub-workflow:
    • get_channel_details – Channel metadata branch.
    • videos – Channel video listing branch.
    • video_details – Single video metadata and statistics.
    • comments – Comment thread retrieval and later analysis.
    • video_transcription – Transcription via Apify.
    • analyze_thumbnail – Thumbnail image analysis via OpenAI.

4.3 YouTube Data API HTTP Nodes

Purpose: Fetch raw data from YouTube that the agent will later interpret.

Typical HTTP Request configurations include:

  • Channel details
    • Endpoint: https://www.googleapis.com/youtube/v3/channels
    • Parameters:
      • part=snippet,contentDetails,statistics (adjust as needed)
      • forHandle=<channel_handle> or id=<channel_id>
      • key=<YOUR_API_KEY>
    • Used to retrieve channel title, description, thumbnails, and basic statistics.
  • List channel videos
    • Endpoint: often search or playlistItems depending on design.
    • Common parameters:
      • channelId=<channel_id>
      • order=date or order=viewCount
      • maxResults to limit the number of videos.
    • Returns a list of video IDs and metadata for further processing.
  • Video details and statistics
    • Endpoint: https://www.googleapis.com/youtube/v3/videos
    • Parameters:
      • part=snippet,contentDetails,statistics
      • id=<video_id_list>
    • Provides titles, descriptions, durations, view counts, likes, and other metrics.
  • Comment threads
    • Endpoint: https://www.googleapis.com/youtube/v3/commentThreads
    • Parameters:
      • part=snippet,replies (if replies are needed)
      • videoId=<video_id>
      • maxResults and pageToken for pagination.
    • Supports pagination through nextPageToken when retrieving large comment sets.

4.4 Transcription via Apify

Purpose: Convert video audio into text for content analysis.

  • Input to Apify:
    • Video URL, typically constructed from the video ID (for example https://www.youtube.com/watch?v=<video_id>).
  • Apify actor:
    • Use a transcription actor or a custom actor that calls a speech-to-text (STT) service.
    • Returns structured text that represents the spoken content.
  • n8n HTTP Request node:
    • Calls the Apify actor endpoint with your API token.
    • Waits for transcription results or polls until the run is complete, depending on your actor configuration.

The resulting transcript is then passed to an OpenAI node for summarization, topic extraction, or generation of timestamps and caption suggestions.

4.5 Thumbnail Analysis (OpenAI Image Model)

Purpose: Evaluate thumbnail quality and generate actionable design feedback.

  • Input data:
    • Highest resolution thumbnail URL from the video metadata (for example maxres thumbnail if available).
  • OpenAI node:
    • Configured to use an image-capable model.
    • Prompt includes guidance to evaluate:
      • Overall design and composition.
      • Text legibility and font size.
      • Color contrast and visual hierarchy.
      • Facial expressions and emotional impact, if faces are present.
      • Clarity and prominence of calls to action (CTAs).
    • Output is a structured critique and improvement suggestions.

4.6 Comment Analysis & Synthesis

Purpose: Transform raw comment threads into insights about audience sentiment and topics.

  • Input:
    • Aggregated comments retrieved from the YouTube commentThreads endpoint.
    • Optionally flattened into a single text block or batched segments.
  • OpenAI processing:
    • Sentiment analysis across all comments (positive, negative, neutral).
    • Keyword and topic extraction to identify recurring themes.
    • Clustering of common feedback or feature requests.
    • Extraction of frequently asked questions that can drive future content.

The AI agent then returns comments-derived insights in structured form, for example bullet points of user pain points or top-requested topics.

4.7 Postgres Chat Memory

Purpose: Maintain context across multiple user interactions.

  • What is stored:
    • Session identifiers or user IDs.
    • Recent channels or videos analyzed.
    • Key user preferences or constraints surfaced during conversation.
  • How it is used:
    • Subsequent queries can reference previous results without repeating parameters, for example:
      • “Now analyze the comments on the last video you just summarized.”
    • The agent can read from Postgres at the start of a session and write updates at the end of each turn.

4.8 Final Response Composition

Purpose: Combine all partial outputs into a cohesive answer for the user.

  • Inputs:
    • Channel summaries and statistics.
    • Selected video metadata and performance metrics.
    • Transcript highlights and extracted topics.
    • Comment sentiment and FAQ clusters.
    • Thumbnail critique and optimization tips.
  • OpenAI node:
    • Formats the response into:
      • Bullet-point insights.
      • A brief analytic report.
      • Content plan suggestions or clip ideas.

5. Configuration Notes & Edge Cases

5.1 API Quotas & Limits

  • YouTube Data API:
    • Each endpoint has a quota cost per request.
    • Batch video IDs where possible to minimize calls.
  • OpenAI:
    • Token usage can grow rapidly with long transcripts and large comment sets.
    • Consider summarizing or sampling input before sending to the model.

5.2 Transcription Cost & Duration

  • Long-form content significantly increases STT costs and processing time.
  • Consider:

Automated Notion API Update Workflow with n8n

Automated Notion API Update Workflow with n8n

This guide documents an end-to-end n8n workflow template that processes Notion API updates using text embeddings, a Supabase vector store, a retrieval-augmented generation (RAG) agent, and automated logging and alerting. The goal is to convert incoming Notion changes into vectorized, searchable context for an agent, while preserving a complete audit trail and surfacing failures in real time.

1. Workflow Overview

The n8n template automates the processing of Notion API update events as follows:

  • Receives Notion update payloads through an HTTP webhook.
  • Splits long Notion content into overlapping text chunks.
  • Generates embeddings using the OpenAI text-embedding-3-small model.
  • Stores the resulting vectors in a Supabase-backed vector index.
  • Uses a RAG agent, powered by an Anthropic chat model, to perform summarization, inference, or validation using retrieved context.
  • Appends agent outputs to a Google Sheet for auditability and review.
  • Sends Slack alerts if the agent path encounters an error.

The result is a resilient, observable pipeline that turns raw Notion API updates into structured, searchable knowledge and operational signals.

2. High-Level Architecture

The workflow is composed of a sequence of n8n nodes, grouped conceptually into four stages: ingestion, vectorization, reasoning, and observability.

2.1 Ingestion

  • Webhook Trigger – Receives POST requests at the /notion-api-update path, containing Notion page metadata and content.
  • Text Splitter – Segments long Notion content into 400-character chunks with a 40-character overlap to maintain context continuity.

2.2 Vectorization and Storage

  • Embeddings – Uses OpenAI text-embedding-3-small to generate vector representations of each chunk.
  • Supabase Insert – Writes embeddings and associated metadata into a Supabase table/index named notion_api_update.
  • Supabase Query – Retrieves top semantic matches from the notion_api_update index when the RAG agent requests context.

2.3 Reasoning and Memory

  • Vector Tool – Exposes the Supabase vector store as a retriever tool to the agent.
  • Window Memory – Maintains a short history of recent interactions, enabling the agent to use limited conversational or processing context across related updates.
  • Chat Model (Anthropic) – Configured with Anthropic credentials, providing the underlying LLM for reasoning.
  • RAG Agent – Orchestrates retrieval from the vector store, combines it with memory and system instructions, and produces structured outputs such as summaries, recommended actions, or validation results.

2.4 Observability and Error Handling

  • Append Sheet (Google Sheets) – Logs the RAG agent output to a Google Sheet, including a Status column for easy scanning and compliance checks.
  • Slack Alert – Executes on the workflow’s onError branch to send formatted alerts to a Slack channel (default #alerts) if the RAG agent or a downstream node fails.

3. Node-by-Node Breakdown

3.1 Webhook Trigger

Purpose: Entry point for Notion API updates.

  • Method: POST
  • Path: /notion-api-update

The Webhook Trigger node should be configured to accept JSON payloads from your Notion automation or intermediary service. Typical payloads may include:

  • Page ID or database item ID
  • Title or name
  • Block content or extracted text
  • Relevant properties or metadata

Before passing data downstream, validate that the payload conforms to the expected schema. At minimum, check for required fields such as page ID and content. If you detect malformed or incomplete payloads, consider:

  • Short-circuiting the workflow and returning an error response.
  • Logging the invalid payload to a separate sheet or logging system.

Proper validation prevents storing unusable content and avoids unnecessary embedding and storage costs.

3.2 Text Splitter

Purpose: Normalize long Notion content into manageable, overlapping segments for embedding.

  • chunkSize: 400 characters
  • chunkOverlap: 40 characters

The Text Splitter node takes the raw text content from the webhook payload and divides it into 400-character segments. A 40-character overlap is applied so that context is shared between adjacent chunks. This overlap helps the RAG agent reconstruct cross-chunk meaning, which is especially important for:

  • Headings and their associated paragraphs.
  • Sentences that span the chunk boundary.
  • Lists or code blocks where continuity matters.

Edge case to consider: very short pages or updates that result in a single chunk. In such cases, the overlap has no effect, but the node still passes a single chunk through to the Embeddings node.

3.3 Embeddings (OpenAI)

Purpose: Generate dense vector representations for each text chunk.

  • Model: text-embedding-3-small

The Embeddings node uses your configured OpenAI credentials to call the text-embedding-3-small model on each chunk. The output is a vector per chunk, which is then passed along with metadata to Supabase.

Operational considerations:

  • Rate limits: If you anticipate a high volume of Notion updates, tune batch size and concurrency to respect OpenAI rate limits. Throttling or backoff strategies can be implemented at the workflow or infrastructure level.
  • Cost control: Smaller models like text-embedding-3-small are optimized for cost and speed, which is generally suitable for indexing Notion content.

3.4 Supabase Insert & Query

Purpose: Persist embeddings and retrieve semantically relevant context.

3.4.1 Supabase Insert

  • Target index/table: notion_api_update

The Supabase Insert node writes each embedding vector into the notion_api_update index, along with identifiers and any additional metadata you choose to include (for example, page ID, chunk index, timestamp, or source URL).

Recommended configuration:

  • Define a composite primary key such as (page_id, chunk_index) to avoid duplicate entries when the same page is processed multiple times.
  • Ensure the vector column is indexed according to Supabase’s vector extension configuration so that similarity queries remain efficient.

3.4.2 Supabase Query

The Supabase Query node is used by the RAG agent retrieval step. It accepts a query vector and returns the top matches from the notion_api_update index. These results are then exposed to the agent via the Vector Tool.

Key parameters typically include:

  • Number of neighbors (for example, top-k matches).
  • Similarity metric configured at the database level (for example, cosine similarity).

While the template focuses on retrieval for the agent, you can also reuse this query configuration for standalone semantic search endpoints or internal tools.

3.5 Vector Tool and Window Memory

3.5.1 Vector Tool

Purpose: Provide a retriever interface over the Supabase vector store to the RAG agent.

The Vector Tool node connects the Supabase Query node to the agent in a tool-like fashion. When the agent determines that it needs additional context, it invokes this tool to fetch relevant chunks from the notion_api_update index.

3.5.2 Window Memory

Purpose: Maintain a bounded context window across related updates.

The Window Memory node stores recent conversation or processing history, giving the agent short-term memory across multiple invocations. This is useful when:

  • The same Notion page is updated multiple times in a short period.
  • You want the agent to be aware of previous summaries or decisions.

The memory window is intentionally limited so the agent does not accumulate unbounded history, which could affect performance or cost for large conversations.

3.6 Chat Model (Anthropic) and RAG Agent

3.6.1 Chat Model (Anthropic)

Purpose: Provide the underlying large language model used by the RAG agent.

The Chat Model node is configured with Anthropic credentials. This node defines the model that will receive the system prompt, user input, retrieved context, and memory.

3.6.2 RAG Agent

Purpose: Orchestrate retrieval, reasoning, and output generation.

The RAG Agent node is responsible for:

  • Accepting system instructions that define behavior (for example, summarize page changes, propose actions, or validate content).
  • Invoking the Vector Tool to retrieve relevant embeddings from Supabase.
  • Using Window Memory to incorporate recent context.
  • Producing structured outputs that downstream nodes can log or act upon.

Configuration options include:

  • Prompt design: You can tune the system message to request summaries, recommended Notion property updates, or actionable items for other systems.
  • Output formatting: Ensure the agent output is consistently structured if you plan to parse fields into specific columns or trigger conditional logic.

Errors in the RAG Agent node propagate to the workflow’s error path, where Slack alerts are generated.

3.7 Append Sheet (Google Sheets)

Purpose: Persist agent outputs for auditing, reporting, and manual review.

The Append Sheet node writes the RAG agent’s response to a Google Sheet. The template maps at least one key field to a column named Status, which can be used to track processing state or high-level outcomes.

Typical columns might include:

  • Timestamp
  • Notion page ID or title
  • Agent summary or decision
  • Status (for example, success, needs review)

This sheet acts as an audit log, supporting compliance requirements and providing a simple interface for non-technical stakeholders to inspect agent decisions.

3.8 Slack Alert (Error Handling)

Purpose: Notify the team when the RAG agent or downstream logic fails.

  • Default channel: #alerts

The Slack Alert node is connected via the workflow’s onError path. When an error occurs, it sends a formatted message to the configured Slack channel. This message typically includes:

  • Workflow name or identifier.
  • Error message or stack information.
  • Optional context, such as the Notion page ID being processed.

These alerts reduce mean time to recovery (MTTR) by surfacing failures quickly to the responsible team.

4. Deployment and Credentials

Before enabling this workflow in a production environment, configure the following credentials in n8n:

  • OpenAI API key for the Embeddings node.
  • Supabase API URL and key for the Insert and Query nodes.
  • Anthropic API credentials (or equivalent chat model credentials) for the Chat Model node.
  • Google Sheets OAuth2 credentials for the Append Sheet node.
  • Slack API token for the Slack Alert node.

Best practices:

  • Use n8n’s credentials vault to store secrets securely and avoid hardcoding API keys in node parameters.
  • Separate environments (for example, staging and production) with distinct credentials and Supabase projects to prevent test data from polluting production indexes.

5. Security, Compliance, and Best Practices

To keep the Notion API update workflow secure and compliant:

  • Validate webhook requests: Use signatures or shared secrets where possible to ensure that incoming requests originate from your Notion integration or trusted middleware.
  • Control data retention: Implement retention policies for the Supabase vector store, such as TTL or soft delete flags, especially if embeddings contain sensitive or regulated content.
  • Enforce role-based access: Restrict who can modify the n8n workflow and limit API key scopes according to the principle of least privilege.
  • Encrypt data: Ensure TLS is enabled for all connections between n8n, Supabase, and external APIs, and use storage encryption where supported by your infrastructure.

6. Performance and Cost Optimization

To keep the workflow efficient as usage grows:

  • Batch embedding requests: Where possible, send multiple chunks in a single Embeddings call to reduce HTTP overhead.
  • Select appropriate models: Use text-embedding-3-small or similarly compact models to balance semantic quality with cost and latency.
  • Prune old vectors: Periodically remove embeddings for outdated or deleted Notion content to keep the notion_api_update index lean and queries fast.
  • Rate-limit incoming events: If your Notion workspace generates high-frequency updates, consider queueing or rate limiting webhook events to avoid hitting provider limits.

7. Monitoring and Testing Strategy

Before running this workflow in production, test and monitor it systematically:

7.1 Testing

  • Send representative sample payloads from Notion to the Webhook Trigger and verify that each downstream node behaves as expected.
  • Validate the Text Splitter behavior with different content lengths, including very long pages and very short updates.
  • Mock external APIs (OpenAI, Supabase, Anthropic, Google Sheets, Slack) in a staging environment to verify error paths and retries.

7.2 Monitoring

Track key metrics to detect regressions and performance issues:

  • Webhook success and failure rate to confirm reliability of ingestion.
  • Embedding API latency and error rate to monitor OpenAI performance and limits.
  • Supabase insert and query latency to ensure vector operations stay within acceptable bounds.
  • RAG agent failures and Slack alert frequency to identify prompt issues, model instability, or upstream data inconsistencies.

8. Common Use Cases

Teams typically deploy this Notion API update workflow for scenarios such as:

  • Automated change summaries: Generate concise summaries of Notion page updates and store them in a central log for stakeholders.
  • Actionable follow-ups: Use agent-generated suggested actions to trigger downstream workflows in project management or ticketing tools.
  • Semantic knowledge search: Build a vector-based search layer over Notion content, enabling semantic queries across pages and databases.

9. Advanced Customization

Once the base template is running, you can extend it in several ways without altering the core architecture:

  • Prompt tuning: Adjust the RAG agent’s system prompt to focus on specific tasks like policy validation, QA checks, or structured extraction of fields.
  • <

Backup n8n Workflows to Gitea (Automated Git Backup)

Backup n8n Workflows to Gitea: Automated Git Backups

Automating backups for your n8n workflows is one of the easiest ways to protect your automations and keep them reproducible. This guide walks you step by step through an n8n workflow template that automatically backs up all your workflows to a Gitea Git repository.

You will learn:

  • Why backing up n8n workflows to Gitea (or any Git repo) is useful
  • How the n8n-to-Gitea backup workflow works behind the scenes
  • How to configure globals, credentials, and nodes in n8n
  • How the workflow decides when to create or update files in Gitea
  • Best practices for security, troubleshooting, and going live

Why back up n8n workflows to Gitea?

Using a Git repository as your backup destination gives you more than just a copy of your workflows. It also adds version control and collaboration features on top.

Backing up n8n workflows to Git (with Gitea in this example) provides:

  • Version history – every change to a workflow is stored as a commit you can inspect or roll back
  • Centralized storage – all workflows live in a single repository, easy to restore or clone
  • Team collaboration – use branches, pull requests, and reviews around your automation logic
  • Automated, scheduled backups – no manual exporting, the workflow runs on a schedule

In practice, this means you can treat your automations like code, with all the benefits of Git-based workflows.

How the n8n-to-Gitea backup workflow works

The provided n8n template automates the full backup process. At a high level, it:

  1. Triggers on a schedule (default: every 45 minutes)
  2. Fetches all workflows from your n8n instance
  3. Loops through each workflow one by one
  4. Checks if a matching JSON file already exists in your Gitea repository
  5. Creates a new file in Gitea if it does not exist
  6. Updates the file if it exists and the content has changed
  7. Stores each workflow as prettified JSON, base64-encoded as required by the Gitea API

To understand how to configure and customize this template, it helps to look at the main building blocks in n8n.

Key n8n nodes used in the template

Schedule Trigger

The Schedule Trigger node starts the backup workflow automatically.

  • Default interval: every 45 minutes
  • You can change this to any interval that fits your backup needs (for example hourly, daily, or custom cron)

Globals (configuration variables)

The Globals node holds configuration values that are reused across multiple nodes. This keeps URLs and repo details in one place.

It typically defines:

  • repo.url – your Gitea base URL, for example https://git.yourdomain.com
  • repo.name – the name of the target repository, for example workflows
  • repo.owner – the user or organization that owns the repository

Other nodes will reference these variables when building API URLs.

n8n node (API request to list workflows)

The n8n API node retrieves all workflows from your n8n instance.

  • It uses your n8n API (token or Basic Auth) to list workflows
  • The output is a collection of workflow objects that will be processed one by one

Make sure this node has valid credentials and permission to list workflows.

ForEach / splitInBatches

The combination of ForEach and splitInBatches nodes is used to iterate over the workflows safely.

  • splitInBatches controls how many workflows are processed at a time
  • ForEach lets you handle each workflow individually

This approach helps avoid rate limits and keeps each API call to Gitea atomic. It is especially useful when you have many workflows.

GetGitea (HTTP Request)

The GetGitea node checks if a file already exists in your Gitea repository for the current workflow.

  • It performs a GET request to a URL like:
    {repo.url}/api/v1/repos/{owner}/{repo}/contents/{workflow-name}.json
  • If the file exists, Gitea returns the file metadata and content, including the current sha
  • If the file does not exist, Gitea returns an HTTP 404, which the workflow uses to trigger the create path

Exist, SetDataCreateNode, SetDataUpdateNode

These logic and helper nodes decide whether the workflow should create a new file or update an existing one.

  • Exist interprets the result of GetGitea (for example 404 vs success)
  • SetDataCreateNode prepares the data structure for creating a new file
  • SetDataUpdateNode prepares the data for updating an existing file, including the required sha

The output of these nodes is then sent to the encoding and HTTP request nodes.

Base64EncodeCreate / Base64EncodeUpdate

Gitea expects file content to be base64-encoded when using the repository contents API. The template uses two code nodes to handle this:

  • Base64EncodeCreate – used when a file is created for the first time
  • Base64EncodeUpdate – used when a file already exists and may be updated

Each of these nodes:

  1. Takes the workflow object
  2. Converts it to prettified JSON for readability in Git
  3. Converts the JSON string to UTF-8 bytes
  4. Encodes those bytes as base64

This base64 string becomes the content field in the Gitea API calls.

PostGitea and PutGitea (HTTP Request)

Two HTTP Request nodes handle the actual write operations to Gitea:

  • PostGitea uses POST to create a new file when it does not exist
  • PutGitea uses PUT to update an existing file, and must include the current sha

The template wires these nodes so that they receive the correct base64 content and metadata from the previous steps.

Step-by-step setup in n8n

The following steps guide you through configuring this template in your own environment.

Step 1: Configure global variables

Open the Globals node and set the values for your Gitea instance:

  • repo.url – for example https://git.your-gitea.com
  • repo.name – for example workflows
  • repo.owner – the username or organization that owns the repository

These values will be reused in the HTTP Request nodes to construct API URLs.

Step 2: Create a Gitea personal access token

The workflow authenticates to Gitea using a personal access token. Create one as follows:

  1. Log in to your Gitea instance
  2. Go to Settings → Applications → Generate Token
  3. Give the token read/write permissions for repositories (or the narrowest scope that still allows file creation and updates)

Next, store this token securely in n8n:

  • Open Credentials in n8n
  • Create a new credential of type HTTP Header Auth
  • Name it something like Gitea Token
  • Set the header to:
    Authorization: Bearer YOUR_PERSONAL_ACCESS_TOKEN

Important: there must be a space after Bearer.

Step 3: Assign credentials to the Gitea HTTP Request nodes

Now connect the token to the nodes that talk to Gitea:

  • Open the GetGitea node and select the Gitea Token credential
  • Repeat for PostGitea and PutGitea

All Gitea API requests are now authenticated through this credential.

Step 4: Configure n8n API credentials

The node that retrieves workflows from n8n also needs valid authentication.

  • Open the n8n API node in the workflow
  • Provide either an API token or Basic Auth credentials
  • Confirm that the account used has permission to list workflows

Once this is set, the node will be able to fetch all workflows for backup.

Step 5: Adjust the schedule (optional)

If the default 45-minute interval does not fit your needs, edit the Schedule Trigger node:

  • Change the interval to the frequency you want
  • Or switch to a cron expression if you need more precise control

How the workflow chooses between create and update

For each workflow, the template follows a clear decision path to avoid unnecessary commits.

1. Check if the file exists in Gitea

The GetGitea node performs a GET request to the Gitea contents API for a file named:

{workflow-name}.json

Two outcomes are possible:

  • File not found (HTTP 404) – the workflow has never been backed up to this repo
  • File found (HTTP 200) – the workflow already exists as a JSON file in the repo

2. Route to create or update logic

The Exist node looks at the HTTP status:

  • If 404, it triggers the create path
  • If successful, it triggers the update path

The two paths look like this:

  • Create path: Base64EncodeCreate → PostGitea
  • Update path: Base64EncodeUpdate → Changed? → PutGitea

3. Compare content before updating

On the update path, the workflow does not blindly send a PUT request. Instead, a Changed node performs a strict string comparison:

  1. It compares the current base64-encoded content generated from the latest workflow
  2. With the base64-encoded content already stored in Gitea

Only if these two strings differ does the workflow proceed to call PutGitea. That way, no unnecessary commits are created when nothing has changed.

When updating, the PutGitea node includes:

  • The new base64-encoded content
  • The existing file sha from the GetGitea response
  • A commit message such as Update workflow {name}

Example Gitea API call patterns

The template uses the standard Gitea repository contents API. The calls look like this:

Get file (used in GetGitea):

GET {repo.url}/api/v1/repos/{owner}/{repo}/contents/{filename}.json

Create file (used in PostGitea):

POST {repo.url}/api/v1/repos/{owner}/{repo}/contents/{filename}.json
Body: {  "content": "<base64-encoded-content>",  "message": "Add workflow {name}"
}

Update file (used in PutGitea, requires sha):

PUT {repo.url}/api/v1/repos/{owner}/{repo}/contents/{filename}.json
Body: {  "content": "<base64>",  "sha": "<current-sha>",  "message": "Update workflow {name}"
}

Troubleshooting and optimization tips

Common issues and how to fix them

  • Authorization errors
    Check that:
    • Your Gitea token is valid and not expired
    • The header is exactly Authorization: Bearer <token>
    • The token has the required repository read/write scope
  • 404 errors when the repository exists
    This usually indicates a URL or variable issue:
    • Verify repo.owner and repo.name in the Globals node
    • Confirm that these values are correctly inserted into the HTTP Request URLs
    • Make sure any special characters are properly URL-encoded if needed
  • PUT failures or missing sha
    When updating a file, Gitea requires the current sha:
    • Ensure the GetGitea node is returning the sha
    • Check that the SetDataUpdateNode passes this sha into the PutGitea body
  • Encoding or corrupted content
    Gitea expects base64-encoded UTF-8 bytes of the file content:
    • Confirm the Base64Encode nodes convert the workflow to prettified JSON first
    • Then ensure that JSON is encoded as UTF-8 bytes and finally as base64
    • Do not send raw JSON directly to the content field

Operational best practices

  • Test manually before scheduling
    Run the workflow manually from n8n and:
    • Watch the execution log for any errors
    • Check the Gitea repository for newly created workflow JSON files
  • Use batches for large instances
    If you have many workflows

Automate Pinterest Analysis & AI Content Suggestions

Automate Pinterest Analysis & AI-Powered Content Suggestions

Imagine waking up, opening your inbox, and finding a neat little summary of what worked on your Pinterest account, what flopped, and a list of fresh, AI-generated pin ideas your team can start on right away. No manual spreadsheets, no endless scrolling through analytics.

That is exactly what this n8n workflow template helps you do. It connects the Pinterest API, Airtable, and an AI agent so you can automatically:

  • Pull detailed pin performance data
  • Store and track it in Airtable over time
  • Run AI-powered analysis on trends
  • Get ready-to-use content ideas sent straight to your team

In this guide, we will walk through what the template does, when to use it, and how to set it up in n8n, step by step. Think of it as building your own Pinterest analytics assistant that runs on autopilot.

Why bother automating Pinterest analytics at all?

Pinterest is a bit different from other platforms. Content does not just spike and vanish. Pins can keep driving traffic and saves for months or even years. That is great for ROI, but it also means:

  • Manual reporting quickly becomes slow and messy
  • It is easy to miss long-term trends and evergreen winners
  • Teams spend more time collecting data than acting on it

By automating your Pinterest analytics with n8n, you get:

  • Continuous monitoring of your top-performing pins and themes
  • AI-powered content ideas tailored to your actual audience behavior
  • A clean historical record in Airtable for A/B testing and planning
  • Minimal manual effort, with daily or weekly reports delivered automatically

If you are serious about Pinterest as a channel, this workflow basically turns your data into a content engine instead of a chore.

What this n8n template actually does

Let us zoom out first. At a high level, the automation runs on a schedule, pulls your latest pins from the Pinterest API, stores and updates them in Airtable, then hands the dataset to an AI agent for analysis and content suggestions. Finally, it emails a human-friendly summary to your team.

High-level n8n workflow overview

  1. A scheduled trigger starts the workflow (daily or weekly).
  2. An HTTP Request node calls the Pinterest API and fetches pins from your account.
  3. A Code/Function node cleans and normalizes the data, and adds helpful tags like type: Organic.
  4. An Airtable node upserts the pin data into a base, keeping a historical record.
  5. An AI agent node (OpenAI via LangChain or similar) analyzes the dataset for trends and opportunities.
  6. A summarization step turns the AI output into a short, readable report.
  7. An Email node sends the summary and content ideas to your marketing or content team.

So every time the workflow runs, your team gets a fresh snapshot of what is working on Pinterest and what to create next.

When should you use this Pinterest automation template?

This workflow is especially helpful if:

  • You publish on Pinterest regularly and want to scale content without guessing
  • Your team spends too much time pulling performance reports manually
  • You want AI-generated pin ideas that are actually grounded in your data
  • You manage multiple campaigns and need consistent, repeatable insights

It is also great if you are building a more advanced analytics stack and want Pinterest data to plug into Airtable for experiments, dashboards, or content calendars.

Step-by-step: key workflow components in n8n

1. Scheduled trigger to kick things off

First, decide how often you want fresh insights. A few common setups:

  • Daily for active campaigns or fast experimentation
  • Weekly for evergreen content and strategic planning

In n8n, use a Schedule Trigger node and set it to run at a specific time, for example every Monday at 8:00 AM. That way, your report lands just in time for your weekly planning meeting.

2. Pull your pins using the Pinterest API

Next up is fetching your data. The workflow uses the Pinterest API v5 pins endpoint with an HTTP Request node.

In the request, you will include your OAuth bearer token in the Authorization header, like this:

Authorization: Bearer YOUR_PINTEREST_ACCESS_TOKEN

Typical fields you will want to request include:

  • id
  • created_at
  • title
  • description
  • link
  • media
  • impressions
  • saves
  • clicks (where available)

If you have a lot of pins, make sure you handle pagination in your HTTP node so you do not miss anything.

3. Normalize and tag the Pinterest data

Raw API responses are rarely in the perfect shape for analysis. A small Code or Function node in n8n can loop through the response and output only the fields you care about, plus a few helpful tags.

For example, you might map each pin to something like:

  • pin_id
  • created_at
  • title
  • description
  • link
  • type (for example, Organic or Paid)

Tagging pins with a type field makes it much easier later to compare organic vs paid performance or experiment with different content categories.

4. Store and upsert records into Airtable

Now that your data is clean, it is time to store it somewhere friendly. This template uses Airtable as a simple, flexible data store.

You will typically configure an Airtable node to:

  • Upsert rows based on pin_id so you do not create duplicates
  • Maintain an append-only history of performance metrics
  • Store additional fields over time, such as impressions, saves, clicks, and any engagement metrics available

With that in place, you get a living Pinterest dataset that you can filter, sort, or connect to other tools, instead of a one-off export that goes stale.

5. Hand the dataset to an AI analysis agent

Here is where it gets fun. The workflow passes your Airtable dataset into an AI agent, often built with LangChain + OpenAI or a similar stack.

The AI agent receives a clear prompt that tells it to:

  • Look for trends, such as most-saved topics and seasonal patterns
  • Identify common keywords or description styles that perform well
  • Spot underperforming categories or formats
  • Return a concise list of new pin ideas your team can test

Here is a sample prompt you can paste into your AI agent node:

You are a data analysis expert. Analyze the following Pinterest pin dataset and return a concise list (6-10) of new pin ideas to reach our target audiences. For each idea include: 1) Pin concept, 2) Suggested headline, 3) Suggested keywords/hashtags, 4) Why it should work based on recent trends in the data.

Dataset:
{{ $json.records }}

Provide the results as a short bulleted list for the marketing team to implement.

You can tweak the wording to match your brand voice or specific goals, but this structure keeps the AI focused and practical.

What should you ask the AI to look at?

To get the most value from your AI analysis, guide it toward patterns that are actually useful for content decisions. For example, you can ask it to analyze:

  • Top-performing pin titles and recurring topics
  • Words or phrases in descriptions that correlate with high saves or clicks
  • Seasonal performance, if your dataset includes timestamps
  • Underused formats that might have upside, such as rich pins, carousels, or short videos
  • Audience intent signals, for example informational vs purchase-driven engagement

The goal is not just “what did well” but “what should we try next based on this”.

Delivering insights to your team automatically

Once the AI has done its job, the workflow wraps everything up into a simple email that your marketing lead or content creators can actually use.

A typical summary email might include:

  • The top 3 trends explained in plain language
  • 6-10 prioritized pin ideas, each with a short rationale
  • Quick notes on how to implement or test the ideas

Use an Email node in n8n (for example Gmail, SendGrid, or another provider) and set the recipients to your marketing manager, content team, or a shared inbox. From there, your team can plug ideas straight into your content calendar.

Operational tips and best practices

Handle Pinterest rate limits and pagination

Pinterest APIs often enforce rate limits per app or per user. To keep your workflow stable:

  • Use pagination when fetching large numbers of pins
  • Implement exponential backoff if you hit 429 or 5xx responses
  • Optionally cache intermediate pages in Airtable or a temporary store so you can resume if the workflow fails midway

Keep your data clean and safe

Good data hygiene saves headaches later. A few guidelines:

  • Store only the fields you truly need for analysis and reporting
  • Avoid collecting personally identifiable information, or mask and remove it if it appears
  • Add an audit column such as last_synced_at in Airtable so you can see when each row was last updated

Prompt engineering for better AI output

Small tweaks in your prompt can dramatically improve AI suggestions. Try to:

  • Be specific about the number of ideas you want
  • Ask for a clear format, such as a numbered or bulleted list
  • Require a short, one-line rationale for each idea

This keeps the output tight, actionable, and easy for your team to skim.

Testing your workflow and rolling it out

Before you rely on this automation for real decisions, run through a quick testing checklist:

  1. Run the workflow in a “dry run” mode to confirm the Pinterest API response structure.
  2. Check that Airtable upserts correctly, with no duplicate pin_id values and all fields mapped as expected.
  3. Test your AI prompt with a smaller dataset and iterate until the suggestions feel consistently useful.
  4. Start by sending the report to one stakeholder or a small group before sharing it with the whole team.

A little testing upfront will save you from confusing dashboards or noisy AI output later.

Security and credential management

Since this workflow touches multiple APIs, treat your credentials carefully. As you configure n8n:

  • Store your Pinterest OAuth token, Airtable API key, and OpenAI credentials in environment variables or n8n’s native credential store
  • Rotate tokens regularly to reduce risk
  • Restrict access to the n8n workspace so only the right people can view or edit the automation

Example n8n node mapping at a glance

If you prefer a quick visual summary, a typical node sequence looks like this:

  • Schedule Trigger → HTTP Request (GET pins) → Code/Function (normalize and tag) → Airtable (upsert) → AI Agent (analysis) → Summarization LLM → Email (send report)

You can always customize or extend this flow, but this structure covers the core Pinterest analytics and AI suggestion pipeline.

Wrapping up and next steps

Automating your Pinterest analytics with n8n, Airtable, and an AI content suggestion engine takes you from “we should look at the numbers sometime” to “we get fresh, data-backed ideas in our inbox every week”. It speeds up creative decision-making and highlights opportunities you might never spot manually.

A simple way to start:

  • Pull a week or two of pin data
  • Validate that your Airtable structure and AI prompts look good
  • Polish the email format so your team can act on it quickly
  • Then scale up to more data and more recipients

Call to action: Want to skip the setup guesswork and use the ready-made n8n template and sample prompts from this guide? Import the template into your n8n instance, plug in your own API keys, run a dry test, and share the first report with your content team. If you would like help tailoring the workflow to your brand or campaigns, reach out to schedule a 30-minute setup session.

n8n: Create, Update & Get e-goi Subscriber

How to Create, Update, and Get an e-goi Subscriber in n8n

If you use e-goi to manage your subscribers and n8n to automate your workflows, you probably don’t want to manually add or update contacts all day, right? In this guide, we’ll walk through a simple but powerful n8n workflow template that handles the whole flow for you: it creates a contact in e-goi, updates that contact, then fetches it again so you can confirm everything worked.

Think of it as a reusable pattern for subscriber management. You can plug it into signup forms, CRM syncs, onboarding sequences, or any process where you need to create and keep subscriber data in sync.

What this n8n + e-goi workflow actually does

The template follows a clear, linear flow:

  1. Start the workflow manually (or with another trigger you choose).
  2. Create a new contact in e-goi.
  3. Update that same contact with new details.
  4. Fetch the contact from e-goi to verify the changes.

Under the hood, it passes the list ID and contact ID from one node to the next using n8n expressions. That means you don’t have to copy-paste IDs or hardcode values, the workflow automatically pulls what it needs from previous steps.

Here are the four nodes involved:

  1. Manual Trigger – kicks off the workflow when you click Execute.
  2. e-goi node – Create contact – creates a new subscriber in a specific list.
  3. e-goi node – Update contact – edits that subscriber’s information.
  4. e-goi node – Get contact – retrieves the full contact record so you can double-check the update.

When you’d use this template

This pattern is handy in a bunch of situations, for example:

  • New user signups that should automatically land in an e-goi list.
  • Keeping your CRM and e-goi in sync without manual exports and imports.
  • Running list hygiene or enrichment flows where you tweak subscriber data over time.
  • Testing e-goi integrations in a safe, controlled way before rolling out bigger automations.

If you ever find yourself thinking, “I just want n8n to create or update this subscriber and show me the result,” this template is exactly what you need.

Before you start: prerequisites

You only need a few things in place to follow along:

  • An n8n instance (either n8n Cloud or self-hosted).
  • An e-goi account with valid API credentials.
  • Basic familiarity with n8n expressions, so you know how to reference values from previous nodes.

Step-by-step: building the workflow in n8n

1. Add a Manual Trigger node

Start a new workflow in n8n and drop in a Manual Trigger node. This makes it really easy to test the flow as you build it, since you can just hit Execute and see what happens.

Later, you can swap this out for a webhook, schedule, or any other trigger that fits your use case, but for now Manual Trigger keeps things simple.

2. Create a contact with the e-goi node

Next, add an e-goi node and connect it to the Manual Trigger.

Configure it like this:

  • Operation: create

Example fields used in the template:

list: 1
email: nathan@testmail.com
additionalFields: { first_name: "Nathan" }

Make sure you select or create your e-goi credentials in this node (API key or OAuth, depending on how you’ve set it up in n8n).

When this node runs, e-goi responds with a JSON object that includes the new contact’s ID. In this template, that ID is typically found at:

json.base.contact_id

This contact ID is the key we’ll reuse in the next steps so we always update and fetch the correct subscriber.

3. Update that same contact using expressions

Now add another e-goi node and connect it after the create node. This one will handle the update operation.

Instead of typing in the list ID and contact ID manually, you’ll use n8n expressions to pull them from the previous node. That way, the workflow stays dynamic and works for any contact created by the first step.

Configure the node like this:

list: ={{$node["e-goi"].parameter["list"]}}
contactId: ={{$node["e-goi"].json["base"]["contact_id"]}}
updateFields: { first_name: "Nat" }

A couple of notes here:

  • list is read from the parameters of the first e-goi node. So if you change the list ID there, it automatically carries through.
  • contactId is read from the JSON output of the create node. That’s how we know we’re updating the exact contact we just created.
  • updateFields can include multiple properties. In the example, we just change first_name from "Nathan" to "Nat", but you can add more fields as needed.

If your e-goi response structure looks a bit different, just adjust the JSON path accordingly. You can always run the create node once and inspect its output in the execution log to confirm where contact_id lives.

4. Get the contact to confirm the update

Finally, add one more e-goi node to retrieve the updated subscriber and verify that everything worked.

Set it to use the get operation and again use expressions to reference the correct list and contact ID:

list: ={{$node["e-goi"].parameter["list"]}}
contactId: ={{$node["e-goi1"].json["base"]["contact_id"]}}
operation: get

Here, the example assumes your nodes are named in a certain way, such as e-goi for the create node and e-goi1 for the update node. Feel free to rename them in n8n, just remember to update the expressions to match.

When you run the workflow, this Get node will return the full contact object. In the execution panel, you should now see the updated first name and any other fields you changed.

Understanding n8n expressions and data mapping

If you’re newer to n8n, the expression syntax can look a bit intimidating at first, but it’s really just a way of saying “grab this value from that node.”

This template shows two very common patterns:

  • Reading a parameter from an earlier node
    {{$node["e-goi"].parameter["list"]}}
    This pulls the list parameter that you configured on the first e-goi node.
  • Reading a value from a node’s JSON output
    {{$node["e-goi"].json["base"]["contact_id"]}}
    This pulls the contact_id from the response returned by the create node.

To make this easier, use the expression editor in n8n. You can click into a field, switch to expression mode, and then browse or click values from previous nodes to insert the correct path.

If something doesn’t work or a value is missing, try this quick check:

  1. Run the workflow until the create node executes.
  2. Open that node’s output and look at the raw JSON.
  3. Find the exact path to the ID, for example json.contact_id or json.base.contact_id.
  4. Update your expression to match that path.

How to test your workflow

Once everything is wired up, it’s time to see it in action.

  1. Click Execute Workflow on the Manual Trigger node.
  2. Open the create e-goi node output. Confirm you see a contact_id in the JSON.
  3. Check the update node. The response should either show success or include the updated contact data.
  4. Inspect the get node output. Verify that the first name (and any other fields you changed) now reflect the updated values, such as "Nat".

If all three steps look good, your create-update-get loop is working.

Troubleshooting common issues

Missing contact_id in the create response

If you don’t see contact_id where you expect it:

  • Open the create node output and inspect the entire JSON object.
  • Look under both json and json.base for any field that looks like an ID.
  • Check if the node returned an error instead of a successful response.
  • Update your expressions to match the actual JSON path where the ID is stored.

Invalid list ID errors

If e-goi complains about the list ID:

  • Double-check that the list exists in your e-goi account.
  • Confirm your API user has access to that specific list.
  • Use the correct numeric ID or identifier required by the e-goi API.

API rate limits or network problems

Sometimes calls fail for reasons outside your control, such as rate limits or temporary network issues. To make your workflow more robust, you can:

  • Add a Retry or Error Workflow pattern in n8n.
  • Use a Wait node between calls if you suspect propagation delays in e-goi.
  • Log errors so you can review them later.

Dealing with duplicate contacts

What if the same email tries to sign up twice? You have a couple of options:

  • Use a search endpoint or node first to check if the contact already exists.
  • Add an IF node to branch the workflow: one path for new contacts, another for existing ones.
  • Rely on e-goi’s built-in deduplication rules if that fits your strategy.

Decide on your approach early so your lists stay clean and consistent.

Best practices & easy enhancements

Once the basic flow works, you can start polishing it. Here are a few ideas:

  • Use a Set node for input validation
    Add a Set node before the create step to normalize and validate data, such as email format or required fields.
  • Guard against failures
    Insert an IF node after the create call to make sure it succeeded before you run the update and get steps.
  • Avoid hardcoding sensitive values
    Store list IDs and credentials in n8n credentials or environment variables instead of plain text inside nodes.
  • Log responses for auditing
    Save responses to a database or log system if you need an audit trail of subscriber changes.
  • Respect GDPR and privacy rules
    Capture consent fields, opt-in timestamps, and handle PII securely according to your local regulations.

Conceptual view of the template JSON

Curious how the template looks in JSON form? Here is a simplified conceptual version that shows how the nodes connect and how the contact ID flows through:

{  "nodes": [  { "type": "Manual Trigger" },  { "type": "e-goi", "operation": "create", "parameters": { "email": "nathan@testmail.com", "list": 1 } },  { "type": "e-goi", "operation": "update", "parameters": { "contactId": "={{$node[\"e-goi\"].json.base.contact_id}}" } },  { "type": "e-goi", "operation": "get", "parameters": { "contactId": "={{$node[\"e-goi1\"].json.base.contact_id}}" } }  ]
}

In your actual n8n instance, you’ll have full node configs, credentials, and more parameters, but this gives you the gist of how the IDs are passed around.

Security and compliance tips

Since you’re working with contact data, it’s worth keeping security in mind:

  • Always store e-goi API keys inside n8n credentials, not in plain text fields.
  • If you store PII in databases or logs, make sure it’s encrypted or handled according to your security policies.
  • Review your workflow for GDPR or other data protection compliance, especially around consent and data retention.

Why this pattern makes your life easier

This simple create-update-get pattern might look basic, but it scales nicely. Once you trust it, you can plug it into:

  • Onboarding journeys where new users get added to e-goi and enriched over time.
  • CRM enrichment flows where you keep marketing and sales tools aligned.
  • List hygiene processes where you regularly update or correct subscriber data.

All of that without writing custom code, just using n8n nodes and expressions.

Try the n8n e-goi workflow template

Ready to see it in your own setup?

  1. Import the workflow template into your n8n instance.
  2. Connect your e-goi credentials in the e-goi nodes.
  3. Hit Execute on the Manual Trigger.
  4. Inspect each node in the execution log to confirm the contact is created, updated, and retrieved correctly.

From there, you can customize it: add conditional logic, “upsert” behavior, or integrate with other systems like CRMs, forms, or payment tools.

If you want more automation ideas like this, subscribe to our newsletter or take a look at the official n8n and e-goi docs for deeper dives into advanced operations and API details.

Build a Visa Requirement Checker with n8n & LangChain

Build a Visa Requirement Checker with n8n & LangChain

This guide walks you through building a practical Visa Requirement Checker using n8n, LangChain components, Weaviate vector search, Cohere embeddings, Anthropic chat, and Google Sheets. You will learn not only how to assemble the workflow, but also why each part exists and how they work together.

What you will learn

By the end of this tutorial, you will be able to:

  • Set up an n8n workflow that answers visa questions like “Do I need a visa to travel from Germany to Japan?”
  • Ingest and process official visa policy documents into a searchable format
  • Use Cohere embeddings and Weaviate for semantic, vector-based search
  • Connect an Anthropic chat model through a LangChain-style agent to generate accurate, policy-backed answers
  • Log all interactions into Google Sheets for auditing and analytics

Why build an automated Visa Requirement Checker?

Visa rules are complex, detailed, and often updated. Manually checking every request is slow and error-prone. An automated checker helps you:

  • Save time by handling routine visa questions automatically
  • Reduce mistakes by consistently using the same official sources
  • Handle natural language queries like “What documents do I need for a US tourist visa?”

By combining embeddings with a vector database, the system can find the most relevant policy snippets even if the user’s question does not exactly match the wording in the documents.

Concepts and architecture

High-level workflow in n8n

n8n acts as the central orchestrator for the entire Visa Requirement Checker. At a high level, the workflow does the following:

  • Receive user questions via a Webhook
  • Split your visa policy documents into smaller chunks
  • Create embeddings for each chunk using Cohere
  • Store those embeddings in a Weaviate vector database
  • Retrieve the most relevant chunks for each new query
  • Use an Anthropic chat model through an Agent node to generate an answer
  • Log the full interaction into Google Sheets for later review and analysis

Key nodes and components in the template

The n8n workflow template is built around these main nodes:

  • Webhook node (POST /visa_requirement_checker) to accept user requests
  • Splitter node (character-based) with chunkSize: 400 and chunkOverlap: 40 for document chunking
  • Cohere Embeddings node to convert text chunks into vectors
  • Weaviate Insert and Weaviate Query nodes for vector indexing and retrieval
  • Tool node configured for Weaviate so the Agent can call it as an external tool
  • Memory buffer window node to store recent conversation context
  • Anthropic chat model node to generate natural language responses
  • Agent node with promptType: define and text: ={{ $json }} to orchestrate reasoning and tool usage
  • Google Sheets Append node to log each interaction

Before you start: data and credentials

Collect visa policy data

First, gather your source material. You will need:

  • Official visa policy pages, PDFs, or documents from government or embassy sites
  • Cleaned text versions of these documents, either as separate text files or a combined master document

The quality and freshness of these documents directly affect how reliable your Visa Requirement Checker will be.

Required accounts and API credentials

To run the workflow end to end, prepare credentials for:

  • n8n (self-hosted or n8n cloud)
  • Cohere for text embeddings
  • Weaviate as the vector database
  • Anthropic for the chat model
  • Google Sheets OAuth2 for logging queries and responses

Step-by-step: building the Visa Requirement Checker in n8n

Step 1 – Create the Webhook endpoint

Start by creating a Webhook node in n8n that will receive user questions.

  • HTTP method: POST
  • Path: visa_requirement_checker

The webhook should accept JSON data that describes the user’s travel scenario. For example:

{  "origin": "Germany",  "destination": "Japan",  "passport_type": "ordinary",  "purpose": "tourism",  "arrival_date": "2025-06-10"
}

You can extend this schema with other fields, such as duration of stay or transit countries, depending on your use case.

Step 2 – Split visa policy documents into chunks

Long policy documents are difficult to search directly, so you will break them into smaller pieces.

Use a Splitter node configured as follows:

  • Splitter type: character-based
  • chunkSize: 400
  • chunkOverlap: 40

This configuration produces overlapping chunks of about 400 characters, with 40 characters of overlap between them. Overlap helps preserve context that might otherwise be cut off at chunk boundaries and improves both embedding quality and retrieval accuracy.

Step 3 – Generate embeddings with Cohere

Next, convert each chunk into a numerical vector representation using the Cohere Embeddings node.

For each chunk:

  • Send the text content to the Cohere Embeddings node
  • Store the resulting vector along with the original text and metadata

These embeddings capture semantic meaning, which allows Weaviate to find the most relevant chunks even when the user’s question uses different wording than the original policy.

Step 4 – Index embeddings in Weaviate

Now you will store the embeddings in a vector database so that they can be searched efficiently.

Use a Weaviate Insert node to write each embedding and its associated data into an index. For this project, you can use an index (class) named:

visa_requirement_checker

Along with the vector, store helpful metadata such as:

  • Country or region
  • Source URL or document name
  • Publication or effective date
  • Exact policy clause or section identifier

This metadata will later allow you to filter search results and provide clear citations in the final answers.

Step 5 – Query Weaviate when a user asks a question

When a new request comes in via the Webhook, the workflow should:

  1. Take the user’s structured data (origin, destination, purpose, etc.)
  2. Formulate a query text or use the raw question
  3. Send that query to a Weaviate Query node

The Query node searches the visa_requirement_checker index and returns the most relevant chunks based on vector similarity.

To enable the LangChain-style agent to call Weaviate on demand, configure a Tool node that wraps the Weaviate query. The Agent will treat this as an external tool it can invoke when it needs more context.

Step 6 – Add memory for multi-turn conversations

To support follow-up questions like “What about a business visa instead?” you can use a Memory buffer window node.

This node stores recent messages in the current session so that the Agent and the Anthropic model can:

  • Remember what the user asked previously
  • Maintain context across multiple turns
  • Avoid repeating the same questions for each follow-up

Step 7 – Configure the Agent and Anthropic chat model

Now connect the reasoning engine that generates the final answer.

  • Use an Anthropic chat model node as the underlying LLM
  • Set up an Agent node that:
    • Uses promptType: define
    • Has text: ={{ $json }} so it receives the combined context and query
    • Can call the Weaviate Tool node as needed

The Agent’s job is to:

  1. Interpret the user’s query
  2. Decide when to call the Weaviate tool to retrieve more policy context
  3. Use the Anthropic chat model to synthesize a clear answer
  4. Cite the relevant policy snippets and sources found via Weaviate

The result should be a concise, policy-backed explanation such as:

“According to the Ministry of Foreign Affairs of Japan (2024), German citizens traveling for tourism for up to X days do not require a visa, provided that…”

Step 8 – Log interactions in Google Sheets

Finally, track every interaction for analysis, debugging, and audits.

Use a Google Sheets Append node to record:

  • Timestamp of the request
  • Original query or structured input
  • Countries and purpose involved
  • Matched sources or policy references
  • Final answer returned to the user
  • Optional confidence scores or similarity metrics

This log makes it easy to review how the system is performing, identify gaps in your data, and refine prompts or metadata over time.

Example end-to-end response flow

To see how everything connects, consider this example query:

User request: POST to /visa_requirement_checker with the question: “Do I need a visa to travel from Brazil to Spain for tourism?”

  1. Webhook node receives the request and passes the JSON payload into the workflow.
  2. Weaviate Query node searches for Spanish visa policies that mention Brazilian passport holders and tourism.
  3. Agent node uses the retrieved chunks plus the user’s details to generate an answer with the Anthropic chat model, including:
    • A short summary of visa requirements
    • Required documents
    • Maximum stay allowed
    • Clear citation of the policy source
  4. Google Sheets Append node logs the full interaction, including which policy chunks were used.

Best practices for a reliable Visa Requirement Checker

Use rich and consistent metadata

Good metadata makes retrieval more precise and explanations more trustworthy. For each chunk you index in Weaviate, include fields like:

  • Source URL or document name
  • Publication or effective date
  • Country or region the policy applies to
  • Specific policy clause or section title

This lets the Agent respond with citations such as: “According to [Ministry of Foreign Affairs – Japan, 2024]…”

Keep your policy data up to date

Visa rules change frequently. To maintain accuracy:

  • Schedule regular re-ingestion of official sources using n8n (daily or weekly)
  • Update or reindex embeddings in Weaviate after each sync
  • Monitor which policies users ask about most often and prioritize those sources

Design prompts for safety and accuracy

Prompt design has a large impact on how the Agent behaves. Consider:

  • Instructing the model to always cite its sources
  • Including explicit instructions to avoid guessing when information is unclear
  • Defining a fallback when vector similarity is low, for example:
    • Ask the user to confirm missing details
    • Suggest consulting the nearest embassy or consulate

Security and privacy considerations

  • Store only non-sensitive metadata by default. If you must log personal data, ensure:
    • Explicit user consent
    • Encryption at rest and in transit
  • Keep all API keys and credentials secure using:
    • n8n credentials storage
    • Environment variables or secrets management

Testing, evaluation, and tuning

How to test your workflow

To validate your Visa Requirement Checker:

  • Test simple country-to-country cases, such as “Germany to Japan, tourism.”
  • Try multi-leg trips or special cases, like transit visas.
  • Include different visa types, for example:
    • Tourist visas
    • Work permits
    • Student visas
  • Cover edge cases such as:
    • Diplomatic or service passports
    • Long-term stays

Use your Google Sheets log to track:

  • Where the model is highly accurate
  • Where it seems uncertain or incomplete
  • User feedback or corrections

Scaling and performance tips

As usage grows, you may need to tune for performance:

  • Monitor Weaviate resource usage and response times
  • Adjust chunkSize and chunkOverlap if retrieval quality or speed suffers
  • Use metadata filters (such as country) to narrow down search scope before vector search
  • Batch embedding inserts to reduce API overhead when indexing large document sets
  • Optionally cache answers to very common questions to reduce repeated queries

Common pitfalls to avoid

  • Weak or inconsistent metadata Makes it harder to filter and cite results, which can lead to noisy or irrelevant answers.
  • Poor chunking configuration Chunks that are too large or too small can harm embedding quality. Start with 400 character chunks and 40 overlap, then adjust based on tests.
  • Over-reliance on the model without citations Always surface links or references to the original policies so users can verify the information themselves.

Ideas for further enhancements

Once the basic Visa Requirement Checker is working, you can extend it with additional features:

  • Language detection and translation Detect the user’s language and translate queries or responses so you can support a global audience.
  • Public-facing UI Build a simple web or mobile interface that sends requests to your n8n Webhook endpoint.
  • Automated policy updates Integrate RSS feeds or embassy APIs, then schedule n8n workflows to re-ingest and reindex content automatically

Automated Job Application Parser with n8n & RAG

Automated Job Application Parser with n8n & RAG

The day the resumes broke Maya

Maya stared at the hiring dashboard and felt her stomach drop.

Two new roles had gone live a week ago. A mid-level backend engineer and a product marketing manager. The response had been incredible. Too incredible.

There were 327 new applications in the inbox, and more arrived every hour. PDFs, Word docs, cover letters pasted into forms, emails forwarded from referrals. Her recruiting team was already behind on other searches, and leadership wanted a short list of candidates by Friday.

She knew the drill. Download resumes, skim for relevant skills, copy names and emails into a spreadsheet, try to remember who looked promising, search for keywords like “PostgreSQL” or “B2B SaaS” and hope the right profiles bubbled up. It was slow, inconsistent, and painfully manual.

By mid-afternoon, Maya realized something simple. It did not matter how good their employer brand was if their hiring process could not keep up.

Discovering a different way to read resumes

That night, scrolling through automation forums, Maya came across an n8n workflow template titled “Automated Job Application Parser with n8n & RAG.” The promise sounded almost too good to be true.

  • Automatically ingest job applications via a webhook
  • Split and embed resume text using OpenAI embeddings
  • Store everything in Pinecone, a vector database, for semantic search
  • Use a Retrieval-Augmented Generation (RAG) agent to parse and structure the data
  • Append results to Google Sheets and alert the team on errors in Slack

If it worked, her team could spend less time copying text into spreadsheets and more time actually speaking to candidates.

She bookmarked the template and thought, “If this can read resumes for me, I might actually get my evenings back.”

From chaos to a plan: designing the automated parser

The next morning, Maya sat down with Leo, a developer on the internal tools team. She laid out the problem.

“We are drowning in resumes,” she said. “I do not just want a keyword search. I need something that understands what a candidate has done, even if they phrase it differently.”

Leo had used n8n before for internal automations. The idea of combining it with a RAG workflow caught his attention.

“We can build this around that template you found,” he said. “n8n will orchestrate everything, OpenAI will handle embeddings and the RAG agent, and Pinecone will store the vector data so we can search semantically.”

They mapped out the high-level flow on a whiteboard:

  1. Receive job applications through a webhook in n8n
  2. Extract and split resume and cover letter text into manageable chunks
  3. Generate embeddings using OpenAI, then store them in Pinecone
  4. Use a RAG agent with memory and a vector tool to interpret the application
  5. Write a structured summary into Google Sheets
  6. Send a Slack alert if anything goes wrong

It was the same core workflow described in the template, but now it had a clear purpose: save Maya and her team from drowning in manual parsing.

Where the workflow begins: catching every application

The Webhook Trigger that replaced the inbox

First, Leo set up the Webhook Trigger node in n8n. Instead of applications landing in a messy email inbox, they would now be sent as POST requests from their careers site and ATS.

They configured a secure webhook URL and added a shared secret token so that only trusted sources could submit candidate data. Any form submission or email-to-webhook integration would send a payload that included:

  • Candidate name and contact details
  • Resume text or attachment content
  • Cover letter text, if available
  • Application metadata such as role and source

“This is our new front door,” Leo said. “Everything starts here.”

Teaching the system to read: chunking and embeddings

Breaking long resumes into smart pieces

Once the webhook caught an application, the workflow passed the content to a Text Splitter node. Maya had never thought about resumes in terms of “chunks” before, but Leo explained why it mattered.

“We cannot send entire long documents directly to the embedding model,” he said. “We want smaller sections that still make sense, so the semantic meaning is preserved.”

They set the Text Splitter with example settings of chunkSize=400 and chunkOverlap=40. That meant each resume and cover letter would be divided into segments of around 400 tokens, with a slight overlap so that context was not lost between chunks.

They agreed to tune these values later based on real resumes and the token limits of their chosen embedding model.

Turning text into vectors with embeddings

Next came the Embeddings node, powered by OpenAI. Leo picked text-embedding-3-small as a good balance of speed and quality for their use case.

“Think of embeddings as a way for the system to understand meaning, not just keywords,” he explained. “Two people might say ‘built a microservice architecture’ or ‘designed distributed backend systems’ and embeddings help us see that they are related.”

The Embeddings node was wired to serve two paths:

  • Insert – to store the generated vectors in Pinecone for later search
  • Query – to retrieve relevant chunks when the RAG agent needed context

With every new application, the workflow would now generate a semantic fingerprint of the candidate’s experience.

Building the memory: Pinecone and vector tools

Storing candidate context in Pinecone

To make all those embeddings useful, Leo connected a Pinecone Insert node. This was where resumes stopped being static documents and became searchable knowledge.

They created a Pinecone index named new_job_application_parser and decided which metadata fields to store alongside each vector:

  • candidate_id
  • document_type (resume or cover_letter)
  • source (email, portal, referral)
  • A snippet of the original_text

Whenever the workflow needed to interpret or revisit a candidate, a Pinecone Query node would search this index by similarity. The query would use the current application context to fetch the most relevant chunks, ready to be handed to the RAG agent.

Window Memory and the Vector Tool

To make the system feel less like a stateless API and more like a thoughtful assistant, Leo added two more pieces.

  • Window Memory, which buffered recent context so the RAG agent could maintain short-term state across steps
  • Vector Tool, which wrapped Pinecone queries into a tool the agent could call when it needed more background

“This is what makes it Retrieval-Augmented Generation,” Leo said. “The agent does not just guess. It retrieves relevant chunks from Pinecone and uses them to answer.”

The turning point: giving the agent a job description

Configuring the RAG Agent and chat model

Now came the heart of the workflow, the part Maya cared about most. Could an AI agent actually parse an application the way a recruiter would?

Leo added a RAG Agent node and connected it to an OpenAI chat model. He set a clear system message:

You are an assistant for New Job Application Parser.

Then they crafted a prompt that told the agent exactly what to extract from each candidate:

  • Candidate name
  • Email and phone number
  • Top skills and years of experience
  • Role fit summary
  • Recommended status, such as Pass, Review, or Reject

The agent would use Window Memory and the Vector Tool to pull the most relevant resume chunks from Pinecone, then synthesize a structured response.

From AI output to a living hiring log

To make the results usable for the team, they connected the RAG agent to an Append Sheet node. Each parsed application would become a new row in a “Log” sheet inside a Google Sheets document.

Every time an application came in, the sheet would update automatically with:

  • Candidate details
  • Key skills and experience summary
  • Fit assessment and recommended status
  • Any other fields they chose to add later

Where Maya once had a chaotic email inbox, she now had a searchable, structured dashboard that updated itself.

Preparing for what might go wrong

Error handling and Slack alerts

Maya had one lingering fear. “What if the agent fails on a weird resume format and we never notice?”

So Leo configured the RAG Agent node to route any errors to a Slack Alert node. If parsing failed or the agent returned an invalid response, the workflow would immediately send a message to their hiring Slack channel.

The alert included:

  • Error details
  • Candidate identifier or source
  • Any relevant context to help debug

Instead of silent failures, they would get fast feedback and could correct issues before they affected many candidates.

Making it safe, compliant, and scalable

Configuration and privacy guardrails

As they moved from prototype to production, Maya and Leo reviewed how the workflow handled sensitive hiring data.

  • Security – They stored all OpenAI, Pinecone, Google, and Slack credentials as secrets or OAuth credentials in n8n, never hard coded. The webhook endpoint was protected and incoming payloads were validated.
  • Data retention – They documented how long candidate data would be kept and ensured it aligned with local regulations. For especially sensitive fields, they considered redacting or encrypting data before storing it in Pinecone or Sheets.
  • Pinecone metadata – They indexed candidate_id, source, and document_type so they could later filter or delete records efficiently.
  • Chunking strategy – They experimented with chunkSize and chunkOverlap to balance relevance against storage and API usage.
  • Rate limiting and cost – Since they expected spikes when new roles opened, they monitored OpenAI and Pinecone usage, prepared to add batching or throttling, and watched costs per processed application.
  • Testing – They fed the system a diverse set of resumes, from interns to senior engineers, to evaluate both retrieval quality and parsing accuracy.

Scaling and monitoring in the background

Once the first version was stable, Leo prepared for growth. If hiring volume increased, they could:

  • Run n8n with horizontal scaling using workers or a managed instance
  • Add observability tools to track failures, processing time, and request costs
  • Place a lightweight queue, such as Redis or SQS, between the webhook and the processing steps so sudden bursts would not overload the system

For Maya, this meant one important thing. The workflow would not crumble the next time a hiring campaign went viral.

Beyond parsing: how the workflow kept growing

Within a few weeks, the automated job application parser had become part of their standard hiring toolkit. But the team quickly saw ways to extend it.

  • Email integration – They added a node that parsed resume attachments from a dedicated recruiting inbox and forwarded the extracted text into the same pipeline.
  • Resume/CV parsers – For roles where education and employment history were crucial, they combined the RAG workflow with specialized resume parsing services to get even more granular structured fields.
  • Candidate scoring – Using the skills and years of experience extracted by the agent, they introduced a simple scoring node that calculated a fit score per role.
  • Dashboarding – Parsed results were synced from Google Sheets into a BI tool and Airtable, making it easier for hiring managers to filter by skills, experience level, or score.
  • Human in the loop – For high priority roles, they added a Slack approval step. Recruiters could quickly review or correct parsed data before final storage or before sending profiles to hiring managers.

The moment Maya noticed things had changed

One Friday afternoon, Maya opened the Google Sheet that the workflow had been quietly updating all week. For the new backend engineer role, every candidate had:

  • Cleanly extracted contact information
  • A list of top skills, including databases, languages, and frameworks
  • A short summary of relevant experience
  • A recommended status that helped her triage at a glance

She filtered by “Review” and “Pass,” scanned the summaries, and in less than an hour had a shortlist ready for the hiring manager. No more late nights copying text from PDFs.

The RAG-based workflow had not replaced her judgment. It had simply turned a flood of unstructured text into a structured, searchable, and reliable foundation for decision making.

How Maya and Leo put it into production

Quick checklist they followed

  1. Provisioned OpenAI and Pinecone accounts and stored credentials securely in n8n.
  2. Created a Google Sheets document for the “Log” and configured OAuth in n8n.
  3. Imported the n8n workflow template for the automated job application parser and adjusted nodes as needed.
  4. Configured webhook security, including shared secrets and payload validation, then tested with sample applications.
  5. Tuned chunk sizes and prompt instructions, iterating on the RAG agent until parsing results were consistently accurate across several resume samples.
  6. Enabled Slack alerts and watched the first 100 processed applications closely, fixing edge cases as they appeared.

What this n8n template really changed

Automating job application parsing with n8n, OpenAI embeddings, and a vector store like Pinecone did more than save Maya time. It:

  • Reduced manual effort and copy-paste work for the hiring team
  • Improved consistency in how resumes and cover letters were evaluated
  • Enabled semantic search across candidate content, even when wording differed
  • Provided a scalable, RAG-based foundation that could grow with their recruitment needs

The result was a hiring pipeline that felt modern, predictable, and ready for higher volume, without exploding costs or headcount.

Ready to turn your resume pile into structured insight?

If you recognize yourself in Maya’s story, you do not have to start from scratch. The n8n workflow template for an automated job application parser gives you a proven blueprint to:

  • Ingest applications via webhook
  • Split and embed resume text using OpenAI
  • Store and search embeddings in Pinecone
  • Run a RAG agent to extract structured candidate data
  • Log everything in Google Sheets and stay informed with Slack alerts

Next steps:

  • Import the template into your n8n instance
  • Test it with at least 10 sample resumes and cover letters
  • Iterate on prompts, chunk sizes, and metadata until the RAG agent reliably extracts the fields your team needs
  • Join a 30 minute walkthrough or schedule a demo if you want help tuning parsing thresholds and output formats for your specific hiring pipeline

You do not have to choose between speed and thoughtful hiring. With the right n8n workflow and RAG setup, you can give your team both.

CallForge: n8n AI Gong Sales Call Processor

CallForge: n8n AI Gong Sales Call Processor

Use AI and n8n to automatically turn Gong sales calls into structured, reusable insights for your team. This guide walks you through how the CallForge workflow template works, how each part fits together, and how to adapt it for your own Notion setup and future CRM integrations.

What you will learn

By the end of this tutorial-style walkthrough, you will be able to:

  • Explain why automating Gong call insights with n8n and AI is valuable
  • Understand the high-level architecture of the CallForge workflow
  • Follow a node-by-node explanation of how data flows through n8n
  • Configure Notion databases and n8n credentials for this template
  • Apply best practices for rate limiting, idempotency, and error handling
  • Import, test, and customize the CallForge template in your own environment

Why automate Gong call insights with n8n and AI?

Sales calls are full of information that matters to multiple teams:

  • Product learns what features customers request and where they struggle
  • Marketing hears real language customers use to describe problems and value
  • Revenue and sales see objections, competitors, and patterns over time

Manually reviewing call transcripts is slow and inconsistent. Important themes are easy to miss, and insights are often trapped in scattered notes or one-off documents.

The CallForge n8n workflow solves this by combining AI-generated analysis with automation. It:

  • Extracts three types of insights from AI output:
    • Marketing Insights
    • Actionable Insights
    • Recurring Topics
  • Creates structured Notion pages for each insight type
  • Handles API rate limits and retries for reliable processing
  • Prepares data so it is easy to sync later into CRMs like Salesforce, HubSpot, or Pipedrive

Concepts and architecture overview

How CallForge fits into your overall AI pipeline

CallForge is not responsible for transcribing calls or generating AI summaries. Instead, it expects another workflow or system to:

  1. Transcribe Gong calls
  2. Run AI on the transcript to generate structured insights
  3. Send those AI results to CallForge via an Execute Workflow Trigger in n8n

Once CallForge receives this payload, it focuses on turning the AI output into organized records in Notion.

High-level n8n workflow structure

At a high level, the CallForge workflow:

  1. Receives AI output and metadata from an upstream workflow
  2. Splits the processing into three parallel tracks:
    • Recurring Topics
    • Marketing Insights
    • Actionable Insights
  3. For each track, runs a similar sub-flow:
    • Check if there is data to process (IF node)
    • Wait briefly to respect rate limits
    • Split the array of insights into individual items
    • Create a Notion database page for each item
    • Aggregate the created records into a bundled object
  4. Merges all branches back together for logging, notifications, or future CRM sync

This architecture keeps the workflow modular, easy to debug, and simple to extend.


Step-by-step: understanding each part of the CallForge workflow

1. Execute Workflow Trigger – where CallForge starts

The Execute Workflow Trigger node is the entry point. Another workflow calls this one and sends a payload containing:

  • metaData – for example:
    • Call title
    • Started timestamp
  • notionData – typically a relation to the original call summary in Notion
  • AIoutput – an object with keys:
    • RecurringTopics
    • MarketingInsights
    • ActionableInsights

Each of these keys usually contains an array of insight objects. CallForge will process each array separately.

2. IF nodes – checking whether there is data to process

Next, three IF nodes inspect the AI output:

  • One IF node for RecurringTopics
  • One IF node for MarketingInsights
  • One IF node for ActionableInsights

Each IF node uses an array length check such as lengthGte >= 1 to confirm that:

  • The array exists
  • It contains at least one item

If an array is empty or missing, the workflow skips the downstream steps for that insight type. This keeps the workflow efficient and avoids unnecessary API calls.

3. Wait nodes – handling Notion API rate limits

Notion and other APIs enforce rate limits. If you send too many requests too quickly, you may receive HTTP 429 errors.

To reduce this risk, CallForge adds a Wait node before each Split Out node. Typical settings include:

  • A short delay, such as 3 seconds
  • One Wait node per insight track

You can adjust these delays based on your Notion plan, the volume of calls you process, and how often you see rate limit errors.

4. Split Out nodes – turning arrays into individual items

The Split Out node takes an array of insights, such as MarketingInsights, and converts it into separate workflow items. Each item represents a single insight.

This pattern is important because it:

  • Lets n8n process each insight independently
  • Enables parallel creation of Notion pages
  • Makes retries and error handling more predictable

After the Split Out step, each item flows into a Notion node that creates a corresponding page.

5. Create Notion Database Page nodes – writing insights into Notion

Each insight type has its own Notion node configured to create a page in the correct database. In most setups you will have three Notion databases, for example:

  • Recurring Topics
  • Marketing Insights
  • Actionable Insights

Key configuration details for each Notion node:

  • Database ID
    • Set this to the specific Notion database where you want that insight type stored.
  • Property mapping
    • Map AI output fields to your Notion properties, such as:
      • Name | title mapped to a property like Summary or Topic
      • Marketing Tags | multi_select mapped to your tag options
      • Sales Call Summaries | relation mapped to the original call page
      • Date Mentioned | date mapped to the call timestamp
  • Icon or emoji
    • Optional but helpful for visual scanning, for example:
      • Recurring Topics: 🔁
      • Marketing Insights: 🎯

Once configured, each incoming item from the Split Out node becomes a new, well-structured Notion page.

6. Aggregate / Bundle nodes – collecting created records

After creating pages in Notion, each track uses an Aggregate (or Bundle) node to gather all newly created items into a single object.

This aggregated object is useful because it:

  • Provides a compact summary of what was created
  • Makes it easier to send a single notification to Slack or email
  • Prepares data for future synchronization with a CRM or other tools

7. Merge nodes – bringing everything back together

At the end of the workflow, Merge nodes combine the different branches. The final merged output usually includes:

  • The original aiResponse or AI output
  • The aggregated insight records (for each type)
  • Any extra tagdata or metadata you passed through

This final object is a good place to attach audit logs, send summaries to Slack or email, or pass data to another workflow for CRM integration.


Configuration and setup in n8n

Required accounts and credentials

Before you import and run the CallForge template, prepare the following:

  • Notion integration token
    • Create a Notion integration and share the relevant databases with that integration.
  • Notion database IDs for:
    • Recurring Topics
    • Marketing Insights
    • Actionable Insights
  • n8n credentials for Notion
    • Configure Notion API credentials inside n8n so the Notion nodes can authenticate.
  • Upstream AI workflow or pipeline
    • This should send AI outputs into the Execute Workflow Trigger of CallForge.

Aligning Notion properties with the template

The template provides example mappings, but you must update them to match your own Notion schema. Typical mappings include:

  • Name | title → a property like Summary or Topic
  • Marketing Tags | multi_select → your own tag values or categories
  • Sales Call Summaries | relation → a relation back to the original call page
  • Date Mentioned | date → the timestamp of the call or when the topic was mentioned

Make sure your Notion databases have these properties created with the correct types (title, multi-select, relation, date, etc.) before running the workflow.


Best practices for a robust CallForge setup

1. Rate limiting strategy

To keep the workflow reliable when dealing with many calls:

  • Adjust the Wait node durations if you see 429 errors from Notion
  • Consider increasing the delay for higher volumes
  • For very large scale, explore batching or queue-based patterns in n8n

2. Idempotency and duplicate prevention

Idempotency ensures that running the workflow multiple times for the same call does not create duplicate records. To achieve this:

  • Give each call or AI output a unique identifier in your upstream pipeline
  • Store this external ID in a dedicated Notion property or inside page content
  • Use that ID to detect duplicates if you implement custom retry logic

3. Error handling and retries in n8n

n8n provides built-in options for handling intermittent failures:

  • Enable retry-on-fail in the Notion nodes
  • Set waitBetweenTries to a few seconds to smooth out transient errors
  • Optionally route failed items into a separate “dead letter” Notion database for manual review

4. Monitoring and observability

To keep an eye on how CallForge behaves in production:

  • Log responses and errors from Notion and other services
  • Use Aggregate nodes to build a concise summary of what was created
  • Send a final summary to Slack, email, or a central log for each run

Customizations and future roadmap

The CallForge template is designed to be extended as your automation needs grow. Common next steps include:

  • CRM integrations
    • Connect to Pipedrive, Salesforce, or HubSpot.
    • Create leads, opportunities, or activities for high-priority actionable insights.
  • More advanced AI prompting
    • Standardize tags and topics across calls so reporting is more consistent.
    • Normalize wording so similar themes are grouped together.
  • Dashboards and reporting
    • Use Notion database views to highlight trending recurring topics.
    • Export data to a BI tool for deeper analysis across accounts and segments.

How to import and run the CallForge template

Follow these steps to get the template running in your n8n instance.

  1. Import the workflow JSON
    • Download or copy the CallForge workflow JSON.
    • In n8n, import it into your workspace.
  2. Configure external credentials
    • Set up Notion credentials using your integration token.
    • Add any other external service credentials you plan to use.
  3. Update Notion database IDs and property mappings
    • Open each Notion node and paste in the correct database ID.
    • Align property names with your Notion schema.
  4. Connect your upstream AI workflow
    • Configure your transcription and AI workflow to call the Execute Workflow Trigger in CallForge.
    • Alternatively, trigger the workflow manually with test data while you configure it.
  5. Run sample calls and validate output
    • Process a few Gong calls end to end.
    • Check each Notion database to confirm that:
      • Pages are created correctly
      • Relations back to the original call are set
      • Tags, dates, and titles are mapped as expected

Real-world benefits of using CallForge

Teams that adopt this n8n workflow for Gong call processing typically see:

  • Faster insight capture
    • Insights appear in Notion automatically after calls, without manual note-taking.
  • Consistent records for cross-functional planning
    • Marketing, product, and sales all work from the same structured dataset.
  • Fewer manual handoffs and less lost context
    • Details from conversations are preserved in linked records instead of scattered docs.

Backup n8n Workflows to Gitea (Step-by-Step)

How One Automator Stopped Losing Workflows: A Story About n8n Backups to Gitea

On a quiet Tuesday afternoon, Lina, a marketing operations lead turned accidental automation engineer, stared at her n8n dashboard in disbelief. A single misclick had just overwritten a critical workflow that synchronized leads between their CRM and email platform. There was no Git history to roll back to, no backup to restore from, and the last export she had made was weeks old.

That was the moment she decided that “I will back this up someday” was no longer good enough.

The Problem: Fragile Automations With No Safety Net

Lina’s team relied heavily on n8n. Dozens of workflows handled lead routing, reporting, notifications, and campaign triggers. Over time, these flows had evolved through countless tweaks and experiments. The trouble was that all this logic lived inside n8n only.

Every change felt risky. If someone edited a workflow and broke it, there was no easy way to see what had changed or to revert to a previous version. If the n8n instance went down, or if a migration went wrong, the team could lose days of work.

She knew what she wanted:

  • A versioned history of every n8n workflow
  • Easy recovery after accidental edits or system issues
  • Collaboration and review via Git, not just screenshots and exports
  • Offsite storage in a reliable Git server like Gitea

Her DevOps colleague had already set up a Gitea instance for internal projects. The missing piece was a bridge between n8n and Gitea that would keep workflows backed up automatically.

The Discovery: An n8n Template That Talks to Gitea

While searching for a better way, Lina found an n8n workflow template designed specifically to back up n8n workflows to a Gitea repository. It promised to:

  • Run on a schedule, for example every 45 minutes
  • Retrieve all workflows from n8n via the API
  • Convert each workflow into a JSON file
  • Base64-encode the content for Git and Gitea compatibility
  • Check Gitea for an existing file for each workflow
  • Create new files or update existing ones only when changes were detected

It sounded like exactly what she needed: a reusable, automated backup pipeline between n8n and Gitea.

Setting the Stage: What Lina Needed in Place

Before she could turn this template into her safety net, Lina gathered the essentials:

  • An n8n instance with API access so workflows could be listed programmatically
  • A Gitea instance, already running inside the company network
  • A dedicated Gitea repository to store workflow JSON backups
  • A Gitea personal access token with repository read and write permissions

With those pieces ready, she imported the template into n8n and began shaping it to fit her environment.

Rising Action: Turning a Template Into a Reliable Backup System

Defining the “Where” With Global Variables

The first step was to tell the workflow where to send everything. Inside the template, Lina opened the Globals (Set) node. This node acted like a central configuration panel.

She filled in three key variables:

  • repo.url – her Gitea base URL, for example https://git.example.com
  • repo.owner – the user or organization that owned the repository
  • repo.name – the repository name, such as workflows

With those values in place, every HTTP call in the workflow would know exactly which Gitea repository to use.

Gaining Access: Creating and Wiring the Gitea Token

Next, Lina needed a secure way for n8n to talk to Gitea. She logged into Gitea, navigated to Settings → Applications, and clicked Generate Token. She granted it repository read and write permissions, then copied the token somewhere safe.

Inside n8n, she opened the credentials manager and created a new credential using HTTP Header Auth. She named it Gitea Token and configured it as follows:

  • Header name: Authorization
  • Header value: Bearer YOUR_PERSONAL_ACCESS_TOKEN (with a space after Bearer)

This single credential would be reused by all Gitea-related HTTP request nodes in the workflow.

Connecting the Dots: Attaching Credentials to HTTP Nodes

The template contained three HTTP request nodes that interacted with Gitea. Lina attached her new credential to each of them:

  • GetGitea – to read an existing file from the repository
  • PostGitea – to create a new file when there was no existing backup
  • PutGitea – to update an existing file using its SHA hash

Once these nodes were wired to the Gitea Token credential, the workflow had authenticated access to the repository.

Ensuring n8n Can See Its Own Workflows

Of course, backing up workflows required that n8n could first list them. The template included a node that fetched workflows via the n8n API. Lina opened that node and confirmed that it had valid API authentication configured, either an API key or Basic Auth.

She ran the node manually and checked the output. All her workflows appeared in the response. That meant the first half of the pipeline, getting data out of n8n, was working correctly.

The Turning Point: How the Template Handles Files and Changes

At this stage, Lina understood how the pieces connected, but the real magic was in how the workflow treated each n8n workflow as a proper Git-tracked file.

From Workflow to JSON File

For every workflow returned by the n8n API, the template performed a series of transformations:

  • It converted the workflow into a pretty-printed JSON string for readability.
  • It then base64-encoded that JSON content, since the Gitea REST API expects file content in base64 format for create and update operations.

The filename convention used by the template was straightforward:

<workflow-name>.json

Lina realized that if any of her workflow names were not unique, she might end up with collisions in the repository. For those cases, she considered tweaking the template to append the workflow ID to the filename to ensure uniqueness.

Checking If a File Already Exists in Gitea

Before creating or updating any file, the template needed to know what already lived in the repository. For each workflow, it called the Gitea endpoint:

/api/v1/repos/{owner}/{repo}/contents/{path}

If a file existed, GetGitea returned two crucial pieces of information:

  • The current file’s sha, required for updates
  • The file content, which could be base64-decoded and compared with the new JSON

The workflow then compared the decoded repository content with the freshly generated JSON from n8n. Only if there was a difference would it proceed to update the file.

If the file did not exist, Gitea responded with a 404. Rather than treating this as an error, the template used it as a signal to create a new file backup.

Deciding Between Create and Update

Once the comparison was done, the workflow followed a simple decision path:

  • If the file did not exist (404), it used a POST request (or PUT depending on the Gitea version) to create a new file in the repository.
  • If the file existed and the content had changed, it used a PUT request, including the existing file sha, to update the file.
  • If nothing had changed, it skipped any write operations, keeping the Git history clean and meaningful.

Behind the scenes, these operations used the standard Gitea API endpoints:

  • Get file: GET /api/v1/repos/{owner}/{repo}/contents/{path}
  • Create file: POST /api/v1/repos/{owner}/{repo}/contents/{path} (or PUT in some versions)
  • Update file: PUT /api/v1/repos/{owner}/{repo}/contents/{path} with the sha of the file

Each create or update call included an Authorization header:

Authorization: Bearer YOUR_PERSONAL_ACCESS_TOKEN

and a JSON body similar to:

{  "content": "BASE64_ENCODED_FILE_CONTENT",  "message": "Backup: update workflow <name>",  "sha": "EXISTING_FILE_SHA"  // only for updates
}

For Lina, this meant that every workflow change would be recorded as a Git commit with a clear message, ready for code review or rollback if needed.

Resolution: From Anxiety to Confidence

First Test: Watching the Backups Appear

With everything wired up, Lina decided it was time to test. She:

  1. Ran the workflow manually inside n8n.
  2. Watched the execution logs as it fetched workflows, checked Gitea, and created or updated files.
  3. Opened the Gitea repository in her browser and refreshed the page.

There they were: a neatly organized list of JSON files, one for each n8n workflow. Each file had a commit message starting with “Backup” and contained the full, pretty-printed definition of the workflow.

She made a small change to one workflow in n8n, ran the backup workflow again, and saw a new commit appear in Gitea, with only that file updated. The change detection logic was working exactly as intended.

Automating the Schedule

Now that the manual run looked good, Lina enabled the schedule trigger in the template. She configured it to run every 45 minutes, which was frequent enough to capture changes without being noisy.

From that point on, backups were no longer a manual chore. They were part of the fabric of her automation platform.

Staying Safe: Best Practices Lina Adopted

Once the system was running, Lina and her DevOps team added a few best practices to keep it secure and maintainable:

  • They rotated the Gitea token periodically and stored it only in n8n credentials or a dedicated secrets manager.
  • They limited the token scope to the specific backup repository whenever possible.
  • They stored the backups in a protected repository under a locked-down organization.
  • They improved commit messages with timestamps and brief summaries to make changes easier to trace.
  • They monitored the scheduled workflow for failures and configured n8n alerts and logging.

These small steps ensured that the backup pipeline was not just convenient, but also secure and auditable.

When Things Go Wrong: Troubles Lina Avoided (and How)

During her setup, Lina anticipated a few common errors and learned how the template handled them.

404 When Checking a File

If GetGitea returned a 404, it simply meant the file did not exist yet. For new workflows, this was expected. The template treated it as a signal to create a new file backup rather than as a failure.

401 or 403 Authorization Errors

For authentication issues, she double-checked:

  • That the token itself was correct.
  • That the Authorization header used the format Bearer YOUR_TOKEN with the space included.
  • That the token had write permissions for the target repository.

Files Not Updating

If a file did not update when expected, the usual culprits were:

  • An incorrect or missing sha in the update request.
  • A comparison step that did not properly decode the repository content before checking for differences.

By ensuring the workflow computed the correct SHA and compared decoded repository content against the local JSON, she kept updates accurate and deterministic.

What Changed For Lina and Her Team

After a few weeks of running the backup workflow, the impact became clear:

  • Accidental edits were no longer disasters. The team could inspect Git history, see exactly what changed, and restore previous versions.
  • New teammates could review workflow definitions in Gitea without logging into n8n, making collaboration easier.
  • Migrations and upgrades felt less risky, since all workflows lived in a separate, version-controlled system.
  • The team could treat n8n workflows like any other code asset, with reviews, branches, and pull requests if they wanted.

Most importantly, Lina stopped worrying every time she hit “Save” in n8n. Her automations finally had a safety net.

Your Next Step: Turn This Story Into Your Own Backup Strategy

If you recognize yourself in Lina’s situation, you can follow the same path:

  1. Import the n8n template that backs up workflows to Gitea.
  2. Configure the Globals node with your repo.url, repo.owner, and repo.name.
  3. Create a Gitea personal access token with repo read and write permissions and add it to n8n as an HTTP Header Auth credential.
  4. Attach that credential to the GetGitea, PostGitea, and PutGitea nodes.
  5. Ensure your n8n workflow fetch node has valid API credentials and returns all workflows.
  6. Run the workflow manually, verify that JSON files appear in your Gitea repository, then enable the schedule trigger.

From there, you can refine commit messages, adjust the backup frequency, and tighten security according to your needs.

Call to action: Import this template into your n8n instance, run it once to validate the backups, then switch on the schedule so your workflows are protected around the clock. If you run into questions, share them with the n8n community or your internal DevOps team so others can benefit from your setup and improvements.

Build Workflows with the n8n Developer Agent

Build Workflows with the n8n Developer Agent

Imagine being able to say, “Hey, can you build me a workflow that does X, Y, and Z?” and a few moments later you get a ready-to-import n8n workflow JSON. That is exactly what the n8n Developer Agent template is built for.

This template takes natural language requests, runs them through a smart multi-agent setup, pulls in your docs from Google Drive if needed, and can even create the workflow directly in your n8n instance using the n8n API. In this guide, we will walk through what it does, how the main parts fit together, how to set it up, and how to keep it safe and reliable.

What the n8n Developer Agent template actually does

At its core, the n8n Developer Agent template is a multi-agent automation blueprint. You give it a high-level request, like:

“Build a workflow that watches a Google Drive folder and posts new file links to Slack.”

The template then:

  • Accepts that request via chat or from another workflow
  • Uses LLM agents (OpenRouter GPT and optionally Anthropic Claude Opus 4) to design the workflow
  • Reads your supporting documentation from Google Drive if you want extra context
  • Generates valid, importable n8n workflow JSON
  • Optionally calls the n8n API to create that workflow automatically in your instance

It is especially handy for teams that need to turn vague “we should automate this” ideas into consistent, production-ready workflows without a lot of manual configuration.

When should you use this template?

This template shines in a few common scenarios:

  • Rapid prototyping: You want to quickly test automation ideas from product, ops, or stakeholders, without hand-building every node.
  • Standardization: Your team wants workflows that follow certain naming conventions or patterns, and you want those rules baked into the generated JSON.
  • Non-technical input: Stakeholders can describe what they want in plain language, and the agent handles the technical details of building the workflow.

If you are tired of manually wiring the same patterns over and over, or you want a smoother bridge between “idea” and “actual n8n workflow”, this template will save you a lot of time.

How the template is structured

The template is organized into two main parts:

  • n8n Developer Agent – the “brain” that talks to the user and chooses which tools and models to use.
  • Workflow Builder – the execution pipeline that fetches docs, calls models, and creates workflows.

Let us go through the key nodes and what they do, in a more conversational way.

Key nodes and how they work together

Triggers: how the request enters the system

When chat message received / When Executed by Another Workflow

Everything starts with a trigger. You have two main options:

  • When chat message received: Use this if you want a chat-style interface where someone types a request and the agent responds.
  • When Executed by Another Workflow: Use this if you want another workflow to call this template programmatically and pass in a request.

For quick testing, you can connect the chat trigger directly to the builder part of the workflow so you can see results fast.

The “brain” of the operation

n8n Developer (Agent)

This node is your main orchestrator. It:

  • Receives the raw user request
  • Decides which tools and models to call
  • Forwards the request to the Developer Tool without changing it
  • Coordinates memory and tool outputs so the conversation stays coherent

Behind the scenes, it uses a system prompt that tells the agent to send the user’s request straight to the Developer Tool, then return a link to the generated workflow to the user. In other words, it is the director that makes sure every specialist (tool or model) does its part.

The specialist that actually builds the workflow JSON

Developer Tool

The Developer Tool is where the actual workflow JSON is created. You can think of it as a focused sub-agent whose only job is to output a complete n8n workflow definition.

Its output should be:

  • A single, valid JSON object that represents a full n8n workflow
  • Including the workflow name, nodes, connections, and settings

The template passes the user’s request to this tool verbatim. From there, the tool uses the models and context you provide to assemble the final workflow JSON.

Bringing your documentation into the conversation

Get n8n Docs & Extract from File (Google Drive)

Sometimes the agent needs more context. Maybe you have internal standards, naming conventions, or custom integration notes stored in docs. That is where these nodes come in:

  • Get n8n Docs (Google Drive): Downloads a document from your Google Drive. This could be internal n8n docs, workflow guidelines, or any reference material.
  • Extract from File: Converts that document into plain text so the LLMs can read and use it while designing the workflow.

This is how you “teach” the agent about your environment and preferences without hardcoding everything into prompts.

The LLMs: Claude Opus 4 and GPT 4.1 mini

The template uses two different model nodes to balance reasoning and formatting:

  • Claude Opus 4 (Anthropic): Optional, but great for deeper, step-by-step reasoning and careful planning.
  • GPT 4.1 mini (via OpenRouter or similar): Used as the primary drafting model for generating and refining the workflow JSON.

Using multiple models lets you mix strengths from different providers. Claude can help with thoughtful design, while GPT focuses on concise, well-structured output.

Keeping the conversation coherent

Simple Memory

The Simple Memory node stores context from the conversation so the agent can handle follow-ups like:

“Actually, can you also add a filter step before sending to Slack?”

With memory, the agent can reference previous inputs and outputs. That said, you will want to be selective about what you store, especially if you are dealing with sensitive information.

Turning JSON into a real workflow

n8n (Create Workflow)

Once the Developer Tool returns a finished workflow JSON, this node talks directly to your n8n instance using the n8n API.

It can:

  • Create a new workflow from the generated JSON
  • Return the created workflow’s ID

This is what makes the whole flow feel magical: you go from a natural language request to a live workflow in your instance in a single run.

Workflow Link (Set node)

After the workflow is created, the Set node converts the workflow ID into a clickable URL, something like:

“View your finished workflow”

This makes it easy to jump straight into n8n, test the workflow, and tweak anything you want.

Quick setup guide: get it running end-to-end

Ready to try it in your own n8n environment? Here is a straightforward setup path:

  1. Import the template
    Bring the template JSON into your n8n instance using the import feature or by pasting the JSON.
  2. Connect your primary LLM (OpenRouter or similar)
    Add credentials for OpenRouter (or your chosen provider) and attach them to the GPT 4.1 mini node. This powers the main drafting agent.
  3. Optionally enable Anthropic Claude Opus 4
    If you want stronger reasoning, add your Anthropic API key and connect it to the Claude Opus 4 node.
  4. Configure Google Drive access
    Set up Google Drive credentials for the Get n8n Docs node and point it to the documentation file or folder you want the agent to use.
  5. Set up an n8n API credential
    Create an n8n API credential and attach it to the n8n (Create Workflow) node so the template can create workflows in your instance.
  6. Run a full test
    Trigger the workflow with a simple prompt, such as:
    “Build a workflow that watches a Google Drive folder and posts new file links to Slack.”
    Then:
    • Check that the generated JSON is valid and importable
    • Confirm that the n8n API successfully creates the workflow
    • Open the “View your finished workflow” link to review and test

Best practices for reliable, safe automation

Since this template is powerful enough to create workflows automatically, a bit of structure and caution goes a long way.

Prompt design and JSON quality

  • Be strict in system prompts: The Developer Tool should output only a JSON object, nothing else. Use clear instructions and examples in the system prompt to enforce this.
  • Provide a JSON schema example: Including a sample schema in the prompt helps models stay consistent and reduces malformed outputs.

Handling sensitive data

  • Do not put secrets in prompts or docs: Keep API keys and passwords out of text fields and documents. Use n8n credential nodes instead.
  • Use memory carefully: Only store the context you really need. Avoid including confidential data in the memory buffer.

Version control and auditing

  • Save generated workflows: Store a copy of the generated JSON in a repo, Google Drive, or another system before or as you import it into n8n.
  • Track changes: This makes it easy to roll back, compare versions, and review what the agent has created over time.

Security and governance considerations

Because this setup can create workflows automatically, you should treat its credentials as high-value assets.

  • Use least privilege for the n8n API credential: If possible, limit its scope to workflow creation and related actions only.
  • Rotate keys regularly: Refresh both LLM and n8n API keys on a schedule.
  • Log generated workflows: Keep an audit trail of what workflows are created by the agent and when.
  • Use a sandbox in regulated environments: If you are in a regulated or sensitive environment, run the workflow generation in an isolated workspace first, then promote vetted workflows to production.

Troubleshooting: common issues and quick fixes

Things not working quite as expected? Here are a few common problems and how to fix them.

  • Developer Tool returns non-JSON output
    Tighten the system prompt. Explicitly say that the tool must output only a single JSON object with no extra text. Including a strict JSON schema example in the prompt usually helps a lot.
  • n8n API fails to create the workflow
    Check:
    • That the n8n API credential is configured correctly
    • That the API key has permission to create workflows
    • The error message from the API, in case the JSON is malformed or missing fields
  • Models produce inconsistent or flaky results
    Try:
    • Providing a small set of high-quality example prompts and outputs
    • Adding guardrails in the prompt, such as required fields
    • Inserting a validation step that checks for required top-level fields like name, nodes, connections, and settings

Real-world use cases

Teams that adopt this template typically use it to:

  • Prototype automations from stakeholder requests: Turn product or ops ideas into working workflows in minutes.
  • Enforce standards: Make sure all generated workflows follow your naming conventions and preferred node patterns.
  • Empower non-technical teammates: Let people describe what they want in natural language while the agent handles the implementation details.

Over time, you can refine the prompts, docs, and validation steps so the agent feels more and more like a knowledgeable teammate.

Wrap-up and next steps

The n8n Developer Agent template brings together LLMs, memory, developer tools, Google Drive integration, and the n8n API into a single, extensible workflow. It shortens the path from “idea in someone’s head” to “importable n8n workflow” and can significantly speed up your automation development process.

To recap, you can:

  • Import the template into your n8n instance
  • Connect OpenRouter (and optionally Anthropic) for LLM power
  • Hook up Google Drive so the agent can read your docs
  • Attach an n8n API credential so workflows can be created automatically
  • Test with a simple, concrete use case and refine from there

Next step: Trigger the template with a specific request, such as:

“Create a workflow to receive form responses, filter by tag, and create a Trello card.”

Then review and validate the generated JSON before importing or letting the template create it via the API. Once you are comfortable with the results, you can gradually move to more complex use cases.

Want a more guided experience or help tuning prompts and validation rules? Start with your target use case, write it out in natural language, and iterate on the template’s prompts and docs until the output matches your standards.