YouTube AI Agent with n8n: Automate Insights

YouTube AI Agent with n8n: Automate Insights

Transform raw YouTube data into structured, decision-ready insights with an n8n-powered AI agent. This workflow template combines the YouTube Data API, OpenAI, Apify, and a Postgres-backed memory layer to automate channel analysis, video intelligence, comment mining, and thumbnail evaluation.

This guide walks through the architecture, key n8n nodes, configuration steps, and practical usage patterns so automation professionals and technical marketers can deploy a robust YouTube analysis agent in production environments.

Strategic value of a YouTube AI agent

For content teams and growth-focused organizations, YouTube is both a brand channel and a rich dataset. Manually reviewing comments, transcribing videos, and evaluating thumbnails does not scale. An n8n-based AI agent centralizes these tasks and provides:

  • Audience intelligence at scale – Automatically summarize comments to identify recurring pain points, feature requests, objections, and emerging content themes.
  • Content repurposing workflows – Transcribe videos to generate SEO-optimized articles, social posts, and internal knowledge assets.
  • Conversion-focused creative feedback – Use AI to critique thumbnails and copy for clarity, emotional impact, and click-through potential.
  • Operational efficiency – Offload repetitive API calls, pagination handling, and data preparation so teams can focus on strategy and creative direction.

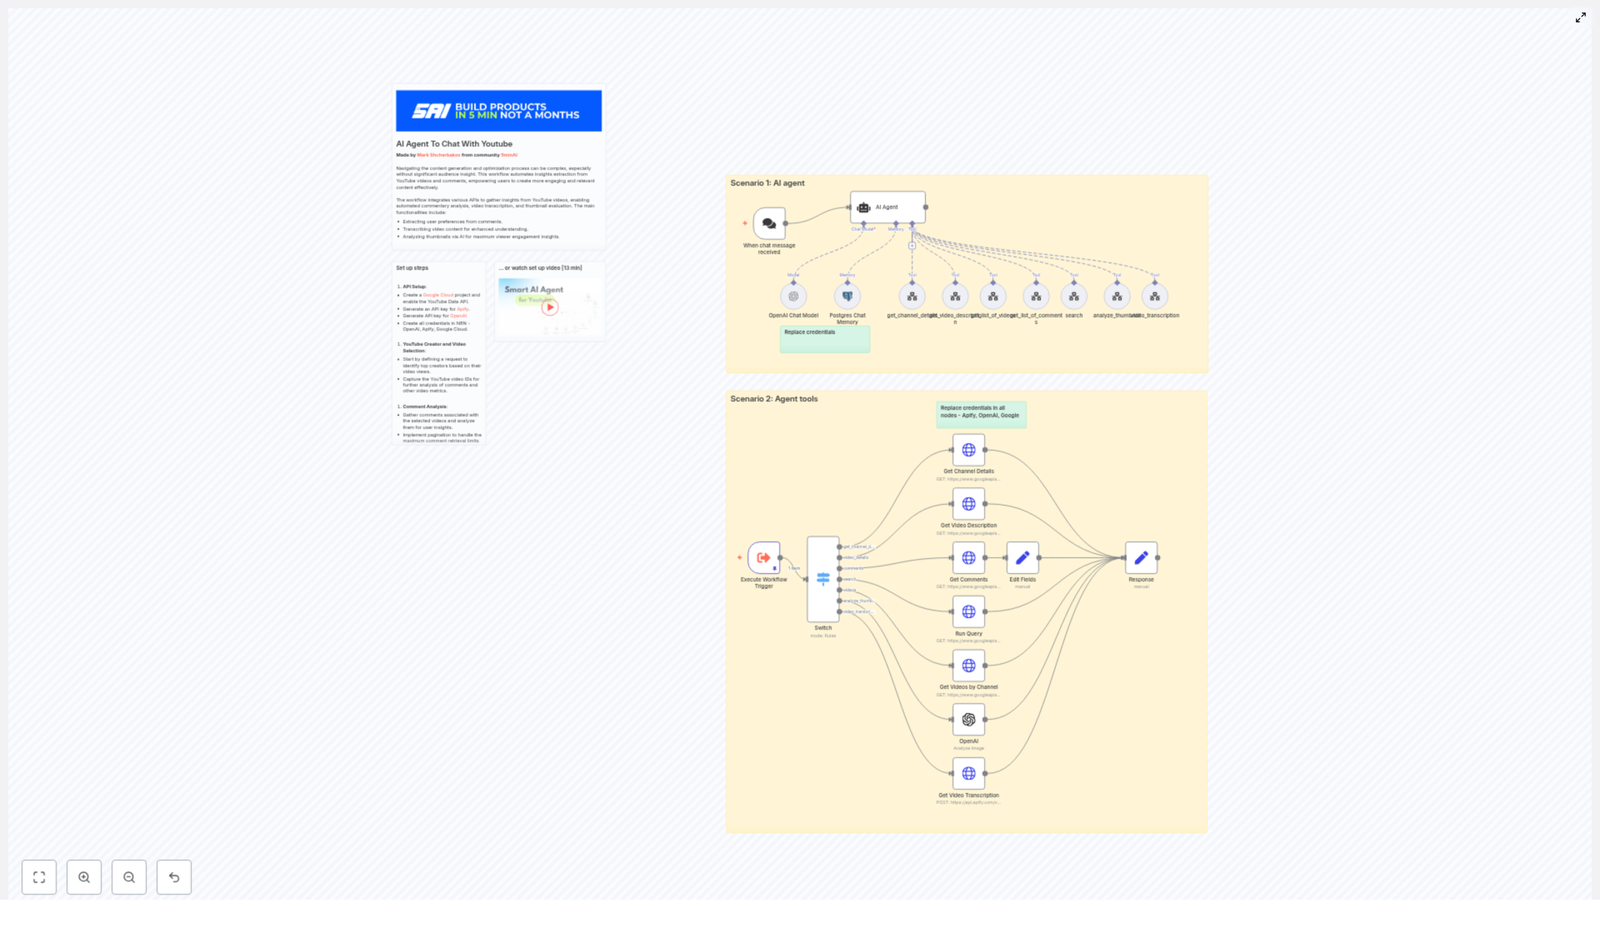
Workflow overview: two core operating modes

The template is structured around two primary scenarios that work together:

  1. AI Agent scenario (conversational entry point)
    A chat-based trigger receives a user query such as “Analyze top videos for channel @example_handle”. The AI agent interprets intent, selects the appropriate tools, orchestrates YouTube and AI calls, and returns a synthesized answer.
  2. Agent tools scenario (specialized helper workflows)
    A set of tool workflows perform targeted operations: retrieving channel metadata, listing videos, fetching detailed video information, collecting comments, initiating transcriptions via Apify, analyzing thumbnails, and composing structured responses.

By separating orchestration logic from tool execution, the template remains modular, easier to maintain, and simple to extend with new capabilities.

Core architecture and key n8n components

1. Chat trigger – conversational entry into the workflow

The chat trigger node acts as the primary entry point. It listens for incoming chat messages or user prompts, then forwards these inputs to the AI agent node. This design enables a natural language interface where users can request analyses using flexible phrasing instead of predefined parameters.

2. AI Agent (LangChain agent) – orchestration and reasoning

The AI agent is responsible for:

  • Understanding user intent and extracting key parameters (channel handle, video URL, number of videos, analysis type).
  • Selecting the right tools (helper workflows) to execute, such as channel lookup, video listing, comment analysis, or transcription.
  • Planning the order of operations, for example: resolve channel, list videos, filter shorts, then analyze comments and thumbnails.
  • Applying system-level rules, such as filtering out shorts under 1 minute using contentDetails.duration or other length attributes.

A system message guides the agent to enforce constraints, maintain consistency, and protect against unnecessary or high-cost operations.

3. YouTube Data API integration nodes

The workflow uses HTTP-based nodes configured for the YouTube Data API. Typical operations include:

  • Get Channel Details – Converts a channel handle or URL into a canonical channel_id. This is the foundation for most subsequent queries.
  • Get List of Videos / Get Videos by Channel – Retrieves paginated video lists with support for ordering by viewCount, date, or relevance. The agent can request a specific number of top videos for focused analysis.
  • Get Video Description / Details – Fetches full video metadata, including snippet, statistics, and contentDetails. This data is used for performance comparisons, topic extraction, and filtering (for example, excluding shorts).
  • Get Comments – Collects threaded comments and replies. Pagination is essential here to capture representative audience sentiment.

4. Transcription via Apify or external service

For deeper content intelligence, the workflow can trigger a transcription service such as Apify:

  • Send the video URL to Apify or another transcription provider.
  • Retrieve a full text transcript once processing is complete.
  • Use the transcript for topic extraction, keyword generation, summarization, and content repurposing.

Transcription is typically reserved for high-value videos due to cost and processing time. The agent can be instructed to confirm with the user or check duration before initiating this step.

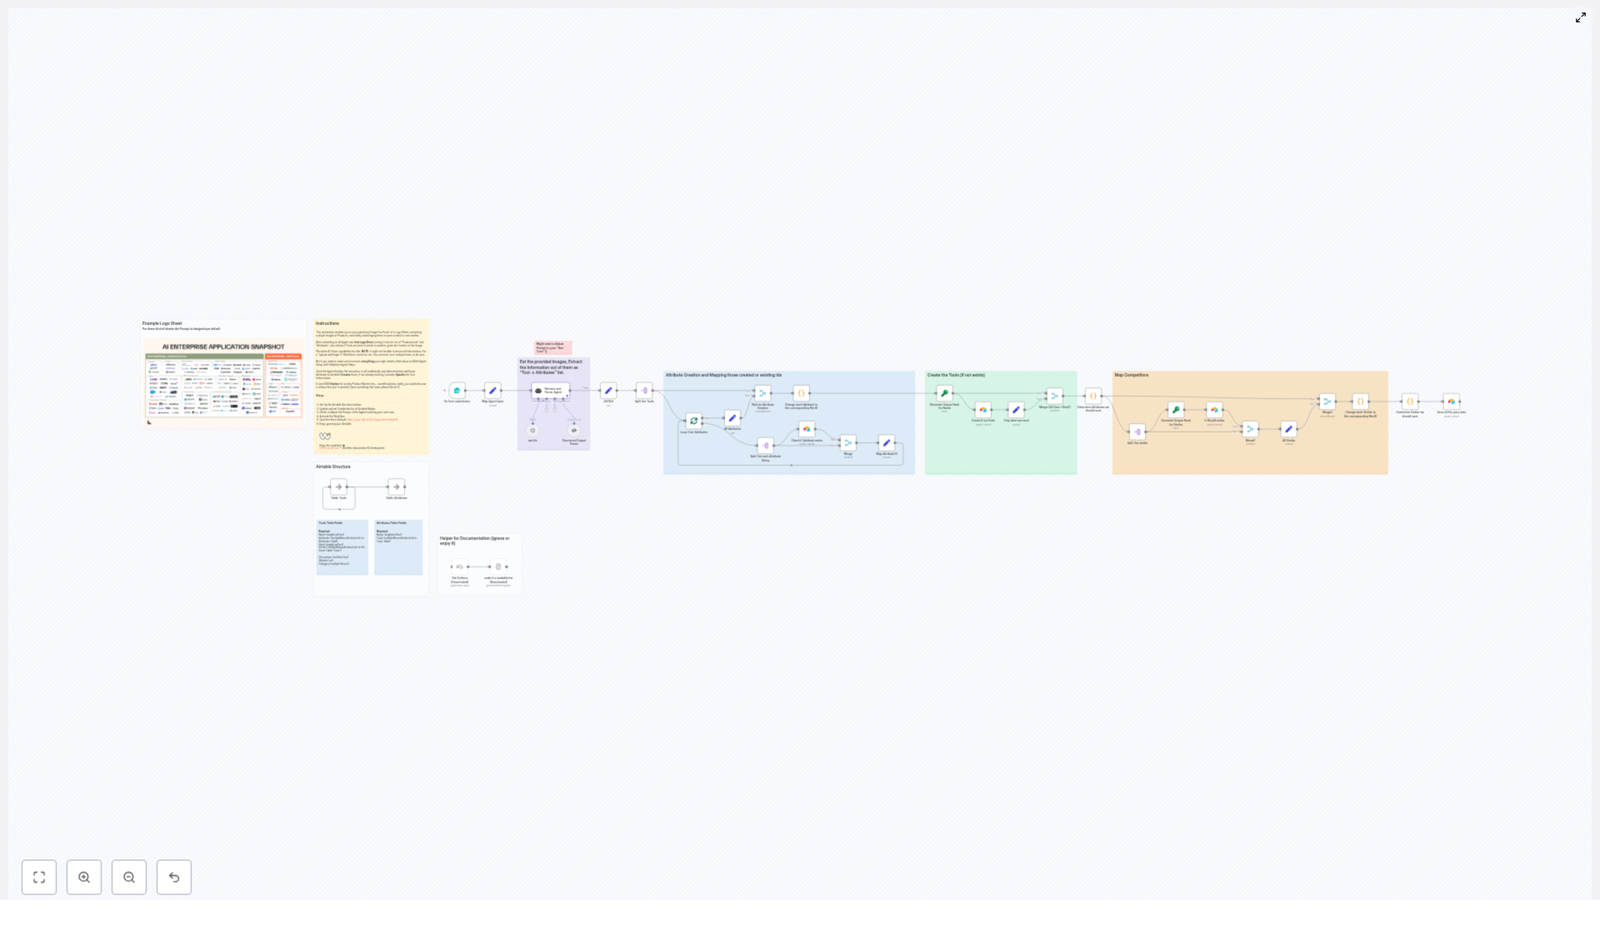
5. Thumbnail analysis with OpenAI image capabilities

The workflow submits high-resolution thumbnail URLs to an OpenAI image analysis operation. A carefully designed prompt guides the model to evaluate:

  • Color contrast and visual hierarchy
  • Focal point clarity and subject visibility
  • Text legibility at various sizes
  • Emotional impact and relevance to the topic
  • Call-to-action clarity and improvement suggestions

Sample prompt used in the template:

Analyze this thumbnail for: color contrast, focal point clarity, text readability, emotional impact, and suggested CTA improvements.

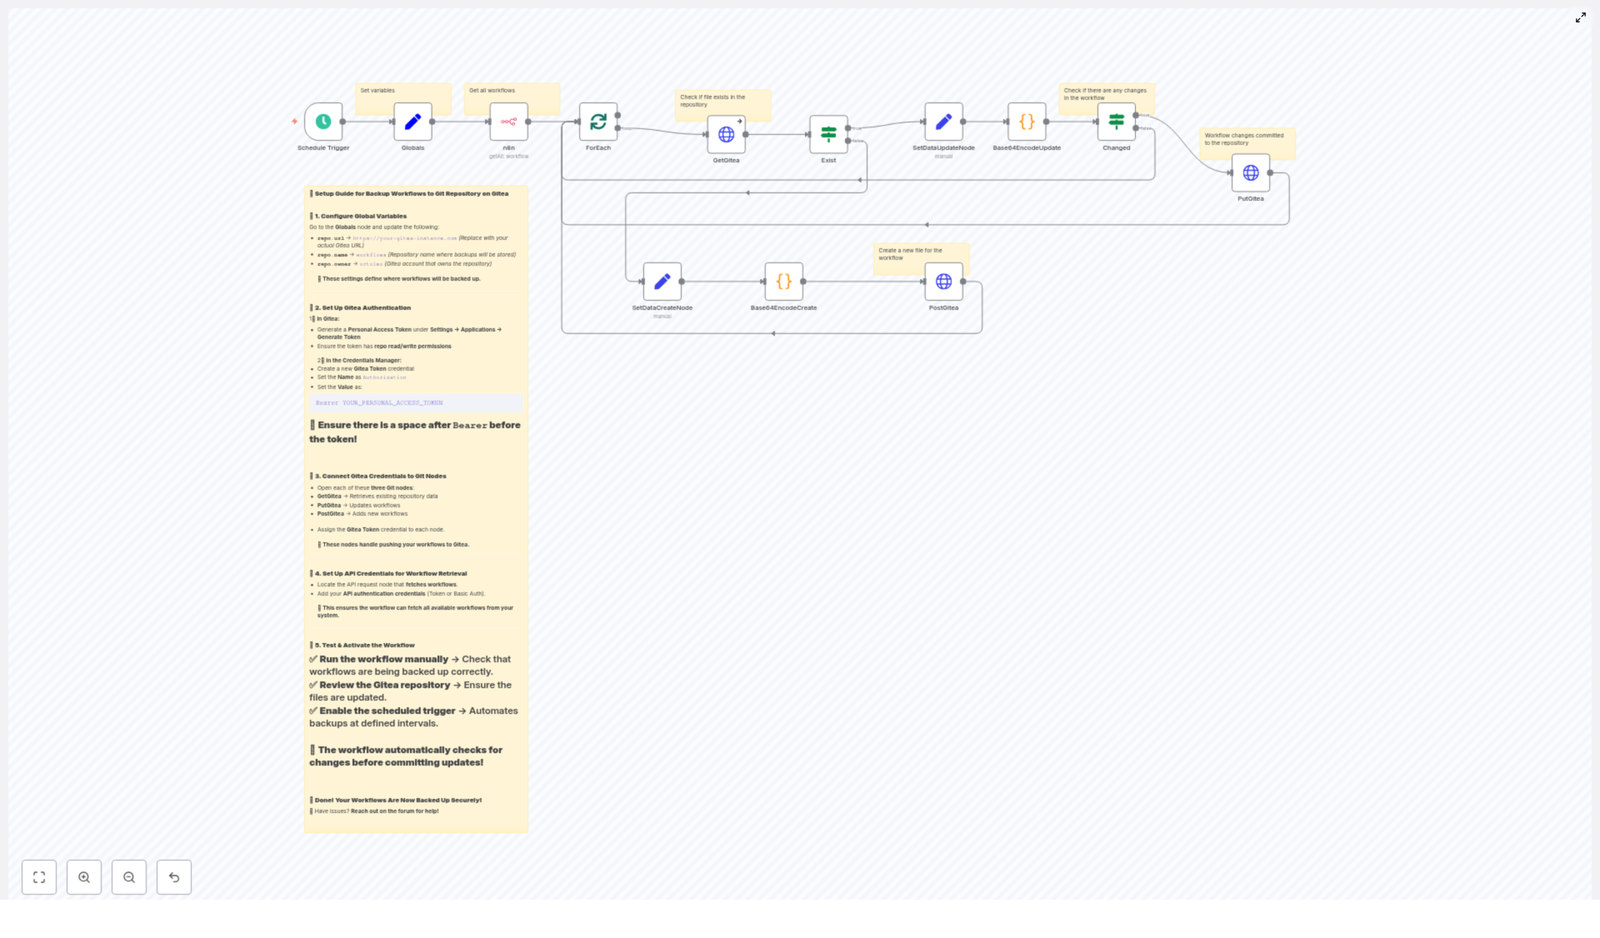
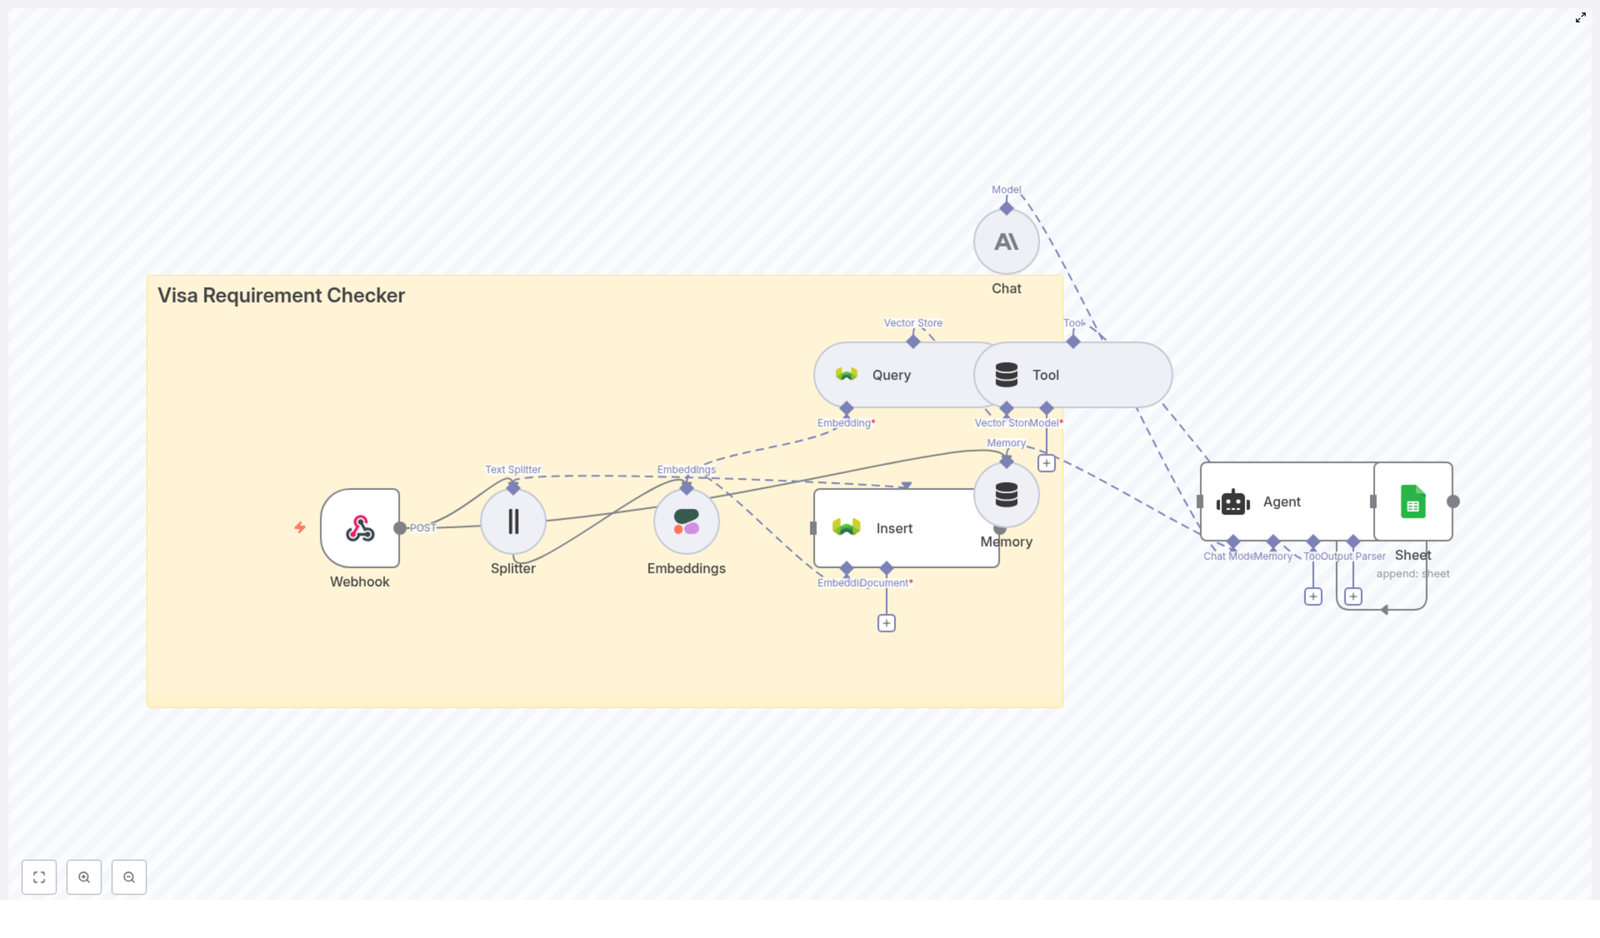
6. Postgres Chat Memory – persistent conversational context

A Postgres database is used as a chat memory layer so the agent can:

  • Persist conversation state across multiple requests.
  • Reference previous analyses or user preferences.
  • Build multi-step, iterative workflows without losing context.

n8n credentials connect to Postgres, and the memory node automatically stores and retrieves relevant context for each session.

Prerequisites and configuration

Required accounts and API keys

Before importing or activating the n8n template, ensure you have:

  • A Google Cloud project with the YouTube Data API enabled and an API key or OAuth credentials.
  • An OpenAI API key for both language and image analysis operations.
  • An Apify account and API token if you use Apify for transcription or crawler-based extraction.
  • An n8n instance with credentials configured for HTTP query auth, OpenAI, Apify, and Postgres.
  • A Postgres database instance for chat memory and structured output storage.

Configuring credentials inside n8n

  1. Create credentials in n8n for:
    • OpenAI (language and image)
    • Apify
    • Google API HTTP Query Auth for YouTube requests
    • Postgres (for memory and analytics storage)
  2. Open the template and replace all nodes marked as “Replace credentials” with your own credential entries.
  3. Individually test each HTTP request node (YouTube endpoints, Apify) using known channel IDs or video URLs to validate connectivity and permissions.

Implementation details and operational safeguards

Handling pagination and large result sets

The YouTube Data API returns limited items per request. To ensure complete coverage:

  • Use nextPageToken to iterate through pages for both video lists and comment threads.
  • Implement loops or a dedicated sub-workflow to aggregate results until all pages are processed or a threshold is reached.
  • Consider limiting the number of items per analysis to manage latency and cost.

Filtering out shorts and irrelevant content

Many use cases focus on long-form videos. To exclude shorts or very short clips:

  • Inspect contentDetails.duration or derived video length.
  • Skip videos under a defined duration, for example 60 seconds, when the user requests full video analysis.
  • Expose duration thresholds as configurable parameters so non-technical users can adjust behavior.

Cost control and resource management

OpenAI and transcription services can generate significant cost at scale. Recommended practices:

  • Prompt the user or apply conditional logic before triggering full-length transcriptions.
  • Set a maximum duration limit for automatic transcription (for example, skip videos over a certain length unless explicitly approved).
  • Batch comment summarization and thumbnail reviews where possible to reduce overhead.
  • Monitor provider dashboards and configure budgets or alerts.

Respecting rate limits and provider constraints

Both YouTube and OpenAI enforce rate limits and quotas. To maintain reliability:

  • Implement exponential backoff or queue-based processing for large channel audits.
  • Throttle concurrent requests when analyzing many videos or channels in parallel.
  • Cache stable data such as channel metadata or historic statistics where appropriate.

End-to-end example: analyzing a YouTube channel

Scenario: “Analyze top videos for channel @example_handle”

  1. Chat trigger receives the user prompt and forwards it to the AI agent node.
  2. AI agent identifies that it must:
    • Resolve the channel handle to a channel_id.
    • Retrieve the top N videos ordered by viewCount.
    • For each video, gather details, comments, and optional transcription and thumbnail analysis.
  3. Channel resolution – The agent calls the get_channel_details tool to fetch the canonical channel_id.
  4. Video selection – The agent invokes get_list_of_videos with:
    • order = viewCount
    • number_of_videos = 5 (or another configured limit)
  5. Per-video analysis:
    • Fetch video metadata and statistics.
    • Retrieve comments and replies, handling pagination.
    • Optionally trigger transcription via Apify for deeper content analysis.
    • Submit the thumbnail URL to OpenAI image analysis using the defined prompt.
  6. Response synthesis – The agent compiles:
    • Top-performing topics and patterns across the selected videos.
    • Sentiment highlights and recurring themes from comments.
    • Thumbnail critique and improvement suggestions.
    • Ideas for repurposing content into blogs, newsletters, or social formats.

    This consolidated output is returned to the user via the response node.

Comment summarization behavior

The workflow aggregates top-level comments and replies, then uses OpenAI to categorize them into buckets such as:

  • Praise and positive feedback
  • Feature or content requests
  • Confusion, friction, or frequent questions
  • Ideas and requests for future topics

This structure enables content planners and product teams to quickly identify what resonates and where viewers struggle.

Best practices for automation professionals

  • Start with a limited scope – Begin by analyzing a small set of recent videos to validate accuracy, latency, and cost before scaling to entire channels or multi-channel portfolios.
  • Validate inputs – Add pre-flight checks to confirm that video URLs are valid, public, and not region-restricted to avoid failing API calls.
  • Keep humans in the loop – Treat AI summaries and recommendations as decision support. Final editorial and strategic decisions should remain with domain experts.
  • Persist structured outputs – Store topics, sentiment scores, thumbnail assessments, and key metrics in Postgres for longitudinal tracking and dashboarding.
  • Iterate on prompts – Continuously refine OpenAI prompts for thumbnail analysis and comment summarization to align with your brand guidelines and KPIs.

Representative use cases

  • Content strategy teams – Identify recurring themes, knowledge gaps, and high-performing angles from viewer comments and top videos.
  • Marketing and growth teams – Systematically optimize thumbnails and titles based on AI feedback for improved click-through and watch time.
  • Creators and thought leaders – Convert transcripts into SEO-friendly blog posts, newsletters, or social media threads.
  • Agencies and consultants – Run scalable audits on client or competitor channels to surface opportunities, content gaps, and trend insights.

Cost, privacy, and compliance considerations

Running this workflow involves paid usage across multiple providers:

  • Transcription services (for example Apify)
  • OpenAI language and image models
  • YouTube API quotas within Google Cloud

Recommended governance practices:

  • Monitor usage in each provider dashboard and enforce budgets or alerts.
  • Respect YouTube terms of service when storing or distributing comments and video-derived data.
  • Anonymize viewer comments if you plan to publish analyses or share datasets externally, and obtain permissions where required.
  • Ensure that Postgres and n8n instances are secured according to your organization’s security standards.

Getting started with the n8n template

To operationalize this workflow in your environment:

  1. Open the template in your n8n workspace.
  2. Replace all placeholder credentials for Apify, OpenAI, Google API, and Postgres.
  3. Run the example search or chat trigger using a known channel handle.
  4. Inspect the response node output for:
    • Correct channel resolution
    • Accurate video selection and filtering
    • Reasonable comment summaries and thumbnail feedback
  5. Iterate on prompts and thresholds (video count, duration limits, pagination depth) before broad deployment.

Try it now: Configure your credentials in the template, run the workflow against a channel you manage, and review the generated insights. If you need a tailored prompt set for thumbnail evaluation or comment analysis aligned with your brand and KPIs, you can extend the system and tool prompts directly within the AI agent node.

Built for creators, marketing teams, and data-driven organizations that require fast, reliable YouTube insights. Automate data collection, extract patterns, and use AI-guided analysis to inform creative and strategic decisions.

Automating Job Application Parsing with n8n & RAG

Automating Job Application Parsing with n8n & RAG

Every new job application represents possibility: a potential teammate, a fresh perspective, a chance to grow your business. Yet in many teams, that possibility gets buried under manual copy-paste work, scattered resumes, and inconsistent notes.

If you are spending hours parsing resumes, updating spreadsheets, and chasing missing details, you are not just losing time. You are losing focus, energy, and the space you need for higher-value work like interviewing, strategy, and building relationships with candidates.

This guide walks you through a practical way out of that cycle. You will build a scalable New Job Application Parser using n8n, OpenAI embeddings, a Pinecone vector store, and a RAG (Retrieval-Augmented Generation) agent. Once set up, this workflow quietly handles the heavy lifting in the background, so you can focus on what actually moves your team forward.


From manual chaos to calm, automated flow

Before we dive into nodes and settings, it helps to look at what we are really trying to change.

Most hiring workflows start with good intentions and end with clutter. Resumes arrive through forms or email, someone pastes details into a sheet, another person tries to summarize experience, and important information slips through the cracks. It is repetitive, error-prone, and hard to scale.

Automation changes that story. When you design a workflow once, it keeps working for you every single day. Your job applications are parsed consistently, stored in a structured format, and instantly searchable. You reclaim hours each week and build a foundation you can keep improving over time.

The template in this article is not just a one-off trick. It is a stepping stone toward a more automated hiring pipeline, where smart tools handle the repetitive work and you spend your time on judgment, insight, and connection.


Why this n8n + RAG architecture unlocks smarter hiring

This setup brings together low-code automation and modern AI so your workflow is both accessible and powerful. Here is how each piece contributes to the bigger picture:

  • n8n gives you a visual, low-code canvas to orchestrate the entire process, from incoming webhooks to final Slack alerts.
  • OpenAI embeddings convert unstructured resume and cover letter text into semantic vectors, making it easy to search by meaning instead of just keywords.
  • Pinecone stores those vectors in a scalable vector database that supports fast, accurate semantic queries.
  • RAG agent uses retrieved context from Pinecone plus a language model to parse, extract, and summarize candidate information with high accuracy.

Instead of yet another spreadsheet-only workflow, you get a modern, context-aware system that grows with your hiring volume and your automation ambitions.


Imagine the workflow in action

Here is the journey your data takes once this n8n template is running:

  • Webhook Trigger receives a POST request whenever a new application arrives.
  • Text Splitter breaks long resumes and cover letters into manageable chunks while preserving context.
  • Embeddings transform each text chunk into a vector using OpenAI’s text-embedding-3-small model.
  • Pinecone Insert stores those vectors in a Pinecone index, along with useful metadata.
  • Pinecone Query later retrieves the most relevant chunks for a given applicant.
  • Vector Tool passes that context into the RAG agent whenever it needs to reason about an application.
  • Window Memory keeps short-term conversational context available for the agent if you extend the flow into multi-step interactions.
  • Chat Model (OpenAI) powers the RAG agent’s reasoning and summarization.
  • RAG Agent combines retrieved context and the chat model to extract structured data and a concise summary.
  • Append Sheet (Google Sheets) logs the final structured result to a “Log” sheet for tracking and analysis.
  • Slack Alert kicks in if anything fails so your team is never left guessing.

This is your new baseline: applications in, structured insights out, with full traceability and clear notifications if something needs attention.


Adopting an automation mindset

Before you start clicking through nodes, it helps to approach this as an ongoing journey, not a one-time task. Your first version of the workflow does not need to be perfect. It just needs to work reliably and save you time.

From there, you can refine prompts, tweak chunk sizes, adjust retrieval parameters, or plug in your ATS. Each improvement compounds the value of your automation. Think of this template as your initial framework that you will customize and extend as your hiring process evolves.


Step 1 – Create your n8n workflow

You can either import the provided n8n JSON template or recreate the nodes visually inside n8n. Once you have the template or a blank workflow, wire it so the data flows cleanly from trigger to output.

Connect the nodes in this core sequence:

  • Webhook TriggerText SplitterEmbeddingsPinecone Insert

Then set up the retrieval and parsing path:

  • Pinecone QueryVector ToolRAG Agent

Finally, connect your output and error handling:

  • RAG AgentAppend Sheet (Google Sheets)
  • Configure workflow onError to send a Slack Alert

Once these connections are in place, you have a complete pipeline ready for configuration and testing.


Step 2 – Configure your credentials

To bring this workflow to life, plug in the services that power embeddings, storage, logging, and alerts. In n8n, add or select the following credentials:

  • OpenAI – Provide your API key so n8n can access the embeddings and chat model.
  • Pinecone – Set your API key, environment, and index name. For example, use new_job_application_parser as the index name.
  • Google Sheets – Configure OAuth2 so the workflow can append parsed results to your “Log” sheet.
  • Slack – Add a bot token that allows posting error messages to a dedicated channel, such as #alerts.

This step is where your workflow connects to the real world. Once credentials are set, you are ready to handle real applications end-to-end.


Step 3 – Split text and create embeddings

Resumes and cover letters can be long, and language models work best with focused chunks of text. That is where the Text Splitter and Embeddings nodes come in.

Text Splitter configuration

Configure the Text Splitter node to use character-based chunking:

  • chunkSize: 400
  • overlap: 40

This setup keeps enough overlap between chunks to preserve context, while keeping each piece small enough to embed efficiently. It is a balanced starting point that you can later tune if needed.

Embeddings configuration

For the Embeddings node, use OpenAI’s text-embedding-3-small model. It provides a strong combination of quality and cost efficiency for this type of semantic retrieval workflow.

Each chunk from the Text Splitter is converted into a vector representation that Pinecone can store and search. This is what enables your RAG agent to pull in the most relevant pieces of an application when it is time to parse and summarize.


Step 4 – Set up your Pinecone index and insertion

Next, you will prepare Pinecone so it can act as the memory layer for your job applications.

Create the index

In Pinecone, create an index named new_job_application_parser. Make sure the index dimension matches the embedding model you are using. Pinecone’s documentation provides the correct dimension for text-embedding-3-small, so confirm that value when creating the index.

Insert vectors with metadata

In the Pinecone Insert node, store each embedding along with helpful metadata so you can trace everything back later. Typical metadata fields include:

  • applicantId
  • source filename or source type
  • chunk index

This metadata makes it easy to retrieve and understand which parts of a resume you are looking at, and it keeps your system auditable as it scales.


Step 5 – Design your RAG agent prompt and tools

Now you will guide the AI so it knows exactly what to extract and how to present it. This is where your automation starts to feel truly intelligent.

RAG agent system message

Provide a clear system message for the agent, for example:

You are an assistant for New Job Application Parser. Use the retrieved context to extract name, email, phone, skills, years of experience, education, and a concise summary. Output JSON only.

This instruction sets expectations, tells the model what fields to return, and enforces a consistent JSON format that your downstream systems can rely on.

Connect the Vector Tool

Wire the Vector Tool to your Pinecone Query node so the RAG agent can request and use relevant chunks on demand. With this setup, the agent does not have to guess. It retrieves the right context from Pinecone, then applies reasoning on top of that information.

The result is a structured, reliable parsing of each application, ready for logging, scoring, or integration with your ATS.


Sample webhook payload to get you started

To test your Webhook Trigger and the rest of the flow, use a sample payload like this:

{  "applicantId": "12345",  "name": "Jane Doe",  "email": "jane@example.com",  "resumeText": "<full resume text here>",  "coverLetter": "<cover letter text here>"
}

Sending this payload into your workflow lets you validate splitting, embedding, insertion, retrieval, and parsing in a single run.


What a successful RAG agent output looks like

When everything is wired correctly, the RAG agent should produce a concise JSON object that captures the essentials of each candidate. For example:

{  "applicantId": "12345",  "name": "Jane Doe",  "email": "jane@example.com",  "phone": "(555) 555-5555",  "skills": ["Python","NLP","ETL"],  "experienceYears": 5,  "education": "MSc Computer Science",  "summary": "Senior data engineer with 5 years' experience in NLP and ETL pipelines."
}

Once you have this structure, you can feed it into dashboards, internal tools, or other automations. It is the foundation for deeper analytics and smarter decision making.


Logging results and staying informed

A great automation not only does the work, it keeps you in the loop. This template uses Google Sheets and Slack to provide that visibility.

Google Sheets logging

Configure the Append Sheet node to write the RAG agent’s JSON output into a “Log” sheet. You might map it to columns like:

  • Applicant ID
  • Email
  • Skills
  • Experience years
  • Education
  • Summary
  • Status or Result

This creates an immediate, searchable record of every parsed application for auditing and quick review.

Slack alerts for reliability

In your workflow settings, configure onError to send a Slack Alert. If any node fails, your team receives a message in the chosen channel, such as #alerts, so you can act quickly instead of discovering issues days later.


Protecting candidate data – security and PII

Job applications contain sensitive personal information, so it is important to design your automation with privacy in mind. As you build and extend this workflow, keep these practices in place:

  • Limit how long you retain raw resumes and cover letters in your vector index. Store only what you truly need.
  • Avoid unnecessary metadata that could expose more PII than required.
  • Encrypt credentials and store secrets as n8n environment variables, not in plain text.
  • Set strict access controls on Google Sheets and Pinecone so only authorized team members can see candidate data.
  • Whenever possible, log summarized or parsed results instead of full resume text in shared locations.

By building security into your workflow now, you create an automation you can confidently scale.


Optimization tips as your volume grows

Once your initial setup is working, you can start tuning it for cost, speed, and accuracy. Here are practical ways to refine the system:

  • Tune chunk size and overlap – Larger chunks preserve more context but increase token usage and storage. Smaller chunks are cheaper but can lose coherence. Experiment around the starting point of chunkSize: 400 and overlap: 40.
  • Adjust retrieval size (top_k) – In Pinecone queries, control how many chunks are returned to the RAG agent. Too many can introduce noise, too few can miss important details.
  • Reduce redundant embeddings – Cache or deduplicate resumes when possible so you do not re-embed identical content.
  • Monitor cost and latency – For routine parsing, consider smaller or lower-cost models when slight accuracy tradeoffs are acceptable.

These optimizations help you keep your automation lean, responsive, and budget-friendly as your hiring pipeline scales.


Testing, validating, and building confidence

Thoughtful testing helps you trust your automation enough to rely on it daily. Use this simple validation path:

  1. Send multiple sample webhook payloads and confirm that text splitting, embedding insertion, and RAG parsing all complete successfully.
  2. Review Google Sheets entries to ensure the JSON structure matches your expectations and that key fields like skills and experience are parsed correctly.
  3. Simulate failures, such as invalid API keys or temporary Pinecone downtime, and confirm that Slack alerts fire so your team knows exactly what happened.

Once you are confident in these basics, you can safely expand the workflow with more advanced steps.


Avoiding common pitfalls on your automation journey

As you experiment and refine, watch out for a few easy-to-miss issues:

  • Overly small chunks – Very small chunk sizes can split sentences mid-thought, which reduces embedding quality and harms retrieval.
  • Missing metadata – If you do not store metadata with vectors, linking parsed results back to the original application becomes difficult.
  • Oversharing raw resumes – Placing full resume text in widely shared sheets or logs can introduce privacy and compliance risks. Prefer summarized or structured fields.

By addressing these early, you keep your workflow clean, maintainable, and respectful of candidate privacy.


Next steps – turning a parser into a full hiring pipeline

Once you trust your job application parser, you can start turning it into a more complete recruitment system. Here are natural extensions:

  • Automatically create candidate records in your ATS (Applicant Tracking System) using the structured JSON output.
  • Trigger recruiter notifications or tasks when candidates match certain skill sets or experience thresholds.
  • Run automated skill-matching and scoring with a secondary LLM prompt that ranks candidates for specific roles

Automate Notion API Updates with n8n & Supabase

Automate Notion API Updates with n8n & Supabase

Keeping Notion databases synchronized and enriched with AI-generated context can quickly become complex at scale. This reference-style guide documents an n8n workflow template that automates the entire pipeline: ingesting updates via webhook, chunking and embedding text, storing vectors in Supabase, running a retrieval-augmented generation (RAG) agent, and finally logging results to Google Sheets with Slack-based error notifications.

The goal is to provide a precise, implementation-ready description of the workflow so you can deploy, audit, and extend it confidently in production environments.

1. Workflow Overview

This n8n template automates Notion-related updates and downstream processing by chaining together a series of specialized nodes. At a high level, the workflow:

  • Accepts structured update events via an HTTP webhook (from Notion or any external system).
  • Splits long text fields into overlapping chunks suitable for embedding.
  • Generates vector embeddings for each chunk using an OpenAI embedding model.
  • Persists vectors and associated metadata in a Supabase vector table for similarity search.
  • Exposes this vector store and short-term memory to a RAG agent.
  • Uses a chat model to produce context-aware outputs (summaries, suggested updates, automation hints).
  • Appends the final result to a Google Sheet for logging and auditing.
  • Sends Slack alerts when errors occur in the RAG or downstream processing stages.

This architecture is suitable for:

  • Notion content enrichment and summarization.
  • Semantic search over Notion pages using Supabase as a vector backend.
  • Automated recommendations or follow-up tasks based on Notion changes.

2. Architecture & Data Flow

The workflow is composed of the following logical components, each implemented with one or more n8n nodes:

  • Ingress
    • Webhook Trigger – Receives POST requests at a dedicated path and passes the payload into the workflow.
  • Preprocessing
    • Text Splitter – Breaks long content into overlapping character-based chunks (chunkSize 400, overlap 40).
  • Vectorization & Storage
    • Embeddings – Calls OpenAI’s text-embedding-3-small (or another configured embedding model) to generate vector representations.
    • Supabase Insert – Writes embeddings, raw chunks, and metadata into a Supabase vector table (index name notion_api_update).
    • Supabase Query – Retrieves top-k similar vectors when the RAG agent requests context.
  • RAG & Orchestration
    • Vector Tool – Wraps the Supabase vector store as a tool that the agent can call.
    • Window Memory – Maintains a sliding window of recent conversational or processing context.
    • RAG Agent – Orchestrates the chat model and vector tool to produce a context-aware response.
  • Output & Observability
    • Append Sheet – Logs each agent output to a Google Sheets worksheet (sheetName: Log).
    • Slack Alert – Sends error notifications when upstream nodes fail.

The data path is linear in the success case, with side branches for logging and error handling. Each node consumes the JSON output of the previous node, optionally enriching it with additional metadata.

3. Node-by-Node Breakdown

3.1 Webhook Trigger

The entry point is an n8n Webhook node configured to accept POST requests at a path such as:

/notion-api-update

Typical JSON payload structure:

{  "page_id": "abc123",  "title": "Quarterly Report",  "content": "Long text body or concatenated comments",  "source": "notion"
}

Key considerations:

  • Required fields:
    • page_id – Unique identifier for the Notion page or record.
    • content – The main text body to embed and analyze.
  • Optional fields:
    • title, source, timestamps, or any other metadata you want to store in Supabase or pass to the agent.
  • Payload size:
    • Keep the payload as lean as possible, especially if content is very long. Avoid embedding unnecessary large fields.

Edge cases:

  • If content is empty or missing, you may want to short-circuit the workflow with a validation step before the Text Splitter, or handle this case explicitly in the RAG agent prompt.
  • Non-UTF-8 or malformed JSON should be handled by the caller; the webhook expects valid JSON.

3.2 Text Splitter

Next, a Text Splitter node prepares the text for embedding by splitting it into overlapping segments. The template uses a character-based strategy:

  • chunkSize: 400
  • chunkOverlap: 40

Behavior:

  • The node takes the content field and produces an array of text chunks.
  • Each chunk is at most 400 characters, with 40 characters of overlap between consecutive chunks to preserve local context.

Configuration notes:

  • For shorter texts, you may get only a single chunk. The workflow still functions correctly.
  • If you change the embedding model to one with different token limits, you can adjust chunkSize accordingly while keeping some overlap to avoid cutting important sentences in half.

3.3 Embeddings Node

The Embeddings node converts each text chunk into a vector representation using OpenAI. In the template, the model is:

  • Model: text-embedding-3-small

Key configuration elements:

  • Credentials:
    • Use n8n’s credential manager to store your OpenAI API key.
    • Reference these credentials in the node configuration rather than hard-coding keys.
  • Input mapping:
    • Ensure the node is configured to read the array of chunks emitted by the Text Splitter.

Output:

  • For each chunk, the node outputs:
    • The original text chunk.
    • The corresponding embedding vector (as an array of floats).

Error handling:

  • Embedding failures can occur due to:
    • Invalid or missing API key.
    • Incorrect model name.
    • Provider-side rate limiting or transient network issues.
  • For production setups, consider enabling retry logic (for example, via n8n’s error workflows or custom logic nodes) with exponential backoff for transient failures.

3.4 Supabase Insert & Supabase Query

3.4.1 Supabase Insert

This node persists each embedding to a Supabase vector table. The template assumes a vector index named:

notion_api_update

Typical table schema (conceptual):

  • id – Primary key.
  • page_id – Notion page identifier.
  • title – Optional title of the page or record.
  • content_chunk – The text chunk associated with the embedding.
  • embedding – Vector column (for example, vector type) used for similarity search.
  • source – Source system, for example notion.
  • timestamp – Ingestion or update timestamp.

Configuration notes:

  • Ensure your Supabase credentials (URL and API key or service role key) are stored in n8n’s credential manager.
  • Map the fields from the Embeddings node output to the appropriate columns in Supabase.
  • Verify that the vector column and index are configured correctly in Supabase for efficient similarity search.

Common failure modes:

  • Mismatched column names or types between Supabase and the node configuration.
  • Incorrect index name (notion_api_update must match the configured index in your Supabase project).
  • Insufficient permissions for the Supabase API key used by n8n.

3.4.2 Supabase Query

The Supabase Query node performs similarity search when the RAG agent requests context. It typically:

  • Accepts a query vector (for example, an embedding of a user query or the current content).
  • Retrieves the top-k nearest neighbors from the notion_api_update index.

Key parameters:

  • Index name: notion_api_update.
  • k: Number of similar vectors to retrieve. Adjust based on the amount of context you want to provide to the agent.

Ensure the query node:

  • Uses the same vector dimensionality and model as the insert node.
  • Returns both the matched text chunks and relevant metadata (for example, page_id, title) so the agent can interpret results.

3.5 Vector Tool & Window Memory

3.5.1 Vector Tool

The Vector Tool node wraps the Supabase vector store so that the RAG agent can call it as a tool during generation. This tool abstracts:

  • How queries are converted to embeddings.
  • How similarity search is performed against Supabase.
  • What fields are returned as context.

In practice, the agent invokes this tool when it needs additional context related to the current task or input payload.

3.5.2 Window Memory

The Window Memory node maintains short-term state across agent turns or multiple workflow steps. It provides:

  • A configurable memory window that stores the most recent interactions.
  • Context for the agent so it can generate more coherent, multi-step outputs.

Configuration guidelines:

  • Set the memory window size based on your use case:
    • Small window for one-shot summarization and simple updates.
    • Larger window if you expect the agent to reference multiple prior steps or conversations.
  • Monitor token usage if you increase the memory window, as this directly affects model costs and latency.

3.6 RAG Agent

The RAG Agent is the core reasoning component that combines:

  • A chat model (Anthropic in the template, though OpenAI or similar models can be used).
  • The Vector Tool for context retrieval.
  • Window Memory for short-term state.

Its job is to produce context-aware outputs for the task “Notion API Update”. Typical outputs include:

  • Concise summaries of the page content.
  • Suggested updates or modifications to the Notion page.
  • Automation commands or follow-up actions based on the content.

The template uses a custom system prompt similar to:

You are an assistant for Notion API Update. Process the following data for task 'Notion API Update': {{ $json }}

You can further refine the agent behavior using a prompt template like:

System: You are an assistant for Notion API Update.
User: Process this payload and suggest page updates or a concise summary depending on the content.
Context: {{retrieved_chunks}}
Input: {{ $json }}

Tips for controlling agent behavior:

  • Clarify in the system message what the agent should and should not do (for example, no speculative content, only use provided context).
  • If outputs are off-topic, adjust:
    • The system prompt wording.
    • The amount of retrieved context (k value in Supabase Query).
    • Any additional instructions in the user message.

3.7 Append Sheet & Slack Alert

3.7.1 Append Sheet (Google Sheets)

The Append Sheet node writes the agent’s output to a Google Sheet for logging, analytics, or manual review. The template uses:

  • sheetName: Log

Common fields to append:

  • timestamp
  • page_id
  • title
  • Agent output (for example, summary or recommended changes)
  • Error status or flags if applicable

Configuration notes:

  • Store Google credentials in n8n’s credential manager.
  • Confirm that the sheet exists and that the node is configured to append rows rather than overwrite existing data.

3.7.2 Slack Alert

The Slack Alert node is typically wired to the onError output of the RAG Agent or other critical nodes. When an error is raised:

  • The node sends a concise message to a designated Slack channel.
  • The message can include:
    • Error type and message.
    • Relevant identifiers such as page_id or timestamp.

Best practices:

  • Use a dedicated Slack channel for automation alerts to avoid noise.
  • Include enough context in the alert to quickly diagnose whether the issue is with credentials, payload format, or external services.

4. Configuration & Security Best Practices

To run this workflow safely in production, pay attention to the following:

  • Credential management:
    • Store all sensitive data in n8n’s credential manager:
      • OpenAI (or other LLM provider) API keys.
      • Supabase keys.
      • Google Sheets credentials.
      • Slack tokens.
      • Anthropic or other chat model credentials.
    • Never hard-code secrets in node parameters or expressions.
  • Webhook security:
    • Prefer private or authenticated endpoints.
    • If exposed publicly:

Build n8n Developer Agent: Auto Workflow Builder

Build the n8n Developer Agent: Auto Workflow Builder

On a rainy Tuesday morning, Alex, a senior automation engineer, stared at yet another Slack message from a product manager.

“Can you spin up a quick workflow that takes new leads from our form, enriches them, and posts a summary to Slack? Should be simple, right?”

Alex had heard that line a hundred times. Each “simple” request meant opening n8n, dragging nodes, wiring connections, double checking credentials, and then documenting everything so the next person could reuse it. By lunchtime the day was gone, and Alex had barely touched the roadmap.

That was the day Alex decided there had to be a better way to build n8n workflows. Not by hand, but by describing what was needed in plain language and letting an AI agent do the heavy lifting.

That search led to the n8n Developer Agent, a multi-agent, AI-assisted workflow template that turns natural language prompts into fully importable n8n workflows. What started as frustration became the beginning of a new automation factory inside Alex’s n8n instance.

The problem: too many ideas, not enough time

Alex’s team was drowning in automation requests. Marketing wanted new lead routing workflows. Support wanted ticket triage. Operations wanted data syncs between tools that did not even have native integrations. Everyone agreed that n8n could do it all, but building each workflow manually was slow and error prone.

Worse, every engineer had their own style. Node names were inconsistent, connections got messy, and documentation lagged behind reality. Reusing workflows meant deciphering someone else’s logic days or months later.

Alex wrote out the pain points in a notebook:

  • Too much manual work – every new workflow started from scratch.
  • Inconsistent structure – node names, metadata, and patterns were all over the place.
  • Slow prototyping – simple ideas took hours to test in n8n.
  • Hard to collaborate – sharing workflows as clean, reusable artifacts was a constant struggle.

What Alex really needed was a developer-grade assistant inside n8n itself, something that could take a sentence like “Build a workflow that triggers hourly and posts a message to Slack” and return a ready-to-import JSON workflow.

The discovery: an AI-powered n8n Developer Agent

While exploring community resources, Alex found a template called the n8n Developer Agent: Auto Workflow Builder. It promised exactly what the team needed:

  • Convert conversational prompts into importable n8n workflow JSON.
  • Use LLMs like GPT-4.1 mini or Claude Opus 4 for reasoning and generation.
  • Pull reference docs from Google Drive so the agent stayed aligned with internal standards.
  • Optionally create workflows directly in the n8n instance via API.

Instead of building workflows by hand, Alex could describe the goal and let the Developer Agent assemble nodes, parameters, and connections. It sounded almost too good to be true.

To see if it was real, Alex imported the template and started exploring how it worked under the hood.

Behind the curtain: how the n8n Developer Agent thinks

What Alex found was not just a single workflow, but a small ecosystem of cooperating agents and tools, each with a clear responsibility.

The high-level architecture Alex uncovered

The template was built around several core components:

  • Chat trigger – listens for user prompts from a chat interface or webhook and kicks off the process.
  • Main agent (n8n Developer) – orchestrates the entire request and coordinates with sub-agents and tools.
  • LLM brain – one or more LLM nodes, such as GPT-4.1 mini or Claude Opus 4, that handle reasoning and generation.
  • Developer Tool – produces the final, importable n8n workflow JSON.
  • Docs and file extraction – pulls reference documentation from Google Drive and converts it into text.
  • n8n API node – optionally creates workflows directly in the n8n instance using the API.

Instead of a monolithic script, the Developer Agent behaved like a small team: one part listened, another thought, another wrote code-like JSON, and another deployed it.

Meet the cast: each node as a character in the story

As Alex stepped through the workflow, each node revealed its role in the story.

The Chat Trigger: where the story begins

The journey starts with the When chat message received node. This trigger listens for new prompts, either from a chat UI or a webhook. Whenever someone in Alex’s team typed a request, that raw text flowed into the Developer Agent.

For early testing, Alex swapped this out with an Execute Workflow node, so prompts could be entered directly from within n8n while fine tuning the setup.

The n8n Developer Agent: the orchestrator

Once a message arrives, the n8n Developer (Agent) steps in as the conductor. It does something important that Alex appreciated: it forwards the original prompt exactly as written to the Developer Tool, without rewriting or filtering it.

This agent also keeps track of context, tool outputs, and memory. After the Developer Tool returns the workflow JSON, the agent prepares a response that includes a link to the newly created workflow so the requester can open it instantly.

The LLM brain: GPT and Claude as architects

The real “thinking” happens in the LLM nodes. Alex configured nodes using:

  • GPT-4.1 mini via OpenRouter for fast, cost effective generation.
  • Claude Opus 4 via Anthropic for deep reasoning and complex structural decisions.

These nodes analyze the user’s request, choose node types, set parameters, and assemble the connections between them. Alex could tune model settings like:

  • Model choice per step.
  • Token limits for output size.
  • Safety and temperature settings to reduce hallucinations.

By combining GPT for creativity and Claude for structure, Alex found a good balance between speed and reliability.

The Developer Tool: where JSON workflows are born

The Developer Tool became Alex’s favorite part. This tool is responsible for outputting a single, well formed JSON object that represents an entire n8n workflow.

Every output must include:

  • name – the workflow name.
  • nodes – a complete array of nodes with types and parameters.
  • connections – how each node connects to others.
  • settings – such as executionOrder or saveManualExecutions.
  • staticData – usually null, unless needed.

To make life easier for future users, Alex also had the tool include sticky notes inside the workflow JSON. These notes highlighted:

  • Which credentials still needed to be configured.
  • Any manual setup steps after import.
  • Usage tips or assumptions made by the agent.

Because the JSON started with { and ended with } with no extra text, it could be imported directly into n8n, either via the UI or programmatically.

Google Drive and Extract from File: the library of knowledge

Alex knew that LLMs perform better when they have clear reference material. The template solved this with Google Drive and an Extract from File node.

By storing internal n8n docs and template examples in Google Drive, then converting them to plain text, the Developer Agent could:

  • Read up-to-date node parameter examples.
  • Follow approved patterns and best practices.
  • Stay aligned with the team’s standard configurations.

For Alex, this meant the agent did not just generate “any” workflow. It generated workflows that matched how the team already worked.

The n8n API node: the deployment engine

Finally, Alex found the n8n node (create workflow). This node uses an n8n API credential to take the JSON from the Developer Tool and create a new workflow directly in the n8n instance.

A simple Set node then formats a clickable link, so whoever requested the workflow can open it with a single click.

In other words, a plain language sentence now turned into a live workflow inside n8n, without anyone dragging a single node manually.

The turning point: setting everything up

Excited but cautious, Alex decided to configure the Developer Agent step by step, starting in a safe sandbox environment.

Step 1 – Connect OpenRouter or your preferred LLM

First, Alex created credentials for OpenRouter and connected them to the LLM nodes that used GPT-variants. A quick test prompt confirmed that:

  • The API keys were valid.
  • The model responded within acceptable latency.
  • Responses were within token limits.

Any other compatible LLM provider could be used here, but OpenRouter made it easy to switch models later.

Step 2 – (Optional) Add Anthropic and Claude

For more complex workflows, Alex wanted the reasoning power of Claude Opus 4. By adding an Anthropic API key and wiring it into a dedicated LLM node, Alex could route structured, logic heavy tasks to Claude.

Over time, a pattern emerged:

  • Use Claude for complex structural outputs and multi step logic.
  • Use GPT for creative phrasing and lighter tasks.

Step 3 – Configure the Developer Tool correctly

Next, Alex focused on the Developer Tool configuration. The key was to map the agent input exactly as received so the original user prompt flowed straight into the tool.

Alex adjusted the system prompt so that the tool would:

  • Return a single valid JSON object.
  • Include name, nodes, connections, settings, and staticData.
  • Add sticky notes for any credentials or configuration items that humans needed to finish.
  • Avoid explanations, Markdown, or any text outside the JSON.

This strict format guaranteed that the output could be imported directly into n8n without manual cleanup.

Step 4 – Connect Google Drive for documentation

To give the agent a reliable knowledge base, Alex:

  1. Made a copy of the team’s canonical n8n documentation in Google Drive.
  2. Connected Google Drive credentials to the Get n8n Docs node.
  3. Used the Extract from File node to convert these docs into plain text.

Now, every time the Developer Agent ran, it had up-to-date examples and recommended settings to reference.

Step 5 – Wire in the n8n API credential

Finally, Alex created an n8n API credential with permission to create new workflows.

Before trusting it in production, Alex tested it by:

  1. Pointing it to a sandbox n8n workspace.
  2. Creating a simple test workflow via the API node.
  3. Verifying that the new workflow appeared correctly and executed without issues.

Only after this test passed did Alex enable auto-creation for real use cases.

The first real test: will it actually build a workflow?

With everything wired up, Alex decided it was time for a real experiment. The prompt was simple:

“Build a workflow that triggers hourly and posts a message to Slack.”

The Developer Agent sprang into action. Behind the scenes, Alex watched each step execute:

  1. The chat trigger captured the request.
  2. The n8n Developer Agent passed the raw prompt to the Developer Tool.
  3. The LLM nodes reasoned about what nodes were needed and how to connect them.
  4. The Developer Tool generated a JSON workflow with a Cron trigger, Slack node, and proper connections.
  5. The n8n API node created the workflow in the sandbox instance.
  6. A link appeared, ready to be clicked.

Alex opened the new workflow and inspected the details:

  • Node types were valid and correctly configured.
  • Connections lined up as expected.
  • Sticky notes clearly listed which Slack credentials to attach.

After a quick credential hookup, Alex ran the workflow. It posted to Slack on schedule with no errors. The test passed.

Testing, validation, and tightening the screws

Success was exciting, but Alex knew that a production ready Developer Agent needed more rigorous validation. A simple checklist emerged.

Alex’s testing routine

  1. Start with a basic request, such as “Build a workflow that triggers hourly and posts a message to Slack.”
  2. Inspect the returned JSON for:
    • Valid node types.
    • Correct connections.
    • Expected settings and metadata.
  3. Import the JSON manually at first, or let the n8n API node create the workflow automatically in a sandbox.
  4. Execute the new workflow and review logs for any errors or missing parameters.
  5. Confirm that sticky notes mention all required credentials and configuration steps.

Each iteration surfaced small improvements that Alex fed back into the Developer Tool prompt and documentation.

Security and governance: keeping the agent under control

As the team grew more confident, a new concern emerged. If an AI agent could create workflows automatically, it needed guardrails.

Alex worked with the security team to add governance controls around the Developer Agent:

  • Role based access – only specific roles could run the Developer Agent or create workflows through the API.
  • Staging environment – all auto created workflows landed in a staging workspace first, then were promoted to production after review.
  • Audit logs – n8n execution logging was enabled, and JSON outputs were stored for later auditing.
  • Model safeguards – prompts that requested secrets or direct credential injection were blocked or flagged.

With these controls in place, leadership felt comfortable letting the Developer Agent handle more of the workload.

When things go wrong: Alex’s troubleshooting playbook

No system is perfect, and Alex quickly discovered a few common issues that could crop up when working with LLM generated workflows.

Problem 1 – Invalid JSON from the Developer Tool

Sometimes the LLM tried to be “helpful” and wrapped the JSON in Markdown or added explanations. The fix was clear:

  • Update the system prompt to insist on a single JSON object only.
  • Confirm that the output always starts with { and ends with }.
  • Strip any extra formatting or text before passing it to the n8n API node.

Problem 2 – Missing credentials in generated workflows

When workflows referenced tools like Slack or Google Sheets, credentials were sometimes left implicit. Alex addressed this by:

  • Having the Developer Tool always include sticky notes pointing out which credentials to connect.
  • Using templated placeholders for credential names, but never including

Automate Pinterest Analysis & AI Content Suggestions

Automate Pinterest Analysis & AI-Powered Content Suggestions

With n8n, the Pinterest API, Airtable, and OpenAI, you can build a hands-free workflow that:

  • Automatically pulls your latest Pinterest pins
  • Stores and organizes pin metrics in Airtable
  • Uses AI to analyze performance and suggest new content ideas
  • Sends a clear summary to your marketing team by email

This guide walks you through how the n8n workflow template works, how to set it up, and how to use it to improve your Pinterest content strategy.

What you will learn

By the end of this tutorial, you will understand how to:

  • Connect n8n to the Pinterest API using an HTTP Request node
  • Normalize Pinterest pin data for storage in Airtable
  • Use Airtable as a structured analytics database for your pins
  • Configure an AI agent (OpenAI via LangChain in n8n) to analyze trends
  • Generate AI-powered content suggestions and send them by email
  • Monitor success with key Pinterest KPIs and troubleshoot common issues

Why automate Pinterest analysis?

Manually exporting data from Pinterest, copying it into spreadsheets, and trying to spot patterns is slow and often inaccurate. Automation solves this by:

  • Keeping your Pinterest data fresh and consistent
  • Reducing human error in data collection and tagging
  • Freeing your team to focus on creative work instead of manual reporting
  • Scaling content planning as your Pinterest account grows

In this workflow, n8n pulls raw pin data from Pinterest, transforms it into a structured Airtable dataset, and then hands it off to an AI agent. The AI looks for trends, surfaces opportunities, and proposes new pin ideas that match your audience and goals.

What this n8n workflow does

The template is built as a single automated pipeline that runs on a schedule and performs these core tasks:

  • Trigger on a fixed schedule (for example, 8:00 AM every week)
  • Call the Pinterest API (GET /v5/pins) to retrieve your account pins
  • Normalize and tag the data in a Code node, including an “Organic” type label
  • Upsert the normalized data into an Airtable base for historical tracking
  • Use an AI Agent (OpenAI via LangChain) to analyze the Airtable records
  • Generate AI-driven content suggestions and summarize them
  • Email a concise report to your marketing manager using Gmail

Prerequisites and setup checklist

Before importing or running the template, make sure you have:

  • n8n instance (cloud or self-hosted)
  • Pinterest developer app with an OAuth Bearer access token
  • Airtable base with a Pinterest table that includes fields such as:
    • pin_id
    • created_at
    • title
    • description
    • link
    • type (for example, Organic vs Ads)
    • Any performance metrics you plan to add later (impressions, saves, clicks)
  • OpenAI API key for the LangChain / OpenAI nodes
  • Email credentials, typically Gmail OAuth credentials, or another email provider configured in n8n

Key concepts before you start

Using n8n as the automation engine

n8n is the tool that orchestrates the entire process. Each node performs a specific function, and data flows from one node to the next. In this workflow:

  • Trigger nodes define when the workflow runs
  • HTTP Request nodes communicate with external APIs like Pinterest
  • Code nodes transform and clean the data
  • App nodes such as Airtable and Gmail store and deliver results
  • AI nodes (LangChain / OpenAI) process data and generate insights

Why Airtable is used as a Pinterest analytics database

Airtable acts as a flexible database where each record represents a Pinterest pin. By storing normalized fields, you can:

  • Track performance over time
  • Filter by pin type, theme, or date
  • Feed clean data into AI analysis

The workflow uses an upsert pattern so that existing pins are updated and new ones are added, instead of creating duplicates.

How the AI agent fits in

The AI agent in n8n uses OpenAI models through LangChain. It reads data from Airtable and, guided by a prompt, it:

  • Identifies themes and topics that perform well
  • Highlights content formats that engage your audience
  • Suggests new pin ideas, titles, and angles

The template’s prompt asks the agent to look for trends and recommend new pins that can reach your target audiences more effectively.

Step-by-step walkthrough of the workflow

Step 1 – Schedule the workflow in n8n

Start by configuring a Schedule Trigger node:

  • Choose how often the workflow should run:
    • Weekly for content planning and reporting (for example, every Monday at 8:00 AM)
    • Daily if you manage a high-volume account that needs frequent optimization
    • Monthly for high-level performance reviews
  • Save the schedule so n8n automatically starts the pipeline at the selected times

Step 2 – Retrieve pins from the Pinterest API

Next, use an HTTP Request node to call the Pinterest API:

  • Endpoint: https://api.pinterest.com/v5/pins
  • Method: GET
  • Authentication: set the header with your Pinterest OAuth Bearer token

You can also use query parameters to refine what is retrieved, for example:

  • Limit results to specific boards
  • Filter by date ranges
  • Select only certain fields to reduce the response size

Being intentional about which fields you request helps keep the workflow fast and can reduce processing costs when you later pass data to AI models.

Step 3 – Normalize the data and tag pins as Organic

The Pinterest API returns a fairly complex JSON structure. To make it easier to work with in Airtable, the template uses a Code node (JavaScript) to:

  • Map the original JSON into a simplified schema
  • Extract key properties such as:
    • pin_id
    • created_at
    • title
    • description
    • link
  • Set a type field to "Organic" in the template

This normalization step is important because it:

  • Ensures consistent field names and types across all pins
  • Makes Airtable records easier to query and filter
  • Allows you to distinguish Organic pins from Ads if you later add paid data

Step 4 – Upsert records into Airtable

Once the data is clean, the workflow passes it to an Airtable node configured to upsert records:

  • Connect the node to your Airtable base and the Pinterest table
  • Map each normalized field from the Code node to the correct Airtable column
  • Set the matching column to pin_id

With this setup:

  • Existing pins are updated if their pin_id already exists
  • New pins are inserted as fresh records
  • Duplicate records are avoided, which keeps your analytics clean

Over time, this builds a historical dataset that is ideal for trend analysis and AI-driven insights.

Step 5 – Run AI analysis and generate content suggestions

After Airtable has been updated, the workflow triggers an AI Agent node that uses OpenAI models via LangChain. The agent:

  • Pulls the relevant Airtable records
  • Analyzes performance patterns and themes
  • Generates actionable recommendations, such as:
    • Topics and themes that resonate with your audience
    • Formats to prioritize (for example, carousels, before/after posts, list pins)
    • Keywords or angles that drive engagement and clicks

The template’s prompt asks the agent to look for trends and propose new pin concepts tailored to your target audience. You can refine this prompt to be more prescriptive, for example by asking for:

  • A fixed number of new pin ideas
  • Titles, captions, and hashtags
  • Target audience personas for each suggestion

Step 6 – Summarize findings and notify your team

AI outputs can be long and detailed, so the workflow includes a summarization LLM step. This node:

  • Takes the raw AI agent output
  • Condenses it into a concise, easy-to-read summary
  • Highlights the most important next steps for content creation

Finally, a Gmail node sends the summary to your marketing manager or team:

  • Subject line could mention the date and that it is a Pinterest performance summary
  • Body includes the summarized insights and suggested actions

This keeps stakeholders informed without requiring them to log into n8n or Airtable.

Example AI-generated Pinterest content ideas

Here are some example outputs you might see from the AI agent. You can use these as templates for your own creatives:

  • How-to carousel: “5 Simple Kitchen Organization Hacks” – multi-image carousel, each image shows one step with a short caption. Suggested keywords: kitchen hacks, small space organization.
  • Before/after transformation: “3 DIY Living Room Makeovers Under $200” – two-image pin per makeover, with a price overlay and a clear call to action linking to your blog post.
  • Trending recipe short: “3-Ingredient Viral Smoothie” – single image with a short, search-optimized caption for quick breakfast recipes.
  • Seasonal gift guide: “10 Budget-Friendly Holiday Gifts for Her” – list-style pin that links to a curated landing page with product details.

Best practices for a reliable Pinterest automation

Handle Pinterest API limits and performance

  • Rate limits: Pinterest sets limits on how often you can call their API. If you manage a large number of pins, consider:
    • Using pagination or cursors to fetch data in batches
    • Adding delays or throttling in n8n to avoid hitting limits
  • Field selection: Only request the fields you actually need. This keeps the payload small and speeds up the entire workflow.

Keep your data clean in Airtable

  • Regularly review your Airtable schema to ensure fields match your analysis needs
  • Archive or move very old records if the table becomes large and slow
  • Verify that pin_id remains unique and consistent across all records

Improve AI output with better prompts

  • Be explicit about the format you want, for example:
    • “Return 5 pin titles with short captions and 3 hashtags each”
    • “Label each idea with a target audience persona”
    • “Specify whether the pin should be a carousel, single image, or before/after”
  • Iterate on your prompt based on the quality of suggestions you receive

Add robust error handling

  • Use n8n’s Error Trigger node to catch failures
  • Send yourself an alert email or message when a node fails
  • Implement retry logic for transient issues, such as temporary API errors

Measuring success: Pinterest KPIs to track

Once your workflow is running regularly, use Airtable to monitor key performance indicators, such as:

  • Impressions and saves for each pin (when available from Pinterest Analytics)
  • Click-through rate (CTR) from pins to your landing pages
  • Saves per pin and overall engagement duration
  • New followers gained from content that was suggested by the AI workflow

Comparing these KPIs before and after implementing the automation helps you understand how much value the AI suggestions are adding.

Troubleshooting common issues

  • Authentication errors with Pinterest:
    • Check that your OAuth Bearer token is correct and not expired
    • Regenerate or refresh the token in your Pinterest developer app if needed
  • Missing or unexpected fields:
    • Verify that your HTTP Request node includes the correct fields and query parameters
    • Review the Pinterest API documentation to ensure you are requesting supported properties
    • Update your Code node mapping if Pinterest changes its response format
  • Duplicate records in Airtable:
    • Confirm that the Airtable node is set to upsert, not always create
    • Ensure the matching column is pin_id
    • Check that the Code node always returns a stable, unique pin_id for each pin

Security and privacy considerations

Because this workflow uses API keys and personal data, follow these guidelines:

  • Store all credentials (Pinterest, Airtable, OpenAI, Gmail) in n8n’s secure credentials manager
  • Do not commit API keys or tokens to public repositories or shared documents
  • When emailing summaries, avoid including raw personally identifiable information (PII) unless it is strictly necessary and properly protected

Quick FAQ

Can I change how often the workflow runs?

Yes. Adjust the Schedule Trigger in n8n to run daily, weekly, or monthly, depending on how frequently you want updated insights.

Can I include advertising data as well as organic pins?

The template tags pins as Organic by default. You can extend the workflow to pull ad data and set the type field accordingly so you can compare Organic and Ads side by side.

Do I have to use Gmail for notifications?

No. Gmail is used in the template, but you can replace it with any email provider supported in n8n, or even send notifications to Slack, Microsoft Teams, or other channels.

Can I customize the AI suggestions to match my brand voice?

Yes

New Job Application Parser with n8n, Pinecone & RAG

New Job Application Parser with n8n, Pinecone & RAG

Automating candidate intake with n8n lets recruiting and talent teams process job applications in a consistent, high-quality way. This reference-style guide documents an n8n workflow template that:

  • Accepts incoming job applications via webhook
  • Splits and embeds application text using OpenAI embeddings
  • Indexes vectors in Pinecone for semantic search
  • Uses a Retrieval-Augmented Generation (RAG) agent to synthesize insights
  • Logs outputs to Google Sheets
  • Sends Slack alerts on operational errors

The goal is a production-ready, observable pipeline that turns unstructured resumes and cover letters into structured, queryable data.


1. Use Case Overview

1.1 Why build a Job Application Parser?

Recruiters and hiring managers receive applications in multiple formats – email bodies, PDF resumes, attached cover letters, and LinkedIn exports. Manual triage introduces several issues:

  • Slow response times to strong candidates
  • Inconsistent evaluation criteria across reviewers
  • Limited ability to search historical applications

An automated Job Application Parser built in n8n addresses these problems by:

  • Extracting and structuring candidate information with minimal manual effort
  • Maintaining a searchable vector index of resumes and cover letters
  • Using LLMs and RAG to generate summaries, skill matches, and suggested statuses
  • Integrating with existing tools like Google Sheets, Slack, and your ATS

2. Workflow Architecture

The n8n template is organized as a linear, event-driven pipeline. At a high level, the architecture consists of:

  • Ingress: Webhook Trigger that receives job application payloads
  • Pre-processing: Text Splitter that segments documents into chunks
  • Vectorization: Embeddings node using OpenAI text-embedding-3-small
  • Vector Storage: Pinecone Insert into index new_job_application_parser
  • Retrieval: Pinecone Query + Vector Tool for context retrieval
  • Context Management: Window Memory for short-lived conversational state
  • Reasoning: Chat Model + RAG Agent to generate structured insights
  • Persistence: Append Sheet node to log results in Google Sheets
  • Observability: Slack Alert on workflow errors

All nodes are orchestrated within a single n8n workflow, with credentials configured per integration (OpenAI, Pinecone, Google Sheets, Slack).


3. Data Flow Description

The following sequence describes the end-to-end data flow from inbound application to logged result:

  1. Webhook Trigger receives a POST request when a new application arrives from an email parser, form submission, or ATS webhook.
  2. The raw application content (e.g., resume text, cover letter text, metadata) is passed to the Text Splitter.
  3. The Text Splitter divides the content into overlapping chunks with:
    • chunkSize = 400
    • chunkOverlap = 40

    This configuration is optimized for typical resume and cover letter lengths.

  4. Each chunk is sent to the Embeddings node, which calls OpenAI with model text-embedding-3-small to generate vector representations.
  5. The workflow aggregates the embeddings and uses Pinecone Insert to upsert them into a Pinecone index named new_job_application_parser, optionally including application metadata.
  6. For the current application, the workflow issues a Pinecone Query to retrieve relevant vectors. A Vector Tool node wraps this retrieval so the RAG agent can call it as a tool.
  7. Window Memory maintains a short history of exchanges, giving the RAG agent limited conversational context without persisting long-term PII.
  8. The Chat Model + RAG Agent node receives:
    • The current application text
    • Retrieved context from Pinecone
    • Window Memory state
    • A system prompt that defines the expected JSON output

    The agent returns a structured summary, skills, suggested status, and other fields.

  9. The workflow writes this structured response to a Google Sheet via Append Sheet, targeting a sheet named Log for downstream analytics or ATS synchronization.
  10. If any node fails, a Slack Alert node posts an error notification to a predefined Slack channel, for example #alerts, providing operational visibility.

4. Node-by-Node Breakdown

4.1 Webhook Trigger

  • Purpose: Entry point for new job applications.
  • Typical sources:
    • Email parsing services that forward structured JSON
    • Custom application forms that POST submissions
    • ATS webhooks that send candidate data on status changes
  • Configuration:
    • HTTP method: POST
    • Path: configurable endpoint path (e.g. /job-application)
    • Payload format: JSON body containing the application text and any metadata

Edge cases: Ensure the webhook handles missing or malformed fields gracefully. In n8n, use optional checks or additional nodes (e.g. IF / Switch) if you expect multiple payload schemas.

4.2 Text Splitter

  • Purpose: Segment long application documents into overlapping text chunks for more effective embedding and retrieval.
  • Key parameters:
    • chunkSize = 400 characters
    • chunkOverlap = 40 characters
  • Rationale:
    • 400-character chunks provide enough context for resumes and cover letters without exceeding embedding payload limits.
    • 40-character overlap preserves continuity across chunk boundaries, which improves retrieval quality.

Configuration note: Feed the Text Splitter a single concatenated string of relevant fields (e.g. resume text + cover letter text) or split them separately if you want distinct indexing strategies.

4.3 Embeddings (OpenAI)

  • Purpose: Convert each text chunk into a numerical vector.
  • Model: text-embedding-3-small (OpenAI)
  • Inputs:
    • Array of text chunks from the Text Splitter node
  • Outputs:
    • Array of embedding vectors, typically one per chunk

Credentials: Configure OpenAI API credentials in n8n. Make sure to set appropriate organization and project limits if applicable.

Error handling: Handle potential rate limits or API errors by configuring retry logic at the workflow or node level, or by routing failures to the Slack Alert node.

4.4 Pinecone Insert

  • Purpose: Persist embedding vectors in a Pinecone index for future semantic retrieval.
  • Index configuration:
    • Index name: new_job_application_parser
    • Index should be created in Pinecone beforehand with a suitable dimension that matches the embedding model.
  • Inputs:
    • Embedding vectors
    • Optional metadata (e.g. candidate ID, role ID, source, timestamp)

Best practice: Store only non-sensitive metadata in Pinecone if you are subject to strict data protection requirements. Sensitive PII can be tokenized or hashed before insertion.

4.5 Pinecone Query + Vector Tool

  • Purpose:
    • Query Pinecone for the most relevant chunks related to the current application or role.
    • Expose retrieval as a tool that the RAG agent can call in-context.
  • Inputs:
    • Query vector derived from the current application text
    • Index name: new_job_application_parser
    • Optional filters (e.g. by role ID or date) if configured
  • Outputs:
    • Top-k matching vector entries with associated text and metadata

Note: The Vector Tool node makes retrieval available to the agent as a callable tool, enabling the agent to pull additional context on demand.

4.6 Window Memory

  • Purpose: Maintain a short-lived memory window of recent messages for the RAG agent.
  • Behavior:
    • Stores a limited number of previous turns, keeping the context focused and cost-bounded.
    • Does not function as a long-term datastore for PII.

Recommendation: Keep the window size conservative to avoid leaking sensitive information across unrelated requests and to limit token usage.

4.7 Chat Model + RAG Agent

  • Purpose: Use an LLM to synthesize retrieved context and application data into a structured evaluation.
  • Inputs:
    • System prompt defining the assistant role and output schema
    • Current application content
    • Retrieved context from Pinecone via the Vector Tool
    • Window Memory state
  • Key configuration:
    • System message example:
      You are an assistant for New Job Application Parser.
    • Explicitly define the JSON keys the agent must return.

Expected JSON output (conceptual structure):

  • summary
  • skills
  • experience_years
  • suggested_status (e.g. "Review", "Reject", "Interview")
  • confidence (0-1)
  • red_flags

Error handling: Validate that the agent returns valid JSON. If parsing fails, you can route the error path to Slack and optionally log the raw response for debugging.

4.8 Google Sheets – Append Sheet

  • Purpose: Persist the RAG agent output in a structured log for analytics and downstream automation.
  • Target:
    • Spreadsheet: your chosen document
    • Sheet name: Log
  • Authentication:
    • Service account or OAuth credentials configured in n8n
  • Behavior:
    • Each application processed results in a new appended row.
    • Columns can map to JSON fields returned by the RAG agent.

Verification: Ensure the service account or OAuth user has edit access to the target spreadsheet and that the sheet name matches exactly.

4.9 Slack Alert

  • Purpose: Provide real-time visibility into workflow failures.
  • Configuration:
    • Slack channel: e.g. #alerts
    • Message template: include error message, node name, and optionally input payload identifiers

Usage: Connect error paths from critical nodes or use n8n’s built-in error workflow feature to route all failures to this alert node.


5. Key Configuration & Tuning Parameters

  • Text Splitter:
    • chunkSize = 400
    • chunkOverlap = 40
    • Optimized for typical resumes and cover letters.
  • Embeddings model:
    • OpenAI text-embedding-3-small
  • Pinecone index:
    • Name: new_job_application_parser
    • Ensure the index dimension matches the embedding model.
  • Google Sheets:
    • Append to sheet named Log
    • Use service account or OAuth credentials with appropriate permissions.
  • Slack:
    • Channel: #alerts (or equivalent monitoring channel)
  • RAG Agent:
    • System prompt: e.g. You are an assistant for New Job Application Parser
    • Define a strict JSON output format for deterministic downstream parsing.

6. Best Practices & Operational Guidance

6.1 PII Handling: Redact or Encrypt

Resumes and applications often contain sensitive personal data such as:

  • Email addresses and phone numbers
  • National IDs or other government identifiers
  • Physical addresses

Recommended practices:

  • Redact or tokenize PII before sending text to the Embeddings node or Pinecone.
  • Store raw PII in a separate, encrypted data store if you need to retain it.
  • Use hashing for identifiers when you only need referential integrity, not the raw value.

Only index non-sensitive fields in the vector database unless you have explicit consent and robust data controls.

6.2 Tuning Chunk Size & Overlap

Chunk parameters directly affect retrieval relevance and cost:

  • For dense, short resumes:
    • Chunk size in the 300-500 character range with 20-40 overlap is typically effective.
  • For long cover letters:
    • Larger chunks may be acceptable since the narrative is more continuous.

Iteratively test retrieval quality with real candidate data and adjust chunkSize and chunkOverlap to balance context richness against token and storage costs.

6.3 Designing Structured RAG Output

Backup n8n Workflows to Gitea

Backup n8n Workflows to Gitea: Automated Git-based Backups (So You Can Stop Worrying)

Imagine this: you are happily building workflows in n8n, tweaking, improving, experimenting. Then one day you break something, hit save a few too many times, and suddenly you would trade your lunch for a simple “undo” button.

That is where backing up your n8n workflows to a Git repository like Gitea comes in. Version history, rollbacks, and a nice audit trail, all handled automatically, so you do not have to babysit exports or copy-paste JSON like it is 2005.

This guide walks you through a ready-to-use n8n workflow template that backs up all your n8n workflows into a Gitea repository on a schedule. We will cover what the workflow actually does, how to set it up, and a few tips to keep it secure and efficient.

What this n8n-to-Gitea backup workflow actually does

At a high level, this template is your “set it and forget it” backup robot. It runs on a schedule, grabs all your workflows from n8n, and syncs them to a Gitea repository as JSON files. It only commits changes when something actually changed, so your Git history does not look like someone leaned on the keyboard.

Here is the basic flow:

  • A Schedule Trigger runs periodically (for example every 45 minutes).
  • A Globals node stores Gitea repo details like repo.url, repo.owner, and repo.name so you can configure everything in one place.
  • The n8n node talks to your own n8n instance and fetches the list of workflows.
  • A ForEach / splitInBatches setup loops through those workflows one by one.
  • GetGitea checks if a JSON file for that workflow already exists in your Gitea repository.
  • An Exist (If) node decides if the workflow should be created as a new file or updated.
  • SetDataCreateNode and SetDataUpdateNode prepare the workflow JSON for encoding.
  • Base64EncodeCreate and Base64EncodeUpdate (Code nodes) pretty-print the JSON and base64-encode it the way the Gitea API expects.
  • A Changed (If) node compares the new encoded content with what is already in the repo.
  • PostGitea creates a new file via the Gitea API when needed.
  • PutGitea updates an existing file, using the file’s SHA so Gitea knows you are updating the right version.

The result: your workflows live safely in Git, complete with version history and easy rollbacks, without you lifting a finger after the initial setup.

Why bother backing up n8n workflows to Gitea?

If you have ever lost a workflow, overwritten something important, or wanted to see what changed between “it worked” and “it does not work anymore,” you already know the answer.

Using Gitea as Git-backed storage for your n8n workflows gives you:

  • Version history so you can see how workflows evolved over time.
  • Easy rollbacks when you want to go back to a known good state instead of debugging for hours.
  • Access control so only the right people can see and modify sensitive workflows.
  • Automated, repeatable backups thanks to n8n scheduling and Gitea’s API.

The workflow is smart enough to check for changes and commit only when the content is different. That keeps your Git history clean and avoids useless commits that say “updated nothing again.”

How the workflow checks for changes (and keeps Git history tidy)

Instead of blindly overwriting files on every run, the workflow behaves like a polite guest: it checks what is there first.

Here is what happens for each workflow:

  1. The workflow JSON is fetched from n8n.
  2. A Code node pretty-prints the JSON, encodes it as UTF-8, then base64-encodes the result.
  3. The GetGitea node reads the existing file content in the repo, if it exists.
  4. The Changed (If) node compares the encoded content from n8n with the encoded content from Gitea.
  5. If they differ, a commit is created using PostGitea (for new files) or PutGitea (for updates).

If nothing changed, no commit is made. That saves API calls, keeps your logs readable, and avoids commit spam.

How the workflow talks to Gitea: API details

The HTTP Request nodes in this template use the standard Gitea contents API. You will see three main endpoints in use:

GET  /api/v1/repos/{owner}/{repo}/contents/{path}
POST /api/v1/repos/{owner}/{repo}/contents/{path}
PUT  /api/v1/repos/{owner}/{repo}/contents/{path}

When creating or updating files, the Gitea API expects a JSON payload that includes:

  • content – the base64 encoded file contents
  • message – the commit message (optional in the template, but highly recommended)
  • sha – required for updates so Gitea knows which revision you are modifying

In the provided template, the HTTP nodes are already configured to send content and, for updates, the sha. You can easily extend them to add a message field so your commit history says something more helpful than “update file.”

Inside the Code nodes: Base64 encoding explained

The Code nodes are the quiet heroes in this setup. They take your workflow JSON and turn it into something Gitea is happy to store.

Conceptually, each Code node does the following:

1) Extract the workflow JSON from the incoming data
2) Pretty-print it with indentation (using something like json.dumps(indent=4))
3) Encode the string as UTF-8
4) Base64-encode the result
5) Return the encoded string as the 'content' field for the HTTP request

Gitea’s create and update content endpoints require this base64 format, so this step is not optional. Without it, Gitea will just stare back at you with error messages.

Step-by-step setup: from template to working backups

Time to go from “nice idea” to “actual working backup.” The template is ready to import into n8n, you just need to plug in your own details.

1. Configure global variables

First, open the Globals node in the workflow. Set these values so the rest of the nodes know where to send your backups:

  • repo.url – your Gitea base URL, for example https://git.example.com
  • repo.owner – the Gitea repository owner (user or organization)
  • repo.name – the repository name, for example workflows

Once this is set, you do not have to hardcode URLs or repo names in multiple places. Future you will be grateful.

2. Create a Gitea personal access token

Next, give the workflow permission to talk to your Gitea repo.

  1. In Gitea, go to Settings → Applications → Generate Token and create a token with repo read/write scope.
  2. In n8n, open Credentials and create a new HTTP Header credential for Gitea.
  3. Set the header name to Authorization and the value to Bearer YOUR_PERSONAL_ACCESS_TOKEN (with a space after Bearer).

Attach this credential to the GetGitea, PostGitea, and PutGitea nodes so they can access your repository without complaint.

3. Provide n8n API access

The n8n node in the workflow needs permission to list your workflows. Configure it using your n8n API token or basic authentication, depending on how your n8n instance is secured.

Make sure it can retrieve the full workflow JSON, not just a summary, otherwise your backups will look very tidy and very empty.

4. Tune the schedule

Open the Schedule Trigger node and choose how often you want backups to run.

  • The template example uses every 45 minutes.
  • If you have a lot of workflows, consider increasing the interval to avoid hitting API rate limits.

Once the schedule is set, the workflow will quietly handle backups in the background without asking for attention.

Best practices so your backups stay useful (and safe)

Automated backups are great, but a few tweaks can make them even better.

  • Keep the repo private if your workflows contain sensitive data or logic. Not everything needs to be public.
  • Add a .gitignore or similar rules if you want to avoid committing large attachments or binary blobs.
  • Adjust the schedule if you have many workflows to reduce API usage.
  • Use informative commit messages. Modify the Post/Put nodes to send a message parameter like Backup: {workflow-name} - {timestamp}.
  • Monitor failures using n8n’s error workflows or alert emails so you know if backups start failing instead of finding out the hard way.

Troubleshooting common issues

Even automated magic can be picky sometimes. Here are a few common problems and what to check.

401 or 403 errors

If you see 401 or 403 responses from Gitea:

  • Verify that your Gitea token has the correct repo read/write permissions.
  • Confirm the header is exactly Authorization: Bearer <token> with a space after Bearer.
  • Make sure the credential is attached to all relevant HTTP nodes (GetGitea, PostGitea, PutGitea).

404 when checking if a file exists

If the GetGitea node returns 404:

  • That usually just means the file does not exist yet, so the workflow will take the “create” branch.
  • If you expected the file to exist, double check the path and filename formatting.
  • The template uses the workflow name plus .json as the filename, so make sure that matches what you see in the repo.

Workflows missing or empty files in the repo

If files are created but look empty or incomplete:

  • Check the n8n node configuration and confirm it returns full workflow JSON.
  • Inspect the data going into the Base64 Code nodes and ensure they receive the full workflow object.
  • Look at the HTTP request payload to confirm that content is being sent correctly.

Security considerations

Backups are only helpful if they are also secure. A few simple habits go a long way:

  • Rotate personal access tokens on a regular schedule.
  • Use least privilege for your Gitea token. Only grant the repository permissions that are actually needed.
  • Restrict access to the backup repository and review commits periodically to catch anything unexpected.

Ideas for extending the workflow

Once you have the basic backup flow running, you can expand it to match your team’s needs.

  • Add richer commit messages with author metadata or environment tags.
  • Organize files into folders in the repo, for example by team or environment.
  • Detect deletions in n8n and remove the corresponding files from the repo if you want a perfect mirror.
  • Create tags or a periodic archive branch to keep full snapshot points in time.

Using the ready-made template: what to do next

The good news: you do not have to build any of this from scratch. The workflow template is ready to import into your n8n instance.

  1. Import the template into n8n.
  2. Configure the Globals node with your Gitea URL, repo owner, and repo name.
  3. Set up your Gitea HTTP header credential and attach it to the GetGitea, PostGitea, and PutGitea nodes.
  4. Configure the n8n node with your n8n API access.
  5. Run the workflow manually once to confirm that files appear in your Gitea repo as expected.
  6. Enable the Schedule Trigger so backups start running automatically.

If you want help customizing commit messages, grouping workflows into folders, or adding alerting for failures, you can reach out in the n8n community forum or contact the author. There is no need to suffer through repetitive backup tasks alone.

Call to action: Import the template, hook it up to your Gitea and n8n credentials, run a manual test, then flip on the schedule. Share the setup with your team so everyone can enjoy the peace of mind that comes with automated workflow backups.

Happy automating, and may your backups always be recent and boring.

AI Logo Sheet Extractor to Airtable (n8n Workflow)

AI Logo Sheet Extractor to Airtable: Enterprise-Grade Automation with n8n & AI

Transform dense logo collages into a structured, queryable dataset with a fully automated n8n workflow. This guide details a production-ready AI logo sheet extractor that leverages AI vision, LangChain, and Airtable to detect product logos, infer attributes, and map similarity relationships, then upsert everything into Airtable with deterministic logic.

The article is written for automation engineers, solution architects, and operations teams who want a repeatable, low-maintenance workflow rather than a one-off script.

Business context: Why automate logo sheet extraction?

Logo sheets – visual grids or collages of product logos and short labels – show up across market landscapes, vendor matrices, and internal research decks. Manually converting these visuals into a structured tools database is:

  • Slow and operationally expensive
  • Prone to transcription errors and inconsistent naming
  • Difficult to standardize across teams and projects

By connecting an AI-powered logo sheet extractor to Airtable with n8n, you can:

  • Convert logo images into structured records automatically
  • Generate standardized attributes such as categories and capabilities
  • Capture similarity or competitor relationships between tools
  • Continuously enrich an Airtable dataset using idempotent upserts

The result is a living database of tools that can feed analytics, market research, and internal knowledge systems.

High-level workflow architecture

The n8n implementation follows a clear, modular pipeline:

  1. Form-based ingestion – A public n8n form receives the logo sheet image and optional context prompt.
  2. AI vision and parsing – A LangChain-based agent with image support analyzes the sheet, detects tools, and returns a structured JSON payload.
  3. Schema validation – A structured output parser enforces a predictable JSON schema.
  4. Attribute management – Attributes are normalized and upserted into an Airtable Attributes table.
  5. Tool upsert with hashing – Tools are created or updated in the Tools table using deterministic hashes as unique keys.
  6. Similarity mapping – Similar tools are resolved to Airtable record IDs and linked to form competitor relationships.

This design separates vision, parsing, and persistence concerns, which makes the workflow easier to debug, scale, and extend.

Airtable data model required for the workflow

Before building the n8n workflow, configure Airtable with a minimal schema that supports attributes, tools, and similarity links.

Tools table (core fields)

  • Name – Single line text, the tool or product name.
  • Attributes – Linked records to the Attributes table, multiple values allowed.
  • Hash – Single line text, deterministic key derived from the tool name used for idempotent upserts.
  • Similar – Linked records to the same Tools table, multiple values allowed to represent competitors or adjacent tools.
  • Optional fields – Description, Website, Category (multi-select) or any other enrichment fields you plan to populate later.

Attributes table (core fields)

  • Name – Single line text, canonical attribute label such as a category or capability.
  • Tools – Linked records back to the Tools table to maintain a many-to-many relationship.

This schema is intentionally minimal and supports both automated ingestion and later manual curation.

Key n8n components and their responsibilities

The workflow relies on a set of n8n nodes that each handle a specific responsibility. Structuring the flow this way improves maintainability and observability.

  • Form Trigger
    • Exposes a public form endpoint for users to upload a logo sheet image.
    • Accepts an optional free-text prompt that provides context to the AI agent.
  • Mapping / Pre-processing node
    • Normalizes the form payload.
    • Maps the uploaded image and user-provided prompt into the expected input format for the AI agent node.
  • LangChain Agent (Retrieve and Parser)
    • Uses an LLM with image capabilities to inspect the logo sheet.
    • Detects logos and surrounding text, infers product names and attributes.
    • Outputs a JSON array with tools, attributes, and suggested similar tools.
  • Structured Output Parser
    • Validates that the model output conforms to the defined JSON schema.
    • Prevents malformed responses from breaking downstream Airtable operations.
  • Split / Loop nodes
    • Iterate over the list of tools and attributes.
    • Allow independent creation, normalization, and linking logic for attributes and tools.
  • Airtable nodes
    • Upsert attributes into the Attributes table, avoiding duplicates.
    • Upsert tools into the Tools table and maintain links to attributes and similar tools.
  • Crypto node (MD5 or similar hash)
    • Generates deterministic hash values from normalized tool names.
    • Provides a stable unique identifier to support repeat-safe upserts.

AI agent contract: prompt design and output schema

The reliability of this workflow depends heavily on a strict contract between the n8n workflow and the AI agent. The agent must return a predictable JSON structure.

Expected JSON output structure

[  {  "name": "ToolName",  "attributes": ["category", "feature"],  "similar": ["OtherTool", "AnotherTool"]  }
]

Each object in the array represents a single tool detected in the logo sheet:

  • name – Canonical tool or product name.
  • attributes – Short, categorical labels that describe the tool.
  • similar – Names of tools that are similar or competitive.

Prompting recommendations

  • In the system message, clearly instruct the agent to:
    • Return only tools it can identify with high confidence.
    • Provide attributes as short, categorical phrases such as “Browser Infrastructure”, “Agentic Application”, “Storage Tool”.
    • Output strictly valid JSON that matches the defined schema.
  • If the sheet contains small or dense logos, request:
    • A confidence flag per item, or
    • Bounding box metadata if supported, for later visual review.
  • Expose an optional user prompt field in the form for additional context, for example:
    • “This sheet compares enterprise AI infrastructure providers.”
    • “These are tools used by data engineering teams.”

Being explicit with the agent instructions and providing an example JSON snippet significantly reduces hallucination and improves output consistency.

Detailed implementation in n8n

1. Configure the ingestion form

Start with a Form Trigger node in n8n:

  • Add an upload field for the logo sheet image.
  • Add an optional text field for user-provided context.
  • Set a clear webhook path such as /form/logo-sheet-feeder to make integrations and documentation easier.

The form becomes the primary entry point for analysts, marketers, or internal stakeholders to submit new sheets for processing.

2. Set up and tune the AI vision agent

Use a LangChain-based node connected to OpenAI or another LLM with image understanding capabilities:

  • Enable binary image passthrough (for example, passthroughBinaryImages) so the node receives the raw image data.
  • In the system prompt, describe the task:
    • Identify tools from the logo sheet, including nearby labels.
    • Infer attributes and similar tools where possible.
    • Return only the JSON structure defined earlier.
  • Optionally, inject the user prompt from the form as additional context.

At this stage, the output is a raw JSON-like structure that still needs validation.

3. Enforce a strict JSON schema

Connect the AI node to a Structured Output Parser:

  • Define the expected fields and their types:
    • name as string
    • attributes as array of strings
    • similar as array of strings
  • Reject or sanitize malformed responses before they reach Airtable operations.

This step is critical for workflow stability, particularly under high volume or when model behavior changes.

4. Create and normalize attributes in Airtable

Next, handle attributes as a separate loop:

  • Use a Split or Item Lists node to iterate over each tool’s attributes array.
  • Normalize attribute strings (for example, trim whitespace, standardize casing) before upserting.
  • Use an Airtable node to:
    • Check if an attribute with the same name already exists.
    • Create it if missing.
    • Return the attribute record ID for downstream linking.

The goal is to maintain a single canonical record for each attribute label and avoid unnecessary duplication.

5. Upsert tools with deterministic hashing

For each tool detected by the agent:

  • Normalize the tool name, for example:
    • Trim whitespace.
    • Convert to lowercase.
  • Use a Crypto node to compute an MD5 (or similar) hash of the normalized name.
  • Use an Airtable node to:
    • Upsert into the Tools table based on the Hash field.
    • Attach the corresponding attribute record IDs from the previous step.
    • Store the Airtable record ID for later similarity mapping.

This deterministic upsert strategy ensures that reprocessing the same or updated logo sheets does not create duplicate tool entries.

6. Map and persist similar tools

Once all tools exist in Airtable, handle similarity relationships:

  • Iterate through each tool’s similar array.
  • For each similar tool name:
    • Normalize the name and compute its hash using the same logic as above.
    • Upsert the similar tool into the Tools table if it does not already exist.
    • Retrieve its Airtable record ID.
  • Update the primary tool’s Similar field with the collected record IDs.

This two-pass approach – first creating tools, then resolving similar relationships – ensures that all referenced tools have valid IDs before linking.

Operational best practices

Handling low-confidence detections

  • Ask the agent to include a confidence indicator for each tool when possible.
  • Route low-confidence items to a manual review queue or a separate Airtable view.
  • Consider re-running problematic sheets with a refined prompt or at higher resolution.

Name and attribute canonicalization

  • Normalize tool names before hashing to avoid duplicates based on trivial differences such as case or spacing.
  • Optionally implement additional normalization rules for common variants, for example:
    • “OpenAI” vs “Open AI”.
  • For attributes, maintain a manual alias or mapping table in Airtable if you frequently see variants like “Agentic Application” vs “Agentic-App”.

Prompt engineering and stability

  • Keep system prompts strict and specific about required output format.
  • Include an explicit example of the JSON array to guide the model.
  • Periodically review outputs and adjust the prompt to reduce hallucinations or drift.

Rate limiting, performance, and cost control

  • Be mindful of model costs for large or frequent logo sheets.
  • Batch processing where possible or use smaller, cheaper models for first-pass extraction.
  • Use n8n’s built-in rate limiting or queuing mechanisms if you expect high throughput.

Privacy considerations

  • Restrict uploads to logo sheets and public branding assets.
  • Avoid using this workflow for images that contain sensitive personal data or confidential information.

Troubleshooting common issues

Logos are missing or merged

Small, low-contrast, or overlapping logos can be difficult for the model to detect reliably.

  • Increase image resolution before upload.
  • Crop large sheets into multiple smaller segments and process them separately.
  • Consider adding bounding box extraction and a review UI for high-value use cases.

Duplicate or inconsistent attributes

Attribute duplication often stems from minor text variations.

  • Strengthen normalization logic in n8n before upserting attributes.
  • Maintain a manual alias table in Airtable to merge similar labels.
  • Periodically audit the Attributes table and consolidate near-duplicates.

Incorrect or missing similarity links

  • Verify that the similarity mapping step runs only after all tools are created.
  • Ensure that you are using the same hashing and normalization logic for both primary and similar tool names.
  • Inspect the agent prompt if it frequently suggests irrelevant or nonsensical similar tools.

Extensions and advanced enhancements

  • Bounding box and visual review Add bounding box data to the agent output and build a simple review UI that overlays detected tools on the original sheet.
  • OCR integration Integrate OCR to capture small labels or fine print near logos, which can significantly improve name disambiguation.
  • Embeddings for semantic similarity Use embeddings to compute similarity between descriptions or attributes and suggest competitors beyond what appears on a single sheet.
  • Scheduled re-processing Set up a scheduled n8n job to re-run older sheets after you improve prompts or switch to a more capable model.

Real-world applications

  • Market research teams Automatically extract vendor landscapes from industry cheat sheets and analyst reports.
  • Content and marketing teams Build and maintain tool directories from conference slides, webinars, and partner decks.
  • Product and strategy teams Track competitor presence across presentations, events, and external publications.

Conclusion: From static logo sheets to a dynamic tools database

By combining n8n, AI vision, and Airtable, you can convert static logo collages into a living, structured dataset with minimal manual effort. With careful prompt design, deterministic hashing, and attribute canonicalization, this AI logo sheet extractor becomes a robust and repeatable part of your automation stack.

Build a Visa Requirement Checker with n8n

Build a Visa Requirement Checker with n8n

Ever found yourself endlessly scrolling government websites trying to figure out if you actually need a visa for your next trip? You are not alone. In this guide, we will walk through how to build a Visa Requirement Checker in n8n that can answer those questions automatically, using embeddings, a vector store, and a conversational AI agent.

We will look at what the template does, when it is useful, and how each part of the workflow fits together. By the end, you will know how to connect a webhook, text splitter, Cohere embeddings, a Weaviate vector store, an Anthropic-powered agent, and Google Sheets logging into one smooth, automated experience.

What this n8n Visa Requirement Checker actually does

At a high level, this workflow takes in details about a traveler and their question, looks up the right visa rules in a vector database, and then uses an LLM to respond in clear, natural language. It is like having a smart assistant that has read all the visa policy docs and can pull out the relevant bits on demand.

Here is what the template helps you automate:

  • Receive visa questions through a simple webhook API
  • Split and embed long policy documents for semantic search
  • Store those embeddings in Weaviate for fast, accurate retrieval
  • Use an Anthropic-powered agent to craft a human-friendly answer
  • Keep a short-term memory of the conversation for follow-up questions
  • Log every interaction to Google Sheets for audits and analytics

Why build a Visa Requirement Checker with n8n?

Visa rules are notoriously complex. They change often and depend on things like:

  • Citizenship and residency
  • Destination country
  • Length of stay
  • Purpose of travel (tourism, business, study, etc.)
  • Previous travel history or special cases

Trying to keep up manually is painful. With an automated visa checker, you can:

  • Deliver up-to-date answers quickly through a webhook endpoint
  • Use vector search to match nuanced, context-heavy guidance
  • Log every query and response in Google Sheets for review or analytics
  • Scale to more users and more languages without multiplying manual work

If you are building a travel app, chatbot, or internal tool for a travel team, this n8n template can become a core part of your user experience.

How the workflow is structured

Let us zoom out before we go step by step. The workflow is made up of a few key building blocks in n8n:

  1. Webhook – Receives incoming POST requests with traveler details and their question.
  2. Text Splitter – Breaks large visa policy documents into smaller chunks.
  3. Cohere Embeddings – Turns each chunk into a vector representation for semantic search.
  4. Weaviate Insert – Stores embeddings plus metadata in a vector database.
  5. Weaviate Query – Finds the most relevant chunks when a user asks a question.
  6. Tool & Agent – An Anthropic-based agent uses those chunks as context to write the final answer.
  7. Memory – Keeps short-term conversation context for follow-up questions.
  8. Google Sheets – Logs questions and answers for audits and metrics.

You can think of it in two phases:

  • Ingestion – Split policy documents, embed them, and store them in Weaviate.
  • Runtime – When a user asks a question, query Weaviate, pass results to the agent, and log the interaction.

Step-by-step: Node-by-node walkthrough

1. Webhook: your public entry point

Everything starts with a Webhook node in n8n. This exposes a POST endpoint, for example:

/visa_requirement_checker

Your frontend, chatbot, or any client can send a JSON payload like this:

{  "citizenship": "India",  "destination": "United Kingdom",  "purpose": "tourism",  "stay_days": 10,  "question": "Do I need a visa?"
}

Some good practices at this stage:

  • Validate the incoming fields before processing
  • Add rate limiting so a single client cannot overwhelm your workflow
  • Require an API key or HMAC signature to prevent unauthorized access

2. Text Splitter: preparing your policy documents

Visa policies tend to be long and full of edge cases. To make them usable for embeddings and vector search, you run them through a Text Splitter node.

This node divides large documents into overlapping chunks, for example:

  • chunkSize = 400
  • chunkOverlap = 40

The overlap helps preserve context between chunks, while the size keeps each chunk within token limits for the embedding model. This balance is important so your semantic search remains accurate and cost effective.

3. Cohere Embeddings: turning text into vectors

Next, you feed each chunk into a Cohere Embeddings node. This converts the text into numerical vectors that capture semantic meaning.

When configuring this node, you will:

  • Pick a Cohere embeddings model that fits your quality and budget needs
  • Generate embeddings for each chunk created by the text splitter
  • Attach metadata such as:
    • source
    • country
    • effective_date
    • document_id

That metadata becomes very handy later when you want to trace a specific answer back to its original policy document.

4. Insert into Weaviate: building your vector store

With embeddings in hand, you use the Insert (Weaviate) node to store them in your vector database. This is where your knowledge base actually lives.

Recommended setup tips:

  • Use a dedicated class or index name such as visa_requirement_checker to keep things organized
  • Store both the vector and the metadata so you can filter by:
    • Country or region
    • Visa type
    • Effective date
  • Leverage Weaviate’s hybrid filters to narrow down results based on structured fields

This ingestion step usually runs when you add or update policy documents, not necessarily on every user query.

5. Query & tool integration: finding relevant guidance

When a traveler asks a question, the workflow moves into retrieval mode. The Weaviate Query node searches your vector store and returns the most relevant chunks.

Typical behavior at runtime:

  • The workflow takes the user’s question and any relevant metadata (citizenship, destination, purpose, etc.)
  • It queries Weaviate for the top-k best matching chunks
  • Those chunks are then passed into the agent as a tool or context source

This tool integration lets the LLM selectively use the retrieved pieces of information instead of guessing from scratch, which significantly reduces hallucinations.

6. Agent (Anthropic Chat): composing the answer

Now comes the conversational part. The Agent (Anthropic Chat) node runs an LLM in chat mode. It receives three key ingredients:

  • The user’s original question
  • The context retrieved from Weaviate
  • Short-term memory from previous turns in the session

You control the behavior of the agent by carefully designing the prompt. Helpful instructions include:

  • Use only the retrieved sources for factual claims
  • Clearly indicate uncertainty and suggest official verification if needed
  • Return both:
    • Structured data (like visa type, required documents, links)
    • A plain-language explanation that users can easily understand

This combination lets you serve answers that are both machine readable and user friendly.

7. Memory & Google Sheets logging: keeping context and records

Visa questions often come in follow-up form, such as “What about multiple entry?” or “What if I stay two days longer?” To handle this gracefully, the workflow uses a short-window Memory component.

This memory keeps the recent conversation history so the agent can respond in context without re-asking the user for all details every time.

At the same time, a Google Sheets node logs each interaction. Typical data you might store:

  • Timestamp
  • Traveler details (ideally anonymized)
  • User question
  • Agent response
  • Any confidence or metadata fields you include

These logs are useful for audits, quality checks, analytics, and improving your prompts or retrieval strategy over time.

Prompt design and safety: keeping answers reliable

Since you are dealing with important travel decisions, safety and accuracy matter a lot. A few prompt and design guidelines help keep your system responsible:

  • Ask the agent to cite the document_id or source link for each factual statement.
  • Instruct the model that if it does not find strong context, it should respond with a safe fallback such as:

    "I could not find authoritative guidance, please consult the embassy or official government website."

  • Be careful with personally identifiable information:
    • Avoid logging raw PII where possible
    • If you must store it, consider encryption or other safeguards

Deployment tips for your n8n visa checker

Once the workflow is working in your development environment, you will want to harden it for production. Here are some things to keep in mind:

  • Store all sensitive credentials as environment variables:
    • Cohere API key
    • Weaviate credentials
    • Anthropic API key
    • Google Sheets credentials
  • Set up monitoring and alerts for:
    • Workflow errors
    • Unusual traffic spikes
    • Failed vector store queries
  • Schedule periodic re-indexing so your vector store reflects the latest visa policies
  • Define data retention rules to comply with privacy regulations in your region

Testing and validation: does it really work?

Before you rely on the system for real users, it is worth investing in structured testing. Some ideas:

  • Test across a wide range of nationalities and destinations
  • Cover different purposes of travel like tourism, business, study, and transit
  • Include tricky edge cases:
    • Multiple-entry visas
    • Airport transit and layovers
    • Diplomatic or official passports
  • Maintain a small, human-reviewed test set with:
    • Sample questions
    • Expected answers
    • Notes on acceptable variations

This helps you evaluate both the retrieval quality (are the right documents being found?) and the final agent response (is it accurate, clear, and safe?).

Sample webhook flow: putting it all together

To summarize the full journey of a single request, here is what happens when a client hits your webhook:

  1. The client sends a POST request to /visa_requirement_checker with traveler details and a question.
  2. The Webhook node receives the request and triggers the workflow.
  3. For ingestion flows, documents go through the Text Splitter and Embeddings nodes, then get inserted into Weaviate.
  4. For runtime queries, the workflow calls the Weaviate Query node to retrieve the top-k relevant chunks.
  5. The Agent node uses those chunks, along with conversation memory, to generate a structured answer and a natural-language explanation.
  6. The workflow logs the query and response to Google Sheets.
  7. The final answer is returned to the client via the webhook response.

Common pitfalls to avoid

There are a few easy mistakes that can cause problems later. Watch out for:

  • No document versioning – If you do not track versions or effective dates, you may end up serving outdated guidance.
  • Letting the model answer without retrieved context – This increases the risk of hallucinations and incorrect advice.
  • Storing raw PII unprotected – Keeping sensitive data in plain text in your sheet or index is a security and compliance risk.

Extensions and improvements once you are live

After the basic workflow is stable, you can start to get more ambitious. Some useful enhancements:

  • Automatically ingest updates by scraping official government websites or consuming their APIs, then trigger re-embedding when content changes.
  • Support multiple languages by:
    • Using language-specific embeddings, or
    • Translating queries before vector lookup and translating answers back.
  • Expose friendly endpoints for:
    • Chatbots on your website
    • Slack or internal tools
    • WhatsApp or other messaging platforms
  • Include a confidence score and direct links to official consular or immigration pages so users can double check details.

When should you use this template?

This Visa Requirement Checker template is ideal if you:

  • Run a travel platform and want smarter, automated visa guidance
  • Need an internal tool for support agents to quickly answer visa questions
  • Are experimenting with LLMs plus vector search in n8n and want a real-world use case
  • Care about traceability and want to know exactly which document each answer came from

If that sounds like you, this workflow gives you a solid, practical starting point without having to glue all the pieces together from scratch.

Wrap-up and next steps

The n8n Visa Requirement Checker showcases how automation, embeddings, and conversational AI can work together to deliver accurate, explainable visa guidance at scale. You start with a small, curated set of policy documents, refine your prompts and retrieval filters, and then gradually grow the system as your needs expand.

If you would like a ready-to-use starter template or help connecting your preferred vector store and LLM, feel free to contact us or subscribe to our newsletter for detailed templates and code snippets.

Get

Build an n8n Developer Agent: Setup & Guide

Build an n8n Developer Agent: Setup & Guide

Imagine describing an idea for an automation in plain language, then watching a complete, import-ready n8n workflow appear in front of you. No wiring every node by hand, no endless copy-paste. Just a clear request and a working workflow.

The n8n Developer Agent template is designed to get you there. It combines multiple language models, memory, and a dedicated Developer Tool into a single, reusable pattern that can turn your ideas into n8n workflow JSON. In this guide, you will walk through the journey from manual workflow building to a more automated, focused way of working, and then learn how to set up this template in your own n8n instance.

From manual busywork to automated creation

Most builders reach a point where the bottleneck is no longer ideas, but time. You know what you want to automate, yet you spend precious hours:

  • Rebuilding similar workflows from scratch
  • Recreating standard patterns like triggers, error handling, and logging
  • Enforcing naming conventions and structure manually

That repetitive work slows down your progress and keeps you from the higher-value thinking that actually grows your projects or business.

The n8n Developer Agent is a way to break through that ceiling. Instead of handcrafting every workflow, you can describe what you need in natural language and let the agent generate a structured, import-ready workflow for you. You stay in control, but you do not have to do all the heavy lifting yourself.

Adopting an automation-first mindset

Before you dive into the template, it helps to shift how you think about building in n8n. With an automation-first mindset, you:

  • See repetitive workflow patterns as candidates for automation, not just tasks to tolerate
  • Use AI and templates to handle boilerplate, so you can focus on design, logic, and strategy
  • Continuously refine prompts, constraints, and tools to improve your “automation factory” over time

This template is not a one-off trick. It is a foundation you can extend, improve, and adapt as you grow more ambitious with automation. Start small, then gradually let the agent handle more of the workflow creation process as your confidence builds.

What the n8n Developer Agent actually is

At its core, the n8n Developer Agent is an automation blueprint that:

  • Listens for chat messages and natural language requests
  • Uses large language models to interpret what you want
  • Leverages memory and a Developer Tool to assemble complete workflow JSON
  • Optionally creates the workflow directly in your n8n instance through the n8n API

The template integrates:

  • Chat triggers to capture your prompts
  • OpenRouter GPT 4.1 mini as the primary reasoning and formatting model
  • Anthropic Claude Opus 4 (optional) for deeper, complex reasoning
  • Simple Memory to keep context across multi-step conversations
  • Developer Tool logic to assemble valid n8n workflow JSON
  • n8n API integration to create workflows and return direct links
  • Optional Google Drive docs to inject your internal standards and templates

Think of it as a “developer assistant” that understands your language, respects your conventions, and outputs workflows you can import and run.

How the workflow is structured

The template is organized into two big pieces that work together:

  • The n8n Developer Agent (the brain) – interprets your request, uses LLMs, memory, and tools to plan and generate workflow JSON.
  • The Workflow Builder (the executor) – validates the output and creates the workflow in your n8n instance, then returns a link.

Core components in your journey from prompt to workflow

1. Chat Trigger – your starting point

The workflow begins when a chat message is received. This node listens for your natural language request, which could be something as simple as:

“Create a workflow that sends me a Slack message whenever a new file is added to this Google Drive folder.”

This trigger is your main entry point into the system.

2. n8n Developer (Agent) – the orchestrator

The n8n Developer node is a multi-tool agent that coordinates everything. It:

  • Receives your prompt from the chat trigger
  • Chooses which language model or tool to use
  • Passes context into memory and the Developer Tool
  • Ensures the final result is a structured workflow JSON, not just free-form text

3. GPT 4.1 mini via OpenRouter – primary reasoning engine

GPT 4.1 mini (through OpenRouter) is used for general reasoning and understanding what you want. It is ideal for:

  • Interpreting your natural language instructions
  • Planning workflow structure
  • Formatting and cleaning up the output

4. Claude Opus 4 (Anthropic) – optional deep thinking

For more complex workflows, the template can optionally call Anthropic Claude Opus 4. This model is well suited for:

  • Complex reasoning and multi-step logic
  • Chain-of-thought style planning when needed

You can keep this disabled at first and enable it once you are ready for more advanced scenarios.

5. Simple Memory – keeping the conversation alive

The Simple Memory node stores temporary context between prompts. This allows the agent to:

  • Remember previous steps in a multi-part request
  • Iterate on a workflow with refinement prompts
  • Maintain continuity across a short conversation

6. Developer Tool – assembling the workflow JSON

The Developer Tool is where the ideas become real. It is a specialized tool or sub-workflow that:

  • Receives structured instructions from the agent
  • Builds a complete n8n workflow JSON object
  • Ensures the output matches n8n’s import schema

The JSON must include top-level fields such as name, nodes, connections, settings, and optionally staticData. The rest of the workflow expects this exact structure to create your workflow successfully.

7. Get n8n Docs & Extract from File – bringing in your standards

These optional nodes let you pull documentation or templates from Google Drive, then extract the relevant content and provide it to the agent. This is powerful if you want:

  • Generated workflows to follow your internal style guide
  • Standard node patterns or snippets reused automatically
  • Consistent documentation embedded in your workflows

8. n8n (Create Workflow) & Workflow Link – closing the loop

Finally, the Workflow Builder section uses the n8n API to:

  • Create a new workflow from the generated JSON
  • Return a clickable link so you can open and review it immediately

This is where your idea becomes a concrete, editable workflow in your n8n instance.

Step-by-step setup: turning potential into practice

Now let us turn this from a concept into a working asset in your stack. Follow these steps to configure the template and start experimenting.

Step 1 – Connect the required APIs

Before running the agent, configure these credentials in n8n:

  • OpenRouter API key for GPT 4.1 mini using either an HTTP Request node or the OpenRouter credential.
  • Anthropic API key for Claude Opus 4 (optional, but recommended for advanced reasoning).
  • Google Drive OAuth credential so the workflow can fetch documentation or templates from your Drive.
  • n8n API credential that allows the workflow to create new workflows programmatically.

Take a moment to verify each credential by running a quick test node. Solid foundations here will save you time later.

Step 2 – Configure the Developer Tool for valid JSON

The Developer Tool is the heart of the workflow assembly process. It must:

  • Return a complete top-level JSON object
  • Include name, nodes, connections, settings, and optionally staticData
  • Follow n8n’s import schema so the workflow can be created without errors

Review the Developer Tool configuration in the template and confirm that the output format matches what the downstream n8n node expects. This is what turns “good ideas” into “importable workflows.”

Step 3 – Add your documentation templates (optional but powerful)

To align the agent with your internal standards:

  1. Copy your n8n style guides, naming conventions, or node templates into a Google Doc.
  2. Grab the file ID of that document.
  3. Update the Google Drive node in the template with this file ID.

The agent can now reference your material so that generated workflows feel like they were crafted by your own team, not a generic tool.

Step 4 – Test with simple, safe prompts

Start small to build trust in the system. Use prompts like:

“Create a workflow that watches a folder on Google Drive and posts new file names to Slack.”

At this stage:

  • Inspect the generated JSON carefully
  • Import it manually if needed, or let the template create the workflow and then review it
  • Confirm node types, connections, and settings match your expectations

Use these early tests to refine your prompts and adjust any constraints in the Developer Tool or system messages.

Best practices to keep your automation safe and scalable

As you give more responsibility to the n8n Developer Agent, you will want guardrails that protect your environment while still giving you leverage and speed.

  • Start with manual approval
    Instead of auto-creating workflows from day one, send generated JSON to a review channel or a manual step. Only create workflows after a human has approved the output. This helps you build confidence in the system.
  • Use scoped credentials
    Provide the agent and any auto-created workflows with limited API keys. For example, restrict them from deleting resources or accessing sensitive data. This keeps experimentation safe.
  • Enable logging and auditing
    Turn on n8n’s execution logging and save execution progress. This gives you an audit trail of:
    • Which prompts were used
    • What workflows were created
    • How the agent reached its decisions
  • Invest in prompt engineering
    Add clear system messages and templates to the agent so it:
    • Follows your naming conventions
    • Uses only approved node types
    • Respects security and data handling rules

Troubleshooting: turning friction into refinement

As you experiment, you might hit a few bumps. Each one is an opportunity to improve the template and your prompts.

Problem: Generated JSON fails to import

Solution:

  • Confirm the Developer Tool returns a top-level JSON object with the fields name, nodes, connections, and settings.
  • Validate the JSON using a linter to catch syntax issues.
  • Check that node types, credential references, and IDs are valid or use stable placeholders that n8n can accept on import.

Problem: Agent returns incomplete workflows

Solution:

  • Strengthen the system prompt with explicit requirements, such as “always include error handling” or “always connect trigger to all main branches.”
  • Add a post-validation step that checks for minimal structural requirements and returns a clear error if something is missing.

Problem: Models hallucinate node names or actions

Solution:

  • Define an explicit mapping of allowed node types and options inside the Developer Tool.
  • Where necessary, shift to a template-based approach where the model fills in parameters within known node structures, instead of composing nodes entirely from scratch.

Prompt ideas to unlock more automation

Well-crafted prompts can dramatically improve the quality of your generated workflows. Use consistent templates so the agent knows exactly what you expect.

  • Simple task prompt:
    “Create a workflow that uploads new CSV files from Google Drive to BigQuery. Include error handling and retry logic.”
  • Complex request prompt:
    “Create a workflow with schedule trigger (daily), download attachments from Gmail matching specific subject keywords, parse CSV attachments, and save parsed rows into a PostgreSQL table with idempotency checks.”

As you gain confidence, create your own internal library of prompts for your most common patterns. This becomes a powerful asset for your team.

Extending the template as your needs grow

This n8n Developer Agent template is a starting point, not a ceiling. As your automation practice matures, you can extend it with:

  • Role-based approval gates using Slack or email review steps
  • Pre-built node libraries for common ETL or integration tasks
  • A UI dashboard to list, review, and roll back auto-created workflows
  • Integrations with private model endpoints or enterprise-grade vector stores for knowledge-driven generation

Each improvement turns your n8n instance into more of an “automation platform” than a collection of individual workflows.

Final checklist before you go to production

Before you fully rely on the n8n Developer Agent in a production environment, walk through this quick checklist:

  • All credentials are connected and verified:
    • OpenRouter
    • Anthropic (if used)
    • Google Drive
    • n8n API
  • Initial mode is set to manual creation and review, not fully automatic.
  • Developer Tool templates and constraints are clearly defined and tested.
  • Logging, audit, and approval workflows are configured and working.

Conclusion: your next step toward a more automated workflow life

The n8n Developer Agent gives you a practical way to translate ideas into working automations faster and more consistently. By turning natural language requests into import-ready workflow JSON, it frees you from repetitive setup work so you can focus on higher-level design, strategy, and experimentation.

Start with small, safe prompts. Validate thoroughly. Iterate on your prompts, constraints, and Developer Tool logic. As your confidence grows, you can gradually allow the agent to create more workflows automatically and accelerate your automation roadmap.

Ready to try it? Import the template into your n8n instance, connect the credentials listed above, and run your first simple prompt. Treat it as the first step in building your own automation assistant. If you would like a curated checklist or a starter library of node templates, sign up for our newsletter or contact our team for professional setup support.