Scrape Trustpilot Reviews to Google Sheets with n8n

Scrape Trustpilot Reviews to Google Sheets with n8n

Systematically collecting Trustpilot reviews and centralizing them in Google Sheets provides a robust foundation for customer sentiment analysis, CRM enrichment, and downstream integrations with other tools. This guide explains how to implement a production-ready n8n workflow that automatically scrapes public Trustpilot reviews, parses the embedded JSON, and appends or updates records in Google Sheets with pagination, error handling, and extensibility in mind.

Use case and workflow capabilities

The workflow is designed for automation professionals who want a reliable, configurable integration between Trustpilot and Google Sheets without manual exports. Once deployed, the n8n workflow can:

  • Trigger on a schedule or on demand
  • Paginate through Trustpilot review pages for a given company
  • Extract review data from the __NEXT_DATA__ JSON embedded in the HTML
  • Normalize and split reviews into individual items
  • Map review attributes to structured fields
  • Append or update rows in Google Sheets based on a unique review_id

This architecture makes it straightforward to plug the resulting data into BI tools, dashboards, or additional n8n workflows.

Prerequisites

Before configuring the workflow, ensure you have:

  • An n8n instance (cloud or self-hosted)
  • A Google Sheets account and an OAuth credential configured in n8n
  • Basic familiarity with n8n nodes, particularly Set, Code, and HTTP Request
  • The Trustpilot company slug you want to scrape (for example n8n.io)

High-level workflow architecture

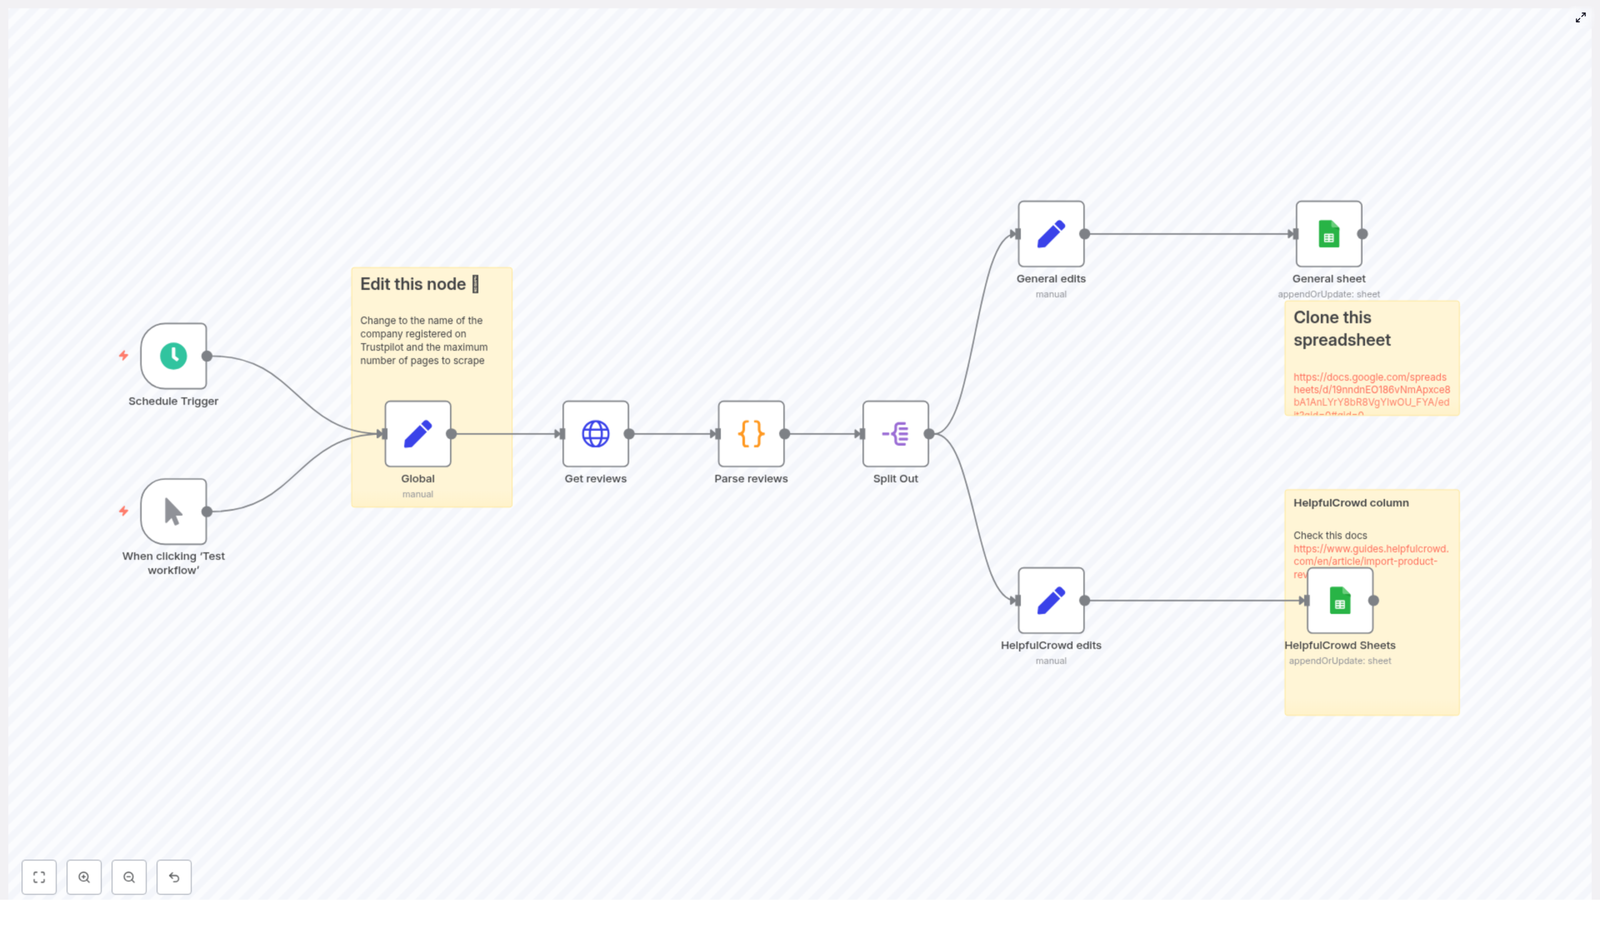
The workflow is composed of several core building blocks, arranged from trigger to data persistence:

  • Trigger node (Schedule or Manual) – starts the workflow
  • Global configuration (Set node) – stores reusable variables like the Trustpilot company slug and pagination limits
  • HTTP Request node – fetches Trustpilot review pages with pagination
  • Code node – parses the HTML, extracts the __NEXT_DATA__ JSON, and returns normalized review objects
  • Split Out node – converts the array of reviews into one n8n item per review
  • Mapping Set nodes – prepares fields for different targets (for example general sheet or a specific integration such as HelpfulCrowd)
  • Google Sheets node(s) – writes or updates rows in one or more sheets

The following sections walk through each part in more detail, with configuration guidance and best practices.

Configuring global variables

Start by defining reusable configuration values in a Set node, often named something like Global. This makes the workflow easier to maintain and reuse across different Trustpilot accounts.

Recommended global fields

  • company_id – the Trustpilot company slug, for example n8n.io
  • max_page – an upper bound on the number of pages to fetch, which prevents runaway pagination

These values are referenced later in the HTTP Request node using n8n expressions, which keeps the URL and pagination logic clean and configurable.

Fetching Trustpilot pages with HTTP Request

The HTTP Request node retrieves the HTML for each Trustpilot review page. Trustpilot exposes public review pages that include the review data in a client-side JSON structure. The workflow leverages this by:

  • Building the base URL using company_id
  • Sorting by recency using query parameters
  • Paginating through pages until no more reviews are available

Key HTTP Request settings

  • URL: https://trustpilot.com/review/{{ $json.company_id }}
  • Query parameter: sort=recency
  • Pagination:
    • Use the built-in pagination to increment a page parameter
    • Stop pagination when a 404 status code is returned, which typically indicates that there are no further pages
    • Configure a requestInterval (for example 5000 ms) to avoid aggressive scraping and respect rate limits

The max_page variable from the Global Set node should also be considered in your pagination logic to ensure that the workflow does not exceed a predefined number of pages.

Parsing the embedded review JSON

Trustpilot embeds review data inside a script tag with the id __NEXT_DATA__. The Code node is responsible for extracting this payload and transforming it into a clean array of review objects that downstream nodes can consume.

Using Cheerio in the Code node

n8n Code nodes provide access to Cheerio, which makes it simple to parse HTML and select elements. The typical parsing flow is:

  1. Load the HTML response into Cheerio
  2. Locate the script tag with id __NEXT_DATA__
  3. Parse its contents as JSON
  4. Extract the reviews from props.pageProps.reviews (subject to Trustpilot markup changes)
  5. Normalize each review into a consistent structure

Example core logic (simplified for clarity):

const cheerio = require('cheerio');

function parsePage(html) {  const $ = cheerio.load(html);  const script = $('#__NEXT_DATA__');  if (!script.length) return [];  const raw = JSON.parse(script.html());  return raw.props.pageProps.reviews || [];
}

// Then loop over input items, call parsePage(html),
// and push normalized review objects into the output.

Important implementation detail: in some sample workflows, the code constructs a normalized data object per review but mistakenly pushes the original review object into the array. Ensure that you push the normalized object instead. This guarantees that fields referenced later in Set and Google Sheets nodes match the expected property names.

Splitting reviews into individual items

After the Code node returns an array of review objects per page, the Split Out node converts that array into individual n8n items. This step is essential because:

  • Each review becomes a discrete item in the workflow
  • Mapping logic in Set nodes becomes simpler and more predictable
  • Each item corresponds to a single row in Google Sheets

Configure the Split Out node to operate on the array returned by the Code node so that downstream nodes receive one review per execution item.

Field mapping and Google Sheets integration

With individual review items available, the next step is to standardize their fields and write them to Google Sheets. This is typically done with one or more Set nodes followed by a Google Sheets node.

Normalizing review fields

The workflow often uses two Set nodes, for example:

  • General edits – a generic mapping suitable for most use cases
  • HelpfulCrowd edits – an alternative mapping tailored to a specific target format or integration

Common fields to map include:

  • Datereview.dates.publishedDate
  • Authorreview.consumer.displayName
  • Bodyreview.text
  • Headingreview.title
  • Ratingreview.rating
  • review_idreview.id (used as the unique identifier)

Adjust these mappings to align with your sheet structure or downstream systems, but keep the review_id field intact for deduplication and updates.

Configuring the Google Sheets node

Use the Google Sheets node with the appendOrUpdate operation so that new reviews are appended and existing ones are updated in place.

  • Operation: appendOrUpdate
  • Matching column: review_id
  • Credentials: the OAuth credential configured in n8n
  • Spreadsheet and sheet: reference your target spreadsheet ID and worksheet

This configuration ensures idempotent writes. Running the workflow multiple times will not create duplicate rows for reviews that already exist in the sheet.

Troubleshooting and best practices

Missing __NEXT_DATA__ or empty results

If the Code node cannot find the __NEXT_DATA__ script tag or returns an empty reviews array:

  • Trustpilot may have changed its frontend structure
  • The request may be blocked or partially served

Mitigation strategies include:

  • Setting a realistic User-Agent header to mimic a browser
  • Adding cookies or additional headers if necessary
  • Switching to a headless browser-based approach (for example using Playwright or Puppeteer) when the content is rendered only client-side

Rate limiting and polite scraping

Respectful scraping is critical from both a technical and legal perspective. Recommended practices:

  • Use a requestInterval (for example 5000 ms) between requests
  • Keep max_page at a sensible value
  • Avoid running full historical scrapes repeatedly; cache results and only fetch new pages when needed

Authentication and private data

The workflow targets public review pages that do not require authentication. If you need access to private data or additional fields not present on public pages, you should:

  • Use Trustpilot’s official APIs where available
  • Configure appropriate API credentials
  • Adhere strictly to Trustpilot’s partner and developer terms

Common issues and resolutions

  • Google Sheets credentials fail Reauthenticate the OAuth credential in n8n, verify that the service account or user has access to the sheet, and confirm the spreadsheet ID and sheet gid are correct.
  • Field mismatches in the sheet Ensure that the property names set in the Code node align with those referenced in the Set nodes and the Google Sheets node. Any discrepancy will result in missing or misaligned data.
  • Pagination stops too early Review your pagination configuration. Confirm that paginationCompleteWhen is set correctly and that the workflow only stops on the intended status code (commonly 404). Also ensure that max_page is not too low.

Security and legal considerations

Scraping public websites that contain personal data can have legal and compliance implications, depending on your jurisdiction and use case. Always:

  • Review Trustpilot’s Terms of Service and any relevant developer or API policies
  • Respect robots.txt and rate limits
  • Prefer official APIs where they meet your requirements
  • Assess data protection and privacy obligations before storing or processing personal data

Enhancements and advanced extensions

Once the core workflow is stable, you can extend it to support more advanced automation scenarios.

  • Persist raw data for debugging Store raw HTML responses or parsed JSON in a storage node (for example, S3-compatible storage or a database) to facilitate troubleshooting when Trustpilot changes its markup.
  • Additional deduplication logic Although appendOrUpdate with review_id is usually sufficient, you can add explicit dedupe steps if reviews might arrive from multiple sources.
  • Alerting on negative reviews Add conditional logic and notification nodes (Slack, email, etc.) that trigger alerts when new reviews fall below a certain rating threshold.
  • Headless browser scraping If Trustpilot increases its reliance on client-side rendering, integrate the Playwright node in n8n to render pages fully and extract the same JSON or DOM content.

End-to-end setup checklist

  1. Create and configure a Google Sheets OAuth credential in n8n, then share the target sheet with the credential’s email address.
  2. Clone or create the Google Sheets template that matches your desired schema.
  3. Update the Global Set node with your Trustpilot company_id and an appropriate max_page value.
  4. Run the workflow in Test mode and inspect the Code node output to confirm that reviews are parsed as expected.
  5. Verify that rows appear in Google Sheets and that the appendOrUpdate operation correctly uses review_id for matching.

Conclusion and next steps

With a relatively small number of well-configured nodes, n8n can provide a robust Trustpilot-to-Google-Sheets integration that supports continuous customer feedback monitoring and downstream automation. Start with a limited number of pages to validate parsing, field mappings, and sheet updates, then gradually scale the workflow while adhering to Trustpilot’s terms and responsible scraping practices.

To get started quickly, clone the workflow template, set your company_id, connect your Google Sheets account, and execute the workflow. Once you have the basics running, you can iterate on alerting, enrichment, and integration with other systems in your automation stack.

Call to action: Clone the sample sheet, configure your n8n Google Sheets credential, and run the workflow against your own Trustpilot slug. If you share your company slug or target schema, we can suggest concrete node settings and mappings tailored to your environment.

Neighborhood Safety Insights with n8n & LangChain

Neighborhood Safety Insights with n8n & LangChain: Technical Workflow Reference

This reference guide describes a production-ready n8n + LangChain workflow template for neighborhood safety analytics. The workflow ingests community incident reports, generates embeddings, stores them in a Redis vector index, retrieves relevant context via semantic search, uses a chat language model and agent tooling to generate insights, and finally logs outcomes to Google Sheets for audit and review.

1. Solution Overview

The workflow is designed for teams that receive unstructured neighborhood safety reports from web forms, mobile apps, or municipal systems and want to convert that data into searchable, contextual knowledge. Using n8n as the orchestration layer, and LangChain-style components for embeddings, retrieval, and agent behavior, the pipeline provides:

  • Automated ingestion of incident reports via an n8n Webhook
  • Text preprocessing and chunking for long reports
  • Embedding generation using Hugging Face or compatible models
  • Storage of vectors and metadata in a Redis vector store
  • Semantic and geospatial-aware retrieval for queries
  • Agent-driven reasoning using a Chat LM (for example Anthropic)
  • Short-term memory for multi-turn or ongoing incident analysis
  • Structured logging of AI outputs to Google Sheets

The same pattern can be reused for any domain that relies on unstructured incident reports, such as facility management, customer support, or operations monitoring.

2. High-Level Architecture

At a high level, the n8n workflow coordinates the following components:

  • Webhook (n8n) – Entry point for incident reports via HTTP POST.
  • Text Splitter – Splits long reports into manageable chunks.
  • Embeddings (Hugging Face) – Converts text chunks into dense vector representations.
  • Redis Vector Store – Persists embeddings and metadata for similarity search.
  • Query & Tool Layer – Performs semantic retrieval based on user or agent queries.
  • Memory Buffer – Maintains short-term conversational or decision context.
  • Chat LM – Generates summaries, classifications, and recommended actions.
  • Agent – Orchestrates tools, memory, and Chat LM; writes results to Google Sheets.
  • Google Sheets – Stores structured logs of AI-generated outputs.

n8n coordinates data flow between these nodes, manages credentials, and exposes the workflow as a reusable, configurable template.

3. Node-by-Node Breakdown

3.1 Webhook Ingestion Node

The workflow begins with a Webhook node configured to accept HTTP POST requests. Typical upstream sources include:

  • Custom web forms for incident reporting
  • Mobile app backends sending JSON payloads
  • Integrations with municipal hotlines or third-party tools

The webhook should standardize incoming payloads into a consistent schema. At minimum, the payload should contain:

  • Reporter identifier (ID or pseudonym, optional)
  • Timestamp of the report
  • Text description of the incident
  • Location (latitude/longitude or address)
  • Media references (optional URLs to images or videos)

Within n8n, you can add validation and sanitization logic around this node to:

  • Reject malformed or incomplete payloads
  • Strip or escape dangerous characters to reduce injection risk
  • Normalize timestamps and location formats

3.2 Text Splitter Node

Many reports are long or contain concatenated message threads. A Text Splitter node segments the report text into smaller, overlapping chunks to improve embedding quality and later retrieval.

Typical configuration:

  • Chunk size: around 400 characters
  • Chunk overlap: around 40 characters

This balance helps embeddings capture local context while avoiding context loss between chunks. Overlap prevents important phrases that span boundaries from being split in a way that harms semantic search.

3.3 Embeddings Node (Hugging Face)

Each text chunk is passed to an Embeddings node backed by a Hugging Face embeddings model (or equivalent provider). The node converts each chunk into a dense vector representation suitable for similarity search.

For each chunk, the workflow should preserve:

  • The vector (embedding output)
  • The original chunk text
  • Location metadata (lat/lon or address)
  • Reporter identifier (if available)
  • Timestamp of the incident

When selecting an embedding model:

  • Favor models optimized for semantic search and event-level understanding.
  • Consider trade-offs between accuracy, latency, and cost.

3.4 Redis Vector Store Node

A Redis vector store node receives the embeddings and persists them using Redis with vector similarity search capabilities (for example via RediSearch modules).

Typical configuration includes:

  • A dedicated index name, for example neighborhood_safety_insights
  • Definition of the vector field for embeddings
  • Indexing of key metadata fields such as:
    • Location (lat/lon or region ID)
    • Timestamp or date
    • Severity labels (if available)
    • Category tags (for example theft, noise complaint)
  • Optional TTL policies if you want data to expire after a certain retention period

Redis provides high-performance nearest-neighbor search across large embedding sets. Index design and metadata indexing are critical for low-latency queries and combined semantic-plus-structured filtering.

3.5 Query & Retrieval Tool Layer

When an analyst, dispatcher, or automated system issues a question, the workflow uses a query tool that:

  1. Converts the natural-language question into an embedding using the same or a compatible model.
  2. Performs a vector similarity search against the Redis index.
  3. Returns the top matching chunks and associated metadata as context.

Example query:

Has there been an uptick in break-ins on Maple Ave in the last 30 days?

For such a query, the retrieval tool can combine:

  • A semantic embedding of the question
  • Time filters, for example last 30 days
  • Location filters, for example Maple Ave or a relevant geospatial bounding box

The resulting set of context chunks is then passed to the language model for summarization or analysis.

3.6 Agent Node (LangChain-style)

A central Agent node coordinates interactions between:

  • The Redis retrieval tool
  • The Chat LM (for example Anthropic or another provider)
  • The memory buffer
  • The Google Sheets logging node

Typical responsibilities of the agent include:

  • Fetching relevant context from Redis based on the user query
  • Summarizing incidents or generating situation overviews
  • Classifying urgency or severity levels
  • Recommending next steps or suggested actions
  • Writing structured log entries into Google Sheets for later review

You can expose the agent through:

  • A chat-style interface (for analysts or dispatchers)
  • An additional webhook endpoint for automated alerts or external integrations

3.7 Memory Buffer Node

To maintain continuity across a session, the workflow uses a windowed memory buffer. This memory:

  • Stores the most recent exchanges or decisions
  • Prevents the agent from repeating information unnecessarily
  • Helps the agent maintain context across follow-up questions and incident threads

The memory window should be configured to retain enough context for coherent multi-turn interactions while avoiding excessive token usage for the language model.

3.8 Google Sheets Logging Node

The final node in the pipeline logs AI-generated outputs to a Google Sheets document. A common pattern is to maintain a dedicated “Log” sheet.

Each appended row can include:

  • Incident summary generated by the Chat LM
  • Assigned severity level (for example low, medium, high)
  • Suggested action or follow-up steps
  • Location associated with the incident
  • Timestamp of the report or query
  • Raw report identifier or reference ID

Google Sheets provides a low-friction interface for stakeholders to:

  • Audit AI outputs
  • Export data for further analysis
  • Share summaries with non-technical collaborators

4. Configuration & Implementation Notes

4.1 Credentials & Security

Configure and protect the following credential sets in n8n:

  • Hugging Face (or embedding provider) API keys
  • Redis connection credentials (host, port, password, TLS settings)
  • Chat LM credentials (for example Anthropic API key)
  • Google Sheets OAuth or service account

Security best practices:

  • Use TLS for webhook endpoints and Redis connections where available.
  • Store secrets in n8n’s credentials store, not in plain-text node parameters.
  • Restrict Google Sheets and Redis access using role-based access control.
  • Anonymize or pseudonymize reporter identifiers if you are processing sensitive data.

4.2 Model & Embedding Tuning

To optimize retrieval quality:

  • Experiment with several embedding models on a sample of your real incident data.
  • Prefer models that capture commonsense reasoning and event semantics for neighborhood reports.
  • Tune chunk size and overlap:
    • Too small: risk of losing important context.
    • Too large: semantic signal becomes diluted and embeddings may be less precise.

4.3 Filtering & Classification Before Indexing

For better retrieval and analytics, consider inserting a lightweight classification step before writing to Redis:

  • Tag each report with categories such as:
    • Theft
    • Suspicious person
    • Noise complaint
    • Vandalism
  • Assign a severity level such as low, medium, or high.

These tags can be stored as metadata fields in Redis and used to:

  • Filter search results
  • Build dashboards and trend visualizations
  • Trigger alerting rules based on severity

4.4 Handling Geospatial Queries

Many neighborhood safety use cases are inherently location-sensitive. To support geospatial queries:

  • Store lat/lon coordinates with each incident in Redis metadata.
  • For queries such as “near 5th & Main”, derive a bounding box or radius around that point.
  • Apply geospatial filters before or after the vector similarity search to ensure location relevance.

Combining semantic similarity with geospatial constraints often yields far more relevant results than either approach alone.

4.5 Monitoring & Observability

For reliable operation at scale, track:

  • Workflow throughput (reports processed per minute or hour)
  • Redis query latency and error rates
  • Embedding API failures or timeouts
  • Chat LM usage and cost metrics

Set alerts for:

  • Spikes in error rates
  • Sudden increases in incident volume (which might indicate coordinated reporting events)

5. Scaling & Cost Management

The primary cost drivers in this workflow are:

  • Embedding generation for each chunk
  • Chat LM calls for summarization and reasoning

To optimize for scale and cost:

  • Batch embeddings where possible to reduce overhead.
  • Cache repeated queries and their results when users ask similar questions frequently.
  • Use a lower-cost embedding model for bulk indexing and reserve higher-quality models for critical or high-value queries if your budget requires it.
  • Plan Redis for horizontal scaling, including sharding and index optimization, as data volume grows.

6. Example Agent Prompt Flow

Consider a dispatcher asking:

Summarize incidents near

Scrape Trustpilot Reviews to Google Sheets

Scrape Trustpilot Reviews to Google Sheets with n8n

Automating the collection of Trustpilot reviews into Google Sheets gives you a reliable data source for monitoring customer sentiment, tracking issues, and feeding review data into downstream systems. This reference-style guide documents a ready-to-use n8n workflow that scrapes Trustpilot reviews, parses the embedded JSON, and appends or updates rows in Google Sheets with deduplication based on review_id.

1. Workflow overview

This n8n template is designed as a scheduled or manually triggered pipeline that:

  • Requests paginated Trustpilot review pages for a specific company slug (company_id).
  • Extracts and parses the __NEXT_DATA__ JSON structure that contains the review data.
  • Normalizes each review into a consistent schema.
  • Writes reviews into one or two Google Sheets tabs using appendOrUpdate with review_id as the unique key.

The workflow supports two output formats:

  • A general archival sheet with standard review fields.
  • A HelpfulCrowd-compatible sheet for direct import into HelpfulCrowd.

2. Architecture and data flow

The workflow is organized as a linear pipeline of nodes, from trigger to Sheets output:

  1. Schedule Trigger / Manual Trigger – entry point that controls when the workflow runs.
  2. Global (Set) – defines global configuration values, including company_id and max_page.
  3. Get reviews (HTTP Request) – fetches Trustpilot review pages with pagination.
  4. Parse reviews (Code) – parses the HTML response, extracts __NEXT_DATA__, and returns an array of review objects.
  5. Split Out – converts the reviews array into individual items (one item per review).
  6. General edits (Set) – maps and normalizes fields for a generic Google Sheet.
  7. HelpfulCrowd edits (Set) – maps and normalizes fields to match HelpfulCrowd’s import schema.
  8. General sheet (Google Sheets) – writes to the general archival sheet using appendOrUpdate.
  9. HelpfulCrowd Sheets (Google Sheets) – writes to the HelpfulCrowd-formatted sheet using appendOrUpdate.

Logical data flow:

  • Trigger node starts the workflow.
  • Global configuration is attached to each item and used downstream by the HTTP Request node.
  • HTTP Request node returns one item per page, each containing HTML content.
  • Code node transforms each HTML payload into an array of review objects.
  • Split Out node flattens that array into separate n8n items.
  • Set nodes project each review into the exact column layout expected by each Google Sheet.
  • Google Sheets nodes write or update rows based on review_id.

3. Prerequisites

  • An n8n instance (Cloud or self-hosted) with access to the public internet.
  • Google Sheets credentials configured in n8n using OAuth.
  • Permission to access and scrape the specific Trustpilot pages (see legal section below).
  • Basic understanding of n8n nodes, credentials, parameters, and how to modify node configurations.

4. Node-by-node breakdown

4.1 Trigger: Schedule Trigger / Manual Trigger

Purpose: Control when the workflow runs.

  • Manual Trigger is typically used during initial setup and testing.
  • Schedule Trigger is used for production runs, for example every hour or once per day.

Key considerations:

  • Use the Schedule Trigger in production to continuously fetch new reviews.
  • Choose an interval that respects Trustpilot rate limits and your own operational needs.

4.2 Global configuration: Global (Set)

Node type: Set

Purpose: Provide reusable configuration values to downstream nodes.

Typical fields set in this node:

  • company_id – the company slug used in Trustpilot URLs. Example: for https://www.trustpilot.com/review/n8n.io, the slug is n8n.io.
  • max_page – maximum number of pages to fetch during pagination.

These values are referenced by the HTTP Request node via expressions like {{ $json.company_id }} and {{ $json.max_page }}.

4.3 HTTP Request: Get reviews

Node type: HTTP Request

Purpose: Fetch HTML pages containing Trustpilot reviews with built-in pagination.

Base URL:

https://trustpilot.com/review/{{ $json.company_id }}

Pagination configuration (core parameters):

  • Query or path parameter for page The page parameter increments using: {{ $pageCount + 1 }}
  • maxRequests Set to: {{ $json.max_page }} This caps the total number of page requests, regardless of what the site returns.
  • requestInterval (ms) A delay between requests, for example 5000 (5 seconds), to reduce rate pressure and lower the chance of being blocked.
  • paginationCompleteWhen Set to receiveSpecificStatusCodes, which means pagination stops when a configured status code is received.
  • statusCodesWhenComplete Set to 404, so the workflow stops when it hits a non-existent page.

Edge cases and behavior:

  • If Trustpilot returns a 404 before reaching max_page, the workflow stops early, which is expected and prevents unnecessary requests.
  • If Trustpilot changes its behavior and returns a different status code for “no more pages”, the pagination logic may need to be updated.
  • If the site uses redirects or HTML shims instead of 404, the current paginationCompleteWhen configuration might not trigger as expected and may require adjustment.

Optional headers:

  • To reduce the risk of being treated as a bot, consider setting a realistic User-Agent header in this node, especially if you encounter missing content or captchas.

4.4 Code node: Parse reviews

Node type: Code

Purpose: Parse the HTML from Trustpilot, locate the __NEXT_DATA__ script tag, extract the embedded JSON, and return an array of review objects.

The Code node uses cheerio to work with the HTML and to locate the script tag:

// Key parsing approach (simplified)
const cheerio = require('cheerio');
const $ = cheerio.load(content);
const scriptTag = $('#__NEXT_DATA__');
const reviewsRaw = JSON.parse(scriptTag.html());
return reviewsRaw.props.pageProps.reviews || [];

Core logic:

  • The HTML response from the HTTP Request node is loaded into cheerio.
  • The script tag with id __NEXT_DATA__ is selected.
  • The script content is parsed as JSON, which contains the page’s data, including reviews.
  • The node returns reviewsRaw.props.pageProps.reviews or an empty array if that path is missing.

Error handling:

  • The template includes a try/catch block so that malformed HTML, missing script tags, or invalid JSON do not crash the entire workflow.
  • On error, the node should fail gracefully and can return an empty set of reviews for that page, depending on how the code is written in the template.

Data extracted per review:

  • Date
  • Author
  • Review text / body
  • Review title / heading
  • Rating
  • Location
  • review_id (used as a unique identifier in Sheets)

Environment note:

  • n8n’s Code node supports require('cheerio') in environments where external modules are available.
  • In some self-hosted n8n setups, you must ensure that cheerio is installed and accessible to the runtime, otherwise the Code node will fail when calling require('cheerio').

4.5 Split Out: expand review array

Node type: Item splitting node (for example Item Lists / “Split Out”)

Purpose: Convert the array of reviews returned by the Code node into one item per review, which is the standard pattern for processing each review independently in downstream nodes.

Behavior:

  • Input: one item containing an array of review objects.
  • Output: multiple items, each corresponding to a single review object.

This step is required so that each Set node and each Google Sheets node operates on individual reviews.

4.6 Field mapping: General edits (Set)

Node type: Set

Purpose: Map raw review fields into a normalized schema suitable for a general archival Google Sheet.

Typical mapped fields:

  • Date – standardized review date.
  • Author – reviewer name or identifier.
  • Body – full review text.
  • Heading – review title.
  • Rating – numeric rating value.
  • Location – reviewer location if available.
  • review_id – unique identifier used for deduplication in Sheets.

The exact field names should match the column headers in your general Google Sheet tab.

4.7 Field mapping: HelpfulCrowd edits (Set)

Node type: Set

Purpose: Transform the same review objects into the schema expected by HelpfulCrowd’s import format.

Typical mapped fields:

  • product_id
  • rating
  • title
  • feedback – review body text.
  • customer_name
  • status – for example, published or pending (depending on how you map it).
  • review_date
  • verified – indicates whether the review is verified, if this information is available or inferred.
  • review_id – still used as the unique key for Sheets operations.

Ensure that these field names align exactly with your HelpfulCrowd import template and with the column names in the corresponding Google Sheet tab.

4.8 Google Sheets: General sheet

Node type: Google Sheets

Operation: appendOrUpdate

Purpose: Write normalized reviews into a general archival sheet while avoiding duplicates.

Key parameters:

  • Authentication Use your configured Google Sheets OAuth credentials.
  • Spreadsheet / Sheet Point to the cloned sample spreadsheet and select the general tab.
  • Operation Set to appendOrUpdate so that existing rows are updated when a matching key is found.
  • matchingColumns Set to review_id. This is critical for deduplication.

Behavior:

  • If a row with the same review_id already exists, that row is updated with the latest data.
  • If no matching review_id is found, a new row is appended.
  • This allows the workflow to be safely re-run without creating duplicate entries for the same review.

4.9 Google Sheets: HelpfulCrowd Sheets

Node type: Google Sheets

Operation: appendOrUpdate

Purpose: Write reviews into a second sheet that matches HelpfulCrowd’s import schema.

Key parameters:

  • Authentication Use the same Google Sheets OAuth credentials as the general sheet node.
  • Spreadsheet / Sheet Select the HelpfulCrowd-formatted tab in the cloned spreadsheet.
  • Operation appendOrUpdate, identical behavior to the general sheet node.
  • matchingColumns Set to review_id to maintain consistency and avoid duplicates.

5. Step-by-step configuration

5.1 Clone the sample spreadsheet

The template assumes you are using a spreadsheet that contains two tabs:

  • A general review sheet.
  • A HelpfulCrowd-formatted sheet.

Steps:

  1. Clone the provided sample spreadsheet into your own Google account.
  2. In n8n, open each Google Sheets node and:
    • Select your Google Sheets OAuth credentials.
    • Point the node to the cloned spreadsheet and the correct tab.

5.2 Configure global variables

Open the Global (Set) node and set the following fields:

  • company_id Set to the Trustpilot company slug, for example: n8n.io.
  • max_page Set to the maximum number of pages to fetch, for example 10. This value is referenced by the HTTP Request node for pagination.

5.3 Verify HTTP Request pagination

Open the Get reviews node and confirm the following:

  • URL is set to: https://trustpilot.com/review/{{ $json.company_id }}
  • Pagination is enabled:
    • Page parameter increments with {{ $pageCount + 1 }}.
    • maxRequests is {{ $json.max_page }}.
    • requestInterval is configured (for example 5000 ms).
    • paginationCompleteWhen is receiveSpecificStatusCodes with statusCodesWhenComplete = 404.

5.4 Validate the Code node behavior

Open the Parse reviews Code node and

Build an NDA Risk Detector with n8n & LangChain

Build an NDA Risk Detector with n8n & LangChain

Every NDA you review is a promise to protect your business, your ideas, and your relationships. Yet buried in those pages can be clauses that quietly introduce risk, slow down deals, or demand extra legal back-and-forth. If you have ever felt the weight of repetitive contract review, this guide is for you.

In this article, you will walk through a journey: from the frustration of manual NDA review, to a new mindset about automation, and finally to a practical, ready-to-use n8n NDA Risk Detector workflow template. By the end, you will see how a single workflow can become a stepping stone to a more automated, focused way of working.

The problem: hidden risks and lost time

NDAs and contracts are full of details that matter. Overbroad confidentiality, harsh indemnity clauses, one-sided change terms, long durations, and unclear data handling can all create real exposure. Manually scanning every document for these issues is:

  • Slow and repetitive
  • Mentally draining, especially at scale
  • Hard to track and audit over time

As your volume of NDAs grows, so does the risk that something slips through. You want to protect the business, but you also want your team free to focus on strategy and high-value work, not endless copy-paste and clause hunting.

The shift: seeing automation as an ally

Instead of treating each NDA as a brand new manual task, imagine having an automated assistant that:

  • Scans every NDA that comes in
  • Highlights risky clauses for your review
  • Remembers similar clauses from past documents
  • Logs decisions so you build a living knowledge base over time

This is where n8n, LangChain-compatible components, and modern language models come together. You are not replacing legal judgment. You are building a system that does the repetitive searching and surfacing, so you can bring your expertise to the right clauses at the right time.

The NDA Risk Detector workflow template is a concrete way to start that transformation. It is a small, focused automation that can unlock big time savings and lay the groundwork for more advanced contract workflows later.

The vision: what this NDA Risk Detector can do for you

Using this n8n workflow, you can:

  • Accelerate NDA review by automatically flagging potential risks
  • Create a searchable memory of clauses using embeddings and a Redis vector store
  • Build an auditable trail in Google Sheets for every NDA processed

The result is a more consistent, scalable, and traceable way to handle NDAs. Instead of starting from zero with each new document, you tap into a growing base of knowledge and automation that works for you in the background.

Architecture at a glance: how the workflow fits together

Before we dive into the steps, it helps to see the big picture. The NDA Risk Detector uses the following components inside n8n:

  • Webhook – Receives NDA text or file content via POST
  • Text Splitter – Breaks the NDA into smaller, overlapping chunks
  • Embeddings – Converts those chunks into vector embeddings using Hugging Face or OpenAI
  • Redis Vector Store – Indexes the embeddings and powers vector search
  • Query / Tool – Exposes Redis search as a tool that the language agent can call
  • Memory – Maintains short-term context for multi-step reasoning
  • Chat / Agent – Uses an LLM to assess risk and generate structured results
  • Google Sheets – Logs outputs for auditing and follow-up

Each piece is simple on its own. Combined, they create a powerful, reusable workflow that can grow with your needs.

Design choices that shape the workflow

Chunking: giving the model the right context

The first key choice is how to split your NDA into chunks. A good chunking strategy helps your vector store return relevant matches and gives the agent enough context to reason about each clause.

In this template, you use a character-based or sentence-based Text Splitter with settings such as:

  • chunkSize: 400
  • chunkOverlap: 40

The overlap preserves context across boundaries, so important phrases that span two chunks are still understood when the vector store is queried. You can tune these values as you learn more about your own contracts.

Embeddings model: balancing cost and quality

The embeddings step turns NDA text into vectors that capture semantic meaning. You can choose:

  • Hugging Face embeddings for an on-premise-friendly, flexible option
  • OpenAI embeddings for high quality on many semantic tasks

Whichever you select, keep the embeddings normalized and consistent across your documents. This ensures that similar clauses end up close together in vector space, which improves the quality of search results.

Vector store: Redis as your contract memory

Redis makes an excellent vector store for this use case. It is fast, scalable, and well supported. In this workflow, you:

  • Create a Redis vector index, for example nda_risk_detector
  • Insert each chunk’s embedding along with metadata like document name, chunk index, and original text

Later, when the agent needs to evaluate a clause, it can query this index to find similar clauses from other NDAs and use them as evidence.

Agent and tools: letting the model reason with context

The real power appears when the LLM agent can call tools. In this case, you:

  • Expose the Redis query node as a Tool inside n8n
  • Give the agent a prompt that instructs it to:
    • Call the vector store tool to fetch similar clauses
    • Evaluate the NDA text against risk categories such as confidentiality scope, duration, indemnity, exclusivity, termination, and data handling
    • Return a structured risk summary and clear recommendations

This pattern lets the model combine its language understanding with your stored knowledge, which is a powerful foundation for many future workflows beyond NDAs.

Step-by-step: building the NDA Risk Detector in n8n

Now let us turn this architecture into a concrete, working workflow. You can follow these steps directly or use the template as a starting point and adapt it to your environment.

1. Webhook input: your automation entry point

Start with a Webhook node configured for POST. Give it a path such as /nda_risk_detector. This webhook will accept:

  • Raw NDA text in the request body
  • Or an uploaded file that you convert to plain text in n8n before processing

This single endpoint can be called from many places: email processors, upload portals, internal tools, or even other workflows. It is the door through which every NDA enters your automated review pipeline.

2. Text Splitter: breaking NDAs into chunks

Next, add a Text Splitter node. Configure it with settings such as:

  • chunkSize: 400
  • chunkOverlap: 40

The splitter will take your NDA text and output a list of overlapping chunks. Aim to preserve sentence boundaries where possible so that each chunk reads coherently. This improves both the embeddings and the agent’s understanding.

3. Embeddings: turning text into vectors

Connect the splitter to an Embeddings node, using either Hugging Face or OpenAI. For each chunk:

  • Generate the embedding vector
  • Attach metadata such as:
    • Document name or ID
    • Chunk index
    • The original text snippet

These vectors are the core of your semantic search capability. Once stored, they let you compare new clauses to your existing corpus of NDAs.

4. Insert into Redis: building your vector index

Now add a Redis node configured as a vector store. Set it to:

  • Mode: insert
  • Index name: for example nda_risk_detector

Insert each embedding vector along with its metadata. Over time, this index becomes a rich memory of the clauses you have processed, which you can reuse across many workflows and analyses.

5. Query / Tool: connecting Redis to the agent

To let the agent leverage this memory, add a Query node that searches your Redis index. This node should:

  • Accept a query vector or text, depending on your configuration
  • Return the most similar chunks, along with similarity scores and metadata

Expose this query node as a Tool in your agent configuration. This way, the LLM can programmatically call it when it needs supporting evidence or examples.

6. Memory and Agent: orchestrating the risk analysis

With the tool ready, set up your Agent node using a chat-capable LLM such as OpenAI or a compatible model. Attach a Memory buffer that keeps a short context window so the agent can remember earlier decisions and queries during a session.

Configure the agent so that it:

  • Receives the NDA chunks and any relevant context
  • Calls the Redis tool when it needs similar clauses
  • Evaluates the text against your chosen risk categories
  • Produces a structured summary, including risk scores and recommendations

This is where your workflow begins to feel like a true assistant rather than just a pipeline. The agent is using tools, memory, and your data to reason about each NDA.

7. Logging to Google Sheets: building an audit trail

Finally, connect the agent output to a Google Sheets node. Configure it to append a new row for each NDA with fields such as:

  • Risk category or categories
  • Severity (for example low, medium, high)
  • Identified clauses or chunk references
  • Recommendations or next steps
  • Timestamp and document identifier

This gives you a living audit log that anyone on your team can review. Over time, this sheet becomes a powerful dataset for improving your prompts, training classifiers, or tracking trends in contract risk.

Prompting the agent for consistent results

A clear, stable prompt is essential if you want reliable output. Here is an example structure you can adapt:

System: You are a contract risk analyst. Use the vector store tool to fetch related clauses, then evaluate the NDA chunk for risks.

User: Evaluate the following NDA text and return a JSON with: {"risk_score": 0-100, "risk_categories": [...], "evidence": [matching_chunks], "recommendation": "..."}

Tool instructions: When uncertain, call the vector store tool to fetch similar clauses and supporting text.

The agent should always return machine-readable JSON. That makes it easy for n8n to log, route, or trigger follow-up actions based on the results. As you gain experience, you can refine the JSON schema and prompt wording to match your internal processes.

Testing, tuning, and growing your workflow

Once the workflow is in place, the next phase is experimentation. This is where you turn a template into a tailored, high-value tool for your team.

  • Test with real examples: Run both known safe NDAs and known risky ones through the webhook. Check whether the risk scores and categories align with your expectations.
  • Tune your retrieval settings: Adjust chunk size, chunk overlap, and the number of retrieved neighbors (k) to improve precision and recall.
  • Refine the prompt and thresholds: Review false positives and false negatives. Update the prompt, risk definitions, or classification thresholds until the output feels trustworthy.

Every small improvement here pays off across every future NDA the system processes. This is the compounding effect of automation in action.

Operational and security considerations

Contracts and NDAs are sensitive by nature. As you automate, keep security and privacy at the center of your design:

  • Use HTTPS for webhooks and TLS for Redis connections so data in transit is encrypted.
  • Apply strict access controls and rotate API keys for Hugging Face, OpenAI, and Redis regularly.
  • Define data retention policies for embeddings and logs. Delete or anonymize old entries when they are no longer needed.

With these practices in place, you can enjoy the benefits of automation without compromising on trust or compliance.

What the workflow produces: sample outputs and next actions

For each NDA processed, the agent can generate a structured summary that includes:

  • Risk score from 0 to 100
  • Primary risk categories, such as:
    • Overbroad confidentiality
    • Indemnity
    • Data transfer or data handling
    • Exclusivity, termination, or duration
  • Evidence: the most relevant chunk text and similarity scores from Redis
  • Recommended action, for example:
    • “Escalate to legal”
    • “Request redline on clause X”
    • “Low risk – proceed”

You can then trigger follow-up automation based on these results, such as sending alerts, updating a CRM, or kicking off an internal review process.

Extending the workflow: your next automation steps

Once your basic NDA Risk Detector is live, you have a powerful foundation. From here, you can expand in several directions:

  • Automated redlines: Use the agent to propose alternative wording for flagged clauses and send suggestions directly to your legal team.
  • Supervised classifiers: Train a classifier on labeled clauses to sharpen precision for specific risk categories.
  • Ticketing integration: Connect to tools like Jira or Asana so that high-risk NDAs automatically create tasks for legal review.

Each extension builds on the same core pattern: embeddings, vector search, an agent that can call tools, and clear logging. As you grow more comfortable with n8n and LangChain-compatible components, you will find many more workflows that follow this pattern.

From template to transformation

Using n8n with embeddings, a Redis vector store, and an agent that can call tools is more than a clever technical exercise. It is a practical way to reclaim time, reduce manual review work, and create a repeatable, auditable NDA review process.

This NDA Risk Detector template is a small but powerful step toward a more automated, focused workflow. Start with it, learn from it, and then keep building. Every improvement you make to this workflow will quietly multiply your impact across hundreds or thousands of future NDAs.

Call to action: Load the workflow template into your n8n instance, try it on a few real NDAs, and begin tuning chunk sizes, prompts, and thresholds to match your contracts. Treat it as a living system that you can refine over time.

If you

NDA Risk Detector: n8n AI Workflow Guide

NDA Risk Detector: Build an Automated Contract Risk Pipeline with n8n

Reviewing nondisclosure agreements (NDAs) for risky clauses is important, but it is also repetitive and slow if done manually. This guide explains, in a teaching-first way, how to use an n8n workflow template called the NDA Risk Detector to automate much of that work.

You will learn how to:

  • Ingest NDAs into n8n through a secure webhook
  • Split long documents into chunks and generate embeddings
  • Store and query those embeddings in a Redis vector index
  • Use an AI agent (LLM) to analyze risk and recommend changes
  • Log every analysis to Google Sheets for traceability
  • Evaluate and improve the accuracy of your NDA risk workflow

Why automate NDA risk detection with n8n?

Legal teams, founders, and operations teams often need to triage NDAs quickly. When every agreement is read line by line, you run into several problems:

  • Slow turnaround – Reviews can bottleneck deal flow.
  • Inconsistent decisions – Different reviewers may apply different standards.
  • Poor visibility – It is hard to track how many NDAs are high risk and why.

An automated NDA risk detector built in n8n helps you:

  • Surface the most risky clauses first so humans can focus where it matters.
  • Apply consistent criteria using the same prompt and risk rubric every time.
  • Integrate with existing tools like Slack, email, and Google Sheets for alerts and audit trails.

Conceptual overview of the NDA Risk Detector workflow

At a high level, this n8n template creates an automated pipeline that:

  1. Receives NDA content via a Webhook.
  2. Splits the NDA into smaller overlapping chunks using a Splitter.
  3. Generates embeddings for each chunk through an embeddings provider.
  4. Stores these vectors in a Redis vector store.
  5. Lets an AI Agent query Redis as a tool to retrieve relevant clauses.
  6. Uses an LLM to classify risk and generate recommendations.
  7. Logs results to Google Sheets for tracking and analysis.

Here are the main building blocks you will work with in n8n:

  • Webhook – Accepts NDA text or file metadata via HTTP POST.
  • Splitter – Breaks the NDA into chunks using chunkSize and chunkOverlap.
  • Embeddings node – Calls an embeddings model (Hugging Face by default) to generate vectors.
  • Insert (Redis) – Stores vectors in a Redis index (for example nda_risk_detector).
  • Query (Redis) + Tool – Performs similarity search for relevant clauses and exposes it as a tool to the agent.
  • Memory – Keeps conversational or session context for the agent.
  • Chat / Agent – Uses an LLM (such as OpenAI) to reason about clauses, classify risk, and propose edits.
  • Google Sheets – Saves analysis results for reporting and compliance.

Step-by-step: how the n8n NDA Risk Detector works

Step 1 – Ingest NDA content via Webhook

The workflow starts with an n8n Webhook node. This acts as an HTTP endpoint where other systems (or a simple script) can send NDA data.

You can send:

  • Raw NDA text
  • Metadata about an uploaded file (for example a PDF stored elsewhere)
  • Sender or source information

Example JSON payload:

{  "filename": "nda_acme_2025.pdf",  "text": "Confidential information includes...",  "source": "email@example.com",  "received_at": "2025-10-01T12:00:00Z"
}

Security tip: never leave this webhook open to the public. Protect it with authentication tokens, IP allowlists, or a gateway so only trusted systems can send NDAs.


Step 2 – Split long NDAs into chunks

Most NDAs are longer than what you want to embed or send to an LLM in one go. The workflow uses a Splitter node to break the text into overlapping segments.

By default, the template uses:

  • chunkSize = 400
  • chunkOverlap = 40

This means each chunk is about 400 tokens or characters (depending on configuration), and each new chunk overlaps the previous one by about 10 percent. Overlap is important because:

  • It keeps key phrases or sentences from being split in a way that loses context.
  • It helps the embedding model understand how clauses relate to each other.

You can adjust these values based on:

  • The embedding model’s token limits
  • The typical length and structure of your NDAs

Step 3 – Generate embeddings for each chunk

After splitting, each chunk is passed into an Embeddings node. The template uses Hugging Face embeddings by default, but the node can be configured to use:

  • OpenAI embeddings
  • Cohere
  • Other compatible providers

When choosing an embedding model for NDA analysis, consider:

  • Semantic accuracy for legal or long-form text.
  • Cost per 1,000 tokens or per request.
  • Latency if you plan to run many analyses in parallel.

Each chunk becomes a vector representation that captures its meaning, which is what you will store and search later in Redis.


Step 4 – Store vectors in a Redis vector index

Next, the workflow uses an Insert node connected to Redis to store each embedding. These vectors are written into an index, typically named something like:

nda_risk_detector

Redis is a good fit for this because it:

  • Is fast enough for production search and retrieval.
  • Is relatively easy to host and scale.
  • Supports vector similarity search directly.

At this point, your NDA has been fully chunked and indexed as vectors. Future queries will search this index to find relevant clauses for risk analysis.


Step 5 – Query Redis and expose it as a Tool

To let the AI agent find relevant NDA sections, the workflow includes a Query node that performs similarity search against the Redis index. Given a query embedding, it returns the most similar chunks.

In the template, this query capability is exposed to the agent as a Tool. That means the agent can decide when to call the tool to:

  • Search for clauses about confidentiality duration.
  • Look up definitions of “Confidential Information”.
  • Find indemnity or IP assignment language.

Instead of sending the entire NDA to the LLM every time, the agent retrieves only the most relevant chunks from Redis, which keeps costs and token usage lower while improving focus.


Step 6 – Use an Agent with Memory to analyze risk

The core of the workflow is the Agent node, which orchestrates the analysis. It works together with:

  • The Vector Store Tool (the Redis query).
  • A Memory component that stores session context.
  • A Chat / LLM node such as OpenAI’s GPT models.

Here is what typically happens in this stage:

  1. The agent receives a task such as “Analyze this NDA for risk.”
  2. It calls the Redis Tool to retrieve relevant chunks for each risk category.
  3. Using the retrieved context and its memory, it evaluates the clauses.
  4. It outputs structured results, for example:
    • An overall risk score (Low, Medium, High).
    • A list of flagged clauses with excerpts.
    • Short rationales explaining the risk.
    • Suggested negotiation or remediation language.

To guide the agent, you will typically give it a clear prompt and rubric. For instance, you might instruct it to pay special attention to:

  • Perpetual or indefinite confidentiality obligations.
  • Very broad definitions of “Confidential Information”.
  • Unilateral injunctive remedies that favor only one party.
  • IP assignment language hidden in an NDA.
  • One-sided indemnity provisions.

Step 7 – Log results to Google Sheets

Finally, the workflow sends the agent’s results into a Google Sheets node. Each NDA analysis becomes a new row, which may include:

  • Filename (for example nda_acme_2025.pdf)
  • Summary of the NDA and key findings
  • Risk level (Low, Medium, High)
  • Flagged clauses or short excerpts
  • Suggested changes or negotiation notes
  • Timestamp of the analysis

This creates a simple but effective audit trail. Over time, you can filter by risk level, track trends, and measure how the automated system compares to human reviewers.


Example agent prompt for NDA risk analysis

Below is an example of a structured prompt you can give to the Agent node. It tells the LLM exactly what to output and what policy to follow:

Analyze the following NDA excerpts. For each excerpt, provide:
1) Risk level (Low/Medium/High)
2) Short rationale (1-2 sentences)
3) Suggested remediation or negotiation language

Use the company policy: prioritize clauses that impose indefinite obligations, ambiguous definitions, or overly broad restrictions.

You can adapt this prompt to match your organization’s risk policy. For example, you might add rules about jurisdiction, data protection, or IP ownership.


Practical tuning tips for better accuracy

Chunk size and overlap

  • Larger chunks (higher chunkSize) mean fewer vectors and lower cost, but you may lose fine-grained detail.
  • Smaller chunks increase precision for search but create more vectors and more queries.
  • An overlap of about 10 percent (for example 40 on 400) helps maintain continuity between chunks.

Embedding model choice

  • Prefer models that handle legal or long-form text well.
  • Test multiple providers (Hugging Face, OpenAI, Cohere) and compare:
    • How well they retrieve truly relevant clauses.
    • Cost per analysis.

Vector store considerations

  • Redis is a strong default for production-grade vector search.
  • For very large-scale indexing or advanced filtering, you can look at Pinecone or Milvus and adjust the workflow accordingly.

Prompt engineering and rubric design

  • Be explicit about what counts as High vs Medium risk.
  • List concrete NDA patterns to watch for, such as:
    • Perpetual confidentiality obligations.
    • Extremely broad non-use or non-solicit clauses.
    • Unilateral rights to injunctive relief or termination.
    • Hidden IP assignment or licensing terms.
    • One-sided indemnities or limitation of liability terms.

Security and privacy when processing NDAs

NDAs often contain highly sensitive business information. When you automate their processing, treat security as a first-class requirement:

  • Encrypt data in transit and at rest for both the original documents and the embeddings stored in Redis.
  • Restrict access to the webhook with strong authentication and network controls.
  • Consider redaction of personal data or names before sending text to third-party LLM or embeddings providers.
  • Maintain audit logs (for example in Google Sheets or a secured database) and define a clear data retention policy.

Extending the NDA Risk Detector workflow

Once the base workflow is running, you can extend it to fit your legal and operations processes.

  • Notifications: Connect Slack or email nodes so that high-risk NDAs automatically trigger alerts to the legal team.
  • Contract management integration: Automatically attach the risk summary to your contract lifecycle or document management system.
  • Feedback loop: Let human reviewers correct the AI’s assessment, then:
    • Feed those corrections back into prompt design.
    • Use them to adjust retrieval or re-ranking strategies.

Evaluating performance of your NDA risk detector

To know whether the automation is working well, track a few key metrics:

  • Precision and recall for high-risk clauses:
    • Compare AI-flagged clauses to a human-labeled set.
  • Time saved per review:
    • Estimate how many minutes the workflow saves per NDA.
  • False positives and false negatives:
    • False positives: benign clauses flagged as risky.
    • False negatives: risky clauses not flagged.
  • User satisfaction:
    • Ask legal reviewers whether the summaries and flags are genuinely useful.

Quick implementation checklist

Use this checklist to get from template to working NDA risk detector:

  1. Deploy the n8n workflow template and secure the Webhook endpoint.
  2. Configure Hugging Face (or another embeddings provider) with valid credentials.
  3. Set up a Redis instance and create a vector index, for example nda_risk_detector.
  4. Connect your LLM provider (for example OpenAI) for the Chat / Agent node.
  5. Connect Google Sheets and specify the sheet where results will be logged.
  6. Run tests with sample NDA payloads and adjust:
    • chunkSize and chunkOverlap
    • Prompts and risk rubric

Build a VIN Decoder with n8n + LangChain

Build an Advanced VIN Decoder with n8n and LangChain

Vehicle Identification Numbers (VINs) encode a significant amount of structured information about a vehicle. With n8n, LangChain, and modern vector search, you can transform a basic VIN lookup into a robust, context-aware decoding pipeline. This guide explains how to implement a no-code VIN decoder workflow that accepts VINs via webhook, generates embeddings with HuggingFace, stores and retrieves vectors from Redis, and uses a LangChain agent to provide enriched responses while logging all activity to Google Sheets.

The result is a scalable, production-ready VIN intelligence layer suitable for fleet operators, automotive marketplaces, and engineering teams experimenting with VIN-driven automations.

Solution Overview

Traditional VIN decoders typically call a single API and return fixed fields such as make, model, and year. By combining n8n, LangChain, and a Redis vector store, you can move beyond static decoding and deliver contextual answers based on documentation, recall information, and OEM specifications.

This workflow enables you to:

  • Index and search across vehicle documentation and technical references using vector similarity
  • Handle complex questions about a VIN, such as trim-level specifics, factory options, or recall details
  • Maintain a complete log of each VIN query and response in Google Sheets for analytics and auditing
  • Scale efficiently using Redis as a vector store and HuggingFace embeddings for fast, semantic retrieval

High-level Architecture

The n8n workflow is structured as a modular, event-driven pipeline. At a high level, it consists of:

  • Webhook – Public HTTP entry point that receives VINs and user prompts
  • Text Splitter – Optional pre-processing for long or multi-VIN inputs
  • HuggingFace Embeddings – Transformation of text into numerical vector representations
  • Redis Vector Store (Insert & Query) – Storage and retrieval of embeddings in the vin_decoder index
  • Vector Store Tool – Tool abstraction that exposes Redis search to the LangChain agent
  • Memory (Buffer Window) – Short-term conversational memory for multi-turn VIN queries
  • LangChain Agent + Chat Model – Core reasoning component that composes the final response
  • Google Sheets – Persistent log of all VIN lookups and agent outputs

This architecture separates ingestion, enrichment, reasoning, and logging, which makes the workflow easier to maintain and scale.

Use Case and Data Flow

The workflow is designed for scenarios where a user or system submits a VIN and an optional prompt. The high-level data flow is:

  1. A client sends a POST request with a VIN and a natural-language prompt to the n8n webhook.
  2. The input is validated and optionally split into chunks for embedding.
  3. Text chunks are converted to embeddings using a HuggingFace model and stored in Redis under the vin_decoder index along with metadata.
  4. When a query is made, the workflow searches Redis for the most relevant documents for that VIN.
  5. LangChain uses the vector store as a tool, together with conversational memory and a chat model, to generate a structured response.
  6. The complete interaction, including the VIN, prompt, response, and source context, is appended to Google Sheets.

Step-by-step Implementation in n8n

1. Configure the Webhook Entry Point

Create a new workflow in n8n and add a Webhook node. Set it to accept POST requests at a path such as /vin_decoder. This endpoint acts as the public interface for all VIN lookups.

Typical payload structure:

{  "vin": "1HGCM82633A004352",  "prompt": "Decode this VIN and list recalls or important notes."
}

Ensure the webhook is secured appropriately before using it in production (see the security section below).

2. Sanitize and Split Input Text

In many real-world cases you may receive more than a single VIN string, for example longer descriptions or combined queries. To prepare this content for embedding, add a Text Splitter node after the webhook.

Recommended configuration:

  • Use a character-based splitter
  • Set a chunk size around 400 characters
  • Configure an overlap of approximately 40 characters

This approach keeps chunks within the embedding model context limits while preserving cross-sentence meaning.

3. Generate Embeddings with HuggingFace

Next, add a HuggingFace Embeddings node and connect it to the Text Splitter (or directly to the Webhook if splitting is not required). Select an appropriate model, such as one from the sentence-transformers family, and configure your HuggingFace API key in n8n credentials.

For each text chunk, the node outputs a numerical vector representation. These vectors power semantic search against your VIN-related documentation and reference data.

4. Persist Vectors in Redis

To enable fast similarity search, add a Vector Store (Redis) Insert node. Configure it with:

  • Index name: vin_decoder
  • Embedding field: the vector output from the HuggingFace node
  • Metadata fields: for example, vin, source, timestamp, and any document identifiers

Redis then serves as a high-performance k-NN backend using vector similarity. This is critical for low-latency VIN lookups at scale.

5. Build the Query Path to the Vector Store

To answer questions about a specific VIN, you need a retrieval path. Add a Vector Store (Redis) Query node that points to the same vin_decoder index. Configure it to retrieve the top-k similar documents given the current prompt and VIN context.

Then, add a Vector Store Tool node. This tool wraps the Redis query functionality in a form that the LangChain agent can call when it needs external context. The agent will use this tool to fetch relevant documents and ground its responses in your indexed data.

6. Add Conversational Memory

For multi-turn interactions where a user may ask follow-up questions about the same VIN, introduce a Memory (Buffer Window) node. This node maintains a sliding window of recent messages and agent responses.

Connect the memory node to the agent chain so that:

  • The agent can reference prior questions and answers in the same session

Proper use of memory improves user experience, particularly for complex diagnostic or investigative queries.

7. Configure the LangChain Agent and Chat Model

Now configure the core reasoning component. Add a LangChain Agent node and a compatible Chat Model node (for example, a HuggingFace chat model). Wire the following into the agent:

  • Tool: the Vector Store Tool that exposes Redis search
  • Memory: the Buffer Window node for short-term context
  • Chat model: your selected HuggingFace chat model

In the agent prompt, instruct the model to:

  • Use retrieved documents from the vector store as the primary source of truth
  • Produce a structured response containing fields such as:
    • vin
    • make
    • model
    • year
    • engine
    • Trim and notable options, where available
    • Recalls or important alerts
  • Include notes or caveats if the information is uncertain or requires manual verification

This configuration enables the agent to synthesize detailed answers that go beyond simple VIN decoding.

8. Log Results to Google Sheets

For observability, auditing, and analytics, add a Google Sheets node configured with the Append operation. After the agent generates its response, append a new row capturing:

  • timestamp
  • vin
  • user_prompt
  • agent_response
  • source_docs or document identifiers used for the answer

This logging pattern provides a complete history of VIN lookups, supports quality monitoring, and simplifies downstream reporting or BI integration.

Example Request and Response

Webhook request

POST /webhook/vin_decoder

{  "vin": "1HGCM82633A004352",  "prompt": "Decode this VIN and list recalls or important notes."
}

Representative agent output (JSON or plain text):

{  "vin": "1HGCM82633A004352",  "make": "Honda",  "model": "Accord",  "year": 2003,  "engine": "2.4L I4",  "recalls": ["Airbag inflator recall - NHTSA 05V"],  "notes": "Possible trim: EX; check door label for paint code"
}

The exact content depends on the indexed documents and the prompt design, but this illustrates the level of structured detail that the workflow can provide.

Best Practices for High-quality VIN Decoding

Curate Authoritative Data Sources

  • Index high-quality reference materials such as OEM service manuals, NHTSA recall texts, and official specification sheets.
  • Store URLs, document IDs, and text snippets as metadata so the agent can reference or cite original sources.

Optimize Text Chunking and Embeddings

  • Use chunk overlap in the Text Splitter to avoid losing context across sentence boundaries.
  • Periodically review vector dimensions and index configuration in Redis to balance accuracy, cost, and latency.

Protect Downstream Systems

  • Implement rate limiting or throttling on the webhook endpoint to protect external APIs and models from abuse.
  • Monitor Redis resource usage and tune query parameters such as top-k results and similarity thresholds.

Security, Privacy, and Compliance

In some jurisdictions, VINs may be considered personally identifiable information, particularly when linked to ownership records or location data. Treat VIN processing accordingly.

  • Enable encryption at rest for Redis and Google Sheets where supported.
  • Restrict access to the n8n instance and webhook using authentication, network controls, or a firewall for production deployments.
  • Define and enforce data retention policies that comply with GDPR and relevant local privacy regulations.

Scaling the Workflow

As usage grows, the following practices help maintain performance and reliability:

  • Run n8n in containers and scale horizontally behind a load balancer.
  • Use a managed Redis service or Redis Enterprise to ensure predictable performance, monitoring, and backups.
  • Pre-index VIN-specific knowledge bases and schedule periodic updates for new recalls, TSBs, and technical bulletins.
  • Place an API gateway or dedicated front-end in front of the webhook to manage authentication, rate limits, and observability.

Conclusion

By integrating n8n, LangChain, HuggingFace embeddings, and Redis, you can deliver a VIN decoder that does far more than simple field parsing. This architecture enables reasoning over rich documentation, supports contextual Q&A, and provides a complete audit trail through Google Sheets logging.

Start by deploying the core path: webhook, text processing, embeddings, and Redis indexing. Once this foundation is in place, incrementally enrich the system with higher quality data sources, improved prompts, and more advanced analytics on your Google Sheets logs.

Next steps: connect your HuggingFace and Redis credentials in n8n, deploy the workflow, and test it with your own VIN dataset. For teams that prefer a faster start or guided implementation, a ready-made template and expert support are available.

Call to action: Get a free starter template or schedule a 30-minute consultation to tailor this VIN decoder to your environment. Sign up on our website or contact us by email to begin.

NDA Risk Detector with n8n & Vector Embeddings

NDA Risk Detector with n8n & Vector Embeddings

This reference guide describes a production-style NDA Risk Detector built in n8n. The workflow automates NDA intake, splits and embeds contract text, stores it in a Redis vector index, and uses an AI agent with tools and memory to identify risky clauses. Results are logged to Google Sheets for auditability and follow-up.

1. Overview

The NDA Risk Detector workflow is designed for legal and product teams that need a repeatable, fast way to surface high-risk clauses in incoming NDAs. Instead of manually scanning each document, the workflow uses vector embeddings and retrieval-augmented generation to:

  • Ingest NDA text or file URLs via a webhook endpoint
  • Split long contracts into context-preserving chunks
  • Generate vector embeddings for each chunk using a selected model
  • Index those vectors in a Redis-based vector store
  • Query the vector store during evaluation using a Tool layer and short-term Memory
  • Run an AI Agent that produces structured risk assessments
  • Append results to a Google Sheet for tracking and compliance

By combining embeddings with a vector store, the system can detect semantically similar risk patterns even when the NDA wording is different from your previous templates or examples.

2. Workflow Architecture

At a high level, the n8n workflow implements a data pipeline with two primary paths:

  • Ingestion path – For reference NDAs, templates, or precedent clauses that you want to index as context.
  • Evaluation path – For newly received NDAs that you want to analyze and score for risk.

Both paths share the core building blocks:

  1. Webhook node – Entry point for NDA content.
  2. Text Splitter node – Breaks NDA text into chunks with overlap.
  3. Embeddings node – Generates vector representations for each chunk.
  4. Redis Vector Store node – Stores or queries vector embeddings (index name nda_risk_detector in the template).
  5. Tool node – Wraps the vector store for Agent usage.
  6. Memory node – Maintains short-term conversational context.
  7. Agent / Chat node – Orchestrates the language model, tools, and memory to produce a risk assessment.
  8. Google Sheets node – Logs results to a spreadsheet for auditing and reporting.

The same architecture can support both batch ingestion of historical NDAs and real-time analysis of new agreements.

3. Node-by-Node Breakdown

3.1 Webhook Node (NDA Intake)

Role: Entry point for external systems to submit NDAs.

  • Trigger type: Webhook node configured to accept POST requests.
  • Payload: The workflow expects either:
    • Raw NDA text in the request body, or
    • A URL pointing to an NDA file that is processed upstream or by another part of your stack.
  • Typical integrations: Form submissions, internal ingestion APIs, or a document upload UI that sends data to the webhook URL.

Configuration notes:

  • Ensure the HTTP method is set to POST.
  • Define a consistent JSON schema for incoming data (for example, { "nda_text": "...", "source_id": "..." }).
  • Use authentication (e.g. header tokens) if the webhook is exposed externally.

3.2 Text Splitter Node (Document Chunking)

Role: Splits long NDA content into smaller chunks that are suitable for embedding and retrieval.

  • Example settings from the template:
    • chunkSize: 400 characters
    • chunkOverlap: 40 characters
  • Purpose:
    • Preserves local context within each chunk.
    • Prevents exceeding token limits of embedding models.
    • Improves retrieval granularity so the agent can reference specific clauses.

Edge cases:

  • Very short NDAs may result in a single chunk. The workflow still operates correctly, but retrieval will be less granular.
  • Highly formatted or scanned PDFs should be converted to clean text before reaching this node to avoid noisy chunks.

3.3 Embeddings Node (Vector Generation)

Role: Converts each text chunk into a numerical vector representation.

  • Template example: Hugging Face Embeddings node.
  • Alternatives: OpenAI embeddings or any other supported embeddings provider.
  • Inputs: Chunked text from the Text Splitter node.
  • Outputs: A vector (array of floats) associated with each text chunk.

Configuration:

  • Set up credentials for your chosen provider (Hugging Face or OpenAI).
  • Select an embedding model that:
    • Supports your primary language(s) of NDAs.
    • Provides sufficient semantic resolution for legal text.
    • Matches your latency and cost constraints.

Error handling:

  • Handle provider-side rate limits by adding delays or batching (see Section 7).
  • Log or route failures (e.g. invalid credentials, network issues) to an error-handling branch in your n8n workflow.

3.4 Redis Vector Store Node (Insert & Query)

Role: Serves as the vector database for storing and retrieving clause embeddings.

  • Index name (example): nda_risk_detector.
  • Modes of operation:
    • Insert mode: Used during ingestion to store embeddings and associated chunk metadata.
    • Query mode: Used during evaluation runs to retrieve the most relevant chunks.

Insert mode usage:

  • Input: Embeddings + original text chunks.
  • Recommended for:
    • Standard NDA templates.
    • Annotated examples of risky clauses.
    • Historical NDAs that represent your typical contract language.

Query mode usage:

  • Input: Embedding of the clause or query text that the agent or workflow provides.
  • Output: Top-N similar chunks with similarity scores and metadata.
  • These results are routed to the Tool node so that the Agent can reference them as evidence.

Configuration notes:

  • Provide Redis connection details and credentials in n8n.
  • Ensure the vector index schema matches the dimensions of your embedding model.
  • For sensitive data, use an encrypted Redis instance and restrict network access.

3.5 Tool Node (Vector Store Tooling Layer)

Role: Exposes the Redis vector store as a callable tool for the AI Agent.

  • Allows the Agent to issue semantic search queries against the indexed NDA chunks.
  • Returns retrieved clauses as structured data that the Agent can incorporate into its reasoning and final answer.

Behavior:

  • The Agent decides when to call the Tool based on its prompt and internal logic.
  • The Tool returns the most relevant chunks for the Agent to cite as supporting evidence.

3.6 Memory Node (Short-term Context)

Role: Maintains a buffer of previous messages or steps so the Agent can consider earlier parts of the NDA or prior interactions.

  • Typically configured as a buffer window memory.
  • Stores a limited history to keep token usage manageable.

Use cases:

  • Multi-step evaluations where the Agent reviews sections sequentially.
  • Follow-up questions or clarifications during a review session.

Configuration considerations:

  • If the memory window is too small, the Agent may lose important earlier context.
  • If the window is too large, token usage and latency may increase unnecessarily.

3.7 Agent / Chat Node (AI Reasoning Layer)

Role: Central orchestration layer that combines the language model, Tool access, and Memory to produce the NDA risk assessment.

  • Supported models: OpenAI or other LLM providers supported by n8n.
  • Inputs:
    • Prompt instructions for risk analysis.
    • Relevant chunks from the Tool node.
    • Conversation context from Memory.
  • Outputs: Structured risk assessment including:
    • Risk categories (for example, termination, indemnity, exclusivity).
    • Rationale and supporting references.
    • Risk severity scores or qualitative labels.

Configuration notes:

  • Attach the Tool node so the Agent can query the vector store when needed.
  • Attach the Memory node so the Agent can recall previous steps in the evaluation.
  • Configure model credentials (e.g. OpenAI API key) in n8n credentials management.

3.8 Google Sheets Node (Logging & Audit Trail)

Role: Persists evaluation results to a Google Sheet for later review, reporting, and compliance checks.

  • Operation: Append mode, adding a new row for each NDA evaluation.
  • Typical columns:
    • NDA identifier or source link.
    • Timestamp of evaluation.
    • Summary of risk findings.
    • Risk categories and severity scores.
    • Optional: IDs or links to relevant chunks.

Configuration notes:

  • Set up Google Sheets credentials in n8n.
  • Map Agent output fields to specific spreadsheet columns.
  • Use a dedicated sheet or tab for NDA risk logs to keep data organized.

4. Step-by-Step Setup Guide

  1. Configure the Webhook node
    Set up a Webhook node in n8n to accept POST requests containing:
    • Raw NDA text, or
    • A URL reference to the NDA file.

    Integrate this endpoint with your existing form, upload UI, or ingestion API.

  2. Add and tune the Text Splitter node
    Connect the Webhook output to a Text Splitter node and configure:
    • chunkSize (for example 400 characters in the template).
    • chunkOverlap (for example 40 characters).

    Larger chunks preserve more context but increase token usage and embedding cost. For legal text, 300-600 characters with 20-100 overlap is a common starting range.

  3. Set up the Embeddings node
    Add a Hugging Face Embeddings node or an OpenAI Embeddings node:
    • Provide the appropriate API key via n8n credentials.
    • Select a model compatible with your language and quality requirements.

    Connect it to the Text Splitter so each chunk is converted into a vector.

  4. Index embeddings into Redis
    Add a Redis Vector Store node configured with a dedicated index, for example:
    • indexName: nda_risk_detector

    In insert mode, send embeddings and their associated text chunks from the Embeddings node into Redis. Use this path to ingest:

    • Reference NDAs.
    • Templates.
    • Precedent clauses and annotated examples.
  5. Wire the query path for evaluations
    For evaluation runs, configure the Redis Vector Store node in query mode:
    • Provide the query embedding (for example generated from a clause or from the NDA section under review).
    • Return the top relevant chunks to the Tool node.

    The Tool node will then expose this retrieval capability to the Agent.

  6. Configure Agent and Memory
    Add an Agent (or Chat) node and:
    • Connect it to your language model provider (e.g. OpenAI credentials).
    • Attach the Memory node to maintain a short interaction history.
    • Attach the Tool node so the Agent can query the vector store during reasoning.

    Craft prompts that instruct the Agent to:

    • Identify risky NDA clauses.
    • Classify them into categories such as termination, indemnity, and exclusivity.
    • Assign risk severity and provide a clear rationale.
  7. Log results in Google Sheets
    Finally, add a Google Sheets node configured to append a new row per evaluation:
    • Map Agent output fields (risk categories, severity, summary) to sheet columns.
    • Include timestamps and NDA identifiers for traceability.

5. Configuration Tips & Best Practices

5.1 Chunking Strategy

  • Start with chunkSize between 300 and 600 characters for legal text.
  • Use chunkOverlap between 20 and 100 characters to avoid splitting important clauses mid-sentence.
  • Adjust based on:
    • Average NDA length.
    • Embedding cost constraints.
    • Observed retrieval quality.

5.2 Embedding Model Selection

  • Higher-quality embeddings usually improve retrieval of nuanced legal language.
  • If budget is a concern, run A/B tests across:
    • Different embedding models.
    • Different chunk sizes.

    and compare retrieval precision and recall on a small labeled test set.

5.3 Indexing Strategy in Redis

  • Index both:
    • Standard, low-risk NDA templates.
    • Known risky clauses, ideally annotated with risk categories.
  • This combination helps the vector store learn the semantic space of both acceptable and problematic language.

5.4 Prompt Design for the Agent

  • Instruct the Agent to:
    • Cite specific retrieved chunks as evidence when flagging a risk.
    • Produce a concise risk score (for example on a 1-5 scale) per clause or per NDA.
    • Explicitly identify which

Build an NDA Risk Detector with n8n & LangChain

Build an NDA Risk Detector with n8n & LangChain: Turn Manual Reviews Into Scalable Automation

From Manual NDA Reviews To Focused, Strategic Work

Reviewing NDAs is important work, but it can also be repetitive, draining, and slow. Legal teams, product leaders, and procurement specialists often spend hours scanning for risky clauses, trying not to miss anything, and copying notes into spreadsheets for tracking.

That time could be spent on deeper analysis, strategic negotiations, or building better processes. Automation will not replace your judgment, but it can protect your attention, surface risks faster, and give you the clarity to focus on what truly matters.

This is where an automated NDA Risk Detector built with n8n and LangChain comes in. Instead of reading every clause from scratch, you can:

  • Send NDA text into a webhook
  • Automatically break it into meaningful chunks
  • Index it in a Redis vector store with Hugging Face embeddings
  • Let an OpenAI-powered agent analyze risk levels and reasons
  • Log everything neatly into Google Sheets for tracking and audits

The result is not just a workflow. It is a repeatable system that helps you scale your review process, reduce human error, and reclaim hours every week.

Shifting Your Mindset: Automation As Your Co-pilot

Before we dive into nodes and prompts, it helps to see this template as more than a one-off tool. It is a stepping stone toward a more automated, focused way of working.

With this NDA Risk Detector you can:

  • Transform unstructured legal text into structured, searchable data
  • Build a consistent risk scoring rubric instead of ad-hoc judgments
  • Experiment, tweak, and improve your prompts and thresholds over time
  • Use the same pattern later for other contracts, policies, or internal documents

Think of it as your first building block in a larger automation ecosystem. Once you get this running, it becomes easier to imagine and implement the next workflow, and the next.

Why This NDA Risk Detector Approach Works

The power of this n8n template lies in how it combines modern AI techniques with practical automation:

  • Scalable: Vector embeddings + Redis enable fast semantic search across individual clause fragments, even as your volume grows.
  • Transparent: Chunking text and storing metadata makes it easy to trace which exact clause triggered a risk flag.
  • Automated: A webhook-driven workflow captures NDAs, runs analysis, and logs results into Google Sheets without manual copying or pasting.

Instead of treating every NDA as a new problem, you create a reusable pipeline that works the same way every time.

High-Level Architecture: How The Workflow Fits Together

The NDA Risk Detector template weaves together several n8n and LangChain components into one coherent automation:

  • Webhook – Accepts NDA text via POST requests.
  • Splitter – Breaks long documents into smaller chunks based on character length and overlap.
  • Embeddings – Uses Hugging Face (or similar) to convert each chunk into semantic vectors.
  • Redis Vector Store – Stores embeddings in an index named nda_risk_detector.
  • Query + Tool – Retrieves the most relevant clause chunks for the risk analysis.
  • Memory – Maintains short-term context for multi-step or conversational analysis.
  • Chat/Agent (OpenAI) – Classifies risk, explains why, and assigns a score.
  • Google Sheets – Logs every result into a spreadsheet for auditing and tracking.

Once configured, you can send any NDA into this pipeline and receive structured risk insights in return.

Step 1: Webhook Intake – Opening The Door To Automation

Your journey starts with a simple entry point: an n8n Webhook node. This is how NDAs enter your automated review system.

Create a webhook with the path /nda_risk_detector. The workflow expects a JSON payload similar to:

{  "document_id": "nda_1234",  "text": "Full NDA text goes here...",  "submitter": "alice@example.com",  "company": "Acme Inc"
}

You can add more metadata later, but this basic structure gives your workflow what it needs to identify, process, and log each document.

Step 2: Splitting The Text Into Meaningful Clauses

Long legal documents are difficult to analyze as a single block. To make the AI more effective, you use a Splitter node to break the NDA into manageable chunks that roughly match clause-level sections.

Recommended starting settings from the template:

  • chunkSize: 400 characters
  • chunkOverlap: 40 characters

These values help preserve context without making each chunk too large. For legal language, aim for chunks in the range of 200 to 800 characters so that individual clauses stay intact.

This is one of the key places to experiment. If the detector misses context or breaks sentences awkwardly, adjust the chunk size or overlap and test again.

Step 3: Creating Embeddings & Storing Them In Redis

Next, you convert each chunk into a vector representation that captures its meaning. This is handled by the Embeddings node.

Use the Hugging Face embeddings node (or OpenAI embeddings if you prefer). Configure your API credentials in n8n so the workflow can call the embedding service. For each chunk:

  • An embedding is created
  • The resulting vector is inserted into Redis using the index name nda_risk_detector

Store helpful metadata alongside each vector, such as:

  • document_id
  • chunk_index
  • chunk_text
  • submitter

This metadata is what allows you to trace any risk flag back to the exact clause and document later.

Step 4: Querying The Vector Store & Exposing It As A Tool

Once the NDA is indexed, the workflow uses a Query node to search the Redis vector index for the most relevant chunks during analysis.

The Tool node then exposes this vector store to the AI agent. This lets the agent:

  • Retrieve specific clause fragments that matter for risk evaluation
  • See surrounding context instead of isolated sentences
  • Ground its responses in the actual NDA text

This combination of embeddings, Redis, and tools is what makes the system scalable and context aware.

Step 5: Memory & Chat – Letting The Agent Analyze Risk

To support multi-step analysis or follow-up questions, attach a short windowed memory to the agent. This helps it keep track of recent context across requests.

Then use the OpenAI Chat node to run the core risk analysis agent. The agent receives:

  • The retrieved clause chunks from the vector store
  • A carefully designed prompt that explains risk categories and the output format

This is where your workflow turns raw text into structured insight.

Designing The Prompt: Clear Instructions, Consistent Output

A strong prompt is essential for reliable automation. Here is a simplified version of a prompt you can use to classify NDA risk:

Analyze the following NDA clauses. For each clause, do two things:
1) Assign a risk level: Low, Medium, or High.
2) Provide a short reason (1-2 sentences) and suggest a remediation (if any).

Return JSON with: document_id, clause_index, clause_text, risk_level, risk_score (0-100), reason, recommendation.

Here are the retrieved clause fragments:
---
{{retrieved_clauses}}
---

Ask the agent to return well-structured JSON. This makes it far easier to log results into Google Sheets and to build additional automations on top of this workflow later.

Using A Clear Risk Scoring Rubric

To keep your analysis consistent, define a simple rubric that the agent follows. For example:

  • High (70-100): Broad confidentiality exceptions, one-sided IP assignment, indefinite or very long obligations, or asymmetric penalties.
  • Medium (35-69): Unclear definitions, vague timeframes, or mutual clauses that are ambiguous or incomplete.
  • Low (0-34): Standard confidentiality terms, reasonable durations, balanced and mutual protections.

This rubric gives you a shared language for risk and makes your automation more predictable.

Logging Results To Google Sheets For Visibility & Growth

Once the agent has evaluated each clause, you want those results to be easy to review, filter, and share. Configure a Google Sheets node to append rows to a sheet, for example called “Log”.

Recommended columns include:

  • Timestamp
  • Document ID
  • Submitter
  • Clause Index
  • Risk Level
  • Risk Score
  • Reason
  • Recommendation

Over time, this sheet becomes a valuable dataset. You can use it to spot patterns, refine your prompts, and improve your contract templates or negotiation playbooks.

Example Agent Output

To visualize how the agent responds, here is a sample JSON output for a single clause:

{  "document_id": "nda_1234",  "results": [  {  "clause_index": 3,  "clause_text": "Recipient may disclose information to affiliates without notice.",  "risk_level": "High",  "risk_score": 85,  "reason": "Permits broad onward disclosure to affiliates without restrictions.",  "recommendation": "Limit affiliate disclosures; require notification and binding obligations."  }  ]
}

This structure is ideal for automation. Each field can be logged, filtered, or used to trigger follow-up workflows.

Deployment & Testing: Turning Your Workflow Into A Reliable System

Once your nodes are connected and credentials are configured, it is time to test and refine. A few practical steps:

  • Run integration tests with several sample NDAs and confirm that rows are correctly appended to your Google Sheets log.
  • Review chunk overlap behavior and ensure clauses are not split mid-sentence in ways that change the meaning.
  • Validate that the agent reliably returns strict JSON. Add a lightweight parser node to catch malformed JSON and fail gracefully.

Think of this phase as training your automation. Every test helps you tune the system for accuracy and reliability.

Security & Compliance For Sensitive NDA Data

Because NDAs often contain confidential and personal information, it is important to treat security as a core part of your design, not an afterthought. Consider:

  • Encrypting data at rest in Redis and using HTTPS for all endpoints.
  • Using scoped service accounts, rotating API keys regularly, and following least-privilege principles.
  • Masking or redacting PII that is not necessary for risk analysis before storing it.
  • Restricting access to the Google Sheet and enabling audit logging for accountability.

With these measures, you can enjoy the benefits of automation while respecting privacy and compliance requirements.

Continuous Improvement: Tuning & Extending Your Detector

One of the most empowering aspects of this n8n template is that it is not fixed. You can keep improving it as your needs evolve.

  • Increase precision by building a labeled dataset of clauses and training a classifier on top of your embeddings.
  • Use multi-model pipelines such as combining OpenAI for reasoning with a smaller local model for fast classification.
  • Store provenance metadata so each flagged item maps back to the original source text, chunk index, and version.
  • Rate-limit webhook intake and queue large documents for asynchronous processing to keep performance stable.

Each improvement turns your NDA Risk Detector into a more powerful, specialized tool that fits your team and your workflows.

Troubleshooting: Common Issues & Simple Fixes

As you experiment, you might encounter a few common challenges. Here are some quick diagnostics:

  • No or poor results: Increase chunkSize or adjust chunkOverlap so clauses remain intact and context is preserved.
  • Agent returns freeform text: Tighten your prompt, clearly require JSON output, and validate the structure before logging.
  • Redis index errors: Double-check that your index name is exactly nda_risk_detector and verify that your Redis vector plugin is correctly configured.

Each fix brings you closer to a stable, production-ready workflow.

From Template To Transformation: Your Next Steps

This NDA Risk Detector is more than a demo. It is a practical, extensible baseline for automated contract screening that combines:

  • n8n automation
  • LangChain primitives like splitter, embeddings, and vector store
  • An OpenAI agent that delivers structured risk analysis
  • Google Sheets logging for transparency and audits

By putting these pieces together, you turn a time-consuming manual process into a reusable system that works for you, not the other way around.

Start Automating Your NDA Reviews Today

Try it now: Import the workflow into n8n, connect your Hugging Face, Redis, OpenAI, and Google Sheets credentials, and send an NDA to the /nda_risk_detector webhook path. Then open your “Log” sheet and watch the analysis appear.

From there, you can customize the prompt, refine the scoring rubric, add a UI to review flagged clauses, or build downstream automations that notify stakeholders when high-risk clauses are detected.

Call to action: Import the template, run a few real-world tests, and note what you would like to improve. Share your feedback with your team or community, and keep iterating. Each small change is a step toward a more automated, focused, and scalable workflow.

Build an NDA Risk Detector with n8n & LangChain

Build an NDA Risk Detector with n8n & LangChain

Imagine never having to manually scan every NDA line by line again. With a smart NDA risk detector built on n8n and LangChain, you can quickly spot risky clauses, log them for audit, and keep your legal team focused on the tricky edge cases instead of the boring repetitive work.

In this guide, we will walk through a production-ready n8n workflow template that ties together:

  • n8n for orchestration and automation
  • LangChain components for document handling
  • Hugging Face embeddings for semantic understanding
  • Redis as a vector store for fast search
  • OpenAI for clause analysis and suggestions
  • Google Sheets for logging and auditing

We will keep all the technical bits accurate, but explain them in a more conversational way so you can actually picture how this fits into your day-to-day work.


When does an NDA risk detector make sense?

If you are dealing with NDAs on a regular basis, you probably know this pattern:

  • Sales or partnerships send over yet another NDA.
  • Legal gets pulled in to check if anything looks off.
  • Everyone waits while someone reads dense legal text.

It is not that every NDA is dangerous, it is that you cannot afford to miss the few that are. That is where automation helps. An NDA risk detector built with n8n and LangChain is especially useful if you:

  • Receive a high volume of NDAs from partners, vendors, or customers.
  • Have limited legal bandwidth and need a fast triage step.
  • Want a structured record of what was flagged, when, and why.

This workflow will:

  • Highlight potentially risky clauses, such as:
    • Overly broad definitions of confidential information
    • Indefinite confidentiality terms
    • Restrictive IP or assignment clauses
  • Pull out the exact text of the clause and its context so a human can review it quickly.
  • Log every analysis into Google Sheets for audit trails and trend analysis.

It will not replace legal review, but it will get you from “no idea what is in this NDA” to “here are the clauses we should actually care about” in seconds.


High-level view of the n8n NDA workflow

Before we dive into each step, here is what the template does end to end:

  • Webhook (n8n) – receives the NDA text via POST.
  • Text Splitter – breaks the document into overlapping chunks.
  • Embeddings (Hugging Face) – turns each chunk into a semantic vector.
  • Insert (Redis Vector Store) – stores those vectors in a Redis index called nda_risk_detector.
  • Query & Tool – semantically searches the Redis index for similar risky clauses.
  • Memory (buffer) – gives the agent short-term memory of recent context.
  • Chat (OpenAI) + Agent – analyzes the retrieved chunks, scores the risk, and suggests remediation.
  • Google Sheets – appends a row with all the findings for each NDA.

Think of it as: “capture NDA input, break it down, understand it semantically, compare it with risky patterns, ask an LLM for a judgment, then log everything.”


Step-by-step: how the NDA workflow runs in n8n

1. Capture the NDA with a Webhook

Everything starts with the Webhook node in n8n. It accepts a POST request that contains either:

  • The raw NDA text, or
  • A link to the document that you fetch and convert to text upstream

This makes it easy to plug into whatever you already use. You can send NDAs from:

  • Web forms
  • Email parsers
  • CRM or contract tools
  • Other automations in your stack

The Webhook centralizes all NDA intake in one consistent entry point.

2. Split the NDA into workable chunks

Long legal documents are hard to process as one piece. The Text Splitter node solves this by breaking the NDA into overlapping segments, using character-based chunking with:

  • chunkSize = 400
  • chunkOverlap = 40

Why does this matter? Chunking:

  • Keeps each piece short enough for embedding models and LLM context limits.
  • Preserves continuity between clauses with a small overlap so you do not lose context mid-sentence.

The result is a list of text chunks that still feel like coherent clauses, not random fragments.

3. Turn chunks into embeddings with Hugging Face

Next, each chunk goes into the Embeddings node, which uses a Hugging Face model in this template.

Embeddings turn text into numeric vectors that capture meaning. Instead of comparing strings literally, you can now search based on semantic similarity, such as “this clause feels like that other risky clause we saw before.”

These vectors are what we will store and search later in Redis.

4. Store vectors in a Redis vector index

The Insert node writes each embedding to a Redis vector store, under the index name nda_risk_detector.

Redis is a great fit here because it is:

  • Fast enough for real-time or near real-time semantic search.
  • Cost-effective and battle-tested in production environments.

Along with the vector itself, you should store helpful metadata such as:

  • Source document ID or name
  • Chunk position or index
  • The original text of the chunk

This metadata makes it easier to trace findings back to the exact place in the NDA later.

5. Retrieve the most relevant chunks via semantic search

When you analyze a new NDA or a specific clause, the Query node performs a semantic search against the nda_risk_detector Redis index.

It returns the top chunks that are most similar to your input. That means you can:

  • Compare new clauses against previously flagged risky ones.
  • Leverage your growing corpus of examples to improve detection over time.

The Query node feeds these retrieved chunks into the downstream Agent as context, so the language model is not starting from scratch every time. It already sees patterns that look similar to known risks.

6. Analyze risk using an Agent with memory

This is where the intelligence comes together. The workflow wires up:

  • The Redis Tool and similarity search results
  • A Memory buffer that stores recent context
  • An Agent node that uses an OpenAI Chat model

The Agent receives:

  • The retrieved chunks from Redis
  • Any relevant recent interactions from the Memory buffer
  • The NDA text or clause that you want to evaluate (passed in via $json in this workflow)

Based on a carefully designed prompt, the Agent should:

  • Classify the risk level for each clause as High, Medium, or Low.
  • Extract the exact risky clause text and its location if available.
  • Explain in plain language why the clause is risky.
  • Propose concise remediation language your legal team could use in negotiations.

This turns raw text into structured, actionable insights that your team can actually use.

7. Log every NDA analysis into Google Sheets

Finally, the workflow hands the Agent’s output to a Google Sheets node, which appends a new row for each analyzed NDA.

A typical row might include:

  • Timestamp
  • Document ID or name
  • Risk level
  • Extracted clause or clause excerpt
  • Suggested remediation
  • Optional reviewer notes

Over time, this gives you:

  • An audit trail for compliance and internal review
  • Data you can analyze to see which risks show up most often
  • A simple way for non-technical stakeholders to monitor the system

Designing an effective prompt for the Agent

The quality of your NDA risk detector depends heavily on the prompt you give the Agent. Here is an example prompt used in this workflow that you can adapt:

You are a legal-tech assistant. Given the NDA clause(s) below and any context, do the following:
1) Classify each clause as High / Medium / Low risk (HIGH = likely blocks signing without legal review).
2) Extract the exact clause text.
3) Provide a one-sentence explanation of the risk.
4) Suggest remediation language (concise).

Return JSON with fields: risk_level, clause_text, explanation, suggestion.

Context: {{retrieved_chunks}}
Clause to evaluate: {{clause_or_full_text}}

A few practical tips:

  • Keep the instructions deterministic. Spell out exactly what you want in numbered steps.
  • Ask for JSON output so n8n can parse and route the results programmatically.
  • Customize the risk definitions and suggestions to match your company’s policies and jurisdictions.

Over time, you can refine the wording based on real outputs and edge cases your legal team encounters.


Improving accuracy with scoring and thresholds

To make the detector robust, you can combine two things:

  • Semantic similarity scores from your Redis vector search
  • Risk classifications from the LLM

Here are some best practices:

  • Use a similarity threshold, for example a cosine similarity of 0.7, to decide which chunks you even send to the Agent.
  • Automatically flag high similarity hits as likely risky, and route medium or low similarity hits for human review.
  • Maintain a labeled dataset of clauses and their risk levels so you can:
    • Tune your thresholds over time
    • Iterate on prompt wording
    • Potentially train supervised models later

This hybrid approach lets you balance automation with control, instead of blindly trusting any single model output.


Privacy, security, and compliance considerations

NDAs often contain very sensitive business information, so it is important to treat this workflow like any other production system handling confidential data. Some practical steps:

  • Encrypt data at rest in Redis and in Google Sheets wherever your stack allows it.
  • Lock down access to API keys, Redis instances, and Sheets. Use short-lived credentials and environment variables in n8n.
  • Keep humans in the loop for high-risk or highly sensitive clauses. The model should assist, not replace, legal judgment.

Make sure your approach aligns with your organization’s security, privacy, and regulatory requirements.


Tuning the workflow for production use

Once the basic pipeline is running, you can start tuning it for your specific NDA patterns and traffic.

  • Experiment with embedding models Try different Hugging Face models. Higher quality embeddings generally improve recall and precision, although they may cost more in compute.
  • Adjust chunking parameters If your NDAs tend to have long or short clauses, tweak chunkSize and chunkOverlap to better match your documents.
  • Control LLM costs Cache frequent queries where possible and apply rate limits in n8n to keep OpenAI usage under control.
  • Scale your storage Google Sheets is perfect for early-stage logging and lightweight analytics. As volume grows, consider moving to a database or data warehouse for more advanced reporting.

What does the output actually look like?

Here is a simple example of how a row in your Google Sheet might look after the workflow finishes:

  • Timestamp: 2025-01-01 12:00 UTC
  • Document: Partner NDA v3
  • Risk level: High
  • Clause excerpt: “Confidential information includes all information, whether oral or written…”
  • Suggestion: Narrow the definition to exclude general knowledge and add a 3-year confidentiality period.

From here, a legal reviewer can quickly decide whether to accept, negotiate, or reject the clause, without having to re-read the entire NDA from scratch.


Ideas for next steps and enhancements

Once you are happy with the core detector, you can keep building on top of it. Some ideas:

  • Add a dashboard Create a front-end view where legal, sales, or operations teams can see and triage flagged NDAs in one place.
  • Integrate with contract tools Connect the workflow to your existing systems such as DocuSign, CLM tools, or CRM, so NDAs flow in and out automatically.
  • Train a supervised classifier Use your labeled clauses and Sheet data to train a more specialized model that can boost precision and reduce noise.

Wrapping up

This n8n + LangChain workflow gives you a practical, production-ready way to automate NDA review. By combining:

  • Semantic search via Hugging Face embeddings and Redis
  • LLM-based analysis with an OpenAI-powered Agent
  • Structured logging into Google Sheets

you get a fast triage layer that highlights risky clauses, suggests remediation language, and keeps a clean audit trail, all without slowing down deal velocity.

Want to put this into practice? You can use the template as a starting point and customize it for your legal standards, risk appetite, and tech stack.

If you would like help turning this into a detailed n8n setup guide, tailoring prompts to your jurisdiction, or sketching a deployment architecture, feel free to reach out or start your free trial of n8n and begin experimenting.

Call to action: What is your biggest NDA headache right now? Drop it in the comments, and I will suggest concrete prompt templates and threshold settings you can try in this workflow.

Build an NDA Risk Detector with n8n & Vector Search

How One Legal Team Stopped Drowning in NDAs With an n8n Risk Detector

The Night the NDAs Took Over

By 9:30 p.m., Maya was still at her desk.

As the lead counsel at a fast-growing SaaS company, she had a problem that never seemed to shrink: NDAs. Sales kept closing more deals, partnerships were spinning up every week, and every single agreement needed a legal eye. Her inbox was a wall of attached PDFs with subject lines like “Quick NDA review – should only take 5 minutes.”

It never took 5 minutes.

Maya knew the risks. Buried in those documents could be clauses about indefinite confidentiality, lopsided indemnity, or sneaky IP assignment that could haunt the company years later. But manual review was slow and tiring, and humans miss things when they are exhausted.

She did not want to become the bottleneck for the entire company, yet she also could not afford to miss a risky clause. She needed a way to surface risky NDA language automatically, prioritize what to review, and keep a clear record of decisions.

That was the night she discovered an n8n NDA Risk Detector template that used vector search, embeddings, and an LLM agent. It promised exactly what she needed: automated clause detection, similarity search, and a Google Sheets log, all wrapped in a workflow she could control.

From Chaos to a Plan: What Maya Wanted to Fix

Before she even opened n8n, Maya wrote down what was breaking her process:

  • She spent too much time scanning for red flags like assignment, broad indemnity, unilateral termination, and indefinite confidentiality.
  • Important NDAs often got stuck in her inbox, with no easy way to prioritize which ones looked riskiest.
  • There was no consistent, auditable trail of why she flagged or approved a contract.

What she needed sounded simple, but technically demanding:

  • A way to accept NDAs automatically from existing tools.
  • A system to analyze clauses using embeddings and similarity search instead of brute-force reading.
  • An LLM-based agent that could turn all this into a clear risk score and explanation.
  • A Google Sheets log that would give her an audit trail for every NDA reviewed.

That is where the n8n template came in. It already combined n8n, LangChain-style components, Redis vector storage, and an LLM agent into a single workflow. All she had to do was adapt it to her stack.

The Architecture Behind Her New NDA Copilot

Maya opened the template and saw an architecture that felt like a blueprint for her new process. Instead of starting from scratch, she could trace the story of each document through a series of nodes:

  • Webhook to receive NDA text or file links from her existing systems.
  • Text Splitter to break long contracts into manageable chunks.
  • Embeddings to convert each chunk into a numerical vector.
  • Redis Vector Store to store and search those vectors.
  • Query + Tool to pull back relevant clauses for analysis.
  • Memory, Chat, and Agent to evaluate risk and generate structured output.
  • Google Sheets logging to record risk scores, explanations, and references.

This was not just a workflow, it was a narrative for each NDA:

  1. The NDA arrives.
  2. It is broken into chunks and embedded.
  3. Vectors are stored in Redis for fast similarity search.
  4. An agent reviews risky patterns, scores them, and writes a report.
  5. The result lands in a central log, ready for human review.

Now she just needed to walk through each part and make it her own.

Act I: The Webhook That Replaced Her Inbox

First, Maya set up the entry point. Instead of NDAs living in email threads, they would now flow into n8n through a Webhook node.

She configured a POST webhook that accepted NDA text or links to files. Her sales team could send data in a simple JSON format like:

{  "document_id": "12345",  "text": "Full NDA text...",  "source": "email"
}

To avoid turning this into a security hole, she added a few safeguards:

  • Required an API key header on all incoming requests.
  • Validated the origin so only trusted systems could send NDAs.

Now, instead of Maya manually forwarding attachments, NDAs streamed directly into the workflow. That alone felt like a small victory.

Act II: Splitting Contracts Into Searchable Pieces

Once an NDA reached n8n, the next challenge was its size. Some contracts were only a page or two, others ran to dozens of pages. Feeding the whole thing to an embedding model at once would not work.

The template solved this with a Text Splitter node, and Maya decided to keep its defaults:

  • chunkSize: 400 characters
  • chunkOverlap: 40 characters

Those numbers struck a balance. Each chunk was small enough for the embedding model to handle efficiently, yet overlap preserved context so clauses that spanned boundaries still made sense.

She knew she could later tune these values for longer or shorter documents, but for now, 400 and 40 gave her a reliable starting point.

Act III: Teaching the System What Her Clauses Look Like

Next came the part that made the workflow feel intelligent: embeddings.

For each chunk of text, the Embeddings node converted language into numerical vectors. These vectors captured the semantic meaning of clauses, which meant the system could later find “similar” risky language even if the wording changed.

In the template, embeddings were powered by a Hugging Face model, using a configured credential like HF_API. That suited Maya well, but she appreciated that she could:

  • Swap in OpenAI embeddings if her team preferred that provider.
  • Use an on-prem embedding model for stricter privacy requirements.

Regardless of the provider, the idea stayed the same. Every chunk became a vector representation, ready to be stored and searched.

Act IV: Redis Becomes Her Memory for Risky Clauses

Once the NDA snippets were embedded, the workflow needed a place to remember them. That is where the Redis Vector Store came in.

The template used a Redis index called nda_risk_detector. For each chunk, the workflow stored:

  • Its vector embedding.
  • Metadata like document_id and chunk_index.

The insert mode was set to “insert”, which made it straightforward to add new documents as they came in. Later, when Maya or a teammate wanted to analyze a specific NDA or clause, the workflow could query this same index and instantly retrieve the most similar chunks.

Redis was no longer just a cache; it became the searchable memory of everything the company had seen in NDAs.

Turning Point: Letting an Agent Score the Risk

The real turning point for Maya was when she saw how the template combined vector search with an LLM-powered agent.

When it was time to review a clause or run a heuristic check on a document, the workflow used a Query node to perform a vector search against the nda_risk_detector index. The closest matches were then passed into a VectorStore Tool node.

This tool was one of the agent’s “eyes.” It allowed the LLM agent to pull in the most relevant context snippets from Redis for whatever question it was trying to answer, such as:

  • “Does this NDA contain an indefinite confidentiality clause?”
  • “Is there a broad indemnity provision that might be risky?”
  • “How does this termination clause compare to our usual standard?”

Behind the scenes, the agent orchestration did three important things:

  • Memory (buffer window) kept track of recent interactions and follow-up questions.
  • Chat (OpenAI or another LLM) evaluated the retrieved snippets for known risk patterns.
  • Agent logic controlled how prompts were structured and how signals were combined into a final answer.

To keep the system reliable, Maya used a structured prompt schema. It told the model exactly what to return and how to format its response.

The Prompt That Made It All Click

The template suggested a prompt like this, which Maya adapted slightly for her policies:

Analyze the following NDA snippets for risky clauses (assignment, broad indemnity, indefinite confidentiality, unilateral termination, IP assignment). Return:
- risk_score: low|medium|high
- reasons: short bullet points
- references: top 3 snippet IDs

Snippets:
1) "..."
2) "..."

This prompt gave her:

  • A risk_score she could sort and filter on (low, medium, high).
  • Short, human-readable reasons for the score.
  • References to the exact snippet IDs in Redis, which helped her trace back to the original contract text.

By keeping the schema clear and deterministic, she reduced randomness in the model’s answers and made it much easier to evaluate and tune the system.

Resolution: A Google Sheet That Told the Whole Story

Once the agent finished its analysis, Maya did not want the result to vanish into logs. She needed a place where legal, product, and leadership could see the big picture.

The final part of the template used a Google Sheets node to append each result as a new row. For every NDA, the sheet stored fields like:

  • timestamp
  • document_id
  • risk_score
  • explanation (reasons)
  • references (snippet IDs)

Over time, this became her auditable trail of NDA reviews. When an executive asked why a contract had been flagged, Maya could point to a specific row with clear reasons and references back to the underlying text.

For the highest risk cases, she layered in optional notifications. Using n8n, she configured alerts so that “high” risk NDAs triggered Slack or email notifications, ensuring nothing urgent slipped through.

Keeping It Safe: Security, Privacy, and Compliance

Because NDAs often include sensitive information, Maya treated security as a first-class requirement. The template’s guidance matched her instincts, and she followed it closely:

  • Encrypt data at rest in Redis and Google Sheets whenever possible.
  • Minimize PII sent to external APIs, redacting or anonymizing names and identifiers when policy required it.
  • Use private or on-prem embedding models where the strictest privacy guarantees were needed.
  • Lock down the webhook with API keys and IP allowlists so only trusted systems could submit documents.

The result was an automated NDA risk detector that did not compromise on privacy or compliance.

How She Tuned It: Testing and Continuous Improvement

Once the basic workflow was live, Maya treated it like any other legal tool: it needed testing, tuning, and a feedback loop.

She started with a labeled dataset of past NDAs and sample clauses that her team had already reviewed. Then she:

  • Measured precision and recall for risky clause detection.
  • Set up a human review loop for all high-risk results to confirm accuracy.
  • Monitored false positives and adjusted prompts or similarity thresholds accordingly.

As she iterated, the system became more aligned with her company’s specific risk tolerance and legal standards.

Where She Took It Next: Extensions and Ideas

Once the core NDA Risk Detector was running smoothly, Maya started to imagine what else she could automate using the same foundation.

  • Automated PDF ingestion: She added an OCR step for scanned contracts so even image-based NDAs could be analyzed.
  • Clause classification: By training a classifier on embeddings, she began automatically labeling clause types, like termination, confidentiality, and IP assignment.
  • Domain-specific tuning: She experimented with fine-tuning embeddings or prompts on legal corpora to get even more accurate risk detection.
  • Web UI for non-technical users: Her team planned a simple interface where business stakeholders could upload NDAs and see flagged clauses without ever touching n8n.

Operational Lessons From the First Month

Running the workflow in production taught Maya a few operational best practices:

  • Retention policy: She set rules to delete vectors for expired or no-longer-relevant documents.
  • Index management: After model updates, she scheduled periodic re-indexing to keep vector quality consistent.
  • Rate limits: To avoid API throttling on embedding providers, she batched embedding calls for bulk NDA imports.

These adjustments kept the system fast, cost-effective, and reliable as volume grew.

What Changed for Maya and Her Team

A month after switching to the n8n NDA Risk Detector, Maya realized something subtle but important: she was no longer drowning in NDAs.

Instead of reading every line of every agreement, she:

  • Let the workflow surface the riskiest clauses first.
  • Relied on similarity search to compare new language to known risky patterns.
  • Used the Google Sheets log to report on trends and justify decisions.

The core message of her new process was simple: automation handled the heavy lifting, while humans made the final calls.

The NDA Risk Detector template had given her a practical, scalable approach to spotting risky NDA language using n8n, embeddings, Redis, and an LLM-based agent. Manual review time dropped, and the quality and consistency of her risk assessments improved.

Your Turn: Put an NDA Risk Detector to Work

If you are a legal lead, founder, or operations manager facing the same NDA overload that Maya did, you do not have to start from scratch.

You can:

  1. Import the NDA Risk Detector template into n8n.
  2. Connect your Hugging Face or OpenAI credentials for embeddings and LLM analysis.
  3. Configure your Redis vector store with an index like nda_risk_detector.
  4. Set up the webhook to receive NDA text or file links from your document ingestion source.
  5. Run a batch of sample NDAs and share the results with your legal team for validation.

If you need a tailored, privacy-first deployment or want help adapting the template to your specific contract types, you can bring in consulting or integration support to accelerate the rollout.

Call to action: Import the template, run a few real NDAs through it, and compare the results to your current manual process. Use the Google Sheets log to discuss findings with your legal team and decide how to tune the workflow. If you want a hands-on workshop or deployment support, reach out and turn your NDA backlog into a manageable, data-driven process