Automate Jira Tickets with n8n: Jira Ticket Handler
Turn raw meeting transcripts, PRD notes, or product manager requests into clear, prioritized Jira tickets with almost no manual work. The Jira Ticket Handler APIs n8n template combines webhooks, an AI agent (LangChain + OpenAI), and the Jira Software node so you can generate, refine, and export multiple Jira-ready tickets from a single input.
What you will learn
This guide walks you through how the template works inside n8n and how to use it in your own workflows. By the end, you will know how to:
Send transcripts, prompts, or epic descriptions to n8n using webhook endpoints
Use an AI agent to turn unstructured text into structured Jira ticket ideas
Automatically apply priorities and story point estimates using consistent rules
Create Jira issues directly from n8n or keep them in a “review first” mode
Customize prompts, security, and mappings to fit your Jira setup
Why use this n8n Jira ticket template?
Many teams waste time manually turning discussions into Jira stories or tasks. This template helps you:
Save hours each week by automating ticket creation from transcripts, PRDs, or PM notes.
Standardize ticket quality with consistent description structure, acceptance criteria, and requirements.
Enforce estimation rules using a Fibonacci-based story point system (1, 2, 3, 5, 8, max 8).
Scale easily by creating multiple tickets from a single long input.
The result is a cleaner backlog, more predictable estimates, and less time spent copy-pasting from meeting notes into Jira.
Key concepts and components
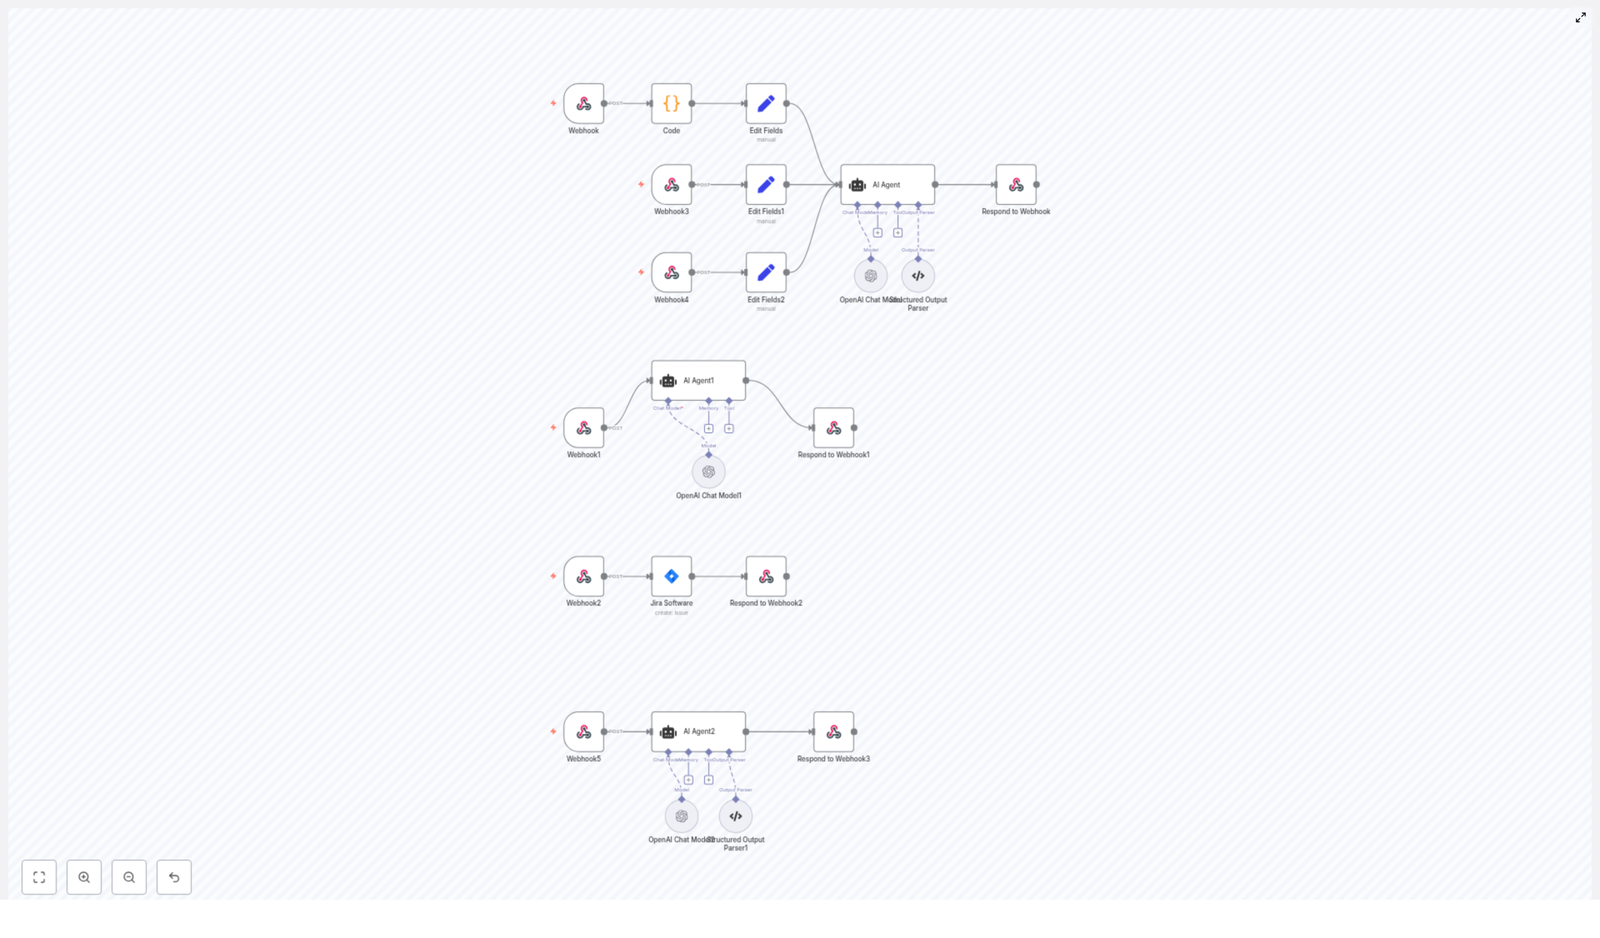
The template is built as a set of webhook-driven workflows in n8n. Each webhook represents a specific use case, such as generating ticket ideas from a transcript or enhancing an existing ticket.
Core building blocks in n8n
Webhook nodes These act as entry points. They receive HTTP POST requests that contain:
Meeting transcripts
Product or epic descriptions
PM change requests or prompts
Code node Optionally downloads and normalizes transcript files when you pass a URL instead of raw text. This is useful if your transcripts are stored externally.
Set nodes Map incoming request fields into a clean context object for the AI agent. Typical fields include:
content (main transcript or text)
prdContent (product context or PRD)
prdContentFile (additional file text)
jiraData (Jira metadata like issue types and priorities)
AI Agent (LangChain) Uses a carefully designed prompt to:
Read the transcript or text
Identify actionable items
Generate multiple Jira ticket definitions that follow a strict schema
OpenAI Chat model The underlying language model used by the LangChain agent. It generates the ticket content based on the prompt and context.
Structured output parser Validates that the AI returns well-formed JSON that matches the expected Jira payload structure. This reduces malformed or incomplete responses.
Jira Software node Uses your Jira Cloud credentials and the parsed AI output to:
Create issues in the correct project
Map issue types, priorities, and reporter IDs
Respond to Webhook Sends a structured response back to the caller. This can include:
The generated ticket ideas
Details of any Jira issues that were created
This makes it easy to plug into Slack, email, CI pipelines, or other tools.
How the Jira Ticket Handler workflow works
Let us walk through the full flow from an incoming transcript to created Jira tickets.
Step 1 – Send a transcript or request to a webhook
You start by making an HTTP POST request to one of the template’s webhook endpoints (listed later). Your request typically includes:
content – the main text, such as a meeting transcript or prompt
jiraData – Jira configuration, such as issue type and priority IDs
prdContent and prdContentFile – optional product context
jiraProjectId and jiraUserInfo – where and under whom to create tickets
If you send a URL instead of direct text, the Code node can download the file and extract the content before passing it on.
Step 2 – Preprocess and map fields for the AI agent
Next, Set nodes organize the incoming data into a clean structure that the AI can understand. They consolidate fields like:
content – main text to analyze
prdContent and prdContentFile – context that helps the AI understand the product or feature
jiraData – mappings between human-readable names and Jira internal IDs
This step is important because it ensures that the AI receives all relevant context in a predictable format.
Step 3 – AI parses the content and generates ticket ideas
The LangChain AI agent uses a prompt that instructs the model to:
Read the transcript or description
Identify distinct action items, bugs, or stories
Produce multiple ticket objects that each contain:
summary
issueType and issueTypeId
description with a specific structure:
Purpose
Requirements
Acceptance criteria
priority and priorityId
storypoints chosen from the Fibonacci sequence (1, 2, 3, 5, 8, max 8)
The output is a JSON array of tickets that are already formatted to match Jira’s expectations.
Step 4 – Validate and optionally create Jira issues
Before anything is sent to Jira, the Structured Output Parser checks that the AI output:
Is valid JSON
Contains all required fields
Matches the expected schema for Jira issue creation
If validation passes and the workflow is configured to create issues, the Jira Software node then:
Uses the provided jiraProjectId to target the correct project
Maps issueTypeId, priorityId, and jiraUserInfo.accountId to Jira fields
Creates each issue in Jira Cloud
You can also configure the workflow to only return ideas without creating issues, so that a human can review and approve them first.
Step 5 – Send a structured response
Finally, the Respond to Webhook node returns a JSON response to the caller. This response typically includes:
The parsed ticket ideas generated by the AI
Any Jira API responses for issues that were created
This design makes it easy to integrate with other tools. For example, you can trigger this workflow from Slack, a CI pipeline, or a custom internal tool, then present the results back to users.
Available webhook endpoints and what they do
The template includes several webhook endpoints, each tailored to a different scenario.
/webhook/jiraTicketIdeadsCreator Use this to create multiple ticket ideas from a transcript. It can download content using the Code node if you supply a file URL.
/webhook/jiraTicketIdeadsCreatorByPrompt Use this when you already have prompt text or free-form content and want ticket ideas without dealing with files.
/webhook/jiraTicketIdeadsCreatorByEpicDescription Provide an epic description and let the workflow generate related child stories.
/webhook/jiraEnhancer Send a PM change request or additional notes to enhance an existing Jira ticket description, keeping the structure consistent.
/webhook/getFigmaMakePrompt Take a Jira story description and generate a Figma Make prompt that designers can use to produce UI mockups.
/webhook/jiraTicketCreator Use this when you already have a validated ticket payload and simply want to create a Jira issue directly.
Example webhook payload
Here is a minimal JSON payload you can send via POST to generate ticket ideas from a transcript:
The AI agent returns an array of ticket objects that follow the structured schema. You can then:
Feed them directly into the Jira Software node for automatic creation
Store them for review and manual approval
How tickets are structured and prompted
The power of this template comes from a clear, consistent prompt. Every generated ticket description follows the same structure.
Ticket description format
Each ticket description must include:
Purpose A short paragraph that explains why this ticket exists and what problem it solves.
Requirements A numbered list of concrete tasks, behaviors, or constraints that must be implemented.
Acceptance criteria A numbered list of conditions that can be used to verify that the ticket is complete and correct.
This structure makes tickets easier to understand for developers, testers, and product managers, and it improves alignment across the team.
Story point rules
Story points are chosen from the Fibonacci sequence:
1, 2, 3, 5, 8
The maximum allowed value is 8. This keeps estimates:
Bounded and predictable
Aligned with common agile estimation practices
If you want to change this behavior, you can modify the AI prompt inside the LangChain agent.
Setup and prerequisites
Before you use the Jira Ticket Handler template, make sure the following are in place:
n8n instance You need n8n running, either self-hosted or on n8n Cloud, with access to LangChain and OpenAI nodes.
OpenAI credentials Configure your OpenAI API key in n8n credentials so the LangChain agent can call the model.
Jira Cloud credentials Set up Jira Software node credentials, including:
Jira site URL
API token
Associated user email or account
Jira configuration data Know the IDs for:
Jira projects (jiraProjectId)
Issue types (for example, Story, Bug)
Priorities (High, Medium, Low, etc.)
These are passed into the workflow via the jiraData object so the AI output can be mapped correctly.
Security and best practices
Because this template handles potentially sensitive text and connects to external APIs, keep the following in mind:
Protect webhook endpoints Use secret tokens in headers, IP allowlists, or an API gateway to restrict access.
Handle sensitive data carefully Avoid sending personally identifiable information (PII) when possible. Consider redacting sensitive content before sending it to OpenAI.
Respect rate limits Both OpenAI and Jira enforce API quotas. Batch large inputs where possible and avoid unnecessary retries.
Log minimally Store only the logs you actually need. Rotate logs regularly and align storage with your compliance requirements.
Troubleshooting common issues
If something does not work as expected, here are common problems and how to address them.
Empty or poor AI output
Check that content is non-empty and contains meaningful text.
Include prdContent or prdContentFile for additional context when needed.
Verify that the prompt in the LangChain agent has not been accidentally modified or stripped of key instructions.
Invalid issueTypeId or priorityId
Confirm that the IDs in jiraData match your Jira instance.
Check that the project you are targeting supports those issue types and priorities.
Model hallucination or malformed JSON
Ensure the prompt clearly states the required JSON schema and constraints.
Use the structured output parser to reject malformed responses and handle errors gracefully.
Example use cases
This template is flexible enough to support different workflows around Jira and automation.
Post-demo follow-ups After a customer demo, send the transcript to the webhook and automatically generate follow-up tasks and bugs.
Sprint planning from PRDs Feed a product manager’s PRD and related notes into the workflow to generate user stories with story points and acceptance criteria.
Design handoff acceleration Use the Figma prompt webhook to convert Jira stories into Figma Make prompts that help designers quickly produce UI mockups.
FAQ
Can I customize the story point limits?
Yes. Open the LangChain agent node in n8n and edit the prompt where the story point rules are defined. You can change the allowed values or the maximum limit to match your team’s estimation approach.
Imagine handing off a website redesign to an AI that actually does the heavy lifting for you – from analyzing the existing site, to drafting a solid PRD, to pushing everything into Lovable.dev for implementation. That is exactly what this n8n template, The Recap AI – Web Developer Agent, is built to do.
If you run website projects, manage client redesigns, or build sites programmatically, this workflow lets you combine AI planning with browser automation so you can ship faster, with less copy-paste work and fewer errors.
What this n8n template actually does
At a high level, this template turns a messy, manual process into a clean, repeatable pipeline:
It scrapes and analyzes an existing website so you have real, grounded content to work from.
It creates a structured Product Requirements Document (PRD) based on that scraped data.
It opens Lovable.dev in a browser session and uses that PRD to create or edit a website.
All of this is coordinated by an AI Web Developer agent that uses memory, planning, and browser tools to move from one step to the next without you constantly stepping in. It also follows a strict anti-hallucination protocol so the AI does not just invent content that was never on the site.
When to use this AI Web Developer workflow
You will get the most value from this n8n template if you:
Do end-to-end website redesigns and need to analyze an existing site before rebuilding it.
Want rapid prototyping, where you turn current content into a PRD and push it into a builder quickly.
Run an agency or internal web team and need a consistent, auditable process from discovery to deployment.
Instead of manually copying text from pages, pasting into docs, rewriting specs, and then rebuilding by hand in Lovable.dev, this automation keeps everything in sync and traceable.
How the architecture is set up in n8n
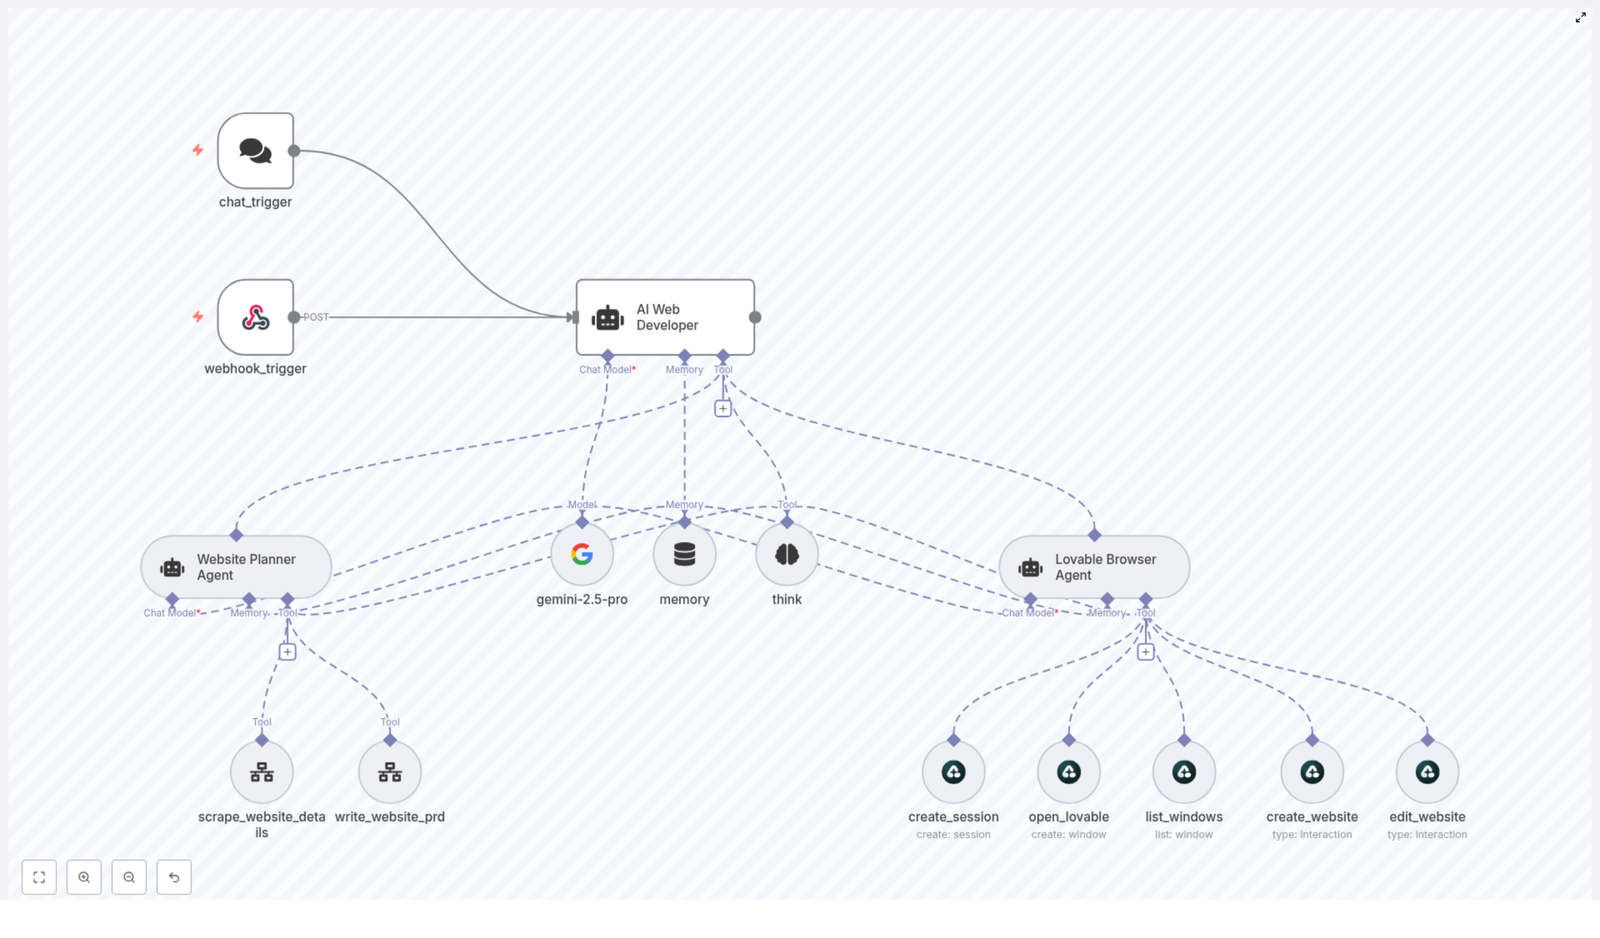
Under the hood, this is an agent orchestration flow in n8n. Think of it as a small team of AI agents and tools, each with a specific job, all managed by one lead developer agent.
Main components
AI Web Developer (orchestrator) – The “project manager” that routes requests, calls tools, and decides what happens next.
Website Planner Agent – Handles scrape_website_details to pull content and structure. – Generates a structured scraped summary. – Uses write_website_prd to create a detailed PRD.
Lovable Browser Agent – Uses Airtop browser tools to work with Lovable.dev:
create_session to open a browser session and store Session_ID
open_lovable to open Lovable.dev and capture Window_ID
list_windows to inspect the current window state
create_website to paste the full PRD into the builder
edit_website to apply specific user-requested edits
Support tools – A memory buffer that stores state like Session_ID, Window_ID, scraped summaries, and PRDs. – A planning think tool that the orchestrator uses before taking action. – An LLM node (configured with gemini-2.5-pro in the template) to power the agents.
These pieces work together so that once a user sends a URL, the agents can scrape, plan, and implement with minimal back-and-forth.
How a typical run works (step-by-step example)
Let’s walk through a common scenario: you want to redesign an existing website and launch the new version with Lovable.dev.
You send the URL You either hit the webhook_trigger from an external system (like a form or GitHub action) or start via chat_trigger inside your chat interface. Both nodes are there to receive incoming user requests.
The AI Web Developer analyzes what to do The orchestrator calls the think tool first. It checks:
What the user wants (redesign, edit, new build, etc.)
What is already in memory (existing scrape, existing PRD, active browser session)
Which sub-agent should run next (Website Planner Agent or Lovable Browser Agent)
The Website Planner Agent scrapes the site It runs scrape_website_details on the URL and pulls:
Site content and copy
Navigation structure
Design details like layout hints, sections, and key components
Technical notes where available
From this, it creates a mandatory SCRAPED WEBSITE ANALYSIS summary that includes company info, navigation, design elements, and other relevant notes.
The agent writes a PRD from the scrape Using write_website_prd, the Website Planner Agent turns that summary into a structured Product Requirements Document. Key details:
The scraped summary must be created first.
The agent must include that summary verbatim in the PRD input.
The PRD contains direct quotes and exact snippets from the scraped content.
This is the anti-hallucination safeguard at work, so the PRD stays anchored to real data.
You review and approve the PRD Once you are happy with the PRD, the orchestrator knows it can move on to implementation.
The Lovable Browser Agent builds or edits the site The AI Web Developer hands off to the Lovable Browser Agent, which:
Looks in memory for an existing Session_ID and Window_ID.
If none exist, runs create_session and open_lovable to start a fresh session and project window.
Uses create_website to paste the PRD into the Lovable builder text area. It waits until the full PRD is entered before submitting.
After the initial implementation, the template keeps Session_ID and Window_ID in memory. That means you can send new edit instructions later, and the workflow uses edit_website to apply changes without spinning up a new browser session each time.
Diving deeper into each part of the workflow
Entry points: chat_trigger & webhook_trigger
There are two ways into this automation:
chat_trigger – Ideal for conversational flows where a user types something like “Redesign this site: https://example.com”.
webhook_trigger – Perfect for external systems like forms, GitHub workflows, or other automation tools that can POST a URL and requirements to n8n.
Once a request lands in either of these nodes, everything else is handled by the orchestrator and agents.
AI Web Developer: the orchestrator brain
This is the central agent that makes decisions. It always:
Calls the think tool first to plan its next steps.
Checks memory to see what data already exists (scrapes, PRDs, sessions).
Decides whether it is time to:
Scrape the website
Generate or update a PRD
Trigger the Lovable Browser Agent for implementation
This planning step is important. It keeps the flow from skipping prerequisites or trying to build a site before a PRD is ready.
Website Planner Agent: scraping and PRD creation
This agent is responsible for all the “thinking” about the website itself.
Scraping with scrape_website_details It extracts:
Full site content where possible
Menu and navigation structure
Design and layout notes
Technical or structural hints
Creating the scraped summary It must generate a clearly labeled SCRAPED WEBSITE ANALYSIS that captures all key observations.
Writing the PRD with write_website_prd The PRD:
Is based directly on the scraped summary.
Includes exact quotes and references from the original content.
Serves as the blueprint for the Lovable.dev build.
Anti-hallucination rule: the agent must not write a PRD until the scraped summary exists, and that summary must be passed into the PRD creation step as-is. This is how the template keeps the AI grounded in real website data.
Lovable Browser Agent: from PRD to live build
This is where Airtop’s browser automation tools come in. The Lovable Browser Agent interacts with Lovable.dev like a very disciplined human operator.
create_session – Starts a new browser session and saves the Session_ID in memory.
open_lovable – Opens Lovable.dev, launches or focuses the project window, and stores Window_ID.
list_windows – Checks which windows are active and what state they are in.
create_website – Pastes the entire PRD into the Lovable builder’s main text area. – The agent should not submit until the full PRD is in place.
edit_website – Applies very specific changes based on user feedback, using the user’s instructions verbatim.
By storing Session_ID and Window_ID in memory, the agent can come back later and continue editing the same project, which is ideal for iterative feedback cycles.
How to structure PRDs so Lovable.dev loves them
The better your PRD, the smoother the Lovable.dev build. When you or the agent create PRDs, aim for:
Page-by-page content with headings, sections, and clear copy for each page.
Primary CTAs for each key page (buttons, forms, etc.).
Imagery guidance such as types of photos, illustrations, or icons.
Design direction like color palette hints and typography preferences.
SEO meta copy including titles and descriptions for important pages.
The template is already designed to push a full PRD into Lovable.dev via the create_website tool, so having this structure in place really helps.
Best practices to keep your automation reliable
1. Always scrape first
Make sure the Website Planner Agent:
Runs scrape_website_details before any PRD work.
Stores the scraped summary in memory.
Uses that summary as required input for write_website_prd.
This is your main defense against hallucinated content.
2. Keep PRDs and scraped summaries separate
Store both artifacts independently in memory. That way you can:
Compare what was scraped vs what the PRD says.
Audit how decisions were made.
Show clients a clear trace from “this is what we found” to “this is what we’ll build.”
3. Use the think tool for multi-step planning
Let the AI Web Developer use the think tool to:
Check if prerequisites are met (scrape done, PRD ready, session active).
Plan multi-step operations like scrape → PRD → implementation.
Avoid skipping straight to Lovable.dev before the groundwork is in place.
4. Manage browser sessions carefully
For smoother runs:
Prefer session reuse instead of creating a new session every time.
Always check memory for Session_ID and Window_ID before calling create_session.
Use list_windows to confirm that the window is still active and valid.
5. Handle missing data explicitly
If the scrape cannot find something important, like business hours or pricing, the agent should:
Note that the data is missing.
Ask the user for clarification instead of guessing.
Whenever you reference existing content, include direct quotes from the scraped pages.
Troubleshooting common issues
Scraped content is missing or incomplete
If scrape_website_details does not capture enough of the site:
Re-run the scrape with updated headers or with JS-enabled rendering if needed.
Document which pages or sections came back incomplete.
Ask the user to confirm or provide missing details before finalizing the PRD.
Browser session or window problems
Sometimes the Airtop session expires or the Lovable window disappears. When that happens:
Create a new session using create_session.
Open Lovable.dev again with open_lovable and store the new Session_ID and Window_ID.
Let the user know what happened and then retry the create_website or edit_website operation.
PRD does not match what the user expected
If the user is not happy with the PRD:
Ask for specific corrections and updated requirements.
Revise the PRD accordingly.
Use the fact that both the PRD and the scraped summary are stored to show a side-by-side comparison and verify changes.
Why this template makes your life easier
Instead of juggling tabs, copying content into docs, and manually rebuilding pages in Lovable.dev, this n8n template gives you a repeatable pipeline:
scrape → summarize → write PRD → implement in Lovable.dev
It is especially useful if you:
Need consistent, documented workflows across multiple projects.
Want to reduce errors and hallucinations in AI-generated specs.
Care about traceability from original site to final build.
Keeping Asana and Notion aligned is a common requirement in mature automation environments. This guide explains how to implement a robust, production-ready Asana to Notion synchronization using n8n so that updates to Asana tasks automatically create or update corresponding pages in a Notion database.
Use case and architecture overview
Asana is typically the operational system of record for task management, while many teams rely on Notion as a central knowledge base and lightweight reporting layer. Synchronizing selected Asana task data into Notion allows stakeholders who work primarily in Notion to access key task metadata, such as Asana GID and deadlines, without context switching.
n8n provides the orchestration layer for this integration. It listens to Asana webhooks, processes and deduplicates events, enriches them with full task data, and then maps them into a Notion database. The workflow is designed to be idempotent, API-efficient and easy to extend.
What the n8n workflow automates
The workflow implements the following end-to-end logic:
Subscribe to Asana task updates via an Asana Trigger node (webhook based).
Extract and deduplicate task GIDs from the webhook payload.
Fetch full task details from Asana for each unique GID.
Query a Notion database for existing pages that reference the same Asana GID.
Determine whether to create a new Notion page or update an existing one.
On create, populate required properties, including the Asana GID and optional deadline.
On update, push changes such as updated due dates into Notion while respecting data completeness checks.
Prerequisites and required components
Before implementing the workflow, ensure the following components are in place:
An n8n instance, either self-hosted or n8n cloud.
An Asana account with API credentials configured in n8n.
A Notion integration with API token and access to the relevant database.
A Notion database configured with at least:
A numeric property named Asana GID.
A date property, for example Deadline, to store the Asana due date.
High-level workflow design in n8n
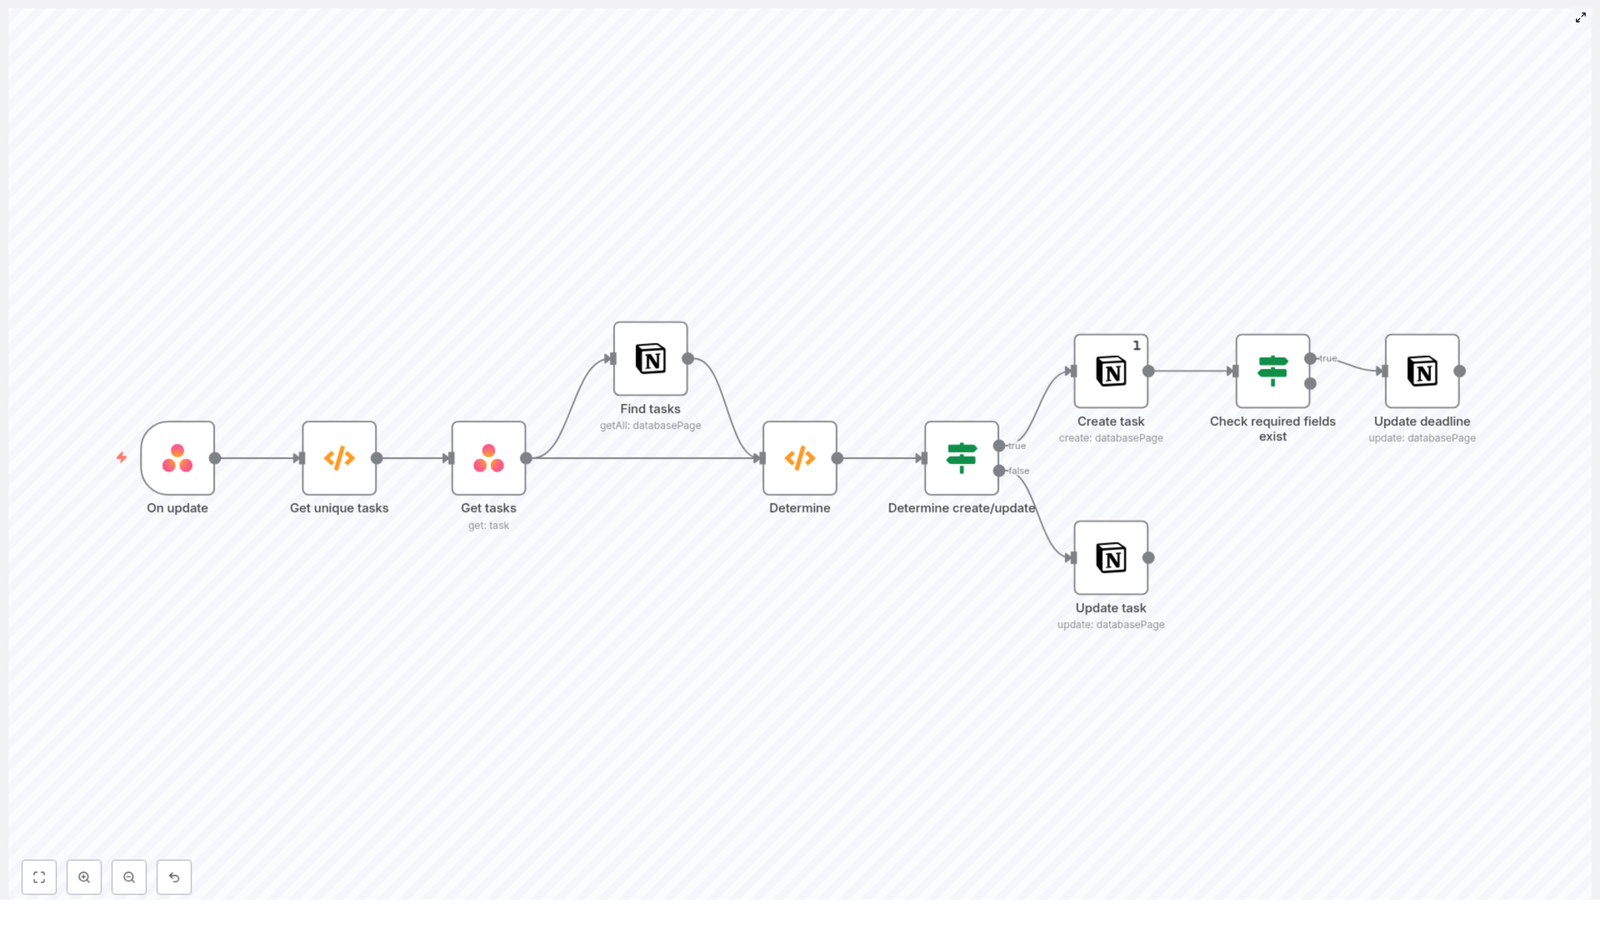
The workflow can be conceptually divided into four stages:
Event ingestion and normalization Capture Asana webhook events and extract unique task identifiers.
Data enrichment Retrieve complete task data from Asana for each unique task GID.
Lookup and decision logic Query Notion for existing records and decide between create or update.
Write operations and validation Create or update Notion pages and apply field-level checks such as presence of due dates.
Node-by-node implementation details
1. Asana Trigger node – Task update events
The workflow starts with an Asana Trigger node configured to listen for task updates. This node creates a webhook subscription in Asana for the specified workspace and resource scope.
Key considerations:
Configure the resource type to receive task-related events.
Specify the correct workspace or project context.
Be aware that a single webhook payload can contain multiple events, possibly for the same task or for non-task resources.
The downstream logic must therefore handle deduplication and resource-type filtering.
2. Function node – Extract and deduplicate task GIDs
The next step is a Function node that parses the webhook payload and produces a clean list of unique task GIDs. It also constructs a reusable Notion filter for each GID.
Typical responsibilities of this node:
Filter events to only include items where resource_type === "task".
Convert Asana GIDs to numeric values for consistent comparison with Notion’s number field.
Remove duplicate GIDs within the same webhook batch.
Build a Notion filter JSON that targets the Asana GID numeric property.
// simplified logic from the Function node
const gids = [];
for (item of items) {  const gid = parseInt(item.json.resource.gid);  const resource_type = item.json.resource.resource_type;  if (!gids.includes(gid) && resource_type === 'task') gids.push(gid);
}
return gids.map(gid => ({  json: {  gid,  notionfilter: JSON.stringify({  or: [  {  property: 'Asana GID',  number: { equals: gid },  },  ],  }),  },
}));
The output of this node is a list of items, each containing a single GID and a Notion filter string used later in the Notion query node.
3. Asana node – Retrieve full task details
For each unique GID, an Asana node is used to fetch the complete task object. This step enriches the event data with fields that are not included in the webhook payload.
Commonly used Asana fields:
name – mapped to the Notion page title.
due_on – mapped to the Notion Deadline date property.
gid – stored in the Asana GID numeric property.
Any additional custom fields required for reporting or downstream processes.
4. Notion node – Search for existing task pages
Next, a Notion node queries the target Notion database using the filter JSON prepared earlier. The goal is to identify whether a page for the given Asana task already exists.
Configuration points:
Set the database ID to the correct Notion database.
Use the JSON filter input referencing the Asana GID numeric property.
The node will typically return either:
No results, which indicates that a new Notion page should be created.
A single page, which indicates that an update operation is required.
5. Function node – Decide between create and update
A second Function node centralizes the decision logic. It compares Asana GIDs from the enriched task data with the pages returned by the Notion query and annotates each item with an action property.
// determine.js (conceptual)
const existingGids = $items('Find tasks').map(i => parseInt(i.json.property_asana_gid));

for (const item of $items('Get tasks')) {  const gid = parseInt(item.json.gid);  if (existingGids.includes(gid)) {  item.json.action = 'Update';  // attach Notion page ID for the update operation  } else {  item.json.action = 'Create';  }
}
return $items('Get tasks');
By the end of this step, each item clearly indicates whether it should follow the create path or the update path, and update candidates carry the associated Notion page ID.
6. If node – Route to create or update branches
An If node evaluates the action property and routes items into two separate branches:
Create branch for items with action = "Create".
Update branch for items with action = "Update".
This separation keeps the workflow maintainable and makes it easier to apply different validation rules or mappings for each scenario.
7A. Create branch – Notion “Create page” node
In the create branch, a Notion node is configured to create a new page in the database. At minimum, the following mappings are recommended:
Notion title property ← Asana name.
Asana GID (number) ← Asana gid (converted to number).
Deadline (date) ← Asana due_on if available.
Additional fields, such as project references, assignee names or custom fields, can be added as needed. This is the ideal place to define your canonical mapping between Asana and Notion.
7B. Update branch – Notion “Update page” node
In the update branch, another Notion node updates the existing page identified in the decision step. Typical updates include:
Synchronizing the Deadline property with Asana’s due_on.
Refreshing the title or other metadata if they have changed.
8. If node – Validate required fields before updating
Asana tasks do not always have a due date. To avoid overwriting valid Notion data with null values, an additional If node can be placed before the update operation to check whether due_on is present.
Only when the Asana task has a valid due date should the Notion Deadline property be updated. This pattern helps maintain data integrity across systems.
Implementation best practices
API efficiency and rate limits
Both Asana and Notion enforce API rate limits. Deduplicating GIDs in the Function node before calling the Asana and Notion APIs significantly reduces unnecessary traffic.
Design the workflow so each Asana task is processed only once per webhook payload.
Idempotency and duplicate prevention
Store the Asana GID in a dedicated numeric property (Asana GID) in Notion.
Always query by this numeric field when checking for existing pages. This avoids accidental duplicates and simplifies troubleshooting.
Error handling and resilience
Use n8n’s Continue On Fail option where partial failure is acceptable, for example when a single task update fails but others should continue.
Log errors or route them to a separate error-handling workflow for retries or notifications.
Field mapping and data consistency
Maintain a clear mapping strategy, for example:
Asana name → Notion title
Asana due_on → Notion Deadline
Asana gid → Notion Asana GID (number)
Document the mapping so future changes to either schema are easier to manage.
Timezone and formatting considerations
Asana often represents due dates as YYYY-MM-DD without time information.
Ensure the format is compatible with Notion date properties and adjust for timezones if your reporting depends on specific time boundaries.
Key code snippets for reuse
Two Function node patterns are particularly reusable across similar workflows.
Deduplicating Asana task GIDs
This snippet, shown earlier, filters webhook events to tasks and returns a unique list of numeric GIDs together with a Notion filter definition:
// simplified logic from the Function node
const gids = [];
for (item of items) {  const gid = parseInt(item.json.resource.gid);  const resource_type = item.json.resource.resource_type;  if (!gids.includes(gid) && resource_type === 'task') gids.push(gid);
}
return gids.map(gid => ({  json: {  gid,  notionfilter: JSON.stringify({  or: [  {  property: 'Asana GID',  number: { equals: gid },  },  ],  }),  },
}));
Determining create vs update actions
This conceptual example illustrates how to compare Asana tasks with existing Notion pages and label each item with the appropriate action:
// determine.js (conceptual)
const existingGids = $items('Find tasks').map(i => parseInt(i.json.property_asana_gid));
for (const item of $items('Get tasks')) {  const gid = parseInt(item.json.gid);  if (existingGids.includes(gid)) {  item.json.action = 'Update';  // attach notion page id where needed  } else {  item.json.action = 'Create';  }
}
return $items('Get tasks');
In a production workflow, extend this logic to include the Notion page ID and any additional metadata you need for updates.
Testing and validation strategy
Before deploying the workflow broadly, validate it in a controlled environment:
Update an Asana task (for example change its name or due date) in a test project.
Confirm that the Asana webhook delivers events to n8n and that the Asana Trigger node fires as expected.
Inspect the Get unique tasks Function node to ensure it extracts the correct GIDs and filters out non-task resources.
Verify that items are correctly routed into the Create or Update branches based on the decision logic.
Check the Notion database to ensure:
A page is created when no existing record is found.
An existing page is updated when a matching Asana GID is present.
The Asana GID is stored as a numeric value and deadlines are synchronized correctly.
Common pitfalls and how to avoid them
Incorrect Notion property names Property keys in the Notion node must match your database properties exactly, including case. Mismatches will result in missing or silently ignored updates.
Mixing numeric and string GIDs Store Asana GIDs as numbers in Notion and convert them consistently in n8n. This ensures the Notion number filter behaves reliably.
Processing non-task webhook events Asana webhooks can include events for other resource types. Always filter by resource_type === "task" before proceeding with task-specific logic.
Conclusion and next steps
By using n8n as the orchestration layer, you can implement a reliable Asana to Notion synchronization that avoids duplicates, respects rate limits and keeps critical task metadata aligned across tools. The core pattern is straightforward and extensible:
Deduplicate webhook events.
Fetch full task data from Asana.
Search for existing records in Notion by Asana GID.
Decide whether to create or update.
Apply changes with appropriate field checks.
This same approach can be expanded to include additional Asana fields such as assignees, custom fields or project information, or adapted to support more advanced scenarios like two-way synchronization.
If you would like support, I can:
Provide a downloadable n8n workflow JSON that follows the structure described above.
Help you map additional Asana fields (assignees, custom fields and more) into your Notion schema.
Walk you through authentication setup for Asana and Notion in your n8n instance.
Call to action: Implement this workflow in a test workspace first, validate the mappings and behavior, then iterate toward your production configuration. If you need a customized version with extended field mappings, attachment handling or two-way sync logic, reach out with your Notion database schema and requirements.
n8n HTTP Request Node: Technical Guide & Best Practices
The HTTP Request node in n8n is a core building block for any advanced automation workflow. It enables you to call arbitrary HTTP endpoints, integrate with REST APIs that do not yet have native n8n nodes, fetch HTML for scraping, and handle binary payloads such as files or images. This guide walks through a reference workflow template that demonstrates three key implementation patterns: splitting API responses into individual items, scraping HTML content with HTML Extract, and implementing pagination loops.
1. Workflow Overview
The example workflow template is designed as a compact reference for common HTTP Request node usage patterns in n8n. It covers:
Array response handling – Fetch JSON from an API, then convert the array in the response body into separate n8n items for downstream processing.
HTML scraping – Request a web page in binary format, then extract structured data from the HTML using the HTML Extract node.
Paginated API access – Iterate over multiple pages of results from an API (for example, GitHub starred repositories) by looping until no further results are returned.
All examples are built around the same core node: the HTTP Request node. The workflow demonstrates how to parameterize URLs, control query parameters, manage authentication, and work with full HTTP responses.
2. Architecture and Data Flow
At a high level, the workflow is composed of three logical sections that can be reused or adapted independently:
2.1 Array response to item list
An HTTP Request node queries an API endpoint that returns JSON, for example a list of albums from a mock API.
An Item Lists – Create Items from Body node converts the JSON array found in the response body into multiple n8n items.
Each resulting item is now processed individually by any downstream nodes.
2.2 HTML scraping pipeline
An HTTP Request node downloads a web page, such as a random Wikipedia article.
The response format is configured as file / binary so the HTML is stored as a binary property.
An HTML Extract node processes that binary HTML and extracts specific elements, for example the article title.
2.3 Pagination loop for APIs
A Set node initializes pagination and API-specific variables, such as page, perpage, and a githubUser identifier.
An HTTP Request node fetches a single page of results, in the example case a list of GitHub starred repositories.
An Item Lists – Fetch Body node converts the JSON array in the response body into multiple items.
An If node checks whether the current page returned any items. This node answers the question “Are we finished?”.
If there are items, a Set – Increment Page node increases the page value and the workflow loops back to the HTTP Request node.
If the page is empty, the If node stops the loop and the workflow exits the pagination sequence.
This architecture keeps the workflow modular. You can clone and adapt each section depending on the target API or website.
3. Node-by-Node Breakdown
3.1 Initial Set node – pagination and parameters
The first Set node defines variables that are reused across HTTP requests. Typical fields include:
page – Starting page number, usually 1.
perpage – Number of results per page, for example 15 or 50, depending on the API limits and performance needs.
githubUser – A username or other resource identifier, used to build the request URL.
These values are stored in the node output and accessed later via n8n expressions. This approach keeps the workflow configurable and reduces hard-coded values.
3.2 HTTP Request node – core configuration
The HTTP Request node is responsible for interacting with external services. Important configuration parameters are:
URL: Use expressions to build dynamic URLs. For example, for GitHub starred repositories: =https://api.github.com/users/{{$node["Set"].json["githubUser"]}}/starred
Query parameters: Map pagination parameters to the values from the Set node:
per_page set to {{$node["Set"].json["perpage"]}}
page set to {{$node["Set"].json["page"]}}
Response format:
JSON for typical REST APIs that return structured data.
file or binary when fetching HTML pages, images, or other binary resources.
Full response:
Disabled by default if you only need the parsed body.
Enabled when you need HTTP headers, status codes, or raw metadata (for example, rate limiting headers or pagination links).
Authentication (if used):
Configured via the node’s credentials section, such as OAuth2 or API key headers.
Alternatively, custom headers can be added manually, for example Authorization: Bearer <token>.
For HTML scraping, the same HTTP Request node is configured with a URL pointing to a web page, response format set to binary, and no JSON parsing.
3.3 Item Lists nodes – splitting response bodies
The workflow uses two Item Lists patterns:
Item Lists – Create Items from Body: Takes a JSON array from the HTTP response body and creates a separate n8n item for each element. This is typically used when fetching a list of objects, such as albums from a mock API.
Item Lists – Fetch Body: Extracts and normalizes items from the JSON body in the pagination example, ensuring that each element is available as a dedicated item for further processing.
As an alternative, you can use the SplitInBatches node to process large arrays in smaller chunks. In this template, the Item Lists node is used to keep the example focused and straightforward.
3.4 If node – termination condition for pagination
The If node evaluates whether the current page of results is empty. Typical logic includes:
Checking the length of the JSON array returned by the HTTP Request node.
Verifying that the Item Lists node produced at least one item.
If the condition indicates no items (empty response), the workflow follows the “finished” branch and exits the loop. If items exist, it follows the “continue” branch, which leads to the page increment step.
3.5 Set – Increment Page node
This Set node calculates the next page number for the pagination loop. It:
Reads the current page value from the previous Set node output or the current item.
Increments it by 1 and writes the new value back into page.
The workflow then routes back to the HTTP Request node, which uses the updated page value in its query parameters. This continues until the If node detects an empty page.
3.6 HTML Extract node – scraping HTML content
For the scraping example, the HTML Extract node is configured to read the HTML from the binary property of the HTTP Request node output. A common configuration is:
Input property: The binary property that contains the HTML document.
CSS selector: For a Wikipedia article title, use #firstHeading.
The node returns the extracted content as structured data, which can then be stored, analyzed, or passed to other nodes.
4. Detailed Configuration Notes
4.1 Pagination strategies in n8n workflows
The template implements page-based pagination, but the same HTTP Request node can support several patterns:
Page-based pagination:
Increment a page query parameter using a Set node.
Common for APIs that expose page and per_page parameters, as in the GitHub example.
Offset-based pagination:
Use an offset parameter that increases by perpage each iteration.
Replace the page variable with offset in the Set node and HTTP Request query parameters.
Cursor-based pagination:
Read a next_cursor or similar token from the response body or headers.
Store the cursor in a Set node and pass it as a query parameter for the next HTTP Request.
Termination is often based on the absence of a next cursor rather than an empty page.
In all cases, the If node logic should match the API’s actual behavior, for example checking for a missing next link instead of relying solely on empty arrays.
4.2 Authentication and credentials
When calling real APIs, secure authentication is essential:
API keys and bearer tokens:
Configure credentials in n8n and select them in the HTTP Request node.
Alternatively, use the Headers section to set Authorization: Bearer <token>.
OAuth-based APIs:
Use n8n’s OAuth credentials if supported for the target API.
The HTTP Request node will attach the tokens automatically once configured.
Avoid hard-coding secrets directly in node parameters. Use n8n credentials or environment variables to keep workflows secure and portable.
4.3 Rate limits and error handling
For production-grade automations, consider the following:
Rate limits:
When Full response is enabled, inspect headers such as GitHub’s X-RateLimit-Remaining.
Use Wait or similar nodes to throttle requests if you approach the limit.
Error handling:
Configure the HTTP Request node’s error behavior if available in your n8n version.
Implement an If node and retry pattern to handle transient failures, for example network timeouts or 5xx responses.
Decide whether to stop the workflow, skip failing items, or retry with backoff based on your use case.
4.4 Binary vs JSON responses
Select the response format according to the target endpoint:
JSON:
Default choice for REST APIs.
Response body is available directly as parsed JSON in the node output.
File / binary:
Use for HTML pages, images, PDFs, or other file content.
Required for the HTML Extract node to parse the HTML document.
Enable full responses only when you need access to headers or status codes. Keeping it disabled reduces memory usage and simplifies item structures.
5. Example: Extracting a Wikipedia Article Title
The template includes a simple scraping pattern you can adapt:
Configure an HTTP Request node to fetch a random Wikipedia page. Set the response format to binary so the HTML is stored as a file.
Add an HTML Extract node that reads the binary HTML output from the HTTP Request node.
Use the CSS selector #firstHeading to extract the article title element.
The result is a structured item containing the page title, which can be logged, stored in a database, or combined with other scraped data for content aggregation workflows.
6. Debugging and Inspection Techniques
To troubleshoot HTTP Request flows and pagination logic:
Open each node to inspect the input and output items after running the workflow.
Insert temporary Set nodes to log intermediate values such as page, perpage, or tokens from responses.
Enable the HTTP Request node’s fullResponse option temporarily to inspect headers when diagnosing authentication, rate limits, or pagination links.
Iterate with small perpage values while developing to reduce noise and speed up testing.
7. Security and Compliance Considerations
When using the HTTP Request node in production:
Do not hard-code API keys or secrets in node parameters. Use n8n credentials or environment variables.
Respect external API terms of service and usage policies.
When scraping HTML, limit request frequency and respect robots.txt and site terms to avoid overloading servers.
8. Practical Best Practices
Use n8n expressions extensively to keep URLs, query parameters, and headers dynamic.
Design pagination checks that match the actual API behavior, for example checking for a next link rather than only relying on empty pages.
Keep full responses disabled unless you explicitly need headers or status codes.
Start with smaller perpage values when building and debugging workflows, then increase them once the logic is stable.
9. Using the Template and Next Steps
The provided template illustrates how to:
Split JSON arrays into individual items with Item Lists.
Scrape HTML content with the HTML Extract node.
Implement looping pagination using Set, HTTP Request, Item Lists, and If nodes.
To get started in your own n8n instance:
Import the workflow template.
Run a single HTTP Request without the pagination loop to verify connectivity and response structure.
Inspect the node outputs and adjust selectors, URLs, and parameters as needed.
Enable or refine the pagination loop once the basic call works as expected.
Optionally, duplicate the workflow and replace the API URL to practice integrating different services.
10. Call to Action
If you are ready to extend your automations with custom HTTP integrations, import this n8n template and run it in your environment. Adapt the nodes to your own APIs, experiment with pagination strategies, and build scraping or data aggregation flows tailored to your use case. For more n8n automation patterns and HTTP Request node best practices, subscribe for future tutorials or share your questions and workflows in the comments.
Mastering the n8n HTTP Request Node: Splitting, Scraping, and Pagination at Scale
The HTTP Request node is a foundational component in n8n for building robust, production-grade automations. It acts as the primary interface between your workflows and external systems, whether you are consuming REST APIs, scraping HTML pages, or iterating through large, paginated datasets.
This article walks through a practical n8n workflow template that demonstrates three advanced patterns with the HTTP Request node:
Splitting JSON API responses into individual items for downstream processing
Scraping and extracting structured data from HTML pages
Implementing reliable pagination loops for multi-page endpoints
The goal is to move beyond simple requests and show how to combine HTTP Request with nodes like Item Lists, HTML Extract, Set, and If to create maintainable, scalable automations.
The Role of the HTTP Request Node in n8n Architectures
From a system design perspective, the HTTP Request node is your general-purpose integration gateway. It supports:
Standard HTTP methods such as GET, POST, PUT, PATCH, and DELETE
Authenticated calls using headers, API keys, OAuth, and more
Flexible response handling, including JSON, text, and binary data such as HTML or files
When combined with complementary nodes, it enables:
Item-level processing using Item Lists, Set, and Function nodes
Conditional logic and branching using If nodes
Advanced parsing and extraction using HTML Extract for web pages
The workflow template described below illustrates how to orchestrate these capabilities in a single, coherent automation.
Workflow Template Overview
The reference workflow, available as an n8n template, is organized into three distinct sections, each focused on a common integration pattern:
Split API responses into items using HTTP Request and Item Lists
Scrape and extract HTML content using HTTP Request and HTML Extract
Implement pagination loops using Set, HTTP Request, Item Lists, and If
Each section is independent, so you can reuse the patterns individually or combine them in your own workflows. The following sections break down each pattern, configuration details, and best practices for automation professionals.
Pattern 1: Splitting JSON API Responses into Items
Use Case: Processing Arrays Returned by APIs
Many APIs return data as an array of objects in the response body. To process each object independently in n8n, you should convert that array into separate items. This enables item-by-item transformations, conditionals, and integrations without manual scripting.
In the template, this pattern is demonstrated with a simple GET request to a mock API:
https://jsonplaceholder.typicode.com/albums
The HTTP Request node retrieves a JSON array of album objects, and the Item Lists node is then used to split that array into individual workflow items.
Node Configuration: HTTP Request → Item Lists
HTTP Request node
Method: GET
URL: https://jsonplaceholder.typicode.com/albums
Response Format: JSON
If you require headers, status codes, or raw body, enable the Full Response option.
Item Lists node (Create Items from Body)
Operation: Create Items from List (or equivalent option in your n8n version)
Field to split: typically body or a JSON path to the array, for example body if the response is a top-level array
Result: each element of the array becomes a separate item for downstream nodes
Why Splitting into Items is a Best Practice
Splitting arrays early in the workflow promotes a clean, item-centric design:
Mapping fields in Set or other integration nodes becomes straightforward
If nodes can evaluate conditions per record, not per batch
Function nodes can operate on a single item context, reducing complexity
This approach aligns well with n8n’s data model and improves maintainability for large or evolving workflows.
Pattern 2: Scraping and Extracting Data from HTML Pages
Use Case: Structured Data from Websites without APIs
In many real-world scenarios, the data you need is only exposed via HTML pages, not via a formal API. n8n can handle this by retrieving the HTML as binary data and then applying CSS or XPath selectors to extract specific elements.
The template uses a random Wikipedia article as a demonstration target:
https://en.wikipedia.org/wiki/Special:Random
The workflow fetches this page and then extracts the article’s title element using the HTML Extract node and the selector #firstHeading.
Node Configuration: HTTP Request → HTML Extract
HTTP Request node
Method: GET
URL: https://en.wikipedia.org/wiki/Special:Random
Response Format: File or Binary so that the HTML is handled as binary data
HTML Extract node
Input: binary HTML data from the HTTP Request node
Selector type: CSS selector or XPath
Example selector: #firstHeading to extract the main article title on Wikipedia
Output: structured fields containing the text or attributes you selected
Operational Best Practices for Web Scraping
Compliance: Always review and respect the target site’s robots.txt file and terms of service. Unauthorized scraping can be disallowed.
Rate limiting: Use Wait nodes or custom throttling logic to space out requests and avoid overloading the site.
Headers and user agents: Set appropriate headers, such as a descriptive User-Agent string, to identify your integration transparently.
Selector validation: Test CSS or XPath selectors in your browser’s developer tools before finalizing them in n8n.
By encapsulating scraping logic in a dedicated sub-workflow or segment, you can reuse it across multiple automations while keeping compliance and performance under control.
Pattern 3: Implementing Robust Pagination Loops
Use Case: Iterating Through Multi-page API Responses
Most production APIs limit the number of records returned per request and expose a pagination mechanism. To retrieve complete datasets, your workflow must iterate until there are no more pages available. The template includes a simple yet reliable loop that illustrates this pattern.
The example scenario uses GitHub’s starred repositories endpoint with typical page-based parameters:
per_page to control the number of items per page
page to specify the current page index
Core Loop Structure
The pagination loop in the workflow uses the following nodes:
Set – Initialize Page: defines initial variables such as page, perpage, and githubUser
HTTP Request: sends a request for the current page using these variables in the query string
Item Lists: splits the response body into individual items
If node: checks whether the response is empty and decides whether to continue or stop
Set – Increment Page: increases the page number and loops back to the HTTP Request node
Step-by-step Configuration
Initialize page state using a Set node:
page = 1
perpage = 15
githubUser = 'that-one-tom'
Build the request URL in the HTTP Request node using n8n expressions, for example:
Extract items with the Item Lists node so each element from the response body becomes an individual item.
Evaluate continuation in an If node:
Condition: check whether the HTTP response body is empty or contains no items
If empty: terminate the loop
If not empty: proceed to increment the page
Increment page in a Set node, for example:
page = $json["page"] + 1 or equivalent expression
This pattern creates a controlled loop that continues until the API stops returning data.
Common Pagination Strategies and How to Handle Them
Not all APIs use the same pagination model. Typical approaches include:
Page-based pagination
Parameters: page and per_page or similar
Implementation: similar to the GitHub example, increment page until no data is returned
Cursor-based pagination
API returns a cursor or token such as next_cursor in the response
Workflow stores this cursor in a Set node and passes it back in the next HTTP Request
Link header pagination
Next and previous URLs are provided in the HTTP Link header
Use the HTTP Request node with Full Response enabled to read headers and follow the next link until it is no longer present
Implementation and Reliability Tips
Stop conditions: base loop termination on explicit signals, such as an empty body, missing next link, or null cursor, rather than assumptions.
Rate limits: honor provider limits by:
Adding delays between pages
Implementing exponential backoff on 429 or 5xx responses
Inspecting rate limit headers such as X-RateLimit-Remaining when available
Observability: log key metrics such as current page, item counts, and error messages to support debugging and partial re-runs.
Advanced HTTP Request Techniques and Troubleshooting
For production workflows, you often need more control over authentication, error handling, and response formats. The following practices help harden your HTTP-based integrations.
Authentication
Use built-in n8n credentials for OAuth, API keys, or token-based auth where possible.
Set custom headers (for example, Authorization, X-API-Key) directly in the HTTP Request node if needed.
Error handling and retries
Use the Error Trigger node for centralized failure handling.
Implement If nodes around HTTP Request to branch on status codes or error messages.
Add retry logic or backoff patterns for transient failures.
Choosing between JSON and binary
Use JSON for structured API responses that you want to map and transform.
Use Binary for HTML pages, files, or other non-JSON payloads that will be processed by nodes such as HTML Extract or Binary data transformers.
Full Response mode
Enable Full Response when you need access to status codes, headers, or raw body data for advanced logic, such as pagination using headers or conditional branching based on HTTP status.
Interactive debugging
Run the workflow step-by-step and inspect node input and output to validate expressions, selectors, and transformations.
Use sample items to refine mapping before scaling the workflow.
Sample n8n Expression for Page-based Queries
The following snippet illustrates how to construct a GitHub API request using n8n expressions for page-based pagination:
// Example: page-based query parameters in n8n expression
https://api.github.com/users/{{$node["Set"].json["githubUser"]}}/starred?per_page={{$node["Set"].json["perpage"]}}&page={{$node["Set"].json["page"]}}
This pattern generalizes to many APIs that accept similar query parameters for pagination.
Conclusion: Building Production-ready HTTP Integrations in n8n
By combining the HTTP Request node with Item Lists, HTML Extract, Set, and If, you can construct highly flexible workflows that:
Split API responses into granular items for detailed processing
Scrape and extract structured data from HTML pages when no API is available
Iterate safely through paginated endpoints until all records are retrieved
Use the template as a reference implementation: start with splitting responses, then layer in HTML extraction and pagination logic as your use cases demand. Validate each segment independently, then integrate them into your broader automation architecture.
If you are integrating with APIs such as GitHub, Stripe, or Shopify, you can adapt these patterns directly by adjusting URLs, parameters, and authentication settings.
Call to action: Open n8n, import or recreate this workflow, and test each node step-by-step. For a downloadable version of the template or assistance tailoring it to your specific APIs and infrastructure, reach out for expert support.
Ever copied data from a website into a spreadsheet for 3 hours straight and thought, “There has to be a better way”? You are right, there is. It is called automation, and in n8n that often starts with the HTTP Request node.
This guide walks through a practical n8n workflow template that shows how to:
Split a big API response into individual items
Scrape HTML content like titles or links
Handle paginated API responses without losing your mind
We will keep all the useful tech bits, but explain them in a friendly way so you can actually enjoy setting this up.
APIs and websites are where most of the interesting data lives now. The HTTP Request node is your “fetch data from the internet” button. It lets you:
Call APIs
Download web pages
Collect data that comes in multiple pages
Once you have the data, n8n’s other nodes can transform it, store it, or send it somewhere else. The workflow in this guide focuses on three real-world patterns that you can reuse, remix, and generally show off to your coworkers as “magic”.
What this n8n workflow template actually does
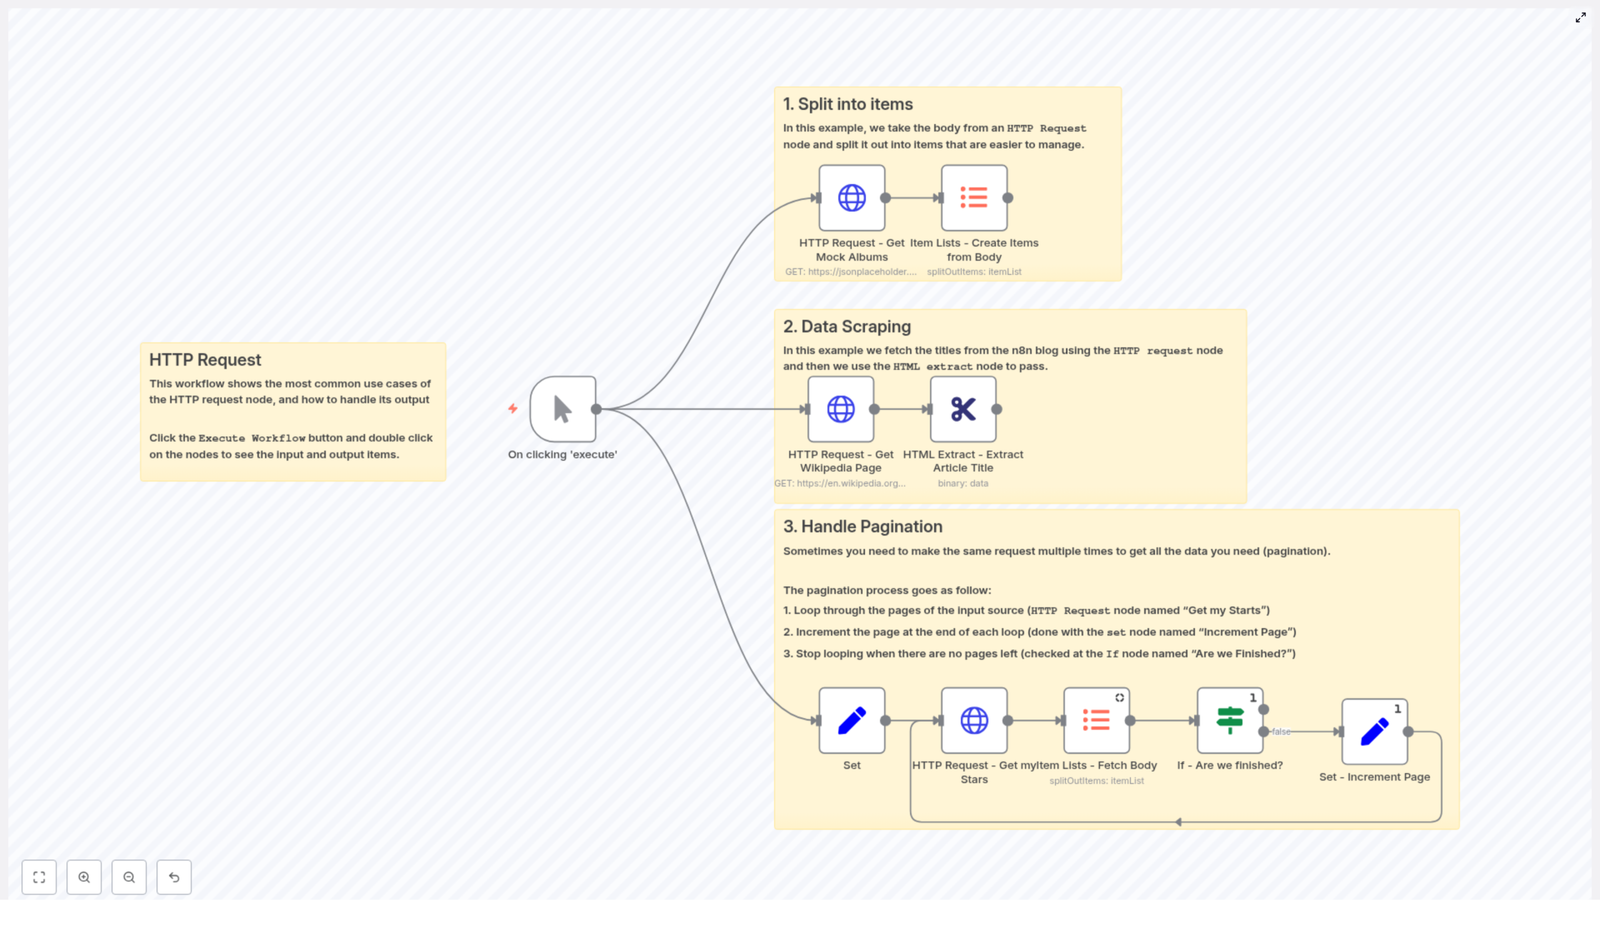
The template is built around a single trigger that kicks off three different use cases:
Split into items – Take an HTTP response that returns an array and turn each element into its own item.
Data scraping – Fetch a web page and extract specific HTML elements with the HTML Extract node.
Handle pagination – Loop through paginated API responses until there are no more results.
The workflow is visually grouped into these sections, so you can run everything from one manual trigger and then inspect each part to see how the data flows.
Quick start: how to use the template
Open your n8n instance.
Import the workflow template or recreate it using the nodes described below.
Run the workflow with a Manual Trigger.
Open each node, check its input and output, and follow the data as it moves through splitting, scraping, and paginating.
Once you understand the patterns, you can plug in your own API URLs, parameters, or websites and let the automation handle the tedious parts.
Use case 1: Split API responses into individual items
Scenario: an API returns a big array of records, and you want to process each record separately instead of treating them as one giant blob. This is where “split into items” comes in.
Nodes used in this section
HTTP Request
Method: GET
URL: https://jsonplaceholder.typicode.com/albums
Response format: JSON (default)
Item Lists – Create Items from Body
How the split works
Call the JSON API Configure the HTTP Request node to call a JSON endpoint. In our example, we use:
GET https://jsonplaceholder.typicode.com/albums
The response is an array of album objects, and n8n reads this as JSON by default.
Convert the array into individual items Add an Item Lists node and set:
fieldToSplitOut to body (or to the exact path of the array inside the response)
This makes the node emit one item per array element. Each album becomes its own item, which is much easier to filter, map, transform, or send to a database.
You can also use nodes like SplitInBatches or a Function node for more advanced control, but Item Lists is a simple starting point when the response is a clean array.
Result: instead of wrestling with a giant JSON array, you now have individual album objects ready for downstream nodes to process in a clean, predictable way.
Use case 2: Scrape web pages with HTML Extract
Scenario: you want to pull specific information from a web page, like titles, headings, or links, without manually copying and pasting. The combo of HTTP Request plus HTML Extract turns you into a polite, structured web scraper.
Nodes used in this section
HTTP Request
Method: GET
Target: a web page URL
responseFormat: file (binary)
HTML Extract
Selectors: CSS selectors
sourceData: binary
How to scrape with HTML Extract
Fetch the HTML as a file In the HTTP Request node:
Set the URL to the page you want to scrape.
Change Response Format to file.
This stores the HTML as binary data, which is exactly what the HTML Extract node expects.
Extract specific elements with CSS selectors Configure the HTML Extract node:
Set sourceData to binary.
Add your extraction rules using CSS selectors.
Example: to grab the main article title from a Wikipedia page, you can use:
#firstHeading
The HTML Extract node lets you pull out exactly what you need, without writing custom parsing code. Use it for things like:
Blog post titles
Product information
Structured elements like lists, headings, or links
Result: you get clean data from messy HTML, ready to push into a database, spreadsheet, or another part of your workflow.
Use case 3: Handle pagination like a pro
Scenario: you call an API and it kindly responds, “Here are your results, but only 15 at a time. Please keep asking for the next page.” Manually clicking through pages is annoying. Automating that loop in n8n is not.
Nodes used in this section
Set – initialize parameters like page, perpage, and githubUser
HTTP Request – call the GitHub API for starred repositories
Item Lists – Fetch Body and split out results into items
If – check whether the response is empty
Set – increment the page number
Step-by-step pagination loop
Initialize your pagination variables Use a Set node to define:
page (for example, 1)
perpage (for example, 15)
githubUser (the GitHub username you want to query)
Configure the HTTP Request for a paginated endpoint In the HTTP Request node, use n8n expressions to build the URL and query parameters dynamically. For GitHub starred repositories, you can use:
Each time the loop runs, the page value will update.
Split the response body into items Add an Item Lists (or similar) node to create individual items from the response body array. This lets you process each starred repository separately.
Check if you reached the end Insert an If node to test whether the HTTP response body is empty:
If the body is empty, there are no more results and pagination is done.
If the body is not empty, you still have more pages to fetch.
Increment the page and loop When the response is not empty, send the flow to another Set node that:
Increments page by 1
Then route the workflow back to the HTTP Request node so it can request the next page.
The loop continues until the If node detects an empty response. At that point, the pagination branch ends and you have collected all pages of data.
Tips for safer, smarter pagination
Respect rate limits: many APIs limit how often you can call them. Use delays or authenticated requests to stay within allowed limits.
Use built-in metadata when available: if the API returns total pages, next-page URLs, or similar hints, prefer those over simply checking for an empty response.
Log progress: store or log the current page so you can debug or resume more easily.
Smaller batches: if your downstream processing is heavy, keep perpage smaller to avoid huge loads in a single run.
General best practices for n8n HTTP Request workflows
Once you start wiring HTTP Request nodes into everything, a few habits will save you time and headaches.
Use credentials Store API keys, tokens, and OAuth details in n8n credentials instead of hardcoding them in nodes. It is safer, easier to update, and more reusable.
Pick the right response format Choose the correct response type for your use case:
JSON for structured API responses
file for HTML or binary data you want to pass to HTML Extract or other nodes
fullResponse if you need headers or status codes for debugging or conditional logic
Handle errors gracefully Use error triggers or the Execute Workflow node to retry failed requests or branch into error-handling flows.
Transform early As soon as you get a response, normalize or split it into a predictable shape. Your downstream nodes will be much simpler and easier to maintain.
Example automation ideas with this template
Once you understand splitting, scraping, and paginating, you can build a surprising amount of real-world automation. For example:
Export all your GitHub stars across multiple pages into a database or spreadsheet.
Scrape article titles from a list of URLs for a content audit or SEO review.
Bulk fetch product listings from an API, split them into individual items, and enrich them with other data sources.
These are all variations on the same patterns you just learned: HTTP Request to get the data, Item Lists or similar nodes to split it, HTML Extract when dealing with HTML, and a simple loop for pagination.
Next steps: put the template to work
The combination of HTTP Request, Set, Item Lists, HTML Extract, and a basic If loop covers a huge portion of everyday automation tasks. Once you get comfortable with these, most APIs and websites start looking very manageable.
To try it out:
Open n8n.
Import the example workflow or recreate the nodes described in this guide.
Click Execute and inspect each node’s input and output to see exactly how the data moves.
If you want, you can also work from the template directly:
Give this workflow a spin in your own n8n instance. If you have a specific API or website in mind, share the endpoint or HTML structure and I can help with a tailored workflow or sample expressions to plug into this pattern.
Happy automating, and may your repetitive tasks be handled by workflows while you do literally anything more interesting.
If you are tired of chasing unpaid invoices by hand, you are not alone. Following up is important, but it is also repetitive, easy to forget, and honestly, not the most fun part of running a business. That is where this n8n workflow template comes in.
In this guide, we will walk through a ready-made n8n automation that sends smart, contextual unpaid invoice reminders using Webhooks, text splitting, vector embeddings, Weaviate, a RAG (retrieval-augmented generation) agent, Google Sheets, and Slack. Think of it as a polite, always-on assistant that never forgets to nudge your clients and keeps your accounting log tidy at the same time.
This workflow takes invoice data from your system, looks up relevant context like past emails or notes, and then uses a language model to write a friendly, personalized reminder. It also logs what happened to a Google Sheet and pings your Slack channel if something fails.
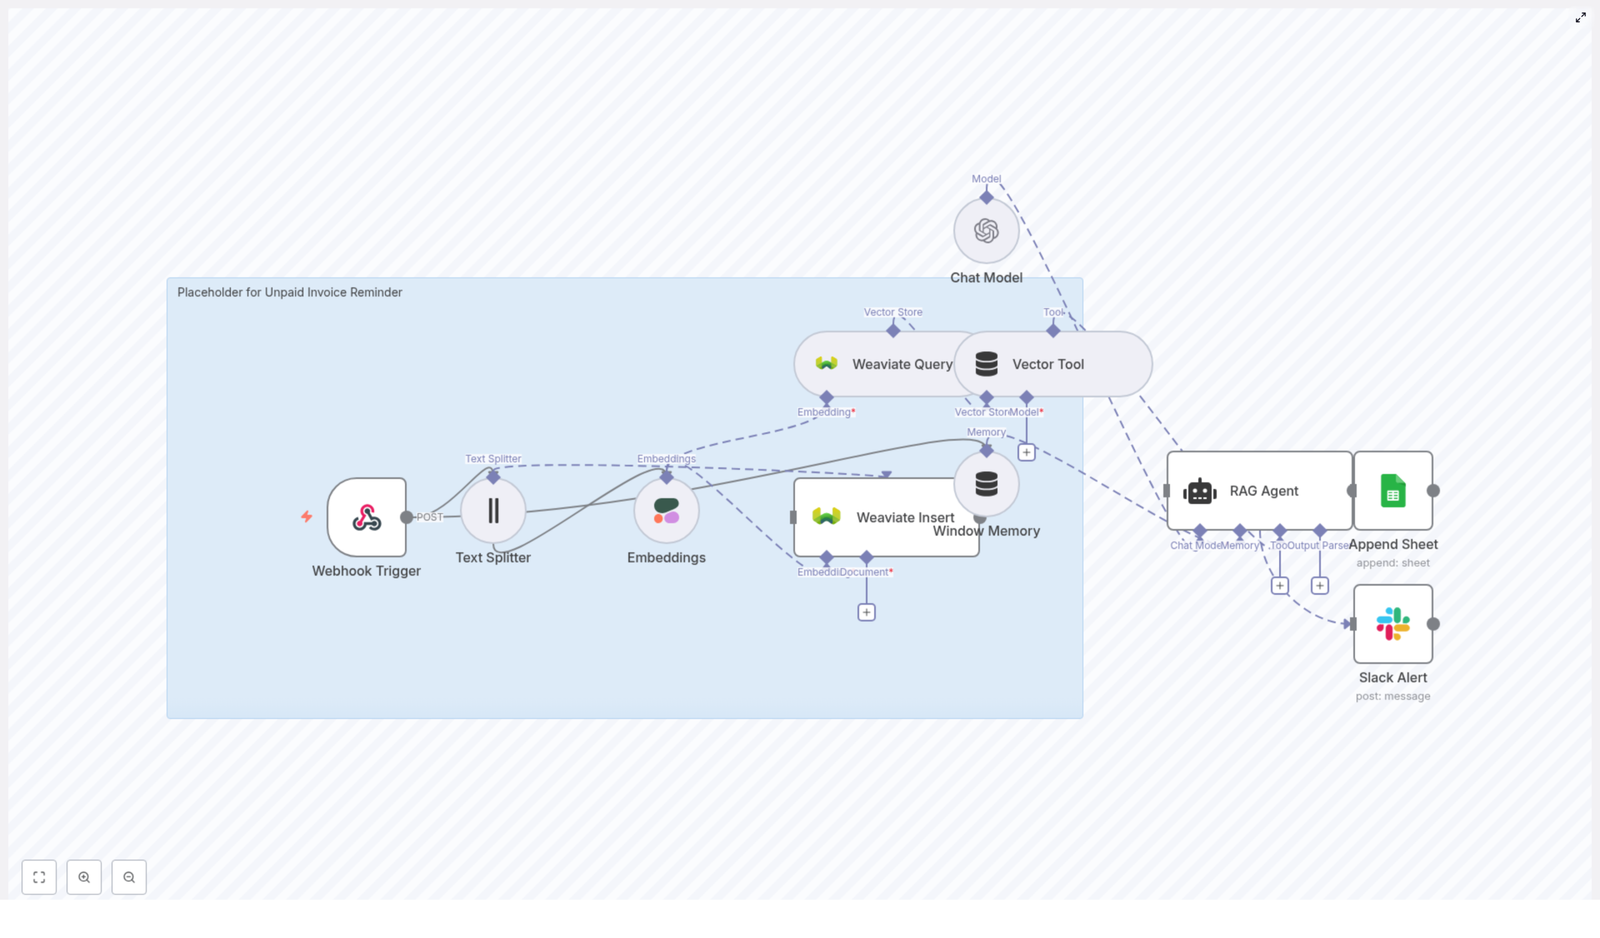
Here is a quick look at the main building blocks inside the template:
Webhook Trigger – entry point that receives invoice data or a scheduled event at POST /unpaid-invoice-reminder.
Text Splitter – breaks long notes or message histories into smaller chunks.
Embeddings (Cohere) – turns each text chunk into a vector embedding for semantic search.
Weaviate Insert & Query – stores and retrieves those embeddings and their metadata.
Vector Tool – formats the retrieved documents so the RAG agent can use them effectively.
Window Memory – short-term memory that keeps recent context available during processing.
Chat Model (OpenAI) – the language model that actually writes the reminder message.
RAG Agent – coordinates retrieval from Weaviate, memory, and the LLM to produce a contextual reminder.
Append Sheet (Google Sheets) – logs reminder status and any extra info you want to track.
Slack Alert – sends an alert to your #alerts channel if something goes wrong.
When should you use this workflow?
This template is a great fit if you:
Regularly send invoices and sometimes forget to follow up.
Want reminders that sound human, not robotic.
Need a traceable log of every reminder sent for accounting or reporting.
Already use tools like Google Sheets, Slack, and an invoicing system that can hit a webhook.
Instead of manually writing, copying, and pasting the same type of email again and again, you can let n8n handle it and only step in when something special comes up.
Why automate invoice reminders in the first place?
Manual follow-ups are easy to delay or skip, and the tone can vary a lot from one message to the next. Automation fixes that.
With an automated unpaid invoice reminder workflow in n8n, you:
Save time by eliminating repetitive follow-up tasks.
Reduce late payments with consistent, timely nudges.
Keep your cash flow healthier with less effort.
Maintain a polite, professional tone every single time.
Capture all activity in a log so you know exactly what was sent and when.
The extra twist here is the use of vector search and a language model. Instead of sending a generic reminder, the workflow can pull in invoice history, previous payment promises, or special terms and use that to write a more thoughtful, contextual message.
How the workflow pieces fit together
Let us walk through what happens behind the scenes when an unpaid invoice triggers this n8n automation.
1. Webhook receives invoice data
Everything starts with the Webhook Trigger. Your invoicing system or a scheduled job sends a POST request to /unpaid-invoice-reminder with details like:
Invoice ID
Client name or ID
Due date
Amount due
Notes or previous communication
This payload becomes the raw material for the rest of the workflow.
2. Long text is split and embedded
If you have long notes or email threads, the Text Splitter node breaks them into smaller, overlapping chunks so they can be embedded cleanly. For example, you might use:
chunkSize: 400
chunkOverlap: 40
Those chunks are then passed into a Cohere Embeddings node, using a model such as embed-english-v3.0. Each chunk is converted into a vector representation that captures the meaning of the text, not just the exact words.
3. Weaviate stores your invoice context
The embeddings and associated metadata are sent to a Weaviate Insert node. Here you store:
The text chunk itself.
The embedding vector.
Metadata like invoice ID, date, client ID, or any tags you want.
This turns your invoice notes and communication history into a searchable knowledge base that you can query later using semantic similarity instead of simple keyword matching.
4. Relevant context is retrieved when needed
When it is time to generate a reminder for a specific unpaid invoice, the workflow uses a Weaviate Query node. It queries Weaviate with invoice details or client information to find the most relevant stored documents.
The results from Weaviate are then passed through a Vector Tool node, which formats and prepares the retrieved context in the way your RAG Agent expects. This might include trimming, concatenating, or structuring the snippets so the agent can use them effectively.
5. Short-term memory and the LLM come into play
To keep everything coherent within a single run, the workflow uses Window Memory. This acts as short-term memory that holds recent context, such as what has already been processed or any intermediate decisions.
The Chat Model (OpenAI) is wired in as the language model that will write the actual reminder text. The RAG agent sends it a combination of:
System instructions (how to write).
Retrieved context from Weaviate.
Current invoice details and memory.
6. The RAG agent orchestrates everything
The RAG Agent is the conductor. It takes in:
The documents returned by Weaviate.
The short-term context from Window Memory.
Your system prompt that defines tone, structure, and required fields.
For example, a typical system instruction might look like:
System: You are an assistant for Unpaid Invoice Reminder; produce a short, polite reminder including invoice number, amount due, due date, and call-to-action to pay.
The agent then calls the Chat Model (OpenAI) with all of that information and gets back a polished, human-friendly reminder message that acknowledges any important notes, such as previous promises to pay.
7. Logging and error alerts
Once the reminder is generated, the workflow writes a log entry using a Google Sheets Append node. You can use a sheet called something like Log and include columns such as:
Status
Invoice ID
Client name
Reminder date
Any other fields you want to track
If anything fails along the way, an onError path routes the problem to a Slack node. This sends a message to your #alerts channel so your team can quickly jump in and fix the issue, instead of silently missing reminders.
Step-by-step: setting up the n8n template
Now let us go through the setup in a more practical, node-by-node way. You can follow this checklist while configuring the template.
1. Create and configure the Webhook
Add a Webhook node in n8n.
Set the HTTP method to POST.
Use a path like /unpaid-invoice-reminder.
Connect your invoicing app or scheduler so it sends unpaid invoice data to this endpoint.
2. Split long text and create embeddings
Add a Text Splitter node and connect it to the Webhook output.
Configure it with a chunk size and overlap, for example:
chunkSize: 400
chunkOverlap: 40
Attach a Cohere Embeddings node using a model such as embed-english-v3.0.
Map the text chunks from the Text Splitter to the Embeddings node input.
3. Store your vectors in Weaviate
Add a Weaviate Insert node and connect the output of the Embeddings node.
Configure your Weaviate credentials and class/schema.
Store:
Original text chunk.
Embedding vector.
Metadata like invoice ID, client ID, date, or tags.
4. Query Weaviate for related context
Add a Weaviate Query node for the reminder generation path.
Build a query based on the invoice or client details.
Return the top relevant documents for the specific unpaid invoice.
Feed the results into a Vector Tool node to shape the data in the format expected by your RAG Agent.
5. Configure Window Memory and the Chat Model
Add a Window Memory node to maintain short-term context across steps.
Set up a Chat Model (OpenAI) node with your chosen model and API key.
Ensure the RAG Agent uses this Chat Model for generating the reminder text.
6. Set up the RAG Agent orchestration
Add a RAG Agent node.
Connect:
Retrieved documents from the Vector Tool node.
Context from Window Memory.
Invoice details from the Webhook or earlier nodes.
Provide a clear system instruction, for example:
You are an assistant for Unpaid Invoice Reminder; produce a short, polite reminder including invoice number, amount due, due date, and call-to-action to pay.
7. Log activity and send Slack alerts
Add a Google Sheets Append node after the RAG Agent.
Point it to your accounting or logging spreadsheet and a sheet like Log.
Include at minimum a Status column and any other fields you want to track.
From the RAG Agent (or a central part of the workflow), configure an onError branch that leads to a Slack node.
Set the Slack node to notify your #alerts channel about failures or exceptions.
Prompt templates for consistent reminders
Clear prompts help the language model stay on-brand and avoid awkward wording. You can customize these, but here is a solid starting point.
System prompt example
Use a system message that defines tone, structure, and required fields:
System: You are an assistant that writes unpaid invoice reminders. Keep tone polite and professional. Include invoice number, amount due, due date, and payment link. If there are previous payment promises or notes, acknowledge them briefly.
User prompt example
Then pass a user prompt that includes the current invoice and any retrieved context. For example:
User: Compose a reminder for Invoice #12345 for Acme Co., amount $2,350, due 2025-10-10. Relevant notes: [retrieved documents].
In the actual workflow, [retrieved documents] is filled in by the Vector Tool and RAG Agent with the relevant snippets from Weaviate.
Best practices and security tips
Since this workflow touches external services and potentially sensitive data, it is worth locking it down properly.
Store all API keys for Cohere, Weaviate, OpenAI, Google Sheets, and Slack using n8n credentials or environment variables.
Protect your webhook with authorization tokens, IP allowlists, or other access controls.
Validate and sanitize incoming data so malicious content does not end up in your logs or prompts.
Monitor usage costs, since embeddings and LLM calls can add up. Batch operations where it makes sense.
Version your Weaviate schema and keep backups of vector data to avoid accidental loss.
Testing and troubleshooting your n8n automation
Instead of turning everything on at once, it is easier to test in stages.
Start with the Webhook: Send a sample payload and verify that n8n receives it correctly.
Add logging: Temporarily log intermediate outputs so you can see exactly what each node is doing.
Enable Text Splitter and Embeddings: Confirm that chunks are generated and embeddings are created without errors.
Test Weaviate Insert and Query: Make sure data is stored and can be retrieved with meaningful results.
Turn on the RAG Agent: Once context retrieval looks good, enable the agent and inspect the generated reminders.
If the reminder text looks off or irrelevant, check:
Which documents are coming back from Weaviate.
Whether your query filters or similarity thresholds need tweaking.
Whether the system and user prompts are clear about what you want.
Use cases and easy extensions
Once you have the core unpaid invoice reminder workflow running, you can build on it quite a bit. Here are some ideas:
Follow-up sequences: Create multiple reminder stages, such as:
A soft nudge shortly after the due date.
A firmer reminder after a set number of days.
A final escalation message before collections.
Multichannel delivery: Add email or SMS nodes so reminders go out through the channel your clients respond to fastest.
Deeper personalization: Include client name, payment history, or custom payment terms to make messages more compelling and relevant.
Analytics and reporting: Use your Google Sheets log as the data source for a dashboard that tracks days-to-pay, response rates, and follow-up efficiency.
Wrapping up
By combining n8n with Cohere embeddings, Weaviate vector search, and a RAG agent powered by OpenAI, you get more than a simple reminder script. You get an intelligent unpaid invoice reminder system that is:
Build a Mortgage Rate Alert System with n8n, LangChain & Pinecone
This guide walks you through an n8n workflow template that automatically monitors mortgage rates, stores them in a vector database, and triggers alerts when certain conditions are met. You will learn what each node does, how the pieces work together, and how to adapt the template to your own use case.
What you will learn
By the end of this tutorial, you will be able to:
Understand how an automated mortgage rate alert system works in n8n
Configure a webhook to receive mortgage rate data
Split and embed text using OpenAI embeddings
Store and query vectors in Pinecone
Use an Agent with memory to decide when to raise alerts
Log alerts to Google Sheets for audit and analysis
Apply best practices for production setups and troubleshooting
Why automate mortgage rate alerts?
Mortgage rates change frequently, and even a small shift can impact both borrowers and lenders. Manually tracking these changes is time consuming and error prone. An automated mortgage rate alert system built with n8n, LangChain, OpenAI embeddings, and Pinecone can:
Continuously monitor one or more rate sources
Notify internal teams or clients as soon as a threshold is crossed
Maintain a searchable history of alerts for compliance, reporting, and analytics
The workflow template described here gives you a starting point that you can customize with your own data sources, thresholds, and notification channels.
Concept overview: how the n8n workflow is structured
The sample workflow, named “Mortgage Rate Alert”, is made up of several key components that work together:
Webhook (n8n) – receives incoming mortgage rate data via HTTP POST
Text Splitter – breaks long or complex payloads into smaller chunks
Embeddings (OpenAI) – converts text chunks into vector representations
Pinecone Insert – stores embeddings in a Pinecone vector index
Pinecone Query + Tool – retrieves similar historical context when new data arrives
Memory + Chat + Agent – uses a language model with context to decide if an alert is needed
Google Sheets – logs alerts and decisions for later review
Think of the flow in three stages:
Ingest – accept and prepare mortgage rate data (Webhook + Splitter)
Understand & store – embed and index data for future retrieval (Embeddings + Pinecone)
Decide & log – evaluate thresholds and record alerts (Agent + Sheets)
Step-by-step: building the workflow in n8n
Step 1: Configure the Webhook node (data intake)
The Webhook node is your entry point for mortgage rate updates. It listens for HTTP POST requests from a data provider, internal service, or web crawler.
Key setup points:
Method: Set to POST
Authentication: Use an API key, HMAC signature, IP allowlist, or another method to secure the endpoint
Validation: Add checks so malformed or incomplete payloads are rejected early
The webhook should receive a JSON body that includes information like source, region, product, rate, and timestamp. A basic example is shown later in this guide.
Step 2: Split the incoming text (Text Splitter)
If your webhook payloads are large, contain multiple products, or include descriptive text, you will want to split them into smaller, meaningful pieces before sending them to the embedding model.
In this template, a character text splitter is used with the following parameters:
chunkSize: 400
chunkOverlap: 40
This configuration helps maintain semantic coherence in each chunk while keeping the number of vectors manageable. It is a balance between:
Embedding quality – enough context in each chunk for the model to understand it
Index efficiency – not generating more vectors than necessary
Step 3: Create embeddings with OpenAI
Each text chunk is then converted into a vector using an OpenAI embeddings model. These embeddings capture the semantic meaning of the content so you can later search for similar items.
Configuration tips:
Use a modern embedding model (the template uses the default configured model in n8n)
Batch multiple chunks into a single API request where possible to reduce latency and cost
Attach rich metadata to each embedding, for example:
timestamp
source
original_text or summary
rate
region or lender identifier
This metadata becomes very useful for filtering and analysis when you query Pinecone later.
Step 4: Insert embeddings into Pinecone
Next, the workflow uses a Pinecone node to insert vectors into a Pinecone index. In the template, the index is named mortgage_rate_alert.
Best practices for the insert step:
Use a consistent document ID format, for example:
sourceId_timestamp_chunkIndex
Include all relevant metadata fields so you can:
Filter by region, product, or source
Filter by time range
Reconstruct or audit the original event
Once stored, Pinecone lets you run fast similarity searches over your historical mortgage rate data. This is useful both for context-aware decisions and for spotting near-duplicate alerts.
Step 5: Query Pinecone and expose it as a Tool
Whenever new rate data arrives, the workflow can query Pinecone to find similar or related past entries. For example, you might look up:
Recent alerts for the same region or product
Past events with similar rate changes
The template includes a Query step combined with a Tool node. The Tool wraps Pinecone as a retrieval tool that the Agent can call when it needs more context.
In practice, this means the Agent can ask Pinecone things like “show me recent events for this product and region” as part of its reasoning process, instead of relying only on the current payload.
Step 6: Use Memory, Chat model, and Agent for decisions
The heart of the alert logic is handled by an Agent node that uses:
A chat model (the example diagram uses a Hugging Face chat model)
A Memory buffer to store recent conversation or decision context
The Pinecone Tool to retrieve additional information when needed
The Agent receives:
The new mortgage rate data
Any relevant historical context retrieved from Pinecone
Prompt instructions that define your business rules and thresholds
Based on this, the Agent decides whether an alert should be raised. A typical rule might be:
Trigger an alert when the 30-year fixed rate moves more than 0.25% compared to the most recent stored rate
You can implement threshold checks directly in the Agent prompt or by adding pre-check logic in n8n before the Agent runs.
Step 7: Log alerts to Google Sheets
If the Agent decides that an alert is warranted, the workflow uses a Google Sheets node to append a new row to a designated sheet.
Typical fields to log include:
timestamp of the event
rate and product type (for example 30-year fixed)
region or market
threshold_crossed (for example “delta > 0.25%”)
source of the data
agent_rationale or short explanation of why the alert was raised
This sheet can serve as a simple audit trail, a data source for dashboards, or a handoff point for other teams and tools.
Designing your threshold and alert logic
The question “when should we alert?” is ultimately a business decision. Here are common strategies you can encode in the Agent or in n8n pre-checks:
Absolute threshold:
Alert if the rate crosses a fixed value, for example:
if rate >= 7.0%
Delta threshold:
Alert if the rate changes by more than a certain number of basis points within a given time window, for example:
if |current_rate - last_rate| >= 0.25% in 24 hours
Relative trends:
Use moving averages or trend lines and alert when the current rate breaks above or below them
You can store historical points in Pinecone and/or Google Sheets, then use similarity queries or filters to find comparable recent events and guide the Agent’s reasoning.
Best practices for running this in production
When you move from testing to production, consider the following guidelines.
Security
Protect the Webhook with API keys, IP allowlists, or signed payloads
Keep Pinecone and external API credentials scoped and secret
Rotate keys periodically and restrict who can access the workflow
Rate limits and batching
Batch embedding requests to OpenAI where possible to reduce overhead
Respect rate limits of OpenAI, Hugging Face, and any other external APIs
Implement retries with exponential backoff to handle transient errors
Cost control
Monitor how many embeddings you create and how large your Pinecone index grows
Tune chunkSize and chunkOverlap to reduce the number of vectors while keeping retrieval quality high
Consider archiving or downsampling older data if cost becomes an issue
Observability and logging
Log incoming payloads, embedding failures, and Agent decisions
Use the Google Sheet as a basic audit log, or integrate with tools like Elasticsearch or DataDog for deeper monitoring
Track how often alerts are triggered and whether they are useful to stakeholders
Testing before going live
Simulate webhook payloads using tools like curl or Postman
Test edge cases such as missing fields, malformed JSON, or unexpected rate values
Review sample Agent outputs to confirm that it interprets thresholds correctly
Troubleshooting common issues
If you run into issues with the mortgage rate alert workflow, start with these checks:
Duplicate inserts:
Verify that your document ID scheme is unique
Add deduplication logic on ingest, for example by checking if a given ID already exists before inserting
Poor similarity results from Pinecone:
Experiment with different embedding models
Adjust chunkSize and chunkOverlap
Normalize text before embedding, for example:
Convert to lowercase
Strip HTML tags
Remove unnecessary formatting
Agent hallucinations or inconsistent decisions:
Constrain the prompt with explicit rules and examples
Always provide retrieved context from Pinecone when asking the Agent to decide
Use deterministic checks in n8n (for example numeric comparisons) to validate threshold decisions made by the Agent
Extending and customizing the workflow
The base template logs alerts to Google Sheets, but you can expand it into a more complete alerting system.
Client notifications:
Use Twilio to send SMS alerts
Use SendGrid or another email provider to notify clients by email
Internal team notifications:
Connect Slack or Microsoft Teams to notify sales or risk teams in real time
Scheduled trend analysis:
Add a scheduler node to snapshot rates daily or hourly
Compute moving averages or other trend metrics
Dashboards:
Feed the Google Sheet or Pinecone data into BI tools to visualize rate history, trends, and active alerts
Example webhook payload
When sending data to your n8n Webhook node, use a clear and consistent JSON structure. A simple example looks like this:
You can extend this with additional fields such as lender name, loan type, or internal identifiers, as long as your workflow is updated to handle them.
Quick recap
To summarize, the mortgage rate alert template in n8n works as follows:
Webhook receives new mortgage rate data.
Text Splitter breaks large payloads into chunks.
OpenAI Embeddings convert chunks into vectors with metadata.
Pinecone Insert stores these vectors in the mortgage_rate_alert index.
Pinecone Query + Tool retrieve related historical context when new data arrives.
Memory + Chat + Agent evaluate the new data plus context to decide if an alert is needed.
Google Sheets logs alerts and reasoning for audit and analysis.
Start by getting data into the system and logging it. Then gradually add embeddings, vector search, and more advanced Agent logic as your needs grow.
Frequently asked questions
Do I need embeddings and Pinecone from day one?
No. You can begin with a simple workflow that ingests data via Webhook and logs it directly to Google Sheets. Add embeddings and Pinecone when you want context-aware reasoning, such as comparing new events to similar
Automate Instagram Posts with n8n, Google Drive & AI Captions
Automating Instagram publishing with n8n enables marketing teams, agencies, and creators to run a scalable, auditable content pipeline. This workflow connects Google Drive, OpenAI, Google Sheets, and the Facebook Graph API so that new assets dropped into a folder are automatically captioned, logged, and published to Instagram with minimal manual intervention.
This article explains the end-to-end architecture, details each n8n node, and outlines best practices for reliability, security, and compliance with platform limits.
Business case for Instagram automation
Consistent posting is a key driver of reach and engagement on Instagram, yet manual workflows rarely scale. A well-designed n8n automation helps teams to:
Save several hours per week on repetitive upload and publishing tasks
Maintain a predictable posting cadence across multiple accounts
Standardize captions, hashtags, and calls to action with AI assistance
Maintain a structured content log in Google Sheets for auditing and reporting
By centralizing the process in n8n, you gain a single source of truth for media assets, captions, and publishing status, which is critical for professional content operations.
Solution architecture overview
The workflow uses a simple but robust architecture built around Google Drive as the content intake point. The high-level flow is:
Ingestion: A Google Drive Trigger watches a specific folder for new media files.
Media retrieval: The file is downloaded into the n8n runtime using the Google Drive node.
Caption generation: OpenAI generates an Instagram-ready caption based on the file context.
Bookkeeping: Google Sheets stores metadata such as file name, caption, and URLs.
Media creation: The Facebook Graph API creates an Instagram media container for the image or video.
Publishing: The created media is published to Instagram using the media_publish endpoint.
The following sections walk through each part of this pipeline in detail and describe how to configure the corresponding n8n nodes.
Core workflow in n8n
1. Triggering on new assets in Google Drive
Google Drive Trigger (fileCreated)
The workflow begins with a Google Drive Trigger configured to respond to the fileCreated event. This trigger monitors a specific folder that your team uses as a “drop zone” for Instagram-ready images and videos.
Key configuration points:
Select the relevant folder that will receive uploads from creators or stakeholders.
Define a polling interval, for example every minute, or adjust according to your operational needs.
Use an OAuth credential in n8n that has read access to the target folder.
When a new file is detected, the trigger emits the file metadata, including the file id, which downstream nodes will use to fetch the actual media.
2. Downloading media from Google Drive
Google Drive (download file)
Next, a standard Google Drive node downloads the media file referenced by the trigger. Configure this node to:
Use the file id from the trigger output as the input parameter.
Store the binary data of the image or video in the n8n execution.
Optionally capture Google Drive links such as webViewLink and thumbnailLink for logging and reporting.
This step ensures the media is available to both the AI caption node and the Facebook Graph API node, and also preserves useful links for your Google Sheets log.
3. Generating AI captions with OpenAI
OpenAI (caption generation)
To standardize and accelerate caption creation, the workflow uses OpenAI to generate an Instagram caption. In n8n, you can use either a message model or a text completion style node, depending on your OpenAI configuration.
Typical prompt design can include instructions such as:
Write 2-3 concise, engaging sentences, optionally including emojis.
Add 3-5 relevant hashtags aligned with the content.
Include a clear call to action, for example “Follow for more” or “Save this post”.
Keep the total length under a defined character limit, for instance 150 characters.
You can pass the file name and any short description or campaign context as variables into the prompt. Store the model output in the node’s JSON payload so it can be:
Written to Google Sheets as part of your content log.
Used directly as the caption parameter when creating the Instagram media object.
4. Logging content in Google Sheets
Google Sheets (append or update)
Google Sheets serves as a lightweight content database and audit trail. Configure a Google Sheets node to append or update a row for each processed file.
Recommended columns include:
Name – original file name or post identifier
Caption – AI generated or final approved caption
Reel Urls – links to the published Instagram media or related resources
Reel Thumbnail – thumbnail URL or Drive thumbnailLink
Optional fields such as publish date, status, or reviewer
Ensure the Google Sheets credential in n8n has edit access to the spreadsheet. Over time, this log becomes invaluable for tracking what was posted, when it was published, and which captions were used.
5. Creating Instagram media containers
Facebook Graph API (media creation)
With the media and caption ready, the next step is to create an Instagram media container using the Facebook Graph API. In n8n, configure a Facebook Graph API node to call the appropriate /media edge.
Key considerations:
For reels or video posts, use the graph-video host such as https://graph-video.facebook.com.
Provide parameters like:
video_url for video assets or image_url for images
caption using the AI generated text
image_url for a thumbnail if applicable
Authenticate with a valid access token associated with your Instagram Business or Creator account that is linked to a Facebook Page.
The response from this call includes a creation_id, which is required to publish the media in the next step.
6. Publishing the media to Instagram
Facebook Graph API (media_publish)
The final operational step is to publish the created container. Configure a second Facebook Graph API node to call the media_publish endpoint.
Configuration details:
Use the same authenticated account and token as the media creation node.
Pass the creation_id returned from the previous step as a parameter.
Use a POST request to initiate publishing.
On success, the media is live on Instagram and you can optionally capture the returned post id or permalink and write it back into Google Sheets for full traceability.
Prerequisites, setup checklist, and permissions
Before running this workflow in production, verify that all required services and permissions are in place:
Google Drive: OAuth credential in n8n with read access to the upload folder.
OpenAI: Valid API key or message model credentials configured in n8n.
Google Sheets: OAuth credential with edit access to the target spreadsheet.
Facebook Graph API:
Instagram Business or Creator account connected to a Facebook Page.
Long lived Page access token or app token with appropriate publish permissions.
n8n instance: Properly secured, with credentials stored using n8n’s credential management and access restricted to authorized users.
Operational best practices for a robust workflow
Validate inputs before publishing
To avoid failed posts and API errors, validate media files early in the workflow. Typical checks include:
File size within Instagram limits
Supported file types (image or video formats)
Aspect ratio and resolution within Instagram’s accepted ranges
If a file does not meet requirements, you can either route it to a resizing step or notify the uploader instead of attempting to publish.
Handle rate limits and errors gracefully
The Facebook Graph API enforces rate limits and can return transient errors. In n8n, implement:
Retry logic for HTTP 429 and similar responses
Exponential backoff or delays between retries
Error logging to Google Sheets or a monitoring channel for quick diagnosis
Capturing error messages from the Graph API responses helps you identify issues such as unsupported media, invalid parameters, or permission problems.
Control caption quality with approvals
While AI captions can significantly speed up publishing, some teams require editorial review. You can introduce a human-in-the-loop step by:
Writing AI generated captions to Google Sheets with a status column.
Requiring a human reviewer to mark a “Ready” or “Approved” flag.
Conditionally executing the Facebook Graph API nodes only when the flag is set.
This hybrid model keeps the benefits of automation while maintaining brand voice and compliance.
Secure credentials and access
Security is critical in production automations. Follow these practices:
Never store API tokens or secrets in plain text within workflow nodes.
Use n8n’s credential store and environment variables for all sensitive data.
Rotate Facebook and OpenAI keys periodically and restrict scopes to the minimum required.
Limit access to the n8n instance and workflow configuration to trusted users only.
Troubleshooting common issues
Missing media errors: Confirm that the file id from the Google Drive Trigger is correctly passed to the download node and that the download completes successfully.
Caption not appearing: Inspect the OpenAI node output and verify that your subsequent nodes reference the correct JSON path, for example $json.choices[0].message.content or the direct output field used by your model.
Facebook Graph API authentication failures: Check that your access token is valid, not expired, and has the necessary permissions. Ensure the Instagram Business account is correctly linked to a Facebook Page.
Publishing failures: Review the Graph API response for user friendly error messages, such as unsupported formats, caption length limits, or invalid URLs, then adjust your media or parameters accordingly.
Advanced enhancements and scaling ideas
Once the basic workflow is stable, you can extend it to support more sophisticated content operations:
Scheduled publishing: Insert a scheduler or wait node that holds the media until a specified publish timestamp, enabling planned content calendars.
Automated image processing: Integrate an image processing node or external service to generate thumbnails, apply branding, or resize assets to Instagram’s recommended dimensions before upload.
Multi account support: Maintain a mapping table in Google Sheets that links specific Google Drive folders to corresponding Instagram accounts and tokens, allowing a single workflow to manage multiple brands.
Conclusion and next steps
This n8n workflow provides a structured, scalable pipeline for Instagram publishing. Google Drive serves as the intake layer, OpenAI automates caption generation, Google Sheets maintains an auditable record, and the Facebook Graph API handles the final publishing step.
With the right credentials, input validation, and error handling, this pattern works well for individual creators, agencies, and larger marketing teams that need predictable and repeatable content operations.
To adopt this in your environment, start with a test setup: use a dedicated Drive folder, small sample files, and a test Instagram Business account to validate the end to end behavior before moving to production.
Call to action: If you want a ready to import n8n workflow and a one page setup checklist, click the link below or share your email to receive the workflow ZIP and a step by step video guide.
Consistent, automated contact synchronization is essential for accurate reporting, effective segmentation, and reliable campaign execution. This guide explains how to implement an n8n workflow that interacts with the Autopilot API to create a list, upsert contacts, enrich them with additional properties, and retrieve the resulting contact set for inspection or downstream processing.
The workflow uses native Autopilot nodes in n8n and is designed for automation professionals who want a reusable pattern for syncing leads from any source, such as CRMs, form tools, or custom applications.
Why integrate Autopilot with n8n?
Autopilot is a marketing automation platform that manages customer journeys, email campaigns, and engagement workflows. n8n is an open source workflow automation tool that connects APIs and systems with minimal custom code. Combining the two provides a flexible integration layer between Autopilot and your broader data ecosystem.
Key advantages of automating Autopilot operations with n8n include:
Automated list management – Create and maintain Autopilot lists programmatically, aligned with campaigns or segments.
Reliable upsert behavior – Ensure contacts are created or updated as needed, without duplicates, using Autopilot’s upsert capability.
Centralized observability – Use n8n for logging, monitoring, and error handling across all integrations touching Autopilot.
Reusable integration patterns – Standardize one workflow and reuse it across teams, brands, or environments with minimal changes.
Use case overview
The example workflow is tailored for scenarios such as onboarding new leads from an external system, validating the resulting list in Autopilot, and enriching contact data. Typical sources include:
Web forms or landing page tools
CRMs and sales platforms
Spreadsheets or CSV imports
Custom applications via webhooks or APIs
At a high level, the workflow performs four core operations in sequence:
Create a new list in Autopilot.
Upsert a contact into that list.
Upsert the same or another contact with an additional Company property.
Retrieve all contacts that belong to the created list.
This pattern can be extended for production use cases, such as campaign-specific lists, periodic syncs from a CRM, or migration projects.
Workflow architecture in n8n
The workflow is built entirely with Autopilot nodes, each configured for a specific resource and operation. Below is a simplified JSON representation of the node configuration to illustrate the structure:
This JSON is illustrative. In practice, you configure each node through the n8n UI, including credentials, parameters, and expressions.
Preparation: Configure Autopilot credentials in n8n
Before assembling the workflow, configure secure access to Autopilot:
Navigate to Settings → Credentials in n8n.
Create a new credential of type Autopilot API.
Provide your Autopilot API key and any additional required account details.
Use the built-in test option to verify that n8n can successfully authenticate against Autopilot.
Ensure that the same Autopilot credential is selected on every Autopilot node you add to the workflow.
Building the workflow in n8n
1. Create a list in Autopilot
Start by adding the first Autopilot node that will provision a new list:
Resource: list
Operation: create
Fields: specify a list name and optionally a description that reflects its purpose (for example, “New Leads – Website”).
When executed, this node returns a list object that includes a list_id field. This identifier is critical because it is referenced by subsequent nodes. Within n8n expressions, the list identifier is typically accessed using:
{{ $json["list_id"] }}
or, if referenced from another node:
{{$node["Autopilot"].json["list_id"]}}
2. Upsert a contact into the created list
Next, add a second Autopilot node to handle contact upserts. This node is responsible for creating a new contact or updating an existing one based on the email address.
Configure the node as follows:
Resource: contact
Operation: upsert
Email: map from your incoming data (for example, from a previous node such as a webhook or CRM) or define an expression.
Additional Fields:
autopilotList: reference the list created in step 1 using an expression such as:
{{$json["list_id"]}}
or, more explicitly:
{{$node["Autopilot"].json["list_id"]}}
If your source data includes other attributes, map them into the node’s fields, for example FirstName, LastName, and any custom properties that your Autopilot account supports. This ensures the upsert operation enriches the contact record from the outset.
3. Upsert a contact with additional properties (Company)
The third node demonstrates how to perform another upsert while adding or updating a specific property, in this case the Company field. This is useful for data enrichment or when you want to maintain separate steps for basic creation and subsequent enhancement.
Configure the third Autopilot node as follows:
Resource: contact
Operation: upsert
Email: you can reuse the email parameter from the previous node with an expression such as:
Company: set a static value like n8n or map from a field in your incoming data.
This step illustrates how to chain updates and maintain consistent identifiers across nodes using expressions, which is a common pattern in more complex n8n automations.
4. Retrieve all contacts from the Autopilot list
The final node in the workflow reads back the contents of the list so you can validate the outcome or pass the data to other systems.
Add a fourth Autopilot node and configure it as follows:
Resource: contactList
Operation: getAll
listId: reference the list from the first node:
listId: ={{$node["Autopilot"].json["list_id"]}}
Return All: enable this option if you want to retrieve every contact in the list instead of limiting the number of results.
The resulting contact data can then be forwarded to logging nodes, databases, BI tools, or notification channels for reporting and monitoring.
Best practices for robust n8n – Autopilot workflows
Expression management and data references
Use the n8n expression editor to construct references to previous node outputs. Referencing $node["NodeName"].json is generally more explicit and reliable than relying on the current item context when a workflow grows.
Inspect node outputs using the execution panel to confirm the exact JSON structure and property names before finalizing expressions.
Contact identity and data quality
Ensure the Email field is always present and validated before calling the Autopilot upsert operation. Autopilot relies on email as the unique identifier for contacts.
Implement validation steps or use an external API to verify email format or enrich data before writing to Autopilot.
Rate limiting and performance
Review Autopilot API rate limits and design your workflow accordingly, especially if you are processing large datasets or running frequent syncs.
Use batching or add delay nodes in n8n when necessary to avoid hitting rate limits.
Error handling and observability
Add a dedicated error handling branch or a Catch Error mechanism in n8n to capture and store failed records.
Use a Function node to normalize error payloads, then send structured error notifications to your preferred channel (for example, email, Slack, or a ticketing system).
Test each node individually using Execute Node before running the full workflow to isolate configuration issues early.
Common pitfalls and how to avoid them
Incorrect expressions: Using an expression like {{$node["Autopilot"].json["list_id"]}} in a node that does not have access to that context or where the path is incorrect will result in undefined. Always verify the actual JSON output and adjust the path accordingly.
Missing credentials: Every Autopilot node in the workflow must explicitly reference the correct Autopilot credential. If a node is left unconfigured or points to a different credential, API calls will fail.
Empty or invalid emails: Upsert operations may fail or create inconsistent records if the email field is missing, empty, or malformed. Implement validation before the upsert step.
Extending the workflow: advanced patterns
Once the core pattern is in place, you can extend it to support more advanced automation scenarios:
Dynamic list creation per campaign: Add a webhook or form submission node at the start of the workflow and create lists dynamically based on campaign identifiers or UTM parameters.
Data enrichment before upsert: Call external APIs for enrichment or validation (for example, geolocation, firmographic data, or email verification) before sending the final payload to Autopilot.
Journey orchestration: Trigger Autopilot journeys based on list membership or contact updates by invoking Autopilot triggers or configuring webhooks between the platforms.
Conclusion and next steps
Using n8n to integrate with Autopilot provides a controlled, scalable way to manage contact data and marketing lists. The workflow described here – create a list, upsert contacts, enrich records, and retrieve the final contact set – offers a solid foundation that can be adapted to lead capture, CRM synchronization, and migration projects.
To implement this in your environment, import or recreate the nodes in your n8n instance, attach your Autopilot credentials, and run the workflow against a test dataset. From there, refine field mappings to align with your CRM, form platform, or other lead source.
Call to action: Deploy this workflow in your n8n environment and tailor it to your stack. If you share your primary source system (for example, Google Sheets, Typeform, Salesforce), you can easily adapt the pattern to create a source-specific, production-ready flow.