Automate Security: Weekly Shodan IP Port Monitoring Workflow

Automate Security: The Story of a Weekly Shodan IP Port Monitoring Workflow

A Monday Morning No One Wants

By 8:15 a.m., Alex already knew it was going to be a bad day.

As the lead security engineer for a fast-growing SaaS company, Alex was used to juggling alerts, audits, and anxious messages from stakeholders. But this Monday was different. Over the weekend, an external audit report had landed in Alex’s inbox with a worrying note:

“We observed unexpected open ports on one of your production IP addresses. Please confirm whether these are intentional.”

Alex’s stomach dropped. There was no easy way to answer that quickly. The team had a spreadsheet of “approved” ports and IPs, but it was updated manually and often out of date. Actual port checks were done ad hoc, whenever someone remembered or when a new incident forced the issue. It was fragile, inconsistent, and stressful.

Alex had already been thinking about automating network checks. The audit made it clear: manual port monitoring was no longer an option. The company needed something reliable, repeatable, and proactive.

Discovering a Better Way With n8n and Shodan

That same day, while looking for ideas, Alex came across a workflow template for n8n automation that used Shodan, the search engine for internet-connected devices. It claimed to run a weekly Shodan IP and port monitoring workflow that could automatically check important IPs and highlight unexpected open ports.

The promise was simple but powerful:

  • Use Shodan to scan key IP addresses.
  • Compare discovered open ports with an internal “expected” list.
  • Automatically create alerts in TheHive when something unusual appears.

Instead of reacting to surprise findings from auditors or external scanners, Alex could have a scheduled workflow quietly checking the network every Monday morning, before anyone else noticed problems.

Setting the Stage: The Watchlist That Matters

Alex started by defining the heart of the workflow: the watchlist.

The security team already kept a list of IP addresses and expected open ports in a central system. It was not perfect, but it was the single source of truth they relied on. The n8n template expected this data in JSON format, which fit perfectly with their existing API.

Each entry in the JSON looked something like this:

  • IP address – the external IP to monitor.
  • Array of expected ports – the ports that should be open or closely watched.

Alex realized that this was exactly what the workflow needed. n8n would fetch this JSON via a secured API endpoint, then use it as the baseline for comparison against the live Shodan data.

The Weekly Rhythm: Scheduling the Workflow

Next, Alex configured the timing. The template suggested running every Monday morning, which made sense. The team wanted regular, predictable checks without constant noise.

By scheduling the workflow to trigger once a week, Alex could:

  • Catch unauthorized open ports before they turned into real incidents.
  • Give the team a clear weekly snapshot of exposure.
  • Eliminate the need for someone to remember to run manual scans.

For the first time, port monitoring would happen automatically, without anyone clicking a button or updating a spreadsheet at the last minute.

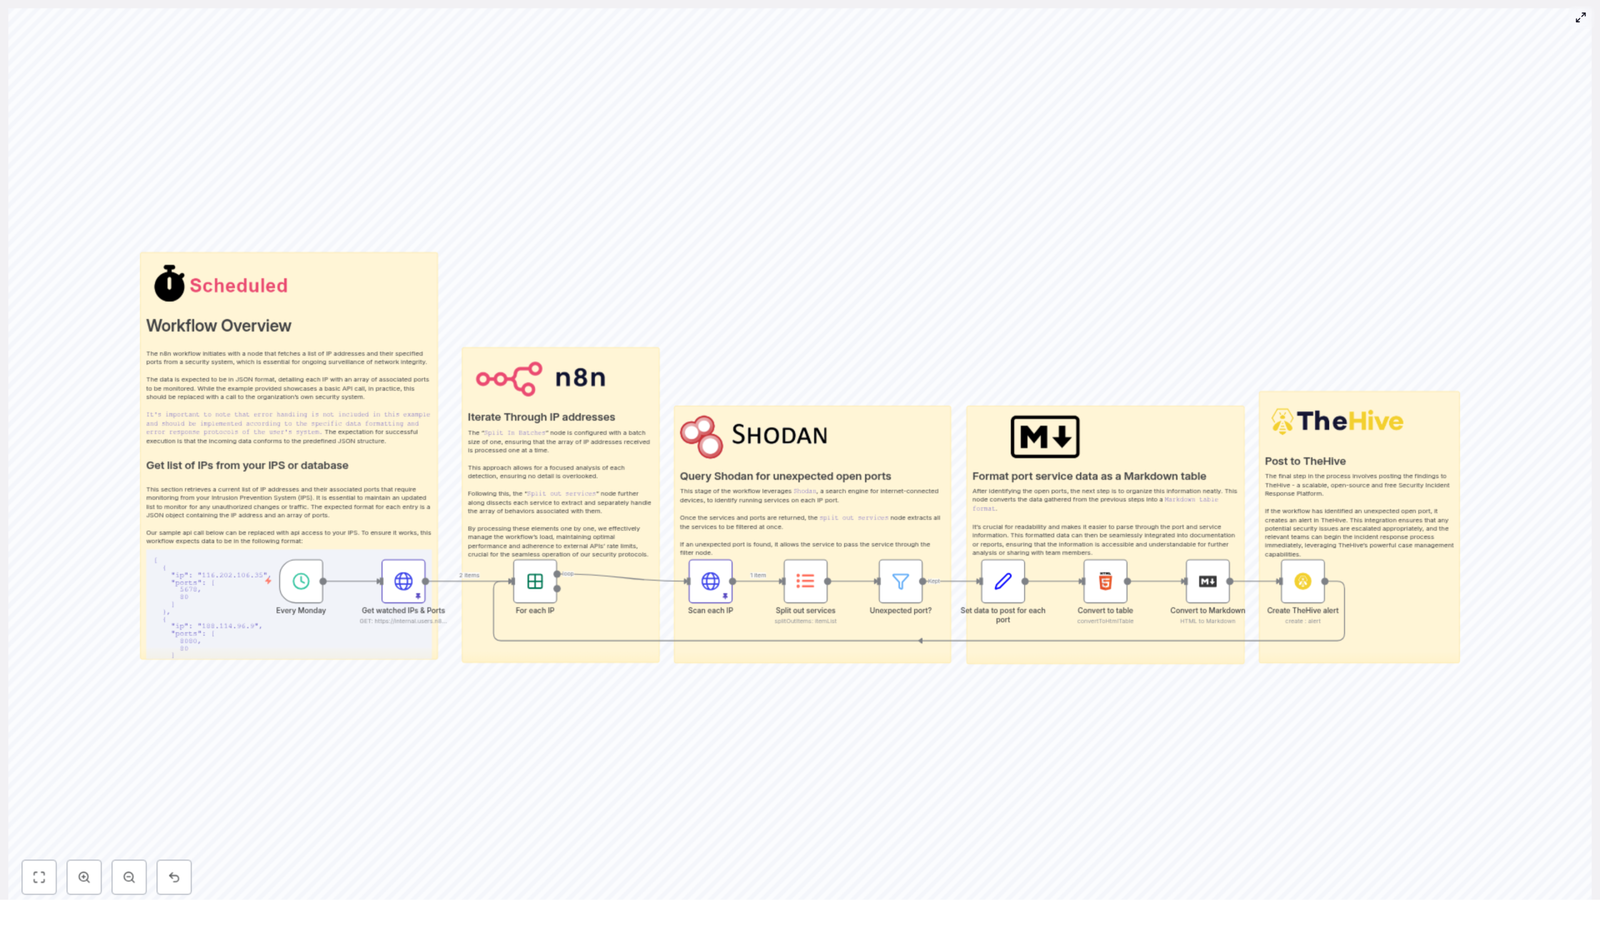
Inside the Workflow: How Alex’s Automation Actually Works

With the schedule and data source in place, Alex dug into the core steps of the workflow. n8n made it easy to visualize, but understanding each stage mattered. If something went wrong, Alex needed to know exactly where to look.

1. Fetching the Monitored IPs and Ports

The workflow begins by calling a secured API endpoint that returns the JSON watchlist. This list includes every IP address that matters to the company and the ports that are expected to be open on each one.

In Alex’s environment, this API was already protected and used by other internal tools, so plugging it into n8n was straightforward. The workflow simply reads the JSON and prepares it for processing.

2. Processing IPs One by One With Batch Handling

Instead of hammering Shodan with a flood of requests, the workflow uses n8n’s batch processing capabilities to iterate through each IP address individually. This is critical for:

  • Reducing API load.
  • Avoiding Shodan rate limits.
  • Keeping the workflow stable and predictable.

Alex liked that this approach was scalable. If the company added more IPs later, the workflow would still handle them gracefully.

3. Querying Shodan for Each IP

For each IP in the list, the workflow calls the Shodan API to retrieve detailed information about open ports and running services. Shodan responds with rich data: which ports are open, what services are detected, and other metadata that can hint at potential misconfigurations.

This is where the magic happens. Instead of manually scanning or relying on external tools, Alex now had a programmatic, repeatable way to ask Shodan exactly what it sees on the company’s IPs.

4. Splitting Out Individual Services

The Shodan response can include multiple services per IP. To analyze them properly, the workflow splits each service into separate items. This makes it possible to examine each open port individually, compare it to the watchlist, and decide whether it is expected or suspicious.

For Alex, this meant granular visibility. No more scanning through long JSON blobs or flat lists. Each port and service became a clear, isolated data point.

5. Filtering Out the Unexpected Ports

Now came the crucial comparison. The workflow checks each discovered port against the list of expected ports for that specific IP. If a port appears in Shodan’s data but is not in the approved list, it is flagged as unexpected.

This step turns raw data into actionable information. Instead of flooding the team with every port Shodan finds, the workflow focuses attention only on deviations from what is supposed to be open.

6. Formatting Findings Into a Markdown Table

Alex knew that if alerts were messy or hard to read, they would be ignored. The workflow solves this by formatting each set of unexpected ports into a clean Markdown table. The table includes structured details about each port and service, making it easy to scan at a glance.

When the security team receives an alert, they do not need to parse raw JSON or hunt for key values. The information is already organized and ready for triage.

7. Creating an Alert in TheHive

The final step was where everything came together.

If the workflow finds any unexpected open ports, it automatically creates an alert in TheHive, the company’s Security Incident Response Platform. Each alert contains:

  • Details about the affected IP.
  • The Markdown table of unexpected ports.
  • Context that helps analysts understand why the alert matters.

This integration turns passive monitoring into active incident response. TheHive receives a structured, actionable alert that can be assigned, tracked, and resolved within existing processes.

The Turning Point: From Panic to Proactive

A few weeks after setting up the workflow, Alex came in on another Monday morning. This time, there was no surprise audit report. Instead, there was a new alert in TheHive, generated by the n8n workflow.

One of the production IPs showed an SSH port that was not on the approved list. The Markdown table in the alert made the issue immediately clear. Within minutes, the team confirmed that a misconfigured rule had exposed the port after a routine deployment.

They closed the exposure, documented the fix, and updated their processes. What would once have been a high-stress incident discovered by someone outside the company was now a controlled, internal catch that never escalated beyond the security team.

Why This Workflow Changed Everything for Alex

Looking back, Alex could summarize the impact in a few clear benefits.

Automation That Frees Up Time

The weekly Shodan IP and port monitoring workflow removed the need for manual checks and spreadsheet maintenance. Routine monitoring and initial triage were now handled by automation, so the team could focus on deeper investigations and strategic improvements.

Timely Detection of Risk

By running every Monday, the workflow created a predictable rhythm of security checks. Unexpected changes, new open ports, or accidental exposures were caught early, instead of surfacing weeks later in an audit or after an incident.

Actionable, Clear Reporting

The Markdown tables and direct integration with TheHive meant that alerts were not just data dumps. They were clear, structured, and ready for incident response. Analysts no longer had to waste time cleaning up or reformatting information.

Scalable and Customizable for the Future

As the company grew, Alex could easily:

  • Add new IPs to the monitored list.
  • Incorporate additional error handling and environment-specific logic in n8n.

The workflow was not a rigid script. It was a flexible automation built on n8n that could evolve with the infrastructure and security requirements.

From Story to Action: Build Your Own Weekly Shodan Monitoring

Alex’s story is not unique. Many security teams struggle with the same problem: too many IPs to watch, too many ports to track, and not enough time to do it manually.

By combining Shodan, n8n automation, and TheHive, this workflow turns weekly IP and port monitoring into a reliable, automated safety net. It helps you move from reactive firefighting to proactive protection.

If you manage external-facing infrastructure or care about your organization’s security posture, setting up this workflow can:

  • Boost your network security monitoring effectiveness.
  • Accelerate incident response.
  • Reduce the chance of being surprised by unexpected open ports.

Talk with your security team or automation specialist, connect your existing IP and port watchlist, and tailor the workflow to your environment. With the right setup, your Monday mornings can look a lot more like Alex’s new normal: calm, controlled, and confidently monitored.

Automate Email Attachment Analysis with n8n & Sublime

Automate Email Attachment Analysis with n8n & Sublime

Imagine never opening another sketchy email again…

You know that feeling when your “phishing reports” inbox is overflowing, and someone says, “Can you just quickly check these suspicious emails?” Suddenly you are downloading .eml files, opening them one by one, squinting at headers, and hoping nothing explodes.

That is exactly the kind of repetitive, slightly soul-draining task that automation loves. Instead of manually poking at every suspicious message, you can let an n8n workflow grab those emails, send them to Sublime Security for analysis, and then post a neat summary into Slack. You get insights, alerts, and visibility, without the click-click-click misery.

In this guide, you will see how this ready-made n8n workflow template helps you automatically analyze phishing or suspicious emails that land in a dedicated inbox, then share results with your security team in real time.

What this n8n + Sublime workflow actually does

At a high level, this automation watches a mailbox, grabs suspicious emails as .eml attachments, sends them to Sublime Security for threat analysis, then reports the results in Slack. If something looks off, you know quickly. If there is no attachment at all, you still get a heads up so nothing slips through unnoticed.

Core capabilities in plain language

  • IMAP email intake: Uses the n8n IMAP node to monitor a phishing or suspicious-email inbox, often fed by Outlook phishing reports, and ingests messages as .eml attachments.
  • Attachment detection: Checks whether an incoming email actually has an attachment, specifically a .eml file, before doing any heavy lifting.
  • Safe data conversion: Converts the attachment from binary into JSON so it can be sent cleanly to the Sublime Security Analysis API.
  • Threat analysis with Sublime Security: Runs the email through active detection rules to spot malicious patterns, suspicious behavior, or other threat indicators.
  • Result separation: Splits the returned rules into two groups: rules that matched and rules that did not match, which makes review much easier.
  • Slack reporting: Builds a readable summary, including counts and names of matched rules, and posts it straight to your chosen Slack channel.
  • Attachment missing alerts: If an email arrives without an attachment, the workflow still notifies your team in Slack so you can investigate misclassifications or odd behavior.

Why bother automating this?

Besides saving your sanity, this workflow gives your security operations a noticeable upgrade.

  • Speed: Threats are analyzed and reported in near real time, which shrinks your response window and helps you act faster.
  • Accuracy: Sublime Security uses up-to-date detection rules, which reduces the chance of manual errors or missed signals.
  • Efficiency: No more manual downloading, converting, and copy-pasting results. The workflow does that part for you.
  • Transparency: Slack notifications keep the whole team in the loop, so everyone can see what is going on with phishing attempts and suspicious emails.

How the workflow runs behind the scenes

Let us walk through the actual flow from “email lands in inbox” to “Slack message pops up”. The steps below map directly to the nodes and logic inside the template, just explained in a more human-friendly way.

1. Email trigger with IMAP

The workflow starts with the IMAP node in n8n. You point it at your dedicated phishing or suspicious-email inbox, usually the one that Outlook or another platform forwards flagged messages to.

Once your IMAP credentials are configured, the node watches that mailbox and automatically pulls in new messages. These are received as .eml file attachments, which represent the full original email that was reported as suspicious.

2. Check if an attachment exists

As soon as a new email arrives, the workflow checks whether it contains an attachment. This is the first filter so you are not wasting resources on random emails that do not include the actual suspicious content.

If an attachment is present, the workflow continues with analysis. If not, it skips the heavy processing and jumps straight to a Slack alert so your team can decide what to do.

3. Convert binary data to JSON

For emails with attachments, n8n converts the binary attachment into JSON. Sublime Security expects structured data, not raw binary, so this step is essential for making the .eml usable by the API.

This conversion prepares the email content for safe, structured transmission to Sublime Security, without you having to manually handle file formats.

4. Analyze the email with Sublime Security

Next, the workflow sends the converted JSON to the Sublime Security Analysis API. Sublime runs the email through its active detection rules to identify:

  • Potential phishing attempts
  • Suspicious patterns or indicators of compromise
  • Other threat signals defined in your detection rules

The result is a detailed analysis that tells you which rules fired and why the email might be dangerous.

5. Split matched and unmatched rule results

Once the analysis comes back, the workflow separates the response into two groups:

  • Matched rules: Rules that detected something of interest or concern.
  • Unmatched rules: Rules that did not detect anything in this particular email.

This split makes it easier to focus directly on what actually triggered during the analysis instead of digging through a long list of every possible rule.

6. Format the summary and send to Slack

With the results organized, the workflow formats a clear summary message. This typically includes:

  • How many rules matched
  • The names of the matched rules
  • A concise overview of the findings

That summary is then sent to a designated Slack channel. Your team gets an instant, nicely formatted report without having to log into multiple tools or open the original email.

7. Notify Slack if there is no attachment

Not every suspicious email arrives with a proper .eml attachment. When the workflow detects that an incoming message is missing the expected file, it sends a Slack notification specifically about the missing attachment.

This helps your team catch potential misconfigurations, misclassifications, or user errors, and ensures nothing quietly slips through the cracks.

Quick setup guide for the template

This template is built so you can get up and running quickly. Here is a simplified setup path using all the steps above:

  1. Import the n8n template: Use the provided template link to add the workflow to your n8n instance.
  2. Configure the IMAP node:
    • Enter your IMAP server details and credentials.
    • Point it to the dedicated phishing or suspicious email inbox that receives .eml reports.
  3. Confirm the attachment check logic: Make sure the node that checks for attachments is looking specifically for .eml files, as expected by your setup.
  4. Set up the Sublime Security connection:
    • Provide the API endpoint for the Sublime Security Analysis API.
    • Add your authentication details, such as API key or token, according to Sublime’s requirements.
  5. Review the binary-to-JSON conversion: Ensure the node that converts the attachment from binary to JSON is mapped correctly to the attachment field provided by the IMAP node.
  6. Configure Slack notifications:
    • Connect your Slack account or webhook.
    • Choose the channel where you want analysis results and alerts to appear.
    • Review the message templates for matched results and missing attachments.
  7. Test with a sample suspicious email:
    • Send a test phishing report into your monitored inbox.
    • Watch the workflow run, confirm Sublime receives and analyzes the .eml, and check that Slack messages look correct.

Tips, tweaks, and next steps

Once the workflow is running, you can refine it to match your team’s style and needs.

  • Adjust Slack message formatting: Add more context, tags, or links to internal runbooks so responders know exactly what to do.
  • Tune detection rules in Sublime: Refine your rules to reduce noise and highlight the threats that matter most to your environment.
  • Add branching logic: In n8n, you can extend the workflow to create tickets, escalate severe findings, or store analysis data for later reporting.
  • Control frequency and scope: Modify IMAP settings or filters so you only process the right kinds of messages, not every random inbox notification.

Turn your inbox into a threat detection hub

Instead of treating your phishing inbox as a chore list, you can turn it into an automated threat detection hub. With n8n handling the flow and Sublime Security doing the heavy analysis, your team can focus on mitigation, not manual triage.

If you want to strengthen your cybersecurity operations, reduce repetitive work, and get faster insight into suspicious emails, this n8n workflow template is a practical way to start. Integrate it, connect your tools, and let automation handle the boring parts.

For deeper customization or more complex incident response flows, consider working with a cybersecurity automation expert to extend this workflow and align it with your organization’s playbooks.

Final thoughts

Combining n8n automation with the Sublime Security API gives your security team a powerful, always-on assistant that never gets tired of checking phishing emails. You get timely analysis, clear Slack updates, and fewer manual steps in your day.

Do not let threatening emails sit quietly in an inbox. Automate your email attachment analysis with n8n and Sublime Security, and keep your organization one step ahead of attackers.

Automate Repurposing TikToks Across Social Media

How to Repurpose TikTok Videos on Autopilot (So You Never Copy-Paste Again)

If you have ever downloaded a TikTok to your phone, AirDropped it to your laptop, uploaded it to Google Drive, then manually posted it to five different platforms, you already know: this is not the life you were meant to live.

Luckily, n8n + RSS + Google Drive + Blotato can do all that boring stuff for you while you focus on creating content, not clicking buttons. This workflow template automatically:

  • Detects new TikTok videos via RSS
  • Downloads the video without a watermark
  • Saves it neatly in a Google Drive folder
  • Repurposes and posts it to multiple social media platforms using Blotato

In other words, it is a content repurposing conveyor belt that runs on autopilot instead of your patience.

What This n8n Workflow Actually Does

This n8n workflow template is built to repurpose TikTok videos across multiple social platforms with minimal human involvement. Here is the big-picture flow:

  1. Trigger: An RSS feed watches your TikTok profile for new posts.
  2. Fetch: When a new TikTok is detected, the workflow grabs the TikTok page and extracts the direct video URL with a script.
  3. Download: The video file is downloaded without a watermark.
  4. Store: The video is uploaded to a specific Google Drive folder.
  5. Repurpose: Blotato API takes over and posts the video to your connected social media accounts.

All of this happens automatically once you have done the initial setup. No more “save to camera roll, upload again, repeat on every app” routine.

Step 1 – Use an RSS Feed Trigger to Catch New TikToks

First, you need a way for n8n to know when you have posted something new on TikTok. That is where an RSS Feed Trigger node comes in.

You can use RSS.app to generate a custom RSS feed from your TikTok profile. n8n then listens to that feed and springs into action whenever a new video shows up.

Setup 1 – RSS Feed for TikTok

  1. Sign up for RSS.app.
  2. Create an RSS feed for your TikTok profile.
  3. Set the Number of Posts to 1 so the feed always shows only the latest video for rapid detection.
  4. Copy your RSS feed URL and paste it into the RSS Feed Trigger node in n8n.

Once that is in place, every new TikTok is like a starting gun for your automation workflow.

Step 2 – Retrieve and Download Your TikTok Video (Without the Watermark)

After the RSS trigger fires, the workflow fetches the TikTok page and uses script parsing to pull out the direct video URL. From there, n8n downloads the video file straight from TikTok.

The best part: the workflow is set up to remove watermarks, so you get a clean version of your content that looks professional on every platform.

No more sketchy third-party sites, no more screen recording, no more “why is there a username bouncing around the screen” energy.

Step 3 – Store Everything Safely in Google Drive

Once the video is downloaded, it is automatically uploaded to a folder in your Google Drive. This gives you a central archive of all your TikTok content, ready for reuse, editing, or backup whenever you need it.

Setup 2 – Connect Google Drive

  1. Connect your Google Drive account to the workflow in n8n.
  2. Select the appropriate Parent Drive where you want videos stored.
  3. Choose the specific Parent Folder that will hold your TikTok video archive.

From here on, every new TikTok gets filed away automatically, like having a super-organized assistant who never forgets to back things up.

Step 4 – Repurpose Everywhere With Blotato API

Now for the fun part: actually posting your content everywhere without lifting a finger.

Blotato is an automation tool that connects to your social media accounts and posts content on your behalf. In this workflow, once the video is safely in Google Drive, Blotato steps in to distribute it across your channels.

You can configure the workflow to upload the media and post to platforms such as:

  • Instagram
  • YouTube
  • Facebook
  • LinkedIn
  • Twitter
  • Threads
  • Pinterest
  • Bluesky

Setup 3 – Blotato Posting

  • Sign up and connect your Blotato account.
  • Select the social media accounts where you want to post your TikTok content.
  • Customize your text captions and scheduling options to match your posting style and timing.

Important: Avoid posting the exact same video too frequently on the same platform. Many platforms treat that as spam and may limit your reach or flag your account. Also, be sure to disclose AI-generated content where required by platform policies.

Resource Links:

Once configured, Blotato turns your TikToks into a multi-platform content strategy instead of a single-app moment.

Monitoring, Logs, and Error Handling

Even the best automation occasionally needs a little debugging. Fortunately, both n8n and Blotato give you clear ways to see what is going on behind the scenes.

Error Report & Monitoring

  • Check your workflow run logs and results directly in the n8n platform to see whether each step ran successfully.
  • Use the Blotato API Dashboard for detailed stats, API usage, and troubleshooting information.

This makes it much easier to spot issues like failed uploads, API errors, or misconfigured accounts before they turn into missed posts.

Putting It All Together

Once the workflow is fully set up, your content pipeline looks like this:

  1. You post a new TikTok.
  2. The RSS Feed Trigger in n8n detects it almost immediately.
  3. The workflow fetches and downloads the video without a watermark.
  4. The video is stored in your chosen Google Drive folder.
  5. Blotato uses the video to publish across your selected social platforms.

No more copy-paste marathons, no more “did I already post this on Instagram” guessing games, just consistent content distribution across your social media channels.

For a more detailed breakdown of each step and configuration option, you can follow the official tutorial here:

Complete Tutorial

Next Steps: Start Automating Your TikTok Repurposing

If you are ready to retire from the manual-upload grind, this n8n workflow template is a simple way to start. Combine the flexibility of n8n with the posting power of Blotato and let automation handle the repetitive parts of your social strategy.

Use this setup to:

  • Expand your presence across multiple platforms from a single TikTok
  • Keep a clean, organized archive of your videos in Google Drive
  • Save time and mental energy for creating content instead of re-uploading it

Ready to repurpose smarter, not harder? Spin up the n8n template and let your TikToks travel the internet while you work on your next idea.

Automate Calendly Bookings to Google Sheets

A Marketer’s Story: How One Simple n8n Workflow Turned Calendly Chaos Into Clean Google Sheets Data

By Tuesday afternoon, Mia’s calendar looked like a battlefield.

As a busy marketing consultant, she lived inside Calendly. Discovery calls, strategy sessions, onboarding meetings – they all flowed through her booking links. But when it came time to prepare reports for clients or plan her week, she always hit the same wall.

Her bookings were everywhere. Calendly showed the times, her email had confirmations, her notes were in a dozen places, and her Google Sheet – the one she used for tracking leads and revenue – was always behind.

Every Friday she spent an hour, sometimes more, copying booking details into a spreadsheet. Names, emails, phone numbers, event types, dates, times, meeting links, notes. One typo could mess up a report. One missed entry could mean forgetting to follow up with a promising lead.

She knew there had to be a better way.

The Pain Of Manual Calendly Tracking

Mia’s problem was not unique. Anyone who relies on Calendly bookings knows the drill:

  • New meetings arrive in Calendly.
  • You open your Google Sheet.
  • You copy and paste details, row by row.
  • You hope you did not miss anything.

It was slow, error-prone, and frustrating. Mia needed:

  • More time for strategy and client work, not manual data entry.
  • Accurate records without worrying about typos or missing bookings.
  • Easy reporting from a single Google Sheet that she could share with her assistant and clients.

One afternoon, after fixing yet another spreadsheet mistake, she searched for “automate Calendly to Google Sheets” and discovered something that would change her weekly routine: an n8n workflow template that auto-logs Calendly bookings directly into Google Sheets.

The Discovery: An n8n Template That Does The Work For You

Mia was not a developer, but she was comfortable with tools. When she opened the n8n template, she saw that it already had everything wired together:

  • A Calendly Booking Webhook that listens for new bookings in real time.
  • A Normalize Booking Data step that cleans and organizes the raw Calendly JSON.
  • A Save Booking to Sheets node that appends each booking as a new row in Google Sheets.
  • A Log Booking Success node that confirms everything worked.

In theory, it meant this: every time someone booked a meeting with her, the details would automatically appear in her Google Sheet, perfectly formatted, ready for reporting or follow up.

It sounded ideal. But would it actually work for her setup?

Rising Action: Setting Up The Automation

Instead of a dry checklist, Mia treated the setup like a small project. Her goal was simple: “By tonight, I want every new Calendly booking to land in my Google Sheet automatically.”

Step 1 – Preparing The Google Sheet

First, she created a new Google Sheet called “Calendly Bookings – Master Log”. In the first row, she added the exact headers that the template expected:

  • Name
  • Email
  • Phone
  • Event Type
  • Date
  • Time
  • Status
  • Meeting Link
  • Notes

Then she grabbed the Google Sheet ID from the URL and pasted it into the Save Booking to Sheets node in n8n, replacing the placeholder YOUR_GOOGLE_SHEET_ID. This was the bridge between her automation and her spreadsheet.

Step 2 – Connecting Calendly With A Webhook

Next came Calendly. The template included a Calendly Booking Webhook node, which generated a webhook URL. This URL would be the listener for all new booking events.

Following the template’s guidance, Mia went into her Calendly account:

  • Opened Account → Integrations → Webhooks.
  • Created a new webhook and pasted in the URL from the “Calendly Booking Webhook” node.
  • Subscribed to the invitee.created event so that every new booking would trigger the workflow.

She hit save, feeling that familiar mix of curiosity and skepticism. If this worked, it would remove an entire recurring task from her week.

Step 3 – Authorizing Google Sheets In n8n

To let n8n write into her spreadsheet, she needed to connect her Google account. Inside the Google Sheets node, she set up OAuth credentials and authorized n8n to access her Sheets.

Once the connection was confirmed, the pieces were in place. Calendly could send booking events, n8n could receive and process them, and Google Sheets was ready to store everything.

The Turning Point: Watching The First Booking Flow Through

Now came the moment of truth.

Mia opened her Calendly link in a private browser window and booked a fake test meeting with herself. She filled in the name, email, phone number, selected a time, and added a short note.

Within seconds, n8n showed activity. The workflow triggered, each node lit up, and the run completed successfully.

She switched to her Google Sheet.

There, in the second row, was the entire booking:

  • Name: Her test name.
  • Email: The address she had entered.
  • Phone: Captured from Calendly’s form.
  • Event Type: The Calendly event she had chosen.
  • Date and Time: Properly split into separate columns.
  • Status: The booking status, ready for filtering and reports.
  • Meeting Link: The join link for the call.
  • Notes: The message she had added.

The Normalize Booking Data node had done its job. Behind the scenes, a JavaScript code step had taken Calendly’s raw JSON payload and extracted all the essentials in a clean, human-friendly format.

The Save Booking to Sheets node appended this normalized data as a new row, and the Log Booking Success node recorded a confirmation message. Everything worked on the first test.

For the first time since she started her consulting business, Mia realized she might never have to manually log a Calendly booking again.

How The Workflow Actually Works (Behind The Scenes)

As Mia grew more comfortable with n8n, she started to appreciate how simple the architecture really was. The template followed a clear, logical flow.

1. Calendly Booking Webhook

This is the entry point. Whenever an invitee is created in Calendly, the webhook receives a real-time event. That event includes all the booking details in JSON format. The webhook node simply listens and passes that data to the next step.

2. Normalize Booking Data

This JavaScript code node is the translator. It:

  • Takes the raw Calendly JSON.
  • Extracts key fields like participant name, email, phone, event type, start time, end time, meeting link, and notes.
  • Formats the date and time into a more readable structure.
  • Outputs a clean, structured object that matches the columns in the Google Sheet.

If your Calendly setup includes custom questions, this is also the place you can customize the script to capture that extra data.

3. Save Booking To Sheets

Once the data is cleaned up, the Google Sheets node appends it as a new row in the target spreadsheet. Each booking becomes a single, complete record, which makes it perfect for tracking, filtering, and reporting.

4. Log Booking Success

Finally, the workflow logs a success message. For Mia, this meant peace of mind. If something went wrong, she could see where. If everything was fine, she had a clear record that the booking was processed and stored correctly.

From Simple Tracking To A Full Automation System

After a week of using the template, Mia noticed something interesting. She did not just save time. She also started thinking differently about her entire booking process.

With every Calendly booking now flowing into Google Sheets automatically, she had a reliable single source of truth. That opened the door to more automation.

Ideas Mia Explored Next

  • Automatic confirmation emails sent from n8n using the same booking data.
  • Slack notifications whenever a high-value event type was booked.
  • Google Calendar event creation for specific bookings that needed extra preparation.

The original template had become the foundation for a broader automation system. Each new node she added built on the same core flow: Calendly event in, data normalized, actions triggered.

Keeping The Workflow Healthy

To make sure her automation stayed reliable, Mia followed a few simple habits:

  • Regularly scanning the Google Sheet to check that each booking row looked correct.
  • Testing webhook connectivity whenever she changed anything in Calendly or n8n.
  • Adjusting the normalization script if she added new questions or fields to her Calendly forms.

These small checks kept her confident that the system was doing its job in the background while she focused on clients and strategy.

The Resolution: From Friday Night Data Entry To Fully Automated Scheduling

A month later, Mia opened her “Calendly Bookings – Master Log” sheet and scrolled.

Every call from the past weeks was there, neatly organized. No gaps, no mismatched dates, no forgotten notes. When a client asked for a breakdown of meetings by event type, she had the answer in seconds.

The stress she used to feel every Friday evening, staring at a half-updated spreadsheet, was gone.

All of that came from a single n8n workflow template that automated Calendly bookings into Google Sheets.

Start Your Own Story With This n8n Template

If you are still copying Calendly bookings into spreadsheets by hand, you are living in the part of the story before the turning point. The template Mia used is ready to go. You only need to:

  1. Create a Google Sheet with the right headers and plug in your YOUR_GOOGLE_SHEET_ID.
  2. Set up the Calendly webhook for the invitee.created event.
  3. Connect your Google account via OAuth in the Google Sheets node.
  4. Run a test booking and watch it appear automatically in your sheet.

From there, you can extend the workflow with emails, Slack alerts, or calendar events, and turn a simple automation into a powerful scheduling system.

Ready to skip the manual work and let n8n handle your Calendly bookings?

Happy scheduling, and enjoy getting your Fridays back.

Automate CrowdStrike Detection Analysis with VirusTotal and Jira

Automate CrowdStrike Detection Analysis with VirusTotal and Jira

Why This Workflow Template Is Such a Time Saver

If you work in a SOC or handle security operations, you know the drill: CrowdStrike fires off a detection, you copy indicators, check VirusTotal, open Jira, create a ticket, then ping the team on Slack. It is important work, but it can get repetitive fast.

This n8n workflow template does all of that for you – automatically. It pulls detections from CrowdStrike, enriches them with VirusTotal data, creates detailed Jira issues, and sends alerts to Slack, all on a schedule. You get structured, enriched incidents without the manual copy-paste grind.

So if you have ever thought, “There has to be a better way to handle these detections,” this is exactly that better way.

What This n8n Workflow Actually Does

At a high level, the workflow:

  • Runs on a schedule and pulls fresh detections from CrowdStrike
  • Looks up key IOCs, like SHA256 hashes, in VirusTotal
  • Builds a rich, human-friendly description of the behavior and context
  • Creates a Jira issue for each detection with all the details filled in
  • Sends a Slack notification so your team can jump on it quickly

The result is a clean, repeatable pipeline from detection to investigation, without anyone needing to manually pivot between tools.

When You Should Use This Template

This workflow is a great fit if:

  • You use CrowdStrike for endpoint detection and response
  • You rely on VirusTotal to validate or enrich file hashes and other IOCs
  • Your incident tracking lives in Jira
  • Your team collaborates in Slack

It is especially useful if your volume of detections is growing and you want consistent triage, or if you want to standardize how incidents are documented and shared across the team.

How the Workflow Runs from Start to Finish

Let us walk through what happens behind the scenes once you have this template set up in n8n.

1. Scheduled Start: Pulling New CrowdStrike Detections

Everything kicks off with a scheduled trigger in n8n. In this template, the workflow is configured to run daily at midnight. You can, of course, adjust that to your own cadence, but midnight is a good default for daily batch processing.

On each run, n8n calls the CrowdStrike API to:

  • Query for new detection IDs since the last run
  • Fetch detailed summaries for each detection

The workflow handles detection IDs in batches so you stay efficient and within API limits while still covering everything that came in.

2. Breaking Detections into Individual Behaviors

Detections can contain multiple behaviors or events, and you probably do not want to treat that as one big blob. The workflow takes each detection and splits it into individual records so that each behavior can be processed separately.

To keep things stable and compliant, the template uses batching. That means it processes a manageable number of items at a time, which helps:

  • Control workflow load in n8n
  • Respect CrowdStrike and VirusTotal API constraints

3. Enriching IOCs with VirusTotal

Now for the part everyone loves: enrichment. For each relevant IOC, such as a SHA256 hash, the workflow calls the VirusTotal API to grab extra context.

From VirusTotal, you can get details like:

  • Reputation or detection score
  • Tags and classifications
  • Detection statistics across engines

To avoid hitting rate limits, the template includes a 1-second pause between VirusTotal requests. It is a small delay that keeps your workflow reliable and API friendly.

4. Pulling Everything Together Into a Clear Description

Once the data is enriched, the workflow aggregates all the behavioral details into a single, well-structured description. This is where it turns raw fields into something a human analyst can quickly read and understand.

The formatted description typically includes:

  • Direct links to the relevant CrowdStrike detection dashboard
  • Links to VirusTotal reports for the IOCs
  • Confidence levels and detection severity
  • Filenames and associated usernames
  • Detailed IOC information pulled from both platforms

Instead of jumping across tools, an analyst can open the ticket and see the whole story in one place, with links ready if they want to dig deeper.

5. Creating Structured Jira Issues

Next, the workflow automatically creates a Jira issue for each detection. No more manually building tickets or forgetting to include something important.

The Jira issue is populated with:

  • A concise summary of the detection
  • Severity and classification pulled from CrowdStrike
  • Host information and other key context
  • The enriched behavioral description that combines CrowdStrike and VirusTotal data

This ensures every incident is formally tracked in your existing workflow, assigned to the right people, and ready for triage, investigation, and resolution.

6. Notifying the Team in Slack

Finally, the workflow sends out a Slack notification so nobody misses what just landed in Jira.

The Slack message can be sent to a specific user or a dedicated channel and usually includes:

  • The severity level of the detection
  • A short description or summary
  • A direct link to the corresponding Jira ticket

That way, your team can move from “alert raised” to “investigation started” in just a couple of clicks.

Why This Workflow Makes Your Life Easier

So what do you actually gain by plugging this into your environment? Quite a lot.

  • Automation: The heavy lifting of analysis is handled for you. CrowdStrike detections and VirusTotal data are stitched together automatically, so your team can focus on decisions, not data entry.
  • Better Enrichment: VirusTotal adds context that turns a raw hash or behavior into something meaningful. With reputation, tags, and detection stats in one place, you can prioritize faster.
  • Stronger Incident Management: Every detection becomes a structured Jira ticket. No more ad hoc tracking in chats or spreadsheets. Your incident lifecycle is documented and consistent.
  • Instant Awareness: Slack notifications keep the team in the loop in real time. Critical threats do not sit unnoticed in a console waiting for someone to log in.

Getting Started with This n8n Template

If your goal is to make your SOC more efficient and your response times faster, connecting your detection, enrichment, and incident tools is a huge win. This n8n workflow template gives you a ready-made starting point.

You can adopt it as is, or customize it to:

  • Adjust the schedule or trigger conditions
  • Tune which fields are sent to Jira
  • Change where and how Slack alerts are posted

The core idea stays the same: let automation handle the repetitive parts so your team can stay focused on real security work.

Start automating your CrowdStrike detection responses today and give your team more time to stay one step ahead of threats.

Comprehensive Guide to VirusTotal & Greynoise Threat Intel Workflow

Comprehensive Guide to the VirusTotal & Greynoise Threat Intel Workflow

Why This n8n Threat Intel Workflow Is Such a Time Saver

If you spend any time in security, you know the drill. Someone pings you with a suspicious URL, or an IP pops up in your logs, and suddenly you are juggling tools, copying data between tabs, and trying to piece together a clear picture of the threat.

This n8n workflow template is built to take that whole manual process off your plate. It connects VirusTotal and Greynoise, automates the lookups, merges the results, and then sends clean, easy-to-read reports right to your email or Slack.

In this guide, we will walk through what the template does, when to use it, and how each part of the workflow fits together. Think of it as your friendly, step-by-step tour of a very powerful automation.

What This Workflow Actually Does

At a high level, this n8n workflow:

  • Accepts URLs and IP addresses from your team via a form or API
  • Figures out whether each input is a URL or IP, and runs a Google DNS Lookup when needed
  • Submits URLs to the VirusTotal API and waits for the scans to complete
  • Enriches IP addresses using the Greynoise API (Noise and RIOT lookups)
  • Merges all that intel into a unified view, keyed by IP
  • Sends personalized reports via email and concise summaries to Slack

The result is a clean, repeatable threat intelligence pipeline that works in the background while you focus on higher level security work.

When You Should Use This Template

This workflow is especially handy if you:

  • Handle frequent phishing or suspicious URL reports from employees
  • Need a standardized process for investigating URLs and IPs
  • Want to give non-technical teams a safe way to submit indicators without exposing your full threat intel stack
  • Are tired of manually querying VirusTotal and Greynoise for every single indicator

In short, if you are doing repetitive URL/IP checks and sharing results with others, this workflow can quickly become part of your daily toolkit.

Step 1 – Collecting Inputs with Forms or API

The workflow kicks off with flexible input collection. You have two main options:

  • Form Trigger in n8n for interactive submissions
  • JSON API submissions for automated or system-to-system integrations

That means people from different departments can send you:

  • One or more URLs
  • One or more IP addresses
  • Their email address so they receive the results directly

The workflow automatically appends the user’s email to each item, which makes it easy to send personalized reports later on, even when you are processing multiple indicators in a batch.

Why this approach is so user friendly

  • Supports batch uploads, so you are not stuck with one indicator at a time
  • Keeps your threat intel tools hidden from non-security users
  • Makes it simple for anyone to submit suspicious data without extra training

Step 2 – Normalizing Data & Using Google DNS

Once the workflow receives the inputs, it needs to figure out what it is dealing with. Is that string an IP address, or is it a URL that needs to be resolved?

To do that, the workflow uses regex checks to distinguish between IPs and domain URLs. For any URL-type input, it triggers a Google DNS Lookup to resolve the domain and extract the corresponding IP address.

The resolved IP is then appended to the original URL, so you end up with a richer data set for downstream analysis.

Best practices at this stage

  • Validate that IPs follow proper IP address standards
  • Confirm that URLs are well-formed before sending them further down the chain
  • Add error handling for:
    • Failed DNS lookups
    • Invalid or malformed inputs

Graceful handling here means bad inputs do not break the whole workflow, and users can get clear feedback if something went wrong.

Step 3 – Scanning URLs with VirusTotal

Now comes the part everyone expects: sending URLs to VirusTotal for scanning. The template handles the asynchronous nature of VirusTotal by building a simple wait-and-check loop.

How the VirusTotal integration works

  1. Start Scan – The workflow submits each URL to the VirusTotal API and initiates a scan.
  2. Wait – It pauses for about 5 seconds to give the scan time to progress.
  3. Check Status – It queries VirusTotal to see if the scan status is now marked as completed.
  4. Filter & Aggregate – Only results with a completed status are kept and aggregated for reporting.

Working within VirusTotal’s rate limits

VirusTotal’s free API comes with some important constraints:

  • 500 requests per day
  • 4 requests per minute

To stay within those limits, you should:

  • Implement retry logic for transient API errors
  • Add logging so you can see when you are hitting rate limits
  • Fine tune wait times and retry thresholds to balance speed vs. quota

This way, your workflow remains reliable even on busy days when you are scanning a lot of indicators.

Step 4 – Enriching IPs with Greynoise

While VirusTotal is handling URLs, the workflow also enriches IP addresses using Greynoise. This gives you crucial context about whether an IP is noisy on the internet, part of benign infrastructure, or linked to malicious behavior.

Two key Greynoise lookups

  • Noise Context Lookup
    This tells you how Greynoise classifies the IP and what kind of activity it has observed. For example, is it part of broad internet scanning, or is it something more targeted?
  • RIOT Lookup
    This checks the IP against Greynoise’s RIOT (Rule It Out) database to identify known benign or trusted infrastructure, and helps separate signal from noise.

Greynoise access requirements

To use this part of the workflow effectively, you will need:

  • Enterprise-level Greynoise API access
  • Valid authentication tokens configured in n8n

Once those are in place, the workflow can automatically enrich every IP it encounters with high quality threat intel.

Step 5 – Merging Results & Building Reports

After both VirusTotal and Greynoise have done their jobs, the workflow brings everything together.

Merging by IP address

The template:

  • Merges VirusTotal and Greynoise output keyed by IP address
  • Combines URL scan results, blocklist information, and IP reputation data
  • Prepares a consolidated view for each submitted item

This is where the magic happens. Instead of jumping between tools, you get a single, unified picture you can act on quickly.

Sending the results to your team

Once the data is merged, the workflow formats it and sends it out via:

  • Email
    Each recipient gets a detailed report that can include:
    • Scan statistics and verdicts
    • Blocklist presence
    • Summary of findings and potential risk
  • Slack
    A concise notification is posted, summarizing the outcome of the scans for quick team awareness.

So the person who submitted the suspicious URL or IP does not have to chase you for updates. The workflow keeps them in the loop automatically.

Operational Tips & Best Practices

To keep this workflow running smoothly in production, a few habits go a long way.

Input quality and validation

  • Sanitize and validate inputs as early as possible
  • Reject obviously invalid indicators with clear error messages
  • Handle non-resolving domains with a friendly fallback explanation

Managing external APIs

  • Tune wait times and retry limits for VirusTotal status checks so you do not waste quota
  • Securely store and manage API credentials for both VirusTotal and Greynoise
  • Rotate keys periodically and follow your organization’s secrets management practices

Monitoring and troubleshooting

  • Keep an eye on execution logs in n8n for:
    • Repeated API errors
    • Performance bottlenecks
    • Patterns of invalid input
  • Adjust the workflow as your volume or threat landscape changes

Why This Workflow Makes Your Life Easier

Instead of treating each suspicious URL or IP as a mini project, this template turns the whole process into a single, automated pipeline. You get:

  • Consistent, repeatable analysis across your organization
  • Less context switching between tools and dashboards
  • Faster response times when something looks risky
  • Clear, shareable reports that non-technical stakeholders can understand

And because it is built in n8n, you can customize any part of it to match your environment, from how inputs arrive to how and where results are delivered.

Getting Started with the Template

Ready to put this into action? Here is what you will need before you hit run:

  • Valid VirusTotal API credentials
  • Valid Greynoise Enterprise API credentials and tokens
  • Access to your n8n instance with permission to add credentials and workflows

Once those are set up, you can import the template, plug in your keys, and start testing with a few sample URLs and IPs.

Next steps

  • Implement the workflow to give your security team reliable, automated threat scanning
  • Share the form or API endpoint with internal teams so they can submit suspicious indicators easily
  • Tune the workflow to match your alerting style, reporting format, and rate limits

If you need custom modifications or want to integrate this with other tools in your stack, it is a great idea to loop in your security automation engineer to help tailor it further.

Is Consciousness an Illusion? Exploring Phenomenal Consciousness

Is Consciousness an Illusion? A Story About Seeing the Mind Differently

The Late-Night Question That Wouldn’t Go Away

It started, as many philosophical crises do, sometime after midnight.

Alex, a software developer who loved both clean code and messy ideas, sat in front of a glowing laptop screen. The plan had been simple: listen to a podcast episode on consciousness while refactoring an old project. Instead, the code editor sat untouched as a single question from the episode dug in and refused to leave:

“Is my experience of being me actually what it seems to be, or is it some kind of illusion?”

Alex had always assumed consciousness was straightforward. Brains process information, memories get stored, senses feed in data, and out comes experience. Logical enough. But the podcast host kept returning to something more puzzling, something philosophers call phenomenal consciousness – the felt quality of experience, the “what it is like” to see red, taste coffee, or feel anxious at 2 a.m.

The more Alex listened, the more one uncomfortable thought formed: maybe the mind does not work the way intuition suggests at all.

Two Kinds of Consciousness Alex Had Never Separated

The episode drew a line that Alex had never consciously drawn before. The host talked about two different but related ideas:

  • Access consciousness – everything in the mind that can be reported, used, or explained in terms of brain processes. Memories, attention, sensory processing, decision making. The stuff you can, in principle, describe in neuroscientific terms.
  • Phenomenal consciousness – the raw feel of experience. The redness of red, the pain of a headache, the feeling of being “you” right now. Not just information in the brain, but what it is like to have that information.

Alex paused the episode and stared at the wall for a moment. Access consciousness made sense. It mapped neatly onto everything Alex knew about computation and information. But phenomenal consciousness felt like a glitch in that neat picture, a stubborn remainder that refused to be reduced to bits and neurons.

This, the host explained, is at the heart of what philosophers call the hard problem of consciousness. Not how the brain processes information, but why and how any of that processing is accompanied by experience at all.

The Rising Tension: A Problem That Wouldn’t Compile

As a developer, Alex was used to tracing bugs back to a missing semicolon or a race condition. But this felt different. The more the episode unfolded, the stranger the problem became.

Was phenomenal experience something that needed a completely different kind of explanation, separate from neuroscience? Or could it somehow emerge from the same physical processes that handled memories and perception? The podcast host walked through familiar metaphors that had shaped Western thinking for centuries, like Descartes’ Cartesian theater – the idea that there is an inner stage where experiences appear, watched by a kind of inner observer or “self.”

Alex realized that this was how the mind had always felt from the inside. As if there was a central place where everything came together, and a unified “me” watching it all. But the episode suggested that this comforting picture might be deeply misleading.

If there is no inner theater, no tiny observer in the head, then what exactly is having these experiences? And why does it feel so much like there is?

The Turning Point: Illusionism Enters the Scene

Halfway through the episode, a new idea dropped in that shifted everything for Alex: illusionism.

The host described a group of philosophers, including Daniel Dennett and Keith Frankish, who argue that what we call phenomenal consciousness might not be what it appears to be at all. Not that experience does not exist, but that the way we think about it is mistaken.

According to illusionism, our sense of having a rich, unified, continuous stream of experience is more like a user interface than a literal description of what the brain is doing. The analogy hit Alex hard. As a developer, interfaces were familiar territory.

Your operating system shows you icons, folders, and windows. None of that is what is actually happening in the hardware. There are no little folders inside the disk, no tiny trash can filling up. Those are simplified visual metaphors that help users interact with something far more complex and hidden.

Illusionists suggest that subjective experience is like that interface. The brain is running countless processes in parallel, with no central screen inside the head. Yet the mind presents all of this to “you” as if there is a single, coherent, continuous show.

Alex found this both unsettling and strangely elegant. It explained why consciousness feels unified, even though no neuroscientist has ever found a literal inner theater or central observer in the brain.

Seeing the Mind as an Interface, Not a Theater

The more the episode unpacked the metaphor, the more it resonated with Alex’s everyday work.

  • In a complex system, you never show users the raw machine state. You give them a simplified model that hides the messy details.
  • The interface is real in its own way, but it is not a perfect mirror of the underlying processes.
  • Users trust the interface because it is useful, not because it reveals the system’s full inner truth.

Illusionists argue that phenomenal consciousness is much like this. The “feel” of experience is not a direct window into the brain’s workings. Instead, it is a constructed representation, shaped by evolution to help organisms navigate the world.

That does not mean nothing is happening. On the contrary, incredibly rich and complex brain processes are at work. But the way those processes get packaged into “what it feels like” is part of the illusion, a convenient interface rather than a literal description.

For Alex, this reframing did not make experience disappear. It made it strangely familiar. Like realizing that a beautiful UI sits on top of a messy codebase, and that both levels are real, just in different ways.

The Pushback: Is “Illusion” the Wrong Word?

Just as Alex was starting to feel comfortable with the illusionist view, the episode introduced another voice: Massimo Pigliucci and other critics who are wary of calling consciousness an illusion at all.

They argue that using the word “illusion” can be misleading. After all, an illusion usually implies that something seems to exist but actually does not. Yet phenomenal consciousness is not like a mirage in the desert. We really do have experiences. They play a role in how we act, think, and talk. They are causally efficacious, not mere phantoms.

From this perspective, the problem is not that consciousness is fake, but that it can be described at different levels of reality and explanation. At one level, you have neurons firing and circuits activating. At another, you have the lived experience of seeing a sunset or feeling nervous before a presentation.

Critics of illusionism often lean toward a more pluralistic view. Instead of reducing everything to one basic description, they suggest that multiple ways of talking about mind and experience can be valid at the same time. Neurobiology explains one layer, phenomenology another. Neither has to cancel the other out.

Listening to this back and forth, Alex realized that the debate was not just about consciousness. It was also about how science and philosophy should relate to each other, and whether one language of explanation must always dominate.

How Metaphors Quietly Shape What We Believe

Later in the episode, another name appeared: Susan Blackmore. Her contribution felt less like a new theory and more like a gentle warning.

Blackmore points out that the metaphors we use to talk about consciousness quietly shape what we think is even possible. Call the mind a “stream,” and you picture a smooth, continuous flow. Call it a “theater,” and you imagine a stage and an audience. Call it a “user interface,” and you think in terms of icons and hidden processes.

Alex recognized the power of this. In software design, the wrong mental model can lead to bad architecture. In philosophy of mind, the wrong metaphor can trap generations of thinkers in unhelpful assumptions.

Blackmore suggests that careful introspection reveals something surprising. Our experience is not always as unified, continuous, or stable as our favorite metaphors suggest. It can be fragmented, constructed on the fly, and full of gaps that we do not normally notice. The mind may be stitching together a narrative of “what it is like” that feels smooth, even if the underlying reality is far messier.

For Alex, this was both humbling and freeing. If metaphors guide intuition, then choosing them carefully becomes part of thinking clearly about consciousness.

Where This Leaves Us: Between Illusion and Reality

By the time the episode began to wrap up, Alex’s original late-night question had multiplied into a small crowd of related ones.

  • If phenomenal consciousness is like a user interface, how far does that analogy go before it breaks?
  • Even if experience is “constructed,” in what sense is it still real and causally powerful?
  • Can we accept that the brain is doing all the work while still taking our inner life seriously?

The host did not pretend to solve the hard problem of consciousness. Instead, the episode positioned illusionism, its critics, and the role of metaphors within a broader philosophical landscape. The discussion pointed toward other deep questions that often travel with debates about consciousness, especially free will and determinism.

If our sense of being a unified, conscious self is partly a construction, what does that mean for our sense of choosing freely? If brain processes underlie our experiences and decisions, how should we think about responsibility and agency? Rather than closing doors, the conversation opened new ones.

A New Curiosity: Consciousness, Free Will, and What Comes Next

When the episode ended, Alex did not feel that the mystery of consciousness had vanished. If anything, it felt sharper, more precisely drawn.

Yet something had changed. The old, vague question “What is consciousness?” had become a more structured curiosity:

  • How do access consciousness and phenomenal consciousness differ, and why does that matter?
  • What does it mean to call consciousness an illusion, and is that the right word?
  • How do metaphors like the Cartesian theater, the stream of consciousness, and the user interface help or hinder understanding?
  • How will these debates shape future discussions of free will, determinism, and moral responsibility?

Instead of feeling paralyzed by the complexity, Alex felt invited into an ongoing conversation, one that blends science, philosophy, and careful reflection on lived experience.

Join the Ongoing Exploration of Mind and Reality

If Alex’s journey through this episode mirrors your own curiosity, you do not have to explore these questions alone.

The podcast that sparked all of this continues to dig into phenomenal consciousness, illusionism, free will, determinism, and many other questions at the edge of what we understand about the mind. Each episode adds another piece to the puzzle, challenging intuitive pictures of consciousness while grounding the discussion in philosophy and science.

To keep following these threads and see where they lead:

  • Subscribe so you do not miss upcoming episodes on free will, determinism, and the science of subjective experience.
  • Visit philosophizethis.org to explore more content, references, and discussions.
  • Engage with a community that shares your curiosity about how consciousness works, what it means to be a self, and whether our deepest intuitions are reliable guides or carefully crafted illusions.

The hard problem of consciousness may not be solved anytime soon, but with the right questions, metaphors, and conversations, it becomes less of a dead end and more of an invitation to think differently about what it means to be aware at all.

Is Phenomenal Consciousness an Illusion? Exploring Key Philosophical Debates

Is Phenomenal Consciousness an Illusion? A Friendly Tour of a Very Tricky Question

If you have ever paused mid-coffee sip and thought, “Wait, what is this whole ‘being me’ thing, exactly?” then congratulations, you have stumbled into one of philosophy’s most persistent headaches. The weird part is that the very thing that feels most obvious – your inner experience – is also one of the hardest things to explain.

Some philosophers even say that what it feels like to be you might be, in an important sense, an illusion. Not a magic-show kind of illusion, more like a user interface that hides the messy details underneath. Intrigued? Mildly unsettled? Perfect. Let us unpack what is going on here.

What Philosophers Mean by “Phenomenal Consciousness”

First, some vocabulary. Phenomenal consciousness is the fancy term for the raw feel of experience. It is the “what it feels like” side of being you.

  • The redness of red
  • The sting of embarrassment
  • The taste of coffee that you swear is different from everyone else’s

This is different from access consciousness, which is about information your brain can use and report on. Access consciousness is involved when you recall a phone number, follow directions, or solve a math problem. It is the stuff we can measure, test, and model.

The problem is that while access consciousness fits pretty nicely into neuroscience, phenomenal consciousness just sits there and refuses to be explained. How do spiking neurons and chemical signals add up to the feeling of pain, or the color blue, or the taste of chocolate? This stubborn puzzle is what philosophers call the “hard problem of consciousness.”

The “Little Person in Your Head” That Is Not Really There

To make sense of experience, many people (without quite realizing it) picture something like a private cinema inside the skull. This idea has a name: the Cartesian Theater, inspired by René Descartes.

In this metaphor, there is a tiny observer inside your brain, watching a mental screen where sights, sounds, and thoughts appear. Your experiences are like a movie, and “you” are the audience.

No serious philosopher or neuroscientist thinks this little inner viewer is literally real, but the metaphor is sticky. It makes us think consciousness is a special, separate thing that sits on top of physical processes, instead of being part of them. That intuitive picture is exactly what some philosophers want us to question.

Enter Illusionism: Consciousness as a Clever User Interface

Here comes the bold move. Philosophers like Daniel Dennett and Keith Frankish suggest that phenomenal consciousness itself might be an illusion.

Not in the sense that nothing is happening, but in the sense that what you experience is a simplified, user-friendly representation of extremely complex brain processes. Think of it like a computer desktop:

  • The little folder icon is not literally a folder
  • The trash can is not a tiny physical bin full of files
  • They are easy-to-grasp symbols that stand in for complicated operations

On this illusionist view, your conscious experiences are like those icons. They are not a separate, magical layer of reality. They are a handy, approximate way your brain presents information to itself so that “you” can navigate the world without needing a PhD in neurobiology.

So, phenomenal consciousness, in this perspective, is not a fundamental ingredient of the universe. It is a kind of user interface that helps a biological system (you) manage reality without being overwhelmed by raw data.

Why Illusionists Think This Makes Sense

Illusionism is not just philosophical trolling. It is built on several observations about how the brain works.

1. The Brain Is a Parallel Processing Monster

Your brain does not run on a single tidy stream of “experience.” It is a mess of many parallel processes happening at once. Visual processing, language, memory, emotional evaluation, motor control, and more all run simultaneously.

The idea that there is one unified, continuous “movie of consciousness” does not fit well with how the brain actually operates. Illusionists argue that our sense of a single, coherent inner show is itself a kind of constructed story, not a literal description of what is going on.

2. Phenomenal Qualities Might Be Metaphors for Neural Events

When you say “this red is so vivid” or “that pain is sharp,” you are reporting phenomenal properties. Illusionists suggest that these might be metaphorical ways of talking about what the brain is doing, rather than direct properties of the brain itself.

In other words, the “redness” you experience is not a literal property floating above your neurons. It is a brain-generated way of representing certain patterns of neural activity so that your system can react appropriately.

3. The Brain Is Already Full of Illusions

We know the brain is a champion illusionist in other domains, so why not here too?

  • Motion perception in movies: You see smooth movement, but what is really there is a series of still frames.
  • Unified memory: Your life feels like one continuous story, but memory is patchy, reconstructed, and often inaccurate.

Given that the brain routinely serves up convincing but inaccurate stories about the world, illusionists argue that consciousness itself might be another example. What you feel is real as an experience, but misleading if you take it as a literal description of the underlying mechanics.

“Illusion” Sounds Harsh: What the Critics Say

Not everyone is thrilled with the label “illusion.” Philosophers like Massimo Pigliucci worry that it suggests our experiences are somehow fake or irrelevant, which is not quite right.

After all, your conscious experiences are causally connected to what your brain is doing. When you click a trash icon on your computer, something very real happens to your files. The icon is not the process, but it is not meaningless either.

So critics argue that calling consciousness an illusion risks confusion. It might be better to think of it as a useful representation rather than a deceptive trick. The brain’s “interface” is not lying to you, it is just simplifying.

Different Levels of Reality Can Coexist

Another key point from critics is that there are multiple valid levels of explanation when we talk about the mind:

  • Neuroscience explains neurons, synapses, and brain regions
  • Psychology explains behavior, cognition, and mental states
  • Subjective experience describes what it feels like from the inside

These levels do not cancel each other out. You can explain water in terms of H2O molecules and still talk meaningfully about waves and currents. In the same way, you can explain brain activity in physical terms and still talk about pain, joy, or color without treating them as illusions in the everyday sense.

Why This Debate Matters: Free Will, Ethics, and Everything Else

The illusionism debate is not just an academic pastime. It touches on big questions about who we are and how we should live.

If phenomenal consciousness is a kind of useful fiction or high-level representation, what does that mean for:

  • Free will: Are our choices “real” in the way we think, or are they part of the interface story our brain tells?
  • Ethics: If suffering and pleasure are represented states, not fundamental cosmic properties, how does that shape moral responsibility?
  • Science: Should neuroscience aim to “explain away” experience, or integrate it as one level of description among others?

Illusionism is attractive because it fits well with a scientific, materialist picture of the world and avoids positing mysterious extra ingredients. At the same time, it pushes hard against our deepest intuitions about what it is like to be a conscious subject. Many philosophers find it compelling but still feel there are open questions and reasons to be cautious before fully embracing it.

So, Is Consciousness an Illusion or Not?

The short answer is that the jury is still very much out. The idea that phenomenal consciousness is an illusion offers a neat, scientifically friendly way to think about the mind. It encourages us to:

  • Question the metaphors we casually use, like the Cartesian Theater
  • See consciousness as part of a complex physical system, not something floating above it
  • Recognize that what feels obvious from the inside might be a clever construction

At the same time, critics remind us that:

  • Our experiences are real as experiences, even if they are representational
  • Calling them “illusions” can confuse more than clarify
  • Different explanatory levels, from neurons to narratives, can all be valid

The ongoing conversation between illusionists, materialists, and other thinkers is less about one side “winning” and more about slowly refining how we talk about the mind. It is a long-term project, and we are still in the early chapters.

Where to Go Next: Free Will, Determinism, and More Mind-Bending Topics

If this has made you slightly suspicious of your own inner life, you are in good company. The next natural stop is the debate over free will and determinism. If consciousness is an interface, what exactly is doing the choosing when you decide to move your hand or change your life?

Future discussions will explore how these ideas connect, including:

  • Whether free will can survive a fully physical view of the mind
  • How determinism and randomness fit into our sense of agency
  • What all this means for responsibility, morality, and everyday life

If you are fascinated by the mysteries of consciousness and the strange, slippery questions it raises, stay tuned. Understanding these debates will not just stretch your brain, it can also deepen how you see human nature, your own mind, and what it means to be a person in a physical universe.

How to Import XML Data into MySQL Using n8n

Importing XML to MySQL with n8n (Without the Headache)

If you have an XML file full of product data and a MySQL database waiting to receive it, you might be thinking, “There has to be an easier way to get this in.” You’re right. That’s exactly where n8n comes in.

Instead of wrestling with custom scripts or one-off import tools, you can build (or simply reuse) an n8n workflow that:

  • Reads your XML file
  • Converts it into JSON
  • Splits it into individual items
  • And inserts everything neatly into a MySQL table

All of this happens in a visual, drag-and-drop interface. No need to be a hardcore developer to follow along.

What This n8n Workflow Template Actually Does

Let’s start with the big picture. This workflow is built to automate a very specific job: importing XML product data into a MySQL table.

Here’s what the template takes care of for you:

  • Manually triggering the workflow whenever you need to run an import
  • Loading an XML file from a given file path
  • Turning the binary file content into readable text
  • Converting XML into structured JSON
  • Splitting that JSON into individual product records
  • Inserting each product into a MySQL table called new_table

So instead of copy-pasting data or writing custom scripts every time, you just run the workflow and let n8n handle the heavy lifting.

When You’d Want To Use This Template

This setup is perfect if you:

  • Receive product catalogs, price lists, or inventory updates in XML format
  • Have a MySQL database where this data needs to live
  • Want a repeatable, low-maintenance way to keep data in sync

For example, maybe your supplier sends you regular XML exports of their product list, or your legacy system spits out XML files that you now want in MySQL. Instead of doing manual imports every time, you can run this workflow and be done in a few clicks.

Before You Start: Preparing Your MySQL Table

Before the workflow starts inserting data, you need a target table in MySQL. The template already includes a Create new table node that is commented out by default. You can enable it if you want n8n to prepare the table for you.

Inside that node, you’ll find this SQL:

CREATE TABLE IF NOT EXISTS new_table AS SELECT * FROM products;
TRUNCATE new_table;

Here’s what that does:

  • CREATE TABLE IF NOT EXISTS new_table AS SELECT * FROM products; Creates a new table called new_table that has the same structure as your existing products table.
  • TRUNCATE new_table; Empties new_table so it’s clean and ready for fresh data.

If you already have a table set up the way you like, you can skip this part. If not, this is a quick way to clone your existing structure and get a blank slate.

Getting Familiar With the XML Data

The workflow is built around a sample XML structure that represents a collection of products. Each product has attributes and nested tags such as:

  • Code
  • Price
  • Name
  • Line
  • Scale
  • Description

Here’s a snippet of the example XML used in the template:

<Products>  <Product Price="69.26" Code="S24_2360">  <Name>1982 Ducati 900 Monster</Name>  <Line>Motorcycles</Line>  <Scale>1:24</Scale>  <Description>Features two-tone paint with chrome accents, superior die-cast detail , rotating wheels , working kick stand</Description>  </Product>
</Products>

The workflow expects data in this general shape: a root <Products> element, with one or more <Product> entries inside. If your XML file has a different structure, you can still use the same approach, you’ll just need to adjust the nodes that reference specific paths like Products.Product.

How the n8n Workflow Is Structured

Now let’s walk through the actual building blocks of the workflow. Each piece has a clear job, and together they form a simple, reliable import pipeline.

1. Manual Trigger – Starting the Workflow

The first node is a Manual Trigger. This node does exactly what it sounds like: it lets you run the workflow whenever you click “Execute Workflow” in n8n.

This is ideal if you want full control over when imports happen, for example after you upload a new XML file or receive it from another system.

2. Read Binary Files – Loading the XML

Next, the Read Binary Files node takes over. Its job is to read the XML file from your filesystem.

In the template, the file path is set to:

/home/node/.n8n/intermediate.xml

You’ll want to update this path to point to your actual XML file. Once configured, this node pulls in the file as binary data so the rest of the workflow can start working with it.

3. Extract Binary Data – Turning It Into Text

Binary content is not very fun to work with directly, so the workflow uses an Extract binary data node (a Code node) to convert that binary content into a UTF-8 string.

Behind the scenes, this node runs a small JavaScript snippet that:

  • Reads the binary data from the previous node
  • Converts it into a human-readable text string

That string is then ready to be fed into the XML to JSON conversion step.

4. XML to JSON – Making the Data Easy to Work With

Once the XML is in text form, the XML to JSON node takes it and turns it into a structured JSON object.

Why JSON? Because JSON is much easier to handle inside n8n. You can easily access nested properties, loop through arrays, and map fields to database columns without needing to manually parse XML tags.

5. Item Lists – Splitting Products Into Individual Items

After the conversion, you’ll have a JSON object where all products live inside something like Products.Product.

The Item Lists node is used to:

  • Look at that Products.Product array
  • Split it so that each product becomes its own item in the workflow

This is important because the MySQL node later on expects one item per row to insert. By splitting the array, you make sure each product is handled individually.

6. Add New Records – Inserting Data Into MySQL

Finally, the Add new records node connects to your MySQL database and inserts each product into the target table.

In this template, the node is configured to insert data into new_table with fields such as:

  • productCode
  • productName
  • productLine
  • And other related product columns

Each item coming from the Item Lists node corresponds to one row in the database. As long as your MySQL credentials and column mappings are set correctly, n8n will handle the inserts automatically.

Why This Makes Your Life Easier

Could you write a script to do all of this? Sure. But here’s why using an n8n workflow template is often a better choice:

  • Visual and easy to tweak – You can see every step, adjust nodes, and add new ones without rewriting code.
  • Reusable – Once set up, you can run it again and again for new XML files.
  • Flexible – Need to add validation, send a notification, or log results? Just drop in extra nodes.
  • Less error-prone – The workflow is structured, so it’s easier to debug than a long script.

Tips for a Smooth XML to MySQL Import

To keep things running smoothly, here are a few practical tips:

  • Double-check the file path Make sure the path in the Read Binary Files node actually points to your XML file.
  • Validate your XML structure Confirm that your XML matches the expected format, especially the root element and product tags.
  • Review node settings Pay close attention to field names in the XML to JSON, Item Lists, and Add new records nodes, as well as your MySQL connection details.
  • Start with a small sample Test the workflow with a small XML file first. Once everything looks good, move on to larger datasets.

Wrapping Up

Importing XML data into MySQL doesn’t have to be a painful, manual process. With this n8n workflow template, you can:

  • Convert XML to JSON automatically
  • Split products into individual items
  • Insert everything into a MySQL table with minimal effort

Whether you’re dealing with product catalogs, inventory lists, or any other structured XML data, this approach gives you a reliable bridge between XML files and your relational database.

Ready to stop doing imports by hand and let automation take over?

Try this n8n template and streamline your XML to MySQL imports today.

How to Import XML Data into MySQL Using n8n

How to Import XML Data into MySQL Using n8n

Overview

This guide describes a complete n8n workflow template that imports XML data into a MySQL database in a fully automated way. The workflow reads an XML file from the filesystem, converts it to JSON, normalizes the structure into individual items, and inserts each item as a row in a MySQL table.

The article is written for users who are already familiar with n8n concepts such as nodes, binary data, credentials, and basic database operations, and who want a clear, reference-style explanation of how this template is constructed and how to adapt it.

Workflow Architecture

The workflow is composed of the following core nodes, executed in sequence:

  • Manual Trigger – Manually starts the workflow execution.
  • Read Binary Files – Loads the XML file from disk into n8n as binary data.
  • Extract Binary Data (Code node) – Converts the binary XML content to a UTF-8 string.
  • XML to JSON – Parses the XML string and outputs a structured JSON object.
  • Item Lists – Splits the JSON structure into one item per product for database insertion.
  • Add New Records (MySQL node) – Inserts each product as a new row in the target MySQL table.

Additionally, the workflow template contains an optional, disabled node that can prepare the database table:

  • Create new table (MySQL node, disabled by default) – Creates and truncates a working table named new_table based on the existing products schema.

Data Flow Summary

  1. The workflow is started manually via the Manual Trigger node.
  2. Read Binary Files reads the XML file from the configured filesystem path into binary data.
  3. Extract Binary Data converts the binary buffer into a UTF-8 string in json format.
  4. XML to JSON parses that string into a nested JSON structure representing products and their attributes.
  5. Item Lists extracts the array at Products.Product and outputs one n8n item per product.
  6. Add New Records maps JSON fields to MySQL columns and performs an insert for each item into new_table.

Node-by-Node Breakdown

1. Manual Trigger

The Manual Trigger node is used as the workflow entry point. It has no configuration parameters and is intended for ad-hoc or test executions.

  • Trigger type: Manual
  • Usage: Click Execute Workflow in the n8n editor UI to start the import on demand.

This approach gives you full control over when XML data is imported, which is useful while developing or when you need to run the import only at specific times. It also helps avoid unintended imports that might occur with scheduled or webhook triggers.

2. Read Binary Files

The Read Binary Files node reads the XML file from the local filesystem into n8n as binary data. This node is critical for handling XML as a file rather than as inline text.

  • Path: /home/node/.n8n/intermediate.xml
  • Output: A single item with a binary property containing the XML file content.

The XML file at this path is expected to contain a list of products, including attributes such as code, name, line, scale, description, and price. Make sure that:

  • The file path is correct for your n8n instance environment.
  • The n8n process has read permissions on the file.
  • The file contents are valid XML with the expected structure (see the example XML section below).

3. Extract Binary Data (Code Node)

The Extract Binary Data node is typically implemented as a n8n Code node that converts the binary data from the previous node into a UTF-8 encoded string. The output is placed into the json section of the item, which is required by the XML parser node.

Conceptually, this node:

  • Reads the binary property that contains the XML file (for example, item.binary.data).
  • Converts the buffer to a UTF-8 string.
  • Writes that string to a JSON field, such as item.json.xmlString or similar, depending on the template.

Key considerations:

  • Encoding: The code explicitly uses UTF-8, which matches the XML declaration in the example (encoding="UTF-8").
  • Error handling: If the binary data is not present or is not valid text, this node will throw an error at runtime. Ensure that the previous node successfully reads the file before this node executes.

4. XML to JSON

The XML to JSON conversion is handled by n8n’s built-in XML node. It takes the XML string from the previous step and outputs a JSON representation that is easier to manipulate inside n8n.

  • Input: XML string from the Extract Binary Data node.
  • Mode: XML to JSON.
  • Output: A JSON object with a root property corresponding to the XML root element, for example Products.

For the example XML, the JSON structure will include a Products object with a Product array containing each product entry. Attributes in the XML (such as Price and Code) and child elements (such as Name, Line, Scale, and Description) are all available as JSON fields.

5. Item Lists (Splitting Products)

The Item Lists node is used to split the JSON structure into separate n8n items so that each product can be processed and inserted individually into MySQL.

  • Source path: Products.Product
  • Behavior: Takes the array at Products.Product and outputs one item per product.

This step is essential for database operations, since the MySQL node expects one item per row to insert. If the XML structure changes and the products are located at a different path, you will need to adjust this path accordingly.

Edge cases to consider:

  • If Products.Product is not an array (for example only one product exists), you may need to confirm how the XML node outputs the structure and adjust the Item Lists configuration.
  • If the path is incorrect or the products array is empty, this node will output zero items and no records will be inserted into MySQL.

6. Add New Records (MySQL Node)

The Add New Records node connects to your MySQL database and inserts each product as a new row in the table new_table. It uses mapped fields from the JSON items produced by the Item Lists node.

  • Resource: Typically “Table”.
  • Operation: “Insert” or “Insert Many” (depending on the template configuration).
  • Table: new_table.

The node maps the following columns (as described in the template):

  • product code – Mapped from the product code in the XML (for example the Code attribute).
  • name – Mapped from the Name element.
  • line – Mapped from the Line element.
  • scale – Mapped from the Scale element.
  • description – Mapped from the Description element.
  • MSRP (Price) – Mapped from the Price attribute in the XML.
  • vendor – Set to a default value in the workflow.
  • stock quantity – Set to a default value in the workflow.
  • buy price – Set to a default value in the workflow.

Before running the workflow, configure your MySQL credentials in n8n and select them in this node. If the connection fails or the table does not exist, the node will throw an error and the workflow execution will stop at this point.

Database Preparation

The template includes a dedicated MySQL node named “Create new table”, which is disabled by default. This node is used to create and reset the working table new_table. It executes the following SQL statements:

CREATE TABLE IF NOT EXISTS new_table AS SELECT * FROM products;
TRUNCATE new_table;

Behavior and implications:

  • CREATE TABLE IF NOT EXISTS – Creates new_table with the same structure as products if it does not already exist.
  • TRUNCATE new_table – Removes all existing rows from new_table, effectively resetting it before a new import.

This node is disabled by default to avoid accidental data loss. Enable and execute it only when:

  • You want to initialize new_table for the first time.
  • You explicitly intend to clear and repopulate new_table with fresh data from the XML file.

Example XML Input

The workflow is built around an XML structure that contains products within a root Products element. Below is a minimal example of the XML content used:

<?xml version="1.0" encoding="UTF-8" standalone="yes"?>
<Products>  <Product Price="69.26" Code="S24_2360">  <Name>1982 Ducati 900 Monster</Name>  <Line>Motorcycles</Line>  <Scale>1:24</Scale>  <Description>Features two-tone paint with chrome accents, superior die-cast detail , rotating wheels , working kick stand</Description>  </Product>
</Products>

Key characteristics of this structure:

  • Root element: Products.
  • Product entries: One or more Product elements inside Products.
  • Attributes: Price and Code on each Product.
  • Child elements: Name, Line, Scale, and Description.

Your own XML files should follow a similar structure if you want to reuse the same node configuration, especially the Products.Product path in the Item Lists node and the field mappings in the MySQL node.

Configuration Notes

MySQL Credentials and Connection

  • Set up MySQL credentials in the n8n Credentials section.
  • Assign those credentials to both the Add New Records node and the optional Create new table node.
  • Verify that the user has permissions to:
    • Connect to the database.
    • Perform INSERT operations on new_table.
    • Optionally, run CREATE TABLE and TRUNCATE if you enable the preparation node.

File System Access

  • Confirm that the XML file path /home/node/.n8n/intermediate.xml exists in your environment.
  • Adjust the path if your n8n instance runs in a different container or directory layout.
  • Ensure read permissions for the n8n process user.

XML Structure and Parsing

  • If your XML uses different element or attribute names, you will need to:
    • Update the Item Lists path from Products.Product to match your root and item elements.
    • Adjust the field mappings in the Add New Records node to align with your JSON output.
  • Invalid XML will cause the XML node to fail. Validate your XML beforehand if you expect inconsistent sources.

Error Handling Considerations

The template focuses on the happy path, but some typical error points include:

  • Missing or unreadable XML file in the Read Binary Files node.
  • Encoding issues when converting binary data to a string in the Extract Binary Data node.
  • Malformed XML that cannot be parsed by the XML to JSON node.
  • Empty or unexpected JSON structure that breaks the Item Lists path.
  • Database connection failures or missing table in the Add New Records node.

Use n8n’s built-in execution logs and node error messages to diagnose issues. You can also add additional nodes, such as IF or Set nodes, to perform validation or logging before critical steps.

Advanced Customization

Adapting to Different XML Schemas

To reuse this workflow for different XML schemas:

  • Update the Item Lists node to point to the correct array path in the JSON output.
  • Remap fields in the Add New Records node to match your new XML attributes and elements.
  • If the root element changes, verify that the XML node still produces the expected JSON structure.

Scaling for Larger XML Files

For larger XML datasets:

  • Consider the memory impact of parsing very large XML files into a single JSON object.
  • Monitor workflow execution time and database performance while inserting many rows.
  • If needed, split large XML files externally before processing or optimize your MySQL configuration for bulk inserts.

Extending Data Processing

You can extend this template to include additional processing steps, such as:

  • Adding validation nodes to check for missing or invalid fields before insertion.
  • Transforming or normalizing values (for example, converting price formats or cleaning descriptions) using Code or Function nodes.
  • Integrating notifications (email, Slack, etc.) after a successful import or when errors occur.

Benefits of Using n8n for XML to MySQL Automation

  • Automation – Replace manual import processes with a repeatable, one-click workflow.
  • Scalability – Adapt the same pattern to larger XML files or new XML schemas with minimal changes.
  • Flexibility