Automate News Summaries: AI-Powered Slack Posting

Automate News Summaries: AI-Powered Slack Posting

Introduction

Monitoring relevant industry news is essential for informed decision-making, yet manually reviewing multiple sources every day is inefficient and error-prone. By combining n8n, AI summarization, and Slack, you can implement a reliable, fully automated news briefing that keeps your team aligned without adding to anyone’s workload.

This article presents an n8n workflow template that aggregates news from Hacker News based on configurable keywords, generates concise AI summaries in Japanese, and posts the results directly into a chosen Slack channel on a defined schedule. It is designed for automation professionals who want a repeatable, configurable system rather than an ad hoc process.

Use Case Overview

The workflow implements an end-to-end news monitoring pipeline:

  • Scheduled execution at a defined time (default: daily at 9:00)
  • Configurable keywords to filter relevant Hacker News articles
  • Retrieval of matching articles using n8n’s Get many items capability
  • AI-based summarization of each article using an OpenRouter Chat Model
  • Formatting of summaries into a Slack-optimized message structure
  • Automated posting of the summaries into a specified Slack channel

The result is a daily, AI-powered news digest tailored to your topics of interest, delivered where your team already collaborates.

Core Workflow Architecture

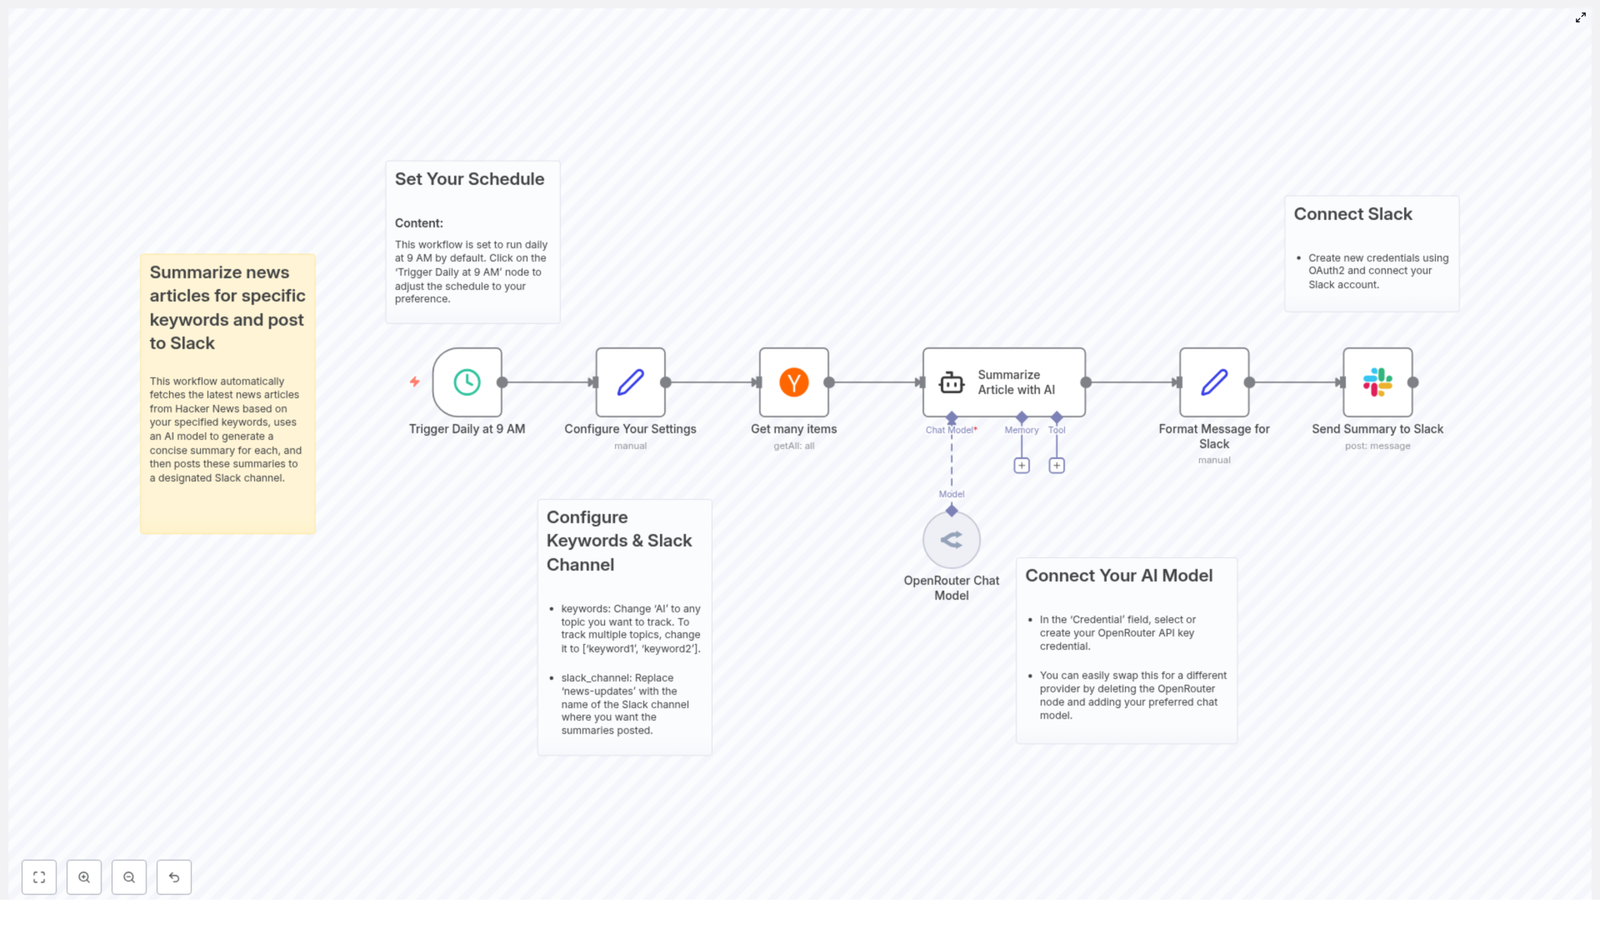
The template is structured around a set of clearly defined nodes, each responsible for a distinct part of the automation. At a high level, the workflow consists of:

  • Trigger node for scheduling execution
  • Configuration node for keywords and Slack channel settings
  • Data retrieval node to fetch Hacker News articles
  • AI summarization node powered by OpenRouter
  • Message formatting node to prepare Slack-ready content
  • Slack node to deliver the summaries to your workspace

Step-by-Step Workflow Breakdown

1. Scheduling the Automation

The workflow uses a time-based trigger to run automatically. By default, the Trigger Daily at 9 AM node is configured to execute once per day at 09:00.

Automation best practice is to align this schedule with your team’s working patterns. For example, a morning summary can support daily standups, while an evening run might serve as a recap. You can modify the cron or schedule settings in this trigger node to adjust:

  • Execution time (for example, 8:30 instead of 9:00)
  • Execution frequency (daily, weekdays only, or at multiple intervals)

2. Central Configuration: Keywords and Slack Channel

To make the workflow easily maintainable, key parameters are consolidated in the Configure Your Settings node. This node typically uses static data or expressions to define:

  • Keywords to track: An array of terms that will be used to filter Hacker News articles. For example:
    ['AI', 'machine learning', 'LLM']

    Providing a single keyword such as “AI” will restrict the search to that term. Multiple topics can be monitored simultaneously by extending this array.

  • Target Slack channel: The channel name or channel ID where the summaries will be posted. This value is referenced later by the Slack node when sending messages.

Storing these values centrally simplifies future adjustments and supports reuse of the template across different teams or topics.

3. Retrieving Articles from Hacker News

Once the schedule and configuration are in place, the workflow proceeds to data collection. The Get many items node is used to query Hacker News for the latest articles that match the configured keywords.

Key aspects of this step:

  • The node filters articles based on the keywords defined in the configuration node.
  • You can limit the number of returned items to control volume and avoid overwhelming users with too many links.
  • The output of this node typically includes article titles, URLs, and other metadata, which are passed downstream for summarization.

From an automation perspective, it is advisable to start with a conservative limit on article count, then expand as needed once you confirm the signal-to-noise ratio is acceptable.

4. AI-Powered Summarization Using OpenRouter

For each retrieved article, the workflow invokes an AI summarization step that leverages an OpenRouter Chat Model. The article URL and relevant metadata are provided as input to the model, which then generates a concise summary tailored to a specific format.

The summarization behavior in this template is defined as follows:

  • Output language: Japanese
  • Structure: three bullet points
  • Style: Focused on key facts and essential information
  • No introductory or closing phrases, only the bullet points themselves

This structured approach ensures consistency across all summaries and makes them easy to scan in Slack. You can further refine the prompt inside the OpenRouter node to adjust tone, detail level, or formatting, as long as you preserve the core logic of the workflow.

5. Formatting Messages for Slack Delivery

After the AI model produces the summary, the workflow prepares the final message that will appear in Slack. A dedicated formatting step combines:

  • The article title
  • The article URL
  • The AI-generated bullet point summary in Japanese

This node applies Slack-friendly formatting so that messages are both readable and visually structured. Typical techniques include clear separation between title, link, and summary, and the use of bullet lists that render well in Slack clients.

Maintaining a consistent message format is important for downstream consumption. Teams can quickly scan the channel, identify relevant items, and click through to the full article when necessary.

6. Posting Summaries to Slack

In the final step, the workflow uses an authenticated Slack node to send the formatted message to the configured channel. This node relies on your Slack OAuth2 credentials to post securely into the selected workspace.

Once configured, each run of the workflow will automatically publish the latest news summaries. Team members receive timely updates without needing to leave Slack or manually check external news sites.

Connecting External Services

AI Model Integration (OpenRouter)

  • In the OpenRouter Chat Model node, select or create an OpenRouter API key credential.
  • Use this credential to authenticate requests and enable AI summarization within the workflow.
  • If you prefer a different AI provider, you can replace the OpenRouter node with another compatible model node, preserving the same input and output structure.

This abstraction allows you to change providers or models without redesigning the entire workflow.

Slack Workspace Authentication

  • Create and configure OAuth2 credentials for Slack within n8n.
  • Grant the required permissions so the workflow can post messages to channels in your workspace.
  • Reference these credentials in the Slack node used for sending the summaries.

Using OAuth2 ensures secure and controlled access, which is a best practice for production-grade automation that interacts with collaboration platforms.

Customization and Optimization Options

The template is intentionally flexible, allowing automation professionals to adapt it to different environments and requirements. Common customization patterns include:

  • Keyword strategy: Modify the keywords array in the configuration node to focus on specific technologies, vendors, or domains. For example, you might track:
    • General topics such as ['AI', 'cloud', 'security']
    • Product-specific terms for competitive monitoring
  • Scheduling: Adjust the trigger node so the workflow runs:
    • Multiple times per day for high-volume topics
    • Only on weekdays to align with business hours
    • At different times for different teams or regions
  • Summary style and language: Update the AI prompt to:
    • Change the level of detail in the bullet points
    • Switch to another language if needed
    • Apply a more formal or more conversational tone
  • Alternative destinations: While the template targets Slack, the same pattern can be extended to other channels by adding or replacing the final node with email, other chat tools, or internal dashboards.

Operational Benefits and Next Steps

By implementing this n8n workflow, you transform unstructured news consumption into a consistent, automated process. The key benefits include:

  • Reduced time spent on manual news monitoring
  • Centralized, topic-specific updates delivered directly into Slack
  • Higher situational awareness across teams without additional effort
  • Scalable configuration for multiple topics, teams, or workspaces

To get started, import the template, connect your OpenRouter and Slack credentials, configure your keywords and channel, then tune the schedule and summary style to match your team’s needs.

Call to action: Deploy this workflow in your n8n instance to establish an AI-driven news briefing system that keeps your organization informed and focused, without manual overhead.

Automate AI-Powered News Summarization with Slack Integration

Introduction

For teams that rely on timely information, manually scanning news sources is inefficient and difficult to scale. By combining n8n, AI summarization, and Slack, you can build a fully automated news intelligence pipeline that delivers concise, high-signal updates directly where your team collaborates.

This article presents an n8n workflow template that automatically collects news articles from Hacker News based on defined keywords, generates AI-powered summaries in Japanese, and publishes the results to a specified Slack channel. The focus is on a robust, production-ready approach that automation professionals can adapt and extend to their own environments.

Solution Architecture

The workflow orchestrates several core components to deliver an end-to-end automated news summarization and distribution process:

  • Time-based trigger that runs the workflow at a fixed schedule (default 9:00 AM daily)
  • Configuration node that centralizes keyword and Slack channel settings
  • Hacker News integration to fetch multiple articles that match the configured keywords
  • AI summarization using an OpenRouter Chat Model node to generate concise Japanese bullet points
  • Slack message formatting with Markdown for readability and structure
  • Slack delivery using OAuth2 for secure posting into the target channel

By chaining these elements in n8n, the workflow provides a repeatable, low-maintenance solution for AI-powered news monitoring.

Key Use Case

The primary use case is automated monitoring of technical and industry topics that are frequently discussed on Hacker News. Typical scenarios include:

  • Tracking developments related to AI, infrastructure, or security
  • Providing daily digests for product, engineering, or leadership teams
  • Consolidating relevant updates into one Slack channel to support decision-making

Summaries are generated in Japanese and structured as bullet points, which is particularly useful for teams that need quick, scannable updates without reading full articles.

Core Workflow Components

1. Time-Based Trigger: Daily Execution

The workflow starts with a scheduled trigger that runs every day at 9:00 AM by default. In n8n, this is implemented using a time-based trigger node (referred to as Trigger Daily at 9 AM in the template).

Best practice: Align the trigger time with your team’s working hours and reporting cadence. For example, you might schedule an early-morning digest before standups or a summary at the end of the day.

You can customize the execution time and frequency directly in the trigger node to support different time zones or multiple runs per day.

2. Central Configuration: Keywords and Slack Channel

To keep the workflow maintainable, configuration is centralized in a single node named Configure Your Settings. This node defines two key parameters:

  • Keywords to track
    Specify one or more keywords that the workflow will use to filter Hacker News content. For a single keyword, you might use a value such as 'AI'. For multiple topics, configure a JSON array, for example:
    [ 'AI', 'machine learning', 'LLM' ]
  • Slack channel
    Set the name of the Slack channel where summaries should be posted, such as #news-digest or #ai-updates.

Best practice: Treat this configuration node as the single source of truth. When requirements change, such as adding new topics or posting to a different channel, you only need to modify this node.

3. Article Retrieval: Hacker News Integration

The Get many items node is responsible for querying Hacker News and returning a set of articles that match the configured keywords. The node:

  • Searches for recent posts that contain any of the specified keywords
  • Limits the number of results for each run, for example to 3 items, to avoid overwhelming users with information
  • Prepares a list of article metadata that will be passed to the AI summarization step

Best practice: Start with a small limit on the number of items, then increase gradually if your team can handle more volume. This keeps the digest focused on the most relevant content.

4. AI Summarization: OpenRouter Chat Model

The core of the workflow is the AI summarization step, implemented using an OpenRouter Chat Model node. For each article, the node:

  • Consumes article data from the Hacker News node
  • Uses an AI language model to analyze the content
  • Produces a concise summary in Japanese, structured as bullet points
  • Maintains a clear, neutral tone suitable for professional audiences

Best practice: Carefully define your prompt in the OpenRouter node to enforce structure, language, and tone. For example, instruct the model to:

  • Output only bullet-point summaries
  • Use Japanese for all text
  • Focus on key insights instead of minor details

If needed, you can later replace this node with a different AI provider while keeping the rest of the workflow unchanged.

5. Slack Message Formatting

Once the summaries are generated, an intermediate node formats the output into a Slack-ready message. This step ensures that the information is easy to scan and visually consistent. The formatting logic typically includes:

  • Applying Markdown to highlight article titles in bold
  • Structuring summaries as bullet lists for quick reading
  • Including links back to the original Hacker News posts

By standardizing the layout, your team quickly learns how to interpret the digest at a glance.

6. Delivery to Slack with OAuth2

The final step uses a Slack node configured with OAuth2 authentication to post the formatted message into the selected channel. This ensures secure, authorized access to your Slack workspace and allows the workflow to post as a specific app or bot user.

Best practice: Use dedicated Slack credentials for automation workflows and restrict permissions to only what is required, typically posting messages to specific channels.

Step-by-Step Implementation Summary

  1. Define the schedule in the time-based trigger node so the workflow runs at the desired time, such as 9:00 AM each day.
  2. Configure keywords and the Slack channel in the Configure Your Settings node, using a JSON array for multiple keywords.
  3. Set up the Hacker News retrieval via the Get many items node, including a sensible limit on the number of articles.
  4. Connect the OpenRouter Chat Model node and refine the prompt to generate Japanese bullet-point summaries with a neutral tone.
  5. Implement message formatting using Markdown so titles, bullet points, and links are presented clearly within Slack.
  6. Configure the Slack node with OAuth2 and point it to the configured Slack channel to post the final digest.

Customization and Extension Options

The template is intentionally flexible so you can adapt it to different teams and environments.

  • Adjusting keywords
    Modify the keywords field in the configuration node to track new technologies, competitors, or industry topics relevant to your organization.
  • Changing the schedule
    Edit the trigger node to run the workflow multiple times per day, only on weekdays, or at custom times that match your operating hours.
  • Switching AI providers
    Replace the OpenRouter Chat Model node with another AI integration if your organization standardizes on a different provider, while preserving the same input-output structure.
  • Targeting different Slack workspaces or channels
    Update OAuth2 credentials and channel configuration to post summaries to other workspaces, teams, or topic-specific channels.

Benefits for Automation-Driven Teams

  • Operational efficiency – Eliminate manual news tracking and provide consistent, automated updates every morning.
  • Improved situational awareness – Keep distributed teams aligned on key developments related to AI and other tracked topics.
  • High information density – Use AI to condense complex or technical articles into accessible Japanese bullet points that can be consumed in seconds.
  • Scalable knowledge sharing – As your interests grow, simply add new keywords or channels without redesigning the workflow.

Getting Started

Deploying this workflow in n8n gives your organization a reliable, AI-powered news summarization system that integrates seamlessly with Slack. Configure your keywords, connect your Slack workspace, and let the automation handle daily monitoring and summarization.

If you are ready to automate your news updates, start with the template, adapt it to your environment, and provide your team with focused, AI-driven summaries every day.

Send Google Sheets Data to Discord Channel Automatically

Send Google Sheets Data to a Discord Channel Automatically with n8n

Introduction

For teams that rely on both Google Sheets for data management and Discord for communication, connecting these tools can significantly improve visibility and reduce manual work. Instead of copying and pasting spreadsheet updates into chat, you can use an n8n workflow to push data changes directly from Google Sheets to a Discord channel in real time.

This workflow template automates that process. It listens for new or updated rows in a Google Sheet, converts the relevant data into a clean ASCII table, and posts the formatted output to a Discord channel via webhook. The result is a clear, readable summary of your sheet data available to your team without any manual intervention.

Use Case Overview

The template is ideal for scenarios where structured spreadsheet data needs to be surfaced quickly in a shared communication space, for example:

  • Investment or portfolio tracking with fields such as Security Code, Price, and Quantity
  • Operational dashboards that need to be broadcast to a team channel
  • Monitoring lists where near real-time updates are important for decision making

By leveraging n8n, you gain a repeatable, low-maintenance automation that keeps Discord aligned with your Google Sheets data.

High-Level Workflow Architecture

The n8n workflow is composed of three core components that work together to deliver the automation:

  • Google Sheets Trigger: Detects new or updated rows in a defined sheet and column.
  • Code Node: Transforms the selected columns into a formatted ASCII table string using JavaScript.
  • Discord Node: Sends the formatted table to a specified Discord channel through a webhook.

This architecture separates data detection, transformation, and delivery into distinct stages, which aligns with automation best practices and makes the workflow easier to maintain and extend.

Key Components and Configuration

1. Google Sheets Trigger – Monitoring Data Changes

The workflow starts with a Google Sheets Trigger node configured to watch a particular spreadsheet, for example a sheet named Investments. It monitors the Security Code column for any new or updated entries.

Important configuration aspects:

  • Spreadsheet and Sheet selection: Choose the correct Google Sheet and tab where your data is stored.
  • Watched column: Set the trigger to observe the Security Code column or any other column that uniquely identifies a row.
  • Polling interval: Configure the node to poll approximately every minute to achieve prompt updates while balancing API usage.

Whenever a new row is added or an existing row is modified in the monitored column, the trigger node initiates the workflow and passes the current data to the next step.

2. Code Node – Converting Sheet Data to an ASCII Table

The next stage is a Code node that processes the rows provided by the trigger. This node uses custom JavaScript to convert selected columns into a structured ASCII table that is suitable for display in a Discord message.

The script focuses on the following columns:

  • Security Code
  • Price
  • Quantity

Core logic implemented in the JavaScript function:

  • Iterates through all items received from the Google Sheets Trigger.
  • Calculates the maximum string length for each column to determine appropriate padding.
  • Builds a header row using the column names and aligns them based on the calculated widths.
  • Generates each data row so that values are aligned under the corresponding header, creating a consistent table layout.

The output of this node is a single string that represents a clean ASCII table. This format is easy to read in a chat environment and works particularly well when wrapped in a code block in Discord.

3. Discord Node – Sending the Formatted Message

The final component is a Discord node configured to post the ASCII table into a specific channel using a webhook URL.

Configuration highlights:

  • Webhook URL: Use the webhook generated in your Discord server for the target channel.
  • Message content: Map the output of the Code node into the message body.
  • Code block formatting: Wrap the ASCII table in triple backticks (```) so Discord renders it as a monospaced code block, preserving alignment and readability.

When the workflow runs, the Discord node posts the table directly into the designated channel, giving your team immediate visibility into the updated spreadsheet data.

Step-by-Step Setup Instructions

To implement this automation in your own environment, follow these steps:

  1. Prepare your Google Sheet
    • Create or open a Google Sheet that contains the columns you want to track, for example Security Code, Price, and Quantity.
    • Ensure column names are clearly defined in the header row.
  2. Configure the Google Sheets Trigger node in n8n
    • Authenticate with your Google account in n8n.
    • Select the appropriate spreadsheet and sheet.
    • Set the trigger to watch the Security Code column or another key column.
    • Adjust the polling interval to match your update frequency requirements.
  3. Set up the Code node
    • Add a Code node after the Google Sheets Trigger.
    • Use JavaScript to:
      • Read the incoming rows from the previous node.
      • Extract the Security Code, Price, and Quantity fields.
      • Compute column widths and build an ASCII table string.
    • Return the final table string in a field that will be referenced by the Discord node.
  4. Create a Discord webhook
    • In your Discord server, open the channel where you want to receive sheet updates.
    • Create a new webhook and copy the webhook URL.
  5. Configure the Discord node in n8n
    • Add a Discord node after the Code node.
    • Paste the webhook URL into the node configuration.
    • In the message field, insert the ASCII table output from the Code node and wrap it in triple backticks to render it as a code block.
  6. Test and validate the workflow
    • Activate the workflow in n8n.
    • Add or update a row in the monitored Google Sheet.
    • Confirm that the workflow runs successfully and that a formatted ASCII table appears in your Discord channel.

Automation Best Practices

  • Use clear column naming: Consistent headers such as Security Code, Price, and Quantity simplify the mapping in the Code node and reduce errors.
  • Optimize polling frequency: A 1-minute interval is suitable for near real-time updates, but you can adjust it to balance responsiveness with API usage and system load.
  • Limit the data scope: If your sheet is large, consider filtering the rows or columns you include in the ASCII table to keep Discord messages concise.
  • Standardize formatting: Keep the ASCII table structure consistent so that team members quickly understand the layout and can scan updates efficiently.
  • Plan for growth: The same pattern can be extended to additional columns or other sheets. Design your Code node with maintainability in mind.

Key Benefits of This n8n Workflow

  • Automated data distribution: Eliminates manual copying of spreadsheet data into Discord, reducing effort and the risk of mistakes.
  • Readable, structured output: ASCII table formatting makes numeric and tabular data easy to interpret directly in a chat channel.
  • Near real-time visibility: Frequent polling ensures that any new or updated row in Google Sheets is quickly reflected in Discord.
  • Flexible configuration: You can customize which columns are included, adjust the polling interval, and adapt the code to different sheet structures.
  • Improved collaboration: Teams receive consistent, formatted updates where they already communicate, which supports faster decisions and better monitoring.

Get Started

Implementing this workflow in n8n is a straightforward way to connect your Google Sheets data with your Discord communication channels. Once configured, it runs in the background and continuously keeps your team informed with structured, up-to-date information.

Deploy the template, adapt the column selection and formatting to your use case, and integrate it into your broader automation strategy in n8n.

Conclusion

This n8n workflow provides a reliable bridge between Google Sheets and Discord by transforming raw spreadsheet rows into well-formatted ASCII tables and posting them automatically to a designated channel. With minimal configuration and a small JavaScript function, you can convert routine data updates into real-time, high-quality notifications that improve transparency and coordination across your team.

Automate Stock Trend Prediction & Reporting with Twelve Data API

How One Analyst Stopped Chasing Charts And Let n8n Predict Stock Trends For Them

By 9:15 PM every weekday, Alex was exhausted.

By day, Alex worked as a solo quantitative analyst and part-time trader. By night, they turned into a spreadsheet operator, copy-pasting closing prices, cleaning columns, calculating averages, and trying to spot 5-day trends before the next market open.

Some nights, Alex missed key moves because the manual routine was simply too slow. Other nights, they second-guessed their own rushed calculations. The more stocks they watched, the worse it got. What started as a passion for data-driven trading was slowly turning into a tedious, error-prone grind.

Alex did not need more data. They needed a system that would collect, analyze, and report stock trends automatically, every single night, without fail.

The Breaking Point: When Manual Tracking Stops Scaling

One Wednesday, the market had been volatile all day. Alex had added several new symbols to their watchlist, thinking they could squeeze in the extra work after dinner. By the time they sat down at their laptop, it was already 9:30 PM.

The routine was painfully familiar:

  • Open a Google Sheet with a long list of stock symbols
  • Look up closing prices for each symbol
  • Copy 5 days of data into the sheet
  • Calculate averages and percentage changes
  • Try to eyeball whether the trend was up, down, or flat
  • Manually write a short summary in an email draft to themselves

Halfway through the list, Alex realized they were rushing, and the numbers were starting to blur. That was the moment they admitted it: this process should not depend on them being awake and focused at night.

They needed something predictable, something that would wake up at the same time every weekday, pull the data, run the math, and deliver a clean report in their inbox. No more copy-paste, no more guesswork.

Discovering n8n And A Ready-Made Stock Prediction Template

Alex had heard of n8n, an automation platform that lets you connect APIs, services, and scripts without writing an entire application from scratch. One quick search later, they found exactly what they were looking for: an n8n workflow template that used the Twelve Data API to automate 5-day stock trend predictions and reporting.

The promise was simple but powerful:

  • Run at market close automatically
  • Read stock symbols from a Google Sheet
  • Fetch the last 5 days of data via Twelve Data API
  • Analyze the trend direction and expected change
  • Update the same Google Sheet with the analysis
  • Send a detailed email report every night

If it worked, Alex could finally stop babysitting spreadsheets and start focusing on strategy.

Setting The Scene: What Alex Needed Before Automation

Before turning the template into their nightly assistant, Alex had to prepare a few essentials. The setup was surprisingly straightforward:

  1. Sign up for a Twelve Data API key. Alex created an account on Twelve Data and grabbed their personal API key, which would authorize the workflow to fetch market data.
  2. Create a Google Sheet with stock symbols. In a simple Google Sheet, Alex added a column with the tickers they wanted to track. This sheet would become the central watchlist and later, the place where the analysis results would be stored.
  3. Connect n8n to Google Sheets and Twelve Data. Inside n8n, Alex configured credentials for Google Sheets and added the Twelve Data API key as an environment variable used by the workflow.
  4. Import and customize the n8n template. With the template loaded, Alex only needed to plug in their API key, select the correct Google Sheet, and set a schedule that matched the market close.

With the groundwork done, the real transformation began.

Rising Action: How The n8n Workflow Took Over The Night Shift

1. A Daily Trigger That Runs While Alex Rests

Instead of Alex sitting down at 9:30 PM, the workflow itself wakes up at 9:00 PM every weekday, right after the market closes. The first node in the template is a time-based trigger that runs Monday through Friday at 21:00.

This timing is crucial. It ensures that the market data for that day is complete before any calculations happen. For Alex, it meant one less decision to make and one less recurring task on the calendar.

2. Reading Stock Symbols From A Living Watchlist

Next, the workflow connects to the Google Sheet that Alex had set up. A Google Sheets node pulls in the list of stock symbols that Alex wants to track.

The beauty of this approach is that Alex can add or remove symbols directly in the sheet without touching the workflow. The watchlist is centralized, human-friendly, and always up to date. Each row in the sheet becomes a starting point for a new round of analysis.

3. Configuring Variables So The Workflow Stays Flexible

As the workflow loops through each symbol, a configuration node sets key variables: the Twelve Data API key and the current stock symbol being processed.

By using variables instead of hard-coded values, Alex keeps the workflow secure and adaptable. If they ever need to rotate the API key or change how symbols are handled, they can do it in one place instead of editing multiple nodes.

4. Fetching 5-Day Stock Data With Twelve Data API

With the symbol and API key in place, the next node calls the Twelve Data API. The request includes:

  • The current stock symbol
  • An interval of 1 day
  • An output size of 5, to get the last 5 days of data
  • The Twelve Data API key for authentication

The response comes back as structured JSON that includes prices and volumes for each of the 5 days. For Alex, this meant no more hopping between websites or downloading CSV files. The data arrives clean, consistent, and ready for analysis.

The Turning Point: Letting JavaScript Decide The Trend

Before automation, Alex would stare at columns of closing prices and manually calculate averages and changes. It was easy to make mistakes, and it was hard to stay consistent.

In the n8n template, a dedicated JavaScript node takes over that job entirely.

5. Analyzing Stock Trends With Code Instead Of Gut Feel

The JavaScript node processes the fetched data step by step:

  • Extract closing prices from the JSON response so only the essential values are used.
  • Compute the slope of the 5-day trend, essentially a simple moving average slope that shows whether prices are generally rising, falling, or staying flat.
  • Classify the trend direction as Up, Down, or Neutral based on that slope.
  • Calculate predicted price changes and percentage changes for the next 5 days, turning raw numbers into actionable insights.

Instead of Alex manually crunching numbers, the code does it instantly and consistently for every symbol. The logic is transparent and repeatable, and it never gets tired or distracted.

Resolution: From Raw Data To Clear Reports In Alex’s Inbox

6. Updating The Google Sheet And Shaping The Email Report

Once the analysis is complete, the workflow does two things at once.

First, it appends the results back into the Google Sheet. For each stock symbol, the sheet now holds:

  • The symbol itself
  • The average price over the last 5 days
  • The percentage change across those 5 days
  • The predicted trend for the next 5 days
  • The expected price change over that next period

This turns the sheet into a living log of both historical and predicted trends, which Alex can filter, chart, or export whenever they want.

Second, an email formatting node in the workflow builds a polished report. It generates both HTML and plain text versions, organizing the data into a clear summary that is easy to scan on desktop or mobile.

7. Sending The Nightly Stock Trend Email

The final node delivers the report straight to Alex’s inbox. By the time they check their email later in the evening, a fresh summary is waiting for them, covering every symbol on their watchlist.

No more logging into multiple tools, no more late-night spreadsheets, and no more wondering if they miscalculated a percentage. The workflow runs, records, and reports without any manual intervention.

Why This n8n Workflow Changed How Alex Trades

After a week of running the automated stock trend prediction workflow, Alex noticed several important changes in how they worked.

  • Consistency: The analysis ran every weekday at the same time, using the same logic. There were no skipped days or rushed calculations.
  • Time savings: What used to take 30 to 60 minutes of manual effort now took zero. Alex could spend that time reviewing strategy instead of wrangling data.
  • Better decisions: With clear 5-day trend predictions and percentage changes in hand, Alex could quickly decide which stocks deserved deeper research the next morning.
  • Organized data: The Google Sheet became a structured archive of symbols, historical averages, and predicted trends, all easily accessible.
  • Reliable data source: By integrating with the Twelve Data API, Alex gained access to comprehensive, real-time market data without worrying about scraping or manual downloads.

Most importantly, Alex no longer felt chained to their laptop at night. Automation handled the routine work, while they focused on interpretation and strategy.

How You Can Recreate Alex’s Automated Stock Trend System

If you see yourself in Alex’s story, you can follow the same path and use this n8n template to automate your own stock trend prediction and reporting workflow.

Step-by-Step Summary

  1. Get your Twelve Data API key. Sign up with Twelve Data and copy your API key.
  2. Prepare your Google Sheet. Add your stock symbols in a column. This will be your watchlist and your log of results.
  3. Import the n8n template. Use the provided template link and load it into your n8n instance.
  4. Configure the workflow nodes.
    • Set the trigger to run at your preferred market close time, such as 9:00 PM Monday to Friday.
    • Connect the Google Sheets node to your sheet that contains the symbols.
    • Add your Twelve Data API key as an environment variable or credential.
    • Verify that the JavaScript node uses the correct fields from the API response.
  5. Enable the workflow. Turn it on and let it run automatically after market close each day.

Within a day, you will start receiving nightly emails that summarize your 5-day stock trends, predicted directions, and expected changes, just like Alex.

From Overwhelmed To In Control With n8n Automation

Alex’s story is familiar to anyone who has tried to track stock trends manually. The data is out there, but the repetitive work of collecting and analyzing it can quietly drain your time and attention.

By using n8n with the Twelve Data API, you can turn that nightly grind into a reliable, automated workflow that:

  • Triggers at market close
  • Reads your stock symbols from Google Sheets
  • Fetches the last 5 days of market data
  • Analyzes trends and predicts the next 5 days
  • Updates your sheet and sends a detailed email report

Instead of reacting to charts at the end of a long day, you wake up with structured insights ready to guide your next moves.

Ready To Let Automation Handle Your Nightly Stock Reports?

If you are ready to stop wrestling with spreadsheets and start using a smarter system, this n8n workflow template is a practical place to begin. It captures the full process from data collection to email reporting, with minimal setup and maximum repeatability.

Try the template, tweak it to match your own watchlist and schedule, and see how it changes your daily trading routine.

Have questions or want to adapt this workflow further? Share your feedback, explore more n8n automation ideas, and keep building systems that support better, data-driven trading decisions.

AI Recruiter Assistant: Automate CV Screening and JD Matching

AI Recruiter Assistant: Automate CV Screening and JD Matching

What You Will Learn

In this guide, you will learn how to use an n8n workflow template to:

  • Automatically collect candidate CVs from Gmail
  • Handle different CV file formats like PDF and Word
  • Store and organize CVs in Google Drive
  • Match candidates to the most relevant job descriptions (JDs) using AI
  • Generate detailed AI screening reports with Google Gemini
  • Log all results in Google Sheets for tracking and audits
  • Notify your hiring team in Slack with clear, actionable summaries

By the end, you will understand how each n8n node in this template works together to create a first-round AI recruiter assistant that saves time and improves consistency.

Concept Overview: How the AI Recruiter Assistant Works

The First-Round Fast Track AI Recruiter Assistant is an n8n workflow that automates the early stages of recruitment. It starts when a candidate sends a CV to a specific email address, then processes the CV, matches it to job descriptions, scores the candidate, and delivers the results to your team.

At a high level, the workflow does the following:

  1. Monitors a Gmail label for new candidate emails with CV attachments
  2. Converts and extracts text from PDF or Word CVs
  3. Saves CV files in Google Drive with consistent naming
  4. Uses AI to match the candidate to the best job description
  5. Uses Google Gemini to evaluate the candidate and generate a report
  6. Extracts key personal details from the CV text
  7. Logs everything in Google Sheets
  8. Sends a well-structured summary to Slack with proceed or reject options

Key Features of the n8n AI Recruiter Template

  • Multi-format CV handling – Accepts and processes CVs in PDF, Word, Doc, and Docx formats.
  • Two-stage JD matching – First checks the candidate email for role mentions, then falls back to CV-based JD matching if needed.
  • AI-powered screening – Uses Google Gemini API to score candidates, highlight strengths and weaknesses, and assess risk vs reward.
  • Automated storage and naming – Stores CVs in Google Drive with a consistent naming scheme for easy retrieval.
  • Audit trail in Google Sheets – Keeps a detailed log of each candidate, their matched JD, and the AI assessment.
  • Slack integration for fast decisions – Sends formatted summaries with interactive proceed or reject buttons directly to your hiring channel.

What You Need Before You Start

To run this n8n workflow template successfully, prepare the following:

  • Gmail account with API access and a dedicated label for CV emails (for example, label:Candidates).
  • Google Drive with:
    • A folder for Candidate CVs
    • A folder for Job Descriptions that the AI will match against
  • Google Sheets spreadsheet, for example named AI Candidate Screening, with columns that match the data you plan to log (candidate details, JD matched, scores, notes, and so on).
  • Slack workspace with:
    • A bot or app configured
    • OAuth credentials and permissions to post messages to your chosen channel
  • Google Gemini AI API key to access the language model for analysis and scoring.

Step-by-Step: How the n8n Workflow Operates

Step 1: Receiving CVs via Gmail

The workflow starts with a Gmail node that watches a specific label for new emails. Typically, you will configure it like this:

  • Filter by label, for example Candidates or Applications
  • Trigger when a new email arrives with an attachment

When a candidate sends an email with their CV attached, the Gmail node:

  • Downloads the attachment
  • Identifies the file type, such as PDF, Doc, Docx, or Word

This prepares the file for the next stage, where the text content is extracted.

Step 2: Handling Different CV File Formats

Candidate CVs often arrive in different formats. The workflow handles this automatically:

  • Word / Doc / Docx files
    • The file is converted into a Google Docs format using a Google Drive node.
    • This conversion makes it easier to extract text reliably.
  • PDF files
    • The file is downloaded and stored directly in Google Drive.
    • Another node then extracts the text from the PDF.

By the end of this step, every CV, regardless of original format, is both stored in Drive and ready for text extraction.

Step 3: Extracting CV Text and Generating Links

Next, the workflow focuses on turning the CV into structured data that AI can understand. Using Google Drive and text extraction nodes, it:

  • Pulls the full text content from the CV (from the Google Doc or PDF)
  • Stores a public or shareable link to the CV file in Google Drive

This step ensures that the AI has a clean text version of the CV for analysis, and that your team can click through to the original file later if needed.

Step 4: Intelligent Job Description (JD) Matching

Once the CV text is available, the workflow uses AI to find the most relevant job description. This happens in two stages to improve accuracy:

4.1 First-pass JD match from email content

An AI agent analyzes the candidate’s email body to see if they mention a specific role or job title. For example, the email might say:

I would like to apply for the Senior Backend Engineer position.

The AI then:

  • Compares the mentioned role or title with the list of available JDs stored in Google Drive
  • Selects the best matching JD based on this context

4.2 Fallback JD match from CV content

If the email does not clearly mention a role, or if the match is uncertain, the workflow falls back to the CV itself. Another AI step:

  • Analyzes the CV text for skills, experience, and keywords
  • Selects up to three relevant job descriptions from your JD folder

4.3 Final JD selection

A second AI agent then performs a more detailed comparison between the candidate profile and the shortlisted JDs. It:

  • Evaluates how well the candidate matches each of the 2 or 3 JDs
  • Chooses the single best job description to use for the final screening

This two-stage approach improves JD match accuracy and helps avoid obvious mismatches.

Step 5: AI-Powered Candidate Screening with Google Gemini

With the final JD selected, the workflow calls a Google Gemini API node to act as an AI recruiter scoring agent. It compares:

  • The candidate’s CV text
  • The selected job description

Using this input, the Gemini model generates a structured screening report that includes:

  • Strengths and qualifications – What the candidate does well, relevant experience, key skills.
  • Weaknesses and mismatches – Gaps in experience, missing skills, or concerns.
  • Risk and reward factors – Potential upside if hired compared to possible risks.
  • Overall fit score (0 to 10) – A clear numeric rating of how well the candidate matches the role.
  • Justification for the score – A short explanation of why that score was given.

This output is what your hiring team will see summarized in Slack and logged in Google Sheets.

Step 6: Extracting Candidate Details from the CV

To maintain clean records, the workflow also extracts key personal information from the CV text. An Information Extractor node (another AI step) looks for:

  • First name
  • Last name
  • Email address

These fields are then used in your Google Sheets log and Slack messages, so you can quickly identify and contact the candidate if needed.

Step 7: Logging Results in Google Sheets

For traceability and reporting, the workflow writes a full record of each candidate screening to a Google Sheets spreadsheet. Typical data points include:

  • Candidate name and email
  • Link to the CV in Google Drive
  • Selected job description and its identifier
  • AI-generated strengths and weaknesses
  • Risk and reward notes
  • Overall fit score and justification
  • Date and time of screening

This sheet acts as an audit trail and a central place to track all first-round decisions.

Step 8: Sending Notifications to Slack

The final step is to notify your hiring team so they can move quickly. A Slack node sends a well-formatted message to a designated channel. The message typically contains:

  • Candidate name and email
  • Role or JD matched
  • Overall fit score
  • Short summary of strengths and weaknesses
  • Link to the full CV and to the Google Sheets record

The message also includes interactive buttons, such as:

  • Proceed – to move the candidate to the next stage
  • Reject – to mark them as not moving forward

This allows recruiters and hiring managers to make fast, informed decisions directly from Slack, without digging through emails or files.

Benefits of Using This n8n AI Recruiter Workflow

  • Significant time savings

    Manual CV screening is slow. Automating the first round lets your team focus on interviews and deeper evaluations.

  • Better JD matching

    AI-based matching uses natural language understanding to pair candidates with the most relevant roles, even when titles vary.

  • Consistent and transparent scoring

    Each candidate is evaluated against the same criteria and logged in Google Sheets, which improves fairness and traceability.

  • Faster team collaboration

    Slack notifications with clear summaries and buttons help your hiring team respond quickly and keep the process moving.

Recap: How the Template Fits into Your Hiring Process

To summarize, the First-Round Fast Track AI Recruiter Assistant template in n8n:

  1. Listens to Gmail for new CVs
  2. Handles PDFs and Word files and stores them in Google Drive
  3. Extracts CV text and generates shareable links
  4. Uses AI to match the candidate to the right job description
  5. Calls Google Gemini to create a detailed screening report and fit score
  6. Extracts basic candidate details for clean records
  7. Logs all results into Google Sheets for tracking and audits
  8. Alerts your hiring team in Slack with actionable summaries

This makes it ideal for companies dealing with high volumes of applications, especially in technical or automation-focused roles where speed and consistency are critical.

Quick FAQ

Do I need coding skills to use this template?

No, the template is designed to be configured visually in n8n. You will need to connect your Gmail, Google Drive, Google Sheets, Slack, and Google Gemini accounts, but this is done through credentials and node settings, not code.

Can I change the scoring criteria or report format?

Yes. You can adjust the prompts sent to Google Gemini in the relevant nodes. This lets you customize how the AI evaluates candidates and what information appears in the final report.

What if a candidate applies for multiple roles?

The JD matching logic can select up to 3 relevant JDs based on the CV, then narrow down to the best one. You can also extend the workflow to log secondary matches if needed.

Is this suitable for non-technical roles?

Yes. The template is not limited to technical roles. As long as you have clear job descriptions and structured CVs, the AI can compare them for any type of position.

Get Started with the n8n AI Recruiter Assistant Template

This AI recruiter assistant workflow combines n8n automation, Google Gemini AI, Google Drive, Google Sheets, and Slack to deliver a scalable, consistent first-round screening process.

Ready to accelerate your hiring process? Implement the First-Round Fast Track AI Recruiter Assistant workflow in your organization today.

Sync Discord Scheduled Events to Google Calendar Easily

Sync Discord Scheduled Events to Google Calendar Easily

What You Will Learn

In this guide you will learn, step by step, how to use an n8n workflow template to:

  • Connect Discord and Google Calendar using their APIs
  • Automatically fetch scheduled events from a Discord server
  • Create or update matching events in Google Calendar
  • Configure your Discord bot, guild ID, and Google Calendar nodes correctly in n8n

By the end, you will have an automated sync that keeps your Discord events and Google Calendar aligned without manual copying.

Why Sync Discord Events With Google Calendar?

Communities, study groups, and event organizers often schedule activities inside Discord, while team members rely on Google Calendar for their daily planning. If these two worlds are not connected, it is easy to miss a session or forget a meetup.

This n8n workflow solves that problem by:

  • Centralizing events so you can see all important dates in Google Calendar
  • Keeping information consistent when event details change on Discord
  • Saving time since you do not have to recreate every event by hand

What You Need Before You Start

Before importing or using the n8n template, make sure you have the following pieces ready.

1. A Discord Bot and Bot Token

The workflow communicates with the Discord API using a bot. You will need to:

  • Create a Discord bot in the Discord Developer Portal
  • Obtain the bot token, which is used to authorize API requests

If you have never created a bot before, follow this tutorial to set one up and get the token: Creating a Discord bot & getting a token .

2. Google Calendar API Credentials

To allow n8n to read and manage events in your Google Calendar, you need OAuth2 credentials for the Google Calendar API. In practice this means:

  • Creating an OAuth2 client in the Google Cloud Console
  • Using those credentials to set up your Google Calendar authentication in n8n

These credentials let the workflow list, create, and update events in your chosen calendar.

3. Access to Your Discord Guild (Server) ID

The workflow targets a specific Discord server using its guild_id. You will configure this ID inside n8n so the workflow knows which server to pull events from.


How the n8n Workflow Works Conceptually

Before we configure anything, it helps to understand the high-level logic. The workflow runs on a schedule and keeps Discord and Google Calendar in sync using the following sequence:

  1. Trigger on a schedule using an On schedule node in n8n.
  2. Read configuration such as the Discord guild_id from a dedicated configuration node.
  3. Fetch scheduled events from Discord by calling the Discord API endpoint /guilds/{guild_id}/scheduled-events.
  4. Check Google Calendar for events that match the Discord event IDs.
  5. Compare data to decide whether each Discord event already exists in Google Calendar or needs to be created.
  6. Create or update Google Calendar events so that details like time, title, description, and location match the latest information from Discord.

The key idea is that the Discord event ID becomes the reference point for deciding whether to create a new calendar event or update an existing one.


Step-by-Step: Setting Up the Workflow in n8n

Step 1: Import the Template and Review the Nodes

Start by importing the n8n workflow template into your n8n instance:

Once imported, open the workflow and look for the following key nodes:

  • On schedule – triggers the workflow at regular intervals
  • Configure – stores configuration values like the Discord guild ID
  • List scheduled events from Discord (HTTP Request node)
  • Get events (Google Calendar node)
  • Create event (Google Calendar node)
  • Update event details (Google Calendar node)

Step 2: Configure the Schedule Trigger

The On schedule node controls how often the sync runs. For example, you might want to:

  • Run every 15 minutes for very active communities
  • Run hourly or daily for less frequent updates

Choose a schedule that balances up-to-date information with API usage limits.

Step 3: Set the Discord Guild ID in the Configure Node

The Configure node typically contains a field for your guild_id, which is the Discord server ID. To find this ID:

  1. In Discord, open User Settings and enable Developer Mode.
  2. Right-click on your server name in the sidebar.
  3. Click Copy ID to copy the guild ID to your clipboard.

If you need a visual walkthrough, see this tutorial: Getting Guild ID .

Paste that ID into the appropriate field in the Configure node so the workflow knows which server to query.

Step 4: Authorize the Discord HTTP Request Node

The List scheduled events from Discord node is an HTTP Request node that calls the Discord API to retrieve events. You must add your bot token in the request headers so Discord accepts the request.

In this node, set the header as follows:

  • Header Name: Authorization
  • Value: Bot <your token>

Replace <your token> with the actual bot token from the Discord Developer Portal. The node will then call: /guilds/{guild_id}/scheduled-events for the guild ID you configured, and retrieve all scheduled events including the user count for each event.

Step 5: Connect and Configure Google Calendar Nodes

The workflow uses Google Calendar nodes to read and modify calendar events. You will typically see nodes named:

  • Get events – to check if an event already exists
  • Create event – to add a new event to Google Calendar
  • Update event details – to modify an existing event

For each of these nodes, you need to:

  1. Select or create your Google Calendar credentials in n8n using your OAuth2 setup.
  2. Replace any placeholder calendar IDs with the actual ID of the Google Calendar where you want events to appear.

The calendar ID is often your email address for a primary calendar, or a specific ID for secondary calendars.

Step 6: How the Workflow Matches Discord Events to Calendar Events

Once the Discord events are fetched, the workflow processes each one and checks Google Calendar to see if there is already a corresponding event. The logic usually works like this:

  1. Take the Discord event ID from the API response.
  2. Use the Get events node to search the target Google Calendar for an event that corresponds to that ID (for example, via a stored ID or a mapped field).
  3. If an event is found, pass it to the Update event details node.
  4. If no event is found, send the Discord event data to the Create event node.

Through this comparison, the workflow decides whether it should create a new calendar entry or update an existing one.

Step 7: Creating New Events in Google Calendar

When the workflow determines that a Discord event is new, it uses the Create event node to build a matching event in Google Calendar. Typical fields mapped from Discord include:

  • Start time and end time
  • Summary or event title
  • Location (for example, a voice channel or physical location)
  • Description, which can contain more details about the event

This ensures that the new calendar event reflects the original Discord scheduled event as closely as possible.

Step 8: Updating Existing Events With the Latest Discord Data

If the workflow finds that a Google Calendar event already corresponds to a Discord event, it uses the Update event details node instead. This node updates fields such as:

  • Start and end times if the event was rescheduled
  • Title or summary if the name changed
  • Location or description if details were edited in Discord

As a result, your Google Calendar always reflects the most recent information from your Discord server.


Benefits of Automating Your Discord to Google Calendar Sync

  • Time-saving – No more copying and pasting event details between platforms.
  • Consistency – Changes made to Discord scheduled events are quickly mirrored in Google Calendar.
  • Centralized scheduling – Everyone can rely on a single calendar view, even if events originate in Discord.

Frequently Asked Questions

Do I need to run the workflow manually?

No. The workflow is triggered by the On schedule node. Once you set the schedule, n8n will run it automatically at the configured intervals.

Can I use a different Google Calendar?

Yes. Just replace the placeholder calendar IDs in the Get events, Create event, and Update event details nodes with the ID of the calendar you want to use.

What happens if I change an event only in Google Calendar?

This template is designed primarily to push data from Discord to Google Calendar. If you change events only in Google Calendar, those changes will not automatically sync back to Discord unless you extend the workflow with additional logic.

Is my Discord bot token secure in n8n?

You should always treat your bot token as a secret. Store it in n8n credentials or environment variables where possible, and avoid hardcoding it in nodes that might be shared.


Next Steps: Put the Workflow Into Action

To start syncing your events:

  1. Create your Discord bot and copy the bot token.
  2. Set up Google Calendar API OAuth2 credentials in n8n.
  3. Import the template and configure the guild_id, bot Authorization header, and Google Calendar IDs.
  4. Adjust the schedule to match how often you want events synced.
  5. Activate the workflow and watch your Discord scheduled events appear in Google Calendar.

With this n8n automation in place, your community or team can stay organized and never miss a Discord event again.

Additional Resources

Build WhatsApp AI Calendar Agent Workflow

Build a WhatsApp AI Calendar Agent Workflow with n8n

Why turn WhatsApp into your personal calendar assistant?

Imagine being able to text your WhatsApp like you would a friend and say things like:

  • “Add a meeting with Sarah tomorrow at 3 PM.”
  • “What does my Friday look like?”
  • “Move my dentist appointment to next Wednesday.”
  • “Delete my 5 PM call today.”

and have everything instantly updated in your Google Calendar, without ever opening it.

That is exactly what this n8n workflow template helps you build: a WhatsApp AI Calendar Agent that understands natural language, talks back to you, and manages your calendar on your behalf using AI.

Under the hood, it connects WhatsApp, Google Gemini (for the AI chat), and Google Calendar, then wraps everything in a friendly chat experience.

What this WhatsApp AI Calendar Agent actually does

This workflow template turns an incoming WhatsApp message into a full conversation with an AI agent that can:

  • Understand what you are asking in plain language using Google Gemini Chat
  • Decide whether you want to create, read, update, or delete a calendar event
  • Talk to Google Calendar to perform that action
  • Remember context during the chat so follow-up questions still make sense
  • Reply to you on WhatsApp with a clear, human-like answer

So instead of clicking around your calendar, you simply chat on WhatsApp and let n8n handle the rest.

When should you use this workflow?

This template is perfect if you:

  • Live in WhatsApp all day and want your calendar to meet you there
  • Need to quickly schedule or modify events on the go
  • Want an AI-powered scheduling assistant without building everything from scratch
  • Prefer conversational commands instead of forms or calendar interfaces

It is especially handy for busy professionals, small teams, or anyone who wants to automate scheduling tasks using natural chat instead of manual input.

How the workflow flows from WhatsApp message to calendar action

Let us walk through what happens step by step when someone sends a WhatsApp message to your connected number.

1. WhatsApp Trigger catches the incoming message

The workflow starts with a WhatsApp Trigger node. This uses a webhook to listen for new WhatsApp messages in real time.

Whenever a user sends a message, this trigger fires and passes the content of that message into the rest of the workflow.

2. Variables are initialized for processing

Next, a set of Variables & Initialization nodes prepare everything the workflow needs to make decisions. These nodes:

  • Extract the text of the incoming message
  • Store metadata like sender details
  • Set up internal variables that will be used for branching and logic

Think of this as the workflow getting its bearings before deciding what to do.

3. Check if it is a new conversation or ongoing chat

Then comes a simple but important check: the Conditional Decision – Is start? node.

This node looks at the message and determines whether it is:

  • A new session or first-time message, in which case it can send a welcome or onboarding-style response
  • Part of an existing conversation, where it should just continue the interaction naturally

This keeps the experience more human and less robotic, especially for new users.

4. The workflow defines the request type and hands it to the AI agent

Once the basics are set, the workflow needs to figure out what the user is actually trying to do. A Define Type style logic step classifies the intent, then routes the request to the AI agent node.

This is where the real magic happens.

5. AI Agent with Google Gemini handles the conversation

The AI Agent Node is powered by the Google Gemini Chat Model, combined with a simple memory mechanism.

Together, they allow the agent to:

  • Understand natural language instructions like “reschedule my 2 PM call”
  • Keep track of context across multiple messages using a memory buffer
  • Generate helpful, conversational responses

Because of the memory buffer, you can say things like:

“Create a meeting with John tomorrow at 10.”
Then follow up with:
“Actually, make it 11.”

and the agent still knows which event you are talking about.

6. Calendar event nodes talk directly to Google Calendar

Once the AI agent understands what you want, it uses a set of Calendar Event Nodes to perform the actual calendar operations in Google Calendar.

  • Get Calendar Event: Fetches event details, so the AI can answer questions like “What is on my schedule this afternoon?”
  • Create Calendar Event: Adds new events based on your instructions, including time, date, and description.
  • Update Calendar Event: Edits existing events, for example when you reschedule or change details.
  • Delete Calendar Event: Removes events that you no longer need.

These nodes work behind the scenes, while the AI agent focuses on the conversation and logic.

7. The final answer is sent back over WhatsApp

After the AI agent has processed your request and the calendar nodes have done their job, the workflow wraps up with the Send Answer Node.

This node uses a WhatsApp message template to send the AI-generated response back to the user. It might say things like:

  • “Got it, I have created your meeting with Sarah tomorrow at 3 PM.”
  • “You have 3 events on Friday. Here are the details…”
  • “Your appointment has been moved to next Wednesday at 11 AM.”

The result is a smooth, chat-based experience that feels like talking to a smart assistant.

Quick recap: How it all works together

Putting it all in one simple flow:

  1. User sends a WhatsApp message.
  2. WhatsApp Trigger activates the workflow.
  3. Variables & Initialization nodes prepare message data.
  4. Conditional Decision – Is start? checks if it is a new session and responds accordingly.
  5. The workflow defines the request type and routes it to the AI Agent Node.
  6. The AI agent, powered by Google Gemini Chat and a memory buffer, interprets the request.
  7. Calendar Event Nodes (get, create, update, delete) interact with Google Calendar.
  8. Send Answer Node replies to the user via WhatsApp with the final response.

From the user’s point of view, it is just chatting. Everything else is handled by n8n and this workflow template.

Why this n8n workflow makes your life easier

  • Hands-off automation: Routine calendar tasks are handled by AI, so you do not have to open your calendar app for every small change.
  • Seamless integration: WhatsApp, Google Gemini, and Google Calendar all work together in one automated workflow.
  • Natural, user-friendly experience: You manage your schedule through simple chat messages instead of complex forms or menus.
  • Context-aware conversations: Memory keeps track of previous messages so the AI understands follow-ups and ongoing discussions.

Ready to try it yourself?

This WhatsApp AI Calendar Agent workflow is a practical way to bring conversational AI into your daily scheduling. You get an always-on assistant that lives inside WhatsApp and talks directly to your Google Calendar using n8n automation.

If you are already using n8n, you can plug in this template, connect your WhatsApp, Google Gemini, and Google Calendar credentials, then start chatting with your calendar in minutes.

Start automating your WhatsApp calendar interactions today and let AI handle the scheduling for you.

Automate Invoices and Reminders with Jotform & QuickBooks

Automate Invoices and Reminders with Jotform & QuickBooks

From Manual Chasing to Effortless Cash Flow

Manually creating invoices, checking who has paid, and sending reminder emails can quietly drain hours from your week. It breaks your focus, delays important work, and often leaves you feeling behind on both admin and growth.

What if that entire process could run in the background while you focus on serving clients, growing your business, or simply reclaiming your time?

This n8n workflow template connects Jotform, QuickBooks Online (QBO), Outlook, and a database into a single automated system. It captures orders, creates invoices, sends them, and follows up with smart payment reminders, all without you lifting a finger after setup.

Think of it as your always-on billing assistant, quietly keeping your revenue flowing and your customers informed.

Adopting an Automation Mindset

Automation is not just about saving a few minutes, it is about building a business that does not depend on you being online 24/7. When you automate repetitive steps like invoicing and reminders, you:

  • Free up mental space to focus on strategy and creativity
  • Reduce errors that come with manual data entry
  • Offer a smoother, more professional experience to customers
  • Create scalable systems that grow with your business

This workflow template is a practical first step into that mindset. You can start with the ready-made structure, then experiment, tweak, and extend it as your needs evolve. Each improvement you make is an investment in a more focused, less stressful way of working.

How the n8n Workflow Brings Everything Together

At its core, this automation links four key pieces of your billing process:

  • Jotform to capture customer orders and details
  • QuickBooks Online to manage customers and create invoices
  • Outlook to send emails and payment reminders
  • A database to track invoice status and reminder history

Here is how the journey flows from a simple form submission to a fully automated reminder system.

1. A Customer Submits a Jotform Order

Everything starts with a Jotform form. A customer fills it out to request a product or service, providing details like:

  • Name
  • Email address
  • Phone number
  • Billing address
  • Selected product or service

Jotform is configured with a webhook so that every submission is instantly sent to n8n. No more copying data from forms into your accounting software, the workflow catches each order automatically and prepares it for invoicing.

2. The Workflow Checks or Creates the Customer in QuickBooks Online

Next, the automation verifies whether this customer already exists in QuickBooks Online. It matches the email address from the Jotform submission against your QBO customer records:

  • If the customer already exists, the workflow updates their billing information to keep your data accurate and consistent.
  • If the customer does not exist, it creates a brand new customer record in QBO using the details from the form.

That means your customer list stays clean and up to date without manual entry, which is a huge win for long term organization.

3. The Correct Product or Service Is Retrieved from QBO

Using the item name submitted in the Jotform, the workflow then looks up the matching product or service in your QuickBooks Online catalog. This step ensures that:

  • The right item is billed
  • Pricing and descriptions stay consistent with your QBO setup
  • Your accounting records remain accurate and easy to reconcile

4. An Invoice Is Automatically Created

With the customer and item information ready, the workflow generates an invoice in QuickBooks Online. The invoice includes:

  • The selected product or service
  • Relevant pricing information
  • A description that references the Jotform submission, so you can always trace back to the original request

You no longer need to log in, search for the customer, pick the product, and build the invoice by hand. That entire sequence is now handled for you.

5. The Invoice Is Sent by Email via QuickBooks

Once the invoice is created, QuickBooks Online takes care of emailing it directly to the customer. The workflow uses QBO’s built-in email capabilities, so your client receives a professional invoice straight from your accounting system, just as if you had sent it yourself.

This immediate response sets a clear, professional tone and reduces delays between order and billing.

6. Invoice Details Are Stored in a Database for Tracking

To enable smart reminders, the workflow stores key invoice information in a database. This includes:

  • invoiceId
  • remainingAmount (outstanding balance)
  • currency
  • remindersSent count
  • Last reminder timestamps

These fields allow the system to know which invoices are still unpaid, how many reminders have been sent, and when it is time to follow up again. Instead of relying on spreadsheets or memory, you have a clear, automated record.

7. Daily Scheduled Payment Reminders Run Automatically

Every day at 8 AM, a scheduled trigger in n8n wakes up your reminder system. The workflow checks all outstanding invoices in the database and applies the reminder rules you configured.

You can define reminder intervals such as:

  • Send a reminder 2 days after invoice creation
  • Send another reminder 3 days later
  • Send a final reminder after 5 days, or any timing that suits your business

Based on these rules, the workflow decides for each invoice whether to:

  • Send a reminder now via Outlook
  • Skip it for now and check again later
  • Stop tracking if the invoice is paid or deleted

This means your customers receive timely, consistent payment reminders without you having to check who is overdue or craft follow-up emails manually.

Who This Workflow Is Perfect For

This n8n template is a great fit if you want to streamline billing without hiring extra help or spending hours on admin. It is especially valuable for:

  • Freelancers juggling multiple clients who want automated, reliable invoicing and reminders.
  • Small businesses that need a structured billing and follow-up framework without building everything from scratch.
  • Consultants, coaches, and service providers who want a professional, consistent payment process that respects both their time and their clients’.
  • E-commerce sellers using Jotform for orders who want those orders to flow directly into QuickBooks invoices with minimal effort.

If you recognize yourself in any of these, this workflow can be a powerful foundation for a more automated and focused way of working.

What You Need Before You Start

To get this n8n workflow template up and running, you will need a few pieces in place. Once they are ready, the rest is largely plug and play.

  • A Jotform form configured with a webhook integration to send submissions to n8n.
  • A QuickBooks Online account with API credentials so n8n can create and update customers and invoices.
  • An Outlook account configured in n8n for sending reminder and summary emails.
  • A database table with columns such as:
    • invoiceId
    • remainingAmount
    • currency
    • remindersSent
    • lastReminderTimestamp (or equivalent)
  • Reminder intervals defined to indicate when to send emails after invoice creation, for example after 2, 3, and 5 days.

Once these elements are connected in n8n, the workflow can run end to end with minimal ongoing maintenance.

Using This Template as a Stepping Stone

This workflow template is not just a finished tool, it is a starting point for your own automation journey. After you get the basic setup running, you can gradually enhance it, for example:

  • Customizing reminder email content in Outlook to match your brand voice
  • Adjusting reminder timings to fit your industry or client expectations
  • Adding summary emails that show you which invoices are still outstanding
  • Integrating additional apps, such as CRMs or project management tools, for even deeper automation

Each small improvement moves you closer to a business that runs on systems instead of constant manual effort.

Start Automating Your Invoicing Today

If you are ready to stop chasing invoices and start working with a calmer, more automated setup, this n8n workflow template gives you a clear path forward. It connects Jotform, QuickBooks Online, Outlook, and your database into a single, reliable invoicing and reminder engine.

Set it up once, then let it handle the repetitive work while you focus on what truly moves your business forward.

For help with setup or deeper customization, you can reach out to our support team or explore our detailed documentation. You are not alone in this journey, and you can shape this workflow to match your exact processes.

Automate Invoices & Reminders with Jotform & QuickBooks

Automate Invoices & Payment Reminders with Jotform, QuickBooks Online & Outlook

Overview

For teams that manage recurring invoices or a high volume of client orders, manual billing quickly becomes a bottleneck. This n8n workflow template connects Jotform, QuickBooks Online (QBO), and Microsoft Outlook to create a fully automated invoicing and reminder system. As soon as a customer submits an order form, the workflow generates a QuickBooks invoice, sends it, tracks its status, and then dispatches scheduled payment reminders until the invoice is paid or the reminder sequence is complete.

This article explains the architecture of the workflow, the key nodes involved, and how to configure it using automation best practices.

Use Case & Automation Goals

The template is designed for organizations that capture orders or service requests through online forms and manage accounting in QuickBooks Online. Typical users include agencies, consultants, freelancers, and small to mid-size businesses that want to:

  • Eliminate manual data entry between Jotform and QuickBooks.
  • Standardize invoice creation and email delivery.
  • Automate payment reminder sequences based on invoice status.
  • Maintain a structured record of invoices and reminders in a dedicated data table.

By centralizing this logic in n8n, you gain a repeatable, auditable workflow that improves cash flow and reduces operational overhead.

High-Level Workflow Design

The automation can be divided into two main flows that run on different triggers:

  1. Invoice creation flow – Triggered in real time by a Jotform submission.
  2. Reminder management flow – Triggered on a daily schedule to handle unpaid invoices.

Core Integrations

  • Jotform – Captures customer and order data via forms and sends it to n8n via a webhook trigger.
  • QuickBooks Online – Stores customer records, products or services, and invoices.
  • Microsoft Outlook – Sends branded invoice reminders from your business email address.
  • Data table – Persists invoice-related metadata, including reminder counts and outstanding amounts.

Flow 1: From Jotform Submission to QuickBooks Invoice

1. Webhook Trigger from Jotform

The process begins when a customer submits a Jotform order or service request. Jotform is configured to send the submission payload to n8n via a webhook. This payload typically includes:

  • Customer name and email address.
  • Billing address and phone number.
  • Selected product or service details.
  • Any additional order-specific fields you require.

2. Parsing and Normalizing Form Data

Once the webhook receives the data, a set of processing nodes prepares it for use across the workflow. Best practice is to normalize the structure at this stage so that downstream nodes work with predictable fields. Typical actions include:

  • Extracting and restructuring address components (street, city, state, postal code, country).
  • Standardizing customer contact details such as email and phone.
  • Mapping Jotform field names to the field schema expected by QuickBooks.

This transformation step reduces the risk of mapping errors and simplifies future maintenance if the form changes.

3. Customer Lookup and Synchronization in QuickBooks

With clean data available, the workflow queries QuickBooks Online to determine whether the customer already exists. The lookup typically uses the email address as the unique identifier.

  • If the customer exists, the workflow updates relevant fields such as billing address and phone number to ensure QuickBooks reflects the latest information from the form.
  • If the customer does not exist, a new customer record is created in QuickBooks using the data extracted from Jotform.

This approach keeps your accounting system synchronized with your customer-facing forms and avoids duplicate customer records.

4. Retrieving Product or Service Item from QBO

Next, the workflow identifies the correct product or service in QuickBooks. Using the item selected in the Jotform submission, a QuickBooks node fetches the corresponding item record and retrieves its internal item ID. This ID is required to correctly associate the line items on the invoice with your predefined products or services in QBO.

5. Invoice Creation and Delivery

With the customer and item data resolved, the workflow creates a new invoice in QuickBooks Online. The invoice includes:

  • The linked customer record.
  • The appropriate product or service item(s) and quantities.
  • Currency and pricing details per your QBO configuration.

After the invoice is created, QuickBooks uses its native email capabilities to send the invoice directly to the customer’s email address. This ensures that the document is formatted according to your QuickBooks template and includes any configured payment links.

6. Persisting Invoice Metadata in a Data Table

To enable robust reminder logic, the workflow stores key invoice metadata in a dedicated data table. Typical fields include:

  • Invoice ID and customer reference.
  • Outstanding or remaining payment amount.
  • Currency used.
  • Number of reminders already sent.
  • Creation date or other timestamps needed for interval calculations.

This data table acts as the single source of truth for reminder scheduling and cleanup operations in the second flow.

Flow 2: Scheduled Payment Reminders & Record Maintenance

1. Daily Scheduler Trigger

A scheduler node is configured to run at a fixed time each day, for example at 8:00 AM. When triggered, it queries the data table to identify invoices that are:

  • Unpaid or partially paid.
  • Still within the configured reminder schedule.

This daily execution pattern centralizes reminder logic and avoids sending reminders at inconsistent times.

2. Evaluating Reminder Intervals

The workflow then evaluates whether each invoice is eligible for another reminder based on predefined business rules, such as:

  • Number of days since invoice creation.
  • Number of reminders already sent.
  • Remaining balance on the invoice.

If the current date matches one of your configured reminder intervals, the invoice is flagged for follow-up. If not, it is skipped until the next eligible run.

3. Sending Outlook Reminder Emails

For invoices that meet the criteria, the workflow uses the Microsoft Outlook integration to send reminder emails from your organization’s email account. The email typically includes:

  • Customer name and invoice reference.
  • Outstanding amount and due date if applicable.
  • A payment link or reference to the original QuickBooks invoice email.
  • Your company branding and standardized messaging.

Each time a reminder is sent, the workflow updates the corresponding record in the data table, incrementing the reminder count and optionally logging timestamps for audit purposes.

4. Cleanup: Archiving or Removing Completed Records

The workflow also handles cleanup logic to prevent the data table from growing indefinitely. It checks whether:

  • The invoice is fully paid, based on QuickBooks data, or
  • The maximum configured number of reminders has already been sent.

In either case, the workflow removes or archives the invoice entry from the data table. This keeps the reminder queue focused only on actionable invoices and simplifies reporting.

Benefits of This n8n Invoice Automation

  • Significant time savings – Invoices are generated and sent automatically at the moment of form submission, which eliminates manual data entry and repetitive tasks.
  • Higher data accuracy – Customer records in QuickBooks are updated consistently from Jotform, reducing discrepancies between systems.
  • Improved cash flow – Structured and timely reminder emails encourage faster payments and reduce overdue balances.
  • Consistent, professional communication – Outlook sends branded, standardized reminder emails that align with your organization’s identity.
  • Scalable architecture – The template supports freelancers and small teams as well as growing businesses without requiring major changes to the workflow logic.

Prerequisites & Configuration Requirements

Before deploying the template, ensure the following components are in place:

  • Jotform with a webhook integration configured to send form submissions to the n8n webhook node.
  • QuickBooks Online account with API access credentials set up in n8n for customer, item, and invoice operations.
  • Microsoft Outlook connection in n8n, authorized to send emails from your company mailbox for reminders.
  • Data table configured in n8n (or a connected database) to store invoice metadata, including invoice ID, remaining amount, currency, and reminder count.
  • Reminder interval configuration, including the number of reminders, days after invoice creation to send each reminder, and the daily scheduler time.

Implementation Steps

To get started with this workflow in your own environment:

  1. Design your Jotform
    Include all required fields for customer identification, billing details, and product or service selection. Ensure field names are clear so they can be easily mapped in n8n.
  2. Connect Jotform to n8n via Webhook
    Create a webhook trigger node in n8n and configure Jotform to send submissions to the generated webhook URL.
  3. Set up QuickBooks Online credentials
    In n8n, configure QBO credentials and connect nodes for customer lookup, customer creation or update, item retrieval, and invoice creation.
  4. Configure the Outlook node
    Authorize the Outlook integration with your business email account. Define the email templates for reminder messages, including dynamic fields such as customer name and invoice details.
  5. Create and map the data table
    Set up the table structure that will hold invoice metadata. Map fields from the QuickBooks invoice response to the corresponding columns in the table.
  6. Define reminder logic and scheduler
    Configure the scheduler node to run at 8 AM (or your preferred time). Implement the logic that checks invoice age, outstanding amount, and reminders sent before sending a new reminder or cleaning up records.

Next Steps

By combining Jotform, QuickBooks Online, and Outlook within n8n, you can transform invoicing from a manual, error-prone task into a controlled, automated process that runs reliably in the background.

If you are ready to streamline your invoicing operations and accelerate payments, deploy this template and adapt the configuration to your billing policies and communication style.

For expert guidance or a tailored implementation, reach out for a dedicated automation consultation.

Using OpenAI Models in n8n Workflows: Examples & Best Practices

Using OpenAI Models in n8n Workflows: Examples & Best Practices

Overview

OpenAI models such as ChatGPT, Whisper-1, and DALLE-2 can be integrated directly into n8n workflows to automate a wide range of language and media tasks. Typical use cases include:

  • Speech-to-text transcription
  • Summarization and translation
  • Programmatic multi-turn conversations
  • Prompt-driven image generation
  • SVG and HTML code generation
  • Quick email reply suggestions

This reference-style guide describes a sample n8n workflow template that combines these capabilities using OpenAI models. It focuses on technical configuration, node behavior, and data flow so you can adapt the pattern to your own automations.

API Approach: Legacy Davinci vs Modern ChatGPT / Whisper

Previous n8n workflows often relied on the Davinci-003 model using the OpenAI Text Completion and Edit operations. While functional, this legacy approach is:

  • Significantly more expensive per token compared to ChatGPT models
  • Less aligned with current OpenAI feature development

The recommended approach is to migrate to the ChatGPT and Whisper APIs:

  • ChatGPT for conversational and instruction-following tasks such as summarization, translation, and content generation
  • Whisper-1 for audio transcription

For details on these APIs and pricing, see the official OpenAI post:
Introducing ChatGPT and Whisper APIs.

Workflow Architecture

The template is structured as a collection of related examples, each focusing on a specific OpenAI capability. The nodes are designed so you can enable or disable sections independently during testing.

High-Level Components

  • Whisper-1 Transcription – Accepts audio input and produces text output.
  • Static Text Example – Provides a fixed transcript for testing downstream text-processing nodes.
  • Summarization and Translation – Uses ChatGPT to generate a tl;dr and a German translation.
  • Programmatic Multi-turn Chat – Builds a message array with roles and sends it to ChatGPT via HTTP.
  • Prompt-to-Image Pipeline – Uses ChatGPT to craft a DALLE-2 prompt, then generates comic-style images.
  • SVG / HTML Code Generation – Produces SVG-based HTML snippets using ChatGPT.
  • Quick Reply Generator – Creates short email reply suggestions from user input.

Data typically flows from an input node (audio or text) into one or more ChatGPT or Whisper calls, then optionally into downstream processing nodes such as image generation or code rendering.

Node-by-Node Breakdown

1. Whisper-1 Transcription Node

This section of the workflow demonstrates how to connect audio input to OpenAI’s Whisper-1 model.

Purpose

  • Convert uploaded audio files into text for downstream processing.

Typical Configuration

  • Node type: OpenAI (or HTTP Request, depending on your n8n version and preference)
  • Model: whisper-1
  • Operation: Transcription
  • Input: Binary audio file from a previous node (for example, webhook, file upload, or storage)

Data Flow

  1. An upstream node provides an audio file as binary data.
  2. The Whisper-1 node sends the file to the OpenAI transcription endpoint.
  3. Whisper-1 returns the transcript as text in the JSON output.
  4. The transcript becomes the input for other nodes such as summarization, translation, or prompt generation.

Notes and Edge Cases

  • Large audio files may significantly increase execution time. During testing, you can disable this node and use the static text example instead.
  • Ensure the correct binary property name is configured in the node if your file is not in the default property.

2. Static Text Example Node

To avoid repeatedly uploading large audio files during development, the workflow includes a node that provides a fixed transcripted text as an example.

Purpose

  • Serve as a predictable text input for downstream ChatGPT examples.

Usage

  • Enable this node when you want to test summarization, translation, or image generation without running Whisper-1 each time.
  • Disable Whisper-1 or other heavy nodes during rapid iteration to speed up testing.

3. ChatGPT Example 1.1 & 1.2: Tl;dr and Translation

These two nodes demonstrate basic text processing with ChatGPT using separate calls for summarization and translation.

3.1 Tl;dr Summarization (Example 1.1)

  • Input: Transcript from Whisper-1 or the static text node.
  • Model: ChatGPT (for example, gpt-3.5-turbo, depending on your n8n version and credentials).
  • Prompt strategy: Instruct ChatGPT to produce a concise tl;dr style summary.

The node returns a short, high-level summary that can be used as the basis for further processing, such as prompt construction for image generation.

3.2 Translation to German (Example 1.2)

  • Input: Original text or the tl;dr summary, depending on your desired behavior.
  • Model: ChatGPT.
  • Prompt strategy: Ask ChatGPT to translate the text into German.

Running summarization and translation as separate nodes keeps the responsibilities clear and makes it easier to reuse each step independently.

4. ChatGPT Example 2: System Instructions + User Content

This node illustrates how to use system and user roles in ChatGPT to control behavior.

Purpose

  • Showcase flexible prompt engineering using role-based messages.
  • Apply general instructions globally through system content.

Configuration Pattern

  • System message: High-level instructions, such as writing style, tone, or constraints.
  • User message: The actual content or question that should be processed.

This pattern is useful when you want consistent behavior across multiple user inputs, for example enforcing a specific output format or language.

5. ChatGPT Example 3.1: Programmatic Multi-turn Conversations

In this part of the workflow, you build an array of messages programmatically, then send it to the ChatGPT API via an HTTP Request node.

Purpose

  • Model multi-turn conversations with explicit system, user, and assistant roles.
  • Maintain conversation history in a structured format.

Typical Implementation

  1. Use a Function or Set node to construct an array of messages, for example:
    • { role: "system", content: "You are a helpful assistant." }
    • { role: "user", content: "User question or statement..." }
    • { role: "assistant", content: "Previous assistant reply..." } (optional for multi-turn)
  2. Pass this array into an HTTP Request node configured to call the ChatGPT chat completions endpoint.
  3. Parse the response and route it to subsequent nodes as needed.

Benefits

  • Fine-grained control over the full conversation context.
  • Easier integration with custom logic that appends or modifies messages before each call.

6. ChatGPT Example 3.2 & DALLE-2 Example 3.3: Image Generation Pipeline

These examples show a two-step pipeline where ChatGPT first generates a creative prompt, then DALLE-2 uses that prompt to produce images.

6.1 Prompt Generation with ChatGPT (Example 3.2)

  • Input: Typically the summarized text from the tl;dr node.
  • Model: ChatGPT.
  • Prompt strategy: Ask ChatGPT to create a detailed, imaginative prompt suitable for DALLE-2. For example, specify “comic-style” or a particular visual mood.

The output is a descriptive text prompt that captures the essence of the summary in visual form.

6.2 Image Generation with DALLE-2 (Example 3.3)

  • Input: Prompt from the previous ChatGPT node.
  • Model: DALLE-2.
  • Operation: Image generation.
  • Configuration: Generate multiple comic-style images related to the content.

The DALLE-2 node returns one or more image URLs or binary image data, depending on how you configure the node and the OpenAI integration in n8n.

7. ChatGPT Example 4: SVG HTML Code Generation

This example demonstrates how ChatGPT can generate HTML containing SVG code.

Purpose

  • Automatically create dynamic visuals, such as SVGs with random shapes, colors, and styles.
  • Use AI-assisted creative coding within your automation pipeline.

Behavior

  • The node sends a prompt instructing ChatGPT to return valid HTML that includes inline SVG.
  • ChatGPT responds with code that can be rendered in a browser or passed to a frontend system.

This is useful for generating simple, programmatically described visuals without manual coding each variation.

8. ChatGPT Example 5: Quick Replies Generator

The final example focuses on generating short email response suggestions.

Purpose

  • Speed up email workflows by suggesting concise replies based on the original message.

Configuration Pattern

  • Input: User-provided email text or message content.
  • Prompt strategy: A short instruction telling ChatGPT to generate several brief, ready-to-use reply options.

The node returns multiple suggested responses that can be displayed to a user, sent via another integration, or filtered based on additional logic.

Configuration Notes & Best Practices

Model and Cost Considerations

  • Prefer ChatGPT models over Davinci-003 for most text tasks to reduce costs and benefit from better instruction-following behavior.
  • Use Whisper-1 for transcription instead of legacy audio handling to leverage improved accuracy and pricing.

Workflow Performance

  • Disable or pause nodes that process large audio files or call slower external services when they are not required for a particular test run.
  • Use the static text example node to test downstream chains (summarization, translation, image generation) without re-running transcription.

Prompt and Role Design

  • Use system messages to define global behavior, tone, and constraints for ChatGPT.
  • Keep user messages focused on the specific content or question.
  • In multi-turn scenarios, include previous assistant messages in the message array to maintain context.

Integration and Error Handling

  • Ensure your OpenAI credentials are configured correctly in n8n’s credentials section before activating the workflow.
  • When using HTTP Request nodes, verify the endpoint URL and required headers (for example, Authorization: Bearer <API_KEY>).
  • Consider using n8n error workflows or Continue On Fail options where appropriate to handle occasional API errors gracefully.

Advanced Customization Ideas

While this template focuses on core patterns, you can extend it in several ways:

  • Chain multiple ChatGPT nodes to enforce step-by-step transformations, such as summarization, sentiment analysis, and then translation.
  • Integrate the quick reply generator with your email provider nodes to send selected replies automatically.
  • Store transcripts, summaries, and generated prompts in a database node for later analytics or reuse.

All of these customizations build on the same fundamental structure: input nodes, OpenAI processing nodes, and downstream integration nodes.

Next Steps

To start using these patterns, connect your OpenAI credentials in n8n and experiment with the ChatGPT and Whisper examples described above. Gradually adapt the prompts, models, and data flows to match your own automation requirements.

For full node parameter details, authentication configuration, and additional examples, refer to the official
n8n OpenAI documentation.