Content Idea Brainstormer with n8n & OpenAI

Content Idea Brainstormer with n8n & OpenAI

In this guide, you will learn how to turn a simple webhook into a powerful content idea engine using n8n, OpenAI, and Redis. We will walk through the full workflow so you can understand each component, how they connect, and how to adapt the template for your own content strategy.

What you will learn

By the end of this tutorial-style walkthrough, you will be able to:

  • Explain the architecture of a content idea brainstormer built in n8n
  • Configure a webhook to receive content briefs and topic seeds
  • Use OpenAI embeddings and a Redis vector store for retrieval-augmented generation
  • Set up tools, memory, and a conversational agent to generate structured content ideas
  • Log results automatically into Google Sheets for review and planning
  • Apply best practices for chunking, prompting, and privacy

Why build a Content Idea Brainstormer in n8n?

Content teams, marketers, and product managers often need a steady stream of high quality content ideas. Doing this manually is slow and hard to scale. An n8n workflow that automates idea generation can help you:

  • Save time by automating brainstorming for blog posts, videos, and social content
  • Standardize idea quality with consistent prompts and formatting
  • Reuse and build on past ideas with a searchable knowledge base
  • Scale ideation across different topics, audiences, and tones

This template uses AI-powered retrieval and prompting so your ideas are not just random, but grounded in previous inputs and stored context.

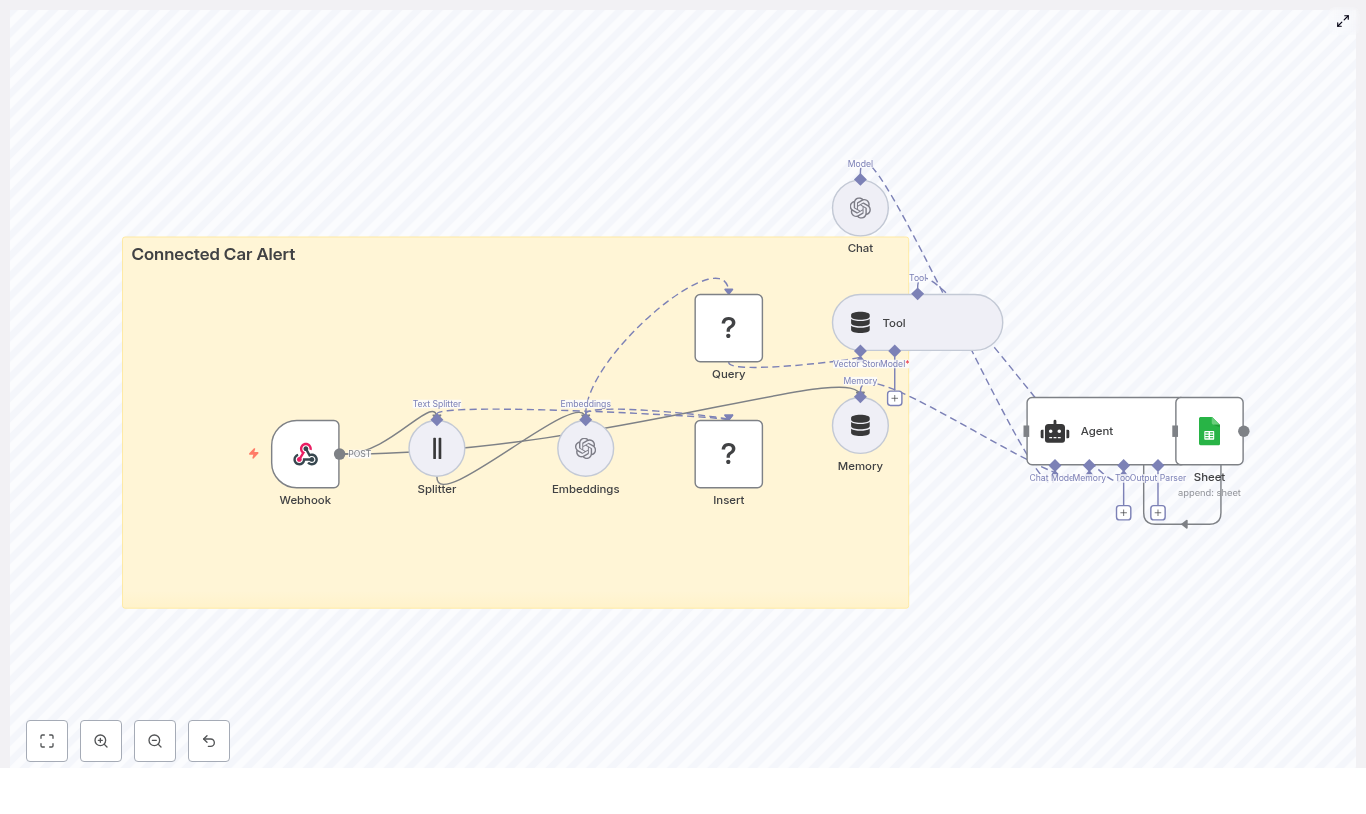
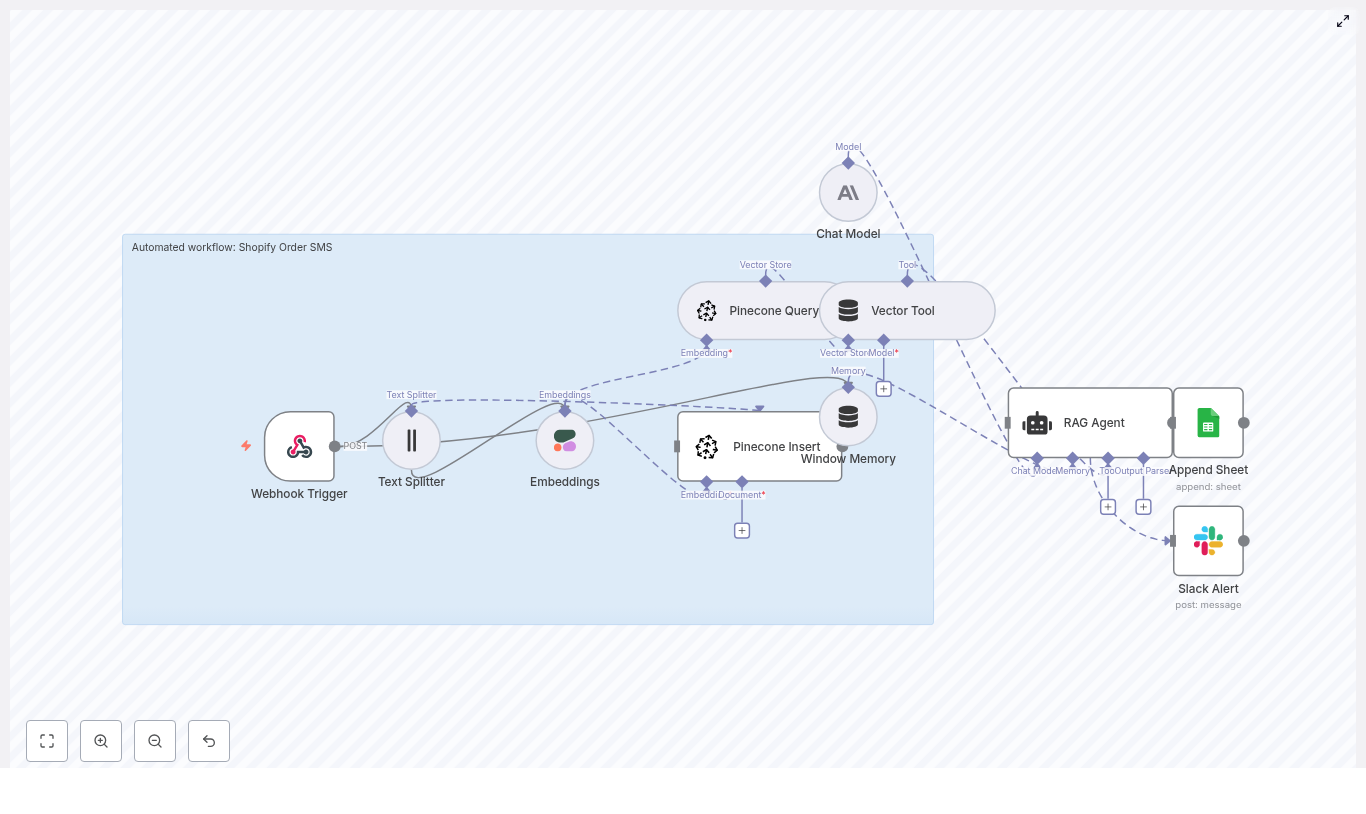
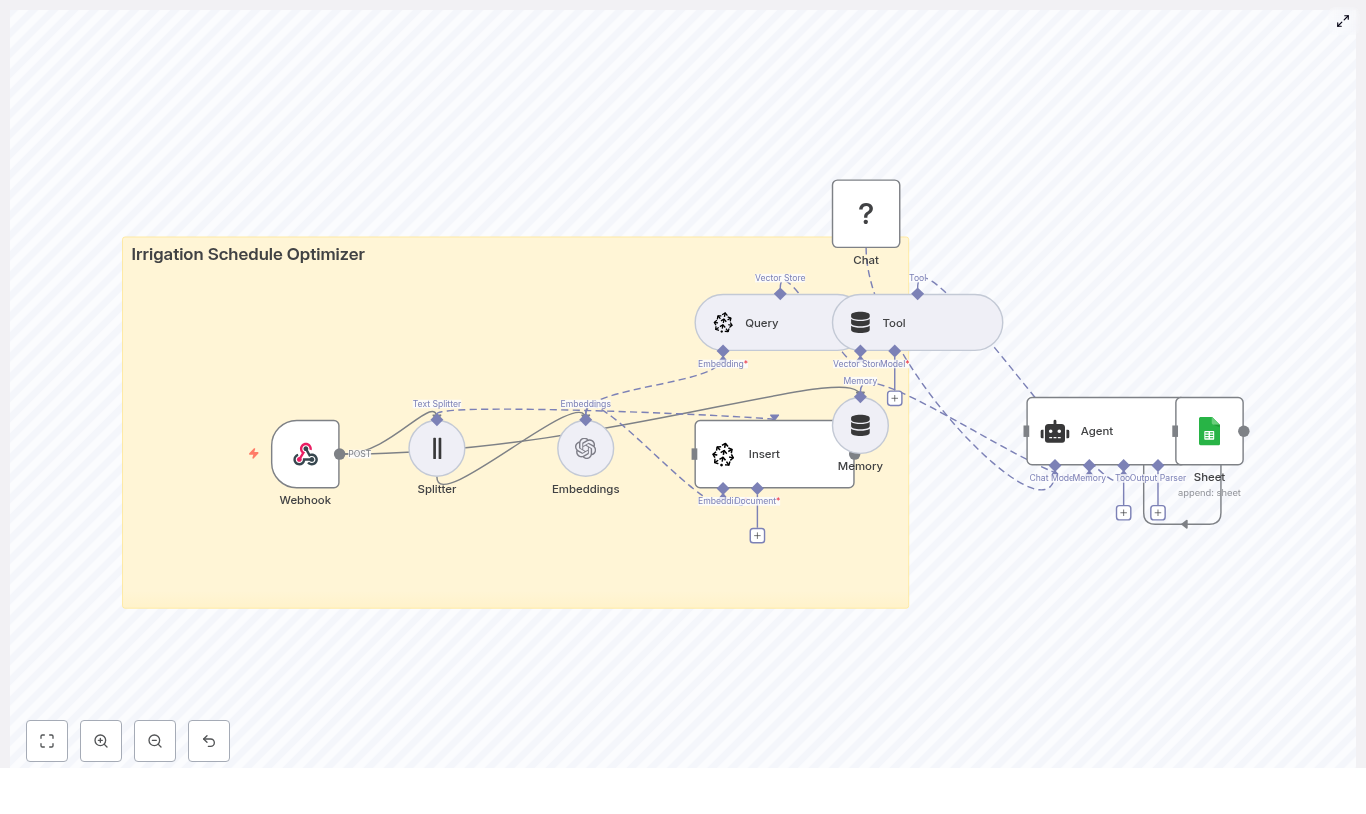
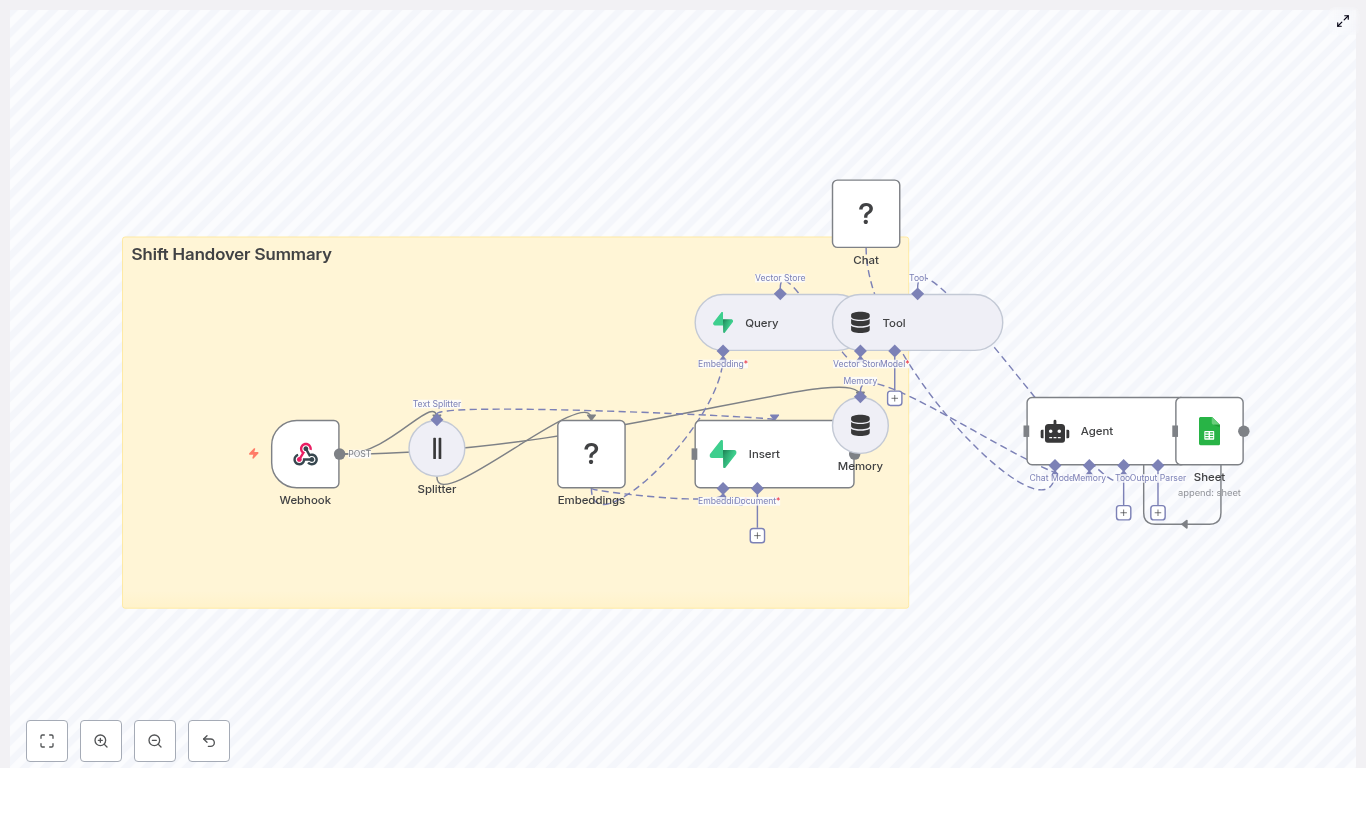
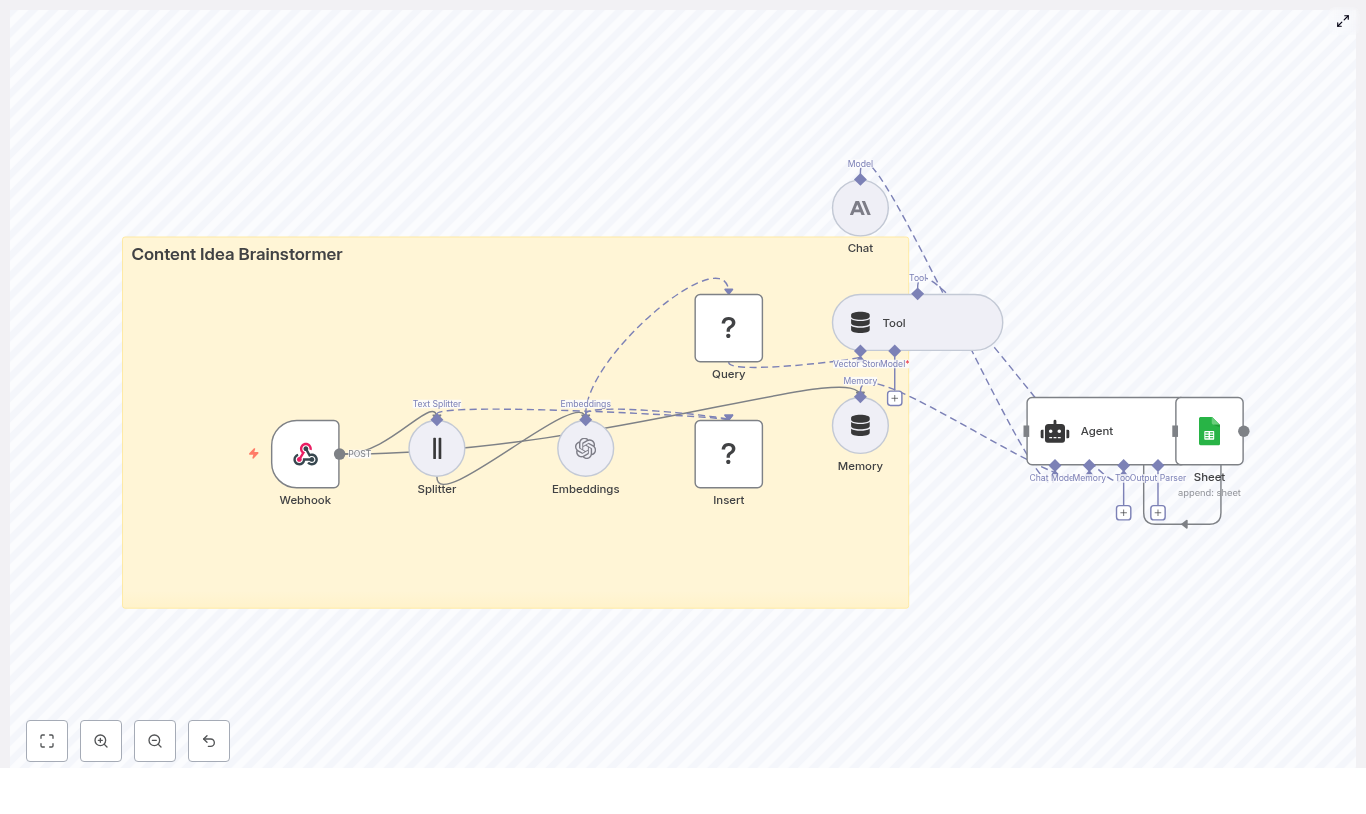
Concept overview: How the system works

At a high level, this n8n workflow takes an incoming content brief, turns it into embeddings, stores them in Redis, and then uses a conversational agent to generate ideas using both memory and vector search.

Main components in the workflow

  • Webhook – Receives new topic seeds or briefs via HTTP POST.
  • Text Splitter – Breaks long input text into smaller chunks.
  • OpenAI Embeddings – Converts text chunks into vector representations.
  • Redis Vector Store (Insert & Query) – Stores and retrieves embeddings for similarity search.
  • Tool & Memory – Exposes vector search as a tool and keeps a short-term conversation history.
  • Agent / Chat Model – Uses a conversational AI model (OpenAI or Anthropic) to generate ideas.
  • Google Sheets – Logs the generated ideas into a shared spreadsheet.

Next, we will walk through each part step by step, in the order you would experience it when a new content brief arrives.

Step-by-step: Building the Content Idea Brainstormer in n8n

Step 1 – Webhook: Receive a content seed

The workflow starts with a Webhook node in n8n. This node waits for incoming HTTP POST requests that contain your content brief or topic seed.

A typical JSON payload might look like this:

{  "seed": "AI for small business: blog post ideas",  "audience": "small business owners",  "tone": "practical"
}

You can send this payload from a web form, Slack command, internal tool, or any other automation that can make a POST request. As soon as the webhook receives the data, the n8n workflow starts running.

Step 2 – Text Splitter: Chunk long input for embeddings

Long briefs or rich descriptions can be too large to embed as a single block. To handle this, the workflow uses a Text Splitter node.

In the template, a character-based splitter is used with:

  • chunkSize = 400 characters
  • chunkOverlap = 40 characters

This approach has two goals:

  • Improve embedding performance by working with smaller pieces of text
  • Maintain context between chunks by overlapping them slightly

The overlap helps avoid losing important information that sits at the boundary between chunks.

Step 3 – Embeddings: Turn text into semantic vectors

Each chunk produced by the splitter is then sent to an OpenAI Embeddings node. This node calls an OpenAI embeddings model to create a vector representation of each text segment.

These embeddings capture the semantic meaning of the text. Instead of matching keywords, the system can later perform similarity search based on meaning. This is what makes retrieval-augmented generation work effectively.

Step 4 – Insert: Store embeddings in a Redis vector index

Next, the workflow uses an Insert node connected to a Redis vector store. The embeddings are written into a Redis index named:

content_idea_brainstormer

Storing embeddings in Redis gives you:

  • Fast similarity search over previously stored content briefs and ideas
  • A scalable solution for medium-sized knowledge bases
  • A way to reuse past context when generating new ideas

Step 5 – Query & Tool: Retrieve relevant context from Redis

When the agent is ready to generate new ideas, it needs context. The workflow uses two key nodes here:

  • Query node – Searches the same content_idea_brainstormer Redis index to find the most relevant existing passages for the current seed.
  • Tool node – Wraps the vector store as a tool that the agent can call during reasoning.

In practice, the Query node performs a similarity search using the new seed or related text. The top matching chunks are then made available as context. By exposing this through a Tool node, the agent can pull in this context when deciding what ideas to generate.

Step 6 – Memory: Keep short-term conversation history

The workflow also includes a Memory component. This maintains a rolling buffer of recent interactions between the user and the agent.

Short-term memory is useful when:

  • Multiple seeds are submitted in a single session
  • The user corrects or refines a previous brief
  • You want consistent style and tone across related idea lists

By remembering what happened earlier in the conversation, the agent can produce more coherent and consistent outputs.

Step 7 – Agent & Chat: Generate structured content ideas

The heart of the system is the Agent node connected to a Chat model (for example, Anthropic or OpenAI). This is where the actual content ideas are generated.

The Agent node:

  • Receives the incoming JSON payload (seed, audience, tone, etc.)
  • Uses the Tool node to retrieve relevant context from Redis
  • Consults the Memory buffer for recent conversation history
  • Runs internal reasoning to produce structured content ideas

In this workflow, the promptType = define behavior is used. That means the entire incoming JSON object is treated as the prompt, which ensures all fields (like audience and tone) influence the output.

Step 8 – Google Sheets: Log ideas for tracking and review

Finally, the generated ideas are passed to a Google Sheets node. This node appends each new set of ideas to a designated sheet.

Storing results in Sheets lets you:

  • Build a content backlog that your team can review
  • Filter, sort, and prioritize ideas before production
  • Connect the sheet to your content calendar or project management tools

Configuring the workflow: Practical tips & best practices

Choosing chunk size and overlap

Text splitting is a key part of any embedding-based workflow. As a general guideline:

  • Use chunk sizes between 300 and 800 characters
  • Set overlap to around 10 to 20 percent of the chunk size

The example configuration of chunkSize = 400 and chunkOverlap = 40 works well in many cases. It provides enough context per chunk without creating too many vectors, which can increase cost and slow down queries.

Selecting an embedding model

When choosing an OpenAI embedding model, aim for a balance between cost and quality. A few points to keep in mind:

  • Use a modern, recommended embedding model from your provider
  • Monitor for model updates, as providers sometimes deprecate older models
  • If you switch models, consider re-running embeddings to keep your Redis index consistent

Tuning the Redis vector store

The quality of retrieval has a big impact on the ideas your agent generates. To tune your Redis vector store:

  • Adjust the similarity threshold if your integration supports it
  • Experiment with the number of results returned (top-k), for example 3 to 7 matches
  • Avoid sending too many passages to the model, which can dilute focus

The goal is to give the agent enough context to be helpful, but not so much that it becomes noisy or confusing.

Prompt engineering for content ideation

A clear, structured prompt is essential for consistent content ideas. In your Agent or Chat node, make sure to:

  • Explicitly pass the seed, audience, and tone
  • Specify how many ideas you want and in what format
  • Include any constraints, such as word counts or specific content types
  • Add examples if you need a very particular style or structure

Example agent prompt structure

Here is a sample prompt structure that works well for this kind of workflow:

Prompt:
You are a content strategist. Using the seed, audience, and retrieved context, generate 8 content ideas: titles, short descriptions (1 sentence), and suggested formats (blog, video, social). Prioritize practicality and SEO.

Seed: "AI for small business: blog post ideas"
Audience: "small business owners"
Tone: "practical"

Context: [retrieved passages...]

Output: JSON array of ideas.

You can adapt this template to match your brand voice, content formats, or internal naming conventions.

Privacy and compliance considerations

When working with embeddings and vector stores, be careful with personal and sensitive data:

  • Scrub or anonymize any personally identifiable information (PII) before embedding
  • Remember that embeddings are not trivial to delete selectively once stored
  • Implement a lifecycle or deletion policy for data that must not be kept indefinitely

These steps are important for privacy, compliance, and responsible AI usage.

Extensions and improvements for your brainstormer

Once the basic workflow is running, you can extend it in several useful ways:

  • Add a web UI so non-technical team members can submit seeds and adjust parameters.
  • Schedule recurring jobs to refresh popular topics with new context or data.
  • Collect user feedback on generated ideas and use it to refine prompts or prioritize topics.
  • Integrate with your CMS or task manager to automatically create draft entries or tasks from accepted ideas.

Monitoring, maintenance, and reliability

To keep your n8n content brainstormer running smoothly, plan for ongoing monitoring and maintenance:

  • Track API usage and latency for OpenAI or Anthropic calls
  • Monitor Redis index growth and storage usage
  • Reindex embeddings if you change to a new embedding model
  • Add error handling in n8n to log failures and retry transient errors

These practices reduce downtime and help you catch issues before they affect your team.

Common pitfalls and how to avoid them

  • No overlap in text splitting – If you split text without overlap, important context at the edges can be lost, which reduces retrieval quality.
  • Too many retrieved passages – Passing a large number of chunks to the model can overwhelm it and lead to generic or unfocused ideas.
  • Embedding sensitive data – Failing to remove PII before embedding can create compliance and privacy risks.

Quick recap

This Content Idea Brainstormer template in n8n:

  • Accepts content briefs through a webhook
  • Splits and embeds text with OpenAI embeddings
  • Stores vectors in a Redis index for fast similarity search
  • Uses tools and memory to give a conversational agent rich context
  • Generates structured content ideas tailored to your audience and tone
  • Logs outputs into Google Sheets for easy review and planning

It is flexible enough for solo creators and scalable for larger content teams, and it can be expanded into a full content production pipeline.

FAQ: Using the n8n Content Idea Brainstormer

Can I use a different chat model or provider?

Yes. The Agent node can be configured with different chat models, such as OpenAI or Anthropic, as long as they are supported by your n8n setup.

Do I have to use Redis as the vector store?

This template uses Redis for speed and simplicity, but in principle you could adapt the workflow to other vector stores if n8n and your infrastructure support them.

How many ideas should I generate per request?

Eight ideas per seed is a practical starting point, as shown in the sample prompt. You can increase or decrease this number depending on your use case and token limits.

Can I change the output format?

Yes. You can adjust the prompt to output markdown, plain text, or more complex JSON structures that match your CMS or planning tools.

Get started with the template

To start using this Content Idea Brainstormer:

  1. Import the template into your n8n instance.
  2. Connect your OpenAI (or other provider) credentials.
  3. Configure your Redis connection and ensure the content_idea_brainstormer index is set up.
  4. Link the Google Sheets node to your desired spreadsheet.
  5. Send a test seed to the webhook and review the ideas in your sheet.

If you want to adapt this workflow for your team, you can extend the prompts, add custom fields to the JSON payload, or connect it directly to your content calendar.

Call to action

Ready to build your own content idea engine with n8n and OpenAI? Use this template, plug in your OpenAI and Redis credentials, and start sending seeds via the webhook. If you need help customizing the workflow for your organization, reach out to us or subscribe for more n8n automation templates and in-depth guides.

Connected Car Alert: n8n Workflow Guide

Connected Car Alert Automation in n8n: Expert Implementation Guide

Modern connected vehicles emit a constant flow of telemetry, diagnostic data, and driver behavior signals. Converting this raw stream into actionable, real-time alerts requires a robust automation pipeline that can ingest, enrich, store, reason over, and log events with low latency.

This guide explains how to implement a Connected Car Alert workflow in n8n using LangChain components and common infrastructure services. The reference template combines:

  • An n8n Webhook for event ingestion
  • A Text Splitter and OpenAI embeddings to vectorize diagnostic content
  • Redis as a vector store for semantic search and historical context
  • A LangChain Agent and Tool to reason over events
  • Google Sheets logging for auditability and downstream operations

The result is a modular, production-ready pattern for connected car alerting that can be extended or adapted to your own fleet, telematics, or IoT scenarios.

Business Rationale: Why Automate Connected Car Alerts

For fleets, OEMs, and mobility providers, timely interpretation of vehicle signals directly affects safety, uptime, and customer experience. A connected car alert system built on n8n delivers:

  • Real-time ingestion of vehicle events via webhooks and HTTP gateways
  • Context-aware reasoning using vector embeddings and a language model
  • Fast retrieval of similar historical events via a vector store
  • Operational visibility through structured logging into spreadsheets or other systems

By centralizing this logic in n8n, teams can iterate quickly on alert rules, prompts, and downstream actions without rewriting backend services.

Solution Architecture Overview

The template is organized as a linear but extensible workflow that processes each incoming vehicle event through several stages:

  1. Ingestion: A Webhook node accepts HTTP POST requests from vehicle gateways or brokers.
  2. Preprocessing: A Text Splitter breaks long diagnostic notes into smaller, overlapping chunks.
  3. Vectorization: An Embeddings node converts text chunks into vector representations.
  4. Persistence: A Redis vector store node inserts vectors for later semantic search.
  5. Retrieval and reasoning: An Agent and Tool query Redis to retrieve similar events and generate an alert.
  6. Short-term memory: A Memory component maintains context across related events.
  7. Logging: A Google Sheets node appends the final alert record for audit and reporting.

This architecture separates concerns clearly: ingestion, enrichment, storage, reasoning, and logging. Each layer can be swapped or scaled independently.

Core n8n Nodes and Components

Webhook: Vehicle Event Ingestion

The Webhook node is the entry point for the workflow. It exposes an HTTP POST endpoint, for example:

Path: connected_car_alert
Method: POST

Your telematics gateway, MQTT bridge, or API integration should send JSON payloads to this endpoint. Typical fields include:

  • vehicleId
  • timestamp
  • odometer
  • errorCodes
  • location
  • diagnosticNotes or other free-text fields

Best practice is to standardize the schema and validate payloads early so the downstream nodes can assume consistent structure.

Text Splitter: Preparing Content for Embeddings

Diagnostic notes and event descriptions can be long and unstructured. The workflow uses a character-based Text Splitter to divide this content into manageable segments before vectorization.

Default parameters in the template are:

  • chunkSize: 400 characters
  • chunkOverlap: 40 characters

This overlap preserves context between chunks, which improves the semantic quality of the embeddings and avoids fragmenting important information across unrelated vectors.

Embeddings: Vectorizing Vehicle Diagnostics

The Embeddings node uses an OpenAI embeddings model (configured via your n8n OpenAI credentials) to convert each text chunk into a high-dimensional vector.

Configuration considerations:

  • Select an embeddings model that balances cost and semantic fidelity for your volume and accuracy requirements.
  • Ensure API quotas and rate limits are sufficient for peak ingestion rates.
  • Optionally, batch multiple chunks in a single embeddings call to reduce overhead.

The resulting vectors are then ready to be inserted into a Redis-based vector store.

Redis Vector Store: Insert and Query

Insert: Persisting Embeddings

The Insert operation writes embedding vectors and associated metadata to Redis. The template uses an index name such as:

indexName: connected_car_alert

This index acts as a dedicated semantic memory for your connected car events. Metadata can include vehicle identifiers, timestamps, and other attributes that you may want to filter on later.

Query and Tool: Semantic Retrieval for Context

The Query node connects to the same Redis index to perform similarity search over historical vectors. This is exposed to the Agent through a Tool node so that the language model can dynamically retrieve relevant past events when generating an alert.

Typical use cases include questions such as:

  • “What similar alerts occurred for this vehicle in the last 30 days?”
  • “Have we seen this combination of error codes before?”

By coupling the Tool with the Agent, the workflow enables retrieval-augmented reasoning without hard-coding query logic.

Memory: Short-Window Context Across Events

The Memory component maintains a short history window that the Agent can access. This is particularly useful when:

  • Multiple events arrive in quick succession for the same vehicle.
  • An incident evolves over time and the alert message must reflect prior context.
  • Follow-up diagnostics or driver notes are appended to an existing case.

Short-window memory helps the Agent handle multi-turn reasoning and maintain coherence without overloading the language model with the entire history.

Agent and Chat: Generating the Alert

The Agent node orchestrates the language model (Chat) and the vector store Tool. Its responsibilities are to:

  • Receive the current event and any relevant memory.
  • Call the Tool to query Redis for similar historical events.
  • Combine current and retrieved context to generate an actionable alert message.

The Chat model then produces a human-readable alert that can include:

  • Problem summary in natural language
  • Recommended actions, for example schedule maintenance, notify driver, or escalate to operations
  • References to similar past incidents if available

Tuning the Agent prompt and behavior is critical to ensure consistent formatting and reliable recommendations.

Google Sheets: Logging and Operational Visibility

The final stage is a Google Sheets node configured to append each generated alert as a new row. This provides:

  • A low-friction audit trail for all alerts
  • An easy integration point for operations teams that already use spreadsheets
  • A quick way to export data into BI tools or reporting pipelines

In more advanced deployments, Sheets can be replaced or augmented with databases, ticketing systems, Slack notifications, or incident management platforms.

Step-by-Step Setup in n8n

To deploy the Connected Car Alert workflow template in your environment, follow these steps:

  1. Prepare credentials
    Set up and store in n8n:
    • OpenAI API credentials for embeddings and chat
    • Redis access (host, port, authentication) for the vector store
    • Google Sheets OAuth credentials for logging
  2. Import and review the template
    Import the provided n8n template and inspect each node. Confirm that the Webhook path connected_car_alert aligns with your vehicle gateway configuration.
  3. Adapt the Text Splitter
    Adjust chunkSize and chunkOverlap based on typical diagnostic note length and complexity. Larger chunks may capture more context, while smaller chunks can improve specificity and reduce token usage.
  4. Select the embeddings model
    In the Embeddings node, choose the OpenAI embeddings model that fits your cost and performance profile. Verify that your rate limits and quotas match expected event throughput.
  5. Configure the Redis vector index
    Set indexName to a project-specific value, for example connected_car_alert. For multi-environment setups, use separate index names per environment.
  6. Tune the Agent prompt and response format
    Define the Agent’s promptType, system instructions, and example outputs. Specify:
    • How severity should be expressed
    • What metadata must appear in the alert (vehicleId, timestamp, key codes)
    • Preferred structure for recommendations
  7. Run end-to-end tests
    Send representative sample payloads to the Webhook. Validate that:
    • Text is split correctly
    • Embeddings are created and inserted into Redis
    • Semantic queries return relevant historical records
    • The Agent generates clear and accurate alert messages
    • Alerts are appended correctly to Google Sheets
  8. Implement monitoring and resilience
    Configure retries and error handling on the Webhook, Redis, and external API nodes. Add logging and notifications for failures or latency spikes.

Key Use Cases for Connected Car Alert Automation

The template supports a range of operational scenarios for connected vehicles and fleets. Common applications include:

  • Fleet safety alerts
    Combine harsh braking or acceleration events with error codes to trigger targeted notifications to operations teams.
  • Predictive maintenance
    Correlate recurring diagnostics with past failures, then prioritize maintenance tasks based on similarity to historical incidents.
  • Driver coaching
    Aggregate and summarize risky driving patterns, then feed structured insights into driver coaching workflows.
  • Incident triage
    Automatically generate human-readable recommendations, classify severity, and escalate incidents that meet predefined thresholds.

Automation Best Practices

To operate this workflow reliably at scale, consider the following practices:

  • Namespace vector indexes
    Separate Redis indexes for development, staging, and production to avoid cross-contamination of embeddings and test data.
  • Protect sensitive data
    Filter or redact personally identifiable information (PII) before sending text to embeddings or LLMs, especially if using public cloud providers.
  • Manage retention and pruning
    Define policies for how long vectors are retained and when old entries are pruned to control storage growth and maintain search performance.
  • Monitor model usage and cost
    Track both embeddings and chat calls. These have different pricing characteristics, so monitor them separately and optimize batch sizes where appropriate.
  • Control ingestion rates
    Rate-limit incoming webhook traffic or buffer events in a queue to prevent sudden spikes from overloading the embeddings API or Redis.

Security and Compliance Considerations

Vehicle telemetry often includes sensitive operational and location data. Secure handling is essential:

  • Use HTTPS for all webhook traffic.
  • Protect the Webhook with authentication (shared secret, HMAC signatures, or API keys).
  • Review data residency and privacy requirements when using cloud LLMs and embeddings.
  • For sensitive deployments, evaluate on-premise embeddings or private LLM instances.
  • Encrypt vectors at rest in Redis and secure access with strong credentials and network controls.

Scaling Strategy and Cost Management

As the volume of connected vehicle data grows, you will need to scale both storage and compute:

  • Redis scaling
    Monitor memory usage and performance. Plan for sharding, clustering, or managed Redis services as your vector index grows.
  • Batching embeddings
    Use batching to reduce the number of API calls and lower overhead, while staying within token and payload limits.
  • Specialized vector databases
    For very large-scale similarity search, consider dedicated vector databases such as Milvus or Pinecone, or managed Redis offerings with vector capabilities.
  • Asynchronous ingestion
    If ingestion volume is high, decouple the webhook from the embeddings and storage steps using queues or background workers.

Testing, Validation, and Monitoring

Robust testing and observability are essential before promoting this workflow to production:

  • Automated tests
    Build test cases with realistic payloads that validate the full path from ingestion to alert logging.
  • Alert quality checks
    Periodically sample generated alerts and verify that:
    • Historical events retrieved from Redis are relevant.
    • Recommendations are accurate and aligned with operational policies.
  • Metrics and logging
    Track key metrics such as:
    • End-to-end latency from webhook to alert
    • Error rates for external dependencies (OpenAI, Redis, Google Sheets)
    • Volume of events and alerts per vehicle or fleet

Conclusion: A Modular Pattern for Real-Time Vehicle Intelligence

This Connected Car Alert template demonstrates how to combine n8n, LangChain components, OpenAI embeddings, and Redis into a cohesive, real-time alerting pipeline. The architecture separates ingestion, vectorization, retrieval, reasoning, and logging, which makes it straightforward to:

  • Swap embeddings providers or LLMs
  • Persist alerts in databases or ticketing systems instead of spreadsheets
  • Extend downstream automation with notifications, workflows, or integrations

By adopting this pattern, automation and data teams can rapidly move from raw vehicle telemetry to actionable, context-aware alerts that improve safety, maintenance planning, and driver experience.

Ready to deploy? Import the n8n template, configure your credentials, and run test payloads with representative vehicle data. If you require support with prompt engineering, scaling vector storage, or integrating with enterprise systems, our team can provide a tailored implementation.

Contact us for a deployment checklist or a guided walkthrough of the workflow.

AI-Powered RAG Chatbot with Qdrant & Google Drive

AI-Powered RAG Chatbot with Qdrant & Google Drive

This guide explains how to implement a production-grade Retrieval-Augmented Generation (RAG) chatbot using n8n as the automation orchestrator, Qdrant as the vector database, Google Drive as the primary content source, and a modern large language model such as Google Gemini or OpenAI. It covers the system architecture, key workflow components, integration details, and operational safeguards including human-in-the-loop controls.

Why Implement a RAG Chatbot on n8n?

Retrieval-Augmented Generation combines a language model with a vector-based retrieval layer so that responses are grounded in your organization’s documents rather than relying solely on the model’s internal training data. In practice, this:

  • Reduces hallucinations and unsupported claims
  • Improves factual accuracy and consistency
  • Enables secure access to private knowledge stored in Google Drive or other repositories
  • Provides an auditable link between answers and source documents

n8n adds a crucial orchestration layer on top of these capabilities. It coordinates ingestion, preprocessing, embedding, storage, retrieval, and human approvals in a single, maintainable workflow that can be adapted to enterprise requirements.

Solution Architecture Overview

At a high level, the RAG chatbot consists of a data ingestion pipeline, a vector storage layer, and a conversational interface. n8n connects all components into a cohesive automation:

  • Google Drive – Primary source of documents to ingest, index, and query.
  • n8n – Workflow engine that handles document retrieval, text extraction, chunking, metadata enrichment, embedding generation, vector upserts, and chat orchestration.
  • Embeddings model (for example, OpenAI text-embedding-3-large or equivalent) – Converts text chunks into numerical vectors for semantic search.
  • Qdrant – High-performance vector database that stores embeddings and associated metadata for similarity search and filtered retrieval.
  • LLM (Google Gemini or OpenAI) – Produces natural language responses using both the user query and retrieved context from Qdrant.
  • Telegram (optional) – Human-in-the-loop channel for critical actions such as vector deletion approvals.

Preparing the Environment

Before building the workflow, configure all required credentials and environment variables in n8n. This ensures secure and repeatable automation.

Required Integrations and Credentials

  • Google Drive API credentials for listing and downloading files
  • Embeddings provider API key (for example, OpenAI text-embedding-3-large)
  • Qdrant endpoint URL and API key, if using a managed or remote deployment
  • LLM credentials for Gemini or OpenAI, depending on your chosen model
  • Telegram bot token and chat ID for sending approval and notification messages

Configure these as n8n credentials or environment variables rather than hardcoding them inside nodes. This aligns with security best practices and simplifies deployment across environments.

Data Ingestion and Indexing Pipeline

The first part of the workflow focuses on ingesting documents from Google Drive, preparing them for semantic search, and storing them in Qdrant with rich metadata.

1. Retrieve Documents from Google Drive

Use n8n’s Google Drive nodes to identify and download the documents that should be included in the chatbot’s knowledge base:

  • Start from a configured Google Folder ID.
  • List or search for file IDs within that folder using the appropriate Google Drive node.
  • Loop over the returned file IDs to process each document individually.
  • Download each file and extract its textual content using a text extraction step or node that matches the file type.

2. Split Text into Semantically Coherent Chunks

Large documents are not indexed as a single block. Instead, they are divided into smaller chunks to improve retrieval quality and fit within LLM context limits. In n8n:

  • Use a token-based splitter node to segment content into chunks, typically in the range of 1,000 to 3,000 tokens.
  • Preserve semantic coherence so that each chunk represents a meaningful section, not an arbitrary cut.
  • Track the chunk index for each document to support better debugging and auditing later.

3. Enrich Chunks with Metadata

Metadata is critical for precise filtering and for understanding what the model is retrieving. An information extraction step can be used to generate structured metadata for each chunk or document, such as:

  • Overarching theme or document summary
  • Recurring topics and key concepts
  • User or customer pain points identified in the content
  • Analytical insights or conclusions
  • Keyword list or tags

Alongside these derived attributes, also retain technical metadata such as:

  • file_id from Google Drive
  • Document title or name
  • Source URL or folder reference
  • Chunk index
  • Author or owner, if relevant

This metadata is stored in Qdrant together with the embeddings and is later used for filtering queries by document, theme, or other criteria.

4. Generate Embeddings and Upsert into Qdrant

After chunking and metadata enrichment, the next step is to convert each chunk into a vector representation and store it in Qdrant:

  • Call your selected embeddings model, for example OpenAI text-embedding-3-large, for each text chunk.
  • Batch requests where possible to optimize performance and cost.
  • Upsert the resulting vectors into a Qdrant collection, including all associated metadata such as file_id, title, keywords, and extracted attributes.

Properly structured upserts enable efficient similarity search combined with metadata filters, which is essential for high-quality RAG responses.

RAG Chat Flow and User Interaction

Once the index is populated, the second part of the workflow handles incoming user queries and generates responses using the RAG pattern.

5. Chat Trigger and Query Handling

Configure a chat or API trigger in n8n to receive user questions from your chosen interface. This could be a web front end, a messaging platform, or a custom integration. The trigger passes the user query into the RAG agent flow.

6. Retrieval from Qdrant

The RAG agent performs a semantic search in Qdrant:

  1. Run a similarity search using the query embedding against the Qdrant collection.
  2. Retrieve the top-k most relevant chunks, where k can be tuned based on quality and performance requirements.
  3. Optionally apply metadata filters, for example:
    • Restricting results to a specific file_id or folder
    • Filtering by theme, author, or label
    • Limiting to certain document types

7. Context Assembly and LLM Prompting

The retrieved chunks are then prepared as context for the LLM:

  • Trim or prioritize chunks so that the assembled context fits within the LLM’s token window.
  • Format the context in a structured prompt, clearly separating system instructions, context, and the user query.
  • Invoke the LLM (Gemini or OpenAI) with the compiled prompt and context.

The model responds with an answer that is grounded in the supplied documents. This response is then returned to the user via the original channel.

8. Persisting Chat History

For auditing, compliance, or support workflows, it is often useful to log interactions:

  • Store the user query, selected context snippets, and model response in Google Docs or another storage system.
  • Maintain a clear association between answers and source documents for traceability.

This historical data can also inform future improvements to chunking, metadata strategies, or retrieval parameters.

Safe Deletion and Human-in-the-Loop Controls

Vector deletion in a production environment is irreversible. To avoid accidental data loss, the workflow incorporates a human-in-the-loop approval process using Telegram.

Controlled Deletion Workflow

  • Identify the file_id values that should be removed from the index.
  • Summarize the affected files into a human-readable message, including key identifiers and counts.
  • Send a confirmation request via Telegram to designated operators, optionally requiring double approval.
  • On approval, execute a deletion step that queries Qdrant for points matching metadata.file_id and deletes them.
  • Log the deletion results and notify operators of success or failure.

This human-in-the-loop pattern significantly reduces the risk of unintended bulk deletions and ensures an auditable trail of destructive operations.

Best Practices for a Robust RAG Implementation

Metadata and Filtering Strategy

Consistent, rich metadata is one of the most important factors in achieving high-quality retrieval:

  • Always store identifiers such as file_id, source URL, and chunk index.
  • Include descriptive labels like themes, topics, and keywords.
  • Use metadata filters in Qdrant queries to narrow the search space and improve relevance.

Chunking Configuration

Chunk size directly affects both retrieval granularity and context utilization:

  • Align chunk size with your LLM’s context window to avoid unnecessary truncation.
  • Prefer token-based splitting over character-based splitting for more consistent semantics.
  • Experiment with different sizes within the 1,000 to 3,000 token range depending on document structure.

Embedding Model Selection

The quality of your embeddings determines how well similar content is grouped:

  • Start with a strong general-purpose model such as text-embedding-3-large.
  • Evaluate cost versus accuracy for your specific corpus and query patterns.
  • Monitor retrieval quality and adjust model choice if you encounter systematic relevance issues.

Security and Access Control

A production RAG system typically handles sensitive or proprietary content. Follow strict security controls:

  • Protect API keys using n8n’s credential store and avoid exposing them in workflow code.
  • Restrict network access to the Qdrant instance and enforce authentication on all requests.
  • Encrypt sensitive metadata at rest where required by policy or regulation.
  • Apply least-privilege principles for service accounts that access Google Drive and other systems.

Monitoring, Logging, and Auditing

Observability is essential for maintaining performance and compliance:

  • Log all upsert and delete operations in Qdrant.
  • Track retrieval requests, including filters and top-k parameters.
  • Monitor index growth, search latency, and error rates.
  • Ensure each returned result can be traced back to its original source file and chunk.

Troubleshooting and Optimization Tips

  • Low relevance of answers – Increase the top-k parameter, adjust chunk size, refine metadata quality, or tighten filters to focus on more relevant document subsets.
  • High embedding or inference costs – Batch embedding calls, avoid re-indexing unchanged documents, and consider a more cost-efficient model where acceptable.
  • Token limit or context window errors – Reduce context length, prioritize the most relevant chunks, or condense retrieved passages before calling the LLM.
  • Deletion failures – Verify that metadata keys and data types align with the Qdrant collection schema, and confirm network connectivity and API permissions.

Example n8n Node Flow

The template workflow in n8n typically follows a structure similar to the one below:

  • Google Folder ID → Find File IDs → Loop Over Items
  • Download File → Extract Text → Token Splitter → Embeddings → Qdrant Upsert
  • Extract Metadata → Attach metadata fields → Save to Qdrant
  • Chat Trigger → RAG Agent → Qdrant Vector Store Tool → LLM → Respond & Save Chat History
  • Deletion Path: Summarize File IDs → Telegram Confirmation → Delete Qdrant Points by File ID (Code Node)

Conclusion

By combining n8n with Qdrant, Google Drive, and a powerful LLM, you can build a flexible and auditable RAG chatbot that delivers accurate answers grounded in your private documents. Thoughtful chunking, high-quality embeddings, robust metadata, and human verification for destructive operations are key to achieving a reliable, production-ready system suitable for enterprise use.

Next Steps and Call to Action

To validate this approach in your environment, start with a small proof-of-concept:

  • Export a subset of Google Drive folder IDs.
  • Deploy the n8n workflow template.
  • Index a limited set of documents and test relevance, latency, and cost.

If you require a ready-to-deploy template, assistance with authentication and compliance, or help scaling to larger document sets, contact our team or download the n8n template. Use the sample workflow as a foundation and adapt it to your specific data, security, and operational requirements.

Ready to build your RAG chatbot? Reach out for a consultation or download the sample workflow and begin integrating your Google Drive knowledge base today.

Automate Shopify Order SMS with n8n & RAG

Automate Shopify Order SMS with n8n & RAG

Picture this: orders are flying into your Shopify store, customers are refreshing their phones every 3 seconds, and you are manually typing out “Your order has shipped!” for the 47th time today. Fun? Not exactly.

That is where this n8n workflow template steps in. It turns raw Shopify order events into smart, context-aware SMS messages using webhooks, AI text processing, embeddings, Pinecone as a vector store, and a Retrieval-Augmented Generation (RAG) agent. In plain English: it remembers useful info, finds what matters, and writes messages that do not sound like a robot from 2003.

Below you will find what this template actually does, how the different n8n nodes work together, how to set it up, and a few tips so you do not accidentally spam your customers or your ops team.

What this Shopify SMS workflow actually does

This n8n template listens for Shopify order events and automatically sends out intelligent SMS updates. It is designed for e-commerce teams that are tired of copy-pasting order texts and want something more powerful than a basic “order confirmed” message.

Instead of simple one-line updates, the workflow can enrich messages with context like order details, past issues, or policy snippets using retrieval-augmented generation. That means:

  • Order confirmations, shipping updates, and exception alerts can be sent quickly and reliably
  • Messages can include relevant info from your own documentation or historical data
  • Everything gets logged for auditing and debugging, so you can see exactly what was sent and why

In short, fewer repetitive tasks, more consistent communication, and happier customers who are not left wondering where their stuff is.

High-level n8n workflow overview

The template uses a chain of tools in n8n to go from “Shopify fired a webhook” to “customer received a helpful SMS” plus logs and alerts. At a high level, it includes:

  • Webhook Trigger (n8n) – receives Shopify order events via POST
  • Text Splitter – breaks long text into manageable chunks
  • Embeddings (Cohere) – turns text chunks into vectors
  • Pinecone Insert & Query – stores and retrieves those vectors as a knowledge base
  • Vector Tool – exposes retrieved vector data to the RAG agent
  • Window Memory – gives the agent short-term memory of recent context
  • Chat Model (Anthropic) + RAG Agent – generates the actual SMS content using context
  • Append Sheet (Google Sheets) – logs outputs for auditing and analysis
  • Slack Alert – sends error notifications to your ops team

Now let us walk through what each part does, then we will get into how to configure the template.

Inside the workflow: node-by-node breakdown

Webhook Trigger: catching Shopify events

The workflow starts with a Webhook Trigger node in n8n. You configure Shopify to send order events to this webhook path, for example:

/shopify-order-sms

When Shopify fires an event, the webhook receives a payload that can include:

  • Customer name and phone number
  • Order items and quantities
  • Order status and timestamps
  • Any metadata or notes attached to the order

This payload is the raw material the rest of the workflow will use to generate a smart SMS.

Text Splitter: breaking things into bite-sized chunks

Long text fields like order notes, multi-item descriptions, or policy pages are not ideal for direct embedding. The Text Splitter node solves that by slicing them into smaller pieces.

The template uses:

  • chunkSize = 400
  • chunkOverlap = 40

This improves embedding quality and makes retrieval more accurate. Instead of one giant blob of text, you get neatly chunked segments that are easier for the vector store to work with.

Embeddings (Cohere): turning text into vectors

Each chunk from the Text Splitter is passed to the Cohere Embeddings node. The template uses the embed-english-v3.0 model to convert text into semantic vectors.

These vectors represent the meaning of the text, which allows the workflow to perform similarity search in Pinecone. That is how the system later finds relevant snippets to include in the SMS, such as common order issues or reference policies.

Pinecone Insert & Query: your evolving knowledge base

Pinecone is used as the vector store in this template. It plays two roles:

  • Insert: New text chunks are stored as vectors in Pinecone, along with metadata. Over time, your knowledge base grows with useful content like policy text, example messages, or frequently asked questions.
  • Query: When a new Shopify order event arrives, the workflow queries Pinecone for relevant vectors based on the generated embeddings. This retrieves the right context for the RAG agent to use when writing the SMS.

The template expects a Pinecone index such as shopify_order_sms, with metadata fields like order_id and event_type that help with filtering and retrieval.

Vector Tool & Window Memory: giving the agent tools and memory

Once Pinecone returns relevant vectors, the Vector Tool node exposes these results as a callable tool for the RAG agent. That means the agent can actively request and use this context while generating an SMS.

Alongside this, the Window Memory node provides short-term memory of recent interactions. This helps the agent handle multi-step logic or sequences of related messages without losing track of what just happened.

Chat Model (Anthropic) + RAG Agent: writing the SMS

At the heart of the workflow is the RAG agent, powered by a chat model from Anthropic. The agent:

  • Takes the Shopify webhook data as input
  • Uses the Vector Tool to pull in relevant context from Pinecone
  • Combines everything to craft an SMS that is accurate, helpful, and aligned with your policies

The agent is configured with a system message that frames it as an assistant for “Shopify Order SMS” processing. You can tweak this system prompt to adjust tone, level of detail, or compliance rules, such as whether promotional language is allowed.

Append Sheet (Google Sheets): logging what was sent

After the RAG agent generates its output, the chosen content (for example the final SMS text or an internal status) is appended to a Google Sheet via the Append Sheet node.

This log is extremely useful for:

  • Auditing what messages were sent
  • Debugging weird outputs or edge cases
  • Verifying compliance and consistency over time

Slack Alert: when things go sideways

Automation is great until something breaks silently. To avoid that, the workflow includes a Slack Alert node that fires when errors occur.

If something fails, the node posts error details into a Slack channel so your ops or engineering team can quickly investigate and fix the issue. It keeps your automation visible and maintainable instead of becoming a mysterious black box.

How to configure the Shopify SMS template in n8n

Once you are ready to stop sending manual updates, here is how to get the template running in your own environment.

  1. Connect Shopify to your n8n webhook
    In Shopify, create a webhook that POSTs order events to your n8n instance. Use a path like:
    /shopify-order-sms
    Make sure your n8n URL is accessible over HTTPS and not blocked by firewalls.
  2. Import the template into n8n
    In your n8n workspace, import the “Shopify Order SMS” template. Once imported, open the workflow and plug in your credentials for:
    • Cohere (for embeddings)
    • Pinecone (for vector storage and search)
    • Anthropic (for the chat model)
    • Google Sheets (for logging)
    • Slack (for error notifications)
  3. Tune the Text Splitter settings
    The default values are:
    • chunkSize = 400
    • chunkOverlap = 40

    You can adjust these based on how long your typical policy docs or order notes are. Shorter chunks can improve retrieval precision, while larger ones keep more context together.

  4. Configure your Pinecone index
    Set up or confirm your Pinecone index, for example:
    shopify_order_sms
    Ensure your vectors include helpful metadata such as:
    • order_id
    • event_type (for example “created”, “shipped”, “canceled”)

    This metadata makes it easier to filter and refine retrieval later.

  5. Review and adjust the RAG agent system prompt
    Open the RAG agent node and review the system message. This is where you define:
    • Preferred tone for SMS messages
    • What to always include (for example order number, status)
    • What to avoid (for example no promotional links unless the user opted in)

    Small prompt tweaks can significantly change how your SMS content feels.

  6. Test with sample Shopify payloads
    Trigger the workflow using sample Shopify events or test orders. While testing:
    • Check the Google Sheets log to confirm the SMS text looks correct
    • Monitor Slack for any error alerts
    • Verify that Pinecone is being populated and queried as expected

Best practices so your automation behaves nicely

Before you send this into the wild, a few practical tips will help you avoid unpleasant surprises.

  • Phone number verification
    Always validate and standardize phone numbers before sending SMS. Use E.164 format so carriers are more likely to accept the messages and you do not end up sending texts into the void.
  • Privacy and compliance
    Treat order data as sensitive. Avoid storing unnecessary PII in Pinecone metadata or embeddings. Make sure your SMS content respects local regulations such as TCPA and GDPR, especially around consent and opt-outs.
  • Monitoring in production
    Keep both the Google Sheets log and Slack alerts enabled, especially during the first few weeks. This is when edge cases will show up, and you will want full visibility into what the workflow is doing.
  • Rate limits
    APIs like Cohere, Pinecone, and your SMS provider will have rate limits. Respect them. Consider batching inserts and using backoff strategies if you are processing a large volume of orders.
  • Prompt design
    Be explicit in your RAG agent system message. Spell out:
    • What every SMS must include
    • What it must never include
    • How to handle sensitive topics or exceptions

    This reduces the chance of the agent producing unexpected or off-brand content.

Troubleshooting common issues

Webhook not firing

  • Double-check Shopify webhook settings
  • Verify your n8n URL is publicly reachable and uses HTTPS
  • Confirm that firewalls or proxies are not blocking requests

No vectors showing up in Pinecone

  • Check that the Embeddings node is successfully returning vectors
  • Verify Pinecone credentials and index name in the Insert node
  • Confirm that the data is actually being sent to the Insert node in the workflow

Poor retrieval or irrelevant context

  • Experiment with different chunk sizes or overlaps in the Text Splitter
  • Ensure high quality source text is being embedded
  • Add or refine metadata fields to improve filtering in Pinecone

Agent producing weird or unexpected SMS text

  • Tighten the system prompt for the RAG agent
  • Add clear examples of acceptable SMS outputs in the prompt
  • Specify disallowed content such as certain phrases or links

Security and data handling guidelines

Since you are dealing with customer orders and phone numbers, treat the data with care.

  • Encrypt API credentials and use secure secrets management in your environment
  • Limit what you store in Pinecone metadata and embeddings, and avoid full PII where it is not needed
  • Restrict access to the Google Sheet and Slack channel that hold logs and alerts

Where to go from here

This n8n template takes Shopify order events, enriches them with embeddings and vector search, and uses a RAG agent to generate intelligent SMS updates. It is a scalable pattern you can build on:

  • Add more knowledge documents to Pinecone, such as FAQs or detailed policies
  • Refine prompts to match your brand voice and compliance needs
  • Extend the workflow to other channels like email, in-app notifications, or CRM updates

To recap your next steps:

  • Import the “Shopify Order SMS” template into your n8n workspace
  • Connect your Cohere, Pinecone, Anthropic, Google Sheets, and Slack credentials
  • Run test orders from a staging Shopify store
  • Monitor logs, review SMS outputs, and iterate on prompts and vector data

Call to action: Import the “Shopify Order SMS” template into your n8n workspace, hook it up to a staging Shopify store, and start testing. Then subscribe for more workflow templates and best practices so your future self never has to manually type “Your order is on the way” again.

Irrigation Schedule Optimizer: Save Water & Boost Yields

Irrigation Schedule Optimizer: Save Water & Boost Yields

Use smart scheduling, sensor data, and n8n automation to stop guessing, stop overwatering, and finally give your crops exactly what they need.

Imagine never having to guess “Did I water too much?” again

You know that moment when you stare at your fields or lawn and try to decide if it needs water, then shrug and turn the system on “just in case”? That tiny guesswork habit adds up to higher water bills, stressed plants, and the occasional mud pit where your crops should be thriving.

An irrigation schedule optimizer exists so you never have to play that game again. Instead of you juggling weather apps, soil readings, and local watering rules in your head, automation quietly does the heavy lifting in the background.

Even better, with an n8n-style workflow template, all of this can run on autopilot. You get smarter irrigation schedules, better yields, and more time to do literally anything other than manually tweaking timers.

What this irrigation schedule optimizer actually does

At its core, an irrigation schedule optimizer is a smart system that figures out when to water and how much to apply, based on actual data instead of vibes.

It pulls in inputs like:

  • Soil moisture from sensors that tell you how wet the root zone really is.
  • Weather data including rainfall, temperature, wind, and solar radiation.
  • Crop type and growth stage so young plants do not get the same treatment as mature ones.
  • Evapotranspiration (ET) so you know how much water is being lost to the atmosphere.
  • System constraints like pump capacity, irrigation zones, max run times, and local watering restrictions.

Using all of that, it calculates how thirsty your plants actually are, subtracts what nature already provided, and then generates an irrigation schedule that is precise instead of wasteful.

Why bother optimizing irrigation with automation?

If you are still running fixed schedules “because that is how we have always done it,” you are probably watering your budget along with your crops. An optimized irrigation schedule helps you:

  • Save water by matching irrigation to real crop needs instead of overcompensating.
  • Cut costs with lower water bills and reduced energy use for pumps.
  • Boost yields by keeping soil moisture in the sweet spot for plant growth.
  • Stay compliant by generating logs and records for regulators or sustainability programs.

In short, you get healthier plants, less waste, and automation that quietly fixes a repetitive task you probably never enjoyed doing anyway.

Under the hood: how a modern n8n-style optimizer works

This kind of optimizer maps nicely to an n8n workflow template. Think of it as a low-code pipeline that collects data, makes decisions, and sends commands to your irrigation system without you clicking around dashboards all day.

Here is how a typical architecture looks:

1. Data ingestion with a Webhook

Field devices such as soil moisture sensors, weather stations, or third-party APIs send data to a webhook endpoint. Each POST request includes sensor readings, timestamps, zone IDs, and any extra metadata you want to track.

In n8n terms, this is your starting trigger: the Webhook node that wakes up the workflow whenever new data arrives.

2. Preprocessing and splitting the payload

Raw data is rarely neat. Incoming payloads are normalized and split if they include long logs or multiple sensor arrays. A Splitter-style step lets the rest of the workflow handle each chunk cleanly and efficiently, instead of dealing with one giant blob of data.

3. Feature transformation into embeddings

Next, relevant time-series and contextual data are converted into embeddings (numerical vectors). These embeddings capture relationships over time, which is especially helpful when you mix field history with weather forecasts.

This step makes it possible to use vector search for:

  • Finding similar historical conditions.
  • Retrieving past outcomes for similar crops, soils, or weather patterns.
  • Giving the decision logic richer context to work with.

4. Storage and retrieval with a vector store

The embeddings and related documents are stored in a vector database such as Pinecone. When it is time to generate a new irrigation schedule, the workflow queries the vector store to pull:

  • Comparable historical scenarios.
  • Known good strategies for that crop and soil type.
  • Context about previous adjustments under similar weather.

5. Decisioning with an agent and language model

An LLM-based decision agent then steps in. It takes the fresh sensor data, the retrieved context from the vector store, and your rules (like ET calculations and pump limits). From there it proposes a concrete irrigation schedule.

The agent can generate:

  • Human-readable reasoning, so you understand why it made that call.
  • Actionable run times for each zone.

Memory buffers allow the system to learn from past tweaks and outcomes, so future suggestions get smarter instead of staying static.

6. Action and logging to controllers and sheets

Finally, the workflow sends an instruction set to your irrigation controllers or APIs so the schedule is actually applied in the field. At the same time, all actions and explanations are logged to a sheet or database.

This gives you:

  • A full audit trail.
  • Data for continuous improvement.
  • Easy reporting for compliance and performance tracking.

The math behind the magic: core concepts and ET

Although the workflow feels magical, it is powered by solid irrigation science. Here are the core concepts it uses behind the scenes.

Key inputs at a glance

  • Soil moisture: Real-time volumetric water content from sensors in the field.
  • Weather data: Forecast precipitation, temperature, wind, and solar radiation.
  • Crop type and growth stage: Crop coefficients (Kc) that adjust water demand as plants develop.
  • Evapotranspiration (ET): The combined water loss from soil evaporation and plant transpiration.
  • System constraints: Pump capacity, irrigation zones, allowed run times, and any local watering restrictions.

The basic ET-driven logic

The optimizer calculates crop water requirement using the classic formula:

ETc = ET0 × Kc

Where:

  • ET0 is the reference evapotranspiration.
  • Kc is the crop coefficient for the specific crop and growth stage.

From there, it subtracts effective rainfall and current soil moisture, then applies your delivery constraints to answer two key questions:

  • How often should irrigation run?
  • How long should each run last?

More advanced setups also use feedback loops and historical responses so the system can adapt over time instead of repeating the same plan forever.

Sample scheduling logic your workflow can follow

To make this less abstract, here is a simplified decision flow that an n8n irrigation schedule optimizer can implement:

  1. Calculate daily crop evapotranspiration with ETc = ET0 × Kc.
  2. Subtract effective rainfall and any irrigation that was already applied.
  3. Compare required root zone water with measured soil moisture, and if it is below your threshold, schedule irrigation.
  4. Split watering into multiple shorter cycles to reduce runoff and improve infiltration.
  5. Respect pause windows for upcoming rain or municipal watering restrictions.

The result is a schedule that feels like it was planned by a very patient irrigation specialist, not someone rushing through a control panel at 6 a.m.

Quick setup roadmap for an n8n-style irrigation optimizer

Here is a streamlined way to get from “manual watering” to “fully automated irrigation schedule optimizer” without getting lost.

Step 1: Assess and map your current system

  1. Review your existing irrigation setup and map all zones.
  2. Note pump capacities, known problem areas, and any local watering rules.

Step 2: Install sensors and connect telemetry

  1. Deploy soil moisture sensors at representative locations and depths.
  2. Integrate reliable weather data, including hourly or daily forecasts and radar-based precipitation where possible.
  3. Configure the devices so they send data to an n8n webhook or similar endpoint.

Step 3: Build or deploy the optimizer workflow

  1. Set up a flow that covers the full pipeline:
    • Data ingestion via webhook.
    • Preprocessing and splitting.
    • Embedding generation and vector store storage.
    • LLM-based decisioning with your ET and constraint rules.
    • Controller commands and logging to sheets or a database.

Step 4: Run a pilot and compare schedules

  1. Start with a single zone as a pilot.
  2. Run optimized vs baseline schedules in parallel for 4 to 8 weeks.
  3. Measure water use, plant health, runoff, and any operational issues.

Step 5: Scale, refine, and extend automation

  1. Roll out the optimizer across more zones once you are happy with the results.
  2. Refine crop coefficients, thresholds, and constraints based on what you learn.
  3. Add extra automation such as pump control or fertigation if needed.

Implementation checklist so you do not miss anything

Use this checklist as a quick sanity check while you set up your irrigation schedule optimizer:

  • Soil moisture sensors installed at representative depths and locations.
  • Weather forecasts and radar-based precipitation integrated and reliable.
  • Crop coefficients (Kc) defined for each crop and adjusted by growth stage.
  • System constraints documented:
    • Maximum run times.
    • Zone capacities.
    • Sequencing rules.
  • Logging and versioning in place for both schedules and sensor readings.
  • Pilot run completed on at least one zone before scaling across the whole property.

Best practices for saving water without stressing your crops

To squeeze the most value out of your new automated irrigation workflow, keep these practices in mind:

  • Use deficit irrigation strategies where acceptable so you save water without hurting yield.
  • Water in the morning or evening to reduce evaporative losses.
  • Check sensors regularly and use redundant sensors in critical zones.
  • Base decisions on soil moisture thresholds instead of fixed calendar schedules.
  • Continuously feed system results back into the model so recommendations improve over time.

The more feedback you give the system, the less you will have to micromanage it later.

Real-world impact: what you can expect

When an irrigation schedule optimizer is properly implemented, results usually look something like this:

  • 15 to 40 percent water savings, depending on your starting practices.
  • Less runoff and reduced nutrient leaching.
  • More consistent crop or turf health across zones.
  • Detailed logs that make compliance and performance monitoring much easier.

In other words, fewer surprises, fewer soggy spots, and more predictable yields.

Will it work with your existing irrigation hardware?

In most cases, yes. Modern irrigation controllers usually support:

  • APIs that accept REST commands.
  • MQTT messages for IoT-style communication.
  • Relay-based control for direct hardware switching.

The optimizer can output whichever format your system needs. For older or legacy controllers, you can use schedule translation services that convert decisions into timed relay events, so you still get smart scheduling without replacing everything at once.

Bringing it all together

An irrigation schedule optimizer combines sensor data, weather intelligence, and automation workflows to deliver precise watering with minimal waste. Whether you manage a farm, a golf course, or a large landscape portfolio, moving from manual guesswork to data-driven scheduling is one of the easiest upgrades you can make.

With an n8n-style automation template handling the repetitive decisions, you get more predictable yields, lower water use, and a lot less time spent fiddling with irrigation controllers.

Ready to optimize your irrigation? You can start with a pilot using the workflow approach described above, then scale once you see the water savings and yield improvements.

Request a demo | Download implementation guide

Keywords: irrigation schedule optimizer, smart irrigation, n8n workflow, water conservation, soil moisture, ET, automation, irrigation scheduling template

Build a Compliance Checklist Builder with n8n

Automating compliance operations is one of the most effective ways to reduce manual effort, minimize risk of human error, and streamline audit preparation. This guide explains how to implement a Compliance Checklist Builder in n8n that leverages LangChain-style components, Pinecone as a vector database, OpenAI embeddings, and Google Sheets for logging and traceability.

The workflow transforms unstructured compliance documents into structured, searchable checklist items and automatically records the results in a Google Sheet. The outcome is an auditable, scalable system suitable for compliance, risk, and security teams.

Business case and core benefits

Compliance and risk teams routinely process large volumes of policies, contracts, regulatory bulletins, and internal standards. These documents are often long, repetitive, and difficult to translate into concrete, testable controls.

By implementing an automated checklist builder with n8n and vector search, you can:

  • Convert unstructured policy text into actionable checklist items
  • Index content for semantic search, not just keyword matching
  • Automatically log every generated checklist item for auditability
  • Improve consistency of reviews across teams and time periods

Solution architecture overview

The solution is built as an n8n workflow that receives documents, chunks and embeds their content, stores vector representations in Pinecone, and then uses an agent-style node to generate compliance checklists on demand. Outputs are written to Google Sheets for persistent logging.

At a high level, the architecture includes:

  • Webhook – Ingests new documents as JSON payloads
  • Text Splitter – Breaks documents into overlapping chunks
  • Embeddings (OpenAI) – Converts text chunks into vector embeddings
  • Pinecone Vector Store – Stores embeddings and enables semantic retrieval
  • Memory & Agent (LangChain-style) – Generates checklist items using retrieved context
  • Google Sheets – Logs checklist items, severity, and provenance

This architecture separates ingestion, indexing, retrieval, and generation, which makes it easier to scale and maintain.

Workflow design in n8n

1. Ingestion: create the webhook endpoint

The workflow starts with a POST Webhook node that receives raw document content and associated metadata. This node acts as the primary ingestion API for your compliance documents, whether they originate from internal tools, document management systems, or ad-hoc uploads.

Typical JSON payload:

{  "doc_id": "POL-2025-001",  "title": "Data Retention Policy",  "text": "Long policy text goes here...",  "source": "internal"
}

Key fields to include:

  • doc_id – Stable identifier for the document
  • title – Human-readable title for reviewers
  • text – Full policy or contract text
  • source – Origin (for example internal, legal, regulator)

Securing this webhook with an API key or authentication mechanism is critical, especially when handling confidential or regulated content.

2. Preprocessing: split documents into chunks

Long documents must be broken into smaller segments so that embedding models and downstream LLMs can process them efficiently and within token limits. Use the Text Splitter node to segment the incoming text field.

Recommended configuration:

  • Chunk size: approximately 400 characters
  • Chunk overlap: approximately 40 characters

The overlap helps preserve context between segments so that important information is not lost at chunk boundaries. For narrative policies, a range of 300-500 characters with 10%-15% overlap is usually effective. For very structured lists or tables, smaller chunks may better preserve individual list items or clauses.

3. Vectorization: generate embeddings

Each text chunk is then passed to an Embeddings node. In the reference implementation, an OpenAI embedding model such as text-embedding-3-small is used, but any compatible model can be configured based on your cost and accuracy requirements.

Best practices for this step:

  • Standardize the embedding model across your index to maintain consistency
  • Monitor embedding latency and error rates, especially at scale
  • Consider a lower-cost model for bulk indexing and a higher-quality model for more sensitive tasks if needed

4. Indexing: insert vectors into Pinecone

Once embeddings are generated, the workflow uses a Pinecone Insert (vector store) node to persist the vectors into a Pinecone index. A typical index name for this use case might be compliance_checklist_builder.

When inserting vectors, attach rich metadata so that retrieval and traceability are preserved. Common metadata fields include:

  • doc_id – Links the chunk back to the original document
  • chunk_index – Sequential index of the chunk for ordering
  • text or snippet – Original text segment for human review
  • source – Source system or category

Storing this metadata in Pinecone ensures that when you retrieve relevant chunks, you can immediately map them back to the right document sections and justify checklist items during audits.

Checklist generation with retrieval and agents

5. Retrieval: query Pinecone for relevant context

When a user or downstream system requests a checklist for a specific document or topic, the workflow performs a semantic search against the Pinecone index. This retrieval step identifies the most relevant chunks based on the query or document identifier.

Typical retrieval patterns:

  • Query by doc_id to generate a checklist for a specific policy
  • Query by free-text question to identify applicable controls across multiple documents

The Pinecone node returns the top-k most relevant chunks, which are then provided as context to an agent-style node in n8n.

6. Generation: use a LangChain-style agent to build the checklist

The retrieved chunks are fed into an Agent node that uses LangChain-style memory and prompting. The agent receives both the context excerpts and a carefully designed system prompt that instructs it to output concrete, testable checklist items.

Typical prompt snippet:

"You are a compliance assistant. Using the retrieved excerpts, produce a checklist of concise, actionable items with a severity label (High/Medium/Low) and a reference to the excerpt ID."

Key requirements you can encode into the prompt:

  • Checklist items must be specific, measurable, and testable
  • Each item should include a severity label such as High, Medium, or Low
  • Every item must reference the original document and chunk or excerpt identifier
  • If no relevant information is found, the agent should return a clear response such as No applicable items

This retrieval-augmented generation pattern helps reduce hallucinations because the agent is constrained to operate on retrieved context rather than the entire model training corpus.

Logging, traceability, and audit readiness

7. Persisting results: append to Google Sheets

After the agent generates the checklist items, the workflow connects to a Google Sheets node. Configure this node to append rows to a sheet, for example a tab named Log. Each row should capture the essential audit trail fields:

  • Timestamp of generation
  • doc_id and document title
  • Checklist item text
  • Severity level
  • Source reference, such as chunk index or excerpt ID

This log provides a durable, queryable record of how checklist items were derived, which is particularly useful during audits, internal reviews, or regulator inquiries.

Implementation best practices

Metadata and provenance

Consistent metadata is foundational for any compliance automation. For each embedded chunk, capture at least:

  • doc_id
  • chunk_index
  • source or source_url where applicable

This metadata should be available both in Pinecone and in your Google Sheets log so that any checklist item can be traced back to its origin with minimal effort.

Chunk sizing and overlap tuning

Chunk size and overlap influence both retrieval quality and cost:

  • For narrative policy text, 300-500 characters with about 10%-15% overlap usually balances context and efficiency.
  • For bullet-heavy documents, contracts with enumerated clauses, or technical specs, consider smaller chunks to avoid mixing unrelated requirements.

Validate chunking by inspecting a few documents end-to-end and confirming that each chunk is semantically coherent.

Prompt engineering for reliable outputs

Design the agent prompt so that it explicitly describes the desired output format and behavior:

  • Require short, verifiable checklist items
  • Instruct the model to reference excerpt IDs or chunk indices
  • Direct the model to state clearly when no evidence is found, for example "If no evidence is found, return 'No applicable items'."

Iterate on the prompt with real documents from your environment to ensure that severity levels and checklist granularity meet internal expectations.

Security and privacy considerations

Compliance content often contains sensitive or confidential information. Recommended controls include:

  • Protect the webhook endpoint using authentication or API keys
  • Rotate OpenAI and Pinecone API keys regularly
  • Consider redacting or anonymizing personal data before embedding
  • Ensure that your vector store and LLM providers meet your data residency and retention requirements

Testing and validation

Before moving to production, thoroughly test the workflow with a diverse set of documents such as policies, contracts, and technical standards.

Suggested test activities:

  • Unit test webhook payloads to ensure all required fields are present and validated
  • Inspect text splitter outputs to confirm logical chunk boundaries
  • Verify that embeddings are generated without errors and inserted correctly into Pinecone
  • Run manual Pinecone queries to confirm that top-k results align with expected relevance
  • Review generated checklist items with subject matter experts for accuracy and completeness

Scaling and cost optimization

As document volume and query frequency increase, observe both embedding and vector store costs.

Techniques to control cost include:

  • Deduplicate identical or near-identical content before embedding
  • Pre-summarize or compress extremely long documents, then embed summaries instead of raw text when appropriate
  • Use a cost-efficient embedding model for bulk indexing and reserve more advanced models for critical workflows

Example end-to-end interaction

To add a new document, send a POST request to your n8n webhook URL with a payload similar to:

{  "doc_id": "POL-2025-002",  "title": "Acceptable Use Policy",  "text": "Full text of the document...",  "source": "legal"
}

The workflow will:

  1. Receive the payload via the webhook
  2. Split the text into chunks and generate embeddings
  3. Insert vectors and metadata into the Pinecone index
  4. Later, on request, retrieve relevant chunks, generate a checklist via the agent, and append the results to Google Sheets

You can trigger checklist generation from a separate UI, an internal portal, or another automation that interacts with the same n8n instance.

Next steps and extensions

The Compliance Checklist Builder described here provides a reusable blueprint for converting unstructured policy content into structured, auditable controls. Once the core workflow is operational, you can extend it in several directions:

  • Expose a lightweight UI or internal portal where reviewers can request and review checklists
  • Implement role-based access control and approval flows within n8n
  • Integrate with ticketing tools like Jira or ServiceNow to automatically create remediation tasks from high-severity checklist items

Deploy the workflow in n8n, connect your OpenAI and Pinecone credentials, and start indexing your compliance corpus to improve review quality and speed.

Call to action: Download the sample n8n workflow JSON or schedule a 30-minute consultation to adapt this Compliance Checklist Builder to your organization’s policies and regulatory environment.

Competitor Price Scraper with n8n & Supabase

Automated Competitor Price Scraper with n8n, Supabase, and RAG

Monitoring competitor pricing at scale is a core requirement for ecommerce teams, pricing analysts, and marketplace operators. This guide documents a production-ready n8n workflow template that ingests scraped product data, converts it into vector embeddings, persists those vectors in Supabase, and exposes them to a Retrieval-Augmented Generation (RAG) agent for context-aware analysis, reporting, and alerts.

The article is organized as a technical reference, with an overview of the data flow, architecture, and node-by-node configuration, followed by setup steps, scaling guidance, and troubleshooting notes.

1. Workflow overview

At a high level, this n8n workflow performs the following tasks:

  • Accepts scraped competitor product data through a Webhook Trigger (typically from a crawler or third-party scraper).
  • Splits long product descriptions or HTML content into text chunks optimized for embeddings.
  • Generates OpenAI embeddings for each chunk.
  • Persists the embeddings and associated metadata into a Supabase vector table.
  • Exposes the vector store to a RAG agent via a Supabase Vector Tool for retrieval of relevant context.
  • Uses an Anthropic chat model to perform analysis, summarization, or commentary on price changes.
  • Appends structured results to Google Sheets for logging, dashboards, and downstream BI tools.
  • Sends Slack alerts whenever the RAG agent encounters runtime errors.

The template is designed to be production-ready, but you can easily customize individual nodes for specific pricing strategies, product categories, or internal reporting formats.

2. Architecture and data flow

The workflow can be viewed as a linear pipeline with a retrieval and analysis layer on top:

  1. Ingress: A Webhook node receives POST requests containing product metadata, pricing information, and raw text or HTML content.
  2. Preprocessing: A Text Splitter node segments large content into overlapping chunks to preserve local context.
  3. Vectorization: An Embeddings node calls OpenAI’s text-embedding-3-small model to generate dense vector representations for each chunk.
  4. Storage: A Supabase Insert node writes the vectors and metadata into a Supabase vector table (index name competitor_price_scraper).
  5. Retrieval: A combination of Supabase Query and Vector Tool nodes exposes relevant vector documents to a RAG agent.
  6. Context management: A Window Memory node maintains short-term interaction history for multi-turn analysis sessions.
  7. Reasoning: A Chat Model node connected to Anthropic acts as the LLM backend for the RAG agent.
  8. RAG orchestration: A RAG Agent node combines retrieved context, memory, and instructions to generate structured outputs.
  9. Logging and observability: An Append Sheet node writes results to Google Sheets, while a Slack Alert node reports errors.

Each component is decoupled so you can adjust chunking, embedding models, or storage strategies without rewriting the full pipeline.

3. Node-by-node breakdown

3.1 Webhook Trigger

The Webhook node is the entry point of the workflow.

  • HTTP method: POST
  • Example path: /competitor-price-scraper

Configure your crawler, scraping service, or scheduled job to send JSON payloads to this endpoint. A typical payload should include:

{  "product_id": "SKU-12345",  "url": "https://competitor.example/product/123",  "price": 49.99,  "currency": "USD",  "timestamp": "2025-09-01T12:00:00Z",  "raw_text": "Full product title and description..."
}

Required fields depend on your downstream use, but for most price-intelligence scenarios you should provide:

  • product_id – Your internal SKU or a stable product identifier.
  • url – Canonical competitor product URL.
  • price and currency – Current observed price and ISO currency code.
  • timestamp – ISO 8601 timestamp of the scrape.
  • raw_text or HTML – Full product title and description, or a cleaned text extraction.

Edge cases:

  • If raw_text is missing or very short, the workflow can still log price-only data, but embeddings may be less useful.
  • Ensure the payload size stays within your n8n instance and reverse proxy limits, especially when sending full HTML.

3.2 Text Splitter

The Text Splitter node normalizes large bodies of text into smaller, overlapping segments so embeddings capture local semantics.

  • Recommended parameters:
  • chunkSize: 400
  • chunkOverlap: 40

With this configuration, each chunk contains up to 400 characters, and consecutive chunks overlap by 40 characters. This overlap helps preserve continuity for descriptions that span multiple chunks.

Configuration notes:

  • For shorter, highly structured content, you can reduce chunkSize to minimize unnecessary splitting.
  • For very long pages, keep chunkSize moderate to avoid excessive token usage when generating embeddings.

3.3 Embeddings (OpenAI)

The Embeddings node transforms each text chunk into a numeric vector using OpenAI.

  • Model: text-embedding-3-small

For each chunk, the node:

  1. Sends the chunk text to the OpenAI embeddings endpoint.
  2. Receives a vector representation.
  3. Combines this vector with the original content and metadata for insertion into Supabase.

Metadata best practices:

  • Include product_id, url, price, currency, and timestamp.
  • Optionally add competitor_name or other keys used for filtering and deduplication.

Error handling: If embeddings fail due to rate limits or transient network issues, configure retries with exponential backoff in n8n, or wrap this node in error branches that route failures to Slack.

3.4 Supabase Insert & Vector Index

The Supabase Insert node persists each embedding and its metadata into a Supabase table configured for vector search.

  • Index name: competitor_price_scraper

A minimal schema for the vector table can look like:

  • id (uuid)
  • content (text)
  • embedding (vector)
  • metadata (jsonb)
  • created_at (timestamp)

Key points:

  • Ensure the embedding column dimension matches the OpenAI embedding model dimension.
  • Store the original chunk text in content for inspection and debugging.
  • Use metadata to store all identifying fields needed for filtering, deduplication, and analytics.

Deduplication and upserts: You can implement a composite uniqueness strategy in Supabase such as product_id + competitor_name + timestamp or rely on an upsert pattern to avoid storing multiple identical snapshots.

3.5 Supabase Query & Vector Tool

The Supabase Query node retrieves the most similar vectors for a given query embedding. The Vector Tool node then exposes this retrieval capability to the RAG agent.

Typical flow:

  1. The RAG agent or a preceding node constructs a query (for example, “show recent price changes for SKU-12345”).
  2. The workflow generates an embedding for this query or uses the RAG agent’s internal retrieval mechanism.
  3. The Supabase Query node runs a similarity search against competitor_price_scraper and returns the top matches.
  4. The Vector Tool node formats these results as context documents for the RAG agent.

Tuning retrieval quality:

  • If results look irrelevant, verify that content and metadata are correctly saved and that your vector index is built and used.
  • Adjust the number of retrieved documents or similarity thresholds in the Supabase Query node as needed.

3.6 Window Memory

The Window Memory node maintains a limited history of recent interactions between the analyst and the RAG agent.

This is particularly useful when:

  • An analyst asks follow-up questions about a specific product or trend.
  • You want the agent to maintain conversational continuity without re-sending full context each time.

Keep the window small enough to avoid unnecessary token usage while still capturing the last few turns of the conversation.

3.7 Chat Model (Anthropic)

The Chat Model node is configured to use Anthropic’s API as the language model backend for the RAG agent.

Responsibilities:

  • Generate instruction-following, analysis-oriented responses.
  • Interpret retrieved context, metadata, and user instructions.
  • Produce concise or detailed summaries suitable for logging in Google Sheets.

The model is not called directly by most workflow nodes. Instead, it is wired into the RAG Agent node as the primary LLM.

3.8 RAG Agent

The RAG Agent node orchestrates retrieval and reasoning:

  1. Receives a system or user instruction, for example, “Summarize any significant price changes for this product compared to previous snapshots.”
  2. Uses the Vector Tool to retrieve relevant context from Supabase.
  3. Optionally includes Window Memory to maintain conversational continuity.
  4. Calls the Chat Model node to generate a structured response.
  5. Outputs a status summary that is passed to the Google Sheets node.

Error routing: If the RAG Agent throws an error (for example, due to invalid inputs or LLM issues), the workflow routes the error branch to the Slack Alert node for immediate notification.

3.9 Append Sheet (Google Sheets) & Slack Alert

The Append Sheet node logs structured output to a designated Google Sheet.

  • Sheet name: Log (or any name you configure)

Typical entries can include:

  • Product identifiers and URLs.
  • Current and previous prices, where available.
  • RAG agent summaries or anomaly flags.
  • Timestamps and workflow run IDs for traceability.

The Slack Alert node is used for error reporting:

  • Example channel: #alerts
  • Payload includes error message and optionally workflow metadata so you can triage quickly.

This pattern ensures that failures in embedding, Supabase operations, or the RAG agent do not go unnoticed.

4. Configuration and credentials

4.1 Required credentials

Before running the template, provision the following credentials in n8n:

  • OpenAI API key for embeddings.
  • Supabase project URL and service key for vector storage and queries.
  • Anthropic API key for the Chat Model node.
  • Google Sheets OAuth2 credentials for the Append Sheet node.
  • Slack token for sending alerts.

Store all secrets in n8n’s credential store. Do not expose Supabase service keys to any client-side code.

4.2 Supabase vector table setup

Define a table in Supabase with at least:

  • id (uuid)
  • content (text)
  • embedding (vector)
  • metadata (jsonb)
  • created_at (timestamp)

Ensure the vector index (competitor_price_scraper) is created on the embedding column and configured to match the embedding dimension of text-embedding-3-small.

5. Step-by-step setup in n8n

  1. Import the workflow template
    Create or reuse an n8n instance and import the provided workflow JSON template for the automated competitor price scraper.
  2. Configure credentials
    Add and test:
    • OpenAI API key.
    • Supabase URL and service key.
    • Anthropic API key.
    • Google Sheets OAuth2 connection.
    • Slack token and default channel.
  3. Prepare Supabase vector table
    Create the table with the minimal schema described above and configure the vector index competitor_price_scraper.

n8n Creators Leaderboard Stats Workflow

n8n Creators Leaderboard Stats Workflow: Automated Creator Intelligence for n8n Libraries

The n8n Creators Leaderboard Stats Workflow is an automation blueprint for aggregating community performance data and transforming it into AI-generated Markdown reports. It pulls JSON statistics from a GitHub repository, correlates creator and workflow metrics, and produces structured insights that highlight the most impactful contributors and automations. This workflow is particularly suited for community managers, platform operators, and automation professionals who require repeatable, data-driven reporting.

Strategic value for community-led platforms

As marketplaces and workflow libraries scale, the volume of available automations grows faster than manual analysis can keep up. Systematic insight into which creators and workflows drive engagement is critical for:

  • Recognizing top contributors and showcasing exemplary workflows to the broader community.
  • Monitoring adoption trends using metrics such as unique visitors and inserters across time windows.
  • Automating reporting for internal reviews, community updates, newsletters, and dashboards.

By embedding these analytics into an n8n workflow, you obtain a repeatable and auditable process instead of ad hoc, manual data pulls.

Workflow overview and architecture

The workflow implements a linear but extensible pipeline, designed around best practices for data ingestion, transformation, and AI-assisted reporting. At a high level, it performs the following stages:

  • Data ingestion – Fetch aggregated JSON metrics from a GitHub repository via HTTP.
  • Normalization – Extract and standardize creator and workflow records into consistent arrays.
  • Ranking – Sort by key performance indicators and limit to top creators and workflows.
  • Enrichment – Merge creator-level and workflow-level data on username.
  • Targeted filtering – Optionally narrow results to a specific creator when required.
  • AI-driven reporting – Use an LLM to generate a Markdown report with tables and qualitative analysis.
  • File output – Persist the Markdown report as a timestamped file to a designated location.

This modular structure makes it straightforward to adapt the workflow to different data sources, metrics, or reporting formats while retaining a clear operational flow.

Key building blocks in n8n

1. Data retrieval layer

The workflow begins with two HTTP Request nodes that access JSON files hosted in a GitHub repository:

  • One JSON file contains aggregated creator statistics.
  • The other contains workflow-level metrics.

A Global Variables node stores the base GitHub path, which allows you to redirect the workflow to a different repository, branch, or analytics source without modifying multiple nodes. This is a recommended best practice for maintainability and environment-specific configuration.

2. Parsing and preprocessing

Once the JSON documents are retrieved, the workflow uses a combination of Set and SplitOut nodes to:

  • Extract the data arrays that hold the creators and workflows.
  • Normalize field names and structures so that subsequent nodes can operate consistently.

To keep the processing scope manageable and focused on the most relevant entries, Sort and Limit nodes are applied. For example:

  • Limit to the top 25 creators based on the chosen metric.
  • Limit to the top 300 workflows for detailed analysis.

Sorting can be tuned to prioritize particular KPIs such as weekly unique visitors or inserters, depending on your reporting goals.

3. Merging and optional filtering

The workflow then correlates creator and workflow datasets using a Merge node. The merge operation:

  • Matches records on the username field.
  • Enriches each workflow with its associated creator data, providing a unified view of performance.

A subsequent Filter node can be used to restrict the output to a single creator. This is particularly useful when the workflow is triggered interactively. For example, a chat-based interaction such as show me stats for username joe can be translated into a JSON payload that selects only that creator’s data for the report.

4. AI-powered Markdown report generation

The consolidated dataset is passed to an AI Agent node configured with your preferred LLM (for example, OpenAI). The agent is typically set with a relatively low temperature to favor consistency and accuracy over creativity.

The prompt is structured to instruct the model to produce a comprehensive Markdown report that includes:

  • A concise but detailed summary of the creator and their overall impact.
  • A Markdown table listing workflows with metrics such as:
    • Unique weekly visitors
    • Unique monthly visitors
    • Unique weekly inserters
    • Unique monthly inserters
  • Community analysis describing why certain workflows perform well.
  • Additional insights such as emerging trends and recommended next steps.

By codifying the report structure in the prompt, you can maintain consistent output across runs and make downstream consumption easier for both humans and systems.

5. Output and file handling

After the AI agent returns the Markdown content, the workflow converts it into a file and writes it to the configured local filesystem. The filename includes a timestamp, which simplifies versioning, auditability, and integration with downstream processes such as newsletters or dashboards.

Deployment and execution: quick start guide

  1. Prepare the analytics source
    Clone the repository that contains the aggregated creator and workflow JSON files, or host your own JSON data in a similar structure.
  2. Configure the GitHub base path
    Update the Global Variables node in n8n with the base GitHub URL that points to your JSON files.
  3. Set up LLM credentials
    Ensure your OpenAI or other LLM credentials are correctly configured for the AI Agent node.
  4. Activate the workflow
    Enable the workflow in your n8n instance.
  5. Trigger the workflow
    Use either:
    • A chat trigger for conversational queries.
    • An execute-workflow trigger that receives JSON input, for example: {"username": "joe"}.
  6. Review the generated report
    Locate the Markdown file in the configured output directory. Confirm the timestamped filename and validate that the content matches your expectations.

Primary use cases and stakeholders

  • Community managers
    Generate weekly or monthly creator leaderboards, highlight trending workflows, and share insights in community updates or newsletters.
  • Individual creators
    Track which workflows gain traction, refine documentation, and plan content or feature updates based on user behavior.
  • Platform and product owners
    Use aggregated metrics to prioritize improvements, select workflows for featured placement, and inform roadmap decisions.

Customization and extension strategies

The workflow is intentionally designed to be adaptable. Common customization patterns include:

  • Alternative analytics sources
    Adjust the GitHub base path variable to point to your own metrics repository or analytics pipeline. As long as the JSON structure preserves the expected data arrays, minimal changes are required.
  • Different ranking criteria
    Change the Sort node configuration to emphasize different KPIs, such as:
    • Unique weekly inserters for adoption intensity.
    • Monthly visitors for long-term visibility.
  • Enhanced AI prompts
    Extend the AI agent prompt to add new sections, for example:
    • Technical deep dives into workflow design.
    • Sample usage scenarios or code snippets.
    • Interview-style commentary for featured creators.
  • Alternative storage backends
    Instead of writing to the local filesystem, switch to a cloud-based target such as Amazon S3 or Google Cloud Storage. This is useful for CI/CD pipelines, multi-node deployments, or centralized reporting.

Troubleshooting and operational considerations

Missing or incomplete JSON data

If the workflow fails to retrieve data or fields appear empty, verify the following:

  • The Global Variables base path matches the actual GitHub repository and branch.
  • The filenames used in the HTTP Request nodes are correct.
  • The JSON documents contain the expected data arrays for both creators and workflows.

Suboptimal AI report quality

If the AI-generated Markdown is inconsistent or lacks structure:

  • Reduce the temperature setting to encourage more deterministic responses.
  • Refine the system prompt and include explicit examples of the desired table format and sections.
  • Clarify which metrics must always be present in the output.

File write or permission errors

When the workflow cannot save the Markdown file:

  • Confirm that the n8n process has write permissions on the target directory.
  • Consider writing to an n8n workspace or a managed storage service if local permissions are constrained.

Security and privacy best practices

The reference implementation reads metrics from public GitHub JSON files. Even in this scenario, you should:

  • Avoid embedding sensitive information in public JSON documents.
  • If you rely on private metrics, store JSON files in a private repository and configure secure credentials for n8n.
  • Review AI-generated reports for any personally identifiable information (PII) and apply anonymization or redaction where necessary.

Adhering to these practices ensures that automation does not inadvertently expose confidential data.

Expected report output

The final Markdown file produced by the workflow typically contains:

  • A narrative summary of the creator’s performance and contribution to the ecosystem.
  • A structured Markdown table listing each workflow with its key metrics, including weekly and monthly visitors and inserters.
  • Community-oriented analysis that explains why certain workflows resonate with users.
  • Forward-looking insights such as trends, opportunities for optimization, and recommended next steps for the creator or platform team.

This format is well suited for direct publication in documentation sites, internal reports, or community announcements.

Getting started with the template

To adopt the n8n Creators Leaderboard Stats Workflow in your environment:

  • Clone the project that contains the workflow and analytics JSON files.
  • Configure the Global Variables node to point to your GitHub metrics source.
  • Set up your LLM credentials and validate the AI Agent configuration.
  • Activate and trigger the workflow in n8n, then review the generated Markdown output.

Call to action: Visit the GitHub repository at https://github.com/teds-tech-talks/n8n-community-leaderboard to obtain the workflow files, run them locally, and contribute enhancements. For assistance with prompt engineering, output customization, or integration patterns, reach out to the author or join the n8n community chat.


Pro tip: Add a scheduled trigger or cron-based node to generate reports at fixed intervals. You can then pipe the Markdown files into your newsletter workflow or internal analytics dashboard for fully automated community reporting.

Automate Shift Handover Summaries with n8n

Automate Shift Handover Summaries with n8n

Capturing clear and consistent shift handovers is critical for keeping teams aligned and avoiding information gaps. In busy environments, it is easy for important details to get lost between shifts.

This guide teaches you how to use an n8n workflow template to:

  • Ingest raw shift notes through a webhook
  • Split and embed notes for semantic search
  • Store embeddings in a Supabase vector store
  • Use an agent to generate a concise, structured handover summary
  • Append the final summary to a Google Sheets log

By the end, you will understand each part of the workflow and how to adapt it to your own operations, NOC, customer support, or field service teams.


Learning goals

As you follow this tutorial, you will learn how to:

  • Configure an n8n webhook to receive shift handover data
  • Split long notes into chunks that work well with embedding models
  • Generate embeddings with a HuggingFace model and store them in Supabase
  • Build an agent that retrieves relevant context and produces a structured summary
  • Append the final output to a Google Sheet for long-term logging and reporting
  • Apply best practices for chunking, metadata, prompts, and security

Why automate shift handovers?

Manual shift handovers often suffer from:

  • Inconsistent detail and structure
  • Missed critical issues or follow-up actions
  • Notes that are hard to search later

Automating the process with n8n helps you:

  • Standardize the format of every handover
  • Make past shifts searchable via embeddings and vector search
  • Quickly surface related incidents and context for the next shift
  • Maintain a central, structured log in Google Sheets

This workflow is especially useful for operations teams, network operations centers (NOC), customer support teams, and field services where accurate handovers directly impact reliability and customer experience.


Concept overview: How the workflow works

Before we go step by step, it helps to understand the main building blocks of the n8n template.

High-level flow

The template workflow processes a shift handover like this:

  1. A POST request hits an n8n Webhook with raw shift notes.
  2. A Splitter node breaks the notes into smaller text chunks.
  3. A HuggingFace Embeddings node converts each chunk into a vector.
  4. An Insert node stores these vectors in a Supabase vector store.
  5. A Query + Tool setup lets the agent retrieve relevant past context.
  6. A Memory node keeps recent conversational context for the agent.
  7. A Chat/Agent node generates a structured summary and action items.
  8. A Google Sheets node appends the final record to your Log sheet.

In short, you send raw notes in, and the workflow produces:

  • A semantic representation of your notes stored in Supabase
  • A clear, structured, and consistent shift handover entry in Google Sheets

Step-by-step: Building and understanding the n8n workflow

Step 1 – Webhook: Entry point for shift notes

The Webhook node is where your workflow starts. Configure it to listen for POST requests at the path:

shift_handover_summary

Any tool that can send HTTP requests (forms, internal tools, scripts, ticketing systems) can submit shift data to this endpoint.

A typical payload might look like this:

{  "shift_id": "2025-09-01-A",  "team": "NOC",  "shift_lead": "Alex",  "notes": "Servers A and B experienced intermittent CPU spikes. Restarted service X. Customer ticket #1245 open. No data loss. Follow-up: investigate memory leak."
}

In the workflow, these fields are passed along to downstream nodes for processing, embedding, and summarization.


Step 2 – Splitter: Chunking long handover notes

Long text can be difficult for embedding models to handle effectively. To address this, the workflow uses a character text splitter node to break the notes field into smaller pieces.

Recommended configuration:

  • chunkSize: 400
  • chunkOverlap: 40

Why chunking matters:

  • Improves embedding quality by focusing on smaller, coherent segments
  • Helps keep inputs within model token limits
  • Preserves local context through a small overlap so sentences that cross boundaries still make sense

You can adjust these values based on the typical length and structure of your shift notes, but 400/40 is a solid starting point.


Step 3 – Embeddings: Converting chunks to vectors with HuggingFace

Next, the workflow passes each text chunk to a HuggingFace Embeddings node. This node:

  • Uses your HuggingFace API key
  • Applies a configured embedding model to each text chunk
  • Outputs vector representations that can be stored and searched

The template uses the default model parameter, but you can switch to a different model if you need:

  • Higher semantic accuracy for domain-specific language
  • Better performance or lower cost

Keep your HuggingFace API key secure using n8n credentials, not hardcoded values.


Step 4 – Insert: Storing embeddings in Supabase vector store

Once the embeddings are generated, the Insert node writes them into a Supabase vector store. The template uses an index named:

shift_handover_summary

Each stored record typically includes:

  • The original text chunk
  • Its embedding vector
  • Metadata such as:
    • shift_id
    • team
    • timestamp
    • author or shift_lead

Metadata is very important. It lets you filter searches later, for example:

  • Find only incidents for a specific team
  • Limit context to the last 30 days
  • Retrieve all notes related to a given shift ID

Make sure your Supabase credentials are correctly configured in n8n and that the shift_handover_summary index exists or is created as needed.


Step 5 – Query + Tool: Enabling context retrieval for the agent

To generate useful summaries, the agent needs access to relevant historical context. The workflow uses two pieces for this:

  1. Query node that searches the Supabase vector store using the current notes as the query.
  2. Tool node that wraps the query as a callable tool for the agent.

When the agent runs, it can:

  • Call this tool to retrieve similar past incidents or related shift notes
  • Use that context to produce better summaries and action items

This is especially valuable when you want the summary to reference prior related issues, recurring incidents, or ongoing tickets.


Step 6 – Memory: Keeping recent conversational context

The Memory node (often configured as a buffer window) stores recent interactions and context. This is useful when:

  • The agent needs to handle multi-step reasoning
  • There is a back-and-forth with another system or user
  • You want the agent to remember what it just summarized when generating follow-up clarifications

By maintaining a short history, the agent can produce more coherent and consistent outputs across multiple steps in the workflow.


Step 7 – Chat & Agent: Generating the structured shift summary

The core intelligence of the workflow lives in two nodes:

  • Chat node: Uses a HuggingFace chat model to generate language outputs.
  • Agent node: Orchestrates tools, memory, and prompts to produce the final summary.

Key configuration details:

  • The Agent node is set with promptType of define.
  • The incoming JSON payload from the webhook (shift_id, team, notes, etc.) is used as the basis for the prompt.
  • The agent can:
    • Call the vector store tool to retrieve relevant context
    • Use the memory buffer for recent history
    • Produce a structured output that includes summary and actions

With the right prompt design, you can instruct the agent to output:

  • A concise summary of the shift
  • Critical issues detected
  • Follow-up actions and owners

Step 8 – Google Sheets: Appending the final handover log

The final step is to persist the structured summary in a log. The workflow uses a Google Sheets node with the operation set to append.

Configuration highlights:

  • Select the correct spreadsheet
  • Use the Log sheet as the target tab
  • Map fields from the agent output into sheet columns

A recommended column layout is:

  • Timestamp
  • Shift ID
  • Team
  • Shift Lead
  • Summary
  • Critical Issues
  • Action Items
  • Owner

This structure makes it easy to filter, sort, and report on shift history, incidents, and follow-up work.


Example: Sending a test payload to the webhook

To test your setup, send a POST request to your n8n webhook URL with JSON like this:

{  "shift_id": "2025-09-01-A",  "team": "NOC",  "shift_lead": "Alex",  "notes": "Servers A and B experienced intermittent CPU spikes. Restarted service X. Customer ticket #1245 open. No data loss. Follow-up: investigate memory leak."
}

Once the workflow runs, you should see:

  • New embeddings stored in your Supabase vector index shift_handover_summary
  • A new row appended in your Google Sheets Log tab containing the summarized shift handover

Best practices for configuration and quality

Chunk size and overlap

Starting values of chunkSize 400 and chunkOverlap 40 work well for many use cases:

  • Smaller chunks can lose context across sentences.
  • Larger chunks risk exceeding token limits and may dilute focus.

Monitor performance and adjust based on the average length and complexity of your notes.

Using metadata effectively

Always include useful metadata with each chunk in the vector store, such as:

  • shift_id
  • team
  • timestamp
  • shift_lead

Metadata makes it easier to:

  • Filter searches to specific teams or time ranges
  • Generate targeted summaries for a particular shift
  • Support future dashboards and analytics

Choosing an embedding model

Start with the default HuggingFace embedding model for simplicity. If you notice that your domain language is not captured well, consider:

  • Switching to a larger or more specialized embedding model
  • Using a fine-tuned model if you work with very specific terminology

Balance accuracy, latency, and cost based on your volume and requirements.

Maintaining the Supabase vector store

Over time, your vector store will grow. Plan a retention strategy:

  • Decide how long to keep historical shift data
  • Use Supabase policies or scheduled jobs to archive or delete older entries
  • Consider separate indexes for different teams or environments if needed

Prompt design for the agent

Careful prompt design has a big impact on the quality of summaries. In the Agent node:

  • Use promptType define to control the structure
  • Pass the raw JSON payload so the agent has full context
  • Explicitly request:
    • A short summary of the shift
    • Bullet list of critical issues
    • Clear action items with owners if possible

Iterate on your prompt until the output format consistently matches what you want to store in Google Sheets.


Troubleshooting common issues

  • Embeddings fail:
    • Verify your HuggingFace API key is valid.
    • Check that the selected model is compatible with the embeddings node.
  • Insert errors in Supabase:
    • Confirm Supabase credentials in n8n.
    • Ensure the shift_handover_summary index or table exists and has the right schema.
  • Agent cannot retrieve relevant context:
    • Check that documents were actually inserted into the vector store.
    • Make sure metadata filters are not too strict.
    • Test the query node separately with a known sample.
  • Google Sheets append fails:
    • Verify Google Sheets OAuth credentials in n8n.
    • Double-check the spreadsheet ID and sheet name (Log).
    • Confirm the mapping between fields and columns is correct.

Security and compliance considerations

Shift notes often contain sensitive operational details. Treat this data carefully:

  • Apply access controls on the webhook endpoint, for example by using authentication or IP restrictions.
  • Store all secrets (HuggingFace, Supabase, Google) as encrypted credentials in n8n.
  • Limit Supabase and Google Sheets access to dedicated service accounts with minimal permissions.
  • Consider redacting or detecting PII before generating embeddings or storing content.

These steps help you stay aligned with internal security policies and regulatory requirements.


Extensions and next steps

Once the core workflow is running, you can extend it in several useful ways:

  • Automated alerts: Trigger Slack or Microsoft Teams notifications when the summary includes critical issues or high-priority incidents.
  • Search interface: Build a simple web UI or internal tool that queries Supabase to find

IoT Firmware Update Planner with n8n

IoT Device Firmware Update Planner with n8n

Keeping IoT firmware up to date can feel like a constant battle. Devices are scattered across locations, releases ship faster than ever, and every missed update can turn into a security or reliability risk. Yet behind that complexity is a huge opportunity: if you automate the planning work, you free yourself to focus on strategy, innovation, and growth instead of chasing version numbers.

The IoT Device Firmware Update Planner built with n8n is designed to be that turning point. It transforms scattered release notes, device metadata, and tribal knowledge into a structured, intelligent workflow that plans firmware rollouts for you. Under the hood it combines webhooks, text splitting, embeddings, a Pinecone vector store, an agent-driven decision layer, and a simple Google Sheets log. On the surface, it gives you clarity, control, and time back.

This article walks you through that journey: from the pain of manual firmware planning, to a new mindset about automation, and finally to a step-by-step look at how this n8n template works and how you can adapt it for your own fleet.

From chaotic updates to confident rollouts

Firmware updates are not optional. They are the foundation for:

  • Security patches that protect your devices and data
  • Performance improvements that keep your fleet efficient
  • New features that unlock customer and business value

Handling all of this manually across hundreds or thousands of devices is risky and exhausting. Human-driven planning often leads to:

  • Misconfigurations and inconsistent rollout policies
  • Unnecessary downtime and support incidents
  • Missed compliance requirements or incomplete audit trails

Automating the firmware update planning process with n8n changes the game. Instead of reacting to issues, you build a repeatable system that:

  • Collects and indexes device metadata and firmware release notes automatically
  • Uses semantic search to surface relevant history and compatibility constraints
  • Lets an agent orchestrate rollout decisions, canary stages, and blocking conditions
  • Logs every decision for transparent audit and operational tracking

That is more than a workflow. It is a foundation for scaling your IoT operations without burning out your team.

Adopting an automation-first mindset with n8n

Before diving into the template, it helps to shift the way you think about firmware planning. Instead of asking, “How do I push this update?” start asking, “Which parts of this decision can be automated, and how can I guide that automation safely?”

With n8n you are not replacing human judgment. You are:

  • Capturing your best practices in a repeatable, visible workflow
  • Letting the system do the heavy lifting of data collection and analysis
  • Using agents and LLMs as assistants that propose plans you can review and refine

This template is a practical example of that mindset. It gives you a starting point you can extend, experiment with, and improve over time. The goal is not perfection on day one. The goal is to build an evolving automation system that learns with you and supports your growth.

Inside the IoT Firmware Update Planner template

On the n8n canvas, the template looks compact and approachable, yet it connects several powerful building blocks. Here is what it includes at a high level:

  1. Webhook – receives POST events such as device heartbeats, new firmware releases, or admin-triggered planning requests
  2. Splitter – breaks long texts like release notes or device logs into smaller chunks
  3. Embeddings (Hugging Face) – converts those chunks into dense vector embeddings for semantic search
  4. Insert (Pinecone) – stores embeddings in a Pinecone index named iot_device_firmware_update_planner
  5. Query + Tool (Pinecone wrapper) – runs similarity search and exposes results as a tool for the agent
  6. Memory – keeps a buffer of conversational context for the agent
  7. Chat (OpenAI model or alternative LLM) – provides the language model interface for reasoning
  8. Agent – coordinates tools, memory, and prompts to craft a firmware update plan
  9. Google Sheets – appends decision logs to maintain an auditable history

Each of these nodes is configurable and replaceable. Together they form a repeatable pattern you can reuse in other automation projects: trigger, enrich, store, reason, and log.

How the workflow runs, step by step

1. Events trigger the workflow

The journey begins with the Webhook node. It listens for POST requests such as:

  • A new firmware release with detailed release notes
  • Device telemetry that signals outdated or vulnerable firmware
  • An administrator request to generate a rollout plan for a specific device group

Each event becomes an opportunity for the system to respond intelligently instead of waiting for manual intervention.

2. Text is prepared for semantic search

Firmware release notes and device logs can be long and dense. The Splitter node breaks this content into manageable chunks, using a chunk size and overlap tuned for better recall during search. These fragments are then passed to the Hugging Face embeddings node, which converts them into vector embeddings.

This step turns unstructured text into structured, searchable knowledge that your agent can use later.

3. Knowledge is stored in Pinecone

Each embedding is inserted into a Pinecone index named iot_device_firmware_update_planner. Over time this index grows into a powerful knowledge base that can include:

  • Firmware release notes and change logs
  • Device capabilities and constraints
  • Historical incidents and rollout outcomes
  • Compatibility mappings and upgrade paths

Instead of relying on memory or scattered documents, you gain a centralized vector store that your agent can query in seconds.

4. The agent plans the rollout

When a planning request arrives, the Agent node becomes the brain of the operation. It uses:

  • The Query node to perform vector similarity search in Pinecone
  • The Tool wrapper to feed search results into the agent
  • Memory to preserve context across turns
  • The Chat (OpenAI or other LLM) node to reason about the information

Based on the semantic context and your policy prompts, the agent produces a structured firmware update plan, which may include:

  • Rollout percentages and phases
  • Canary groups and test cohorts
  • Blocking conditions and safety checks
  • Rollback steps and verification actions

This is where your operational knowledge starts to scale. The agent applies the same level of care every time, without fatigue.

5. Decisions are logged for audit and learning

Finally, the workflow appends each decision to Google Sheets or another sink of your choice. Typical log fields include:

  • Timestamps and request identifiers
  • Device groups or segments affected
  • Summary of the recommended rollout plan
  • Operator notes or overrides

These logs provide a clear audit trail and a feedback loop. You can review what the agent recommended, compare it to real outcomes, and refine your prompts or policies over time.

What you need to get started

Setting up this n8n template is straightforward. Use this checklist as your starting point:

  • n8n account, either self-hosted or on n8n Cloud
  • OpenAI API key for the chat agent, or another supported LLM provider
  • Hugging Face API key for embeddings, or a local embedding model endpoint
  • Pinecone account with an index named iot_device_firmware_update_planner
  • Google Sheets credentials with permission to append rows
  • Secure webhook endpoints with authentication, for example HMAC signatures or tokens

Once these are in place, you can import the template, connect your credentials, and start experimenting with a small test set of devices.

Best practices for a reliable automation journey

Secure your webhooks

Webhooks are your entry point, so protect them carefully. Validate payloads using signatures or tokens, and avoid exposing unauthenticated endpoints. This reduces the risk of accidental or malicious triggers that could disrupt your planning process.

Use version control and staging

Keep firmware metadata in a versioned datastore so you always know which release is in play. Combine that with staging groups and canary rollout strategies to limit the impact of any unexpected behavior. The agent can incorporate these patterns into its recommendations.

Limit exposure of sensitive data

When you send data to external LLM or embedding services, sanitize user or device identifiers where possible. For highly sensitive environments, consider running embeddings or language models inside your own infrastructure and updating the template to point to those endpoints.

Monitor, observe, and iterate

Automation is not “set and forget.” Track success rates, failure counts, and rollback frequency. You can:

  • Use the Google Sheets log for quick visibility
  • Forward logs into your observability stack such as Datadog or ELK
  • Set alerts when error thresholds or rollback counts exceed expectations

These signals help you continuously refine prompts, policies, and thresholds in the workflow.

Example use cases that unlock real value

Once the template is running, you can apply it to several high-impact scenarios:

  • Automated canary rollout recommendations based on device telemetry and historical incidents stored in the vector index
  • Compatibility checking that flags devices requiring intermediate firmware versions before a safe upgrade
  • Release note summarization that highlights relevant changes for specific device models or features
  • Post-update anomaly triage by querying similar historical incidents and recommended mitigations

Each of these use cases saves time, reduces risk, and builds confidence in your automation strategy.

Security considerations for high-stakes updates

Firmware updates are powerful and potentially dangerous if mishandled. Before you let automation make or suggest rollout decisions, ensure you have strong safeguards in place:

  • Use cryptographic signing for firmware artifacts and verify signatures on devices
  • Segment devices by criticality and apply stricter rollout policies to sensitive groups
  • Document and test rollback plans, and include those steps in the agent prompt
  • Encrypt sensitive logs and tightly control access to the vector store index

These measures let you enjoy the benefits of automation without compromising safety.

Scaling your fleet and controlling costs

As your IoT fleet expands, so do your data and compute needs. The template is designed to scale, and you can keep costs under control by:

  • Batching small, frequent updates into grouped embedding requests where possible
  • Retaining only high-value historical documents in the Pinecone index and archiving older or low-impact content
  • Using more affordable embedding models for routine or low-risk queries, and reserving premium models for critical decisions

With these practices, your automation can grow alongside your business without runaway expenses.

Testing the n8n firmware planner safely

Before you trust any automated system with production devices, validate it in a controlled environment. A simple test path looks like this:

  1. Use a small set of non-critical devices or a simulator as your testbed
  2. Post a sample firmware release note payload to the webhook
  3. Confirm that embeddings are generated and visible in the Pinecone index
  4. Ask the agent to create a rollout plan for a test device group
  5. Verify that the resulting decision log appears correctly in Google Sheets with all required metadata

Once you are comfortable with the results, you can gradually expand to larger groups and more complex scenarios.

Customizing and extending the template

The real power of n8n lies in how easily you can adapt workflows to your environment. This template is intentionally modular so you can evolve it step by step. Some ideas:

  • Swap Hugging Face embeddings for a local or custom model endpoint
  • Replace Pinecone with another vector database such as Milvus or Weaviate
  • Add Slack or Microsoft Teams notifications to request human approval before a rollout proceeds
  • Integrate device management platforms like Mender, Balena, or AWS IoT to trigger actual OTA jobs after the plan is approved

Each customization moves you closer to a fully integrated, end-to-end firmware management system tailored to your stack.

From template to transformation

The IoT Device Firmware Update Planner n8n template is more than a collection of nodes. It is a blueprint for how you can run safer, smarter, and more scalable firmware operations.

By combining semantic search, agent-driven decision making, and a simple yet effective audit log, you gain a system that:

  • Learns from past incidents and outcomes
  • Reduces operational risk and manual toil
  • Frees your team to focus on innovation and higher value work

As you refine prompts, add new data sources, and connect more tools, this workflow can become a central pillar of your IoT automation strategy.

Take the next step with n8n automation

You do not need a massive project to get started. Begin small, prove the value, and grow from there.

To try the template:

  • Import it into your n8n instance
  • Connect your API keys for Hugging Face, Pinecone, OpenAI (or your chosen LLM), and Google Sheets
  • Run it against a small, low-risk device group or simulator
  • Review the agent’s plans, adjust prompts, and iterate

If you want help tailoring the workflow to your fleet or integrating it with your OTA provider, you can reach out to your internal platform team or automation specialists, or consult a step-by-step setup guide to walk through each configuration detail.

Keywords: IoT firmware update planner, n8n workflow, OTA updates, Pinecone, Hugging Face, OpenAI, semantic search, agent automation, IoT automation template.