Build a Carbon Footprint Estimator with n8n, LangChain and Pinecone
This guide explains how to implement a scalable, production-ready Carbon Footprint Estimator using n8n as the orchestration layer, LangChain components for tool and memory management, OpenAI embeddings for semantic search, Pinecone as a vector database, Anthropic (or another LLM) for reasoning and conversation, and Google Sheets for lightweight logging and audit trails.
The workflow is designed for automation professionals who need an intelligent, queryable knowledge base of emissions factors that can both answer questions and compute carbon footprints programmatically.
Target architecture and core capabilities
The solution combines several specialized components into a single, automated pipeline:
n8n as the low-code automation and orchestration platform
LangChain for agents, tools and conversational memory
OpenAI embeddings to encode emissions content into semantic vectors
Pinecone as the vector store for fast semantic retrieval
Anthropic or another LLM for reasoning, conversation and JSON output
Google Sheets as a simple, persistent log and audit layer
With this stack, you can:
Index emissions factors and related documentation for semantic search
Expose a webhook-based API that accepts usage data (kWh, miles, flights, etc.)
Retrieve relevant emissions factors via Pinecone for each query
Let an LLM compute carbon estimates, produce structured JSON and cite sources
Log all interactions and results for compliance, analytics and review
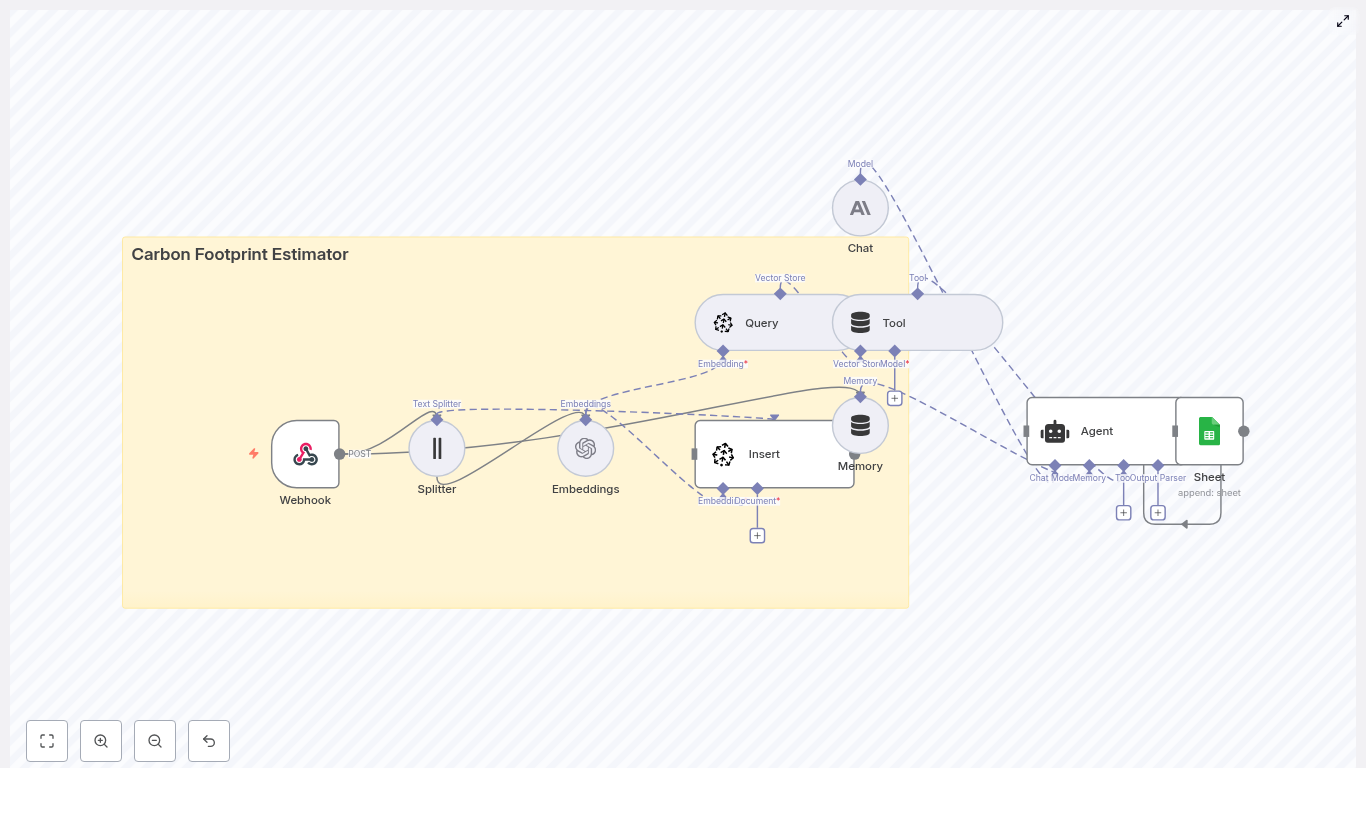
High-level workflow overview
The n8n workflow can be conceptualized as two tightly integrated flows: ingestion & indexing and query & estimation.
Ingestion and indexing flow
A Webhook receives POST requests containing documents or emissions factor data to index.
A Text Splitter breaks large content into smaller chunks with controlled overlap.
The OpenAI Embeddings node converts each chunk into a dense vector representation.
An Insert (Pinecone) node writes vectors and metadata into a dedicated Pinecone index.
Query and estimation flow
The Webhook also accepts user questions or footprint calculation requests.
A Query (Pinecone) node retrieves the most relevant chunks for the request.
A Tool node exposes Pinecone search results to the LangChain Agent.
A Memory component maintains recent conversation context.
The Chat / Agent node (Anthropic or another LLM) uses tools + memory to compute a footprint, generate a structured response and cite references.
A Google Sheets node appends the request, estimate and metadata for logging and auditability.
Node-by-node deep dive
Webhook – unified entry point
The workflow begins with an n8n Webhook node configured to handle POST requests on a path such as /carbon_footprint_estimator. This endpoint can be integrated with web forms, internal systems, or other applications.
The payload typically includes:
Consumption data for estimation, for example:
Electricity use in kWh
Distance traveled in km or miles
Flight segments or other transport activities
Documents or tabular data to index, such as:
CSV files with emission factors
Policy documents
Manufacturer specifications
At this stage you should also implement basic input validation and unit checks to ensure that values are clearly specified in kWh, km, miles, liters or other explicit units.
Text Splitter – preparing content for embeddings
Large or unstructured documents are not efficient to embed as a single block. The Splitter node divides text into smaller segments while preserving enough context for semantic search.
A typical configuration might be:
chunkSize: 400 tokens
chunkOverlap: 40 tokens
This approach maintains continuity between chunks and improves retrieval quality, especially for dense technical documents where a factor definition may span multiple sentences.
OpenAI Embeddings – semantic vectorization
Each chunk produced by the Splitter is passed to the Embeddings (OpenAI) node. This node generates dense vector representations that capture semantic meaning rather than exact wording.
Once embedded, you can handle queries like:
“What is the emission factor for natural gas per kWh?”
even if the underlying documents phrase it differently. This is crucial when building a robust emissions knowledge base that must handle varied user language.
Pinecone Insert – building the emissions knowledge base
The Insert (Pinecone) node stores each embedding, along with its source text and metadata, into a Pinecone index such as carbon_footprint_estimator.
For reliable traceability and explainability, include metadata such as:
This metadata allows the Agent to surface precise references and supports auditing of how each emission factor was used.
Pinecone Query and Tool – contextual retrieval for the Agent
When a user submits a question or an estimation request through the Webhook, the workflow calls a Query (Pinecone) node. The query uses the user prompt to retrieve the most relevant chunks from the index.
The results are then wrapped by a Tool node that exposes the Pinecone query as a callable tool for the LangChain Agent. This pattern lets the LLM selectively pull in only the context it needs and keeps the prompt grounded in authoritative data.
Memory – maintaining conversation context
To support multi-turn interactions, the workflow uses a Memory buffer that stores recent messages and responses. This enables better handling of follow-up questions such as:
“Can you break that down by activity?”
“What if I double the mileage?”
“Use the same grid mix as before.”
By retaining context, the Agent can provide more coherent and consistent answers across an entire conversation rather than treating each request as an isolated query.
Chat / Agent – orchestrating tools and computing estimates
The Chat / Agent node is the central reasoning component. It receives:
The user request from the Webhook
Relevant emissions factors and documentation via the Pinecone Tool
Conversation history from the Memory buffer
The Agent runs a carefully designed prompt that instructs the model to:
Use only the provided emissions factors and context
Compute carbon footprint estimates based on the supplied activity data
Return structured, machine-readable output
Cite sources and references from the metadata
A recommended output format is a JSON object with fields such as:
estimate_kg_co2e: total estimated emissions
breakdown: array of activities and their contributions
references: list of URLs or document identifiers used
Google Sheets – logging and audit trail
Finally, a Google Sheets node appends each interaction to a spreadsheet. A typical log entry can include:
Timestamp
Raw user input
Computed estimate_kg_co2e
Breakdown details
References and source identifiers
This provides a quick, accessible audit trail and supports analytics and manual review. For early-stage deployments or prototypes, Google Sheets is often sufficient before moving to a more robust database.
Implementation best practices
Input quality and validation
Validate units at the Webhook layer and normalize them where possible.
Reject or flag incomplete payloads that lack essential information such as activity type or units.
Metadata and explainability
Include rich metadata with each vector in Pinecone, such as source, publication date and methodology.
Encourage the Agent via prompt engineering to surface this metadata explicitly in its responses.
Chunking and retrieval tuning
Adjust chunkSize and chunkOverlap based on document type. Dense technical content typically benefits from slightly larger overlaps.
Configure similarity thresholds in Pinecone to avoid returning loosely related or low-quality context.
Reliability and security
Use n8n credentials vaults to store API keys for OpenAI, Pinecone, Anthropic and Google Sheets.
Implement rate limiting and retry logic for bulk embedding and indexing operations.
Log both inputs and outputs to support transparency, especially when estimates feed into regulatory reporting.
Example Agent prompt template
A clear, structured prompt is critical for predictable, machine-readable output. The following example illustrates a simple pattern you can adapt:
System: You are a Carbon Footprint Estimator. Use only the provided emission factors and context.
Compute emissions, explain your reasoning briefly, and always cite your sources.

User: Calculate footprint for 100 kWh electricity and 20 miles driving.

Context: [semantic search results from Pinecone and memory]

Return JSON only, with this structure:
{  "estimate_kg_co2e": number,  "breakdown": [  {  "source": "string",  "value_kg_co2e": number  }  ],  "references": ["url or doc id"]
}
You can further refine the prompt to enforce unit consistency, add rounding rules or align with your internal reporting formats.
Scaling and production considerations
As the solution matures beyond prototyping, consider the following enhancements:
Data layer: Migrate from Google Sheets to a relational database when you need complex queries, stronger access control or integration with BI tools.
Index strategy: Use separate Pinecone indexes for major domains such as electricity, transport and manufacturing to improve retrieval quality and simplify lifecycle management.
Batch operations: Batch embedding and insert operations to reduce API overhead and improve throughput for large datasets.
Governance: Introduce human-in-the-loop review for critical outputs, especially where numbers are used in regulatory or public disclosures.
Caching: Cache results for frequent or identical queries to reduce cost and latency.
Common use cases for the workflow
Real-time sustainability dashboards that display live emissions estimates for operations or customers.
Employee travel estimators that help staff understand the impact of business trips.
Automated compliance and ESG reporting that cites specific emissions factor sources.
Customer-facing calculators for e-commerce shipping or product lifecycle footprints.
Conclusion
By combining n8n, LangChain components, OpenAI embeddings, Pinecone and Anthropic, you can create a robust Carbon Footprint Estimator that is both explainable and extensible. The architecture enables low-code orchestration, high-quality semantic search and structured, source-backed estimates suitable for internal tools or customer-facing applications.
Start with the template workflow for experimentation, then incrementally harden it using the best practices and production considerations described above.
Next steps
To deploy this in your own environment:
Import the workflow template into your n8n instance.
Configure credentials for OpenAI, Pinecone, Anthropic and Google Sheets in the n8n credentials vault.
Index your emissions factors and reference materials.
Test the webhook with sample activities and iterate on the Agent prompt and retrieval parameters.
If you need to adapt the template for specific datasets, regulatory frameworks or reporting standards, you can extend the workflow with additional nodes, validation logic or downstream integrations.
SendGrid Bounce Alert Workflow With n8n & Weaviate: A Story From Panic To Control
On a Tuesday morning that started like any other, Maya, a lifecycle marketer at a fast-growing SaaS startup, opened her inbox and froze. Overnight, unsubscribe rates had ticked up, open rates had dropped, and a warning banner from her ESP hinted at a problem she had always feared but never really prepared for: deliverability issues.
Her campaigns were still sending, but more and more messages were bouncing. Some addresses were invalid, some domains were complaining, and others were silently dropping messages. The worst part was that she had no clear way to see what was happening in real time, let alone understand why.
She knew one thing for sure: if she did not get a handle on SendGrid bounces quickly, her sender reputation and domain health could spiral out of control.
The Problem: Invisible Bounces, Invisible Risk
For months, Maya had treated bounces as an occasional annoyance. They lived in CSV exports, sporadic dashboards, and vague “bounce rate” charts. But now the consequences were real:
Invalid addresses and full inboxes were cluttering her lists.
Spam complaints and blocked messages were quietly damaging her IP reputation.
Domain issues were going unnoticed until too late.
Her team had no automated way to monitor SendGrid bounce events. Everything was manual. Someone would pull a report, skim it, maybe add a note in a spreadsheet, then move on to the next fire. There was no consistent logging, no context-aware analysis, and no reliable alerts.
She needed something different: a near real-time SendGrid bounce alert pipeline that did more than just collect data. It had to understand it.
The Discovery: An n8n Workflow Template Built For Bounces
While searching for “SendGrid bounce automation” and “n8n deliverability monitoring,” Maya stumbled on a template that sounded almost too good to be true: a SendGrid bounce alert workflow using n8n, Weaviate, embeddings, and a RAG agent.
The promise was simple but powerful. Instead of just logging bounces, this workflow would:
Ingest SendGrid Event Webhook data directly into n8n.
Break verbose diagnostic messages into chunks for embeddings.
Use OpenAI embeddings to create vector representations of bounce context.
Store everything in Weaviate for semantic search and retrieval.
Let a RAG (Retrieval-Augmented Generation) agent reason over that data.
Append structured results into Google Sheets.
Send Slack alerts if anything went wrong.
Instead of just knowing that a bounce happened, Maya could know why, see similar historical events, and get a recommended next action. It sounded like the workflow she wished she had built months ago.
So she decided to try it.
Setting The Stage: What Maya Needed Before She Started
Before she could turn this into a working SendGrid bounce alert system, Maya gathered the prerequisites:
An n8n instance, which her team already used for some internal automations.
A SendGrid account with the Event Webhook feature enabled.
An OpenAI API key for embeddings (or any equivalent embedding provider).
A running Weaviate instance to store vector data.
Access to Anthropic or another chat LLM to power the RAG agent.
A Google Sheets account for logging results.
A Slack workspace with a channel ready for alerts.
With the basics in place, she opened n8n and imported the template. That is when the real journey started.
Rising Action: Building The Bounce Intelligence Pipeline
1. Catching The First Signal: Webhook Trigger
Maya began at the entry point of the workflow: the Webhook Trigger node.
She configured SendGrid’s Event Webhook to send bounce events to a specific n8n URL, something like:
To avoid turning her endpoint into a public door for junk traffic, she followed best practices and secured it with IP allowlisting and a shared secret. Only authenticated SendGrid payloads would make it into the pipeline.
2. Making The Text Digestible: Text Splitter
She quickly realized that SendGrid’s diagnostic messages could be long and messy. To make them suitable for embeddings, the workflow used a Text Splitter node.
This node would break the combined diagnostic text into manageable chunks:
chunkSize: 400
chunkOverlap: 40
The idea was straightforward. Instead of embedding one giant blob of text, each chunk would capture a focused piece of context. That would produce more meaningful vectors later on.
3. Turning Text Into Vectors: Embeddings
Next came the Embeddings node. Maya configured it to use OpenAI’s text-embedding-3-small model, which struck a good balance between cost and semantic quality for her volume.
Each chunk from the Text Splitter was converted into a vector representation. She kept batch sizes conservative to stay within rate limits and avoid surprises on her OpenAI bill.
These vectors were not just numbers. They were the foundation of semantic search over her bounce history.
4. Giving Memory To The System: Weaviate Insert
With embeddings ready, the workflow moved to Weaviate Insert. Here, the vectors were stored in a Weaviate collection named:
sendgrid_bounce_alert
Alongside each vector, the workflow saved structured metadata, including:
messageId
timestamp
eventType (bounce, delivered, dropped)
recipient
diagnosticMessage
the original payload
By designing a consistent schema, Maya ensured she could run both semantic and filtered queries later. She could ask Weaviate for “bounces similar to this one” or “all bounces for this recipient in the last 24 hours.”
5. Retrieving Context On Demand: Weaviate Query As Vector Tool
Storing vectors was only half the story. The real power came when the workflow needed to look back at history.
The template included a Weaviate Query node, wrapped as a Vector Tool. This turned Weaviate into a tool the RAG agent could call whenever it needed context. For example, when a new bounce arrived, the agent could fetch:
Previous similar bounces.
Historical diagnostics for the same domain.
Patterns related to a specific ISP or error code.
Instead of making decisions in a vacuum, the agent could reason with real, historical data.
6. Keeping Short-Term Context: Window Memory
To tie everything together, the workflow used a Window Memory node. This provided a short history of recent interactions and agent outputs.
For Maya, this meant the RAG agent could remember what it had just seen or recommended. If multiple related events came in close together, the agent could correlate them and craft a better summary or next step.
7. The Brain Of The Operation: RAG Agent
At the center of the workflow was the RAG Agent, powered by a chat LLM such as Anthropic.
She configured its system prompt along the lines of:
You are an assistant for SendGrid Bounce Alert.
The agent had access to:
The Vector Tool for Weaviate queries.
Window Memory for recent context.
Given a new bounce event, the agent would:
Pull in relevant context from Weaviate.
Analyze the error and historical patterns.
Produce a human-readable status.
Recommend an action, such as:
Suppress the address.
Retry sending later.
Check DNS or domain configuration.
Generate a concise summary suitable for logging.
Maya was careful with prompt design and safety. She limited the agent to recommendations, not destructive actions. No automatic suppression or deletion would happen without explicit business rules layered on top.
8. Writing The Story Down: Append To Google Sheet
Once the RAG agent produced its output, the workflow passed everything to an Append Sheet node for Google Sheets.
Each row in the “Log” sheet contained:
Timestamp of the bounce.
Recipient and event type.
Diagnostic message.
Agent status and recommended action.
Any extra notes or context.
For the first time, Maya had a durable, searchable log of bounce events that was more than just raw errors. It was enriched with analysis.
9. When Things Go Wrong: Slack Alert On Error
Of course, no system is perfect. API outages, malformed payloads, or misconfigurations could still happen.
To avoid silent failures, the workflow used a Slack Alert node connected via On Error paths. If the RAG agent or any critical node failed, a message would land in her #alerts channel with details.
Instead of discovering issues days later, her team would know within minutes.
The Turning Point: Testing The Pipeline Under Fire
With everything wired up, Maya needed to prove that the workflow worked in practice.
Simulating Real Bounces
She used curl and Postman to send sample SendGrid webhook payloads to the n8n webhook URL. Each payload mimicked a realistic bounce, using structures like:
The workflow extracted the fields it needed, combined the human-readable reason with surrounding context, and passed that text to the Text Splitter. From there, the embeddings and Weaviate steps kicked in automatically.
Verifying Each Layer
She checked Weaviate to confirm that embeddings were created and indexed correctly in the sendgrid_bounce_alert collection.
She triggered a manual RAG agent prompt like: "Summarize the bounce and recommend next action."
She opened the Google Sheet and saw new rows appearing, each with a clear summary and recommendation.
She forced an error by temporarily breaking an API key, then watched as a Slack alert appeared in #alerts.
For the first time, she could see the entire lifecycle of a bounce event, from webhook to vector search to intelligent summary, all in one automated pipeline.
Design Choices That Saved Future Headaches
Securing Webhooks From Day One
Maya knew that an exposed webhook could be a liability. So she implemented:
HMAC verification or shared secrets to validate payloads.
IP filtering to only accept requests from SendGrid.
She treated the webhook as a production endpoint, not a quick hack.
Embedding Strategy That Balanced Cost And Quality
To keep costs predictable, she chose text-embedding-3-small and stuck to the chunking strategy:
Chunk sizes that stayed within token limits.
Overlaps that preserved context between chunks.
She also batched embedding requests where possible to minimize API calls.
Weaviate Schema That Enabled Hybrid Search
By storing both vectors and metadata, she could run hybrid queries. For example:
“All bounces for this recipient in the last 7 days.”
“Similar errors to this diagnostic message, but only for a specific ISP.”
Fields like messageId, recipient, eventType, timestamp, and diagnosticMessage made analytics and debugging much easier.
Safe Agent Behavior And Auditability
For the RAG agent, she:
Crafted a clear system prompt with a narrow scope.
Limited it to non-destructive recommendations by default.
Logged agent decisions in Google Sheets for future audits.
If the business later decided to auto-suppress certain addresses, they could layer business rules and confidence thresholds on top of the agent’s outputs, not hand it full control from day one.
Monitoring And Retries
To keep things stable over time, she added:
Retry logic for transient network or timeout errors.
Slack alerts for persistent issues.
The option to log errors in a separate sheet or monitoring dashboard.
This meant the workflow would be resilient even as APIs or traffic patterns changed.
Beyond The First Win: Extensions And Future Ideas
Once the workflow was running smoothly, Maya started thinking about how far she could take it. The template opened the door to several extensions:
Auto-suppress addresses based on agent confidence scores and explicit business rules.
Daily bounce summaries emailed to the deliverability or marketing ops team.
Enriching bounce data with ISP-level status from third-party APIs.
Dashboards in Grafana or Looker by exporting the Google Sheet or piping logs into a dedicated datastore.
She also looked at performance and cost optimization:
Batching embedding requests to reduce API calls.
Choosing lower-cost embedding models for high-volume scenarios.
Using TTL policies in Weaviate for ephemeral or low-value historical data.
Tracking usage and adding throttling if needed.
The workflow had started as a crisis response. It was quickly becoming a core part of her deliverability strategy.
The Resolution: From Panic To Predictable Deliverability
Weeks later, Maya’s inbox looked different. Instead of vague warnings and surprise deliverability drops, she had:
A production-ready SendGrid bounce alert system built on n8n.
Near real-time visibility into bounce events.
A semantic index in Weaviate that let her search and compare diagnostic messages.
A RAG agent that summarized issues and suggested clear next steps.
A Google Sheet log that made audits and reporting straightforward.
Slack alerts that surfaced problems before they became crises.
The core message was simple: by combining n8n automation, vector search with Weaviate, LLM-powered
Inventory Restock Forecast with n8n & Vector Store
Automating inventory restock decisions helps you avoid stockouts, reduce excess stock, and keep fulfillment running smoothly. This guide walks you through an n8n workflow template called “Inventory Restock Forecast” and explains, step by step, how it works and how to deploy it.
You will learn how the workflow:
Receives inventory data through a webhook
Splits and embeds text into vectors
Stores and queries vectors in a Supabase vector store
Uses an Anthropic-powered agent to make restock recommendations
Logs every recommendation into Google Sheets for review
Learning goals
By the end of this tutorial you should be able to:
Understand the high-level architecture of the Inventory Restock Forecast n8n template
Configure all required credentials and services (Cohere, Supabase, Anthropic, Google Sheets)
Customize text splitting, embeddings, and vector queries for your inventory data
Explain how the agent uses vector search results to produce restock recommendations
Adapt and troubleshoot the workflow for different business contexts such as ecommerce, wholesale, or retail chains
Concept overview: What this n8n workflow does
This n8n automation combines embeddings, a vector store, and an LLM agent to generate context-aware restock suggestions. It is designed to work with unstructured or semi-structured inventory data such as product descriptions, historical sales notes, and vendor details.
Why use this workflow?
The Inventory Restock Forecast template is useful if you want to:
Make faster and more consistent restock decisions based on historical context and product signals
Search large unstructured inventory documents using vector similarity instead of simple keyword search
Maintain an automated log and audit trail in Google Sheets for reporting and human review
Have an extensible foundation where you can swap models, adjust chunk sizes, and add your own business rules
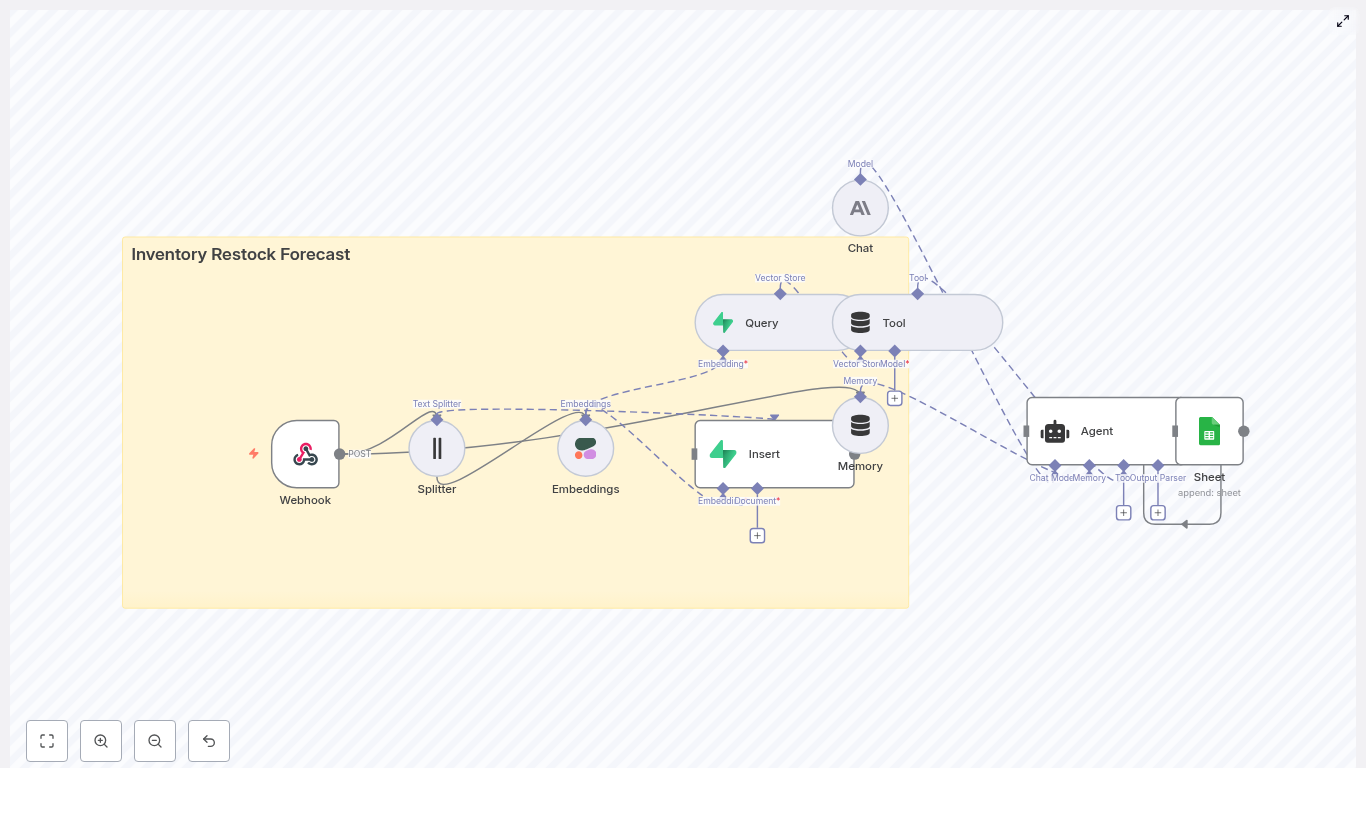
High-level architecture of the template
At a high level, the workflow moves through these stages:
Webhook – Receives incoming inventory updates or historical documents via HTTP POST.
Text Splitter – Breaks long text into smaller chunks using configurable chunkSize and chunkOverlap values.
Embeddings – Sends these chunks to Cohere (or another provider) to generate vector embeddings.
Supabase Insert – Stores the embedding vectors in a Supabase index called inventory_restock_forecast.
Vector Query & Tool – Performs similarity search to retrieve the most relevant context for each query.
Memory – Maintains a short conversation buffer so the agent can remember recent context.
Chat (LM) & Agent – Uses Anthropic to reason about the data, call the vector tool when needed, and generate recommendations.
Google Sheets – Writes the final recommendation and metadata into a sheet as a log entry.
Next, we will walk through how to deploy and configure this template in n8n, then look in more detail at how the agent makes its decisions.
Step-by-step: Deploying the Inventory Restock Forecast template
Step 1 – Import the template into n8n
Open your n8n instance and go to the Workflows section.
Use the Import option to upload the provided JSON template file.
After import, visually inspect the workflow:
Confirm all nodes are present (Webhook, Splitter, Embeddings, Supabase, Agent, Google Sheets, etc.).
Check that connections between nodes match the intended data flow.
Step 2 – Configure required credentials
The template relies on several external services. In n8n, open each node that uses external APIs and attach or create the correct credentials.
Cohere (Embeddings)
Provide your Cohere API key in the credentials section.
Ensure the embeddings node is set to use these credentials.
Supabase (Vector Store)
Enter your Supabase URL and service key.
Confirm that the pgvector extension is enabled in your Supabase database.
Make sure the table and index for inventory_restock_forecast exist and are configured for vector similarity queries.
Anthropic (Agent & Chat)
Add your Anthropic API credentials.
Attach them to the Chat/Agent node that generates recommendations.
Google Sheets (Logging)
Set up OAuth2 credentials for Google Sheets.
Create or specify a sheet (for example, a sheet named Log).
In the Google Sheets node, point the workflow to this sheet or adjust the node settings to match your preferred sheet name.
Step 3 – Tune text splitting and embeddings
Before sending real data, it is important to understand how text splitting and embeddings work in this template.
Text splitter configuration
The template uses the following default values:
chunkSize = 400
chunkOverlap = 40
These values are a good starting point for product descriptions and purchase histories. You can adjust them based on your documents:
For longer documents, consider a smaller chunkSize or a higher chunkOverlap to capture more context around each sentence.
For short, focused descriptions, you can often keep the defaults or even reduce overlap to speed up processing.
Choosing an embeddings provider
The template is configured to use Cohere for embeddings, which balances latency and accuracy for many inventory use cases.
You can switch to other providers if needed:
OpenAI
Hugging Face
Other embeddings APIs supported by n8n
To change providers, update the Embeddings node configuration and attach the appropriate credentials.
Step 4 – Create and test the webhook
The workflow begins with a Webhook node that listens for POST requests. In the template, this is typically configured with a path such as:
/inventory_restock_forecast
Send a test POST request with a JSON payload that includes product details and recent activity. For example:
{  "product_id": "SKU-12345",  "description": "Red cotton t-shirts - monthly sales history and reorder points...",  "last_30d_sales": 150
}
After sending the request:
Check that the Splitter node receives the payload and creates chunks.
Verify that the Embeddings node processes each chunk without errors.
Open your Supabase dashboard to confirm that vectors are inserted into the inventory_restock_forecast table.
Once this basic data flow is working, you are ready to explore how the agent uses these vectors to make restock decisions.
How the n8n agent generates restock recommendations
From vector search to decision
When you trigger a restock query, the workflow performs the following logical steps:
Vector similarity search
The Query node calls the Supabase vector index inventory_restock_forecast.
It retrieves the most relevant vectors based on the incoming product data, such as sales history, notes, or vendor lead times.
Context assembly
The retrieved chunks are combined into a context package for the agent.
This context may include past sales, reorder patterns, supplier performance, and other product signals.
Agent reasoning with Anthropic
The Anthropic-powered agent receives:
New input data (current stock, recent sales velocity, etc.)
Retrieved context from the vector store
Business rules defined in the prompt
Using this information, the agent calculates:
A recommended order quantity
A priority level (for example, urgent vs normal restock)
A textual rationale explaining the decision
Memory buffer
A short-term memory node keeps track of recent interactions.
This allows the agent to maintain continuity, especially if you query multiple related products in sequence.
Designing the agent prompt
The quality of recommendations depends heavily on the prompt attached to the Agent node. A clear prompt should define:
Inputs available to the agent
Current stock level
Sales in the last 30 days or another relevant period
Vendor lead times and variability
Any notes or constraints stored in the vector database
Business rules to apply
Examples of rules you might include in the prompt:
Maintain at least 14 days of safety stock.
Respect minimum order quantities (for example, at least 50 units per order).
Take into account supplier lead time and known delays.
Output format for easier downstream use
To make the output machine readable and easy to log, define a structured format such as JSON. For example, instruct the agent to return:
product_id
recommended_qty
priority (for example, “high”, “medium”, “low”)
rationale explaining the reasoning in plain language
By standardizing this format, you make it easier to integrate the recommendations with other systems such as ERP or purchasing tools.
Logging recommendations in Google Sheets
After the agent produces a recommendation, the workflow sends the result to a Google Sheets node. This creates a running log of all restock decisions.
What gets logged
Each row in the sheet (for example, in a sheet named Log) can include:
Timestamp of the recommendation
Product ID
Recommended order quantity
Priority level and rationale
A context snippet or reference to the vectors/IDs used
This log acts as an audit trail. Buyers and managers can:
Review past recommendations
Compare them with actual purchase decisions and outcomes
Export the data into procurement or BI systems for analysis
Best practices for scaling and reliability
As you move from testing to production, consider the following best practices.
Indexing strategy in Supabase
Use product-level metadata such as product_id, category, and vendor to tag your vectors.
Filter queries by these tags when possible to narrow the search space and improve performance.
Data housekeeping
Re-embed documents after significant changes such as updated pricing, changed lead times, or revised product descriptions.
Remove or archive outdated vectors that no longer reflect current business reality.
Handling rate limits and throughput
Batch incoming webhook submissions if you expect high volume.
Use n8n concurrency and rate limit controls on the Embeddings and Agent nodes to avoid provider throttling.
Security considerations
Protect your webhook with authentication or IP allowlists if possible.
Use service keys for Supabase and never expose them in public workflows.
Store API keys and secrets only in n8n credentials, not in plain text fields.
Monitoring and error handling
Add error handling branches to catch failures in:
Embeddings generation
Supabase inserts
Agent responses
Send alerts to a notification channel such as Slack or email when errors occur.
Adapting the workflow to different business types
The core template is generic, but small adjustments can make it more effective for specific industries.
Ecommerce stores
For ecommerce, consider:
Integrating detailed order history and SKU-level unit economics.
Using shorter chunk sizes to capture line-item details and recent customer reviews or comments.
Emphasizing seasonality and promotions in your agent prompt.
Wholesale and B2B suppliers
For wholesale or B2B operations, it is often important to:
Incorporate minimum order quantities and vendor-specific lead time variability.
Store supply contracts and terms as vectors so the agent can reference them.
Include large account commitments and contract dates in the context.
Retail chains and multi-location businesses
Retail chains may want to:
Include location-level sales velocity and stock levels.
Model stock transfers between locations as an alternative to new purchase orders.
Use the memory buffer to keep track of recent interactions for each location-product combination.
How to Build a Car Insurance Quote Generator with n8n and Vector AI
This guide describes a production-ready n8n workflow template for generating personalized car insurance quotes. It uses n8n as the orchestration layer and integrates LangChain-style components, Hugging Face embeddings, Pinecone as a vector database, Anthropic for conversational quote generation, and Google Sheets for logging and analytics.
1. Solution Overview
The workflow implements an automated car insurance quote generator that:
Receives quote requests through a public webhook endpoint.
Transforms and embeds relevant text into vector representations.
Persists and retrieves contextual knowledge from Pinecone.
Exposes the vector store to an LLM-driven Agent as a queryable tool.
Maintains short-term conversation context using memory.
Uses Anthropic as the chat model to generate natural language quotes.
Logs each quote attempt to Google Sheets for audit and analysis.
The result is a scalable, explainable quote generator that can be integrated into websites, CRMs, or internal tools with minimal code.
2. Target Use Case & Benefits
2.1 Why automate car insurance quotes?
Customers expect rapid, tailored responses when requesting insurance quotes. Manual handling of these requests is slow and error-prone. This n8n-based workflow automates:
Initial lead qualification and quote generation.
Context-aware policy recommendations using prior data.
Structured logging for compliance and performance tracking.
2.2 Key benefits
Scalable knowledge storage using Pinecone vector search for product and policy data.
Context-aware responses via embeddings, retrieval, and short-term memory.
Low-code orchestration with n8n for configuration, monitoring, and iteration.
Traceable audit logs in Google Sheets for compliance, QA, and reporting.
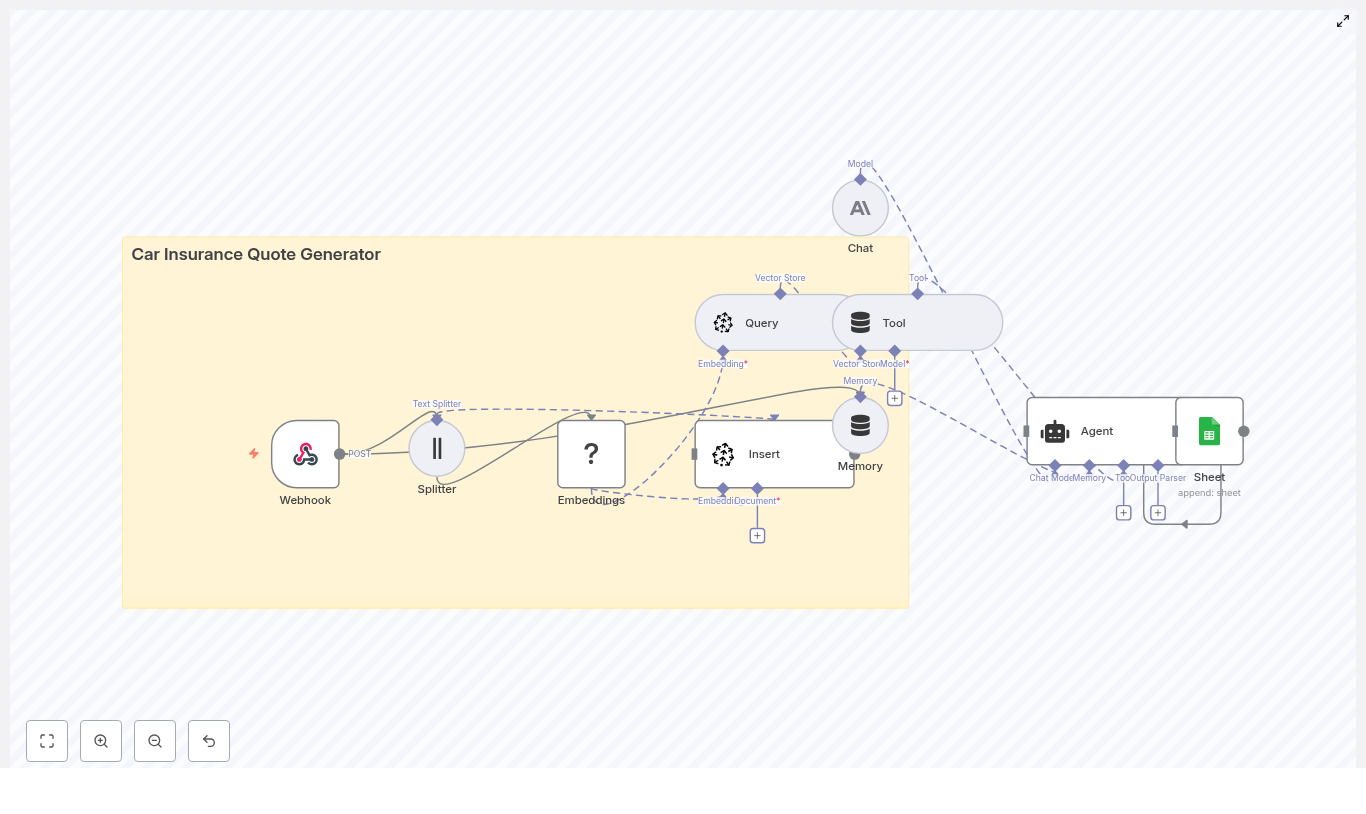
3. High-Level Architecture
The architecture is implemented as a single n8n workflow composed of the following logical components:
Inbound interface: Webhook node (HTTP POST) for quote requests.
Preprocessing: Text Splitter for chunking long text.
Vectorization: Hugging Face embeddings node.
Persistence: Pinecone Insert node to store vectors.
Retrieval: Pinecone Query node for semantic search.
Tool abstraction: Tool node exposing retrieval as an Agent tool.
Conversation state: Memory buffer node for short-term context.
LLM engine: Anthropic Chat node for natural language generation.
Orchestration logic: Agent node that coordinates tools, memory, and chat.
Logging: Google Sheets node to append structured quote records.
Data flows from the webhook through preprocessing, embedding, and retrieval, then into the Agent and LLM, and finally into a Sheets log. Pinecone is used both as a knowledge store and as a source of grounding context for the LLM.
4. Node-by-Node Breakdown
4.1 Webhook Node – Entry Point
Role: Accepts incoming quote requests and triggers the workflow.
Typical configuration:
HTTP Method: POST
Path: e.g. /car_insurance_quote_generator
Response mode: Synchronous response with the generated quote or an acknowledgment, depending on your design.
The Webhook node parses the JSON body and makes it available to subsequent nodes as {{$json}}. You can map specific fields (such as vehicle or notes) into later nodes for embedding and retrieval.
4.2 Text Splitter Node – Chunking Input
Role: Split long or composite text into manageable chunks before embedding.
This node is most relevant if your workflow processes:
Long free-form notes in the request.
Attached policy documents or FAQs.
Historical quote narratives you want to index.
Typical parameters:
Chunk size: e.g. 400 characters or tokens.
Chunk overlap: e.g. 40 to preserve context across boundaries.
Chunking helps maintain semantic coherence in embeddings while keeping vector store operations efficient. If the incoming text is already short, you can bypass or conditionally skip this node.
4.3 Hugging Face Embeddings Node – Vectorization
Role: Convert text chunks into vector embeddings suitable for semantic search.
Key configuration points:
Model selection: Use a sentence or document embedding model optimized for semantic similarity. Set the model name in:
Environment variables, or
n8n credentials / configuration to avoid hardcoding.
Input field: Map the chunked text field (output of Text Splitter) into the embeddings node.
Each input item becomes an embedding vector. These vectors, along with any metadata, are passed to the Pinecone Insert node.
4.4 Pinecone Insert Node – Persisting Vectors
Role: Store embeddings and metadata in a Pinecone index.
Typical configuration:
Index name: e.g. car_insurance_quote_generator.
Namespace: Optional, for separating environments or product lines.
Vector payload: Embedding array from the Hugging Face node.
The query node returns a list of matches with vectors, scores, and metadata. These results are later exposed to the LLM as a tool output.
4.6 Tool Node – Exposing Vector Search to the Agent
Role: Wrap the Pinecone retrieval as a callable tool for the Agent.
In an Agent-style architecture, tools represent external capabilities that the LLM can invoke. Here, the Tool node:
Takes the Pinecone Query output.
Defines a tool interface that the Agent can call when it needs to “look up” relevant policies or prior quotes.
Returns structured results that the Agent can reference when constructing the final quote.
This design ensures that the LLM is grounded in actual retrieved data rather than relying solely on its internal training.
4.7 Memory Node – Short-Term Conversation Context
Role: Maintain recent interaction history to support multi-turn conversations.
The Memory node stores:
Previous user messages (follow-up questions, clarifications).
Key decisions or selected coverage options.
Typical configuration uses a buffer that keeps the last N messages or a limited token budget. The Agent reads from and writes to this memory so that:
Coverage choices remain consistent across turns.
Additional drivers or vehicles added in follow-up messages are respected.
If you only support single-turn interactions, memory can be minimal, but retaining at least a short buffer is useful for user corrections and clarifications.
4.8 Anthropic Chat Node – Natural Language Generation
Role: Provide the LLM that generates the quote text and explanations.
Core configuration parameters:
Model: Anthropic chat model of your choice.
System / role prompt: Instructions that define:
Voice and tone (professional, clear, compliant).
Required fields in the quote.
Constraints on what the model should and should not say.
Temperature: Controls variability. Lower for more deterministic pricing explanations.
Max tokens / response length: To avoid overly long outputs.
The Agent directs the Anthropic node to:
Generate a structured quote.
Provide a human-readable explanation of coverage, deductibles, and exclusions.
List next steps for the customer or agent.
4.9 Agent Node – Orchestrating Tools, Memory, and Chat
Role: Coordinate the LLM, tools, and memory to produce the final quote.
The Agent node acts as the “brain” of the workflow. It:
Receives the user request and any prior conversation context from memory.
Decides when to call the vector search tool to retrieve relevant information.
Combines:
Webhook request data,
Retrieved Pinecone documents,
Memory state,
and passes them to the Anthropic Chat node.
Produces both:
A structured machine-readable quote (JSON-like structure).
A human-friendly summary for display or email.
Prompts and tool descriptions should clearly instruct the Agent to ground its responses in retrieved evidence and avoid fabricating policy details.
4.10 Google Sheets Node – Logging and Analytics
Role: Persist a log of each quote attempt for auditing and analysis.
Typical configuration:
Operation: Append row.
Spreadsheet: Dedicated sheet for car insurance quotes.
Mapped columns (examples):
timestamp
requestId or webhook execution ID
customerName
vehicle (stringified make/model/year)
recommendedPlan
priceEstimate
followUpRequired (boolean or text)
This logging layer supports compliance, performance review, A/B testing of prompts, and manual override workflows.
5. Configuration Notes & Credentials
5.1 Credentials
Webhook: No external credentials, but you should secure it (see security section).
Hugging Face: API token configured in n8n credentials or environment variables.
Pinecone: API key and environment configured in n8n credentials.
Anthropic: API key stored securely in n8n credentials.
Google Sheets: OAuth or service account credentials configured in n8n.
5.2 Handling large payloads
Enable chunking only when needed to reduce unnecessary embedding calls.
Consider truncating or summarizing extremely long notes before embedding.
5.3 Error handling patterns
Configure retry behavior or error workflows for:
Transient Pinecone failures.
LLM timeouts or rate limits.
Google Sheets API errors.
Return a fallback response from the Webhook when critical dependencies fail, such as:
A generic message that the quote could not be generated automatically.
Instructions for manual follow-up.
6. Security, Privacy, and Compliance
Because the workflow processes personal and potentially sensitive information, security and data protection are essential.
Webhook security:
Protect the endpoint with an API key, IP allowlist, or OAuth-based authentication.
Ensure HTTPS is enforced for all requests.
Data encryption:
Use TLS for data in transit.
Rely on provider-level encryption at rest for Pinecone and Google Sheets.
Data minimization:
Avoid storing unnecessary PII in the vector store.
Prefer anonymized identifiers and high-level metadata in Pinecone.
Retention policies:
Define how long logs and memory buffers are stored.
Implement deletion or anonymization policies to comply with regulations.
7. Testing, Tuning, and Edge Cases
7.1 Initial dataset and tuning
Start with a small but representative dataset of quotes and policies.
Experiment with:
Different embedding models.
Chunk sizes and overlaps.
Pinecone index configuration.
7.2 Retrieval quality
Use Pinecone filters to constrain results by:
Policy type (e.g. “liability”, “comprehensive”).
State or jurisdiction.
Product line or segment.
Review retrieved documents to ensure they are relevant and properly grounded.
Ever finished a blog post, felt proud, hit publish… then spent 15 minutes staring at the “Tags” box wondering if “productivity”, “productivity-tips”, or “productivity-hacks” is the “right” one?
If you run a busy WordPress site, manual tagging quickly turns into a full-time hobby you did not sign up for. It is tedious, inconsistent, and suspiciously good at breaking your SEO and site navigation when you are not looking.
That is where this n8n workflow template comes in. It quietly watches for new content, sends it to OpenAI for smart tag suggestions, syncs everything with your WordPress tags via the REST API, and updates your posts – all without you lifting a finger.
In this guide, you will see what the workflow does, how it works behind the scenes, how to set it up, and a few tips so your tags stay clean, consistent, and delightfully automatic.
Tags are not just decoration. Good tagging quietly powers:
Better content discovery and recommendations
Stronger internal linking and topic clusters
Healthier long-term SEO and site structure
The problem: doing this by hand is boring, slow, and inconsistent. Different editors use different spellings, formats, and naming ideas, so your taxonomy slowly turns into a junk drawer of almost-duplicate tags.
Automating tagging with n8n and AI solves that by:
Saving time on every single post
Enforcing consistent tag formats and rules
Reducing human error and duplicate tags
Using AI to suggest contextual tags that reflect the real themes of your article, not just random keywords
In short, you get cleaner tags, better navigation, and fewer “why are there 11 versions of this tag” conversations.
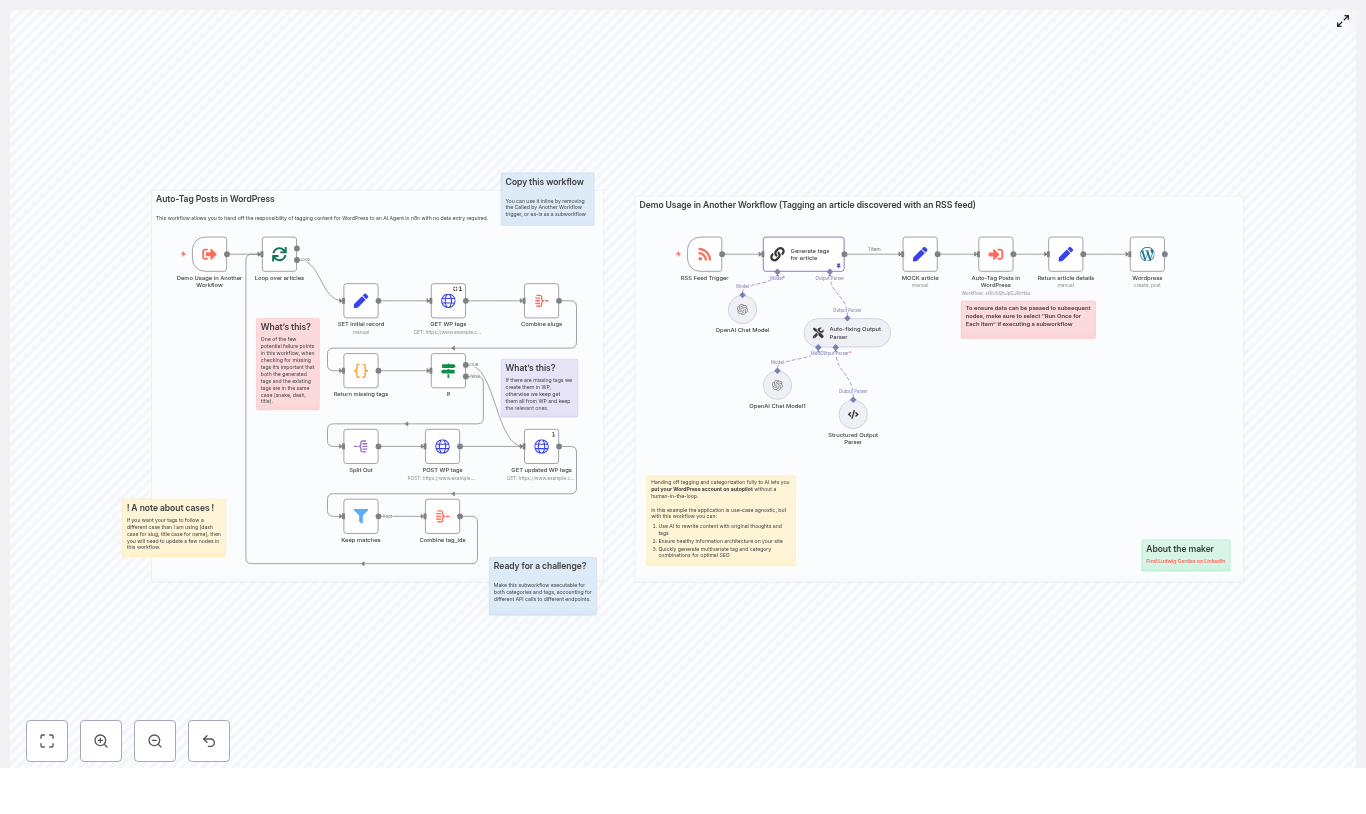
What this n8n workflow template actually does
This workflow is a ready-to-use automation that connects an RSS feed, OpenAI, and your WordPress site. Here is the high-level flow:
It detects new content via an RSS Feed Trigger (or another trigger you choose).
It sends the article content to an OpenAI model and asks for 3-5 relevant tags.
It parses and normalizes those tags (for example, title case names and dash-case slugs).
It calls the WordPress REST API to fetch your existing tags.
It creates any missing tags in WordPress when needed.
It collects the correct tag IDs and updates or publishes the WordPress post with those tags attached.
Result: posts get consistent, AI-generated tags with zero manual typing, clicking, or second-guessing.
Meet the key n8n nodes (behind-the-scenes magic)
RSS Feed Trigger – your content watcher
The workflow starts with an RSS Feed Trigger that looks for new posts or articles in your feed. When something new appears, the workflow wakes up and gets to work.
If your content does not come from RSS, you can easily swap this out for:
a Webhook trigger
a Schedule trigger
a Manual trigger while testing
OpenAI node – the tag idea machine
Next, an OpenAI node (using a Chain LLM or Chat model) reads the article content and suggests 3-5 tags.
The prompt in the template is crafted to:
Return tags in a consistent format (for example, title case for display names)
Provide slugs in dash-case so they are easy to compare and store
This consistent formatting is important so that later steps can reliably compare suggested tags with existing WordPress tags.
Structured & auto-fixing output parsers – your JSON bodyguards
AI models occasionally get creative with formatting, which is charming for poetry and terrible for workflows.
To prevent that, the template uses:
Structured Output Parser to turn the model response into a clean JSON array of tags
Auto-fixing Output Parser to repair malformed outputs and keep the workflow stable
End result: you always get predictable, machine-friendly tag data instead of mystery strings.
GET WordPress tags and comparison logic – “do we already have this?”
Once the AI has suggested tags, the workflow calls the WordPress REST API to fetch your existing tags.
It then:
Normalizes slugs (for example, lowercase and dash-separated)
Compares the normalized AI suggestions to your current tags
Identifies which tags already exist and which ones are missing
This comparison step is what prevents your tag list from turning into a collection of nearly identical duplicates.
POST WordPress tags – creating missing tags
For tags that do not exist yet, the workflow uses the WordPress tags endpoint to create them.
After creating new tags, the workflow:
Calls the WP tags endpoint again
Retrieves the updated list with accurate tag IDs
Those IDs are required when you attach tags to a post, so getting them right is crucial.
Combine tag IDs and publish – the final handoff
Finally, the workflow:
Combines the IDs of both existing and newly created tags
Passes that list to the WordPress node
Publishes or updates the post with the correct tag IDs attached
By the time this step finishes, your post is live with smart, consistent tags and you did not have to scroll through a tag list once.
How to set up the workflow (simplified guide)
Ready to retire from manual tagging? Here is how to get the template running in your n8n instance.
Clone the n8n workflow template Import the provided template into your n8n instance. It already includes:
Nodes wired up for OpenAI
Nodes configured for WordPress REST API calls
Parsing and comparison logic ready to go
Configure your credentials In n8n, add:
Your OpenAI API key
Your WordPress credentials (application password or OAuth)
Make sure the WordPress user has permission to:
Read and create tags
Publish or update posts
Adjust the trigger for your content source By default, the workflow uses an RSS Feed Trigger. Point it to your own feed URL, or:
Swap in a webhook trigger if content comes from another system
Use a schedule trigger to run checks periodically
Use a manual trigger while experimenting
Set your tag naming rules The template is designed with:
Title case for display names
Dash-case (kebab-case) for slugs
If you prefer snake_case, camelCase, or another style, adjust:
The OpenAI prompt
Any transformation nodes that handle casing or slug creation
Important: keep slug and name transformations consistent across all relevant nodes so comparisons work correctly.
Test with a few posts Before you let it run on everything:
Run the workflow in test mode
Check which tags were created in WordPress
Inspect slugs and tag names
Verify that the correct tag IDs show up on the post
Once you are happy with the results, you can safely let it handle your regular publishing flow.
Best practices for clean, useful tags
To keep your tag system from drifting back into chaos, these practices help a lot:
Normalize your casing and slug rules For example:
Display: Productivity Tips (title case)
Slug: productivity-tips (dash-case)
This makes tag comparisons deterministic and easier to maintain.
Limit the number of tags per post Aim for about 3-7 tags per article. Too many tags dilute relevance and clutter your taxonomy.
Respect API limits Both WordPress and OpenAI can throttle you if you send too many requests at once. Use:
n8n wait nodes
n8n retry logic
to keep calls rate-limited and stable.
Use OpenAI output parsers for strict JSON Configure the output to look like:
{ "tags": ["Tag One", "Tag Two"] }
This improves reliability and makes debugging far easier.
Only create tags when truly needed Let the workflow check existing slugs first. Only run the create-tag step for missing tags to avoid duplicates and clutter.
Troubleshooting common issues
1. Tags are not matching due to case or punctuation
Symptom: You see duplicates like Productivity-Tips and productivity-tips.
Fix: Apply a consistent slug normalization function before comparisons, for example:
Convert to lowercase
Replace spaces with dashes
Strip extra punctuation where appropriate
2. OpenAI returns unexpected output format
Symptom: The model returns plain text, bullet points, or anything that is not valid JSON.
Fix:
Use the Structured Output Parser node
Add the Auto-fixing Output Parser node as a safety net
Update your prompt to explicitly say: “Respond only in valid JSON with this structure…”
3. WordPress permission errors
Symptom: Requests to create tags or update posts fail with permission-related errors.
Fix:
Double-check your WordPress credentials in n8n
Ensure the API user has edit_terms and publish_posts capabilities or equivalent
If using application passwords, confirm they are configured for REST access
4. Duplicate tags keep appearing
Symptom: You end up with multiple tags that look almost identical, often differing only by case or punctuation.
Fix:
Before creating a tag, compare normalized slugs against the full WordPress tag list
If duplication persists, add a final dedupe step that checks both tag names and slugs before saving
Ideas for extending the workflow
Once you are happily auto-tagging posts, you can extend the same pattern to other parts of your content strategy.
AI-generated categories Duplicate the tagging subflow and point it at the WordPress categories endpoint. Adjust logic for any differences in how categories behave vs tags.
AI-assisted tag descriptions Use the same OpenAI model to generate:
Short tag descriptions
SEO-friendly metadata for tag archive pages
Human-in-the-loop review For high-value content, insert a manual approval step so editors can:
Approve or tweak suggested tags
Reject irrelevant suggestions
Multi-site or multisite tagging Adapt the REST calls to target:
Multiple standalone WordPress sites
Multisite installations with different endpoints
Security and governance tips
Automation is great, but you still want to keep your keys and site safe.
Store credentials in n8n Put your OpenAI and WordPress credentials in n8n’s secure credentials store. Avoid hard-coding keys directly into nodes.
Limit WordPress API permissions Give the API user only what it needs, typically:
Tag and term-related capabilities
Post publishing or editing capabilities
Log actions for auditing Keep a record of:
Which tags were created automatically
Which posts were updated
This helps if automatic tag creation affects your information architecture and you need a changelog.
Real-world impact of automated tagging
Teams that adopt this kind of workflow usually notice results quickly:
Publishing cycles get faster because no one is stuck in tag purgatory
There are fewer tag collisions and near-duplicates
Content becomes easier to discover and navigate
Large sites, like newsrooms or learning platforms, remove a major manual bottleneck
In practice, you get a cleaner taxonomy, better SEO, and happier editors who can focus on writing instead of formatting slugs.
Try the template and retire manual tagging
If you are ready to put your WordPress tagging on autopilot, the next steps are simple:
Import the n8n template into your instance
Add your OpenAI and WordPress credentials
Point the trigger at your content source
Run a few tests and tweak casing rules to your taste
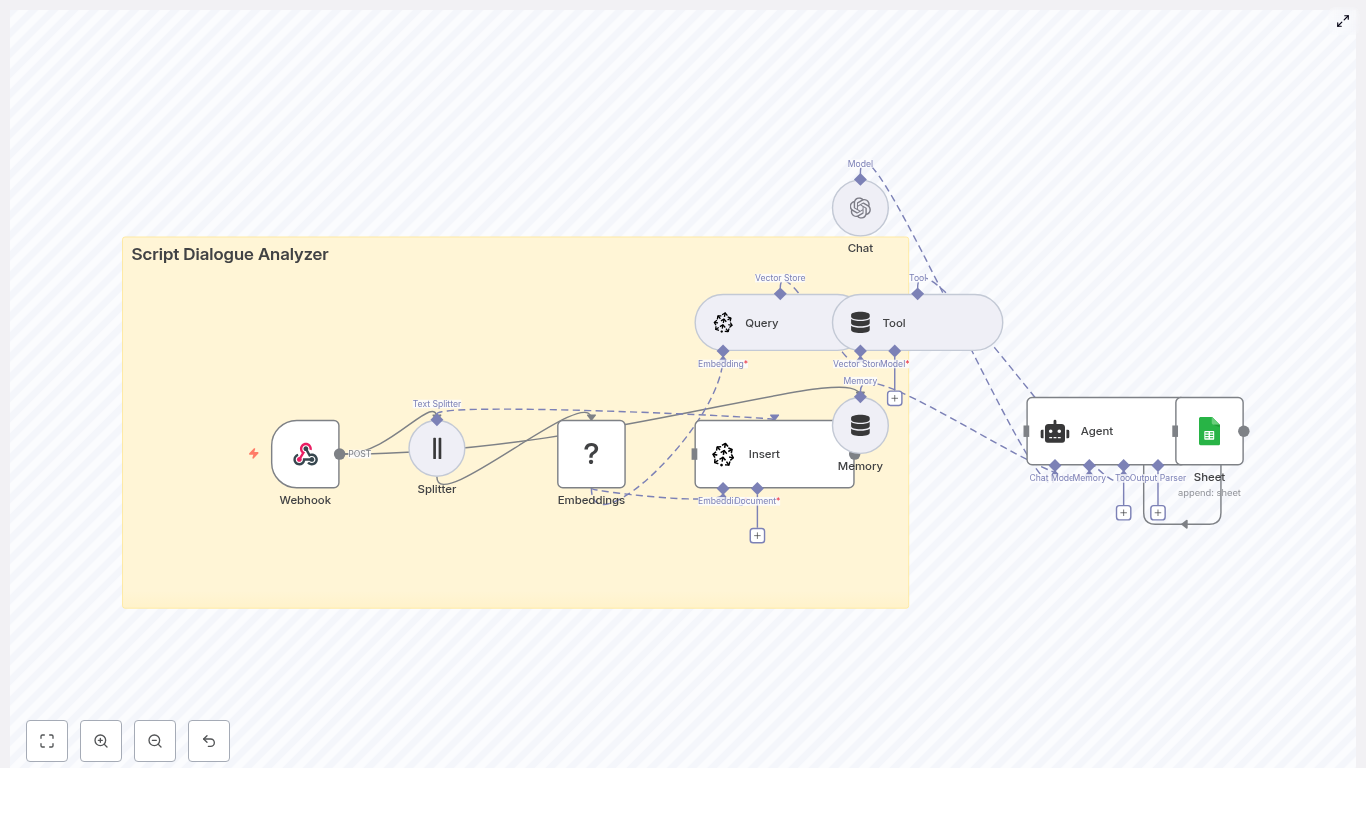
Script Dialogue Analyzer with n8n, LangChain, Pinecone, Hugging Face & OpenAI
This guide describes how to implement a production-style Script Dialogue Analyzer in n8n using LangChain, Pinecone, Hugging Face embeddings, and OpenAI. The workflow ingests screenplay text via a webhook, chunks and embeds dialogue, persists vectors in Pinecone, and exposes a LangChain Agent that retrieves relevant passages and generates analytical responses. Final outputs are logged to Google Sheets for traceability.
1. Solution Overview
The Script Dialogue Analyzer is designed for users who need structured, repeatable analysis of screenplay dialogue, such as:
Screenwriters and story editors
Localization and dubbing teams
Script consultants and analysts
AI and NLP researchers working with dialogue corpora
By combining text splitting, vector embeddings, and a vector database with a large language model (LLM) agent, you can submit a script or scene and then ask natural-language questions such as:
“List the primary traits of ALEX based on Scene 1 dialogue.”
“Show lines that indicate tension between ALEX and JORDAN.”
“Find repeated motifs or phrases across the first three scenes.”
“Extract all expository lines that reveal backstory.”
The workflow performs retrieval-augmented generation (RAG) on top of your script: it searches Pinecone for relevant dialogue chunks, then lets the LLM synthesize structured, context-aware answers.
2. High-Level Architecture
The n8n workflow is organized as an end-to-end pipeline:
Text Splitter – Character-based splitter with overlap to maintain context across chunks.
Embeddings (Hugging Face) – Generates vector representations of each chunk.
Pinecone Insert – Stores vectors and associated metadata in the script_dialogue_analyzer index.
Pinecone Query + LangChain Tool – Exposes semantic search as a tool callable by the Agent.
Conversation Memory – Buffer window that preserves recent exchanges for multi-turn analysis.
Chat LLM + LangChain Agent (OpenAI) – Orchestrates tool calls and composes final responses.
Google Sheets – Persists queries, context, and answers for auditing and later review.
The following sections document the workflow in a reference-style format, focusing on node configuration, data flow, and integration details.
3. Data Flow & Execution Lifecycle
Ingestion: A client sends a POST request to the n8n Webhook with screenplay or dialogue JSON.
Preprocessing: The workflow normalizes and concatenates dialogue text, then passes it to the text splitter.
Chunking: The splitter generates overlapping character-based chunks optimized for embeddings and retrieval.
Embedding: Each chunk is sent to Hugging Face for embedding generation.
Indexing: The resulting vectors, along with metadata (for example script title, character, scene), are inserted into Pinecone.
Query Phase: When a user query arrives, the Agent uses the Pinecone Query node as a LangChain tool to retrieve relevant chunks.
Reasoning: The OpenAI-backed Agent uses retrieval results plus memory to generate an analytical response.
Logging: The workflow appends a record to Google Sheets containing the query, retrieved context, answer, and metadata.
4. Node-by-Node Reference
4.1 Webhook Node
Purpose: Entry point for incoming scripts or dialogue payloads.
Method:POST
Content-Type:application/json
Example payload:
{  "title": "Scene 1",  "dialogue": [  { "character": "ALEX", "line": "Where did you go?" },  { "character": "JORDAN", "line": "I had to leave. It wasn't safe." }  ]
}
Expected structure:
title (string) – A label for the scene or script segment.
dialogue (array) – Each item should include:
character (string) – Speaker identifier.
line (string) – Spoken line of dialogue.
Configuration notes:
Set the Webhook node to respond only to POST to avoid accidental GET triggers.
Validate the JSON shape downstream or in pre-processing logic if your real payloads vary.
Ensure the node outputs are routed directly into the text splitting stage.
Edge cases:
If dialogue is empty or missing, the workflow will have nothing to embed or index. In such cases, you may want to add a guard node (for example IF) to exit early or return an error response.
Non-UTF-8 or malformed JSON should be handled at the client or reverse proxy level, as the template expects valid JSON.
4.2 Text Splitter Node
Purpose: Chunk long scenes or scripts into manageable segments without losing conversational context.
Splitter type: Character-based text splitter
Recommended configuration (from the template):
chunkSize: 400
chunkOverlap: 40
Behavior:
The node concatenates dialogue lines into a single text block or processes them as configured, then slices them into overlapping character spans.
The 40-character overlap helps preserve context at chunk boundaries so that semantically related lines are present in multiple chunks.
Configuration notes:
Ensure the input field used for splitting contains plain text, not nested JSON objects.
Consider pre-formatting lines as "CHARACTER: line" before splitting to preserve speaker attribution inside each chunk.
Trade-offs:
Smaller chunkSize improves retrieval precision but may fragment dialogue sequences.
Larger chunkSize preserves more context but can dilute the semantic specificity of embeddings.
4.3 Hugging Face Embeddings Node
Purpose: Convert each text chunk into a vector embedding suitable for semantic search.
Model placeholder:model: default (in the template)
Recommended model examples:
sentence-transformers/all-MiniLM-L6-v2
Any other Hugging Face sentence embedding model suitable for dialogue semantics
Credentials:
Configure a Hugging Face API key in n8n credentials and select it in the node.
Configuration notes:
Map the node input to the chunk text field produced by the splitter.
Ensure the node returns embeddings as arrays of floats that can be consumed by the Pinecone Insert node.
Batching is recommended when embedding large scripts to respect rate limits and reduce overhead, where supported by your n8n version and node configuration.
Potential issues:
If embeddings are null or the node throws an error, verify the model name and API key.
Large payloads may trigger rate limits. In this case, introduce throttling or chunk your workflow execution.
4.4 Pinecone Insert Node
Purpose: Persist embeddings and metadata into a Pinecone vector index for later retrieval.
Index name:script_dialogue_analyzer
Mode:insert
Credentials:
Pinecone API key
Pinecone environment (for example us-west1-gcp, depending on your account)
Configuration notes:
Generate a unique ID per chunk (for example a combination of script title, scene number, and chunk index) to avoid collisions.
Attach metadata fields such as:
title (script or scene title)
character (if chunk is dominated by a single speaker)
scene_number or similar identifier
line_index or chunk index
Ensure the vector dimension in Pinecone matches the embedding dimension of your chosen Hugging Face model.
Usage pattern:
Each chunk from the splitter is embedded, then inserted as a separate vector record in Pinecone.
Metadata enables more granular filtering or precise referencing in downstream responses.
Troubleshooting:
If queries later return no results, confirm that vectors are actually present in the script_dialogue_analyzer index.
Check that the index name and environment in the Insert node match the Query node configuration.
4.5 Pinecone Query Node & LangChain Tool
Purpose: Retrieve the most relevant dialogue chunks for a given user query and expose this retrieval capability as a LangChain tool.
Behavior:
The node accepts a query string or embedding, performs a similarity search on the script_dialogue_analyzer index, and returns the top-k nearest vectors.
These results are wrapped as a LangChain tool so that the Agent can call Pinecone search as needed during reasoning.
Configuration notes:
Use the same Pinecone credentials and index name as in the Insert node.
Set an appropriate top_k value (for example 5-10) based on how much context you want the Agent to consider.
Ensure the node outputs include both the text payload and metadata for each match so the LLM can reference them explicitly.
Edge cases & tuning:
If queries feel noisy or off-topic, try lowering top_k or adjusting similarity thresholds (if available in your configuration).
If results are too sparse, verify that the query text is embedded using the same model or embedding configuration as the index.
4.6 Memory (Buffer Window) Node
Purpose: Maintain short-term conversational context across multiple user queries, for example iterative analysis of the same scene.
Behavior:
The memory node stores recent user inputs and Agent outputs in a buffer window.
On each new query, the Agent receives this conversation history, which helps it maintain continuity and refer back to previous findings.
Configuration notes:
Set a reasonable window size so that memory remains relevant without exceeding token limits.
Ensure the memory node is correctly wired to both read from and write to the Chat / Agent node.
4.7 Chat LLM + LangChain Agent (OpenAI)
Purpose: Act as the core reasoning engine that interprets user queries, decides whether to call the Pinecone tool, and generates human-readable analysis.
Components:
Chat Node (OpenAI): Provides the underlying LLM.
LangChain Agent: Orchestrates tool calls and composes the final answer.
Agent responsibilities:
Interpret user intent from natural language input.
Invoke the Pinecone search tool when contextual evidence is required.
Use conversation memory to maintain continuity across multiple queries.
Produce structured analyses, for example:
Character voice and traits
Sentiment and emotional tone
Motifs, repeated phrases, or thematic patterns
Suggestions for alternative lines or refinements
Credentials:
OpenAI API key configured in n8n and selected in the Chat node.
Configuration notes:
Attach the Pinecone Query node as a tool to the Agent so it can perform retrieval as needed.
Connect the memory node so that the Agent receives the latest conversation context.
Optionally, customize the system prompt to instruct the Agent to:
Always ground answers in retrieved dialogue chunks.
Quote specific lines and characters when making claims.
Avoid speculation beyond the retrieved evidence.
Hallucination mitigation:
Encourage the Agent (via prompt) to explicitly reference retrieved chunks.
Limit top_k or adjust retrieval parameters to prioritize highly relevant passages.
4.8 Google Sheets Logging Node
Purpose: Persist a structured log of each analysis run for auditing, review, or downstream reporting.
Target: A Google Sheet identified by SHEET_ID
Typical fields to log:
User query
Script or scene title
Top retrieved passages (or references to them)
Agent answer
Metadata such as:
Timestamp
Scene number
Character focus (if applicable)
Credentials:
Google Sheets OAuth2 credentials configured in n8n.
Configuration notes:
Use “Append” mode so each new analysis is added as a new row.
Align the node’s field mapping with your sheet’s column structure.
Consider logging only references or short excerpts of script text to reduce sensitivity and size.
5. Example Queries & Usage Patterns
Once the script is indexed, you can send natural-language questions to the Agent, which will:
Interpret the query.
Call Pinecone to fetch relevant chunks.
Generate a synthesized, context-aware answer.
Example prompts:
“List the primary traits of ALEX based on Scene 1 dialogue.”
“Show lines that indicate tension between ALEX and JORDAN.”
“Find repeated motifs or phrases across the first three scenes.”
“Extract all expository lines that reveal backstory.”
For each query, the Agent uses Pinecone retrieval as external evidence and the LLM as a reasoning layer on top of that evidence.
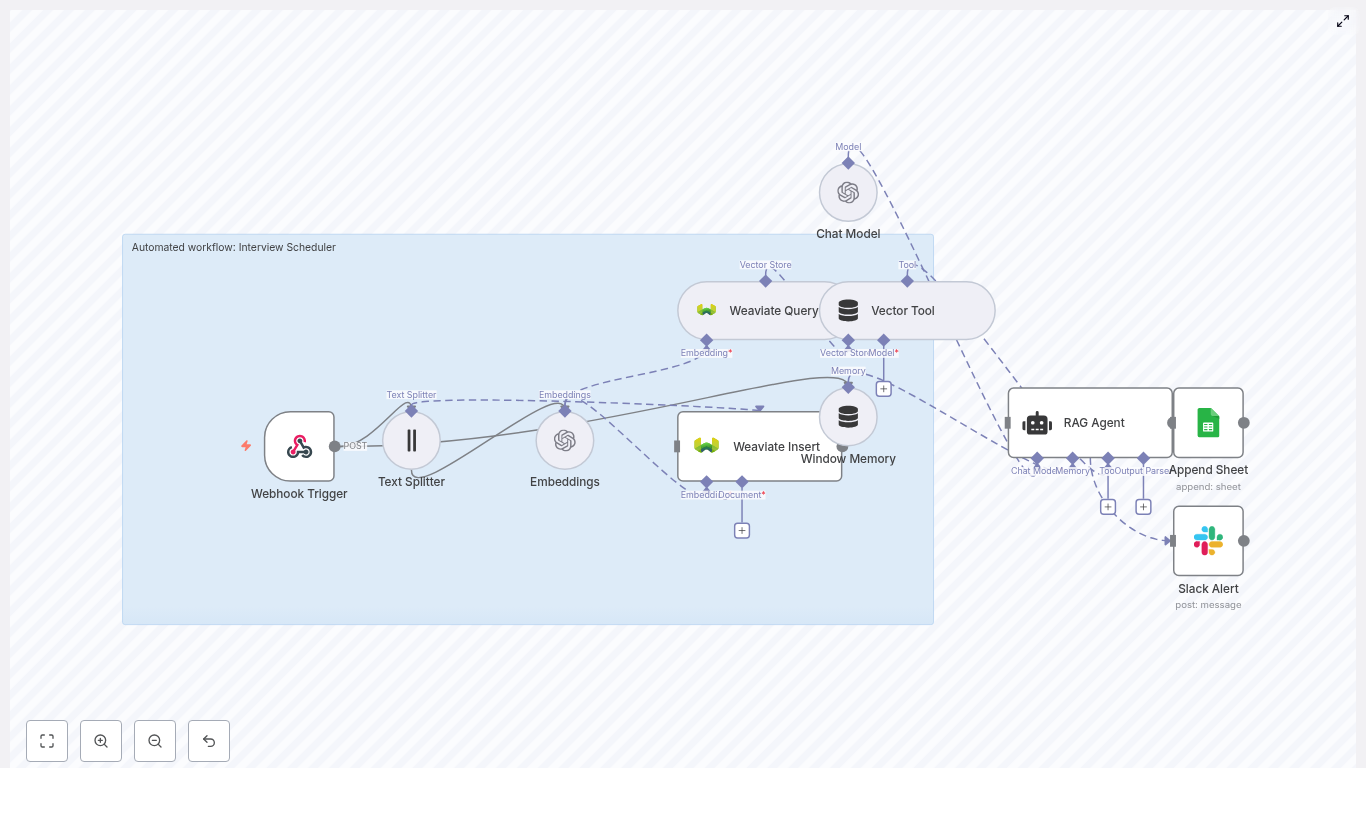
Automate Interviews with n8n: Interview Scheduler Template
Use this n8n Interview Scheduler workflow template to automate interview coordination, centralize candidate data, and maintain an auditable log of every interaction. The automation combines a webhook trigger, text splitting, OpenAI embeddings, a Weaviate vector database, a retrieval-augmented generation (RAG) agent, and structured logging in Google Sheets, with Slack alerts for operational errors.
This reference-style guide explains the workflow architecture, each node’s role, configuration details, and how data moves through the system so you can deploy, debug, and extend the template with confidence.
1. Workflow Overview
The Interview Scheduler workflow is designed to:
Accept interview requests via an HTTP POST webhook.
Extract and split free-text content into manageable chunks.
Generate semantic embeddings with OpenAI and store them in Weaviate.
Use a RAG-style agent to interpret candidate constraints and propose next steps.
Persist all outcomes to Google Sheets for reporting and auditability.
Send Slack alerts if any error occurs during processing.
The result is a reusable, API-driven interview scheduling automation that can sit behind your forms, ATS, or custom front-end.
2. Architecture & Data Flow
The workflow is composed of the following logical stages:
Webhook Trigger – Receives interview request payloads via HTTP POST.
Text Splitting – Splits long notes or email threads into chunks.
Embeddings (OpenAI) – Converts chunks into vector representations.
Weaviate Insert – Stores embeddings into the interview_scheduler index.
Weaviate Query – Retrieves contextually relevant records for the current request.
Vector Tool – Exposes Weaviate query as a tool for the RAG agent.
RAG Agent – Uses OpenAI Chat Model, vector tool, and window memory to generate a scheduling decision or response.
Window Memory – Maintains short-term conversational state across steps.
Google Sheets Append – Logs each processed request and agent status.
Slack Alert (onError) – Sends notifications to a Slack channel if the workflow fails.
Data flows linearly from the webhook through embedding and retrieval into the agent, then into logging. An error branch handles failures and triggers Slack alerts.
3. Node-by-Node Breakdown
3.1 Webhook Trigger
Node type: Webhook Purpose: Entry point for external systems to submit interview requests.
The workflow is triggered via an HTTP POST webhook named interview-scheduler. n8n exposes a unique URL for this webhook, which you can integrate with:
Web forms (e.g. application or scheduling forms).
Applicant Tracking Systems (ATS) that support webhooks.
Custom front-ends or backend services.
Expected payload fields (example):
candidate_name
contact_info (email, phone, or both)
preferred_times (free text or structured JSON)
notes (optional, may include email threads or recruiter comments)
Configuration notes:
Method should be set to POST.
Ensure the n8n instance is accessible via a public endpoint if used from external systems.
Consider adding authentication or IP allowlists to restrict access to the webhook.
3.2 Text Splitter
Node type: Text Splitter Purpose: Break long text into smaller segments suitable for embedding and retrieval.
Candidate notes or email threads can be lengthy. The Text Splitter node processes the relevant text fields and divides them into overlapping chunks, for example:
chunkSize = 400 characters
overlap = 40 characters
This configuration preserves context across boundaries and improves retrieval accuracy. Overlap ensures that important information near the end of a chunk is still visible at the beginning of the next chunk.
Edge considerations:
If the text is shorter than the configured chunkSize, it will pass through as a single chunk.
Verify that only relevant fields (for example notes or preferred_times) are passed to the splitter to avoid unnecessary token usage later.
3.3 Embeddings (OpenAI)
Node type: OpenAI Embeddings Purpose: Transform text chunks into numerical vectors for semantic search.
The workflow uses an OpenAI embeddings model such as text-embedding-3-small to convert each text chunk into a vector. These embeddings are later stored in Weaviate and used for similarity search.
Typical configuration:
Model:text-embedding-3-small (or another compatible OpenAI embedding model)
Input: Array of chunked text from the Text Splitter node
Credentials: OpenAI API key configured in n8n credentials
Operational notes:
Monitor your OpenAI usage limits and costs, especially if processing high volumes.
Batching chunks into a single embeddings request where possible can reduce API overhead.
If the node fails, check API key validity, model name, and account rate limits.
3.4 Weaviate Insert & Query
Node types: Weaviate Insert, Weaviate Query Purpose: Persist embeddings and retrieve relevant context for each new request.
3.4.1 Weaviate Insert
The Insert node stores each embedding vector along with its associated metadata in a Weaviate index. The template assumes an index (class) named interview_scheduler.
Key configuration elements:
Weaviate instance: Cloud or self-hosted, reachable from n8n.
Index name (class):interview_scheduler.
Schema: Should support fields such as text content, candidate identifiers, timestamps, and any other metadata you include.
Schema validation:
Ensure the schema is created in Weaviate before running the workflow.
Match property names in the node configuration with the Weaviate schema fields.
3.4.2 Weaviate Query
The Query node performs a similarity search against the interview_scheduler index using the current request’s embeddings. This returns the most relevant passages or records to be used as context by the RAG agent.
Usage in the workflow:
The query uses the embedding of the current request to retrieve similar historical notes or constraints.
Returned results are passed to the Vector Tool node, which exposes them to the agent.
Failure handling:
If the query fails, verify network connectivity to the Weaviate instance and index name spelling.
Check that the Weaviate API key or auth configuration is correctly set in n8n credentials.
3.5 Vector Tool & RAG Agent
3.5.1 Vector Tool
Node type: Vector Tool (LangChain-style tool wrapper) Purpose: Wrap Weaviate query capabilities as a callable tool for the agent.
The Vector Tool node takes the Weaviate Query configuration and exposes it as a function-like tool that the agent can invoke when it needs additional context. This keeps the RAG logic modular and allows the agent to decide when to query the vector store.
3.5.2 RAG Agent
Node type: Agent (RAG / tool-using agent) Purpose: Combine candidate data, vector store context, and a chat model to generate scheduling decisions.
The RAG Agent node uses an OpenAI Chat Model together with:
The Vector Tool for retrieving context from Weaviate.
Window Memory for short-term conversational history.
Key configuration aspects:
Model: An OpenAI chat model configured in n8n (for example a GPT-based model).
System prompt: Instructs the agent to act as an Interview Scheduler assistant, guiding it to:
Interpret candidate availability and constraints.
Identify conflicts or missing information.
Propose suggested interview times or next steps.
Tools: The Vector Tool is attached so the agent can fetch context as needed.
Output: The agent produces a structured status message that typically includes:
Recommended interview slots or actions.
Any detected conflicts or issues.
Summary notes for logging.
Prompt design tips:
Define a clear output format (for example JSON fields or bullet points) to simplify downstream parsing and logging.
Explicitly instruct the agent on how to handle ambiguous or incomplete availability information.
3.6 Window Memory
Node type: Window Memory Purpose: Maintain a limited sliding window of conversation history for the agent.
Window Memory stores the most recent messages in the interaction so the agent can maintain context across multiple steps. This is particularly useful for:
Follow-up questions about availability.
Clarifications on constraints or preferences.
Multi-turn interactions where the agent refines its suggestion.
Configuration note: The memory window size should be set to a reasonable number of turns to balance context retention with token usage and performance.
3.7 Append to Google Sheets
Node type: Google Sheets – Append Purpose: Persist a log of each processed request and the agent result.
After the RAG Agent generates the final status, the workflow appends a new row to a Google Sheet. This sheet acts as a single source of truth and an audit log for interview scheduling operations.
Typical configuration:
Spreadsheet ID: The target Google Sheets document ID (SHEET_ID).
Sheet name:Log.
Example fields to log:
Timestamp of processing.
Candidate name.
Parsed availability or requested time slots.
Agent decision or status message.
Any error flags or notes.
Access control: Ensure the Google Sheets credentials used in n8n have write access to the specified spreadsheet and sheet.
3.8 Slack Alerts (Error Handling)
Node type: Slack – Send Message Purpose: Notify the team when the workflow encounters an error.
The workflow includes an onError branch. If any upstream node fails (for example OpenAI, Weaviate, or Sheets), this branch sends a Slack alert to a configured channel such as #alerts.
Alert content (typical):
Error message or stack trace (as available in n8n error data).
Context about which node failed.
Optional reference to the candidate or request ID if available.
Slack configuration:
Slack app or bot token configured as credentials in n8n.
Channel ID or name set in the node parameters (for example #alerts).
4. Configuration & Deployment Checklist
Before enabling the Interview Scheduler in production, verify the following:
n8n instance
Hosted or self-hosted with a stable, public URL for the webhook.
Environment variables and credentials stored securely in n8n.
OpenAI
OpenAI account with a valid API key.
OpenAI credentials configured in n8n.
Embedding model (for example text-embedding-3-small) and chat model available in your account.
Weaviate
Cloud or self-hosted Weaviate instance reachable from n8n.
Schema defined with an index (class) named interview_scheduler.
Authentication and TLS configured according to your environment.
Google Sheets
Service account or OAuth credentials configured in n8n.
Target spreadsheet ID (SHEET_ID) accessible by those credentials.
Sheet named Log created in the spreadsheet.
Slack
Slack app or bot with permission to post messages.
Slack credentials configured in n8n.
Alert channel (for example #alerts) specified in the node.
5. Best Practices for Reliability & Cost Control
Secure the webhook
Use authentication headers, tokens, or IP allowlists to prevent unauthorized requests.
Optimize text chunking
Use chunk overlaps (for example 40 characters) to maintain context between chunks.
Avoid embedding unnecessary fields to reduce token usage.
Control embedding costs
Monitor embedding volume and costs in OpenAI dashboards.
Batch chunks where possible to reduce API overhead.
Design robust prompts
Provide a clear system message describing the agent’s role as an Interview Scheduler.
Specify the expected output structure to make downstream parsing and logging easier.
Minimize sensitive data in vectors
Store only the necessary personal data in Weaviate.
Use hashed identifiers where possible to align with privacy policies.
6. Security & Privacy Considerations
Interview workflows often handle personal and potentially sensitive information. Ensure that your implementation aligns with your organization’s security and compliance requirements.
Encryption
Use TLS for all connections to Weaviate and Google Sheets.
Ensure n8n itself is served over HTTPS.
Access control
Restrict access to the Google Sheet and Weaviate index to necessary service accounts only.
In this tutorial, you will learn how to build an automated “Calendar to ClickUp” workflow in n8n that:
Receives calendar events through a webhook
Splits and embeds event descriptions using LangChain and OpenAI
Stores and retrieves context with Pinecone vector storage
Uses a RAG (Retrieval-Augmented Generation) agent to generate structured ClickUp tasks
Logs results to Google Sheets and sends Slack alerts when something goes wrong
The goal is to turn raw calendar data into reliable, structured ClickUp tasks with as little manual work as possible.
Why Automate Calendar Events Into ClickUp?
Manually turning meetings and calendar events into ClickUp tasks is:
Time-consuming
Prone to copy-paste errors
Inconsistent across team members
By combining n8n, LangChain, Pinecone, and OpenAI, you can build a workflow that:
Ingests calendar data via a webhook in real time
Understands event descriptions using text embeddings
Retrieves related context from previous meetings
Generates structured task fields ready for ClickUp
Logs all activity and alerts you on failures
This approach is especially useful when your event descriptions contain rich notes, action items, or follow-ups that you do not want to lose.
Key Concepts Before You Start
n8n Workflow Basics
n8n is a workflow automation tool where you connect nodes to process data step by step. In this workflow you will use nodes for:
Webhook Trigger to receive events
Text processing and embeddings
Pinecone for vector storage and search
RAG Agent for task generation
Google Sheets and Slack for logging and alerts
Text Splitting and Embeddings
Long event descriptions are split into smaller chunks so that:
Embeddings can capture meaning more accurately
Vector search can find the most relevant pieces later
Embeddings are numerical representations of text. In this workflow, OpenAI’s text-embedding-3-small model turns chunks of event text into vectors that can be stored and searched in Pinecone.
Pinecone and RAG (Retrieval-Augmented Generation)
Pinecone is a vector database. You will:
Insert embeddings into a Pinecone index named calendar_to_clickup
Query that index to retrieve similar or related content for a new event
RAG combines that retrieved context with the current event to guide a chat model. Instead of the model guessing from scratch, it uses relevant past information to generate more accurate ClickUp task details.
Workflow Architecture Overview
The template workflow in n8n is built from these main components:
Webhook Trigger: Receives calendar payloads at POST path calendar-to-clickup
Text Splitter: Splits long descriptions into chunks (size 400, overlap 40)
OpenAI Embeddings: Uses model text-embedding-3-small
Pinecone Insert and Pinecone Query: Store and query vectors in index calendar_to_clickup
Vector Tool and Window Memory: Provide retrieved context to the RAG Agent and maintain conversation context
Chat Model + RAG Agent: Converts event data into ClickUp-ready task fields
Google Sheets Append: Logs RAG outputs to a sheet named Log
Slack Alert: Sends error notifications to a channel (for example, #alerts) using an onError path
Step-by-Step: Building the Calendar to ClickUp Workflow in n8n
Step 1: Create the Webhook Trigger
Add a Webhook Trigger node in n8n.
Set the HTTP method to POST.
Set the path to calendar-to-clickup.
Copy the webhook URL and configure your calendar integration or middleware to send event payloads to this URL.
Once configured, every time a calendar event is created or updated (depending on your calendar setup), the payload will be sent to this webhook and will start the n8n workflow.
Step 2: Normalize and Split the Event Description
Add a Text Splitter node after the Webhook Trigger.
Use the Character Text Splitter type.
Configure:
chunkSize: 400
chunkOverlap: 40
Map the calendar event description field from the webhook JSON into the Text Splitter input.
These settings keep enough overlap between chunks so that context is not lost at the boundaries. This improves both embedding quality and later retrieval accuracy.
Step 3: Generate OpenAI Embeddings
Add a LangChain OpenAI Embeddings node.
Select the model text-embedding-3-small.
Feed the text chunks from the Text Splitter node into this embeddings node.
The output of this node will be dense vectors that represent the meaning of each text chunk. These vectors are what you will store in Pinecone.
Step 4: Store Embeddings in Pinecone
Add a Pinecone Insert node.
Point it to a Pinecone index named calendar_to_clickup (create this index in Pinecone if you have not already).
Map the embeddings and any relevant metadata (such as event ID, title, or timestamp) from the previous node into the insert operation.
By indexing embeddings, you can later enrich new events with related historical context, such as previous meetings with the same client or earlier sessions of a recurring project.
Step 5: Retrieve Context with Pinecone Query, Vector Tool, and Window Memory
When a new event is processed, you want to bring in relevant past information.
Add a Pinecone Query node that:
Queries the calendar_to_clickup index
Uses the embedding of the current event as the query vector
Add a Vector Tool node to expose the retrieved vectors and their metadata to the RAG Agent.
Add a Window Memory node so that the agent can keep track of ongoing context across steps in the RAG flow.
Together, these nodes give the RAG Agent both the current event and any similar or related past content to work with.
Step 6: Configure the RAG Agent to Create ClickUp Task Fields
Add a Chat Model node configured with your OpenAI chat model of choice.
Add a RAG Agent node and connect:
The Chat Model
The Vector Tool output
The Window Memory
Set the RAG Agent system message to:
You are an assistant for Calendar to ClickUp.
Set the prompt type to define.
Feed both the raw calendar event JSON and the retrieved context into the agent.
The RAG Agent should output a structured representation of the ClickUp task, including fields such as:
Task title
Description
Due date
Assignees
Priority
Tags or custom fields required by your ClickUp workspace
Example Prompt to the RAG Agent
Here is a sample prompt structure you can use for the agent:
{  "system": "You are an assistant for Calendar to ClickUp.",  "user": "Process the following data for task 'Calendar to ClickUp':\n\n{{ $json }}"
}
In n8n, {{ $json }} is typically replaced with the current item’s JSON data from the workflow.
Step 7: Log the Output and Prepare for ClickUp Task Creation
Add a Google Sheets Append node.
Connect it after the RAG Agent node.
Configure it to:
Use your chosen spreadsheet
Append to a sheet named Log
Map the RAG Agent output fields into columns in the Log sheet.
This gives you a simple audit trail of what the agent produced for each event.
After logging, you can add a ClickUp API node (or a generic HTTP Request node) to actually create tasks in ClickUp using the structured output from the agent. The template focuses on logging, but it is designed so you can easily add your ClickUp creation logic using your ClickUp API key and workspace configuration.
Error Handling with Slack Alerts
To avoid silent failures, the workflow includes a dedicated error path.
The RAG Agent node has an onError connection to a Slack Alert node.
When the agent fails, the Slack node posts a message to a channel such as #alerts.
The message contains error details, so your team can quickly investigate webhook issues, model errors, or data problems.
Make sure the Slack node is configured with the correct workspace, channel, and authentication so that alerts always reach the right people.
Best Practices for a Reliable Workflow
Security: Protect your webhook with a secret token, IP allowlist, or other access controls to prevent unauthorized requests.
Rate limits: Monitor your OpenAI and Pinecone usage. Use batching where possible to reduce the number of requests and avoid throttling.
Chunking strategy: The default chunkSize of 400 and chunkOverlap of 40 work well for many event descriptions, but you can adjust them based on typical description length and complexity.
Schema enforcement: In the RAG Agent prompt, require a strict output format such as JSON or TSV. This makes downstream ClickUp API calls predictable and easier to validate.
Monitoring: Log both inputs and outputs in Google Sheets or a database. This helps with debugging, audits, and improving your prompts over time.
Testing Checklist
Before using this in production, run through the following tests:
Send sample calendar events of different sizes and complexity to the webhook.
Confirm that embeddings are generated and stored correctly in the calendar_to_clickup Pinecone index.
Check that the RAG Agent output strictly follows the expected schema and includes all required ClickUp fields.
Verify that logs appear in the Log sheet in Google Sheets.
Ensure Slack alerts only trigger on real errors, not on successful runs.
Cost and Performance Considerations
Several components in this workflow have usage-based costs:
OpenAI embeddings: Costs depend on the number of tokens you embed. Using text-embedding-3-small is cost-effective for bulk ingestion.
Chat model: More powerful models are more expensive but may handle complex reasoning better. You can reserve them for the RAG Agent and keep embeddings on the smaller model.
Pinecone storage: Costs scale with the number of vectors and the index configuration. Consider deleting or archiving outdated vectors to control storage usage.
Monitoring usage and adjusting chunk size, frequency of ingestion, and retention policies can help optimize both cost and performance.
Ideas for Extending the Pipeline
Once the basic “Calendar to ClickUp” flow is stable, you can build more advanced features:
Bidirectional sync: Add a ClickUp to Calendar workflow so that changes in tasks (status, due date, etc.) are reflected back in calendar events.
Advanced matching: Use Pinecone to suggest similar past tasks so you can reuse templates, assignees, or tags.
Custom field mapping: Map calendar metadata (such as organizer, location, or meeting type) to ClickUp custom fields based on the calendar source.
Approval UI: Insert a lightweight approval step, for example a Slack message with interactive buttons, before creating high-impact tasks automatically.
Quick FAQ
Do I have to use Pinecone?
Pinecone is used for scalable and efficient vector search. If you want retrieval-augmented generation with historical context, you need some form of vector storage. Pinecone is a good managed option for this template.
Can I change the embedding model?
Yes. The template uses text-embedding-3-small for cost-effective bulk ingestion, but you can choose another OpenAI embedding model if you need different performance or accuracy characteristics.
How do I actually create the ClickUp task?
The template focuses on generating structured task data and logging it. To create tasks, add a ClickUp API node (or HTTP Request node) after the logging step, map the RAG Agent output to ClickUp’s task fields, and authenticate with your ClickUp API key.
Is the RAG Agent output format fixed?
No, but it should be clearly defined. In your system messages and prompts, specify the exact JSON or TSV schema you expect so that downstream nodes can parse it reliably.
Recap and Next Steps
You have seen how to build an n8n workflow that:
Receives calendar events via a webhook
Splits and embeds descriptions using LangChain and OpenAI
Stores and retrieves context with a Pinecone index
Uses a RAG Agent to transform events into structured ClickUp tasks
Logs results to Google Sheets and sends Slack alerts on errors
To move forward:
Deploy the webhook and confirm calendar events are reaching n8n.
Build and test the embedding and Pinecone indexing steps.
Iterate on your RAG Agent prompts and output schema until the ClickUp fields are reliable.
Add and configure the ClickUp API node to create tasks automatically.
Share the workflow with your team and refine it based on feedback.
Call to action: Try this template in your n8n workspace, experiment with different chunk sizes and prompt formats, and then connect it to ClickUp so tasks are created without manual effort. If you need help customizing the RAG prompts or mapping to your specific ClickUp fields, collaborate with your team or automation specialist
Automate Blog Content Creation with GPT-4, Perplexity & WordPress
Publishing great blog content on a regular basis is tough, right? Brainstorming topics, doing research, drafting, editing, formatting for WordPress, then telling everyone it is live – it all adds up.
The good news is that you can automate a huge chunk of this workflow without sacrificing quality. By combining GPT-4, Perplexity, n8n, and WordPress, you can build a content engine that handles research, writing, publishing, and notifications for you.
In this guide, we will walk through an n8n workflow template that does exactly that. You will see how Perplexity handles research, GPT-4 turns that into SEO-friendly blog posts, n8n glues everything together, and Slack, Gmail, and Notion keep your team in the loop.
If you are publishing regularly, you have probably felt the strain of keeping up. Automation helps you:
Publish more often without burning out your team.
Keep a consistent structure, tone, and SEO approach across posts.
Pull in up-to-date research so your content does not feel stale.
Push posts straight to WordPress with the right metadata and formatting.
Automatically notify your team and log everything for future audits.
In other words, you still control the strategy and voice, but the repetitive parts – research, drafting, formatting, and notifications – run on autopilot.
What this n8n workflow template actually does
Let us zoom out for a second. At a high level, the template takes a topic or question and turns it into a published WordPress article, then pings your team and logs the details.
Here is the journey, end to end:
You submit a topic, target keywords, and desired length.
Perplexity runs live research and returns a summary with citations.
n8n cleans and structures that research for GPT-4.
GPT-4 writes an SEO-optimized article with headings, meta description, and HTML.
The post is sent to WordPress as a draft or published post.
Slack, Gmail, and Notion updates keep everyone informed and create an audit trail.
The beauty of using n8n is that you can customize each step, add checks, and keep a human in the loop wherever you want.
The main building blocks of the workflow
Perplexity for research
Perplexity is your research assistant. It pulls together search-aware summaries with links to sources so you are not guessing whether the information is current or credible.
In this workflow, Perplexity is used to:
Gather fresh facts, stats, and examples for your topic.
Provide citations you can link to in your article.
Reduce the chance of hallucinations in your final content.
Automating this step means every post starts from a solid, up-to-date research base instead of random guesses.
GPT-4 for drafting and SEO optimization
Once Perplexity has done the research, GPT-4 steps in as your SEO content writer.
With the right prompt, GPT-4 can:
Turn research into a structured blog post with H1, H2, and H3 headings.
Generate a compelling meta description.
Write in HTML or Markdown so it is ready for WordPress.
Include target keywords naturally, not in a spammy way.
The key is to give GPT-4 clear instructions in your n8n node: tone, length, keywords, internal linking ideas, and any calls to action you want at the end.
Example prompt snippet:
"You are an SEO content writer. Using the research below, write a 1,200-word blog post with H1, H2s, and H3s, include the keywords: 'automate blog content', 'GPT-4', 'Perplexity', and 'WordPress'. Add a 140-character meta description and a closing CTA."
n8n as the automation backbone
n8n is where everything comes together. Think of it as the conductor for your content pipeline.
In this template, n8n is responsible for:
Triggering the workflow from a form or chat submission.
Sending the topic to Perplexity and capturing the response.
Formatting the research into a clean structure for GPT-4.
Calling GPT-4 and receiving the finished article and meta fields.
Pushing the result to WordPress.
Sending notifications and logging records in Notion.
You can also add conditional logic, retries, and error handling so the workflow is stable enough to run in the background without babysitting.
WordPress for publishing
Once GPT-4 has created the article, the WordPress node in n8n handles the publishing side.
It can:
Create a new post with the generated title and HTML body.
Set categories, tags, and SEO metadata.
Attach or select a featured image based on the topic.
Save as a draft for review or publish immediately.
This is where you decide how hands-off you want to be. Many teams start with drafts, then move to auto-publish once they trust the pipeline.
Slack, Gmail, and Notion for notifications and logging
After a post is created, the workflow does not just stop. It also keeps your team informed and your records tidy.
The template uses:
Slack to ping an editorial or marketing channel when a new post is ready or published.
Gmail to email stakeholders who prefer updates in their inbox.
Notion to log each article with title, summary, URL, and status for future reference and audits.
This gives you visibility across the whole process and a history you can always come back to.
How the step-by-step n8n workflow runs
Let us walk through the actual flow as it appears in n8n, from the first trigger to the final notification.
Step 1 – Capture a topic or question
The workflow starts with a simple input, often from a form or chat interface. You provide:
The main topic or question.
Target keywords you want to rank for.
Preferred length or depth of the article.
n8n uses this information as the query sent to Perplexity.
Step 2 – Run automated research with Perplexity
Next, n8n calls the Perplexity API using that topic and context. Perplexity returns:
A summarized overview of the topic.
Key points and arguments.
Citations and links to authoritative sources.
Relevant statistics or data where available.
All of this is captured as structured data inside n8n so it can be reused in later steps.
Step 3 – Clean and format the research output
Perplexity’s response is useful, but you usually do not want to feed it to GPT-4 as-is. The workflow includes a formatter node that:
Extracts bullet points and key ideas.
Pulls out the list of sources and citations.
Normalizes any suggested keywords or subtopics.
This gives GPT-4 a neat, structured context so it can write with better attribution and clarity.
Step 4 – Generate SEO content with GPT-4
Now GPT-4 takes over. Using the formatted research and your instructions, it creates:
An H1 blog title.
A logical H2 and H3 outline.
The full body content in HTML or Markdown.
A short, optimized meta description.
You can also include instructions for:
Reading level and tone of voice.
Specific keywords to include.
Internal linking suggestions.
A closing call to action.
If you want a human in the loop, you can configure the workflow so the content lands in WordPress as a draft first, then your editor reviews and publishes.
Step 5 – Publish (or draft) in WordPress
Once GPT-4 returns the content, the WordPress node pushes it to your site. In this step you can:
Map the GPT-4 title to the WordPress post title.
Insert the HTML into the main content field.
Set tags, categories, and SEO meta fields.
Attach a featured image, either generated or chosen from your media library.
Choose whether to set the post status as draft or publish.
Step 6 – Notify your team and log the article
After WordPress confirms the post creation, the final part of the workflow kicks in:
Slack notification to share the title and URL in your chosen channel.
Gmail email to relevant stakeholders with a brief summary and link.
Notion entry that stores the title, summary, URL, and status for tracking and audits.
This makes your content pipeline transparent and keeps everyone aligned without manual updates.
SEO and editorial best practices for automated content
Automation is powerful, but it does not replace a solid content strategy. To keep your automated posts ranking well and aligned with your brand, keep these practices in mind:
Always include citations and link out to the authoritative sources Perplexity provides.
Use human review for sensitive topics like legal, medical, or compliance-heavy content.
Focus on natural language and user intent rather than stuffing keywords.
Include internal links to your evergreen or cornerstone content to strengthen your site structure.
Add a clear meta description and use structured data (schema.org) when appropriate.
Monitoring performance and keeping quality high
Once your workflow is running, you will want to keep an eye on how the content performs and tweak as you go.
Some useful KPIs to track:
Organic search traffic to automated posts.
Bounce rate and time on page.
Click-through rate from search results (influenced by titles and meta descriptions).
You can also:
Run A/B tests on headlines and CTAs to see what resonates.
Adjust your GPT-4 prompts based on what performs best.
Add an automated QA step in n8n that checks for minimum word count, presence of key phrases, and a meta description before publishing.
Common pitfalls to watch out for
Like any automation, there are a few traps you will want to avoid. Here are some of the big ones and how to handle them:
Stale research: For time-sensitive topics, configure Perplexity to pull fresh results or schedule periodic rechecks and content updates.
Over-automation: Keep a human editor in the loop for brand voice, sensitive themes, or high-impact content.
Plagiarism risk: Rely on Perplexity’s citations and prompt GPT-4 to paraphrase, synthesize, and add original commentary instead of copying.
Broken workflows: Add retry logic and error handlers in n8n, and send failure alerts to Slack or email so you can fix issues quickly.
Inside the example n8n flow: key nodes
The template shown in the visual diagram maps neatly to the steps we have covered. Some of the most important nodes are:
Form trigger: Collects the initial topic or question, plus any extra parameters like keywords or length.
Perplexity node: Calls the Perplexity API and returns research summaries and citations.
Formatter node: Cleans and structures the research so GPT-4 gets a clear, well-organized context.
GPT-4 node: Generates the full SEO-optimized article, including headings and meta description.
WordPress node: Creates or updates the post with the right content and metadata.
Gmail, Slack, and Notion nodes: Handle notifications and logging once the article is created.
Scaling your automated content production
Once you have the basic workflow running smoothly, you can start thinking about scale. Here are a few ideas:
Create reusable prompt templates and content briefs so every article follows a consistent tone and structure.
Use metadata-driven publishing, like categories, tags, and featured images, to keep your content library organized.
Automate internal link insertion to your cornerstone or cluster content for stronger SEO.
Batch your work: queue multiple topics or research queries, then have GPT-4 generate drafts on a schedule for steady publishing.
Bringing it all together
When you connect Perplexity’s research, GPT-4’s writing capabilities, n8n’s orchestration, and WordPress publishing, you end up with a powerful, repeatable system to automate blog content creation.
The payoff is clear:
Higher publishing velocity without extra headcount.
More consistent SEO signals across your posts.
Less manual copy-pasting and status chasing, thanks to Slack, Gmail, and Notion integrations.
If you are just getting started, you do not need to automate everything on day one. Begin with research and draft generation, then gradually plug in WordPress publishing and notifications. Over time, you can add QA checks and human review points until you hit the right balance between speed and control.
Call to action: Want a ready-made n8n workflow to do all this for you? Use the template to get your first automated article live in under 24 hours, or book a walkthrough with our automation team if you would like a guided setup. Get the template & schedule a demo.
Keywords: automate blog content, GPT-4, Perplexity, WordPress, n8n workflow, AI content automation, SEO.
Keeping a consistent Instagram presence can feel like a full-time job. Ideas live in Airtable, images sit in folders, and publishing dates are scattered across calendars. As your team and content grow, the simple act of “getting posts out” can start to drain your focus and creativity.
It does not have to stay that way. With the right workflow, your content pipeline can move from manual juggling to a calm, predictable system that runs in the background. In this guide, you will walk through an n8n workflow template that turns Airtable rows into scheduled Instagram posts, complete with smart context, safety checks, and clear logging.
This template uses text splitting, OpenAI embeddings, a Pinecone vector store, RAG (retrieval-augmented generation) tooling, and straightforward alerts to Google Sheets and Slack. Think of it as your first step toward a more automated, focused, and scalable content operation.
The problem: manual Instagram scheduling slows you down
For many teams, Airtable is already the brain of their content system. Captions, assets, publish dates, tags, and status flags all live there. Yet the last mile – actually scheduling posts – often remains manual. Someone has to copy captions, double check dates, look for duplicates, and push everything into a scheduler or API.
That manual work costs more than time. It invites errors, breaks your flow, and makes it harder to scale your content output. When you are stuck in repetitive tasks, you have less energy for strategy, creativity, and experimentation.
The possibility: a smarter, calmer content pipeline
Automation with n8n lets you turn Airtable into a true command center for Instagram. By combining n8n with embeddings and a vector store, you unlock a more intelligent workflow that can:
Reduce manual scheduling to a single action in Airtable, like setting a record to “Ready to Schedule”.
Spot near-duplicate captions before they go live so your feed stays fresh.
Use contextual retrieval to refine captions in line with your brand voice.
Log every attempt and error so you always know what happened and why.
Instead of worrying about “Did that post go out?” you can trust the system and focus on higher value work. This template is designed as a practical, realistic step toward that kind of workflow.
Mindset shift: from one-off tasks to reusable systems
Building this n8n workflow is more than a technical exercise. It is a mindset shift from repeatedly doing the same tasks to designing a system that does them for you. Each node you connect, each check you add, becomes a reusable asset for your team.
You do not need to automate everything at once. Start with a simple path from Airtable to a log, then layer in intelligence, approvals, and direct posting. As you gain confidence, you will see more opportunities to remove friction and reclaim time.
The n8n workflow template at a glance
The n8n template organizes your Instagram scheduling flow into clear, modular stages. Here is an overview of the main nodes and what they handle:
Webhook Trigger – Receives a POST request from Airtable or a scheduler.
Text Splitter – Breaks long captions into smaller chunks.
Embeddings (OpenAI) – Converts each text chunk into vector embeddings.
Pinecone Insert – Stores embeddings in a Pinecone index for future retrieval.
Pinecone Query + Vector Tool – Finds related content to provide context for caption evaluation and generation.
Window Memory & Chat Model (Anthropic) – Supplies short-term context to the RAG Agent.
RAG Agent – Uses the vector tool and language model to decide what to do next, such as refining captions or flagging issues.
Append Sheet – Logs outcomes into Google Sheets for tracking and audits.
Slack Alert – Sends alerts when something goes wrong so your team can act quickly.
Each of these stages is configurable, so you can adapt the workflow to your brand, team structure, and publishing tools.
From Airtable row to scheduled post: the journey
Step 1: Triggering the workflow from Airtable
The journey starts in Airtable, where your team already manages content. Use Airtable Automations or a third-party integration to send a POST request to your n8n Webhook Trigger whenever a record is marked as “Ready to Schedule”.
The webhook payload should include all the details needed to schedule a post:
recordId – The Airtable record id for traceability.
caption – The main text for the Instagram post.
imageUrl – A URL to the image asset.
publishAt – The desired publish date and time in ISO format.
Optional metadata such as tags or campaign info.
This single event in Airtable becomes the starting point for your entire automated scheduling flow.
Sample webhook payload
When you connect Airtable to the n8n webhook, your JSON payload might look like this:
{  "recordId": "rec123456",  "caption": "Launch week: behind the scenes of our new product...",  "imageUrl": "https://cdn.example.com/images/post1.jpg",  "publishAt": "2025-09-15T14:00:00Z",  "tags": ["launch","product"]
}
Use this structure as a reference when setting up your Airtable Automation.
Step 2: Cleaning and splitting the caption text
Once the webhook fires, the Text Splitter node prepares your caption for embedding. Long captions or multi-section notes are split into manageable chunks so that embedding models stay within token limits and retrieval stays accurate.
The template typically uses:
Chunk size of about 400 characters.
Overlap of about 40 characters between chunks.
This approach keeps related ideas together and improves the quality of later vector searches.
Step 3: Creating embeddings and storing them in Pinecone
Next, each text chunk is sent to an OpenAI embedding model such as text-embedding-3-small. The Embeddings (OpenAI) node converts each chunk into a numeric vector representation.
The Pinecone Insert node then stores these embeddings in your Pinecone index. Indexing your captions enables powerful use cases:
Searching for similar or duplicate captions.
Seeding a RAG process with relevant past content.
Building a memory of what you have previously published.
Over time, this index becomes a living library of your content, ready to support smarter decisions.
Step 4: Using vector search for context and quality
When the workflow evaluates or generates a caption, the Pinecone Query node retrieves related vectors from your index. The Vector Tool then passes these to your language model as contextual information.
This contextual retrieval helps you:
Avoid near-duplicate captions that might make your feed feel repetitive.
Leverage previously successful caption patterns for A/B testing and inspiration.
Preserve your brand voice by grounding new suggestions in past content.
Instead of writing in isolation, your model writes with awareness of your history.
Step 5: RAG Agent – decide, refine, and route
The heart of this workflow is the RAG Agent node. It combines three key ingredients:
Retrieved vectors from Pinecone via the Vector Tool.
Short-term context from Window Memory.
A chat model such as Anthropic (or another LLM you configure).
Using these, the RAG Agent can decide what to do with each incoming record. Typical outputs include:
A final, refined caption or a newly generated one based on your input.
Scheduling instructions such as date, time, and timezone.
Status flags like Scheduled, Needs Approval, or Duplicate Found.
This is where your workflow starts to feel truly intelligent, not just automated. You can adjust prompts and logic to align with your brand standards and review process.
Step 6: Logging outcomes and surfacing issues
Once the agent decides on the next action, the workflow records what happened. The Append Sheet node writes a new row to a Google Sheet with key details, such as:
Airtable record id.
Final caption.
Scheduled time.
Status and any notes.
This creates a simple audit trail and a central place to review scheduling activity.
If something goes wrong, the Slack Alert node steps in. Issues like permission errors, missing images, or detected duplicates can trigger a message to a channel such as #alerts. Your team gets immediate visibility so they can correct problems before they impact your posting schedule.
Setup checklist: get your first automation live
To turn this template into a working system, walk through the following checklist:
Create or access an n8n instance, either self-hosted or on n8n cloud.
Set up required API credentials in n8n:
OpenAI for embeddings.
Pinecone for vector storage and search.
Anthropic (optional) or another LLM provider for the chat model.
Google Sheets OAuth for logging.
Slack for alerts.
Create and configure a Pinecone index named schedule_instagram_content_from_airtable or similar.
Configure Airtable Automations to POST to the n8n Webhook Trigger when a record is marked as “Ready”.
Run a test with a sample Airtable row to confirm:
Text splitting works as expected.
Embeddings are created and inserted into Pinecone.
Validate the RAG Agent outputs. Check that captions, statuses, and decisions match your expectations.
Finally, connect the workflow to your chosen scheduler or Instagram posting service such as Buffer, Hootsuite, or the Meta Graph API.
Once this is in place, your first automated posts can move from Airtable to your scheduler with minimal manual effort.
Growing with your needs: extending the workflow
As your content strategy matures, this n8n template can evolve with you. Here are some ways to extend it:
Add an approval step Route agent-generated captions to Slack or back into Airtable for manual review before scheduling. This is ideal if you want automation plus human oversight.
Integrate image moderation Connect an image moderation API to check for policy or brand issues before a post is approved.
Publish directly Use the Meta Graph API or scheduling services like Buffer and Hootsuite to publish directly from your workflow, while respecting posting windows and rate limits.
Close the loop with analytics After posts go live, pull engagement metrics back into your system, store them in Pinecone, and teach the RAG Agent to favor high performing caption patterns.
Each enhancement turns your scheduling flow into a more complete content engine that learns and improves over time.
Troubleshooting and fine tuning
As you experiment, you might hit a few bumps. Here are practical tips to keep things running smoothly:
If embeddings hit token limits, reduce the chunk size in the Text Splitter or switch to a different embedding model.
If you see connection errors with Pinecone, verify that your index name, API key, and region are correct.
If the RAG Agent produces irrelevant or off brand suggestions, try:
Increasing the number of retrieved vectors.
Improving the system message or context in Window Memory.
Use the Slack Alert node to surface uncaught errors so you can refine the workflow quickly.
Treat these adjustments as part of the journey. Each improvement makes your automation more reliable and aligned with your goals.
Security, compliance, and responsible automation
As you automate more of your publishing process, keep security and compliance in focus:
Store all API keys in n8n credentials and restrict who can edit the workflow.
If you process user-generated content or PII, add moderation steps and define data retention policies for Pinecone vectors.
Follow Instagram and Meta API terms when automating posting or scheduling.
Responsible automation protects your audience, your brand, and your team.
Conclusion: your next step toward a scalable content system
This n8n template is more than a shortcut for Instagram scheduling from Airtable. It is a foundation you can build on, combining automation with contextual intelligence through embeddings and a vector store.
Start small and steady:
Configure the webhook trigger and logging to Google Sheets.
Validate how the RAG Agent handles real captions from your Airtable base.
Once you trust the results, connect it to your scheduler or posting service.
From there, layer in approvals, moderation, analytics, and more advanced logic. Each improvement gives you back more time for strategy, creativity, and growth.
Ready to automate more of your work? Import this template into n8n, connect your credentials, and run a test webhook with a sample Airtable record. Use it as a starting point, then shape it into the content system your team needs.
Call to action: Try this workflow today, link it to your Airtable base, and watch your scheduling time drop dramatically. If you want support tailoring the workflow for direct Instagram posting or advanced moderation, reach out or schedule a demo.