
Automate Abandoned Cart Emails with n8n & RAG
Imagine this: someone spends time browsing your store, adds a few products to their cart, then disappears. Frustrating, right? The good news is that you can win many of those customers back automatically with smart, personalized abandoned cart emails.
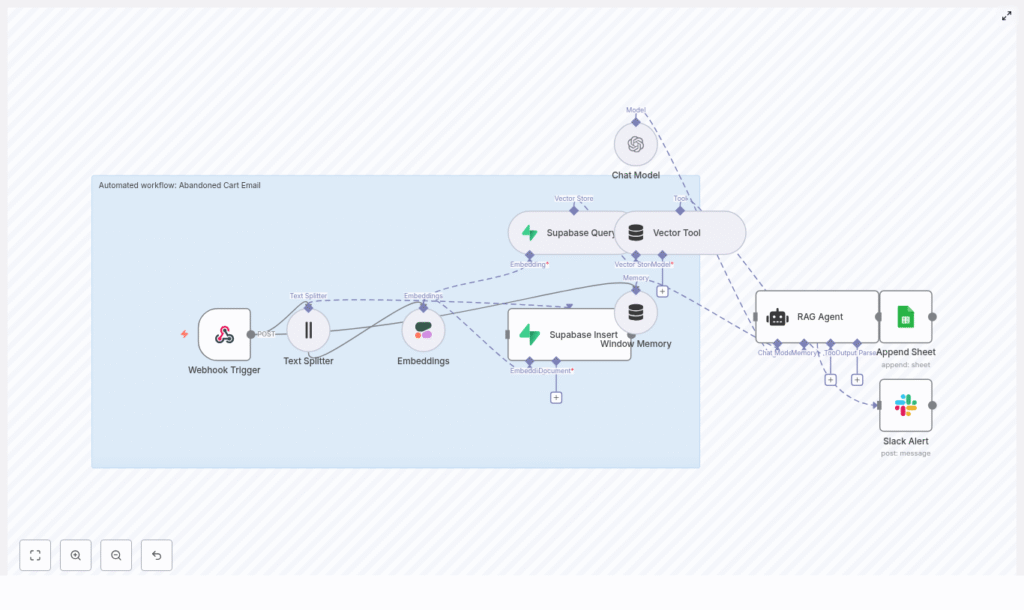
In this guide, we will walk through a complete n8n workflow that does exactly that. It uses embeddings, a vector store, and a RAG (Retrieval-Augmented Generation) agent to turn cart data into tailored email content. You get a production-ready flow that captures events, stores context, retrieves the right info, writes the email, and logs everything, all without building your own backend.
Grab a coffee, and let’s break it down step by step.
Why bother automating abandoned cart emails?
Abandoned cart emails are one of the most effective retention tools in ecommerce. People already showed intent by adding items to their cart, so a well-timed reminder can bring a surprising amount of that revenue back.
When you automate this with n8n, you:
- React instantly when a cart is abandoned.
- Stay consistent, instead of manually sending follow-ups.
- Use customer and product context to personalize each message.
The result is usually better open rates, more clicks, and more completed purchases. And once it is set up, the system just runs in the background for you.
What this n8n workflow actually does
Let us start with the big picture. This workflow connects your store to a RAG-powered email generator and a few helpful tools for logging and alerts. End-to-end, it:
- Receives an abandoned cart event via a Webhook Trigger.
- Splits cart and product text into smaller chunks with a Text Splitter.
- Creates semantic embeddings using Cohere (or another embedding provider).
- Saves those embeddings in a Supabase vector store so they can be searched later.
- Queries that vector store when it is time to generate an email and exposes it as a Vector Tool for the RAG agent.
- Uses a Chat Model (like OpenAI Chat) plus Window Memory to keep short-term context.
- Runs a RAG Agent to write personalized abandoned cart email copy.
- Logs outcomes to Google Sheets for tracking and analysis.
- Sends a Slack alert whenever something fails so you do not miss issues.
In other words, from the moment a cart is abandoned to the moment an email is written and logged, this workflow handles the entire journey.
When should you use this template?
This n8n template is ideal if:
- You run an online store and want to recover more abandoned carts automatically.
- You like the idea of AI-generated email copy, but still want it grounded in real product and customer data.
- You prefer not to build and maintain a custom backend for handling events, vectors, and email generation.
If you are already using tools like Supabase, Cohere, OpenAI, Google Sheets, and Slack, this will plug nicely into your existing stack. Even if you are not, the template gives you a clear structure to follow.
How the core pieces fit together
Let us walk through the main nodes in the workflow and how they work together to create those emails.
1. Webhook Trigger: catching the abandoned cart
The whole flow starts with a Webhook Trigger node. You expose a POST endpoint, such as /abandoned-cart-email, and configure your store or analytics platform to call it whenever a cart is considered abandoned.
The webhook payload typically includes:
- Customer ID and email address.
- Cart items and item descriptions.
- Prices and totals.
- Timestamp or session info.
Keep this payload focused on what you need to personalize the email. The lighter it is, the easier it is to maintain and debug.
2. Text Splitter: preparing content for embeddings
Product descriptions or notes can get pretty long. To make them useful for semantic search, the workflow uses a Text Splitter node to break them into smaller chunks.
In this template, the Text Splitter is set up with:
- Chunk size: 400 characters
- Overlap: 40 characters
This overlap helps preserve sentence continuity between chunks. You can tune these values based on your content. Smaller chunks give you more precise vectors but can increase storage and retrieval costs.
3. Embeddings (Cohere): turning text into vectors
Once the text is split, each chunk is converted into an embedding using a semantic model. In the example, the workflow uses Cohere’s embed-english-v3.0 model.
Why embeddings? They let you search by meaning instead of exact keywords. That way, when your RAG agent needs context about a product or customer, it can find the most relevant chunks even if the wording is different.
When choosing an embedding provider, keep an eye on:
- Cost per request.
- Latency and performance.
- Language coverage and model quality.
4. Supabase Insert: building your vector store
Next, those embeddings are stored in Supabase, acting as your vector database. The workflow inserts each embedding into a consistent index, for example "abandoned_cart_email".
Alongside the vector itself, you store useful metadata, such as:
product_iditem_namepricecart_id
This metadata makes it easier to filter and audit later. You can see exactly which products and carts were involved in each email, and you can refine your retrieval logic over time.
5. Supabase Query & Vector Tool: retrieving the right context
When it is time to generate an email, the workflow queries that same index in Supabase to fetch the most relevant vectors for the current cart or customer.
Typically, you retrieve the top-k nearest vectors, where k is a small number like 3 to 8, so the prompt stays focused. The workflow then exposes this vector search as a Vector Tool to the RAG agent.
This lets the agent pull in:
- Product details and descriptions.
- FAQ content or support notes.
- Relevant customer notes or history, if you store them.
Instead of guessing what to say, the agent can rely on real, retrieved context.
6. Window Memory: keeping short-term context
The Window Memory node helps the RAG agent remember recent interactions or events. This is useful when:
- The same customer triggers multiple abandoned cart events.
- You want the agent to stay aware of the last few steps in the flow.
By maintaining a limited window of past context, the agent can produce more coherent and consistent responses without overwhelming the model with too much history.
7. Chat Model & RAG Agent: writing the email
At the heart of the workflow is the Chat Model (for example, OpenAI Chat) combined with a RAG Agent. Here is what happens:
- The Chat Model provides the language generation capability.
- The RAG Agent pulls in relevant context from the vector store via the Vector Tool.
- The agent uses a system message and prompt template to shape the final email.
A typical system message might be:
"You are an assistant for Abandoned Cart Email."
Then you give the agent a prompt that asks it to produce key elements like the subject line, preview text, HTML body, and a call to action.
8. Append Sheet (Google Sheets): logging everything
Once the email content is generated, the workflow appends a new row to a Google Sheet. This log might include:
- The generated email content.
- Status or outcome flags.
- Any metrics or IDs you want to track.
This sheet becomes your lightweight analytics and audit trail. Over time, you can use it to track delivery, opens, clicks, and even recovered revenue tied to specific email variants.
9. Slack Alert: catching errors quickly
If something goes wrong, you do not want to find out days later. That is where the Slack node comes in.
On errors, the workflow posts a short alert to a channel like #alerts with key details about what failed, such as:
- Credential issues.
- Rate limit problems.
- Malformed webhook payloads.
This way, you can jump in quickly, fix the problem, and keep your automation running smoothly.
A practical prompt template for your RAG Agent
Want consistent, conversion-focused copy? Here is a simple prompt structure you can adapt for the agent:
<system>You are an assistant for Abandoned Cart Email.</system>
<user>Generate an abandoned cart email for this customer:
- Customer name: {{customer_name}}
- Cart items: {{item_list}}
- Product highlights and context from vector store: {{retrieved_context}}
Return: subject, preview_text, body_html, recommended_cta, personalization_notes.
</user>
You can tweak the tone, brand voice, or formatting in this template, but the structure gives the model everything it needs to produce a complete email.
Best practices to get the most from this workflow
Once you have the basics running, a few small tweaks can make a big difference.
- Tune retrieval size: Start by retrieving 3 to 8 top vectors. Too few and you might miss context, too many and the prompt can get noisy or expensive.
- Chunking strategy: A chunk overlap around 10 percent is a good starting point. It helps preserve sentence flow across chunks.
- Use metadata wisely: Store product metadata with embeddings so you can filter by category, price range, or in-stock status during retrieval.
- Personalize thoughtfully: Use the customer’s first name and mention specific items from their cart to build trust and relevance.
- Respect compliance: Include unsubscribe options, honor do-not-contact flags, and only store the PII you truly need.
- Monitor performance: Log both successes and failures, and use Slack alerts to spot unusual error spikes early.
- A/B test your copy: Try different subject lines and CTAs, record the variants in Google Sheets, and see what actually performs best.
Scaling and keeping costs under control
As volume grows, embedding and retrieval costs can add up. The good news is that they are fairly predictable, and you have several levers to optimize:
- Cache static embeddings: Product descriptions rarely change. Embed them once and reuse the vectors instead of re-embedding every time.
- Deduplicate content: Before inserting into the vector store, skip near-identical content to avoid unnecessary cost and clutter.
- Use tiered models: Consider using a lower-cost embedding model for broad retrieval, then call a higher-end LLM only for final email generation.
With these strategies, you can scale your abandoned cart automation without nasty cost surprises.
How to test the workflow before going live
Before you flip the switch in production, it is worth running through a quick test checklist:
- Send a test POST request to the webhook with a sample cart payload.
- Check that text chunks are created and embeddings are successfully written to Supabase.
- Trigger the RAG agent flow and review the generated subject, preview text, and email body.
- Verify that a new row is appended to your Google Sheet and that Slack alerts fire correctly on simulated errors.
This gives you confidence that all the pieces are wired correctly before real customers hit the flow.
Subject line and CTA ideas to get you started
Stuck on copy ideas? Here are a few subject lines that mix urgency and relevance:
- “[Name], your cart items are almost gone – save 10% now”
- “Still thinking it over? Your [product] is waiting”
- “Grab your [product] before it sells out”
For calls to action, keep it clear and aligned with what you want them to do. Examples include:
- “Complete Your Purchase”
- “Reserve My Items”
- “View My Cart”
These are also great candidates for A/B tests inside your workflow.
Security and data privacy considerations
Because this workflow touches customer data and external APIs, it is important to treat security and privacy as first-class concerns.
- Secure credentials: Store Supabase, Cohere, OpenAI, Google Sheets, and Slack credentials inside n8n’s credentials system, not in plain text.
- Validate webhooks: Use HMAC signatures or signed payloads so your webhook only accepts legitimate requests.
- Minimize PII in vectors: Avoid storing sensitive personal data in vector metadata, and apply retention policies that align with GDPR or other regional regulations.
With these safeguards in place, you can enjoy the benefits of automation without compromising trust.
Next steps: putting the template to work
Ready to turn this into a live, revenue-saving workflow?
- Import the n8n workflow template into your own n8n instance.
- Connect your credentials for Supabase, Cohere, OpenAI, Google Sheets, and Slack.
- Send a few realistic test webhooks with real-world cart data.
- Iterate on your prompt template, retrieval settings, and email tone until it matches your brand.
- Start tracking results and run A/B tests on subject lines and CTAs.
Call to action: Want the ready-to-import workflow JSON and a production checklist? Grab the template and setup guide from our resources page, or reach out to our automation team if you would like a custom implementation tailored to your stack.
