
Maintaining an active GitHub repo can feel like juggling flaming torches. New issues pop up, people comment, some folks want to help, and suddenly you are spending more time assigning tickets than actually working on them. That is where this n8n workflow template comes in.
This guide walks you through a ready-made n8n automation for GitHub issue assignment that:
- Automatically assigns issues to the creator when they ask for it
- Lets commenters claim issues with a simple “assign me” message
- Politely replies if someone tries to grab an issue that is already taken
We will look at what the template does, when it is useful, how each node works, and how you can tweak it to fit your own workflow. Think of it as having a friendly, always-on triage assistant for your repo.
When should you use this n8n GitHub auto assignment workflow?
If you maintain an open-source project or any busy repository, you probably recognize these pain points:
- You keep forgetting to assign issues as they come in
- Contributors comment “assign me” but you see it hours (or days) later
- Multiple people try to claim the same issue and confusion follows
- You manually apply the same labels and rules over and over
This workflow is perfect if you want to:
- Speed up responses to new issues and volunteers
- Encourage contributors to self-assign in a structured way
- Standardize assignment rules across multiple repositories
- Reduce mental overhead so you can focus on actual work
In short, if your GitHub notifications feel out of control, this automation can quietly take over the boring parts.
What this n8n GitHub template actually does
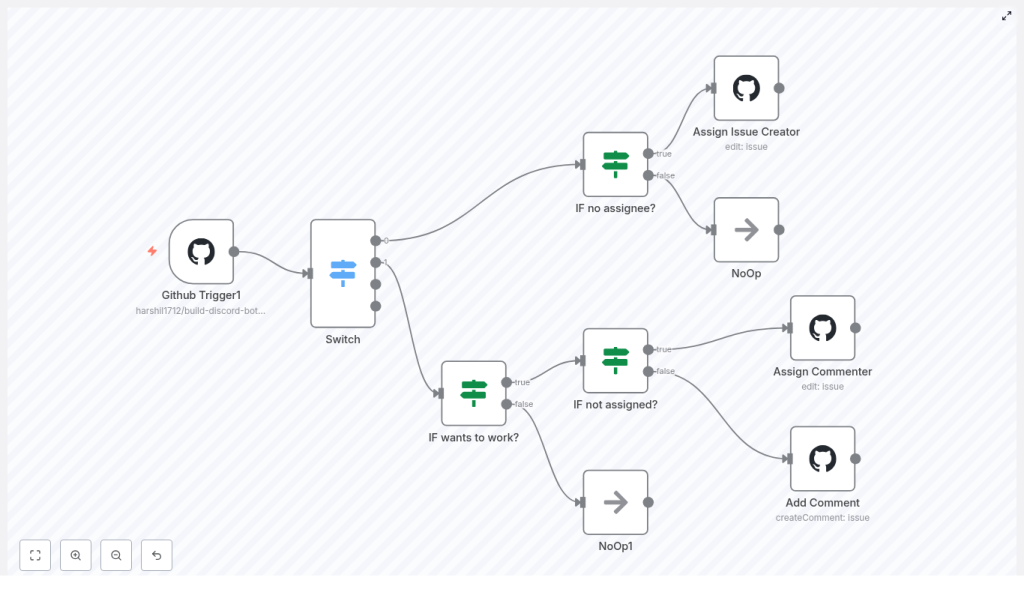
The template is built around a GitHub Trigger node and a few decision nodes that react to two types of events:
issuesevents (like when a new issue is opened)issue_commentevents (when someone comments on an issue)
From there, the workflow:
- Listens for new issues and new comments
- Checks whether someone is asking to be assigned, using a regex like “assign me”
- If the issue is unassigned:
- Assigns the issue creator if the request is in the issue body
- Assigns the commenter if they volunteer in a comment
- If the issue is already assigned:
- Posts a friendly comment explaining that someone else has it
Everything happens automatically in the background as GitHub events come in through the webhook.
Node-by-node tour of the workflow
Let us walk through the main nodes in the template so you know exactly what is going on under the hood.
1. GitHub Trigger node
This is where the magic starts. The GitHub Trigger node listens to your repository and fires whenever something relevant happens.
Configuration highlights:
- Events:
issuesandissue_comment - Repository: your target repo name
- Authentication: a GitHub OAuth token with the appropriate
repo(orpublic_repo) scope
Once this trigger is active, n8n will register the webhook with GitHub and start receiving payloads for new issues and comments.
2. Switch node – deciding what type of event it is
Next, the workflow uses a Switch node to figure out whether the incoming event is a new issue or a new comment.
It reads the action property from the webhook payload using an expression like:
={{$json["body"]["action"]}}You then configure rules so that:
openedgoes down the “new issue” pathcreatedgoes down the “new comment” path
This simple branch is what lets you handle issue creation and comments with different logic in the same workflow.
3. Detecting “assign me” intent with regex
Both the issue path and the comment path need to figure out one key thing: is this person asking to be assigned?
To do that, the workflow uses a regular expression. The template includes a practical pattern like:
/[a,A]ssign[\w*\s*]*me/gmThis matches phrases such as “Assign me” or “assign me please”. A slightly more flexible option you can use is:
/\bassign( me|ing)?\b/iHere is what is going on there:
\bmakes sure you match whole words, not partial strings( me|ing)?allows “assign me” or “assigning”imakes it case insensitive, so “Assign” and “assign” both work
You can tweak this regex depending on how your contributors usually phrase their requests.
4. Checking if the issue is already assigned
Before assigning anyone, the workflow checks whether the issue is still free to claim. It looks at the length of the assignees array in the payload:
={{$json["body"]["issue"]["assignees"].length}}If the length is 0, the issue is unassigned and safe to give to someone. If it is greater than 0, the workflow knows there is already an assignee and can respond accordingly.
5. Assigning the issue creator
When a new issue is opened and the body contains “assign me” (or your chosen pattern), the Assign Issue Creator node kicks in.
It uses a GitHub edit operation to:
- Set the assignee to the user who created the issue
- Optionally add a label such as
assignedto make the status clear
The node pulls key values from the webhook payload using expressions like:
owner: ={{$json["body"]["repository"]["owner"]["login"]}}
repository: ={{$json["body"]["repository"]["name"]}}
issueNumber: ={{ $json["body"]["issue"]["number"] }}
For the actual assignee, it uses the issue creator’s login:
= {{$json.body.issue["user"]["login"]}}That way, the moment someone opens an issue and asks to be assigned, it is theirs without you lifting a finger.
6. Assigning a commenter who volunteers
On the comment path, the workflow looks for “assign me” in the comment text instead of the issue body. If the regex matches and the issue has no assignees, it uses the Assign Commenter node.
This node is very similar to Assign Issue Creator, but the assignee comes from the comment user:
= {{$json["body"]["comment"]["user"]["login"]}}Again, you can also add labels like assigned when you update the issue. This makes it obvious at a glance that someone has claimed it.
7. Handling already-assigned issues with a friendly comment
What if someone tries to claim an issue that is already assigned? Instead of silently ignoring them or overwriting the existing assignee, the workflow uses an Add Comment node.
This node posts a short reply such as:
Hey @username,

This issue is already assigned to otheruser 🙂
You can customize the wording, of course, but the idea is to keep communication clear and public so nobody is left wondering what happened.
8. NoOp nodes
You will also see NoOp and NoOp1 nodes in the template. These are simply placeholder nodes used as “do nothing” branches when conditions are not met. They help keep the workflow structure clean and explicit.
Key configuration details at a glance
GitHub credentials and permissions
To keep everything secure and reliable, make sure you:
- Use a GitHub token with the minimum required scope:
repofor private repospublic_repoif you only work with public repos
- Store the token in n8n credentials, not hard-coded directly into nodes
- Confirm that the token belongs to a user with write access to the repository
Also keep in mind that the GitHub API has rate limits. This particular workflow only makes a few calls per event, so it is usually fine, but if you later expand it to bulk operations, you may want to think about backoff or batching strategies.
How to test your GitHub issue auto assignment workflow
Once everything is configured, it is worth running through a quick checklist to make sure the automation behaves as expected.
- Deploy and activate the workflow in n8n
When the GitHub Trigger node is active, n8n will handle webhook registration with GitHub automatically. - Test issue creation with “assign me”
Create a new issue in your repo and include “assign me” (or your regex phrase) in the issue body. The workflow should:- Assign the issue to the creator
- Add any configured labels (like
assigned)
- Test claiming through a comment
On an unassigned issue, post a comment that includes “assign me”. The workflow should:- Assign the issue to the commenter
- Apply labels if configured
- Test conflict handling
On an already-assigned issue, post another “assign me” comment from a different account. You should see the Add Comment node reply to explain that the issue is already taken.
Troubleshooting common issues
If something does not work on the first try, here are a few things to check.
- Webhook is not firing
Make sure the GitHub Trigger node is active, the webhook is correctly registered for the right repo, and the subscription is still valid in your GitHub repository settings. - Expressions show
undefined
Open the node’s test view in n8n and inspect the incoming JSON payload. Sometimes GitHub payload structures change slightly or differ between events. Update your expressions so paths like$json["body"]["issue"]["number"]match the actual payload. - Permission errors
If you see 4xx errors from GitHub, double-check:- The token scopes (repo vs public_repo)
- That the token owner has write access to the repository
- Regex not matching contributor messages
If people use different phrasing like “can I work on this?” or “I’d like to take this”, you can loosen or expand your regex to catch more variations.
Sample JSON snippet from the template
Here is a small piece of configuration-like JSON that reflects the core logic of the template:
{  "events": ["issue_comment","issues"],  "switch": {  "value1": "={{$json[\"body\"][\"action\"]}}",  "rules": ["opened","created"]  },  "if_no_assignee": {  "condition": "={{$json[\"body\"][\"issue\"][\"assignees\"].length}} == 0",  "regex": "/assign( me|ing)?/i"  }
}
This snippet shows how the workflow listens to both issue and comment events, checks the action, and only proceeds with assignment if there are no assignees yet and the regex matches.
Ideas to extend and customize the workflow
Once you have the basic auto assignment running, you can start layering on more advanced automation. Here are some enhancement ideas:
- Team-based assignments
Map certain keywords or labels to GitHub teams instead of individual users. For example, “frontend” could assign@org/frontend-team. - Smarter label automation
Automatically apply labels liketriage,good first issue, or priority levels based on keywords in the issue title or body. - Approval step for sensitive work
For big or security-sensitive issues, route the request to maintainers for review before auto-assigning. - Throttle repeated claims
Add logic that prevents the same user from spamming “assign me” comments across multiple issues in a short period. - Dashboard and notifications
Log assignments to a spreadsheet, database, or a Slack channel so your team has a clear overview of who is working on what.
Why this n8n template makes your life easier
At its core, this workflow is simple, but it solves a very real problem: manual triage does not scale. By letting your contributors self-assign issues with a tiny bit of structure, you:
- Make your project more welcoming
- Reduce the time you spend on admin tasks
- Keep assignment rules consistent and visible
- Encourage faster collaboration
And because it is built in n8n, you can easily adapt it to your team’s policies, add new branches, or plug it into other tools you already use.
Ready to try the GitHub issue auto assignment template?
If you want to stop manually assigning every issue and comment, you can start with this template as a solid base.
Here is what to do next:
- Import the template into your n8n instance
- Configure your GitHub credentials and select the target repository
- Review the regex and labels to match your project style
- Activate the workflow and run through the test steps above
If you would like help customizing this flow for team assignments, labels, or approval steps, you can always reach out or follow more of our n8n automation tutorials.
Get the template » • Subscribe for more n8n automation guides

One thought on “Automate Assigning GitHub Issues with n8n”