
Automate Blog Writing with n8n, LangChain & OpenAI
Turn simple prompts into polished, SEO-ready blog posts using an n8n workflow template powered by a LangChain AI Agent, OpenAI, and a handy memory buffer. Fewer repetitive tasks, more actual thinking.
Imagine never writing another first draft by hand
You open your laptop, stare at a blinking cursor, and think, “I really should write that 1,500-word post about automation.” Then you remember you still need to brainstorm titles, structure H2s, keep SEO rules in mind, and somehow sound like a human. Again.
That is where this n8n workflow template strolls in like a very organized intern who never gets tired. It takes your topic, asks the right questions, plans the structure, writes a draft, and can even send everything off to your CMS or editor. You still stay in control, but you no longer have to do the same boring steps on loop.
Why automate blog writing in the first place?
Content demand keeps growing, but headcount and budget usually do not. Teams want consistent, search-optimized articles, yet nobody wants to spend their life copying outlines into docs or checking if the primary keyword made it into the H2s.
Automating blog writing with n8n, LangChain, and OpenAI helps you:
- Skip repetitive setup tasks and get to a solid first draft faster
- Apply the same SEO and formatting rules every single time
- Reuse prompts, workflows, and logic instead of reinventing the wheel per article
- Plug into your existing CMS or publishing pipeline without manual copy-paste
Done right, automation does not replace your editorial judgment, it just removes the tedious parts so you can focus on ideas, nuance, and final polish.
What this n8n blog-writing workflow actually does
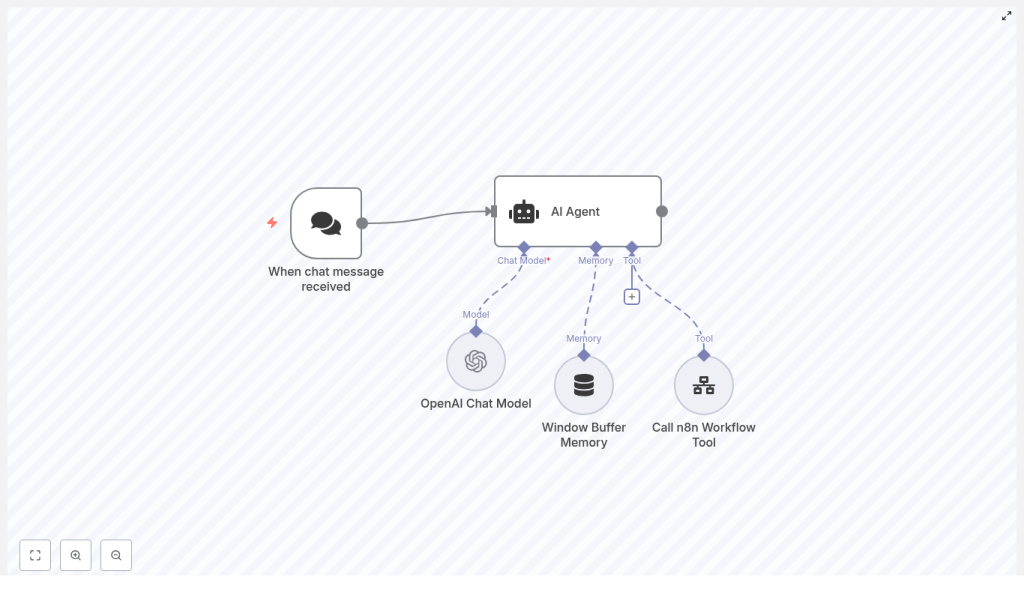
This example n8n workflow template wires together a few key nodes so your blog creation process behaves like a small, polite content robot:
- Chat Trigger – collects your topic, keywords, tone, and length
- LangChain-based AI Agent – acts as the “SEO strategist” brains of the operation
- OpenAI Chat Model – generates titles, outlines, and the blog draft
- Window Buffer Memory – remembers recent conversation context so nothing important gets lost
- Call n8n Workflow Tool – hands the finished draft to another workflow for publishing or review
How the pieces talk to each other
- You send a topic or partial brief through the Chat Trigger.
- The AI Agent applies its system message (for example, “behave like a master SEO strategist”), refines the brief, and decides when it is time to write.
- The OpenAI Chat Model creates titles, H2 headings, and full draft content.
- The Window Buffer Memory keeps recent messages so the agent can iterate on titles, outlines, or sections without forgetting previous decisions.
- Once the draft looks good, the Call n8n Workflow Tool triggers a downstream workflow to save, review, or publish the article.
The result is a reliable, repeatable content pipeline instead of a chaotic mix of docs, sticky notes, and “I’ll finish that later.”
Quick-start setup guide in n8n
Let us walk through the main pieces you need to configure in n8n to get this blog-writing workflow running. You can reuse the same pattern for other content tasks or different models.
Step 1: Capture your brief with a Chat Trigger
The Chat Trigger node is your front door. It receives incoming prompts and instructions from you or your team. Configure it to collect the key details the workflow needs to produce a good post, such as:
topicprimary_keywordaudience/toneword_count_estimate
Think of it as a mini brief form. The better the inputs, the less your future self has to fix.
Step 2: Set up the LangChain AI Agent
Next, use an agent node that supports LangChain-style behavior. This is where you define your content brain. Provide a system message that sets expectations, for example:
You are a master SEO strategist. I will provide a topic for a blog post. Help refine the blog post title and required H2s. Once approved, start writing the blog post.Within this agent, define responsibilities such as:
- Reviewing and refining the user brief so it is specific enough
- Proposing several title options plus a set of H2 headings
- Asking follow-up questions if the brief is vague or missing details
- Calling the writing tool once the outline is approved and ready
This keeps your workflow from jumping straight into a full draft before the structure and SEO angle are nailed down.
Step 3: Connect an OpenAI Chat Model
Now connect the agent to an OpenAI-compatible chat model. Configure the messages so the model receives:
- The system prompt that defines the SEO strategist role
- The user’s brief, including the primary keyword and any constraints
- Agent prompts that request specific outputs like outlines, intros, or full sections
Typical flow looks like this:
- Agent refines the title and H2 outline
- Once approved, the agent asks the model for the introduction, body sections under each H2, and a conclusion
To keep quality and cost under control, use these tuning tips:
- Set temperature between 0.2 and 0.6 for a mix of creativity and predictability
- Increase max tokens enough to cover the full draft, especially for longer posts
- For very long articles, generate them in sections to avoid hitting token limits
Step 4: Add Window Buffer Memory for context
The Window Buffer Memory node stores the recent conversation so the agent does not forget what you already agreed on. It is like a short-term memory for your workflow that tracks titles, outlines, and earlier decisions.
Configure the window length to the number of recent messages you want to keep, for example 10. This helps the agent iterate on drafts or headings without re-asking the same questions or drifting away from the original plan.
Step 5: Trigger a downstream workflow when the draft is done
Once the agent decides the draft is complete, use the Call n8n Workflow Tool to start a second workflow. That is where all the “after writing” tasks live, such as:
- Saving the draft to Google Docs, Notion, or a headless CMS
- Running grammar and plagiarism checks
- Sending the draft to an editor or reviewer
- Scheduling publication with metadata like meta title, description, and slug
This separation keeps your main content workflow focused on creation, while a dedicated pipeline handles quality checks and publishing.
Keeping things safe, accurate, and SEO friendly
Build in editorial guardrails
Even the smartest workflow should not publish directly to your blog without a human looking at it. Keep a mandatory review step in your downstream workflow so editors can catch:
- Hallucinated facts or outdated information
- Problematic or off-brand language
- Inconsistent claims or missing context
Use system prompts and validators to reduce these issues, and if your policy requires it, add a step that tags or flags outputs as “AI-generated.”
Enforce SEO and content quality rules
To keep your content optimized, bake SEO rules right into the agent’s system prompt. For example, require that every post includes:
- A meta description
- An SEO title around 50 to 60 characters
- Headers that include the primary keyword where appropriate
- Suggested internal and external links
In the downstream workflow, you can also run an automated readability check, such as Flesch-Kincaid or a similar score, to make sure your content is not written like a legal contract.
Watch rate limits and costs
Language models are powerful, but they are not free. To keep API usage under control:
- Batch or chunk generation for longer posts
- Cache repeated content where it makes sense
- Use the agent and Window Buffer Memory to avoid unnecessary calls until the outline is final
That way your automation saves both time and budget instead of quietly inflating your bill.
Testing, monitoring, and improving your workflow
Once your n8n blog-writing workflow is live, treat it like a product, not a one-off experiment. Add logging and light testing so you can track what is working and what needs tuning.
Key metrics to keep an eye on
- Draft acceptance rate by editors
- Average number of edits per article
- Organic traffic and keyword rankings for published posts
- API calls and cost per published article
Adjust system prompts, temperature, memory window length, and outline rules over time. Small tweaks can significantly improve quality and reduce the amount of manual cleanup needed.
A compact example prompt and flow
Here is a concise JSON-style prompt you can use when calling the agent for a new article:
{  "system": "You are a master SEO strategist. Produce 3 title options and a suggested H2 outline that targets the primary keyword.",  "user": {  "topic": "How to automate blog writing",  "primary_keyword": "automate blog writing",  "audience": "marketing managers",  "desired_length": "1200-1500"  }
}
After you approve the outline, have the agent generate the full draft in sections: introduction, each H2 section, then the conclusion. This makes it much easier to review and edit progressively instead of wrestling with a giant wall of text.
Where to go from here
Automating blog creation with n8n, a LangChain AI Agent, and OpenAI gives you a scalable content engine that still respects editorial quality. Start small with the workflow pattern in this template:
- Collect structured briefs with the Chat Trigger
- Refine titles and outlines using the AI Agent
- Store context in Window Buffer Memory
- Generate drafts through the OpenAI Chat Model
- Hand everything off to a downstream workflow for checks and publishing
Try it on a single topic first, then iterate on prompts, memory settings, and SEO rules until your first-draft acceptance rate climbs and your editors stop complaining about repetitive fixes.
Call to action: Want to move even faster? I can generate ready-to-import JSON for the n8n nodes, a tested system prompt pack, or a starter downstream workflow for publishing to WordPress. Tell me which one you want to build first and we will take it from there.
