
Ever find yourself copying an old Confluence page, tweaking a few fields, and thinking, “There has to be a better way”? If you are doing release notes, onboarding docs, or incident reports over and over, you are not alone.
In this guide, we will walk through an n8n workflow template that automatically creates new Confluence pages from an existing space template. We will chat about what the workflow does, when it is worth using, and how to set it up step by step so you can stop doing the boring stuff by hand.
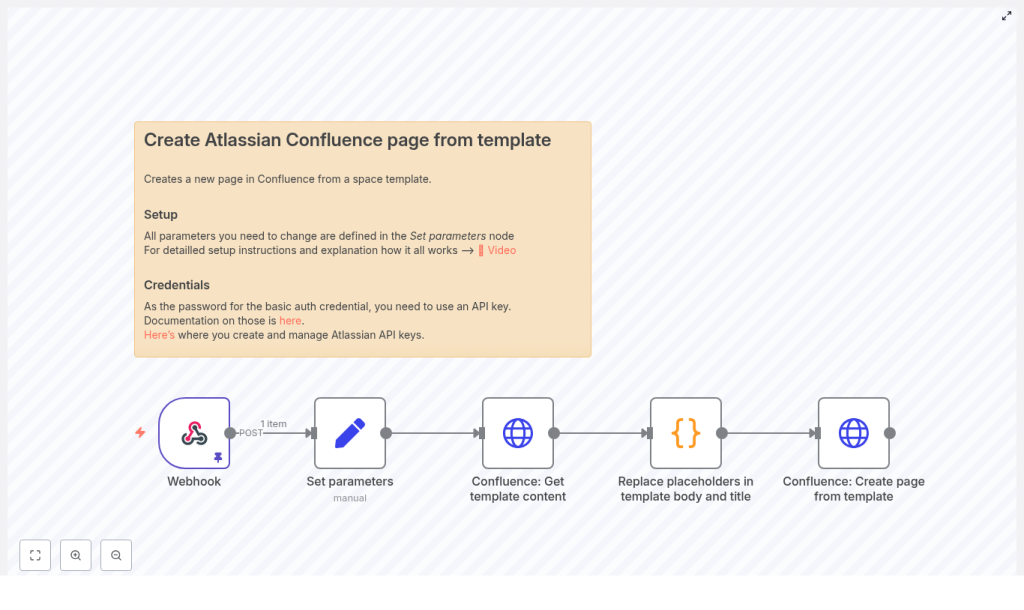
What this n8n – Confluence workflow actually does
At a high level, this automation takes a Confluence template, fills in placeholders with real data from a webhook, then creates a brand new page for you. No more copying and pasting, no more “did I forget a field this time?” worries.
Here is the basic flow:
- n8n waits for a webhook call with data, for example a release, user, or ticket.
- It pulls some configuration values like your Confluence base URL, template ID, space key, and parent page ID.
- It calls the Confluence REST API to fetch the template content.
- A Code node replaces placeholder tokens in the template with the actual values from your webhook payload.
- Finally, it creates a new Confluence page using that filled-in content.
The result: consistent, standardized pages created on demand, directly from your tools or pipelines.
When to use this Confluence automation
This workflow is perfect any time you need repeatable documentation with a similar structure every time. For example:
- Release notes populated from your CI/CD pipeline
- Onboarding checklists filled with user or employee details
- Incident reports that pull in ticket IDs, timelines, and owners
If you are already using Confluence templates and you find yourself creating almost identical pages again and again, this n8n template will probably save you a lot of clicks and reduce human error along the way.
What you need before you start
Before you plug in the workflow, make sure you have:
- An Atlassian account and Confluence Cloud with permission to create pages in the target space.
- An Atlassian API token for authentication (this is used as the password in basic auth).
- An n8n instance where you can use HTTP Request nodes and a Code node.
- Your Confluence template ID, plus the space key and parent page ID where you want new pages to appear.
Once you have those in place, you are ready to wire everything together.
How the n8n workflow is structured
The workflow is built around five main nodes that work together:
- Webhook – receives incoming data and triggers the workflow.
- Set parameters – stores static configuration like URLs and IDs.
- Confluence: Get template content – fetches the template title and body.
- Replace placeholders in template – uses JavaScript to inject data into the template.
- Confluence: Create page from template – sends a POST request to create the final page.
Let us go through each of these so you know exactly what to configure.
Step 1 – Webhook: trigger the workflow with data
The Webhook node is how your other tools talk to n8n. You can send it data from CI/CD systems, forms, Zapier, custom apps, or anything else that can make an HTTP request.
Configure the Webhook node to:
- Use a unique path (so you know which workflow you are hitting).
- Accept POST requests.
The payload should contain all the values you want to plug into the Confluence template. For example:
{  "user": { "name": "Alice", "email": "alice@example.com" },  "release": { "version": "1.4.2", "notes": "Bug fixes and improvements" },  "ticket": { "id": "PROJ-123", "url": "https://jira.example/browse/PROJ-123" }
}
Later on, the Code node will read this JSON, match it with placeholders in the template, and swap everything in.
Step 2 – Set parameters: keep your config in one place
Next up is a Set node that acts like a small config file inside your workflow. These are values that rarely change, so it is easier to define them once and reuse them everywhere.
In the Set node, define fields such as:
confluence_base_url– for examplehttps://your-domain.atlassian.nettemplate_id– the ID of the Confluence template you want to usetarget_space_key– the space key where the new page should livetarget_parent_page_id– the ID of the parent page to nest under
Keeping these in one node makes it much easier to update later, especially if you move to a different space or change templates.
Step 3 – Fetch your Confluence template content
Now n8n needs the actual template from Confluence so it can work with the title and body.
Use an HTTP Request node configured as a GET request to the Confluence REST API:
GET https://your-domain.atlassian.net/wiki/rest/api/template/{template_id}
In the response, you will get:
- The template title, usually in a field like
name. - The template body in Confluence
storageformat atbody.storage.value.
Those two pieces are what you will transform in the next step.
Step 4 – Replace placeholders in the template
This is where the magic happens. A Code node scans the template title and body for placeholders and replaces them with values from the webhook payload.
The placeholders follow a pattern like $some.field.path$. That path lines up with the JSON structure in your webhook data. For example:
$user.name$looks for{"user": {"name": "..."}}$release.version$looks for{"release": {"version": "..."}}
Here is a sample JavaScript snippet that does the heavy lifting:
function replacePlaceholders(template, values) {  const placeholderPattern = /\$(.*?)\$/g;  return template.replace(placeholderPattern, (match, p1) => {  const keys = p1.split('.');  let value = values;  for (const key of keys) {  if (value && key in value) {  value = value[key];  } else {  return match; // fallback to original placeholder  }  }  return value;  });
}

const templateTitle = $('Confluence: Get template content').item.json.name;
const templateBody = $('Confluence: Get template content').item.json.body.storage.value;
const values = $('Webhook').item.json;

const pageTitle = replacePlaceholders(templateTitle, values);
const pageBody = replacePlaceholders(templateBody, values);

return { "page_title": pageTitle, "page_body": pageBody };
A couple of handy details here:
- If a placeholder does not match any value in the payload, it is left as-is. That makes it easier to spot missing data later.
- If you ever need more advanced logic, such as loops, lists, or conditional sections, you can generate HTML fragments in this Code node and then insert them into the template body.
Step 5 – Create the new Confluence page
Once the template is filled in, the final step is to send it back to Confluence as a new page.
Use another HTTP Request node configured as a POST to the Confluence content endpoint:
POST https://your-domain.atlassian.net/wiki/rest/api/content/
Content-Type: application/json
Authorization: Basic base64(email:api_token)

{  "type": "page",  "title": "2025-09-12-14-30 - Release notes 1.4.2",  "space": { "key": "TARGET_SPACE" },  "ancestors": [{ "type": "page", "id": "PARENT_PAGE_ID" }],  "body": {  "storage": {  "value": "<p>Your rendered storage HTML here</p>",  "representation": "storage"  }  }
}
A few important notes:
- Authentication uses basic auth with your Atlassian account email as the username and the API token as the password.
- type must be
page. - space.key and ancestors.id control where the page lives and which page it is nested under.
- The body.storage.value field should contain the HTML you produced in the Code node.
Best practices for smooth Confluence automation
To keep things safe and maintainable, it helps to follow a few simple habits:
- Start by testing in a sandbox space or under a restricted parent page so you do not clutter production docs.
- Keep your Confluence templates simple and use placeholders only where you really need dynamic data.
- Validate webhook payloads and return clear error messages if required fields are missing.
- Log Confluence responses so you can capture the created page ID and URL for follow-up automations or notifications.
- Export your n8n workflow and keep it in version control so you can track changes over time.
Troubleshooting common issues
401 Unauthorized
If you get a 401, double-check your authentication details. Make sure you are:
- Using your Atlassian account email as the username.
- Using a valid, active API token as the password.
- Confirming that the token has not been revoked or regenerated without updating n8n.
Template placeholders are not replaced
If some placeholders are still visible in the final page, it usually means the payload structure does not match the placeholder path.
For example, the placeholder $release.version$ expects a payload like:
{  "release": {  "version": "1.4.2"  }
}
If the JSON keys or nesting differ, the Code node will not find the value and will leave the placeholder unchanged.
Malformed storage HTML
Confluence uses a specific storage format that expects valid HTML and properly formatted Atlassian macros. If you are dynamically generating HTML in the Code node:
- Check for mismatched or unclosed tags.
- Make sure you are escaping special characters correctly.
- Verify that any macros you insert follow Confluence syntax.
Security tips for using n8n with Confluence
Because this workflow touches your documentation system, it is worth tightening security a bit:
- Never commit API tokens to public repos. Use n8n credentials or environment variables for secrets.
- If you accept webhooks from external sources, validate the sender using IP allowlists, HMAC signatures, or other checks.
- Grant the least privileges necessary to the Confluence account that n8n uses, so it cannot do more than it needs to.
Why this n8n template makes your life easier
Once this workflow is in place, you are no longer manually creating Confluence pages for every release or incident. Instead, your tools send a webhook, n8n fills in the template, and the new page appears right where it should be, with the right structure and data every time.
That means:
- Less repetitive work.
- More consistent documentation.
- Fewer mistakes and forgotten fields.
Try the template and customize it to your needs
Ready to give it a spin?
- Import the workflow into your n8n instance.
- Set your Confluence credentials (email + API token) in n8n.
- Configure the template ID, space key, and parent page ID in the Set node.
- Trigger the webhook with a sample JSON payload and check the new page in Confluence.
Start in a sandbox space, tweak your placeholders and formatting, and iterate until the generated pages look exactly how you want. If you need more advanced replacement logic for lists or conditional sections, you can extend the Code node to handle those patterns too.
Next step: import the template, run a test, and share it with your team once it is dialed in. If this kind of automation is helpful, keep exploring more n8n workflows to connect your tools and clean up other repetitive tasks.
