
Automate File Generation with n8n & Slack
Use this reference guide to configure an n8n workflow that periodically generates JSON data, converts it to a binary representation, writes it to disk, and posts a confirmation message to Slack. The focus here is on the exact node configuration, data flow between nodes, and practical considerations for running this workflow in production.
1. Workflow Overview
This workflow demonstrates a common automation pattern in n8n: scheduled data generation, file creation, and notification. It is suitable for tasks like scheduled report exports, JSON backups, or generating files for downstream ingestion pipelines.
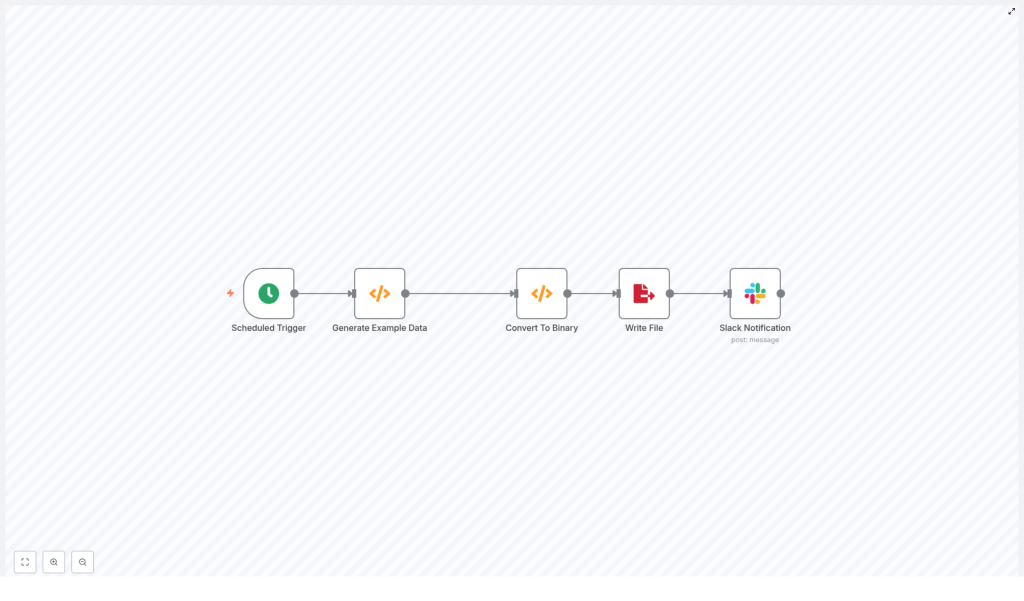
The example workflow consists of five nodes:
- Scheduled Trigger – initiates the workflow at a defined interval
- Generate Example Data (Function) – constructs the JSON payload
- Convert To Binary (Function) – encodes JSON as base64 and stores it in the
binaryproperty - Write File – persists the binary data as a file on the file system
- Slack Notification – sends a status message to a Slack channel
Once you understand this pattern, it can be extended to:
- Upload generated files to cloud storage (for example, S3 or Google Drive)
- Send files as email attachments
- Trigger additional workflows or services after file creation
2. Architecture & Data Flow
The workflow processes a single item at a time, which is typical for scheduled tasks. The execution flow is linear:
- Scheduled Trigger creates an initial item with basic metadata.
- Generate Example Data overwrites
items[0].jsonwith the JSON payload that will be written to disk. - Convert To Binary reads
items[0].json, converts it to a base64-encoded string, and assigns it toitems[0].binary.data. - Write File consumes the
binary.dataproperty and writes it to a file with a configured filename and path. - Slack Notification sends a confirmation message that the file has been written, optionally including filename and timestamp information.
At no point is the file content stored in Slack or external systems by default. The Slack node sends only a text message unless you explicitly extend the workflow to upload or attach the file.
3. Node-by-Node Breakdown
3.1 Scheduled Trigger Node
Purpose: Start the workflow automatically at a defined interval.
Key configuration:
- Node type: Scheduled Trigger
- Mode: Use either simple intervals or a cron expression.
- Typical test setting: Every 1 minute for rapid feedback while developing.
- Typical production setting: Hourly, daily, or a custom cron schedule depending on your reporting or export needs.
The Scheduled Trigger node usually outputs a single item into the workflow. This item can contain basic metadata, but in this example, the next node will replace the JSON content entirely.
3.2 Generate Example Data (Function Node)
Purpose: Generate the JSON object that will be turned into a file.
Node type: Function
Example code used in the workflow:
items[0].json = {  "text": "asdf",  "number": 1
};
return items;
Behavior and notes:
- This code replaces the existing
jsoncontent of the first item with a simple object containing a string and a number. - You can expand this object to include timestamps, identifiers, or any other metadata. For example, you can add
dateorrunIdfields for traceability. - If you need to gather data from APIs or databases, you can insert additional nodes before this Function node and aggregate their outputs here.
Example extension: Add a timestamp or run identifier:
items[0].json = {  text: "asdf",  number: 1,  date: new Date().toISOString(),  runId: $execution.id
};
return items;
This pattern keeps all data for the file in a single JSON object, which simplifies the conversion step.
3.3 Convert To Binary (Function Node)
Purpose: Convert the JSON object into binary data that the Write File node can handle.
Node type: Function
Example code used in the workflow:
items[0].binary = {  data: {  data: Buffer.from(JSON.stringify(items[0].json, null, 2)).toString('base64')  }
};
return items;
How this works:
JSON.stringify(items[0].json, null, 2)converts the JSON object into a formatted string with indentation of 2 spaces. The formatting is purely for readability if you open the file later.Buffer.from(...).toString('base64')converts the string to a Node.jsBufferand then encodes it as a base64 string compatible with n8n’s binary format.- The result is stored at
items[0].binary.data.data. The important part for n8n is that a binary property exists (here nameddata) containing adatakey with the base64 string.
Key technical details:
- Binary property name: In this example, the property is
data. You can choose any name, such asfileorpayload, but it must match the configuration in the Write File node. - Buffer usage: The use of
Buffer.fromavoids deprecation warnings associated withnew Bufferand is the recommended Node.js approach.
Edge cases and validation:
- If
items[0].jsonisundefinedor not serializable,JSON.stringifywill fail. Ensure that the previous node always provides a valid JSON object. - If you handle large JSON payloads, be aware of memory usage and potential execution time limits in your n8n environment.
3.4 Write File Node
Purpose: Persist the generated binary data to a file on the n8n host file system.
Node type: Write File
Key configuration parameters:
- Binary Property: Set this to
data(or the name you used in the Convert To Binary node). - File Name:
- Static example:
test.json - Dynamic example using an expression:
report-{{$now.toISOString().slice(0,10)}}.json
- Static example:
- File Path / Directory: If applicable, configure a path relative to the n8n working directory or an absolute path in your container/host.
File system considerations:
- The Write File node writes to the file system where the n8n process runs. In containerized deployments, this is often an ephemeral or container-local filesystem.
- For long-term storage or shared access, consider:
- Mounting a persistent volume
- Using a network file system
- Uploading the file to cloud storage (for example, S3 or Google Drive) in a subsequent step
- Ensure that the n8n process has permission to write to the configured directory. Permission issues are a common cause of Write File failures.
Error handling notes:
- If the configured binary property name does not exist, the node will fail with an error indicating that the binary data is missing. Verify that the property name exactly matches the one set in the Convert To Binary node.
- File name collisions can cause repeated overwrites. Use dynamic filenames with timestamps or unique IDs when you want to preserve historical files.
3.5 Slack Notification Node
Purpose: Notify a Slack channel when the file has been created.
Node type: Slack
Example message content:
File written: test.jsonAuthentication options:
- Incoming Webhook: Configure a Slack incoming webhook URL and use it in the Slack node credentials.
- Slack App / Bot Token: Use a bot token with the minimal required scopes to post messages to your target channel.
Configuration tips:
- Set the target channel (for example,
#alertsor#automation) in the Slack node parameters. - You can include dynamic data in the message using expressions, such as the generated filename or timestamp.
- For richer messages, use Slack attachments or Block Kit structures supported by the n8n Slack node.
Common issues:
- Authentication errors if the token or webhook is invalid or revoked.
- Channel not found if the bot is not invited to the channel or the channel name is incorrect.
4. Configuration Notes & Best Practices
4.1 Scheduling Strategy
- Use a fast interval (for example, every minute) only during development and testing.
- For production, choose a schedule that matches your operational requirements, such as daily at midnight for daily reports.
- Cron expressions provide fine-grained control if you need non-trivial schedules.
4.2 Dynamic Filenames
To avoid overwriting files and to make it easier to trace executions, use dynamic filenames with timestamps or unique identifiers.
Example daily filename expression:
report-{{$now.format('YYYY-MM-DD')}}.jsonYou can also incorporate execution IDs or other metadata if needed.
4.3 Storage Strategy
- Local filesystem: Acceptable for short-lived files or internal testing, but not ideal for backups or shared access.
- Durable storage: For long-term retention and reliability, upload files to:
- AWS S3
- Google Cloud Storage
- Google Drive
- A dedicated file server or NAS
- n8n provides native nodes or HTTP-based integrations to send files directly to these services, which reduces dependency on the n8n host filesystem.
4.4 Error Handling & Retries
- Use the On Error workflow trigger to build a separate error-handling workflow that receives failed executions.
- Wrap network-dependent steps (for example, Slack, cloud uploads) with retry logic for transient errors like timeouts or rate limits.
- Implement exponential backoff where appropriate to avoid hammering external services during outages.
4.5 Monitoring & Logging
- Use n8n execution logs and the node output inspector to verify intermediate data and debug issues.
- Consider creating a dedicated monitoring workflow that:
- Listens for failed executions
- Sends alerts to Slack or email
- Captures key metadata such as workflow name, error message, and timestamp
- Keep logs concise and avoid including sensitive data in messages or external notifications.
5. Testing & Debugging
Before enabling a production schedule, thoroughly test the workflow:
- Manual execution: Run the workflow manually from the n8n UI to validate each node’s behavior.
- Short test intervals: Temporarily set the Scheduled Trigger to a frequent interval (for example, every minute) to observe repeated runs.
- Inspect node outputs: Use the UI to check
jsonandbinarydata at each step.
Typical issues and checks:
- Binary property not found: Confirm that the binary property name configured in the Write File node matches the property set in the Convert To Binary Function (for example,
data). - File write permission error: Verify that the file path is valid and that the user running n8n has write permissions.
- Slack authentication failure: Recheck tokens, webhook URLs, and channel configuration in the Slack node credentials and parameters.
6. Security Considerations
- Secrets management: Do not hard-code secrets or tokens inside Function nodes. Use n8n credential types and environment variables to securely manage sensitive values.
- File system access: Restrict the directories that n8n can write to and avoid granting unnecessary system-level permissions.
- Cloud credentials: When extending the workflow to upload files to cloud storage, rotate access keys regularly and limit permissions to only the required buckets or folders.
- Slack scopes: Configure Slack apps or bots with the minimal required scopes and consider using a dedicated bot user for automation notifications.
7. Extending the Workflow
Once the base pattern is working, you can enhance it with additional automation steps:
- AWS S3 integration: Upload the generated file to S3 and post a pre-signed URL to Slack for easy access.
- Email delivery: Attach the generated file to an email via SMTP or a transactional email provider node.
- Downstream triggers: Publish a message to a message queue or make an HTTP call to notify other systems that a new file is available.
All of these extensions can be added after the Write File node or used as alternatives if you prefer not to store files locally.
8. Minimal JSON Workflow Example
The following snippet represents a minimal n8n workflow definition that generates a simple JSON file and then sends a Slack notification after writing the file:
{  "name": "Generate and Save Example File",  "nodes": [ ... ]
}
Import this JSON into your n8n instance via the UI, then adjust node parameters such as the schedule, Slack credentials, and filename to match your environment.
9. Summary
This n8n workflow pattern for automated file generation and Slack notifications is built around a simple sequence:
- Schedule a trigger.
- Generate or collect JSON data.
- Convert that JSON to binary data.
- Write the binary data to a file on disk or in external storage.
- Notify your team via Slack.
By following the configuration details in this guide, you can adapt the template for daily reports, backups, or other file-based integrations while keeping scheduling, storage, and security under control.
Next steps: Import the example workflow into your n8n instance, customize the JSON payload and filename, and enable the schedule. If you want to integrate with S3, Google Drive, or add more advanced error handling, involve your automation team or reach out to the n8n community for implementation patterns.
<
