
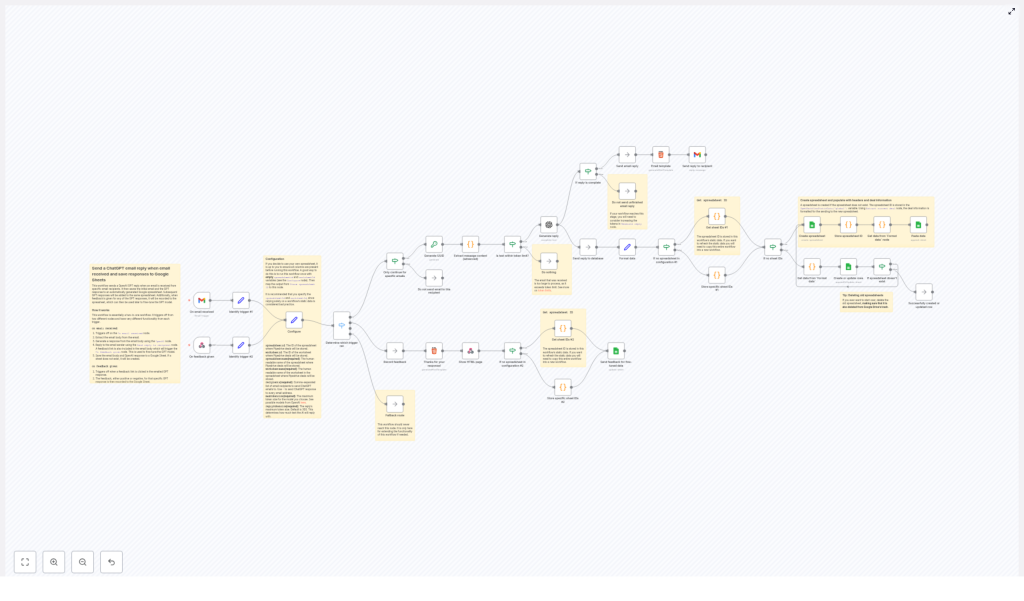
Automate Gmail Replies and Save to Google Sheets Workflow
What You Will Learn
In this guide, you will learn how to use an n8n workflow template that:
- Automatically replies to incoming Gmail messages using OpenAI GPT
- Saves both the original email and the AI-generated reply to Google Sheets
- Adds simple feedback links to each reply and records the feedback
- Keeps a structured history of all conversations for analysis and improvement
By the end, you will understand each part of the workflow, how the trigger works, how data flows through n8n, and what you need to configure to make it run reliably.
Concept Overview: What This n8n Workflow Does
This n8n template connects three main tools:
- Gmail – receives incoming emails and sends replies
- OpenAI GPT – generates intelligent, context-based responses
- Google Sheets – stores each email, reply, and feedback result
The workflow is designed to help you:
- Handle repetitive email replies automatically
- Keep a clear record of what was received and how the AI responded
- Collect user feedback on each reply to see what works and what needs improvement
Two Ways the Workflow Is Triggered
This automation has two main trigger points. Understanding these is key before you dive into the steps.
1. When a New Email Is Received
The first trigger activates when a new email arrives in Gmail. At this point, the workflow:
- Reads the email content and sender information
- Generates a unique ID (UUID) to track this specific conversation
- Sends the email content to OpenAI GPT to create a reply
- Sends the AI-generated reply back to the sender
- Includes feedback links in the reply email, such as “Yes” or “No” to rate the response
- Logs the original email, the reply, and metadata into a Google Sheet
2. When Feedback Is Submitted
The second trigger activates when a recipient clicks one of the feedback links in the reply email. When this happens, the workflow:
- Receives the feedback signal (for example, “Yes” for a good reply or “No” for a poor one)
- Finds the matching row in Google Sheets using the unique ID
- Updates the corresponding row to record whether the response was good or needs improvement
This creates a simple feedback loop that lets you track how well the AI replies are performing over time.
Step-by-Step: How the Workflow Runs in n8n
Now let us walk through the main steps of the workflow in the order they typically run, starting from the trigger.
Step 1 – Identify What Triggered the Workflow
The first logic block in the workflow checks whether it was triggered by:
- A new email arriving in Gmail
- A feedback link being clicked
This “identify trigger” step is important because it decides which path the workflow should follow next. It ensures that email processing and feedback handling are clearly separated but still part of the same automation.
Step 2 – Process the Incoming Email
When the workflow is triggered by a new email, it performs several actions to prepare the content for OpenAI:
- Extract email content – The workflow reads the body of the email, the subject line, and the sender address.
- Generate a UUID – It creates a unique identifier for this conversation, which is later used to match feedback and Google Sheets rows.
This step ensures that every email and reply pair can be tracked independently, even if many emails arrive at once.
Step 3 – Check Token Limits for OpenAI
Before sending the email content to OpenAI GPT, the workflow checks the text length against configured token limits.
- Token limit check – The workflow makes sure the combined size of the prompt and the expected reply fits within the model’s maximum token capacity.
- If the email is too long, the workflow trims or adjusts the content so that it can be processed safely.
This prevents errors from OpenAI and also helps control costs and performance by avoiding overly long prompts.
Step 4 – Generate an AI Reply with OpenAI GPT
Once the content is validated against token limits, the workflow sends the processed email text to OpenAI GPT.
- Generate reply – GPT receives the email content as input and returns a relevant, context-aware response.
- The workflow stores this AI-generated reply along with the UUID and other metadata.
At this stage, you have both the original email and an AI reply ready to send back to the user and to store in Google Sheets.
Step 5 – Send the Reply Email from Gmail
Next, the workflow sends the AI-generated reply back to the original sender using Gmail.
- Send email reply – The workflow builds the reply email body, inserts the GPT-generated text, and includes feedback links such as “Yes” and “No”.
- Each feedback link is configured to call the feedback webhook that triggers the second part of the workflow.
This makes it very easy for users to rate the response with a single click, without needing to fill out a form or send another email.
Step 6 – Store Email and Reply in Google Sheets
After sending the reply, the workflow logs all relevant information in Google Sheets. This step handles both creation and updates.
- Create spreadsheet and worksheet if needed – If the configured Google Sheet or worksheet does not exist yet, the workflow creates them automatically.
- Save conversation data – The workflow writes a new row that includes:
- The unique ID (UUID)
- The original email content
- The AI-generated reply
- Sender information and other metadata
- Update rows by unique ID – The UUID is used as a stable key so that later feedback can update the correct row.
This creates a centralized, structured log of all automated conversations that you can filter, sort, or analyze later.
Step 7 – Record Feedback in Google Sheets
When the workflow is triggered by a feedback link click, it follows a shorter path focused on updating the existing data.
- Locate the correct row – Using the UUID passed from the feedback link, the workflow finds the corresponding conversation in Google Sheets.
- Update feedback fields – It marks the reply as either:
- Good or accepted (for “Yes”)
- Needing improvement (for “No”)
Over time, this gives you a clear picture of which kinds of replies are working and where you might want to refine prompts or logic.
Configuration Highlights in n8n
To get the most out of this template, you will configure a few key settings inside n8n.
Spreadsheet and Worksheet Naming
You can define human-readable names for both the Google spreadsheet and the worksheet. This helps keep your data organized, especially if you use multiple automations.
- Spreadsheet name – The main file where all email and reply data is stored.
- Worksheet name – The specific sheet inside the file where rows are added and updated.
Email Recipients Filter
The workflow allows you to control which incoming emails should receive an automated GPT reply.
- You can specify particular sender email addresses that the workflow will respond to.
- Alternatively, you can use
*to respond to all senders.
This is useful if you want to limit automation to support inboxes, specific clients, or test accounts.
Token Limit Settings
To manage cost and performance when using OpenAI, the workflow includes configuration for token limits.
- Maximum model token size – Controls how much total text (prompt plus reply) the model can process.
- Maximum reply token size – Sets an upper bound on how long the AI-generated response can be.
Fine-tuning these values helps ensure that your automation is efficient while still producing useful replies.
Benefits of This n8n Gmail Automation
Using this workflow template provides several practical advantages:
- Automated, personalized replies – OpenAI GPT generates context-aware responses without manual effort.
- Complete conversation history – Every email and reply is stored in Google Sheets for later review or reporting.
- Built-in feedback loop – Simple “Yes” and “No” links let users rate responses with minimal friction.
- Scalable data storage – Google Sheets serves as a central, scalable place to store and manage all your interaction data.
How to Use This Template in Your Own Setup
To start using this workflow in your n8n instance:
- Open the template from the link below in your n8n environment.
- Connect your Gmail, OpenAI, and Google Sheets credentials.
- Configure spreadsheet and worksheet names that match your organization style.
- Set the email recipient filter to target the right senders.
- Adjust token limits for the OpenAI model and reply size if needed.
- Activate the workflow and test it with a sample email.
Once everything is working, you can gradually roll it out to handle more of your email traffic.
FAQ and Quick Recap
What problem does this workflow solve?
It reduces the time you spend manually replying to emails by using GPT to generate responses, while also keeping a complete log of all interactions and feedback in Google Sheets.
Where is the data stored?
All key information, including the original email, the AI reply, a unique ID, and feedback, is stored in a Google Sheet that you specify in the configuration.
Can I control who receives automated replies?
Yes. Use the email recipients filter to specify allowed sender addresses or set it to * if you want to respond to all incoming emails.
How does the workflow handle long emails?
The token limit check step ensures that the email content is trimmed or adjusted to fit within the OpenAI model’s token limits. This helps avoid errors and keeps usage efficient.
How is feedback recorded?
Each reply email includes “Yes” and “No” feedback links. When a user clicks one, the workflow is triggered again, finds the matching row in Google Sheets using the UUID, and updates the feedback status.
Final Summary
This n8n workflow template gives you an end-to-end Gmail automation that:
- Uses OpenAI GPT to generate intelligent, automated email replies
- Logs every email and response in Google Sheets for tracking and analysis
- Includes a simple feedback loop so you can measure and improve AI reply quality
If you want to streamline your email handling with AI while keeping a clear, data-driven record of all conversations, this template provides a ready-made solution you can customize to your needs.
