
Automate Instagram Carousel Posts with Google Sheets & Cloudinary
Imagine Never Copy-Pasting Captions Again
You know that moment when you are juggling 12 tabs, 4 folders, and 1 rapidly cooling coffee, just to post a single Instagram carousel? First you open Google Drive, then you grab the images, then you copy the caption from a spreadsheet, then you upload everything manually to Instagram. Repeat for every post. Forever.
Or you could let an n8n workflow do all that for you while you focus on the fun stuff, like actually creating content.
This guide walks you through an automated n8n workflow template that connects Google Sheets, Google Drive, Cloudinary, and the Instagram Graph API to publish Instagram carousel posts on autopilot. No more repetitive clicking, no more “did I already post this?” panic.
What This n8n Workflow Actually Does
At a high level, this automation is your personal posting assistant. Here is the basic idea:
- You keep a Google Sheet where each row represents a scheduled Instagram carousel post.
- Images for each post live in a specific Google Drive folder.
- The workflow uses Cloudinary to host the images so they are ready for Instagram.
- Using the Instagram Graph API, the workflow creates and publishes a carousel post with your caption and all the images.
- When it is done, it updates the Google Sheet so you know that post is taken care of.
In practice, this means you can plan content in Sheets, drop images in Drive, and let n8n quietly handle the “boring but important” part: actually publishing the carousel to Instagram.
Before You Start: One-Time Setup Checklist
There are a few things to prepare so the template can work smoothly. Think of this as setting the stage so your automation can perform its magic.
1. Build Your Master Google Sheet
Create a Google Sheet that acts as your master content schedule. Each row is one Instagram carousel post. Make sure you have columns like:
- ExecuteId – a unique identifier for each post.
- Folder – the Google Drive folder URL that contains the images for that carousel.
- Expected content – your Instagram caption.
- Status – use values like
ToDoandProcessedso the workflow knows what to publish. - Type – set this to
Carouselfor posts that should be published as carousels.
The workflow will only pick up rows where Status = “ToDo” and Type = “Carousel”, so those two are important.
2. Organize Images in Google Drive
For each planned carousel:
- Create or use a dedicated Google Drive folder.
- Upload all the images that should appear in that carousel.
- Make sure the folder is shared with the correct public permissions so n8n can access the files using the link in your sheet.
Each row in your sheet points to one of these folders through the Folder column.
3. Prepare Your Cloudinary Account
Cloudinary acts as the middleman that hosts your images in a format Instagram is happy with. You will need to:
- Create a Cloudinary account if you do not already have one.
- Optionally create a specific folder in Cloudinary to keep your Instagram assets organized.
- Note down your cloud name and upload preset. You will plug these into the relevant n8n node so the workflow can upload images automatically.
4. Get Your Instagram API Credentials Ready
Since this uses the Instagram Graph API, you will need:
- Your Instagram access token.
- Your Instagram business or user ID.
These are used to authenticate API calls so the workflow can create media containers and publish carousel posts on your behalf. Keep these credentials secure and follow Instagram’s token refresh guidelines.
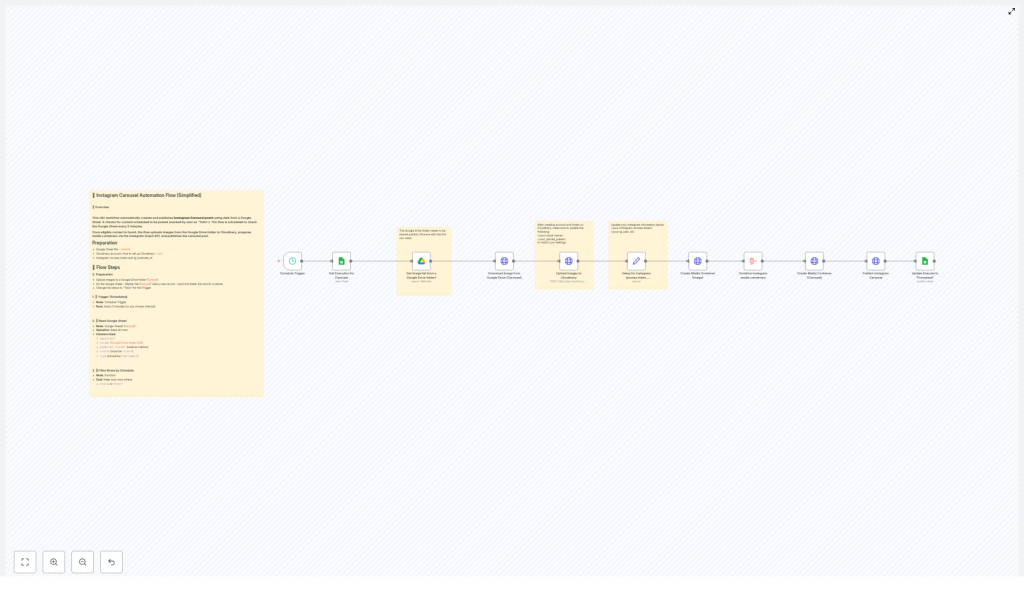
How the n8n Workflow Runs Behind the Scenes
Now for the fun part: what actually happens when the workflow runs. Here is the full flow, step by step, with all the important technical details kept intact.
1. Scheduled Trigger Checks Your Sheet
The workflow starts with an n8n Schedule Trigger node that runs at a regular interval, for example every 5 minutes (you can adjust this). Each time it runs, it checks your Google Sheet for rows where:
- Status is set to
ToDo - Type is set to
Carousel
Those rows represent carousel posts that are ready to be processed and published.
2. Retrieve Post Data from Google Sheets
A Google Sheets node reads the rows that match the criteria. From each row, the workflow extracts:
- The folder link pointing to the Google Drive folder with the images.
- The caption from the Expected content column.
- The ExecuteId and other useful metadata.
This gives the workflow everything it needs to know which images to fetch and what text to publish with the post.
3. Collect All Images from the Google Drive Folder
Next, the workflow uses a Google Drive node to grab all the image files from the folder URL provided in the sheet. For this to work correctly, the folder must be publicly accessible with the appropriate sharing settings.
Every image in that folder is treated as part of the carousel, so what you put in the folder is what gets published.
4. Download Images from Drive
Each image is then downloaded from Google Drive using a direct download URL. This step prepares the files so they can be uploaded to Cloudinary. Think of it as n8n grabbing the raw ingredients before sending them off to the hosting kitchen.
5. Upload Images to Cloudinary
Once the images are downloaded, the workflow sends them to Cloudinary using the Cloudinary API. For each image:
- The node uploads the file with your configured cloud name and upload preset.
- Cloudinary returns a hosted image URL, which is what Instagram will ultimately use.
Make sure the Cloudinary node in n8n is configured with the correct credentials so the uploads succeed.
6. Set Up Instagram Parameters
With the image URLs ready, the workflow prepares the parameters needed for the Instagram Graph API. This includes:
- Your Instagram access token.
- Your Instagram business or user ID.
- The image URLs from Cloudinary.
- The caption pulled from the Google Sheet.
These values are passed into the nodes that will create media containers and, eventually, the carousel itself.
7. Create Media Containers for Each Image
Using the Instagram Graph API, the workflow creates a media container for each image. Each container points to one Cloudinary URL and includes the caption.
At this stage, you have multiple individual media containers, one per image, all ready to be stitched together into a carousel.
8. Gather All Media Container IDs
Instagram needs all the media container IDs in one place to build a carousel. The workflow:
- Collects the IDs from every media container it just created.
- Combines them into an array that will be referenced when creating the carousel media container.
9. Create the Carousel Media Container
Next, the workflow creates a special carousel media container that references the array of image container IDs. This tells Instagram: “These images belong together, show them as a carousel.”
10. Publish the Carousel Post to Instagram
With the carousel media container ready, the workflow sends the final publish call to the Instagram Graph API. Instagram then posts the carousel to your account using the caption and images you prepared.
This is the moment where your content appears on your feed without you touching the Instagram app. Very satisfying.
11. Update the Google Sheet Status
To avoid accidental duplicates, the workflow finishes by updating the original row in your Google Sheet. It sets the Status column to Processed.
That way, the next time the schedule trigger runs, it skips posts that already went live and only processes new rows still marked as ToDo.
Tips, Best Practices, and “Please Do This So It Works” Notes
- Check Drive permissions carefully Make sure your Google Drive folders are shared with the right public access so n8n can read the images. If the workflow cannot see the files, nothing gets posted.
- Keep Instagram tokens safe and fresh Store your access token securely and follow Instagram’s guidelines for refreshing tokens so the automation does not suddenly stop working.
- Test with a sample post first Before you hand over your entire content calendar, run the workflow with a test carousel. Confirm that images are in the right order, the caption looks good, and the status updates correctly in your sheet.
- Use Cloudinary’s image optimizations Cloudinary offers image transformation features that can help optimize sizes and quality. Using these can speed up uploads and keep your posts looking sharp.
Why This Workflow Is Worth Setting Up
By connecting Google Sheets for scheduling, Google Drive for asset storage, Cloudinary for hosting, and the Instagram Graph API for publishing, this n8n workflow removes a huge chunk of manual work from your social media process.
No more repeating the same 10 clicks for every carousel. No more wondering which posts are already published. You plan once, drop images in the right folders, and let automation quietly handle the rest.
Ready to automate your Instagram Carousel posts and reclaim some brain space? Set up this workflow, connect your accounts, and let n8n take over the repetitive parts of your content publishing.
