
Automate Leave Requests with n8n Workflows
Handling employee leave requests by hand can be slow, inconsistent, and difficult to track. In this step-by-step guide you will learn how to use an n8n workflow template to automate leave requests using files, external triggers, and a GraphQL API.
This tutorial is written in a teaching-first style. We will start with what you are going to learn, explain the concepts behind each n8n node, then walk through the workflow step by step, and finish with best practices, testing tips, and a short FAQ.
What you will learn
By the end of this guide you will be able to:
- Trigger an n8n workflow from another workflow using the Execute Workflow Trigger node.
- Read and parse JSON files from disk to collect leave request data.
- Optionally run cleanup shell commands safely.
- Merge data from multiple nodes so you can build a complete payload.
- Send a GraphQL mutation to create a leave request in your HR system.
- Apply best practices for validation, error handling, security, and testing.
Why automate leave requests with n8n?
Manual leave management often involves emails, spreadsheets, and copy-paste work. This leads to:
- Time-consuming data entry.
- Higher risk of mistakes in dates, types, or employee details.
- Inconsistent records across systems.
By automating leave requests in n8n you can:
- Reduce manual input by reading data from files or other systems.
- Standardize how leave data is formatted and submitted.
- Speed up the process of creating requests in your HR backend via GraphQL.
The template you will work with connects file processing, command execution, and a GraphQL API into one reusable n8n workflow.
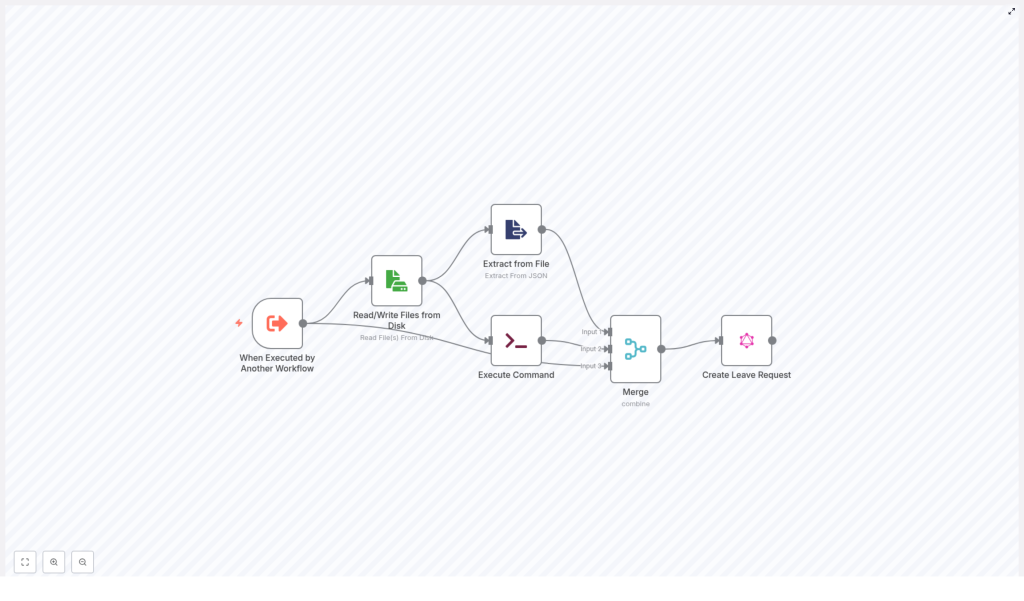
Concept overview: how the workflow fits together
Before we dive into configuration, it helps to understand the big picture. The example n8n workflow follows this general flow:
- Trigger – The workflow is started by another workflow using Execute Workflow Trigger.
- File read – A JSON file on disk is read to obtain payload and metadata.
- JSON extraction – The JSON content is parsed and specific fields are extracted.
- Optional cleanup – A shell command removes temporary files if needed.
- Merge data – Data from the trigger, file, and command are merged into a single item.
- GraphQL request – A GraphQL mutation creates a leave request in the HR system.
In n8n terms, this means you will use the following key nodes:
- Execute Workflow Trigger
- Read/Write Files from Disk
- Extract from File (Extract From JSON)
- Execute Command
- Merge
- GraphQL
Step 1 – Configure the Execute Workflow Trigger
Purpose of this node
The Execute Workflow Trigger node lets other workflows call this leave-request workflow. It makes the workflow reusable and easy to integrate into different automation scenarios, such as:
- A form submission workflow that passes leave details.
- A system that exports leave data to a file and then calls this workflow.
What to configure
In the Execute Workflow Trigger node, define the inputs you expect to receive. Typical fields include:
filename– Name or path of the session or payload file.type_of_leave– For example SICK, VACATION, etc.start_time– Start date or datetime of the leave.end_time– End date or datetime of the leave.leave_length– For example FULL_DAY or HALF_DAY.
These inputs keep the workflow flexible. If a calling workflow already knows some of these values, it can pass them directly. If not, they can be taken from the file later.
Step 2 – Read the leave data file from disk
Why read from disk?
Many systems export data into files, for example as JSON on a shared volume. The Read/Write Files from Disk node lets your workflow consume these files reliably. In this template it is used to read a JSON file that contains session data or a packaged payload for the leave request.
Key configuration details
In the Read/Write Files from Disk node:
- Set the node to read mode.
- Use a dynamic
fileSelectorvalue so the node can:- Default to a known session filename, or
- Use the incoming
$json.filenamefrom the trigger, if provided.
This approach lets the same workflow handle different files without changing the node each time.
Step 3 – Extract structured data from the JSON file
What this node does
Once the file is read, you have raw JSON content. The Extract from File (Extract From JSON) node parses this JSON and extracts the fields you care about, for example:
- Employee email address.
- Authentication token.
- Arrays or nested objects with additional employee data.
How it feeds the GraphQL mutation
The output of this node becomes the source for your GraphQL variables. For instance, you might extract:
data[0].emailfor the employee identifier.tokenfor the Authorization header.
Make sure the fields you extract match the structure of your JSON file. If your file format changes, adjust this node accordingly.
Step 4 – (Optional) Execute a cleanup command
Why use Execute Command?
Temporary files can accumulate over time. The Execute Command node lets you run shell commands so you can clean up files after they have been processed. A common example is removing a session file.
Example cleanup command
An example command used in this pattern is:
rm -rf {{ $json.fileName }}This removes the file whose name is provided in the JSON data. You can adapt this to your environment, for instance by using a safer command or a specific directory path.
Safety considerations
Use this node carefully:
- Always validate file paths before deletion to avoid removing unintended files.
- Restrict the command to a controlled directory where temporary files are stored.
- Consider making cleanup conditional, for example only after successful GraphQL calls.
Step 5 – Merge data from trigger, file, and command
Role of the Merge node
By this point, you may have:
- Data from the original trigger (type_of_leave, start_time, etc.).
- Parsed JSON data from the file (email, token, additional metadata).
- Optional information from the Execute Command node (such as command output or status).
The Merge node combines these streams into one unified item that you can send to the GraphQL node.
Common configuration
In the example workflow, the Merge node uses the combineByPosition mode. That means:
- Item 1 from one input is merged with item 1 from the other input.
- Item 2 is merged with item 2, and so on.
This works well when each branch produces the same number of items and they align logically. If your data shape differs, consider other merge modes that n8n provides, such as merging by key or keeping all items.
Step 6 – Create the leave request with a GraphQL mutation
What the GraphQL node does
The final step is to send a GraphQL mutation to your HR backend to actually create the leave request. The GraphQL node lets you define the mutation and pass variables dynamically from the merged data.
Example mutation
Here is a sample mutation used in the workflow:
mutation CreateLeaveRequest($input: CreateLeaveRequestInput!, $condition: ModelLeaveRequestConditionInput) {  createLeaveRequest(input: $input, condition: $condition) {  adjustment_type  comment  employeeLeaveRequestsId  end_time  employee { first_name last_name }  leave_length  start_time  type  id  }
}
Dynamic variables configuration
In the variables section of the GraphQL node, you can build the input object using n8n expressions. For example:
"type": $json?.type_of_leave || "SICK",
"start_time": $json?.start_time || "",
"end_time": $json?.end_time || "",
"leave_length": $json?.leave_length || "FULL_DAY",
"employeeLeaveRequestsId": Array.isArray($json?.data) && $json.data.length > 0 && $json.data[0]?.email ? $json.data[0].email : $json?.email || ""
This configuration:
- Uses
type_of_leavefrom the payload, or defaults to"SICK"if none is provided. - Sets
start_timeandend_timefrom the payload, or uses empty strings as fallbacks. - Defaults
leave_lengthto"FULL_DAY"when not specified. - Derives
employeeLeaveRequestsIdfromdata[0].emailif available, otherwise falls back to$json.emailor an empty string.
Authentication with Authorization header
For secure access to your HR API, configure the GraphQL node to send an Authorization header. Typically this token is:
- Read from the parsed JSON file, or
- Passed in from the triggering workflow.
Use n8n credentials or environment variables wherever possible instead of hard-coding tokens directly in the node.
Best practices for this n8n leave request workflow
Validate inputs early
- At the trigger stage, check that required fields such as
start_time,end_time, and an employee identifier are present. - Use an IF node or a dedicated validation step to stop execution when critical data is missing.
Handle files and commands safely
- Sanitize file paths before reading or deleting files.
- Avoid overly broad commands like
rm -rf /or patterns that could remove unintended directories. - Limit the workflow to a controlled directory for temporary files.
Improve observability and error handling
- Log key events, such as file read success, JSON parse success, and GraphQL call status.
- Use the Error Workflow feature or dedicated error handling branches to catch failures.
- Include clear error messages and context in logs for faster debugging.
Protect secrets and configuration
- Store API endpoints, tokens, and other sensitive values in n8n credentials or environment variables.
- Avoid committing secrets to version control or embedding them in node parameters.
Document and version your workflow
- Add comments to nodes to explain their role in the leave request process.
- Maintain versions so you can roll back if a change introduces issues.
Testing and validation checklist
Always test your leave automation workflow in a safe environment before going live. Here is a structured way to validate it.
Set up test data
- Create sample session or payload files with realistic employee data.
- Include different leave types and date ranges, for example full-day and half-day scenarios.
- Simulate the calling workflow that triggers this one with test inputs.
What to verify
As you run test executions in n8n, confirm that:
- The file is correctly located and read.
- The JSON is parsed without errors and the expected fields are extracted.
- The merged data going into the GraphQL node contains all required fields.
- The HR backend receives the correct GraphQL payload and creates the leave request.
Common edge cases to test
- Missing or malformed JSON file – What happens if the file is not found or contains invalid JSON?
- Incorrect or expired auth token – Does the workflow surface a clear error when the GraphQL request is unauthorized?
- Half-day or unusual leave lengths – Do values like HALF_DAY work correctly in your backend?
- Overlapping dates – How does your HR system respond if a new request overlaps with existing leave?
- Cleanup commands – Are files removed only after successful processing, and never before?
Error handling patterns you can add
To make the workflow more robust, consider adding these patterns:
- Catch or IF node for required fields
Add a branch that checks for required data. If fields likeemployeeLeaveRequestsIdorstart_timeare missing, stop the workflow or route to an error-handling path. - Failure notifications
Send an email or Slack message when something fails. Include:- The reason for the failure (for example GraphQL error message).
- The raw payload or key fields that caused the issue.
- Retry logic for transient errors
For network hiccups or temporary API issues, implement retries with delays or exponential backoff instead of failing immediately.
Security considerations for HR data
Leave requests contain personal data, so security is important.
- Protect files at rest
Encrypt files where possible and limit access to directories used by the workflow. - Use scoped tokens
Configure API tokens with only the permissions needed to create leave requests, not full administrative access. - Mask sensitive logs
Avoid logging full authentication tokens or complete payloads that contain personally identifiable information. Use partial logging or redaction.
Extending the workflow: approvals and notifications
Once the basic leave creation flow is working, you can extend it into a more complete HR automation:
- Add an approval step
After creating the leave request via GraphQL, insert an approval process that updates the request status in your HR system. - Notify employees and managers
Send confirmation emails or Slack messages to the employee and their manager when a request is created or approved. - Sync leave balances
Trigger another workflow to update leave balances or accruals after a request is approved.
Quick recap
This n8n workflow template helps you:
- Receive leave request data from other workflows or files.
- Read and parse JSON content from disk.
- Option
