
Automate Marketing Campaign Documentation with n8n + OpenAI
Turn raw campaign JSON into clear, concise marketing documentation automatically. Save time, reduce manual errors, and keep every stakeholder aligned on what a campaign does and how it should perform.
What you will learn in this guide
This tutorial walks you through an n8n workflow template that uses OpenAI to convert a campaign JSON into a structured marketing brief. By the end, you will know how to:
- Understand the overall automation flow between n8n and OpenAI
- Configure the n8n nodes used in the template
- Feed campaign JSON into the workflow using a form
- Generate documentation that covers audience, goals, triggers, flows, and more
- Set up credentials and test the workflow safely in your own n8n instance
Why automate campaign documentation?
Most teams still write campaign briefs manually. This usually leads to:
- Slow turnaround times for new campaigns
- Inconsistent documentation formats across teams
- Outdated or incomplete briefs as campaigns evolve
- Extra meetings just to clarify how a campaign works
By using an automation pipeline that converts a campaign JSON (from n8n, Zapier, Make, or any other automation tool) into a clear marketing brief, you can:
- Onboard new team members faster
- Run experiments with confidence, backed by documented goals and triggers
- Hand off work to stakeholders without repeated explanations
- Keep a consistent, up to date record of how each campaign is designed
How the n8n + OpenAI workflow works
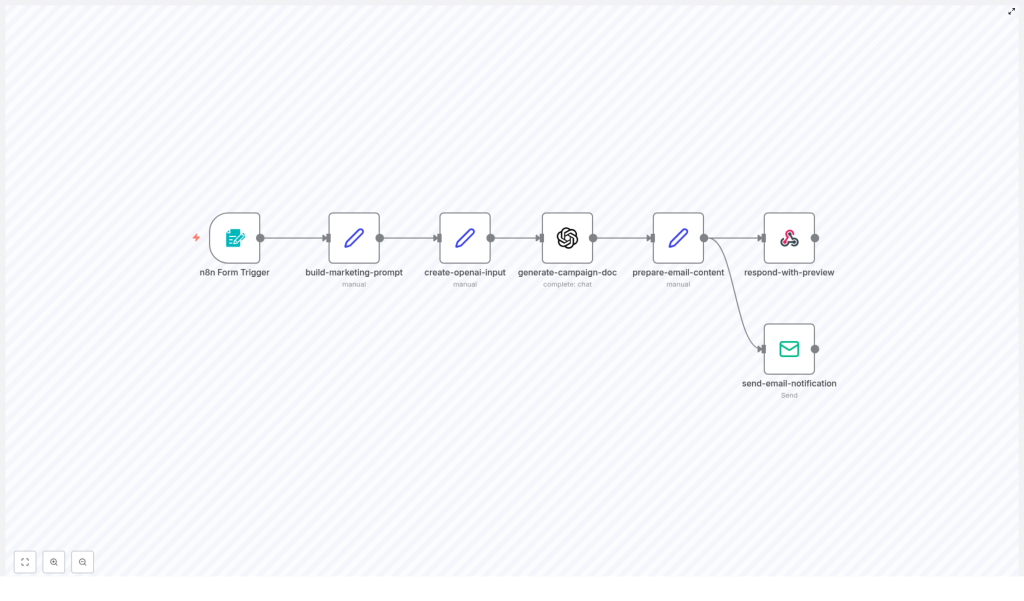
This template uses n8n as the automation engine and OpenAI (GPT) as the content generator. At a high level, the workflow does the following:
- A marketer submits a campaign JSON and some metadata through a form.
- n8n constructs a controlled prompt and sends the JSON to OpenAI.
- OpenAI returns a concise HTML marketing document based on the JSON.
- n8n shows a preview in the webhook response and emails the final documentation to the campaign owner.
Node-by-node overview
Here is how each n8n node in the template contributes to the automation:
- n8n Form Trigger – Collects:
- Campaign Title
- Campaign JSON
- Campaign Owner Email
This is the main entry point where marketers submit campaign details.
- Set (build-marketing-prompt) – Builds a strict instruction prompt that:
- Defines the sections the document should include
- Controls tone and formatting
- Guides OpenAI to produce structured, repeatable outputs
- Set (create-openai-input) – Injects the campaign title and raw JSON into the prompt payload, so the model has both context and data.
- OpenAI (generate-campaign-doc) – Sends the final prompt to a GPT model and gets back HTML documentation that is ready for review or distribution.
- Set (prepare-email-content) – Wraps the generated HTML into a simple email layout and prepares the subject line for the outgoing message.
- Respond to Webhook – Displays a styled HTML preview in the browser right after form submission, so the marketer can see the generated brief instantly.
- Email Send – Sends the final documentation to the campaign owner using your configured email provider.
What the generated campaign documentation includes
The automation is designed to turn your JSON into a complete, human friendly marketing brief. Below are the main sections you can expect, and how they relate to the data you provide.
1. Campaign target audience
This section explains who the campaign is meant to reach. The generated document typically covers:
- Primary audience – For example:
- Current customers
- New trial users
- Cart abandoners
- Audience segments and personas – Such as:
- Demographic details
- Behavioral triggers
- Product fit or usage patterns
- Recommended filters – Practical filters you can apply, like:
- Last purchase date
- Engagement score
- Tags or properties from your CRM
2. Campaign goals and KPIs
The brief outlines what success looks like and how to measure it. It usually includes:
- Primary objectives:
- Acquisition
- Activation
- Retention
- Upsell or cross-sell
- Key metrics, such as:
- Conversion rate
- Open rate and click-through rate (CTR)
- Return on investment (ROI)
- Engagement metrics
- Revenue per user or per campaign
- Benchmarks – Baseline performance and target lift, for example:
- Increase CTR by 15 percent
- Reach a 3 percent conversion rate
3. Trigger conditions and entry points
This part documents when and how users enter the campaign, which helps both marketers and engineers understand the logic. It can describe:
- Event triggers:
- Form submission
- Purchase completion
- Trial expiry
- Time-based schedules
- Entry criteria:
- Audience segments
- Minimum inactivity period
- Product usage thresholds
- Scheduling details:
- Send windows and quiet hours
- Time zone handling
- Throttling rules and retry logic
4. Message sequence and flow
The documentation includes a channel-by-channel plan that maps to your JSON definition:
- Channel breakdown:
- SMS
- Push notifications
- Social ads
- In-app messaging
- Message cadence:
- Initial touch
- Follow-ups and reminders
- Escalation messages
- Final attempt or exit
- Content themes and CTAs:
- Subject line guidance or examples
- Primary call to action
- Landing page URLs
- Personalization fields or tokens
5. Required integrations and credentials
The brief also helps you or your operations team understand what systems are involved. It typically lists:
- OpenAI API key – Used by the
generate-campaign-docnode to call the GPT model. - Email provider credentials – SMTP or transactional email service credentials used by the
send-email-notificationnode. - CRM and marketing platform connectors – For example:
- HubSpot
- Segment
- Mailchimp
These may require API tokens if the campaign syncs segments or events.
- Webhook URLs and OAuth details – Any webhook endpoints, client IDs, or client secrets needed for third-party API access.
Security tip: Always store keys in n8n credentials. Do not paste secrets directly into prompts, Set nodes, or logs.
6. A/B testing and customization guide
The generated documentation can also suggest how to experiment and optimize the campaign. It often covers:
- Test variables:
- Subject lines and preheaders
- CTA wording and button labels
- Send times and days of week
- Imagery or layout variations
- Segmentation strategies:
- Random audience splits (for example 50/50 or 30/70)
- Geo-based splits
- Behavior or cohort based splits
- How to modify variants in JSON:
- Use a clear naming convention such as
campaign-v1,campaign-v2 - Store each variant as a separate JSON object
- Pass these variant JSON objects into the automation for documentation
- Use a clear naming convention such as
- Optimization guidance:
- Run tests long enough to reach statistical significance, usually 3 to 14 days depending on traffic
- Measure lift on the primary KPIs defined earlier
Step-by-step: setting up the workflow in n8n
In this section, you will configure the template in your own n8n instance and run your first test.
Step 1: Install and import the workflow
- Make sure you have an n8n instance running (self-hosted or cloud).
- Import the provided workflow JSON into n8n.
- Open the workflow editor and confirm that all nodes appear correctly.
Step 2: Configure the Form Trigger node
- Open the Form Trigger node.
- Set a clear path for the webhook URL (for example
/campaign-doc). - Define the form fields that marketers will fill:
- Campaign Title – A human readable name for the campaign.
- Campaign JSON – The raw JSON that describes the campaign logic.
- Campaign Owner Email – The address that receives the generated documentation.
- Share the form URL with your team once you have tested it.
Step 3: Add OpenAI credentials
- In n8n, go to Credentials.
- Create a new credential for OpenAI.
- Generate an API key in your OpenAI account and paste it into the credential.
- Return to the OpenAI (generate-campaign-doc) node and select the new credential.
Step 4: Configure email sending
- Decide which email provider you will use:
- SMTP server
- Transactional provider like SendGrid, Postmark, etc.
- In n8n, create the appropriate email credentials:
- SMTP credentials:
- User and password
- Host and port
- From address, for example
campaigns@yourcompany.com
- Alternative email providers – Follow the provider specific setup in n8n if you prefer not to use raw SMTP.
- Attach these credentials to the Email Send (or send-email-notification) node in your workflow.
Step 5: Tailor the prompt and brand voice
- Open the Set (build-marketing-prompt) node.
- Review the instruction text that controls:
- Document sections
- Tone and writing style
- Formatting rules (for example HTML headings and lists)
- Adjust the instructions to match your brand voice or add any required corporate sections, such as:
- Legal disclaimers
- Compliance notes
- Internal review steps
- Save your changes and consider versioning the prompt text so you can track updates over time.
Credential summary
- OpenAI:
- Generate an API key in your OpenAI account.
- Save it securely in n8n credentials.
- SMTP or email provider:
- User, password, host, port
- From address such as
campaigns@yourcompany.com
- Optional analytics or CRM keys:
- Use these if you want to track UTM parameters or sync audience status with tools like HubSpot, Segment, or Mailchimp.
Testing your campaign documentation workflow
Before rolling this out to your whole team, run a few tests to confirm everything works as expected.
Testing checklist
- Submit a sample form entry with a small, representative campaign JSON.
- Verify that the OpenAI node returns valid HTML content.
- Check that the Respond to Webhook node displays a readable HTML preview in your browser.
- Confirm that the email is delivered to the campaign owner and renders correctly in:
- Gmail
- Outlook
- Mobile email apps
- Inspect logs to ensure credentials and secrets are not logged in plain text.
- Rotate any keys if you suspect they were exposed during early testing.
Example: minimal campaign JSON
Here is a simple JSON payload you can use to test the workflow. It describes a basic winback email campaign.
{ "title": "Winback - 90 Day Inactive", "audience": "customers_inactive_90_days", "channels
