
Automate Range Trading with Uniswap & n8n
What You Will Learn
In this guide, you will learn how to use an n8n workflow template to automate range trading on Uniswap for the ETH/USDC pair. By the end, you should understand:
- What range trading is and why automation helps
- How the workflow uses TWAP (Time-Weighted Average Price) from Uniswap
- The role of each key node in n8n: configuration, data fetching, decision logic, and execution
- How to connect 1Shot API, Uniswap, and Telegram inside n8n
- How to set up, run, and safely test the template
Concepts Behind the Workflow
Range Trading on Uniswap
Range trading is a strategy where you define a price band and buy when the market is below a certain level and sell when it is above another level. This workflow focuses on ETH/USDC on Uniswap and automates those actions based on a predefined range.
Why Use TWAP Instead of Spot Price
The workflow relies on TWAP (Time-Weighted Average Price) from the Uniswap pool, not just a single spot price. TWAP is calculated from a series of observations over a time window. This helps smooth out short spikes or dips and makes your trading decisions more stable and less sensitive to momentary volatility.
How n8n, Uniswap, and 1Shot Work Together
- n8n – Orchestrates the entire automation, scheduling checks every 30 minutes, running logic, and sending notifications.
- Uniswap – Provides the on-chain ETH/USDC liquidity pool and the actual swaps.
- 1Shot API – Acts as the bridge to the blockchain. It reads pool data and executes smart contract calls like approvals and swaps from within n8n.
Why Automate Range Trading?
Manual range trading requires constant monitoring and quick reactions when price moves in or out of your range. Automation helps you:
- React consistently whenever price crosses your thresholds
- Avoid emotional decisions and stick to the strategy
- Reduce the chance of missing opportunities while away from the screen
- Keep a clear, auditable process with notifications and confirmations
How the Workflow Operates in n8n
High-Level Workflow Overview
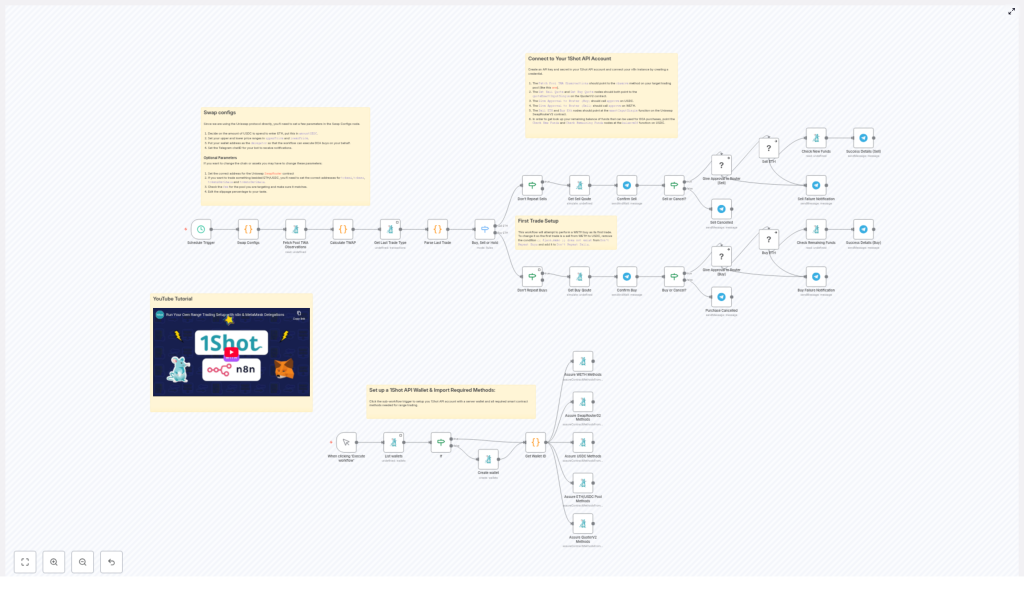
The n8n workflow runs on a schedule and follows this loop:
- Trigger every 30 minutes.
- Fetch TWAP observations from the Uniswap ETH/USDC pool using 1Shot API.
- Calculate the TWAP and liquidity with a JavaScript function node.
- Compare the TWAP to your configured upper and lower price boundaries.
- Decide whether to buy, sell, or hold.
- If a trade is needed, request Telegram confirmation from you.
- On confirmation, approve tokens and execute the swap on-chain via 1Shot API.
- Send success or error notifications through Telegram.
Step-by-Step: Understanding Each Key Node
1. Initial Wallet Setup
When the workflow starts, it first ensures that your wallet environment is ready in 1Shot:
- Checks if a wallet already exists in your 1Shot account.
- If it does not find one, it creates a new wallet.
- Verifies that the required Uniswap smart contract methods are imported so that the workflow can call functions like approvals and swaps.
This step is essential for seamless automated interactions with Uniswap later in the workflow.
2. Swap Configs Node – Defining Your Strategy
The Swap Configs node is where you define how the strategy behaves. It initializes all important parameters, including:
- Trade size – How much USDC to spend per trade.
- Price range – Your
upperPriceandlowerPriceboundaries for ETH in terms of USDC. - Slippage tolerance – The maximum price deviation you accept during a swap.
- TWAP window size –
secondsAgodefines how far back to look when calculating TWAP. - Wallet details – Addresses and configuration for interacting with your funds.
- Telegram settings – Chat ID and bot details for sending you messages and confirmations.
By editing this node, you can tailor the trading strategy to your risk level and market view. For example, you can tighten the price range for more frequent trades or widen it to focus on larger swings.
3. Fetch Pool TWAP Observations
Next, the workflow uses the 1Shot API to query the Uniswap ETH/USDC liquidity pool. This node:
- Calls the pool contract to fetch observation data needed for TWAP.
- Retrieves historical data points that represent how price evolved over time.
These raw observations are not directly human-readable prices yet, but they are the foundation for computing TWAP.
4. Calculate TWAP with JavaScript
The Calculate TWAP node is a JavaScript function node that converts the raw Uniswap data into a usable average price and liquidity figure. Inside this node:
- Observation data from the previous step is processed.
- Token decimals are taken into account so that the final price matches ETH/USDC units.
- BigInt arithmetic is used to handle high precision calculations and mimic on-chain math accurately.
- The result is a time-weighted average price for ETH in USDC over your chosen window, plus liquidity information.
This calculated TWAP is what the rest of the workflow uses for all trading decisions.
5. Trade Decision Logic – Buy, Sell, or Hold
After TWAP is calculated, the workflow reaches a decision point. A switch node compares the TWAP with your configured price bounds and routes the flow accordingly:
- If TWAP is below your lower price, the logic may trigger a buy path.
- If TWAP is above your upper price, the logic may trigger a sell path.
- If TWAP is within the range, the workflow will typically hold and take no trading action.
This node ensures that trades only occur when the market is outside your target range, which is the core idea of range trading.
6. Preventing Redundant Trades
To avoid unnecessary or repeated transactions, the workflow includes logic that:
- Tracks recent trades based on the same parameters.
- Prevents executing the same buy or sell action multiple times in quick succession for the same conditions.
This helps reduce gas costs and keeps your trading behavior more controlled and intentional.
7. Approval and Execution on Uniswap
When a buy or sell path is triggered and confirmed, the workflow performs two critical on-chain steps using 1Shot API:
- Token approval
- It calls the token contract (for example, USDC) to approve the Uniswap SwapRouter contract.
- This approval allows SwapRouter to spend your tokens up to a specified amount for the trade.
- Swap execution
- It calls the appropriate Uniswap function to perform the swap (ETH to USDC or USDC to ETH).
- It uses your configured slippage tolerance to calculate the minimum output amount that you are willing to accept.
- If the expected output falls below this minimum, the transaction will revert, protecting you from excessive slippage.
Both of these steps are automated but still follow your predefined parameters from the Swap Configs node.
8. Telegram Confirmations and Notifications
To keep you in control and informed, the workflow integrates with Telegram at multiple points:
- Pre-trade confirmation
Before a swap is executed, the workflow sends a detailed message describing the proposed trade, such as:- Whether it is a buy or a sell
- The amount of ETH or USDC involved
- The current TWAP and your configured thresholds
You can then confirm or reject the trade via Telegram.
- Post-trade updates
After execution, you receive a message showing whether the transaction succeeded or failed, along with any relevant details like transaction hash or error message. - Error alerts
If anything goes wrong during approval, execution, or data fetching, the workflow sends an error notification so you can investigate quickly.
Additional Features for Reliability
- Dynamic minimum output calculation – The workflow computes the minimum tokens you should receive based on your slippage setting, helping protect you from poor execution.
- Comprehensive error handling – Failures in API calls, contract interactions, or logic branches are caught and reported to you via Telegram.
- Embedded tutorial support – The original template includes a YouTube tutorial to walk you through setup visually, which you can follow alongside this written guide.
How to Set Up and Use the Workflow in n8n
Step 1 – Connect 1Shot API in n8n
- Open your n8n instance.
- Add your 1Shot API credentials as a new credential type if you have not already.
- Verify that n8n can successfully authenticate with your 1Shot account.
Step 2 – Configure the Swap Configs Node
- Open the Swap Configs node in the workflow.
- Set the amount of USDC you want to use per trade.
- Define your lowerPrice and upperPrice boundaries for ETH/USDC.
- Adjust slippage tolerance to match your risk preference.
- Set the TWAP window using
secondsAgoto control how far back the average is calculated. - Enter your wallet details that will be used for trading.
Step 3 – Set Up Telegram Integration
- Create a Telegram bot if you do not have one yet and obtain its API token.
- Get your Telegram chat ID where you want to receive messages.
- In n8n, configure the Telegram nodes in the workflow with your bot token and chat ID.
- Test sending a simple message from n8n to confirm that notifications are working.
Step 4 – Schedule the Workflow
- Locate the trigger node (for example, a Cron node) in the workflow.
- Set it to run every 30 minutes or adjust the interval if you want more or less frequent checks.
- Enable the workflow so that it starts running at the configured schedule.
Step 5 – Monitor and Confirm Trades via Telegram
- When the workflow detects a buy or sell signal, you will receive a Telegram message with all relevant details.
- Review the proposed trade and confirm or decline directly in Telegram (according to the template’s interaction design).
- After confirmation, watch for the follow-up notification with the result of the transaction.
Step 6 – Start Small and Iterate
Important: Always begin with small trade amounts to test the full cycle end to end. Verify:
- That TWAP values look reasonable compared to market data.
- That approvals and swaps succeed on-chain.
- That your Telegram confirmations and notifications behave as expected.
Quick FAQ
Is this template suitable for beginners?
Yes. While it interacts with on-chain contracts, the heavy lifting is handled by the n8n nodes and the 1Shot API. As long as you follow the configuration steps carefully and test with small amounts, it can be used by both beginners and experienced traders.
Can I change the trading pair?
The template is designed around the Uniswap ETH/USDC pool. Adapting it to another pair would require updating pool addresses, token decimals, and possibly parts of the TWAP calculation and configuration. This is possible but involves more advanced customization.
Why use TWAP instead of the latest price?
TWAP averages price over a chosen window, which helps filter out short-lived volatility. This leads to more stable and disciplined trading signals, especially for automated strategies.
How often should I run the workflow?
The default is every 30 minutes, which balances responsiveness and resource usage. You can adjust the schedule based on how actively you want to trade and how quickly you want to react to price movements.
Conclusion
This n8n and 1Shot-powered workflow gives you a structured way to automate range trading on Uniswap for the ETH/USDC pair. By using TWAP as the main indicator, it helps you capture price movements within a defined range while reducing manual effort and emotional bias.
With clear configuration options, Telegram confirmations, and robust error handling, the template is suitable for traders who want both automation and control. Whether you are just starting with DeFi automation or already experienced, this workflow can serve as a solid foundation for your range trading strategy.
Ready to start automated range trading?
Connect your wallet, configure the workflow, and deploy it in n8n to begin automating your ETH/USDC swaps.
Important: Always test with small amounts and make sure you fully understand the risks of automated trading and on-chain interactions before scaling up.
