
Automate Real Estate Calls with Google Sheets & VAPI in n8n
What You Will Learn
In this guide, you will learn how to use an n8n workflow template to:
- Trigger automated outbound calls from a Google Sheets lead list
- Send those leads to VAPI.ai to place calls and talk to prospects
- Capture call results and notes back into Google Sheets
- Automatically schedule appointments in Google Calendar
- Handle batching, formatting, and reliability so your automation scales
This walkthrough is designed for real estate teams, but the same approach works for any outbound calling workflow powered by n8n, Google Sheets, and VAPI.
Concept Overview: How the Workflow Fits Together
Before diving into the step-by-step setup, it helps to understand the overall flow of data through n8n.
High-Level Workflow
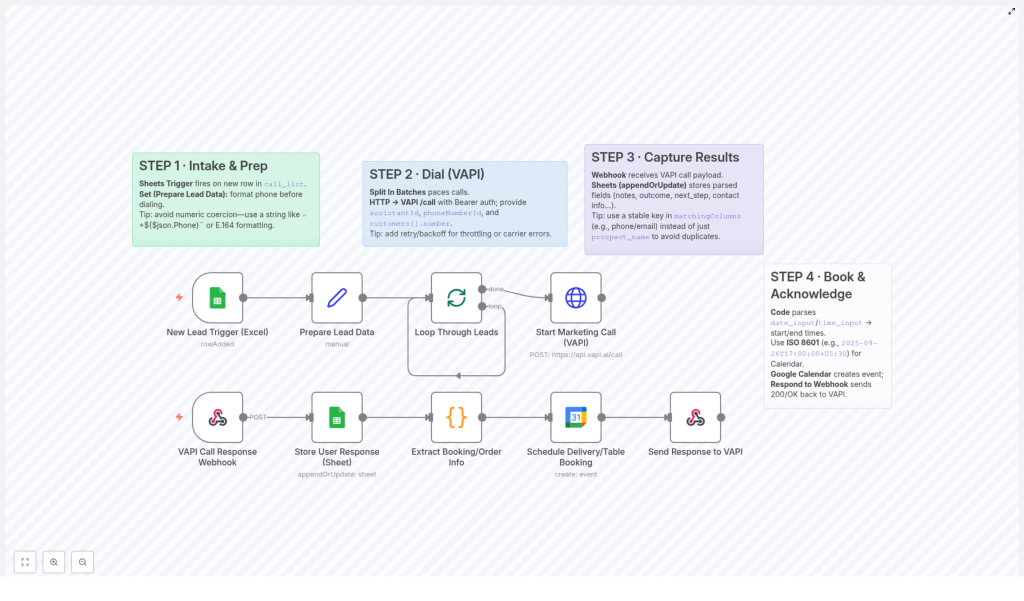
- New lead added to Google Sheets
A Google Sheets Trigger watches yourcall_listsheet. When a new row is added, n8n starts the workflow. - Lead data prepared for calling
A Set node formats the lead details, especially the phone number, so that VAPI can dial it correctly. - Calls sent to VAPI in controlled batches
A Split In Batches node controls pacing, and an HTTP Request node sends each batch to VAPI’s/callendpoint. - VAPI sends call results back to n8n
A Webhook node receives call outcomes from VAPI and triggers the follow-up part of the workflow. - Call outcomes stored and appointments scheduled
Results are written back to Google Sheets, appointment times are parsed, and Google Calendar events are created. - VAPI is acknowledged
n8n responds to VAPI with a 200 OK using a Respond to Webhook node.
Now let’s walk through each stage in detail, as you would configure it inside n8n.
Step 1 – Capture & Prepare New Leads from Google Sheets
1.1 Use Google Sheets Trigger on your lead list
The workflow starts with a Google Sheets Trigger node connected to your call_list sheet. This sheet is your master list of new leads and should include at least:
- Prospect name
- Phone number
- Any other useful context (source, property type, notes, etc.)
Configure the trigger so that it fires whenever a new row is added. Each new row represents a new lead that should receive an automated call.
1.2 Prepare and clean lead data with a Set node
Next, add a Set node to standardize the data coming from Google Sheets before it is used by VAPI.
The most important field to prepare is the phone number. Spreadsheet tools often treat phone numbers as numeric values, which can cause problems such as:
- Loss of leading zeros
- Incorrect formatting when converted to JSON
To prevent this, format the phone number as a string in E.164 format (international format that starts with a plus sign). For example, you might use a formula like:
=+{{ $json.Phone }}This ensures that when the data reaches the HTTP Request node, the phone number is already a properly formatted string that VAPI can dial reliably.
Step 2 – Send Calls to VAPI in Batches
2.1 Control pacing with Split In Batches
Placing too many calls at once can hit provider rate limits or overload your systems. To avoid this, the workflow uses a Split In Batches node.
This node:
- Processes your list of leads in smaller groups
- Helps you comply with VAPI and carrier rate limits
- Makes it easier to implement retries and error handling
Set the batch size according to your expected call volume and provider limits. For example, you might send 10 or 20 leads per batch, depending on your use case.
2.2 Call the VAPI /call endpoint with HTTP Request
Within each batch, an HTTP Request node sends the actual call instructions to VAPI’s /call endpoint.
Key configuration details:
- Method: POST
- URL: VAPI
/callendpoint - Authentication: Bearer token (include your VAPI API key in the Authorization header)
- Body format: JSON
The JSON body typically includes:
assistantId– your VAPI assistant identifierphoneNumberId– the VAPI phone number used to place callscustomers– an array of customer objects, each with anumberfield
Example structure for the customers array:
{  "assistantId": "YOUR_ASSISTANT_ID",  "phoneNumberId": "YOUR_PHONE_NUMBER_ID",  "customers": [  { "number": "+11234567890" },  { "number": "+19876543210" }  ]
}
Tip: Use expressions in n8n to map the formatted phone number from the Set node into the customers[].number field.
2.3 Handle throttling and errors
Carrier networks and APIs can temporarily throttle or fail requests. To make your outbound calling workflow more resilient:
- Enable retry logic in the HTTP Request node or wrap it in additional logic to reattempt failed calls
- Consider using exponential backoff so that repeated failures wait longer between attempts
- Log failed attempts to a separate sheet or system for review
Step 3 – Receive and Store Call Results from VAPI
3.1 Capture VAPI callbacks with a Webhook node
After VAPI completes a call, it sends the call outcome to a URL you provide. In n8n, this URL is handled by a Webhook node.
Configure the Webhook node to:
- Use the HTTP method and path VAPI expects
- Accept JSON payloads containing call results
- Trigger the next steps of your workflow whenever VAPI posts data
The payload from VAPI typically includes details such as:
- Call outcome or status
- Call notes or transcript details
- Prospect information and any captured objections
- Suggested follow-up time or appointment details
3.2 Write call outcomes back to Google Sheets
Once the Webhook node receives the call data, the workflow synchronizes it with your lead sheet using a Google Sheets node.
Use the appendOrUpdate operation so that each lead’s row is updated with the latest information instead of creating duplicates.
Fields you might store include:
- Call outcome (e.g., interested, not interested, no answer)
- Call notes and objections
- Follow-up date and time
- Next steps or assigned agent
- Any additional prospect details captured during the call
3.3 Choose a reliable matching key
To ensure updates go to the correct row, configure matchingColumns carefully.
Recommended: Use a stable, unique identifier such as:
- Phone number
- Email address
Avoid relying only on names, since multiple leads can share the same name. Using a unique key prevents duplicate rows and keeps your data clean and consistent.
Step 4 – Convert Call Outcomes into Calendar Appointments
4.1 Parse appointment date and time with a Code node
When a prospect agrees to a meeting, VAPI includes date and time information in the callback payload. However, this data may not yet be in the exact format your calendar needs.
To handle this, the workflow uses a Code node. This node:
- Reads date and time fields from the VAPI response
- Converts them to a consistent timezone
- Outputs a properly formatted datetime string
In this template, the times are converted to India Standard Time (IST) and formatted as ISO 8601 strings, which are ideal for calendar integrations.
4.2 Create calendar events in Google Calendar
After the Code node prepares the datetime values, a Google Calendar node creates the actual event.
Typical fields to map include:
- Calendar ID (the calendar where you want the event created)
- Event summary or title (e.g., “Real estate consultation with [Prospect Name]”)
- Start and end times in IST ISO 8601 format
- Description or notes (can include call notes and property details)
This ensures that every qualified prospect who books a time on the call is automatically added to your calendar in the correct timezone, without any manual scheduling.
4.3 Acknowledge the callback with Respond to Webhook
Once the event is created and the sheet is updated, the workflow sends a confirmation back to VAPI.
Use a Respond to Webhook node to return a 200 OK status. This tells VAPI that the callback was received and processed successfully, which helps keep the integration stable and prevents unnecessary retries from VAPI’s side.
Benefits of Automating Real Estate Calls with n8n, Google Sheets & VAPI
- Reduced manual effort
Calls are automatically triggered from your Google Sheets lead list and results are written back without manual data entry. - Improved scheduling
Appointment times from calls are parsed and converted to IST, then automatically added to Google Calendar in the right format and timezone. - Better data hygiene
Using unique identifiers and theappendOrUpdateoperation keeps your lead sheet as a single source of truth, with up-to-date outcomes and notes. - Scalable outbound calling
Split In Batches, retries, and proper error handling help you scale up your calls while respecting rate limits and avoiding overload.
Frequently Asked Questions
Do I need to change anything in the template before using it?
Yes. You must replace placeholder values like assistantId and phoneNumberId in the HTTP Request node with your actual VAPI credentials. Also connect your own Google Sheets and Google Calendar accounts in the respective nodes.
What format should phone numbers be in?
Use E.164 format, which starts with a plus sign and includes the country code, for example +11234567890. The Set node and Google Sheets formula help ensure the phone number is treated as a string and not accidentally changed by the spreadsheet.
Can I adapt this workflow for non-real-estate use cases?
Yes. Although this template is described for real estate, the pattern is generic. Any business that needs automated outbound calls, result logging, and calendar booking can reuse the same structure with minor adjustments.
How do I prevent duplicate rows in my lead sheet?
Configure the Google Sheets node to use appendOrUpdate and choose a unique identifier, such as phone number or email, in matchingColumns. This ensures updates are applied to existing rows instead of creating new ones.
Next Steps: Try the n8n Template
By combining n8n, Google Sheets, and VAPI, you can turn your lead list into a fully automated outbound calling and appointment booking system. This reduces manual work, improves follow-up consistency, and helps your real estate team focus on closing deals instead of dialing numbers.
Set up the template, connect your credentials, and start running calls directly from your lead sheet.
