
Automate Twitch Clip Highlights with n8n
Turn your Twitch streams into ready-to-use highlight scripts with a fully automated n8n workflow. In this guide you will learn how to:
- Accept Twitch clip transcripts via a webhook
- Split long transcripts into smaller chunks for better processing
- Create semantic embeddings with Cohere
- Store and search those embeddings in Weaviate
- Use a Hugging Face chat model and n8n Agent to write highlight scripts
- Log results to Google Sheets for review and reuse
By the end, you will have a working Twitch Clip Highlights Script workflow that connects n8n, Cohere, Weaviate, Hugging Face, and Google Sheets into a single automated pipeline.
Why automate Twitch clip highlights?
Reviewing clips manually is slow and inconsistent. Automated highlight generation helps you:
- Find your best moments faster, without scrubbing through hours of VODs
- Repurpose Twitch content for YouTube Shorts, TikTok, Instagram, and more
- Maintain a consistent style and structure for highlight reels
- Build a searchable archive of your stream’s key moments
This workflow uses:
- n8n for orchestrating the entire process
- Cohere embeddings to convert text into semantic vectors
- Weaviate as a vector database for fast similarity search
- Hugging Face chat model to generate human-readable highlight scripts
- Google Sheets for simple logging and review
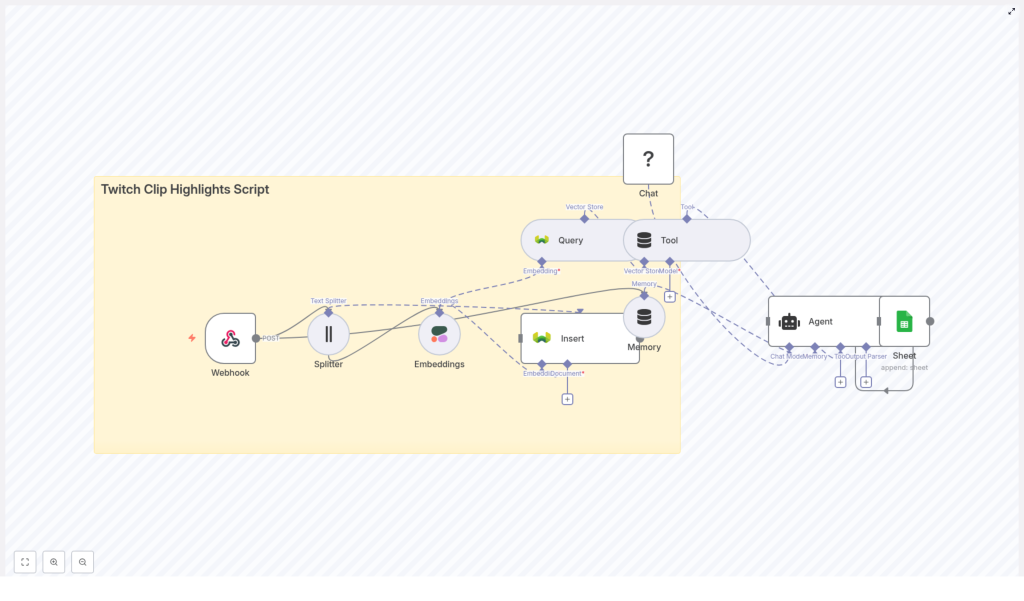
How the n8n Twitch highlights workflow works
Before we build it step by step, here is the high-level flow of the n8n template:
- Webhook receives clip data and transcript.
- Text Splitter breaks long transcripts into overlapping chunks.
- Cohere Embeddings converts each chunk into a vector.
- Weaviate Insert stores vectors plus metadata in a vector index.
- Weaviate Query retrieves the most relevant chunks for a highlight request.
- Tool + Agent passes those chunks to a Hugging Face Chat model.
- Agent produces a concise, readable highlight script.
- Google Sheets logs the script, metadata, and timestamps for later use.
Next, we will walk through each part of this workflow in n8n and configure it step by step.
Step-by-step: Build the Twitch Clip Highlights Script workflow in n8n
Step 1 – Create the Webhook endpoint
The Webhook node is your workflow’s entry point. It receives clip data from your clip exporter or transcription service.
- In n8n, add a Webhook node.
- Set the HTTP Method to
POST. - Set the Path to
twitch_clip_highlights_script.
This endpoint should receive JSON payloads that include at least:
clip_id– unique ID of the clipstreamer– streamer or channel nametimestamp– when the clip occurredtranscript– full transcript text of the clip
You can adapt the field names later in your node mappings, as long as the structure is consistent.
Example webhook payload
{  "clip_id": "abc123",  "streamer": "GamerXYZ",  "timestamp": "2025-09-28T20:45:00Z",  "transcript": "This is the full transcript of the clip..."
}
Use this sample payload to test your Webhook node while you build the rest of the workflow.
Step 2 – Split long transcripts into chunks
Long transcripts are harder to embed and can exceed token limits for language models. Splitting them into overlapping chunks improves both embedding quality and downstream summarization.
- Add a Text Splitter node after the Webhook.
- Set the Chunk Size to something like
400characters. - Set the Chunk Overlap to around
40characters.
These values are a good starting point for spoken transcripts. The overlap keeps context flowing between chunks so that important details are not lost at chunk boundaries.
Tip: For most Twitch clips, 300-500 characters per chunk with a small overlap works well. If you notice that the model misses context, try increasing the overlap slightly.
Step 3 – Generate embeddings with Cohere
Next, you will turn each transcript chunk into a numeric vector using Cohere embeddings. These vectors capture semantic meaning and are what Weaviate will use for similarity search.
- In n8n, configure your Cohere credentials under Settings > API credentials.
- Add an Embeddings node after the Text Splitter.
- Select Cohere as the provider.
- Choose a stable model. The template uses the
defaultmodel. - Map the chunk text from the Text Splitter as the input to the Embeddings node.
The Embeddings node will output a numeric vector for each chunk. You will store these vectors, along with metadata, in Weaviate.
Best practice: When processing many clips, batch embedding requests to reduce API calls and cost. n8n can help you group items and send them in batches.
Step 4 – Store vectors and metadata in Weaviate
Weaviate is your vector database. It stores both the embeddings and important metadata so you can later search for relevant moments and still know which clip and timestamp they came from.
- Add a Weaviate Insert node after the Embeddings node.
- Set indexName (or class name) to
twitch_clip_highlights_script. - Map the embedding vector output from the Embeddings node.
- Include metadata fields such as:
clip_idstreamertimestamp- A short text excerpt or full chunk text
- Optional: source URL or VOD link
Persisting metadata is crucial. With clip_id, streamer, timestamp, and source URL stored, you can:
- Quickly retrieve the exact segment you need
- Deduplicate clips
- Filter results by streamer, date, tags, or language
Vector store tuning tip: Configure Weaviate with an appropriate similarity metric such as cosine similarity or dot product, and consider adding filters (for example tags, language, or streamer) to narrow down search results when querying.
Step 5 – Query Weaviate for highlight-worthy chunks
Once you have clips stored, you need a way to pull back the most relevant moments when you want to generate highlight scripts. This is where the Weaviate Query node comes in.
- Add a Weaviate Query node to your workflow for the retrieval phase.
- Provide a short query prompt or natural language question, such as:
- “Find the funniest moments from yesterday’s stream”
- “Moments where the streamer wins a match”
- Configure the node to return the top N matching chunks based on semantic similarity.
The Query node will return a ranked list of candidate chunks that best match your request. These chunks will be passed into the language model to create a coherent highlight script.
Step 6 – Use a Tool + Agent with a Hugging Face chat model
Now you have the right chunks, you need to turn them into a readable highlight script. n8n’s Tool and Agent pattern connects Weaviate results with a chat model from Hugging Face.
- Add a Chat node and select a Hugging Face chat model.
- Configure your Hugging Face API key in n8n credentials.
- Connect the Weaviate Query node as a tool that the Agent can call to retrieve relevant chunks.
- Add an Agent node:
- Use the Chat node as the underlying model.
- Design a prompt template that explains how to use the retrieved chunks to produce a highlight script.
Example agent prompt template
"Given the following transcript chunks, identify the top 3 moments suitable for a 30-60s highlight. For each moment provide: 1) Start/end timestamp 2) One-sentence summary 3) Two short lines that can be used as narration."
The Agent node will:
- Assemble the final prompt using your template and the retrieved chunks
- Call the Hugging Face chat model
- Return a structured, human-friendly highlight description
You can optionally add a Memory node to keep buffer memory, which allows the Agent to maintain context across multiple turns or related highlight requests.
Step 7 – Log generated scripts to Google Sheets
To track your highlights and review them later, log every generated script to a Google Sheet.
- Add a Google Sheets node after the Agent.
- Set the operation to Append.
- Map fields such as:
- Stream or streamer name
- Clip ID or list of clip IDs used
- The generated highlight script
- Summary tags or keywords
- Generation timestamp
- Link to the original clip or VOD
This sheet becomes your simple dashboard for:
- Quality review before publishing
- Tracking which clips have already been used
- Handing off scripts to editors or social media tools
Best practices for a reliable Twitch highlights pipeline
1. Choose sensible chunk sizes
- Start with 300-500 characters per chunk.
- Use a small overlap (for example 40 characters) to preserve context.
- Increase overlap if the model seems to miss setup or punchlines that span chunk boundaries.
2. Store rich metadata in Weaviate
Always include:
clip_idstreamertimestamp- Source URL or VOD link
This makes later filtering, deduplication, and manual review much easier.
3. Tune vector search and performance
- Select a similarity metric like cosine or dot product that fits your Weaviate setup.
- Store additional fields like language, tags, or game so you can filter queries.
- Batch embedding calls to Cohere to reduce API costs.
4. Monitor rate limits and costs
- Track usage for both Cohere and Hugging Face APIs.
- Use smaller, cheaper models for routine summarization.
- Reserve larger models for final polished scripts or special highlight reels.
5. Respect privacy and content rights
- Only process clips you have permission to use.
- Follow Twitch and platform policies when storing and distributing content.
- Consider adding a moderation step for sensitive or inappropriate content.
Testing and validating your n8n workflow
Before you rely on this workflow for production, validate each part.
- Test the Webhook
Send a single small payload (like the sample above) and watch the execution in n8n. Confirm that all nodes receive the expected data. - Check embeddings in Weaviate
After inserting vectors, run a few manual queries in Weaviate and verify that:- Embeddings are stored correctly
- Metadata fields are present and accurate
- Retrieved chunks are semantically relevant to your queries
- Review Agent outputs
Inspect the Agent node’s output before auto-posting anywhere. If the scripts are not in your desired voice:- Refine the prompt template
- Add examples of good highlight scripts
- Adjust the number of chunks or context length
Troubleshooting common issues
- Embeddings do not appear in Weaviate
Check:- Weaviate credentials in n8n
- Field mapping in the Insert node
- That the embedding vector is correctly passed from the Embeddings node
- Poor quality highlight scripts
Try:- Adding more context or more top chunks from Weaviate
- Increasing the token window for the chat model
- Refining the Agent prompt with clearer instructions and examples
- Empty or malformed webhook payloads
This often comes from a misconfigured clip exporter. Add a temporary Google Sheets or logging node right after the Webhook to capture raw payloads and see what is actually arriving.
Scaling the workflow for multiple streamers
Once the basic pipeline works, you can extend it to handle more channels and more volume.
- Multi-tenant indexing – Use a namespace or separate index per streamer in Weaviate.
- API key management – Rotate Cohere and Hugging Face keys if you approach quotas.
- Moderation step – Insert a moderation or classification node to flag sensitive content before generating or publishing scripts.
- Downstream automation – Connect the generated scripts to:
- Social platforms (YouTube, TikTok, Instagram)
- Video editing APIs or tools that create short-form edits
- Content management systems or scheduling tools
FAQ and quick recap
What does this n8n template automate?
It automates the flow from raw Twitch clip transcript to a ready-to-use highlight script. It handles ingestion, splitting, embedding, semantic search, script generation, and logging.
Which tools are used in the workflow?
- n8n – workflow orchestration
- Cohere – text embeddings
<
