
Automate YouTube Transcript to Blog with n8n
Got a great YouTube channel but not enough time to turn those videos into blog posts? You are not alone. Manually copying transcripts, cleaning them up, and turning them into SEO-friendly articles can eat your entire day.
In this guide, we will walk through a practical n8n workflow template that takes a YouTube transcript and automatically turns it into a polished blog post. It uses n8n, embeddings, Pinecone as a vector database, and a RAG (Retrieval-Augmented Generation) agent to do the heavy lifting for you.
By the end, you will know exactly what this automation does, when you should use it, and how it can quietly run in the background while you focus on making more content.
Why turn YouTube transcripts into blog posts automatically?
Think about each video as a little content goldmine. When you repurpose a YouTube transcript into a blog, you:
- Reach people who prefer reading instead of watching
- Build long-form, searchable content that can rank on Google
- Give your audience another way to revisit your ideas and frameworks
The problem is the manual part. Copying, pasting, editing, formatting, adding headings, making it SEO-ready, and then logging everything somewhere for tracking can quickly become a full-time job.
This is where n8n shines. With a well-designed workflow, you can:
- Cut your turnaround time from hours to minutes
- Keep publishing consistent, even if your schedule is packed
- Standardize your blog format so every post looks clean and professional
If you are posting videos regularly and want your blog to keep up without burning out, this automation is exactly what you need.
How the n8n YouTube transcript to blog workflow works
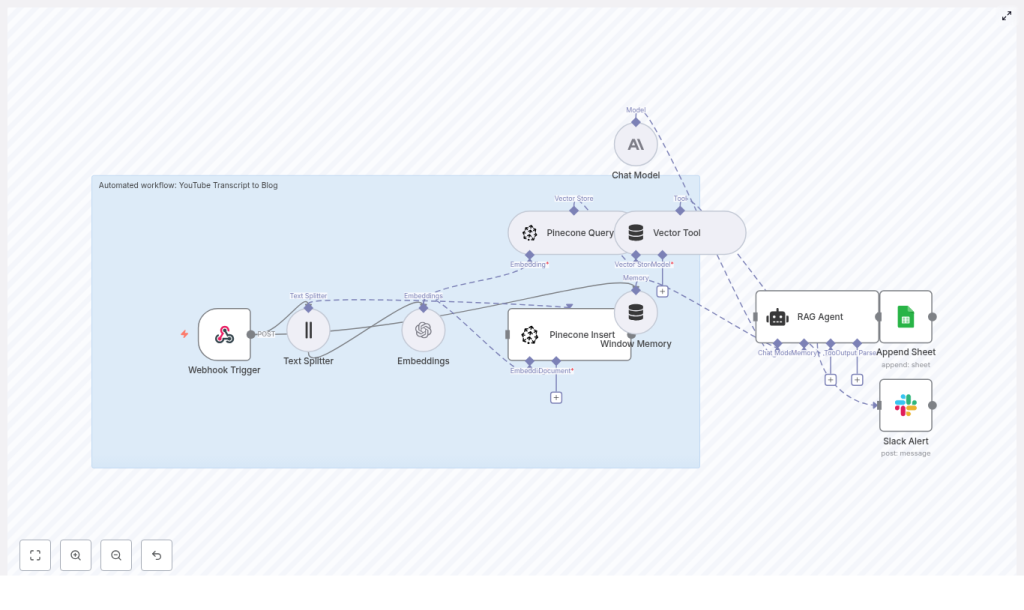
Let us start with the big picture. The workflow follows a fairly simple, repeatable pattern:
- Webhook Trigger in n8n receives the YouTube video data or transcript
- Text Splitter breaks the transcript into smaller chunks
- Embeddings model converts each chunk into vectors
- Pinecone stores those vectors along with metadata
- Pinecone Query + Vector Tool feed the most relevant chunks to a RAG agent
- RAG Agent generates an SEO-friendly blog post based on the transcript
- Google Sheets + Slack log the result and optionally notify your team
So at a high level, your video transcript goes in, and a structured blog post comes out, with n8n coordinating the entire process in the middle.
When should you use this workflow?
This template is perfect if you:
- Publish educational, explainer, or tutorial videos on YouTube
- Want every video to have a matching blog post for SEO
- Need a repeatable way to turn transcripts into long-form written content
- Work with a content team that reviews and edits AI drafts
It is especially useful if you already use tools like the YouTube Data API, Zapier, or other automation tools, because the workflow starts with a simple webhook that can plug into almost anything.
Key building blocks of the workflow
Webhook Trigger: how your workflow gets the transcript
Everything starts with n8n’s Webhook node. This node listens for incoming POST requests and can accept:
- A YouTube
video_id - Raw transcript text
- A video link plus metadata
That makes it easy to connect this workflow to the YouTube Data API, Zapier, or any custom script that can send a simple JSON payload.
Here is a sample payload you might send to the webhook:
{  "video_id": "abc123",  "title": "How to Optimize Video SEO",  "transcript": "Full transcript text...",  "published_at": "2025-01-01T12:00:00Z"
}
One important tip: keep the webhook response fast. Let the webhook acknowledge with a 200 quickly, then handle the heavy processing asynchronously so the sender is never stuck waiting.
Text Splitter: breaking long transcripts into chunks
Transcripts are usually long and messy. To make them usable for embeddings and retrieval, the workflow uses a Text Splitter node.
This node cuts the transcript into overlapping sections so that context is preserved from one chunk to the next. Typical settings look like:
chunkSize: around 350 to 500 characterschunkOverlap: around 30 to 80 characters
The overlap is important. It gives the model continuity, so it does not suddenly lose context at the boundary between two chunks.
Embeddings: turning text into vectors
Once the transcript is split, each chunk is sent to an embeddings model, such as OpenAI text-embedding-3-small. The goal here is to convert text into numerical vectors that capture meaning, not just keywords.
These vectors make it possible to:
- Search for similar content by meaning
- Retrieve the most relevant parts of a transcript later
- Give the RAG agent focused, on-topic context
Along with the vector, you can attach metadata like video_id and timestamp so you always know where a chunk came from.
Pinecone: storing and retrieving transcript chunks
Next, the workflow uses Pinecone as a vector database. There are two main actions here: Insert and Query.
Insert into Pinecone
Each embedding is stored in a Pinecone index, for example youtube_transcript_to_blog, along with useful metadata such as:
video_idtimestampchunk_textspeaker(if available)original_url
This gives you a searchable history of all your videos and their transcript pieces.
Query Pinecone for relevant context
When it is time to generate a blog post, the workflow sends a query to Pinecone to fetch the most relevant chunks. For example, you might query with something like:
“Create a 1,200-word SEO blog post summarizing the main points and including headings about X.”
Pinecone responds with the top-k chunks that best match the query. Those chunks become the source material for your RAG agent.
Vector Tool and Window Memory: keeping the agent grounded
The Vector Tool in the workflow wraps the Pinecone query results into a format that the RAG agent can understand and use effectively. It basically says, “Here is the context you should rely on.”
Alongside that, Window Memory keeps short-term state while the agent is generating the content. This is helpful if you want to:
- Iterate on the same draft
- Ask for edits or additional sections
- Keep the tone and structure consistent across generations
RAG Agent: turning transcript chunks into a blog post
The heart of the workflow is the RAG (Retrieval-Augmented Generation) agent. It combines:
- The retrieved transcript chunks from Pinecone
- A generative language model (like OpenAI or Anthropic)
- A carefully designed system prompt
A typical system message might look like:
“You are an assistant for YouTube Transcript to Blog. Create an SEO blog post with headings, summaries, and a call-to-action.”
With that guidance, the agent uses the transcript context to write a coherent, grounded blog post that:
- Follows a clear structure
- Includes headings and subheadings
- Reads like a human wrote it, not like a transcript dump
Google Sheets logging and Slack alerts
Once the blog is generated, the workflow can:
- Append a row to Google Sheets with details like video ID, title, generation time, and a link to the draft
- Send a Slack alert if something goes wrong or when a new post is ready for review
This makes it easy for your content or editorial team to track what was generated, review drafts, and catch any issues early.
Step-by-step: building the n8n YouTube transcript to blog workflow
Let us put everything together into a clear sequence you can follow:
- Create an n8n workflow
Start with a Webhook node that listens for new transcripts or video events. This is the entry point for your YouTube data or transcript text. - Split the transcript
Add a Text Splitter node and configure it with:chunkSizearound 350 to 500 characterschunkOverlaparound 30 to 80 characters
This prepares your transcript for embedding and retrieval.
- Generate embeddings
Use an Embeddings node (for example, OpenAItext-embedding-3-small) to create a vector for each chunk. Attach metadata likevideo_idandtimestampto each record. - Insert vectors into Pinecone
Connect to your Pinecone index, such asyoutube_transcript_to_blog, and insert the embeddings plus metadata. Confirm that indexing is working correctly. - Query Pinecone to generate a blog
When you want to create a post, query Pinecone for the top-k most relevant chunks using a natural language request like:
“Create a 1,200-word SEO blog post summarizing main points and including headings about [topic].” - Compose the RAG Agent call
Build your RAG agent input with:- System message: role description and formatting rules
- Tool input: the top-k chunks from Pinecone
- User prompt: post title, target keywords, tone, and desired length
The agent then uses the transcript context to write the actual blog post.
- Handle the output
Once the HTML blog content is generated, you can:- Save it directly into your CMS
- Append a new row to Google Sheets for logging and editorial review
- Optionally send a Slack notification with a link to the draft
Prompt engineering and SEO-focused formatting
The magic is not just in the workflow, it is also in how you talk to the RAG agent. A clear, structured prompt can make the difference between a messy draft and a publish-ready article.
Here are example instructions you can bake into your system or user prompts:
- Generate a clear H1 and multiple H2 headings
- Include an excerpt and an SEO meta description
- Use the primary keyword “YouTube transcript to blog” naturally at least 2 to 3 times
- Write around 1,000 to 1,500 words with subheadings and bullet lists where it makes sense
- End with a strong, clear call-to-action
- Provide an SEO-friendly slug and a meta description between 150 and 160 characters
With this kind of structure, your generated posts are much more likely to be consistent, search-friendly, and easy to scan.
Best practices to get reliable, high-quality posts
To keep your automation both powerful and safe, it helps to follow a few best practices.
- Human-in-the-loop review
Especially for the first few runs, have someone read and lightly edit each post. This helps catch hallucinations, misinterpretations, and tone issues. - Tune chunk size
If your content is highly technical or dense, try smaller chunks so each piece stays focused. For more conversational videos, slightly larger chunks may work fine. - Choose embedding models wisely
Use a smaller, cost-effective embedding model for indexing. If budget allows, reserve more powerful models for the final generation step to improve quality. - Use rich metadata
Store speaker names and timestamps. These can be used later for quoting, attribution, or adding “as mentioned at [time] in the video” style references. - SEO-aware output
Encourage the model to add keyword-rich headings, internal links (if your CMS supports it), and structured sections like FAQs or summaries where appropriate.
Costs and performance: what to watch out for
This workflow has three main cost drivers:
- Embedding generation
- Pinecone vector storage and queries
- Token usage for the generative language model
To keep things efficient and budget friendly, you can:
- Batch embedding requests instead of sending one chunk at a time
- Use a smaller embedding model for indexing and a higher-capacity model only for final content generation
- Limit the number of top-k results from Pinecone, usually 3 to 6 chunks are enough for solid context
With a bit of tuning, you can keep cost per blog post quite manageable while still getting high-quality output.
Webhook payload and debugging tips
To keep your workflow easy to debug and maintain, send a concise, predictable payload into the webhook, like the example earlier. A few extra tips:
- Return a quick 200 OK from the webhook so the sender is never blocked
- Log key fields like
video_idandtitleearly in the workflow for easier troubleshooting - Use Slack alerts to notify you when an error occurs so you can jump in fast
Putting it all together
Automating your YouTube transcript to blog workflow with n8n, embeddings, Pinecone, and a RAG agent can completely change how you handle content.
Instead of manually turning every video into a blog post, you:
- Feed transcripts into a single webhook
- Let the workflow handle splitting, embedding, storing, and retrieval
- Have a RAG agent generate structured, SEO-optimized blog content
- Log everything to Google Sheets and keep your team in the loop via Slack
With good prompt engineering, rich metadata, and a simple human review loop, you can reliably scale blog creation from your existing video library without sacrificing quality.
Ready to build this workflow? If you want a starter n8n template, configuration examples, or help wiring this into your CMS, you can grab the template and start experimenting today.
Call-to-action:
