
Automate Zendesk to Jira with n8n: Turn Support Handoffs Into a Seamless Flow
Every time you copy a Zendesk ticket into Jira by hand, you lose a little bit of focus. You jump tools, retype details, paste links, and hope nothing gets missed. Over a day or a week, that context switching adds up. It slows your team down and pulls attention away from the work that really matters: helping customers and shipping improvements.
Automation with n8n can turn that friction into flow. By connecting Zendesk and Jira with a simple, reliable workflow, you create a system that quietly does the busywork for you. New tickets are picked up, checked, synced, and updated without you lifting a finger. Your support and engineering teams stay aligned, your incidents move faster, and you reclaim time and mental space.
This guide walks you through an n8n workflow template that does exactly that. You will see how to listen for new Zendesk tickets, detect whether a related Jira issue already exists, then either add a comment or create a new Jira issue and store its key back in Zendesk. Along the way, you will also see how this template can be a stepping stone toward a more automated, focused way of working.
The problem: Manual Zendesk to Jira handoffs drain your time
When Zendesk and Jira are not connected, every cross-team ticket becomes a mini-project:
- Someone in support has to create a Jira issue by hand.
- Ticket context needs to be copied, cleaned up, and pasted.
- Links between tools have to be maintained manually.
- Updates in one system may never make it into the other.
Over time, this creates hidden costs:
- Duplicate work for support and engineering teams.
- Lost or inconsistent context between Zendesk and Jira.
- Slow and error-prone triage, especially during busy periods.
- Difficulty meeting SLAs because information is scattered.
It does not have to stay this way. A small amount of automation can unlock a big shift in how your teams collaborate.
The mindset shift: Let automation carry the routine work
Automation is not just about saving a few clicks. It is about creating space for deeper work. When you let n8n handle the predictable steps, you:
- Reduce context switching so your team can stay in flow.
- Build reliable, repeatable processes instead of ad-hoc fixes.
- Strengthen collaboration between support and engineering.
- Free yourself to focus on strategy, not data shuffling.
Think of this Zendesk to Jira workflow as your first building block. Once you have it in place, you can extend it with richer data mapping, smarter routing, and even two-way syncing. Each improvement compounds the time you gain back.
The solution: An n8n template that keeps Zendesk and Jira in sync
The n8n workflow you are about to set up listens for new Zendesk tickets, checks for an existing Jira issue key in a custom field, and then:
- Adds a comment to an existing Jira issue if it finds a key, or
- Creates a new Jira issue and stores the new key back in Zendesk.
Technically, the workflow uses:
- A Webhook trigger to receive Zendesk events.
- The Zendesk node to fetch full ticket details.
- A small Function node to inspect a custom field for a Jira Issue Key.
- An IF node to branch based on whether that key exists.
- Jira nodes to create issues or comments.
- A Zendesk Update node to write the Jira key back.
The result is a lightweight, maintainable automation that quietly keeps both tools aligned. Once it is running, every new ticket becomes an opportunity to save a few more minutes and a bit more mental energy.
What you need before you start
To follow along and use the n8n Zendesk to Jira automation template, make sure you have:
- An n8n instance (self-hosted or n8n cloud) with permission to create webhooks.
- A Zendesk account with API access and a custom field to store the Jira issue key.
- A Jira Software Cloud account with API credentials and a project where issues will be created.
- Basic familiarity with n8n nodes and light JSON editing.
If you are new to n8n, do not worry. This workflow is a friendly starting point. You will see how each node works, and you can build on it as your confidence grows.
How the n8n workflow is structured
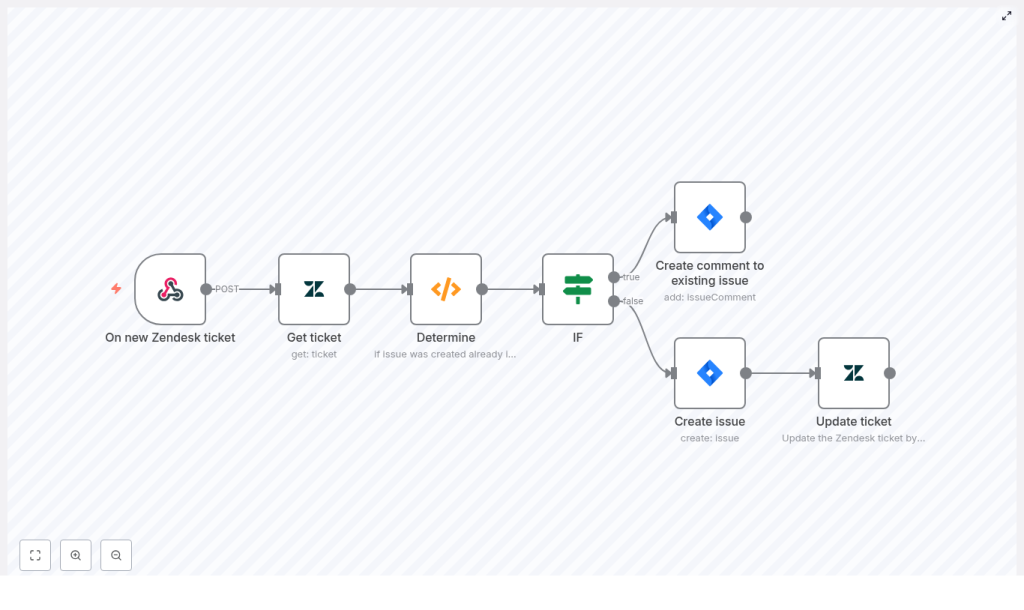
Here is the high-level sequence the template uses to automate Zendesk to Jira:
- Webhook: Listens for new or updated Zendesk tickets.
- Zendesk Get: Fetches the full ticket with all custom fields and comments.
- Function (Determine): Checks a specific custom field for a Jira issue key.
- IF: Branches depending on whether that key is present.
- Jira issueComment: Adds a comment to an existing Jira issue if the key exists.
- Jira create issue: Creates a new Jira issue if no key is found.
- Zendesk Update: Writes the new Jira issue key back into the Zendesk custom field.
Next, you will configure each node. As you do, notice how simple the logic really is. This is the kind of automation you can understand at a glance, yet it can save hours over time.
Step 1: Webhook – listen for new Zendesk tickets
Start with the trigger that will kick off your automation.
Configure the Webhook node
In n8n, add a Webhook node and set a path, for example:
/zendesk-new-ticket-123This path becomes part of the URL that Zendesk will call.
In your Zendesk account:
- Create or update a trigger or webhook that sends events to the n8n Webhook URL.
- Use the POST method so the ticket data is sent in the request body.
- Configure it to fire when a ticket is created or updated, depending on your needs.
Once this is connected, every new ticket event will reach your n8n workflow automatically.
Step 2: Get the full Zendesk ticket
The webhook payload is useful, but you usually want the complete ticket record. That is where the Zendesk node comes in.
Configure the Zendesk “Get ticket” node
Add a Zendesk node and select the get operation. For the ID field, reference the ticket ID from the webhook payload, for example:
{{$node["On new Zendesk ticket"].json["body"]["id"]}}(Adjust the node name if your Webhook node uses a different label.)
This retrieves the full ticket object, including:
custom_fieldssuch as your Jira issue key field.- Ticket comments and metadata.
- Requester, tags, and other useful context.
At this point, your workflow has everything it needs to decide whether to create a new Jira issue or update an existing one.
Step 3: Decide if a Jira issue already exists
Next, you will inspect a specific Zendesk custom field that stores the Jira issue key. This decision is the heart of the workflow: it determines whether you add a comment or create a new issue.
Configure the “Determine” Function node
Add a Function node and connect it after the Zendesk Get node. Use the following example code, and update the field ID to match your Zendesk configuration:
/* Zendesk field ID which represents the "Jira Issue Key" field. */
const ISSUE_KEY_FIELD_ID = 6689934837021;

new_items = [];
for (item of $items("Get ticket")) {  var custom_fields = item.json["custom_fields"];  var jira_issue_key = "";  for (var i = 0; i < custom_fields.length; i++) {  if (custom_fields[i].id == ISSUE_KEY_FIELD_ID) {  jira_issue_key = custom_fields[i].value;  break;  }  }  new_items.push({  "Jira issue key": jira_issue_key  });
}
return new_items;
Important details:
- Replace
ISSUE_KEY_FIELD_IDwith the ID of your Zendesk custom field. You can find this in Zendesk admin > Ticket Fields. - The function outputs an item with a single property:
Jira issue key.
This output makes the next step easy: you simply check whether that value is empty or not.
Step 4: Branch the workflow with an IF node
Now you will tell n8n how to behave in each scenario.
Configure the IF node
Add an IF node and connect it after the Determine node. Set the condition to check whether the Jira issue key is present, for example:
{{$node["Determine"].json["Jira issue key"]}} isNotEmptyThis creates two clear paths:
- True branch: A Jira issue already exists, so the workflow will add a comment to that issue.
- False branch: No Jira issue exists yet, so the workflow will create a new one.
From here, your Zendesk to Jira sync becomes fully automatic. Each ticket is handled appropriately without anyone having to think about it.
Step 5: Add a comment to an existing Jira issue
When the IF node finds an existing Jira key, you can keep Jira updated with the latest Zendesk activity.
Configure the Jira issueComment node
On the true branch of the IF node, add a Jira node and choose the issueComment operation. Configure it to:
- Use the
issueKeyfrom the Determine node output. - Set the comment body from the Zendesk ticket event.
An example expression for the comment body could be:
{{$node["On new Zendesk ticket"].json["body"]["comment"]}}You can adjust this to include more context, such as ticket ID, requester, or a direct link to Zendesk. Every new Zendesk update can now appear in Jira automatically, keeping engineers in the loop without manual effort.
Step 6: Create a new Jira issue when needed
When no Jira issue exists yet, the workflow will create one for you on the false branch of the IF node.
Configure the Jira “Create issue” node
Add another Jira node and select the create issue operation. Typical settings include:
- Summary: Use the Zendesk ticket subject.
- Description: Include a link back to the Zendesk ticket and any key details.
For example, you might use this description template:
See Zendesk issue at: https://your-domain.zendesk.com/agent/tickets/{{$node["Get ticket"].json["id"]}}Make sure you also:
- Set the correct project and issueType IDs (or names) in the Jira node.
- Optionally map additional fields like priority, tags, or requester.
From now on, new Zendesk tickets that require engineering attention will automatically become Jira issues, complete with a reference back to the original ticket.
Step 7: Write the Jira key back into Zendesk
To close the loop, you want Zendesk to know which Jira issue is associated with each ticket. That way, future updates can reuse the same Jira issue instead of creating duplicates.
Configure the Zendesk “Update ticket” node
After the Jira Create issue node, add a Zendesk Update node. Configure it to:
- Target the original Zendesk ticket ID.
- Update the Jira issue key custom field with the newly created Jira key.
You can capture the Jira key from the create issue node, for example:
{{$node["Create issue"].json["key"]}}Once this is stored in the custom field, the next time the ticket changes, the workflow will recognize the key and route to the “existing issue” path. Your systems stay in sync without extra effort.
Testing your Zendesk to Jira automation
Before you rely on this workflow in production, take a moment to test and validate it. This is where you turn a good idea into a dependable part of your process.
- Enable the n8n webhook and send a test POST from Zendesk (or use curl/Postman) with a sample ticket payload.
- Check the Zendesk Get node to confirm you see the full ticket data, including
custom_fields. - Verify the Determine node correctly reads the Jira issue key field.
- Test both branches:
- A ticket that already has a Jira key set.
- A ticket without any Jira key.
- Look in Jira to confirm that:
- Comments are added to existing issues.
- New issues are created with the Zendesk link in the description.
- Check Zendesk after issue creation to confirm the Jira key is populated in your custom field.
Once these checks pass, you have a working bridge between Zendesk and Jira that runs on its own.
Make your workflow more resilient and polished
With the core automation in place, you can start refining it. This is where you turn a working flow into a robust system that your team can trust at scale.
Error handling and reliability
- Add a Set node or extra Function node to clean up comment text before sending it to Jira, for example stripping HTML or limiting length.
- Use Try/Catch patterns or an Error Trigger workflow in n8n to handle API failures gracefully and notify admins when something goes wrong.
- Log responses from Jira and Zendesk, for example by storing them in a database or sending them to a monitoring channel for traceability.
- Watch out for rate limits. If you handle a high volume of tickets, consider throttling requests or batching updates.
- Secure your webhook with a secret token and validate incoming payloads before processing them.
Advanced enhancements for deeper integration
- Map additional Zendesk fields such as priority, tags, and requester into Jira custom fields to preserve richer context.
- Create label rules in Jira
