
Automated KlickTipp to Gmail: How One Marketer Finally Fixed Their Transactional Email Headache
By the time Lena opened her laptop each morning, her inbox was already full of small fires.
Customers waiting for order confirmations that had not arrived. Webinar registrants asking if their login link was correct. Trial users wondering whether their account was really activated. Every missed or delayed email chipped away at trust, and every manual follow-up stole time from the work Lena actually wanted to do: growing the business.
She had KlickTipp handling her contacts and tags, Gmail for day-to-day communication, and a growing list of transactional messages that needed to go out instantly and on-brand. What she did not have was a reliable way to connect it all without living in her inbox.
That changed the day she discovered an n8n workflow template that automated transactional emails from KlickTipp to Gmail.
The Problem: Manual Emails In A Fast-Paced World
Lena was the marketing lead at a small SaaS company. KlickTipp managed their contacts and tags, and every action in KlickTipp was supposed to trigger a specific email:
- New customer signups needed personalized welcome messages
- Tag-based automations had to send confirmations and updates
- Support events required quick follow-ups and status notifications
In theory, it was simple. In reality, Lena was copying and pasting email templates, personalizing them by hand, and hoping she did not miss anyone.
Branding was inconsistent. Some emails looked polished and on brand, others looked rushed. Tracking was almost impossible. If a customer said, “I never got that email,” Lena had to dig through Gmail, cross-check KlickTipp, and guess what went wrong.
She needed transactional email automation that could:
- Send immediate, personalized emails based on KlickTipp events
- Use consistent HTML templates aligned with their brand
- Track delivery status back in KlickTipp so the team could see what happened at a glance
After yet another morning of manual follow-ups, Lena decided she was done patching the problem. She opened n8n and went looking for a better way.
The Discovery: An n8n Template That Connects KlickTipp To Gmail
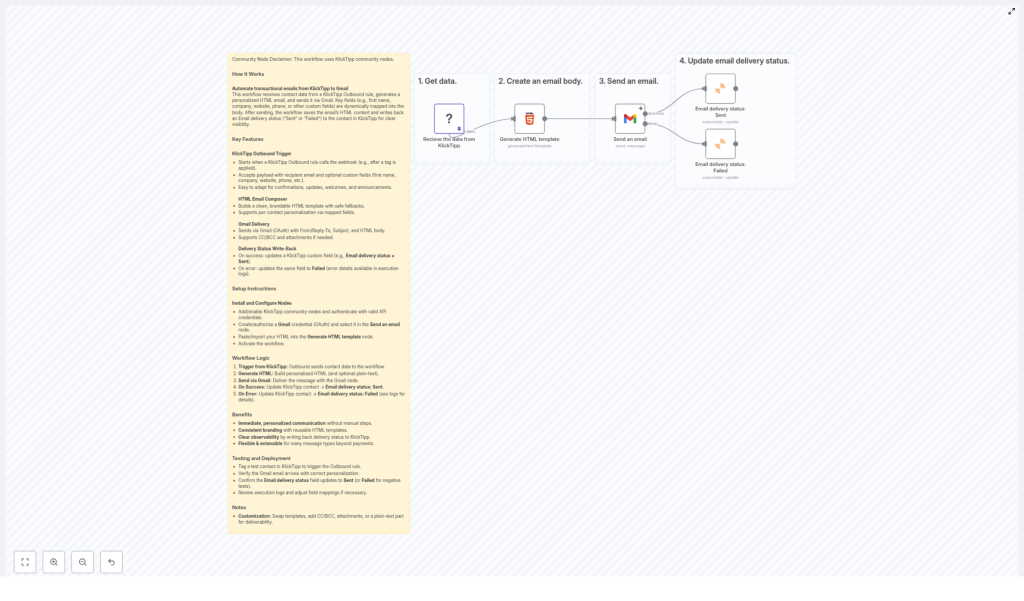
Inside the n8n template gallery, one workflow caught her eye: an automation that sends transactional emails from KlickTipp to Gmail and then writes the delivery status back to KlickTipp.
On paper, it promised exactly what she needed:
- Trigger on KlickTipp outbound events
- Generate a personalized HTML email using contact data
- Send through Gmail using OAuth
- Update the contact in KlickTipp with a “Sent” or “Failed” status, plus the original HTML
If it worked, it would replace hours of manual work with a single automated flow. Lena decided to try it.
How The Workflow Actually Works (From Lena’s Perspective)
Instead of starting from a blank canvas, Lena imported the ready-made n8n workflow template. As she clicked through each node, the story of the automation unfolded.
The Trigger: When KlickTipp Speaks, n8n Listens
At the start of the workflow sat the KlickTipp Outbound Trigger. This node was the bridge between KlickTipp and n8n.
Whenever KlickTipp fired an outbound event, such as a tag being applied to a contact, the trigger would wake up the workflow. It pulled in exactly what Lena needed for her emails:
- The recipient’s email address
- Custom fields like first name, website, and phone
In other words, every time KlickTipp tagged someone, n8n would instantly know who that person was and what details to use in the email.
The Heart Of The Story: Generating A Personalized HTML Email
Next, Lena opened the node that would decide how her emails looked: Generate HTML Template.
This was an HTML node configured with a branded template. Inside, she saw placeholders for contact information, such as:
{{ $json["firstName"] }}for the customer’s first name{{ $json["website"] }}for their website{{ $json["phone"] }}for their phone number
The node used templating variables to dynamically insert contact data from KlickTipp. That meant every recipient would get a message that felt written just for them, while Lena only had to design the HTML once.
She swapped in her company’s colors, logo, and typography, then saved the node. For the first time, her transactional emails would be both personalized and fully on brand.
The Delivery Engine: Sending Through Gmail With OAuth2
With the HTML ready, the next step was actually sending the email. That is where the Gmail node came in.
This node was configured to use OAuth2 for secure authentication. After creating and authorizing a Gmail OAuth credential, Lena could set:
- The sender name (for example, “Acme Support”)
- The subject line (for example, “Your Account Is Ready”)
- A reply-to address so responses went to the right inbox
The node also supported advanced options like CC, BCC, and attachments, which gave her room to grow later if she wanted to send invoices or additional documents.
Most importantly, the HTML body from the previous node flowed directly into the Gmail node. No more copy-paste, no more formatting errors.
The Turning Point: Knowing What Happened To Every Email
Before this workflow, Lena had one nagging fear: “What if customers do not get the email, and I never know?”
The template solved that with a neat final step. After the Gmail node attempted to send the message, the workflow branched into two possible paths, each handled by its own KlickTipp node.
If The Email Was Sent
On success, the workflow used a KlickTipp node to:
- Update the contact with a delivery status of “Sent”
- Save the original HTML content along with the status
This gave Lena and her team full transparency. They could open a contact in KlickTipp and see not only that an email had been sent, but also what it looked like.
If The Email Failed
If something went wrong, the other KlickTipp node kicked in. It would:
- Mark the delivery status as “Failed”
- Log error details to help with troubleshooting
Instead of guessing why a message did not arrive, Lena could read the error information and fix the underlying issue, such as a misconfigured field or invalid email address.
Why This Automation Changed Lena’s Day-To-Day Work
Once the workflow was clear in her mind, the benefits became obvious.
- Immediate, personalized communication The moment KlickTipp applied a tag, the workflow triggered. Customers received confirmations, announcements, and transactional emails within seconds, with their own first name, website, and phone number woven into the content.
- Consistent branding across every message The reusable HTML template ensured every email matched the company’s style. One template, many personalized outputs.
- Clear visibility into delivery status With “Sent” or “Failed” saved back to KlickTipp, Lena finally had a single source of truth. Support could check status without digging through Gmail.
- Flexibility for future use cases The same framework could handle more than just transactional emails. Different tags could trigger different templates, from onboarding sequences to event reminders.
How Lena Set Everything Up In n8n
Putting the workflow into action was less about coding and more about connecting the right pieces. Here is how Lena did it, step by step.
Step 1 – Enable KlickTipp Community Nodes
First, she enabled the KlickTipp community nodes in n8n, then authenticated them with her KlickTipp API credentials. This allowed n8n to receive outbound events and update contacts directly.
Step 2 – Create A Gmail OAuth Credential
Next, she set up a Gmail OAuth2 credential in n8n and authorized it with the company’s Gmail account. This let the Gmail node send emails securely on behalf of the business.
Step 3 – Import And Adjust The HTML Template
In the Generate HTML Template node, Lena imported her branded HTML layout. She added or adjusted placeholders for:
- First name
- Phone number
- Website
The HTML node used these templating variables to inject data from KlickTipp dynamically.
Step 4 – Map KlickTipp Fields Correctly
To make sure the right information flowed into the email, she checked the field mappings. The custom fields from KlickTipp, such as first name, phone, and website, needed to match the variables used inside the HTML template.
Step 5 – Activate The Workflow
Once everything looked correct, Lena saved and activated the workflow. From that point on, every relevant KlickTipp outbound event would automatically trigger the process.
The First Test: From Tag To Inbox
To see if it really worked, Lena created a test contact in KlickTipp and applied the tag that should start the workflow.
- Trigger: The KlickTipp outbound rule fired and activated the n8n workflow.
- Email arrival: Within moments, a fully branded, personalized email appeared in her Gmail inbox.
- Status check: Back in KlickTipp, the contact now showed a delivery status of “Sent”, along with the HTML content.
For good measure, she tested an invalid email scenario to confirm the failure path. The workflow correctly marked the status as “Failed” and logged the error, confirming that troubleshooting would be straightforward.
After a few small adjustments to field mappings, she was confident enough to roll it out to real customers.
How She Customized The Workflow For Her Business
Once the core automation was running, Lena started to adapt it to different needs.
- Different templates for different tags She swapped email templates depending on the type of message, such as onboarding, password reset, or event reminders.
- Additional recipients and attachments For some messages, she used CC or BCC to keep team members in the loop, or attached PDFs like invoices or guides.
- Plain-text version for deliverability She added a plain-text part to the emails to improve deliverability and accessibility for recipients who prefer non-HTML emails.
The workflow became a flexible backbone for their email communication, not just a one-off fix.
The Resolution: From Inbox Chaos To Calm Automation
A few weeks after turning on the automated KlickTipp to Gmail workflow, Lena noticed something unusual: her mornings were quiet.
Customers were getting their confirmations on time. The support team could see exactly what had been sent. The marketing team trusted that every tag in KlickTipp would trigger the right, branded message without manual work.
Instead of chasing down missing emails, Lena could focus on strategy, campaigns, and growth, knowing that transactional communication was handled by a reliable, transparent n8n workflow.
Set Up Your Own KlickTipp To Gmail Automation
If you recognize yourself in Lena’s story, you do not have to keep fighting your inbox. This n8n workflow template gives you a clear, tested way to:
- Trigger emails from KlickTipp outbound events
- Generate personalized HTML messages using contact data
- Send them through Gmail with OAuth2
- Write “Sent” or “Failed” status back to KlickTipp for full visibility
Install the template, plug in your credentials, adjust the HTML to match your brand, and let n8n handle the rest.
Ready to streamline your customer communications and reduce manual work to almost zero? Start using this automated KlickTipp to Gmail workflow today and turn every tag into a timely, personalized email that your customers can rely on.
