
Build a RAG GenAI App with WordPress & n8n
This guide walks you through turning your WordPress site into a Retrieval-Augmented Generation (RAG) application using n8n, OpenAI embeddings, Supabase or Postgres with pgvector, and a chat interface. You will learn how the three main n8n workflows (initial embedding, upsert, and chat) work together so your static content becomes an interactive, conversational AI experience.
What You Will Learn
By the end of this tutorial, you will be able to:
- Explain what RAG is and why it is useful for WordPress content.
- Understand the high-level architecture of the n8n WordPress RAG template.
- Set up the three core workflows:
- Workflow 1 – Initial Embedding
- Workflow 2 – Incremental Upsert
- Workflow 3 – Chat / Q&A
- Configure WordPress, vector stores, and OpenAI embeddings inside n8n.
- Apply best practices for chunking, metadata, security, and cost control.
- Troubleshoot common issues like missing documents or irrelevant answers.
Concept Overview: Why RAG for WordPress?
Retrieval-Augmented Generation (RAG) combines two ideas:
- Retrieval – Searching over a vector store of your documents to find the most relevant content for a user query.
- Generation – Using a large language model (LLM) to generate an answer, guided by the retrieved content.
When applied to a WordPress website, RAG lets you build a chat or search assistant that:
- Answers questions based on your actual posts, pages, and documentation.
- Includes links and metadata so users can verify the information.
- Reduces support load by providing self-service answers.
- Improves content discovery compared to basic keyword search.
Instead of training a custom model, you reuse your existing WordPress content. n8n orchestrates the flow of content from WordPress into a vector store, then into a chat workflow that uses an LLM like gpt-4o-mini to generate grounded answers.
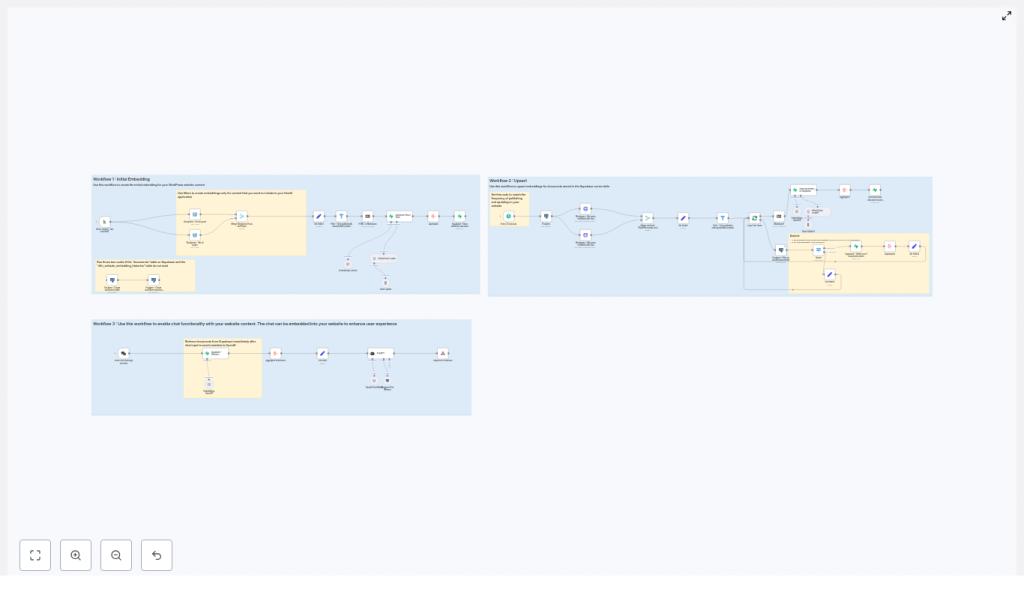
High-Level Architecture of the n8n Template
The provided n8n template is built around three separate workflows that work together:
- Workflow 1 – Initial Embedding
Fetches all WordPress posts and pages, cleans and splits the content into chunks, generates embeddings with OpenAI, and stores them in a vector database (Supabase or Postgres with pgvector). - Workflow 2 – Upsert (Incremental Updates)
Runs on a schedule or after content changes. It detects new or modified posts, regenerates embeddings for those items, and updates the vector store. - Workflow 3 – Chat
Accepts user questions via a webhook or chat interface, retrieves the most relevant chunks from the vector store, and sends them to an LLM agent that composes a final answer with citations.
This separation keeps your system efficient: the heavy embedding work runs periodically, while the chat workflow responds in real time using precomputed vectors.
Key Building Blocks in n8n
1. WordPress Integration
n8n can connect to WordPress in two main ways:
- WordPress nodes – Use n8n’s built-in WordPress nodes to fetch posts and pages.
- HTTP Request nodes – Call the WordPress REST API directly if you need custom filtering.
In both cases, you should:
- Filter to published content only.
- Exclude password-protected or draft posts.
- Map important fields like ID, title, URL, content, publication date, and modification date.
This ensures only public, relevant content ends up in your vector store.
2. HTML to Text Conversion and Chunking
WordPress content is usually stored as HTML. Before creating embeddings, the workflow:
- Converts HTML to markdown or plain text to remove layout markup and shortcodes.
- Splits the cleaned text into smaller segments using a token-based text splitter.
A common configuration is:
- Chunk size – Around 300 tokens per chunk.
- Overlap – Around 30 tokens between chunks.
The overlap helps preserve context that might otherwise be cut off at chunk boundaries. You can adjust these values later to improve retrieval quality.
3. Embeddings with OpenAI
For each chunk of text, n8n calls an OpenAI embedding model, such as text-embedding-3-small. The result is a numeric vector that represents the semantic meaning of the chunk.
Each vector is stored together with structured metadata, for example:
url– Link to the original WordPress post or page.title– Title of the source content.content_type– For example, post, page, or documentation.publication_date– Original publish date.modification_date– Last updated date.id– Internal identifier for tracking and upserts.
Rich metadata is essential for transparent answers and for managing updates over time.
4. Vector Store Options: Supabase or Postgres + pgvector
The template supports two main vector storage approaches:
- Supabase Vector Store
A managed Postgres service that supports vector columns. It stores embeddings and metadata and exposes a match or similarity query API. This is usually the easiest option to start with. - Self-hosted Postgres + pgvector
If you manage your own database, you can install thepgvectorextension. The template includes SQL snippets to:- Create a
documentstable with a vector column. - Define a
match_documentsfunction to perform similarity search.
- Create a
5. Chat Flow and AI Agent
In the chat workflow, n8n listens for user questions, retrieves relevant chunks from the vector store, and then calls an LLM agent, such as gpt-4o-mini. The agent receives:
- The user’s question.
- The top N most similar document chunks, each with its metadata.
The agent then generates a natural language answer that must include citations, such as URLs and dates, so users can see where the information came from.
Step-by-Step: Workflow 1 – Initial Embedding Pipeline
The first workflow prepares your entire WordPress site for RAG by building the initial vector index.
Step 1: Fetch WordPress Posts and Pages
- Use the WordPress node or HTTP Request node to retrieve all posts and pages.
- Filter to:
- status = published
- no password protection
Step 2: Filter and Map Metadata
- Remove any drafts or private content.
- Map fields like:
- WordPress ID
- Title
- Slug or URL
- Content (HTML)
- Publication and modification dates
- Content type (post, page, etc.)
Step 3: Convert HTML to Text
- Use an HTML-to-text or HTML-to-markdown node or function in n8n.
- Strip out layout elements, menus, and other boilerplate where possible to reduce noise.
Step 4: Split Text into Chunks
- Apply a token-based text splitter:
- Chunk size: about 300 tokens.
- Overlap: about 30 tokens.
- Each chunk should still include a reference to the parent document (for example, the WordPress post ID).
Step 5: Generate Embeddings
- Call the OpenAI embedding model for each chunk.
- Batch requests when possible to reduce latency and cost.
- Attach metadata to each embedding:
- url, title, content_type
- publication_date, modification_date
- internal id (for example, WordPress post ID plus chunk index)
Step 6: Insert into Vector Store
- Write each embedding and its metadata into:
- Supabase vector table, or
- Postgres table with a
vectorcolumn (via pgvector).
Step 7: Record Workflow Execution Timestamp
- Store the time of this run in a dedicated table or configuration location.
- This timestamp is used by the upsert workflow to fetch only changed content later.
Step-by-Step: Workflow 2 – Upsert (Incremental Updates)
The upsert workflow keeps your vector store in sync with your WordPress site without re-embedding everything.
Step 1: Decide How to Trigger Updates
- Schedule the workflow to run periodically (for example, every hour or once a day), or
- Trigger it via webhook or event when content is edited or created.
Step 2: Fetch Recently Modified Content
- Read the last workflow timestamp from storage.
- Query WordPress for posts and pages where
modification_dateis greater than this timestamp.
Step 3: Check Existing Records in the Vector Store
- For each changed WordPress document:
- Query the vector store by its internal ID or other unique identifier.
- Determine if it is:
- New – not present in the vector store.
- Updated – present but with a newer modification date.
Step 4: Re-embed and Upsert
- For updated documents:
- Delete all existing chunks associated with that document from the vector store.
- Re-run the same steps as in Workflow 1:
- HTML to text
- Chunking
- Embedding
- Insert new embeddings with metadata
- For new documents:
- Run the full embedding pipeline and insert the new chunks.
Step 5: Save New Timestamp
- After processing all changes, store the current timestamp.
- This becomes the reference point for the next incremental run.
Step-by-Step: Workflow 3 – Chat Pipeline
The chat workflow answers user questions in real time using the precomputed embeddings.
Step 1: Receive the User Question
- Expose a webhook trigger in n8n that accepts:
sessionId– to track the conversation.chatInput– the user’s question or message.
- Connect this webhook to your front-end chat widget on WordPress.
Step 2: Retrieve Relevant Document Chunks
- Compute an embedding for the user’s question, or
- Use a similarity query that takes the question text directly (depending on your vector store setup).
- Query the vector store to return the top N most similar chunks (for example, top 5 or top 10).
- Include both the chunk text and metadata in the result.
Step 3: Call the AI Agent
- Send to the LLM:
- The original user question.
- The retrieved chunks and their metadata.
- Instruct the agent to:
- Use only the provided documents as the main source of truth.
- Include citations in the answer, such as URLs and dates.
- Indicate when it does not know the answer from the provided context.
Step 4: Return the Answer
- The agent generates a response that:
- Answers the question in natural language.
- References metadata like:
- URL
- Content type
- Publication and modification dates
- n8n sends this response back through the webhook to your chat interface.
Best Practices for a Reliable WordPress RAG System
1. Metadata and Provenance
Always include metadata in both the vector store and the final answers. At a minimum, track:
urltitlecontent_typepublication_datemodification_date
This builds user trust, helps with debugging, and makes it easy to navigate back to the original content.
2. Chunking Strategy
Chunk size and overlap directly affect retrieval quality:
- Smaller chunks:
- Higher precision (answers are more focused).
- Risk of losing broader context.
- Larger chunks:
- More context but potentially more noise.
Starting with 300 tokens and 20-50 token overlap is a good balance. Test with real queries and adjust based on answer quality.
3. Cost and Rate Limit Management
- Use the upsert workflow to avoid re-embedding unchanged content.
- Batch embedding requests where possible
