
Build a Visa Requirement Checker with n8n & Vector AI
Imagine never again trawling through embassy sites, PDFs, and FAQ pages just to answer a simple visa question. With n8n and vector AI, you can turn scattered information into a reliable, conversational assistant that works for you around the clock.
This guide walks you through building a Visa Requirement Checker in n8n that accepts traveler details through a webhook, indexes your visa policy content with embeddings, runs vector search to find the right rules, and uses an AI agent to return clear, actionable guidance. Every interaction is logged to Google Sheets, so you can learn, improve, and scale.
Think of this template as a starting point for a more automated, focused workflow. Once it is in place, you can adapt it, extend it, and use the same pattern to automate other knowledge-heavy tasks in your business.
The problem: Constantly changing visa rules and scattered information
Travel and immigration policies do not stand still. They change often, differ by country and passport type, and are buried in:
- Embassy and consulate websites
- PDF policy documents
- Help centers and FAQ pages
For travel teams, HR departments, and customer support, this creates a daily challenge:
- Checking whether a traveler needs a visa
- Identifying required documents and conditions
- Finding and sharing the correct official references
Doing this manually is slow, repetitive, and prone to mistakes. It also keeps your team stuck in low-leverage work instead of focusing on higher-value tasks, like improving traveler experience or optimizing processes.
The shift: From manual lookups to an automated knowledge assistant
Automation is not just about saving time. It is about creating systems that support you and your team as you grow. An automated Visa Requirement Checker built with n8n and vector AI gives you:
- Consistency – The same question always goes through the same logic and sources.
- Speed – Answers are generated in seconds, not minutes.
- Scalability – Handle more requests without burning out your team.
- Insight – Logged interactions reveal common questions and gaps in your content.
This workflow is a practical example of what is possible when you combine n8n automation with vector databases and LLMs. Once you understand the pattern, you can reuse it for other domains like HR policies, product documentation, or internal knowledge bases.
The solution: A Visa Requirement Checker workflow in n8n
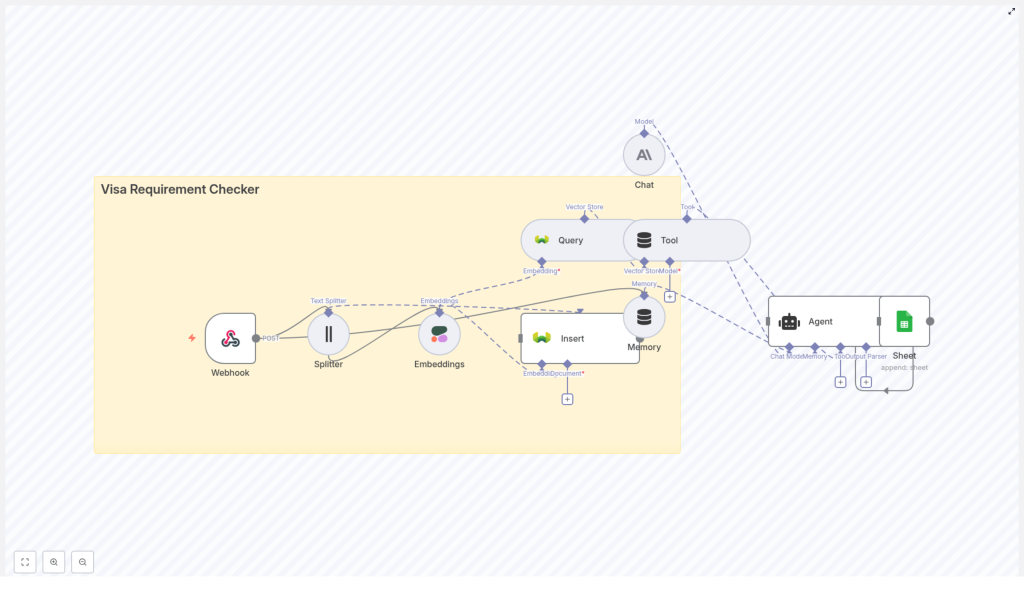
The workflow you will build brings together several powerful components into a single, cohesive system:
- Webhook – Receives traveler details via HTTP POST.
- Text Splitter – Breaks long policy documents into smaller, indexable chunks.
- Embeddings (Cohere) – Converts those chunks into vector representations.
- Weaviate Vector Store – Stores and retrieves vectors with semantic search.
- Vector Tool – Exposes the vector store as a tool the agent can call.
- Memory buffer – Keeps recent conversation context for follow-up questions.
- Chat model & Agent – Uses an LLM (Anthropic, OpenAI, or similar) to reason over retrieved policies and format the final answer.
- Google Sheets – Logs queries, responses, and citations for auditing and optimization.
Let us walk through the workflow step by step, and you will see how each piece contributes to a more automated and focused way of working.
Step 1 – Capture traveler details with a Webhook
Your journey starts with a simple entrypoint: the n8n Webhook node. This is how external systems, forms, or internal tools send visa queries into your workflow.
Configure the Webhook node to accept HTTP POST requests. A typical payload might look like this:
{  "traveler_country": "India",  "destination_country": "Germany",  "passport_type": "Ordinary",  "purpose": "tourism",  "stay_days": 10
}
This payload triggers the rest of the workflow. At this step, you can already take control of data quality:
- Validate that required fields are present.
- Reject or flag invalid requests early.
- Optionally normalize values (for example, lowercasing country names).
Once the webhook is in place, you have a reliable way to feed real-world questions into your automated assistant.
Step 2 – Turn policy documents into searchable chunks
Prepare your reference content
To answer visa questions accurately, your workflow needs a solid base of reference material. This typically includes:
- Official embassy or consulate pages
- Visa policy PDFs and guidelines
- Frequently asked questions and help articles
These documents are usually long and not directly suitable for vector search. That is where the Text Splitter node comes in.
Split documents with the Text Splitter node
Use a character-based splitter to break large documents into smaller segments. A common setup is:
- Chunk size: around 400 characters
- Overlap: around 40 characters
The overlap helps preserve context across chunk boundaries, while the limited chunk size keeps each piece manageable for your embeddings model. This step transforms messy, monolithic documents into clean, indexable units that your AI agent can work with.
Step 3 – Create embeddings for each text chunk
Next, you convert each chunk into a vector, a numerical representation that captures its meaning. In this template, you use a provider like Cohere through the n8n Embeddings node.
Key points when configuring embeddings:
- Use a consistent model across all chunks.
- Keep normalization settings consistent to ensure comparable vectors.
Alongside each embedding, store useful metadata, such as:
- Source URL
- Document title
- Chunk index or ID
- Original text content
This metadata is essential later when your agent needs to show citations, share links, or explain where its answer came from. You are not just building a smart system, you are also building a transparent one.
Step 4 – Insert vectors into Weaviate
With embeddings created, you are ready to store them in a vector database. The workflow uses Weaviate as the vector store.
In n8n, configure the node that inserts embeddings into Weaviate with a named index, for example:
visa_requirement_checker
Set up the Weaviate class schema to include:
- Vector fields for the embeddings
- Metadata fields like URL, title, and original text
Enable semantic search so you can later query the store using embeddings derived from user questions. The goal is simple: fast, accurate retrieval of the most relevant chunks whenever a traveler asks a question.
Step 5 – Query the vector store at runtime
When a new query arrives through the webhook, the workflow repeats part of the embedding process for the question itself. The query is turned into an embedding and sent to Weaviate to find relevant chunks.
In this step, you:
- Convert the user question into an embedding.
- Query Weaviate for the top
kmost similar chunks. - Return both text segments and their metadata.
These retrieved chunks are then exposed to the AI agent as a vector store tool. The agent can call this tool when it needs context, which keeps the model grounded in your actual policy documents rather than guessing.
Step 6 – Maintain context with a memory buffer
Real conversations rarely end with a single question. Travelers might ask follow-ups like:
- “What about transit visas?”
- “Does this change if I stay 30 days instead of 10?”
To handle this gracefully, the workflow uses a memory buffer. This node stores a short window of recent messages, for example the last three turns, and feeds them back into the agent prompt.
The result is a more natural, conversational experience where the system remembers what was said and can respond accordingly, instead of treating every message as a completely new request.
Step 7 – Use a Chat Model and Agent to craft the final answer
Now you bring everything together with an LLM-powered agent. In the template, the Chat node uses an LLM such as Anthropic, but you can also connect OpenAI or other compatible providers.
The Agent node orchestrates how the model uses tools, including the vector store and memory buffer. To get reliable, helpful answers, give the LLM a clear prompt template that emphasizes:
- Use vector store results as the primary factual source.
- Cite sources, including URL and document title, whenever possible.
- Handle uncertainty honestly, for example by saying, “For official confirmation, consult the embassy website.”
Design the agent to:
- First call the vector tool to retrieve relevant policy chunks.
- Then generate a concise, tailored answer based on:
- Traveler country
- Destination country
- Passport type
- Purpose of travel
- Length of stay
If the data is ambiguous or incomplete, instruct the model to ask clarifying questions rather than making assumptions. This keeps the experience both user friendly and trustworthy.
Step 8 – Log every interaction to Google Sheets
To continuously improve your workflow, you need visibility into how it is being used. The final step in the template is a Google Sheets node that appends each interaction to a spreadsheet.
Useful fields to log include:
- Timestamp
- Incoming payload (traveler details and question)
- Agent response text
- Top cited sources (URLs and titles)
- Any confidence notes or uncertainty signals
This simple logging strategy turns your Visa Requirement Checker into an ongoing learning system. You can spot patterns, refine your content, and identify where the model needs better instructions or more data.
Keep it robust: Deployment considerations
Security & privacy
As you move from experiment to production, build in strong safeguards:
- Use HTTPS for your webhook endpoints.
- Restrict access with API keys or IP allowlists.
- Mask or remove personally identifiable information when not needed.
- Avoid storing personal data unless it is required and ensure it is encrypted.
- Protect access to your vector index and embedding provider keys.
Data freshness
Visa policies change, so your knowledge base must evolve with them. To keep your system up to date:
- Automate content refreshes by crawling or importing from official sources.
- Schedule re-embedding whenever documents change significantly.
- Store a last-updated timestamp in your metadata so the agent can warn users when information may be outdated.
Relevance and ranking
To get high quality answers, tune your retrieval strategy:
- Adjust
top_kto balance depth and noise. - Experiment with distance metrics and similarity thresholds.
- Use rule-based filters, for example by traveler country or passport type, before running semantic search to remove clearly irrelevant results.
These optimizations help your agent focus on the most meaningful context, which improves answer quality and user trust.
Prompt engineering tips for better answers
Your prompt is where you set expectations for the model. A few practical guidelines:
- Templatize the agent request to always include traveler details and a short instruction to answer clearly and list sources.
- Ask the model to format output with:
- A short summary
- Required steps or actions
- A list of required documents
- Official links or citations
- Reduce hallucinations by explicitly instructing the model to say “I do not know” when the retrieved sources do not support a claim.
Clear prompts lead to more reliable automation, and they make your workflow easier to maintain as you iterate.
Example of a structured response
Here is a sample of what a well formatted answer from your agent might look like:
Summary: Indian passport holders traveling to Germany for tourism (<=90 days) do not require a visa for short stays in the Schengen area.

Required documents:
- Valid passport (at least 3 months beyond the planned stay)
- Round-trip ticket
- Proof of accommodation

Source: German Embassy - Visa Info (https://example.gov)

Note: Always verify with the embassy for transit visas and long-term stays, as rules can change.
This kind of structure makes it easy for your team and your travelers to act on the information quickly.
Testing, monitoring, and continuous improvement
To turn this template into a dependable part of your operations, build habits around testing and monitoring:
- Create end-to-end tests that send sample payloads through the webhook and verify output patterns and citations.
- Review Google Sheets logs regularly for anomalies or confusing answers.
- Track metrics such as:
- Average response time
- Percentage of answers marked as “uncertain”
- Top sources and documents used
These insights help you refine your prompts, improve your content, and decide where to invest next in your automation roadmap.
Scaling and extending your Visa Requirement Checker
Once your first version is running, you can evolve it into a more powerful, global assistant. Some natural extensions include:
- Multi-lingual support – Embed and index documents in multiple languages, and add language detection on input to respond in the traveler’s preferred language.
- Self-serve admin UI – Build a simple dashboard where content owners can upload new documents and trigger re-indexing without touching n8n directly.
- Structured rules integration – Combine vector-based retrieval with a policy engine or rule set for deterministic checks, such as visa-free country lists.
Each improvement not only makes your Visa Requirement Checker more capable, it also strengthens your broader automation skills in n8n.
Next steps: Turn this template into your own growth engine
You now have a clear path from scattered visa information to an AI-powered Visa Requirement Checker that runs inside n8n. The next step is to put it into action and adapt it to your reality.
To get started:
- Clone a base n8n workflow that includes the nodes described above.
- Populate your vector index with official embassy and consulate pages.
- Configure your credentials for Cohere, Weaviate, and Anthropic or OpenAI.
- Connect a Google Sheet for logging and iteration.
Once everything is wired up, deploy your webhook endpoint and send a sample POST request with traveler details. Watch as the agent retrieves relevant policies, composes a sourced recommendation, and logs the entire interaction for review.
This template is not just a one-off tool. It is a stepping stone toward a more automated, insight-driven way of working. As you gain confidence, you can reuse the same pattern for other use cases, automate more of your knowledge work, and free your team to focus on strategy and creativity.
Try it now: Deploy the workflow, run a test query, and see how much time and effort you can save. If you would like a ready-to-run template or support customizing the flow for your geography, data sources, or internal tools, reach out or subscribe for more n8n
