Automate AI Video Creation & Multi-Platform Publishing

Automate AI Video Creation & Multi-Platform Publishing with n8n

Overview

This reference guide describes an n8n workflow template that automates the complete lifecycle of short-form video content: from AI-based video generation to multi-platform publishing across nine social networks. The automation integrates Telegram, Blotato, Piapi, GPT-4, Cloudinary, and Google Sheets to create, enrich, store, and distribute videos with minimal manual intervention.

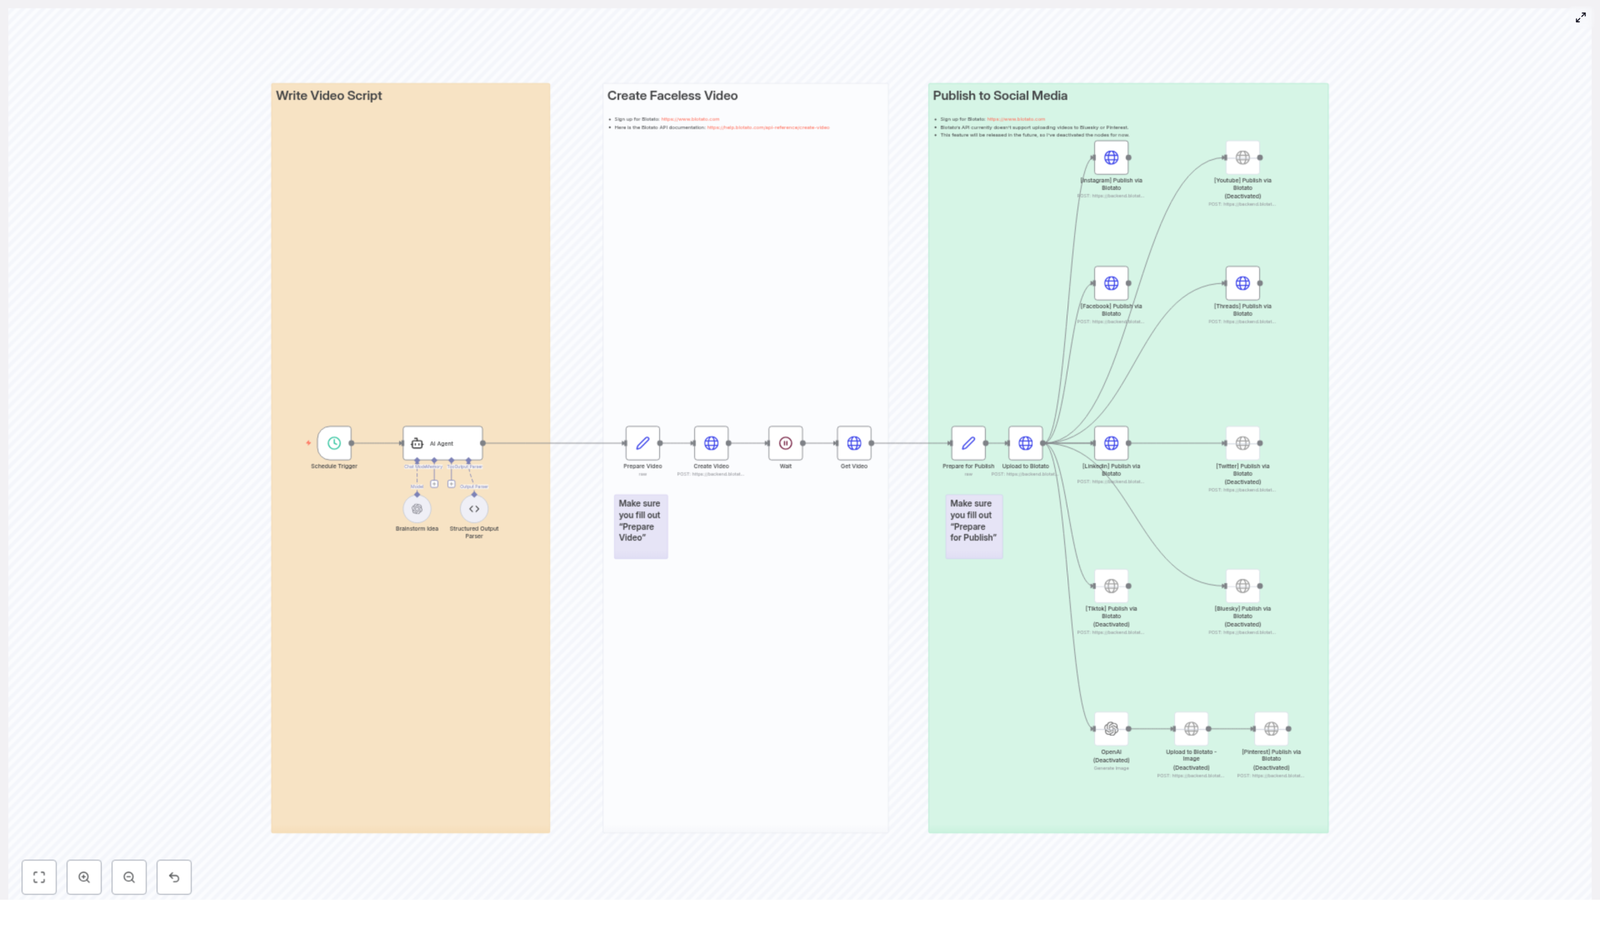
The workflow is organized into five major stages:

  1. AI video generation from text or image input
  2. Automatic music and voice-over creation
  3. Caption overlay and video enhancement
  4. Metadata storage and Telegram notification
  5. Automated publishing to nine social platforms

This documentation-style rewrite focuses on the technical behavior of the template, including data flow, node responsibilities, and configuration considerations for advanced users of n8n and API-based automation.

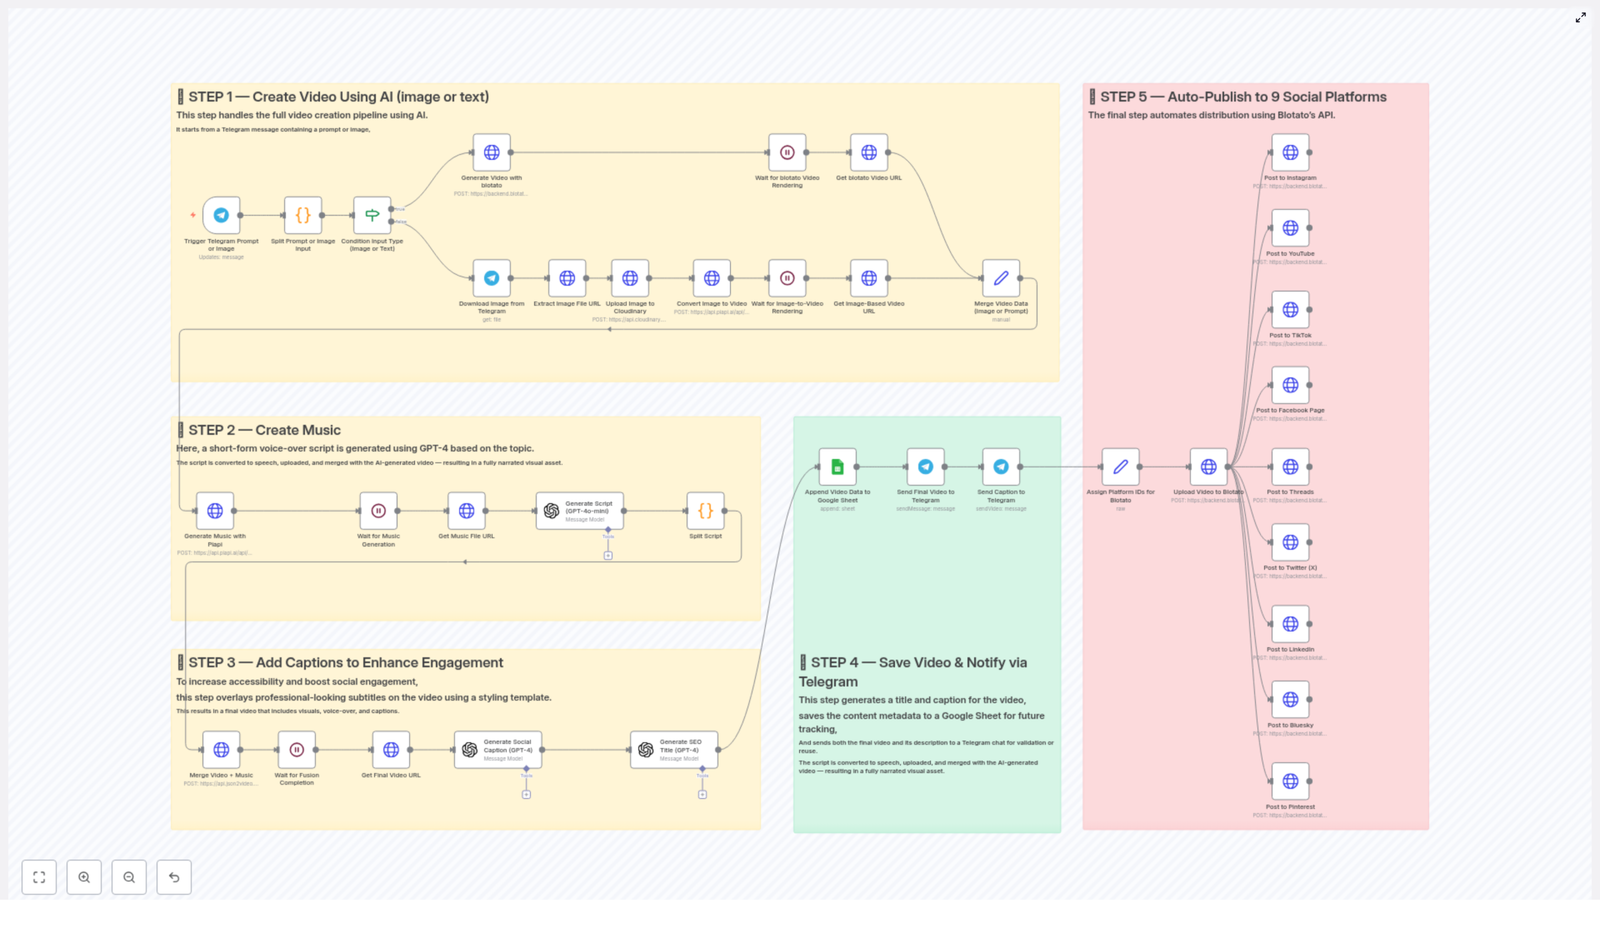
Architecture & Data Flow

At a high level, the workflow is triggered by a Telegram interaction and then branches based on whether the user submits text or an image. Both branches ultimately converge into a unified video asset that is enriched with audio, captions, and metadata, then published to multiple social channels.

Core Integrations

  • Telegram – Input channel for prompts or images and final notification endpoint.
  • Blotato API – AI video generation from text prompts and multi-platform publishing orchestration.
  • Piapi API – Image-to-video conversion and text-to-audio generation.
  • GPT-4 – Script generation, caption text creation, and SEO-friendly titles.
  • Cloudinary – Media storage for uploaded images used in video generation.
  • Google Sheets – Persistent storage of video metadata for tracking and analytics.

Execution Stages

  1. Input & Video Generation – Accepts either text or image from Telegram, then generates an AI video via Blotato or Piapi.
  2. Audio & Music Creation – Uses GPT-4 to generate a voice-over style script and Piapi to render it as audio.
  3. Caption & Overlay Processing – Combines video and audio, applies a caption style template, and adds hook/payoff text overlays.
  4. Storage & Notification – Writes metadata to Google Sheets and returns the final video and details to Telegram.
  5. Multi-Platform Publishing – Distributes the final video and caption to nine social platforms via Blotato.

Stage 1 – AI Video Creation from Text or Image

Trigger & Input Handling

The workflow begins when a user interacts via Telegram. The trigger node (for example, a Telegram Trigger node) receives either:

  • A text prompt describing the desired video, or
  • An image uploaded to the chat, optionally with a caption.

A conditional node (such as an IF or Switch node) typically evaluates the Telegram payload to determine whether the incoming message contains text, an image, or both. Based on this evaluation, the workflow follows one of two paths.

Path A – Text-Based Video Generation with Blotato

When the user sends a text prompt, the workflow uses Blotato’s video generation API to produce a cinematic-style AI video.

Key Behavior

  • The text prompt from Telegram is passed as the main input parameter to Blotato.
  • A predefined cinematic style template is used to standardize the visual look and feel of generated videos.
  • The Blotato node (typically an HTTP Request or dedicated Blotato node if available) sends the prompt and template identifier to the API.
  • The API responds with a video asset reference, such as a rendered video URL or an ID that can be used to fetch the final video.

The result is a video object that will be merged later with other media and metadata in downstream nodes.

Path B – Image-to-Video Conversion with Piapi & Cloudinary

If the user provides an image, the workflow follows a separate branch that converts the image into a short AI-generated video.

Image Retrieval from Telegram

  • The Telegram message payload is inspected to obtain the file ID or URL of the uploaded image.
  • A follow-up call to Telegram’s API downloads the original image file.

Upload to Cloudinary

  • The downloaded image is uploaded to Cloudinary using a configured Cloudinary node or HTTP Request node.
  • Cloudinary returns a public image URL that is stable and accessible to external services.

Image-to-Video Generation with Piapi

  • The Cloudinary image URL is passed to Piapi’s image-to-video endpoint.
  • Piapi generates a short AI-based video using the image as the primary visual input.
  • Once rendering is complete, the workflow retrieves the rendered video URL from Piapi’s response.

The output of this branch is a video asset derived from the original image, which is aligned with the text-based video output format so both branches can be merged consistently.

Convergence of Video Data

After the text and image branches complete, a merge node (for example, a Merge node in “Pass-through” or “Wait” mode) unifies the execution paths:

  • Both branches are normalized to produce a standard structure containing at least a videoUrl or equivalent identifier.
  • Any additional metadata, like the source type (text or image) or original prompt, can be preserved for logging or analytics.

From this point onward, the workflow processes a single video object regardless of the initial input type.


Stage 2 – Music & Voice-Over Creation

Script Generation with GPT-4

To create an engaging audio track, the workflow first generates a short-form voice-over script using GPT-4. The script is based on the video topic, original prompt, or caption idea.

Typical Parameters

  • Input context – The original text prompt, Telegram caption, or derived topic description.
  • Style constraints – Short-form, social-media-ready, concise, and optimized for spoken delivery.
  • Output format – A single script string suitable for text-to-audio conversion.

The GPT-4 node returns a script that will be used as the text input for audio generation.

Text-to-Audio Conversion with Piapi

The generated script is then passed to Piapi’s text-to-audio capability to produce music or a voice-over track.

Node Behavior

  • The Piapi node receives the script text and any required configuration, such as voice type or language, as parameters.
  • Piapi starts rendering the audio file and returns either the final URL or a task identifier.
  • The workflow waits until the audio rendering is complete before proceeding.

Waiting for Rendering Completion

Depending on Piapi’s API design, the workflow may:

  • Use a direct response if the API returns the final audio URL immediately, or
  • Implement a polling loop or delay if the API returns a job ID, checking periodically until the status indicates completion.

At the end of this stage, the workflow has a stable music or audio file URL that will be merged with the video in the next stage.


Stage 3 – Caption Overlay & Video Enhancement

Caption Strategy & Text Generation

To improve engagement and accessibility, the workflow overlays captions onto the video using a predefined styling template. GPT-4 is used again, this time to generate structured overlay text.

Hook and Payoff Lines

  • The GPT-4 node is prompted to produce two distinct text segments:
    • A hook line that captures attention at the beginning of the video.
    • A payoff line that delivers the main value or conclusion.
  • The output is formatted so that the hook and payoff can be mapped to specific caption regions or timestamps in the video.

Video & Audio Fusion with Captions

The workflow then merges the previously generated video and the audio track, and applies the caption overlay.

Processing Steps

  • Inputs:
    • Video asset from Stage 1.
    • Audio file URL from Stage 2.
    • Hook and payoff text from GPT-4.
  • A caption or styling template is selected to ensure consistent typography, positioning, and effects.
  • The fusion process combines:
    • The base video,
    • The audio track as background music or voice-over, and
    • Overlay text with the defined style.

Waiting for Final Video Rendering

The workflow waits for the video processing to complete. Similar to the audio step, this can involve:

  • Using the final video URL directly if returned synchronously, or
  • Polling for job completion if the processing is asynchronous.

Once completed, the workflow stores the final processed video URL, which now includes music and professional-looking captions.


Stage 4 – Metadata Storage & Telegram Notification

Title & Caption Generation with GPT-4

Before storing and distributing the video, the workflow generates optimized metadata for social media.

SEO-Friendly Title

  • GPT-4 is prompted to create a concise, descriptive video title.
  • The title is designed to be both SEO-friendly and suitable for platforms like YouTube and Pinterest.

Engaging Social Caption

  • A separate or combined GPT-4 call generates an engaging social media caption.
  • The caption is tailored for short-form platforms and can incorporate hooks, CTAs, and relevant keywords.

Persisting Video Metadata in Google Sheets

To track published content and support analytics, the workflow writes video metadata to a configured Google Sheet.

Typical Columns

  • Video URL – Final processed video link from Stage 3.
  • Title – SEO-optimized title from GPT-4.
  • Caption – Social media caption text.
  • Source – Optional field indicating whether the content originated from text or image input.
  • Timestamp – Execution or creation date for tracking.

A Google Sheets node (such as “Append” mode) inserts a new row for each generated video, ensuring a persistent log of all content processed by the workflow.

Telegram Notification to the Originating Chat

After saving the metadata, the workflow sends the final result back to the Telegram chat that initiated the request.

Notification Content

  • The final video (as a direct video file or a link, depending on Telegram configuration).
  • The generated title and caption.
  • Any additional contextual information, such as confirmation that the video is ready for publishing or reuse.

By maintaining this feedback loop, users can quickly validate the output, reuse captions, or share the content manually if needed.


Stage 5 – Automated Publishing to 9 Social Platforms

Blotato-Powered Multi-Platform Distribution

The final stage of the workflow automates publishing to multiple social networks using Blotato’s distribution capabilities. The same video asset and caption are syndicated across:

  • Instagram
  • YouTube
  • TikTok
  • Facebook
  • Threads
  • Twitter (X)
  • LinkedIn
  • Bluesky
  • Pinterest

Platform-Specific Account Mapping

Blotato’s API is configured with platform-specific account IDs so the same workflow can publish to multiple destinations without additional manual setup in n8n.

Typical Parameters Sent to Blotato

  • Video URL – The final processed video from Stage 3.
  • Caption – The social media caption text generated in Stage 4.
  • Account IDs – Identifiers for specific profiles or pages on each platform.

The Blotato node handles the complexity of each platform’s API, while n8n focuses on orchestrating the overall process and passing the correct data payload.


Configuration Notes & Practical Considerations

Credentials & Authentication

  • Telegram – Requires a bot token and proper webhook or polling configuration for the trigger node.
  • Blotato – Needs an API key or token with permissions for video generation and publishing.
  • Piapi – Requires credentials for both image-to-video and text-to-audio endpoints.
  • Cloudinary – Needs API key, secret, and cloud name for authenticated uploads.
  • Google Sheets – Uses OAuth or service account credentials to read/write the target spreadsheet.
  • GPT-4 – Requires OpenAI-compatible credentials or equivalent provider access.

Error Handling & Edge Cases

When customizing this template, consider adding explicit error handling around:

  • Missing or invalid Telegram input – For example, when neither a text prompt nor an image is provided.
  • Failed uploads to Cloudinary or failed downloads from Telegram.
  • Timeouts or failed renders from Piapi or Blotato during video or audio generation.
  • Rate limits or quota issues for GPT-4 and external APIs.
  • Google Sheets write failures due to permission changes or sheet structure modifications.

In n8n, this can be addressed with Error Workflow configurations, IF nodes checking response status codes, or Try/Catch-style sub-workflows where supported.

Performance & Latency

  • Video and audio rendering are typically the slowest steps. Consider using delays or polling intervals that balance responsiveness with API rate limits.
  • For high throughput, you may want to limit concurrent executions or implement queuing logic within n8n.

Advanced Customization Ideas

Template & Style Variations

  • Expose the cinematic style template as a variable so users can select between multiple visual styles.
  • Allow different caption styles (font, color, position) by passing

How to Restore Data Using itemMatching() in n8n

How to Restore Data Using itemMatching() in n8n

In complex n8n automations, it is common to trim payloads for performance or clarity, then later need to reattach fields that were previously removed. The itemMatching(itemIndex: number) helper makes this pattern straightforward by allowing you to reference related items from earlier nodes in the workflow.

This guide documents a concrete workflow template that restores email addresses after the data has been reduced to only customer names. It focuses on how itemMatching() works inside a Code node, how the data flows between nodes, and what to watch out for when using this pattern in production n8n workflows.

Workflow overview

This n8n workflow demonstrates a common pattern:

  1. Load a full dataset from a data source.
  2. Reduce the payload to only the fields needed for intermediate processing.
  3. Later, restore specific fields (in this case, email addresses) from the original dataset using itemMatching() in a Code node.

The example uses the Customer Datastore (n8n training) node as the source of customer records. The workflow then trims the data to only customer names, and finally restores the corresponding email addresses using itemMatching(itemIndex). This lets you maintain minimal payloads between nodes while still having access to the original data when required.

Workflow architecture

The workflow consists of three main stages:

  • Trigger stage A manual trigger node labeled When clicking “Execute Workflow” starts the workflow execution for testing and demonstration.
  • Data retrieval stage The Customer Datastore (n8n training) node fetches all customer records using the getAllPeople operation. This node outputs full customer objects, including fields such as name and email.
  • Data reduction and restoration stage The Edit Fields node reduces the payload to only the name field. A subsequent Code node then uses itemMatching() to reattach the matching email values from the original dataset.

The key architectural idea is that the reduced items maintain positional alignment with the original items. The itemMatching(itemIndex) function leverages this index alignment to retrieve the correct source item from the earlier node output.

Node-by-node breakdown

1. Manual Trigger: “When clicking "Execute Workflow"”

Node type: Trigger Purpose: Start the workflow on demand from the n8n editor.

This node has no special configuration for this example. It simply provides a manual entry point so you can execute the workflow from the UI while testing the itemMatching() behavior.

2. Customer Datastore (n8n training)

Node type: Data source / custom training node Operation: getAllPeople

This node retrieves an example dataset of customers. Each item typically includes several attributes such as:

  • name
  • email
  • Other customer-related fields depending on the training datastore

The important point for this template is that the output contains both name and email, and that all items are returned in a deterministic order. This order will later be relied upon when using itemMatching(itemIndex) to restore emails.

3. Edit Fields node (data reduction)

Node type: Edit Fields / Set-style node Purpose: Reduce the payload to only the customer names.

The output of the Customer Datastore (n8n training) node is passed into an Edit Fields node. This node is configured to keep only the name field and remove all other properties from each item.

After this step:

  • Each item still represents a customer.
  • The name field is preserved.
  • The email field and any other attributes are intentionally removed.

The reduced items remain in the same order as the original items from the datastore node. This index preservation is critical for itemMatching() to work correctly in the next step.

4. Code node (data restoration with itemMatching())

Node type: Code Language: Python (in this example) Purpose: Reattach the email field from the original dataset using itemMatching().

The reduced items from the Edit Fields node are passed into a Code node. Inside this node, the script iterates over all current items and uses itemMatching() to access the corresponding original item from the Customer Datastore (n8n training) node.

The core logic is:

for i,item in enumerate(_input.all()):  _input.all()[i].json.restoreEmail = _('Customer Datastore (n8n training)').itemMatching(i).json.email

return _input.all();

This code:

  1. Loops over all items currently available to the Code node.
  2. For each index i, calls itemMatching(i) on the Customer Datastore (n8n training) node reference.
  3. Reads the email field from the matched original item.
  4. Writes that value into a new property named restoreEmail on the current reduced item.
  5. Returns the modified items array as the node output.

After execution, each item in the Code node output contains:

  • The original name (kept by the Edit Fields node).
  • A new restoreEmail property holding the email retrieved from the original dataset.

How itemMatching() works in this template

itemMatching(itemIndex: number) is an n8n helper function that lets you access the item from another node that corresponds to the same logical item in the current execution.

In this workflow:

  • _('Customer Datastore (n8n training)') references the output of the node named Customer Datastore (n8n training).
  • .itemMatching(i) retrieves the item from that node that matches the current index i.
  • .json.email reads the email field from that matched item.

The Python snippet is equivalent in intent to a JavaScript loop that would use the same itemMatching() helper when run inside a JavaScript-based Code node. The key is that the index i is used consistently across both the reduced items and the original items.

Configuration and setup notes

Node naming and references

The Code node uses the expression _('Customer Datastore (n8n training)'). This means:

  • The node name in the workflow canvas must exactly match Customer Datastore (n8n training).
  • If you rename the node, you must update this reference in the Code node accordingly.

Item order and index alignment

For itemMatching(itemIndex) to return the expected item, the following must hold:

  • The number of items from the datastore node and the number of items reaching the Code node must match, or at least the indices you access must exist in both.
  • The order of items must be preserved across intermediate nodes such as Edit Fields. Nodes that filter, split, or reorder items can break the index alignment.

If the order or count changes between the source node and the Code node, itemMatching() may return unexpected matches or cause index-related issues.

Supported languages in the Code node

The example is written in Python, but the same concept applies when using JavaScript in the Code node. You can:

  • Use Python, as shown, if your n8n instance supports Python in the Code node.
  • Use JavaScript and call itemMatching() in a similar way from JavaScript code.

In both languages, the itemMatching() behavior and semantics are the same. Only the syntax for loops and assignments differs.

Edge cases and error handling considerations

While the template is straightforward, there are a few practical considerations when adapting it to more complex workflows:

  • Missing items or mismatched indices If the number of items changes between the original node and the Code node, accessing itemMatching(i) for an out-of-range index will not produce the intended mapping. Ensure that intermediate nodes do not filter out items unless you also adjust the logic accordingly.
  • Removed or renamed fields The example assumes that email exists on the original items. If the field name changes, or if some items do not have an email, you should account for that in your Code node logic to avoid null or undefined values being assigned.
  • Node rename issues If the Customer Datastore (n8n training) node is renamed, the reference inside the Code node must be updated. Otherwise, the helper _() will not be able to resolve the node output correctly.

In more advanced implementations, you can add conditional checks in the Code node to gracefully handle missing emails or unexpected data structures before assigning values to restoreEmail.

Advanced customization ideas

Once you understand the basic pattern used in this template, you can extend it to more advanced n8n workflows:

  • Restoring multiple fields Instead of restoring only email, you can restore multiple properties from the original dataset, for example phone, address, or internal IDs.
  • Selective restoration based on conditions In the Code node, you can add logic to restore emails only for certain customers, such as those matching a particular filter or status.
  • Combining with other transformation nodes Use itemMatching() in combination with other transformation nodes, such as IF, Merge, or additional Code nodes, to build complex pipelines while still keeping earlier full datasets available when needed.

The underlying pattern remains the same: keep your working payloads lean, and reattach data from earlier in the workflow using itemMatching() when required.

Why use itemMatching() in n8n?

Using itemMatching() in your n8n workflows provides several benefits:

  • Maintain data integrity You can safely reduce the payload to only the fields you need for intermediate processing, while preserving the ability to restore key attributes later. This helps avoid repeated queries to external systems or duplicating heavy data structures.
  • Optimized workflows Smaller payloads reduce memory usage and can simplify debugging and visualization in the n8n UI. itemMatching() lets you keep workflows efficient without losing access to the original data context.
  • Flexible automation design This pattern is ideal when you need to display or manipulate only a subset of fields temporarily, but still need to reattach complete records before sending final outputs to another system or storage.

Implementation checklist for your own workflow

To implement a similar pattern in your own n8n project:

  1. Start with a data source node (for example, a database, API, or the Customer Datastore) that outputs full records including the fields you plan to restore later.
  2. Add a Set or Edit Fields node to reduce the payload to only the fields required for intermediate processing.
  3. Ensure that the reduced items preserve the same order and count as the original dataset.
  4. Add a Code node and reference the original node using _('Node Name').itemMatching(index) inside your loop.
  5. For each item, read the fields you want to restore (such as email) from the matched original item and write them to the current item.
  6. Return the modified items from the Code node and continue your workflow with the enriched data.

Additional tips and resources

  • Always verify that item order is preserved between nodes when relying on itemMatching(itemIndex). Avoid nodes that re-sort or filter items without adjusting your logic.
  • You can implement the same pattern using either JavaScript or Python in the Code node, depending on your preference and environment support.
  • For more detailed reference material and examples, see the official n8n documentation on itemMatching().

Using itemMatching() is a powerful way to keep your n8n workflows both efficient and context-aware. By separating data reduction from data restoration, you can design automations that are easier to maintain, scale, and debug.

Complete Guide to Managing Webflow Items with n8n

Complete Guide to Managing Webflow Items with n8n

Why Automate Webflow With n8n?

If you have ever added or updated items in a Webflow collection by hand, you know how repetitive it can get. Copy, paste, tweak a field, double-check the slug, repeat. It is fine for a few items, but once you start doing this regularly, it becomes a time sink and a source of mistakes.

That is where this n8n workflow template steps in. It connects directly to your Webflow collection and handles three key actions for you:

  • Creating a new item
  • Updating that item with more data
  • Fetching the final version so you can verify or reuse it elsewhere

Think of it as a small but mighty automation that keeps your Webflow content clean, consistent, and easy to manage, without you clicking through the Webflow UI every time.

What This n8n – Webflow Workflow Actually Does

This template is built around a simple linear sequence of four nodes. Each one plays a specific role in managing items in a Webflow collection:

  • Manual Trigger Node – lets you start the workflow whenever you want.
  • Webflow – Create Item Node – creates a brand new item in a chosen Webflow collection.
  • Webflow – Update Item Node – updates that freshly created item with more fields.
  • Webflow – Get Item Node – pulls back the final item so you can confirm everything worked or pass it to the next step in your automation.

It is a straightforward pattern, but it is powerful because you can easily adapt it to your own site, collections, and use cases.

When Should You Use This Template?

You will find this workflow especially useful if you:

  • Regularly add or update items in a Webflow CMS collection.
  • Want to connect Webflow to other tools using n8n, for example a form tool, CRM, or internal database.
  • Need a reliable process to create items, then enrich them with more data, then confirm the final result.
  • Are testing Webflow automations and want a clear, step-by-step example to build on.

It is a great starting point if you are new to n8n and Webflow automation, but it is also flexible enough for more advanced setups like bulk imports or multi-step content workflows.

Step-by-Step: How the Workflow Runs

1. Start With the Manual Trigger

The first node is a Manual Trigger. This does not connect to any external app, it simply lets you kick off the workflow by clicking Execute inside n8n.

Why is this useful? It is perfect for:

  • Testing your setup before going live.
  • Running the workflow on demand, for example when you are experimenting with new Webflow fields.

Later, you can always swap this out for a different trigger, like a webhook or schedule, but the manual trigger keeps things simple while you are getting started.

2. Create an Item in Your Webflow Collection

Next, the workflow moves into the Webflow – Create Item node. This is where n8n talks to the Webflow API using your credentials and creates a new CMS item.

In this template, the node is configured to use a specific collection:

collectionId: "601788ab33a62ac6a2a0284c"

You will replace this with your own collection ID, but the idea is the same. The node sends these fields to Webflow:

  • name: “n8n”
  • slug: “n8n”
  • _archived: false
  • _draft: false

So the workflow creates a published, non-archived item with a specific name and slug. Once Webflow accepts this request, it returns details about the new item, including its itemId. That ID is crucial for the next steps.

3. Update the Newly Created Item

After the item is created, the workflow passes its data to the Webflow – Update Item node. This node uses the itemId from the previous response to update that exact item.

Here is what gets updated:

  • avatar is set to https://n8n.io/n8n-logo.png.
  • name, slug, _archived, and _draft are reaffirmed from the JSON data to keep everything consistent.

Why split this into create then update? This pattern is handy when you want to:

  • Create a basic item first, then enrich it later with more fields.
  • Depend on the itemId from the creation step for further logic.

In a real project, you might pull the avatar URL or other fields from another system, a form submission, or a previous node instead of hardcoding them.

4. Retrieve the Final Item From Webflow

The last step is the Webflow – Get Item node. Using the same itemId, it fetches the fully updated item from your collection.

This gives you the final, authoritative version of the item as stored in Webflow. From here, you can:

  • Verify that the update worked as expected.
  • Send the item data to another app, like Slack, email, or a database.
  • Use it as input for additional n8n nodes in a larger automation chain.

Why This Workflow Makes Your Life Easier

So what is the real benefit of putting all this into n8n instead of doing it manually in Webflow?

  • Automation – No more repetitive data entry. Once it is set up, you can run it in seconds.
  • Better data integrity – Every new item is created and updated with the right fields in a consistent way.
  • Built-in verification – The final Get Item step confirms that everything worked, which is great for debugging and peace of mind.
  • Scalability – The same pattern can grow with you. You can loop over multiple items, connect to other services, or add logic for different scenarios.

In short, you are turning a manual, error-prone process into a repeatable, reliable automation that you can adapt as your content needs evolve.

How to Customize This n8n – Webflow Template

The template works out of the box as an example, but you will almost always want to tweak it for your own Webflow project. Here is how to do that.

1. Plug In Your Own Webflow Site and Collection

First, replace the placeholder IDs with your real ones:

  • siteId – your Webflow site identifier.
  • collectionId – the ID of the collection you want to manage.

You can find these in your Webflow project settings or via the Webflow API. Once they are set, the workflow will operate directly on your own content.

2. Match the Fields to Your Collection Schema

Next, adjust the fields in the fieldsUi configuration so they match your collection setup. Every Webflow collection has its own schema, so you might have fields like title, description, image, category, or anything custom you have created.

In practical terms, that means:

  • Editing field names so they correspond to your Webflow collection fields.
  • Updating values so they come from your own data, not just the example values.
  • Adding or removing fields depending on what your collection expects.

This is where the workflow really becomes your automation instead of just a demo.

3. Extend the Workflow With Extra Logic

Once the basics are working, you can start layering on more functionality. Some ideas:

  • Add error handling nodes to catch and log failed API calls.
  • Insert a logging step that writes details to a database or a Google Sheet.
  • Trigger notifications in Slack or email whenever a new Webflow item is created.
  • Connect this workflow to other n8n templates to build a full content pipeline.

The template is intentionally simple so you can treat it as a building block and expand from there.

Getting Started With the Template

Ready to try it out? Here is a quick checklist:

  1. Open the template in n8n.
  2. Set up your Webflow credentials in n8n if you have not already.
  3. Replace the siteId and collectionId with your own.
  4. Adjust the fieldsUi to match your collection fields and desired values.
  5. Run the workflow using the Manual Trigger and check the created item in Webflow.

Once you see it working end to end, you can confidently start integrating it into larger automations.

Wrap-Up: Bring Webflow Into Your Automation Stack

This n8n workflow template gives you a clear, step-by-step example of how to manage Webflow collection items programmatically. You create an item, update it with additional data, then retrieve it for verification or further processing, all inside a single, easy-to-understand automation.

It is a small workflow, but it opens the door to much bigger possibilities, like syncing content across tools, building editorial pipelines, or running bulk updates without touching the Webflow UI.

Give it a try and see how much time you save once Webflow content management becomes just another smooth part of your n8n automation stack.

Complete Guide to Setting Up and Generating TOTP Codes in n8n 🔐

Complete Guide to Setting Up and Generating TOTP Codes in n8n 🔐

Imagine This: Your Workflow Wants a Password Every 30 Seconds

You finally sit down with your coffee, ready to get things done, and what happens? Another login, another code, another “open authenticator app, copy code, paste code, repeat until your soul leaves your body” moment.

Now imagine your automations quietly handling those Time-based One-Time Passwords (TOTP) for you. No more copy-paste marathons, no more “where did I put my phone” panic. That is exactly what this n8n TOTP workflow template helps you do.

In this guide, you will learn how to generate TOTP codes inside n8n using the TOTP node, how to hook it into your workflows, and how to keep everything secure and in sync. Same strong security, far fewer sighs.

Quick Refresher: What Is TOTP, Really?

TOTP stands for Time-based One-Time Password. It is a short-lived passcode that is generated using:

  • The current time
  • A secret key that both the client and server know

The result is a code that usually changes every 30 seconds and can be used as a second factor in authentication. So even if someone gets your password, they still need that tiny, fast-expiring code to get in.

That is why TOTP is a core building block for two-factor authentication (2FA) and why it is so handy to generate it directly inside your n8n automations.

Why Use TOTP in n8n Workflows?

n8n is all about automating the boring stuff, and “typing codes again and again” definitely qualifies as boring. With the TOTP node, n8n can generate valid authentication codes on its own, in sync with your authentication server.

Here is what the TOTP node brings to your automation life:

  • Automatic TOTP generation using a stored secret key
  • Fresh codes every 30 seconds that match what your authenticator app would show
  • Easy integration into any workflow that needs 2FA or temporary codes

So instead of you juggling codes in real time, your workflow can quietly fetch the TOTP and pass it along where needed.

Where This Actually Helps in Real Life

Once you have TOTP inside n8n, you can use it in all sorts of security-sensitive automations, for example:

  • Automated login flows that require 2FA codes
  • Secure API authentication where an extra TOTP step is needed
  • CI/CD pipeline verification, for example when a deployment step needs a one-time code

Anywhere you would normally grab your phone to read a TOTP code, your workflow can do the job instead.

How the n8n TOTP Template Works (High-Level)

The template uses a simple combination of nodes:

  • A Manual Trigger node so you can test things whenever you like
  • The TOTP node, which uses stored credentials to generate the current TOTP code

You click “Test workflow”, n8n runs the TOTP node, and you instantly get a fresh code generated from your secret key. From there, you can plug that code into any other part of your automation.

Step-by-Step: Setting Up TOTP in n8n

Let us walk through the setup. It is short, painless, and involves zero copy-pasting from your phone.

1. Start With a Manual Trigger

First, add a Manual Trigger node to your workflow. This node is perfect for testing because you can run the workflow on demand by clicking “Test workflow” in the n8n editor.

2. Add the TOTP Node

Next, drag the TOTP node into your workflow and connect it to the Manual Trigger node.

This node is where the TOTP magic happens. It will generate a time-based one-time password every time the workflow runs.

3. Set Up TOTP Credentials

Inside the TOTP node, find the credentials section. Here you will:

  • Select an existing TOTP account credential, or
  • Create a new TOTP credential and store your secret key

This secret key is the same one that would normally be used in an authenticator app. n8n uses it to generate the exact same codes that app would show.

4. Configure Node Parameters

Good news, this part is usually light on effort. The TOTP node often needs only minimal configuration. Just make sure that:

  • The secret key is correct
  • The settings match your authentication server requirements, such as the time step (often 30 seconds)

Once those are aligned, n8n will produce valid TOTP codes in sync with your server.

5. Test Your Workflow

Now for the fun part. Click “Test workflow” in n8n.

The workflow runs, the TOTP node generates a fresh code, and you can see the output directly in the execution data. That code can then be used wherever your automation needs it, such as in a login step or API call.

Security & Reliability Tips for TOTP in n8n

Automating TOTP is powerful, but with great power comes the responsibility to not leave your secret keys lying around like sticky notes on a monitor.

1. Protect Your Secret Keys

Always store your TOTP secret keys securely. Do not expose them in logs, screenshots, or public repositories.

Use n8n credentials to keep the secret key safe inside your workflow configuration instead of hardcoding it in nodes or expressions.

2. Keep Clocks in Sync

TOTP is all about time. If your server time and n8n time do not agree, your codes will not either.

  • Ensure your server clock is accurate
  • Confirm that the client or authentication service also uses the correct time

A tiny time drift can mean a lot of “invalid code” messages, which is not the kind of automation excitement anyone wants.

3. Maintain Your Workflows

Security is not a “set it and forget it” thing. Make a habit of:

  • Reviewing your workflows periodically
  • Updating them if your security policies change
  • Adapting to any new requirements from your authentication provider

This keeps your TOTP setup reliable and aligned with best practices over time.

Wrapping Up: Less Repetition, More Security

With the n8n TOTP node, you can bring strong two-factor authentication into your workflows without constantly playing “find the code” on your phone.

By using a Manual Trigger for testing, connecting the TOTP node, storing your secret key in credentials, and aligning settings with your authentication server, you get a secure, fully automated way to generate TOTP codes on demand.

Ready to stop typing the same codes over and over? Set up TOTP in n8n, plug it into your automations, and enjoy the peace of mind that comes with robust, hands-off authentication.

AI Overview Optimizer Workflow Explained

AI Overview Optimizer Workflow Explained (Without Losing Your Sanity To SEO)

Picture This…

You just finished writing a beautiful, heartfelt, 2,000-word masterpiece. You hit publish, sit back, and wait for the traffic to roll in.

Google: “Cute. Anyway, here is what our AI Overview thinks is actually useful.”

If you have ever felt the soul-crushing pain of tweaking titles, meta descriptions, and headings over and over again, only to still guess what Google really wants, this n8n workflow template is here to rescue you from that loop.

Meet the AI Overview Optimizer workflow, your new SEO sidekick that reads Google’s AI Overview, compares it with your article, and tells you exactly how to fix your content instead of making you play keyword roulette.

What This n8n Workflow Actually Does

In simple terms, this workflow uses AI to study what Google’s AI Overview is showing for a specific search query, then audits your article against that benchmark and gives you a detailed SEO improvement plan.

It is like having an SEO strategist, content editor, and slightly obsessive note-taker all rolled into one automated flow.

Main Goals Of The AI Overview Optimizer

  • Analyze Google’s AI Overview for your target query, country, and language.
  • Scrape your article content from a URL you provide.
  • Compare your content with what Google’s AI seems to favor.
  • Generate a structured SEO Improvement Report with specific, actionable steps.

Under The Hood: Workflow Components

This n8n template is made up of several key pieces that work together quietly while you enjoy not doing all this by hand.

  • When chat message received
    This is the trigger node. Whenever a new user message comes in (typically with a search query and article URL), the workflow wakes up and gets to work.
  • AI Overview Optimizer
    This is the main agent, powered by GPT-4.1. Think of it as your AI SEO strategist. It coordinates the tools, processes the data, and produces the final recommendations.
  • GPT-4.1
    The large language model that understands your inputs and generates human-like, detailed outputs. It is responsible for turning raw data into a clear, structured SEO improvement report.
  • Simple Memory
    A memory component that keeps track of the conversation context. This helps with multi-turn chats so the optimizer does not forget what you just said two messages ago.
  • Analyze AI Overview Tool
    This tool fetches and analyzes Google’s AI Overview results for the query, country, and language you specify. It essentially figures out what kind of content structure, topics, and semantics Google’s AI is rewarding for that search.
  • Get Article Tool
    This one scrapes the article from the URL you provide. It extracts the key content elements so the workflow can see what is already on your page and what might be missing.

How The Workflow Runs (Without You Lifting A Finger)

Step 1 – The Conversation Starts

You send a message through the chat interface. Typically, this includes:

  • Your target search query.
  • The URL of the article you want to optimize.

The When chat message received node triggers the workflow and passes this information to the AI Overview Optimizer agent.

Step 2 – Studying Google’s AI Overview

The agent first calls the Analyze AI Overview Tool. This tool:

  • Looks up Google’s AI Overview for your query.
  • Uses the specified country and language to localize the results.
  • Extracts what the AI Overview is highlighting, including structure, topics, and key entities.

This gives the workflow a benchmark of what “ideal” content looks like in the eyes of Google’s AI for that specific query.

Step 3 – Auditing Your Article

Next, the agent uses the Get Article Tool to scrape your article content from the URL you provided. It retrieves the main sections and key elements of your page so the workflow can understand:

  • How your article is structured.
  • What topics you cover.
  • What might be missing or underdeveloped.

Step 4 – GPT-4.1 Puts It All Together

Now the fun part. The AI Overview Optimizer agent feeds both data sets into GPT-4.1, with Simple Memory keeping the conversation context intact.

GPT-4.1 compares:

  • The AI Overview benchmark from Google’s AI.
  • Your current article content.

From there, it generates a detailed SEO Improvement Report that includes:

  • Suggested improvements for your title and meta description.
  • Missing content categories, topics, and entities to add.
  • Recommendations for deepening your content where it is too shallow.
  • Guidance on aligning your structure and semantics with what AI Overview favors.

Why This Workflow Is Worth Using

Key Benefits Of The AI Overview Optimizer

  • Data-driven SEO
    Recommendations are based on insights from Google’s AI Overview, not just guesswork or generic best practices.
  • Automated analysis
    No more manually comparing SERPs, AI Overviews, and your article line by line. The workflow does the heavy lifting for you.
  • Better ranking potential
    By aligning your content with the structure and topics Google’s AI is already surfacing, you increase your chances of ranking higher and faster.
  • Clear, actionable steps
    You get a structured report with concrete actions instead of vague advice like “write better content.”

In other words, this workflow is built to remove the guesswork and repetitive grind from SEO content optimization, while still keeping you in control of the final edits.

Quick Setup & Usage Guide

1. Open The Template

Start by loading the AI Overview Optimizer workflow template in n8n.

2. Configure Any Required Credentials

Make sure your environment is set up to use GPT-4.1 and the tools in the workflow. Check that any needed API keys or integrations are correctly configured in n8n so the AI Overview Optimizer agent can call:

  • GPT-4.1
  • Analyze AI Overview Tool
  • Get Article Tool

3. Trigger The Workflow Via Chat

Use the chat interface connected to this workflow. In your message, include:

  • The search query you are targeting.
  • The URL of the article you want to optimize.

Once the When chat message received node picks up your message, the full optimization flow starts automatically.

4. Review Your SEO Improvement Report

When the workflow finishes, you receive a comprehensive SEO Improvement Report generated by GPT-4.1. This report will outline:

  • What your content is doing well.
  • Where it falls short compared to the AI Overview benchmark.
  • Specific edits and expansions you should make.

From there, you can update your article with confidence instead of just hoping your tweaks are enough.

Tips, Next Steps, And How To Get The Most Out Of It

Use It As A Regular SEO Checkup

Run this workflow whenever you publish a new article or significantly update an existing one. Search expectations change, and AI Overview results evolve, so regular checkups help keep your content aligned.

Combine With Your Own Expertise

The workflow gives you a data-backed roadmap, but you still bring the brand voice, nuance, and real-world experience. Use the recommendations as a strong starting point, then tailor them to match your audience and style.

Iterate On High-Value Pages First

Start by optimizing pages that matter most, like revenue-driving posts, landing pages, or cornerstone articles. The improvements suggested by the workflow can have a bigger impact there.

Wrapping Up

The AI Overview Optimizer workflow is a smart, automated way to align your content with what Google’s AI Overview is already prioritizing. By benchmarking against AI Overview, then auditing your article with GPT-4.1 and contextual memory, it delivers a targeted SEO improvement plan that helps your pages rank faster and perform better.

Instead of endlessly tweaking headings and hoping for the best, you can let this n8n template handle the analysis while you focus on writing content worth reading.

Ready to try it? Feed your query and article URL into the chat interface and let the workflow generate a detailed SEO improvement report for you.

Automate Spotify Liked Songs Sync to Playlist

Automate Spotify Liked Songs Sync to Playlist

Ever find yourself liking songs on Spotify all the time, but forgetting to add them to your favorite playlist? Then a few weeks later, that playlist no longer reflects what you actually listen to. Frustrating, right?

This is exactly the kind of small but annoying problem that automation solves beautifully. In this guide, we will walk through an n8n workflow template that automatically syncs your Spotify Liked Songs to a specific playlist, keeps it clean, and updates it on a schedule you choose.

We will keep all the technical bits accurate, but explain them in a casual, friendly way so you know exactly what is going on and why it makes your life easier.

What This n8n Workflow Actually Does

Let us start with the big picture. This n8n workflow connects to your Spotify account and regularly compares two things:

  • Your Spotify Liked Songs
  • A specific playlist that you choose

Every time it runs, it checks for differences and syncs them so the playlist always mirrors your current likes. It does two main jobs for you:

  • Adds songs that you have liked but are not yet in the playlist.
  • Removes songs from the playlist that you have unliked or removed from your Liked Songs.

The workflow is designed to run automatically every 24 hours by default, so your playlist quietly updates in the background. No more dragging tracks around manually or wondering why your “favorites” playlist feels out of date.

When Should You Use This Template?

This workflow is perfect if you:

  • Use Liked Songs as your main way of saving music, but still want a curated playlist that stays in sync.
  • Have a “Favorites”, “Daily Mix”, or “Main Library” playlist you want to always match your current likes.
  • Are tired of manually adding and removing songs from playlists.
  • Want a low-maintenance, set-it-and-forget-it system for playlist management.

If you are already using n8n or looking for a practical first automation to try, this is a great starting point.

How the Workflow Works Behind the Scenes

Let us break down how the template operates from start to finish. You do not need to be an expert to follow this, but it helps to know what each part does so you can customize it later.

1. Scheduled Sync With the Schedule Trigger

The whole process kicks off with a Schedule Trigger node. In the template, it is set to run automatically once a day at midnight.

What this means for you:

  • No manual button pressing.
  • Your playlist updates every 24 hours by default.
  • You can change the timing if daily is not your style.

You can adjust this schedule to run more or less often, depending on how frequently you add new music.

2. Telling the Workflow Which Playlist to Sync

Next up is a Set node that defines a variable called varplaylistto. This is simply the name of the playlist you want to keep in sync with your Liked Songs.

In this node, you:

  • Open the Set node labeled something like “Edit set Vars”.
  • Find the variable varplaylistto.
  • Replace its value with the exact name of your target playlist.

That is how the workflow knows which playlist to read from and update. If you ever want to sync a different playlist, just change this value.

3. Connecting Your Spotify Account

For n8n to read and update your Spotify data, you need to connect your Spotify account in a few nodes. The template uses multiple Spotify nodes, each with a specific job:

  • Spotify get Liked Songs – pulls all the tracks from your Liked Songs library.
  • Spotify get all playlists – fetches all your playlists so the workflow can find the one that matches varplaylistto.
  • Spotify get Tracks of X – retrieves all the tracks currently in the target playlist for comparison.
  • Spotify add Missing to x – adds any liked songs that are not yet in the playlist.
  • Spotify delete old – removes tracks from the playlist that you have unliked or no longer have in Liked Songs.

In each of these nodes, make sure your Spotify credentials are set up correctly. Once that is done, the workflow can safely read and modify your playlists.

4. Sorting, Filtering, and Finding the Right Playlist

To avoid any confusion, the workflow does some sorting and filtering before comparing songs.

Here is what happens:

  • It sorts songs based on the date they were added, from oldest to newest.
  • It filters your playlists to find the one whose name matches the value of varplaylistto.

This makes sure that the comparison is done between the right playlist and the correct set of liked tracks. No accidental updates to the wrong playlist.

5. Comparing Liked Songs With the Playlist

The real magic happens in the Compare Datasets node. This is where the workflow figures out what needs to change.

It compares two lists:

  • All your Liked Songs.
  • All the tracks currently in your chosen playlist.

From that comparison, it identifies:

  • Which liked songs are missing from the playlist.
  • Which songs are in the playlist but no longer liked.

That gives the workflow a clear to-do list: add what is missing, remove what no longer belongs.

6. Updating the Playlist With Batch Loops

Once the workflow knows what needs to change, it updates the playlist in two separate passes:

  • Adding missing tracks: Any liked songs that are not yet in the playlist are added using a batch loop so the updates are handled in manageable chunks.
  • Removing old tracks: Any songs that are in the playlist but not in your Liked Songs anymore are removed, also via a batch loop.

Using batch loops helps the workflow handle larger playlists without hitting limits or timing out, and it keeps everything efficient.

7. Optional Notifications With Gotify

If you like a bit of feedback after automations run, the template includes optional Gotify nodes.

These can send you a short summary notification that includes:

  • How many songs were added.
  • How many songs were deleted.
  • How long the sync took.

This part is optional, so if you prefer silent automation, you can simply leave these nodes disabled or unconfigured.

How to Set It Up Step by Step

Let us quickly recap the setup in a more practical, checklist-style way.

Step 1 – Import the Template

Open n8n, import the Spotify Liked Songs to Playlist template, and make sure all nodes are visible and connected.

Step 2 – Configure the Schedule Trigger

  • Open the Schedule Trigger node.
  • Confirm it is set to run every 24 hours at midnight, or change the timing to whatever fits your listening habits.

Step 3 – Set Your Target Playlist Name

  • Open the Set node where varplaylistto is defined.
  • Replace the existing value with the exact name of your Spotify playlist.

Step 4 – Add Your Spotify Credentials

  • Open each Spotify-related node:
    • Spotify get Liked Songs
    • Spotify get all playlists
    • Spotify get Tracks of X
    • Spotify add Missing to x
    • Spotify delete old
  • Set or select your Spotify credentials in each node.

Step 5 – (Optional) Configure Gotify Notifications

  • If you use Gotify, open the notification nodes.
  • Enter your Gotify server details and configure the message content if needed.

Step 6 – Test the Workflow

  • Run the workflow manually once from n8n.
  • Check your target playlist in Spotify to confirm songs were added and removed correctly.

Step 7 – Enable the Workflow

  • Once you are happy with the test, activate the workflow.
  • From now on, it will run automatically on the schedule you defined.

Customization Tips and Ideas

You can keep things simple or tweak the workflow to fit your style. Here are a few easy customizations:

  • Edit the playlist name: In the “Edit set Vars” varplaylistto node, change the value to any playlist you want synced.
  • Change the sync frequency: Adjust the Schedule Trigger to run hourly, weekly, or at specific times of day.
  • Refine notifications: If using Gotify, customize the message text to show exactly the details you care about.
  • Experiment with different playlists: Duplicate the workflow and sync multiple playlists with different rules if you like.

Why This Automation Makes Your Life Easier

Instead of managing playlists by hand, you let automation do the boring part. You simply like the songs you enjoy, and the workflow quietly keeps your chosen playlist in sync.

The result:

  • Your playlist always reflects your current taste.
  • No more “I thought I added that track already” moments.
  • You save time and mental energy for actually enjoying the music.

Try the Template and Make Spotify Work for You

If you are ready to stop babysitting your playlists, this n8n workflow is an easy win. Set it up once, tweak it to your preferences, and let it handle the repetitive work in the background.

Give it a try, see how it feels to have your Liked Songs and playlist in perfect sync, and then build on it with more automations if you like.

Feel free to share how you are using it or what you would like to improve. Your feedback and ideas can inspire even better workflows.

Wrapping Up

This n8n workflow uses the Spotify API to keep your favorite music organized with almost no effort. Whether you stick with the default daily sync or adjust it to your own schedule, you stay in full control while automation does the heavy lifting.

Like your music, not manual playlist maintenance? Then this setup is for you.

Automate Spotify Liked Songs Sync to Playlist

Automate Spotify Liked Songs Sync to Playlist with n8n

What You Will Learn

In this tutorial-style guide, you will learn how to use an n8n workflow template to automatically sync your Spotify Liked Songs with a specific playlist. By the end, you will understand:

  • How the workflow runs on a schedule to keep your playlist updated
  • How n8n fetches your liked songs and playlists from Spotify
  • How the workflow compares two datasets to find songs to add or remove
  • How to customize the target playlist, schedule, and notifications

This guide is ideal if you want a hands-free way to keep a Spotify playlist perfectly aligned with your Liked Songs.

Concept Overview: How the Workflow Works

Before we jump into the step-by-step instructions, it helps to understand the main idea behind the automation.

Core Idea

The n8n workflow runs at a regular interval (for example, every night at midnight). Each run does the following:

  1. Retrieves your current Liked Songs from Spotify
  2. Retrieves your Spotify playlists and identifies the target playlist
  3. Fetches the tracks currently in that target playlist
  4. Compares the liked songs with the playlist tracks
  5. Adds any liked songs that are missing from the playlist
  6. Removes any songs from the playlist that you no longer like
  7. Optionally sends a notification summarizing what changed

In other words, the playlist becomes a live mirror of your Liked Songs, updated automatically.

Key Components in n8n

The workflow is built from several types of nodes in n8n:

  • Trigger node – starts the workflow on a schedule
  • Set / Variable nodes – store configuration values like playlist name and start time
  • Spotify nodes – interact with your Spotify account (fetch liked songs, playlists, and modify playlists)
  • Filter / Comparison nodes – select the right playlist and compare datasets
  • Loop / Operation nodes – add and remove tracks one by one
  • Optional notification nodes – send a summary via Gotify

Step-by-Step: Inside the n8n Workflow Template

Now let us walk through each part of the workflow in the order it executes, explaining what each node does and how they work together.

Step 1 – Schedule the Workflow

The workflow starts with a Schedule Trigger node.

  • What it does: Triggers the workflow automatically every 24 hours.
  • Configured time: 0 o’clock (midnight), so your playlist is refreshed once per day.

You can change this later if you want a different interval or time of day.

Step 2 – Define the Target Playlist Name

Next, a variable is used to tell the workflow which playlist to sync.

  • The workflow uses a variable called varplaylistto.
  • Your task: Set varplaylistto to the exact name of the Spotify playlist you want to keep in sync with your Liked Songs.

This is usually done in an "Edit set Vars" or similar Set node inside n8n.

Step 3 – Initialize Timing Variables

To track performance, the workflow initializes an internal variable, often named timestart.

  • Purpose: Store the start time of the workflow run.
  • Benefit: Can be used later to measure how long the workflow took to complete.

This step does not affect the logic of syncing but is useful for monitoring and optimization.

Step 4 – Connect to Spotify and Fetch Data

The next group of nodes communicates with your Spotify account.

4.1 Fetch Liked Songs

  • The workflow calls Spotify to retrieve all tracks you have liked.
  • This dataset represents the source of truth for what should be in your synced playlist.

4.2 Fetch User Playlists

  • Another Spotify node fetches all playlists in your account.
  • These results are used to find the specific playlist whose name matches varplaylistto.

Important: You must configure the Spotify nodes with your own Spotify account credentials in n8n so that the workflow can access your data. This is done by setting up a Spotify credential in n8n and selecting it in each Spotify node.

Step 5 – Filter to the Target Playlist

Once all playlists are fetched, the workflow needs to isolate the one you want to sync.

  • A filter step checks each playlist name against the varplaylistto variable.
  • Only the playlist whose name matches your target value continues through the workflow.

This gives the workflow a single, specific playlist to work with.

Step 6 – Get Tracks from the Target Playlist

With the target playlist identified, the workflow then:

  • Uses a Spotify node to retrieve all tracks currently in that playlist.
  • Stores this list so it can be compared to your Liked Songs.

At this point, the workflow has two main datasets:

  1. All your Liked Songs
  2. All tracks in the target playlist

Step 7 – Prepare, Sort, and Merge Data

Before comparing, the workflow prepares the data for accurate matching.

  • Both datasets are sorted, often by the date the songs were added.
  • The workflow may normalize or structure fields so that each track can be matched consistently, typically using identifiers like track IDs.
  • The data is then prepared for the Compare Datasets node, which expects a clear "left side" and "right side" to compare.

This preparation step ensures that the comparison results are reliable.

Step 8 – Compare Liked Songs with Playlist Tracks

The Compare Datasets node is the core logic that decides what to add or remove.

It checks:

  • Tracks in Liked Songs but not in the playlist – these are the songs that need to be added.
  • Tracks in the playlist but not in Liked Songs – these are the songs that should be deleted.

After this step, the workflow has two clean lists:

  1. Tracks to add to the playlist
  2. Tracks to remove from the playlist

Step 9 – Add Missing Songs to the Playlist

The workflow then processes the list of songs that are liked but not yet in the playlist.

  • It loops through each missing track.
  • For each track, a Spotify node calls the "add to playlist" API operation.
  • The track is added to the target playlist automatically.

This loop continues until all missing liked songs have been added to the playlist.

Step 10 – Remove Songs That Are No Longer Liked

Next, the workflow handles the opposite case: songs that are in the playlist but no longer liked.

  • It loops through every track in the "to delete" list.
  • For each one, a Spotify node calls the "delete from playlist" API operation.
  • The track is removed from the target playlist.

After this step, the playlist should match your current Liked Songs list.

Step 11 – Optional Notifications (Gotify)

Finally, the workflow can optionally send you a summary of what changed.

  • Internal nodes count how many tracks were added and how many were deleted.
  • A Gotify node can send a message that includes these counts.

This is useful if you want to keep an eye on the automation without opening n8n or Spotify every time.

How to Customize the n8n Spotify Sync Workflow

The template is ready to use, but you should adjust a few key settings to fit your needs.

1. Set Your Target Playlist Name

  • Open the "Edit set Vars" (or similar) node in n8n.
  • Find the variable varplaylistto.
  • Enter the exact name of the Spotify playlist you want to sync with your Liked Songs.

2. Add Your Spotify Credentials

  • In n8n, create or select a Spotify credential that connects to your account.
  • Open each Spotify node in the workflow.
  • Assign your Spotify credential under the account connection or authentication section.

Without this, the workflow cannot read your liked songs or modify your playlists.

3. Adjust the Schedule

  • Open the Schedule Trigger node.
  • Change the interval if you want the sync to run more or less frequently.
  • You can also change the time of day if midnight is not ideal for you.

For example, you might run it every 6 hours, once a week, or at a specific time each evening.

Why Automate Spotify Playlist Sync with n8n?

Using this n8n workflow template to sync Spotify Liked Songs to a playlist has several advantages:

  • Save time: No more manually adding every new liked song to your favorite playlist.
  • Always up to date: Your chosen playlist stays in sync with your Liked Songs without effort.
  • Full visibility: Optional notifications let you know how many songs were added or removed in each run.
  • Flexible automation: Because it runs in n8n, you can extend it with extra steps, such as logging changes or triggering other workflows.

Quick Recap

Here is a brief summary of what the workflow does:

  1. Runs on a schedule using a Schedule Trigger.
  2. Uses varplaylistto to identify your target playlist.
  3. Initializes timing variables like timestart for performance tracking.
  4. Fetches your Liked Songs and user playlists from Spotify.
  5. Filters playlists to find the one matching varplaylistto.
  6. Gets all tracks from the target playlist.
  7. Sorts and prepares data, then uses Compare Datasets to find:
    • Songs to add (liked but not in the playlist)
    • Songs to delete (in the playlist but not liked)
  8. Adds missing songs with Spotify "add to playlist" operations.
  9. Removes old songs with Spotify "delete from playlist" operations.
  10. Optionally sends Gotify notifications with counts of added and deleted tracks.

FAQ

Do I need coding skills to use this n8n template?

No, you do not need to write code. You mainly configure nodes, fill in variables like varplaylistto, and connect your Spotify credentials. The template handles the logic for you.

Can I sync to more than one playlist?

This particular template focuses on one target playlist defined by varplaylistto. To sync multiple playlists, you could duplicate and adapt the workflow or extend it to handle multiple target playlists, but that would require additional configuration.

Will this delete songs from my Liked Songs?

No. The workflow only adds to or removes from the target playlist. Your Liked Songs remain the master list and are not modified by this automation.

Can I change how often the playlist is updated?

Yes. Open the Schedule Trigger node in n8n and adjust the frequency and time according to your preference.

Start Using the Template

If you want to automate your Spotify playlist management with n8n, this template is a practical starting point. After a brief setup, you will have a fully automated system that keeps your playlist aligned with your Liked Songs, so you can focus on enjoying your music instead of maintaining it.

Give it a try in your n8n instance and feel free to customize it further for your own workflows.

Automate Calendly to Notion with n8n Workflow

Ever Copy-Pasted Calendly Invites Into Notion for the 47th Time?

If you have ever found yourself dragging Calendly details into Notion like a human copy-paste machine, this one is for you. Repetitive admin work is the villain of productivity, and yet it somehow keeps showing up on your calendar.

Enter n8n, your friendly automation sidekick. With a simple workflow, you can connect Calendly to Notion so that every new invitee magically appears in your Notion database as a shiny new page. No more manual entry, no more “I’ll update the CRM later” lies.

What This n8n Workflow Actually Does

This workflow is all about turning scheduled meetings into structured data in Notion without you lifting a finger.

Here is the basic flow:

  • Calendly Trigger node listens for new invitees.
  • When someone books a meeting, Calendly sends their details to n8n.
  • Notion node takes that info and creates a new page in your chosen Notion database.

The result is a smooth pipeline from scheduling to documentation, so your Notion workspace becomes a simple CRM or meeting hub that stays up to date automatically.

Key Pieces of the Workflow

1. Calendly Trigger Node

Think of this as the watchful gatekeeper that jumps into action whenever a new person books time with you.

  • Purpose: Listen for new scheduling events from Calendly.
  • Event configuration:
    • events: ["invitee.created"] – this fires whenever a new invitee is created.
  • Authentication:
    • Uses your Calendly API credentials so n8n can securely talk to your Calendly account.

2. Notion Node

Once Calendly shouts “New invitee!”, the Notion node politely creates a new page for that person in your database.

  • Purpose: Create a new page in a Notion database with the invitee’s details.
  • Main configuration:
    • resource: databasePage – tells Notion we are working with database pages.
    • databaseId: Set this to the ID of the Notion database where you want your invitees stored.
    • propertiesUi.propertyValues: Map Calendly fields to Notion properties:
      • Name|title: Uses the invitee’s name as the Notion page title.
      • Email|email: Fills in the email property with the invitee’s email address.
      • Status|select: Sets a default status value using a select option ID, for example “New”, “Pending”, or whatever your system uses.
    • Requires Notion API credentials to authenticate and access your workspace.

Why Bother Automating Calendly to Notion?

Besides saving your sanity, this automation comes with some very practical benefits.

  • Time-saving: No more manually creating Notion pages for every meeting. The workflow tracks appointments for you, every time a Calendly invitee is created.
  • Centralized information: All invitee details live in one Notion database, ready for follow-ups, notes, and action items.
  • Better organization: Use Notion’s filters, sorts, relations, and views to turn raw meeting data into an actual system instead of a pile of scattered notes.

Quick Setup Guide: From Zero to Automated in a Few Steps

Let’s walk through how to get this n8n Calendly to Notion workflow running. You only have to do this once, then automation does the boring part forever.

Step 1 – Create Calendly API Credentials

First, give n8n a way to talk to Calendly.

  • In your Calendly account, generate an API key.
  • Keep it handy, you will plug it into n8n as your Calendly API credentials.

Step 2 – Set Up Notion API Access

Next, allow n8n to create pages in your Notion workspace.

  • Create a Notion integration with permissions to access and modify the target database.
  • Connect that integration to your database in Notion so it can read and write data.

Step 3 – Build Your Notion Database

Now prepare the place where all your invitees will live.

  • Create a Notion database (table, board, or list view is fine).
  • Add these properties:
    • Name – type: title
    • Email – type: email
    • Status – type: select (for example “New”, “Contacted”, “Completed”).
  • Copy the database ID, you will use it in the Notion node configuration.

Step 4 – Import the n8n Workflow Template

Instead of building everything from scratch, use the ready-made workflow template.

  • In n8n, import the provided workflow JSON.
  • This will create a workflow with the Calendly Trigger node and the Notion node already in place.

Step 5 – Add Your Credentials in n8n

Now connect all the dots.

  • In n8n, configure your Calendly API credentials using the API key you created earlier.
  • Set up your Notion API credentials with the integration token.
  • Optionally, use environment variables for API keys if you prefer a cleaner and more secure setup.

Step 6 – Configure the Notion Node

Double check that the data from Calendly lands in the right place in Notion.

  • Set resource to databasePage.
  • Paste your databaseId from Notion.
  • Map the properties:
    • Name|title → invitee’s name.
    • Email|email → invitee’s email.
    • Status|select → default status (using the correct select option ID).

Step 7 – Activate and Test the Workflow

Time for the fun part.

  • Turn the workflow on in n8n.
  • Book a test meeting in Calendly using a different email address.
  • Check your Notion database and confirm that a new page appears with the correct Name, Email, and Status.

If everything looks right, you have officially retired from manual invitee logging.

Ideas to Take This Automation Even Further

This Calendly to Notion workflow is a solid foundation, but you do not have to stop here.

  • Add more Calendly fields: Map extra invitee details into additional Notion properties, such as event type, time, or custom questions.
  • Trigger notifications: After creating the Notion page, add another node to send yourself an email or Slack message when a new invitee is added.
  • Connect other tools: Use the same workflow to sync data with other apps in your stack, or chain it into larger automations.

Start Automating Your Scheduling Workflow

This n8n workflow template makes it easy to integrate Calendly with Notion so your scheduling and productivity systems stay in sync without extra effort. Once it is running, every new invitee becomes a neatly structured entry in Notion, ready for tracking, follow-up, and whatever workflows you build on top.

If you are ready to stop manually copying data and let automation do the boring work, try the template, customize it to your setup, and enjoy the extra free time.

Ready to build your automated Calendly to Notion workflow? Grab the n8n template below and make repetitive data entry a thing of the past.

Automate Notion Entries from Calendly with N8N

Automate Notion Entries from Calendly with n8n

Why bother automating Calendly to Notion in the first place?

You know that feeling when someone books a call with you and you think, “I’ll add their details to Notion later,” and then… you never do? Or you copy-paste the same info over and over again? That’s exactly the kind of tiny but constant task that slowly drains your time and attention.

This workflow template fixes that. Every time an invitee schedules a meeting in Calendly, n8n automatically creates a matching entry in your Notion database. No manual data entry, no missed leads, no “I swear I wrote that down somewhere.”

In this guide, we’ll walk through what the template does, when you’ll actually want to use it, and how to set it up step by step inside n8n.

What this n8n workflow template actually does

Let’s start with the big picture. This automation is very simple, but very effective:

  • Trigger: A new Calendly invitee is created (invitee.created event).
  • Action: A new page is added to a specific Notion database with that invitee’s details.

So every time someone books via your Calendly link, you instantly get a new row or page in Notion with their name, email, and a status you define. You can treat that Notion database as your lightweight CRM, a client list, a sales pipeline, or a meeting notes tracker.

When this workflow is a perfect fit

This template is ideal if:

  • You use Calendly for scheduling calls, demos, interviews, or coaching sessions.
  • You keep track of contacts, leads, or meetings inside a Notion database.
  • You want invitees to appear in Notion automatically without copying data by hand.
  • You prefer to keep everything centralized in Notion for follow-ups, notes, and status updates.

If that sounds like your setup, this n8n workflow will quietly keep everything in sync for you in the background.

How the automation is structured in n8n

The workflow uses just two nodes, which keeps things easy to understand and maintain:

  1. Calendly Trigger node – listens for new invitees created in your Calendly account.
  2. Notion node – creates a new page in your chosen Notion database using the invitee data.

Once connected, the Calendly trigger sends the invitee information directly into the Notion node, which then writes it into your database.

Step 1 – Configure the Calendly Trigger node

We’ll start with the part that listens for new bookings. In n8n, add a Calendly Trigger node to your workflow. This node is responsible for reacting whenever someone books an appointment with you.

Here’s what you need to set up inside the node:

  • Event: Choose invitee.created.
    This tells n8n to run the workflow every time a new invitee is created in Calendly, which basically means whenever someone finishes booking a time with you.
  • Credentials: Connect your Calendly API credentials.
    Make sure you use valid Calendly API keys so n8n can securely listen to events from your account.

Once this node is configured, n8n will be ready to pick up every new booking automatically.

Step 2 – Set up the Notion node to create database pages

Next up is telling n8n what to do with the Calendly data. That’s where the Notion node comes in. This node will create a new page in your chosen Notion database whenever the Calendly trigger fires.

Basic configuration

  • Resource: Set this to databasePage.
    This tells n8n that you want to create a new page inside a Notion database, not just a standalone page.
  • Database ID: Paste the ID of the Notion database where you want the entries to go.
    This is your main “destination” for all new invitee records.
  • Credentials: Connect your Notion API credentials.
    Make sure your integration has access to the specific database you plan to use.

Map Calendly invitee data to Notion properties

Now for the fun part: mapping the data. You want the information from Calendly to land in the right columns or properties in Notion. In the Notion node, configure the properties so they pull values from the Calendly trigger payload:

  • Name: Map this to the invitee’s name from Calendly.
  • Email: Map this to the invitee’s email address.
  • Status: Set a default select status using the status identifier in your Notion database.
    For example, you might use something like “New,” “Scheduled,” or “Pending follow-up” as the default.

This mapping makes sure each new Notion page is properly structured and ready for you to work with, instead of just being a blank page with random text.

Step 3 – Connect the nodes so data flows automatically

With both nodes configured, you just need to connect them inside n8n:

  • Link the output of the Calendly Trigger node to the input of the Notion node.

That connection tells n8n: “Whenever a new invitee is created in Calendly, send their data over here and create a Notion page from it.” Once you save and activate the workflow, your automation is live.

Why this simple automation makes life easier

It might look like a small workflow, but it solves a very real daily annoyance. Here is what you gain once it is running:

  • No more manual data entry Every new Calendly booking instantly appears in Notion. You do not have to copy names and emails into your database ever again.
  • An always up to date Notion CRM or meeting tracker If you use Notion as a CRM, lead tracker, or meeting log, this workflow keeps it current without you touching it.
  • Lower risk of missing opportunities Since every invitee is automatically logged, you are far less likely to forget a follow-up or lose track of who booked what and when.

In short, n8n handles the repetitive part so you can focus on the conversation with the person who booked, not the admin around it.

Wrapping up

By connecting Calendly and Notion through n8n, you get a lightweight but powerful automation that quietly keeps your records clean and organized. It is easy to customize, so you can extend it later with more fields, additional steps, or extra tools if you want to build a more advanced workflow around your meetings.

Ready to try it yourself?

If you are using Calendly and Notion already, this is one of those “set it up once and forget about it” automations that pays off every single day. Connect your accounts, follow the steps above in n8n, and let the workflow take over the busywork.

Want to skip the manual setup and start faster? Use the ready made template below and tweak it to fit your own Notion database and Calendly setup.

Automated Faceless AI Videos Workflow Explained

Automated Faceless AI Videos Workflow Explained

Why this n8n workflow is a game changer

Imagine waking up, checking your phone, and seeing fresh short-form videos already posted to your socials… that you didn’t have to write, edit, or upload yourself. That’s exactly what this Automated Faceless AI Videos workflow in n8n is built to do.

It pulls together AI brainstorming, scriptwriting, video generation, and automatic publishing through the Blotato API, so you can consistently push out viral-style faceless videos across multiple platforms with almost no manual effort.

If you’re trying to grow on Instagram, Facebook, LinkedIn, Threads, or other platforms, but content creation keeps eating your time, this workflow lets you hand off the repetitive parts to automation and focus on strategy instead.

What this workflow actually does

At a high level, the workflow moves through three big stages:

  • Brainstorms and writes a short video script using GPT-4o
  • Creates a faceless video using Blotato with your chosen style and voice
  • Publishes the video to your connected social media accounts automatically

All of that runs on a schedule you define, so you can have new videos going out every day, a few times a week, or whatever rhythm fits your content plan.

When should you use this template?

This n8n template is perfect if you:

  • Want to post short, faceless AI videos without being on camera
  • Need a repeatable content engine that runs on autopilot
  • Like the idea of testing viral-style hooks and ideas at scale
  • Are already using or open to using Blotato for video generation

If you enjoy being in front of the camera and editing everything manually, you might not need this. But if you’re thinking, “I just want regular, quality content going out without babysitting the process,” then this workflow will feel like a huge relief.

Step 1 – Automated scriptwriting with GPT-4o

The first part of the workflow focuses on coming up with the idea and writing the script for your faceless video.

Schedule Trigger

Everything starts with a Schedule Trigger. You set this to run at a specific time, for example, every day at 10 AM. Once that time hits, n8n wakes up the workflow and kicks things off automatically.

Brainstorm Idea

Next, the workflow uses the GPT-4o language model to brainstorm a batch of potential video ideas. By default, it can generate 50 viral faceless video ideas around a theme you define, such as:

“Little known history facts about [famous person]”

You can tweak that theme to match your niche, whether it’s finance tips, productivity hacks, relationship advice, or anything else your audience loves.

AI Agent

Once those 50 ideas are generated, the AI Agent steps in. It:

  • Randomly selects one idea from the list so each run feels fresh and unpredictable
  • Researches relevant facts and statistics related to that idea
  • Writes a short script for a roughly 15-second video with a strong hook at the beginning
  • Creates a short 2-sentence caption that includes the hashtag #ai

The result is a tight, punchy script that is ideal for Reels, Shorts, and other vertical short-form content.

Structured Output Parser

To keep everything clean and predictable for the rest of the workflow, a Structured Output Parser checks that the AI Agent returns data in proper JSON format. It makes sure the required fields are there, typically:

  • script – the spoken text for the video
  • caption – the short text that will be posted with the video

This step is what lets the next nodes plug that content straight into video creation without you having to manually copy and paste anything.

Step 2 – Turn the script into a faceless video

Once the script and caption are ready, the workflow moves into production mode and uses Blotato to create the actual video.

Prepare Video Node

The Prepare Video node is where you define how your video should look and sound. Here you can configure things like:

  • Which Blotato template to use
  • The voice that reads the script
  • Caption position on screen
  • Visual style and animation preferences

This node also injects the script and caption generated by the AI Agent so the video content matches what was just written.

Create Video Node

With everything prepared, the workflow sends a POST request to the Blotato API using the Create Video node. This tells Blotato to:

  • Use your chosen template and settings
  • Render the video based on the script
  • Apply your selected style, voice, and animations

At this point, Blotato starts generating the video in the background.

Wait Node

Video rendering is not instant, so the workflow includes a Wait node. This simply pauses the workflow for a short period so Blotato has time to process and render the video. Without this delay, the next step might try to fetch the video before it is ready.

Get Video Node

After the wait period, the Get Video node checks in with the Blotato API to retrieve the final result. When the video is finished, this node pulls back the video URL that will be used for hosting and publishing.

Step 3 – Publish to social media automatically

Once the video URL is available, the workflow shifts to distribution and handles publishing across your chosen platforms.

Prepare for Publish

The Prepare for Publish node gathers everything needed for posting, including:

  • Your social media account IDs
  • The final video URL
  • Both long and short versions of the caption if you are using different formats per platform

This is also where you make sure your configuration is correct so each platform knows which account to post to.

Upload to Blotato

Next, the workflow uses an Upload to Blotato step to host the created video. The video URL from the previous node is uploaded to Blotato, which then serves as the media hosting location for the social posts.

Social Media Publishing Nodes

Finally, the workflow uses specific social media publishing nodes to push the video live. It can automatically publish your content, along with the caption, to platforms such as:

  • Instagram
  • Facebook
  • LinkedIn
  • Threads
  • Optionally TikTok, YouTube, Twitter, Bluesky (some of these may be deactivated depending on current API support)

Once set up, this means your video goes from idea to live post across multiple platforms without you logging into each account separately.

Image Generation Nodes (currently deactivated)

The template also includes Image Generation nodes that can:

  • Create images from text
  • Upload those images to Pinterest

Right now, these nodes are disabled, but they are there if you want to experiment later or expand beyond video content once relevant support is available.

Important setup details you should not skip

Before you hit run and expect magic, there are a couple of critical configuration steps:

  • You must add your Blotato API key in the relevant node so the workflow can talk to Blotato.
  • Your social media account IDs need to be correctly set inside the “Prepare for Publish” node. Without these, the workflow will not know where to post.
  • Some platform integrations are currently disabled while they wait for stable API support. You can enable or adjust these as the APIs evolve.

The template also uses sticky notes inside the workflow as visual reminders so you do not miss key configuration steps, especially in:

  • “Prepare Video”
  • “Prepare for Publish”

Make sure to review and complete those nodes before running the workflow in production.

Why this workflow makes your life easier

Instead of spending hours every week brainstorming ideas, writing scripts, creating videos, and uploading them one by one, this n8n workflow turns the whole process into a hands-off system.

It helps you:

  • Scale your content output without burning out
  • Stay consistent across multiple platforms
  • Experiment with viral-style faceless content using AI
  • Free up time for strategy, engagement, and higher-level creative work

If you have been wanting to show up more often online but the manual work kept getting in the way, this is a practical way to let automation handle the heavy lifting.

Ready to try the Automated Faceless AI Videos template?

This workflow brings together scheduling, GPT-4o scriptwriting, Blotato video generation, and multi-platform publishing in one smooth pipeline. Once configured, it quietly works in the background, helping you grow your audience with regular, engaging faceless AI videos.

Set it up once, let it run, and watch your social presence scale with far less effort.