Automate Mailchimp Subscriber Creation from Airtable

Automate Mailchimp Subscriber Creation from Airtable: A Story of One Marketer’s Turning Point

Introduction: When the Email List Became a Problem

Every Monday morning, Julia, a marketing manager at a growing startup, opened two tabs like clockwork: Airtable and Mailchimp. Airtable held a clean list of new signups from events, lead magnets, and website forms. Mailchimp was where the email campaigns lived. Between them sat a tedious ritual that Julia dreaded.

She would copy names, emails, and interests from Airtable, paste them into Mailchimp, double check for typos, and hope she did not miss anyone. By the time she was done, an hour had passed and her coffee was cold. Worse, there were always small mistakes, outdated lists, and missed subscribers who never received the welcome series they had asked for.

One day, after realizing a batch of high-intent leads never made it into Mailchimp, Julia decided that this was the last time manual list updates would cost her conversions. That is when she discovered an n8n workflow template that could automate Mailchimp subscriber creation directly from Airtable.

Rising Action: Discovering n8n and the Airtable-Mailchimp Template

Julia had heard of n8n as a flexible automation tool, but she had never tried building a workflow herself. The promise of a ready-made template that could:

  • Pull users from Airtable
  • Send them into a Mailchimp list
  • Tag them by interest for segmentation

was exactly what she needed.

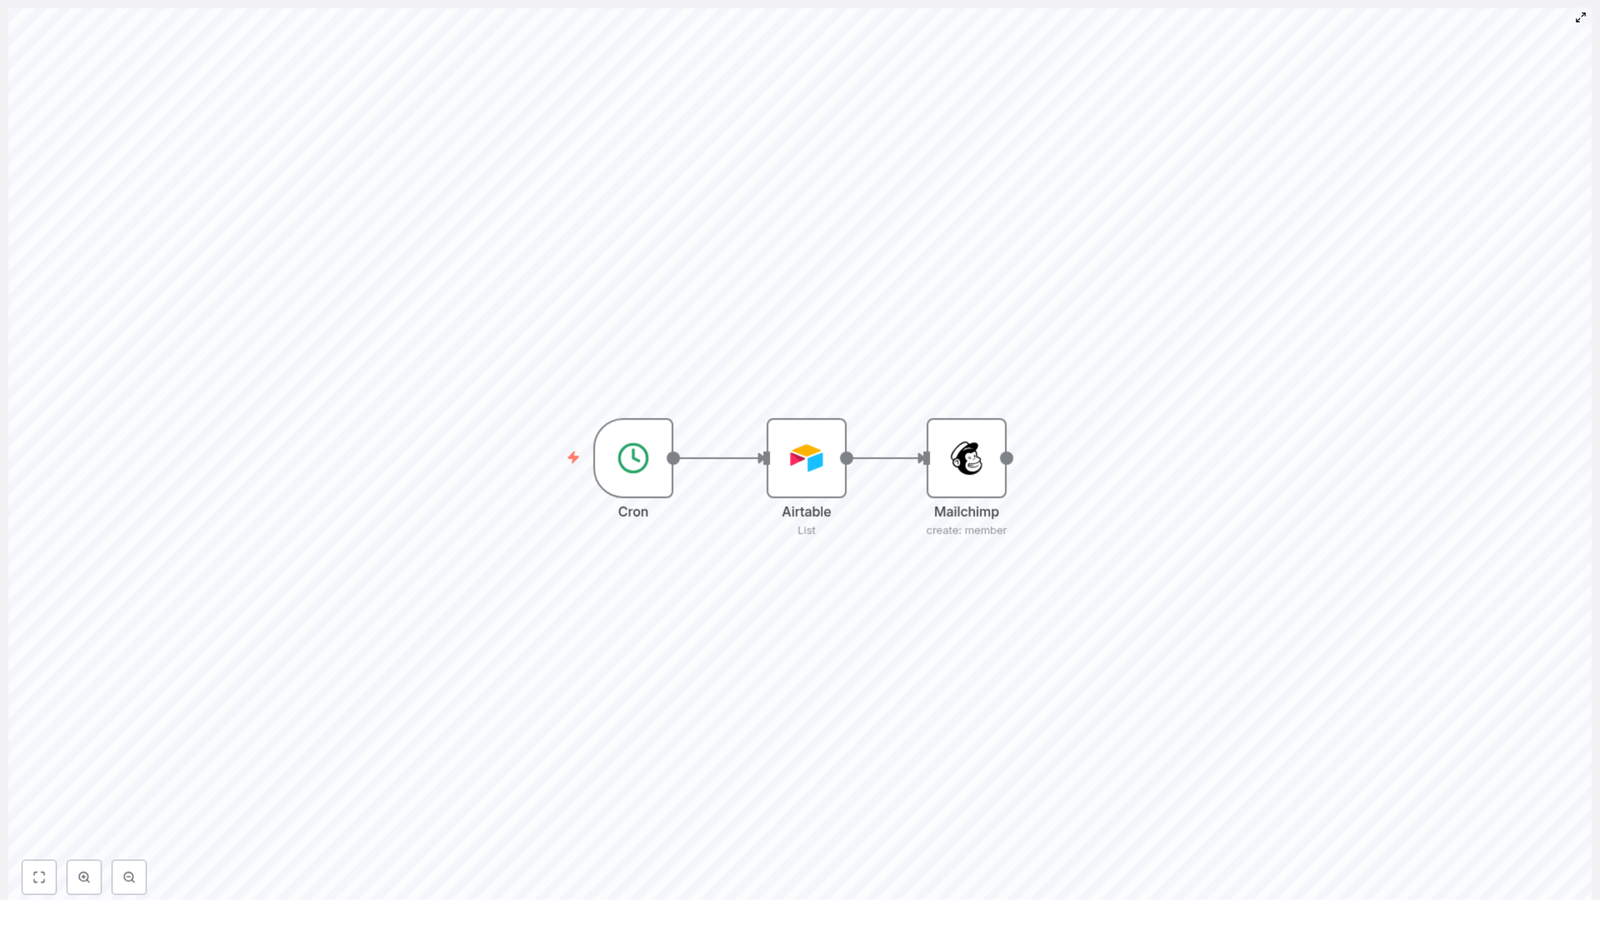
She clicked into the template and realized that under the surface of her problem was a simple automation story with three characters of its own: the Cron node, the Airtable node, and the Mailchimp node. Together, they could replace her repetitive Monday routine with a reliable, hands-off workflow.

The Core of the Workflow: Three Nodes That Changed Everything

The Cron Node – Ending Manual Check-ins

The first piece of the template was the Cron node. Julia quickly understood its role: it would act like a timer that woke the workflow up at specific intervals. Instead of her logging in every Monday to sync data, the Cron node would quietly trigger the automation on a schedule she defined.

She set it to run daily so that new signups from the previous day would automatically sync to Mailchimp. No more waiting a week, no more forgotten updates.

The Airtable Node – Turning a Table into a Source of Truth

Next, Julia looked at the Airtable node. This was where n8n connected to her Airtable base, specifically to the “Users” table that her team had been using for months. The template was already configured to retrieve the core fields she relied on:

  • Name – for personalization in email campaigns
  • Email – the key identifier for each subscriber
  • Interest – the topic or category that each user cared about

She realized this node was doing what she had been doing manually, only faster and with zero chance of miscopying an email address. Each time the Cron node triggered the workflow, the Airtable node would fetch all the relevant records from the Users table, ready to be turned into Mailchimp subscribers.

The Mailchimp Node – Automatically Creating Subscribers

The final step in the template was the Mailchimp node. This was the part Julia cared about most, because it directly impacted her campaigns.

For each Airtable record, the Mailchimp node would:

  • Create a new list member in the specified Mailchimp audience
  • Use the email and name from Airtable as merge fields, so her dynamic content still worked
  • Apply the “Interest” field as a tag, which meant her audience would be automatically segmented based on what users actually cared about

Instead of building segments manually or guessing what people wanted, she could rely on accurate, structured data flowing straight from Airtable into Mailchimp.

The Turning Point: From Manual Chaos to Automated Flow

With the pieces in place, Julia followed the template’s structure and adapted it to her own setup. The steps were surprisingly straightforward once she understood how the nodes worked together.

How Julia Set Up the Automation in n8n

  1. She confirmed her Airtable base had the required fields: Name, Email, and Interest in a table called “Users”.
  2. In n8n, she connected her Airtable account and configured the Airtable node to read from that Users table and pull exactly those fields.
  3. She connected her Mailchimp account, then selected the target Mailchimp list (audience) and set the correct list ID inside the Mailchimp node.
  4. She adjusted the Cron schedule to run every morning at 8 a.m., right before her daily reports, so new subscribers were always included.
  5. Finally, she activated the workflow so the automatic syncing could begin.

The first time the workflow ran, she watched as new subscribers appeared in her Mailchimp audience without her lifting a finger. Their names were correctly mapped, their emails were accurate, and each one carried a tag based on their interest, ready for targeted campaigns.

Resolution: What Changed After the Automation Went Live

Within a week, Julia could feel the difference. Instead of spending time copying data, she was creating better campaigns and testing new segments. The Airtable to Mailchimp automation had quietly become a core part of her marketing stack.

Benefits Julia Saw From the n8n Workflow Template

  • Time-saving – The workflow automatically added users from Airtable to Mailchimp so she no longer wasted hours on manual data entry.
  • Accuracy – With n8n handling the transfer, human errors dropped. No more missing subscribers or mistyped emails.
  • Better segmentation – The Interest field became a powerful tag in Mailchimp, letting her send highly relevant content to each segment.
  • Scalability – As her database grew, the workflow kept up. She could easily add more fields or adapt the automation for new campaigns without rewriting everything.

Most importantly, her mailing list stayed fresh and up to date. New leads never sat forgotten in Airtable. They were welcomed, nurtured, and segmented from the moment they arrived.

How You Can Follow Julia’s Path

If you are managing signups in Airtable and sending campaigns with Mailchimp, you do not have to keep juggling spreadsheets and manual imports. The same n8n automation template that turned Julia’s Monday headache into a background process can do the same for you.

All it takes is:

  • A well structured Airtable base with Name, Email, and Interest fields
  • Your Airtable and Mailchimp accounts connected to n8n
  • A Cron schedule that matches how often you want your lists to sync
  • A few minutes to map fields and activate the workflow

Conclusion: Let Your Tools Do the Repetitive Work

Integrating Airtable with Mailchimp using n8n is more than a technical tweak. It is a shift in how you work. Instead of spending your time moving data from one place to another, you let automation keep your subscriber list accurate, segmented, and ready for action.

That is how Julia went from dreading her weekly list updates to focusing on what really mattered: building campaigns that convert.

Ready to boost your email marketing? Get started with Mailchimp today!

PDF to Blog Workflow with Automated SEO Content

Turn PDFs Into SEO-Ready Blog Posts (Without Losing Your Mind)

Imagine Never Copy-Pasting From PDFs Again

You know that feeling when you open a long PDF, sigh dramatically, and start copy-pasting chunks into your blog editor like a human OCR machine? Yeah, nobody enjoys that.

This n8n workflow template politely takes that painful job away from you. It grabs text from a PDF, feeds it to an AI model, formats everything as a structured, SEO-friendly blog post, then ships it straight into Ghost as a draft. You keep the control and editorial voice, the workflow does the boring bits.

If your content marketing stack includes PDFs, Ghost, and a burning desire to automate repetitive tasks, this workflow is about to become your new favorite coworker.

What This n8n PDF-to-Blog Workflow Actually Does

At a high level, the workflow takes a PDF and turns it into a polished, AI-written blog draft that is:

  • Structured with headings, paragraphs, and HTML tags
  • SEO-conscious, with a clean, concise title
  • Formatted as a proper article with intro, body, and conclusion
  • Ready to review as a draft in your Ghost CMS

Behind the scenes, it uses PDF text extraction, an AI language model, and n8n’s logic nodes to move your content from “static document” to “publishable blog post” with minimal manual effort.

Quick Overview Of The Workflow Steps

Here is the journey your PDF goes on, from dusty attachment to shiny blog draft:

  1. Upload PDF and extract readable text
  2. Send that text to an AI model to generate a blog post
  3. Parse the AI output to separate the title and content
  4. Run a conditional check to make sure the result is valid
  5. Publish the draft post to Ghost via the Ghost Admin API

Now let us walk through each step in more detail so you know exactly what is happening and where you can tweak things.

Step 1 – Upload Your PDF And Extract The Text

First, you provide the workflow with a PDF that contains your source content. This could be a report, whitepaper, article, or any other document you want to repurpose as a blog post.

n8n then uses a PDF extraction node that is built to pull out the readable text from the file. This is crucial, because AI models work with text, not with pretty PDF layouts. The node converts your static PDF into editable, analyzable text data that can be passed cleanly into the next step.

No more manual highlighting, copying, and fixing broken line breaks. The node quietly does the unglamorous work for you.

Step 2 – Let AI Turn That Text Into A Blog Post

Once the text is extracted, it is sent straight to an AI language model. This node is configured with a custom prompt that tells the AI exactly what kind of output you want: a structured, SEO-friendly blog post.

The AI responds with a JSON object that includes:

  • A short, SEO-optimized title
  • The full blog post content, formatted with HTML tags

The content is not just a wall of text. The AI structures the article into logical sections, making it easy to read, scan, and edit later inside your CMS.

What The AI Content Creation Node Is Set Up To Do

The AI node is carefully instructed so you get a usable blog post, not a random essay. Its main features include:

  • Generating an engaging title under 10 words to support SEO performance
  • Organizing the article using <h2> headings and <p> paragraphs
  • Including a clear introduction, multiple thematic sections, and a conclusion
  • Using <blockquote> elements when citing or referencing source material from the PDF
  • Maintaining a professional tone with smooth transitions so the post reads naturally

In short, the AI does the first full draft for you, complete with structure and formatting, so you can focus on strategy and editing instead of layout and retyping.

Step 3 – Cleanly Separate The Title And Content

The AI sends back a JSON response that includes both the title and the HTML-formatted blog body. To make that usable for publishing, the workflow runs a code node that:

  • Parses the JSON and extracts the title field
  • Extracts the content field that holds the HTML blog post
  • Cleans the HTML by removing any redundant or unwanted tags
  • Ensures what remains is just the intended blog content

This node also performs validation checks to confirm that both the title and content are present and non-empty. If something looks off, the workflow will not blindly try to publish a broken draft.

Step 4 – Conditional Check Before Publishing

Next, an If node steps in as the responsible adult in the room. It checks whether the extracted title and content are valid and not empty.

  • If the data looks good, the workflow continues to the publishing node.
  • If something is missing or invalid, the workflow routes to a “Do Nothing” node.

The “Do Nothing” node safely ends the workflow without throwing errors or trying to publish incomplete content. It is like a quiet safety net that prevents half-baked drafts from appearing in your CMS.

Step 5 – Publish A Draft Blog Post To Ghost

Once the content passes the validation check, the workflow sends it to Ghost using the Ghost Admin API. The post is created as a draft, not published immediately.

This gives you full control to:

  • Review the AI-generated article
  • Edit the tone, add images, or tweak formatting
  • Optimize internal links or add CTAs
  • Hit “Publish” only when you are happy with the final result

Ghost handles the content management part, while n8n and the template handle the heavy lifting that gets you from PDF to draft in a few automated steps.

Why This PDF-To-Blog Workflow Is Worth Using

If you deal with recurring reports, documentation, or long-form PDFs, this workflow can save you from a lot of repetitive busywork. Key benefits include:

  • Simplified content repurposing – Turn PDFs into structured blog posts without manually copying and reformatting.
  • Automated SEO-friendly content creation – Get titles and structured sections that are easier to optimize for search.
  • Less manual effort in digital publishing – Let automation handle extraction, drafting, and formatting so you can focus on strategy and editing.
  • Easy integration with existing CMS – Works smoothly with Ghost and can fit into broader n8n workflows across your content stack.

Instead of spending hours on mechanical tasks, you can spend minutes reviewing and polishing the drafts that land in your CMS.

How To Get Started With This n8n Template

Ready to retire your copy-paste routine and let automation help with content creation?

  1. Open the n8n template using the link below.
  2. Connect your PDF source and set up the PDF extraction node.
  3. Configure your AI credentials and customize the prompt if needed.
  4. Add your Ghost Admin API details so the workflow can create drafts.
  5. Run a test with a sample PDF and review the resulting draft in Ghost.

Once it is working, you can plug this into your regular content pipeline and start turning reports, whitepapers, and long-form PDFs into ready-to-edit blog posts.

Next Steps And Ideas

After you have this workflow running, you can:

  • Schedule regular PDF imports and automatic blog draft creation
  • Chain additional n8n nodes for tagging, categorizing, or notifying your team
  • Experiment with different AI prompts for varied tone or structure

Start converting those forgotten PDFs into fresh, SEO-optimized blog content today, and let automation handle the repetitive parts that no one will miss.

Building a Slack AI Agent Workflow with n8n

Introduction

Imagine dropping a question into a Slack channel and getting a smart, context-aware reply in seconds, without leaving Slack or copying things into another tool. That is exactly what this n8n Slack AI Agent workflow is all about.

In this guide, we will walk through how this workflow works, what each part does, and how you can set it up yourself in n8n. We will talk about filtering out noisy bot messages, keeping conversation memory, using external APIs for extra knowledge, and sending responses right back into Slack. Think of it as building your own opinionated, slightly sarcastic AI teammate that actually knows what is going on.

What This Slack AI Agent Workflow Actually Does

At a high level, this n8n workflow listens to messages coming from Slack, checks whether they are from a real user, passes valid messages to an AI agent, lets that agent pull in extra knowledge from tools like SerpAPI and Wikipedia, and then posts a tailored response back into the same Slack channel.

Here is what happens behind the scenes, step by step:

  • Slack sends message events to an n8n webhook.
  • The workflow filters out bot messages so it does not talk to itself or loop endlessly.
  • Real user messages are handed off to an AI Agent node.
  • The AI agent uses memory to keep track of past messages in that channel.
  • It can call tools like SerpAPI and Wikipedia to look things up.
  • The final answer is pushed back into Slack via a Slack node.

When You Would Want To Use This

You will probably love this setup if you:

  • Spend a lot of time in Slack and want answers where you already work.
  • Need an AI assistant that remembers the ongoing conversation instead of answering in isolation.
  • Want to give your bot a specific personality, such as Gilfoyle from Silicon Valley, so it is not just another bland chatbot.
  • Care about avoiding weird loops where bots respond to bots endlessly.

It is great for internal Q&A, team support, quick research, or just having a slightly grumpy genius in your Slack channels.

Key Components Of The n8n Workflow

Let us break down the main building blocks inside n8n and how they fit together.

1. Webhook Trigger – Listening To Slack Messages

Everything starts with a Webhook node. This node is the entry point for the workflow. Slack sends a POST request to this webhook every time a message event occurs in your workspace.

Important detail: Slack sends events for all kinds of messages, including those generated by bots. That is why the next step is all about filtering.

2. If Node – Filtering Out Bot Messages

To avoid chaos, the workflow uses an If node labeled “Is user message?”. This node checks the incoming Slack payload for a bot ID.

  • If a bot ID is present, the message is treated as a bot message and is sent to a No Operation node. That effectively ignores it and stops processing.
  • If there is no bot ID, the message is considered a user message and continues to the AI agent.

This simple check prevents recursive loops where your AI might start answering itself or other bots, which can quickly get messy.

3. AI Agent Node – The Brain Of The Workflow

The core of this setup is the AI Agent node. This is where the intelligence and personality live. The node receives the user’s message text and is configured with several important components:

  • System Message: The agent is instructed to behave like Gilfoyle from Silicon Valley. That means blunt, cynical, and very no-nonsense, with sharp and efficient answers. You still get useful information, but with a bit of character.
  • Chat Model: The AI Agent connects to an OpenAI Chat Model node, using gpt-4o-mini as the model. This model processes the prompt, combines it with context and tools, and generates human-like responses.
  • Memory: The agent uses a Simple Memory node. This memory is keyed by Slack channel IDs, so the conversation history is stored per channel. That way, when someone asks a follow-up question, the AI remembers what was said earlier and can respond with context.
  • Tools: The AI Agent is connected to external tools:
    • SerpAPI for web search, so it can pull in fresh, real-time information.
    • Wikipedia for encyclopedic knowledge and quick factual lookups.

    These tools let the agent go beyond what is in the prompt or memory and provide more accurate and up to date answers.

4. Slack Node – Sending The Reply Back

Once the AI Agent has generated a reply, the output is passed to a Slack node. This node is configured with your Slack credentials and posts the response back into the same Slack channel where the message originated.

The result is a smooth, conversational experience. The user types a message, the AI thinks, maybe looks some things up, and then replies directly in the thread or channel, just like a teammate would.

Why This Architecture Works So Well

There are a few reasons this particular setup is so effective for building a Slack AI agent with n8n.

  • Efficient filtering: By checking for bot IDs and routing those messages to a No Operation node, you avoid infinite loops and unnecessary processing. The workflow focuses only on real user input.
  • Context awareness: The Simple Memory node keeps track of previous messages per Slack channel. That means your AI agent can handle multi-turn conversations and follow-up questions without losing the thread.
  • Multi-tool intelligence: With SerpAPI and Wikipedia wired into the AI Agent, your Slack bot is not limited to canned responses. It can search the web and tap into encyclopedic knowledge when needed.
  • Personality built in: Using a Gilfoyle-style system message gives the bot a distinct voice. Interactions feel more engaging and less robotic, which can make people more likely to actually use it.

Step-by-Step: How To Set This Up In n8n

Ready to build this for your own workspace? Here is a straightforward outline of what you need to do.

1. Create And Configure Your Slack App

  • In Slack, create a new app for your workspace.
  • Enable event subscriptions so Slack can send message events to your n8n webhook URL.
  • Select the appropriate events, such as message events in channels or direct messages, depending on your use case.

2. Set Up The Webhook Node In n8n

  • Add a Webhook node to your n8n workflow.
  • Copy the generated webhook URL and paste it into your Slack app’s event subscription settings.
  • Configure the webhook to receive Slack message events and ensure the method is set to POST.

3. Add The If Node To Filter Bot Messages

  • Insert an If node after the Webhook node.
  • Configure it to check the incoming data for a bot ID field.
  • If a bot ID is present, route that branch to a No Operation node so nothing else happens.
  • If no bot ID is found, route the message to the AI Agent node.

4. Configure The AI Agent Node

  • Drop in an AI Agent node and connect it to the user message branch of the If node.
  • Set the System Message to define the bot’s personality, for example, behaving like Gilfoyle: blunt, cynical, and highly efficient.
  • Connect the AI Agent to an OpenAI Chat Model node and select gpt-4o-mini as the model.
  • Attach a Simple Memory node and configure it so that conversation history is stored using Slack channel IDs as keys.
  • Link the AI Agent to SerpAPI and Wikipedia nodes so it can call those tools for web search and reference data when needed.

5. Add The Slack Response Node

  • Place a Slack node after the AI Agent node.
  • Configure it with your Slack credentials or OAuth token.
  • Set it to post the AI’s response back into the correct Slack channel, using the channel information from the original event.
  • Optionally, reply in a thread if you want to keep conversations tidy.

6. Test, Refine, And Personalize

  • Send a few test messages in Slack and watch the workflow run in n8n.
  • Adjust the system prompt if you want the AI to be more or less sarcastic, more formal, or tailored to your team culture.
  • Tweak AI parameters or tool settings if you want shorter, longer, or more detailed answers.

Why This Makes Your Life Easier

Once this is running, you no longer have to switch tools, copy questions into separate AI apps, or explain the same context over and over. Your AI agent lives inside Slack, remembers what was said, and can look things up when needed.

It can act as a smart assistant, an automated responder for common internal questions, or a team bot with a bit of attitude. You get automation, context, and personality, all in one workflow.

Conclusion

This n8n workflow template is a practical example of how to connect Slack with an AI agent that:

  • Filters out bot messages to avoid loops.
  • Uses memory to keep conversations coherent across multiple messages.
  • Calls external tools like SerpAPI and Wikipedia for richer, more accurate answers.
  • Responds with a distinct personality instead of sounding generic.

If you have been wanting a Slack bot that feels more like a smart coworker than a basic script, this architecture gives you a solid foundation to build on.

Try The Template Yourself

Ready to spin this up in your own workspace? You do not have to start from scratch.

Use the existing n8n workflow template, then tweak the AI’s personality, swap tools in or out, and adapt it to your team’s needs. Whether you want a friendly assistant, a brutally honest DevOps guru, or something in between, you can shape it to match your style.

Efficient E-commerce Order Management Automation

Efficient E-commerce Order Management Automation

Why Automate Your E-commerce Orders in n8n?

If you run an online store, you already know how many tiny steps live inside a single order. A customer hits “buy”, and suddenly you are juggling payment checks, inventory, shipping, and status updates. Miss one step and you risk delays, angry emails, or manual cleanup.

This is exactly where an automated n8n workflow template shines. It takes that entire order journey – from the moment an order comes in to the point where tracking details are confirmed – and handles it for you in a clean, reliable flow.

Instead of manually checking payments or updating systems, this template keeps everything in sync behind the scenes so you can focus on growing your store, not babysitting orders.

What This n8n Order Management Template Actually Does

In simple terms, this workflow listens for new orders, creates an order record in your backend (like Bubble.io), checks payment and inventory in parallel, and if everything looks good, triggers shipment and updates the order with tracking details.

Here is the high-level flow:

  • Receive a new order event through a webhook
  • Create a persistent order record in your backend
  • Run payment processing and inventory checks at the same time
  • Validate both results with IF nodes
  • Generate a shipment tracking number when all checks pass
  • Update the order with payment status, fulfillment status, and tracking info
  • Send a final confirmation response back to the caller

Everything is handled by n8n, using a series of connected nodes that you can customize to your own tools and APIs.

When Should You Use This Template?

This order automation workflow is perfect if you:

  • Sell through a website or app and want orders processed automatically
  • Use services like Bubble.io or a similar backend to store order data
  • Rely on a payment gateway API and a separate inventory system
  • Want to avoid manually verifying payments or stock before shipping
  • Need a scalable order management process that can handle more volume without extra staff

If any of that sounds familiar, this n8n template will save you time, reduce mistakes, and give your customers faster, clearer updates.

Step-by-Step: How the Workflow Runs in n8n

1. Webhook: Catching the New Order Event

Everything starts with a webhook node. This node listens for new order events from your website or app. Whenever a customer places an order, that system sends the order data to this webhook URL.

The webhook captures all the essentials, such as:

  • Order ID
  • Customer name
  • Items ordered
  • Total amount
  • Payment status (usually set to pending at this point)

Once the webhook receives this payload, the workflow kicks off automatically. No manual clicks, no extra steps.

2. Creating the Order Record in Your Backend

Next, the workflow takes that incoming order data and sends it to your backend system. In this template, it is designed to work with a Bubble.io application, but the same idea works with similar backends too.

n8n uses an HTTP or app-specific node to:

  • Create a new order record in your database
  • Store all relevant details for future tracking and reporting

This gives you a persistent, central record of the order that everything else can reference, instead of relying only on the initial request.

3. Running Payment and Inventory Checks in Parallel

Once the order record exists, the workflow branches into two paths that run at the same time. This is one of the big efficiency wins of this template.

  • Payment gateway API call

    The workflow sends the payment details to your external payment gateway. This could be any payment provider that exposes an API.

    The goal here is to process the transaction and get a clear success or failure response.

  • Inventory availability check

    At the same time, another node calls your inventory service to confirm that all ordered items are in stock.

    This step helps you avoid processing payments for items you cannot actually ship.

By running these checks concurrently instead of one after another, you cut down on total processing time and make your order flow feel much snappier.

4. Validating Payment and Stock With IF Nodes

Once both APIs respond, the workflow uses two IF nodes to validate what came back.

  • Payment success check

    This IF node looks at the payment gateway response and checks whether the payment was successful. If the status indicates failure or an error, the workflow:

    • Stops further processing
    • Returns a payment error message to the original caller
  • Inventory availability check

    The second IF node verifies that all ordered items are in stock. If the inventory service reports insufficient stock, the workflow:

    • Halts the process
    • Sends back an inventory error response

Only when both checks pass does the order move on to shipping. This double validation is what keeps your system accurate and your customers happy.

5. Merging Results and Requesting Shipment

When everything looks good, the workflow merges the successful payment and inventory results. With both pieces of information confirmed, it is safe to proceed to fulfillment.

At this point, n8n calls your shipping provider to generate a tracking number. That might be via a shipping API or a logistics platform you already use.

The response usually includes:

  • A tracking number
  • Any additional shipment details provided by the carrier

This tracking info becomes part of your order record so you and your customer can follow the shipment.

6. Updating the Order and Sending Final Confirmation

With payment confirmed, stock verified, and tracking created, the workflow updates the original order record in your backend.

Typical updates include:

  • Setting the payment status to paid
  • Marking the fulfillment status as processing
  • Saving the tracking number from the shipping provider

After this update, the workflow retrieves the fresh version of the order data and sends a final success response back to the original caller. That can then be used to:

  • Show an order confirmation screen
  • Trigger a confirmation email or notification
  • Update your internal dashboards

The whole journey from “order placed” to “order confirmed with tracking” is handled automatically by n8n.

Why This n8n Automation Makes Your Life Easier

Faster Processing With Parallel Calls

Because payment and inventory checks run at the same time, you are not waiting on one to finish before starting the other. That parallel processing cuts down on overall order handling time and makes your e-commerce flow feel more responsive.

Fewer Mistakes, More Reliable Orders

The workflow uses multiple validation steps so orders only move forward when payment is successful and stock is available. This reduces:

  • Accidental shipments without payment
  • Orders confirmed for items that are out of stock
  • Manual corrections and follow-up messages

Happier Customers With Clear Status and Tracking

Customers love quick confirmations and tracking links. Since this template updates payment status, fulfillment status, and tracking automatically, you can send accurate information right away, which builds trust and reduces support tickets.

Scales Easily As Your Store Grows

Whether you are handling a handful of orders or hundreds per day, the same automated flow works. Because the process is handled by n8n with minimal manual intervention, you can scale up without immediately needing extra staff to manage orders.

Ready To Try This n8n Order Management Template?

Automating your e-commerce order management flow is one of those upgrades that quickly pays off. You get fewer errors, faster responses, and a smoother experience for both you and your customers.

If you are using n8n or thinking about it, this template gives you a solid, production-ready starting point that you can tweak for your own stack, APIs, and business rules.

Want to see the actual workflow and start using it?

Automate Emelia Reply Notifications with N8N Workflow

Automate Emelia Reply Notifications with an n8n Workflow

Overview

This guide describes a ready-to-use n8n workflow template that automatically sends notifications whenever a contact replies to an Emelia email campaign. The workflow connects Emelia with Mattermost and Gmail so that your team receives real-time alerts in chat and by email without manual monitoring of campaign replies.

The automation is built around an Emelia reply webhook trigger and two notification nodes, and is suitable for teams that already use Emelia for outbound campaigns and want reliable, low-latency reply tracking.

Architecture & Data Flow

At a high level, the workflow follows this event-driven pattern:

  1. Emelia Reply Trigger (Webhook)
    • Listens for replied events from a specific Emelia campaign.
    • Receives reply metadata, including contact details such as first name and company.
  2. Mattermost Notification
    • Posts a formatted message into a predefined Mattermost channel.
    • Uses dynamic fields from the trigger payload to personalize the message.
  3. Gmail Notification
    • Sends an email notification to an administrator or shared inbox.
    • Includes reply information so the email team can follow up quickly.

Once deployed, the workflow runs continuously in n8n. No polling is required, since Emelia pushes reply events directly to the n8n webhook URL.

Prerequisites

  • An active Emelia account with at least one email campaign configured.
  • An n8n instance (self-hosted or cloud) with access to the public internet.
  • A Mattermost workspace and channel where notifications will be posted.
  • A Gmail account (or Google Workspace account) for sending admin notifications.

For details on authentication and available parameters, refer to the official documentation:

Node-by-Node Breakdown

1. Emelia Reply Trigger Node

The Emelia reply trigger is implemented as a webhook endpoint in n8n that is called whenever a contact replies to a specific campaign. This node is responsible for:

  • Listening for replied events associated with a configured campaignId.
  • Extracting key fields from the incoming payload, such as:
    • Contact first name
    • Contact company
    • Any additional reply metadata provided by Emelia
  • Passing the structured data to downstream nodes in the workflow.

Key Configuration Parameters

  • Event Type: Set to a reply-related event, typically replied.
  • Campaign Identifier:
    • campaignId must match the campaign in Emelia that you want to monitor.
    • Only replies from this specific campaign will trigger the workflow.
  • Webhook URL:
    • Generated by n8n when you create the workflow.
    • Configured in Emelia so reply events are sent to this URL.

Behavior & Edge Considerations

  • If the campaignId does not match, no trigger will occur for that campaign’s replies.
  • If Emelia sends a reply event with missing optional fields (for example, company not set), those values may be empty in subsequent nodes. Template your messages to handle missing data gracefully.
  • Network or connectivity issues between Emelia and n8n can prevent the webhook from firing. Check your n8n logs and Emelia webhook configuration if no events are received.

2. Mattermost Notification Node

After the trigger fires, the next node posts a real-time notification into a chosen Mattermost channel. This ensures the team can see and act on replies without leaving their chat environment.

Core Responsibilities

  • Receive the data payload from the Emelia trigger node.
  • Compose a message that includes:
    • The contact’s first name.
    • The contact’s company.
    • Any other relevant reply context available from the trigger.
  • Send the message to a specific Mattermost channel using the configured credentials.

Essential Configuration

  • Mattermost Credentials:
    • Configured in n8n under credentials (for example, personal access token or bot account, depending on how your Mattermost integration is set up).
    • Must have permission to post messages to the target channel.
  • Channel:
    • Set the channel name or ID where notifications should appear.
    • Ensure the channel is accessible to the configured Mattermost user or bot.
  • Message Template:
    • Use n8n expressions to reference fields from the Emelia payload, such as:
      • {{$json["firstName"]}}
      • {{$json["company"]}}
    • Include a short description of the event, for example, that a contact replied to a specific campaign.

Error Handling Notes

  • If Mattermost credentials are invalid or permissions are insufficient, the node will fail and the message will not be posted.
  • Consider configuring workflow error handling or retries in n8n if you expect transient connectivity issues.
  • Message formatting should be robust to missing optional fields. For example, avoid relying on company if it is not always present.

3. Gmail Notification Node

In parallel with the Mattermost alert, the workflow also sends an email notification through Gmail. This is intended for administrators or an email operations team that prefers to track replies directly from their inbox.

Core Responsibilities

  • Build an email that summarizes the reply event.
  • Include dynamic data from the Emelia trigger, such as:
    • Contact name
    • Company
    • Any other reply details you choose to map
  • Send the email to a configured admin address using Gmail credentials.

Essential Configuration

  • Gmail Credentials:
    • Configured in n8n as a Gmail or Google account connection.
    • Must be authorized to send emails from the selected account.
  • Recipient Address:
    • Set to an admin email, shared inbox, or distribution list that should receive reply alerts.
  • Subject and Body Templates:
    • Use n8n expressions to insert data from the Emelia trigger, similar to the Mattermost node.
    • Example elements to include:
      • Campaign identifier
      • Contact first name and company
      • Short indication that the contact has replied

Behavior & Reliability

  • If Gmail rate limits or authentication issues occur, the node may fail and the admin email will not be sent.
  • Ensure that the sending account complies with your organization’s email policies to avoid deliverability issues.
  • For critical notifications, you can monitor n8n execution logs to confirm that emails are being sent as expected.

Configuration Notes

Connecting Emelia to n8n

  • In Emelia, configure the webhook or reply callback URL to point to the webhook URL generated by the Emelia reply trigger node in n8n.
  • Ensure the campaignId in your n8n workflow matches the campaign configured in Emelia.
  • Test the connection by sending a test reply to the campaign and verifying that the workflow executes in n8n.

Securing Your Integrations

  • Store Emelia, Mattermost, and Gmail credentials securely using n8n’s built-in credentials manager.
  • Restrict access to the workflow and credentials to authorized users only.
  • Review permission scopes for each integration so that they are limited to what is required for notifications.

Advanced Customization Ideas

The base template focuses on a straightforward, three-node pipeline. You can extend it in n8n to fit more complex operational needs while preserving the original logic.

  • Additional Filters
    • Add conditional logic to handle replies differently based on contact attributes or campaign segments.
  • Enriched Notifications
    • Include more fields from the Emelia payload in Mattermost and Gmail messages to give your team more context.
  • Multi-channel Routing
    • While this template uses Mattermost and Gmail, you can easily add more nodes to push notifications to other systems supported by n8n.

Benefits of This n8n – Emelia Workflow

  • Efficiency
    • Automates reply tracking and removes the need to manually check Emelia for responses.
  • Real-time Team Alerts
    • Mattermost notifications keep your team informed the moment a contact replies.
  • Centralized Email Communication
    • Gmail notifications ensure that important replies are visible in the inboxes your team already uses.

Get Started

To implement this automation in your environment, import and configure the template in your n8n instance, then connect it to your Emelia campaign, Mattermost workspace, and Gmail account.

For in-depth configuration details and credential setup, consult the official documentation:

Once everything is in place, every reply to your Emelia campaign will automatically trigger the workflow, send a Mattermost message, and dispatch a Gmail notification so your team never misses a response.

AI Facebook Ad Spy Tool: How to Automate Facebook Ad Analysis

AI Facebook Ad Spy Tool: How to Automate Facebook Ad Analysis in n8n

What You Will Learn

In this tutorial-style guide, you will learn how to use an AI-powered Facebook Ad Spy Tool built on n8n to automatically:

  • Scrape active Facebook ads with the Apify Facebook Ad Library Scraper
  • Filter ads by page popularity to focus on strong competitors
  • Analyze video, image, and text creatives with Google Gemini and OpenAI models
  • Summarize and rewrite ad copy for strategic insights
  • Store all results in Google Sheets for easy tracking and comparison

By the end, you will understand how each part of the workflow works, how the branches for different media types are structured, and how to customize the template for your own ad research.

Concept Overview: How the Automation Works

The workflow is an end-to-end automation pipeline that turns raw Facebook ads into structured insights using n8n. It connects several tools and services:

  • Apify Facebook Ad Library Scraper to collect active ads
  • Google Gemini to deeply analyze video content
  • OpenAI GPT-4.1 and GPT-4o to summarize and rewrite ad copy and image descriptions
  • Google Drive for stable video hosting during analysis
  • Google Sheets as a central database for all processed ads

The workflow runs in several stages:

  1. Trigger & scraping of Facebook ads
  2. Filtering by page popularity (likes)
  3. Routing ads based on media type (video, image, text-only)
  4. Separate processing paths for each media type with AI analysis
  5. Saving structured outputs into Google Sheets
  6. Applying wait nodes to respect API rate limits

Step 1 – Triggering the Workflow and Scraping Ads

1.1 Starting the Workflow

The workflow can be started either:

  • Manually from the n8n editor, or
  • Programmatically through an n8n trigger or external call

Once triggered, the first key node is the “Run Ad Library Scraper” node that connects to Apify.

1.2 Running the Apify Facebook Ad Library Scraper

The “Run Ad Library Scraper” node sends an API request to Apify to fetch active Facebook ads that match your criteria. In the template, it is configured to:

  • Search for ads containing the keyword phrase “ai automation”
  • Limit the number of ads to up to 200
  • Filter by country and date as set in the node parameters

This gives you a batch of current ads related to AI automation that you can then analyze in detail.

Step 2 – Filtering Ads by Page Popularity

Not all ads are equally valuable for competitive research. To focus on more influential advertisers, the workflow includes a filtering step.

2.1 Using the Likes Threshold

After scraping, the ads pass through a node that checks the number of page likes for each advertiser. The template uses a condition such as:

  • Include only ads from pages with more than 1000 likes

This helps you concentrate on brands that already have some traction, which usually means more polished and better-tested ad creatives.

Step 3 – Routing by Media Type in n8n

Once the relevant ads are filtered, the workflow needs to handle different creative formats differently. Video ads require a different analysis pipeline than image or text-only ads.

3.1 The Media Type Switch Node

A Switch node in n8n checks the media type of each ad creative and routes it into one of three branches:

  • Video ads branch
  • Image ads branch
  • Text-only ads branch

From this point, each branch has its own set of nodes tailored to that media type, but all of them eventually send structured results to Google Sheets.

Step 4 – Processing Video Ads with Gemini and GPT-4.1

Video ads carry a lot of information: visuals, motion, scenes, and sometimes voiceover or on-screen text. This branch uses Google Drive, Google Gemini, and OpenAI to extract and refine that information.

4.1 Downloading and Uploading the Video

For each video ad:

  • The workflow downloads the SD video file from the ad snapshot URL provided by the scraper.
  • The file is then uploaded to Google Drive. This creates a stable hosting location that can be used for further processing.

4.2 Preparing the Video for Gemini Analysis

To analyze the video content using Google Gemini, the workflow performs a few technical steps:

  • It starts a resumable upload session with Gemini so that the video can be uploaded reliably.
  • The video is re-downloaded from Google Drive to verify integrity before sending it to Gemini.
  • The verified video data is then uploaded to Gemini for analysis.

4.3 Getting a Detailed Video Description from Gemini

After the upload is complete, the workflow waits for Gemini to finish processing. Once done, Gemini returns an extremely detailed description of the video content, which may include:

  • Scenes and visual elements
  • On-screen text
  • Objects, people, and actions
  • Overall context and themes

4.4 Summarizing and Rewriting Video Ads with GPT-4.1

The next step is to combine:

  • The original scraper data for the ad, and
  • The Gemini video description

These are passed into an OpenAI GPT-4.1 node with a custom prompt. GPT-4.1 is used to:

  • Create a structured, human-readable summary of the ad
  • Generate a rewritten version of the ad copy that is optimized for strategic analysis and inspiration

4.5 Saving Video Ad Results to Google Sheets

The workflow then writes the processed data to a Google Sheet, including:

  • Ad summary
  • Rewritten ad copy
  • Video-related prompts or descriptions
  • Relevant metadata from the scraper
  • A label such as “Type = Video” for easy filtering

A short Wait node is included to pace requests and help you stay within API rate limits.

Step 5 – Processing Image Ads with GPT-4o and GPT-4.1

Image ads focus heavily on visual design and layout. This branch uses image analysis and text generation to understand and reframe these creatives.

5.1 Analyzing the Image with GPT-4o

For each image ad:

  • The workflow takes the image URL from the ad snapshot.
  • An AI model, such as GPT-4o, is used to analyze this image in detail.

The model produces a rich description that can include:

  • Visual elements, colors, and layout
  • Text shown in the image
  • Branding and design style
  • Overall message conveyed by the visuals

5.2 Creating a Summary and New Copy with GPT-4.1

The detailed image description, together with the original scraper data, is then sent to another GPT-4.1 node. This node is responsible for:

  • Producing a clear, structured summary of the ad
  • Generating a more engaging or “spirited” rewritten ad copy for strategic insight

5.3 Storing Image Ad Insights in Google Sheets

As in the video branch, the results are appended to your Google Sheets archive, including:

  • Summary
  • Rewritten copy
  • Image-related outputs
  • Metadata from the original ad
  • A classification such as “Type = Image”

A wait step is also included to maintain a safe pace and avoid hitting API limits.

Step 6 – Processing Text-Only Ads with GPT-4.1

Some ads contain only text, with no images or videos. These are handled in a simpler, more direct branch.

6.1 Sending Text Ads Directly to GPT-4.1

For text-only creatives:

  • The workflow takes the scraped text content from the ad.
  • This content is passed directly to a GPT-4.1 node.

The model is prompted to:

  • Summarize the core message of the ad
  • Rewrite the ad copy in a clear, strategic way

6.2 Logging Text Ad Results

The outputs are then stored in Google Sheets, similar to the other branches, with:

  • Summary
  • Rewritten text
  • Relevant metadata
  • A tag such as “Type = Text”

Wait nodes manage the cadence to stay within API quotas.

Step 7 – Configuration and Setup in n8n

To get this n8n template working in your own environment, you need to configure a few keys and IDs.

7.1 Connecting the Scraper (Apify)

  • Open the “Run Ad Library Scraper” node in n8n.
  • Add your Apify API key so the node can authenticate and perform scraping.
  • Adjust the search keyword, country, and date filters if needed.

7.2 Adjusting the Popularity Filter

  • Locate the “Filter For Likes” node.
  • Set your preferred likes threshold (for example, keep the “more than 1000 likes” condition or set a different value).

7.3 Setting Up Google Gemini for Video

  • In the nodes such as “Begin Gemini Upload Session”, “Upload Video to Gemini”, and “Analyze Video with Gemini”, enter your Gemini API keys.
  • Confirm that the project and region settings match your Google Cloud configuration.

7.4 Configuring OpenAI Prompts

  • Open each OpenAI node that uses GPT-4.1 or GPT-4o.
  • Insert your OpenAI API key if required by your n8n credentials setup.
  • Customize the prompt text to match your preferred tone, level of detail, or strategic focus.

7.5 Connecting Google Sheets

  • In the Google Sheets nodes, replace the default document ID and sheet ID with your own.
  • Confirm that the column mapping matches the fields you want to store, such as summary, rewritten copy, media type, and metadata.

7.6 Respecting API Rate Limits

  • Keep the built-in Wait nodes in place to avoid hitting rate limits for Apify, Gemini, OpenAI, or Google APIs.
  • If you increase the number of ads processed, consider extending the wait durations.

Why Use This AI Facebook Ad Spy Workflow

This automated system provides several practical benefits for marketers, agencies, and growth teams.

  • Time savings – It replaces manual competitor ad research with a repeatable n8n workflow.
  • High-quality insights – AI-generated summaries and rewrites help you quickly understand what competitors are testing.
  • Multi-media coverage – It handles video, image, and text ads using specialized AI models for each format.
  • Centralized intelligence – All processed ads are stored in a single Google Sheet that you can sort, filter, and reference later.

Quick Recap

Here is a short recap of how the AI Facebook Ad Spy Tool works in n8n:

  1. Trigger the workflow and run the Apify Facebook Ad Library Scraper.
  2. Filter ads by page likes to focus on stronger competitors.
  3. Use a Switch node to route ads by media type: video, image, or text-only.
  4. For video ads, download, upload to Google Drive, analyze with Gemini, then summarize and rewrite with GPT-4.1.
  5. For image ads, analyze the image URL with GPT-4o, then summarize and rewrite with GPT-4.1.
  6. For text-only ads, send the text directly to GPT-4.1 for summarization and rewriting.
  7. Store all outputs in Google Sheets with a clear “Type” label and use wait nodes to respect rate limits.

FAQ

Can I change the keyword from “ai automation” to something else?

Yes. In the “Run Ad Library Scraper” node, you can replace the keyword phrase with any term relevant to your niche or industry.

What if I want to track more than 200 ads?

You can increase the limit in the scraper configuration, but you may need to:

  • Extend the wait times between requests
  • Monitor your API quotas for Apify, Gemini, OpenAI, and Google services

Can I use a different storage system instead of Google Sheets?

The template is built around Google Sheets for simplicity, but in n8n you can easily swap or add other destinations, such as databases, Airtable, or CSV files, by adding or replacing nodes.

Is this tool only for agencies?

No. It is useful for anyone running Facebook ads, including solo marketers, in-house teams, and agencies that want a structured way to track competitor creatives and messaging.

Get Started With the Template

If you manage advertising strategy or run an agency, this AI Facebook Ad Spy Tool can significantly speed up your competitive research. Prepare your API keys, plug them into the nodes, customize the prompts and filters, and you will quickly start building a rich library of analyzed ads from your market.

Happy building and optimizing your digital ad intelligence!

AI Facebook Ad Spy Tool Explained: Automate Ad Analysis

AI Facebook Ad Spy Tool Explained: Automate Ad Analysis

The Marketer Who Was Tired Of Guessing

By the time Emma opened her laptop each morning, her competitors were already in her feed.

Emma ran a small but fast-growing performance marketing agency that specialized in AI tools and automation services. Her clients expected her to know which Facebook ads were working in their niche, what angles competitors were using, and which creatives were actually driving conversions.

She knew the answer was hidden in the Facebook Ad Library. The problem was time.

Every week she would:

  • Manually search the Facebook Ad Library for keywords like “ai automation”
  • Screenshot or copy-paste interesting ads into a Google Sheet
  • Try to categorize them by type: video, image, or text
  • Write her own summaries and insights for each ad

It was slow, repetitive, and easy to miss important patterns. Worse, she knew she was only scratching the surface. Hundreds of ads went unseen, and she had no systematic way to turn them into a real competitive intelligence database.

One evening, while browsing automation communities, she stumbled across something that made her stop scrolling.

A template called “AI Facebook Ad Spy Tool” built in n8n.

Discovering an Automated Ad Intelligence Engine

The description sounded almost too good to be true. An AI Facebook Ad Spy Tool that could scrape, analyze, and archive Facebook ads automatically, using:

  • The Facebook Ad Library API for data collection
  • Google Gemini and OpenAI GPT-4 models for analysis and rewriting
  • Google Sheets as a central database for ad intelligence

It promised exactly what Emma needed: a way to turn raw Facebook ads into structured, searchable insights without spending her entire week in the Ad Library.

Curious, she imported the n8n template into her workspace. That is when the story of her ad research workflow changed.

First Run: Watching The Workflow Come Alive

Emma started simple. She adjusted the template to focus on her favorite niche: AI automation tools in the US market. Then she hit the manual execute button in n8n.

That single click triggered the entire workflow.

The Trigger That Started It All

The workflow began with a manual execution trigger. No schedules yet, no fancy triggers, just a clean, controlled run so she could see what was happening at each step.

Immediately after execution, the first node kicked in: Run Ad Library Scraper.

Scraping Facebook Ads With Precision

The scraper used the Facebook Ads Library API to retrieve active ads that matched Emma’s criteria. In the example setup included in the template, it was configured to:

  • Search for ads containing the exact phrase “ai automation”
  • Limit results to the United States
  • Look back over the last 7 days
  • Fetch up to 200 ads
  • Include active statuses and detailed ad information

Within seconds, Emma watched n8n pull in a stream of ads that she would previously have spent hours trying to collect. But the workflow did not stop there.

Raising The Bar: Filtering And Sorting What Matters

Emma knew not all ads are created equal. Some come from brand new pages with no traction, others from established advertisers with real budgets behind them. The template had already thought of that.

Filtering For Credible Advertisers

The next node in the chain was called Filter For Likes. Its job was simple but powerful: only allow ads from pages with more than a certain number of likes to pass through.

By default, the template used a threshold of 1000 likes. That meant Emma would only analyze ads from pages with a real audience and some level of credibility.

She realized she could adjust this number later if she wanted to tighten or relax the filter, but for now, the default made sense. Less noise, more signal.

Sorting Ads By Content Type

Once the weaker pages were filtered out, the remaining ads moved into a Switch node. This is where the workflow began to feel truly intelligent.

The Switch node categorized each ad into one of three main types:

  • Video Ads
  • Image Ads
  • Text Ads

Each category followed its own tailored analysis path, optimized for that specific media type. Emma liked that the workflow did not treat all ads the same. A video needed different handling than a text-only ad, and this template respected that.

The Turning Point: AI Takes Over The Heavy Lifting

As the workflow branched into its three paths, Emma watched in real time as AI models began transforming raw ad data into something far more valuable.

When Video Ads Became Structured Insights

Video ads were always Emma’s biggest headache. Downloading them, hosting them, and then trying to explain what was happening in each one was tedious. The template automated the entire chain.

For Video Ads, the workflow executed a series of steps:

  1. Download Video – The video URL from the Facebook Ad Library was downloaded locally using the Download Video node.
  2. Upload To Google Drive – The video file was uploaded to Google Drive, giving Emma a stable, shareable link for her team and clients.
  3. Prepare Gemini Upload Session – A Gemini API upload session was initiated. The video was then redownloaded and uploaded to the Google Gemini AI platform.
  4. Wait For Processing – The workflow included a short waiting period to give Gemini time to process the video.
  5. AI Video Analysis – Gemini analyzed the video content and produced a detailed description of what was happening, what objects were visible, and the overall context of the ad.
  6. Strategic Summary With GPT-4.1 – The video metadata and Gemini’s description were then passed to OpenAI’s GPT-4.1. GPT generated a comprehensive summary of the ad and rewrote the copy with a focus on strategic intelligence, positioning, and angles.
  7. Append To Google Sheets – All enriched data, including links, descriptions, summaries, and rewritten copy, was appended to a Google Sheet. This became Emma’s growing ad intelligence database.
  8. Rate Limit Handling – Waiting nodes were built into the workflow to avoid hitting API rate limits and to keep everything running smoothly.

For the first time, Emma could see complex video ads broken down into clean, searchable insights without watching each video herself.

Image Ads Turned Into Deep Visual Intelligence

Next, Emma followed the path for Image Ads. These were often the backbone of her clients’ campaigns, and she wanted to know exactly what competitors were doing visually.

The workflow handled image ads like this:

  1. Visual Analysis With GPT-4o – Each image was sent to GPT-4o, which excelled at extremely detailed object and context recognition. It could identify elements in the image, infer the mood, and understand the visual strategy.
  2. Strategic Rewrite With GPT-4.1 – The original ad details and GPT-4o’s visual analysis were combined and passed to GPT-4.1. GPT then summarized the ad and rewrote the copy, focusing on key hooks, offers, and angles.
  3. Store Results In Google Sheets – Just like with video ads, the final output was stored in Emma’s connected Google Sheet, building a structured archive of image ad intelligence.
  4. Wait Nodes For Pacing – Waiting nodes were included to space out API calls and prevent any rate limiting.

Instead of just glancing at screenshots, Emma now had AI-generated breakdowns of what each image was communicating and how it was positioned.

Text Ads, Simplified And Enriched

Finally, the workflow handled Text Ads, which were the simplest from a technical standpoint but still valuable for messaging research.

The path for text-only ads was straightforward yet powerful:

  1. Send To GPT-4.1 – The ad text was passed directly to GPT-4.1 for summarization and rewriting.
  2. Save To Google Sheets – The summarized and rewritten copy, along with original details, was added to the same Google Sheet database.
  3. Include Wait Times – The workflow used wait nodes to avoid hitting rate limits during bursts of processing.

Within one run, Emma had a unified, AI-enriched view of video, image, and text ads, all neatly stored in one place.

Customizing The Workflow To Match Her Agency

After seeing the first successful run, Emma realized the template was not just a fixed tool. It was a flexible framework she could adapt to her own processes and branding.

Adding Her Own API Keys

To move from testing to production, she updated the workflow with her own credentials:

  • Facebook Ads Library Scraper API key in the scraper node
  • Google Gemini API key for video analysis
  • OpenAI API key for GPT-4o and GPT-4.1 processing

Once these were in place, the workflow was fully connected to her own accounts and ready for regular use.

Tuning The Filters For Her Niche

The Filter For Likes node became one of her favorite levers. For broader market research, she kept the threshold at 1000 likes. For premium, high-budget campaigns, she experimented with higher thresholds to focus only on the biggest players.

By simply adjusting a number, she could control how strict the workflow was about which ads made it into her intelligence database.

Custom Prompts For On-Brand Insights

The real magic for Emma came from modifying the AI prompts in the OpenAI nodes. She tailored them so that GPT would:

  • Use her agency’s preferred tone and terminology
  • Highlight hooks, offers, and calls to action
  • Identify target audience and positioning
  • Suggest potential test angles for her own campaigns

This meant the summaries and rewrites were not generic. They felt like they were written by a strategist inside her own agency.

Connecting Her Own Google Sheets

Finally, she swapped out the example Google Sheet with her own document and custom sheet tabs. One tab for video ads, one for images, one for text, and another for high-performing patterns she wanted to track over time.

Every time the workflow ran, her sheets updated automatically, turning a static spreadsheet into a living intelligence system.

Life After Automation: The Benefits In Practice

Within a few weeks, Emma’s workflow looked completely different from the painful manual process she started with. The benefits of the AI Facebook Ad Spy Tool became obvious in her day-to-day work.

  • Automation of manual research – She no longer spent hours searching and copying ads. The workflow did the scraping, filtering, and analysis for her.
  • Unified analysis across media types – Video, image, and text ads were all processed within a single n8n workflow, each with its own optimized path.
  • Deep content understanding – State-of-the-art AI models like Google Gemini, GPT-4o, and GPT-4.1 provided rich descriptions, context, and strategic rewrites.
  • Centralized data in Google Sheets – All outputs were stored in one place, ready for reporting, dashboards, or further analysis.
  • Flexible, prompt-driven insights – By editing prompts, Emma could change the style, depth, and focus of the insights without touching the overall workflow logic.

Instead of guessing what competitors were doing, she had a structured, constantly updated view of the market. Her clients noticed the difference in her strategy decks and creative recommendations.

Putting The Template To Work In Your Own n8n Setup

Emma’s story is not unique. Any marketer, founder, or growth-focused team that relies on Facebook ads can use this same n8n template to build a competitive intelligence engine.

To get started in your own environment:

  1. Import the AI Facebook Ad Spy Tool template into n8n.
  2. Add your API keys for the Facebook Ads Library Scraper, Google Gemini, and OpenAI.
  3. Adjust the search keywords, country, and date range in the scraper node to match your niche.
  4. Set your preferred likes threshold in the Filter For Likes node.
  5. Customize the AI prompts in OpenAI nodes to match your tone and strategic needs.
  6. Connect your own Google Sheets document and define the sheet tabs where data should be stored.
  7. Manually execute the workflow for a first test run, then later schedule it if you want regular updates.

Resolution: From Guesswork To Systematic Ad Intelligence

What started as Emma’s frustration with manual research turned into a repeatable, automated system that powered real strategic decisions.

The AI Facebook Ad Spy Tool is more than a simple scraper. It is a sophisticated n8n workflow that:

  • Collects Facebook ads via the Ad Library API
  • Intelligently analyzes each ad by type using Google Gemini and GPT models
  • Rewrites and summarizes ad copy for fresh strategic insights
  • Logs all enriched data in Google Sheets for easy review and analytics

If you want to move from scattered screenshots to a structured competitive intelligence system, this template gives you a head start.

Deploy it in your n8n environment, plug in your keys, refine the prompts, and let automation handle the heavy lifting while you focus on strategy.

Datengetriebene SEO-Optimierung für effektive Content-Verbesserung

Datengetriebene SEO-Optimierung mit n8n: Schritt-für-Schritt zum automatisierten Content-Upgrade

Lernziele: Was du mit diesem n8n-Workflow erreichst

In diesem Artikel lernst du, wie ein n8n-Workflow zur datengetriebenen SEO-Optimierung aufgebaut ist und wie du ihn gezielt einsetzen kannst, um Inhalte systematisch zu verbessern. Nach der Lektüre weißt du:

  • wie der Workflow Artikel automatisch crawlt und Inhalte extrahiert,
  • wie Google Search Console Daten und BigQuery für SEO-Analysen genutzt werden,
  • wie OpenAI im Workflow für KI-gestützte Textoptimierung eingebunden ist,
  • wie Performance-Reports automatisch in Google Sheets erstellt und gespeichert werden,
  • welche Optimierungspotenziale du im Workflow noch ausschöpfen kannst.

Grundkonzept: Datengetriebene SEO mit n8n automatisieren

Der vorgestellte n8n-Workflow ist so aufgebaut, dass er den kompletten Prozess der Content-Optimierung abbildet. Er verbindet Crawling, SEO-Datenanalyse und KI-Textoptimierung in einem automatisierten Ablauf. Die drei Kernbereiche sind:

  • Crawl Article – Artikel automatisch abrufen und Inhalte in ein analysierbares Format bringen,
  • Generate Optimized Report – Inhalte mit Hilfe von OpenAI und Google Search Console Daten optimieren,
  • Generate and Save Performance Report – Performance-Daten über BigQuery abrufen und in Google Sheets speichern.

Der Workflow startet mit einer einfachen Formularabfrage, in der du die zu analysierende URL eingibst. Ab diesem Moment laufen alle weiteren Schritte automatisiert ab.

Schritt 1: Einstieg in den Workflow – URL per Formular erfassen

Am Anfang des n8n-Workflows steht ein Formular-Trigger. Dieser dient als Eingangspunkt für deine SEO-Analyse:

  • Du gibst die URL des Artikels ein, den du optimieren möchtest.
  • n8n nimmt diese URL entgegen und leitet sie an den nächsten Bereich des Workflows weiter.

Diese einfache Eingabe bildet die Grundlage für alle folgenden Schritte, da der gesamte Prozess auf dem konkreten Artikel aufbaut.

Schritt 2: Artikel-Crawling und Datenextraktion in n8n

Im Bereich Crawl Article kümmert sich der Workflow darum, den Inhalt der angegebenen Seite automatisiert zu erfassen und in ein geeignetes Format zu bringen.

2.1 Automatisiertes Crawlen der URL

Der Workflow ruft die eingegebene URL auf und:

  • crawlt den Artikel automatisch,
  • extrahiert den relevanten HTML-Content der Seite,
  • bereitet den Inhalt für weitere Verarbeitungsschritte vor.

2.2 HTML zu Markdown konvertieren

Damit der Inhalt besser analysiert und von der KI verarbeitet werden kann, wird der HTML-Text in Markdown umgewandelt. Das hat mehrere Vorteile:

  • Strukturierte Darstellung von Überschriften, Listen und Absätzen,
  • leichtere Weiterverarbeitung in KI-Modellen,
  • klare Trennung von Layout und Inhalt.

2.3 Statusabfragen und Wartelogik

Da Crawling und Konvertierung etwas Zeit benötigen können, baut der Workflow wiederholte Statusabfragen ein:

  • Der Workflow prüft, ob die Datenerfassung abgeschlossen ist.
  • Er wartet bei Bedarf und fragt den Status erneut ab.
  • Erst wenn die Daten vollständig vorliegen, geht es zum nächsten Schritt.

So wird sichergestellt, dass die nachfolgenden Analysen nur mit vollständigen und korrekt verarbeiteten Inhalten arbeiten.

Schritt 3: KI-gestützte SEO-Optimierung mit OpenAI und Search Console

Im zweiten Hauptbereich Generate Optimized Report nutzt der Workflow eine KI-Komponente (OpenAI), um aus den gesammelten Daten konkrete Optimierungsvorschläge zu erzeugen.

3.1 Kombination von Content und Performance-Daten

Die KI erhält zwei zentrale Informationsquellen:

  • den aktuellen Artikel in Markdown-Form,
  • Performance-Daten aus der Google Search Console, zum Beispiel:
    • Klicks,
    • Impressionen,
    • CTR (Click-Through-Rate),
    • Ranking-Positionen.

Durch diese Kombination kann die Optimierung wirklich datengetrieben erfolgen, da die KI nicht nur den Text, sondern auch das tatsächliche Nutzerverhalten berücksichtigt.

3.2 Welche Ergebnisse erzeugt die KI?

Auf Basis dieser Daten generiert die OpenAI-Komponente:

  • Optimierungsvorschläge für bestehende Textpassagen,
  • neue, verbesserte Titel für den Artikel,
  • optimierte Meta-Beschreibungen,
  • angepasste Textabschnitte, die besser auf Suchintention und Keywords eingehen.

So erhältst du konkrete Vorschläge, wie du:

  • die Klickrate (CTR) erhöhen,
  • die Sichtbarkeit verbessern,
  • und die Relevanz deines Contents für bestimmte Suchanfragen steigern kannst.

Schritt 4: Performance-Datenanalyse mit BigQuery

Um die Entwicklung deiner SEO-Performance besser zu verstehen, nutzt der Workflow im dritten Bereich Generate and Save Performance Report eine BigQuery-Abfrage.

4.1 Vergleich von Zeiträumen

Die BigQuery-Abfrage greift auf historische SEO-Daten zu und vergleicht zum Beispiel:

  • aktuelle 30-Tage-Perioden mit vorherigen 30 Tagen,
  • Entwicklung von Klicks, Impressionen und CTR über die Zeit,
  • Veränderungen bei wichtigen Keywords.

Dadurch erkennst du:

  • welche Keywords an Sichtbarkeit gewinnen,
  • wo Rankings stagnieren oder fallen,
  • wo Optimierung besonders dringend ist.

4.2 Keyword-Performance im Überblick

Ein Beispiel für ausgewertete Keywords könnte so aussehen:

Keyword Klicks Impressionen CTR Position Trend
SEO Optimierung 120 1500 8% 10 Gaining
Google Search Console Daten 90 1400 6.4% 12 Stable
Content Optimierung 75 1300 5.8% 15 Gaining
Keyword Tracking 50 1100 4.5% 20 Declining
CTR Analyse 40 900 4.4% 18 Gaining

Solche Tabellen helfen dir, Prioritäten bei der Optimierung zu setzen und gezielt an Keywords zu arbeiten, die viel Potenzial haben.

Schritt 5: Automatisierte Berichtserstellung in Google Sheets

Damit du die Ergebnisse deiner Analysen jederzeit im Blick hast, speichert der Workflow die Daten automatisch in Google Sheets.

5.1 Reports automatisch generieren

Auf Basis der BigQuery-Ergebnisse erstellt n8n einen Performance-Report und überträgt ihn nach Google Sheets. Das ermöglicht dir:

  • alle wichtigen Kennzahlen an einem zentralen Ort zu sammeln,
  • Verläufe und Trends über längere Zeiträume zu verfolgen,
  • Berichte einfach mit deinem Team zu teilen.

5.2 Entscheidungsgrundlage für langfristige SEO-Strategie

Da die Reports regelmäßig aktualisiert werden können, entsteht eine solide Datengrundlage für:

  • laufende SEO-Maßnahmen,
  • Content-Planung,
  • Priorisierung von Optimierungsprojekten.

Erweiterte Themen: Wie du mehr aus dem Workflow herausholst

Über die Basisfunktionen hinaus deckt der Workflow oder seine Erweiterungen weitere wichtige SEO-Aspekte ab.

Keyword-Tracking

Eine kontinuierliche Überwachung der Keyword-Performance hilft dir, schnell auf Veränderungen im Suchverhalten zu reagieren und Inhalte gezielt anzupassen. So erkennst du frühzeitig, wenn ein wichtiges Keyword an Sichtbarkeit verliert oder neue Chancen entstehen.

Suchintention verstehen

Daten sind nur ein Teil der Wahrheit. Erfolgreiche Optimierung berücksichtigt auch die Suchintention hinter den Anfragen. Der Workflow unterstützt dich dabei, Inhalte so anzupassen, dass sie die Erwartungen der Nutzer besser erfüllen und damit die Nutzererfahrung verbessern.

CTR-Optimierung

Durch die Analyse der Click-Through-Rate (CTR) kannst du gezielt Maßnahmen einleiten, etwa:

  • optimierte Titel,
  • ansprechendere Meta-Beschreibungen,
  • bessere Snippets in den Suchergebnissen.

Das Ziel ist, mehr Klicks aus bestehenden Impressionen zu generieren.

Datenintegration als Basis für Strategie

Die Verknüpfung von Google Search Console, BigQuery und Google Sheets schafft eine starke Grundlage für nachhaltige SEO-Strategien. Du kombinierst:

  • Rohdaten aus der Search Console,
  • skalierbare Analysen mit BigQuery,
  • übersichtliche Darstellung und Reporting in Google Sheets.

Automatisierung mit n8n

Durch automatisierte Workflows in n8n sparst du Zeit und erhöhst die Effizienz bei der datengetriebenen Content-Optimierung. Wiederkehrende Aufgaben wie Crawling, Reporting und Datensynchronisation laufen im Hintergrund, während du dich auf die Umsetzung der Optimierungsvorschläge konzentrierst.

Qualität sichern: Empfehlungen und Optimierungspotenziale im Workflow

Damit dein n8n-Workflow stabil und zuverlässig läuft, solltest du einige Punkte beachten und bei Bedarf optimieren.

Automatisierte SEO-Analyse sinnvoll nutzen

Die Kombination aus Crawling, Performance-Daten und KI ist eine sehr effektive Basis, um Artikel datengetrieben zu optimieren. Achte darauf, die generierten Vorschläge kritisch zu prüfen und an deinen individuellen Content-Stil anzupassen.

Fehlerhandling verbessern

Für einen robusten Betrieb empfiehlt es sich, das Fehlerhandling zu stärken:

  • Prüfe, ob beim Crawling Fehlermeldungen oder Zeitüberschreitungen auftreten können.
  • Plane adaptive Wiederholungen ein, wenn Anfragen scheitern.
  • Richte bei Bedarf Alerts ein, zum Beispiel per E-Mail oder Chat, wenn Teile des Workflows fehlschlagen.

Datenvalidierung sicherstellen

Damit die vorgeschlagenen Optimierungen verlässlich sind, müssen die zugrunde liegenden Daten korrekt sein:

  • Stelle sicher, dass die BigQuery-Daten aktuell sind.
  • Überprüfe, ob alle relevanten Properties der Google Search Console angebunden sind.
  • Vermeide veraltete oder unvollständige Datensätze, um falsche Schlüsse zu verhindern.

Skalierung und Mehrsprachigkeit

Wenn der Workflow erfolgreich läuft, kannst du ihn erweitern:

  • Skaliere auf mehrere URLs parallel, zum Beispiel für ganze Content-Cluster.
  • Ergänze Mehrsprachigkeit, um Inhalte in verschiedenen Sprachen automatisiert zu analysieren und zu optimieren.

Beispielhafte optimierte Textpassagen für deinen Content

Im Rahmen des Workflows können Textpassagen gezielt überarbeitet werden. Hier einige Beispiele, wie ursprüngliche Formulierungen optimiert werden können.

Einführung in datengetriebene SEO-Optimierung

Ursprüngliche Passage:
„Unser Workflow nutzt die Google Search Console Daten, um den Erfolg von Inhalten zu messen und darauf basierende Verbesserungen vorzuschlagen.“

Optimiert:
„Mit der datengetriebenen SEO-Optimierung analysieren wir umfangreiche Performance-Daten aus der Google Search Console, um gezielte Empfehlungen für eine bessere Klickrate und Sichtbarkeit zu geben.“

Artikel-Crawling und Datenextraktion

Ursprüngliche Passage:
„Der Artikel wird automatisch gecrawlt und der HTML-Inhalt in Markdown konvertiert.“

Optimiert:
„Durch automatisiertes Crawlen und präzise HTML-zu-Markdown-Konvertierung erfassen wir den vollständigen Artikelinhalt für eine tiefgehende SEO-Analyse und Optimierung.“

Performance-Datenanalyse mit BigQuery

Ursprüngliche Passage:
„Wir vergleichen aktuelle und vorherige 30-Tage-Perioden, um Trends und Veränderungen bei Keywords zu identifizieren.“

Optimiert:
„Mithilfe von BigQuery analysieren wir detailliert die Performance von Keywords über verschiedene Zeiträume, um steigende oder fallende Sichtbarkeit zu erkennen und entsprechende Optimierungen abzuleiten.“

Automatisierte Berichtserstellung

Ursprüngliche Passage:
„Google Sheets wird verwendet, um Berichte zu erstellen und zu speichern.“

Optimiert:
„Die Integration von Google Sheets ermöglicht das automatisierte Erstellen und Speichern von Performance-Berichten, welche jederzeit für die Auswertung und Entscheidungen bereitstehen.“

KI-gestützte Textoptimierung

Ursprüngliche Passage:
„Die OpenAI-Komponente erzeugt auf Basis der Daten verbesserte Artikeltexte und neue Titel.“

Optimiert:
„Durch den Einsatz von KI wie OpenAI werden datenbasierte Textpassagen erstellt und optimierte Titel generiert, um sowohl Nutzer als auch Suchmaschinen besser anzusprechen.“

SEO-Titelideen für deinen Artikel (max. 60 Zeichen)

  • Datengetriebene SEO-Optimierung – So verbesserst du Artikel
  • SEO-Optimierung basierend auf Google Search Console Daten
  • Artikel verbessern mit datenbasierten SEO-Strategien

How to Build a Bitrix24 Chatbot with Webhook Integration

How to Build a Bitrix24 Chatbot with Webhook Integration in n8n

1. Overview

This guide explains how to implement a Bitrix24 chatbot using an n8n workflow template that relies on Bitrix24 webhook events. The workflow receives incoming POST requests from Bitrix24, validates credentials, routes events based on their type, and sends structured responses back to the Bitrix24 REST API.

The content is organized in a documentation-style format for technical users who want a clear reference to the workflow architecture, node behavior, and configuration details.

2. Workflow Architecture

At a high level, the n8n workflow acts as a webhook-based integration between Bitrix24 and your bot logic:

  • Bitrix24 Handler (Webhook trigger) receives incoming HTTP POST requests from Bitrix24.
  • Credentials Node parses the payload and extracts authentication and routing data.
  • Validate Token Node enforces security by verifying the application token.
  • Route Event Node inspects the event type and dispatches it to the correct processing branch.
  • Process Message / Join / Install / Delete Nodes implement event-specific logic.
  • HTTP Request Nodes interact with the Bitrix24 REST API to send messages or register the bot.
  • Respond to Webhook Nodes return success or error responses to Bitrix24.

The data flows linearly from the Bitrix24 webhook into the handler node, through validation and routing, then branches into specialized processing nodes before returning a final HTTP response.

3. Node-by-Node Breakdown

3.1 Bitrix24 Handler (Webhook Trigger)

The Bitrix24 Handler node is the entry point of the workflow. It is configured as a Webhook trigger node in n8n and is responsible for:

  • Accepting HTTP POST requests sent from Bitrix24.
  • Receiving the full webhook payload, including authentication information, event metadata, and message content.
  • Passing the raw JSON body to downstream nodes without modification.

All subsequent nodes rely on this payload to determine the event type and to construct appropriate responses.

3.2 Credentials Node

The Credentials node processes the incoming payload and extracts the fields required for authentication and API calls. Typical data extracted includes:

  • Application or bot token.
  • Client ID or application identifier.
  • Domain or Bitrix24 portal URL used to target the REST API.

This node usually runs as a Function or Set node in n8n that:

  • Reads specific JSON properties from the webhook body.
  • Assigns them to standardized field names used by later nodes.
  • Ensures that required authentication values are present before continuing.

3.3 Validate Token Node

The Validate Token node ensures that the incoming request originates from a trusted Bitrix24 application. It:

  • Compares the application token from the payload with an expected token or validation rule.
  • Determines if the request is authorized to access the workflow.

If the token is invalid, the node triggers an Error Response branch that:

  • Returns an HTTP 401 Unauthorized status code to Bitrix24.
  • Stops further processing for that request.

If the token is valid, processing continues to the routing logic.

3.4 Route Event Node

The Route Event node examines the event type in the webhook payload and decides which branch of the workflow should handle it. Typical event types include:

  • Message add events when a new message is sent to the bot.
  • Bot join events when the bot is added to a chat.
  • Installation events when the bot application is installed.
  • Deletion events when the bot is removed.

This is usually implemented as a Switch or IF node in n8n that:

  • Reads an event identifier from the incoming JSON.
  • Routes execution to one of the processing nodes:
    • Process Message
    • Process Join
    • Process Install
    • Process Delete

3.5 Process Message Node

The Process Message node is responsible for handling new bot messages. It:

  • Extracts the chat dialog ID from the event payload.
  • Reads the message text sent by the user.
  • Constructs a response message that can be static or based on the user input.

In the template, the response behavior is typically:

  • Sending a greeting such as Hi! I am an example-bot. I repeat what you say.
  • Optionally echoing the user’s message back to them.

The processed data is then passed to an HTTP Request node that calls the Bitrix24 REST API to post the reply back into the chat using the extracted dialog ID.

3.6 Process Join Node

The Process Join node handles events where the bot joins a chat. Its main responsibilities are:

  • Identifying the chat or dialog where the bot was added.
  • Preparing a welcome or greeting message for that chat.

The node passes this prepared message to a corresponding HTTP Request node that:

  • Calls the appropriate Bitrix24 REST endpoint.
  • Sends a greeting message to confirm that the bot is active and available.

3.7 Process Install Node

The Process Install node manages bot installation events. It is used to register the bot with Bitrix24 and configure its visible properties. During this step, the workflow:

  • Calls the Bitrix24 REST API to register the bot.
  • Sets configuration properties such as:
    • Bot name and last name.
    • Bot color.
    • Bot email.
    • Other supported registration parameters as required by the Bitrix24 API.

This logic is executed through an HTTP Request node that uses the domain and token extracted earlier to communicate with the Bitrix24 REST interface.

3.8 Process Delete Node

The Process Delete node is triggered when a bot deletion event is received. In the template:

  • It is currently a no-operation (no-op) node.
  • No additional cleanup logic is performed by default.

You can extend this node later to handle tasks such as:

  • Revoking tokens.
  • Clearing related data in external systems.
  • Logging uninstall events for auditing or analytics.

3.9 HTTP Request Nodes

Multiple HTTP Request nodes are used throughout the workflow to interact with Bitrix24:

  • Sending responses to chat messages.
  • Posting greeting messages when the bot joins a chat.
  • Registering the bot during installation.

These nodes typically:

  • Use the domain and token extracted by the Credentials node.
  • Call the relevant Bitrix24 REST endpoints with the required parameters.
  • Include the dialog ID and message body when sending chat messages.

3.10 Respond to Webhook Nodes

The Respond to Webhook nodes finalize communication with Bitrix24 by returning HTTP responses:

  • Success Response node:
    • Sends a JSON response back to Bitrix24.
    • Indicates that the event was processed successfully.
  • Error Response node:
    • Returns appropriate HTTP status codes, for example 401 on token validation failure.
    • Signals that the event was rejected or could not be processed.

4. Execution Flow

The typical execution sequence for the workflow is:

  1. Bitrix24 sends a POST webhook request to the Bitrix24 Handler node URL.
  2. The Credentials node parses the request payload and extracts:
    • Authentication token.
    • Client ID.
    • Domain or portal URL.
  3. The Validate Token node checks the application token:
    • If invalid, the workflow routes to an Error Response node that returns a 401 Unauthorized response.
    • If valid, processing continues.
  4. The Route Event node inspects the event type (for example, message add, bot join, installation, deletion).
  5. The workflow branches to the corresponding processing node:
    • Process Message:
      • Reads the dialog ID and message text.
      • Builds a reply, such as a greeting or echo of the user message.
    • Process Join:
      • Creates a greeting message for the chat where the bot joined.
    • Process Install:
      • Registers the bot via the Bitrix24 REST API and sets its properties.
    • Process Delete:
      • Currently performs no additional logic but can be extended.
  6. Each processing branch uses one or more HTTP Request nodes to:
    • Call Bitrix24 REST endpoints.
    • Send real-time responses or perform bot registration.
  7. A Success Response node returns a JSON response to Bitrix24 confirming that the event was handled successfully.

5. Configuration Notes

5.1 Webhook Setup in Bitrix24

To use this workflow, configure Bitrix24 to send webhook events to the URL exposed by the Bitrix24 Handler webhook node. Ensure:

  • The HTTP method is set to POST.
  • The payload includes the token, domain, client ID, and event details expected by the Credentials node.

5.2 Token Validation

In the Validate Token node:

  • Define the logic to compare the incoming token with the expected application token.
  • Return a 401 error via the Error Response node if the token does not match.

This step is essential for preventing unauthorized requests from triggering the workflow.

5.3 HTTP Request Node Configuration

For each HTTP Request node that calls the Bitrix24 REST API:

  • Use the domain from the Credentials node to build the base URL.
  • Include the token as required by the Bitrix24 REST endpoints.
  • Pass the dialog ID and message text when sending chat messages.
  • Specify bot properties such as name, last name, color, and email during installation.

5.4 Error Handling Considerations

While the template includes a token validation failure path, you may also:

  • Extend error branches to capture HTTP errors from Bitrix24 REST calls.
  • Log unexpected event types routed through the Route Event node.
  • Handle missing or malformed fields in the incoming payload gracefully.

6. Advanced Customization

6.1 Enhancing Message Processing

The Process Message node currently demonstrates a simple pattern, such as:

  • Replying with a statement like Hi! I am an example-bot. I repeat what you say.
  • Echoing the user’s message back to the chat.

You can extend this logic by:

  • Implementing conditional replies based on keywords or patterns.
  • Adding message context awareness across multiple messages.
  • Integrating with external systems for dynamic data retrieval.

6.2 Integrating AI or External Services

To build a more intelligent Bitrix24 chatbot using this n8n workflow, you can:

  • Insert additional nodes between Process Message and the Bitrix24 HTTP Request nodes that:
    • Call AI APIs to generate natural language responses.
    • Query internal tools or databases for contextual information.
  • Use Function nodes to transform or enrich the message text before sending it back.

6.3 Extending Installation and Deletion Logic

The Process Install and Process Delete nodes can be enhanced to:

  • Register additional bot settings or permissions at install time.
  • Perform cleanup actions, such as removing related records or disabling integrations when the bot is deleted.

7. Start Building Your Bitrix24 Chatbot

This n8n workflow template provides a structured starting point for building a Bitrix24 chatbot with webhook integration. By combining the Bitrix24 Handler, validation, event routing, and HTTP Request nodes, you can automate chat interactions, respond in real time, and integrate your bot with other systems.

Use this template as a foundation, then extend the processing nodes with your own business logic, external integrations, or AI-powered responses to deliver fast, personalized automation inside Bitrix24.

How to Load JSON Data into Google Sheets and CSV

How One Marketer Stopped Copy-Pasting JSON and Let n8n Do the Work

The Night Sara Almost Quit Spreadsheets

Sara stared at her screen, eyes blurring over yet another JSON response from an API. Her job as a marketing operations specialist should have been about strategy and insights, yet her evenings kept disappearing into a maze of copy-pasting data into Google Sheets, cleaning columns, and exporting CSV files for her team.

Every campaign meant the same routine. Pull data from an API, download a file, reformat it, import it into Google Sheets, then export a CSV for reporting and backups. One missed field or a wrong column, and her dashboards broke. She knew there had to be a smarter way to load JSON data into Google Sheets and CSV, but every solution she found seemed too complex or too rigid.

Then one afternoon, while searching for “automate JSON to Google Sheets and CSV,” she stumbled on an n8n workflow template that promised exactly what she needed: a simple way to load JSON data from any API directly into Google Sheets or convert it into a CSV file, all without manual effort.

Discovering the n8n Workflow Template

The template description sounded almost too good to be true. It showed a workflow that would:

  • Fetch JSON data from an API using an HTTP Request node
  • Send that JSON straight into Google Sheets, appending new rows automatically
  • Transform the JSON into a flat structure and generate a CSV file using a Spreadsheet File node

Instead of a vague promise, this was a concrete, working automation. It even used a public RandomUser API as an example so she could see the full flow in action before plugging in her own data.

Sara clicked the template link, imported it into n8n, and decided to test it exactly as it was. If it worked with sample data, she could adapt it to her real API later.

First Run: From Click To Clean Data

The Manual Trigger That Changed Her Routine

The workflow started with something simple: a Manual Trigger node. No schedules, no external events, just a button labeled Execute Workflow.

At first, that felt almost too basic, but as she thought about it, it made sense. She could:

  • Use the manual trigger while testing the workflow
  • Later replace it with an app trigger or schedule trigger when she was ready to automate everything

She hit Execute Workflow and watched the next node light up.

Meeting the HTTP Request Node

The core of the template was an HTTP Request node. It was configured to call the RandomUser API at:

https://randomuser.me/api/

The response came back in JSON format, complete with nested objects. There were fields like name, email, and location, all neatly structured but not exactly spreadsheet friendly. For years, this kind of nested JSON had been the reason she spent hours wrangling data.

In n8n, though, she could see the JSON clearly in the node’s output. This was the raw material the rest of the workflow would use.

Two Paths From One JSON: Sheets And CSV

From the HTTP Request node, the workflow split into two distinct paths. This was where Sara realized the template was not just a demo, but a flexible pattern she could reuse across multiple projects.

Path 1 – Sending JSON Straight To Google Sheets

The first branch flowed into a Google Sheets node. Instead of doing complex transformations, it took the JSON output from the HTTP Request node and mapped it directly into a spreadsheet.

The node was configured to:

  • Append new rows to a specific Google Sheet
  • Use the JSON fields as column values

Since some apps and spreadsheets can handle nested JSON, this direct approach worked surprisingly well. For quick reports or internal tools that understand JSON structures, she could skip the whole flattening process and let the data flow straight in.

All she had to do was:

  • Authorize the Google Sheets node with her account
  • Select the target spreadsheet and worksheet
  • Map the JSON fields to the appropriate columns

Within minutes, fresh user data from the RandomUser API appeared in her sheet. No more downloading files or importing manually.

Path 2 – Flattening JSON And Generating A CSV

The second branch was what really caught her attention. It showed how to take the same JSON response and turn it into a clean CSV file using two nodes working together.

Step 1 – The Set Node As A Data Sculptor

The Set node acted like a sculptor for the JSON. Instead of keeping the original nested structure, it:

  • Extracted only the relevant fields, such as full name, country, and email
  • Combined nested properties into simple strings, for example merging first and last name
  • Created a much flatter, spreadsheet-friendly layout

For Sara, this was the missing piece she had been manually reproducing in spreadsheets for years. Now she could define exactly which fields to keep and how to format them, all inside the workflow.

Step 2 – Spreadsheet File Node For CSV Output

Once the data was flattened, it flowed into the Spreadsheet File node. This node converted the structured data into a downloadable file.

In the template, it was configured to generate a CSV file, ideal for:

  • Sharing data with teammates who preferred CSV
  • Uploading into other analytics tools
  • Archiving snapshots of data for later audits

She also noticed that with a quick settings change, the same node could convert the data into other formats like XLS. That meant the workflow could adapt to whatever her team or tools needed.

Shaping The Template Around Her Own API

After running the template a few times with the RandomUser API, Sara felt confident enough to tailor it to her real use case. The structure was already there, she just had to swap in her own details.

How She Customized The Workflow

Step by step, she adapted the template:

  1. Replaced the Manual Trigger She switched the manual trigger to a schedule trigger so the workflow would run automatically every morning before her team checked their dashboards.
  2. Updated the HTTP Request URL She changed the HTTP Request node to point to her marketing analytics API instead of https://randomuser.me/api/, adjusting any authentication settings as needed.
  3. Remapped the Google Sheets Node She updated the Google Sheets node so that the columns matched her actual reporting structure, mapping each JSON field to the correct column name.
  4. Refined the Set Node Fields In the Set node, she selected the exact fields she wanted in her CSV report, flattening nested objects into clear labels like “campaign_name,” “country,” and “click_through_rate.”
  5. Enabled and Authorized Google Sheets She made sure the Google Sheets node was fully authorized with her Google account and had access to the right spreadsheet.
  6. Removed Unnecessary Parts For one project, she only needed the CSV output, so she disabled the Google Sheets branch. For another, she only needed live data in Sheets and turned off the CSV generation.

The template did not lock her into a single pattern. Instead, it gave her a flexible foundation that she could reshape for each data source and reporting requirement.

The Turning Point: From Manual Drudgery To Reliable Automation

A week later, something quietly remarkable happened. The morning rush of “Did you update the sheet?” messages stopped. Her teammates opened their dashboards and found everything already up to date.

The n8n workflow handled:

  • Fetching JSON from her APIs on a schedule
  • Appending data directly into Google Sheets
  • Generating CSV files for archival and sharing

What used to be an hour or more of manual work each day was now a background process she barely had to think about. If she needed to adjust a field, she changed it in the Set node. If a new API endpoint became available, she updated the HTTP Request node and mappings.

Why This n8n Template Became Her Go-To

Looking back, Sara realized the value of the workflow was not just in saving time, but in making her data process more reliable and scalable.

Key Benefits She Experienced

  • Automated Data Integration No more copying and pasting JSON API data into spreadsheets. The workflow handled the entire extraction and loading process automatically.
  • Flexible Output Options She could push data directly into Google Sheets for live reporting or convert it into CSV files for sharing, backups, or imports into other systems.
  • Simplicity And Extensibility The template was easy to understand and customize. She could plug in different APIs, adjust JSON mappings, and switch formats without rebuilding everything from scratch.

From Overwhelmed To In Control

What started as a desperate search for “how to load JSON data into Google Sheets and CSV” turned into a complete shift in how Sara handled API data. Instead of wrestling with exports and imports, she designed workflows that did the heavy lifting for her.

Now, when a new project comes in, she does not dread the data side. She opens n8n, clones her workflow template, updates a few nodes, and lets automation take over.

If you are tired of repetitive data handling, this n8n workflow template can be your turning point too. Use it to automate the extraction, transformation, and loading of JSON data into Google Sheets or CSV files, whether you need real-time syncs or scheduled exports.

Set it up once, refine it as you go, and reclaim the hours you used to spend on manual work.

Happy automating.