Analyze Screenshots with AI using n8n, URLbox and OpenAI
Automating website screenshot capture and analysis can save hours of manual work. With the right n8n workflow, you can monitor UI changes, extract visual content, and send AI-powered insights directly to Slack or other tools.
This tutorial walks you step by step through an n8n workflow template that:
- Accepts a website URL and name via webhook
- Captures a full-page screenshot with URLbox
- Analyzes the screenshot with OpenAI image tools
- Merges AI insights with website metadata
- Sends a clear summary to Slack
Learning goals
By the end of this guide, you will be able to:
- Explain why automated screenshot analysis is useful for product, QA, and marketing teams
- Understand how n8n, URLbox, and OpenAI work together in a single workflow
- Rebuild or customize the provided n8n workflow template
- Design prompts that extract structured information from screenshots
- Apply basic security, error handling, and scaling best practices
Concepts and tools you will use
Why automate screenshot analysis?
Capturing and checking screenshots by hand is slow and difficult to scale. Automation helps you:
- Monitor visual changes for regressions, broken layouts, or unexpected UI updates
- Extract content such as headlines, CTAs, and key messages from landing pages
- Track competitors by regularly capturing and analyzing their public pages
- Generate reports that summarize what is visible on a set of URLs
With n8n, you can connect multiple services using low-code nodes and add AI image analysis to interpret what is on the page instead of just storing the image.
n8n as the automation backbone
n8n is the platform that orchestrates the entire workflow. In this template it is responsible for:
- Receiving incoming data through a Webhook
- Preparing and transforming data with nodes like Set and Merge
- Calling external APIs such as URLbox and OpenAI using HTTP Request or dedicated nodes
- Sending notifications to Slack
URLbox for screenshot capture
URLbox provides a Screenshot API that renders web pages as images. In this workflow, URLbox:
- Takes the provided URL
- Renders the page
- Returns a screenshot image (for example as a PNG or JPG)
Key capabilities you will use:
- Full-page capture so you see everything, not only the fold
- Viewport configuration to simulate different screen sizes
- Format selection such as
jpgorpng
You will need a URLbox API key, which is passed in the Authorization header of the HTTP request.
OpenAI image analysis
The OpenAI Image Analysis (Vision) model can interpret screenshots and return:
- Natural language descriptions of what is on the page
- Extracted text content using OCR
- Structured insights, for example:
- Main hero headline
- CTA button text
- Brand or logo mentions
By carefully designing your prompt, you can get compact, structured JSON that is easy to use in downstream nodes and notifications.
How the n8n workflow fits together
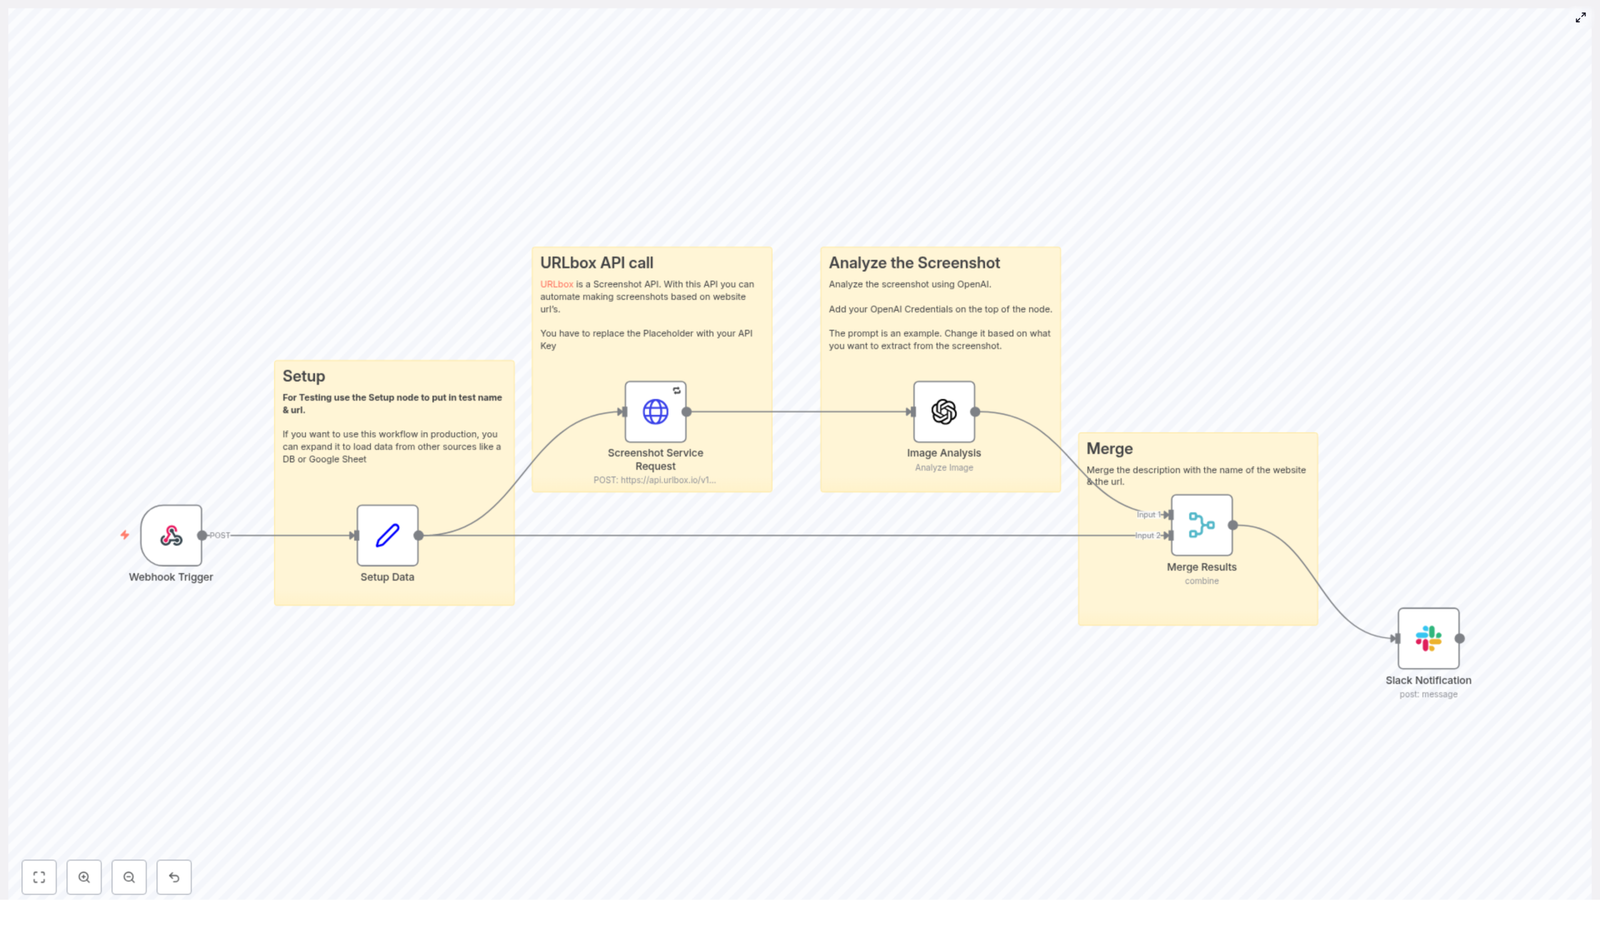
Before we build it step by step, here is the high-level flow of the template:
- Webhook Trigger – Receives a JSON payload with
website_nameandurl. - Set (Setup) Node – Normalizes and prepares these values for the rest of the workflow.
- HTTP Request to URLbox – Captures a full-page screenshot of the URL.
- OpenAI Image Analysis – Analyzes the screenshot and extracts descriptions and key text.
- Merge Node – Combines the website metadata with the AI analysis results.
- Slack Node – Posts a summary and optionally the screenshot to a Slack channel.
Next, you will walk through each step in detail so you can recreate or modify the workflow in your own n8n instance.
Step-by-step: Building the screenshot analysis workflow in n8n
Step 1 – Create the Webhook trigger
Start by adding a Webhook node in n8n. This is how external tools or scripts will trigger the workflow.
- HTTP Method:
POST - Path example:
/screenshot-webhook
The webhook expects a JSON body with at least two fields:
{  "website_name": "n8n",  "url": "https://n8n.io/"
}
You can test this using tools like curl, Postman, or any service that can send POST requests.
Step 2 – Prepare and store the payload
Next, add a Set node after the Webhook. This node helps you:
- Map incoming data from the webhook to well-defined fields
- Provide default values for testing
- Ensure consistent field names for later nodes
In the Set node, define fields such as:
website_nameurl
You can either hard-code values for debugging or map them from the Webhook node using n8n expressions.
Step 3 – Capture a screenshot with URLbox
Now you will call URLbox to generate the screenshot. Add an HTTP Request node and configure it as follows:
- HTTP Method:
POST - URL:
https://api.urlbox.io/v1/render/sync(or the relevant URLbox endpoint)
In the request body, include the URL and any desired options. Typical body parameters include:
url: the website URL from the Set nodefull_page:trueto capture the entire pageviewport: width and height if you want a specific viewport sizeformat:jpgorpng
For authentication, set the Authorization header to your URLbox API key. In n8n, store this in a credential and reference it in the node instead of hard-coding it.
Important URLbox options to consider:
full_page: true– captures the entire scrollable pageviewport– simulate desktop or mobile by adjusting width and heightformat– choose betweenjpgorpngdepending on quality and size needs
The response from URLbox will typically include a URL to the generated screenshot or binary image data, which you will pass to OpenAI.
Step 4 – Analyze the screenshot with OpenAI
Once you have the screenshot, add an OpenAI Image Analysis node (or use the LangChain/OpenAI integration if that is your preferred setup).
Configure the node so that it receives either:
- The screenshot URL returned by URLbox, or
- The binary image data if you are passing the file directly
Next, craft a prompt that clearly explains what you want the model to do. For example:
“Your input is a screenshot of a website. Describe the content in one sentence and extract the main headline and any visible CTA text.”
To make the output easier to process downstream, you can ask for structured JSON:
- Request specific keys, such as
headline,cta_text, anddetected_logos. - Mention that if a value is missing, it should be
nullrather than omitted. - Ask the model to be concise and avoid extra commentary.
Prompt design tips for robust extraction:
- Ask for structured JSON output, for example:
{"description": "...", "headline": "...", "cta_text": "...", "detected_logos": [...]}
- If you expect text from the page, explicitly request OCR style extraction.
- Limit verbosity so the response is short and machine friendly.
Step 5 – Merge website metadata with AI results
Now you have two sets of data:
- Website metadata from the Set node (
website_name,url) - Analysis output from the OpenAI node (description, headline, CTA text, etc.)
Add a Merge node to combine these into a single JSON object. Depending on how your nodes are connected, you can:
- Merge by position if there is a one-to-one relationship between items
- Merge by key if you have a specific field to match on
The final merged item might look something like:
{  "website_name": "n8n",  "url": "https://n8n.io/",  "description": "Automation platform homepage with workflow builder visuals.",  "headline": "Automate your workflows",  "cta_text": "Get started"
}
This object is now ready to be turned into a Slack message or stored in a database.
Step 6 – Send a summary to Slack
To complete the workflow, add a Slack node that posts a message to your chosen channel.
Construct a compact summary using data from the Merge node. For example:
Website: n8n
URL: https://n8n.io/
Analysis: Hero headline: "Automate your workflows" - CTA: "Get started"
Depending on your Slack integration, you can:
- Include the screenshot URL in the message
- Attach the image directly as a file
- Add emojis or formatting to highlight changes or alerts
Security, reliability, and best practices
Protecting your API keys
- Store your URLbox and OpenAI keys in n8n credentials, not directly in node fields.
- Limit who can view or modify credentials in your n8n instance.
Managing rate limits and costs
- Be aware of rate limits on URLbox and OpenAI APIs.
- Use n8n’s retry and backoff settings on HTTP Request nodes.
- Capture only the pages you truly need and avoid unnecessary full-page renders.
Validating AI output
- Check that the AI response is valid JSON before using it.
- Sanitize or truncate text before posting to Slack.
- Handle cases where the model returns incomplete or unexpected data.
Error handling and retries
To make the workflow production ready, add some basic resilience:
- HTTP Request retries: Configure the URLbox HTTP node to retry on network errors or 5xx responses.
- OpenAI error branches: Add conditional logic to detect:
- Empty or malformed AI responses
- Errors returned by the OpenAI API
- Fallback alerts: If analysis fails or the image is missing, send a Slack message to an admin or error channel instead of the main channel.
This ensures that when something goes wrong, you are notified and can investigate, instead of silently losing data.
Advanced ideas to extend the workflow
Once the basic template is running, you can expand it with more advanced automation patterns:
- Batch processing: Loop over a list of URLs from a Google Sheet, database, or CSV file and run the same screenshot-analysis pipeline for each entry.
- Visual regression monitoring: Store previous screenshots and use an image diff tool to compare new captures. Alert only when the visual difference exceeds a certain threshold.
- Structured data extraction: Ask the AI model to return JSON fields such as
headline,promo,price, andform_fields, then write the results to a database or analytics system. - Multi-model pipelines: First run OCR to extract all text, then use a classification model to detect logos, primary colors, layout type, or page category.
Sample prompt for consistent JSON output
To get reliable, machine-friendly responses from OpenAI, use a prompt that enforces a strict JSON format. For example:
"Analyze this website screenshot. Return JSON with keys: 'description', 'headline', 'cta_text', 'detected_text'. If a key is not present, return null."
This makes it much easier to parse the response in n8n and reduces the chance of errors in downstream nodes.
Recap
In this guide you learned how to build an n8n workflow that:
- Receives a website URL and name via a webhook
- Captures a full-page screenshot with URLbox
- Analyzes the screenshot with OpenAI’s image analysis capabilities
- Merges AI insights with website metadata
- Sends a clear summary to Slack
With this foundation, you can adapt the workflow for monitoring, reporting, competitor tracking, or any other use case that benefits from automated visual analysis.
FAQ
Can I trigger this workflow without a webhook?
Yes. Instead of a Webhook node, you can start the workflow from a Schedule Trigger, a manual execution, or another source such as a Google Sheets or database node that feeds URLs into the pipeline.
Do I have to use full-page screenshots?
No. You can disable full_page or adjust the viewport options in URLbox if you only care about the visible area or a specific resolution.
What if the page has very little text?
The AI model will still return a description of the visual layout. For text fields like headline or cta_text, you can expect null or empty values if nothing is clearly visible.
Is it possible to store the results instead of sending them to Slack?
Yes. Replace or supplement the Slack node with a database, Google Sheets, Notion, or any other storage node in n8n to keep a history of analyses.
Connect WordPress Forms to Mautic with n8n

How to Connect WordPress Forms to Mautic Using n8n (Step-by-Step)
Build a robust automation pipeline that captures WordPress form submissions, standardizes and validates the data, then creates or updates contacts in Mautic using an n8n workflow. This guide explains the use case, architecture, and implementation details of the n8n template so you can deploy it confidently in production environments.
Why integrate WordPress forms with Mautic via n8n?
For teams that rely on WordPress for lead generation and Mautic for marketing automation, manual export and import of form data is inefficient and error-prone. An automated n8n workflow between WordPress and Mautic ensures that:
- Leads are captured in real time, directly into your Mautic instance
- Data is normalized and validated before contact creation
- Invalid or suspicious email addresses are filtered out or flagged
- Stakeholders are notified when manual review is required
This approach improves lead quality, accelerates follow-up, and protects your CRM from polluted or incomplete data.
Solution architecture and workflow design
The n8n template implements a controlled data pipeline from WordPress to Mautic. It uses a webhook trigger, transformation logic, contact creation, and conditional handling for invalid emails.
Core workflow stages
- Inbound webhook from WordPress A Webhook node in n8n receives POST requests from your WordPress form plugin.
- Lead normalization A Set node (NormalizeLead) standardizes key fields such as name, email, mobile, and form identifier.
- Contact creation in Mautic A Mautic node creates or updates a contact using the normalized data.
- Email validation decision An If node evaluates whether the email address satisfies basic validation criteria.
- Invalid email handling If the email is invalid, the workflow sends a notification and marks the contact in Mautic as Do Not Contact or tags it for cleanup.
- Workflow termination The flow ends after successful processing or after handling invalid data.
This structure separates responsibilities: intake, transformation, validation, persistence, and exception handling. It also makes the workflow easy to extend with additional validation or enrichment steps.
Configuring the n8n workflow step by step
1. Configure the WordPress webhook trigger
Start by exposing an HTTP endpoint in n8n that your WordPress form can call.
- Create a Webhook node in n8n and set the HTTP method to
POST. - Choose the appropriate
Content-Typeaccording to your form plugin:application/x-www-form-urlencodedfor many classic WordPress form pluginsapplication/jsonif your plugin supports JSON payloads
- Copy the generated webhook URL.
- In your WordPress form plugin (such as Contact Form 7, Gravity Forms, WPForms, and others), configure a webhook or integration endpoint and paste the n8n webhook URL there.
- Ensure the form is configured to send data using the POST method.
2. Normalize and clean incoming lead data
Once the webhook receives data, the next priority is to standardize the payload into a reliable internal schema.
Use a Set node in n8n, often named NormalizeLead, to:
- Map raw form fields to canonical names
- Apply formatting and basic validation logic
- Preserve metadata such as form identifiers for segmentation
Typical mappings might include:
- name: convert to title case
- email: convert to lower case and run a simple syntax check
- mobile: remove formatting or country prefixes according to your conventions
- form: keep the original
form_idor form name for later segmentation in Mautic
Example n8n expressions for the Set node:
name = {{$json.body.Nome.toTitleCase()}}email = {{$json.body['E-mail'].toLowerCase()}}Adapting these expressions to your actual field names from WordPress is essential. Keep naming consistent across WordPress, n8n, and Mautic to reduce mapping issues.
3. Create or update the contact in Mautic
With normalized data available, you can safely interact with Mautic.
- Add a Mautic node and configure it with your Mautic API credentials (OAuth or API key, depending on your setup).
- Map the normalized fields to Mautic contact fields:
- email → primary email field in Mautic (required)
- name →
firstNameor an equivalent field - mobile → mobile or phone field, often via
additionalFields - form or form_id → a custom field for attribution or segmentation
At minimum, ensure that email and firstName are mapped. Additional fields such as mobile are valuable for SMS or WhatsApp follow-up flows in Mautic.
4. Validate email addresses and branch the workflow
To prevent invalid data from entering Mautic, the template uses a conditional step based on email validity.
- Insert an If node after normalization or after initial validation logic.
- Evaluate a boolean flag such as
$json.email_validor a similar expression that represents your validation result. - Configure two paths:
- Valid path: continue normal processing or simply end the workflow.
- Invalid path: trigger notifications and mark the contact as Do Not Contact or tag it appropriately in Mautic.
On the invalid path, the workflow typically performs two actions:
- Notification: send a Slack message, email, or internal alert so a human can review or correct the record.
- Mautic flagging: use a Mautic node to add the contact to a Do Not Contact list or assign a tag indicating an invalid email.
5. Final validation and testing
Before moving to production, thoroughly test the integration.
- Submit sample forms from your WordPress site with:
- Valid data
- Intentionally malformed emails
- Edge cases such as missing fields
- Inspect n8n execution logs to confirm:
- Incoming payloads are parsed correctly
- Normalized fields match your expectations
- Contacts appear in Mautic with correct field mappings
- Invalid emails follow the correct branch and trigger notifications
Security, data quality, and reliability best practices
Secure the webhook endpoint
Webhook endpoints are potential attack surfaces. Protect them with multiple layers where possible:
- Add a secret token as a query parameter or header and validate it in n8n.
- Restrict access by IP address if your infrastructure allows it.
- Serve n8n behind HTTPS and, ideally, behind an authenticated proxy or gateway.
Strengthen email verification
Basic regex or syntax validation is useful, but for production-grade lead management consider augmenting the workflow with more advanced checks:
- Call an external email verification API (for example ZeroBounce or Kickbox).
- Perform MX record lookups to identify invalid or non-existent domains.
- Maintain a list or heuristic rules for disposable email providers and treat them differently.
These enhancements can be integrated into the n8n workflow as additional nodes before the If condition.
Map extended fields for richer Mautic profiles
To improve segmentation, attribution, and reporting in Mautic, consider mapping more than just name and email:
- UTM parameters such as
utm_source,utm_medium, andutm_campaign - Landing page URL or referrer
- Form identifier or form type (for example, demo request, newsletter, webinar)
Ensure that corresponding custom fields exist in Mautic and that naming is consistent across WordPress, n8n, and Mautic.
Handle rate limits and transient errors
Mautic or third-party services may impose rate limits or experience temporary downtime. To increase reliability:
- Monitor Mautic API rate limits and adjust request frequency accordingly.
- Use n8n retry settings on nodes that call external APIs.
- Consider queueing mechanisms, such as n8n’s Execute Workflow node or external message queues, to buffer requests during high load or outages.
Troubleshooting and operational monitoring
Common configuration issues
- No data received in n8n Verify that:
- The webhook URL in WordPress exactly matches the one in n8n.
- The form is configured to use the POST method.
- There are no firewall or proxy rules blocking outbound requests from WordPress.
- Malformed or unexpected JSON If payloads are not parsed correctly:
- Check the
Content-Typeheader sent by the form plugin. - Switch the webhook configuration between
application/jsonandapplication/x-www-form-urlencodedto match what the plugin sends.
- Check the
- Mautic authentication failures If the Mautic node fails to authenticate:
- Revalidate OAuth or API key credentials.
- Check token expiration and refresh flows.
- Confirm that the Mautic API is enabled and accessible from the n8n environment.
Logging, alerts, and observability
For production automations, visibility into failures is essential.
- Enable detailed logging in n8n to capture request payloads, errors, and node-level details.
- Configure Slack or email notifications for failed executions or error branches.
- Maintain a lightweight dashboard or report to track webhook success and failure rates, which helps identify systemic issues or plugin changes on the WordPress side.
Extending the n8n template for advanced use cases
The base workflow is intentionally simple so it can serve as a foundation for more sophisticated automations. Common extensions include:
- Contact enrichment Integrate services such as Clearbit or FullContact to append company, role, or social data to contacts before they reach Mautic.
- Automated onboarding sequences Trigger specific Mautic campaigns or email sequences based on the form type, form_id, or UTM parameters.
- Real-time lead scoring and routing Implement scoring logic in n8n or Mautic and route high-value leads to sales channels, such as Slack alerts, CRM tasks, or direct notifications.
Because the workflow already centralizes intake and normalization, adding new branches and integrations is straightforward.
Automate Transcription with n8n, OpenAI & Notion
Automate Transcription with n8n, OpenAI & Notion
Convert raw audio into structured, searchable knowledge with a fully automated n8n workflow. This reference guide documents a complete transcription pipeline that uses Google Drive for ingestion, OpenAI for transcription and summarization, Notion for knowledge management, and Slack for notifications.
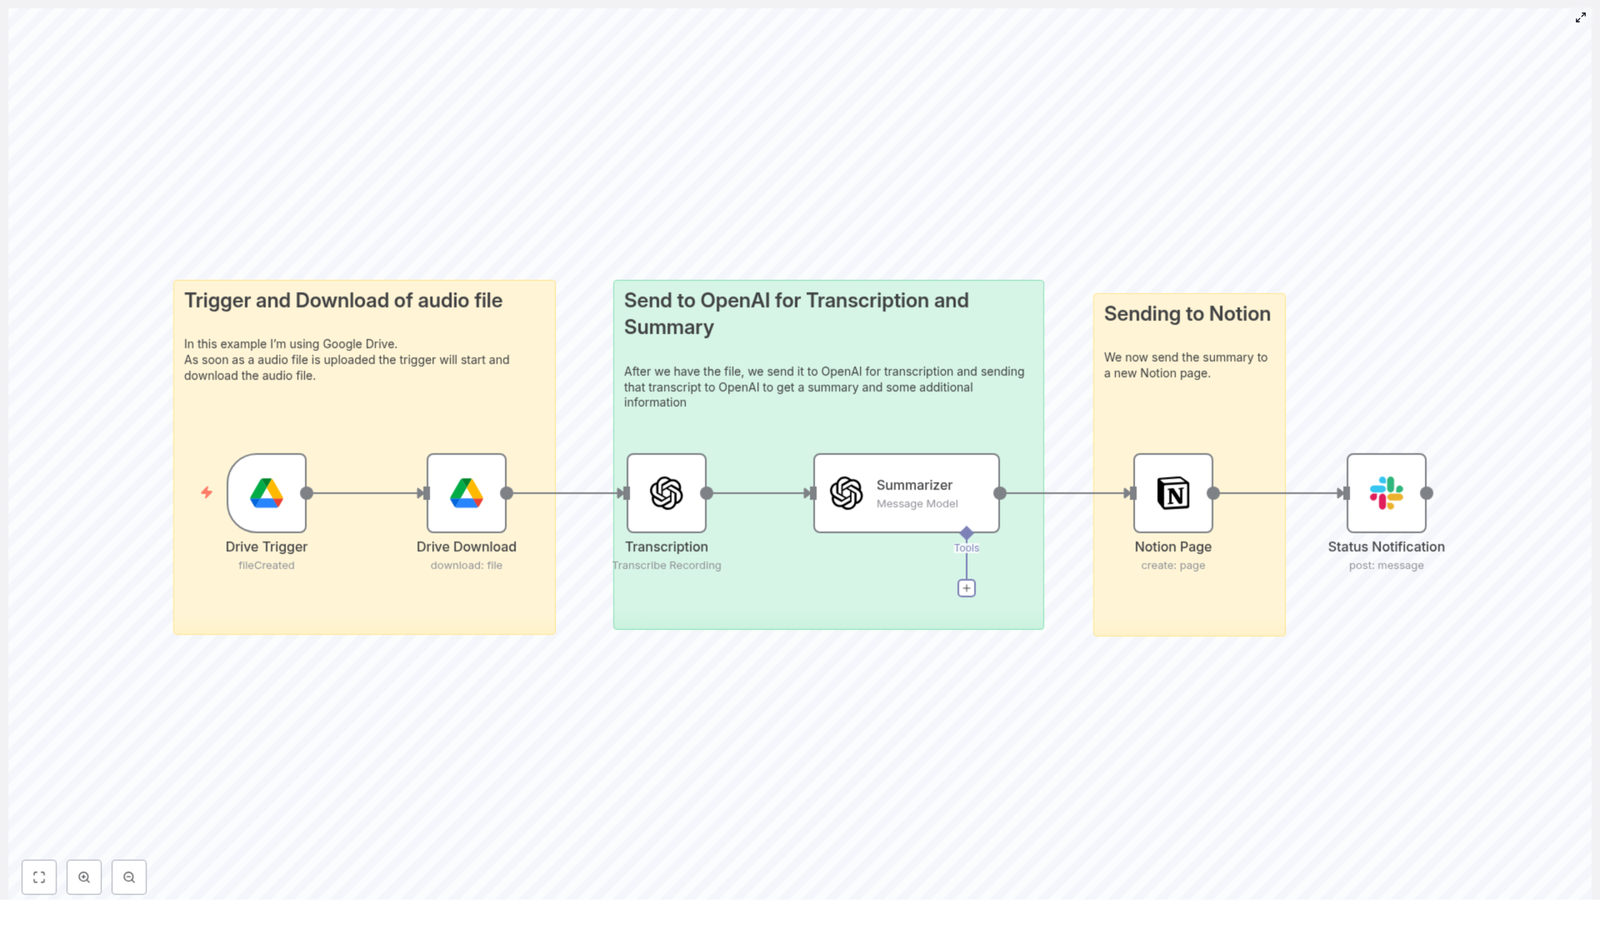
The data flow is:
Google Drive Trigger → Google Drive Download → OpenAI Audio Transcription → GPT JSON Summary → Notion Page Creation → Slack Notification
1. Workflow Overview & Use Cases
1.1 Purpose of the Automation
Manual transcription is slow, inconsistent, and difficult to scale across teams. By using n8n to orchestrate transcription and summarization, you can:
- Reduce manual work for meeting notes, call summaries, and content production.
- Standardize how summaries, action items, and follow-ups are captured.
- Centralize knowledge in Notion so it can be searched, tagged, and shared.
- Ensure every recording automatically produces usable outputs.
1.2 Typical Scenarios
This n8n template is particularly useful for:
- Podcast production – generate episode summaries, notes, and timestamps-ready content.
- Product and engineering teams – document design reviews, architecture discussions, and decisions with action items.
- Customer success and sales – archive customer calls in Notion and track follow-ups from conversations.
2. Architecture & Data Flow
2.1 High-level Architecture
The workflow is built around n8n as the orchestration layer:
- Input: Audio files uploaded to a specific Google Drive folder.
- Processing:
- File download into n8n as binary data.
- Transcription via OpenAI audio API (Whisper-style transcription).
- Summarization via a GPT model with a structured system prompt.
- Output:
- Notion page populated with title, summary, and structured fields.
- Slack message to notify stakeholders that the transcript and summary are ready.
2.2 Node Sequence
- Google Drive Trigger – watches a folder for new audio files.
- Google Drive (Download) – retrieves the file as binary data.
- OpenAI Audio Transcription – converts audio to text.
- GPT Summarizer – transforms raw transcript into structured JSON.
- Notion Page – creates a page or database entry.
- Slack Notification – sends a status update with a link to the Notion page.
3. Node-by-Node Breakdown
3.1 Google Drive Trigger Node
Role: Entry point. Detects when a new audio file is added to a specific Google Drive folder and starts an n8n execution.
3.1.1 Configuration
- Resource: Typically “File” (depending on the node version).
- Event:
fileCreatedso that each new file triggers the workflow. - Folder: Set to the target folder ID where audio files are uploaded.
- Polling frequency: For near real-time, a 1-minute interval is common. Adjust based on API limits and latency requirements.
- Credentials: Google Drive credentials with at least read access to the folder.
3.1.2 Behavior & Edge Cases
- Only files created after the workflow is activated are typically detected.
- Ensure the authenticated account or service account can access the folder, otherwise no events will be received.
- Unsupported file formats will still trigger the workflow, so you may want to filter by extension (e.g.,
.mp3,.wav,.m4a) in later nodes.
3.2 Google Drive Node (Download)
Role: Converts the reference from the trigger into actual binary content for downstream nodes.
3.2.1 Configuration
- Operation:
download(or equivalent “Download file”). - File ID: Mapped from the trigger node output (e.g.,
{{$json["id"]}}). - Binary property: Set to a property name such as
data. This property will contain the binary audio.
3.2.2 Behavior & Edge Cases
- If the file is large, download time may be noticeable. Monitor execution time and consider n8n’s timeout limits.
- Ensure the binary property name is consistent with what the OpenAI node expects.
- If the file is missing or permissions change between trigger and download, the node will fail. Add error handling if this is likely.
3.3 OpenAI Audio Transcription Node
Role: Converts the binary audio into a text transcript using OpenAI’s audio transcription endpoint (Whisper-style models).
3.3.1 Configuration
- Node type: OpenAI or LangChain/OpenAI node configured for audio transcription.
- Operation / Resource:
audio/transcriptionsor “Transcribe” depending on node version. - Binary property: Reference the same property used in the Google Drive node (e.g.,
data). - Model: Use an appropriate audio model. Whisper-style models or the OpenAI audio transcription endpoint are suitable for most use cases.
- Language (optional): If you know the primary language of the recording, set the language parameter to improve accuracy and reduce misdetections.
3.3.2 Behavior & Edge Cases
- Noise and audio quality: Noisy or low-quality audio may reduce accuracy. Consider pre-processing outside n8n if needed.
- Multilingual recordings: If language is unknown, let the model auto-detect. For consistent output, prefer setting the language explicitly when possible.
- File size limits: Very long recordings may approach API limits. For extremely long audio, consider splitting before upload or implementing a chunking strategy.
- Rate limits: Handle rate limit errors with retries in n8n (see the error handling section).
3.4 GPT Summarizer Node
Role: Converts the raw transcript into a structured JSON summary that can be stored and queried easily.
3.4.1 Configuration
- Node type: OpenAI (Chat) or LangChain/OpenAI configured for chat completion.
- Model: The example uses
gpt-4-turbo-preview. You can substitute with a different GPT model depending on cost and quality trade-offs. - Input:
- Map the transcript text from the previous node as the user content.
- Provide a detailed system prompt that instructs the model to output only JSON.
3.4.2 JSON Output Structure
The system prompt should instruct the model to return a JSON object with the following fields:
titlesummarymain_pointsaction_items(date-tagged if relative dates are mentioned)follow_upstories,references,arguments,related_topicssentiment
For consistency, instruct the model to:
- Return JSON-only with no additional commentary.
- Use ISO 8601 format for absolute dates (for example,
2025-10-24). - Apply a clear rule for converting relative phrases such as “next Monday” into absolute dates, if your use case requires it.
- Follow a provided example JSON schema in the prompt.
3.4.3 Handling the Response
- The model’s output may be returned as a string. In that case, parse it to JSON in a subsequent node before mapping to Notion.
- Validation is important. Use a validation or code node to confirm that the response is valid JSON and contains all required keys.
- For very long transcripts, consider chunking the transcript and summarizing each chunk before combining summaries into a final pass to avoid token limits.
3.5 Notion Page Node
Role: Persists the structured summary as a Notion page or database item, making transcripts searchable and organized.
3.5.1 Configuration
- Node type: Notion.
- Operation: Typically “Create Page” or “Create Database Entry”, depending on your workspace setup.
- Credentials: Notion integration with permissions to create pages in the chosen workspace or database.
- Mapping:
- Title: Map from the
titlefield in the GPT JSON output. - Summary content: Use the
summaryfield as the main text block. - Database properties (optional): Map fields such as tags, meeting date, and participants from the JSON structure to Notion properties.
- Title: Map from the
3.5.2 Behavior & Edge Cases
- If the JSON parsing fails or a required field is missing, the Notion node will likely error. Validate JSON before this step.
- Ensure that property types in Notion (e.g., date, multi-select, people) match the data you are sending.
- Notion rate limits are usually forgiving for this use case, but heavy usage may require backoff or batching.
3.6 Slack Notification Node
Role: Notifies stakeholders that processing has completed and provides a direct link to the Notion page.
3.6.1 Configuration
- Node type: Slack.
- Operation: Typically “Post Message”.
- Channel: A team channel or a dedicated notifications channel.
- Message content:
- Include a short one-line summary.
- Include the URL of the newly created Notion page.
- Credentials: Slack app or bot token with permission to post in the chosen channel.
3.6.2 Behavior & Edge Cases
- If Slack is temporarily unavailable, the node can fail. Consider retries or a fallback email notification.
- Check that the bot is invited to the channel where you want to post.
4. Prompt Engineering & Reliability
4.1 Prompt Design Best Practices
- Be explicit: Instruct the model to output only valid JSON, with no extra text.
- Provide an example: Include a complete example JSON object in the system prompt to enforce structure.
- Define constraints: Specify required keys, acceptable value formats, and how to handle missing information.
- Clarify date handling: If you need date-tagged action items, clearly define how to convert relative dates to ISO 8601.
4.2 JSON Validation in n8n
- Use a Code node or dedicated validation node to:
- Parse the string response into JSON.
- Check for required fields like
title,summary, andaction_items.
- If validation fails, send an internal alert or store the raw response for manual inspection instead of writing to Notion.
4.3 Handling Long Transcripts
- Long audio files can produce transcripts that approach model token limits.
- Mitigation strategies:
- Chunk the transcript and summarize each segment separately.
- Combine partial summaries in a final summarization pass.
- Restrict the level of detail requested if only high-level notes are needed.
4.4 Noise and Language Considerations
- For noisy or multilingual recordings:
- Use the language parameter when you know the main language.
- Consider preprocessing audio externally if noise is severe.
5. Security & Access Control
5.1 Credential Management
- Store API keys and OAuth tokens in n8n’s credential storage. Do not hard-code sensitive values directly in nodes.
- Use separate credentials for development, staging, and production environments.
5.2 Principle of Least Privilege
- Google Drive: Limit the integration scope to the folders and files required for the workflow.
- Notion: Restrict the integration to only the databases or pages that need to be created or updated.
- Service accounts: For Google Drive watchers, consider a dedicated service account that centralizes file access rather than relying on individual user accounts.
6. Monitoring, Error Handling & Retries
6.1 Basic Error Handling Patterns
- Transcription retries:
- Configure the OpenAI audio node or a surrounding wrapper to retry on rate limit or transient network errors.
- Administrative alerts:
- If a file fails repeatedly, send a Slack message to an internal admin channel with the file ID and error details.
- Backup logging:
- Optionally log transcripts and summaries to
- Optionally log transcripts and summaries to
Automate Marketing Campaign Documentation
Automate Marketing Campaign Documentation with n8n + OpenAI
Turn raw campaign JSON into clear, concise marketing documentation automatically. Save time, reduce manual errors, and keep every stakeholder aligned on what a campaign does and how it should perform.
What you will learn in this guide
This tutorial walks you through an n8n workflow template that uses OpenAI to convert a campaign JSON into a structured marketing brief. By the end, you will know how to:
- Understand the overall automation flow between n8n and OpenAI
- Configure the n8n nodes used in the template
- Feed campaign JSON into the workflow using a form
- Generate documentation that covers audience, goals, triggers, flows, and more
- Set up credentials and test the workflow safely in your own n8n instance
Why automate campaign documentation?
Most teams still write campaign briefs manually. This usually leads to:
- Slow turnaround times for new campaigns
- Inconsistent documentation formats across teams
- Outdated or incomplete briefs as campaigns evolve
- Extra meetings just to clarify how a campaign works
By using an automation pipeline that converts a campaign JSON (from n8n, Zapier, Make, or any other automation tool) into a clear marketing brief, you can:
- Onboard new team members faster
- Run experiments with confidence, backed by documented goals and triggers
- Hand off work to stakeholders without repeated explanations
- Keep a consistent, up to date record of how each campaign is designed
How the n8n + OpenAI workflow works
This template uses n8n as the automation engine and OpenAI (GPT) as the content generator. At a high level, the workflow does the following:
- A marketer submits a campaign JSON and some metadata through a form.
- n8n constructs a controlled prompt and sends the JSON to OpenAI.
- OpenAI returns a concise HTML marketing document based on the JSON.
- n8n shows a preview in the webhook response and emails the final documentation to the campaign owner.
Node-by-node overview
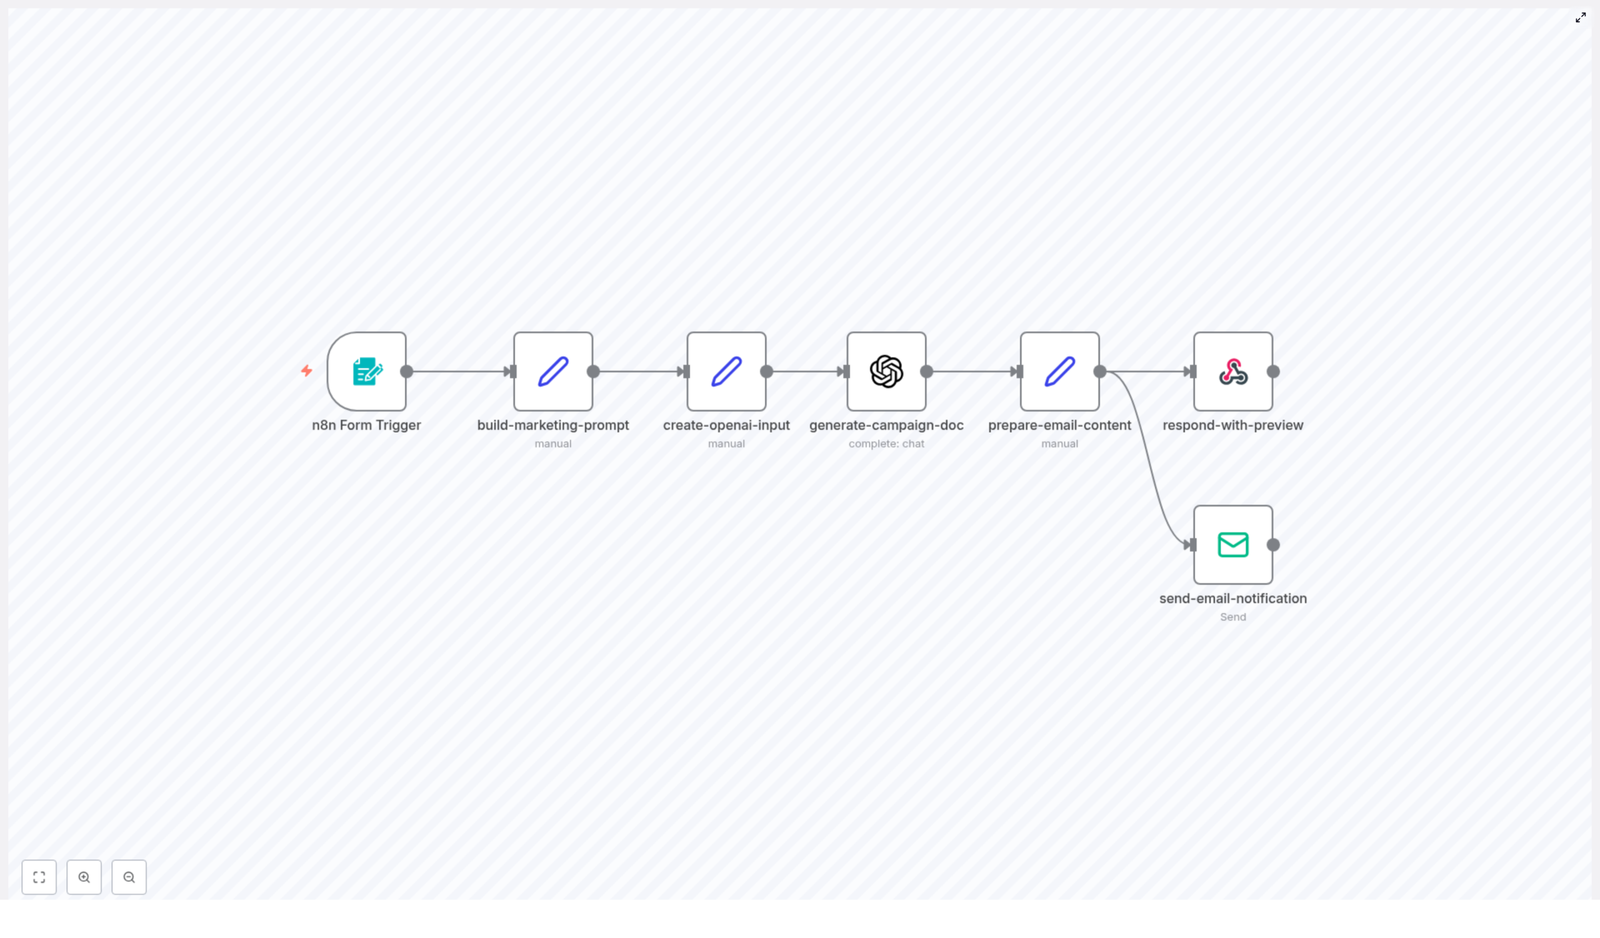
Here is how each n8n node in the template contributes to the automation:
- n8n Form Trigger – Collects:
- Campaign Title
- Campaign JSON
- Campaign Owner Email
This is the main entry point where marketers submit campaign details.
- Set (build-marketing-prompt) – Builds a strict instruction prompt that:
- Defines the sections the document should include
- Controls tone and formatting
- Guides OpenAI to produce structured, repeatable outputs
- Set (create-openai-input) – Injects the campaign title and raw JSON into the prompt payload, so the model has both context and data.
- OpenAI (generate-campaign-doc) – Sends the final prompt to a GPT model and gets back HTML documentation that is ready for review or distribution.
- Set (prepare-email-content) – Wraps the generated HTML into a simple email layout and prepares the subject line for the outgoing message.
- Respond to Webhook – Displays a styled HTML preview in the browser right after form submission, so the marketer can see the generated brief instantly.
- Email Send – Sends the final documentation to the campaign owner using your configured email provider.
What the generated campaign documentation includes
The automation is designed to turn your JSON into a complete, human friendly marketing brief. Below are the main sections you can expect, and how they relate to the data you provide.
1. Campaign target audience
This section explains who the campaign is meant to reach. The generated document typically covers:
- Primary audience – For example:
- Current customers
- New trial users
- Cart abandoners
- Audience segments and personas – Such as:
- Demographic details
- Behavioral triggers
- Product fit or usage patterns
- Recommended filters – Practical filters you can apply, like:
- Last purchase date
- Engagement score
- Tags or properties from your CRM
2. Campaign goals and KPIs
The brief outlines what success looks like and how to measure it. It usually includes:
- Primary objectives:
- Acquisition
- Activation
- Retention
- Upsell or cross-sell
- Key metrics, such as:
- Conversion rate
- Open rate and click-through rate (CTR)
- Return on investment (ROI)
- Engagement metrics
- Revenue per user or per campaign
- Benchmarks – Baseline performance and target lift, for example:
- Increase CTR by 15 percent
- Reach a 3 percent conversion rate
3. Trigger conditions and entry points
This part documents when and how users enter the campaign, which helps both marketers and engineers understand the logic. It can describe:
- Event triggers:
- Form submission
- Purchase completion
- Trial expiry
- Time-based schedules
- Entry criteria:
- Audience segments
- Minimum inactivity period
- Product usage thresholds
- Scheduling details:
- Send windows and quiet hours
- Time zone handling
- Throttling rules and retry logic
4. Message sequence and flow
The documentation includes a channel-by-channel plan that maps to your JSON definition:
- Channel breakdown:
- SMS
- Push notifications
- Social ads
- In-app messaging
- Message cadence:
- Initial touch
- Follow-ups and reminders
- Escalation messages
- Final attempt or exit
- Content themes and CTAs:
- Subject line guidance or examples
- Primary call to action
- Landing page URLs
- Personalization fields or tokens
5. Required integrations and credentials
The brief also helps you or your operations team understand what systems are involved. It typically lists:
- OpenAI API key – Used by the
generate-campaign-docnode to call the GPT model. - Email provider credentials – SMTP or transactional email service credentials used by the
send-email-notificationnode. - CRM and marketing platform connectors – For example:
- HubSpot
- Segment
- Mailchimp
These may require API tokens if the campaign syncs segments or events.
- Webhook URLs and OAuth details – Any webhook endpoints, client IDs, or client secrets needed for third-party API access.
Security tip: Always store keys in n8n credentials. Do not paste secrets directly into prompts, Set nodes, or logs.
6. A/B testing and customization guide
The generated documentation can also suggest how to experiment and optimize the campaign. It often covers:
- Test variables:
- Subject lines and preheaders
- CTA wording and button labels
- Send times and days of week
- Imagery or layout variations
- Segmentation strategies:
- Random audience splits (for example 50/50 or 30/70)
- Geo-based splits
- Behavior or cohort based splits
- How to modify variants in JSON:
- Use a clear naming convention such as
campaign-v1,campaign-v2 - Store each variant as a separate JSON object
- Pass these variant JSON objects into the automation for documentation
- Use a clear naming convention such as
- Optimization guidance:
- Run tests long enough to reach statistical significance, usually 3 to 14 days depending on traffic
- Measure lift on the primary KPIs defined earlier
Step-by-step: setting up the workflow in n8n
In this section, you will configure the template in your own n8n instance and run your first test.
Step 1: Install and import the workflow
- Make sure you have an n8n instance running (self-hosted or cloud).
- Import the provided workflow JSON into n8n.
- Open the workflow editor and confirm that all nodes appear correctly.
Step 2: Configure the Form Trigger node
- Open the Form Trigger node.
- Set a clear path for the webhook URL (for example
/campaign-doc). - Define the form fields that marketers will fill:
- Campaign Title – A human readable name for the campaign.
- Campaign JSON – The raw JSON that describes the campaign logic.
- Campaign Owner Email – The address that receives the generated documentation.
- Share the form URL with your team once you have tested it.
Step 3: Add OpenAI credentials
- In n8n, go to Credentials.
- Create a new credential for OpenAI.
- Generate an API key in your OpenAI account and paste it into the credential.
- Return to the OpenAI (generate-campaign-doc) node and select the new credential.
Step 4: Configure email sending
- Decide which email provider you will use:
- SMTP server
- Transactional provider like SendGrid, Postmark, etc.
- In n8n, create the appropriate email credentials:
- SMTP credentials:
- User and password
- Host and port
- From address, for example
campaigns@yourcompany.com
- Alternative email providers – Follow the provider specific setup in n8n if you prefer not to use raw SMTP.
- Attach these credentials to the Email Send (or send-email-notification) node in your workflow.
Step 5: Tailor the prompt and brand voice
- Open the Set (build-marketing-prompt) node.
- Review the instruction text that controls:
- Document sections
- Tone and writing style
- Formatting rules (for example HTML headings and lists)
- Adjust the instructions to match your brand voice or add any required corporate sections, such as:
- Legal disclaimers
- Compliance notes
- Internal review steps
- Save your changes and consider versioning the prompt text so you can track updates over time.
Credential summary
- OpenAI:
- Generate an API key in your OpenAI account.
- Save it securely in n8n credentials.
- SMTP or email provider:
- User, password, host, port
- From address such as
campaigns@yourcompany.com
- Optional analytics or CRM keys:
- Use these if you want to track UTM parameters or sync audience status with tools like HubSpot, Segment, or Mailchimp.
Testing your campaign documentation workflow
Before rolling this out to your whole team, run a few tests to confirm everything works as expected.
Testing checklist
- Submit a sample form entry with a small, representative campaign JSON.
- Verify that the OpenAI node returns valid HTML content.
- Check that the Respond to Webhook node displays a readable HTML preview in your browser.
- Confirm that the email is delivered to the campaign owner and renders correctly in:
- Gmail
- Outlook
- Mobile email apps
- Inspect logs to ensure credentials and secrets are not logged in plain text.
- Rotate any keys if you suspect they were exposed during early testing.
Example: minimal campaign JSON
Here is a simple JSON payload you can use to test the workflow. It describes a basic winback email campaign.
{ "title": "Winback - 90 Day Inactive", "audience": "customers_inactive_90_days", "channels
Auto-Document n8n Workflows with AI
Auto-Document n8n Workflows with AI
Turn your n8n workflows into clear, SEO-friendly documentation in minutes. This lightweight n8n template uses a simple form trigger and OpenAI to help you document faster, share knowledge easily, and free up time for higher-impact work.
The real problem: documentation that never keeps up
If you build automations, you already know the pattern. Workflows evolve, new steps get added, logic changes, and suddenly your documentation is out of date again. You promise yourself you will update it later, but new priorities appear, and the gap keeps growing.
That gap has a cost. Teammates struggle to understand what a workflow does, handoffs slow down, and you become the bottleneck for every question. Over time, your automation ecosystem becomes harder to trust and harder to scale.
This n8n template is designed to break that cycle. Instead of treating documentation as a chore, you can turn it into a simple, automated step in your process. One small workflow can unlock more clarity, more collaboration, and more time for the work that really moves your product or business forward.
From manual work to an automation mindset
Automation is not just about saving clicks. It is about creating space for focus, creativity, and growth. When you automate documentation, you are doing more than generating text. You are:
- Making your workflows discoverable and searchable
- Reducing onboarding time for new team members
- Lowering the risk of knowledge being locked in one person’s head
- Building a foundation for a more scalable, resilient automation stack
Think of this template as a starting point for a new habit. Each time you update a workflow, you can trigger fresh, consistent documentation in seconds. Over time, your entire n8n environment becomes easier to understand, easier to share, and easier to improve.
Who this n8n template is perfect for
This workflow is intentionally simple, yet powerful enough to support many roles and teams:
- n8n users managing multiple workflows who want quick, consistent documentation without writing everything by hand
- Developers and automation engineers who need reliable, structured docs for complex flows
- Customer-facing or operations teams that hand off automations to other departments and want clear explanations ready to share
- Technical writers who want a first draft generated automatically so they can focus on refinement, not starting from scratch
High-impact use cases for this AI documentation workflow
Once in place, this template can quietly support many moments in your automation lifecycle:
- Handoffs and releases – Automatically create documentation when you ship or transfer a workflow to another team
- Changelogs and internal wikis – Generate short summaries to paste into release notes, internal docs, or knowledge bases
- Onboarding – Provide new teammates with readable explanations of critical workflows so they ramp up faster
- Stakeholder updates – Produce email-ready descriptions of automations for non-technical stakeholders
Each of these use cases removes a little friction. Together, they create a more transparent, collaborative automation culture.
What this n8n workflow template actually does
At its core, this template takes in a workflow JSON and returns clean, structured documentation in minutes. Here is the journey your data goes through:
- You submit a form with a workflow title and the workflow JSON.
- The template prepares a focused prompt that tells OpenAI how to write the documentation.
- It combines your inputs and the prompt into a single payload for the AI model.
- OpenAI (GPT-4 chat) generates concise documentation in plain text or markdown.
- The workflow returns an HTML response so you see the result immediately in your browser.
- Finally, it sends an email notification with the generated documentation to a configured recipient.
The entire flow is designed to be fast, repeatable, and easy to extend. You can start with the default behavior, then gradually customize it as your needs grow.
Inside the template: node-by-node walkthrough
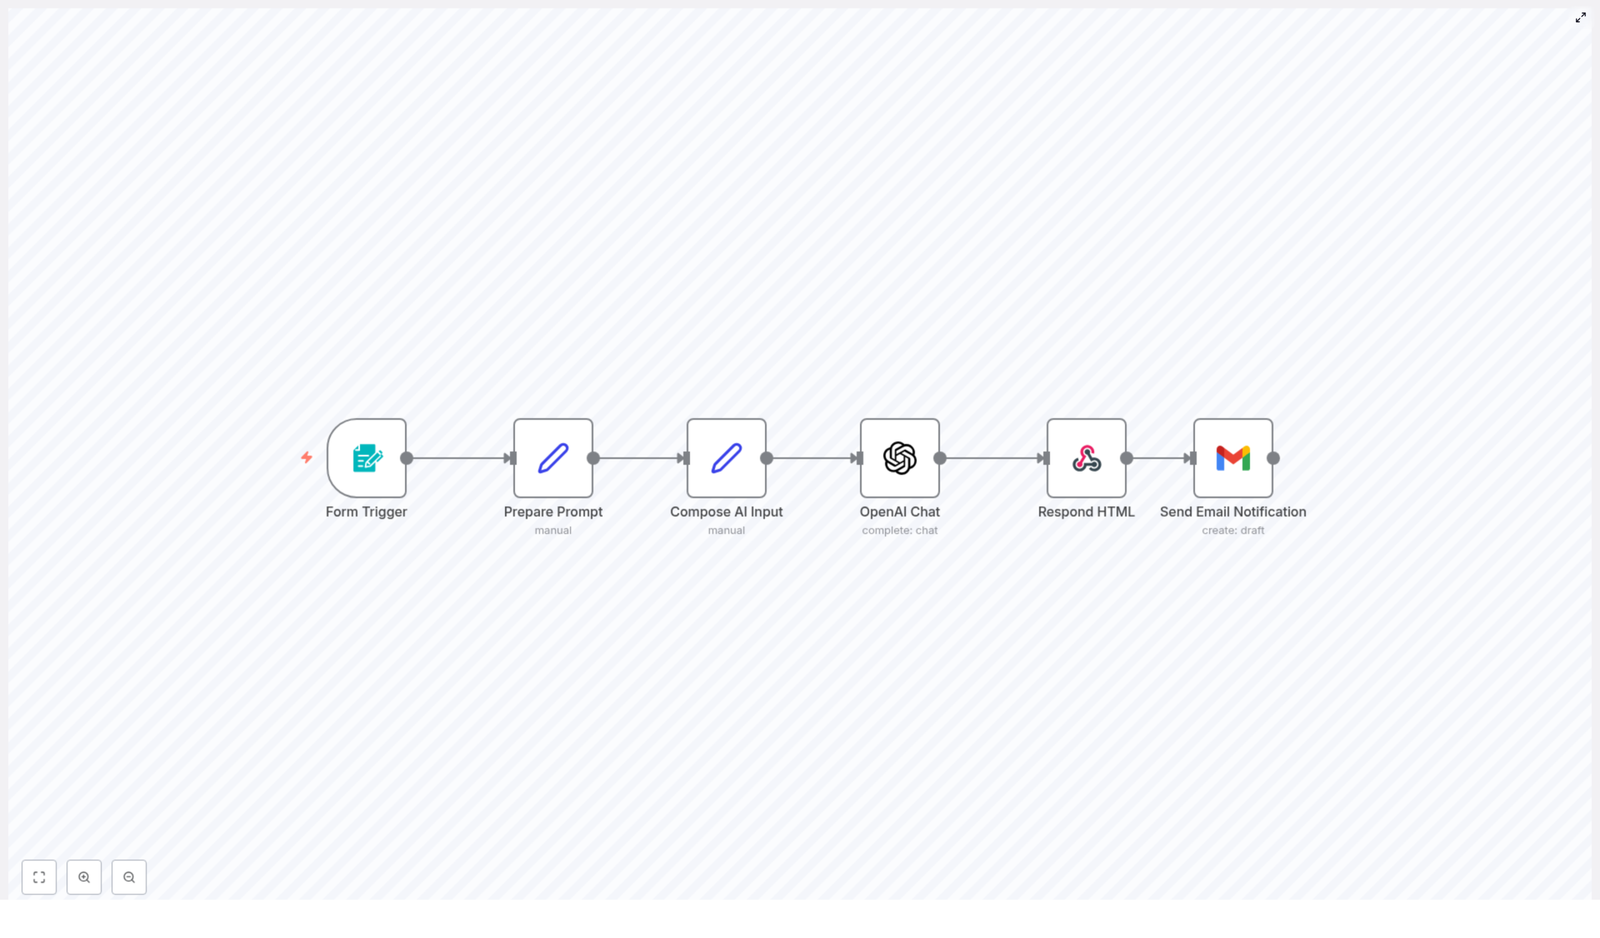
The template is built from six main nodes, each playing a specific role in your documentation pipeline.
1. Form Trigger
Purpose: Collect the workflow title and JSON from the user.
- Trigger type: Form
- Inputs: Workflow Title (required), Workflow JSON (required)
- When to use: Whenever you want to generate documentation for any n8n workflow JSON
This simple form is your gateway. It turns any workflow export into something that can be documented in seconds.
2. Prepare Prompt (Set)
Purpose: Build the instruction text that guides the AI.
This node stores a concise, carefully written prompt that tells OpenAI how to structure the documentation, what to focus on, and how brief to be. By keeping the instructions clear and compact, you get more consistent, high-quality output.
3. Compose AI Input (Set)
Purpose: Combine everything the AI needs into one payload.
Here, the workflow merges the form inputs (title and JSON) with the prepared prompt. The result is the exact text the OpenAI Chat model receives. This step ensures the AI has full context about the workflow and the format you expect.
4. OpenAI Chat
Purpose: Generate the documentation using GPT-4 chat.
- Model: GPT-4 chat (configured directly in the template)
- Output: Concise documentation in plain text or markdown
This is where the transformation happens. Your raw workflow JSON becomes a clear explanation that teammates and stakeholders can actually read and understand.
5. Respond HTML
Purpose: Show the generated documentation instantly in the browser.
This node wraps the AI output in minimal HTML with simple styles for readability. The person who submitted the form sees the documentation immediately, which makes testing and iteration fast and rewarding.
6. Send Email Notification
Purpose: Deliver the documentation automatically to your inbox or a shared mailbox.
The template uses a Gmail node in draft mode by default, but you can switch to any email provider. This makes it easy to notify stakeholders, archive docs, or route them into an existing communication flow.
Step-by-step setup: get value in minutes
You do not need a complex configuration to start benefiting from this template. Follow these steps:
- Import the template into your n8n instance.
- Open the workflow and configure your credentials:
- OpenAI API key
- Your email provider credentials (for example, Gmail or another email node)
- Update the recipient email address in the Send Email Notification node.
- Trigger a test by submitting a sample workflow JSON through the form.
- Once you are happy with the output, share the form URL with your team or embed it inside an internal tool or portal.
Within a single session, you can go from “no automated docs” to “every workflow has a clear explanation on demand.”
How the AI documentation is structured
The template prompt encourages the model to return a compact, practical document. A typical output includes:
- A short title and one-line summary
- A quick note on who the workflow is for and its primary use case
- A brief “how it works” section, often as a step list
- Setup instructions and basic customization tips
This structure is ideal for internal wikis, changelogs, onboarding docs, or email summaries. You get just enough detail to be useful, without overwhelming the reader.
Customize the template to fit your style
Once the basic flow is running, you can adapt it to match your team’s voice, tools, and documentation standards. Here are some practical ideas:
- Adjust the prompt in “Prepare Prompt”. Change tone (formal, conversational, technical) or desired length (very brief vs. more detailed).
- Tune the OpenAI model settings. Switch models or tweak temperature and max tokens to control creativity, consistency, and length.
- Save docs to your knowledge base. Add nodes to send the generated documentation to Google Drive, Notion, Confluence, an S3 bucket, or another storage system.
- Create code snippets or wiki pages automatically. Append a step that creates a GitHub or GitLab snippet, or directly updates a wiki page.
- Brand the HTML output. Modify the wrapper in Respond HTML to include your logo, colors, or additional elements like links to related workflows or diagrams.
Each small tweak makes the workflow more aligned with your processes and more valuable to your team.
Best practices to get consistently strong results
Guidelines for better documentation output
- Provide clean, valid workflow JSON. Remove large binary blobs or unrelated metadata where possible.
- Test with several different workflows to see how the prompt behaves, then refine it to fit your preferred structure.
- Keep the prompt concise but explicit about the sections and style you want. The template already favors brevity, which usually improves clarity.
Troubleshooting common issues
- Incomplete or cut-off output: Increase the model’s max tokens or break very large workflows into smaller sections.
- Email not sending: Double-check your email node credentials. If issues persist, consider switching to SMTP or an API-based email service.
- Form submission errors: Verify webhook permissions and confirm that the form trigger path is configured correctly.
Security and privacy considerations
Since this template sends workflow JSON to an external API (OpenAI), it is important to think about what data you include. Before submitting a workflow JSON:
- Remove credentials, API keys, and private tokens.
- Strip out any sensitive metadata that is not required for documentation.
If you need to work with sensitive data, consider using a self-hosted model or restricting access to the form so only trusted users can submit workflows.
Your next step toward a more automated workflow life
This n8n template turns a tedious, often delayed task into a quick, reliable automation. It is a small workflow with an outsized impact: consistent, searchable documentation for your n8n automations without the constant manual effort.
More importantly, it can be a mindset shift. Once you experience how easy it is to automate documentation, you may start to see other repetitive tasks that are ready to be automated too. This is how a single template becomes a stepping stone toward a more focused, high-leverage way of working.
Try it now: Import the template into your n8n instance, add your OpenAI credentials, and submit a workflow JSON through the form trigger. When you are ready to go deeper, connect storage or wiki nodes so every generated document is archived automatically.
Automate Marketing Campaign Docs with n8n + OpenAI

Automate Marketing Campaign Documentation with n8n and OpenAI
Every growing marketing team eventually hits the same wall: you want to launch more campaigns, test more ideas, and move faster, yet documentation keeps pulling you back into manual work. Writing campaign docs by hand is slow, repetitive, and easy to postpone, even though it is exactly what keeps strategy and execution aligned.
This is where automation becomes more than a productivity hack. It becomes a way to protect your focus, scale your impact, and give your team the clarity they need to do their best work. In this guide, we will walk through an n8n workflow template that uses OpenAI to turn a simple campaign JSON into clear, consistent documentation, delivered straight to the campaign owner.
Think of this template as a starting point for a more automated marketing operation. You can use it as-is, customize it, or build on top of it as your processes mature.
The problem: manual campaign docs drain energy and momentum
Most teams know they should document every campaign, but in practice:
- Docs get written at the last minute or not at all.
- Important operational details live in someone’s head or scattered tools.
- Handoffs between marketing ops, creative, and performance teams feel clunky.
Over time, this leads to slower launches, confusion about goals and audiences, and difficulty learning from what worked or failed. The more campaigns you run, the heavier this documentation burden feels.
The opportunity: automation as a growth mindset
Instead of treating documentation as a chore, you can treat it as a process to automate and improve. With the right workflow, you can:
- Capture campaign details once, in a structured JSON format.
- Let AI turn that structure into human-friendly, marketing-focused documentation.
- Share it instantly with the right owner for review and action.
This shift frees your team to focus on strategy, creative, and experimentation, while n8n and OpenAI handle the repetitive, formatting-heavy work. You are not just saving time, you are building a repeatable system that supports growth.
From idea to automation: what this n8n template does for you
The n8n workflow at the heart of this guide takes a campaign JSON payload, feeds it through a carefully structured prompt, and uses OpenAI to generate concise campaign documentation in HTML. It then previews the result and emails it to the campaign owner.
At a high level, the workflow:
- Accepts campaign inputs through an n8n Form Trigger or another entry point.
- Builds a clear, strict prompt around your campaign JSON.
- Uses an OpenAI chat model to generate standardized documentation in HTML.
- Returns an on-screen preview to the requester.
- Sends the final doc via email to the campaign owner.
Once this is in place, creating campaign docs becomes a matter of submitting a form or triggering the workflow from your existing tools. The process that used to take hours can now take seconds.
What the generated documentation includes
The real power of this workflow is that it turns raw JSON into a structured, actionable document your team can actually use. When the OpenAI node receives your campaign JSON and the marketing prompt, it produces a short, focused document that typically covers:
- Campaign target audience and personas
- Primary goals and KPIs, such as conversion rate, CTR, ROI, and engagement
- Trigger conditions and entry criteria for the automation
- Message sequence and channel plan across email, SMS, social, and ads
- Required integrations and credentials to launch and track the campaign
- A/B testing and customization guidance for experimentation
- A quick setup and testing checklist for smooth deployment
This becomes your single source of truth for each campaign, which makes it easier to onboard teammates, align stakeholders, and revisit campaigns later for optimization.
Inside the workflow: how the n8n template is structured
Let us walk through the main building blocks of the workflow. As you read, think about how you might adapt or extend each step for your own stack.
1. Form Trigger – capture campaign inputs
The journey starts with an n8n Form Trigger. This is where you or your teammates submit a new campaign for documentation. Configure the form to capture three essential fields:
- Campaign Title – a clear name for the campaign.
- Campaign JSON – a textarea where you paste the campaign automation JSON (from n8n, Zapier, Make, or similar).
- Campaign Owner Email – the person who will receive the documentation.
Set the webhook path and add a short description so requesters know exactly what to paste and how this form fits into your process. This small step creates a consistent intake experience that can scale as your team grows.
2. Prompt Builder (Set node) – turn raw data into a clear instruction
Next, a Set node acts as the “prompt builder.” Here you create a single, well-structured prompt string that includes:
- A short, specific instruction for the AI.
- The Campaign JSON that describes the automation.
Keep the instruction strict but concise so you get predictable, clean HTML in return. The structure used in this workflow looks roughly like:
"PROMPT: The above is a marketing campaign automation JSON... Output ONLY the generated documentation in clean HTML format with proper headings and bullet points."This is your main lever for controlling the tone, level of detail, and structure of the generated docs. Over time, you can tweak this prompt to match your brand voice or internal standards.
3. OpenAI Node – generate the documentation in HTML
With the prompt ready, the workflow calls an OpenAI node using the chat resource. Configure it with a secure API credential and pass the combined input string from the Set node.
Key configuration points:
- Use a modern chat model that supports structured, instruction-following responses.
- Request concise HTML output with headings and bullet points.
- Limit the maximum tokens to avoid excessively long responses and control costs.
This step transforms your technical JSON into human-readable documentation that is ready to preview and share.
4. Prepare preview and email – package the results
Once the HTML documentation is generated, another Set node prepares everything needed for communication:
- An email subject line that references the campaign.
- The HTML body, including the model’s output.
- The recipient address, taken from the Campaign Owner Email field.
In parallel, a Respond to Webhook node can return an immediate HTML preview to the person who submitted the form. This optional step gives instant feedback and encourages quick iteration. If the first version is not perfect, you can adjust the JSON or prompt and re-run the workflow in minutes.
5. Send Email – deliver the doc to the campaign owner
Finally, an email node sends the documentation to the campaign owner. Use an SMTP credential or a transactional email provider such as SendGrid or Postmark.
For a professional touch, keep the email template branded and include:
- A timestamp for traceability.
- Contact information or a reply-to address for follow-up questions.
This closes the loop: a campaign idea that started as JSON is now a polished document in the owner’s inbox, ready to guide execution.
Flexible entry points: how to trigger the workflow
The simplest way to use this template is through the manual form submit. As your automation maturity grows, you can connect more powerful entry points, for example:
- Triggers from a project management tool, such as a new card in Trello or Jira.
- Draft creation events in a campaign repository using GitHub or GitLab webhooks.
- Scheduled bulk generation for multiple campaigns using a CSV file or database query.
By connecting these triggers, you move from “remembering to document” to “documentation happens automatically whenever we plan or update a campaign.”
Required integrations and credentials
To run this n8n workflow template smoothly, you will need a few core integrations:
- An n8n instance, either self-hosted or cloud.
- An OpenAI API key with appropriate usage limits.
- SMTP or transactional email provider credentials for sending the docs.
- Optional credentials for tools like your CRM, analytics, ads manager, or CDP if you want to enrich the campaign JSON with dynamic content.
Store all keys and secrets in n8n’s credential manager, not directly in workflow nodes. Limit scopes where possible and keep credentials on a need-to-know basis.
A/B testing and customization: using the template to experiment
Once your documentation is automated, you can turn your attention to experimentation. This workflow can help you document and scale A/B tests consistently.
Suggested approach:
- Variables to test: subject lines, first paragraph, call-to-action wording, send times, and channel mix.
- Audience segmentation: create audience slices in your CRM and reference them in the campaign JSON input.
- Message variants: extend your JSON payload with keys such as
"subject_variants"or"cta_variants", then re-run the generator to get documentation tailored to each variant. - Optimization process: use the generated docs as the single source of truth for what you tested, then iterate based on the winners.
This not only keeps your tests organized, it also builds a knowledge base your team can learn from over time.
Testing checklist before you rely on automation
Before you roll this workflow into production, walk through a simple testing checklist:
- Validate that required fields are present: title, JSON, and owner email.
- Submit a full test and confirm email deliverability and preview rendering.
- Check that OpenAI output is valid HTML and does not include sensitive data.
- Verify SMTP credentials and run basic spam checks such as SPF, DKIM, and DMARC.
- Optionally, store a copy of each generated doc in a central repository for audits.
These steps give you confidence that the automation will support your team reliably, not create surprises.
Security and compliance: automate responsibly
Anytime you send data to a third-party model, security and compliance matter. For this workflow:
- Strip or redact sensitive PII or proprietary logic from the campaign JSON before sending it to OpenAI.
- Use enterprise-level agreements with your AI provider if you process customer data.
- Restrict access to n8n credentials and maintain audit logs of workflow changes and executions.
Handled thoughtfully, AI-powered documentation can fit within strict compliance requirements while still giving your team the benefits of automation.
Best practices to keep your workflow effective
To get the most out of this n8n template, consider these ongoing practices:
- Keep the prompt strict but clear, since your email and preview rendering rely on predictable HTML output.
- Include templates and required fields directly in your intake form to reduce back-and-forth.
- Version your campaign JSON schema so that documentation stays compatible as your processes evolve.
- Use the preview step as a safe space for owners to edit, refine, and re-run the generation before publishing.
Over time, these small refinements turn a simple workflow into a robust part of your operating system.
Example campaign JSON (simplified)
Here is a simplified example of the kind of JSON you might feed into the workflow:
{  "campaign_name": "Spring Promo",  "audience": ["new_users", "engaged_subscribers"],  "channels": ["email", "sms"],  "goals": {"conversion_rate": "3%", "revenue": "$10k"},  "triggers": {"signup_window_days": 7}
}
You can extend this structure with more details over time, such as creative guidelines, budget ranges, or specific tools used in the automation.
From friction to flow: what this workflow changes for your team
When you automate marketing campaign documentation with n8n and OpenAI, you reduce the friction between strategy and execution. Instead of chasing information or rewriting the same sections repeatedly, your team gets:
- Consistent, concise, and actionable docs for every campaign.
- Faster launches and clearer handoffs between ops, creative, and performance teams.
- A repeatable process that scales as your campaign volume grows.
Most importantly, you reclaim time and mental energy that you can reinvest in higher-impact work: better ideas, smarter targeting, and deeper experimentation.
Next steps: experiment, refine, and expand
You do not need a perfect system to get started. Begin small, then improve as you go:
- Run the workflow with a sample campaign JSON and review the generated documentation.
- Iterate on the prompt to adjust tone, length, and level of detail until it matches your style.
- Integrate the Form Trigger into your campaign intake process so every new campaign starts with documentation.
- Later, connect project management tools or repositories to trigger docs automatically from your planning board.
Each iteration makes your workflow a little smarter and your team a little more focused.
Call to action: Ready to turn documentation into a strength instead of a bottleneck? Export the n8n workflow from this post, test it with a sample JSON, and send your first AI-generated campaign doc to a teammate. When you are ready to customize the prompt, secure credentials, or extend the automation to more tools, reach out to our team for a tailored implementation.
Build a CI/CD Pipeline Auditor with n8n & AI

Build a CI/CD Pipeline Auditor with n8n & AI
Learn how to build an automated CI/CD pipeline auditor using n8n, OpenAI, and email notifications. This step-by-step guide explains the concepts, walks through the workflow node by node, and shows you how to customize and secure the setup.
What you will learn
By the end of this tutorial, you will know how to:
- Set up an n8n workflow that accepts CI/CD pipeline configuration files through a form
- Use OpenAI to generate structured, audit-style documentation for a pipeline
- Send the audit results via email and return a formatted HTML report
- Customize prompts, templates, and notifications for your team
- Apply basic security and compliance practices when using AI with pipeline files
This guide is ideal if you want to automate pipeline documentation, streamline audits, and reduce manual review work in your DevOps process.
Why automate CI/CD pipeline audits?
Engineering teams often struggle to keep CI/CD pipelines well documented and auditable. Manual reviews are slow, inconsistent, and easy to deprioritize when delivery pressure is high. At the same time, missing or outdated documentation:
- Slows down onboarding for new engineers
- Increases operational risk when pipelines change
- Makes audits and compliance checks harder
Using n8n and an AI model like OpenAI, you can automatically:
- Ingest a pipeline configuration file (for example GitHub Actions, GitLab CI, Jenkinsfile, or Azure Pipelines)
- Generate a concise, structured audit report
- Send the report to the right stakeholders via email
- Return an HTML report that can be viewed directly in a browser
How the n8n CI/CD Pipeline Auditor works
At a high level, the workflow does the following:
- Collects pipeline details from a webhook-based form
- Builds a clear, structured prompt for the AI model
- Combines the user inputs and the pipeline file into a single AI request
- Uses OpenAI to generate audit documentation
- Sends the results by email
- Returns a polished HTML report in the webhook response
Expected outputs from each run
For every pipeline file submitted, the workflow produces:
- Clear, structured audit documentation for the CI/CD pipeline
- An email notification to the specified recipient, including the audit content
- An HTML report that can be viewed directly from the webhook response
- Documentation that follows a consistent structure, controlled by your prompt template
Prerequisites and setup
Before you build or run the workflow, make sure you have:
- An n8n instance (cloud or self-hosted)
- An OpenAI API key configured in n8n credentials
- Email credentials or OAuth set up in n8n (for example Gmail or another SMTP provider)
- Basic access control for the webhook endpoint, especially if it will be exposed externally
Managing credentials and secrets
To keep your setup secure:
- Store all credentials in the n8n credentials store, not directly in nodes, prompts, or logs
- Ask users to remove or mask secrets (tokens, private keys, passwords) from pipeline files before submission, or
- Add an automatic redaction step to the workflow so sensitive values are removed before content is sent to OpenAI
These practices reduce the risk of leaking sensitive data to third-party services.
Step-by-step: building the workflow in n8n
This section walks through each node in the workflow and explains how they connect. You can follow along in n8n and recreate the pipeline auditor from scratch or use these steps to understand and customize the existing template.
1. Collect input with pipeline-form-trigger
The workflow starts with a webhook-based form node. This node exposes a URL where users can submit pipeline information. Typical fields include:
- Pipeline file content – the full CI/CD configuration file pasted or uploaded
- Pipeline name – a human-readable name for the pipeline
- Pipeline type – for example:
- GitHub Actions
- GitLab CI
- Jenkinsfile
- Azure Pipelines
- Other
- Notification email – the address where the audit report should be sent
You can embed this form in an internal portal, share the webhook URL with your team, or trigger it from other systems for automated audits.
2. Design the AI instructions with prepare-audit-prompt
Next, you need a node that creates a deterministic, well-structured prompt for the AI model. The prepare-audit-prompt node typically contains static text that explains to the model:
- Who the pipeline is for (target audience)
- What problem the pipeline solves and the use case
- How to summarize the pipeline overview (triggers, stages, jobs, and key steps)
- Which details to highlight, such as environment variables and secrets references
- Expected outcomes, like builds, artifacts, deployments, and notifications
- Setup and rollout instructions
- Customization tips for different teams or environments
- Security and compliance recommendations
Because the prompt is the main control for the AI output, keeping it clear and structured will give you consistent, high-quality documentation.
3. Combine user input and prompt in compose-ai-input
The compose-ai-input node merges everything the model needs into a single input. It usually does the following:
- Takes the prompt text from
prepare-audit-prompt - Adds dynamic values from the form, such as the pipeline name and type
- Appends the full pipeline configuration file
The result is one structured string that the AI model can analyze. This helps ensure that the audit report is tailored to the specific pipeline, not just generic documentation.
4. Generate documentation with generate-audit-documentation (OpenAI)
The generate-audit-documentation node is an OpenAI node configured to call a chat model such as GPT-4. It uses the combined input from compose-ai-input as the message content.
Recommended OpenAI settings include:
- Model: a capable chat model, for example GPT-4
- Temperature: around 0.2 to 0.7 for a balance between reliability and variety
- Max tokens: a relatively high limit so the model can produce comprehensive documentation
The node returns the generated audit text, which you will use both in the email and in the HTML response.
5. Notify stakeholders with send-email-notification
Once the AI has generated the audit, the send-email-notification node sends an HTML email to the address provided in the form. In this email, it is useful to include:
- A clear subject line referencing the pipeline name
- A short summary or header describing the audit
- The full audit content in a readable HTML layout
This way, stakeholders can review the documentation directly from their inbox, without needing to access the webhook response or n8n itself.
6. Return a web-ready report with respond-with-html-report
The final node in the workflow responds to the original webhook request. It typically returns:
- A polished HTML report that includes the generated audit content
- Metadata such as the pipeline name, type, and a timestamp
This is especially useful when the form is used directly in a browser or embedded into internal documentation portals, where users expect to see the results immediately on screen.
Understanding the audit report structure
The AI-generated audit usually follows a consistent structure. By default, you can expect sections such as:
- Who is this pipeline for? – describes the intended audience, for example backend engineers, DevOps teams, or data engineers
- What problem it solves / Use case – summarizes the business or technical goal of the pipeline
- Pipeline overview – outlines triggers, jobs or stages, and key steps in the workflow
- Environment variables and secrets referenced – lists configuration values that must be set for the pipeline to work
- Expected outcomes – explains what the pipeline produces, such as artifacts, deployments, or notifications
- Setup and rollout instructions – provides guidance on how to enable and roll out the pipeline
- Customization tips – offers ideas for adapting the pipeline to different environments or teams
- Security and compliance considerations – highlights potential risks and best practices
This structure is fully controlled by the prompt text in the prepare-audit-prompt node. Adjusting that prompt lets you align the documentation with your organization’s templates, compliance requirements, or internal style guide.
Example prompt (trimmed)
Here is a shortened example of the kind of instructions you might use in the prompt node:
"""
Analyze the provided CI/CD pipeline file and produce concise, actionable documentation for DevOps stakeholders.
Include: who is this for, what problem it solves, pipeline overview, expected outcomes, setup instructions, customization tips, and security considerations.
"""
Customization ideas for your workflow
Once the basic workflow is working, you can extend it to better fit your environment.
Improve safety with automated redaction
Add a node that scans the pipeline text for patterns that look like secrets, such as API keys or tokens, and masks them before sending the content to OpenAI. This reduces the risk of exposing sensitive data.
Use repository webhooks as triggers
Instead of (or in addition to) manual form submissions, you can:
- Connect GitHub or GitLab webhooks to the workflow
- Trigger an audit automatically when a pipeline file changes
This turns the workflow into a continuous documentation and audit tool for your CI/CD configurations.
Send multi-channel notifications
Beyond email, you can route audit summaries to:
- Slack or Microsoft Teams channels for quick visibility
- Jira or similar tools to create tickets for follow-up actions
Add quality gates and checks
You can extend the prompt or add additional logic so that the workflow:
- Checks for the presence of tests, security scanning, or manual approvals
- Flags missing critical steps in the documentation
- Optionally fails a run or opens a ticket when important checks are missing
Version and store reports
For long-term audits and compliance, consider:
- Saving each generated report to a central repository or object storage like S3
- Tagging reports with commit hashes or pipeline versions
- Building a simple index or dashboard of past audits
Security and compliance best practices
AI-assisted workflows that process configuration files can introduce new security considerations. To keep your system compliant and safe:
- Redact secrets before sending any content to third-party APIs like OpenAI
- Use role-based access control for the n8n form and webhook so only authorized users can submit pipelines
- Store generated reports securely in an access-controlled location and keep audit logs of who ran which reports
- Document data retention and make sure your handling of PII and secrets aligns with your organization’s policies
Rollout checklist
Use this checklist when you are ready to move from experimentation to a real rollout:
- Deploy n8n and configure OpenAI credentials
- Create and secure the webhook or form, and verify that access control is in place
- Test the workflow with a non-sensitive pipeline file and confirm:
- The AI generates a useful audit
- The email is delivered with the expected content
- The HTML report is returned correctly by the webhook
- Add redaction logic or clear consent messaging for pipelines that may contain secrets
- Iterate on the prompt and email or HTML templates based on feedback from stakeholders
Final tips and next steps
When you first introduce this workflow, start with a low-risk approach:
- Limit access to internal users
- Require redaction of secrets before submission
- Review a sample of generated reports to check for consistency and accuracy
As you gain confidence, you can expand usage and add features like automated quality gates or integration with change management systems. For example, you might automatically create change requests when a pipeline lacks certain approvals or security checks.
Call to action: Try deploying this workflow in a staging environment and run it against a few representative pipelines. If you want a copy of the n8n workflow or need help tailoring the prompts and templates to your stack, contact your DevOps automation team or reply to this post to request support.
n8n CI/CD Pipeline Auditor Workflow Guide
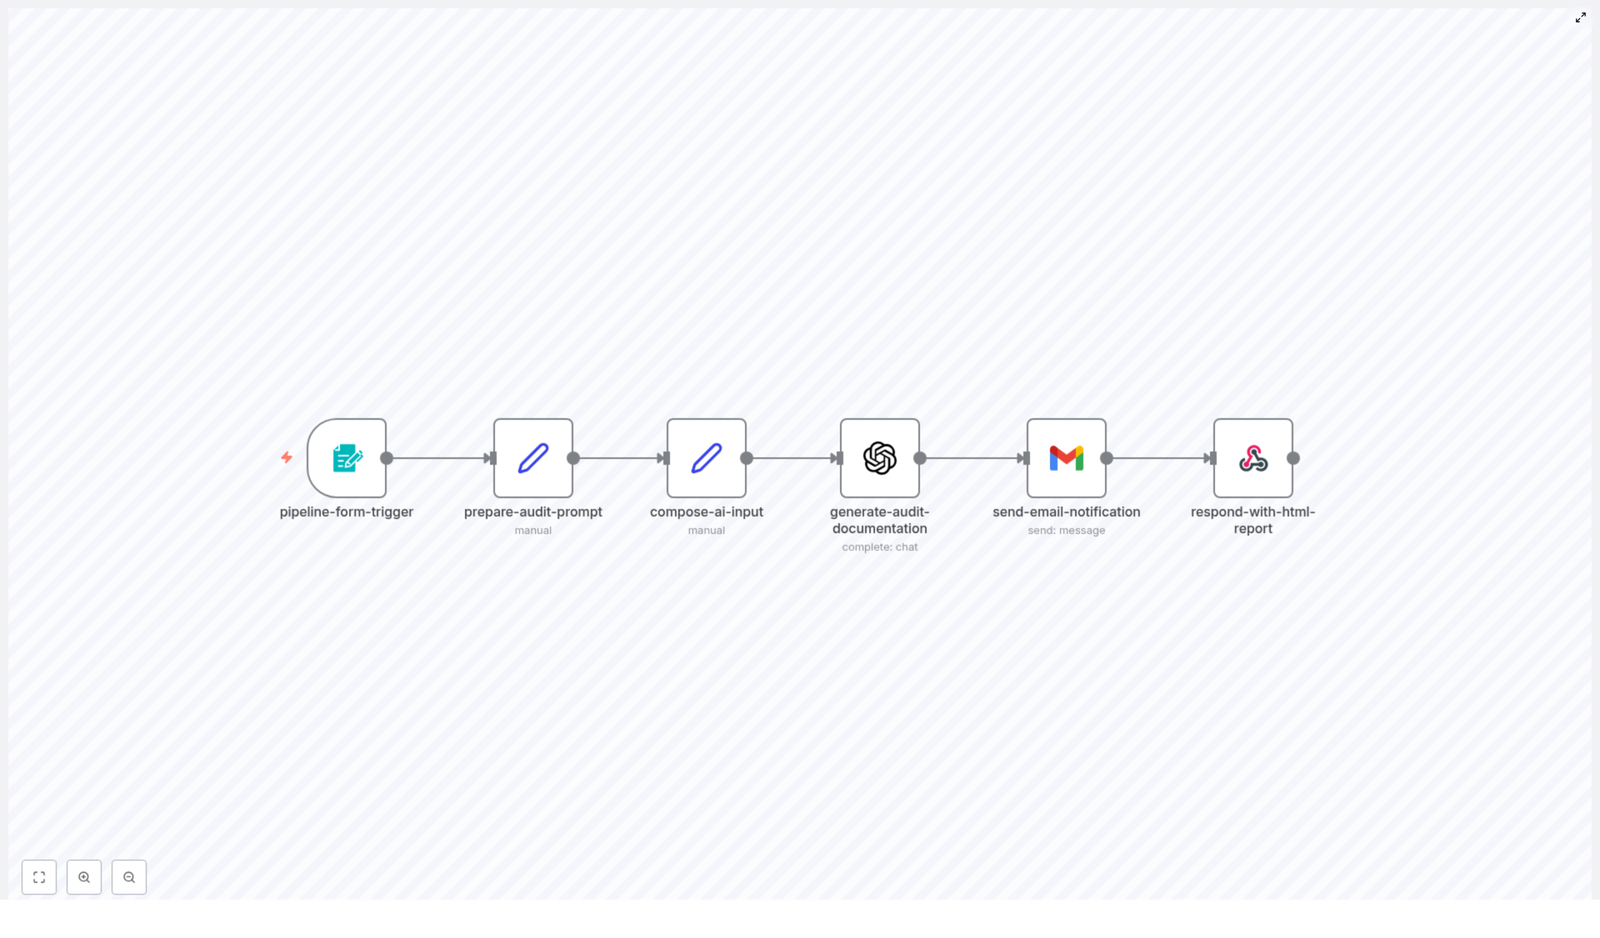
n8n CI/CD Pipeline Auditor Workflow Guide
Follow the story of a DevOps engineer who turns chaotic CI/CD reviews into a smooth, automated process using an n8n workflow that audits pipeline configuration files with OpenAI and delivers polished HTML and email reports.
The problem: one engineer, too many pipelines
When Maya joined her new team as a DevOps engineer, she thought she was ready for anything. She had years of experience, a solid grasp of CI/CD, and a love for automation. What she did not expect was the sheer volume of pipeline files that needed review.
Every week, developers sent her YAML snippets, Jenkinsfiles, and Azure Pipelines configs through email, chat, and even screenshots in tickets. Some were neatly documented, others were mysterious blocks of configuration with no comments at all.
Her reality looked like this:
- No standard way to review pipelines across teams
- Long delays in giving feedback because everything was manual
- Developers confused by cryptic CI/CD configs and missing documentation
- Security and compliance concerns buried inside unreadable files
Each review required her to read through the pipeline, figure out who it was for, what problem it solved, and whether it followed best practices. Then she had to write a clear explanation and send it back in an email. It was important work, but it was also repetitive and slow.
Maya knew there had to be a better way. What she wanted was simple: a standardized, automated CI/CD audit that could turn raw pipeline files into human-readable reports, and send them directly to stakeholders.
The discovery: a CI/CD pipeline auditor template in n8n
One afternoon, while exploring ways to automate her workload, Maya came across an n8n workflow template called CI/CD Pipeline Auditor. The description immediately caught her eye. It promised to:
- Accept pipeline files through a form
- Use an OpenAI model to generate concise audits and documentation
- Email the results as an HTML report
- Return a polished HTML page right in the browser
In other words, exactly what she had been trying to cobble together by hand.
Under the hood, the workflow automated pipeline audits for teams that needed consistent, actionable reviews of YAML, Jenkinsfiles, and Azure Pipelines configurations. It was designed to standardize configuration reviews, save time, and make audits understandable for both engineers and non-technical stakeholders.
For Maya, this was not just a cool template. It was a potential escape from her never-ending backlog of manual CI/CD reviews.
How the workflow actually works: Maya follows the path
Before she trusted the template with real pipeline files, Maya wanted to understand exactly how it operated. She opened it in n8n and traced the linear flow of nodes from left to right.
The high-level journey of a pipeline file
- Form Trigger collects the pipeline name, pipeline file content, notification email, and pipeline type.
- Set (prepare prompt) builds a detailed prompt with guidelines and examples for OpenAI.
- Set (compose AI input) combines the form data and prompt into a single payload.
- OpenAI (generate audit) produces the audit documentation.
- Gmail (send email) delivers the audit as an HTML email to stakeholders.
- Respond to Webhook returns a polished HTML report directly to the browser or form submitter.
What impressed Maya was how each node had a clear purpose. It was not a messy tangle of logic. It was a straightforward pipeline for auditing pipelines.
Rising action: setting up the auditor in Maya’s environment
To bring the workflow to life, Maya needed a few essentials in place.
Prerequisites she prepared
- An n8n instance with internet access, running in her organization’s environment
- An OpenAI API key added to n8n credentials
- Gmail OAuth2 credentials, ready to use with the email node (or the option to swap to SMTP or SendGrid later)
- Optional but recommended: secure hosting for the webhook so teams outside the internal network could submit pipelines
Installation steps she followed
- Imported the workflow JSON into her n8n instance.
- Opened the Form Trigger node and customized the webhook path and form fields.
- Attached her OpenAI credential to the OpenAI node, set a GPT-4 class model, a moderate temperature (around 0.7), and a generous max tokens limit.
- Configured the Gmail node with OAuth2 details, keeping in mind she could switch to another provider if needed.
- Activated the workflow and prepared a sample pipeline file to test the entire flow.
With the basics wired up, the real test was about to begin.
The turning point: the first automated audit
Maya opened the form exposed by the pipeline-form-trigger node. The form was simple but purposeful, with fields that mapped directly to the workflow logic.
Step 1: submitting a pipeline via the form
The pipeline-form-trigger node provided these fields:
- Pipeline Name as a text input
- Pipeline File as a textarea where she pasted YAML or Jenkinsfile content
- Notification Email for whoever needed the report
- Pipeline Type as a dropdown with options like GitHub Actions, GitLab CI, Jenkinsfile, Azure Pipelines, and Other
This single form meant engineers could submit pipeline files for on-demand auditing without needing CLI tools or direct repository access. For Maya, it was the beginning of self-service CI/CD audits.
Step 2: preparing the AI audit prompt
Once the form was submitted, the prepare-audit-prompt Set node took over. Inside it, Maya found a carefully written prompt template for the OpenAI model.
The prompt instructed the model to produce a concise, actionable audit that covered:
- Who the pipeline is for
- The use case and problems it solves
- A clear pipeline overview, including triggers, jobs or stages, environment variables, and images
- Expected outcomes of running the pipeline
- Setup, rollout, and customization tips
- Security and compliance notes
Instead of leaving the model to guess, the node enforced a structured output that Maya could rely on.
Step 3: composing the AI input payload
The next Set node, compose-ai-input, combined the form data and the prompt into a single string payload. It merged:
- The raw pipeline configuration
- The instructions that defined how the audit should look
- Any context from the pipeline type dropdown
This ensured the OpenAI node received everything it needed in one well-structured request.
Step 4: generating the audit with OpenAI
The generate-audit-documentation node was where the magic happened. Using an OpenAI Chat model, configured with GPT-4 class capabilities, it generated the final audit text.
With a moderate temperature and a generous token limit, the model could provide detailed but focused analysis. Maya watched the first run and saw the AI return a full breakdown of her sample pipeline, including explanations and recommendations.
Step 5: emailing the results
Next, the send-email-notification Gmail node took the AI output and wrapped it into an HTML email. It sent the message to the notification address provided in the form, complete with a summary header and formatted sections.
She had already configured OAuth2 credentials in n8n, so the email arrived within seconds. For the first time, a pipeline audit landed in her inbox without her writing a single line of explanation manually.
Step 6: returning a polished HTML report
Finally, the respond-with-html-report node returned a styled HTML page directly to the browser. The template included simple styling, a success badge, and the audit content formatted for readability.
Anyone who submitted a pipeline through the form would see an instant, well-structured report without waiting for a human response.
The result: consistent audits and a calmer DevOps life
Within a week of rolling out the workflow, Maya noticed a shift.
- Configuration reviews became standardized across teams.
- Developers received clear, human-readable audit reports instead of raw YAML feedback.
- Email delivery and HTML output were fully automated, freeing her from repetitive explanations.
- OpenAI’s recommendations were concise and actionable, helping teams improve pipelines faster.
The workflow did not replace her expertise, but it amplified it. She could focus on complex edge cases and architectural decisions instead of re-explaining the same CI/CD basics for every new pipeline.
Going further: how Maya customized the n8n template
Once the core workflow was stable, Maya started extending it to match her organization’s needs. The template was intentionally modular, so customization felt natural.
Ideas she explored
- Adding a code scanner node to run tools like
yamllintorhadolintbefore the audit. - Integrating a secrets scanner, such as GitGuardian, before sending content to OpenAI.
- Persisting audits to a database like MySQL or Postgres for historical tracking.
- Creating tickets in Jira whenever a pipeline needed follow-up work.
- Sending results to Slack or Microsoft Teams channels for faster collaboration.
- Posting audit summaries as comments on GitHub pull requests instead of or in addition to email.
- Introducing role-based access controls and an approval step for production pipeline changes.
Each enhancement built on the same foundation: a simple form, a well-crafted AI prompt, and a clear reporting flow.
Security and compliance: what she put in place
Because the workflow passed pipeline configuration to a third-party model, Maya treated security and compliance as first-class concerns.
She implemented several best practices:
- Masked or removed secrets such as API keys and passwords before sending any content to OpenAI.
- Limited exposure of private repository details by fetching config files server-side whenever possible, instead of asking users to paste sensitive content.
- Used organizational OpenAI access controls and data usage policies to manage how data was handled.
- Logged who requested each audit and defined a retention policy for audit data.
These safeguards allowed her to benefit from automated audits without compromising sensitive information.
Best practices Maya learned while tuning the workflow
Over time, Maya refined the template to make the audits even more reliable and useful.
- She made the OpenAI prompt very explicit about the output structure to ensure consistent formatting.
- She kept the model focused on actionable steps, preferring brevity and clarity over long, unfocused analysis.
- She used the pipeline type dropdown to give the model context, such as whether it was GitHub Actions or a Jenkinsfile.
- She added an initial validation step to catch syntax issues in YAML before sending it to the model.
- She experimented with adding a severity score or checklist style output for quick triage.
These small adjustments turned the workflow from a generic template into a dependable internal tool.
What the AI-generated audit looks like
The prompt in Maya’s workflow asked OpenAI to return a structured audit with clear sections. A typical output followed a pattern like this:
# Who is this pipeline for?

# What problem does this pipeline solve?

# Pipeline Overview
- Triggers
- Jobs/Stages
- Key steps
- Environment variables

# Expected Outcomes

# Setup & Rollout Instructions

# How to customize

# Security & Compliance Considerations
Because the structure was predictable, it was easy to scan, share, and even parse programmatically for further automation.
Automate Mailing Address Verification with n8n & Lob
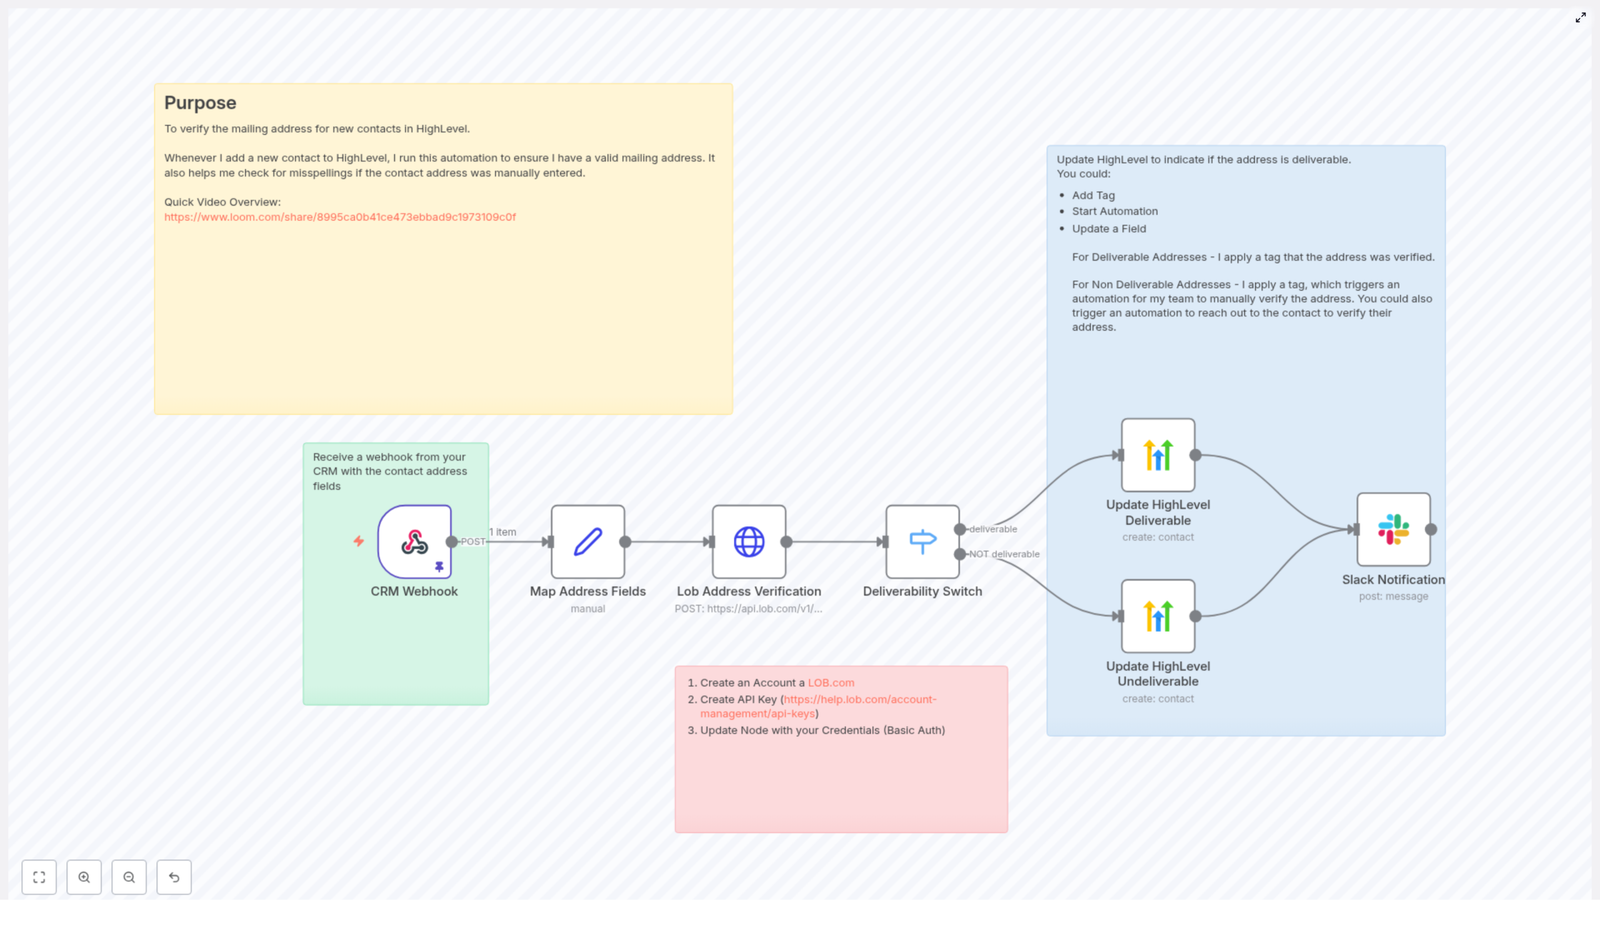
Automate Mailing Address Verification with n8n & Lob
Maintaining accurate and deliverable mailing addresses in your CRM is essential for direct mail campaigns, billing, and customer communications. This technical guide documents an n8n workflow template that validates new contact mailing addresses with Lob’s US address verification API, then updates HighLevel and notifies your team automatically.
The workflow is designed for operations, marketing, and engineering teams that want a reliable, repeatable address verification pipeline integrated into their CRM stack.
1. Workflow Overview
This n8n automation is triggered whenever a new contact is created in your CRM. The workflow:
- Receives a webhook payload from your CRM that includes contact and address data.
- Normalizes the incoming fields into a consistent structure.
- Submits the address to Lob’s
/v1/us_verificationsendpoint. - Evaluates the
deliverabilitystatus returned by Lob. - Updates the contact in HighLevel with appropriate tags based on deliverability.
- Sends a Slack notification so your team can review or act when needed.
The result is a fully automated address verification pipeline that reduces returned mail, improves data quality, and provides clear visibility into address status directly inside your CRM.
2. Components & Prerequisites
2.1 Tools and Services
- n8n – Open-source automation platform that orchestrates the workflow.
- Lob – Address verification API, using the US verifications endpoint.
- HighLevel – CRM where contact records and tags are updated.
- Slack – Used to send real-time notifications to a channel.
- Your CRM – Origin system that sends a webhook into n8n when a contact is created.
2.2 Required Data From Your CRM
The webhook payload from your CRM should include at minimum:
- Address line 1 (street address).
- City.
- State.
- ZIP / postal code.
- Contact identifier (email, phone, or contact_id) that can be used to locate the record in HighLevel.
Optional but recommended fields:
- Secondary address line (apartment, suite, unit, etc.).
- Phone number.
3. Architecture & Data Flow
The workflow follows a linear but branching architecture:
- Webhook node receives contact data from your CRM.
- Set node maps and normalizes address fields into a predictable format.
- HTTP Request node calls Lob’s US address verification API with the mapped fields.
- Switch node evaluates Lob’s
deliverabilityvalue and routes execution. - HighLevel node(s) update the contact record with tags for deliverable or non-deliverable addresses.
- Slack node sends a summary message to a chosen channel.
Error handling and retries can be layered on top of this architecture using n8n’s error workflows, Retry, and Delay nodes.
4. Node-by-Node Breakdown
4.1 Webhook Node – Inbound CRM Trigger
Purpose: Accepts HTTP POST requests from your CRM when a new contact is created or updated.
- HTTP Method:
POST - Payload: JSON body containing contact and address fields.
Typical expected payload fields:
address– Primary street address.city– City name.state– State or region (for example,DC).zip_code– ZIP or postal code.email– Contact email used for HighLevel lookup.phone– Contact phone number used for HighLevel lookup.contact_id– Optional unique identifier for the contact.
Configuration notes:
- Expose the Webhook URL that n8n generates and configure your CRM to send a POST request to that URL on contact creation.
- Ensure the CRM sends all required fields. Missing fields may cause Lob to return
riskyorundeliverable. - Include at least one stable identifier (email, phone, or contact_id) that matches how you plan to update contacts in HighLevel.
4.2 Set Node – Address Field Normalization
Purpose: Normalize incoming CRM fields into a uniform structure for use in the Lob API request.
Example mapping used in the template:
address: {{ $json.address }}
address2: (optional)
city: {{ $json.city }}
state: {{ $json.state }}
zip: {{ $json.zip_code }}
Key points:
address2can be left blank or mapped from a secondary address line if your CRM provides it.- Use this node to trim whitespace, adjust casing, or perform simple transformations if needed.
- Verify that the field names in this node match exactly with your CRM’s webhook payload keys.
4.3 HTTP Request Node – Lob Address Verification
Purpose: Call Lob’s US address verification API with the normalized address fields.
Endpoint:
POST https://api.lob.com/v1/us_verifications
Body parameters:
primary_line={{ $json.address }}
secondary_line={{ $json.address2 }}
city={{ $json.city }}
state={{ $json.state }}
zip_code={{ $json.zip }}
You can send these fields as form-encoded or JSON, depending on how the HTTP Request node is configured in your n8n instance.
Authentication:
- Use your Lob API key via Basic Auth or an
Authorizationheader. - Configure this in n8n’s credentials manager rather than hardcoding it into the node.
Response:
Lob returns a JSON object that includes a deliverability field, for example:
deliverableundeliverablerisky
This field is later evaluated by the Switch node. You can also choose to store the full response for auditing or debugging purposes.
4.4 Switch Node – Deliverability Evaluation
Purpose: Route the workflow based on Lob’s deliverability value.
Expression evaluated: $json.deliverability
In the template, at least two branches are defined:
- Case:
deliverable– The address is recognized as deliverable. The workflow proceeds to tag the contact as “Mailing Address Deliverable” in HighLevel. - Case: not
deliverable– For values such asundeliverableorrisky, the workflow tags the contact as “Mailing Address NOT Deliverable” and can trigger a manual verification process for your team.
Edge considerations:
- If Lob introduces new deliverability statuses, ensure the Switch node is updated accordingly.
- You can add additional branches to treat
riskydifferently from fullyundeliverableif your use case requires it.
4.5 HighLevel Node – Contact Update
Purpose: Update the corresponding contact record in HighLevel with deliverability tags.
The template is configured to update contacts by email or phone, but you can also pass contact_id if your CRM mapping supports it.
Example additionalFields configuration:
additionalFields: {  tags: "Mailing Address Deliverable"
}
For non-deliverable addresses, the tag is adjusted accordingly, for example:
Mailing Address NOT Deliverable
Usage notes:
- Confirm the identifier used for the update (email, phone, or contact_id) matches what HighLevel expects.
- Once tagged, you can use HighLevel’s internal automation features to:
- Trigger manual verification workflows.
- Start follow-up sequences to request corrected addresses from contacts.
4.6 Slack Node – Team Notification
Purpose: Notify your team when an address verification has been processed.
After the HighLevel update, a Slack node sends a concise message to a chosen channel.
Example message template:
Mailing address verification for {{ $json.email }}: {{ $json.deliverability }}
Configuration notes:
- Use n8n’s Slack credentials to authenticate with your workspace.
- Set the channel where operations, support, or marketing teams can monitor verification results.
- Consider including additional context such as contact_id or tags if your team needs more detail.
5. Error Handling & Reliability
Address verification calls can fail due to transient network issues, API limits, or malformed input. To increase reliability:
- Use n8n error workflows: Configure an error workflow to catch failures from the Lob HTTP Request node and apply a retry strategy.
- Retry and delay: Use Retry or Delay nodes to back off and retry requests that fail due to rate limits or temporary network errors.
- Logging failed verifications: Log failures to a spreadsheet, database, or another system of record for manual follow-up.
- Rate limiting: If your CRM generates high volumes of new contacts, consider batching or queuing requests to avoid hitting Lob rate limits.
6. Security & Credentials Management
Protecting API keys is critical when integrating external services like Lob and HighLevel.
- Use n8n credentials manager: Store Lob and HighLevel API keys in n8n’s credentials system rather than hardcoding them into nodes.
- Avoid plaintext in exports: Do not embed API keys directly in node parameters or expressions, which could end up in exported workflow JSON.
- Environment variables: Where appropriate, use environment variables in combination with n8n credentials for secure configuration.
7. Testing with Sample Data
n8n allows you to pin test data to the Webhook node, which is extremely useful for developing and validating the workflow without relying on live CRM events.
Sample payload used in the template:
{  "city": "Washington",  "email": "mr.president@gmail.com",  "phone": "877-555-1212",  "state": "DC",  "address": "1600 Pennsylvania Avenue NW",  "zip_code": "20500",  "contact_id": "5551212"
}
Recommended test steps:
- Pin this JSON payload on the Webhook node.
- Execute the workflow manually from the Webhook node onward.
- Inspect the Lob response and confirm the
deliverabilityfield is being evaluated correctly by the Switch node. - Verify that the HighLevel contact is updated and that the Slack notification is sent as expected.
8. Best Practices for Production Use
- Normalize inputs: Trim whitespace, standardize casing, and ensure fields are not null before sending data to Lob.
- Persist Lob responses: Store the raw Lob response in a custom field or external store for auditing and troubleshooting.
- Timestamped verification tags: Use tags such as
address_verified_2025-10-24to track when an address was last validated. - Manual verification queue: For contacts tagged as “Mailing Address NOT Deliverable”, build a small queue or view where your team can work through corrections and outreach.
9. Common Pitfalls & How to Avoid Them
- Field mapping mismatches: Ensure CRM field names match what the Set node expects. A mismatch can result in empty or incorrect values being sent to Lob.
- Missing authentication: Lob requires a valid API key and sufficient quota. Double-check credentials if you see authentication or quota-related errors.
- Partial or incomplete addresses: Incomplete inputs can cause Lob to return
riskyorundeliverable. Make sure your CRM enforces required fields where possible.
10. Summary & Next Steps
This n8n workflow template delivers a complete, production-ready address verification pipeline:
- Accepts a webhook from your CRM when a new contact is created.
- Normalizes address fields for consistent processing.
- Calls Lob’s US address verification API.
- Branches on the
deliverabilityresult using a Switch node. - Updates the corresponding contact in HighLevel with clear deliverability tags.
- Notifies your team via Slack so they can respond quickly when an address is not deliverable.
By automating mailing address verification, you reduce returned mail and wasted postage, improve campaign deliverability, and maintain higher quality CRM data while freeing your team from manual checks.
How to get started:
- Import the n8n workflow template into your n8n instance.
- Configure Lob and HighLevel credentials securely via the n8n credentials manager.
- Pin the sample data to the Webhook node and run a few test executions.
- Connect your CRM’s webhook to the n8n Webhook URL once testing is successful.
If you need help adapting the template to your CRM schema or internal processes, you can extend the mapping logic, add additional branches for specific deliverability states, or integrate more notification channels as required.
Call to action: Import the template into n8n and verify your first 10 addresses today. If you need assistance integrating this workflow into your stack, reach out or leave a comment and we can help tailor the flow to your specific CRM and data model.
n8n WhatsApp Echo Workflow Guide
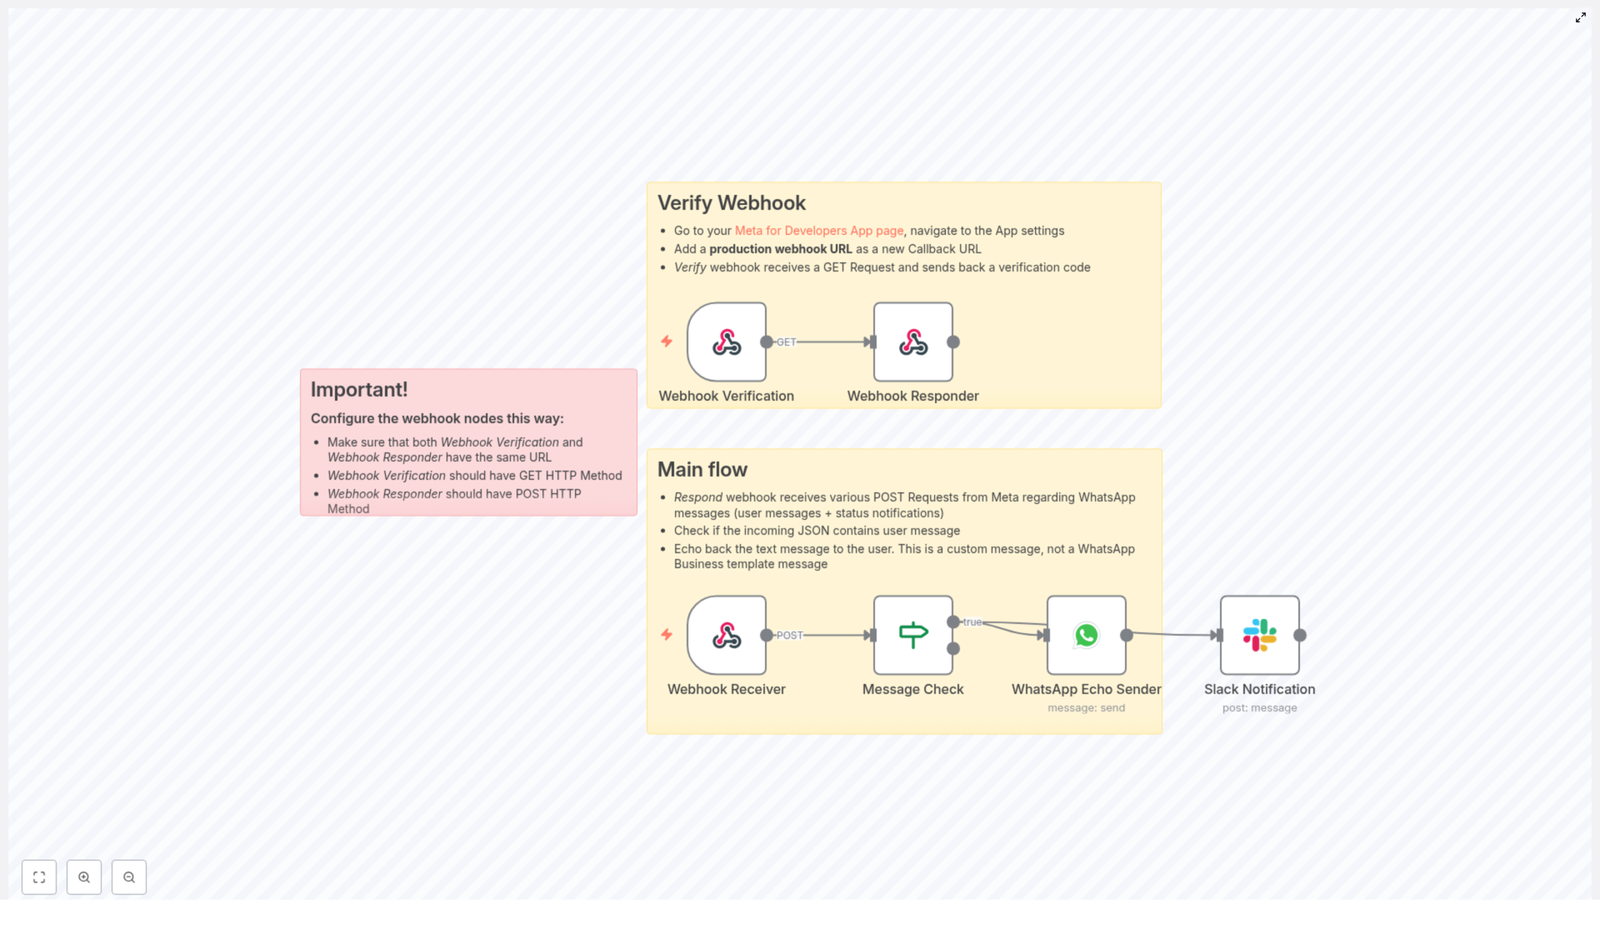
n8n WhatsApp Echo Workflow Guide: Learn, Build, and Test Your Integration
This guide teaches you how to build and understand a complete WhatsApp Echo workflow in n8n. You will learn how to:
- Verify Meta (Facebook) webhook callbacks using a GET request
- Receive incoming WhatsApp messages via POST webhooks
- Check that a user message exists before replying
- Send an echo response back to the sender through the WhatsApp Business API
- Send a Slack notification every time a message is received
- Apply best practices for security, testing, and troubleshooting
By the end, you will not just have a working template, you will also understand how each n8n node fits together and how to extend this workflow later.
1. What Is a WhatsApp Echo Workflow and Why Use It?
A WhatsApp Echo workflow is a simple automation that receives a message from a user, then replies with the same (or a modified) text. It is mainly used as a diagnostic and learning tool.
Why start with an echo flow?
An echo workflow is ideal when you are first connecting n8n to the WhatsApp Business API because it helps you:
- Validate webhook setup Confirm that Meta can reach your n8n webhook and that your GET verification handshake is working.
- Test message parsing Check that you are reading the correct JSON paths from Meta’s payload.
- Prototype responses Try out automated replies before you invest time in message templates or complex logic.
- Notify internal tools Send alerts to Slack or other tools whenever a message arrives.
Once this echo workflow is stable, you can safely build richer automations on top of it.
2. How the n8n WhatsApp Echo Workflow Is Structured
The template is built from several connected nodes in n8n. Each node has a clear role in the flow, from receiving the webhook to sending the reply.
High-level components
- Webhook Verification (GET) – Handles Meta’s initial webhook verification by returning the
hub.challengevalue. - Webhook Receiver (POST) – Accepts incoming WhatsApp webhook events (messages, status updates, etc.).
- Webhook Responder (POST) – Sends responses back to Meta when needed.
- Message Check (If node) – Checks if the incoming JSON contains a user message.
- WhatsApp Echo Sender – Sends an echo reply to the user using your WhatsApp Business API credentials.
- Slack Notification – Posts a summary of the message into a Slack channel for monitoring or debugging.
The key idea is that the GET and POST webhooks share the same path, so Meta can verify and then use that same URL for message delivery.
3. Understanding the Incoming WhatsApp Webhook Payload
Before configuring nodes, it helps to see the structure of the JSON that Meta sends to your webhook.
Example trimmed payload
{  "object": "whatsapp_business_account",  "entry": [  {  "changes": [  {  "value": {  "messages": [  {  "from": "1234567890",  "id": "ABGGH1",  "timestamp": "161975",  "text": {  "body": "Hello"  }  }  ]  }  }  ]  }  ]
}
In this example:
messages[0].fromis the sender’s phone number.messages[0].text.bodyis the message text the user sent.
These paths are exactly what you will reference in n8n expressions for the echo reply and the Slack notification.
4. Step-by-Step: Building the Workflow in n8n
This section walks through each node in the order you would typically configure them. Follow along in your n8n instance while you read.
4.1 Webhook Verification (GET)
Goal: Respond correctly to Meta’s webhook verification request during setup.
When you configure your webhook in the Meta Developer dashboard, Meta sends a GET request to your URL with a hub.challenge parameter. Your endpoint must return this value so that Meta can confirm ownership.
Configuration steps:
- Create a Webhook node in n8n.
- Set the HTTP Method to
GET. - Choose a Path (for example
/whatsapp-webhook). You will reuse this same path for the POST webhook. - Connect this node to a Webhook Responder node (explained below) or configure the response directly in the node if your setup allows.
Returning the challenge:
The Webhook Responder should return the value Meta sends in hub.challenge. In n8n, set the response body to an expression like:
={{ $json.query['hub.challenge'] }}This tells n8n to read the query parameter from the GET request and send it back as the response body.
4.2 Webhook Receiver (POST)
Goal: Receive incoming WhatsApp events from Meta as POST requests.
Once Meta has verified your webhook, it will send message events to the same URL but using the POST method.
Configuration steps:
- Create another Webhook node.
- Set the HTTP Method to
POST. - Set the Path to exactly the same value as the GET node (for example
/whatsapp-webhook). - Ensure the node is configured to pass the raw JSON body into the workflow.
At this point, any WhatsApp message will trigger the POST webhook and the JSON data will be available to downstream nodes.
4.3 Webhook Responder (POST)
Goal: Send HTTP responses for POST webhook calls when needed.
While WhatsApp webhooks often work fine with a simple 200 OK, using a dedicated Webhook Respond node gives you more control over the response body and headers.
Configuration steps:
- Add a Webhook Respond node.
- Connect it after the Webhook nodes or at the end of the flow, depending on your design.
- Set the Response Mode to return a JSON or text response.
- Make sure the URL/path matches the Webhook nodes’ path so the response is tied to the correct request.
For testing, you can respond with a simple JSON such as {"status": "received"} to confirm that the webhook is working.
4.4 Message Check (If node)
Goal: Only send an echo reply when the payload actually contains a user message.
WhatsApp webhooks can include various types of events, such as message status updates. You usually only want to echo back when a message exists. The If node is used to check this.
Example condition:
leftValue: ={{ $json.body.entry[0].changes[0].value.messages[0] }}
operator: object exists
This condition checks whether messages[0] exists in the JSON. If it does, the workflow continues to the nodes that send the WhatsApp reply and Slack notification.
- If true (message exists): Proceed to WhatsApp Echo Sender and Slack Notification.
- If false (no message): End the workflow or handle other event types differently (for example, status updates).
4.5 WhatsApp Echo Sender
Goal: Send an echo response back to the user who sent the original WhatsApp message.
This node uses your WhatsApp Business API credentials to send a standard text message. It reads the sender’s number and text body from the incoming payload and constructs a reply.
Typical configuration fields:
- phoneNumberId Your WhatsApp phone number ID from the Meta Business settings.
- recipientPhoneNumber Use an expression to read the sender’s number:
= {{ $json.body.entry[0].changes[0].value.messages[0].from }} - textBody Use an expression to echo the incoming text:
=Echo back: {{ $json.body.entry[0].changes[0].value.messages[0].text.body }} - Operation Set to
send.
Important note about templates:
This is a free-form text message, not a pre-approved template. The WhatsApp Business API allows this type of non-template reply only within the 24-hour messaging window after the user’s last message.
4.6 Slack Notification
Goal: Notify your team in Slack whenever a WhatsApp message is received.
This node is useful for monitoring, debugging, or letting human operators see incoming messages without logging into n8n or the WhatsApp inbox.
Example message expression:
=Received WhatsApp message from {{$json.body.entry[0].changes[0].value.messages[0].from}}: {{$json.body.entry[0].changes[0].value.messages[0].text.body}}
This expression builds a summary string that includes both the sender’s number and the text body. Configure the Slack node with:
- Correct Slack credentials in n8n
- A valid channel name or ID
- Permissions that include the
chat:writescope for your Slack app
5. Deployment and Testing Tips
Once all nodes are configured, you need a proper environment for Meta to reach your n8n instance and for you to test the full flow.
5.1 Use HTTPS and a Public URL
Meta requires a publicly accessible HTTPS endpoint for webhooks. During development you can:
- Use a tunneling tool like ngrok to expose your local n8n instance over HTTPS.
- Use a dedicated staging server with valid TLS certificates.
5.2 Keep Webhook Paths Consistent
The following nodes must share the same path:
- Webhook Verification (GET)
- Webhook Receiver (POST)
Meta uses this single URL for both verification and incoming events. The Webhook Responder should return the verification challenge for GET requests and handle normal responses for POST events.
5.3 Verify Tokens Correctly
In your Meta App configuration, you set a verification token. Meta sends this token during the verification step and expects your endpoint to confirm it.
In a simple n8n-only setup, you can just return hub.challenge. If you implement custom logic outside n8n, or additional checks, make sure you validate the token before responding to the challenge.
5.4 Respect the 24-Hour Messaging Window
The WhatsApp Business API allows free-form, non-template replies only within a 24-hour period after the user’s last message. Outside that window you must use pre-approved message templates.
Your echo workflow relies on this rule, so for older conversations you may need to switch to templates or avoid sending a reply.
6. Troubleshooting Common Issues
If something is not working, use this checklist to quickly find the problem.
- Webhook verification failed
- Confirm that the GET handler returns the
hub.challengevalue exactly. - Verify that the callback URL in your Meta App settings matches the URL from the n8n Webhook node.
- Confirm that the GET handler returns the
- No messages reaching the workflow
- Inspect the raw JSON body in the Webhook Receiver node.
- Check that your path is correct and the method is set to POST.
- Confirm that you are reading the correct path:
entry → changes → value → messages.
- WhatsApp send errors
- Verify that
phoneNumberIdis correct. - Check that your WhatsApp credentials in n8n are valid.
- Ensure the WhatsApp Business account is approved to send messages.
- Verify that
- Slack notifications not appearing
- Confirm the Slack credentials and channel name or ID.
- Make sure your Slack app has the
chat:writescope. - Check n8n execution logs for any Slack API errors.
7. Security and Best Practices
Even for a simple echo workflow, you should treat your webhook endpoints as production-grade APIs.
- Validate incoming requests Use the app-level verify token or request signature verification provided by Meta, if available.
- Restrict access where possible Limit webhook exposure to Meta IP ranges or add secret headers that only Meta knows.
- Monitor and log failures Use n8n execution history to review errors, and consider external logging for critical production systems.
- Handle edge cases separately Messages with media, status updates, or system notifications should often follow a different branch instead of being echoed back as text.
8. Extending the WhatsApp Echo Workflow
Once your echo flow is working reliably, it becomes a strong foundation for more advanced WhatsApp automation in n8n.
- Automatic media handling Detect media messages, download images or audio, and store them in cloud storage.
- Rich bot logic Route messages to an NLP service or knowledge base to interpret intent and provide smarter replies.
- Fallback routing to humans Escalate to a human operator via Slack or email when the bot cannot understand the user’s request.
- Analytics and reporting Log messages to a database or data warehouse for metrics, dashboards, and long-term analysis.
9. Recap and Next Steps
You have seen how to build a complete n8n WhatsApp Echo workflow that:
- Handles Meta’s webhook verification using a GET request
- Receives WhatsApp messages via a POST webhook
- Checks for the presence of a message before replying
- Sends an echo response using the WhatsApp Business API
- Notifies a Slack channel whenever a new message arrives
- Applies security, testing, and troubleshooting best practices
To put this into practice:
- Deploy the workflow in your n8n instance.
- Configure your WhatsApp Business API credentials and phoneNumberId.
- Expose your webhook with HTTPS (for example using ngrok).
- Register the callback URL in your Meta Developer App settings.
- Send