Automate Lemlist Reply Routing with n8n & OpenAI

Automate Lemlist Reply Routing with n8n & OpenAI

If you are running any kind of cold outreach or nurture campaigns, you know the drill. Replies start rolling in, and suddenly your inbox is full of:

  • People asking to unsubscribe
  • Genuinely interested leads
  • Out-of-office messages
  • Random replies that do not fit any neat box

Now imagine not having to manually read and sort all of that. This n8n workflow template connects Lemlist, OpenAI, HubSpot, and Slack so replies get auto-classified and routed to the right action. No more inbox triage marathons, no more missed hot leads.

Let us walk through what this template does, when you would want to use it, and exactly how each piece fits together.


What this n8n + Lemlist + OpenAI workflow actually does

At a high level, the workflow listens for a reply in Lemlist, sends the text to OpenAI for classification, then uses that result to decide what to do next. Depending on the category, it can:

  • Instantly unsubscribe someone from your Lemlist campaign
  • Mark a lead as interested, create a HubSpot deal, and ping your team on Slack
  • Create a follow-up task in HubSpot for out-of-office replies
  • Send anything else to Slack for manual review

So instead of you skimming every reply, n8n quietly does the sorting for you in the background.


Why bother automating Lemlist reply routing?

If you are already getting replies, you might be thinking, “I can just do this manually.” You can, but here is what automation gives you:

  • Immediate unsubscribe handling so you stay compliant and respectful
  • Faster response to interested leads by pushing them straight into your CRM and Slack
  • Structured follow-up on out-of-office replies instead of forgetting to circle back
  • Fewer mistakes since you are not relying on a human skimming subject lines at 6 pm

In short, this workflow keeps your outreach clean, compliant, and fast, while freeing you from repetitive inbox admin.


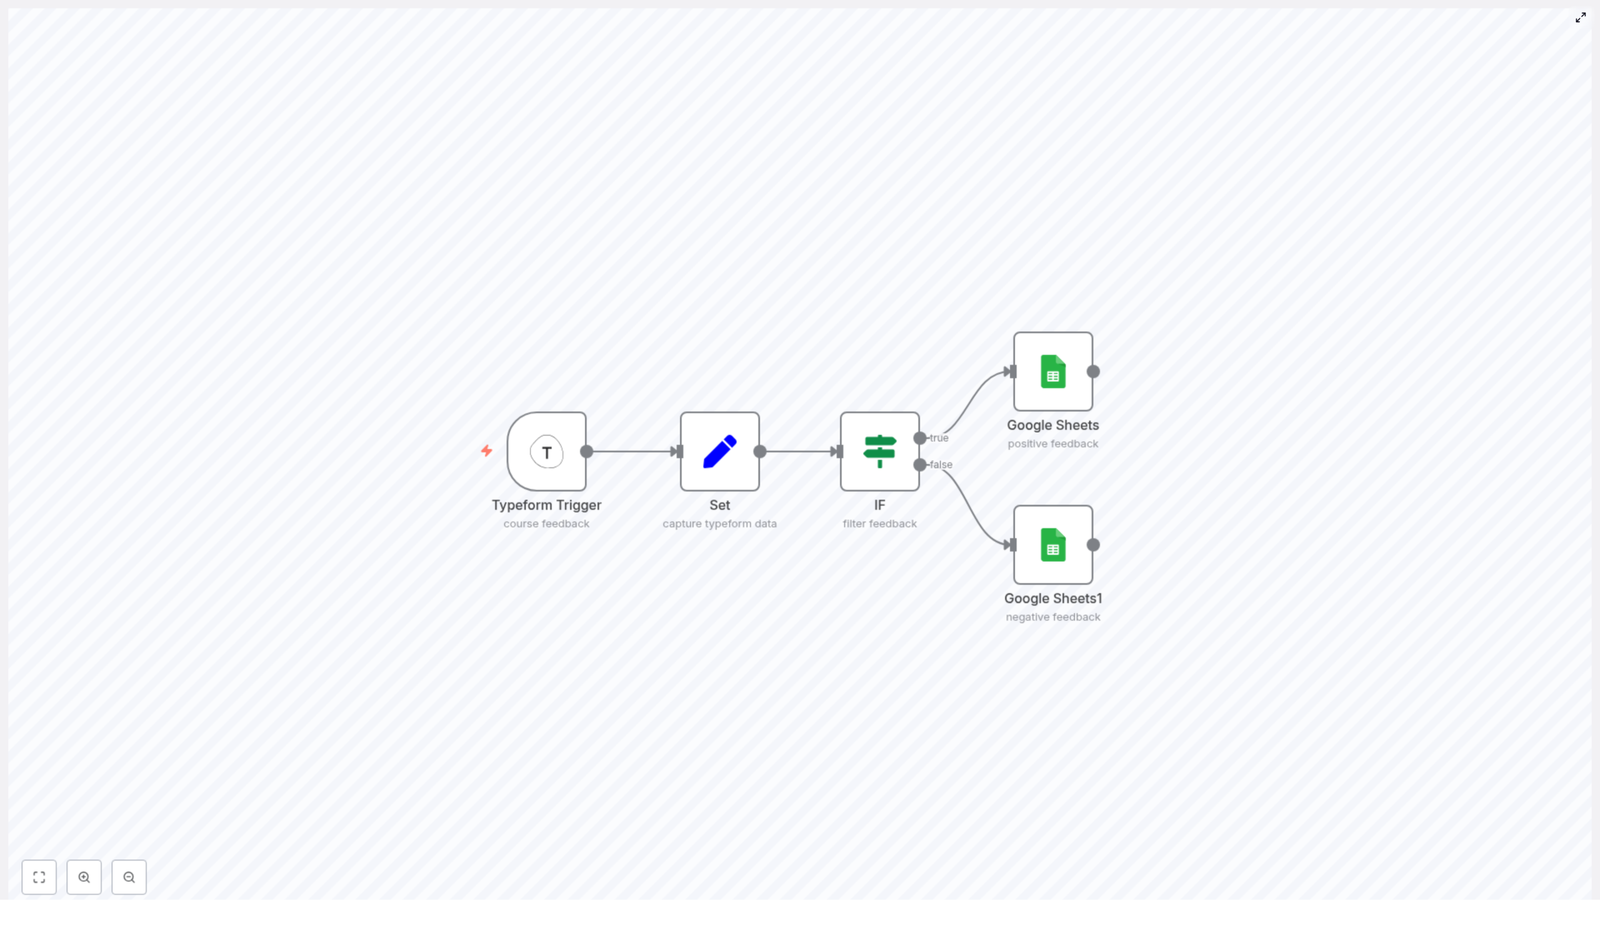
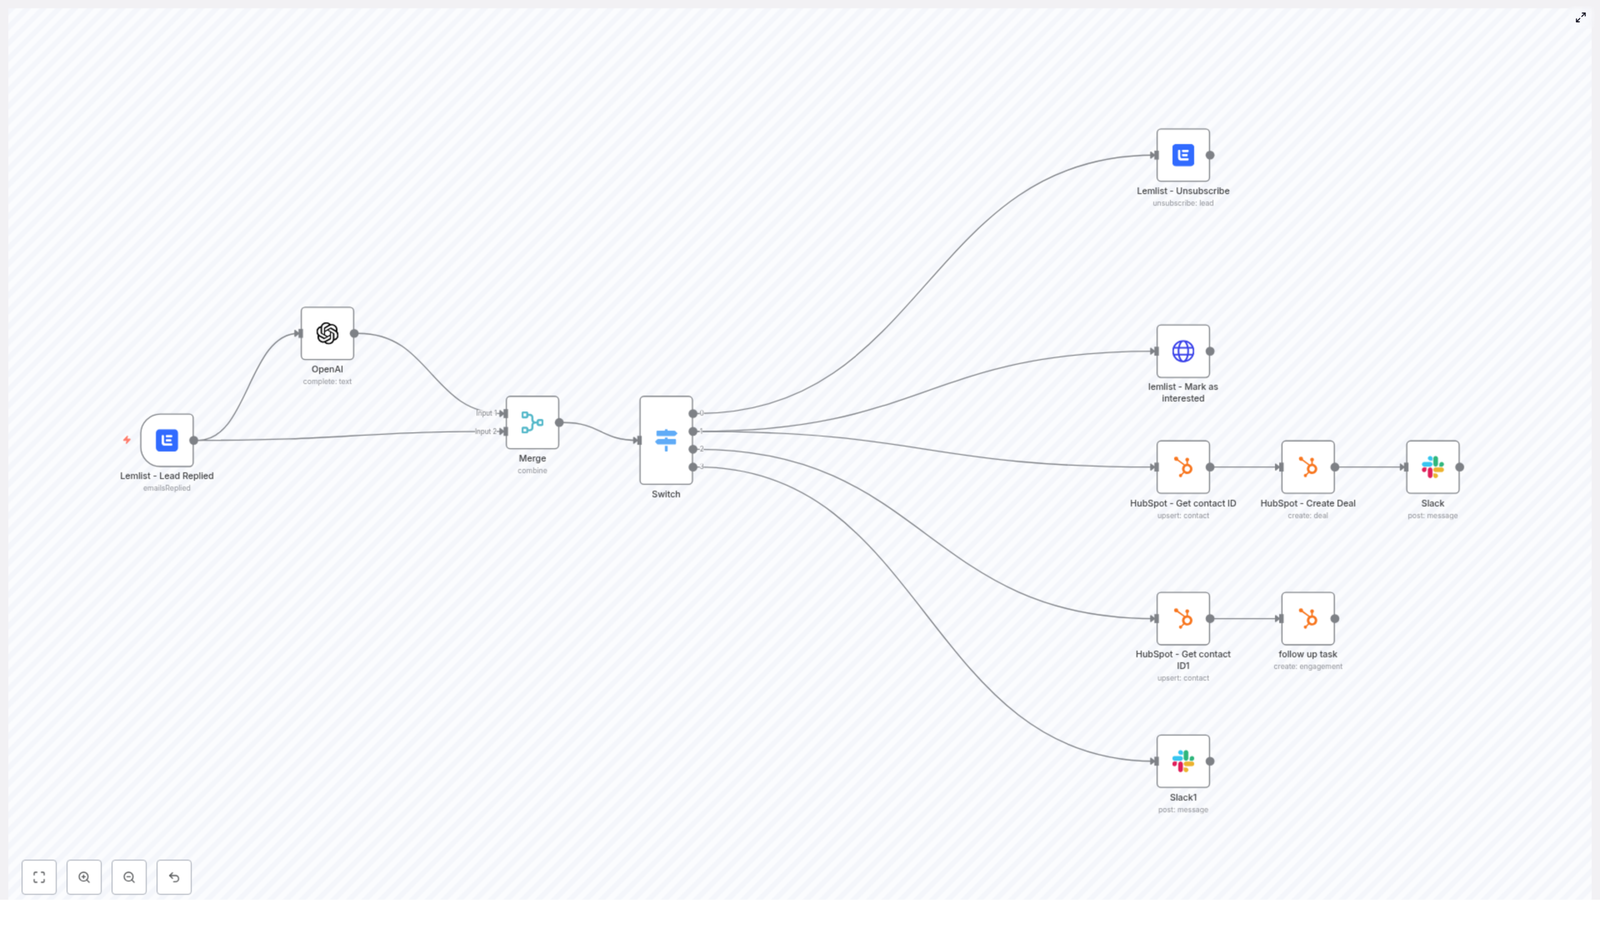
How the workflow is structured in n8n

Here is the full journey of a reply, from Lemlist to the right destination:

  1. Lemlist detects a reply and triggers the n8n workflow.
  2. The reply text goes to OpenAI to be classified into one of four buckets.
  3. A Merge node combines the classification with the original Lemlist data.
  4. A Switch node routes the item into one of four branches:
    • Unsubscribe
    • Interested
    • Out of Office
    • Other
  5. Each branch runs its own set of actions in Lemlist, HubSpot, and Slack.

Let us go through each part so you know exactly what is happening and what can be customized.


Step-by-step n8n node breakdown

1) Lemlist – Lead Replied (Trigger)

Everything starts with the Lemlist trigger node. Configure it with the emailsReplied event so the workflow runs every time a lead replies to your campaign.

Key points when setting it up:

  • Configure the webhook correctly in Lemlist so replies fire the trigger.
  • Optionally enable isFirst if you only want the first reply from each lead.

This node sends useful data into the workflow, including:

  • text – the reply body
  • leadEmail – the lead’s email address
  • campaignId – the campaign the reply belongs to
  • Other metadata like team and campaign details

You will use these fields later in HubSpot, Slack, and Lemlist actions.


2) OpenAI – classify the reply

Next, the reply text is sent to OpenAI to figure out what kind of message it is. The goal is to map each email into one of these categories:

  • interested
  • Out of office
  • unsubscribe
  • other

To keep the model predictable, use a deterministic setup:

  • temperature = 0
  • topP = 1
  • maxTokens = 6

Here is an example prompt used in the template:

The following is a list of emails and the categories they fall into:
Categories=["interested", "Out of office", "unsubscribe", "other"]

Interested is when the reply is positive.

{{$json["text"].replaceAll(/^\s+|\s+$/g, '').replace(/(\r\n|\n|\r)/gm, "")}}
Category:

The node responds with a short label like unsubscribe or interested. That tiny string is what drives the routing logic later on.


3) Merge – combine OpenAI result with the original Lemlist data

Now you have two streams of information in n8n:

  • The original Lemlist reply payload
  • The OpenAI classification result

The Merge node brings them together into a single item.

Configure the Merge node to:

  • Use Combine mode
  • Use mergeByPosition

This way, the output JSON has both the reply text and the classification in one place, which makes it easy for the Switch node to do its job.


4) Switch – route based on the reply category

The Switch node looks at the classification text and decides which branch to follow. You can set it up to do string matches on the category value.

An example configuration might look like this:

value1 = {{$json["text"].trim()}},
rules: ["Unsubscribe" -> output 1, "Interested" -> output 2, "Out of Office" -> output 3],
fallback -> output 4

One important detail: OpenAI may return lowercase values like unsubscribe instead of Unsubscribe. To avoid routing issues, you can:

  • Normalize the text using toLowerCase(), or
  • Add multiple rule variants, such as "unsubscribe" and "Unsubscribe"

From here, each branch handles a specific type of reply.


Branch-by-branch actions

Unsubscribe branch

When the classification is “unsubscribe”, you want to act quickly and cleanly.

In this branch, the workflow calls a Lemlist node configured to unsubscribe the lead from the campaign. A typical configuration is:

email = {{$json["leadEmail"]}}

This instantly removes the lead from your sequences and helps you stay on top of compliance and user trust.


Interested branch

This is the fun one. When someone replies with interest, you want them in your CRM and in front of your team as fast as possible.

The “Interested” branch performs two main actions:

  1. Mark the lead as interested in Lemlist
  2. Create or update a contact and deal in HubSpot, then send a Slack notification

1. Mark as interested in Lemlist

Use an HTTP Request node to call the Lemlist API and mark the lead as interested:

POST https://api.lemlist.com/api/campaigns/YOUR_CAMPAIGN_ID/leads/{{$json["leadEmail"]}}/interested

Replace YOUR_CAMPAIGN_ID with your actual campaign ID.

2. Create or update in HubSpot and notify Slack

Next, the workflow:

  • Uses a HubSpot node to upsert or fetch a contact by email
  • Creates a deal for that contact in your chosen pipeline
  • Sends a Slack message with a direct link to the HubSpot deal

The HubSpot nodes in this template use OAuth2. When upserting the contact, you can pass first and last name via additionalFields. After the deal is created, the Slack node shares a link like:

https://app-eu1.hubspot.com/contacts/PORTAL_ID/deal/{{$json["dealId"]}}

Make sure to adjust your HubSpot region and PORTAL_ID to match your account.


Out of Office branch

Out-of-office replies are not a “no”, they are a “not now”. This branch makes sure you do not forget to follow up.

Here is what happens:

  • The workflow gets or upserts the contact in HubSpot, so the person exists as a contact.
  • It then creates an engagement of type task in HubSpot.

You can set a task subject such as:

OOO - Follow up with {{firstname}} {{lastname}}

Schedule the task for the appropriate follow-up date, based on how you want to handle out-of-office responses.


Other branch

Not every reply will fit nicely into “interested”, “unsubscribe”, or “out of office”. For everything else, the workflow routes the message into a Slack notification for manual review.

Typically this includes:

  • The reply text itself
  • Relevant Lemlist metadata
  • A link back to the Lemlist campaign report

That way a human can scan the message and decide what to do, without you losing track of it.


Useful n8n expressions and snippets

A few expressions make this workflow more robust and cleaner to maintain.

Trim reply text to avoid whitespace issues

Leading or trailing spaces can cause Switch conditions or prompts to behave oddly. Use:

{{$json["text"].trim()}}

You can use this in the Switch node or in the OpenAI prompt.

Upsert a HubSpot contact with name fields

When working with HubSpot, you often want to store the lead’s name along with their email. Here is a typical expression setup:

email = {{$json["leadEmail"]}}
additionalFields.lastName = {{$json["leadLastName"]}}
additionalFields.firstName = {{$json["leadFirstName"]}}

This ensures your CRM stays clean and properly populated.


Testing and debugging the workflow

Before you trust this with your live outreach, it is worth running a few tests. Here is a simple approach:

  • Use Execute Workflow or Active Webhook mode in n8n and send test replies from Lemlist.
  • Temporarily log OpenAI outputs into a Slack or Email node so you can see exactly what category is returned.
  • Start with cautious routing, for example send “interested” replies to a QA Slack channel first, and only later move to full automation.
  • Normalize OpenAI output by trimming and using toLowerCase(), or define multiple Switch rules for common variations.

A bit of testing up front saves you from misrouted leads later.


Security, compliance, and reliability best practices

Because this workflow touches emails, PII, and external APIs, it is worth tightening up a few things.

  • Use n8n credentials for all API keys instead of hardcoding them.
  • Limit PII exposure by only sending the fields you truly need to external services, and follow GDPR or other privacy regulations.
  • Implement error handling using n8n’s error workflow or retry logic to catch failed API calls and alert admins.
  • Respect rate limits for OpenAI, Lemlist, and HubSpot. Add delays or concurrency limits if you are processing high volumes.

Ideas for advanced enhancements

Once the basic routing is working, you can gradually make the workflow smarter. For example, you could:

  • Use embeddings or a small classifier model for more detailed categories like pricing questions or feature requests.
  • Add sentiment scoring to highlight especially warm or urgent leads.
  • Store every classified reply in a database such as Airtable or Postgres for reporting, trend analysis, and prompt improvements.
  • Introduce a simple keyword-based allowlist or denylist for unsubscribe detection to reduce OpenAI calls and cut costs.

Think of the template as a strong starting point that you can layer more intelligence onto over time.


Troubleshooting common issues

Running into odd behavior? Here are a few quick checks:

  • Inconsistent classification: Lower the temperature (keep it at 0) and add more explicit examples in your OpenAI prompt.
  • Switch node not routing correctly: Inspect the Merge node output and confirm you are reading the correct property name. Also check for whitespace and casing issues.
  • HubSpot deal creation errors: Double-check the deal stage ID and ensure your authenticated HubSpot account has the right scopes and permissions.

Wrap-up: what you get from this template

With this n8n + Lemlist + OpenAI workflow in place, you get:

  • Automated triage of outreach replies
  • Instant unsubscribe handling
  • Faster routing of interested leads into HubSpot and Slack
  • Structured follow-up for out-of-office messages
  • A simple path for human review of edge cases

You can import the template into n8n, plug in your Lemlist, OpenAI, HubSpot, and Slack credentials, and be up and running quickly. From there, adjust the categories, prompts, and routing rules to match your tone and sales process.

Try the template now – import the workflow, connect your tools, and run it on a handful of test replies. If you want to adapt it for different HubSpot stages, more nuanced categories, or extra scoring logic, you can tweak the nodes or reach out for help.

Call-to-action: Ready to automate your reply handling and respond to leads faster? Import the template, run a 2-week experiment, and see the impact on your follow-up speed. If you get stuck or want a custom setup, reply to this post or contact us for a personalized walkthrough.

Build a Typeform Feedback Workflow in n8n

Build a Typeform Feedback Workflow in n8n

Collecting course feedback is critical for continuous improvement, but copying Typeform responses into Google Sheets by hand is slow and error prone. This guide explains, in a technical and implementation-focused way, how to build an n8n workflow that listens to Typeform submissions, normalizes the payload, evaluates a numeric rating, and appends positive and negative feedback to separate Google Sheets tabs automatically.

Workflow overview

This n8n workflow automates the full feedback pipeline from Typeform to Google Sheets. It:

  • Subscribes to a specific Typeform form using a Typeform Trigger node (webhook-based).
  • Normalizes the raw JSON into concise, reusable fields with a Set node.
  • Routes each response into a positive or negative branch using an IF node based on a numeric rating.
  • Appends positive feedback to one Google Sheets tab and negative feedback to another using two dedicated Google Sheets nodes.

The reference workflow consists of exactly five nodes:

  • Typeform Trigger – Receives new submissions as JSON via webhook.
  • Set – Extracts and renames relevant fields such as rating and opinion text.
  • IF – Evaluates the rating against a threshold (for example, greater than or equal to 3).
  • Google Sheets (positive) – Appends rows for responses classified as positive.
  • Google Sheets (negative) – Appends rows for responses classified as negative.

This structure is intentionally simple and is a good starting point for more advanced n8n automation around feedback, sentiment analysis, and reporting.

Architecture and data flow

The automation follows a linear flow with a single branching decision:

  1. Incoming webhook
    The Typeform Trigger node exposes a webhook URL. When a participant submits the form, Typeform sends a structured JSON payload to this URL. n8n starts a new execution for each submission.
  2. Field normalization
    The Set node reads values from the incoming JSON using question labels as keys, then writes them to shorter, canonical field names. All downstream logic uses these normalized keys.
  3. Conditional routing
    The IF node evaluates the normalized numeric rating field. If the value meets or exceeds a configured threshold, the execution flows through the “true” output. Otherwise, it follows the “false” output.
  4. Persistence in Google Sheets
    Two separate Google Sheets nodes receive the routed items. One appends to a “positive” sheet or tab, the other to a “negative” sheet or tab. Both map fields such as timestamp, rating, and free-text opinion into columns.

No additional transformation or external services are required for the core template. All logic is contained within these five nodes.

Node-by-node configuration

1. Typeform Trigger node

The Typeform Trigger node is responsible for connecting n8n to the Typeform form you want to monitor. It operates via a webhook endpoint that Typeform calls on each new submission.

Key parameters

  • Form ID
    Set this to the identifier of your Typeform, for example yxcvbnm. You can find this ID in the Typeform URL or in the Typeform dashboard.
  • Webhook URL
    Once you activate the node or the workflow, n8n generates a webhook URL. You can:
    • Register this URL manually in your Typeform form’s webhook settings, or
    • Use the built-in integration from within the Typeform Trigger node if available in your n8n version.

    The webhook must be active and reachable for submissions to trigger the workflow.

  • Credentials
    Configure and select your Typeform API credentials in n8n. These credentials allow n8n to validate the webhook and, if needed, fetch related form data. Ensure:
    • The access token is valid and has the required scopes for webhooks and responses.
    • The credentials are selected in the Typeform Trigger node.

Runtime behavior

On each submission, Typeform sends a JSON payload to n8n. This payload typically includes:

  • Metadata such as submission ID and timestamps.
  • Answers keyed by question identifiers or labels.

The node passes the raw JSON to the next node as $json. All subsequent nodes read from this structure.

Edge cases

  • Webhook not firing – Confirm that the webhook URL is correctly registered in Typeform and that the n8n workflow is active. If you change the workflow environment (for example, URL or tunnel), you need to re-register the webhook.
  • Changed form structure – If you modify questions or labels in Typeform, the JSON shape may change. You will need to update expressions in downstream nodes, especially the Set node.

2. Set node – normalize answers

The Set node standardizes the incoming payload into concise keys that are easier to work with in conditions and expressions. Instead of referencing long question texts repeatedly, you map them once in this node.

Example field mappings

In the template, the Set node defines at least two fields:

  • usefulness{{$json["How useful was the course?"]}} This is expected to be a numeric rating (for example, on a 1-5 scale).
  • opinion{{$json["Your opinion on the course:"]}} This is a free-text feedback field.

You can add more fields in the Set node if your Typeform includes additional questions that you want to store in Google Sheets or use for routing.

Configuration notes

  • Keep Key-Value Mode enabled so that each new property is defined explicitly.
  • Data types – Ensure that the rating field is stored as a number. If Typeform sends it as a string, n8n usually handles numeric comparison correctly, but you should verify the value in the execution preview.
  • Field naming – Use short, stable keys such as usefulness or rating instead of full question labels to make expressions and conditions easier to maintain.

Impact of question label changes

The expressions in this node rely on exact question labels like "How useful was the course?". If you update the question text in Typeform, the path $json["How useful was the course?"] may no longer resolve. In that case:

  • Trigger a new test submission.
  • Inspect the raw JSON in n8n’s execution log.
  • Update the expressions in the Set node accordingly.

3. IF node – route by rating

The IF node splits the workflow into two branches based on the rating captured in the Set node. This is the core decision point that determines whether a response is handled as positive or negative feedback.

Condition configuration

Use the following example condition:

Number:  value1  = {{$json["usefulness"]}}  operation = largerEqual  value2  = 3

This configuration means:

  • The node reads the numeric value from $json["usefulness"].
  • It compares this value using the largerEqual operation.
  • If the rating is greater than or equal to 3, the condition evaluates to true.
  • Otherwise, it evaluates to false.

Branch semantics

In n8n, the IF node has two outputs:

  • Output 1 (index 0) – The “true” branch. All items that satisfy the condition are passed here.
  • Output 2 (index 1) – The “false” branch. All items that do not satisfy the condition are passed here.

Connect these outputs as follows:

  • True branch (index 0) → Google Sheets node for positive feedback.
  • False branch (index 1) → Google Sheets node for negative feedback.

Potential pitfalls

  • Incorrect connections – If you accidentally swap the outputs, positive ratings may be stored as negative and vice versa. Double check the node connections visually and verify with test submissions.
  • Null or missing values – If the usefulness field is missing or not numeric, the condition may behave unexpectedly. Use the execution preview to confirm that the Set node always produces a valid numeric value.

4. Google Sheets nodes – append rows

The workflow uses two separate Google Sheets nodes to persist feedback. One handles positive responses, the other handles negative responses. Both are configured similarly, with only the target range or sheet differing.

Common configuration parameters

  • Operation
    Set to append. This adds each new feedback record as a new row at the end of the specified range or sheet.
  • Range
    Use the format <sheet_tab_name>!<column_range>. For example:
    • Positive feedback: positive_feedback!A:C
    • Negative feedback: negative_feedback!A:C

    If you omit the range, Google Sheets appends to the default sheet, but using explicit ranges makes the behavior more predictable.

  • Spreadsheet ID
    Set the Sheet ID to the ID from your Google Sheets URL. It is the long string between /d/ and /edit in the URL. Ensure the ID matches the spreadsheet that contains your positive and negative tabs.
  • Authentication
    Select your oAuth2 credentials configured in n8n. The associated Google account must have write access to the target spreadsheet.

Field mapping

Within each Google Sheets node, map the fields you want to store. Typical mappings include:

  • Timestamp – For example, {{ new Date().toISOString() }} for an ISO 8601 timestamp.
  • Rating{{$json["usefulness"]}}
  • Opinion text{{$json["opinion"]}}

If your sheet includes a header row, configure the keyRow parameter so that n8n aligns values with the correct columns. The header names should match the keys you map in the node.

Positive vs negative nodes

The two Google Sheets nodes are logically identical except for:

  • The tab name and range, for example:
    • positive_feedback!A:C
    • negative_feedback!A:C
  • The branch they are connected to:
    • Positive node receives items from the IF node’s true output.
    • Negative node receives items from the IF node’s false output.

Configuration checklist

Before running the workflow in production, verify the following:

  • Typeform Trigger:
    • Correct Form ID set.
    • Webhook URL registered and active in Typeform.
    • Typeform credentials valid and selected.
  • Set node:
    • Expressions reference the correct question labels.
    • Rating field resolves to a numeric value.
  • IF node:
    • Threshold value set as intended (for example, 3).
    • True and false outputs connected to the correct Google Sheets nodes.
  • Google Sheets nodes:
    • Spreadsheet ID matches your target document.
    • Ranges use correct tab names and column ranges.
    • OAuth2 credentials have write access.
    • Header row configuration (keyRow) matches your sheet layout.

Expressions and common n8n patterns

This workflow relies heavily on n8n expressions to access JSON fields and generate dynamic values. Some useful patterns:

  • Access a specific question’s answer directly from the Typeform payload
    {{$json["Your opinion on the course:"]}}
  • Use normalized fields from the Set node
    {{$json["usefulness"]}} and {{$json["opinion"]}}
  • Generate a timestamp
    {{ new Date().toISOString() }}

When building more complex automations, you can reuse the same patterns to enrich data, build conditional logic, or integrate with other APIs.

Testing and validation

Validate the workflow end to end before relying on it in production. A typical test process:

  1. Submit test responses in Typeform
    Use different rating values, including both below and above the threshold (for example, 2 and 4), to exercise both branches of the IF node.
  2. Inspect n8n execution logs
    Open the workflow executions in n8n and:
    • Check the payload received by the Typeform Trigger node.
    • Verify that the Set node outputs the expected usefulness and opinion fields.
    • Confirm that the IF node routes each item to the correct branch.
  3. Verify Google Sheets output
    Ensure that:
    • Positive ratings appear in the positive feedback tab.
    • Lower ratings appear in the negative feedback tab.
    • Columns are aligned with headers and no values are shifted.

If data does not appear as expected, review the configuration checklist and adjust node settings accordingly.

Troubleshooting and operational tips

  • Wrong or missing field names
    If the Set node expressions return null or undefined values:
    • Submit a fresh response.
    • Open the execution and inspect the raw JSON.
    • Update expressions like $json["How useful was the course?"] to match the current payload.
  • Authentication errors with Google Sheets
    HTTP 401 or 403 errors typically indicate:
    • Expired or revoked OAuth2 credentials.
    • Insufficient permissions for the Google account.

    Reconnect the OAuth2 credentials in n8n and verify that the account has edit access to the spreadsheet.

  • Range and tab issues
    If rows are not appearing where expected:
    • Confirm that tab names in positive_feedback!A:C and negative_feedback!A:C exactly match the sheet tabs

Automate Typeform Feedback to Google Sheets with n8n

Automate Typeform Feedback to Google Sheets with n8n

Collecting course feedback is only useful if you can quickly turn it into structured, actionable data. This guide explains, in a technical and reference-style format, how to implement a complete Typeform → n8n → Google Sheets workflow. The workflow listens for new Typeform submissions, normalizes the payload, evaluates a numeric rating, and routes positive and negative feedback into separate Google Sheets.

The walkthrough is based on the sample template JSON referenced in the original article and focuses on node configuration, data flow, and practical implementation details. All steps and parameters are preserved, but organized in a more systematic, documentation-style layout.


1. Workflow Overview

This automation uses an n8n workflow template composed of five core nodes:

  • Typeform Trigger – Receives new form submissions via webhook.
  • Set – Extracts and normalizes key fields from the Typeform payload.
  • IF – Evaluates a numeric rating to determine feedback polarity.
  • Google Sheets (positive_feedback) – Appends positive responses to a specific sheet.
  • Google Sheets (negative_feedback) – Appends negative responses to a separate sheet.

The result is a fully automated pipeline that:

  • Captures all Typeform responses in real time.
  • Segments feedback based on a rating threshold.
  • Stores positive and negative feedback in separate, structured Google Sheets.
  • Provides a base for further automations, such as alerts or follow-up actions.

2. Architecture & Data Flow

2.1 Logical Flow

  1. Typeform submits a response to the configured form.
  2. Typeform Trigger node in n8n receives the webhook payload.
  3. Set node reads the incoming JSON, extracts the rating and free-text opinion, and outputs a minimal, normalized object.
  4. IF node evaluates the numeric rating against a predefined threshold (e.g. rating ≥ 3 is considered positive).
  5. If the condition is true, the item flows to the positive Google Sheets node, which appends a row to the positive_feedback sheet.
  6. If the condition is false, the item flows to the negative Google Sheets node, which appends a row to the negative_feedback sheet.

2.2 Core Use Cases

  • Automated segmentation of course feedback by sentiment or satisfaction score.
  • Continuous, timestamped logging of feedback in Sheets for reporting and analysis.
  • Triggering downstream workflows for negative feedback (support alerts, tickets, follow-up emails).

3. Node-by-Node Breakdown

3.1 Typeform Trigger Node

Role: Ingest new Typeform submissions into n8n via webhook.

3.1.1 Essential Configuration

  • webhookId: 1234567890 (template placeholder)
  • formId: yxcvbnm (template placeholder)
  • Credentials: Typeform credentials configured in n8n (API key or Typeform integration)

In n8n, the Typeform Trigger node typically registers a webhook with Typeform. When a respondent submits the form, Typeform sends an HTTP POST to n8n containing the response payload.

3.1.2 Connectivity & Webhook Activation

  • Ensure the webhook is enabled in your Typeform account for the specified formId.
  • If n8n is self-hosted, expose your instance via a public URL or tunneling solution so Typeform can reach the webhook endpoint.
  • Use a test submission in Typeform to confirm that:
    • The webhook is firing correctly.
    • n8n receives the payload without errors.
    • The payload structure matches what the downstream nodes expect.

3.1.3 Edge Cases

  • If no data appears in n8n, check the webhook status in Typeform and verify that the n8n URL is accessible from the internet.
  • For form changes (new questions, label changes), re-check the payload structure before adjusting mappings in the Set node.

3.2 Set Node (Capture & Normalize Typeform Data)

Role: Transform the raw Typeform JSON into a compact, normalized object that contains only the fields required for routing and storage.

3.2.1 Template Configuration

The template uses a Set node configured with explicit mappings:

{  "values": {  "number": [  {  "name": "usefulness",  "value": "={{$json[\"How useful was the course?\"]}}"  }  ],  "string": [  {  "name": "opinion",  "value": "={{$json[\"Your opinion on the course:\"]}}"  }  ]  },  "keepOnlySet": true
}

This configuration:

  • Defines a numeric field usefulness mapped from the question labeled "How useful was the course?".
  • Defines a string field opinion mapped from the question labeled "Your opinion on the course:".
  • Enables keepOnlySet to remove all other properties from the incoming JSON, leaving only the normalized fields.

3.2.2 Label vs Key-Based Mapping

  • Using the text labels (as in the example) is convenient but sensitive to label changes in Typeform.
  • For more stable workflows, you can map using the underlying response keys from the raw payload instead of the human-readable labels.

3.2.3 Practical Notes

  • Ensure the Typeform question labels in the expressions match exactly, including punctuation and capitalization.
  • If the rating is delivered as a string, the IF node will still work if n8n can coerce it to a number, but for safety you can cast explicitly in the expression if needed.
  • keepOnlySet: true is recommended for clarity and performance, especially when you only need a small subset of the payload.

3.3 IF Node (Feedback Segmentation)

Role: Route feedback to different branches based on the numeric rating.

3.3.1 Template Condition

The IF node checks the usefulness value created by the Set node:

{  "conditions": {  "number": [  {  "value1": "={{$json[\"usefulness\"]}}",  "operation": "largerEqual",  "value2": 3  }  ]  }
}

Behavior:

  • If usefulness ≥ 3, the item is routed to the true branch (index 0), considered positive feedback.
  • If usefulness < 3 or not provided (and cannot be parsed), the item goes to the false branch (index 1), treated as negative or non-positive feedback.

3.3.2 Threshold Selection

  • The example uses 3 as the cutoff for a typical 1-5 scale.
  • For stricter segmentation, many teams prefer ≥ 4 as the threshold for positive feedback.
  • Adjust the value2 parameter to match your rating policy.

3.3.3 Edge Cases & Data Types

  • If the rating is missing or not a valid number, the condition may fail or behave unexpectedly. Inspect the raw payload if routing does not match your expectations.
  • To avoid type issues, you can ensure the value is numeric in the Set node (for example, by using an expression that parses the value) before it reaches the IF node.

3.4 Google Sheets Nodes (Append Positive & Negative Feedback)

Role: Persist feedback into two separate Google Sheets ranges for later analysis and reporting.

3.4.1 Positive Feedback Node

Template configuration for the positive branch:

  • Operation: append
  • Range: positive_feedback!A:C
  • sheetId: asdfghjklöä (placeholder, replace with your actual sheet ID)
  • Authentication: oAuth2

This node appends a new row to the positive_feedback sheet in the specified Google Spreadsheet for each item that passes the IF condition.

3.4.2 Negative Feedback Node

Template configuration for the negative branch:

  • Operation: append
  • Range: negative_feedback!A:C
  • sheetId: qwertzuiop (placeholder, replace with your actual sheet ID)
  • Authentication: Typically the same OAuth2 credential as the positive node

This node appends rows to the negative_feedback sheet whenever the rating does not meet the positive threshold.

3.4.3 Sheet Structure & Headers

  • Create descriptive header rows in both sheets (e.g. Timestamp, Usefulness, Opinion, Submission ID).
  • Enable keyRow in the Google Sheets node if you want to reference columns by name in n8n.
  • Ensure that the range (e.g. A:C) covers all columns you intend to populate.

3.4.4 Credentials & Access

  • Use a dedicated OAuth2 credential or service account to limit access and make the integration easier to maintain.
  • Verify that the configured account has write access to the target spreadsheet.

3.4.5 Failure Modes

  • Incorrect sheetId or sheet name will cause append operations to fail.
  • If the OAuth token is expired or revoked, n8n will return authentication errors until reauthorized.
  • Mismatched ranges (e.g. fewer columns than provided data) can lead to unexpected alignments in the sheet.

4. Configuration Notes & Best Practices

4.1 Mapping Fields From Typeform

  • Always check the raw webhook payload from Typeform when you first configure the workflow.
  • Use stable identifiers (question IDs or keys) where possible to reduce breakage when labels change.
  • Document which Typeform questions map to which n8n fields, especially for multi-question forms.

4.2 Avoiding Duplicates and Ensuring Auditability

  • Store a unique submission identifier (if available in the payload) in your sheets.
  • Include timestamps so you can track when each response was received and processed.
  • These fields make it easier to detect duplicates and perform historical analysis.

4.3 Security & Privacy Considerations

  • Only capture and persist fields that are strictly necessary for your analysis or follow-up.
  • Avoid storing sensitive personal data in Google Sheets unless you have a clear policy and safeguards.
  • Use OAuth2 with the minimal required scopes for Google Sheets access.
  • Secure your n8n instance with HTTPS, strong credentials, and IP allowlists where possible.

5. Enhancements & Real-World Improvements

5.1 Add Timestamps and Responder Metadata

To provide context for each row in Google Sheets, you can extend the Set node to include metadata from the Typeform payload, such as submission time.

Example expression for a timestamp field:

timestamp: ={{$json["submitted_at"] || new Date().toISOString()}}

This expression attempts to use the submitted_at field from Typeform and falls back to the current time if it is not present.

5.2 Sanitize and Validate Input

Before writing to Google Sheets, you can introduce additional nodes to clean and validate data:

  • Function node to:
    • Trim whitespace from text responses.
    • Remove or escape HTML if present.
    • Limit text length for very long comments.
  • IF nodes to:
    • Skip rows that lack required fields.
    • Handle invalid or out-of-range ratings.

5.3 Automatic Follow-Up Actions for Negative Feedback

For responses routed to the negative branch (rating below the threshold), you can extend the workflow with additional nodes, such as:

  • Slack node to send an immediate alert to a support or course team channel.
  • Helpdesk integration node (e.g. Zendesk, Freshdesk) to create a support ticket.
  • Email node to send a personalized follow-up or apology email, optionally including a link to a more detailed feedback form.

These actions can be chained after the negative Google Sheets node or in parallel, depending on your process.

5.4 Error Handling & Retries

Google Sheets API calls may occasionally fail due to rate limits or transient network issues. To handle this robustly:

  • Use n8n’s built-in retry options where available on the Sheets nodes.
  • Alternatively, implement a retry pattern by:
    • Wrapping the Sheets node in a sub-workflow or using additional nodes to:
    • On failure, wait for X seconds and retry up to N times.
  • For permanent failures, log the problematic payloads to:
    • A dedicated “errors” sheet, or
    • An external error tracking or logging service.

6. Troubleshooting Reference

6.1 No Incoming Data in n8n

  • Verify that the Typeform webhook is enabled and associated with the correct formId.
  • Check that the public URL of your n8n instance is reachable from the internet.
  • Send a test submission from Typeform and inspect the execution logs in n8n.

6.2 Missing or Empty Field Values

  • Compare the question labels used in the Set node with the actual labels in Typeform.
  • Inspect the raw JSON payload from the Typeform Trigger node to identify the exact keys.
  • Update the Set node expressions if labels or structure have changed.

6.3 Google Sheets Append Errors

  • Confirm that the sheetId matches the target spreadsheet.
  • Ensure that the specified range (e.g. positive_feedback!A:C) exists and that the sheet name is correct.
  • Check that

LinkedIn AI Agent: Automate Content with n8n

LinkedIn AI Agent: Automate Content with n8n

Automating LinkedIn content creation and publishing is now practical and accessible. With a carefully designed n8n workflow that connects tools like Airtable, Apify, OpenAI, Telegram, and the LinkedIn API, you can:

  • Scrape posts from competitors or favorite creators
  • Extract and repurpose high-value content automatically
  • Store drafts for human review in Airtable
  • Publish approved posts to LinkedIn on a schedule

All of this happens while you keep full editorial control over what actually goes live.


What you will learn in this guide

This article walks you through the LinkedIn AI Agent workflow template in n8n step by step. By the end, you will understand how to:

  • Set up an automated content pipeline using n8n
  • Scrape LinkedIn posts with Apify and avoid duplicates
  • Extract and classify content (text, image, video, document)
  • Repurpose content with OpenAI into multiple LinkedIn-ready formats
  • Manage an editorial queue in Airtable and keep humans in the loop
  • Publish posts automatically through the LinkedIn API
  • Apply best practices for security, quality, and scaling

Concept overview: How the LinkedIn AI Agent works

Before we dive into the step-by-step build, it helps to understand the big picture. The workflow is built around three core ideas:

1. A consistent content pipeline

Brands and creators grow on LinkedIn when they publish consistent, high-quality content. The AI Agent supports this by automating the pipeline from discovery to publishing:

  1. Discover relevant posts from selected creators or competitors
  2. Extract insights and text from different content types
  3. Repurpose the content into several LinkedIn-friendly formats
  4. Store everything as drafts in Airtable for review
  5. Publish approved content at scheduled times

The outcome is higher content velocity, better reuse of ideas, and a more predictable posting schedule.

2. Key tools and integrations

The workflow relies on a few main components, each with a specific role:

  • n8n – The automation engine that orchestrates the whole process using nodes, triggers, and conditional logic.
  • Apify – Scrapes LinkedIn posts from chosen profiles or creators. This is often used for competitor or inspiration scraping.
  • Airtable – Acts as your content database and editorial dashboard. It stores creators, scraped posts, repurposed drafts, statuses, and metadata.
  • OpenAI (GPT-4o / GPT-4o Vision) – Repurposes content, rewrites posts, transcribes audio or video, and analyzes images.
  • Telegram (optional) – Provides a human-in-the-loop channel where you can send ideas or voice notes into the workflow.
  • LinkedIn API – Publishes content (text-only or with images) directly to LinkedIn from n8n.

3. Three main workflow sections

The template is easiest to understand if you think of it as three connected but distinct sections:

  1. Competitor’s Scraping – Finds and fetches new LinkedIn posts.
  2. Content Extraction & Repurposing – Extracts text and transforms it into new LinkedIn content.
  3. Airtable, Review & Auto Publishing – Manages the editorial queue and publishes approved posts.

Step-by-step: Building and understanding the workflow in n8n

Step 1: Configure the content discovery (Competitor’s Scraping)

This first section runs on a schedule and keeps your content pipeline filled with fresh material.

1.1 Schedule Trigger

In n8n, start with a Schedule Trigger node:

  • Set it to run at the frequency you prefer, such as daily or weekly.
  • This ensures the workflow automatically checks for new posts without manual input.

1.2 Load target creators from Airtable

Next, add a node to Get Creators from Airtable:

  • Connect to your Airtable base where you store a list of creators or competitors.
  • Each record typically includes fields like LinkedIn profile URL, creator name, and any tags or notes.
  • The workflow loops through this list and treats each creator as a source to scrape.

1.3 Scrape LinkedIn posts with Apify

For each creator, use an Apify node configured to Scrape LinkedIn Posts:

  • Call an Apify actor that is set up to fetch recent posts for the given profile.
  • Make sure to pass in the correct parameters, such as profile URL and the number of posts to fetch.
  • Apify returns structured data for each post, including IDs, text, media links, and timestamps.

1.4 Filter out existing posts to avoid duplicates

Once Apify returns the posts, add a Filter Out Existing Posts step:

  • Compare each scraped post’s unique ID against the records stored in Airtable.
  • If the post ID already exists, skip it to avoid processing the same content twice.
  • Only new posts move forward in the workflow.

This deduplication step keeps your system efficient and prevents repeated repurposing of the same content.


Step 2: Extract and repurpose content with OpenAI

After the workflow has identified new posts, it needs to understand what type of content each one is and extract usable text.

2.1 Detect the content type

Add a Switch Content Type node in n8n:

  • This node checks what kind of content was scraped: text, image, video, or document.
  • Each type follows a slightly different extraction path, but all of them end up as text for OpenAI.

2.2 Handle each content type

  • Text
    If the original post is text-only:
    • The text can be captured directly from the scraped data.
    • No extra processing is required before sending it to OpenAI.
  • Document
    If the post contains a document, such as a PDF:
    • Download the document file using its URL.
    • Run it through a PDF extractor or similar tool to capture the internal text.
    • Clean up the extracted text if necessary before repurposing.
  • Image
    If the post includes an image:
    • Send the image to OpenAI Vision (GPT-4o with vision capabilities).
    • Ask it to extract any embedded text and describe the context of the image.
    • Use this description as the basis for the repurposed content.
  • Video
    If the post is a video:
    • Download the video file from the scraped URL.
    • Reformat it if needed so it is compatible with your transcription tool.
    • Transcribe the audio to capture the spoken script.
    • The resulting transcript becomes the text input for OpenAI.

2.3 Merge extracted text into a standard record

Regardless of the original source, the final goal of this section is to produce a standardized text record. In n8n you can:

  • Combine fields like title, description, transcript, and image description into one unified text block.
  • Attach metadata such as creator name, original URL, and content type to this record.

2.4 Repurpose with OpenAI into three content variants

Now connect an OpenAI node configured to repurpose the text into multiple LinkedIn-ready formats. A common setup is to ask for three variants:

  1. Text-only LinkedIn post – A clear, engaging post suitable to publish as plain text.
  2. Text + image (tweet-style visual) – A version that includes copy designed to be placed on an eye-catching image, similar to a tweet-style graphic.
  3. Text + infographic instructions – Detailed guidance for a designer, including layout ideas, sections, and chart suggestions for an infographic.

The OpenAI node typically returns a structured JSON, for example:

{  "relevant": true,  "text": "...",  "infographic": "...",  "tweet": "..."
}

The relevant field is important:

  • If the source content is marketing-related or valuable, the node marks "relevant": true and the workflow continues.
  • If the content is not suitable for your LinkedIn strategy, it can mark it as irrelevant and the workflow skips further processing.

Step 3: Manage drafts in Airtable and publish via LinkedIn

Once OpenAI has generated the repurposed content, the workflow moves into the editorial and publishing phase.

3.1 Store repurposed outputs in Airtable

Create an Airtable base that acts as your editorial queue. For each repurposed item, store fields such as:

  • Final text for the LinkedIn post
  • Image URLs or design instructions (for visual posts)
  • Infographic brief for designers
  • Original source URL and creator
  • Content type (text-only, image, infographic)
  • Status (for example: review, ready, posted)

This structure lets your team see what has been generated, what needs review, and what is scheduled to go live.

3.2 Keep humans in the loop for editorial control

One of the strengths of this workflow is that it does not remove human judgment. Instead, it supports it:

  • Editorial control – Team members can open Airtable, review the generated posts, make edits, and change the status from review to ready when they approve.
  • Optional Telegram integration – If you use Telegram, you can also send ideas or voice notes that flow into the same Airtable queue, giving you a central place for all content.

3.3 Schedule automatic publishing from Airtable

To publish approved posts, add a second Schedule Trigger in n8n that handles Publishing:

  • This schedule might run multiple times per day, depending on your posting strategy.
  • On each run, the workflow queries Airtable for records where status = ready.
  • Those posts are then passed to the LinkedIn publishing logic.

3.4 Publish to LinkedIn with or without media

Use the LinkedIn API node in n8n to publish:

  • Publish paths – If the Airtable record includes an image URL or generated media, the workflow creates a LinkedIn post with media attached.
  • If there is no associated image, the workflow publishes a text-only post.

3.5 Update Airtable after publishing

Once the LinkedIn post is successfully published:

  • The workflow updates the corresponding Airtable record to set status = posted.
  • This prevents the same content from being published again in future runs.

Practical configuration tips for a stable workflow

Security and credentials

Because this workflow touches several APIs, secure configuration is essential:

  • Store all API keys and OAuth credentials in n8n’s credentials manager, not in plain text inside nodes.
  • Rotate keys on a regular schedule to reduce security risk.
  • Use scoped tokens where possible, such as:
    • Airtable Personal Access Tokens with only the required bases and permissions.
    • LinkedIn OAuth clients with limited scopes that only allow necessary publishing actions.

Rate limits and retries

External services like Apify, OpenAI, and LinkedIn enforce rate limits:

  • Use exponential backoff and retry logic in n8n’s HTTP Request nodes when calling APIs directly.
  • Where supported, enable credentials throttling in n8n so requests are automatically paced.
  • Spread your scraping and publishing tasks throughout the day instead of running everything at once.

Error handling for robustness

Errors will happen, especially with file downloads, transcriptions, and uploads. Plan for them:

  • Use onError handlers on critical nodes to prevent the entire workflow from failing.
  • Log failed items to a dedicated Airtable table or a Slack channel for manual review.
  • Include meaningful error messages and metadata so you can quickly see what went wrong.

Data quality and deduplication

Good data hygiene makes your analytics and editorial work easier:

  • Normalize fields such as dates, author names, and URLs before writing to Airtable.
  • In addition to checking post IDs, add checks for near-duplicate content, for example:
    • Similar titles or text segments
    • Very small variations of the same idea
  • This helps avoid reposting the same concept with only minor edits.

Best practices for repurposed LinkedIn content

Automation is powerful, but the content still needs to perform well on LinkedIn. Keep these guidelines in mind:

  • Prioritize value – Focus on posts that offer clear lessons, frameworks, or case studies instead of vague inspiration.
  • Use strong hooks – Make the first 1 to 2 sentences attention-grabbing to improve engagement and dwell time.
  • Keep it scannable – Use short paragraphs, numbered lists, and bullet points to make posts easy to read.
  • Add a call to action – Encourage readers to comment, repost, or follow to boost interaction.
  • Experiment with formats – Test text-only posts versus image-driven posts to see what your audience prefers.

Scaling, analytics, and optimization

Once the basic workflow is stable, you can scale and optimize it using data:

  • Track metrics like impressions, engagements, clicks, and follower

Automate LinkedIn Content with n8n + AI

Automate LinkedIn Content with n8n + AI

Discover how to implement a production-grade LinkedIn content automation pipeline using n8n, Apify, OpenAI, Telegram, and Airtable. This workflow continuously discovers relevant posts, extracts and repurposes them with AI, routes them through an editorial process, and publishes to LinkedIn on a schedule – all within a single, maintainable automation.

Strategic value of LinkedIn content automation

For many B2B companies, founders, and creators, LinkedIn is a primary channel for distribution and demand generation. The challenge is not knowing what to post, but maintaining a consistent cadence of high-quality, on-brand content.

Manual tasks such as monitoring competitors, extracting insights from their content, transcribing media, and rewriting posts consume significant time and are difficult to scale. By combining n8n with AI and lightweight data storage, you can build an end-to-end LinkedIn content engine that:

  • Continuously discovers posts from selected competitors, influencers, and creators
  • Extracts text from documents, images, and videos
  • Uses OpenAI to repurpose content into multiple LinkedIn-ready formats
  • Centralizes drafts, metadata, and status tracking in Airtable
  • Automatically publishes approved posts to LinkedIn based on a defined schedule

High-level architecture of the n8n workflow

The automation is organized into three main modules, each responsible for a distinct phase of the content lifecycle. In the n8n canvas these modules are typically color-coded for clarity:

  1. Competitor Scraping – Ingests LinkedIn posts and media from specified profiles using Apify or similar scrapers, prevents duplicates via Airtable, and normalizes raw content.
  2. Content Agent – Accepts content from scraping or Telegram, invokes OpenAI for transcription and repurposing, and applies structured prompt rules to generate multiple post variants.
  3. Auto Publishing – Pulls approved content from Airtable, determines the correct LinkedIn post type, and publishes automatically on a defined cadence.

This modular structure simplifies maintenance and makes it easy to extend or replace individual components without redesigning the entire workflow.

End-to-end workflow: from discovery to published post

1. Scraping and deduplication pipeline

The content lifecycle starts with automated discovery of relevant LinkedIn posts from your chosen creators or competitors.

  • Triggering the scraper
    A Schedule Trigger node runs at your defined intervals (for example, hourly or daily). This trigger calls an Apify actor or similar scraper via an HTTP Request node to retrieve the latest posts for a configured list of profiles.
  • Preventing duplicates with Airtable
    Before any new content is processed, the workflow queries Airtable for existing post IDs. A simple Code node or IF node is then used to compare scraped items against these stored IDs.
    Only posts with IDs that do not yet exist in Airtable move forward. This ensures:
    • No accidental reposting of the same content
    • Airtable remains the single source of truth for all processed posts

2. Content extraction across media types

Once a new post is identified, the workflow branches based on content type to extract usable text and metadata.

  • Routing by content type
    The workflow determines whether the input is a document, image, video, or plain text. This routing can be implemented using IF nodes or Switch nodes in n8n.
  • Documents (PDF and similar)
    For document-based content, the workflow:
    • Downloads the file
    • Runs it through a PDF or document extraction node or custom logic
    • Returns clean text suitable for AI processing
  • Images
    Images are passed to an OCR or vision-capable model. Using OpenAI vision or a third-party OCR service, the workflow extracts any embedded text, captions, or overlays that are relevant for repurposing.
  • Videos
    Video posts are downloaded and their audio is extracted. The audio stream is then sent to OpenAI Speech-to-Text for transcription. This step converts spoken content into structured text that can be repurposed.
  • Plain text posts
    If the original LinkedIn post is already text-based, the workflow can skip media extraction and pass the content directly to the AI repurposing step.

Regardless of the input type, the pipeline consolidates the outcome into a consistent content object with fields such as:

  • id
  • username
  • datePosted
  • url
  • likesCount
  • content (normalized text)
  • contentType (text, image, video, document)

3. AI-driven repurposing with OpenAI

With normalized content available, the workflow delegates repurposing to an OpenAI node configured with a carefully designed prompt. This is the core of the “content agent” module.

The OpenAI (Chat) node receives the content object and returns a structured JSON with three primary deliverables:

  1. Text-only LinkedIn post – A stand-alone post suitable for direct publishing.
  2. Text + tweet-style image text – A post that includes copy for LinkedIn plus a short, punchy text overlay designed for an accompanying image.
  3. Text + infographic description – A post that includes copy plus a detailed specification for an infographic or carousel-style visual.

The prompt in the Repurpose node enforces:

  • A defined JSON schema so the AI outputs are machine-readable
  • Brand voice and narrative style, for example:
    • Shareable personal or founder-style stories
    • Clear, structured lists of tactics or lessons
    • Actionable, tactical takeaways
  • Three distinct variants per input to support different creative formats
  • A relevance filter that flags non-marketing or off-topic content as not relevant

Typical prompt rules include:

  • Keep each post between 300 and 400 words
  • Use line breaks, bullet points, and numbered lists for readability
  • End with a single, concise call to action such as “Follow for more” or “Share if useful.”

4. Editorial review and Airtable as the control layer

To maintain quality and compliance, the workflow never publishes AI output directly without human oversight.

  • Writing to Airtable
    For all content that passes the relevance gate, the workflow writes:
    • Original metadata and source references
    • Repurposed text variants
    • Media links or infographic specs
    • A status field that tracks the lifecycle (for example, review, ready, posted)
  • Human review process
    Editors or content owners work directly in Airtable to:
    • Review AI-generated copy for accuracy and brand alignment
    • Refine or overwrite fields such as finalText
    • Update the status to ready once a post is approved for publishing

This editorial gate is critical for risk management, especially when repurposing competitor content or opinionated posts.

5. Automated, scheduled publishing to LinkedIn

The final stage of the pipeline focuses on consistent, automated distribution.

  • Publishing trigger
    A second Schedule Trigger node runs at your chosen posting cadence. It queries Airtable for records where status = "ready".
  • Selecting and preparing the post
    The workflow selects one or more posts according to your logic (for example, next in queue, highest priority, or random). It then checks whether the selected record is:
    • Text-only
    • Text plus image
    • Text plus other media
  • Media handling
    If media is required, the workflow:
    • Downloads the relevant image or asset
    • Prepares it in the format expected by the LinkedIn node
  • Publishing via LinkedIn node
    The LinkedIn node, configured with OAuth credentials, publishes the content as a LinkedIn post. On success, the workflow updates the Airtable record to status = "posted" for tracking and reporting.

Key n8n nodes and external integrations

The workflow relies on a combination of native n8n nodes and external services. At a glance:

  • Schedule Trigger – Orchestrates both scraping and publishing cadences.
  • HTTP Request (Apify) – Connects to Apify actors or APIs to scrape LinkedIn content and media from specified profiles.
  • Airtable – Serves as the operational database for:
    • Post metadata and source references
    • Repurposed content variants
    • Status tracking and audit logs
    • Media URLs and related assets
  • OpenAI (Chat + Speech-to-Text) – Handles:
    • Transcription of audio from video posts
    • Image or OCR analysis when using vision models
    • Copy repurposing with structured prompts and JSON outputs
  • Telegram Trigger (optional) – Provides an alternative input path for:
    • Voice notes with content ideas
    • Manual text snippets you want the content agent to expand or adapt for LinkedIn
  • LinkedIn – Publishes text and media posts using your authenticated LinkedIn account via OAuth.

Prompt design and repurposing strategy

For automation professionals, the prompt is the primary control surface for quality. A robust prompt for this workflow typically includes:

  • Explicit input and output specification
    Provide the raw content and define the exact JSON schema the AI must return. This ensures downstream nodes can reliably parse the output.
  • Brand voice, tone, and structure
    Specify:
    • Target persona and level of expertise
    • Preferred tone (for example, authoritative but approachable)
    • Structure such as hook, narrative, list of tactics, and closing CTA
  • Variant requirements
    Require three variants:
    • Primary LinkedIn text post
    • Short, tweet-style image text for visual overlays
    • Detailed infographic or carousel specification
  • Relevance gate
    Instruct the model to flag content as irrelevant when it does not relate to your focus area, for example, marketing or growth. This prevents polluting Airtable with off-topic posts.
  • Formatting rules
    Include guidelines such as:
    • Maximum length (300 to 400 words)
    • Use of headings, line breaks, and numbered lists
    • Exactly one call to action at the end

Operational best practices for this automation

To run this workflow reliably at scale, consider the following best practices.

  • Maintain an editorial checkpoint
    Keep the Airtable review step mandatory. Fully automated publishing of AI-generated and competitor-derived content can drift from your brand voice, introduce factual errors, or increase copyright risk.
  • Respect content ownership and platform policies
    Avoid reposting copyrighted content verbatim. Focus on transformation, commentary, and synthesis. Where appropriate, attribute original creators and always comply with LinkedIn’s API terms and the terms of your scraping provider.
  • Monitor usage, costs, and rate limits
    Track:
    • OpenAI token usage for chat and transcription
    • Apify or scraper rate limits and quotas
    • LinkedIn API constraints

    Batch requests where possible to reduce overhead and avoid throttling.

  • Implement logging and observability
    Store:
    • Raw scraped inputs
    • AI outputs and final edited content
    • Publishing responses and error messages

    in Airtable or a secondary logging system. This supports audits, debugging, and rollback if needed.

Troubleshooting and scaling the workflow

As your content volume grows, you may encounter quality or performance challenges. Typical adjustments include:

  • Improving transcription quality
    If audio transcription is noisy or inaccurate:
    • Switch to a higher-fidelity OpenAI speech model
    • Preprocess audio to reduce background noise
    • Filter out very low-quality sources before transcription
  • Scaling scraping operations
    For larger creator lists:
    • Shard creators across multiple Schedule Trigger nodes or workflows
    • Distribute requests and respect rate limits to avoid blocking
    • Use caching for repeated media downloads
  • Handling heavy processing tasks
    For intensive workloads such as video transcription or image analysis:
    • Introduce worker queues or external job runners
    • Offload long-running tasks to dedicated processing workflows
    • Use n8n’s built-in concurrency and retry settings to improve robustness

Privacy, legal, and ethical considerations

Automating competitor analysis and content repurposing requires careful handling of legal and ethical issues.

  • Manual oversight of scraped content
    Always review scraped material before publishing. Avoid copying private, restricted, or clearly copyrighted content without transformation or permission.
  • Transparency about AI usage
    If your audience expects disclosure, clearly indicate when content is AI-assisted or AI-generated.
  • Compliance with platform and data source terms
    Follow:
    • LinkedIn’s API and platform policies
    • Apify’s usage terms
    • Robots.txt and any applicable site-level restrictions

    Non-compliance can lead to account restrictions or legal exposure.

Conclusion: turning discovery into a repeatable LinkedIn engine

With this n8n + AI workflow, you can transform fragmented content discovery into a structured, repeatable LinkedIn publishing system. The pipeline:

  • Aggregates insights from competitors and creators via scraping and Telegram
  • Uses OpenAI to repurpose raw content into multiple LinkedIn-ready formats
  • Centralizes review, governance, and status tracking in Airtable
  • Publishes approved posts on a predictable schedule through the LinkedIn node

Once

Automate Reddit Posts with n8n

Automate Reddit Posts with n8n

Ever wished you could hit one button and have Reddit take care of itself for a bit? With n8n, you can do exactly that. In this guide, you’ll walk through a compact workflow that:

  • Creates a Reddit post automatically
  • Grabs the data of that new post
  • Immediately adds a comment to it

We’ll wire together a Manual Trigger, plus three Reddit nodes (create post, get post, and create comment), and by the end you’ll have a reusable automation that you can run on demand or on a schedule.

Why bother automating Reddit with n8n?

If you post on Reddit regularly, you already know how repetitive it can get. Writing similar posts, copying links, adding the same comment or FAQ under every post… it adds up.

With an n8n workflow handling this for you, you can:

  • Save time by skipping manual posting and commenting
  • Stay consistent with your messaging and formatting
  • Scale up if you manage multiple subreddits or accounts
  • Build no-code or low-code automations that you can tweak without writing scripts

Whether you are a solo maker, a community manager, or part of a social media team, this workflow gives you a neat little pipeline that publishes a post, fetches the post ID, then drops in a follow-up comment without you lifting a finger.

What this n8n Reddit workflow does

Let’s quickly break down what you’ll actually build before jumping into the steps.

In this workflow, you’ll have:

  • A trigger
    • Start with a Manual Trigger for easy testing
    • Later, you can swap it for a Cron node or other trigger to schedule or automate it
  • Reddit node 1 – Create a post
    • Posts to a specific subreddit
    • Lets you define the title and body (or inject dynamic content with expressions)
  • Reddit node 2 – Get post details
    • Uses the post ID from the previous node
    • Fetches metadata, permalink, and status
  • Reddit node 3 – Add a comment
    • Posts a comment directly under the new post
    • Can include static text or dynamic data from the rest of the workflow

All of this is built with standard n8n nodes and Reddit’s OAuth2 API, so you stay within Reddit’s rules while still automating the boring parts.

Before you start: prerequisites

You do not need to be a developer to follow this, but you do need a few things set up first:

  • An n8n instance (cloud or self-hosted)
  • A Reddit account with an OAuth2 application (client ID and secret)
  • Reddit OAuth2 credentials configured in the n8n credentials manager
  • Basic familiarity with how n8n nodes and expressions work

If that all sounds good, let’s start by getting Reddit talking to n8n.

Step 1 – Set up Reddit OAuth2 credentials

Before n8n can post or comment on Reddit for you, Reddit needs to know who you are. That is where OAuth2 comes in.

1. Register your app on Reddit

  1. While logged into Reddit, go to https://www.reddit.com/prefs/apps
  2. Click “create an app”
  3. Choose “script” (or “web app” if that suits your deployment better)
  4. Fill in the details:
    • Name: anything descriptive for your automation
    • Redirect URI: for n8n this usually looks like https://n8n.example.com/rest/oauth2-credential/callback or the equivalent callback URL for your instance
  5. Save the app and copy the client ID and client secret

2. Configure Reddit OAuth2 in n8n

Now connect that Reddit app to n8n:

  1. Open n8n and go to the Credentials section
  2. Create a new credential of type “Reddit OAuth2 API”
  3. Paste in your:
    • Client ID
    • Client secret
    • Redirect URL (same as configured in Reddit)
  4. Start the authorization flow that n8n prompts you with
  5. When Reddit asks for permissions, make sure you grant at least these scopes:
    • submit – to create posts
    • read – to fetch post details
    • identity – to identify the user

Once this is done, n8n is officially allowed to post and comment on your behalf using the Reddit node.

Step 2 – Build the n8n workflow

With credentials sorted, you can build the actual workflow. It is a simple linear chain of four nodes:

  • Manual Trigger
  • Reddit (create: post)
  • Reddit1 (get: post)
  • Reddit2 (create: postComment)

Let’s walk through each one and how to configure it.

Manual Trigger node

Start by dropping in a Manual Trigger node. This is your on-demand start button.

While you are testing, this is the easiest way to run the workflow. Later on, you can swap it for:

  • Cron node for scheduled posts (daily, weekly, etc.)
  • Webhook trigger to post when something happens in another app
  • Any other trigger that fits your use case

For now, keep it simple with Manual Trigger so you can click and run the whole flow whenever you want.

Reddit node – create a post

Next, add your first Reddit node and set it up to create a post in a subreddit.

Key settings to configure:

  • Resource: post
  • Operation: create
  • Subreddit: the subreddit you want to post to, for example n8n
  • Title: the title of your post
    • Use plain text for something static
    • Or use an n8n expression to build it dynamically
  • Text (optional): the body of the post if you are creating a text post
  • Credentials: select the Reddit OAuth2 credentials you configured earlier

When this node runs successfully, Reddit responds with a JSON object that includes the newly created post and its id. That ID is the key piece of data you will pass into the next nodes.

Reddit1 node – get post details

Now add a second Reddit node. This one will confirm the post exists and pull extra metadata like the permalink.

Configure it to:

  • Resource: post
  • Operation: get

For the postId field, you will not type a static value. Instead, use an expression that references the output of the previous node.

You can use either of these expression styles:

{{ $json["id"] }}

or, more explicitly referencing the node by name:

{{ $node["Reddit"].json["id"] }}

Both approaches tell n8n to grab the id from the JSON output of the create-post node. Once this node runs, you will have a richer set of data about the post, which can be handy for logging, cross posting, or building a comment that includes the permalink.

Reddit2 node – create a comment

Finally, add a third Reddit node that will post a comment under the newly created post.

Set it up like this:

  • Resource: postComment
  • Operation: create
  • commentText: the text of your comment

To make sure the comment is attached to the right post, you again use the post ID via an expression. You can pull it from the previous node:

{{ $json["id"] }}

or from the explicitly named node:

{{ $node["Reddit1"].json["id"] }}

You can keep the comment static, or get fancy and use expressions to inject:

  • Links or resources
  • Data returned from other nodes
  • Timestamps or stats

At this point, your workflow is ready for a test run.

Step 3 – Test the workflow and debug issues

How to test your Reddit automation

  1. Click Save on your workflow
  2. Select the Manual Trigger node
  3. Run the workflow
  4. Watch each node execute in order
  5. Inspect the output of the Reddit nodes:
    • The first Reddit node should show the created post data with an id
    • The second should show full post details
    • The third should return a successful response for the comment

If everything looks good, check Reddit itself to see your new post and its automatic comment.

Common troubleshooting tips

If something breaks, here are a few usual suspects to check:

  • Authentication errors
    • Re-open your Reddit OAuth2 credential in n8n and run the authorization again
    • Confirm the correct scopes were granted: submit, read, identity
  • Subreddit or permission issues
    • Some subreddits restrict automated posts or require moderator approval
    • Test in your own or a private/dev subreddit first
  • Rate limits
    • Reddit has API rate limits, so avoid tight loops or very frequent posting
    • If you hit limits, wait before retrying to avoid temporary bans
  • Invalid postId
    • If the get-post or comment node fails, double check the expression for the id
    • Open the previous node’s JSON output and confirm the exact path to the ID

Once those are sorted, your workflow should run reliably.

Level it up: enhancements and best practices

As soon as you have the basic flow working, you can start making it smarter. Here are some ideas to expand this Reddit workflow with n8n.

  • Schedule recurring posts
    • Replace the Manual Trigger with a Cron node
    • Use it for weekly community updates, recurring announcements, or content series
  • Add conditional logic
    • Use an If node to only post when certain criteria are met
    • For example, only post if content passes validation, or if something is trending
  • Tap into Reddit’s newer APIs
    • If you need advanced features not yet available in the Reddit node, use the HTTP Request node
    • Let n8n still handle OAuth, while you call the newer endpoints directly
  • Log everything for analytics
    • Send post and comment data to Google Sheets, Airtable, or a database
    • Use it for tracking performance, auditing, or reporting
  • Build in error handling and alerts
    • Add error branches to handle failures gracefully
    • Send alerts to Slack or email if a post or comment fails

This way, you are not just automating a single task, you are building a small but robust social automation system around Reddit.

Real-world use cases for this Reddit workflow

Wondering where this actually fits into your day to day work? Here are some concrete ways people use this type of automation:

  • Scheduled community updates
    • Post weekly or monthly updates, then auto-comment with links, FAQs, or follow up info
  • Automated content distribution
    • Summarize a new blog post or newsletter and post it to Reddit automatically
    • Keep a consistent presence without manually copying content every time
  • Cross posting with quality checks
    • Pull content from other platforms, validate it, then post to Reddit when it meets your criteria
  • Auto-response comments
    • Post a comment under your own post with:
      • A link to your FAQ
      • Helpful resources
      • Disclaimers or additional context

Once you have the pattern in place, it is easy to adapt to different subreddits and workflows.

Security and compliance tips

Since this automation uses OAuth and posts on your behalf, it is worth keeping things secure and compliant.

  • Protect your credentials
    • Keep your Reddit OAuth2 client ID and secret private
    • In team environments, limit who can view or edit the Reddit credential in n8n
  • Respect Reddit’s rules
    • Follow Reddit’s API terms of use
    • Check each subreddit’s rules, especially around

Build a Reddit Upvote Alert with n8n & Weaviate

Build a Reddit Upvote Alert with n8n and Weaviate

Picture this: you post something brilliant on Reddit, go make coffee, and by the time you are back, it is quietly blowing up. But instead of celebrating, you are refreshing the page like it is 2012, trying to see if the upvotes are “real” or just your mom and a bot.

Good news. You do not have to babysit Reddit anymore.

This guide shows you how to use an n8n workflow template to automatically:

  • Catch Reddit upvote events the moment posts start gaining momentum
  • Enrich the content with embeddings and store it in Weaviate for smart, semantic search
  • Run a RAG agent to summarize what is happening and why it matters
  • Log everything neatly in Google Sheets and ping your team in Slack when things go wrong

In other words, you get a Reddit early-warning system that does the boring parts for you, while you pretend it is all “strategic monitoring.”

What this n8n Reddit Upvote Alert workflow actually does

This workflow template, called “Reddit Upvote Alert”, is a production-ready automation that connects Reddit events to a full semantic pipeline. At a high level, it:

  • Listens for Reddit upvote events through a Webhook Trigger
  • Splits long post content into chunks that are friendly for embeddings
  • Generates embeddings with the text-embedding-3-small model
  • Stores vectors in Weaviate using a dedicated index
  • Uses a RAG agent with a vector tool and memory to create intelligent summaries
  • Logs everything in Google Sheets for tracking and analysis
  • Sends Slack alerts if something breaks or special conditions occur

So instead of manually checking “Did that post get more upvotes yet?” every 10 minutes, you get structured alerts, searchable context, and a clear history of what happened.

How the architecture fits together

Here is how the pieces plug into each other inside n8n:

  • Webhook Trigger – Receives a POST request whenever your upstream system detects a Reddit post crossing a certain upvote threshold.
  • Text Splitter – Breaks long Reddit text into smaller character-based chunks so your embeddings stay efficient and meaningful.
  • Embeddings node – Uses text-embedding-3-small to convert each chunk into a vector.
  • Weaviate Insert / Query – Writes those vectors into a Weaviate index and later queries them for semantic context.
  • Window Memory – Gives your RAG agent short-term memory so it can keep track of the conversation context.
  • Vector Tool + RAG Agent – Lets the agent pull relevant context from Weaviate and craft a smart, concise alert with a chat model.
  • Append Sheet – Logs the final result in a Google Sheets tab called Log.
  • Slack Alert – Sends a message to a Slack channel if errors occur or special conditions are met.

Think of it as a tiny, polite robot that watches Reddit for you, remembers what happened, and leaves a paper trail in Sheets.

Step-by-step: setting up the Reddit Upvote Alert template in n8n

Now let us turn this from “cool idea” into a working workflow. Follow these steps inside your n8n instance.

1. Create the Webhook endpoint

Start with the Webhook Trigger node:

  • Method: POST
  • Path: reddit-upvote-alert

Configure Reddit or your middleware so that whenever a monitored post crosses your chosen upvote threshold, it sends a JSON payload to this webhook URL.

This is the entry point for the whole automation, so once this is live, Reddit events will start flowing into your workflow.

2. Split long Reddit text into chunks

Next, add a Text Splitter node and set it to use a character-based splitter. In the template, the recommended values are:

  • chunkSize = 400
  • chunkOverlap = 40

This keeps your chunks short enough for embedding and context retrieval, while a bit of overlap helps preserve coherence so your searches still make sense.

3. Generate embeddings for each chunk

Send the output of the Text Splitter into an Embeddings node and configure it to use the text-embedding-3-small model.

Each chunk of text turns into a vector representation. These vectors are what Weaviate uses later to find semantically similar content, not just exact keyword matches.

4. Store embeddings in Weaviate

Add a Weaviate Insert node and connect your embeddings to it. Use:

  • Index name: reddit_upvote_alert

Store useful metadata along with each vector, such as:

  • Post ID
  • Subreddit
  • Timestamp
  • Score or upvote count

The template also includes a Weaviate Query step that the agent uses later to retrieve relevant context during execution.

5. Configure memory and the vector tool

To help your agent sound like it knows what is going on, add:

  • Window Memory – This acts as a short-term memory buffer so the agent can keep track of previous messages and context.
  • Vector Tool – Point this tool at your Weaviate query node so the agent can ask for relevant chunks of content when needed.

With these two pieces, your agent can both remember the conversation and pull in extra information from Weaviate when crafting alerts.

6. Set up the RAG Agent

Now for the brains of the operation. Add a RAG Agent node and configure it with your preferred chat model. In the template, an Anthropic chat model is used.

Provide a system message so the agent knows its job. For example:

“You are an assistant for Reddit Upvote Alert.”

The agent receives:

  • Retrieved context from Weaviate via the vector tool
  • Short-term memory from the Window Memory node
  • Your instructions in the system prompt

From that, it generates a concise summary or alert about the Reddit event, including what happened and why it matters.

7. Log results in Google Sheets

Connect the output of the RAG Agent to an Append Sheet node. Use a Google Sheet with a tab named Log and map columns such as:

  • Status
  • Post ID
  • Summary
  • Upvotes
  • Subreddit
  • Timestamp

This gives you a running history of all alerts and agent outputs for future analysis, audits, or “look what Reddit did last week” presentations.

8. Add error handling and Slack notifications

Finally, connect the onError output of the RAG Agent (or other key nodes) to a Slack Alert node.

Configure the Slack node to post to a channel such as #alerts with a helpful message, for example:

Reddit Upvote Alert error: {$json.error.message}

That way, when something breaks, you hear about it in Slack instead of discovering it three days later while wondering why your sheet is suspiciously quiet.

What you need before you start

Before importing and running the template, make sure you have these credentials and services ready:

  • n8n instance (cloud or self-hosted)
  • OpenAI API key (or another embeddings provider) referenced in n8n as OPENAI_API
  • Weaviate instance (managed or self-hosted)
  • Anthropic API key (or another chat model provider) used for the Chat Model node
  • Google Sheets OAuth2 credentials
  • Slack bot token for sending notifications

Once these are configured in n8n, you can plug them into the nodes in the template without changing the logic.

Recommended configuration and tuning tips

Chunk size and overlap strategy

The default Text Splitter settings in the template are:

  • chunkSize = 400
  • chunkOverlap = 40

This is a solid starting point, balancing embedding cost with context quality. You can:

  • Increase chunkSize for shorter posts if you want fewer, larger chunks
  • Decrease chunkSize for very long threads to keep each chunk manageable

Choosing an embedding model

The workflow uses text-embedding-3-small by default, which is a good cost-quality tradeoff for production.

If your use case needs extremely precise retrieval and you have the budget, you can switch to a higher quality model. Otherwise, this model is usually enough to catch trends and find relevant content.

Weaviate indexing best practices

When inserting vectors into Weaviate, always include helpful metadata. For example:

  • Post ID
  • Subreddit
  • Author (if appropriate)
  • Timestamp
  • Upvote count

Use the index name reddit_upvote_alert so your data stays scoped to this workflow. This makes it easier to filter queries by subreddit, time range, or other attributes later.

Designing the RAG Agent system message

A concise, clear system prompt makes your agent far more useful. For example:

“You are an assistant for Reddit Upvote Alert. Use retrieved context to summarize the event into a two-sentence alert with upvote count and suggested actions.”

You can tweak the length, tone, or level of detail, but keep it explicit about what the agent should output.

Security, privacy, and moderation reminders

Automation is fun until someone leaks an API key in a screenshot. A few things to keep in mind:

  • Keep API keys out of logs, screenshots, and public workflows.
  • Follow Reddit’s API and user privacy policies. Do not store sensitive user data unless you have proper consent.
  • If your upstream can generate a lot of events, add rate limiting on the webhook endpoint to avoid overloads.

If you plan to store user-generated content for the long term, double check privacy rules and platform terms to stay compliant.

Troubleshooting your Reddit Upvote Alert workflow

Common issues and how to fix them

  • Authentication failures
    Check that your credentials in n8n are set and named correctly. For example: OPENAI_API, WEAVIATE_API, ANTHROPIC_API, SHEETS_API, SLACK_API.
  • Weaviate insert errors
    Confirm that the schema exists in Weaviate and that the index name matches exactly: reddit_upvote_alert.
  • Timeouts with large payloads
    Make sure the Text Splitter runs early in the flow to reduce request sizes, and consider increasing node timeouts if your content is very long.

Monitoring and logging

Use n8n execution logs to inspect failed runs and see where things went sideways.

Between:

  • Slack error notifications from your Slack Alert node
  • Google Sheets rows appended by the Append Sheet node

you get both real-time alerts and an audit trail of what the agent produced for each event.

Use cases and easy extensions

Once the core template is running, you can extend it in all sorts of ways. For example:

  • Notify community managers when posts start trending so they can respond, moderate, or engage quickly.
  • Aggregate trends by subreddit or topic using vector queries and scheduled batch jobs for analytics.
  • Upgrade the RAG Agent to suggest follow-up actions, such as promoting a popular post on other social channels.

All of that starts from the same base workflow that listens to upvotes and enriches the content with embeddings and Weaviate.

Get started with the Reddit Upvote Alert template

If you are tired of manually hunting for trending posts or copy-pasting links into spreadsheets, this workflow is your ticket out of repetitive-task purgatory.

The n8n + Weaviate Reddit Upvote Alert template gives you a scalable, semantic way to track Reddit activity, summarize what is happening, and keep a clean log of it all.

To start using it:

  1. Import the “Reddit Upvote Alert” template into your n8n instance.
  2. Plug in your credentials for OpenAI, Weaviate, Anthropic (or other chat model), Google Sheets, and Slack.
  3. Set up your Webhook Trigger endpoint and connect your Reddit or middleware system to POST events to it.
  4. Turn the workflow on and watch your alerts appear in Sheets and Slack.

If you want to refine the RAG prompt, adjust the Weaviate schema, or tune chunk sizes, you can customize the template without changing its overall structure.

Note: When storing user-generated content, always make sure you comply with privacy regulations and platform terms of service.

Social Media Content Automation Factory

How to Build a Social Media Content Automation Factory with n8n and LLMs

Learn how to design an n8n workflow template that automates content creation, approval, image generation, and publishing for X, Instagram, LinkedIn, Facebook, Threads, and YouTube Shorts – all from a single, reusable automation.

What You Will Learn

In this guide you will walk through how to turn n8n into a “social media content factory” powered by LLMs. By the end, you should understand:

  • The core concepts behind a social media automation factory
  • How to structure inputs, prompts, and JSON schemas for LLMs in n8n
  • How to connect LLM content agents, image generation, and hosting
  • How to add a human approval step before publishing
  • How to route and publish content to multiple social platforms
  • How to collect analytics and feed results back into your prompts

This article is written as an instructional walkthrough of the existing n8n workflow template, so you can both understand how it works and adapt it to your own use case.

Why Build a Social Media Automation Factory in n8n?

Most brands and teams struggle to keep up with the demand for consistent, platform-specific content. Each network has its own style, rules, and formats, which often leads to duplicated work and manual errors.

An automation factory built in n8n centralizes the entire process – from idea to published post – so you can:

  • Scale content production without hiring a large social team
  • Keep a consistent brand voice across all platforms
  • Reduce copy-paste errors and scheduling bottlenecks
  • Use LLMs to generate optimized captions, hashtags, and CTAs
  • Integrate image generation and image hosting directly into your workflow

Think of the workflow as a factory line. Once you feed in a campaign idea or brief, the automation handles routing, content generation, visuals, approval, and publishing for you.

Key Concepts: The Building Blocks of the Factory

Before you look at the n8n steps, it helps to understand the main components that make this template work.

1. Input and Routing

The factory starts with a single entry point. This might be a chat trigger, a form, or another n8n trigger node. The input typically includes:

  • The campaign goal or brief
  • The platforms you want to publish to (X, Instagram, LinkedIn, Facebook, Threads, YouTube Shorts)
  • Any preferences about images or visual style

Routing logic then decides which platforms to create content for. This ensures that the rest of the workflow only generates and publishes content where it is needed.

2. System Prompt and JSON Schema

The system prompt and schema are the “rules” the LLM follows. In this template you use:

  • A centralized system prompt that defines tone, brand voice, legal or compliance rules, and platform style guidelines
  • A JSON schema that defines the exact fields the LLM must output, for example:
    • caption
    • image_suggestion
    • hashtags
    • call_to_action

This structure makes the LLM output predictable and machine readable, which is critical for later publishing steps.

3. LLM Content Agents

LLM agents (such as GPT-family models or other LLMs) are responsible for producing platform-ready text. In the factory pattern you typically ask the LLM to create:

  • Short, punchy posts for X
  • Professional, longer-form posts for LinkedIn
  • Visual-focused captions for Instagram
  • Posts tailored for Facebook and Threads
  • Short video scripts for YouTube Shorts

Each platform has its own expectations, so the system prompt and schema instruct the LLM to adjust tone, length, and structure accordingly.

4. Multimedia Generation and Hosting

Text alone is rarely enough. The workflow also integrates with image generation or design tools to create:

  • Images and illustrations
  • Thumbnails
  • Visual ideas for short-form videos

These assets are then uploaded to an image hosting service, such as imgbb or Google Drive. The hosting step returns URLs or downloadable links, which the workflow stores alongside each post so the publishing nodes can attach the correct media.

5. Human Approval and Review

Even with strong automation, most teams want a human to approve content before it goes live. The template includes an approval step through email, Slack, or another communication channel where reviewers can:

  • See the proposed posts and images
  • Approve as-is
  • Request changes or edits

This keeps your brand safe and compliant without slowing down the process too much.

6. Publishing Router and Platform Nodes

Once content is approved, a publishing router in n8n sends platform-specific payloads to the correct API nodes. It handles:

  • Formatting posts for each network
  • Adding images or videos
  • Applying platform-specific limits and rate-limiting rules

You can plug in separate nodes for X, Instagram, Facebook, LinkedIn, Threads, and YouTube Shorts, all fed by the same router.

7. Analytics and Feedback Loop

The final concept is the feedback loop. After posts are published, you can collect basic metrics such as:

  • Engagement
  • Reach
  • Clicks

These results can be stored and later used to refine your prompts. Over time you can nudge the LLM toward better-performing language, hashtag patterns, and posting times.

Step-by-Step: How the n8n Workflow Template Works

Now that you know the core concepts, let us walk through a typical run of the n8n workflow from start to finish.

Step 1 – Receive the Content Request

The workflow begins with a trigger, for example:

  • A chat-based trigger where a user types a brief
  • A form submission containing campaign information

The input usually includes the campaign goal, which platforms to target, and any notes about visual style or required assets.

Step 2 – Fetch and Compose the System Prompt and Schema

Next, the workflow retrieves a centrally managed system prompt and JSON schema. This may be stored in a file, a database, or a document that non-technical stakeholders can edit.

In this step you:

  • Load the base system prompt that defines tone, brand rules, and platform-specific guidance
  • Load or define the JSON schema that lists required fields for each platform
  • Merge the user input with these rules into a single prompt package for the LLM

Step 3 – Call the LLM Content Agent

The combined user prompt and system prompt are then sent to an LLM node. The LLM returns structured JSON that matches your schema. Typical fields include:

  • Platform-specific captions
  • Hashtag suggestions
  • Call-to-action text
  • Image or visual suggestions
  • Short scripts for video content

Because the output is already structured, n8n can easily route and transform it in later steps.

Step 4 – Generate Visuals and Upload Assets

Using the image suggestions from the LLM, the workflow then calls an image generation or template service. This part of the template can:

  • Create one or more images based on the brief
  • Generate thumbnails or visual ideas for short videos

Once the visuals are ready, another node uploads them to an image host such as imgbb or Google Drive. The workflow stores the returned URLs in the same payload as the captions and hashtags.

Step 5 – Send for Approval

Before anything is published, the workflow sends a summary for review. This is usually done through:

  • Email
  • Slack
  • Another notification or collaboration tool

The approval message contains the proposed posts, suggested images, and key metadata. Reviewers can respond by approving or requesting changes. The workflow waits for this decision before moving on.

Step 6 – Publish to Social Platforms

Once the content is approved, the publishing router node takes over. It:

  • Checks which platforms were selected in the original request
  • Formats each post according to platform rules
  • Attaches the correct media URLs

The router then sends the final payloads to the respective platform API nodes, such as:

  • X (Twitter) node
  • Instagram node
  • Facebook node
  • LinkedIn node
  • Threads node
  • YouTube Shorts workflow or API integration

Step 7 – Track Performance and Optimize

After publishing, the workflow can collect metrics from each platform and store them. These analytics are then:

  • Appended to workflow memory or a database
  • Used to identify high-performing posts
  • Fed back into future prompt versions to refine style, hashtags, and timing

Over time, the factory becomes smarter and more aligned with what your audience responds to.

Design Tips for a Reliable Automation Factory

To make your n8n template stable and easy to maintain, keep the following best practices in mind.

Use a Strict Output Schema

Define required JSON fields for every platform, such as:

  • caption
  • image_suggestion
  • hashtags
  • call_to_action

This avoids malformed data and makes the approval messages and publishing steps consistent and easy to read.

Keep the System Prompt Modular

Store the system prompt outside the workflow, for example in a Google Doc or database. This lets marketing, legal, or brand teams update:

  • Brand voice and tone
  • Compliance and legal constraints
  • Platform-specific instructions

without changing any n8n logic.

Use Templates and Variations for Content

Instead of asking the LLM for a single caption, have it generate 2 to 3 variations using short templates for:

  • Headlines
  • Captions
  • Calls to action

Reviewers can then pick the best version or you can A/B test different variants to improve performance.

Automate Image Sizing and Platform Rules

Each platform has different requirements. To avoid manual adjustments, add logic for:

  • Image aspect ratios
  • Character limits
  • Alternative images per platform when needed

For example, you might automatically crop or select different images if a network requires a different size.

Always Keep a Human in the Loop

Even with a mature automation, keep a lightweight approval step. This is especially important for:

  • Regulated industries
  • High-visibility campaigns
  • Brands with strict tone and messaging rules

A quick review protects your brand and ensures quality.

Common Pitfalls and How to Avoid Them

As you customize or extend the template, watch out for these frequent issues.

  • Overreliance on a single prompt: If you never change your prompt, performance may stagnate. Keep versions of your prompts and test new formulations periodically.
  • No schema validation: Always validate LLM output against your JSON schema before moving to publishing. This prevents broken or incomplete requests.
  • Ignoring platform nuance: Each network expects a different style. Shorten content for X, keep Instagram captions visual and engaging, and maintain a professional tone on LinkedIn. Encode these differences in your system prompt.
  • Weak asset management: Use centralized image hosting and consistent file naming. This reduces the risk of missing or broken media links when posts go live.

Example n8n Node Pattern for the Factory

Here is a simple way to arrange your nodes in n8n to implement this factory-style workflow:

  1. Chat trigger or form input
  2. Fetch system prompt and JSON schema
  3. Compose combined prompt for the LLM
  4. LLM content agent node
  5. Image generator node
  6. Upload to image host node
  7. Approval email or Slack notification node
  8. Publishing router node
  9. Platform-specific API nodes (X, Instagram, Facebook, LinkedIn, Threads, YouTube Shorts)
  10. Analytics collector node

This modular structure makes it easy to add or remove platforms without redesigning the entire workflow, which is one of the main benefits of the factory approach.

Quick FAQ and Recap

What is a social media content automation factory?

It is a reusable n8n workflow that takes a campaign idea as input and automatically generates, enriches, approves, and publishes content across multiple social platforms, with LLMs handling most of the writing and ideation.

Which platforms does this template support?

The pattern described here is designed for X, Instagram, LinkedIn, Facebook, Threads, and YouTube Shorts. You can extend it to other platforms by adding more publishing nodes.

Do I still need humans in the process?

Yes. The template includes an approval step so humans can review and edit content before it goes live, which is important for brand safety and compliance.

How do LLMs fit into the workflow?

LLMs generate structured, platform-ready text based on your system prompt and schema. They suggest captions, hashtags, calls to action, and visual ideas, which the rest of the workflow uses for media generation and publishing.

Can the factory improve over time?

Yes. By collecting engagement and performance metrics, you can refine prompts, adjust templates, and improve your content strategy based on real results.

Ready to Build Your Own Automation Factory?

If you want help mapping this pattern to your specific content needs, you can work from this n8n template and customize it to your team, approval process, and platforms.

We also offer a workshop to translate your requirements into a tailored n8n +

Automate Lecture Thumbnail Export to LMS with n8n

Automate Lecture Thumbnail Export to Your LMS with n8n

Education and learning teams increasingly rely on consistent digital assets for lectures, especially thumbnails that appear in learning management systems (LMS), course hubs, and communication channels. This guide documents a complete n8n workflow that automates the export of Google Slides thumbnails, resizes them, uploads them to Google Drive, creates resources in Canvas, and notifies students via Slack and Gmail. The goal is to provide a reusable, technically precise reference for building and maintaining this automation.

Relevant keywords: n8n workflow, Google Slides automation, Google Drive, Canvas LMS, Slack notifications, Gmail notifications, LMS automation, lecture thumbnails.


1. Use Case & Benefits

1.1 Problem Statement

Manually generating and distributing lecture thumbnails for every session is repetitive, slow, and prone to mistakes, particularly for large or multi-section courses. Each lecture typically requires:

  • Exporting one or more slides as images from Google Slides
  • Resizing and standardizing those images
  • Uploading them to a shared storage location
  • Creating or updating LMS resources
  • Notifying students via Slack, email, or both

Performing these steps by hand for each lecture does not scale and increases the likelihood of inconsistent formatting or missing assets.

1.2 Why Automate This With n8n

Automating lecture thumbnail exports with n8n helps you:

  • Save instructor and admin time by eliminating manual exports and uploads
  • Standardize thumbnail sizes and naming conventions across all lectures
  • Ensure consistent distribution to Canvas and communication channels like Slack and Gmail
  • Centralize assets in Google Drive as the single source of truth for course media

2. Workflow Overview

2.1 High-Level Flow

The reference n8n workflow, typically named “Education LMS Lecture Thumbnail Export and Notification”, implements the following logical sequence:

  1. Trigger the workflow on a defined schedule using a Cron node.
  2. Retrieve slide metadata from a specific Google Slides presentation.
  3. Filter the set of slides to select only those that should generate thumbnails.
  4. Request and download thumbnails for the selected slides from the Google Slides API.
  5. Resize and normalize the images to a consistent thumbnail format (for example, 640×480 PNG).
  6. Upload the processed thumbnails to a designated Google Drive course folder.
  7. Call the Canvas LMS API to create file or resource entries referencing the Google Drive links.
  8. Aggregate results and send notifications via Slack and Gmail.
  9. Capture and log errors, especially around LMS integration, without breaking the entire pipeline.

2.2 Outcome

For each slide that passes the filter criteria, the workflow produces a cleaned, consistently sized PNG file stored in the appropriate Google Drive course folder. Corresponding resources are created in the Canvas course using those Drive links, and students receive automated announcements via Slack and email. Instructors and admins gain a repeatable, observable process that runs on a schedule without manual intervention.


3. Architecture & Data Flow

3.1 Core Components

  • Trigger: n8n Cron node, which determines when the workflow executes.
  • Content Source: Google Slides presentation (identified by presentation ID).
  • Processing: Filter logic and image manipulation using n8n nodes.
  • Storage: Google Drive folder that holds the generated thumbnails.
  • LMS Integration: Canvas REST API accessed via an HTTP Request node.
  • Notifications: Slack and Gmail nodes for student-facing updates.
  • Observability: Code and NoOp nodes for logging and controlled failure handling.

3.2 Data Flow Summary

  1. Trigger: Cron node starts the workflow at configured times.
  2. Slides Metadata: Google Slides node queries the presentation and returns slide objects with IDs and thumbnail endpoints.
  3. Selection: Filter node reduces the slide list to those that should be exported.
  4. Thumbnail Retrieval: For each selected slide, the Google Slides API is called to fetch a thumbnail, stored as binary data.
  5. Image Processing: Image edit node resizes binary image data to the target thumbnail dimensions and format.
  6. Upload: Google Drive node uploads the processed binary images to the configured course folder and returns file metadata and URLs.
  7. LMS Resource Creation: HTTP Request node sends a POST request to the Canvas API to register each thumbnail as a file or resource, referencing the Google Drive link.
  8. Notification Preparation: Code node aggregates file names, URLs, and LMS resource data into structured messages.
  9. Notifications: Slack and Gmail nodes send announcements containing Drive and Canvas links.
  10. Error Handling: On failure paths, logging nodes capture error context, and non-critical failures can be tolerated without stopping the entire workflow.

4. Node-by-Node Breakdown

4.1 Cron Trigger Node

Purpose: Define when the workflow runs.

Configuration:

  • Type: Cron
  • Example schedule: 0 17 * * 1,3,5 (17:00 on Monday, Wednesday, and Friday)

Adjust the cron expression to match your lecture schedule or publishing cadence. For instance, you might align it with typical lecture end times or weekly content release windows.

4.2 Google Slides Node – Get Slides

Purpose: Retrieve metadata for all slides in a specific Google Slides presentation.

Key parameters:

  • Operation: Get Slides (or equivalent operation that lists pages)
  • Presentation ID: The ID of the Google Slides deck that contains your lecture content.
  • Credentials: Google OAuth credentials configured in n8n with access to Google Slides.

Output: A collection of slide objects, each typically containing:

  • objectId (unique identifier for the slide)
  • Thumbnail-related endpoints or data that can be used in subsequent thumbnail requests

Ensure that the Google account used in the credentials has at least read access to the target presentation. Misconfigured scopes or missing permissions will cause this node to fail.

4.3 Filter Node – Select Key Slides

Purpose: Reduce the full slide list to only those slides you want to export as thumbnails.

Example logic:

  • Select only the first slide as a title thumbnail.
  • Select only the last slide as a summary or “next steps” thumbnail.

The example workflow filters to the first and last slide, which is often sufficient for lecture previews and wrap-ups. However, you can customize the filter conditions to:

  • Export every nth slide (for example, every 5th slide).
  • Filter based on slide notes or tags (such as slides that contain specific keywords in speaker notes).
  • Match other criteria available in the slide metadata.

Use the n8n Filter node or a Code node to implement the logic. The key output is a reduced set of items, each carrying an objectId for downstream thumbnail generation.

4.4 Google Slides Node – Get Thumbnail

Purpose: Request a thumbnail image for each selected slide from the Google Slides API.

Key parameters:

  • Operation: Get Thumbnail (or equivalent API operation)
  • Slide identifier: Use the pageObjectId or objectId from the previous node.
  • Download: Set download = true so that n8n stores the image as binary data.

Output: Each item now includes binary image data representing the slide thumbnail. This binary property will be used by the image processing node.

Edge cases:

  • If a slide cannot generate a thumbnail, the node may fail or return an error response. Consider enabling “Continue on Fail” if you prefer to skip problematic slides and process the rest.
  • Ensure that the Google Slides API quota and rate limits are sufficient for your schedule and volume.

4.5 Image Edit / Resize Node

Purpose: Normalize thumbnail size and format for consistent presentation in your LMS and communication channels.

Key parameters:

  • Operation: Edit / Resize image
  • Target dimensions: For example, 640x480
  • Output format: PNG
  • Input data: Binary image data from the previous node

Standardizing image dimensions ensures that thumbnails appear uniform in Canvas modules, course pages, and Slack or email previews.

Considerations:

  • If original slides have unusual aspect ratios, define how the node should handle cropping or padding.
  • Very large original images may take longer to process, so monitor performance on the first few runs.

4.6 Google Drive Node – Upload Thumbnails

Purpose: Store processed thumbnails in a Google Drive folder that acts as the central repository for course assets.

Key parameters:

  • Operation: Upload File
  • Folder ID: The ID of the course-specific folder where thumbnails will be stored.
  • File content: Binary data from the image edit node.
  • Naming convention: Examples:
    • <objectId>_thumbnail.png
    • <Lecture_Title>_Slide_<index>.png

Permissions:

  • Configure folder-level sharing so that Canvas and students can access the files as intended.
  • Use link sharing or domain-restricted sharing depending on institutional policies.

Output: Each item now includes Google Drive file metadata, typically including file ID and link, which is required for the Canvas API integration.

4.7 HTTP Request Node – Create Canvas LMS Resource

Purpose: Register the uploaded thumbnail in Canvas as a file or resource that students can access through the LMS.

Key parameters:

  • Method: POST
  • Endpoint: /api/v1/courses/:course_id/files
  • Base URL: Your Canvas instance URL
  • Headers: Include authorization, for example:
    • Authorization: Bearer YOUR_CANVAS_API_TOKEN
  • Body: Include the necessary fields to reference the Google Drive link and metadata (file name, description, etc.), according to your Canvas integration policy.

You need a valid Canvas API token with permissions scoped to the relevant course. The exact fields in the request body depend on how your Canvas environment is configured to handle external file references.

Error handling:

  • If the Canvas API returns an error (for example, due to invalid token, missing course ID, or unsupported file reference), capture the response body and status code in a logging node.
  • Decide whether to stop the workflow on LMS errors or continue and log them for manual follow-up.

4.8 Code Node – Aggregate Results & Prepare Messages

Purpose: Transform node outputs into human-readable summaries for Slack and email.

Typical responsibilities:

  • Iterate over uploaded files and LMS resources.
  • Construct a list of thumbnail names and their Google Drive URLs.
  • Optionally include Canvas resource links or identifiers.
  • Build structured message bodies with:
    • A brief summary of the lecture or date
    • Direct link to the Google Drive folder
    • Links to the newly created Canvas resources

The code node output is then passed to the Slack and Gmail nodes as the message text or HTML body.

4.9 Slack Node – Post Announcement

Purpose: Notify students or a course announcements channel that new lecture thumbnails and materials are available.

Configuration notes:

  • Channel: Point to a dedicated course channel, such as #course-123-announcements.
  • Message: Use the prepared text from the code node, including:
    • High-level summary
    • Link to the Drive folder
    • Links to Canvas resources, if applicable
  • Credentials: Use a Slack bot token configured in n8n.

4.10 Gmail Node – Send Email Notification

Purpose: Send email notifications to students, a mailing list, or instructor accounts.

Configuration notes:

  • Recipients: A class mailing list or a group alias is often easiest to maintain.
  • Subject: Include lecture title or date, for example, “New Lecture Thumbnails Available for Week 3”.
  • Body: Use content generated in the code node, including:
    • Contextual summary of the update
    • Drive folder link
    • Canvas resource links
  • Credentials: Gmail OAuth credentials configured in n8n.

5. Error Handling & Observability

5.1 General Strategy

Robust automation should handle partial failures gracefully and make it easy to investigate issues. The reference workflow includes:

  • NoOp fallback nodes to absorb errors where appropriate.
  • Logging code node that records error messages and timestamps.

5.2 Recommended Practices

  • Use “Continue on Fail” for non-critical nodes.
    • For example, if one thumbnail fails to upload, you may still want to notify students about the other successful thumbnails.
  • Log LMS integration errors.
    • Capture which file or slide caused the error.
    • Record the timestamp and the Canvas API response payload where possible.
  • Alert admins on repeated failures.
    • Trigger a separate notification to admins or support if critical steps, such as Canvas API calls, fail consistently across runs.
    • Use existing channels like Slack, email, or third-party alerting tools such as PagerDuty if integrated.

6. Security & Permissions

6.1 Google APIs (Slides & Drive)

Automate Real Estate Thumbnails with n8n

Automate Real Estate Thumbnails with n8n

High quality, consistent property thumbnails are critical for modern real estate listings. This reference guide documents an end-to-end n8n workflow template, the Real Estate Property Thumbnail Pipeline, that automates thumbnail creation and distribution from Google Slides to your CMS and agents.

The workflow:

  • Extracts slides from a Google Slides presentation
  • Generates web-optimized thumbnails with a watermark
  • Uploads processed images to Google Drive
  • Updates Airtable property records with the image URLs and metadata
  • Builds a CSV summary of processed slides
  • Sends an email notification with the CSV attached

1. Workflow Overview

1.1 Use case and benefits

Manual thumbnail export and formatting is time consuming and error prone. This n8n workflow automates the full pipeline so that real estate teams can:

  • Enforce consistent image dimensions and quality for all listings
  • Apply on-brand watermarks or logos without manual editing
  • Deliver thumbnails quickly to internal CMSs and listing agents
  • Maintain traceability via CSV summaries and CMS status fields

1.2 High level process

At a high level, the workflow performs the following operations:

  1. Scheduled trigger via Cron
  2. Retrieve slides from a specified Google Slides presentation
  3. Request and download slide thumbnails as binary image data
  4. Process each image with sharp (resize, watermark, encode)
  5. Upload processed images to a Google Drive folder
  6. Update corresponding Airtable property records with Drive URLs and slide metadata
  7. Aggregate run results into a CSV summary
  8. Send an email notification to the agent with the CSV attached

2. Architecture & Data Flow

2.1 Node sequence

The template uses the following n8n nodes, in this order:

  • Cron (nightly-property-scan)
  • Google Slides (get-property-slides)
  • Google Slides (fetch-slide-thumbnails)
  • Function (resize-watermark-images) using sharp
  • Google Drive (upload-to-google-drive)
  • Airtable (update-property-cms)
  • Code (prepare-csv-summary)
  • Email (send-agent-notification)

2.2 Data transformations

The main data transformations across the workflow are:

  • Slides metadata from Google Slides is converted into a list of slide items (each with an objectId, index, and thumbnail URL or binary).
  • The second Google Slides node converts each slide into binary image data for downstream image processing.
  • The Function node with sharp transforms raw thumbnails into standardized, watermarked JPEGs and enriches each item with metadata such as fileName and processedAt.
  • The Google Drive node returns a public or shareable link (webViewLink) that is stored in Airtable.
  • The Code node aggregates individual items into a CSV string or file suitable for email attachment.

2.3 Triggering strategy

The workflow is designed to run on a schedule, typically nightly at 02:00, but can be adjusted to hourly or used on demand. The Cron node is the single entry point and can be extended to read contextual input (such as a specific presentation ID) if required.

3. Node-by-Node Breakdown

3.1 Cron trigger (nightly-property-scan)

Purpose

Automatically starts the pipeline on a defined schedule so that new or updated slides are processed without manual intervention.

Key configuration

  • Mode: Time-based schedule
  • Default schedule: Nightly at 2 AM

You can adjust the Cron expression to:

  • Run more frequently for high volume portfolios
  • Run less frequently for smaller sets of listings
  • Trigger manually by disabling Cron and using the workflow’s “Execute Workflow” feature

3.2 Google Slides: get-property-slides (get-property-slides)

Purpose

Retrieves the list of slides from a Google Slides presentation that represents the property listing.

Key parameters

  • presentationId:
    • By default, set to a static Google Slides presentation ID.
    • Can be overridden dynamically via expressions, for example if the Cron or a previous node provides the ID.
  • Output:
    • JSON data for each slide, including objectId, slide index, and other metadata.

Behavior notes

  • If the presentation ID is invalid or access is denied, the node will fail with a Google API error. Ensure the configured OAuth credentials have permission to read that presentation.
  • All slides in the presentation are processed by default. If you want to limit to specific slides, you can filter items in a subsequent Function node.

3.3 Google Slides: fetch-slide-thumbnails (fetch-slide-thumbnails)

Purpose

Requests a thumbnail image for each slide retrieved in the previous step and downloads it as binary content for image processing.

Key parameters

  • Mode: Fetch thumbnail for each slide
  • Binary property: Typically set to something like data, which is later used by the Function node.

Output

  • Each item contains:
    • JSON: slide metadata (e.g. objectId, slideIndex)
    • Binary: base64-encoded image data under the configured binary property

Edge cases

  • Missing binary data: If the node is not configured to download binary content, downstream image processing will fail. Ensure “Download” or equivalent is enabled and a binary property name is set.
  • Rate limits: Large presentations can hit Google API quotas. If you see rate limit errors, add delay or retry logic between batches of slides.

3.4 Function: resize-watermark-images (resize-watermark-images)

Purpose

Uses the sharp library to standardize each thumbnail to web-friendly dimensions, apply a watermark overlay, and encode the result as a JPEG.

Core script

The template uses a Function node with the following core logic:

const sharp = require('sharp');

const items = [];

for (const item of $input.all()) {  const imageBuffer = Buffer.from(item.binary.data.data, 'base64');  // Resize to standard web dimensions (1200x675) and overlay watermark  const processedImage = await sharp(imageBuffer)  .resize(1200, 675, { fit: 'cover' })  .composite([{ input: Buffer.from('<svg width="200" height="60"><text x="10" y="40" font-size="24" fill="white" opacity="0.7">AGENCY LOGO</text></svg>'), gravity: 'southeast' }])  .jpeg({ quality: 85 })  .toBuffer();  items.push({  json: {  objectId: item.json.objectId,  slideIndex: item.json.slideIndex,  fileName: `property_slide_${item.json.objectId}.jpg`,  processedAt: new Date().toISOString()  },  binary: {  data: {  data: processedImage.toString('base64'),  mimeType: 'image/jpeg',  fileName: `property_slide_${item.json.objectId}.jpg`  }  }  });
}

return items;

What this node does

  • Reads the binary image from item.binary.data.data (base64 encoded).
  • Decodes it to a Buffer for processing with sharp.
  • Resizes the image to 1200×675 pixels using fit: 'cover' to maintain aspect ratio.
  • Applies a simple SVG watermark with the text “AGENCY LOGO” positioned at the southeast (bottom-right) corner.
  • Encodes the result as a JPEG with quality 85.
  • Returns a new item with:
    • JSON metadata: objectId, slideIndex, fileName, processedAt
    • Binary data: base64-encoded processed image, MIME type, and file name

Customization points

  • Dimensions: Change .resize(1200, 675) to match your site’s preferred aspect ratio.
  • Watermark:
    • Replace the inline SVG with your own SVG markup.
    • Adjust text size, color, opacity, or position.
    • Use a PNG watermark by loading a binary buffer instead of SVG.
  • Format:
    • Switch from JPEG to WebP by replacing .jpeg({ quality: 85 }) with .webp({ quality: 85 }) if your delivery stack supports it.

Error handling considerations

  • If item.binary.data is missing or malformed, Buffer.from will fail. This typically indicates a misconfiguration in the thumbnail fetch node.
  • Large images or many slides may increase processing time. Monitor workflow execution duration and adjust schedule or concurrency as needed.

3.5 Google Drive: upload-to-google-drive (upload-to-google-drive)

Purpose

Uploads each processed thumbnail to a specific folder in Google Drive and provides a shareable link for use in Airtable and downstream systems.

Key parameters

  • Operation: Upload file
  • Binary property: Matches the binary property name used in the Function node (for example, data).
  • Folder ID (folderId): The target Drive folder where thumbnails will be stored.
  • File name: Typically taken from fileName in the item JSON (e.g. property_slide_[objectId].jpg).

Output

  • Each item is enriched with Google Drive metadata, including:
    • webViewLink: the URL used in Airtable and potentially your CMS.

Notes

  • Ensure your Google OAuth credentials have both Slides and Drive scopes, and access to the target folder.
  • Use descriptive folder structures (for example, property IDs as subfolders) if you manage a large portfolio.

3.6 Airtable: update-property-cms (update-property-cms)

Purpose

Updates the property record in Airtable with the Drive URL and related slide metadata so that your CMS or internal tools can reference the new thumbnails.

Key parameters

  • API key: Airtable personal access token or API key configured in n8n credentials.
  • Base ID (appId): The Airtable base that contains your property table.
  • Table name (table): The table where property records live.
  • Record ID (record id): The specific record to update for the property.

Typical fields updated

  • Thumbnail URL: Set to the webViewLink returned by Google Drive.
  • Slide object ID: Stores objectId from the slide for traceability.
  • Status: Optionally set to a value such as “Thumbnails Generated” or “Ready for Review”.

Behavior notes

  • Ensure the Airtable field names in the node match your schema exactly.
  • If you manage multiple slides per property, you may want to:
    • Store an array of URLs, or
    • Use a linked table for multi-image relationships.

3.7 Code: prepare-csv-summary (prepare-csv-summary)

Purpose

Builds a CSV summary of all processed slides in the current run, which is then attached to the notification email as a human-readable audit log.

Typical contents

  • Columns may include:
    • objectId
    • slideIndex
    • fileName
    • processedAt
    • driveUrl (from webViewLink)

The node aggregates all items from the previous steps and outputs either:

  • A CSV string in JSON, or
  • A CSV file in a binary property to be used as an attachment.

3.8 Email: send-agent-notification (send-agent-notification)

Purpose

Sends an email to the listing agent (or a distribution list) summarizing the processed thumbnails and attaching the CSV file.

Key parameters

  • SMTP credentials: Configured in n8n to connect to your email server.
  • Recipient: The agent’s email address or a team mailbox.
  • Subject and body: Typically include:
    • A brief summary of the run
    • Links to the Drive folder or CMS
  • Attachments: The CSV summary produced by the previous Code node.

Usage notes