Imagine opening your inbox and finding a neat set of slide thumbnails from your latest presentation, ready for review, sharing, or archiving. No downloading, no exporting, no manual screenshots. Just clear visual previews delivered automatically while you focus on more meaningful work.
This is exactly what this n8n workflow template helps you do. It takes a Google Slides presentation, generates thumbnails for each slide, and emails them using Gmail. In this guide, you will walk through the problem this solves, the mindset behind automating it, and then the exact steps to set up and customize the workflow in n8n.
Think of it as a small but powerful step toward a more automated, focused workday.
From manual busywork to automated clarity
Manually exporting slide thumbnails is one of those tasks that feels small but adds up quickly. Every time you need previews for a client, a marketing review, or a course update, you:
Open the Google Slides file
Export or screenshot individual slides
Rename and organize the images
Compose an email and attach everything
It is repetitive, easy to forget, and definitely not the best use of your time or your team’s energy.
Automation flips that script. Instead of repeating the same steps over and over, you design the process once, then let it run for you. You free up mental space, reduce errors, and create a reliable system that works the same way every time.
This n8n template is a practical example of that shift. It gives you a clear, configurable workflow that:
Retrieves all slides from a Google Slides presentation
Generates a thumbnail image for each slide
Sends those thumbnails by email via Gmail
Once it is set up, you can run it manually, on a schedule, or trigger it from other tools. The result is the same: instant visual updates without manual effort.
How the n8n Google Slides thumbnail workflow works
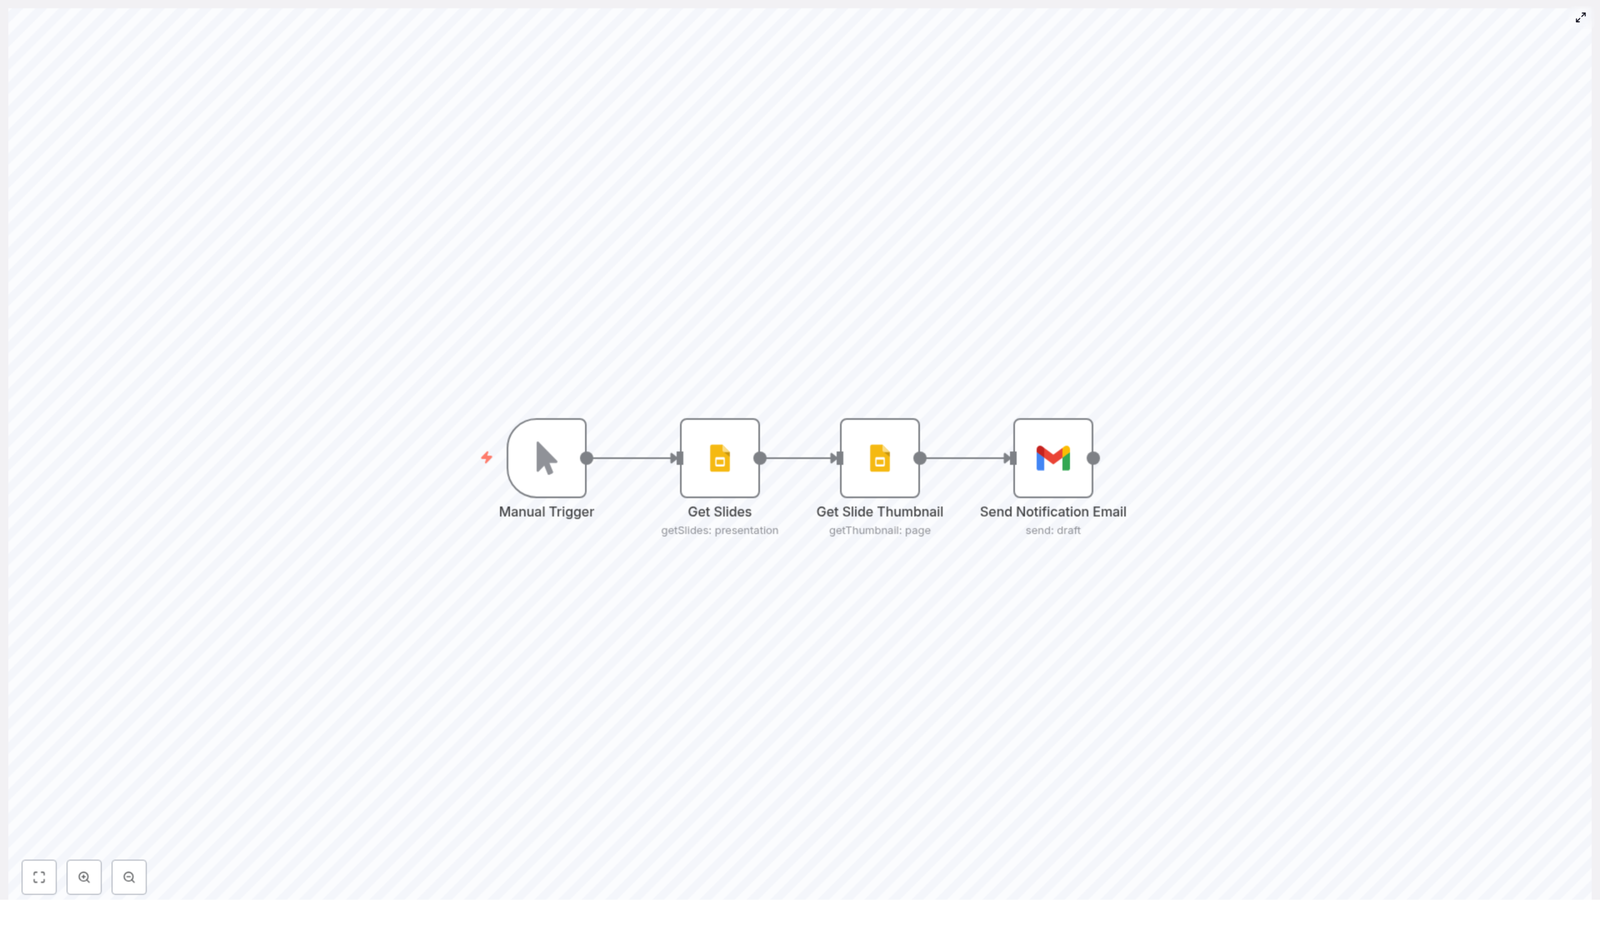
At its core, this workflow connects Google Slides and Gmail inside n8n using a series of nodes that each play a clear role. Here is the high-level flow you will be building and customizing:
Trigger the workflow manually or on a schedule
Get Slides from a specific Google Slides presentation
Generate thumbnails for each slide
Send thumbnails by email using Gmail
As you follow the steps below, you can keep it simple or start experimenting with enhancements like batching, archiving, or combining multiple thumbnails into a single email. This workflow is meant to be a starting point for your own automation ideas.
Step 1: Choose how and when the workflow runs
Manual Trigger node
The template starts with a Manual Trigger node. It is perfect for testing and for workflows you want to run on demand.
Later, as you gain confidence and want more automation, you can replace or complement it with:
Cron node to run on a schedule (for example, every morning)
Webhook to trigger from another app or service
Other trigger nodes depending on your use case
This flexibility lets you start simple, then gradually move toward a fully automated system as your needs grow.
Step 2: Retrieve all slides from Google Slides
Get Slides (Google Slides node)
The next step is to fetch the slides you want to convert into thumbnails. For that, the workflow uses a Google Slides node with the following configuration:
Operation:getSlides
Return all:true so every slide in the deck is retrieved
presentationId: the ID from your Google Slides URL
The presentationId is the part of the URL between /d/ and /edit. You can:
Hard-code it directly in the node for a fixed deck
Pass it dynamically as a parameter or variable if you are automating multiple presentations
This node returns one item per slide, including the slide’s objectId. That ID is essential because it is what you will pass into the next node to generate each thumbnail.
Step 3: Turn each slide into a thumbnail image
Get Slide Thumbnail (Google Slides node)
Once you have the list of slides, the workflow uses another Google Slides node to create thumbnails:
Operation:getThumbnail
Resource:page
pageObjectId: an expression that uses each slide’s ID, for example {{$json["objectId"]}}
The key detail here is how the slide ID is passed. By using the expression {{$json["objectId"]}}, each item from the previous node (each slide) is processed and turned into its own thumbnail.
There is one more very important setting: make sure the node returns the actual image file, not just a link.
Enable download or configure the node to return binary data
With download enabled, the node will add a binary property to each item that contains the thumbnail image data. You will use this binary property when attaching the file in Gmail.
Step 4: Send thumbnails by email using Gmail
Send Notification Email (Gmail node)
The final core step is to send the generated thumbnails as email attachments. This is handled by a Gmail node with:
Operation:send
Recipients, subject, and body: set these according to your needs
binaryPropertyName: the name of the binary property that holds the thumbnail
For example, if the thumbnail node stores the image under the key thumbnail, you would set binaryPropertyName in the Gmail node to thumbnail. If the key is data or something else, match that name exactly.
Make sure your Gmail OAuth2 credentials include the right scope so n8n can send emails:
https://www.googleapis.com/auth/gmail.send
Once this is set, each slide thumbnail can be attached and delivered to your chosen recipients, whether that is a marketing team, a client, or your own inbox.
Setting up Google credentials in n8n
Before this workflow can talk to Google Slides and Gmail, you need to configure OAuth2 credentials in n8n. This setup is done once and can be reused across multiple workflows.
If you plan to use Google Drive in related workflows, you can also include the relevant Drive scopes.
Gmail OAuth2 credentials with:
https://www.googleapis.com/auth/gmail.send
In n8n:
Go to Settings > Credentials
Create or import OAuth2 credentials for Google Slides and Gmail
When creating each credential, make sure the redirect URI shown in n8n is also added to your Google Cloud OAuth client configuration
Once this is done, you can select these credentials in your Google Slides and Gmail nodes and they will be ready to use across your automations.
Key configuration details that keep the workflow smooth
To make this automation robust and easy to extend, pay attention to a few important configuration points.
presentationId
The presentationId in the Get Slides node tells n8n which deck to process. You can:
Paste it directly from the Slides URL for a single presentation
Pass it dynamically if your process involves different decks
pageObjectId
Use the expression {{$json["objectId"]}} in the Get Slide Thumbnail node so that each slide from the previous node is used correctly. This is what connects each slide to its thumbnail.
Binary property naming
The thumbnail node will store the image binary under a specific key, for example data or thumbnail. You can see this in the node’s output. Use that exact key in the Gmail node’s binaryPropertyName field so attachments are mapped correctly.
Handling large presentations
If your presentations have many slides, you may want to control how they are processed to avoid rate limits or quota errors. You can:
Use the SplitInBatches node to process slides in smaller groups
Add a Wait node or delays between email sends
Use n8n’s built-in concurrency controls to pace the workflow
This lets you scale up your automation without running into limits.
Mapping thumbnails cleanly into your email
For a polished, reliable result, make sure your thumbnails are attached with the right filenames and MIME types.
Confirm that the Get Slide Thumbnail node returns binary data with:
A filename
An appropriate MIME type such as image/png or image/jpeg
In the Gmail node:
Set binaryPropertyName to the binary key from the thumbnail node, for example thumbnail
Set a descriptive attachment filename, such as:
Slide-{{$json["index"]}}.png
or a name based on the slide’s objectId
If you only see a URL in the output instead of a file, go back to the thumbnail node and ensure the download option is checked. That switch is what tells n8n to fetch the actual image binary rather than just referencing a remote link.
Troubleshooting common issues
As you experiment and refine your workflow, you may run into a few common issues. Here are quick checks to get you back on track.
No slides returned:
Verify the presentationId
Confirm that the authorized Google account has at least view access to the presentation
Thumbnail returns only a URL:
Enable the download option or set the node to return binary
Confirm that the Slides API scopes and permissions are correct
Gmail send fails:
Check that the Gmail OAuth2 credential includes https://www.googleapis.com/auth/gmail.send
Re-authenticate the credential if the token has expired or was revoked
Rate limits or errors with many slides:
Use SplitInBatches to process slides in smaller sets
Add a Wait node or delays between sends
Adjust concurrency or pacing to respect Google’s quotas
Going beyond the basics: ideas to extend the workflow
Once the core workflow is running, you can start shaping it around your own processes. Here are some powerful enhancements you can add with just a few more nodes.
Archive thumbnails before sending Save images to Google Drive or Amazon S3 using their respective nodes. This is useful for:
Creating a visual archive of all your decks
Feeding thumbnails into other tools or content pipelines
Send a single email with multiple attachments Instead of sending one email per slide, you can:
Use Merge or Wait nodes to collect all thumbnails
Send one combined email once every thumbnail is ready
Enrich the email body with slide details Pull extra data from the Get Slides node, such as:
Slide index or position
Slide notes or annotations
Then map that information into the email body for more context.
Trigger the workflow from other tools Replace the Manual Trigger with:
A Google Drive trigger when a presentation changes
A Slack or webhook trigger to generate thumbnails on command
This moves you closer to a fully automated, event-driven system.
Security and privacy you can trust
Automation should make your life easier, not introduce new risks. As you connect Google Slides and Gmail, keep these security practices in mind:
Grant only the scopes you need Prefer readonly Slides scopes and the minimal Gmail send scope required for this workflow.
Be mindful of who receives thumbnails If your slides contain sensitive content, send them only to trusted recipients and keep distribution lists controlled.
Rely on secure transport Gmail already uses TLS for email in transit, but you can add further protections if your organization requires them.
Audit which Google account is used Make sure the account behind your OAuth credentials is appropriate for the content you are automating, especially for internal or confidential decks.
Real-world ways to use this n8n template
This workflow is intentionally simple, yet it fits into many real-world scenarios. Here are a few examples to spark ideas:
Marketing teams Receive daily thumbnail previews of updated sales or campaign decks so everyone can review changes visually without opening the full presentation.
Content operations Automatically generate image previews for slide galleries, knowledge bases, or CMS uploads.
Education and training Send instructors a digest of slide thumbnails after they update course materials, making it easy to review and share changes.
Each of these use cases starts with the same foundation: this n8n workflow template. From there, you can adapt and expand it to fit your exact process.
Bringing it all together
This Google Slides thumbnail workflow is more than a handy shortcut. It is a small but meaningful shift toward a more automated way of working. Instead of spending time on repetitive exports and manual emails, you design a reliable system once and let n8n handle the rest.
With this template you can:
Convert Google Slides pages into thumbnails automatically
Deliver those thumbnails via Gmail with zero manual effort
Easily extend the flow to archive, batch, filter, or enrich your outputs
Use it as a stepping stone. Start with the basic template, then experiment. Try batching, add storage, pull in slide notes, or connect a new trigger. Each improvement brings you closer to a workflow that reflects how you actually work, not how tools expect you to work.
How One Marketer Stopped Manually Exporting Google Slides Thumbnails With n8n
On a Tuesday evening, long after most of her team had logged off, Mia was still at her desk.
She was the marketing manager in charge of weekly product updates, which meant one thing: Google Slides. Every week the presentation changed, and every week she had to export new thumbnails, attach them to emails, and send them to product managers, sales, and a handful of executives who never opened the full deck.
Click, export, download, rename, attach, send. Then repeat for every slide.
It felt like a punishment for caring about good communication.
That night, while dragging yet another PNG into yet another email, Mia finally asked herself a question she should have asked months ago: “Why am I doing this manually?”
The Pain Of Manual Google Slides Thumbnails
Mia’s team loved having visual previews. Thumbnails made it easy to skim changes, review designs, and spot issues quickly. But the process behind the scenes was a mess.
Every new version of the presentation meant a fresh round of exports.
Stakeholders in different time zones wanted updates at different times.
She needed a repeatable way to share previews, not a fragile checklist.
Whenever someone asked for “just a quick preview of the latest slides,” Mia knew it would cost her at least half an hour of repetitive work. The more the presentation evolved, the more often she had to repeat the same steps.
She knew there had to be a better way to:
Generate thumbnails for every slide in a Google Slides presentation
Attach those thumbnails to emails automatically
Run the process on a schedule or on demand
Reuse the thumbnails in other tools like Slack, a CMS, or cloud storage
That was when a colleague mentioned something that would change her workflow completely: an n8n template called “Google Slides Thumbnail Export and Notify.”
Discovery: An n8n Template That Promised To Do It All
Mia had heard of n8n before, mostly from the engineering team. They used it to connect APIs, automate reports, and trigger alerts. She had always assumed it was “too technical” for her.
Then she opened the template description.
The workflow did exactly what she had been doing by hand:
Retrieve slides from a Google Slides presentation
Download a thumbnail for each slide via the Google Slides API
Send each thumbnail as an attachment in Gmail
In other words, it promised to turn her late-night export ritual into a hands-off automation.
There was only one catch: she would need to understand how the workflow was built and configure it herself. But the template already had the core structure in place. She just had to make it her own.
Setting The Stage: Authentication And Access
Before Mia could touch the nodes inside n8n, she had to give the workflow permission to talk to Google Slides and Gmail.
With a quick search and a bit of help from a dev colleague, she followed these steps:
Opened Google Cloud Console and created OAuth credentials
Set up an OAuth client ID and secret with the right scopes:
For Google Slides: https://www.googleapis.com/auth/presentations.readonly
For Gmail: https://www.googleapis.com/auth/gmail.send (or readonly + send)
Added both credentials to n8n’s credentials manager
Selected those credentials inside the Google Slides and Gmail nodes
During the first authentication, Google asked her to grant access. Once she confirmed, the n8n template was ready to talk to her Slides and send emails on her behalf.
The hard part was over. Now came the fun part: shaping the workflow to match her real-world process.
Inside The Workflow: How The Nodes Tell The Story
When Mia opened the template in n8n, she saw four main nodes connected together. It looked less like “coding” and more like a flowchart of the steps she had been doing manually.
The Trigger: From Manual Starts To Scheduled Runs
The first node was a Manual Trigger. During testing, this was perfect. She could click “Execute Workflow,” watch the steps run, and see what happened at each stage.
Later, she knew she could swap it for a Cron node and schedule it to run:
Every morning before her team’s standup
Hourly during a big launch week
Or only on specific weekdays
If another system needed to kick off the process, she could even replace it with a Webhook trigger. For now, she left it as Manual Trigger so she could test safely.
Step 1: Getting All The Slides
The next node was called Get Slides, built using the Google Slides node.
Its configuration was simple but crucial:
Node type: Google Slides
Operation:getSlides
presentationId: the long ID in her Google Slides URL, between /d/ and /edit
returnAll: set to true so that every slide in the deck was included
When she ran the workflow, this node produced an array of slide objects. Each one had an objectId that identified a specific slide. Those IDs would become the key to getting thumbnails in the next step.
Step 2: Turning Each Slide Into A Thumbnail
The real magic happened in the Get Slide Thumbnail node.
This node used the Google Slides API again, but in a different way:
Node type: Google Slides
Operation:getThumbnail
Resource:page
She needed to tell n8n which slide to turn into a thumbnail. To do that, she mapped the pageObjectId to the slide’s ID from the previous node using an expression:
{{$json["objectId"]}}
For the presentationId, she had two options:
Type in the same presentation ID she used earlier, or
Finally, she toggled download to true. That told n8n to fetch the thumbnail as binary data, usually a PNG or JPEG file.
Now, each item in the workflow carried a binary thumbnail of a slide. All that was left was to send those images out.
Step 3: Sending Notification Emails With Thumbnails Attached
The last node in the base template was Send Notification Email, using the Gmail node.
Node type: Gmail
Operation:send
Mia filled in the obvious details: recipient email addresses, subject line, and email body. Then she had to make sure the attachment mapping was correct.
In the Gmail node, she set binaryPropertyName to the key used by the thumbnail node, often data by default. That told Gmail which binary field to attach as a file.
Once configured, every time the workflow ran, Gmail would use that binary property to include the thumbnail image as an email attachment.
The Turning Point: From First Test To Reliable Automation
With all nodes configured and credentials in place, Mia took a breath and clicked “Execute Workflow.”
First, the Manual Trigger fired. Then the Get Slides node pulled in every slide. The Get Slide Thumbnail node iterated through them, creating a thumbnail for each. Finally, the Gmail node sent emails, one per slide, each with a thumbnail attached.
Her inbox filled with messages from herself. Every slide, neatly attached as an image.
It was working.
She had just replaced a repetitive manual task with a repeatable automation. But Mia quickly realized she could go further and tailor the template to her exact needs.
Leveling Up: Enhancements That Made The Workflow Truly Useful
Once the basic flow was stable, Mia started to refine it. The template was flexible enough that she could adapt it without breaking the core logic.
Combining Thumbnails Into Fewer Emails
Sending one email per slide worked, but it was noisy. Her stakeholders preferred a single digest.
So she adjusted the workflow to batch thumbnails:
Collected multiple binary files into an array
Attached them all in one Gmail node execution
Now her team received a single email with all the slide previews for that presentation.
Making File Names Human Friendly
By default, the attachments had generic names. To make them easier to understand, she added a small Function node that set the fileName in the binary data.
She used a simple naming pattern like:
Slide-1.png
Slide-2.png
Slide-3.png
Reviewers could now see exactly which thumbnail matched which slide at a glance.
Saving Thumbnails To Cloud Storage
Some teams did not want email at all. They preferred a folder in Google Drive or a bucket in S3.
Because the template already produced binary thumbnail data, Mia simply added another node after the Get Slide Thumbnail step:
A Google Drive node to upload files to a shared folder, or
An S3 or other storage node for archival and backups
From there, it was easy to link those thumbnails in Slack or a CMS without adjusting the core logic.
Adding Error Handling And Reliability
To make sure her automation would not silently fail, Mia introduced Error handling:
Used the Error Trigger node to capture failures
Configured alerts to notify her or an admin when something broke
Added simple retry logic where it made sense
Now, if Google APIs had a bad day or credentials expired, she would know before stakeholders started asking, “Where are today’s thumbnails?”
Automating The Schedule
With everything working smoothly, Mia finally replaced the Manual Trigger with a Cron node.
She scheduled the workflow to run every weekday at 8:00 AM. By the time her team logged in, they already had fresh slide previews in their inbox or storage system.
Real-World Use Cases Mia Unlocked
Once the workflow was in place, Mia began to see new ways to use it across the company.
Daily thumbnail digests for product and marketing decks, so leadership could skim updates without opening the full presentation
Automated QA reviews, emailing updated slides to designers and editors every time the deck changed
Content previews, pushing thumbnails to a CMS or Slack channel for quick visual checks before publishing
Archival and backup, saving thumbnails to cloud storage so publishers could track how slides evolved over time
The same n8n template supported all of these scenarios with only minor variations.
When Things Go Wrong: Troubleshooting Lessons
It was not all smooth sailing. During her experimentation, Mia hit a few common issues. Fortunately, each one had a clear fix.
401 / Permission errors She learned to:
Recheck the OAuth scopes in Google Cloud Console
Confirm that both the Slides and Gmail APIs were enabled
Re-authenticate the credentials in n8n
No thumbnails returned This usually meant:
The presentationId was wrong, or
The Google Slides API was not properly enabled
Email failing to send She had to:
Verify Gmail OAuth scopes included sending permissions
Check that the sending account was allowed to email the recipients
Ask the G Suite admin to whitelist the app if necessary
Binary mapping errors When attachments did not show up, the culprit was usually the binaryPropertyName in the Gmail node. Making sure it matched the thumbnail node’s binary key, often data, fixed the issue.
Security And Best Practices She Adopted
As the workflow became more critical to her team, Mia tightened up security.
She stored all credentials in n8n’s secure credential storage and avoided hardcoding tokens in any node.
She limited OAuth scopes to only what the workflow needed, especially the readonly Slides scope and minimal Gmail send permissions.
She kept an eye on Google API quotas and rate limits, particularly once she scheduled the workflow to run daily.
By treating the automation like a small internal product rather than a quick hack, she ensured it would scale with the team’s needs.
What The Template Does Out Of The Box
At its core, the “Google Slides Thumbnail Export and Notify” n8n template does the following whenever it is triggered:
Lists all slides in a specific Google Slides presentation
Iterates through each slide and downloads a thumbnail using the Google Slides API
Sends each thumbnail as a separate email attachment via Gmail
From there, you can adapt it to:
Aggregate all thumbnails into a single digest email
Upload thumbnails to Google Drive, S3, or other storage
Post thumbnails to Slack or Microsoft Teams channels
The template gives you a working baseline. The story you tell with it is up to you.
The Resolution: From Late Nights To Hands-Off Previews
Weeks later, Mia realized something surprising. Her Tuesday evenings were quiet.
No more exporting thumbnails. No more frantic last-minute previews before a leadership call. The automation simply ran, morning after morning, delivering exactly what her stakeholders needed.
What started as a tedious recurring task had become a stable workflow powered by n8n. She had turned manual steps into a reliable system that scaled effortlessly as her presentations and audience grew.
Her only regret was not setting it up sooner.
Ready To Automate Your Own Slide Previews?
If you see yourself in Mia’s story, you do not have to keep exporting thumbnails by hand.
Import the Google Slides Thumbnail Export and Notify template into n8n.
Add your Google Slides and Gmail credentials with the correct OAuth scopes.
Run it manually, confirm the thumbnails and emails look right, then put it on a schedule.
From there, you can customize the workflow to save thumbnails to Drive, push them to Slack, or integrate them into your CMS or QA process.
Call to action: Import the workflow, try a scheduled run, and subscribe for more n8n automation templates that remove repetitive work from your week.
Copper Person Sync with n8n and Slack: A Simple, Time-Saving Workflow
Ever find yourself typing the same contact details into Copper, then into your other tools, then pinging your team on Slack to say, “Hey, this person is set up”? It adds up, right?
This n8n workflow template does that whole routine for you. It creates a person in Copper CRM, updates their details, grabs the final record to double-check everything, and then sends a friendly confirmation straight into Slack.
In this guide, we’ll walk through what the workflow does, when it’s useful, and how each node works, so you can plug it into your own setup with confidence.
What this Copper person sync workflow actually does
At a high level, this n8n workflow:
Creates a new person in Copper CRM
Updates that person with extra information, like a phone number
Fetches the final person record from Copper to confirm the data
Sends a Slack notification with the person’s details
It is a neat, linear flow that shows off a common CRM automation pattern: create → update → verify → notify.
When should you use this workflow?
This template is perfect if you:
Regularly add new contacts to Copper and want to avoid manual data entry
Need your team to know when a new person is created or updated
Want a reliable, auditable process around contact creation
Plan to trigger downstream automations based on new or updated people in Copper
You can use it as-is for quick tests, or as a starting point for more advanced workflows that hook into forms, landing pages, or other tools.
Why automate Copper person management with n8n?
Manually managing contacts is one of those tasks that feels small but eats your day. Automation with n8n helps you:
Keep data consistent across Copper, Slack, and any other tools you plug in
Trigger follow-up actions automatically, like tasks, notifications, or reporting
Save time for more strategic work instead of copy-pasting emails and phone numbers
Maintain a clear trail of how and when contact records are created or changed
Once this is set up, you do not have to worry about “Did I remember to update Copper?” or “Did I tell the team about this new contact?” The workflow handles that for you.
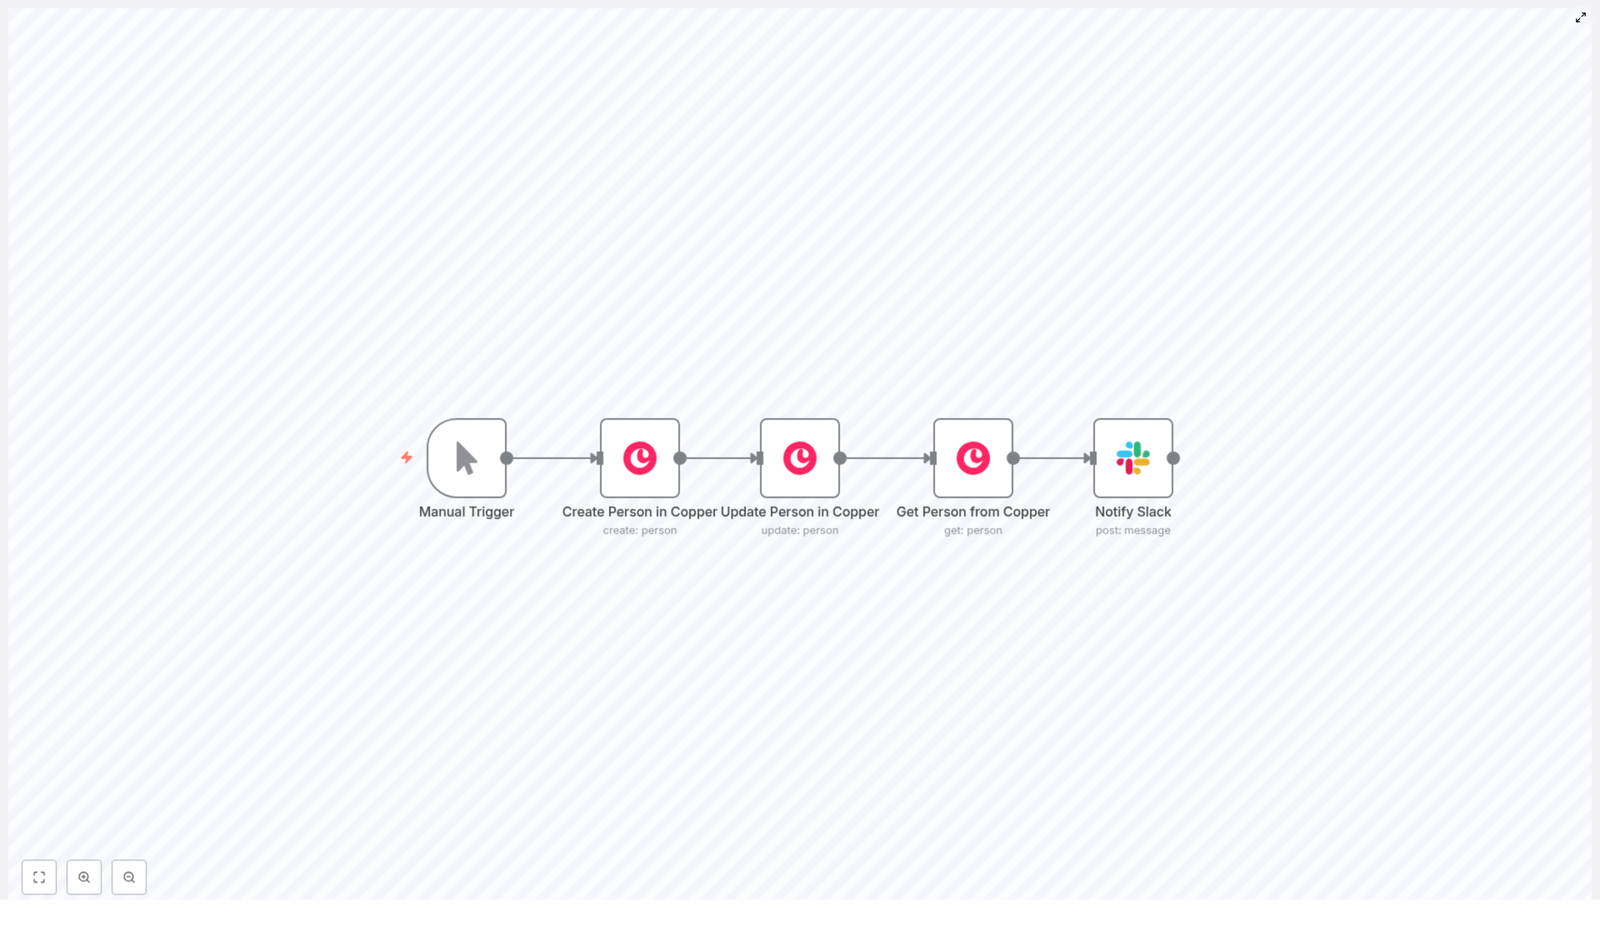
Quick tour of the workflow structure
This template uses five n8n nodes connected in a straight line:
Manual Trigger – starts the workflow on demand
Create Person in Copper – creates the initial person record
Update Person in Copper – adds or updates fields like phone numbers
Get Person from Copper – pulls the final person record from Copper
Notify Slack – posts a confirmation message in a Slack channel
Visually, it looks like this:
Manual Trigger → Create Person in Copper → Update Person in Copper → Get Person from Copper → Notify Slack
Let’s walk through each node so you know exactly what is happening at each step.
Step-by-step: how each node works
1. Manual Trigger
The workflow starts with a Manual Trigger node. This is ideal while you are building or testing, because you can just hit “Execute workflow” in n8n whenever you want to run it.
Once you are happy with it, you can swap this node out for something more automated, like:
A Webhook that listens to events from your app or website
A Cron or scheduler node that runs on a schedule
A trigger from another tool, like Google Sheets or Typeform
2. Create Person in Copper
Next up is the Create Person in Copper node. This is where the workflow calls Copper’s API to create a new person resource.
When this node runs, Copper returns the full person object. The important part here is the person id, which we will reuse in the next nodes. n8n makes that easy by exposing the returned data as $json so you can reference it in expressions.
3. Update Person in Copper
Right after creating the person, the workflow moves to the Update Person in Copper node. This step is useful when you want to add more details or adjust fields right after creation.
In the template, the node is set up to update the person’s phone number:
Resource:person
Operation:update
personId:={{$json["id"]}} (this grabs the id from the previous node)
The key detail is the expression used for personId:
{{$json["id"]}}
This tells n8n to take the id from the JSON output of the previous node (the one that created the person) so you always update the correct record.
4. Get Person from Copper
To make sure everything looks right in Copper, the next node is Get Person from Copper. This node fetches the person by id and gives you the final, updated contact record.
Configuration is straightforward:
Resource:person
Operation:get
personId:={{$json["id"]}} (again, using the id from the previous step)
This step is helpful if you want to:
Double-check that Copper stored the data as expected
Use the final person object in later nodes or other systems
Pass a clean, verified record into Slack or reporting tools
5. Notify Slack
Finally, the Notify Slack node sends a confirmation message to a Slack channel of your choice. This is the “Hey team, this person is ready in Copper” moment.
In the template, the node posts a simple message:
Resource:message
Operation:post
Channel:#general
Text:Person processed in Copper: {{$json["id"]}}
The text field uses an expression again so the message includes the actual person id that was just processed.
Sample n8n workflow template (JSON)
Want to get hands-on quickly? Here is the trimmed JSON for the workflow template described above. You can import it directly into n8n and customize it for your own use case.
Once imported, you can swap out the sample name, email, phone number, and Slack channel with your own values, or better yet, map them dynamically from other nodes.
Getting set up: required credentials
Before you hit run, you will need a few things in place in your n8n environment.
n8n instance Use either a self-hosted n8n setup or n8n cloud, whichever you prefer.
Copper credentials Add your Copper API credentials in n8n. You will need:
A valid Copper API key
Any required Copper API configuration for your account
Slack credentials In Slack, create an app or use an existing bot token that has the chat:write scope. Install it to your workspace, then add those credentials to n8n.
Slack channel configuration In the Slack node, set the channel (for example #general). For more reliability, especially in larger workspaces, you can use the channel ID instead of the name.
Best practices for a reliable Copper – n8n – Slack workflow
Once the basic template is running, a few tweaks can make it production-ready.
Use expressions instead of hardcoding For real-world usage, avoid fixed values like a single name or email. Map data from previous nodes or external triggers so each run handles different people automatically.
Add error handling Use an IF node or a dedicated error workflow to catch failed API calls and notify an admin or log the error. This is especially important if you are creating or updating many contacts.
Respect API rate limits Copper’s API has rate limits. If you are processing large batches, add delays or queueing logic in n8n to avoid hitting those limits.
Protect sensitive data Store API keys and other secrets in environment variables or n8n’s credentials system, not directly in node parameters or plain text.
Troubleshooting common issues
If something does not work on the first try, here are a few quick checks.
Authentication problems Double-check that your Copper API key and Slack token are correct and that the necessary scopes and permissions are granted.
Missing or unexpected fields Look at the node output in n8n’s UI. Confirm that keys like id, emails, and phone_numbers are actually present in the Copper response.
Expression errors If an expression like {{$json["id"]}} is failing, use the Debug panel and run nodes individually. Make sure you are referencing the correct node output and that the field exists.
Ideas for extending this n8n Copper workflow
Once you have the basic person sync working, you can easily layer on more automation. For example, you could:
Check for existing people by email before creating a new one, to avoid duplicates
Enrich contacts with third-party APIs like Clearbit or Hunter before sending them to Copper
Automatically create tasks or opportunities in Copper when certain conditions are met
Log processed contacts to a Google Sheet or database for reporting and analytics
This template is a solid building block. You can plug it into lead capture forms, onboarding flows, or any other process where new people enter your system.
Wrapping up
This Copper person sync workflow is a simple but powerful example of what n8n can do for your CRM processes. It shows how to:
Create a person in Copper
Update their details with additional fields
Verify the final record
Notify your team in Slack
From here, you can adapt the pattern to match your own stack and processes, while keeping everything consistent and automated.
Want to try it yourself? Import the template into n8n, connect your Copper and Slack credentials, and run a test. If you need more detailed guidance or want help tailoring the workflow to your specific use case, feel free to reach out or subscribe for more automation tips.
Call to action: Import the workflow, automate your Copper contact management, and let n8n handle the busywork. If you have a particular scenario in mind, share your use case and we will happily suggest improvements.
n8n Copper Person Sync Workflow: Turn Manual CRM Tasks Into Seamless Automation
Every growing business reaches a point where manual CRM updates start to slow things down. Copying data into Copper, double checking fields, and pinging your team on Slack can quietly eat away at your focus and energy.
With n8n, you can turn that routine work into a simple, reliable automation that runs in the background while you focus on higher value tasks. This n8n Copper Person Sync Workflow automatically creates a person in Copper, enriches their details, verifies the final record, and then notifies your team in Slack.
Think of it as a small but powerful step on your journey toward a more automated, distraction-free workflow.
The problem: Manual person management holds you back
Manually managing people in Copper might feel manageable at first, but as your leads, customers, and team grow, it becomes a bottleneck:
Data entry is slow and easy to get wrong.
Important details like phone numbers or emails can be missed or mistyped.
Your team often has to ask, “Is this record up to date?”
Notifications rely on someone remembering to post in Slack.
Every extra click and copy-paste steals time from work that actually moves your business forward. Automation is not just about saving minutes, it is about reclaiming your attention so you can focus on strategy, relationships, and growth.
The shift: From reactive tasks to proactive automation
When you adopt an automation mindset, you start asking a different question:
“What if this task happened automatically, every time, without me?”
This is where n8n shines. It lets you design workflows that connect Copper, Slack, and your other tools so that data flows where it needs to go with minimal effort from you.
This Copper Person Sync workflow is a great starting point. It is simple enough to understand in one sitting, yet powerful enough to become the foundation for more advanced automations later. Once you see it working, you can begin to imagine and build your own variations.
The workflow: A 5-step journey from new person to team notification
The template is built around five n8n nodes that work together in a clear sequence. Each one represents a step in the journey from “new person” to “team informed and ready to act.”
Manual Trigger – start the workflow on demand during testing or demos.
Create Person in Copper – create a new person record with name and work email.
Update Person in Copper – enrich that person with additional details like phone number.
Get Person from Copper – retrieve the final record and confirm the values.
Notify Slack – send a confirmation message to a Slack channel with the person ID.
In just a few clicks, this flow creates, updates, verifies, and broadcasts a new person record. It is a compact example of how automation can replace repetitive work with a consistent, reliable process.
Step-by-step: Configuring each node in n8n
1. Manual Trigger – start small, test confidently
Begin with the Manual Trigger node. This lets you run the workflow on demand while you are building and testing.
Later, when you are ready for production, you can swap this for a trigger that fits your use case, such as:
A webhook that fires when a form is submitted.
A scheduler that runs at set intervals.
Another automation event, similar to a Zapier trigger.
Starting with a manual trigger keeps things simple so you can see exactly what happens at each step before you automate it fully.
2. Create Person in Copper – lay the foundation
Next, configure the Copper node to create a person. This is the foundation of your workflow, where a new contact is born inside Copper.
In the template, the node is pre-filled with sample data:
Name: Harshil
Email: harshil@n8n.io (category: work)
Key settings to verify:
Resource:person
Operation:create
Credentials: Your Copper API credentials, either API key or OAuth depending on your setup.
Once this node runs, Copper returns a new person record with a unique id. That identifier becomes the thread that connects the rest of your workflow.
3. Update Person in Copper – enrich your data
Creating a record is just the beginning. The real value comes when you enrich that record with more complete information.
In the Update Person in Copper node, you map the id from the previous step to the personId field using an expression like:
{{$json["id"]}}
This tells n8n to take the id from the output of the Create node and use it to update the same person in Copper.
In the example, the workflow adds a work phone number:
Phone: 1234567890 (category: work)
You can extend this with any other fields you need. This step ensures that every new person is not just created, but also enriched with useful contact details your team can rely on.
4. Get Person from Copper – verify and prepare for messaging
To build trust in your automation, it helps to verify that everything worked as expected. That is the role of the Get Person from Copper node.
Configure it with the Get operation and map the personId in the same way as the Update node, using the {{$json["id"]}} expression from the previous step.
This node fetches the final, updated person record from Copper. It is useful for:
Confirming that your updates were applied correctly.
Preparing clean data for your Slack notification.
Debugging and understanding the exact payload Copper returns.
5. Notify Slack – keep your team in the loop
Automation is not only about the data, it is also about communication. The final step is to let your team know that a person has been processed and is ready in Copper.
In the Slack node, use the following example configuration:
Resource:message
Operation:post
Channel:#general
Text:Person processed in Copper: {{$json["id"]}}
You can easily expand this message to include the person’s name, email, phone number, or even a direct link to the Copper record. That way, your sales, support, or marketing teams can act instantly, without hunting for information.
Best practices to keep your Copper automation clean and reliable
Once your first version is running, you can start refining it so it scales with your business. Here are some practical best practices to apply as you grow.
Deduplicate before you create
Duplicate records can quickly clutter your CRM and confuse your team. Before you create a new person, add a step that checks whether they already exist.
You can do this by:
Using a Find Person node in n8n.
Calling Copper’s search API to look up existing records by email or other identifiers.
If a match is found, you can branch the workflow to update the existing person instead of creating a new one. This simple habit keeps your Copper instance clean and more trustworthy.
Error handling and retries
Even the best APIs occasionally fail. It is important to design your workflow to handle errors gracefully.
Enable error workflows in n8n so failed executions are captured.
Use the Execute Workflow node to implement retry logic for transient errors.
Send alerts via email or Slack when an operation fails, so you can investigate quickly.
With good error handling, you can rely on your automations even as they become more central to your operations.
Respect rate limits and use batching
When you start processing many people at once, Copper’s API rate limits become important.
For bulk imports, add short delays between requests to avoid throttling.
Use batch processing patterns in n8n to process groups of records efficiently.
This approach keeps your syncs stable and prevents interruptions during high volume operations.
Secure your credentials
Security should grow alongside your automation stack.
Store Copper and Slack credentials in n8n’s built-in credentials manager.
Avoid hard coding API keys or tokens directly in nodes or public templates.
Limit access to n8n and Copper based on team roles and responsibilities.
This way, you gain the benefits of automation without compromising data security.
Use environment variables for flexible setups
As your automation moves from development to staging to production, environment-specific details can change.
Store channel names, default email domains, or phone formats in n8n environment variables.
Reference those variables in your nodes so you can reuse the same workflow across environments.
This small optimization makes your workflows more portable, maintainable, and easier to scale.
Extending the workflow: Turn a starter template into your own system
Once your core Copper Person Sync is running, you can treat it as a building block. Here are some practical ways to extend and customize it.
Add a Find Person step before creation to check for existing records and branch based on whether a match is found.
Use a Transform or Set node to standardize phone number formats, name casing, or to parse complex incoming payloads before they reach Copper.
Log errors centrally in Google Sheets, Airtable, or a database so you have an audit trail for debugging and compliance.
Enhance Slack messages with richer content or interactive elements such as buttons like “Open in Copper” or “View details.”
Each improvement brings you closer to a tailored automation system that reflects how your team actually works.
Troubleshooting: Simple checks when something feels off
As you experiment and extend the workflow, you may run into occasional issues. Here are some quick checks that often resolve them.
If a node fails with authentication errors, double check your Copper API credential type and regenerate keys if needed.
When using expressions such as {{$json["id"]}}, confirm that the previous node actually outputs an id field. You can see this in the node output panel in n8n.
If payloads are not in the format you expect, insert a Set node to normalize or reshape fields before they are sent to Copper.
These small debugging habits make you more confident and faster at building new automations.
Real-world use cases: Where this template fits into your day
This Copper person sync workflow can support many different teams and processes. Here are a few ways to put it to work immediately:
Sales: Automatically add leads from a web form into Copper and notify your sales Slack channel so reps can follow up fast.
Customer success: Enrich newly created contacts with profile data from other systems and keep your team aligned on the latest customer information.
Marketing: Batch create people from event signups, then send a Slack alert to the campaign owner when the import is complete.
Each use case starts with the same core pattern, then grows into something tailored to your business.
Security and compliance: Automate with responsibility
As you automate more of your CRM processes, it is important to stay mindful of privacy and compliance.
Sync only the data you genuinely need, especially when it involves personally identifiable information (PII).
Ensure access controls are properly set up in n8n and Slack so only the right people can see sensitive data.
If your organization is subject to GDPR or similar regulations, record consent where needed and design workflows that can support data deletion or export on request.
Thoughtful automation can actually strengthen your compliance posture by making processes more consistent and auditable.
Your next step in the automation journey
The n8n Copper Person Sync Workflow is more than just a five node example. It is a practical starting point for transforming how you handle CRM data, communicate with your team, and protect your time.
With this template, you can:
Eliminate repetitive manual CRM tasks.
Keep your Copper data current and enriched.
Give your team instant visibility through Slack notifications.
From here, you can iterate. Add deduplication, validation, richer notifications, and new integrations as your needs evolve.
Action plan: Put the template to work
To start using this workflow in your own n8n instance:
Import the provided workflow JSON into n8n.
Connect your Copper and Slack credentials using the credentials manager.
Run the workflow with the Manual Trigger to see each step in action.
Add a Find Person node for deduplication so you avoid creating duplicates.
When you are ready for production, replace the Manual Trigger with a webhook or another trigger that fits your process.
If you need help adapting the template to your exact use case, reach out to your team, collaborators, or automation experts who can help you tailor the workflow around your unique processes.
Want to keep growing your automation skills? Subscribe for more n8n automation tutorials and Copper CRM tips so you can continue building workflows that save time and support your personal and business growth.
How One Real Estate Team Stopped Losing Leads Overnight With an n8n Workflow
On a rainy Tuesday afternoon, Sarah, a real estate marketing manager at a fast-growing brokerage, stared at her inbox in disbelief. Another promising lead had slipped through the cracks. The prospect had filled out a form on their website on Saturday morning, but no agent followed up until Monday evening. By then, the buyer had already signed with a competitor.
It was not the first time. Leads came in from landing pages, Facebook ads, chat widgets, and partner sites. Agents complained they were not notified fast enough. The sales manager insisted that Copper CRM data was incomplete. The email team wanted every new lead in Mailchimp for nurture campaigns. Meanwhile, Sarah was stuck in the middle, manually copying and pasting data and forwarding messages, hoping nothing got missed.
She knew something had to change. That was the day she discovered an n8n workflow template that promised to automate real estate lead intake, nurturing, and assignment from end to end.
The Problem: Time-Sensitive Leads, Manual Chaos
Sarah understood the stakes. Real estate leads are incredibly time-sensitive. Every minute between form submission and first contact could mean the difference between a signed contract and a lost opportunity. Research she had read made it clear that responding within minutes dramatically improves conversion rates.
Yet her process was riddled with manual steps and human error:
Leads arrived in different inboxes with inconsistent formats.
Sometimes email or phone fields were missing or mistyped.
Agents were tagged manually in Slack, often hours later.
Tasks were created inconsistently in Pipedrive, if at all.
Marketing nurture lists in Mailchimp were updated weekly, not instantly.
Missed emails, wrong tags, no follow-up. The team was working hard, but the system was failing them.
Sarah’s goal was simple: capture every lead once, enrich it automatically, notify the right people instantly, and make sure a follow-up task landed in an agent’s queue without her ever touching a spreadsheet.
The Discovery: An n8n Template Built for Real Estate Lead Automation
While researching automation options, Sarah came across an n8n workflow template designed specifically for real estate lead nurture and assignment. It promised a complete flow that would:
Ingest leads through a webhook from any form or ad source.
Create and enrich records in Copper CRM.
Add prospects to a Mailchimp nurture sequence.
Notify the agent team in Slack.
Assign follow-up tasks in Pipedrive based on region.
Return structured responses to the original sender.
It sounded like exactly what she needed. But she wanted to understand how it worked before rolling it out to her team.
The Plan: Designing a Lead Flow That Never Drops a Prospect
Sarah sketched out the story of a single lead as it moved through the new system. Instead of a messy chain of emails, she wanted a clear, fault-tolerant path from the moment someone clicked “Submit” on a form.
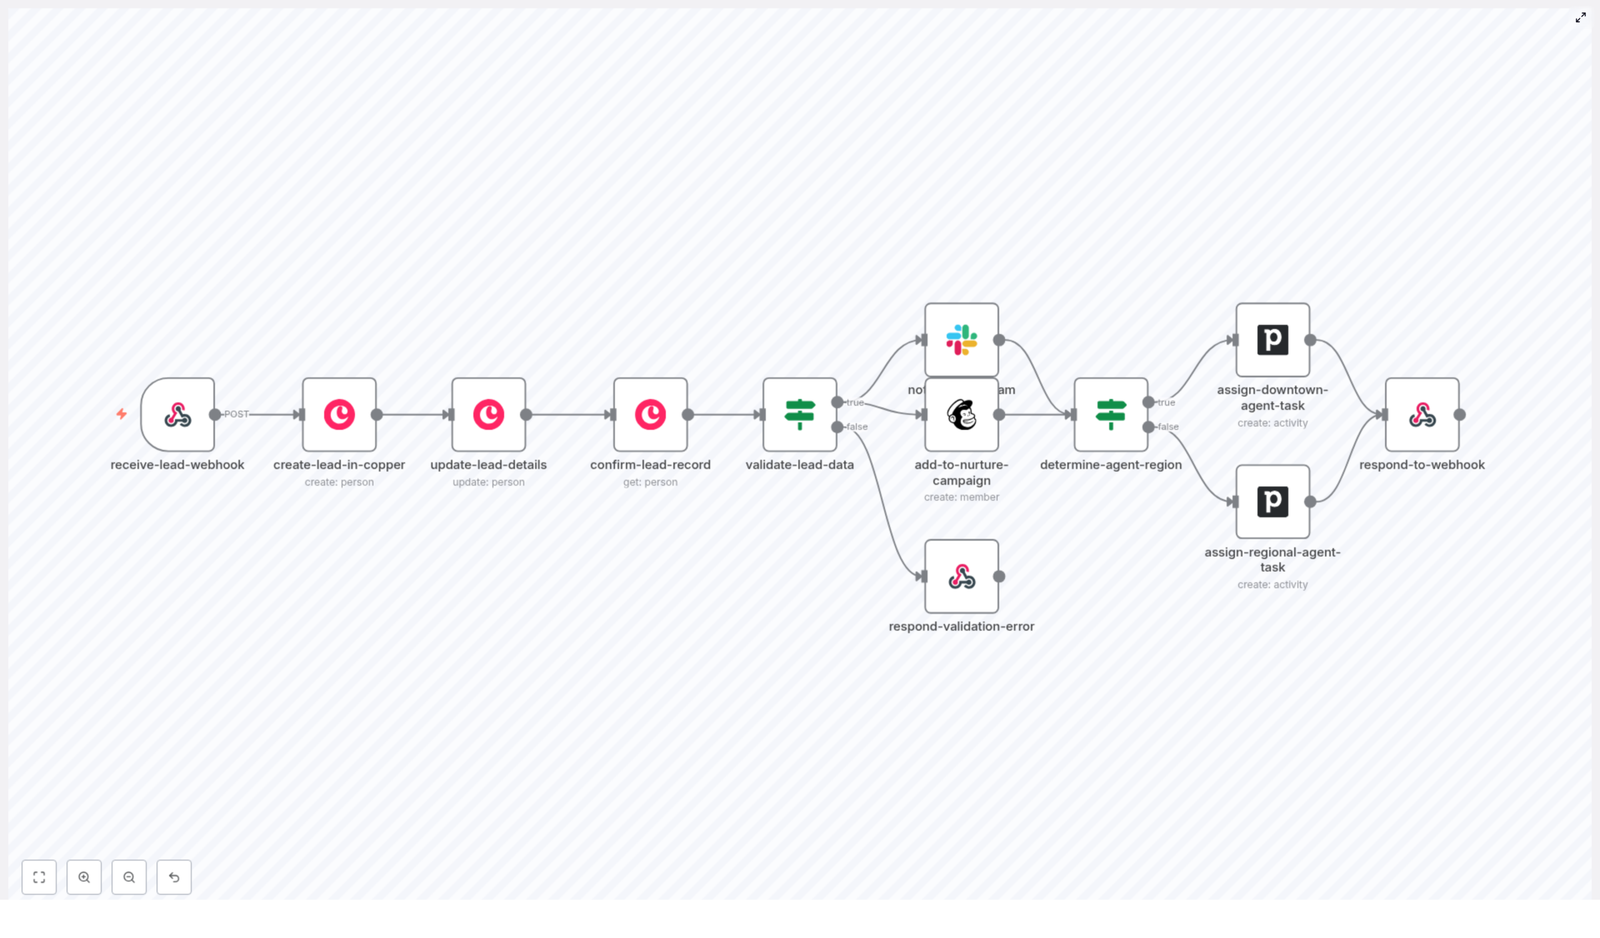
The n8n template gave her that path. The workflow would follow this narrative:
A buyer fills out a form or contacts the team through an ad.
The lead hits an n8n webhook that validates and structures the data.
A person record is created and updated in Copper CRM.
The workflow confirms the record exists and checks required fields.
If valid, it notifies the team in Slack and enrolls the lead in Mailchimp.
The workflow determines the correct region and creates a Pipedrive task for the right agent.
Finally, it sends a clean response back to the source confirming success or error.
With the big picture in mind, Sarah dove into the actual nodes that powered this automation.
Rising Action: Building the Workflow That Saves Every Lead
Step 1: The Webhook That Catches Every Lead
Sarah started with the entry point: a Webhook node called receive-lead-webhook. This node exposed an HTTP POST endpoint in n8n that her website, chat widget, and ad platforms could send lead data to.
She configured it to accept only the fields her team actually needed:
name
email
phone
property_type
preferred_location
budget
source
By limiting accepted fields, she kept the payload clean and predictable. No more random extra data, no more guessing which field mapped where.
Step 2: Creating the Lead in Copper CRM
Next came the Copper node that would bring the lead into the CRM. The node, which she labeled create-lead-in-copper, took the JSON payload from the webhook and mapped it to Copper’s person fields.
She made sure to:
Use the incoming email as the work email by default.
Set up custom fields for property_type, budget, and preferred_location.
Those custom fields would let her team segment leads later, report on performance by property type or budget range, and build smarter automations in the future.
Step 3: Updating Lead Details and Tagging for Clarity
Once the person was created, Sarah did not want any ambiguity about who was new and who needed attention. So she configured an update node called update-lead-details.
This node:
Filled in missing fields like mobile phone if they were available.
Applied tags such as real-estate-lead and new-prospect.
These tags became a powerful filter in Copper. Agents could quickly view all new prospects without worrying about duplicates or incomplete profiles.
Step 4: Confirming the Lead Record Exists
To avoid subtle timing issues, Sarah added a confirmation step named confirm-lead-record. This node fetched the person back from Copper using the CRM’s canonical ID.
That canonical ID would be the reference point for everything downstream. By working with the returned person object, Sarah eliminated race conditions where a later node might run before the record was fully available in Copper.
Step 5: Validating Lead Data Before Moving On
Sarah knew that bad data could break even the best automation. So she introduced a checkpoint: an IF node called validate-lead-data.
This node checked for required fields, especially email. If a critical field was missing, the workflow:
Immediately returned a 400 error to the webhook sender.
Logged or notified the team so they could investigate.
If the data passed validation, the workflow moved on to the fun part: notifications and nurture.
The Turning Point: Instant Notifications and Smart Assignment
Up until this point, Sarah had recreated the basic data entry work she used to do manually. The turning point came when she connected that data to her team in real time and automated the assignment rules.
Step 6: Parallel Notifications in Slack and Mailchimp
Instead of choosing between “tell the team” and “start the nurture,” Sarah realized she could do both at once.
She configured two parallel branches:
Branch 1: notify-agent-team (Slack)
A Slack node called notify-agent-team posted a formatted message to the sales channel every time a new lead arrived. The message included:
A quick summary of the lead’s name, property interest, and location.
A link directly to the Copper person record.
This meant agents could see hot leads appear in real time and click straight into the CRM with zero friction.
Branch 2: add-to-nurture-campaign (Mailchimp)
At the same time, a Mailchimp node called add-to-nurture-campaign enrolled the lead in a nurture list.
Sarah mapped merge fields like:
FNAME
LNAME
PROPERTY
LOCATION
Now, personalized email sequences started automatically. Prospects received relevant content while agents prepared to follow up, creating a seamless experience without any manual imports.
Step 7: Determining the Right Agent Region
The next challenge was routing leads to the right agent. Sarah’s brokerage had a downtown team and a broader regional team, and routing had always been a messy manual decision.
She added an IF node called determine-agent-region that inspected the preferred_location field. In her first version, the logic was simple:
If the location contained the word “downtown”, the lead would be routed to the downtown team.
Otherwise, it would go to the regional team.
She liked that this structure could later be expanded to handle more complex geographies, zip code lookups, or even a round-robin list of agents. For now, it was enough to remove guesswork and make routing consistent.
Step 8: Creating Agent Tasks in Pipedrive
Once a region was determined, the workflow branched into one of two Pipedrive nodes:
assign-downtown-agent-task
assign-regional-agent-task
Both nodes created a clear, actionable activity in Pipedrive:
Activity type: call task.
Due date: 24 hours from lead capture.
Duration: 30 minutes.
Note: a summary of the lead’s property interest, location, and budget.
For Sarah, this was the moment of relief. Every lead now came with a built-in next step, a due date, and an audit trail. No more “I did not see that email” excuses.
Step 9: Responding Back to the Source
Finally, she wrapped the workflow with a Webhook response node called respond-to-webhook.
On success, the workflow returned a clean JSON response that included:
The new lead ID.
A confirmation that an agent had been assigned.
If validation failed earlier, a different response node sent back a 400 error along with a helpful message so the source system could correct or retry the payload.
The loop was now closed. Every system that sent leads into n8n would know exactly what happened next.
Best Practices Sarah Adopted Along the Way
As she refined the workflow, Sarah built in several best practices to keep things stable and secure.
Validate early and often: She validated email and phone at intake and returned clear error messages when data was missing, so upstream sources could fix issues immediately.
Use canonical IDs: Every downstream action used Copper’s canonical person ID, which prevented duplicate records and made follow-up actions reliable.
Protect sensitive data: The webhook used HTTPS, and she whitelisted trusted IPs where possible. Credentials were encrypted in n8n, and Slack messages showed only non-sensitive details to avoid exposing PII in public channels.
Idempotency for retries: She added a unique reference like form_submission_id to the payload. The workflow checked for existing records using that ID before creating new ones, which handled form provider retries gracefully.
Tags and custom fields: Consistent tags and structured custom fields made segmentation, reporting, and future automation branching far easier in both Copper and Mailchimp.
Monitoring and alerts: Error-handling branches notified a dedicated DevOps or ops channel whenever a node failed, so issues could be fixed before they impacted sales.
Future Enhancements: Where Sarah Plans to Go Next
Once the core workflow was running smoothly, Sarah started dreaming bigger. The template made it easy to add extra intelligence without rebuilding everything.
Geolocation enrichment: She considered calling a geocoding or reverse-lookup API to normalize addresses and automatically determine the nearest agent.
Lead scoring: A small scoring function could assign points based on budget, intent, or property type and route high-value leads directly to senior agents.
Round-robin assignment: For busy regions, she could store an agent pointer in a small database or Google Sheet and rotate assignments fairly.
Multi-channel notifications: SMS or Microsoft Teams notifications could be added for teams that did not live in Slack.
Analytics integration: By pushing lead events to Mixpanel, Google Analytics, or a BI tool, she could track conversion rates and measure the impact of faster response times.
Testing, Deployment, and Staying Compliant
Before going live, Sarah treated the workflow like any other critical system.
Testing the Workflow
She tested each node independently:
Used Postman and curl to send sample payloads to the webhook.
Checked Copper to confirm person records and custom fields were created correctly.
Verified that Mailchimp lists updated and merge tags populated as expected.
Ensured Slack messages appeared in the right channel with the right details.
Confirmed Pipedrive tasks were created with accurate due dates and notes.
Once satisfied, she deployed the workflow to a production n8n instance with environment-specific credentials and enabled workflow versioning to track changes over time. She also turned on retry logic for critical nodes to handle temporary outages gracefully.
Security and Compliance
Since the workflow handled personal data, Sarah aligned it with local regulations like GDPR and CCPA:
Forms included clear consent options for contact and marketing.
Mailchimp unsubscribe requests were honored automatically.
Only necessary PII was stored, and access to third-party apps was audited regularly.
This gave her leadership team confidence that the new automation was not only efficient but also compliant.
The Resolution: Faster Responses, Fewer Lost Deals
A few weeks after launching the n8n workflow, Sarah noticed a shift. Agents were responding to new leads in minutes instead of hours. Copper records were complete and consistently tagged. Mailchimp nurtures kicked in without waiting for manual imports. Pipedrive tasks gave every agent a clear next step.
Most importantly, those awkward conversations about “lost” leads started to disappear.
The template had given her brokerage a robust starting point for rapid lead handling, from intake to task assignment, with Copper, Mailchimp, Slack, and Pipedrive all working together. Instead of juggling tools, the team could focus on what they did best: building relationships and closing deals.
Put Sarah’s Story to Work in Your Own Brokerage
If you see your own team in Sarah’s story, you do not have to rebuild this from scratch. The n8n template she used is ready to deploy and customize.
To get started:
Deploy the workflow template to your n8n instance.
Swap in your Copper, Mailchimp, Slack, and Pipedrive credentials.
Test with a handful of sample leads from your actual forms or ad sources.
From there, you can adjust routing rules, add lead scoring, or introduce geolocation and round-robin logic tailored to your brokerage.
Need help customizing? If you want advanced scoring, more complex region logic, or multi-channel notifications, you can work with an automation specialist to adapt the flow to your exact needs.
Call-to-action: Deploy this n8n workflow today and cut your first-response time. Faster responses lead to more signed contracts, and fewer great leads slipping away to your competitors.
HR Onboarding Automation with n8n: Give Every New Hire a Smooth First Day
Think about the last time you onboarded someone. How many tools did you touch? Email, calendar, HR system, chat, task manager, IT tickets… it adds up fast. Now imagine most of that happening automatically while you sip your coffee.
That is exactly what this HR onboarding automation with n8n is built to do. Using a single workflow, you can:
Receive new hire data from a form or HR system
Create and update a person in Copper CRM
Announce the new hire in Slack
Spin up onboarding tasks in Asana
Add them to the right Google Workspace group
Schedule orientation in Google Calendar
Return a clean JSON response so the calling app knows everything worked
Let’s walk through what this template does, when you should use it, and how each piece fits together in a way that makes your life a lot easier.
Why bother automating HR onboarding?
Onboarding is one of those processes that looks simple on paper but quickly turns into a checklist jungle. Every new hire needs the same basic setup, yet someone still has to type, click, and copy-paste across tools.
With an automated n8n workflow, you can:
Get new hires productive faster – accounts, groups, meetings, and tasks are ready before day one.
Cut down on mistakes – no more typos in email addresses or missed calendar invites.
Keep onboarding consistent – every new person goes through the same steps and gets the same information.
Make audits and reporting easier – track onboarding status right in Copper or your HR tools.
Help HR, IT, and hiring managers stay aligned – everyone sees the same data, at the same time.
If you find yourself repeating the same setup tasks for every new hire, this template is made for you.
What this n8n onboarding workflow actually does
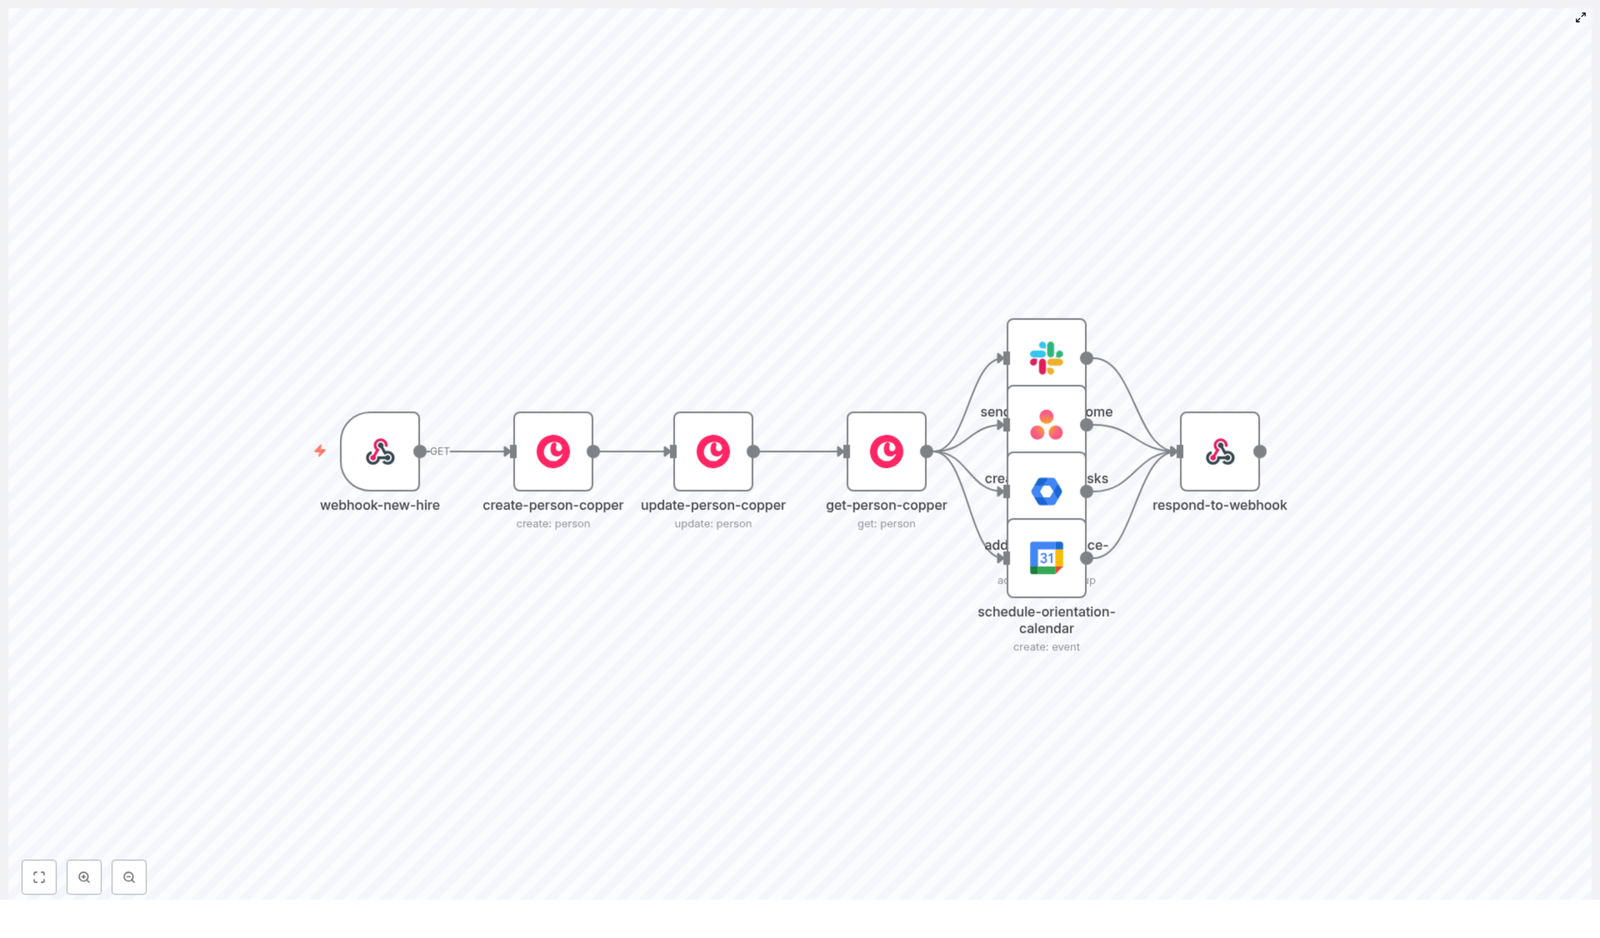
This workflow template connects your HR or form submission to a full onboarding sequence. Here is the high-level flow in plain language:
A Webhook receives new hire details from your HRIS, ATS, or a form.
A Copper CRM person is created for the new hire.
The Copper record is updated with extra fields like phone, title, department, and onboarding status.
The workflow retrieves the person from Copper to make sure everything is saved correctly.
A Slack message announces the new hire to your HR or team channel.
An Asana task is created to manage the onboarding checklist.
The new hire is added to a Google Workspace group for new employees.
A Google Calendar event is scheduled for orientation.
The workflow responds to the webhook with a JSON success payload.
Key tools this template connects
Copper CRM – stores the central person record and onboarding-related custom fields.
Slack – posts welcome and announcement messages.
Asana – tracks onboarding tasks and checklists.
Google Workspace Admin – adds the new hire to email groups.
Google Calendar – creates orientation events.
n8n Webhook – acts as the entry point for HR apps or forms.
Now let’s unpack each part of the workflow so you know exactly what is happening and where you can customize it.
Step-by-step: Inside the n8n onboarding template
1. Webhook: webhook-new-hire
Everything starts with an n8n Webhook node. It listens for a POST request containing the new hire’s information. Typical fields you will send include:
firstName
lastName
email
phone
role
department
managerId
startDate
You will want to secure this endpoint. Use a signed webhook, a secret token in the headers, or an IP allowlist so random callers cannot trigger your onboarding flow.
2. Create a Copper person: create-person-copper
Next, the workflow creates a person record in Copper CRM using the data from the webhook. At a minimum, you map:
First and last name
Work email
This becomes the canonical record for the new hire, which is handy if you want to use Copper as a lightweight HR tracking hub or tie onboarding to other processes later.
3. Update Copper with onboarding details: update-person-copper
Right after creating the person, the template updates that same Copper record. It fills in details like:
Phone number
Job title or role
Manager ID
Department
A custom field such as onboarding_status = "In Progress"
Storing onboarding metadata directly in Copper lets you build HR dashboards, run reports, or quickly see where each new hire is in the process.
4. Confirm the Copper record: get-person-copper
Once the record is updated, the workflow retrieves the full person from Copper. This step:
Makes sure all fields exist and were saved correctly.
Provides a clean, consistent data structure for downstream nodes.
The returned object usually includes the emails array, custom_fields, id, and name, which other nodes can rely on without having to guess formats.
5. Announce the new hire in Slack: send-slack-welcome
Now for the fun part. The workflow sends a formatted Slack welcome message to your HR channel or a general team channel. The message typically includes:
The new hire’s name and role
Email address
Start date
Department
You can customize the text, add channel mentions, and use emojis to make it feel more personal and visible. That way, everyone knows who is joining and when.
6. Create onboarding tasks in Asana: create-asana-tasks
To keep the operational side under control, the workflow creates an Asana task in your HR or onboarding project. This task can include:
A checklist of onboarding items like:
Workstation setup
Account creation
1:1 with manager
Training modules
Paperwork and compliance
A due date set to the new hire’s startDate
From there, your HR or People team can track progress and make sure nothing slips through the cracks.
7. Add the new hire to a Google Workspace group: add-to-workspace-group
Using the Google Workspace Admin node, the workflow adds the new hire’s email address to a group such as:
new-employees@company.com
This is perfect for:
Onboarding email sequences
Shared resources and docs
Company-wide announcements
It also keeps your distribution lists automatically in sync with new arrivals.
8. Schedule orientation in Google Calendar: schedule-orientation-calendar
The next step is to create a Google Calendar event for the new hire’s orientation. The node typically:
Sets the event date to the startDate
Invites the new hire and HR team members
Adds a detailed agenda
Specifies the meeting location or video link
Enables reminders and notifications
This saves you from manually sending invites and helps ensure orientation is scheduled consistently for every hire.
9. Return a JSON response: respond-to-webhook
Finally, the workflow sends a JSON response back to the original caller. This response confirms that the onboarding steps ran successfully and can include values like:
The Copper person ID
The canonical name
Any other IDs or status flags you want to return
Your HR system, applicant tracking system, or form can then show a confirmation to the user or log the result for future reference.
Example: Sample webhook payload
To trigger the workflow, you send a POST request to your n8n webhook with JSON similar to this:
Make sure your dates are formatted in ISO style YYYY-MM-DD if your downstream tools or nodes expect that format. It keeps parsing simple and avoids weird date issues later.
Keeping things safe: Security, access, and testing
Secure your webhook and credentials
Since this workflow touches multiple systems, you want to treat it like any other production integration. A few best practices:
Protect the webhook with a secret token, signed requests, or an IP allowlist.
Use scoped service accounts for Copper, Slack, Asana, and Google, with only the permissions you actually need.
Store and rotate API keys using n8n’s credential storage instead of hard-coding them.
Handle errors gracefully
Things will fail occasionally, so it is good to plan for that. You can use n8n’s error handling features to:
Retry Copper create or update calls if you get 429 or other transient errors.
Send a Slack alert to a dedicated HR or admin channel if any node fails.
Log failed payloads to S3, Google Drive, or a database so you can reprocess them later.
Test before you go live
Before you plug this into your real HR process, run it through some test scenarios:
Use n8n’s active test mode with staging credentials where possible.
Send realistic sample payloads and verify that records appear correctly in Copper, Asana, Slack, and Google Workspace.
If you have CI in place, consider adding a simple job that hits the webhook with test data to catch regressions early.
Customization ideas to match your HR process
The template works out of the box, but you will probably want to tweak it to match how your company does onboarding. Here are a few ideas:
Extend Copper custom fields to track:
Equipment requests and approvals
Asset tags for laptops or phones
Training completion or progress
Branch onboarding tasks in Asana based on:
Department (Engineering vs. Sales)
Role type (manager vs. individual contributor)
Add conditions so contractors skip steps like:
Google Workspace group addition
Certain internal trainings
Set up probation milestones at 30, 60, and 90 days that automatically:
Send checklists to managers
Trigger surveys for new hires
Connect your HRIS (such as BambooHR or Workday) so onboarding and other lifecycle events all use a single source of truth.
The nice thing about n8n is that you can keep iterating. Start simple, then add branches and conditions as your process matures.
Troubleshooting: What to check when things go wrong
If something does not behave as you expect, here are a few quick checks:
Slack messages not posting? Double-check the Slack app token, channel permissions, and that the bot is actually a member of the target channel.
Copper updates failing? Verify that your custom_field_definition_id values match the fields configured in your Copper instance.
Asana or Google nodes complaining? Look at OAuth scopes and consent. Make sure the app has permission to create tasks, manage groups, or create calendar events.
Use n8n’s execution logs and the node output preview to inspect the input and output JSON at each step. It is one of the fastest ways to see where a field is missing or mis-mapped.
When should you use this n8n onboarding template?
This template is a great fit if:
You already use Copper, Slack, Asana, and Google Workspace.
You receive new hire data from a form, ATS, or HRIS and want everything else to happen automatically.
Your team is tired of repeating the same onboarding steps for every single employee.
Even if you only start with a few steps, you can gradually expand the workflow into a full employee lifecycle automation.
Ready to try it? Next steps
If this sounds like the kind of time saver your team needs, getting started is pretty simple:
Import the provided n8n workflow template into your n8n instance.
Connect your credentials for Copper, Slack, Asana, and Google Workspace.
Send a test payload from a staging HR app or a simple REST client.
Review the results in each connected tool and adjust mappings or messages as needed.
If you want to go a bit further, you can:
Customize the workflow for contractors, interns, or international hires.
Add payroll or identity verification integrations.
Enhance error handling, logging, and audit trails for compliance.
Call to action: Import the n8n template, connect your APIs, and run a test hire today, or get in touch to plan a tailored onboarding automation that matches your exact HR process.
Every day, your social channels are waiting. They need fresh posts, smart copy, and on-brand visuals. But if you are drafting everything by hand, that daily rhythm can quickly turn into a time sink that pulls you away from strategy and growth.
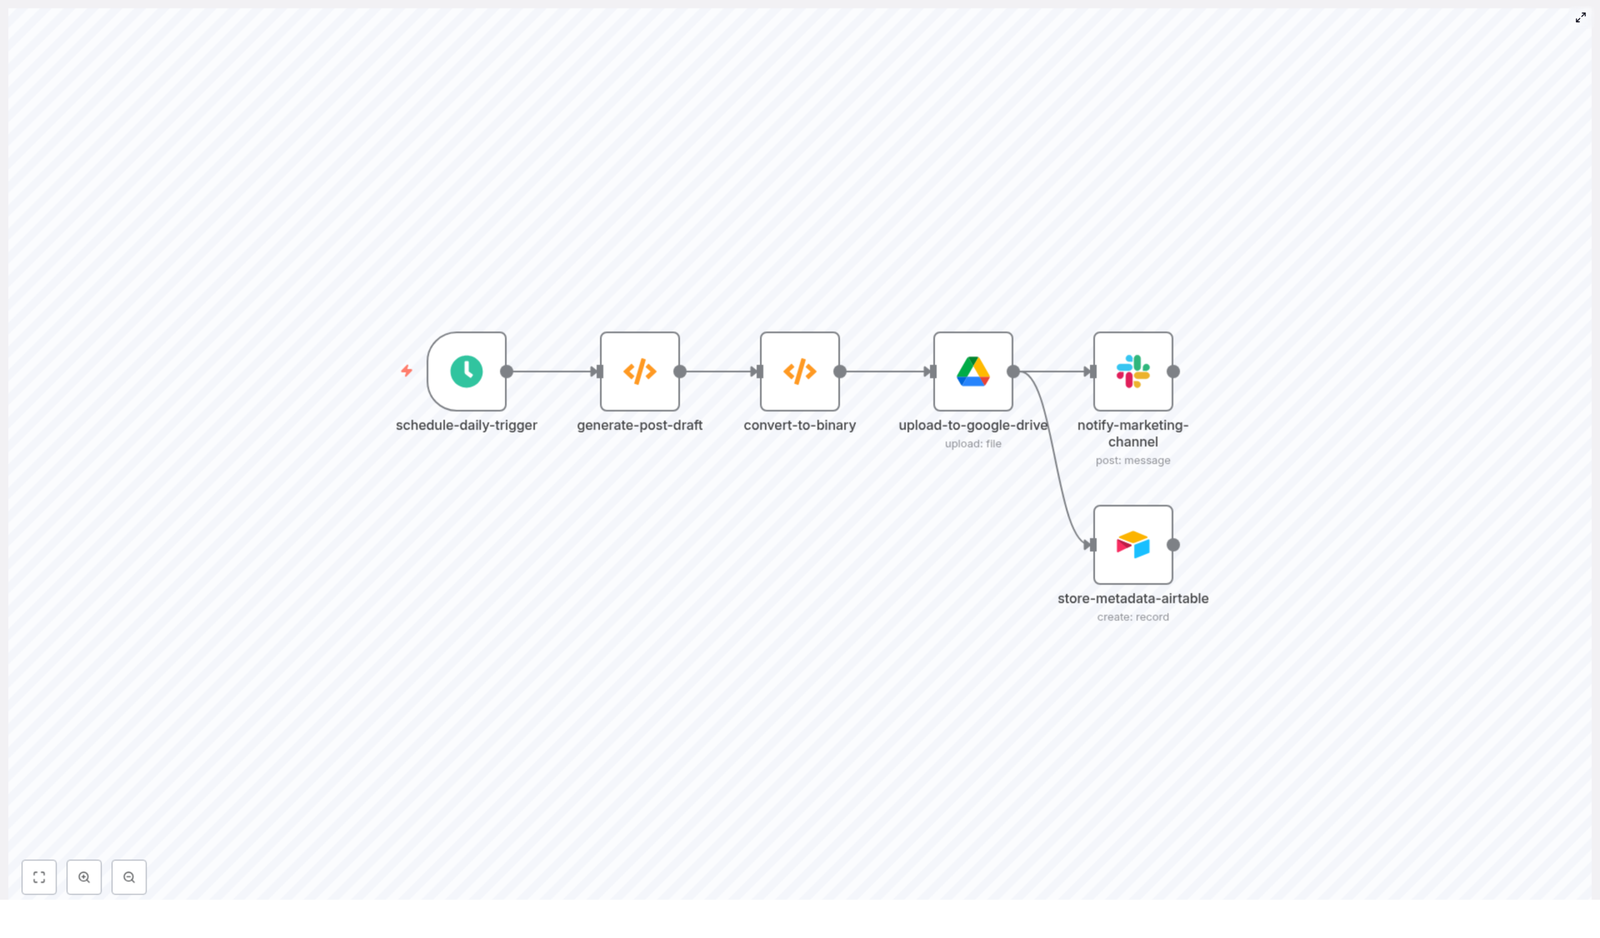
What if, instead, every morning started with a ready-made social media draft already prepared for your team, neatly stored, shared, and tracked? That is exactly what this n8n workflow template helps you create.
In this guide, you will walk through the journey from manual drafting to a fully automated Daily Social Media Post Draft Automation built in n8n. Along the way, you will see how a simple workflow can become a powerful stepping stone toward a more focused, automated, and scalable marketing operation.
The problem: manual drafts slow you down
Social media rewards consistency, but consistency is hard when everything depends on manual effort. Drafting posts, finding images, organizing files, and notifying the team can easily eat into your most productive hours.
That manual process often leads to:
Missed posting days when things get busy
Scattered drafts across docs, chats, and drives
Slow approvals and unclear ownership
Less time for strategy, experimentation, and analysis
If this sounds familiar, you are not alone. Many teams hit this wall as they grow. The good news is that it is a perfect moment to introduce automation.
The mindset shift: let automation handle the routine
Automation is not about replacing creativity, it is about protecting it. When you let tools like n8n handle the repetitive steps, you free yourself and your team to focus on the work that actually moves the needle.
Think of this workflow as your daily content assistant. It does not decide your brand voice or your campaign strategy. Instead, it:
Shows up every day at the same time
Prepares a complete social media draft
Organizes everything in one place
Notifies the right people to review and approve
Once you experience this level of structure and predictability, it becomes easier to imagine automating other parts of your marketing operations too. This is how small automations compound into real business growth.
The vision: a daily draft ready before your team logs in
Here is what your ideal morning can look like with this n8n template in place:
At 9:00 AM, n8n triggers your workflow on schedule.
A fresh social media post draft is generated, complete with copy, hashtags, and a suggested image URL.
The draft is converted into a markdown file and uploaded to a dedicated Google Drive folder.
Your marketing Slack channel receives a clear preview and a direct link to the draft.
All metadata, including date, platform, and links, is stored in Airtable for tracking and reporting.
No scrambling. No hunting for files. Just a consistent flow of content, ready for your team to refine and publish.
What this n8n workflow actually does
This Daily Social Media Post Draft Automation template ties together your tools and turns them into a single, reliable system. At a high level, the workflow:
Runs on a daily schedule using a cron-based trigger
Generates a randomized social media post draft (copy, hashtags, suggested image URL)
Transforms that draft into a markdown file in binary format
Uploads the markdown file to Google Drive
Sends a Slack notification with a preview and the Drive link
Saves all key metadata in Airtable for structured tracking
Let us walk through the core n8n nodes that make this possible, then explore how you can adapt them to your own style and workflows.
Core n8n nodes that power the workflow
1. Schedule Trigger: set your daily rhythm
The journey starts with the Schedule Trigger node. This is where you define when your automation should run. Using a cron expression, you can control the exact time and frequency.
Example cron expression:
0 9 * * *
This runs every day at 9:00 AM. Adjust the time and timezone to match your team’s working hours or your audience’s peak engagement window.
Once this is in place, you no longer have to remember to start the process. n8n does it for you, reliably, every day.
2. Function: generate a structured post draft
Next comes the creative engine of the workflow, a Function node that builds a JSON object representing your social media draft. This is where you define the structure of your content.
Typical fields include:
postDate – ISO date for the post
copyText – The draft copy text
hashtags – Space-separated hashtags
suggestedImageURL – An Unsplash or chosen image URL
platform, status, createdAt
You can define several copy templates and rotate between them or randomize them to keep your content fresh while staying on brand. Over time, you can extend this node to:
Pull ideas from a content calendar or Airtable base
Use an LLM to generate more dynamic text
Align drafts with campaigns or themes
This is where your creativity meets automation. You design the patterns, and n8n executes them consistently.
3. Function: convert markdown to binary
To upload your draft to Google Drive, n8n needs the file content as binary data. A second Function node handles this conversion.
In this step, you:
Take the markdown string that represents your draft
Convert it into a base64-encoded binary payload
Attach a clear filename, such as social-draft-YYYY-MM-DD.md
Using a consistent filename pattern makes it simple to search, filter, and reference drafts later. Over time, your Drive folder becomes a searchable library of your social media history.
4. Google Drive: store drafts where your team works
With the binary file ready, the Google Drive node uploads your markdown draft to a designated folder. This is where you connect the automation to your team’s existing workflow.
Key steps here:
Select or create a dedicated drafts folder for social posts
Configure the correct scopes and permissions so your marketing team can access the files
Organize the folder structure by year, month, or platform for quick navigation
Once this is set up, every new draft lands in the right place, at the right time, without anyone needing to drag and drop files manually.
5. Slack: notify your team and invite quick feedback
Next, the workflow uses the Slack node to send a clear, actionable message to your marketing channel. This is where your automation meets your team’s daily communication.
Your Slack notification can include:
Post date and platform
A short preview of the copy text
Hashtags
The Google Drive link to the full markdown draft
Simple reaction-based approvals, such as ✅ to approve or ❌ to reject
By using Slack node templating, you can pull dynamic fields directly from the draft object. Over time, your team will trust that every morning, the next draft will be sitting there waiting for review.
6. Airtable: track your content operations with metadata
Finally, the workflow stores structured metadata in Airtable (or another CMS of your choice). This turns your daily drafts into a trackable, reportable content pipeline.
Useful fields to capture include:
Post Date
Copy Text
Hashtags
Suggested Image URL
Drive Link
Platform
Status
Created At
With this data in place, you can filter by status, review your publishing cadence, and later connect performance metrics back to specific drafts.
Customization ideas to make the workflow truly yours
Once you have the basic template running, the real fun begins. This workflow is a starting point, not a ceiling. You can keep evolving it as your needs grow.
Multi-platform variants
If you publish on multiple platforms, you can adapt the Function node to generate platform-specific variations. For example:
Short, punchy copy for Twitter/X
More detailed, professional copy for LinkedIn
Caption-focused text and different hashtag strategies for Instagram
Create an array of templates keyed by platform and randomly pick or cycle through them. This lets you honor each platform’s style while keeping everything automated.
Approval workflows and handoffs
You can also extend the automation to handle approvals. For instance:
Wait for specific Slack reactions before moving to the next step
Watch for a status change in Airtable, such as “Approved” or “Needs edits”
Trigger a second workflow that sends approved content to a publishing tool like Buffer or Hootsuite via API
This turns your daily draft automation into a full content pipeline, from idea to scheduled post.
Image selection and visual consistency
Start with Unsplash as a flexible image source, then refine as your brand visuals mature. You can:
Use a curated image bank in Google Drive
Store approved brand assets as attachments in Airtable
Integrate an image generation API for custom visuals
Over time, your automation can learn your visual language just as much as your written tone.
Staying reliable: error handling and best practices
As you lean more on automation, reliability becomes essential. n8n gives you tools to build resilient workflows that you can trust.
Enable retry and error-handling nodes to catch failed uploads or API issues.
Log failures to a dedicated Slack channel or send summary emails so you always know what is happening.
Use environment variables for Drive folder IDs, Airtable base IDs, and Slack channels to keep the workflow portable and secure.
Run the workflow manually for the first few days to validate content quality and permissions before relying on full automation.
Security and permissions: automate with confidence
Good automation respects security. You can keep your data safe and still enjoy full automation by following a few simple principles:
Grant the least privilege required for each integration.
For Google Drive, use a service account or a restricted personal account with access only to the drafts folder.
For Airtable and Slack, use API keys with limited scopes and rotate them regularly.
With these safeguards in place, you can scale your automation without compromising your security posture.
Scaling up: from daily drafts to a full content system
Once your daily draft automation is running smoothly, you can extend it into a more complete marketing system.
Central content calendar: Pull templates and campaign language from Airtable so your daily drafts align with launches, promotions, or themes.
Analytics integration: After posts go live, push engagement metrics back into Airtable to see what performs best.
A/B testing: Generate multiple variants per day, track which one gets approved or published, and learn from your own data.
Each improvement builds on the same foundation: a reliable, automated draft process that runs without you having to think about it.
Step-by-step: getting started with the template
You do not have to build everything from scratch. Use the existing n8n template as a launchpad, then customize it to match your brand and workflow.
Install n8n and connect your Google Drive, Slack, and Airtable accounts.
Create a dedicated drafts folder in Google Drive with the right sharing settings for your team.
Set up an Airtable base with the metadata fields listed above (Post Date, Copy Text, Hashtags, Suggested Image URL, Drive Link, Platform, Status, Created At).
Import or rebuild the workflow in n8n using the nodes described: Schedule Trigger, Function nodes, Google Drive, Slack, and Airtable.
Test the workflow end to end manually, then activate the schedule trigger and let it run for a few days.
As you test, refine your templates, tweak your Slack messages, and adjust your Airtable fields. Treat this as a living system that grows with your needs.
From busywork to momentum: what you gain
Automating daily social media drafts with n8n does more than save time. It creates momentum.
You eliminate repetitive work and context switching.
You speed up content operations and approvals.
You keep your team aligned around a single, predictable process.
You build a foundation that can support more advanced automation later.
With just a handful of n8n nodes and well-designed templates, you can generate, store, and distribute consistent draft content every morning, ready for review and publishing.
Take the next step: try the template and make it your own
Ready to automate your social workflow with n8n? Start by importing the example template, then:
Customize the copy templates to reflect your brand voice.
Adjust the schedule to match your team’s rhythm.
Experiment with different platforms, hashtags, and image sources.
Run the workflow in test mode for one week and see how it changes your daily routine. Use that experience to iterate, improve, and expand.
If you want help tailoring the workflow to your brand or adding more advanced approval steps, you can reach out to our consultancy team for a free 30-minute audit and guidance on scaling your automation strategy.
Tip: Save this workflow in n8n as “Daily Social Draft Automation” and create new versions whenever you update templates or add integrations. Over time, you will build a version history of how your automation evolved alongside your marketing.
Call-to-action:
Want a turnkey version of this workflow tailored to your brand, complete with your platforms, tone, and assets? Book a free consultation or download the JSON template to import directly into n8n and start automating your daily social media drafts today.
Use this reference guide to configure an n8n workflow that periodically generates JSON data, converts it to a binary representation, writes it to disk, and posts a confirmation message to Slack. The focus here is on the exact node configuration, data flow between nodes, and practical considerations for running this workflow in production.
1. Workflow Overview
This workflow demonstrates a common automation pattern in n8n: scheduled data generation, file creation, and notification. It is suitable for tasks like scheduled report exports, JSON backups, or generating files for downstream ingestion pipelines.
The example workflow consists of five nodes:
Scheduled Trigger – initiates the workflow at a defined interval
Generate Example Data (Function) – constructs the JSON payload
Convert To Binary (Function) – encodes JSON as base64 and stores it in the binary property
Write File – persists the binary data as a file on the file system
Slack Notification – sends a status message to a Slack channel
Once you understand this pattern, it can be extended to:
Upload generated files to cloud storage (for example, S3 or Google Drive)
Send files as email attachments
Trigger additional workflows or services after file creation
2. Architecture & Data Flow
The workflow processes a single item at a time, which is typical for scheduled tasks. The execution flow is linear:
Scheduled Trigger creates an initial item with basic metadata.
Generate Example Data overwrites items[0].json with the JSON payload that will be written to disk.
Convert To Binary reads items[0].json, converts it to a base64-encoded string, and assigns it to items[0].binary.data.
Write File consumes the binary.data property and writes it to a file with a configured filename and path.
Slack Notification sends a confirmation message that the file has been written, optionally including filename and timestamp information.
At no point is the file content stored in Slack or external systems by default. The Slack node sends only a text message unless you explicitly extend the workflow to upload or attach the file.
3. Node-by-Node Breakdown
3.1 Scheduled Trigger Node
Purpose: Start the workflow automatically at a defined interval.
Key configuration:
Node type: Scheduled Trigger
Mode: Use either simple intervals or a cron expression.
Typical test setting: Every 1 minute for rapid feedback while developing.
Typical production setting: Hourly, daily, or a custom cron schedule depending on your reporting or export needs.
The Scheduled Trigger node usually outputs a single item into the workflow. This item can contain basic metadata, but in this example, the next node will replace the JSON content entirely.
3.2 Generate Example Data (Function Node)
Purpose: Generate the JSON object that will be turned into a file.
JSON.stringify(items[0].json, null, 2) converts the JSON object into a formatted string with indentation of 2 spaces. The formatting is purely for readability if you open the file later.
Buffer.from(...).toString('base64') converts the string to a Node.js Buffer and then encodes it as a base64 string compatible with n8n’s binary format.
The result is stored at items[0].binary.data.data. The important part for n8n is that a binary property exists (here named data) containing a data key with the base64 string.
Key technical details:
Binary property name: In this example, the property is data. You can choose any name, such as file or payload, but it must match the configuration in the Write File node.
Buffer usage: The use of Buffer.from avoids deprecation warnings associated with new Buffer and is the recommended Node.js approach.
Edge cases and validation:
If items[0].json is undefined or not serializable, JSON.stringify will fail. Ensure that the previous node always provides a valid JSON object.
If you handle large JSON payloads, be aware of memory usage and potential execution time limits in your n8n environment.
3.4 Write File Node
Purpose: Persist the generated binary data to a file on the n8n host file system.
Node type: Write File
Key configuration parameters:
Binary Property: Set this to data (or the name you used in the Convert To Binary node).
File Name:
Static example: test.json
Dynamic example using an expression:
report-{{$now.toISOString().slice(0,10)}}.json
File Path / Directory: If applicable, configure a path relative to the n8n working directory or an absolute path in your container/host.
File system considerations:
The Write File node writes to the file system where the n8n process runs. In containerized deployments, this is often an ephemeral or container-local filesystem.
For long-term storage or shared access, consider:
Mounting a persistent volume
Using a network file system
Uploading the file to cloud storage (for example, S3 or Google Drive) in a subsequent step
Ensure that the n8n process has permission to write to the configured directory. Permission issues are a common cause of Write File failures.
Error handling notes:
If the configured binary property name does not exist, the node will fail with an error indicating that the binary data is missing. Verify that the property name exactly matches the one set in the Convert To Binary node.
File name collisions can cause repeated overwrites. Use dynamic filenames with timestamps or unique IDs when you want to preserve historical files.
3.5 Slack Notification Node
Purpose: Notify a Slack channel when the file has been created.
Node type: Slack
Example message content:
File written: test.json
Authentication options:
Incoming Webhook: Configure a Slack incoming webhook URL and use it in the Slack node credentials.
Slack App / Bot Token: Use a bot token with the minimal required scopes to post messages to your target channel.
Configuration tips:
Set the target channel (for example, #alerts or #automation) in the Slack node parameters.
You can include dynamic data in the message using expressions, such as the generated filename or timestamp.
For richer messages, use Slack attachments or Block Kit structures supported by the n8n Slack node.
Common issues:
Authentication errors if the token or webhook is invalid or revoked.
Channel not found if the bot is not invited to the channel or the channel name is incorrect.
4. Configuration Notes & Best Practices
4.1 Scheduling Strategy
Use a fast interval (for example, every minute) only during development and testing.
For production, choose a schedule that matches your operational requirements, such as daily at midnight for daily reports.
Cron expressions provide fine-grained control if you need non-trivial schedules.
4.2 Dynamic Filenames
To avoid overwriting files and to make it easier to trace executions, use dynamic filenames with timestamps or unique identifiers.
Example daily filename expression:
report-{{$now.format('YYYY-MM-DD')}}.json
You can also incorporate execution IDs or other metadata if needed.
4.3 Storage Strategy
Local filesystem: Acceptable for short-lived files or internal testing, but not ideal for backups or shared access.
Durable storage: For long-term retention and reliability, upload files to:
AWS S3
Google Cloud Storage
Google Drive
A dedicated file server or NAS
n8n provides native nodes or HTTP-based integrations to send files directly to these services, which reduces dependency on the n8n host filesystem.
4.4 Error Handling & Retries
Use the On Error workflow trigger to build a separate error-handling workflow that receives failed executions.
Wrap network-dependent steps (for example, Slack, cloud uploads) with retry logic for transient errors like timeouts or rate limits.
Implement exponential backoff where appropriate to avoid hammering external services during outages.
4.5 Monitoring & Logging
Use n8n execution logs and the node output inspector to verify intermediate data and debug issues.
Consider creating a dedicated monitoring workflow that:
Listens for failed executions
Sends alerts to Slack or email
Captures key metadata such as workflow name, error message, and timestamp
Keep logs concise and avoid including sensitive data in messages or external notifications.
5. Testing & Debugging
Before enabling a production schedule, thoroughly test the workflow:
Manual execution: Run the workflow manually from the n8n UI to validate each node’s behavior.
Short test intervals: Temporarily set the Scheduled Trigger to a frequent interval (for example, every minute) to observe repeated runs.
Inspect node outputs: Use the UI to check json and binary data at each step.
Typical issues and checks:
Binary property not found: Confirm that the binary property name configured in the Write File node matches the property set in the Convert To Binary Function (for example, data).
File write permission error: Verify that the file path is valid and that the user running n8n has write permissions.
Slack authentication failure: Recheck tokens, webhook URLs, and channel configuration in the Slack node credentials and parameters.
6. Security Considerations
Secrets management: Do not hard-code secrets or tokens inside Function nodes. Use n8n credential types and environment variables to securely manage sensitive values.
File system access: Restrict the directories that n8n can write to and avoid granting unnecessary system-level permissions.
Cloud credentials: When extending the workflow to upload files to cloud storage, rotate access keys regularly and limit permissions to only the required buckets or folders.
Slack scopes: Configure Slack apps or bots with the minimal required scopes and consider using a dedicated bot user for automation notifications.
7. Extending the Workflow
Once the base pattern is working, you can enhance it with additional automation steps:
AWS S3 integration: Upload the generated file to S3 and post a pre-signed URL to Slack for easy access.
Email delivery: Attach the generated file to an email via SMTP or a transactional email provider node.
Downstream triggers: Publish a message to a message queue or make an HTTP call to notify other systems that a new file is available.
All of these extensions can be added after the Write File node or used as alternatives if you prefer not to store files locally.
8. Minimal JSON Workflow Example
The following snippet represents a minimal n8n workflow definition that generates a simple JSON file and then sends a Slack notification after writing the file:
{  "name": "Generate and Save Example File",  "nodes": [ ... ]
}
Import this JSON into your n8n instance via the UI, then adjust node parameters such as the schedule, Slack credentials, and filename to match your environment.
9. Summary
This n8n workflow pattern for automated file generation and Slack notifications is built around a simple sequence:
Schedule a trigger.
Generate or collect JSON data.
Convert that JSON to binary data.
Write the binary data to a file on disk or in external storage.
Notify your team via Slack.
By following the configuration details in this guide, you can adapt the template for daily reports, backups, or other file-based integrations while keeping scheduling, storage, and security under control.
Next steps: Import the example workflow into your n8n instance, customize the JSON payload and filename, and enable the schedule. If you want to integrate with S3, Google Drive, or add more advanced error handling, involve your automation team or reach out to the n8n community for implementation patterns.
Automated System Health Monitoring with n8n: Persist Reports to S3 and Notify via Slack
This article describes how to implement a robust, low-maintenance system health monitoring workflow in n8n that is suitable for production environments and self-hosted infrastructure. The workflow:
Executes periodic health checks on a defined schedule
Collects key system metrics and service status
Stores complete JSON health snapshots in Amazon S3
Sends structured Slack alerts for both normal and critical conditions
Use Case and Design Rationale
This pattern is well suited for small to mid-size teams, self-hosted clusters, and environments where you need:
A transparent and auditable history of system health over time
Fast, actionable alerts in Slack for operational incidents
Cost-effective storage of detailed diagnostic data in S3
Instead of flooding Slack with verbose payloads, the workflow stores the full JSON snapshot in S3 and posts a concise Slack message that includes a summary plus a link to the full report. This separation keeps chat channels readable while providing rich data for forensic analysis, troubleshooting, and compliance audits.
Workflow Architecture Overview
The n8n workflow follows a linear yet resilient pipeline that can be easily extended:
Scheduled trigger initiates the health check at a fixed interval.
Metric collection function gathers CPU, memory, disk, and service states.
Conversion to binary prepares the JSON snapshot as a file-ready payload.
S3 upload writes the snapshot to a designated S3 bucket with tags and timestamps.
Alert evaluation inspects the snapshot for threshold breaches or failures.
Slack notification sends either a critical or nominal status message.
Error handling backs up problematic snapshots and alerts on-call if uploads fail.
The following sections detail each key node, integration, and best practice to make this workflow production ready.
Core n8n Nodes and Logic
1. Scheduled Health Check Trigger (schedule-health-check)
The workflow starts with a Schedule node configured to run every 5 minutes by default. This interval is configurable and should be tuned to your observability and cost requirements.
Default frequency: every 5 minutes
Considerations:
Shorter intervals increase visibility but may raise S3 storage and Slack noise
Longer intervals reduce cost but may delay detection of issues
Coordinate with API rate limits if you integrate external services later
2. System Metric Collection Function (collect-system-metrics)
This Function node executes JavaScript (Node.js) to gather host and system information. It leverages the built-in os module to retrieve memory and host details. The template includes simulated CPU and disk metrics so that the workflow runs out of the box, and you can replace these with real measurements as you move to production.
Typical responsibilities of this node:
Capture timestamp and hostname
Read memory usage (total and free)
Collect or simulate CPU and disk statistics
Check service states (e.g. running, degraded, stopped)
Evaluate thresholds and populate an alerts array when conditions are breached
// simplified example
const os = require('os');
const timestamp = new Date().toISOString();
const cpuUsage = /* sample or real measure */;
const memoryTotal = os.totalmem();
const memoryFree = os.freemem();

const healthData = {  timestamp,  hostname: os.hostname(),  metrics: {  // cpu, memory, disk, etc.  },  services: [  // { name: 'service-name', status: 'ok' | 'degraded' | 'down' }  ],  alerts: []
};

// threshold checks -> push to alerts
// e.g. if (cpuUsage > 0.9) healthData.alerts.push({ type: 'cpu', level: 'critical', value: cpuUsage });

return [{ json: healthData }];
In a production deployment, you may replace the simulated sections with:
Shell commands via the Execute Command node (top, df, vmstat, iostat)
Calls to a local agent or API endpoint that exposes metrics as JSON
Integration with existing monitoring agents if they provide HTTP or CLI access
3. Binary Conversion for S3 Upload (convert-to-binary)
n8n represents file uploads as binary data. This Function node converts the JSON snapshot into a base64-encoded binary payload and sets the appropriate metadata:
fileName: typically includes hostname and timestamp, for example my-host_2024-01-01T10-00-00Z.json
mimeType: application/json
The output of this node is a binary item that the S3 node can upload as a file object. Keeping the snapshot as pure JSON simplifies downstream processing and analysis.
4. Upload Snapshot to S3 (upload-to-s3)
The S3 node writes the binary snapshot to a designated bucket, for example system-health-snapshots. This bucket holds the full history of health checks.
Recommended configuration and practices:
Bucket: a dedicated bucket for health snapshots, separated by environment if necessary
Object key convention: include environment, hostname, and timestamp to support easy querying
Tags: add tags such as Environment=prod, Type=system-health to enable lifecycle rules and cost analysis
IAM: use a least-privilege IAM user or role configured in n8n credentials with access only to the required buckets and prefixes
Storing snapshots in S3 provides durable, low-cost storage that can be integrated with downstream tooling such as Athena, Glue, or external analytics platforms.
5. Alert Evaluation Logic (check-for-alerts)
An If node inspects the alerts array produced by the metric collection function. It branches the workflow into two paths:
Critical path: when one or more alerts exist, the workflow prepares a high-priority Slack message (for example with a red color indicator) and can route to incident channels or on-call rotations.
Nominal path: when the system is healthy, it sends a green or informational message to a logging or observability channel, indicating that all systems are nominal.
This separation allows you to maintain a consistent audit trail while reserving attention-grabbing formatting for genuine incidents.
Designing Effective Slack Notifications
Slack messages should be concise, structured, and immediately actionable. The workflow typically constructs messages with the following elements:
Title that includes hostname and timestamp
One-line metrics summary (for example CPU, memory, and disk utilization)
Service status overview (key services and their states)
List of critical alerts if any thresholds are breached
Direct link to the full JSON snapshot in S3 for deeper investigation
An example structure produced by the function that prepares the Slack payload might look like:
{  text: '🚨 Critical System Health Alert',  attachments: [  {  color: 'danger',  title: 'Health Check - my-host',  text: '*Metrics:* \nCPU: 92% ...',  footer: 'System Health Monitor'  }  ]
}
For normal states, you can adapt the same structure with a different color (for example good) and a message such as “All systems nominal”. Avoid including sensitive data directly in Slack and rely on S3 links for detailed payloads.
Storage Strategy, Retention, and Cost Optimization
Persisting every health check in S3 provides a valuable historical dataset, but it should be managed carefully to control costs.
Lifecycle policies:
Transition objects older than 30 to 90 days to Glacier or other archival tiers
Optionally delete snapshots after a defined retention period if compliance allows
Tagging:
Use consistent tags for environment, system role, and data type
Leverage tags for cost allocation and analytics
Sampling strategy:
Adjust check frequency to balance observability with storage overhead
Consider lower frequency for non-critical systems and higher frequency for core infrastructure
Security and IAM Hardening
Since this workflow integrates with both AWS and Slack, security configuration is critical.
IAM permissions:
Create a dedicated IAM user or role for n8n
Grant only the required S3 actions, such as PutObject and PutObjectTagging, scoped to the specific buckets and prefixes
Credential management:
Store AWS credentials and Slack tokens in the n8n credentials store
Avoid embedding secrets directly in node parameters or code
Network and bucket policies:
Restrict S3 bucket policies to known VPC endpoints or IP ranges where feasible
Ensure Slack tokens have only the scopes required for posting messages and not broader workspace access
Resilience, Error Handling, and Alert Hygiene
The template includes a dedicated error handling path that:
Backs up problematic snapshots to a separate alerts bucket
Notifies on-call personnel when S3 uploads fail or other critical errors occur
To further increase resilience and reduce noise, consider:
Retries with backoff:
Implement retry logic with exponential backoff for transient S3 or Slack failures
Alert deduplication:
Introduce logic to avoid sending repeated alerts for the same incident window
For example, alert once per host and issue until the condition clears
Rate limiting and aggregation:
Aggregate multiple minor alerts into periodic summaries
Apply rate limits to Slack notifications to prevent channel saturation
Customizing and Extending the Workflow
The provided template is a solid baseline and can be adapted to more advanced production scenarios.
Real metrics instead of simulations:
Use the Execute Command node to run top, df, vmstat, or similar tools
Query a local or remote agent that exposes metrics as JSON
Incident management integration:
Connect to PagerDuty, Opsgenie, or similar platforms for escalation workflows
Trigger incidents only for critical alerts while keeping informational messages in Slack
Metrics aggregation:
Send key metrics to a time series database such as Prometheus or InfluxDB
Use n8n primarily for snapshotting and alert fan-out while dashboards live in your TSDB or observability stack
Historical analytics and dashboards:
Query S3 snapshots with tools like Athena or feed events into an ELK stack
Build dashboards that show alert frequency, host health trends, and capacity planning insights
Pre-Deployment Security Checklist
Before enabling the workflow in production, validate the following:
IAM policies are restricted to the intended S3 buckets, prefixes, and actions only.
No sensitive information (such as secrets, tokens, or PII) is included directly in Slack messages.
Slack channel permissions are appropriate for the sensitivity of the health data.
Slack tokens are scoped correctly and stored securely in n8n credentials.
Conclusion and Next Steps
This n8n workflow provides a lightweight yet powerful system health monitoring pipeline. It combines:
Regular, automated health snapshots stored in S3 for long-term analysis
Structured Slack notifications that enable rapid detection and remediation
Extensibility for integration with incident management and observability platforms
To adopt this pattern in your environment:
Clone the workflow into your n8n instance.
Configure AWS and Slack credentials using the n8n credentials store.
Adjust thresholds, check frequency, and S3 bucket names to match your infrastructure.
Enable the schedule and validate behavior in a non-production environment before rollout.
If you want to refine alert deduplication, integrate real CPU and disk measurements, or connect to tools such as PagerDuty or Prometheus, you can iteratively extend the existing nodes or add new branches for those systems.
Picture this: it is 7:59 a.m., your coffee is finally at the perfect temperature, and you remember you still need to text Grandma to check in, look up the weather in her area, squint at the air quality index, decide if it is “fine” or “absolutely not,” and then message her again with advice. Every. Single. Day.
Now imagine all of that just happens automatically while you drink your coffee in peace. That is exactly what this workflow template is for. Using a low-code automation platform like n8n, a weather API, an air quality API, and an SMS service, you can set up daily wellness and weather alerts for an elderly family member, plus escalation messages for a caregiver when things look risky.
No more copy-pasting AQI numbers or Googling “is 38°C bad.” The workflow does the worrying and the math, you just get the peace of mind.
What this n8n workflow template actually does
This elderly care automation template is designed to:
Run a daily wellness check-in at a fixed time
Fetch local weather and air quality data for the senior’s location
Evaluate conditions against safety thresholds
Send a friendly wellness SMS if everything looks normal
Send urgent alerts to both the senior and a caregiver if conditions are extreme
Under the hood, the workflow uses a classic low-code automation pattern with common APIs and a handful of n8n nodes. The outcome is a simple, scalable way to keep older adults safer and caregivers better informed, without anyone needing to become a full-time weather analyst.
Why bother automating wellness and weather alerts?
Older adults tend to be more sensitive to environmental extremes, whether it is heat, cold, high winds, or poor air quality. These conditions can quickly turn from “slightly annoying” to “medically serious.” Automating this process helps you avoid relying on memory, mood, or how busy you are that day.
With an automated n8n workflow, you get:
Consistency – A reliable, scheduled check-in every morning, not just on days you remember.
Proactive care – Early warnings when weather or air quality could trigger health issues.
Less caregiver burnout – Manual follow-up only when conditions cross clear thresholds.
Simple, actionable advice – Messages that say “stay hydrated” or “avoid going outside” instead of “AQI 4, good luck.”
Key building blocks of the workflow
Here is what powers the template, component by component:
Scheduler (cron node) – Triggers the workflow at a specific time each day, for example 08:00 local time.
Weather API (OpenWeatherMap) – Retrieves current temperature, feels-like temperature, humidity, and wind speed for the senior’s location.
Air quality API – Uses coordinates to fetch the local air quality index (AQI) and flag unhealthy pollution levels.
Data preparation node – Normalizes all the raw API responses into easy-to-use fields like temperature, feelsLike, windSpeed, humidity, and airQualityIndex.
Decision node (If/Condition) – Checks whether any threshold is exceeded and decides if escalation is required.
Messaging gateways (Plivo, Twilio, etc.) – Send SMS messages to the senior and, when needed, to the caregiver.
All of this is wired together in n8n so that once you configure it, the workflow quietly runs in the background every day without asking for your attention.
How the n8n elderly wellness workflow runs each day
Let us walk through the daily routine your automation will follow. Think of it as your digital assistant doing rounds.
1. Start with a daily schedule
The first step is a cron node that kicks off the workflow at a consistent time, like 08:00. That way, the senior receives the wellness SMS before heading out or starting their day, and the caregiver knows alerts will always arrive around the same time.
2. Grab the weather and air quality data
Next, the workflow calls a weather provider such as OpenWeatherMap to get current conditions for the senior’s city or coordinates. Once the weather data comes back, including latitude and longitude, the workflow makes a second request to the air pollution API to retrieve the AQI.
Example API calls used in the template:
// Pseudocode for OpenWeatherMap current weather call
https://api.openweathermap.org/data/2.5/weather?q=Miami&appid=YOUR_API_KEY&units=metric

// Air Pollution API using coordinates
https://api.openweathermap.org/data/2.5/air_pollution?lat={lat}&lon={lon}&appid=YOUR_API_KEY
If the weather API does not return coordinates, the air quality step will fail, so make sure the location configuration is correct before going live.
3. Normalize the data so it is easy to work with
Raw API responses are not exactly senior-friendly or workflow-friendly. To fix that, a data preparation node extracts the important pieces and maps them to clear variable names.
Fields typically mapped are:
temperature: main.temp
feelsLike: main.feels_like
windSpeed: wind.speed
humidity: main.humidity
airQualityIndex: list[0].main.aqi
Using clean, readable names makes it much easier to build conditions and craft message templates later, instead of constantly digging through nested JSON.
4. Decide if conditions are “fine” or “call someone now”
Once the data is normalized, the workflow uses an If node to compare the values to your chosen thresholds. The example template uses clinically informed limits such as:
temperature < 0°C – Risk of hypothermia.
temperature > 32°C – Elevated risk of heat-related illness.
feelsLike > 38°C – Extreme heat, time to be extra careful.
windSpeed > 15 m/s – Strong, potentially dangerous winds.
airQualityIndex in an unhealthy range (AQI 3-5, depending on provider scale).
In the If node, these rules are combined with a logical OR. That means if any single condition is extreme, the workflow treats it as an escalation scenario. No negotiation with the weather.
5. Send the right SMS to the right people
Finally, the workflow decides what to say and who needs to hear it.
If all conditions are within safe limits, the senior receives a friendly wellness SMS with simple advice for the day.
If one or more thresholds are exceeded, the senior gets a clear, urgent message and the caregiver receives an escalation alert so they can follow up.
Example SMS templates you can adapt:
Wellness SMS:
"Good morning! Temp: {{temperature}}°C. Advice: {{healthAdvice}}"

Escalation SMS (caregiver):
"ALERT: Extreme conditions detected for [Name]. Temp: {{temperature}}°C. {{healthAdvice}} Please check on them immediately."
These templates use the automation platform’s expression syntax so you can dynamically insert values like temperature or healthAdvice into each message.
Example expressions for your n8n nodes
To save you some time (and prevent unnecessary debugging), here are example expressions you can plug into Set nodes or other fields in n8n.
// Assignments in a Set node
{  "temperature": "={{$node['Weather Fetcher'].json.main.temp}}",  "windSpeed": "={{$node['Weather Fetcher'].json.wind.speed}}",  "airQualityIndex": "={{$json.list[0].main.aqi}}",  "feelsLike": "={{$node['Weather Fetcher'].json.main.feels_like}}",  "humidity": "={{$node['Weather Fetcher'].json.main.humidity}}"
}

// Conditional check (If node) - pseudocode
temperature < 0 OR temperature > 32 OR windSpeed > 15 OR feelsLike > 38
These patterns keep your node configuration tidy and make it easier to tweak thresholds or message content later.
Quick setup guide for the template
Here is a simplified checklist to get your elderly care workflow running in n8n:
Import the template into your n8n instance using the provided workflow JSON or template link.
Configure the cron node with your desired local time for the daily check-in.
Add your API keys for OpenWeatherMap and the air pollution API and set the correct city or coordinates.
Set up your SMS provider (Twilio, Plivo, etc.) and add the senior’s and caregiver’s phone numbers.
Adjust thresholds in the If node to match the senior’s health profile and regional climate.
Customize SMS text with your preferred tone, language, and any specific instructions.
Test in “safe mode” by sending messages to your own number first, then roll it out to real recipients.
Once this is done, your only daily task is occasionally checking your logs and maybe bragging about your automation skills.
Best practices so your automation is helpful, not stressful
1. Tune thresholds to the real person, not just the textbook
The example temperature and AQI limits are a good starting point, but not every senior has the same needs. Someone with heart or lung conditions might need more conservative thresholds, while a person used to very hot or cold climates might tolerate wider ranges.
Review the defaults and adjust them based on the senior’s health profile and local weather patterns.
2. Use the right units and language
Make sure the weather API is returning the units your recipients understand, metric or imperial. Also, write SMS content in the senior’s preferred language and at a reading level that feels comfortable. Clear messages are much more useful than technically precise but confusing ones.
3. Protect privacy and sensitive data
Even a simple workflow like this touches personal data, such as location and phone numbers. Use secure API keys, restrict who can access your n8n instance, and avoid logging sensitive health or identity information unless you have a good reason and proper safeguards.
4. Test before you trust it
Before enabling this for a vulnerable person, run several test cycles using your own phone numbers and sample locations. A handy approach is to create a “dry run” mode that logs what would be sent without actually sending SMS messages. Once you are confident in the behavior, flip the switch for real alerts.
5. Keep an eye on API usage and costs
Weather and air quality APIs often have rate limits or usage-based pricing. If you support multiple seniors, use caching when you are making the same request repeatedly, and monitor your usage to avoid surprises on your bill.
Troubleshooting common issues
If the workflow misbehaves, here are a few likely culprits to check before blaming the robots:
Missing coordinates – If the air quality request fails, confirm that the weather API is returning lat and lon and that you are passing them correctly.
Wrong units – Double-check the units parameter in your weather request (metric vs imperial) so your thresholds still make sense.
SMS not delivered – Verify your messaging provider credentials, check that the phone numbers include the correct country codes, and confirm carrier support for the destination country.
Ideas to extend the elderly care workflow
Once you have the basic n8n automation running smoothly, you can start layering on more context and smarter behavior.
Integrate wearable or home sensors – Pull in data such as heart rate or motion to get a fuller picture of daily wellness.
Add a two-way check-in – Send a daily SMS asking the senior to reply “OK” and trigger follow-up actions if no response arrives.
Log everything to a sheet or database – Store daily conditions and messages for trend analysis, audits, or sharing with healthcare providers.
Use voice call fallback – For critical alerts, set up an automated voice call if SMS fails or is not acknowledged.
These additions can turn a simple weather-based check into a lightweight, homegrown remote monitoring system powered by n8n.
Wrapping up: automation as a quiet safety net
Automating daily wellness check-ins based on weather and air quality is a practical way to add an extra layer of protection for older adults. With a scheduled trigger, reliable weather and AQI data, clear escalation rules, and targeted SMS alerts, you get consistent, proactive care while saving manual effort for the moments that really matter.
To get started, import the template, connect your weather and air-quality APIs, configure your SMS provider, and set your thresholds. Test thoroughly with your own number, then tailor the messages and rules to the senior’s specific needs.
Call to action: Try building or customizing this workflow in your automation platform today, and let automation handle the repetitive daily checks so you can focus on real human conversations. If you need help adapting it to a particular senior care scenario, reach out for a consultation or share your questions.