Elderly Care Automation: Daily Wellness & Weather Alerts

Elderly Care Automation: Daily Wellness & Weather Alerts

On a humid August morning in Miami, Emma sat at her kitchen table, staring at her phone. Her father, Luis, had stopped answering her daily “How are you feeling today?” texts. At 82, he insisted on living alone, and while he was mentally sharp, his body did not always keep up. A heatwave had rolled in overnight, and Emma could not shake the thought that he might decide to “just run a quick errand” in dangerous conditions.

She had tried everything – reminders, sticky notes on his fridge, group chats with her siblings – but nothing gave her the peace of mind she needed. The real problem was not lack of care, it was lack of timely information. Emma needed to know, each morning, whether the weather and air quality around her dad were safe, and she needed him and his caregiver to get clear guidance without her manually checking every forecast.

That was the day she discovered an n8n workflow template for elderly care automation, one that promised daily wellness and weather alerts, fully automated. It sounded almost too simple: connect weather and air quality data, send SMS alerts at a set time, and escalate to caregivers when conditions turned risky. Still, it was exactly the kind of system she had been trying to piece together by hand.

The problem Emma faced: caring at a distance

Emma’s situation is not unique. Older adults are far more vulnerable to extreme temperatures, high winds, and poor air quality. A normal summer day for a younger person can be a serious health risk for someone in their eighties. The risks include:

  • Hypothermia during cold snaps, even indoors when heating is inadequate
  • Heat stress and dehydration on very hot or humid days
  • Breathing difficulties and cardiovascular strain when air quality worsens
  • Falls and injuries during high winds or storms

Emma tried manually checking weather apps every morning and texting her dad and his part-time caregiver with advice like “Stay hydrated today” or “Skip your walk, air quality is bad.” Some days she forgot, other days she checked too late. The inconsistency worried her.

What she needed was consistent daily checks at a fixed time, actionable advice written in simple language, and automatic escalation to the caregiver when conditions crossed certain thresholds. That is exactly what the elderly care automation template in n8n was designed to do.

Discovering the n8n elderly care automation template

Emma was already using n8n for small marketing automations at work, so when she stumbled on a template titled “Elderly Care Automation: Daily Wellness & Weather Alerts,” she immediately clicked through. The description sounded like it had been written for her:

  • Run a daily wellness check at a scheduled time, for example 8:00 AM
  • Pull live weather and air quality data for the older adult’s city
  • Evaluate risk thresholds for temperature, wind, and AQI
  • Send a normal wellness SMS when conditions are safe
  • Send urgent SMS alerts to both the older adult and caregiver when conditions are dangerous

Instead of refreshing a weather app and composing messages herself, Emma could let n8n do the heavy lifting. The workflow template already connected to OpenWeatherMap for weather and air quality, and to an SMS provider like Plivo for text alerts.

She decided to try it. The next few hours would completely change how she cared for her dad.

Rising action: turning worry into automation

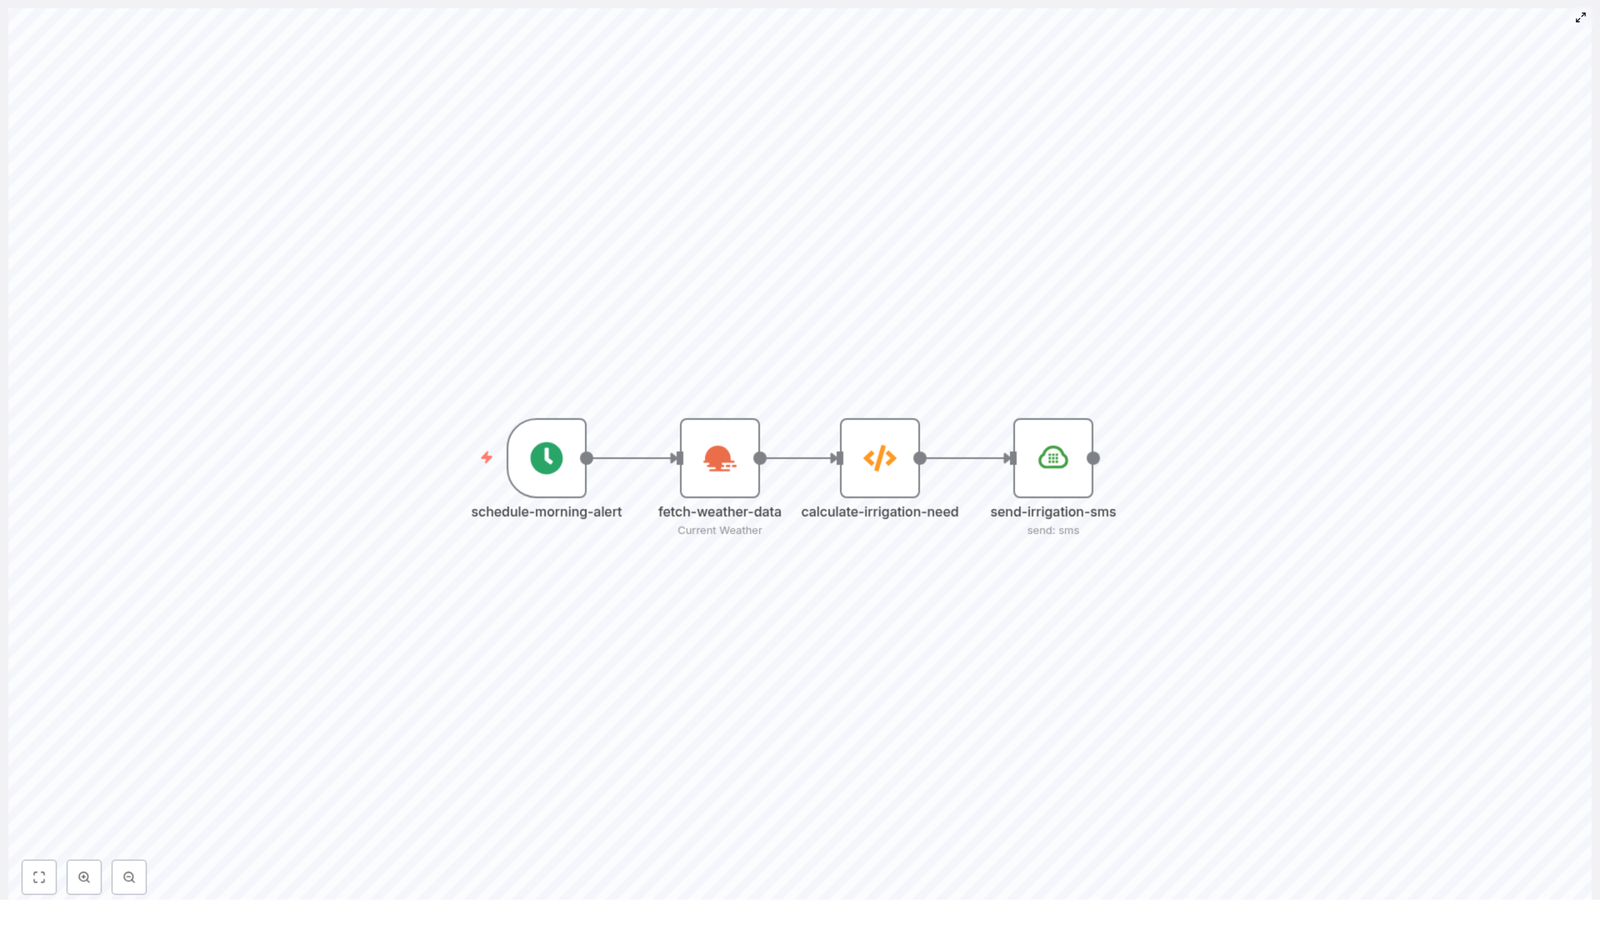
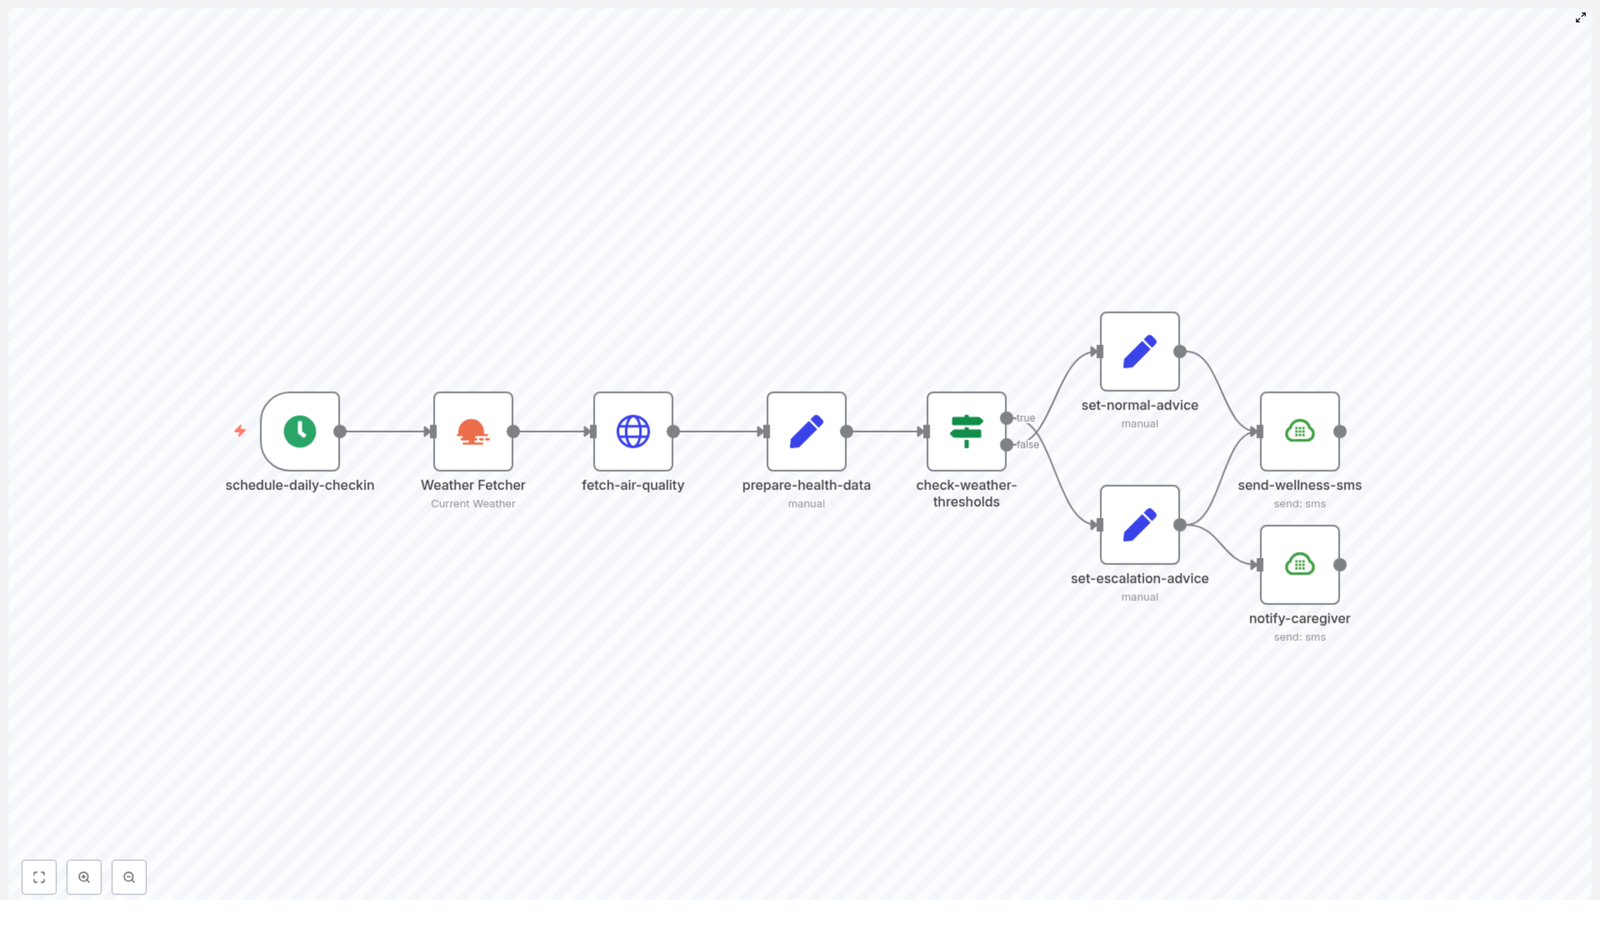
Emma opened n8n, imported the template, and began following the nodes one by one. What looked like a complex system was actually a clear story of what should happen every morning at 8:00 AM for her father.

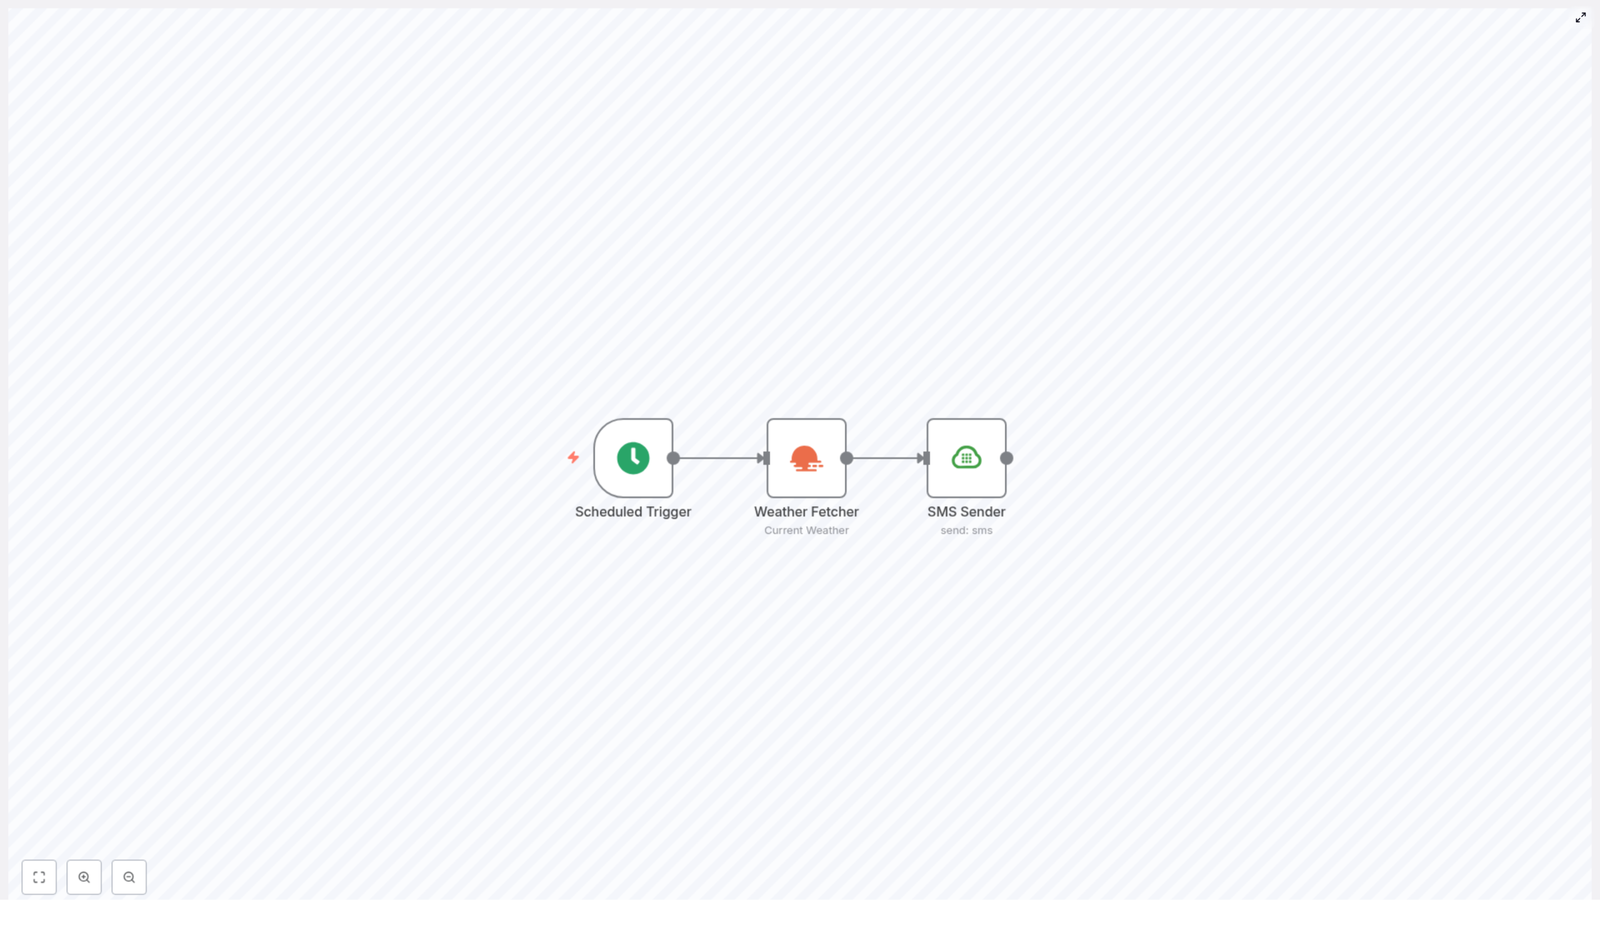
Starting the daily ritual: schedule-daily-checkin (Cron)

The first node she saw was schedule-daily-checkin, a Cron trigger. This was the heartbeat of the whole workflow. She configured it to run at 08:00 every day, aligned with her father’s routine. That way he would receive advice early enough to change his plans, like skipping a midday walk if extreme heat was on the way.

She double checked the timezone settings so that “8:00 AM” in the workflow really meant 8:00 AM in Miami, not in the server’s default timezone. She had been burned by timezone confusion before, and the template documentation reminded her to confirm this.

Bringing in real-time context: Weather Fetcher (OpenWeatherMap)

Next came the Weather Fetcher node that called the OpenWeatherMap API. Emma connected her OpenWeatherMap account via n8n credentials, making sure the API key was stored securely and not hard-coded in the workflow.

The template allowed her to set the cityName dynamically. For now, she entered “Miami” for her father, but she noticed she could later load this from a spreadsheet or database if she wanted to support multiple relatives.

The node pulled key weather values and stored them for later:

  • main.temp – the current temperature
  • main.feels_like – what the temperature feels like with humidity
  • wind.speed – wind speed in meters per second
  • main.humidity – humidity percentage

She also set the units to Celsius, but made a note that she could switch to Fahrenheit if needed for other locations.

Checking the invisible threat: fetch-air-quality (HTTP Request)

Heat and cold were obvious risks, but Emma knew that air quality could be just as dangerous for her dad’s lungs. The template had already accounted for this with a fetch-air-quality node, using an HTTP Request to call OpenWeatherMap’s air pollution endpoint.

This node returned an Air Quality Index (AQI) value for Miami. By combining AQI with temperature and humidity, the workflow could give much smarter advice. For example, even on a comfortable temperature day, a high AQI might trigger a message like “Air quality is unhealthy, please stay indoors and avoid strenuous activity.”

Emma appreciated that the template suggested mapping numeric AQI values to human-friendly categories like “Good,” “Moderate,” or “Unhealthy.” It would be confusing to tell her dad “AQI is 160” without explaining what that meant.

Preparing data for health decisions: prepare-health-data (Set)

Once the raw data came in, the workflow used a prepare-health-data Set node to normalize everything into clear fields:

  • temperature
  • feelsLike
  • windSpeed
  • humidity
  • airQualityIndex

This step made the rest of the logic more readable and easier to adjust. Instead of juggling nested JSON paths, the workflow could simply refer to temperature or airQualityIndex directly when checking thresholds or building SMS messages.

The turning point: encoding caregiver instincts as rules

The most emotional part of the build for Emma was the moment she translated her worry into clear, objective rules. She reached the check-weather-thresholds If node, where the template evaluated whether conditions were safe or dangerous.

Here, she saw the caregiver-focused thresholds that the template recommended:

  • temp < 0°C – hypothermia risk
  • temp > 32°C – heat stress risk
  • feelsLike > 38°C – extreme heat conditions
  • windSpeed > 15 m/s – dangerously high winds
  • AQI > 150 – unhealthy air quality that should trigger escalation

For Miami, she adjusted the temperature thresholds slightly, knowing that her dad was especially sensitive to heat. She set the heat stress risk a bit lower and kept the extreme heat threshold for feelsLike as is. She also decided to treat AQI above 100 as “caution” and above 150 as “urgent.”

In that single node, Emma encoded what she had been doing intuitively for months: scanning forecasts, comparing numbers against her mental checklist, and deciding whether to worry. Now n8n would do it for her, consistently, every morning.

Crafting the right words: set-normal-advice and set-escalation-advice

Once the workflow decided whether conditions were safe or risky, it branched into two different paths using Set nodes: set-normal-advice and set-escalation-advice.

In the normal path, Emma wrote a gentle, routine message for her dad:

“Good morning, Dad. Today’s weather looks safe. Temperature is {{temperature}}°C and air quality is {{AQI_category}}. Stay hydrated and enjoy your day.”

In the escalation path, she crafted more urgent, action-oriented messages, both for her dad and for his caregiver:

  • For her dad: “Good morning, Dad. Today is very hot and air quality is unhealthy. Please stay indoors, drink water often, and avoid going outside unless necessary.”
  • For the caregiver: “Alert: Luis faces risky conditions today. Temp: {{temperature}}°C, Feels like: {{feelsLike}}°C, AQI: {{airQualityIndex}}. Please check in and ensure he stays safe.”

She kept the messages short to avoid SMS length issues and made sure every alert ended with a simple recommendation, not just raw data.

Delivering the messages: send-wellness-sms and notify-caregiver (Plivo SMS)

The final part of the workflow connected everything to the real world. The template used Plivo as the SMS provider through two nodes: send-wellness-sms and notify-caregiver.

Emma set up her Plivo credentials in n8n, again using secure credentials storage instead of exposing API keys in the workflow. She entered her father’s phone number as the recipient for the wellness SMS and the caregiver’s number for escalation alerts.

From this point on, n8n would send one of two types of SMS every morning:

  • A routine wellness message to her father when conditions were safe
  • An urgent pair of messages, one to her father and one to the caregiver, when thresholds were exceeded

To avoid any mishaps, Emma configured a staging number first and ran several test executions. She watched the messages arrive on her own phone, verified the wording, and adjusted thresholds until the alerts felt meaningful but not excessive.

Behind the scenes: configuration lessons Emma learned

As she refined the workflow, Emma picked up several practical tips that made the automation reliable and scalable.

Storing API keys securely

Instead of pasting API keys into nodes, she used n8n’s credential management to store:

  • OpenWeatherMap API key for weather and air quality
  • Plivo (or alternative SMS provider) credentials

This protected sensitive data and made it easier to reuse the same credentials in multiple nodes.

Handling units and locations

Emma checked that OpenWeatherMap was returning data in Celsius and that the AQI scale matched the guidance she used. For future expansion, she planned to:

  • Switch units to Fahrenheit for relatives in the US who preferred it
  • Load recipientCity, recipientPhone, and caregiverPhone from a Google Sheet or database so the workflow could loop over multiple people

Making AQI understandable

To make messages clearer, she mapped AQI values to categories like:

  • 0-50: Good
  • 51-100: Moderate
  • 101-150: Unhealthy for sensitive groups
  • 151+: Unhealthy

This way, her father would read “Air quality is Unhealthy” instead of a confusing number.

Testing before going live

Before she let the workflow contact her dad, Emma:

  • Pointed all SMS messages to her own number
  • Used a test city and modified thresholds to force both “safe” and “dangerous” scenarios
  • Checked that escalation only happened when conditions truly warranted it

Only after several days of smooth tests did she switch the numbers to her father and his caregiver.

Staying safe and compliant with sensitive data

As she built out the system, Emma was careful about privacy and regulations. Even though she was not running a hospital, she wanted to follow good practices that align with laws like HIPAA and GDPR when applicable.

She made sure to:

  • Store only essential data like phone number and city, nothing more
  • Use encrypted credentials in n8n for all API access
  • Save any recipient records in secure, access-controlled storage
  • Get her father’s explicit consent to receive automated SMS messages

For organizations like home care agencies or senior living communities, these steps become even more important. The same workflow can scale, but so do the compliance responsibilities.

Scaling beyond one loved one

Once Emma saw how well the automation worked for her dad, she started imagining how it might help others. The template was already designed to scale.

To support multiple recipients or more advanced logic, she could:

  • Loop through a list of recipients from a database or spreadsheet and run the weather and AQI check for each person
  • Write a daily log of checks to a database for audit, reporting, or trend analysis
  • Add voice call notifications or mobile push alerts for especially urgent conditions
  • Integrate wearable data, like heart rate or activity level, to personalize thresholds

She realized that what started as a personal project could easily become a lightweight monitoring layer for an entire senior living community or a home care agency’s client list.

Common pitfalls Emma avoided

Not everything worked perfectly on the first try. A few potential pitfalls surfaced as she tested and refined the workflow:

  • Timezone mismatches – She verified that the Cron node used the correct timezone so messages did not arrive at 3:00 AM.
  • API rate limits – For many recipients, she planned to stagger checks or add caching to avoid hitting OpenWeatherMap’s limits.
  • Overly long SMS messages – She shortened templates to keep costs down and ensure messages were readable at a glance.
  • False positives – She tuned thresholds with historical weather data so her dad would not receive urgent alerts for minor changes.

By addressing these early, she built a system that was both reliable and respectful of everyone’s attention.

Who this kind of workflow can help

Emma’s story is just one example. The same n8n elderly care automation template can be a game changer for:

  • Home care agencies that want automated daily wellness and environmental checks for clients
  • Family caregivers supporting remote older relatives in different cities or countries
  • Senior living communities that need an additional monitoring layer for heatwaves, storms, or poor air quality

In each case, the core idea is the same: use real-time weather and air quality data, clear thresholds, and automated SMS to keep older adults safer and caregivers better informed.

Resolution: what Emma’s mornings look like now

Two weeks after turning on the workflow, Emma

Automate Daily Irrigation Alerts with n8n

Automate Daily Irrigation Alerts with n8n

On a cool morning in Salinas, Ana unlocked the door to her small farm office and glanced at the whiteboard on the wall. It was crowded with scribbled notes: “Check forecast,” “Walk north field,” “Drip line test,” “Text crew about irrigation.” She sighed. Most days started like this, with a race against the sun and a guess about how much water the crops really needed.

Some mornings she overwatered because the previous day had been hot. Other times she skipped irrigation, only to find wilted leaves by afternoon. Weather apps helped, but she still had to remember to check them, interpret the data, and message the field team on time. It was too easy to miss short-term changes or get distracted by other emergencies.

What Ana wanted was simple: a short, reliable irrigation advisory that arrived automatically every morning, based on current local weather, that she could trust and forward to her crew. No more guesswork, no more manual checks at 5:30 a.m.

The problem: manual irrigation decisions in a changing climate

Ana’s situation is not unique. Small farm managers and irrigation coordinators juggle dozens of tasks, yet irrigation decisions still depend on:

  • Opening weather apps or browser tabs every morning
  • Mentally translating temperature and rain chances into irrigation time
  • Typing and sending SMS messages to crew members or partners

These manual checks are slow and easy to forget. They also do not always keep up with short-term weather shifts. A surprise morning drizzle or unexpected heat spike can make yesterday’s plan obsolete.

Ana knew that if she could automate just this one part of her day, she could save time, reduce water waste, and keep her crops healthier. That is when she discovered an n8n workflow template that promised exactly what she needed: a daily irrigation advisory delivered by SMS, powered by live weather data.

Discovery: finding an n8n template for irrigation alerts

Ana had already been using n8n for a few basic automations, so when she stumbled on an “Automate Daily Irrigation Alerts” template, she was curious. The description sounded familiar:

“Runs on a daily schedule, fetches current weather from OpenWeatherMap, evaluates irrigation need with simple rules, and sends a concise SMS via Plivo.”

That was exactly the workflow she had been doing manually, only slower and with more stress. The idea of turning it into an automated n8n workflow felt like a turning point.

She opened the template and saw a clear node flow:

  • Cron – trigger once each morning
  • OpenWeatherMap – fetch current weather for the farm
  • Function – calculate irrigation recommendation from temperature and rain
  • Plivo (SMS) – send the advisory to the farm manager or crew

It looked lightweight, understandable, and easy to customize. The only question was whether it would really match the way she made decisions in the field.

Rising action: turning Ana’s morning routine into an automated workflow

Ana decided to import the workflow into her n8n instance and walk through each step as if she were teaching it how to think like a farm manager.

Step 1 – Teaching the workflow when her day starts

The first node was a Cron trigger. In the past, Ana had set an alarm for 5:45 a.m. to check the weather. Now she set the Cron node to do that for her.

She configured the node to fire at 06:00 local time, right before irrigation decisions were usually made. In the n8n workflow settings, she made sure the farm’s timezone was correctly set so the trigger would run at the expected local hour, not at some random UTC time.

For the first time, she realized she could sleep through the old alarm and still have the information she needed waiting on her phone.

Step 2 – Connecting the farm to real-time weather

Next was the OpenWeatherMap node, which would replace Ana’s habit of refreshing a weather app and squinting at icons.

She configured it as follows:

  • Operation: currentWeather
  • Location: city name or latitude/longitude for the farm
  • Credentials: her OpenWeatherMap API key

For her farm in Salinas, she used precise coordinates. The node returned temperature, humidity, and a weather array with descriptions like “Rain,” “Clouds,” or “Clear.”

This was the same data Ana used every day, but now it would feed straight into the logic of the workflow without her needing to interpret it manually.

Step 3 – Encoding her irrigation rules into a Function node

The heart of the workflow was the Function node called calculate-irrigation-need. This was where Ana’s field experience became code.

Inside the node, the example logic extracted temperature and the main weather description, then mapped them to four possible recommendations:

  • HIGH – Irrigate 30-45 minutes when hot and not raining
  • MEDIUM – Irrigate 15-30 minutes when warm and not raining
  • LOW – Check soil moisture, irrigate if dry
  • NONE – Skip irrigation when rain is expected

One line in particular caught her eye:

if (temp > 25 && precipitation !== 'Rain') {  irrigationRecommendation = 'HIGH - Irrigate 30-45 min today';
}

That was almost exactly how she thought about hot, dry days. She adjusted the thresholds slightly to match her own experience, then added a calculatedAt timestamp so she could log when each decision was made.

She also made a mental note:

  • OpenWeatherMap returns Kelvin by default, so she explicitly configured it for Celsius and confirmed the conversion.
  • Later, she could feed in soil moisture or crop type for more precise control.

For now, the simple rule-based logic was enough to replace her daily mental math.

Step 4 – Delivering the advice by SMS with Plivo

The final piece of the puzzle was communication. Ana used to type out messages to her crew every morning. Now, the Plivo node would do that automatically.

She configured the SMS node with:

  • Her verified Plivo sender number
  • The crew’s phone numbers as recipients
  • Securely stored Plivo credentials in n8n, instead of hard-coding them

The example message format was short and actionable:

Farm: Salinas – 26°C, Rain chance light rain. Recommended irrigation: MEDIUM – Irrigate 15-30 min today.

Ana customized the wording slightly to match how her team liked to read updates, but kept the essential structure: location, temperature, rain chance, and a clear recommendation.

The turning point: testing the workflow before going live

Before trusting an automated system with something as important as water, Ana wanted proof. She walked through a simple validation routine inside n8n.

  1. Manual runs with different weather scenarios
    She used sample weather payloads to simulate:
    • Hot and dry days
    • Warm and cloudy days
    • Rainy mornings

    Each time, she checked that the Function node produced the recommendation she would have chosen herself.

  2. Checking units and timezones
    She verified that OpenWeatherMap was returning Celsius, not Kelvin, and confirmed that the Cron trigger aligned with her local timezone.
  3. Sending test SMS messages
    First she sent messages to her own phone to confirm formatting, then to a second test number to ensure Plivo was correctly configured and using E.164 format.

By the end of the afternoon, the workflow was behaving exactly like her own decision process, only faster and more consistent.

Resolution: life after automation

The first week with the automated irrigation advisory changed Ana’s mornings. At 6:00 a.m., her phone buzzed with a short SMS:

Farm: Salinas – 24°C, Clouds. Recommended irrigation: MEDIUM – Irrigate 15-30 min today.

She forwarded it to the crew chat and started her day without opening a single weather app. On a rainy morning, the message read:

Farm: Salinas – 19°C, Rain. Recommended irrigation: NONE – Skip irrigation, rain expected.

No guesswork, no wasted water, and no scrambling to update the team mid-morning.

Over time, Ana began to refine and extend the workflow, turning a simple automation into a small decision-support system for her farm.

How Ana improved the basic n8n irrigation workflow

Adding soil moisture sensors for smarter decisions

As her confidence grew, Ana integrated soil moisture data. Using LoRaWAN sensors and an API, she sent moisture readings into n8n and passed them into the same Function node.

With a simple threshold check, the logic could now say, “Even if it is warm and dry in the air, do not irrigate if the soil is still moist.” This prevented unnecessary watering the day after a deep irrigation or heavy rain.

Scaling to multiple fields and crops

Eventually, Ana wanted different rules for different blocks: leafy greens, fruiting crops, and a small greenhouse. She stored farm metadata in a Google Sheet that included:

  • Coordinates per field
  • Crop type
  • Preferred irrigation durations

The workflow read from this sheet, looped through each farm block, and applied slightly different thresholds and messages. What started as a single SMS became a structured multi-farm advisory, still managed by the same n8n template.

Using short-term rainfall forecasts instead of only current conditions

Ana also realized that current conditions were not always enough. A clear sky at 6:00 a.m. did not guarantee a dry afternoon. She enabled OpenWeatherMap’s forecast endpoints and used hourly or daily forecasts to check whether measurable rain was expected in the next 6-12 hours.

Now, the workflow could say, “Skip irrigation if rain is predicted soon,” instead of only reacting to what the sky looked like at that moment.

Logging, trends, and alerts

To track how often the farm needed heavy watering, Ana added a logging step. Each decision was written to a CSV file or Google Sheet with:

  • Date and time
  • Temperature
  • Weather description
  • Irrigation recommendation

She even set up an additional notification: if the system produced repeated HIGH recommendations several days in a row, n8n would send her an email or Slack message. That pattern could indicate a leak, a broken emitter, or unusually hot weather that needed extra attention.

Operational realities: what Ana learned about running this in production

Costs and usage

As the workflow matured, Ana kept an eye on:

  • OpenWeatherMap API costs for higher request volumes or detailed forecasts
  • SMS charges from Plivo or any other provider she might switch to

She optimized by limiting recipients to key decision makers and avoided unnecessary test runs once the system was stable.

Security practices in n8n

From the start, she followed good security hygiene:

  • Stored API keys and phone credentials in n8n credentials, never inside Function code
  • Restricted access to her n8n instance
  • Used HTTPS for remote access

This kept sensitive data safe while still allowing her to adjust logic and thresholds easily.

Reliability and error handling

Occasionally, external services would fail. Ana added basic error handling so that if the weather API call failed, the workflow would either retry or send her an alert instead of silently doing nothing.

Using n8n’s error workflows and retry logic, she made sure that a temporary API outage did not turn into a missed irrigation day.

Troubles Ana solved along the way

Like any automation, the irrigation advisory needed a bit of tuning. Ana ran into a few common issues and fixed them quickly:

  • Strange temperature readings
    When numbers looked wrong, she checked the OpenWeatherMap unit settings and confirmed she was using Celsius instead of Kelvin.
  • SMS messages not delivering
    She verified that her Plivo sender number was correctly provisioned and that recipient numbers followed international E.164 format.
  • Recommendations that felt slightly off
    She adjusted thresholds, for example using 22°C instead of 20°C for “warm,” and folded in soil moisture data where available.

Each tweak made the system feel more like a trusted colleague and less like a rigid script.

Who this kind of n8n irrigation workflow helps

Ana’s story is one example, but the same n8n template works well for:

  • Small vegetable farms that hand-water or run simple drip systems
  • Greenhouse operations that need daily checks without adding staff
  • Cooperative farms that share a single irrigation manager across multiple sites

Anywhere that daily irrigation decisions depend on weather and quick communication, an automated advisory can reduce stress and improve water efficiency.

Your next chapter: putting the template to work

With just a few n8n nodes, Ana turned a stressful morning routine into a calm, repeatable process. You can follow the same path:

  1. Import the workflow JSON into your n8n instance.
  2. Set your OpenWeatherMap credentials and configure units (Celsius or Fahrenheit).
  3. Add your Plivo credentials and verified phone numbers.
  4. Update farm coordinates or city name for your location.
  5. Run manual tests with different weather scenarios.
  6. Enable the Cron trigger and monitor results for a week.
  7. Tune thresholds and rules to match your crops, soil, and local climate.

From there, you can expand to multi-farm setups, integrate soil moisture sensors, or switch from current conditions to forecast-based logic, all within the same n8n framework.

Ready to try it? Import the template, connect your APIs, and let your first automated irrigation advisory arrive tomorrow morning instead of waking up to another guessing game.

Call-to-action: Import the workflow, run tests, and tune thresholds. Improve farm water efficiency with simple automation today.

Daily Irrigation Alerts with n8n for Small Farms

Daily Irrigation Alerts With n8n For Small Farms: A Story From The Field

The Morning That Changed Marta’s Farm

Marta used to wake up before sunrise, not to enjoy the quiet of her small vegetable farm, but to check the weather, walk the rows, and guess how long to run irrigation. On hot days she worried about under-watering and stressed plants. On cloudy mornings she feared wasting water just hours before a surprise shower. Most days, irrigation felt like a gamble.

Her crew depended on her call by 7 a.m. If she missed something, they either over-watered and wasted money or under-watered and put yields at risk. She had weather apps, spreadsheets, and sticky notes with “rules of thumb,” but nothing that tied it all together into clear, daily guidance.

One evening, after a long day of chasing leaks and checking forecasts, Marta stumbled on an idea that sounded almost too simple: a weather-driven irrigation advisory that runs automatically with n8n, checks real-time weather, applies a small JavaScript rule set, and sends an SMS with a clear recommendation to her crew.

That was the night she decided to automate her mornings.

Why Marta Needed A Weather-Driven Irrigation Advisory

Marta’s challenges will sound familiar to many small farm managers:

  • She often irrigated even when rain was on the way, because she did not trust the forecast or had not checked it in time.
  • Her timing rarely matched crop demand, especially on days with unexpected heat spikes or cooler temperatures.
  • She had to remember to text or call her team every morning, which pulled her away from planning and operations.
  • Her budget was tight, so she needed something that could run on low-cost infrastructure like n8n Cloud or a self-hosted instance.

What she really wanted was a small, reliable “assistant” that would wake up before she did, look at the weather for her fields, make a simple decision, and text her crew with a clear, actionable irrigation recommendation.

Discovering The n8n Irrigation Template

Marta already used n8n for a few basic automations, so when she found an n8n workflow template for daily irrigation alerts, it caught her eye. The promise was exactly what she needed:

A workflow that runs every morning, pulls current weather from OpenWeatherMap, uses a Function node with simple JavaScript logic to calculate an irrigation recommendation, and then sends a Plivo SMS to her team.

It sounded like a tiny decision engine for her farm, built on four key building blocks:

  • Cron trigger – to schedule the workflow every morning at 06:00.
  • OpenWeatherMap node – to fetch the current weather for her location.
  • Function node – to run custom logic and produce a recommendation.
  • Plivo SMS node – to send the final advisory to her crew.

Instead of Marta checking the weather and doing mental math, n8n could do it for her, consistently and on time.

The Logic Behind Marta’s New “Irrigation Brain”

Before she trusted an automation to advise her crew, Marta wanted to understand the logic. The heart of the workflow lived in the Function node, which read three key values from OpenWeatherMap:

  • Temperature
  • Humidity
  • Precipitation description

Based on these, the function returned one of four recommendations: HIGH, MEDIUM, LOW, or NONE. It was intentionally conservative, easy to read, and easy to customize. The JavaScript looked like this:

// Example JavaScript used in the Function node
const temp = $input.first().json.main.temp;
const humidity = $input.first().json.main.humidity;
const precipitation = $input.first().json.weather[0].main;
const description = $input.first().json.weather[0].description;

let irrigationRecommendation = '';

if (temp > 25 && precipitation !== 'Rain') {  irrigationRecommendation = 'HIGH - Irrigate 30-45 min today';
} else if (temp > 20 && precipitation !== 'Rain') {  irrigationRecommendation = 'MEDIUM - Irrigate 15-30 min today';
} else if (precipitation === 'Rain' || description.includes('rain')) {  irrigationRecommendation = 'NONE - Rain expected, skip irrigation';
} else {  irrigationRecommendation = 'LOW - Check soil moisture, irrigate if dry';
}

return {  json: {  ...($input.first().json),  irrigationRecommendation: irrigationRecommendation,  calculatedAt: new Date().toISOString()  }
};

As she walked through it, Marta noticed a few important details and notes that matched how she already thought about irrigation:

  • Temperatures above 25°C triggered a HIGH recommendation, which she could adjust for her specific crops.
  • If the API reported rain, or if the description included “rain”, the workflow suggested NONE, meaning “skip irrigation today”.
  • She could choose Celsius or Fahrenheit, as long as she used the same unit consistently in both OpenWeatherMap and her thresholds.

It was simple, but not simplistic. And most importantly, it was transparent. She could tweak it any time.

Rising Action: Building The Workflow In n8n

On a quiet afternoon, Marta sat down to turn this idea into a real automation. She opened her n8n instance and started to assemble the pieces of the template into a workflow tailored to her farm.

1. Teaching The Workflow When To Wake Up

First, she added a Cron Trigger. This would decide when her irrigation advisor “woke up” each day.

She set it to run once daily at 06:00 and double-checked that the workflow timezone matched her farm’s local timezone in the n8n settings. That way, her crew would receive the SMS before they started their day in the fields.

2. Giving It Eyes On The Weather

Next, Marta configured the OpenWeatherMap node. She chose the Current Weather operation and entered her farm’s coordinates so the data would be as accurate as possible.

She stored her OpenWeatherMap API key in n8n credentials instead of hard-coding it in the node. That small decision kept her workflow secure and easier to maintain.

3. Adding The Decision Logic

With weather data in place, she dropped in a Function node and pasted the JavaScript logic. This was where the real magic happened.

She adjusted the temperature thresholds slightly for her region and crops. She knew that some of her leafy greens did not love extreme heat, so she kept the HIGH recommendation around 25°C, but she made a note that she could refine this later as she collected more data.

She also thought ahead: one day she wanted to add soil moisture sensors. The Function node would be the perfect place to merge sensor readings (via HTTP, MQTT, or a database) with the weather data to make more precise decisions.

4. Finding A Voice: SMS With Plivo

Finally, Marta needed her workflow to “speak” to her team. She connected her Plivo credentials in n8n and added a Plivo SMS node.

Using the data from earlier nodes, she built a message template that looked like this:

Farm: {{ $node["fetch-weather-data"].json["name"] }} - {{ $node["fetch-weather-data"].json["main"]["temp"] }}°C, Rain: {{ $node["fetch-weather-data"].json["weather"][0]["description"] }}. Recommendation: {{ $json["irrigationRecommendation"] }}.

She set the “from” number to her Plivo phone number and the “to” number to one of her crew members. Later, she planned to:

  • Call the SMS node multiple times for different team members, or
  • Use a SplitInBatches node to iterate through a list of recipients.

Within a few clicks, her workflow had a clear voice and a clear audience.

The Turning Point: Testing, Debugging, And First Live Run

Before letting the workflow run on its own, Marta wanted proof that it worked. She treated it like a new hire on the farm: trust, but verify.

Testing The Weather And Logic

  • She ran the workflow manually in n8n to check the data coming back from OpenWeatherMap. Temperature, humidity, and precipitation all looked correct.
  • Inside the Function node, she used console.log(...) to log intermediate values while debugging. This helped her see exactly what thresholds were being triggered and which recommendation was returned.

Validating SMS Delivery

  • She sent a test SMS to her own phone first, verifying that the message formatting was clear and that the recommendation made sense based on the current weather.
  • Once satisfied, she added her crew lead’s number and ran another manual test.

The first time her phone buzzed with an automated advisory, it read something like:

Farm: Salinas - 26°C, light rain unlikely. Recommended irrigation: HIGH - 30-45 min today.

It was short, clear, and exactly the kind of guidance she had been trying to provide manually every morning.

Life After Automation: How The Workflow Changed Marta’s Mornings

Within a week, the difference was obvious.

On hot days, her crew received a “HIGH” or “MEDIUM” advisory and set irrigation accordingly, without waiting for Marta to text. On days when OpenWeatherMap reported rain, the message came through as:

NONE - Rain expected, skip irrigation

They stopped watering before storms, saved water, and reduced muddy field conditions that used to slow harvest.

Marta no longer had to open three apps and walk the field at sunrise just to make a call. The workflow did that first pass for her, and she could always override it if needed. Her time shifted from reactive checks to proactive planning.

Customization Ideas Marta Is Already Considering

Once the basic template was running smoothly, Marta started planning the next layer of improvements. The n8n workflow gave her plenty of room to grow:

  • Add soil moisture integration: Pull sensor readings via HTTP, MQTT, or a database, then refine irrigation duration based on both soil data and weather.
  • Per-field recommendations: Store field information in Airtable or Google Sheets and loop through each entry to calculate specific irrigation plans for each block.
  • Use longer-term forecasts: Check 3-day precipitation probability to avoid watering right before a forecasted storm.
  • Switch SMS provider: Swap Plivo for Twilio or switch to email alerts if SMS costs become an issue.

For some fields, she also experimented with more detailed alerts that linked to maps or internal tools, such as:

Field A: 26°C, no rain. Irrigation: HIGH (30-45 min). Check map: https://yourfarm.com/fields/A

Keeping It Safe And Reliable: Marta’s Best Practices

As her confidence in the workflow grew, Marta made sure it was not only helpful but also safe and robust.

  • She stored all API keys and SMS credentials in n8n credentials, not in the workflow JSON.
  • She respected OpenWeatherMap usage tiers and rate limits to avoid unexpected charges.
  • She added retries and error handling, including an Error Trigger node that notified her via Slack if something failed.
  • She logged each advisory in a Google Sheet for future auditing and to improve her rules over time.

When Things Go Wrong: How She Troubleshoots

Not every day is perfect, even with automation. Marta prepared for common issues:

  • Empty weather data: She checked the farm coordinates and verified that her OpenWeatherMap API key included access to Current Weather data.
  • SMS not sending: She confirmed her Plivo account balance, checked that her numbers were correctly provisioned, and ensured the “from” number included the proper country code.
  • Weird timing: When messages arrived at unexpected hours, she double-checked the n8n server timezone and Cron configuration.

Looking Ahead: Advanced Enhancements On The Horizon

As her operation grew, Marta started dreaming bigger. With a bit more infrastructure, she could:

  • Incorporate machine learning or evapotranspiration (ET) models to estimate water needs more precisely.
  • Integrate satellite soil moisture data or local weather stations for a richer, hyper-local picture.
  • Automate valve control, with proper safeguards, so that recommendations could eventually trigger irrigation hardware.

The same n8n template that started as a simple advisory could evolve into a full irrigation decision support system.

From Manual Mornings To Smart Alerts: Your Turn

Marta’s story is not unique. Many small farms face the same tension between water savings, crop protection, and limited time. This n8n workflow template for daily irrigation alerts offers a low-effort way to:

  • Reduce water waste by skipping irrigation when rain is expected.
  • Align irrigation timing with temperature and crop demand.
  • Automate daily reminders so managers can focus on operations instead of weather apps.
  • Run on affordable infrastructure, either n8n Cloud or self-hosted.

You can start exactly where Marta did: with a simple rule set, a single SMS, and a morning Cron job.

How To Start With The Template

  1. Deploy the workflow in your n8n instance.
  2. Connect your OpenWeatherMap and Plivo credentials in n8n.
  3. Run a manual test to validate data, logic, and SMS formatting.
  4. Log results and iterate: adjust temperature thresholds, add soil sensors, or expand to per-field alerts.

If you need a more advanced setup, such as per-field configurations, soil sensor integration, or valve control, you can work with a farm automation specialist or ask for help in the n8n community forums.

Save water, protect your crops, and keep your team informed, one morning SMS at a time.

Automate Daily Weather SMS with n8n (OpenWeatherMap + Plivo)

Automate Daily Weather SMS with n8n (OpenWeatherMap + Plivo)

Automating daily weather alerts is a simple yet powerful way to keep teams, customers, or yourself informed without any manual effort. In this guide, you will learn how to design a production-ready n8n workflow that retrieves current weather data from OpenWeatherMap and delivers it as an SMS via Plivo on a fixed schedule.

This article is written for automation professionals and technical users who want a reliable, maintainable n8n weather SMS workflow that can be extended and integrated into broader automation strategies.

Use case overview

The core objective is to build an n8n workflow that:

  • Runs automatically at a defined time using a Scheduled Trigger (cron)
  • Calls the OpenWeatherMap API to fetch current conditions for a given city
  • Formats the response and sends it as an SMS through Plivo

Typical use cases include:

  • Daily temperature and conditions for remote or field-based teams
  • Weather-based operational triggers, such as pausing deliveries during severe conditions
  • Personal reminders, such as carrying an umbrella or adjusting clothing based on temperature

Keywords: n8n weather SMS, OpenWeatherMap integration, Plivo SMS, cron trigger, automate weather SMS alerts.

Architecture and key components

The workflow is intentionally minimal, using three core n8n nodes that can be extended as required:

  • Scheduled Trigger (Cron) – initiates the workflow at a fixed daily time
  • OpenWeatherMap node – retrieves current weather data for a configured location
  • Plivo node – sends an SMS with a formatted summary of the weather

This linear sequence keeps the logic easy to audit and maintain:

Scheduled Trigger → OpenWeatherMap → Plivo SMS

Prerequisites

Before you configure the workflow in n8n, ensure you have:

  • An operational n8n instance (self-hosted or n8n.cloud)
  • An OpenWeatherMap API key (the free tier is sufficient for daily checks)
  • A Plivo account with:
    • An SMS-enabled phone number
    • Auth ID and Auth Token
  • Basic familiarity with setting up n8n nodes and credentials

Step-by-step workflow configuration

1. Configure the Scheduled Trigger (Cron)

Start by adding a Scheduled Trigger node, which uses cron-style configuration to control when the workflow runs.

For a daily run at 9:00 AM:

  • Set the trigger type to Cron
  • Configure the hour field to 9

If your n8n instance operates in UTC, align the configured time with your target timezone. For example, if you want 9:00 AM local time and your local time is UTC+2, you would set the cron hour to 7. Timezone alignment is critical for reliable scheduling in production environments.

2. Add and configure the OpenWeatherMap node

Next, connect the Scheduled Trigger node to an OpenWeatherMap node. This node will query the current weather for a specific city.

Key configuration steps:

  • Select or create OpenWeatherMap credentials in the n8n credentials manager and provide your API key.
  • Specify the City Name (for example, Berlin).
  • Set the operation to Current Weather to retrieve live conditions.

The OpenWeatherMap node returns a JSON payload with multiple fields. Commonly used properties include:

  • main.temp – current temperature (Kelvin by default, unless units are specified)
  • weather[0].description – short textual description (for example, clear sky)
  • wind.speed – wind speed

For many user-facing SMS messages, you will want to convert the temperature from Kelvin to Celsius or Fahrenheit. You can do this either directly in expressions or via a Function node, as described later.

3. Configure the Plivo SMS node

After the OpenWeatherMap node, add a Plivo node to send the SMS message. Connect it to the output of the weather node.

In the Plivo node configuration:

  • Select or create Plivo credentials (Auth ID and Auth Token) in the n8n credentials manager.
  • Set the From field to your SMS-enabled Plivo number.
  • Set the To field to the recipient phone number(s).
  • Define the Message body using n8n expressions to reference data from the OpenWeatherMap response.

Example SMS template that reads data from a node named Weather Fetcher:

Hey! The temperature outside is {{$node["Weather Fetcher"].json["main"]["temp"]}}°C. Current conditions: {{$node["Weather Fetcher"].json["weather"][0]["description"]}}.

If OpenWeatherMap is returning temperature in Kelvin and you prefer Celsius, use an expression for conversion. For example:

=Math.round($node["Weather Fetcher"].json["main"]["temp"] - 273.15)

You can embed this expression directly in the message field, for instance:

Hey! The temperature outside is {{Math.round($node["Weather Fetcher"].json["main"]["temp"] - 273.15)}}°C. Current conditions: {{$node["Weather Fetcher"].json["weather"][0]["description"]}}.

This approach keeps the workflow simple while still providing readable, user-friendly values in the SMS.

Conceptual workflow JSON

The following JSON illustrates the structure of the workflow that you can import into n8n. You will still need to configure credentials and adjust parameters such as city name and phone numbers:

{  "name": "Daily Weather SMS",  "nodes": [  {  "name": "Scheduled Trigger",  "type": "n8n-nodes-base.cron",  "parameters": {  "triggerTimes": {  "item": [  {  "hour": 9  }  ]  }  }  },  {  "name": "Weather Fetcher",  "type": "n8n-nodes-base.openWeatherMap",  "parameters": {  "cityName": "berlin"  }  },  {  "name": "SMS Sender",  "type": "n8n-nodes-base.plivo",  "parameters": {  "message": "=Hey! The temperature outside is {{$node[\"Weather Fetcher\"].json[\"main\"][\"temp\"]}}°C."  }  }  ],  "connections": {  "Scheduled Trigger": {  "main": [  [  {  "node": "Weather Fetcher"  }  ]  ]  },  "Weather Fetcher": {  "main": [  [  {  "node": "SMS Sender"  }  ]  ]  }  }
}

Use this JSON as a conceptual reference or as a starting point for importing and then refining the workflow in the n8n editor.

Operational best practices

Timezone alignment

Validate the timezone used by your n8n instance. If the instance runs in UTC but your recipients expect local time, adjust the Cron node configuration accordingly. Misaligned timezones often result in messages being sent several hours earlier or later than intended.

Temperature units and formatting

For clarity and user experience:

  • Convert Kelvin to Celsius or Fahrenheit using expressions or a Function node.
  • Apply rounding with Math.round() or similar functions to avoid long decimal values.
  • Explicitly include units, for example °C or °F, in the SMS message.

Error handling and resilience

For production-grade automations, implement robust error handling:

  • Use a global Error Workflow or a Catch Error pattern to capture failures from the OpenWeatherMap or Plivo nodes.
  • Send internal alerts (via email, Slack, or another channel) if an API call fails or Plivo returns an error.
  • Optionally, send a fallback SMS to the recipient indicating that the weather information could not be retrieved.

Rate limits and performance

Monitor and respect the rate limits of both OpenWeatherMap and Plivo:

  • For a single daily notification per recipient, the default free tiers are generally sufficient.
  • If you scale to multiple locations or higher frequency, consider caching responses or consolidating requests to stay within rate limits.

Localization and personalization

To support different audiences and regions:

  • Localize the message language based on recipient preferences.
  • Use conditional logic or branches to choose between Celsius and Fahrenheit.
  • Maintain separate recipient lists or branches for different regions or teams.

Troubleshooting common issues

Invalid or missing credentials

  • Verify that the OpenWeatherMap API key is correctly stored in the n8n credentials manager and associated with the OpenWeatherMap node.
  • Confirm that the Plivo Auth ID and Auth Token are valid and correctly referenced in the Plivo node.

SMS not delivered

  • Ensure that your Plivo number is SMS-enabled for the destination country.
  • Check that your Plivo account is active and permitted to send SMS to the target region.
  • Inspect Plivo logs or error messages in n8n to identify delivery issues.

Unexpected temperature readings

  • If temperatures appear incorrect, confirm whether OpenWeatherMap is returning Kelvin, Celsius, or Fahrenheit.
  • Adjust the API unit settings or apply the necessary conversion in n8n.
  • Validate your conversion logic in expressions or Function nodes.

Security and cost management

From a security and operational standpoint:

  • Store all API keys and tokens exclusively in the n8n credentials manager, not in plain text within nodes.
  • Rotate keys periodically in line with your security policies.
  • Monitor Plivo SMS usage and associated costs. Plivo charges per SMS, so implement logging or alerts to avoid unexpected billing.
  • For OpenWeatherMap, the free tier is adequate for simple daily checks, but a paid plan may be required for high-frequency updates or multiple locations.

Extending and scaling the workflow

Once the basic automation is in place, you can evolve it into a more sophisticated weather notification system:

  • Multiple recipients or groups: Send the same alert to multiple phone numbers, or dynamically select recipients from a database or CRM.
  • Conditional alerts: Use IF nodes to trigger messages only when certain thresholds are met, such as extreme temperatures or severe weather conditions.
  • Logging and compliance: Record each sent SMS in a Google Sheet, database, or logging system for auditing and analytics.
  • Multi-channel notifications: In addition to SMS, forward the same weather summary to Slack, Microsoft Teams, or email using additional n8n nodes.

Conclusion

By combining the Scheduled Trigger, OpenWeatherMap, and Plivo nodes, n8n provides a clean and extensible pattern for automated daily weather SMS alerts. With minimal configuration, you can have a reliable workflow that runs every morning, retrieves up-to-date weather information, and distributes it to your chosen recipients.

With added features such as temperature conversion, error handling, logging, and conditional logic, this simple flow can become a robust component of your broader automation landscape.

Next steps: Import the workflow into your n8n instance, configure your OpenWeatherMap and Plivo credentials, set your desired schedule, and run a test execution to validate the end-to-end behavior.

If you need to adapt this workflow for multiple cities, custom thresholds, or advanced message templates, feel free to reach out or leave a comment. It is straightforward to extend this template to match more complex operational requirements.

Call to action: Try this n8n weather SMS workflow today. Import the template, plug in your credentials, and run an immediate test. If you find this useful, subscribe for more n8n automation tutorials and best practices.

Automate Daily Weather SMS with n8n

Automate Daily Weather SMS with n8n

Using n8n together with OpenWeatherMap and an SMS provider such as Plivo, you can implement a fully automated workflow that sends a daily weather update directly to your phone. This guide documents a ready-to-use n8n template in a technical, reference-style format, including its architecture, node configuration, data flow, and options for customization and error handling.

1. Workflow overview

This n8n workflow is designed to run at a scheduled time every day, request current weather data for a specified city from the OpenWeatherMap API, and deliver the temperature via SMS using Plivo.

The template consists of three connected nodes:

  • Scheduled Trigger (Cron) – initiates the workflow at a configured time each day
  • Weather Fetcher (OpenWeatherMap) – queries OpenWeatherMap for current weather data
  • SMS Sender (Plivo) – sends a text message containing the temperature to a target phone number

Typical use cases include daily personal reminders, weather checks for distributed teams, and integration into business processes that depend on local conditions. The workflow is lightweight, cost-aware, and straightforward to extend.

2. Architecture and data flow

2.1 High-level flow

  1. Cron node triggers the workflow at a fixed schedule (for example, every day at 09:00).
  2. OpenWeatherMap node receives the trigger, calls the OpenWeatherMap API with the configured city name and API key, and returns a JSON payload with current weather data.
  3. Plivo node reads the temperature from the OpenWeatherMap node output via an expression, formats the SMS body, and sends the message using your Plivo credentials.

2.2 Node linkage

  • Scheduled Trigger → Weather Fetcher: The Cron node has a single main output that feeds into the OpenWeatherMap node. It does not require input data; it simply starts the chain.
  • Weather Fetcher → SMS Sender: The JSON output from OpenWeatherMap is passed as input to the Plivo node. The Plivo node uses n8n expressions to reference specific fields, such as main.temp.

The core temperature value is typically available at the JSON path main.temp in the OpenWeatherMap response. The workflow assumes that this field is present and correctly typed as a numeric value.

3. Prerequisites

Before importing and configuring the template, ensure you have:

  • An n8n instance (cloud or self-hosted) with access to the internet
  • An OpenWeatherMap API key
  • A Plivo account with SMS capability (or an equivalent SMS provider; the conceptual steps are similar)
  • A phone number that can receive SMS messages

All secrets such as API keys and account tokens should be stored in the n8n credentials manager, not directly in node parameters.

4. Node-by-node breakdown

4.1 Scheduled Trigger (Cron) node

Purpose

The Cron node is responsible for executing the workflow on a fixed schedule. In the template, it is configured for a single daily run.

Key parameters

  • Trigger mode: Cron
  • Trigger times:
    • Example configuration: run daily at 09:00 (9 AM)
    • Hour, minute, and day-of-week can be adjusted as needed
  • Timezone:
    • Set to your preferred timezone to ensure correct local time execution

Configuration notes

  • You can add multiple trigger times if you want more than one SMS per day. Be aware that this increases API usage and SMS costs.
  • For testing, you can temporarily adjust the schedule to a near-future time or run the workflow manually from the editor.

4.2 Weather Fetcher (OpenWeatherMap) node

Purpose

The OpenWeatherMap node queries the OpenWeatherMap API for current weather data for a given city and returns a JSON object containing temperature and other metadata.

Required parameters

  • City name:
    • Example: berlin
    • Use a valid city name recognized by OpenWeatherMap; you can include country codes if needed (for example, berlin,de) depending on your OpenWeatherMap node options.
  • API credentials:
    • Reference your OpenWeatherMap API key via n8n credentials.
  • Units:
    • Recommended: metric (returns temperature in Celsius)
    • If left unset, OpenWeatherMap defaults to Kelvin, which will require manual conversion in expressions.

Output structure

The node returns a JSON payload similar to the standard OpenWeatherMap current weather response. The temperature is typically at:

main.temp

Other useful fields include:

  • weather[0].description – a short textual description of the conditions
  • main.humidity – humidity percentage

Edge cases

  • If the city name is invalid or misspelled, the node may return an error response or an unexpected structure. Validate the output before using it in production.
  • If units are not set to metric, the value of main.temp will be in Kelvin. Ensure you either:
    • Explicitly configure Units = metric, or
    • Convert Kelvin to Celsius in the expression that builds your SMS text.

4.3 SMS Sender (Plivo) node

Purpose

The Plivo node sends the daily SMS message. It reads the temperature and other data from the OpenWeatherMap node and constructs the message body using n8n expressions.

Credentials

  • Configure your Plivo credentials in the n8n credentials manager.
  • Select those credentials in the Plivo node so that the node can authenticate against Plivo’s API.

Core parameters

  • From:
    • Your Plivo-enabled phone number or sender ID, depending on your Plivo setup and local regulations.
  • To:
    • The destination phone number that will receive the SMS.
  • Message:
    • Configured using an n8n expression that references the OpenWeatherMap node output.

Example message expression

In the Message field, use an expression starting with =:

=Hey! The temperature outside is {{$node["Weather Fetcher"].json["main"]["temp"]}}°C.

This expression:

  • Reads the main.temp value from the node named Weather Fetcher.
  • Inserts the numeric temperature into the message string.
  • Assumes you configured the OpenWeatherMap node with Units = metric, so the value is already in Celsius.

Edge cases

  • If the node name in the expression does not match the actual node name (for example, you rename the OpenWeatherMap node), the expression will fail. Update the node name in all related expressions if you rename nodes.
  • If the OpenWeatherMap node fails or returns no main.temp field, the expression may evaluate to undefined or cause an error. Use error handling patterns described later in this guide to handle such cases.

5. Template import and initial setup

5.1 Import the workflow template

  1. Open your n8n editor (cloud or self-hosted).
  2. Import the provided workflow JSON/template using the import function.
  3. Confirm that the workflow shows three nodes in sequence:
    • Scheduled TriggerWeather FetcherSMS Sender

5.2 Configure the Cron node

  • Open the Scheduled Trigger node.
  • Set the desired daily time, for example:
    • Hour: 9
    • Minute: 0
  • Adjust the timezone if necessary to match your local or business timezone.
  • Optionally, define multiple trigger times for more frequent notifications, keeping cost and rate limits in mind.

5.3 Configure the OpenWeatherMap node

  • Open the Weather Fetcher node.
  • Set:
    • City name: for example, berlin
    • Credentials: select your OpenWeatherMap API key from the credentials list
    • Units: choose metric for Celsius
  • Save the node configuration.

5.4 Configure the Plivo node

  • Open the SMS Sender node.
  • Select your Plivo credentials from the credentials manager.
  • Set the From and To numbers according to your Plivo account and target phone.
  • In the Message field, insert the expression that references the temperature from the previous node, for example:
    =Hey! The temperature outside is {{$node["Weather Fetcher"].json["main"]["temp"]}}°C.

6. Message formatting and data handling

6.1 Enhanced message formatting

To produce more readable or informative SMS messages, you can use more complex expressions or add a Set node to build a formatted string.

Example including description and rounding the temperature:

=Hey! In Berlin it's {{$node["Weather Fetcher"].json["weather"][0]["description"]}} and around {{$Math.round($node["Weather Fetcher"].json["main"]["temp"])}}°C.

This expression:

  • Reads the weather description at weather[0].description.
  • Rounds the temperature to the nearest integer using $Math.round().

6.2 Kelvin to Celsius conversion (if units are not metric)

If you do not set Units = metric, OpenWeatherMap returns temperatures in Kelvin. You can convert to Celsius directly in the expression:

=Hey! The temperature is {{( $node["Weather Fetcher"].json["main"]["temp"] - 273.15 ).toFixed(1)}}°C.

Notes:

  • toFixed(1) formats the result to one decimal place.
  • Using metric in the OpenWeatherMap node is simpler and reduces the chance of conversion errors.

6.3 Using a Set node for complex messages

For more complex templates, consider inserting a Set node between the OpenWeatherMap and Plivo nodes:

  • Use the Set node to:
    • Create a new field such as smsText that holds the final message string.
    • Use expressions inside the Set node fields to assemble text from multiple JSON fields.
  • Then, in the Plivo node, reference {{$json["smsText"]}} as the message body.

7. Testing and validation

7.1 Manual execution

  1. Save the workflow.
  2. Click Execute Workflow in the n8n editor to run it on demand.
  3. Open the Weather Fetcher node execution data and inspect the JSON output.
  4. Confirm that the temperature is available at main.temp and that the value is in the expected unit (Celsius if using metric).

7.2 SMS test

  1. After validating the OpenWeatherMap output, execute the workflow again or manually execute the SMS Sender node (if supported by your n8n version).
  2. Check your phone to verify that the SMS is received and correctly formatted.
  3. Monitor your Plivo dashboard for:
    • Delivery status
    • Any reported errors
    • SMS costs for the test and future runs

8. Error handling and retries

8.1 General patterns

To make this automation more resilient, integrate n8n’s error handling features:

  • Use the workflow’s Settings → Run On Error behavior or dedicated error workflows to capture failures.
  • Add an IF node after the OpenWeatherMap node to:
    • Check for the presence of main.temp or expected status codes.
    • Route to an alternative path if data is missing or invalid.
  • Use the node-level Retry settings or a custom loop to retry transient network or API errors, respecting OpenWeatherMap and Plivo rate limits.
  • Send error notifications to Slack, email, or another monitoring endpoint so you can react quickly to repeated failures.

8.2 Typical failure scenarios

  • Invalid API key:
    • OpenWeatherMap or Plivo returns authentication errors. Verify credentials in n8n and in the respective provider dashboards.
  • City not found:
    • The OpenWeatherMap node returns an error or an unexpected structure. Validate the city name and add checks in an IF node.
  • SMS delivery issues:
    • Plivo may accept the message but fail to deliver due to carrier or destination-related problems. Monitor Plivo delivery reports for details.

9. Cost and rate-limit considerations

Both SMS and API calls can incur costs or hit rate limits, especially on free plans.

  • Minimize frequency:
    • Use a single daily SMS per recipient instead of frequent polling.
  • Cache data for multiple recipients:
    • If you plan to send similar messages to multiple numbers, consider fetching the weather once and reusing the result, rather than calling OpenWeatherMap repeatedly.
  • Monitor usage:

DevOps: GitHub Team Provisioning & Sync with n8n

DevOps: GitHub Team Provisioning & Sync with n8n

Automating GitHub team provisioning with n8n is a powerful way to standardize access, speed up onboarding, and reduce manual work for your DevOps team. In this guide, you will learn how to use an n8n workflow template to create GitHub teams, sync members, and send Microsoft Teams notifications, all from a single webhook call.

What you will learn

By the end of this tutorial-style article, you should be able to:

  • Explain why automating GitHub team creation and synchronization is valuable for DevOps.
  • Understand how each n8n node in the workflow contributes to team provisioning.
  • Trigger the workflow with a webhook that carries project and organization details.
  • Automatically create a GitHub team, add members, verify membership, and send a Teams notification.
  • Apply best practices for security, error handling, and idempotency in n8n workflows.
  • Extend the baseline workflow to match your organization’s needs.

Why automate GitHub team provisioning?

In many organizations, GitHub team management is still handled manually. Someone in DevOps or platform engineering creates a team, adds members, checks permissions, and then informs stakeholders. This approach has several problems:

  • Slow onboarding – new projects wait on manual steps before developers can push code.
  • Inconsistent access – different teams might use different naming conventions or membership rules.
  • Higher risk of errors – manual steps increase the chance of missing a user or granting the wrong access.
  • Unnecessary overhead – DevOps engineers spend time on repetitive, low-value tasks.

By automating GitHub team provisioning with n8n, you can:

  • Standardize how teams are created across all projects.
  • Improve security by enforcing consistent membership and permissions.
  • Accelerate developer onboarding for new repositories and services.
  • Integrate with other systems like Microsoft Teams, HR, or identity providers.

How the n8n workflow works at a high level

The sample n8n workflow is triggered by a single webhook and then runs through a series of automated steps. At a high level, it:

  1. Receives a project provisioning request through a webhook.
  2. Creates a new GitHub team in the specified organization.
  3. Retrieves organization members or a filtered list of users to add.
  4. Adds those members to the newly created GitHub team.
  5. Verifies that the team membership is correct.
  6. Sends a summary notification to a Microsoft Teams channel.
  7. Returns a structured JSON response to the original caller.

Next, we will walk through each part of the workflow in n8n, node by node, so you can understand exactly what is happening and how to adapt it to your environment.

Step-by-step: Building the GitHub team provisioning workflow in n8n

Step 1 – Accept provisioning requests with a Webhook node

The entry point to this automation is a Webhook node, often named something like receive-project-request. This node exposes an HTTP POST endpoint that other systems or scripts can call whenever a new project needs a GitHub team.

A typical JSON payload looks like this:

{  "organization": "acme-corp",  "projectName": "my-new-project",  "description": "Optional description",  "teamsChannelId": "19:general-channel-id"
}

Key fields:

  • organization – the GitHub organization where the team should be created.
  • projectName – the name of the new project, which will also be used as the GitHub team name.
  • description – an optional description for the team, useful for documentation and audits.
  • teamsChannelId – the Microsoft Teams channel ID that should receive the notification.

Production tip: validate the incoming payload to ensure required fields are present and correctly formatted before continuing. You can do this using an additional Function node or n8n’s built-in validation patterns.

Step 2 – Create a GitHub team

Once the webhook has received the request, the workflow moves to a GitHub node configured to create a team, often called create-github-team.

In this node, you typically configure:

  • Operation – Create Team.
  • Organization – pulled from the webhook payload.
  • Team name – usually the project name from the request.
  • Privacy – set to closed (the default) so membership is controlled.
  • Description – from the request description or an autogenerated string.

Example n8n expressions to map data from the webhook to the GitHub node:

organization: ={{ $json.body.organization }}
name: ={{ $json.body.projectName }}

You can also generate a description dynamically, for example:

description: ={{ $json.body.description || `Team for project ${$json.body.projectName}` }}

Step 3 – Get organization members

After the team is created, the workflow needs to know which users to add. This is handled by a node often named get-org-members.

Typical behavior for this step:

  • Use a GitHub node operation like List Members for the organization.
  • Optionally filter members by role (for example, only members, not outside collaborators).
  • In more advanced setups, derive the target member list from:
    • An identity provider (Okta, Azure AD, etc.).
    • An LDAP or directory sync.
    • A field in the original provisioning request (for example, a list of user handles).

For a basic implementation, using all organization members is a simple starting point. Later, you can refine this to match your access control policies.

Step 4 – Add members to the GitHub team

The next step is to add the selected users to the new team. This is handled by a node such as add-members-to-team, which iterates over the member list and invites each user to the team.

Important configuration points:

  • Role – usually:
    • member for regular team members.
    • maintainer for users who should manage team membership and settings.
  • Error handling – you do not want the entire workflow to fail if one user is already a member or cannot be added:
    • Use continueOnFail where appropriate.
    • Or wrap the operation in try/catch logic using a Function or Error Workflow pattern.

This step typically runs in a loop, where each item from get-org-members is processed and added to the team. n8n handles this item-by-item execution automatically when you connect the nodes in sequence.

Step 5 – Verify team membership

After adding members, it is useful to confirm that the team now reflects the expected state. A node like verify-team-members reads the team membership from GitHub to confirm the additions.

Common reasons to include this verification step:

  • Produce accurate counts for reporting and notifications.
  • Detect missing invites or failures that may require manual follow-up.
  • Support idempotent behavior, where re-running the workflow does not create duplicates but still returns correct information.

The output of this node typically includes the final member list and a count of how many users are on the team.

Step 6 – Notify a Microsoft Teams channel

Once the GitHub team is ready, the workflow sends a summary message to Microsoft Teams using a node such as notify-teams-channel.

The notification usually includes:

  • Team name and project name.
  • Organization name.
  • Number of members added to the team.
  • Direct URL to the GitHub team.

This gives project stakeholders immediate visibility that the team has been provisioned and is ready to use. The Teams node is configured with an OAuth2 connection that has permission to post messages to the specified channel ID from the webhook payload.

Step 7 – Respond to the webhook caller

Finally, the workflow returns a JSON response to the original caller using a Webhook Response or Respond to Webhook node, often called respond-to-webhook.

A typical response payload might look like this:

{  "success": true,  "teamName": "my-new-project",  "teamSlug": "my-new-project",  "membersCount": 12,  "teamUrl": "https://github.com/orgs/acme-corp/teams/my-new-project"
}

The caller can then use this data to continue their own automation, such as updating a project catalog, notifying another system, or attaching the team URL to a ticket.

Security and permissions for the workflow

Because this workflow creates teams and manages access, it must be designed with security in mind. Keep the following guidelines in place:

  • GitHub permissions
    Use a GitHub App or a fine-scoped personal access token that is limited to:
    • Managing teams and memberships only within the target organization.
    • Avoiding unnecessary repository or admin scopes.
  • Microsoft Teams permissions
    Configure an OAuth2 connection with only the scope required to:
    • Post messages to the target channel.
    • Avoid broader tenant-wide permissions where possible.
  • Webhook security
    Protect the webhook so that only authorized systems can trigger provisioning:
    • Use HMAC signatures, API keys, or mutual TLS.
    • Validate authentication before processing the request.
  • Secret management
    Store all tokens and API keys in n8n’s credential system:
    • Do not hard-code secrets in workflow JSON or expressions.
    • Restrict who can view or edit credentials in n8n.

Designing for reliability: error handling, idempotency, and rate limits

Idempotency

Idempotency means that running the same request more than once results in the same final state. For this workflow, that typically involves:

  • Checking if a team with the requested name already exists.
  • Returning the existing team details instead of creating a duplicate.
  • Treating “already a member” responses as success when adding users.

Error handling and retries

APIs occasionally fail due to transient issues. To make the workflow more robust:

  • Use n8n’s retry settings or implement exponential backoff for temporary errors.
  • Enable continueOnFail when adding members so one failure does not stop the entire run.
  • Capture error messages from GitHub and Teams for troubleshooting.

Handling GitHub rate limits

GitHub enforces rate limits on API calls. When processing large member lists:

  • Monitor the X-RateLimit-Remaining header in responses.
  • Batch operations or introduce small delays between requests.
  • Design the workflow so it can resume or be retried without creating inconsistent states.

Testing and validating the workflow

Before you enable this workflow for production use, run through a careful testing process.

  1. Use a sandbox GitHub organization
    Test the workflow in a non-critical organization so you can experiment without affecting real teams.
  2. Start with a small member list
    Limit the number of users initially to confirm that:
    • The team is created correctly.
    • Members are added as expected.
    • The Teams notification and webhook response look right.
  3. Simulate failure scenarios
    Intentionally trigger edge cases like:
    • A user who is already a team member.
    • API rate limits.
    • Invalid organization or project names.

    Confirm that retries, idempotency, and continueOnFail behave as intended.

  4. Enable logging and auditing
    Log key steps and responses:
    • Webhook inputs.
    • GitHub team creation responses.
    • Member addition results.
    • Teams notification outcomes.

    This helps with debugging and compliance.

Extending the workflow for real-world DevOps needs

The baseline workflow is a strong starting point, but most organizations will want to extend it. Here are common enhancements:

  • Assign repository permissions
    After creating the team, automatically grant it permissions on one or more repositories:
    • Read, triage, write, maintain, or admin.
  • Promote maintainers
    Identify a subset of members who should be team maintainers and set their role accordingly.
  • Integrate with HR or identity providers
    Instead of using all organization members:
    • Pull member lists from Okta, Azure AD, or another identity provider.
    • Map project or team attributes to specific groups in those systems.
  • Schedule periodic audits
    Create a separate n8n workflow that:
    • Runs on a schedule.
    • Compares GitHub team membership to an authoritative source.
    • Reconciles differences or raises alerts.
  • External logging and compliance
    Send audit logs to systems like:
    • Amazon S3.
    • Elasticsearch.
    • A database or data warehouse.

    This supports historical tracking and compliance reporting.

Best practices for automated GitHub team provisioning

  • Use minimal privileges
    Give automation tokens only the permissions they absolutely need.
  • Adopt clear naming conventions
    Use descriptive team names and slugs, for example:
    • proj-my-new-project-dev
    • proj-my-new-project-maintainers

    This makes audits and troubleshooting much easier.

  • Keep workflows idempotent and observable
    Ensure re-running a request does not create duplicate teams or inconsistent access, and that you can see what happened at each step.
  • Notify stakeholders on both success and failure
    Send actionable messages that include:
    • What was provisioned.
    • Who requested it.
    • What to do if something went wrong.

Troubleshooting common issues

If something does not work as expected, these checks can help you quickly identify the problem.

Automate HR Onboarding with n8n & Bitwarden

Automate HR Onboarding with n8n & Bitwarden

Onboarding a new employee is a highly repeatable workflow, which makes it an ideal candidate for automation. This reference guide describes a production-ready n8n workflow template that provisions Bitwarden access for new hires, organizes them into department-based groups, verifies membership, and sends a Slack notification to IT. The goal is to provide a clear, technical breakdown of how the workflow operates, how data flows between nodes, and how to configure it securely in a real environment.

1. Workflow overview

This n8n workflow is triggered by an HRIS webhook and orchestrates a sequence of Bitwarden and Slack operations. At a high level, the workflow:

  • Accepts a POST request from your HRIS or onboarding system.
  • Creates or prepares a Bitwarden group associated with the employee’s department.
  • Retrieves Bitwarden organization members and identifies the new hire’s account.
  • Assigns the new hire to the appropriate Bitwarden group.
  • Verifies that the assignment was successful by querying group members.
  • Sends a structured Slack notification to the IT channel.
  • Returns a JSON response back to the HRIS caller with the result.

Core automation tools involved:

  • n8n – orchestration and workflow engine.
  • Bitwarden – password manager and group management via API.
  • Slack – IT team notification channel.
  • HRIS – upstream system that triggers the onboarding via webhook.

2. Architecture and data flow

The workflow is designed as a linear, event-driven process initiated by an HTTP webhook. Below is the logical sequence of nodes and how data moves between them:

  1. receive-hris-webhook (Webhook)
    Receives the HRIS POST payload and exposes all employee fields as $json data to downstream nodes.
  2. create-department-group (Bitwarden: create group)
    Uses values from the incoming payload to create a Bitwarden group associated with the employee’s department.
  3. list-all-members (Bitwarden: getAll members)
    Queries the full list of Bitwarden organization members. This is used to locate the new hire’s Bitwarden member record, typically by email.
  4. assign-new-hire (Bitwarden: updateMembers)
    Adds the new hire’s Bitwarden member ID to the department group created earlier.
  5. verify-group-members (Bitwarden: getMembers)
    Fetches the group membership list and confirms that the new hire is now part of the group, and counts total members.
  6. notify-it-team (Slack: post message)
    Posts a formatted Slack message to the IT channel summarizing the onboarding and Bitwarden group status.
  7. respond-to-webhook (Webhook response or HTTP Response)
    Sends a JSON response back to the HRIS, including key identifiers and a status indicator.

Each node consumes the output of the previous node via n8n’s standard $json context and node references (for example, $node["create-department-group"].json["id"] for the group ID). This keeps the workflow deterministic and traceable.

3. Input contract: expected HRIS webhook payload

The workflow assumes that your HRIS or onboarding platform sends a JSON payload with basic employee metadata. At minimum, the following fields are expected and referenced by expressions in the template:

{  "employee_name": "Jane Doe",  "email": "jane.doe@example.com",  "employee_id": "E12345",  "department": "Engineering",  "start_date": "2025-11-01",  "manager_name": "John Manager",  "slack_channel_it": "#it-onboarding"
}

Important notes:

  • email is typically used to match the Bitwarden member record.
  • department is used as the Bitwarden group name.
  • employee_id is used as an external identifier for traceability.
  • slack_channel_it can be used to parameterize the Slack notification target channel.

If your HRIS uses different field names, you can adjust the expressions in the downstream nodes accordingly.

4. Node-by-node technical breakdown

4.1 Webhook entry point: receive-hris-webhook

Node type: Webhook
Purpose: Entry point that accepts the HRIS POST request.

Configuration guidelines:

  • HTTP Method: POST.
  • Path: A unique, non-guessable path segment (for example, /hris/onboarding plus a random suffix).
  • Protocol: HTTPS only. Terminate TLS at your n8n host or reverse proxy.

Security considerations:

  • Validate authenticity of the webhook using:
    • An HMAC signature header, if your HRIS supports it.
    • A shared secret header that must match a known value in n8n.
  • Enable IP allowlisting or firewall rules where possible to restrict which systems can call this endpoint.

The payload is accessible in subsequent nodes via $json, for example $json.employee_name or $json.department.

4.2 Bitwarden group creation: create-department-group

Node type: Bitwarden – Create Group
Purpose: Create a Bitwarden group that represents the employee’s department.

The workflow uses expressions to populate the Bitwarden group fields from the webhook payload:

name: ={{ $json.body.department }}
additionalFields.externalId: ={{ $json.body.employee_id }}

Depending on how your HRIS payload is structured in n8n, you may reference $json.department directly (for example, if the payload is not nested under body). Adjust the expression as needed.

Behavior and recommendations:

  • If a department already exists as a Bitwarden group, creating another group with the same name can result in duplicates.
  • To avoid duplicates, introduce a preliminary step that:
    • Looks up existing groups by name or external ID.
    • Reuses the existing group ID if found.

This template assumes straightforward group creation but can be extended to implement idempotent behavior.

4.3 Member enumeration: list-all-members

Node type: Bitwarden – Get All Members
Purpose: Retrieve all Bitwarden organization members to locate the new hire’s member record.

Typical usage pattern:

  • Call the Bitwarden API to return the full member list.
  • Filter the result set by email to find the corresponding member for the new hire.

Implementation detail:

  • Filtering can be done either:
    • Inside the Bitwarden node if supported by query parameters, or
    • With an additional n8n node (for example, an IF node or a Function node) that iterates over the returned list and matches member.email === $json.email.

If no member is found, you must decide how to handle this (see error handling).

4.4 Group assignment: assign-new-hire

Node type: Bitwarden – Update Members
Purpose: Add the new hire’s Bitwarden member ID to the department group.

The node uses references to previous outputs:

groupId: ={{ $node["create-department-group"].json["id"] }}
memberIds: ={{ $json["id"] }}

Where:

  • $node["create-department-group"].json["id"] is the Bitwarden group ID created earlier.
  • $json["id"] is the Bitwarden member ID obtained from the member enumeration step.

Operational notes:

  • This call updates group membership by adding the given member ID to the group.
  • If the member does not exist yet in Bitwarden, the operation will fail and should be handled by your error strategy.

Recommendation:

  • If the user is not yet a Bitwarden member, invoke Bitwarden’s invitation or member creation endpoint first, then retry the membership update.

4.5 Membership verification: verify-group-members

Node type: Bitwarden – Get Members (for a group)
Purpose: Confirm that the new hire has been successfully added to the department group and retrieve the current member list.

Key behaviors:

  • The node queries Bitwarden for all members associated with the specified group ID.
  • The response can be used to:
    • Verify that the new hire’s member ID or email is present.
    • Determine the current member count for the department.

The member count is typically used to enrich the Slack notification and the webhook response payload.

4.6 IT notification: notify-it-team

Node type: Slack – Post Message
Purpose: Notify IT that Bitwarden onboarding is complete and provide a quick summary.

The node posts a formatted message to a specified Slack channel. A sample message template used in the workflow is:

🎉 New Employee Onboarding Complete!

*Employee:* {{ employee_name }}
*Department:* {{ department }}
*Email:* {{ email }}
*Start Date:* {{ start_date }}

✅ Bitwarden group created and access provisioned
✅ Total members in {{ department }}: {{ members_count }}

*Hiring Manager:* {{ manager_name }}

Typical configuration aspects:

  • Channel: Use $json.slack_channel_it from the webhook payload or hard-code a channel such as #it-onboarding.
  • Text: Use n8n expressions to inject values from:
    • The HRIS payload (for example, employee_name, department, email).
    • The verification node (for example, members_count).

Ensure that the Slack credentials in n8n have permission to post to the selected channel.

4.7 Webhook response: respond-to-webhook

Node type: Webhook Response or HTTP Response
Purpose: Return a JSON payload to the HRIS caller with the final status and key identifiers.

Typical response content:

  • A high-level status (for example, success or error).
  • The Bitwarden group ID created or used.
  • The final member count in the group.
  • Any error message or diagnostic information if something failed.

Use this node if your HRIS expects synchronous feedback. If the HRIS operates asynchronously, you can still log the result or call a follow-up API endpoint.

5. Security and configuration best practices

When using n8n to manage Bitwarden onboarding, treat the workflow as a privileged automation component. Recommended practices include:

  • Secure credential storage
    • Store Bitwarden API tokens and Slack tokens in n8n’s credentials manager, not in node parameters or plain JSON.
    • Prefer short-lived or scoped API tokens if Bitwarden supports them, and rotate credentials regularly.
  • Webhook validation
    • Verify each incoming request using an HMAC signature or shared secret header.
    • Reject requests that fail signature verification or originate from unexpected sources.
  • Least privilege
    • Grant the Bitwarden API token only the scopes required for group and member management, not full administrative access.
  • Auditability
    • Enable audit logging in Bitwarden to track group creation and membership changes.
    • Use n8n’s execution logs to correlate HRIS events with Bitwarden operations.
  • Robust API handling
    • Implement retries and exponential backoff on Bitwarden calls where appropriate, especially for transient network errors.
    • Monitor for Bitwarden API rate limiting and adjust the onboarding throughput if needed.
  • Input validation
    • Sanitize all HRIS fields before using them in API calls or Slack messages.
    • Validate email format, department names, and IDs to prevent malformed requests and accidental injection.

6. Error handling and edge cases

The template targets the happy path, but real-world HR onboarding will encounter exceptions. Below are common failure scenarios and recommended handling strategies.

6.1 User not found in Bitwarden

Scenario: The HRIS sends a new hire’s email, but list-all-members does not return a matching Bitwarden member.

Recommended handling:

  • Branch the workflow:
    • If member exists, proceed to assign-new-hire.
    • If member does not exist, trigger a separate invitation or member-creation flow using Bitwarden’s API.
  • Notify IT via Slack that the user was invited or needs manual review.

6.2 Group already exists

Scenario: A department group is already present in Bitwarden and the workflow tries to create another group with the same name.

Recommended handling:

  • Insert a “get group by name” step before creation:
    • If a group is found, skip creation and reuse the existing group ID.
    • If not found, proceed with group creation.

6.3 Partial failures

Scenario: The group is successfully created, but the member assignment or verification fails.

Recommended handling:

  • Capture the error output from the failing node.
  • Send a Slack alert to IT with:
    • The employee details.
    • The group ID.
    • A clear description of the failure (for example, “member assignment failed”).
  • Optionally persist the error details in a log system or ticketing tool for follow-up.

6.4 Rate limiting and throughput

Scenario: Bulk onboarding or batch HRIS events cause Bitwarden API rate limits to be hit.

Recommended handling:

  • Monitor Bitwarden’s API responses for rate limit signals.
  • Implement throttling or queuing inside n8n, for example:
    • Use a Wait node or rate-limiting pattern.
    • Batch onboarding events to spread them over time.

7. Testing and validation workflow

Before using the template in production, validate each part of

Bitwarden Group Sync Workflow in n8n

Bitwarden Group Sync Workflow in n8n

Automating Bitwarden user and group management with n8n reduces manual operations, improves consistency, and lowers the risk of configuration errors. This reference guide documents a Bitwarden group synchronization workflow template built in n8n. The workflow is triggered by a webhook, creates or manages a Bitwarden group, synchronizes members, verifies the result, and sends a Slack notification.

The content below is structured as technical documentation for engineers who want to understand, adapt, and operate this workflow in production environments.


1. Workflow Overview

This n8n workflow implements a unidirectional group synchronization pattern for Bitwarden. It is designed to be invoked by an external system (for example HR, IAM, SCIM, or a custom script) via HTTP POST.

At a high level, the workflow:

  • Accepts a JSON payload via an n8n Webhook node.
  • Creates a Bitwarden group with the specified name.
  • Retrieves the set of members that should belong to this group.
  • Updates the Bitwarden group membership to match the desired set.
  • Reads back the group members to validate the update.
  • Posts a summary of the operation to a Slack channel.

The template uses Bitwarden as both the target system (for the group) and the source of members. In a real-world environment you can replace the member source with an HR system, directory service, or identity provider.


2. Architecture and Data Flow

2.1 Node Sequence

The workflow is composed of the following nodes, executed from left to right:

  1. IncomingWebhook (n8n Webhook trigger)
  2. CreateGroup (Bitwarden, resource: group, operation: create)
  3. ListGroupMembers (Bitwarden, resource: member, operation: getAll)
  4. UpdateGroupMembers (Bitwarden, resource: group, operation: updateMembers)
  5. GetGroupMembers (Bitwarden, resource: group, operation: getMembers)
  6. SlackNotification (Slack, operation: post:message)

2.2 Data Flow Summary

  • The Webhook node receives a JSON body that includes a group_name and optionally source_member_ids.
  • group_name is passed into the Bitwarden CreateGroup node via an expression.
  • The CreateGroup node returns a Bitwarden group object, including the group id.
  • ListGroupMembers retrieves candidate members. In the template this is a Bitwarden member listing; in custom setups it may be replaced by another data source.
  • The UpdateGroupMembers node receives:
    • groupId from CreateGroup.
    • An array of member IDs, derived from ListGroupMembers.
  • GetGroupMembers uses the same groupId to read back the final membership list.
  • SlackNotification formats a message containing the group ID and the resulting membership data and posts it to a configured Slack channel.

3. Prerequisites

  • An operational n8n instance with access to the internet or to your Bitwarden and Slack endpoints.
  • Configured Bitwarden credentials in n8n with sufficient scopes to:
    • Create and manage groups.
    • Read and update members.
  • Configured Slack credentials (Slack app or bot token) with permission to post messages to the target Slack channel.
  • A reliable source of Bitwarden member identifiers:
    • The template uses a Bitwarden node (member resource, getAll operation).
    • In production you may instead use LDAP, SCIM, an HR API, or another identity store.

4. Webhook Contract

4.1 Endpoint

The Webhook node is configured with a path similar to:

/webhook/bitwarden-group-sync

The workflow is triggered by an HTTP POST request to the full webhook URL generated by n8n, which typically includes the base URL, the path, and the Webhook’s unique ID when in production mode.

4.2 Expected Payload

The workflow expects a JSON payload of the following shape:

{  "group_name": "documentation",  "source_member_ids": ["member-id-1", "member-id-2"]
}
  • group_name (string) – The name of the Bitwarden group to create or manage. In the template, the default example is documentation.
  • source_member_ids (array of strings) – Optional example field representing member IDs provided directly by the caller. The template itself retrieves members via Bitwarden, but this field illustrates how external systems can pass their own IDs.

If you plan to rely solely on the Bitwarden member listing node, source_member_ids can be omitted. If you use an external identity source, you can adapt the workflow so that source_member_ids becomes the primary source of truth.


5. Node-by-Node Breakdown

5.1 IncomingWebhook

  • Type: Webhook
  • Method: POST
  • Path: /webhook/bitwarden-group-sync (or equivalent)

Purpose: This node is the entry point of the workflow. It receives the incoming JSON payload and exposes the data as $json for subsequent nodes.

Usage notes:

  • Use this endpoint as a generic integration point for HR systems, SCIM connectors, CI/CD pipelines, or event-driven scripts.
  • You can configure additional security on this node such as basic auth, header checks, or IP allowlisting at the infrastructure level.

5.2 CreateGroup (Bitwarden)

  • Node type: Bitwarden
  • Resource: group
  • Operation: create

Function: Creates a new Bitwarden group based on the name provided by the Webhook payload, or a default name configured in the node.

Key configuration:

  • Group name:
    • Static example: documentation.
    • Dynamic mapping using an expression:
      {{ $json["group_name"] }}

Output: The node returns a JSON object that includes the newly created group id. This ID is used downstream to update and verify group membership.

Edge case:

  • If a group with the same name already exists, the behavior depends on Bitwarden’s API semantics and your environment. The template assumes a new group is created. To avoid duplicates, you can insert a preceding step to list groups and check for existing ones before calling create.

5.3 ListGroupMembers (Bitwarden)

  • Node type: Bitwarden
  • Resource: member
  • Operation: getAll

Function: Retrieves a collection of Bitwarden member records. These are the candidate accounts that will be added to the group.

Template behavior:

  • The workflow template returns all members available via the Bitwarden API.
  • Each returned item typically includes a unique member identifier, which is required for group membership operations.

Production considerations:

  • For large organizations, retrieving all members on every run may be inefficient or unnecessary.
  • Filter members using:
    • Bitwarden query parameters (if available in your n8n Bitwarden node version).
    • Additional n8n nodes such as IF, Set, or Function to restrict the list to the desired subset.

5.4 UpdateGroupMembers (Bitwarden)

  • Node type: Bitwarden
  • Resource: group
  • Operation: updateMembers

Function: Updates the membership of the Bitwarden group created earlier. It receives the group ID and a list of member IDs and instructs Bitwarden to set the group’s members accordingly.

5.4.1 Data Mapping

The workflow uses n8n expressions to map inputs into this node:

  • Group ID:
    {{ $node["CreateGroup"].json["id"] }}

    This expression references the id field from the CreateGroup node output.

  • Member IDs:
    {{ $json["id"] }}

    In the template, this expression refers to the current item from the ListGroupMembers node. Depending on how the node is configured and how many items it returns, you may need to aggregate these IDs into an array.

Important: The Bitwarden API expects an array of member IDs for updateMembers. If your previous node returns one item per member, you must ensure that the UpdateGroupMembers node receives a single item with a field containing an array of IDs, not multiple items with single IDs.

5.4.2 Preparing the ID Array

If your upstream node returns objects like:

[  { "id": "member-id-1", ... },  { "id": "member-id-2", ... }
]

you can use a Set or Function node before UpdateGroupMembers to transform them into:

{  "memberIds": ["member-id-1", "member-id-2"]
}

Then map this array directly into the Bitwarden node parameter that expects the member IDs array.

5.4.3 Edge Cases and Validation

  • If the member list is empty, Bitwarden may interpret this as clearing all members from the group. Confirm this behavior in your environment before relying on it.
  • If any provided member ID is invalid or missing required permissions, the API will typically return an error. Use n8n error handling to catch and report such issues.

5.5 GetGroupMembers (Bitwarden)

  • Node type: Bitwarden
  • Resource: group
  • Operation: getMembers

Function: Reads back the current membership of the target Bitwarden group. This is used for verification, auditing, and to compose the Slack notification.

Configuration:

  • Group ID:
    {{ $node["CreateGroup"].json["id"] }}

Output: A list of members currently associated with the group, as seen by Bitwarden after the update operation.

5.6 SlackNotification

  • Node type: Slack
  • Operation: post:message

Function: Sends a message to a Slack channel (for example #general) summarizing the group synchronization result.

Template message (expression):

{{"Group members updated for group id: "  + $node["CreateGroup"].json["id"]  + " - Members: "  + JSON.stringify($node["GetGroupMembers"].json)}}

Recommendations:

  • Replace the raw JSON with a more human-readable format before sending to Slack, for example:
    • Include the group name as well as the group ID.
    • Provide a concise list of member emails or display names if available.
    • Add links to related tickets or dashboards if your process requires it.

6. Configuration Notes & Best Practices

6.1 Secure Credential Management

  • Store Bitwarden and Slack credentials in n8n’s built-in credentials manager.
  • Do not hard-code API keys or tokens in node parameters or expressions.
  • Use least-privilege credentials that only have the scopes required for:
    • Group creation and modification.
    • Member read and write operations.
    • Slack channel posting.
  • Rotate API keys and tokens periodically according to your security policy.

6.2 Input Validation

Before performing any API calls, validate the Webhook payload:

  • Ensure group_name is present and not empty.
  • If you rely on source_member_ids, verify that it is an array of strings.

Add an IF or Function node immediately after the Webhook to perform these checks and, if invalid, return an HTTP 400 response with a clear error message. This prevents malformed requests from creating inconsistent state in Bitwarden.

6.3 Handling Large or Frequent Updates

For large environments or frequent sync operations:

  • Be aware of Bitwarden API rate limits and quotas.
  • Use n8n features such as:
    • Split In Batches to chunk member updates.
    • Wait nodes to introduce delays between batches.

6.4 Idempotency and Existing Groups

To make the workflow safe to re-run:

  • Check if a group with the specified group_name already exists before calling CreateGroup:
    • Use a Bitwarden group listing operation (if available) followed by an IF node.
    • If the group exists, reuse its id instead of creating a new one.
  • This create-or-update pattern prevents duplicate groups and simplifies rollback or replays.

6.5 Logging and Error Handling

  • Enable n8n’s Error Workflow feature or add dedicated branches with IF nodes that check for failed responses from Bitwarden or Slack.
  • On failure:
    • Log the detailed error response (status code, message, payload

Automated Incident Routing & Escalation for On-Call

Automated Incident Routing & Escalation for On-Call Engineers

If you work in SRE or operations, you know the feeling: it is 3 a.m., something is on fire, and everyone is scrambling to figure out who should jump in first. What if that whole dance – routing, assigning, creating tickets, nudging people on Slack, and escalating when needed – just happened on its own?

That is exactly what this n8n workflow template is designed to do. It takes an incoming alert, figures out the best on-call engineer, opens a Jira ticket, sends a Slack notification, waits for an acknowledgement, and escalates automatically if no one responds in time. All while logging everything neatly for metrics and audits.

Let us walk through what this workflow does, when you would want to use it, and how it actually works under the hood.

What this n8n incident workflow does for you

At a high level, this n8n workflow gives you an automated incident routing and escalation pipeline that looks like this:

  • Receives alerts from your monitoring tools through a webhook
  • Normalizes the alert payload into a common schema
  • Pulls your on-call rota and engineer roster
  • Matches the incident to the best on-call engineer based on skills, timezone, and availability
  • Creates a Jira incident ticket
  • Notifies the assigned engineer in Slack and waits for an acknowledgement
  • Escalates to the next engineer or manager if there is no response in time
  • Logs key incident metrics to Google Sheets for reporting and audits

So instead of someone manually checking a rota, opening Jira, pinging Slack, and watching the clock, n8n quietly does all of that for you.

Why automate incident routing and escalation?

Manual triage might work when you have a tiny team or low alert volume, but it does not scale. It is also incredibly easy to make mistakes when you are tired or under pressure.

Automating your incident routing and escalation helps you:

  • Reduce MTTA and MTTR – faster acknowledgement and resolution times because the right person is contacted immediately.
  • Route to the right engineers – incidents go to people with the right skills who are actually on-call and available.
  • Keep escalation behavior consistent – no more guesswork or ad-hoc decisions, everything follows a clear policy.
  • Centralize your tooling – monitoring, ticketing, communication, and metrics all flow through one automated pipeline.

In short, you spend less time coordinating and more time fixing what is broken.

When should you use this n8n template?

This workflow is ideal if:

  • You already use tools like Datadog, Prometheus Alertmanager, or CloudWatch for monitoring
  • You track incidents in Jira
  • Your team communicates in Slack
  • You maintain some form of on-call rota and engineer roster

If that sounds like your setup, this template can act as a production-ready starting point for a fully automated incident lifecycle.

How the workflow works, step by step

1. Receiving alerts with a webhook

Everything begins with a simple webhook node in n8n. Your monitoring systems, such as Datadog, Prometheus Alertmanager, or AWS CloudWatch, send incident alerts to this webhook endpoint.

Since every monitoring tool loves its own format, the raw payloads can look quite different. That is where the next part comes in.

2. Normalizing the alert payload

The workflow runs a normalization function that turns those different payloads into a consistent schema. It pulls out fields like:

  • alert_id
  • severity
  • title
  • service
  • region
  • timestamp

By standardizing the data early, the rest of the workflow can use simple, reliable logic without worrying about which monitoring tool sent the alert. This step is critical if you want automation that does not break every time an integration changes a field name.

3. Pulling the on-call rota and engineer roster

Next, the workflow needs to figure out who is actually on the hook for this incident.

To do that, it combines two data sources:

  • On-call rota – fetched via an API that tells you who is currently on-call.
  • Engineer roster – stored in a Google Sheet (or internal source) with details like:
    • Skills and expertise
    • Timezones
    • Slack IDs and email addresses
    • On-call flags
    • Availability status

By combining the live rota with a verified roster, the workflow can make smarter, more accurate decisions about who should handle each alert.

4. Matching the incident to the best on-call engineer

This is where the fun logic happens. A small scoring algorithm ranks engineers based on how well they fit the incident. It typically considers:

  • Skill match score – counts overlaps between incident tags and engineer skills.
  • Timezone compatibility – prefers engineers in timezones that align with the incident region.
  • Availability and on-call flag – only looks at people who are actually on-call and available.
  • Escalation level – used as a tie-breaker, favoring lower escalation levels when scores are equal.

The workflow filters for engineers who are on-call and available, calculates their scores, sorts them, and picks the best match. If, for some reason, no good match is found, it falls back to a designated Escalation Manager so there is always coverage.

5. Creating a Jira incident ticket

Once an assignee has been chosen, the workflow automatically creates a Jira ticket. Details like project, issue type, and priority are derived from the alert severity and other normalized fields.

The ticket becomes the central place for tracking the incident, linking all the automated steps back to a single record.

6. Notifying the engineer in Slack

After Jira is set up, n8n sends a direct message via Slack to the assigned engineer. That message includes:

  • Key incident details
  • A link to the Jira ticket
  • A clear call to acknowledge the incident within a short time window, for example 5 minutes

This DM is your first-line notification, so the engineer gets everything they need in one place without hunting through multiple tools.

7. Waiting for acknowledgement and escalating if needed

The workflow then waits for an acknowledgement via a web callback. In practice, this might be triggered by a button in Slack or a link that the engineer clicks to confirm they are on it.

Two things can happen:

  • Acknowledged in time – the workflow logs the acknowledgement, marks the incident as accepted, and returns a success response.
  • No acknowledgement within the timeout – the escalation logic kicks in. The workflow:
    • Promotes the incident to the next engineer or escalation level
    • Notifies the new assignee via Slack
    • Optionally alerts a shared on-call Slack channel to mobilize more people

This way, you are never stuck wondering if someone saw the alert. The system either gets an acknowledgement or moves on to the next person automatically.

8. Logging incidents and metrics to Google Sheets

Every important step is logged to a Google Sheet for metrics and audits, including:

  • Jira ticket creation
  • Assigned engineer
  • Acknowledgement events
  • Escalations
  • Timestamps for each key step

This gives you a lightweight audit trail and a handy data source for dashboards, SLO tracking, and post-incident reviews.

Best practices for reliable automated routing

To get the most out of this n8n workflow, a bit of housekeeping and policy work goes a long way. Here are some practical tips:

  • Keep the roster fresh – regularly update skills, timezones, on-call flags, Slack IDs, and emails.
  • Standardize incident tags – consistent tagging from your monitoring tools makes the skill matching far more accurate.
  • Define clear escalation policies – write down your timeouts and escalation levels, then encode them in the workflow.
  • Test with simulated alerts – run non-production tests to make sure routing, notifications, and escalations behave as expected.
  • Monitor the automation itself – add alerts for n8n workflow failures, API errors, or invalid roster data.

Implementation checklist

Ready to roll this out in your own environment? Here is a simple checklist to follow:

  • Provision an n8n instance (self-hosted or n8n cloud)
  • Configure webhook endpoints and permissions for your monitoring tools
  • Connect Jira and Slack credentials in n8n
  • Create and maintain your engineer roster in Google Sheets or an internal API
  • Implement the alert normalization and matching logic as small JavaScript functions
  • Set up Google Sheets or a database to store incident metrics and logs
  • Run end-to-end tests, then document the escalation flow for your team

Security and operational considerations

Even the best automation needs to be secure and robust. When you deploy this workflow, keep in mind:

  • Store secrets in the n8n credentials manager instead of hardcoding them.
  • Protect webhook endpoints with IP allowlists, auth tokens, or both where possible.
  • Use least-privilege tokens for Slack and Jira, only granting the scopes the workflow actually needs.
  • Watch out for rate limits on external APIs, especially during incident storms or high alert volume.

Why this template makes your life easier

With this workflow in place, incident handling becomes predictable and repeatable. You get:

  • Lower MTTR and MTTA
  • Less manual coordination during stressful incidents
  • Clear, documented routing and escalation behavior
  • Metrics and audit trails built in from day one

Instead of chasing people and updating tools by hand, you let n8n take care of the plumbing while your team focuses on fixing the actual problem.

Wrapping up

Automating incident routing and escalation with n8n is a straightforward way to modernize your on-call process. This workflow template gives you a practical pattern you can adapt to your own stack:

  • Normalize incoming alerts
  • Match them to the best on-call engineer based on skills and timezone
  • Create a Jira ticket automatically
  • Notify the assignee in Slack and wait for acknowledgement
  • Escalate automatically when there is no response
  • Log everything to Google Sheets for metrics and audits

If you would like a copy of this n8n workflow or help tailoring it to your environment, you do not have to start from scratch.

Call to action

Ready to automate your incident response and take some pressure off your on-call engineers? Download the sample n8n workflow or reach out to our team for hands-on implementation and training. Start improving your MTTR with reliable automated routing and escalation today.

Request the workflow

Match Interviewers with Contacts in n8n

Match Interviewers With Contacts in n8n (Step-by-Step Tutorial)

Recruiting and HR teams often need to connect interview records from one system with people profiles stored in another. This tutorial walks you through an n8n workflow template that does exactly that.

You will learn:

  • Why matching interviewer IDs with contact records is important
  • How the sample n8n workflow is structured
  • Why a simple Merge node can fail when working with arrays
  • How to use a Function node to reliably match multiple interviewers per interview
  • How to troubleshoot and extend this pattern in your own automations

The goal is to give you a clear, instructional walkthrough so you can confidently adapt this pattern to your own n8n workflows.


1. Why match interviewers with contacts in n8n?

Most interview scheduling tools store interviews with only basic identifiers, such as an interviewer ID. At the same time, your people directory (like Airtable, an HRIS, or a CRM) holds the rich profile data you actually want to use:

  • Full name
  • Job title
  • Photo URL
  • Employee ID (eid)

By matching interview records to people records, you unlock powerful automation use cases:

  • Show interviewer photos and job titles in calendar invites
  • Send enriched email or Slack notifications with real names instead of IDs
  • Build reports that connect interview activity to employee metadata

In n8n, this requires joining two data sources: interviews and people. The template you are working with demonstrates one way to do this and then introduces a more robust alternative.


2. Understanding the sample n8n workflow

Before we improve the workflow, it helps to understand the basic structure of the example provided. The sample n8n workflow includes the following nodes:

  • Scheduled Trigger – Starts the workflow on a schedule.
  • Static Interviews (Function) – Provides a sample interview payload with an interviewers[] array.
  • Static People Data (Function) – Provides a sample people array, where each record has fields.eid as an identifier.
  • Normalize Interviews – Converts interviews.data into multiple n8n items, one item per interview.
  • Normalize People – Converts the people array into multiple n8n items, one item per person.
  • Merge By Interviewer ID – Tries to match interview items with people items by comparing interviewers[0].id to fields.eid.

This design can work under one strict condition: each interview must have exactly one interviewer, and that interviewer must always be at interviewers[0].

In real systems, interviews often involve several interviewers. Once you have multiple entries in interviewers[], the Merge node configuration becomes fragile.


3. Why the Merge node is brittle for array-based keys

The Merge node in n8n is useful when you can rely on simple, direct key comparisons. However, when keys are buried inside arrays, like interviewers[], several problems appear.

3.1 Limitation of fixed property paths

  • A path such as interviewers[0].id only ever looks at the first interviewer.
  • If an interview has multiple interviewers, only the first one is considered. Others are completely ignored.

This means that if the “correct” interviewer is at index 1 or 2, the Merge node will not find it.

3.2 Strict key matching rules

The Merge node in mergeByKey mode compares specific properties from the two input streams:

  • If a property path does not exist on an item, that item will not match.
  • If types differ (for example, number vs string) or there is extra whitespace, the comparison fails.
  • The Merge node does not iterate through arrays to find “any matching element” inside them.

So if your requirement is “match any interviewer in interviewers[] with a person whose fields.eid matches the ID”, the Merge node alone is not flexible enough.

To handle this pattern safely, you typically need a Function node that can:

  • Loop through all interviewers in an interview
  • Normalize identifiers (for example, convert to strings and trim)
  • Attach the full person record when a match is found

4. Recommended pattern: use a Function node for flexible matching

Instead of relying on a Merge node with fragile array indexing, you can:

  1. Normalize interviews and people into two clean data sets.
  2. Feed both into a single Function node.
  3. Inside the Function node, build a lookup table of people keyed by eid.
  4. Loop through each interview and every interviewer in interviewers[].
  5. Attach the matched person record to each interviewer entry.

This approach has several advantages:

  • Supports any number of interviewers per interview
  • Handles IDs as strings or numbers, with or without whitespace
  • Lets you enrich each interviewer with extra profile data, such as job title or photo URL
  • Avoids Merge node edge cases where some items silently fail to join

5. Step-by-step: building the Function node solution

In this section, you will see the Function node code and a breakdown of what it does. You can paste this directly into an n8n Function node that receives two inputs:

  • Input 1 – An object with data containing an array of interviews.
  • Input 2 – An array of people records with fields.eid.

5.1 Function node code

// Input: items[0] = { json: { data: [...] } } (interviews)
//  items[1] = { json: [...] } (people)

const interviews = items[0].json.data || [];
const people = items[1].json || [];

// Build lookup by eid (string normalized)
const peopleByEid = {};
for (const p of people) {  const eid = (p.fields && p.fields.eid != null) ? String(p.fields.eid).trim() : null;  if (eid) peopleByEid[eid] = p;
}

const output = [];
for (const interview of interviews) {  // deep clone interview to avoid mutation  const cloned = JSON.parse(JSON.stringify(interview));  // Ensure interviewers is an array and normalize each one  cloned.interviewers = (cloned.interviewers || []).map(iv => {  const id = (iv.id != null) ? String(iv.id).trim() : null;  const person = id ? (peopleByEid[id] || null) : null;  // attach matched person record under `person` key  return Object.assign({}, iv, { person });  });  output.push({ json: cloned });
}

return output;

5.2 What the Function node does, step by step

  1. Read the inputs
    interviews is taken from items[0].json.data and people from items[1].json. If either is missing, it falls back to an empty array.
  2. Create a people lookup table
    It loops over every person record and builds a dictionary called peopleByEid where the key is a normalized eid:
    • Converts fields.eid to a string
    • Trims whitespace
    • Stores the full person object using that normalized key
  3. Clone each interview
    For each interview, it creates a deep clone using JSON.parse(JSON.stringify(...)). This prevents accidental mutation of the original input data.
  4. Loop through all interviewers
    It ensures cloned.interviewers is an array, then uses .map() to process each interviewer:
    • Normalizes iv.id to a trimmed string.
    • Looks up the corresponding person record in peopleByEid.
    • Returns a new interviewer object that includes a person property.
  5. Attach person data or null
    If a match is found, person contains the full person record. If not, person is set to null. This makes it easy for downstream nodes to detect missing matches.
  6. Return one item per interview
    Each enriched interview is pushed into output as an n8n item: { json: cloned }. At the end, the Function returns the output array.

5.3 Summary of the Function node behavior

  • Builds a dictionary of people keyed by normalized fields.eid.
  • Walks through each interview and every interviewer inside it.
  • Attaches a person property to each interviewer, containing the matched person record or null.
  • Outputs one item per interview with fully enriched interviewer data.

6. Example of the enriched output

After the Function node runs, a single interview item in n8n will look similar to this:

{  "pointer": "12345",  "panel": "234234",  "subject": "Blah Blah",  "interviewers": [  {  "id": "111222333",  "name": "Bobby Johnson",  "email": "bobbyj@example.com",  "person": {  "name": "test",  "fields": {  "FirstName": "Bobby",  "LastName": "Johnson",  "JobTitleDescription": "Recruiter",  "Photo": [{ "url": "http://urlto.com/BobbyPhoto.jpg" }],  "eid": "111222333"  }  }  }  ]
}

This structure is ideal for downstream automation. You can now safely reference:

  • interviewers[0].person.fields.FirstName
  • interviewers[0].person.fields.JobTitleDescription
  • interviewers[0].person.fields.Photo[0].url

For example, you can use these values in calendar invites, notification messages, or reporting workflows.


7. Best practices when matching interviewers and people

7.1 Normalize identifiers consistently

IDs often come in different shapes:

  • Numbers in one system and strings in another
  • Values with leading or trailing spaces

To avoid subtle mismatches, always:

  • Convert IDs to strings, for example String(value)
  • Trim whitespace with .trim()
  • Apply the same normalization logic to both sides of the comparison

7.2 Handle missing matches explicitly

Not every interviewer ID will have a corresponding person record. Instead of failing silently, design your workflow so you can detect and handle these cases:

  • Keep person as null when no match is found.
  • Downstream, check for person === null and implement fallbacks, such as:
    • Sending an alert to an operations channel
    • Falling back to the raw ID without enrichment
    • Triggering a secondary lookup in another system

7.3 Supporting multiple interviewer arrays

The Function node approach works naturally with any number of interviewers in interviewers[]. If you want to continue using the Merge node instead, you must first reshape your data so each item exposes a single interviewer ID at a direct property path.

That usually means:

  1. Splitting each interview into multiple items, one per interviewer, using a Function node or a SplitInBatches pattern.
  2. Writing the interviewer ID to a simple property like interviewerId on each item.
  3. Using the Merge node in mergeByKey mode with:
    • propertyName1 = interviewerId
    • propertyName2 = fields.eid

This works, but is more complex than using a single Function node that handles everything in one place.

7.4 Enrich calendar invites and notifications

Once you have enriched interview data, you can plug it into many other n8n nodes, for example:

  • Google Calendar: Create events that include interviewer display names and photos (via HTML in the event description).
  • Slack or Microsoft Teams: Send notifications that list interviewer names, roles, and profile images.
  • Source system updates: Write matched person IDs or enrichment status back to your interview source for better auditability.

7.5 Performance and scaling considerations

On small datasets, you can safely load all people records in each workflow run. For larger directories, consider:

  • Fetching only the subset of people whose IDs you need for the current batch of interviews.
  • Caching the people lookup in an external cache or database and reusing it across runs.
  • Monitoring execution time and memory usage as your data grows.

8. Troubleshooting checklist for n8n merges and lookups

If your workflow is not matching interviewers and people as expected, walk through this checklist:

  • Check normalization outputs: Confirm that your “Normalize Interviews” and “Normalize People” nodes truly output one interview or person per item.
  • Inspect intermediate data: Use a Debug node or an HTTP Request node that echoes data to log intermediate payloads. Verify that the properties you expect actually exist.
  • Verify property paths: In Merge nodes, make sure propertyName1 and propertyName2 are correct. Use the Expression editor to test each path on a sample item.
  • Check types and whitespace: If Merge returns no items, inspect the raw values. Convert both sides to strings and trim whitespace to ensure they really match.
  • Confirm array handling: If IDs are inside arrays, verify whether you are using a fixed index like [0] or looping through all elements in a Function node.

9. When it still makes sense to use the Merge node

The Function node approach is more flexible, but the Merge node is still useful in some scenarios. You can rely on Merge when:

  • Your input shape is fixed and simple.
  • Each interview has exactly one interviewer.
  • Or you have already split interviews into single-interviewer items with a direct property like interviewerId.

In that case, the Merge node in mergeByKey mode is convenient and requires no custom JavaScript. Just be sure to set:

    <