Efficient Webpage Content Fetching & Processing Workflow

Efficient Webpage Content Fetching & Processing Workflow

Overview and Use Case

Reliable webpage content extraction is fundamental for web scraping, data enrichment, content analysis, and AI-driven automation. This n8n workflow template provides a robust pattern for fetching HTML pages, validating inputs, handling errors in a controlled way, and returning either full or simplified content in a clean Markdown format.

The workflow is designed for automation professionals who need to convert natural language requests into structured HTTP calls, process the resulting HTML, and keep resource usage predictable by enforcing content length limits.

High-Level Architecture

At a high level, the workflow performs four main functions:

  • Interpret natural language instructions and translate them into query parameters.
  • Fetch webpage content via an HTTP request, with controlled configuration.
  • Validate responses, manage errors, and constrain output size.
  • Post-process HTML into a structured, optionally simplified Markdown representation.

These capabilities are implemented using a combination of the ReAct AI Agent, OpenAI Chat Model, HTTP Request node, and a series of transformation and validation steps in n8n.

Core Workflow Components

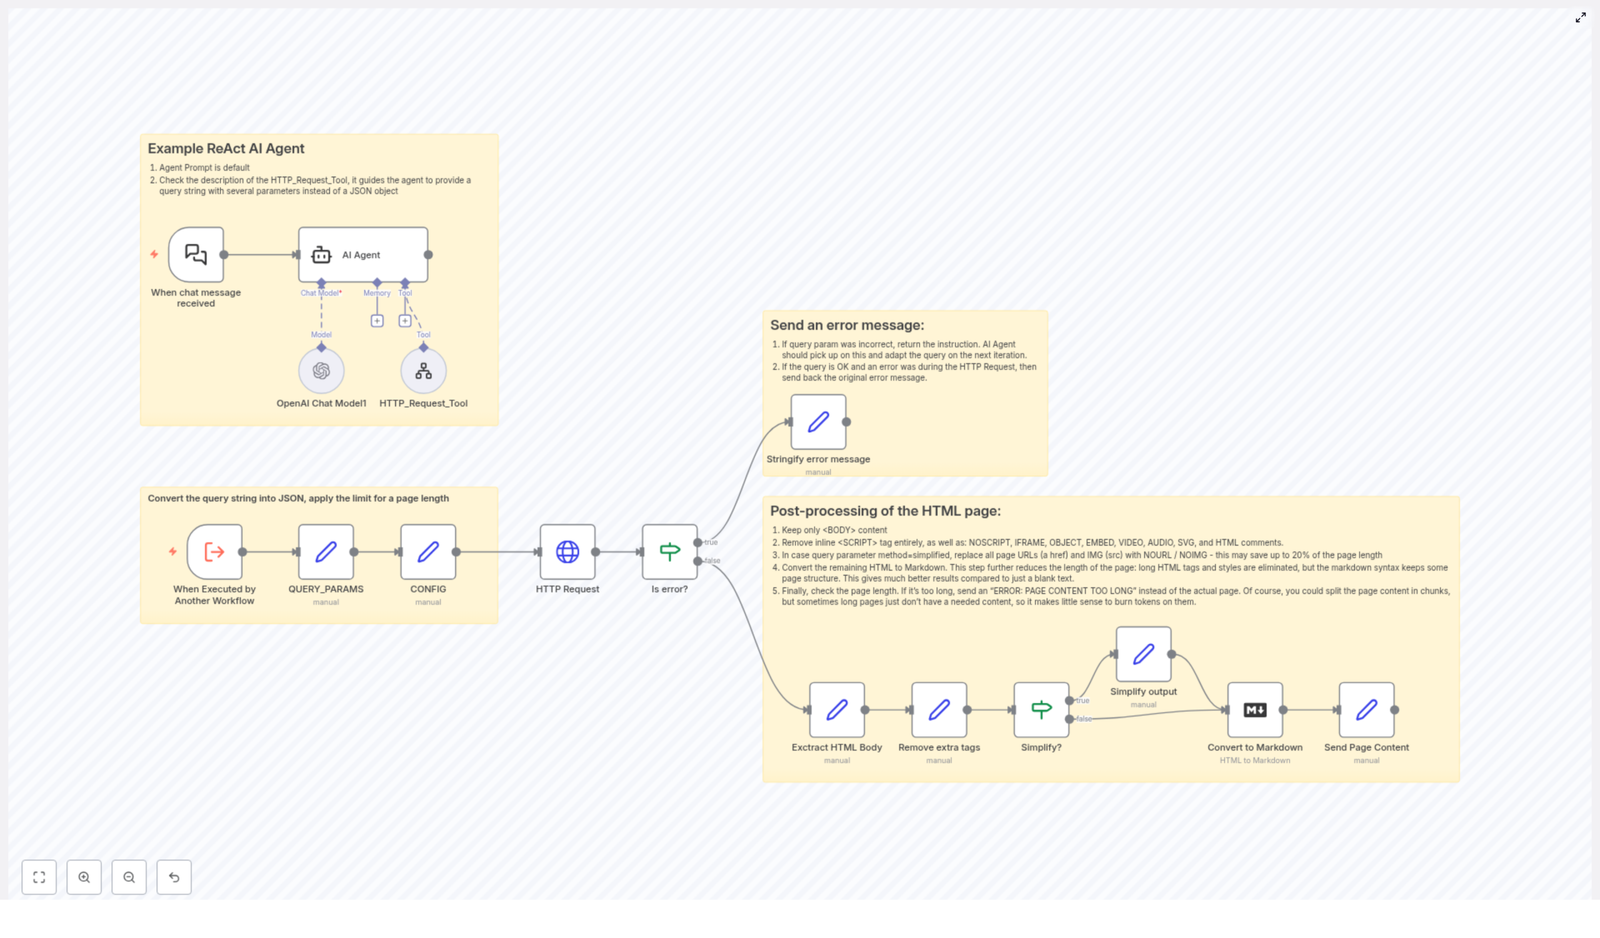
ReAct AI Agent as the Orchestration Layer

The ReAct AI Agent is the central orchestrator of this workflow. It receives natural language input and determines how to act on it by coordinating multiple tools:

  • OpenAI Chat Model is used for language understanding, interpretation of user intent, and generation of structured instructions.
  • HTTP_Request_Tool is invoked by the agent to perform the actual retrieval of live webpage content based on the interpreted query parameters.

This ReAct pattern allows the workflow to bridge free-form user queries with deterministic automation steps, which is especially valuable when building intelligent scraping or content processing pipelines.

Query Parsing and Configuration Management

Once the workflow is triggered, it converts the incoming query string into a structured JSON representation to make downstream processing predictable and reusable.

  • QUERY_PARAMS: The raw query string is parsed into a JSON object. Each query parameter becomes a key-value pair, which can then be referenced by subsequent nodes.
  • CONFIG: A configuration object sets operational constraints, most notably a maximum page length. By default, this is configured to 70000 characters, which acts as a hard limit for the amount of content returned.

This approach ensures that the workflow can be adapted or parameterized without changing the core logic. Adjusting the maximum length or adding new query parameters becomes a configuration task instead of a redesign.

Fetching Webpage Content

HTTP Request Node Behavior

The HTTP Request node is responsible for performing the actual page fetch. It takes the URL derived from the parsed query parameters and encodes it safely before sending the request.

Key characteristics:

  • The URL is encoded to avoid issues with special characters in query strings.
  • The node is configured to handle unauthorized certificates safely, which is useful when dealing with a variety of websites and SSL configurations.
  • The raw HTML response is passed along for subsequent checks and transformations.

Error Detection and Reporting

To ensure that downstream processing only runs on valid responses, the workflow introduces a structured error handling layer.

  • Is error? node checks whether the HTTP request resulted in an error, for example due to network issues or invalid URLs.
  • If an error is detected, a dedicated step called Stringify error message converts the error details into a clear, human-readable message that is returned to the caller.
  • If no error is found, the workflow proceeds to HTML extraction and transformation.

This pattern improves observability and makes it easier to integrate the workflow into larger systems, since failures are explicit and formatted rather than ambiguous or silent.

HTML Content Processing Pipeline

After a successful HTTP response, the workflow applies a series of transformations to clean, simplify, and reformat the HTML into a more useful representation.

Step 1: Extract the HTML Body

The first post-processing step isolates the content inside the <body> tag. This focuses processing on the main page content and excludes headers, metadata, and other non-essential elements that typically live outside the body.

Step 2: Remove Non-Essential Tags

The workflow then strips out elements that are not relevant to content analysis or that can interfere with downstream processing:

  • <script> tags
  • <noscript> tags
  • <iframe> tags
  • Other inline or embedded elements that add noise or potential security concerns

By removing these tags, the workflow reduces clutter, minimizes the chance of executing or parsing unnecessary code, and prepares a cleaner HTML structure for further transformation.

Step 3: Optional Simplification of Links and Images

Depending on the query method and configuration, the workflow can simplify the page content by replacing certain elements with placeholders. This is particularly useful when the consumer is only interested in textual content or when output size needs to be minimized.

  • Links are replaced with the placeholder NOURL.
  • Images are replaced with the placeholder NOIMG.

This optional simplification step provides a flexible mechanism to offer both full and reduced versions of the content without maintaining separate workflows.

Step 4: Convert HTML to Markdown

Once the HTML has been cleaned and optionally simplified, it is converted into Markdown. Markdown offers a leaner, more structured representation that retains headings, lists, and basic formatting while remaining easy to parse, store, or feed into language models.

This conversion significantly improves compatibility with downstream tools and analytical workflows that prefer text-based formats over raw HTML.

Step 5: Enforce Maximum Length and Return Content

The final step checks the length of the generated Markdown content against the configured maximum page length defined in CONFIG (default 70000 characters).

  • If the content length is within the limit, the Markdown is returned as the final output.
  • If it exceeds the limit, the workflow returns a clear status message instead: ERROR: PAGE CONTENT TOO LONG.

This safeguard prevents excessive payloads, protects downstream systems from overload, and enforces predictable resource usage across multiple executions.

Key Benefits and Automation Best Practices

  • Controlled resource consumption: The explicit page length check ensures that large or unexpectedly complex pages do not overwhelm the system or downstream consumers.
  • Flexible output modes: Support for both full and simplified content (via NOURL and NOIMG placeholders) allows the same workflow to serve different use cases, from detailed analysis to lightweight preview.
  • Robust error handling: Centralized error detection and stringified error messages make it easy to integrate this workflow into larger automation pipelines and monitoring setups.
  • Clean, safe content: Systematic removal of scripts, iframes, and other non-essential elements improves security and reduces noise, which is critical for AI and analytics workloads.
  • Config-driven behavior: Using configuration nodes like QUERY_PARAMS and CONFIG promotes maintainability and makes it simple to adjust limits or parameters without refactoring the workflow.

Practical Applications

This n8n template is particularly suited for:

  • Web scraping pipelines that need pre-cleaned content for downstream parsing or NLP.
  • AI agents that must fetch and summarize web pages while staying within token or size limits.
  • Content monitoring systems that periodically fetch and process pages for changes or compliance checks.
  • Knowledge extraction workflows that convert web content into Markdown for storage in knowledge bases or vector databases.

Getting Started

To leverage this workflow in your own environment:

  1. Import the template into your n8n instance.
  2. Review and adjust CONFIG, especially the maximum page length, to align with your system limits and use case.
  3. Customize the query handling in QUERY_PARAMS if you need additional parameters or different URL-building logic.
  4. Integrate the ReAct AI Agent with your preferred OpenAI Chat Model configuration and credentials.
  5. Connect the workflow to upstream triggers or downstream systems such as databases, queues, or other automation services.

Conclusion

This workflow template provides a structured, production-ready pattern for transforming natural language instructions into reliable web content extraction. By combining the ReAct AI Agent, HTTP Request handling, thorough HTML clean-up, and Markdown conversion, it delivers a controlled, transparent, and scalable solution for automation professionals who work extensively with web data.

Adopting this pattern can significantly improve the efficiency, reliability, and maintainability of your web scraping and content processing automations.

AI Agent with PostgreSQL for Hardware Store Chatbot

AI Agent with PostgreSQL for Hardware Store Chatbot

Imagine having your best hardware expert online 24/7

Picture this: a customer lands on your website late in the evening, wondering which drywall system they should use, how many panels they need, and what screws go with them. Instead of waiting for store hours, they just ask a chatbot, get accurate product suggestions, and even a quote – all in one conversation.

That is exactly what this n8n workflow template is built to do. It connects an AI agent powered by Google Gemini with your PostgreSQL hardware product database using the MCP Client. The result is a conversational AI that behaves like a knowledgeable hardware store assistant, answering real-time product questions and guiding customers through their projects.

What this n8n template actually does

At its core, this workflow turns your product database into a smart, interactive assistant. Instead of customers browsing endless product lists, they can just talk to the chatbot in natural language and get:

  • Instant product details like price, availability, and dimensions
  • Help choosing the right materials for specific projects
  • Recommendations for complementary products
  • Itemized quotations with quantities and totals

All of this is driven by a combination of Google Gemini for language understanding and generation, and PostgreSQL for accurate, up-to-date product data.

When should you use this workflow?

This template is a great fit if you:

  • Run a hardware store or sell construction materials
  • Have your product catalog stored in a PostgreSQL database
  • Want to offer smarter, more interactive support on your website or chat channels
  • Need customers to quickly find the right products without calling or visiting in person

If your customers often ask things like “What screws do I need for this panel?” or “Can you help me calculate materials for a ceiling?”, this workflow can take a huge load off your staff and improve the customer experience at the same time.

How the n8n workflow is structured

Let us walk through how everything connects behind the scenes. The automation is built around a few key pieces that work together inside n8n.

1. Chat Trigger – where the conversation starts

The workflow begins with a Chat Trigger. This is the entry point that receives customer questions from your chat interface. Whether someone asks about a specific product, a category, or a project, this trigger passes the message into the rest of the workflow.

2. AI Agent with Google Gemini – the brain of the assistant

Once the query is received, it is handed over to the AI Agent, which uses the Google Gemini Language Model. This is what allows the assistant to:

  • Understand natural language questions
  • Decide what information it needs from the database
  • Generate clear, conversational responses

The AI Agent is not working alone though. It is tightly integrated with your database through a special client.

3. DB Tools Client and Database Tools Trigger – the bridge to PostgreSQL

The DB Tools Client is what connects the AI Agent to your shared PostgreSQL database of hardware products. When the AI realizes it needs product data, it uses this client to send queries to the database.

Those queries are routed through a Database Tools Trigger, which then directs them to different PostgreSQL nodes. Each node is specialized for a specific type of search, so the AI can look up products in a very flexible way.

How product search works inside the workflow

Instead of a single generic search, the template includes several PostgreSQL nodes, each tailored to a different kind of query. This gives the AI a lot of control over how it retrieves data.

  • Query Product by ID – Perfect when the customer or system already knows the unique product identifier.
  • Query Product by Name – Looks up products by their commercial name, such as a specific panel or screw type.
  • Query Product by Description – Searches based on descriptive text, ideal when the user is not sure of the exact product name.
  • Query Product by Category – Filters products by top-level categories like Paneles or Tornillería.
  • Query Product by Subcategory – Allows more precise searches, for example Tablaroca or Canales.
  • Query Product by Note – Searches using technical notes or additional information stored with the product.

Because the AI Agent can choose between these options, it can handle a wide range of customer questions and still return accurate, relevant results.

Key features that make this template so useful

Real-time product information

Your customers can ask things like:

  • “Do you have this panel in stock and what size is it?”
  • “How much does this screw cost per box?”
  • “What are the dimensions and weight of this product?”

The chatbot uses live data from your PostgreSQL database, so responses include up-to-date details like availability, price, dimensions, and even complementary products that go well together.

Smart project guidance and recommendations

This is where the AI really shines. It does not just list products, it can also:

  • Advise on drywall systems, ceilings, and finishing materials
  • Help calculate approximate quantities for a project
  • Suggest appropriate products for specific use cases

So a customer might say, “I am building a drywall partition for a 4×3 meter wall, what do I need?” and the AI can walk them through the materials they should consider.

Automatic quotation generation

Once the customer has decided what they want, the AI Agent can pull everything together into a clear quote. It can generate:

  • Itemized lists of products
  • Quantities for each item
  • Prices and totals

This makes it much easier for customers to move from “just browsing” to “ready to buy”, without needing manual intervention from your team.

Flexible multi-criterion searching

Because the workflow supports searching by ID, name, category, subcategory, description, and notes, customers can phrase their questions naturally. Whether they know the exact product code or just have a vague description, the AI can still find what they are looking for.

Technical setup: what you need to configure

To get this template working smoothly in your own environment, there are a few technical pieces you will need to set up in n8n.

PostgreSQL credentials

Every PostgreSQL node in the workflow needs valid connection details. You will want to configure:

  • Host, port, and database name
  • User and password
  • Any required SSL or network settings

Make sure these credentials are consistent across all nodes that access your shared hardware product database.

Google Gemini API key

The Google Gemini Language Model powers the AI Agent’s understanding and responses. To use it, you will need a valid Google Gemini API key configured in n8n. This key allows the workflow to send user messages to the model and receive natural language replies.

MCP Client Tool configuration

The MCP Client Tool is what makes real-time communication between the AI Agent and PostgreSQL possible. It works together with the Database Tools Trigger to:

  • Receive data requests from the AI Agent
  • Route them to the correct PostgreSQL query node
  • Return the results back to the AI so it can respond to the user

Once this is set up, your AI assistant can dynamically query your product data during a conversation, instead of relying on static or outdated information.

What the customer experience feels like

From the customer’s point of view, they are not interacting with a complicated system. They are simply chatting with what feels like an expert hardware store assistant.

The AI can:

  • Understand natural, everyday language
  • Answer technical questions with clear explanations
  • Provide technical specifications and availability
  • Suggest ways to improve or complete their project

The tone remains professional but helpful, so customers feel supported rather than overwhelmed. It is like having your most knowledgeable salesperson available in every chat window, all the time.

Why this template makes your life easier

Instead of building a full AI and database integration from scratch, this n8n workflow gives you a ready-made structure that you can adapt to your store. You save time on development, reduce repetitive customer support tasks, and help customers move faster from idea to purchase.

It is especially powerful if you are already using PostgreSQL to manage your catalog, since the template is designed to plug right into that setup with some configuration.

Ready to try it in your own hardware store?

If you manage a hardware store or work with construction materials, this AI agent can become a key part of your digital customer service. You will be able to provide:

  • Precise and instant product information
  • Personalized recommendations for each project
  • Automatic, clear quotations that customers can act on

All through a conversational AI that runs on top of n8n, Google Gemini, and your PostgreSQL database.

Want to explore how this could fit into your infrastructure or existing tools? Reach out and start modernizing your customer experience with an AI assistant tailored to hardware and construction products.

Effortless WordPress to Pipedrive Integration Guide

Effortless WordPress to Pipedrive Integration Guide

Overview: From Website Inquiry to Qualified Lead in Pipedrive

Connecting WordPress contact forms directly to Pipedrive with n8n transforms how inbound leads are captured, qualified, and handed off to sales. Instead of manually copying form submissions into your CRM, this automated workflow ensures every inquiry is consistently logged, enriched, and followed up on.

This guide explains how to implement a production-ready automation using Contact Form 7, a webhook extension, n8n, and the Pipedrive API. It covers configuration of all components, the core workflow logic, and recommended customization options for advanced users and automation professionals.

Architecture of the Automation

The integration follows a straightforward, scalable pattern:

  1. Contact Form 7 on WordPress collects lead data.
  2. A CF7 webhook sends the submission payload to an n8n Webhook node.
  3. n8n uses the Pipedrive API to:
    • Identify or create the person record.
    • Create a new lead linked to that person.
    • Attach a note with context from the website form.
    • Create a follow-up activity for the sales team.

The result is a fully automated pipeline from website form to actionable lead in Pipedrive, with all key interactions tracked.

Preparing WordPress and Contact Form 7

1. Install and Configure Contact Form 7

Begin by setting up the data capture layer on your WordPress site.

  • Install Contact Form 7:

    From the WordPress admin dashboard, navigate to Plugins > Add New, search for Contact Form 7, install, and activate it. This plugin provides a flexible way to create and manage forms without custom PHP.

  • Create or edit your form:

    Design a form that collects the minimum viable data for lead creation. The following example includes fields for name, email, and company:

    <label> Name [text* your-name autocomplete:name] </label>
    <label> E-Mail-Adresse [email* your-email autocomplete:email] </label>
    <label> Unternehmen [text* company] </label>
    [submit "Senden"]

    You can extend this with additional fields as required, but ensure that the field names are consistent with what you expect to process in n8n.

2. Enable Webhook Support for CF7

  • Install the CF7 Webhook extension:

    Add a plugin that introduces webhook functionality to Contact Form 7. This allows each form submission to be sent as an HTTP request to an external URL, which in this case will be your n8n Webhook node.

  • Configure the webhook URL:

    Once the extension is active, open your Contact Form 7 form settings. In the webhook configuration section, you will later paste the n8n webhook URL generated by your workflow. For now, note where this setting is located, as you will return to it after the n8n Webhook node is created.

Connecting n8n and Pipedrive

3. Retrieve the Pipedrive API Key

To allow n8n to communicate with Pipedrive, you must authenticate using a personal API key.

  • Log into your Pipedrive account.
  • Open your personal settings from the profile icon in the top navigation.
  • Locate the API or API Key section.
  • Copy your personal API key and store it securely for use in n8n credentials.

4. Configure Pipedrive Credentials in n8n

With the API key available, define a reusable credential in n8n.

  • In n8n, open the Credentials section or create credentials directly from within a Pipedrive node.
  • Select Pipedrive API as the credential type.
  • Paste the API key into the appropriate field.
  • Assign a clear, descriptive name to the credential, for example Pipedrive – Production, and save it.

This credential will be referenced by all Pipedrive nodes in the workflow, which simplifies maintenance and rotation of keys.

Building the n8n Workflow

5. Define the Webhook Trigger

The Webhook node is the entry point for the automation.

  • Create a new workflow in n8n.
  • Add a Webhook node and configure:
    • HTTP Method: Typically POST.
    • Path: A descriptive endpoint path, such as /wordpress-contact.
  • Save and activate the workflow temporarily to generate the webhook URL.
  • Copy the URL and return to your Contact Form 7 webhook settings.
  • Paste the n8n webhook URL into the CF7 webhook configuration and save the form.
  • Submit a test form on your website and verify in n8n that the Webhook node receives the payload with all expected fields.

6. Implement the Pipedrive Logic

Once the webhook is receiving data, you can design the CRM logic that follows best practices for lead management.

6.1 Search for an Existing Person in Pipedrive

  • Add a Pipedrive node configured for the Person resource and the Search operation.
  • Use the email address from the Webhook node as the search parameter, for example with an expression referencing the your-email field.
  • Connect the Webhook node to this Pipedrive node.

The purpose of this step is to avoid creating duplicate person records and to maintain clean CRM data.

6.2 Apply Decision Logic: Existing vs New Person

  • Insert an IF or Switch node after the search.
  • Configure a condition that checks whether the search result contains at least one person. This can be based on the length of the returned items or the presence of an ID.
  • Branch the workflow:
    • If person exists: Use the existing Pipedrive person ID from the search results.
    • If person does not exist: Create a new person in Pipedrive.

6.3 Create a New Person When Needed

On the branch where no existing person is found:

  • Add another Pipedrive node configured to:
    • Resource: Person
    • Operation: Create
  • Map the fields from the Webhook payload, such as:
    • Name from your-name
    • Email from your-email
    • Company from company (optionally mapped to organization or a custom field, depending on your Pipedrive setup)

Both branches (existing person and newly created person) should converge to a state where you have a reliable person ID to use in downstream nodes.

6.4 Create a Lead Linked to the Person

  • Insert a Pipedrive node configured for:
    • Resource: Lead
    • Operation: Create
  • Reference the person ID from the previous step, either from the search result or the create-person node.
  • Set a clear lead title, for example with an expression such as:
    Website inquiry from {{ $json["your-name"] }}

This ensures that each website submission becomes a distinct lead object that can be tracked through your pipeline.

6.5 Attach a Note with Contextual Information

  • Add another Pipedrive node configured to:
    • Resource: Note
    • Operation: Create
  • Link the note to the appropriate entities:
    • Associate with the lead ID created in the previous step.
    • Optionally, also associate with the person ID for richer history.
  • Compose the note content using form data, for example:
    • Submission source (e.g. “Website contact form”).
    • Submitted fields such as company, email, and any message field if present.

This note provides sales with immediate context about the request without needing to reference the original email notification or website backend.

6.6 Create a Follow-up Activity for Sales

  • Add a final Pipedrive node configured for:
    • Resource: Activity
    • Operation: Create
  • Link the activity to the person and lead where appropriate.
  • Define the activity subject and type, for example:
    • Subject: Follow up with website lead {{ $json["your-name"] }}
    • Type: Call, meeting, or follow-up depending on your internal process.
  • Optionally set a due date or relative time frame (for example, within 1 business day) to ensure timely follow-up.

With this final step, the workflow not only logs the lead but also enforces a follow-up action, which is critical for consistent sales execution.

Customizing and Optimizing the Workflow

7. Tailoring Fields and Expressions

The template is intentionally flexible and can be adapted to different sales processes and data models.

  • Lead title and description: Adjust expressions to match your naming conventions and include key qualifiers such as product interest or source campaign.
  • Note content: Expand the note to incorporate additional form fields, UTM parameters, or referrer information if you capture it.
  • Activity subject and type: Align activity settings with your Pipedrive activity types and internal SLA requirements.

8. Best Practices for Reliability and Maintenance

  • Validation and error handling: Consider adding nodes to validate incoming data, handle missing email addresses, or route failed API calls to a notification channel.
  • Testing in a sandbox: If available, test the workflow with a non-production Pipedrive environment before activating it for live traffic.
  • Version control: Export and store workflow definitions in version control so changes can be tracked and rolled back if needed.

Deploy the Template and Scale Your Lead Management

By connecting Contact Form 7, n8n, and Pipedrive, you eliminate repetitive manual data entry and ensure every website inquiry is consistently captured, enriched, and actioned. This integration improves data quality, speeds up response times, and provides your sales team with a complete, structured view of each inbound lead.

If you require support with implementation or need tailored automation solutions that fit complex sales operations, reach out at hallo@kapio.eu.

Image Source: Kapio Logo

Automate Meeting Summaries from Google Drive Files

Automate Meeting Summaries from Google Drive Files

Imagine Never Writing Another Meeting Summary By Hand

You know that moment after a meeting when everyone vanishes from the call, and you are left staring at a wall of notes thinking, “So… now I have to turn this chaos into something readable?” If your meeting recaps are starting to feel like a part-time job, it is probably time to let automation take over.

This n8n workflow template is your new post-meeting assistant. It watches a Google Drive folder, grabs new meeting files (PDF or plain text), feeds them to AI for a structured summary, turns that into a polished HTML email, and sends it via Gmail to the right person. All while you move on to literally anything else.

What This n8n Workflow Actually Does

At a high level, this automation connects Google Drive, OpenAI, and Gmail inside n8n to create a fully automated meeting summary pipeline. Here is the journey your file goes on, from “just uploaded” to “beautiful summary in your inbox.”

1. Constantly Watches a Google Drive Folder

You pick a folder in Google Drive, usually something like Meetings. The n8n Google Drive trigger node keeps an eye on it. Whenever a new file lands there, the workflow wakes up and gets to work. No buttons to click, no scripts to run, no “Did I remember to send that recap?” panic.

2. Detects the File Type Automatically

Not all meeting notes look the same, and that is fine. The workflow checks the file’s MIME type and sends it down the right path:

  • application/pdf files go through a PDF text extraction process.
  • text/plain files are handled with plain text extraction.

This lets you mix and match formats. Whether your notes are exported from a tool as a PDF or typed into a basic text file, the workflow can handle both without complaining.

3. Extracts the Raw Meeting Text

Once the workflow knows what kind of file it is dealing with, it pulls out the actual text. That raw content becomes the input for the AI step. No copying, pasting, or hunting through documents. The text is ready for summarization automatically.

4. Summarizes Everything With GPT-4o-mini

Now for the fun part. Using OpenAI’s GPT-4o-mini, the workflow turns your messy meeting notes into a structured JSON summary. The AI is instructed to produce a very specific format that includes:

  • A short summary under 40 words
  • A list of key decisions made during the meeting
  • Important notes and highlights from the discussion
  • The overall sentiment of the meeting: positive, neutral, or negative
  • An array of tasks, each with:
    • Description
    • Owner
    • Deadline
    • Assigned sentiment

The result is not just a wall of text. It is a structured JSON object that is easy to work with, reuse, and format in later steps of the workflow.

5. Validates And Normalizes The AI Output

AI is powerful, but sometimes it needs a little supervision. The workflow parses the JSON and checks that all expected keys and data types are present. It also organizes tasks by sentiment category:

  • Positive tasks
  • Neutral tasks
  • Negative tasks

This validation step helps protect you from broken or incomplete data. If the AI tries to be a little too creative with the format, the workflow brings it back in line.

6. Builds A Polished HTML Email Summary

Once the JSON is cleaned up, the workflow converts it into a nicely formatted HTML email. The summary, decisions, notes, and tasks are laid out clearly, using inline styling that is optimized for Gmail. The result looks professional and easy to scan, even for someone who did not attend the meeting.

7. Emails The Summary To The Right Person

Finally, the Gmail node sends the formatted summary to the user who last modified the Google Drive file. That means the person who uploaded or updated the meeting notes automatically gets the recap delivered to their inbox, without needing to remember to send anything.

How To Set Up The Workflow In n8n

Getting this running is much easier than writing your next manual summary. Here is a simplified setup guide to follow inside n8n.

Step 1 – Connect Your Accounts

In n8n, connect the three services this workflow depends on:

  • Google Drive for file monitoring and access
  • OpenAI for GPT-4o-mini summarization
  • Gmail for sending the final email summary

Make sure each account is authenticated and working correctly before moving on.

Step 2 – Configure The Google Drive Trigger

Set up the Google Drive trigger node to watch your chosen folder, for example a folder named Meetings. This is where you will drop your PDF or text meeting notes. Each new file in that folder will automatically trigger the workflow.

Step 3 – Add The AI System Prompt

In the AI summarization node that uses GPT-4o-mini, paste in the provided system prompt included with the template. That prompt tells the model exactly how to analyze the meeting notes and how to structure the JSON output, including the summary, decisions, notes, sentiment, and tasks.

Step 4 – Configure The Gmail Node

In the Gmail node, set the message body to use the HTML generated earlier in the workflow. Use the expression:

{{$json.email_html}}

This pulls in the HTML email content that was created from the normalized JSON data, so your recipients get the nicely formatted summary instead of raw JSON.

Step 5 – Drop In A Test File

To test everything, place a meeting notes file into the monitored Google Drive folder. You can use either:

  • A PDF file
  • A plain text (.txt) file

Once the file appears, the workflow should run, extract the text, summarize it, format the email, and send it to the last modifier of that file. If your inbox suddenly contains a polished recap, you are good to go.

Why This Automation Is Worth It

If you are still on the fence about automating your meeting summaries, here is what this n8n template gives you.

  • Serious time savings by turning meeting recap creation into a fully automated process.
  • Support for multiple formats, including PDF and plain text, so you are not locked into a single note-taking tool.
  • Actionable task generation with tasks grouped by sentiment, which makes it easier to spot positive progress and potential issues.
  • Automatic distribution through Gmail, sent directly to the relevant person who modified the meeting file.
  • Easy customization with n8n nodes and OpenAI integration, so you can tweak prompts, email formatting, or routing rules as needed.

In short, less time formatting bullet points, more time doing work that actually matters.

Next Steps And Ideas For Power Users

Once you have the basic template up and running, you can extend it further inside n8n. For example, you could:

  • Forward the summary to a team mailing list or shared inbox.
  • Log tasks into a project management tool using additional n8n nodes.
  • Store the JSON output for reporting or analytics later.

The core workflow already handles the heavy lifting, so you can build on top of it without reinventing anything.

Start Automating Your Meeting Summaries

If your calendar is full and your patience for manual summaries is empty, this template is for you. Set up the Google Drive folder, connect OpenAI and Gmail in n8n, and let the workflow quietly keep your team aligned with AI-powered insights.

Perfect for team syncs, sprint reviews, client calls, and any meeting where “We will send a summary later” usually turns into “We totally forgot.”

Email Header Analysis for IPs and Spoofing Detection

Overview

Email remains a primary communication channel for both users and applications, which makes it a frequent target for spoofing, phishing, and other abuse. Inspecting raw email headers is one of the most reliable ways to identify the true sending infrastructure, evaluate IP reputation, and verify whether authentication mechanisms like SPF, DKIM, and DMARC are correctly applied.

This n8n workflow template provides an automated, end-to-end email header analysis pipeline. It receives raw headers via a webhook, parses and normalizes them, extracts all relevant IP information, and validates authentication results. The output is a structured security report that can be consumed by other systems or used directly for manual review.

High-Level Architecture

The workflow is organized into two primary analytical branches, both starting from a single webhook entry point:

  • IP reputation and fraud analysis branch
    Focuses on all IP addresses found in Received headers. It:
    • Extracts IP addresses from header content using a regex-based node.
    • Queries the IPQualityScore API for fraud and abuse indicators.
    • Queries IP-API for ISP, organization, and geolocation metadata.
    • Maps numeric fraud scores to human-readable risk levels.
    • Aggregates results into a consolidated IP security profile.
  • Email authentication validation branch
    Concentrates on SPF, DKIM, and DMARC validation results. It:
    • Parses Authentication-Results and related headers.
    • Extracts SPF, DKIM, and DMARC statuses from multiple possible locations.
    • Normalizes pass, fail, neutral, and unknown outcomes.
    • Prepares a unified authentication summary for the final response.

Both branches converge in a final aggregation stage where IP reputation data and authentication results are merged and returned as the webhook response.

Data Flow Summary

  1. Webhook input – Receives raw email header text.
  2. Header parsing – Splits the header string into key-value pairs.
  3. IP extraction and enrichment – Identifies IPs from Received headers and enriches them with fraud and geolocation data.
  4. Authentication parsing – Extracts SPF, DKIM, and DMARC results from various header fields.
  5. Risk scoring and normalization – Converts raw scores and result codes into human-readable categories.
  6. Aggregation and response – Merges all data into a single structured output and returns it to the caller.

Node-by-Node Breakdown

1. Webhook: Entry Point for Raw Headers

Purpose: Accept raw email header content via HTTP and trigger the workflow.

  • Trigger type: Webhook node.
  • Expected payload: A field containing the full email header string (for example, body.headers or a custom field, depending on your integration).
  • Output: An item with the original header text available to subsequent nodes.

Configuration notes:

  • Ensure the sending system passes the entire header block without modification, including folded lines and continuation lines.
  • Use the same field name consistently, as the parsing node will reference this property.

2. Header Parsing: Explode Email Header

Node: Explode Email Header

Purpose: Convert a single raw header string into a structured representation suitable for downstream logic.

  • Input: Raw header text from the Webhook node.
  • Operation: The node parses the header line-by-line and:
    • Splits each line at the first colon into a header name and value.
    • Normalizes header names to a consistent format (for example, case-insensitive matching).
    • Outputs an array or object mapping header fields to their values.
  • Output: Key-value pairs representing each header, such as Received, Authentication-Results, Received-SPF, DKIM-Signature, and Received-DMARc where present.

This structured format is critical for both the IP analysis and authentication branches, as it enables targeted extraction of specific header types.

3. IP Extraction: Extract IPs from “received”

Node: Extract IPs from "received"

Purpose: Identify and collect all IP addresses present in Received headers.

  • Input: The parsed header data, specifically the Received fields.
  • Logic:
    • Applies a regular expression to each Received header line to find IP address patterns.
    • Supports multiple IPs per header line, if present.
    • Generates one item per IP address for downstream processing.
  • Output: A list of IP items, each containing at least the IP address and optional contextual data from the original header line.

Edge case: If no Received headers exist or no IPs match the regex, this branch will produce zero items. The rest of the workflow continues, but the IP reputation portion of the report will be empty or flagged as unavailable, depending on how you handle the output.

4. IP Reputation and Enrichment

4.1 IPQualityScore API

Service: IPQualityScore

Purpose: Evaluate the risk profile of each extracted IP address.

  • Input: Individual IP items from the extraction node.
  • Operation:
    • Calls the IPQualityScore API endpoint for each IP.
    • Retrieves fields such as:
      • Fraud score (numeric risk indicator).
      • Recent abuse or spam activity flags.
      • Indicators of fraud, abuse, or other suspicious behavior.
  • Output: IP items enriched with IPQualityScore data.

Credentials: Configure your IPQualityScore API key in the corresponding credentials section of the node. Ensure rate limits and quotas are respected in your environment.

4.2 IP-API Geolocation and ISP Lookup

Service: IP-API

Purpose: Provide contextual information for each IP address, such as ISP, organization, and geographic location.

  • Input: The same IP items, potentially already enriched by IPQualityScore.
  • Operation:
    • Calls IP-API with each IP.
    • Retrieves:
      • ISP and organization names.
      • Country, region, city, and other geolocation fields.
  • Output: IP items containing both risk and contextual information.

4.3 Fraud Scoring and Risk Categorization

Node: Custom logic within a function or expression node (described as Fraud Scoring in the original workflow).

Purpose: Convert raw numeric fraud scores and abuse flags into human-readable risk levels.

  • Input: IP items with IPQualityScore results.
  • Logic:
    • Maps fraud scores to categories such as:
      • Good
      • OK
      • Suspicious
      • Poor
      • Bad
    • Flags IPs with recent spam or abuse activity as higher risk, based on IPQualityScore indicators.
  • Output: Each IP item now includes a normalized risk level and explicit flags for recent spam activity.

4.4 Collecting IP Insights

Node: Collect interesting data

Purpose: Aggregate all relevant attributes for each IP into a compact, structured representation.

  • Input: IP items enriched by both IPQualityScore and IP-API, plus the custom fraud scoring.
  • Operation:
    • Selects only the most relevant fields for the final report (for example, IP, risk level, fraud score, spam flags, ISP, organization, country).
    • Normalizes field names for consistent downstream usage.
  • Output: A streamlined list of IP profiles, ready to be merged and returned in the webhook response.

Later in the workflow, these items are merged across all IPs to provide a comprehensive IP security profile for the analyzed email.

5. Email Authentication Validation

5.1 Parsing Authentication-Results

Node: SPF/DKIM/DMARC from "authentication-results"

Purpose: Extract SPF, DKIM, and DMARC validation outcomes from the Authentication-Results header.

  • Input: Parsed header data, specifically the Authentication-Results field.
  • Operation:
    • Searches for tokens indicating authentication mechanisms and their statuses.
    • Identifies whether SPF, DKIM, and DMARC passed, failed, or produced neutral or unknown results.
  • Output: A structured representation of SPF, DKIM, and DMARC states, such as:
    • spf: pass | fail | neutral | unknown
    • dkim: pass | fail | neutral | unknown
    • dmarc: pass | fail | neutral | unknown

5.2 Additional SPF, DKIM, and DMARC Sources

The workflow also inspects related headers to capture authentication details that may not be fully represented in Authentication-Results alone.

  • SPF from “received-spf”
    Extracts SPF evaluation information from the Received-SPF header when present. This can provide extra context about the SPF check performed by intermediate MTAs.
  • DKIM from “dkim-signature”
    Reads the DKIM-Signature header to confirm the presence of a DKIM signature and to support interpretation of DKIM results.
  • DMARC from “received-dmarc”
    Uses the Received-DMARc header when available to validate DMARC evaluation and policy application.

Each of these nodes focuses on its specific header type and extracts relevant indicators to complement the main Authentication-Results parsing.

5.3 SPF Authentication Checker

Node: SPF Authentication Checker

Purpose: Route or conditionally process the workflow based on SPF evaluation results.

  • Input: SPF status from Authentication-Results and, where applicable, Received-SPF.
  • Operation:
    • Evaluates whether SPF is a pass, fail, neutral, or unknown.
    • Uses this evaluation to inform later decision-making or to annotate the final report.
  • Output: A normalized SPF status and any derived flags that indicate SPF reliability.

5.4 Normalization with Set Nodes

Nodes: Multiple Set nodes

Purpose: Standardize field names and ensure that SPF, DKIM, and DMARC results are ready for merging.

  • Input: Outputs from the authentication parsing nodes.
  • Operation:
    • Assigns explicit properties for each mechanism, for example:
      • spf_status
      • dkim_status
      • dmarc_status
    • Ensures consistent value sets (pass, fail, neutral, unknown) across all branches.
  • Output: Clean, consistently named fields that can be easily merged with IP data in the aggregation phase.

6. Aggregation and Webhook Response

6.1 Merging IP and Authentication Data

Nodes: Merge and item list nodes

Purpose: Combine all analysis results into a single response payload.

  • Input:
    • The list of enriched IP profiles from the IP analysis branch.
    • The normalized SPF, DKIM, and DMARC statuses from the authentication branch.
  • Operation:
    • Uses merge/item list nodes to:
      • Aggregate all IP records into a structured array.
      • Attach authentication summary fields at the top level of the result.
    • Ensures the final structure is suitable for both human inspection and programmatic consumption.
  • Output: A consolidated report that includes:
    • Per-IP risk and geolocation data.
    • Overall SPF, DKIM, and DMARC statuses.

6.2 Webhook Response Formatting

Purpose: Return the aggregated results back to the caller that initiated the webhook.

  • Response content: A JSON object or similar structured payload containing:
    • An array of IP entries with:
      • IP address.
      • Fraud score and mapped risk level.
      • Spam or abuse flags.
      • ISP, organization, and geolocation information.
    • Authentication summary with:
      • SPF status.
      • DKIM status.
      • DMARC status.

This final response gives a quick overview of both the infrastructure used to send the email and the integrity of its authentication configuration.

Configuration Notes and Edge Cases

  • Missing or partial headers: If certain headers, such as Received or Authentication-Results, are absent, the corresponding analysis branch will yield limited or no data. The workflow still completes, but the final report

Automate Invoices and Reminders with Jotform & Xero

Automate Invoices and Payment Reminders with Jotform, Xero, and n8n

Overview

For teams that manage recurring billing, manual invoice creation and chasing late payments can quickly become a bottleneck. This n8n workflow template connects Jotform, Xero, and AI-powered email generation to automate the full invoicing lifecycle: from capturing order data, to issuing invoices, to sending structured payment reminders and internal summaries.

The result is a consistent, auditable invoicing process that reduces human error, accelerates cash collection, and keeps both customers and internal stakeholders informed.

End-to-End Workflow Architecture

The automation is built around a simple principle: any new Jotform submission triggers a sequence of actions in Xero and supporting systems. Below is a high-level view of the stages involved:

  • Capture customer and order data from Jotform
  • Normalize and structure that data for downstream systems
  • Create or update the customer contact in Xero
  • Generate an invoice tied to a specific product or service
  • Use AI to draft and send a professional invoice email
  • Persist invoice metadata in a tracking data table
  • Run a daily reminder scheduler to follow up on unpaid invoices
  • Summarize daily reminder activity for the sales or finance team

Trigger and Data Ingestion

1. Jotform Submission as the Entry Point

The workflow starts when a customer completes and submits a Jotform. The form should be configured to collect all essential billing and contact details, including:

  • Customer name
  • Email address
  • Phone number
  • Selected product or service
  • Billing address

A Jotform webhook is configured to POST this data into n8n, which then initiates the rest of the automation.

2. Data Parsing and Normalization

Once the submission reaches n8n, the workflow parses the payload and formats it into structured fields that align with Xero’s data model. Typical processing includes:

  • Splitting the billing address into components such as street, city, postal code, and country
  • Normalizing customer names and contact details
  • Mapping the selected product or service to the corresponding Xero item code

This preparation step is critical for reliable integration with Xero and prevents failures caused by inconsistent or unstructured input.

Customer and Invoice Management in Xero

3. Contact Creation or Update in Xero

With clean data available, the workflow checks whether the customer already exists as a contact in Xero. The logic typically follows this pattern:

  • If no matching contact is found, a new contact record is created
  • If a contact exists, the workflow updates key fields, including phone number, email, and billing address

This ensures that Xero remains the single source of truth for customer information and that all invoices are linked to up-to-date contact records.

4. Automated Invoice Generation

After the contact step, the workflow creates a new invoice in Xero for the product or service selected in the Jotform. Key characteristics of this step include:

  • Invoices are associated with the correct Xero contact
  • Line items use the same item codes as configured in Xero for consistency
  • Amounts, currency, and descriptions are taken from the form submission and your Xero configuration

This eliminates manual invoice creation and ensures that every customer submission results in a standardized invoice in your accounting system.

AI-Driven Communication and Email Delivery

5. Generating and Sending the Invoice Email

Once the invoice is created, the workflow uses an OpenAI-based node to generate a professional, HTML-formatted invoice email. The AI agent can incorporate:

  • Customer name and contact details
  • Invoice number, amount, and due date
  • Payment instructions or links

The finalized email is then sent to the customer using your configured SMTP or email provider. This guarantees that invoices are delivered promptly and with a consistent tone and structure.

Invoice Tracking and Reminder Logic

6. Persisting Invoice Metadata

To enable reminder scheduling and tracking, the workflow stores key invoice attributes in a dedicated data table. Typical columns include:

  • invoiceId – the unique identifier from Xero
  • remainingAmount – the outstanding balance
  • currency – the invoice currency
  • remindersSent – the number of reminders already issued
  • lastSentAt – timestamp of the most recent reminder

This table acts as the control layer for the reminder system and allows the workflow to make decisions based on current payment status.

7. Daily Reminder Scheduler

A scheduled trigger runs every day at 8 AM and evaluates all stored invoices. For each record, the workflow decides whether to:

  • Send a new reminder email
  • Defer the reminder until the configured interval is reached
  • Remove the invoice from tracking if it is fully paid or has reached the maximum number of reminders

Reminder intervals are configurable, for example 2, 3, or 5 days after invoice creation or after the last reminder. This ensures that customers are followed up with at a cadence that aligns with your credit control policies.

8. Reminder Decision Logic

Within the scheduler, the workflow applies a set of business rules:

  • If the invoice still has an outstanding amount and the defined interval has elapsed, a reminder email is sent to the customer
  • After each reminder, the workflow updates remindersSent and lastSentAt in the tracking table
  • If the invoice is fully paid or the maximum reminder threshold is exceeded, the invoice record is removed from the reminder table

This approach keeps the reminder process both automated and controlled, avoiding over-contacting customers while ensuring overdue invoices are not forgotten.

Internal Reporting and Oversight

9. Daily Summary for Sales or Finance Teams

To maintain transparency, the workflow uses AI to compile a daily summary of all reminder emails sent. The summary can include:

  • Number of reminders issued
  • Key invoice identifiers and customers contacted
  • Any notable patterns or follow-up suggestions generated by the AI

This report is emailed to the designated sales or finance distribution list, providing a clear overview of collections activity and enabling timely human follow-up where necessary.

Ideal Users and Business Scenarios

This n8n template is particularly valuable for organizations that issue frequent invoices and rely on prompt payments but want to avoid manual chasing. Typical users include:

  • Freelancers and independent professionals
  • Service providers with recurring or project-based billing
  • Consultants and coaches
  • Small businesses across various industries
  • E-commerce operators or custom product sellers

Any team that uses Jotform for data capture and Xero for accounting can benefit from this end-to-end automation.

Prerequisites and Configuration Requirements

To deploy this workflow template effectively in n8n, ensure the following components are in place:

  • A Jotform webhook configured to POST form submission data into n8n
  • A Xero account with OAuth2 credentials set up for API access
  • Aligned product or service item codes between Jotform form options and Xero items
  • An email SMTP configuration in n8n for sending invoices and reminders
  • A data table or database collection with at least the following fields: invoiceId, remainingAmount, currency, remindersSent, lastSentAt
  • Defined reminder intervals, for example 2, 3, and 5 days after invoice creation or last reminder

Once these elements are configured, you can plug in the template, map your fields, and adapt the business rules to match your internal credit control strategy.

Conclusion

By combining Jotform for data capture, Xero for financial records, and AI for communication, this n8n workflow template delivers a robust, fully automated invoicing and reminder system. It reduces manual workload, shortens payment cycles, and ensures that every customer receives clear and timely communication about their invoices.

Ready to streamline your invoicing and collections process? Deploy this template in n8n to improve billing efficiency, enhance customer experience, and give your finance team better visibility into outstanding payments.

Advanced Suspicious Login Detection with GreyNoise

Advanced Suspicious Login Detection with GreyNoise in n8n

Introduction

Protecting user accounts from credential abuse and unauthorized access is a critical requirement in modern infrastructures. The Suspicious Login Detection workflow template for n8n combines real-time event ingestion, threat intelligence from GreyNoise, and contextual enrichment from multiple data sources to help security and platform teams quickly identify and prioritize risky login activity.

This article explains how the workflow operates, the role of each node, and how the different integrations work together to deliver a robust, automated suspicious login detection capability.

Use Case and Workflow Logic

The workflow is designed to ingest login events, enrich them with intelligence and context, then classify and notify on suspicious behavior. It focuses on four main dimensions of risk:

  • IP reputation and internet noise activity (via GreyNoise)
  • Geolocation anomalies (via IP-API)
  • Device and browser changes (via UserParser)
  • Historical login patterns (via PostgreSQL)

By correlating these data points, the n8n workflow assigns a priority level to each login attempt and triggers the appropriate alerts to both security teams and end users.

Triggers and Data Ingestion

Webhook and Manual Trigger

The workflow can be initiated in two ways, which is useful both for production usage and for controlled testing:

  • Webhook Trigger: The primary entry point that listens for incoming login events from your application or authentication service. Each event typically contains IP address, user agent, timestamp, and user identifier.
  • Manual Trigger: A secondary trigger that allows security engineers or developers to manually start the workflow for testing, validation, or simulation of specific scenarios.

Data Extraction

Once the workflow is triggered, a dedicated node extracts and normalizes the key attributes from the login event payload:

  • IP address of the client making the request
  • User agent string used during the login
  • Timestamp of the login attempt
  • User ID associated with the session

This structured data then feeds into the analysis and enrichment stages that follow.

Threat Intelligence and Contextual Enrichment

IP Reputation with GreyNoise

The GreyNoise node is central to the workflow’s risk assessment. It evaluates the IP address of each login attempt against GreyNoise’s datasets, including NOISE and RIOT, to determine how that IP behaves on the wider internet.

Through this integration, the workflow can classify the IP as:

  • Known noisy or malicious: Frequently involved in scanning, probing, or attack activity.
  • Benign: Considered non-threatening based on GreyNoise intelligence.
  • Unknown or ambiguous: Not clearly benign and may require closer inspection.

Based on this classification, the workflow assigns an initial priority level to the login event, which is later refined with additional context.

Geolocation Analysis with IP-API

To identify unusual login locations, the workflow uses IP-API to enrich the IP address with geolocation data. This typically includes:

  • City
  • Country

The workflow then compares the current location against the user’s last 10 login locations. If the new login originates from a location that is significantly different from the user’s recent history, it can be treated as a potential anomaly and contribute to a higher risk score.

User Agent and Device Profiling with UserParser

Device and browser changes are another strong signal for suspicious activity. The workflow integrates with UserParser to parse the raw user agent string into structured attributes, such as:

  • Browser type and version
  • Operating system
  • Device type

The parsed user agent from the current login is then compared against device and browser information from previous logins. A completely new device or browser profile for the same user can indicate credential theft or account sharing and is used as an additional factor in the risk assessment.

Historical Login Context from PostgreSQL

To provide behavioral context, the workflow queries a PostgreSQL database for the user’s last 10 login records. This historical data supports:

  • Comparison of current IP and geolocation with recent login locations
  • Comparison of current device and browser with previously observed user agents
  • Detection of unusual patterns, such as sudden changes in geography or device profile

This step is essential for anomaly detection, allowing the workflow to move beyond static rules and incorporate user-specific behavior.

Risk Scoring and Threat Prioritization

After enrichment, the workflow correlates all signals to determine the final alert priority. GreyNoise classifications play a key role in this decision, while geolocation and device anomalies provide additional weight.

The template uses a three-tier priority model:

  • High Priority: Login attempts from IPs that are unknown or malicious in GreyNoise, especially when combined with unusual location or device data. These events are likely to indicate targeted attacks or active exploitation attempts.
  • Medium Priority: Activity from IPs that are not clearly malicious but may be associated with RIOT or are otherwise unknown, possibly with some contextual anomalies. These events warrant review but may not require immediate incident response.
  • Low Priority: Benign IPs with no strong anomaly indicators. These logins are typically part of normal user behavior and can be logged with minimal operational overhead.

Notification and Response Automation

Slack Alerts for Security Teams

For operational visibility, the workflow sends structured alerts to one or more Slack channels. Each alert contains:

  • Assigned priority (high, medium, or low)
  • IP address and GreyNoise classification
  • Geolocation details (city and country)
  • Device and browser information from UserParser
  • Relevant historical context from the last 10 logins

This enables security and SRE teams to rapidly triage events, correlate them with other signals, and decide on appropriate response actions such as session invalidation or additional verification.

Email Notifications to End Users

When the workflow detects a new device or unusual location, it can also send an email notification directly to the affected user. This serves two purposes:

  • Increases user awareness of possible account misuse
  • Encourages users to take immediate action, such as changing passwords or enabling multi-factor authentication

By involving users in the detection loop, organizations can shorten the time to discovery for compromised accounts.

Benefits and Best Practices

This n8n workflow template delivers several advantages for teams looking to strengthen their authentication security posture:

  • Holistic risk assessment: Combines IP reputation, geolocation, device fingerprinting, and historical behavior into a single, automated decision process.
  • Real-time monitoring: Webhook-based ingestion enables immediate analysis and response at the moment of login.
  • Actionable alerts: Rich, contextual notifications via Slack and email support fast, informed decision making.
  • Straightforward integration: Uses standard APIs and PostgreSQL queries that can be integrated with most existing authentication and logging systems.

For best results, ensure:

  • Consistent and reliable logging of login events into the source system that triggers the webhook
  • Accurate and up-to-date user login history in PostgreSQL
  • Secure storage and management of API credentials for GreyNoise, IP-API, and UserParser
  • Clearly defined operational runbooks for handling high and medium priority alerts

Implementation Considerations

Before deploying the template into production, automation and security teams should:

  • Configure and validate all external integrations using valid API credentials for GreyNoise, IP-API, and UserParser.
  • Connect the workflow to the appropriate PostgreSQL instance containing user login history.
  • Adjust Slack channels and email templates to align with internal incident response processes.
  • Test various scenarios using the manual trigger to confirm that enrichment, prioritization, and notifications behave as expected.

Conclusion

The Suspicious Login Detection workflow for n8n provides a powerful, extensible foundation for advanced login monitoring. By aggregating intelligence from GreyNoise, IP-API, and UserParser, and correlating it with historical login data stored in PostgreSQL, it enables proactive detection of high-risk login activity and supports rapid, informed responses.

Organizations can use this template as-is or adapt it to fit their specific authentication stack, alerting preferences, and incident response workflows.

Next Steps

To take advantage of this template in your own environment:

  • Deploy the workflow in your n8n instance.
  • Configure webhook endpoints to receive login events from your application or identity provider.
  • Provide valid credentials for GreyNoise, IP-API, and UserParser, and connect your PostgreSQL database.
  • Iterate on alert thresholds and notification rules based on your risk appetite and operational capacity.

Once configured, you will be able to detect, prioritize, and respond to suspicious login attempts as they occur.

AI Logo Generator Workflow from Website URL

AI Logo Generator Workflow From Any Website URL

Imagine getting a logo from just a URL…

Picture this: you paste a website URL into a form, hit send, and a few seconds later you get a custom AI-generated logo that actually matches the site’s look and feel. No long briefs, no back and forth, no blank-page anxiety.

That is exactly what this n8n workflow template does for you.

Using a mix of automation and AI models like OpenAI GPT and Google Gemini, this workflow grabs a screenshot of the site, reads its content, turns that into a smart logo prompt, then generates a logo image and sends it right back to you. All from a single request.

In this guide, we will walk through what the workflow does, how it works behind the scenes, what you need to set it up, and when it can really save you time.

What This n8n Workflow Actually Does

At a high level, this is an AI logo generator workflow for n8n that creates a logo from a website URL. You send it a URL, and it returns a logo image as a binary response.

Here is what happens under the hood, step by step, in simple terms:

  • Receives a URL via webhook – You send a POST request with a JSON body that includes websiteUrl. That kicks off the workflow.
  • Captures a clean screenshot – Using the ScreenshotOne API, it takes a screenshot of the homepage, blocking ads and trackers so the image is focused on the real content.
  • Scrapes the website content – It fetches the HTML and pulls out text to understand what the site is about, its tone, and its context.
  • Builds a logo prompt with GPT – An AI agent powered by an OpenAI GPT model (configured as GPT-5 mini in this template) looks at both the screenshot URL and the site content and writes a detailed, creative logo prompt.
  • Generates the logo image with Gemini – That prompt is then passed to the Google Gemini image model, which turns it into a unique logo image.
  • Sends the logo back – Finally, n8n responds to the original request with the generated logo as a binary image output.

The result is an end-to-end automated logo creation flow that starts from a URL and ends with a ready-to-use logo image.

When You Would Use This Workflow

So where does this actually fit into your day-to-day work? Here are some practical use cases where this template really shines.

1. Marketing agencies testing logo concepts

If you are working with multiple clients, you can quickly spin up logo prototypes based on their websites. Just drop in their URL and generate a few options to kickstart a branding discussion or moodboard.

2. Web developers onboarding new clients

Setting up a new site and the client does not have a logo yet? Use this workflow to auto-generate a temporary or draft logo that visually matches the site. It is great for staging environments or early design previews.

3. Designers looking for inspiration

Sometimes you just need a starting point. You can feed in competitors’ URLs or similar sites and generate logo ideas to spark your own creativity, then refine or redesign from there.

4. Education, demos, and workshops

Teaching automation or AI design workflows? This is a perfect demo for showing how n8n can orchestrate multiple AI tools, from scraping content to generating images, all in a single flow.

How The Workflow Runs, Step By Step

Let us go a bit deeper into the actual flow so you know exactly what is going on inside n8n.

1. Webhook trigger

The workflow starts with a Webhook node. It listens for a POST request that includes a JSON body like this:

{  "websiteUrl": "https://example.com"
}

As soon as that request hits your n8n instance, the rest of the workflow kicks in.

2. Capture the website screenshot

Next, the workflow calls the ScreenshotOne API to grab a screenshot of the homepage for the given URL.

  • It uses your ScreenshotOne access key for authentication.
  • Ads and trackers are blocked to keep the screenshot clean.
  • The resulting screenshot URL is stored so the AI can use it later.

This gives the AI visual context about layout, colors, and overall style.

3. Fetch and parse website content

In parallel with the visual snapshot, the workflow also scrapes the website content. It pulls the HTML and extracts text so the AI can understand:

  • What the business or project does
  • Key topics, products, or services
  • Brand tone, language, and audience hints

Combining both text and visuals helps the AI create a logo prompt that feels aligned with the actual brand.

4. Generate the logo prompt with GPT

This is where the AI agent comes in. Using an OpenAI GPT model (set to GPT-5 mini in this template), the workflow:

  • Takes the screenshot URL
  • Reads the scraped website content
  • Crafts a detailed, descriptive prompt for logo generation

The prompt usually includes information like style, color mood, brand personality, and any strong themes that appear on the site. You can also tweak this step to add your own branding rules or preferences.

5. Create the logo image with Google Gemini

Once the prompt is ready, it is passed to the Google Gemini image model using your Google AI Studio API key.

Gemini then generates a custom logo image based on that prompt. The result is returned to n8n as binary image data.

6. Respond with the logo image

Finally, the workflow sends a response back to the original request, returning the generated logo image as a binary file. Your app, form, or frontend can then display it, save it, or let the user download it instantly.

What You Need Before You Start

To get this workflow up and running, you will need a few accounts and API keys. Here is the checklist.

Required accounts and services

  • n8n instance – You need an n8n setup that can run workflows with webhook support (self-hosted or cloud).
  • ScreenshotOne API – For capturing website screenshots with a clean output.
  • OpenAI API – To access GPT models for generating the logo prompt.
  • Google AI Studio – To use the Google Gemini image model for logo creation.

How to set up your API keys

Here are the setup steps in order:

  1. Sign up at screenshotone.com and grab your ScreenshotOne access key.
  2. Create or log in to your OpenAI account at platform.openai.com and generate an API key with access to GPT models.
  3. Go to aistudio.google.com/app/apikey and create a Google Gemini API key.
  4. Open the workflow in n8n and replace the API placeholders in these nodes:
    • Capture Website Screenshot – use your ScreenshotOne access key.
    • Generate Logo Prompt – use your OpenAI API key.
    • Generate Logo Image – use your Google Gemini API key.
  5. Import the template into your n8n instance, activate the workflow, and make sure the webhook URL is accessible from wherever you will be sending requests.

Tips, Best Practices, and Little Gotchas

To keep everything running smoothly, here are a few helpful tips.

  • Use publicly accessible URLs
    The website must be reachable from your n8n instance for both screenshots and content scraping. Private or firewall-protected sites will not work unless your setup can access them.
  • Tune ScreenshotOne timeouts
    If some pages load slowly, adjust the timeout and delay settings in the ScreenshotOne node so it waits long enough before capturing the screenshot.
  • Add your own branding rules
    In the logo prompt generation step, you can add extra style instructions, like:
    • Preferred color palettes
    • Typography hints
    • Flat vs 3D style
    • Minimalist vs detailed

    This can help keep logos more consistent with your brand or your clients’ guidelines.

  • Keep an eye on API quotas
    Make sure your OpenAI, ScreenshotOne, and Google Gemini API keys have enough quota and the right permissions. If any of them hit a limit, the workflow will fail mid-run.

Why This Workflow Makes Life Easier

Instead of manually brainstorming logo ideas, writing prompts, and juggling multiple tools, this n8n template connects everything for you in one automated flow.

You get:

  • A logo idea that actually reflects the website content and style
  • Faster client onboarding and concept exploration
  • A repeatable, scalable way to generate logo drafts
  • A great example of how to combine n8n, GPT, and Gemini in a real-world automation

Ready To Try It?

This AI logo generator workflow is a simple but powerful way to turn any website URL into a personalized logo, using automation instead of manual effort.

Want to speed up your branding workflow? Plug this template into n8n, drop in your API keys, and start generating logos from URLs in seconds.

Need help tweaking the prompt, adding extra logic, or integrating this into your app? Feel free to ask or share your questions and ideas in the comments.

Complete OIDC Client Workflow with n8n and Keycloak

Complete OIDC Client Workflow with n8n and Keycloak

What This Workflow Actually Does (In Plain English)

If you're looking to hook up n8n with Keycloak so users can log in securely using OpenID Connect (OIDC), this workflow template does exactly that. It walks through the full OIDC client flow, including support for PKCE (Proof Key for Code Exchange) to keep things extra secure.

Think of it as a ready-made login flow that:

  • Accepts incoming authentication requests through a webhook
  • Redirects users to Keycloak to log in
  • Exchanges the authorization code for an access token
  • Fetches user details from the userinfo endpoint
  • Shows either a login page or a personalized welcome page

So instead of wiring all of that together manually, you get a complete, reusable OIDC client workflow in n8n, ready to plug into your app or internal tools.

When You'd Want To Use This Template

Wondering if this is for you? This workflow is a great fit if you:

  • Use Keycloak as your identity provider
  • Want to integrate OIDC login into an app, portal, or internal tool via n8n
  • Prefer not to hand-code the full OAuth2 / OIDC flow
  • Care about security and want PKCE support
  • Need a simple way to show logged-in vs logged-out pages

In short, if you want to offload authentication to Keycloak while keeping your logic in n8n, this template makes your life much easier.

High-Level Flow: How the OIDC Client Works

Here's the basic story of what happens when someone hits your webhook URL:

  1. n8n receives the request via a Webhook node.
  2. The workflow loads all the important OIDC settings (endpoints, client ID, scope, etc.).
  3. It checks any cookies to see if there is already a session.
  4. If there is an authorization code in the URL, it exchanges that for an access token.
  5. With the access token, it calls the userinfo endpoint to get the user's profile.
  6. If everything checks out, it shows a welcome page with the user's email.
  7. If not logged in yet, it shows a login form that kicks off the OIDC flow with PKCE.

Let's walk through each part of the workflow so you know exactly what's going on under the hood.

Step-by-Step: Inside the n8n OIDC Workflow

1. Webhook Trigger – Your Entry Point

Everything starts with the Webhook node. This is the URL that:

  • Receives the initial request when a user visits your app entry page
  • Acts as the redirect URI when Keycloak sends back the authorization code

When you configure your OIDC client in Keycloak, this webhook URL is what you'll set as the redirect_uri. It is basically the "home base" of your login flow.

2. Set Variables – Central Place for OIDC Settings

Next, the workflow uses a Set Variables node to store all the important configuration values. This keeps everything clean, editable, and in one place. In this node, you'll define things like:

  • auth_endpoint – Your Keycloak authorization endpoint
  • token_endpoint – Where the workflow exchanges the authorization code for a token
  • userinfo_endpoint – The endpoint to get user profile data
  • client_id and optionally client_secret
  • scope – Usually includes openid for OIDC
  • redirect_uri – The same URL as your webhook
  • A flag to enable or disable PKCE

Once this is set up, you rarely need to touch the rest of the logic. Just update these values if your Keycloak config changes.

3. Parsing Cookies – Managing Sessions

Then comes a Code node that parses cookies from the incoming HTTP headers. Why does that matter?

Because cookies help you:

  • Track whether a user is already authenticated
  • Manage simple session data between requests

The Code node reads the Cookie header, breaks it down into usable key-value pairs, and makes that information available to the rest of the workflow.

4. Authorization Code Check – Are We Coming Back From Login?

At this point, the workflow needs to figure out what kind of request it is dealing with:

  • A user visiting for the first time, or
  • A user returning from Keycloak with an authorization code

This is handled by an IF node, often labeled something like "IF we have code in URI and not in PKCE mode". It checks:

  • Is there an authorization code in the query string?
  • Is PKCE disabled, so we can do a straightforward code exchange?

If the conditions are met, the workflow moves on to exchange that code for an access token.

5. Token Exchange – Swapping Code for Access Token

When the workflow has an authorization code and conditions are right, it uses an HTTP Request node to call the token_endpoint. This request includes:

  • The code from the URL
  • Your client_id (and possibly client_secret if you are using one)
  • The redirect_uri
  • Any PKCE-related parameters if PKCE is enabled

The response from this request should contain an access token that the workflow can use to call the userinfo endpoint.

6. Checking for Access Token – Did It Work?

After the token exchange, another IF node checks whether an access token was actually returned. This is often labeled something like "IF token is present".

If a valid token exists, the workflow can safely move on to the next step. If not, it can handle the error or send the user back to a login page.

7. Fetching User Info – Getting the Profile

Once the workflow has an access token, it uses another HTTP Request node to hit the userinfo_endpoint. This call usually includes:

  • An Authorization: Bearer <access_token> header

The identity provider (Keycloak in this case) responds with user profile data, such as email and other claims, depending on your configuration and scopes.

8. Validating User Info – Making Sure Everything Is OK

Now the workflow needs to confirm that the userinfo response is valid. An IF node, often named "IF user info ok", checks whether:

  • The userinfo request succeeded
  • Expected fields like email or subject are present

If everything looks good, the workflow treats the user as authenticated and can render a personalized page.

9. Rendering Pages – Login vs Welcome

Finally, the workflow decides what to show the user. There are typically two possible outputs:

  • Welcome Page
    If the user is successfully authenticated, the workflow returns an HTML page with a friendly greeting. This usually includes the user's email from the userinfo response so you can say something like "Welcome back, user@example.com".
  • Login Form
    If the user is not logged in yet, the workflow returns an HTML login page. This page:
    • Presents an OIDC login form
    • Supports PKCE so the flow is secure even for public clients
    • Redirects the user to Keycloak for authentication

These HTML templates are part of the workflow, so you can tweak them to match your own brand and user experience.

Quick Setup Guide: Connecting Keycloak to the Workflow

Let's talk about how to wire this up with Keycloak. The good news is that it is pretty straightforward. Here is a simple checklist you can follow:

  1. Open the Keycloak admin console.
  2. Go to Realm settings and open OpenID Endpoint Configuration.
  3. Copy the following URLs:
    • authorization_endpoint
    • token_endpoint
    • userinfo_endpoint

    Paste these into the Set Variables node in your n8n workflow.

  4. Under Clients, create a new client and give it a name of your choice.
  5. During client configuration:
    • Disable Client authentication
    • Enable only Standard flow
  6. In the client's Login settings, add your n8n webhook URL to Valid redirect URIs. This must match the redirect_uri you set in the workflow.
  7. Copy the client ID you created and set it in the Set Variables node as client_id.

After that, just activate the workflow in n8n and visit the webhook URL in your browser to test the login flow.

Why PKCE Matters For Your OIDC Flow

You might be wondering, "Do I really need PKCE?" In many cases, yes, you do.

PKCE (Proof Key for Code Exchange) is an extension to OAuth2 that adds an extra layer of security on top of the authorization code flow. It is especially important for:

  • Public clients that cannot safely store a client secret
  • Browser-based apps and mobile apps

With PKCE, the client generates a one-time secret that is used when requesting the authorization code and again when exchanging that code for a token. This helps protect against attacks where someone tries to intercept the authorization code and use it themselves.

The nice part is that this n8n workflow is already designed with PKCE support in mind, so you can take advantage of that without building the logic from scratch.

Make It Yours: Customizing the Experience

Out of the box, the template gives you a working OIDC login and welcome flow. But you do not have to stop there.

Bonus tip: You can customize the HTML templates in the workflow so they match your own branding. Change the colors, add your logo, tweak the text, or embed the login and welcome views into a larger page layout. The logic stays the same, but the user experience becomes fully yours.

Try the OIDC Client Workflow With n8n and Keycloak

If you are building a secure authentication system with OpenID Connect and want to keep your logic in n8n, this workflow template is a huge time saver. Instead of wrestling with tokens, endpoints, and redirects by hand, you get a complete, working example that you can adapt to your needs.

Use it to:

  • Streamline user login flows
  • Integrate Keycloak authentication into your existing tools
  • Experiment with OIDC and PKCE in a visual, low-code way

Have questions, want to extend it further, or ran into something odd in your setup? Feel free to reach out or drop a comment. This kind of workflow is a great foundation to build on.

AI Logo Generator Workflow from Website URL

AI Logo Generator Workflow from Website URL

From Manual Design Churn to Automated Creativity

If you have ever stared at a blank canvas trying to imagine a logo that matches a website, you know how draining that can be. You jump between tools, capture screenshots, skim through copy, write prompts, tweak designs, and repeat. It is creative work, but it can also be slow, repetitive, and distracting from the bigger projects you want to focus on.

Automation with n8n gives you a different path. Instead of reinventing the wheel for every site, you can build a workflow that understands a website and instantly turns it into a logo concept. This AI logo generator template is not just a neat trick, it is a practical example of how you can reclaim time, reduce busywork, and create space for higher level thinking and design.

In this article, you will walk through that journey. You will see the problem, open up to what is possible with automation, then learn exactly how this n8n workflow uses ScreenshotOne, OpenAI GPT-5 Mini, and Google Gemini to generate custom logos from any website URL. Along the way, you will be encouraged to adapt, extend, and make this template your own.

Shifting Your Mindset: Let Automation Do the Heavy Lifting

Manual logo brainstorming for every new website can feel like a badge of honor, but it is often a bottleneck. When you let automation handle the repetitive parts, something powerful happens:

  • You move faster from idea to visual concept.
  • You create a repeatable process that works for every site you touch.
  • You free your mind for strategy, refinement, and experimentation.

This AI logo generator workflow in n8n is a concrete step toward that mindset. You provide a website URL, the automation does the rest: it understands the site visually and textually, then turns that understanding into a logo image. You are no longer starting from zero, you are starting from a generated concept that you can refine or use immediately.

The Big Picture: How the AI Logo Generator Workflow Works

At its core, this n8n template listens for a website URL, analyzes that site, and responds with a ready to use logo image. Here is the overall flow:

  1. A webhook in n8n receives a JSON payload like {"websiteUrl":"https://example.com"}.
  2. The workflow captures a screenshot of the homepage using ScreenshotOne.
  3. It scrapes the website HTML to understand the site’s content and purpose.
  4. OpenAI GPT-5 Mini uses both the screenshot URL and the scraped text to generate a detailed logo prompt.
  5. Google Gemini turns that prompt into a logo image that reflects the site’s branding and theme.
  6. The workflow responds with the binary logo image so you can use it or plug it into other automations.

Every step is designed to save you time and create a repeatable system that you can trigger for any site, whenever you need fresh logo ideas.

Step-by-Step Journey Through the Workflow

1. Starting the Automation: Webhook Trigger

The journey begins with a simple POST request to an n8n webhook. This is how you tell the workflow which website to analyze. The payload looks like:

{  "websiteUrl": "https://example.com"
}

Once this JSON is received, the rest of the process unfolds automatically. You can trigger this from a form, another app, your own tools, or even a script. One URL in, one logo out.

2. Capturing the Website’s Visual Identity with ScreenshotOne

Next, the workflow uses the ScreenshotOne API to capture a snapshot of the website’s homepage. This screenshot is not just a picture, it is a window into:

  • Brand colors and palettes
  • Typography and layout style
  • Overall visual tone

By feeding this screenshot URL into the AI later, you give it a richer understanding of how the brand looks, not just how it reads.

3. Scraping Website Content for Context

Visuals alone are not enough. To generate a logo that feels relevant, the workflow also scrapes the HTML content of the page. This step gathers:

  • Headlines and key messaging
  • Descriptions of products or services
  • Any text that hints at the brand’s mission or audience

This textual context helps the AI understand what the site is about, so the final logo concept matches both the look and the purpose of the website.

4. Turning Insight into a Logo Idea with OpenAI GPT-5 Mini

Now comes the creative bridge. The workflow combines the screenshot URL and the scraped site content, then passes them to OpenAI GPT-5 Mini. GPT-5 Mini uses this information to craft a detailed logo prompt that might include:

  • Brand mood and tone
  • Color preferences based on the site
  • Icon or symbol ideas that fit the business
  • Style suggestions, such as minimalist, playful, modern, or corporate

This step turns raw data into a structured creative brief, ready for an image model to interpret. It is like having an assistant that reads the site for you and writes a polished logo design request.

5. Generating the Logo Image with Google Gemini

With the logo prompt in hand, the workflow calls Google Gemini through Google AI Studio. Gemini transforms the text prompt into an actual logo image that reflects:

  • The site’s visual branding captured by ScreenshotOne
  • The site’s purpose and messaging from the scraped content
  • The style and concept described by GPT-5 Mini

The result is a logo image that feels tailored to the website, not a random graphic. You can use it as a first draft, a concept to refine, or even as a final asset in some cases.

6. Sending Back the Finished Logo

Finally, the workflow responds to the original webhook request by returning the binary logo image. From there, you can:

  • Display it instantly in your own app or dashboard
  • Save it to storage or a design library
  • Pass it into another n8n workflow for further processing or delivery

You started with a URL, and now you have a complete, AI generated logo ready to use or iterate on.

What You Need Before You Start

To run this automation smoothly, you will need a few essentials in place:

  • n8n instance with webhook support
  • ScreenshotOne account with an API key
  • OpenAI account with an API key for GPT-5 Mini
  • Google AI Studio account with an API key for Google Gemini

Once these are set up, you are ready to import the template and bring this workflow to life.

Setting Up the AI Logo Generator in n8n

Here is how to get the template running so you can start generating logos from website URLs in minutes:

  • Import the workflow JSON file into your n8n instance.
  • Open the workflow and configure credentials for each service:
    • ScreenshotOne node with your ScreenshotOne API key
    • OpenAI node with your GPT-5 Mini API key
    • Google Gemini node with your Google AI Studio API key
  • Replace any placeholder API keys with your real keys.
  • Activate the webhook trigger node so it can receive POST requests.
  • Test the setup by sending a POST request to the webhook URL with a websiteUrl value.

Once your test returns a logo image, you have a working, reusable automation that can support your projects again and again.

Real-World Ways to Use This n8n Template

This workflow is not just a demo, it is a foundation you can build on. Here are some practical ways to put it to work:

  • Marketing teams: Quickly generate logo concepts for client websites during discovery calls or early proposal stages.
  • Developers: Automatically create branding visuals when spinning up new web projects or staging environments.
  • Designers: Use generated logos as inspiration or mood starters before diving into full scale design work.
  • Educators: Show students how AI powered design workflows operate end to end using real tools and APIs.

As you get comfortable, you can extend the workflow to add variations, store results in a database, or send logos directly to clients or teammates.

Growing With Automation: Experiment, Improve, Repeat

One of the biggest advantages of n8n is how easy it is to iterate. This template is a starting point, not a finished destination. Once it is running, consider:

  • Adjusting the GPT-5 Mini prompt to include specific logo styles you prefer.
  • Adding additional nodes to store generated logos in cloud storage.
  • Triggering the workflow from forms, CRMs, or project management tools.
  • Creating multiple logo variants from the same website URL for A/B testing.

Each tweak you make turns this template into a more personalized tool that reflects how you work and what you value.

Troubleshooting and Fine-Tuning

If something does not work as expected, it is usually a small configuration issue. Here are common checks to keep your workflow running smoothly:

  • If screenshots fail or timeout, increase the timeout value and double check that the website URL is correct and reachable.
  • If GPT-5 Mini prompt generation fails, confirm that your OpenAI API key is valid and that you have enough quota.
  • If logos look blank, generic, or off-brand, enrich the prompt generation step with more detailed style instructions and constraints.
  • If the workflow does not trigger at all, verify the webhook payload format and make sure all node connections are properly configured.

Treat troubleshooting as part of the learning process. Every fix you apply deepens your understanding of n8n and makes future automations easier to build.

Take the Next Step: Turn URLs Into Logos Automatically

This AI logo generator workflow shows what is possible when you blend n8n automation with AI tools like ScreenshotOne, OpenAI GPT-5 Mini, and Google Gemini. In a single flow, you go from a simple website URL to a custom logo image that reflects both the look and the story of the site.

You do not have to overhaul your entire process overnight. Start small: import this template, connect your API keys, and run a few tests. Feel the difference of having a system that works for you in the background. Then keep building on it, one improvement at a time.

Your time is valuable. Let automation handle the repetitive steps so you can focus on strategy, creativity, and growth.