Backup n8n Workflows to Gitea (Automated Guide)
Imagine losing your favorite automation…
You just spent an afternoon crafting the perfect n8n workflow. It talks to 5 tools, cleans your data, sends the right emails, and basically runs your life so you do not have to. Then something breaks, a workflow gets corrupted, or you accidentally hit delete before coffee. Now you are clicking around trying to remember what you did three versions ago.
That is the moment you realize: “Huh, maybe I should have backed this up somewhere.” Preferably somewhere versioned, safe, and not inside a single database that could vanish with one bad day.
This is exactly what this n8n workflow template solves. It automatically backs up all your n8n workflows as JSON files into a Gitea repository on a schedule you control. No more manual exports, no more “which version was that”, and no more hoping nothing breaks.
What this n8n to Gitea backup workflow actually does
This template is an automated backup system for your n8n workflows using Gitea as the storage backend. In plain language, it:
- Runs on a schedule you define, for example every 45 minutes or once a day
- Pulls all workflows from your n8n instance via the n8n API
- Turns each workflow into a pretty-printed JSON file
- Stores each file in a Gitea repository as
<workflow-name>.json - Creates new files when workflows are new, and updates files only when something has changed
Behind the scenes it talks to the Gitea API, handles base64 encoding for file contents, checks if the file already exists, and updates it using the proper SHA when needed. You get version history, readable diffs, and peace of mind, without lifting a finger after setup.
Why bother backing up n8n workflows to Gitea?
If you are already using n8n, you probably like automation and dislike repetitive tasks. Manual exports definitely fall into the “repetitive and annoying” category. This workflow fixes that and gives you:
- Fast recovery if a workflow is lost, corrupted, or accidentally edited into oblivion
- Clear version history so you can see what changed and roll back if needed
- Self-hosted safety by storing everything in your own Gitea instance instead of a public cloud Git provider
- Flexible backup frequency that you can match to how often your workflows change
In short, you get Git-style safety for your automations without adding another manual task to your to-do list.
What you need before you start
Before importing and running the template, make sure you have:
- An n8n instance with API access that can list workflows
- A Gitea repository where the backup JSON files will live
- A Gitea personal access token with repository read/write permissions
- n8n credentials configured for:
- your n8n API
- your Gitea token (used by HTTP Request nodes)
Quick setup: from zero to automatic backups
Here is the short version of getting the template running. After this section you will find a more detailed node-by-node breakdown if you like to know exactly what is happening.
Step 1 – Configure global repository variables
Open the Globals node in the workflow and set these values:
- repo.url: your Gitea base URL, for example
https://git.example.com - repo.owner: the repository owner, user or organization
- repo.name: the repository name, for example
workflows
These globals keep the workflow reusable and easy to move between environments without editing every node.
Step 2 – Create a Gitea personal access token
In your Gitea instance:
- Go to Settings → Applications
- Click Generate New Token
- Give it repo read/write permissions
In n8n, create an HTTP credential that uses this token. Use the header:
Authorization: Bearer YOUR_PERSONAL_ACCESS_TOKENDo not forget the space after Bearer. That tiny space is the difference between “works perfectly” and “401 Unauthorized”.
Step 3 – Assign credentials to the right nodes
In the n8n workflow:
- Assign your Gitea token credential to the HTTP Request nodes that talk to Gitea:
GetGiteaPutGiteaPostGitea
- Assign your n8n API credential to the node that lists workflows from your n8n instance
Step 4 – Pick your backup schedule
Open the Schedule Trigger node and set how often you want backups to run:
- Every 45 minutes, like the example
- Hourly
- Daily
- Whatever matches how often you change workflows
More changes, more frequent backups. Less change, fewer runs. Your future self will thank you either way.
Under the hood: how the workflow logic works
Now let us walk through the main nodes so you know exactly what this template is doing for you.
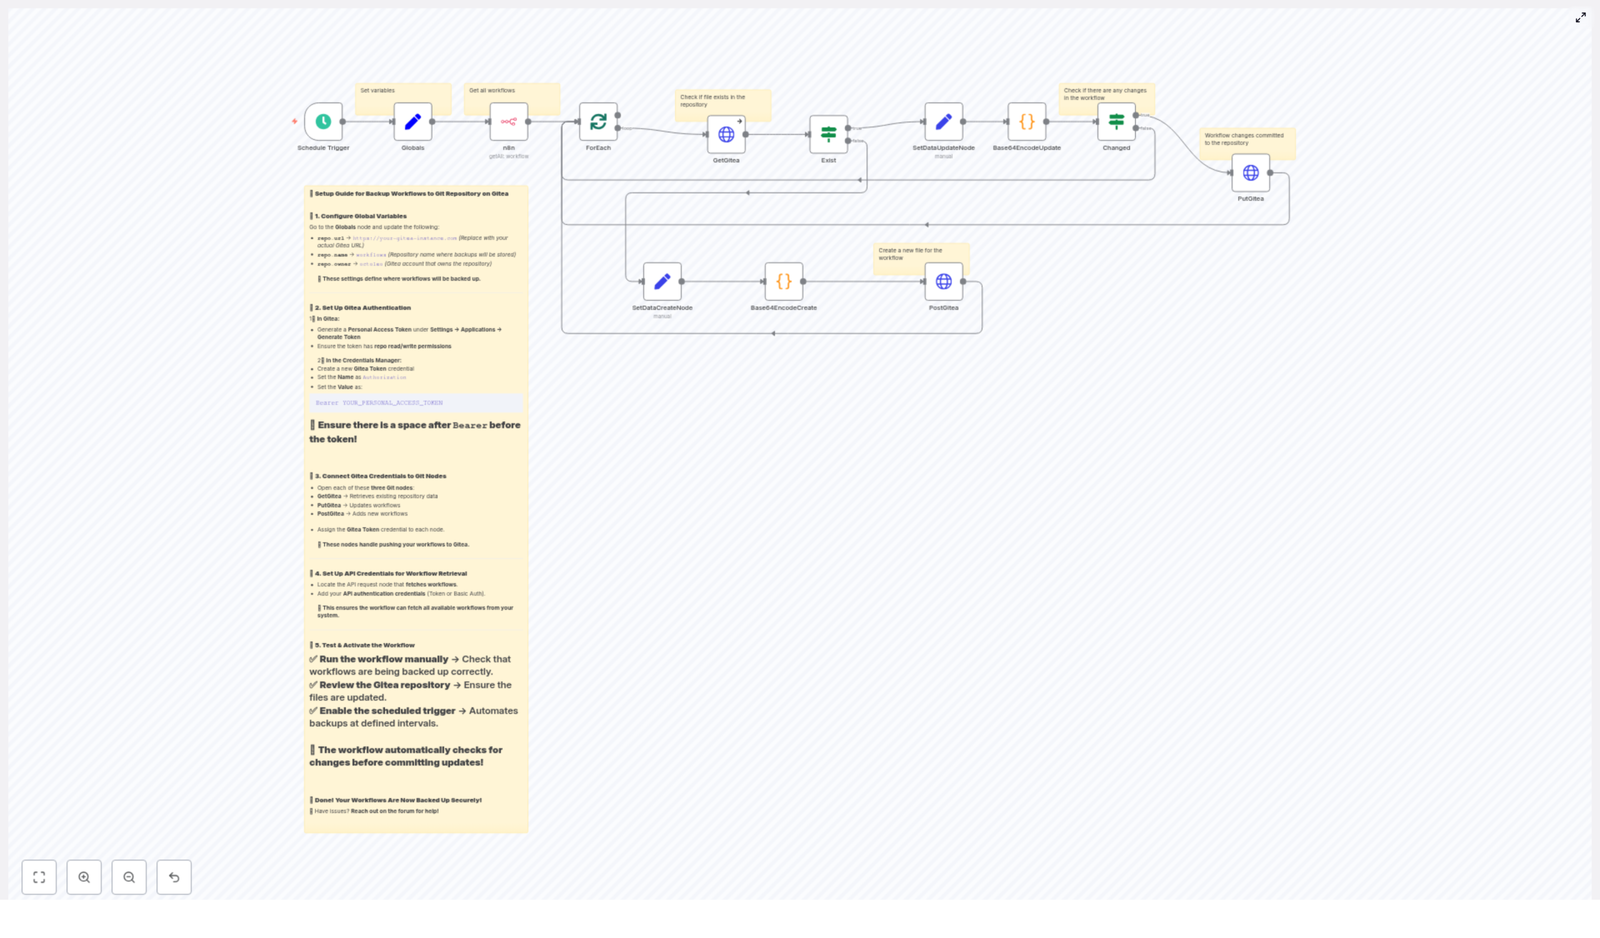
Schedule Trigger
This node is the starting point. It fires the workflow at the interval you configured. The example uses a 45 minute interval, but you can easily switch it to hourly, daily, or any other supported schedule.
Globals node
The Globals node acts as a mini settings file inside your workflow. It stores values like:
repo.urlrepo.ownerrepo.name
By centralizing these values, you can move between test, staging, and production Gitea instances with minimal edits.
n8n API node – fetching workflows
The n8n (API node) connects to your own n8n instance and retrieves all available workflows. Make sure the credential used here has permission to list workflows via the n8n API.
ForEach / Split in Batches – handling workflows one by one
Once all workflows are fetched, the workflow uses a combination of ForEach or SplitInBatches logic to process each workflow individually. This way:
- Each workflow becomes its own JSON file in Gitea
- Large numbers of workflows are processed in manageable chunks
- You avoid hammering the Gitea API all at once
GetGitea (HTTP Request) – does the file already exist?
The GetGitea HTTP Request node checks if a file for the current workflow already exists in the repo. It calls Gitea’s contents endpoint like this:
GET /api/v1/repos/{owner}/{repo}/contents/{path}.jsonThe {path} usually corresponds to the workflow name, with URL encoding applied so special characters do not break the request.
If the file is missing, Gitea returns a 404. The node is configured to continue on error so the workflow can handle this case gracefully and move on to file creation.
Exist (If node) – branching for create vs update
The Exist If node examines the result from GetGitea and decides what to do next:
- If GetGitea returned a 404, the file does not exist, so the flow goes down the create file path
- If it returned an existing file payload, the flow goes down the update file path
Base64 encoding nodes (Create & Update)
Gitea expects file contents to be sent as base64 encoded strings. To keep your repo readable and your diffs clean, the workflow uses a small Python code node to:
- Extract the workflow JSON object
- Pretty-print it with indentation so the JSON in Gitea looks nice
- Encode the resulting JSON string as base64
The core idea looks like this:
json_string = json.dumps(workflow_object, indent=4)
base64_string = base64.b64encode(json_string.encode('utf-8')).decode('utf-8')
Both the create and update paths use this encoded content when talking to the Gitea API.
Changed (If node) – only update when needed
To avoid noisy commits, the Changed If node compares the newly generated base64 content with the existing content from Gitea:
- If the content is the same, no update is sent
- If the content differs, the workflow calls PutGitea to update the file
This keeps your commit history clean and meaningful, instead of “updated the same thing again” every 45 minutes.
PutGitea and PostGitea (HTTP Request) – saving files
Two HTTP Request nodes handle writing to Gitea:
- PostGitea (create): sends a
POSTto the contents endpoint to create a new file with the base64 encoded content - PutGitea (update): sends a
PUTrequest including the file’sshafrom GetGitea to update the existing file content
Gitea API request example
Gitea’s contents API accepts several useful JSON fields in the request body, including:
content– base64 encoded file contents (required)message– commit messagebranch– branch name to commit tosha– required for updates to existing files
Here is an example cURL call to update a file:
curl -X PUT "https://git.example.com/api/v1/repos/owner/repo/contents/workflow.json" \ -H "Authorization: Bearer YOUR_TOKEN" \ -H "Content-Type: application/json" \ -d '{ "content":"BASE64_CONTENT", "message":"Backup: update workflow.json", "sha":"FILE_SHA" }'
The provided n8n template sends the minimal required fields by default. You can optionally add message and branch in the HTTP body parameters for more descriptive commits and custom branches.
Testing the template before you trust it
Before you rely on this workflow as your safety net, give it a quick test run.
- Run the workflow manually in n8n and confirm:
- Workflows are fetched correctly from your n8n instance
- JSON files appear in the Gitea repository
- Open the files in Gitea and check that:
- The JSON is pretty printed and readable
- Commits look sensible in the history
- Enable the Schedule Trigger once you are happy with the results so backups run automatically
Security tips and best practices
Automation is great, leaking tokens is not. A few sensible precautions:
- Store your Gitea token in n8n credentials, do not hardcode it in nodes
- Use a least-privilege token scoped only to the repositories you need, with read/write permissions
- Limit repository access in Gitea and rotate tokens regularly
- If n8n is running in production, also back up the n8n database and credential store using appropriate secure methods
Troubleshooting: when your backup needs a backup
Common errors and how to fix them
- 401 Unauthorized
Check the Authorization header format in your n8n credentials. Some setups expect:Authorization: token TOKENorAuthorization: Bearer TOKEN
Make sure the correct credential is attached to all Gitea HTTP Request nodes.
- 404 Not Found
Verify:- The
repo.ownerandrepo.namevalues - The file path and workflow name mapping
The template uses URL encoding for names so paths with special characters still work.
- The
- Encoding errors
Confirm that:- The JSON is valid before encoding
- The base64 encoding step is applied correctly
Pretty-printing the JSON helps you spot structural issues and makes diffs easier to read.
- Rate limiting or performance problems
If you have a lot of workflows, the SplitInBatches logic already helps. You can:- Adjust batch size
- Increase the interval between runs
- Add custom rate limiting if your Gitea instance is strict
Customization ideas to make it your own
Once the basic backup is working, you can start adding quality-of-life improvements.
- Smarter commit messages
Include timestamps, workflow IDs, or change hints in the commit message for easier tracking in Gitea. - Branch strategies
Instead of committing to the default branch, create a branch per day or week and push backups there. - Handling sensitive data
If workflows contain secrets, either:- Strip them out before committing, recommended
- Or encrypt sensitive fields before sending them to Gitea
- Use other Git providers
Prefer GitHub or GitLab? You can adapt the same logic by:- Swapping Gitea API endpoints for the provider’s API
- Updating credentials accordingly
Wrapping up: let automation back up your automation
Backing up your n8n workflows to a Gitea repository gives you versioned, auditable, and easily recoverable automation definitions with almost no ongoing effort. Once this template is in place, it quietly keeps everything safe while you focus on building new workflows instead of babysitting old ones.
Next steps:
- Import the n8n workflow template
- Add your Gitea token and n8n API credentials
- Run a manual test and confirm files appear correctly in Gitea
-
Build an AI Newsletter Pipeline with n8n
Build an AI Newsletter Pipeline with n8n
Imagine it is newsletter day again. Your coffee is cold, your tabs are overflowing, and you are copy-pasting tweets and markdown files like it is 2012. You tweak headlines, rephrase intros, triple-check links, and then someone on Slack says, “Can we swap the lead story?”
If that scenario feels a little too real, it is time to let automation do the heavy lifting. With n8n and a few well-behaved LLMs, you can turn your newsletter workflow from “frantic scramble” into “press play and review.”
This guide walks you through a production-ready n8n workflow template that builds an AI-powered newsletter pipeline. It ingests content, filters it, lets LLMs pick and write stories, gets human approval in Slack, and then assembles and publishes your newsletter. You keep the editorial judgment, the workflow handles the repetitive chores.
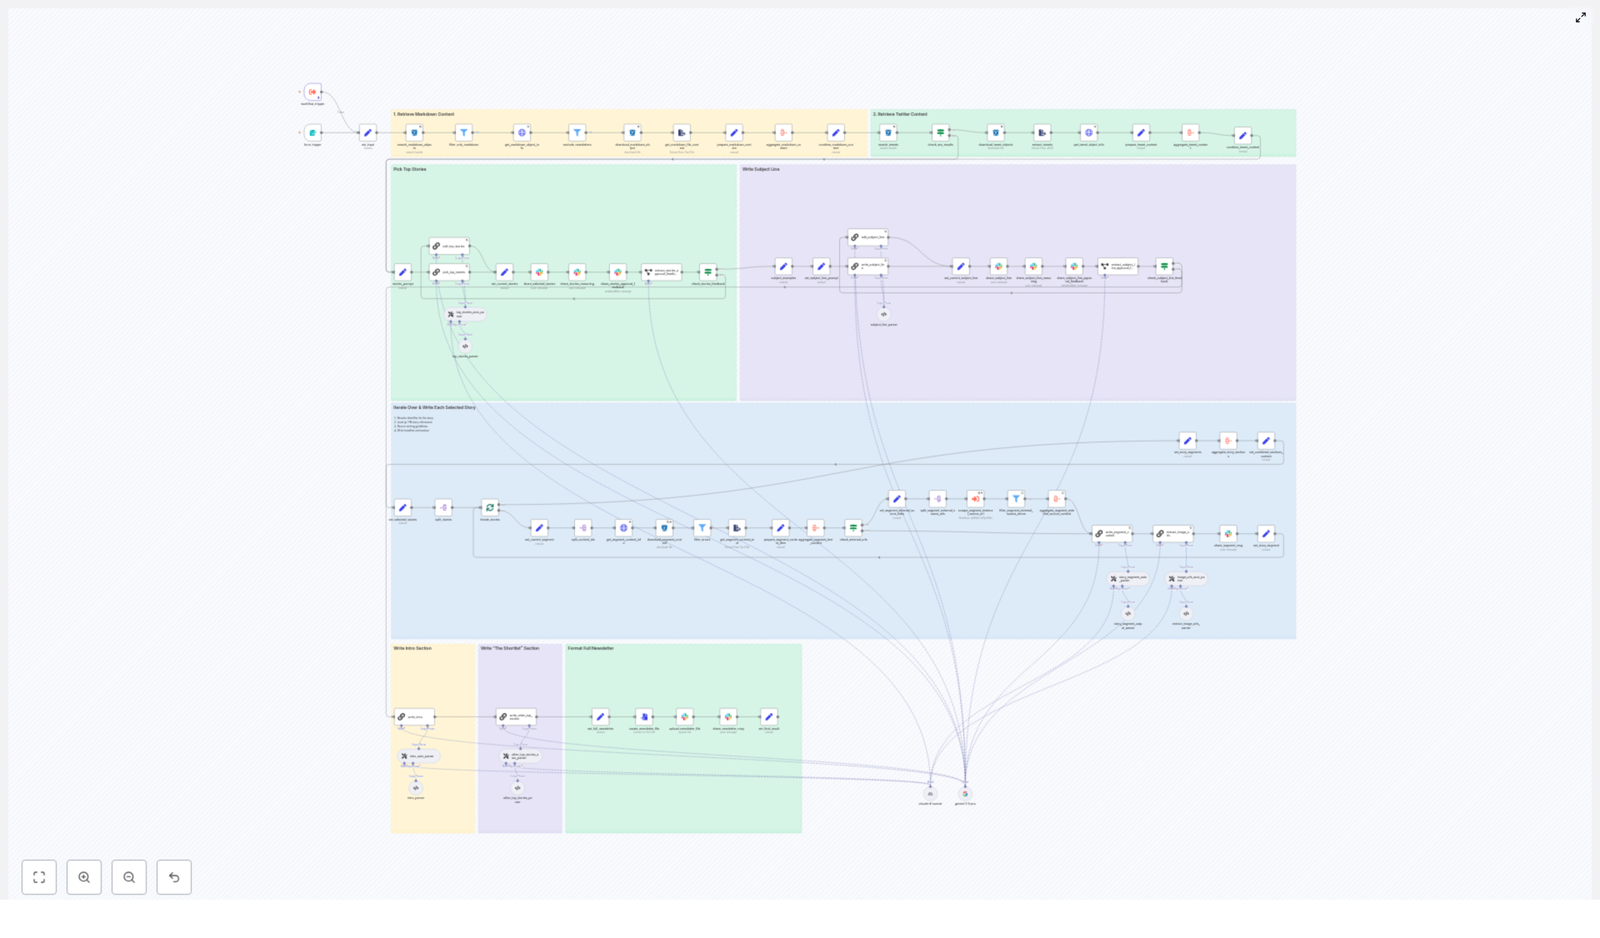
What this n8n newsletter workflow actually does
At a high level, the workflow is an automation pipeline for AI newsletters. It connects your content sources, uses LLMs for selection and writing, and then routes everything through a human-friendly approval loop.
The n8n template (importable as JSON) follows these major stages:
- Input trigger – kick off the pipeline for a specific issue date, either from a form or a schedule.
- Content retrieval – pull markdown articles and tweets from S3, normalize them, and add helpful metadata.
- Filtering and de-duplication – filter out old content, non-markdown files, and previous newsletter issues.
- LLM top story selection – use an LLM (LangChain, Gemini, Anthropic, etc.) to rank candidates and pick the top 4 stories.
- Story expansion – have an LLM write structured newsletter sections for each chosen story.
- Intro, subject line, and shortlist – generate the email intro, subject lines, and an “Other Top Stories” list.
- Approval and collaboration via Slack – send selections and reasoning to Slack for human review and edits.
- Assembly and export – stitch everything into a final markdown file and push it to Slack or other distribution channels.
The result is an AI newsletter pipeline that is repeatable, auditable, and way less soul-crushing than building each issue by hand.
Why bother automating your newsletter?
Manually building a newsletter is like doing data entry with extra steps. It is slow, repetitive, and surprisingly easy to mess up a link or re-feature an old story.
With n8n and modern LLMs, you can:
- Ingest content from multiple sources such as S3 buckets, scraped web pages, and social posts.
- Use LLMs to pick relevant stories that match your audience and avoid random “because the model felt like it” choices.
- Generate consistent copy for headlines, intros, and sections that keep your brand voice intact.
- Keep humans in control by collecting feedback and approvals in Slack before anything ships.
Automation does not replace your editorial brain, it just stops you from spending it on copy-paste duty and link wrangling.
Inside the workflow: how the pipeline is structured
1. Triggering the newsletter run
The workflow starts with a trigger node. You can:
- Use a form trigger if you want to manually kick off an issue.
- Use a schedule trigger if you prefer a weekly or daily cadence.
When the trigger fires, it passes in two key inputs:
- Issue date – tells the workflow which content window to pull from.
- Previous newsletter content – used later to avoid repeating stories you already covered.
Think of this as giving the pipeline its “assignment” for the day.
2. Grabbing content from S3 (markdown and tweets)
Next, the workflow heads to S3 to find candidate stories. This step:
- Runs an S3 search using the issue date as a prefix to list relevant markdown objects.
- For each object, calls a metadata endpoint or reads object metadata, then downloads the file.
- Pulls tweets from a tweet bucket in a similar way and parses them into normalized text.
Every piece of content is wrapped in a small header block that tracks:
- Unique
identifier - Source (for example, S3 markdown or tweet)
- Authors
external-source-urlsfor traceability and later scraping
This gives the rest of the workflow a clean, structured set of candidates to work with instead of a random pile of files.
3. De-duplication and filtering logic
Now that you have a content buffet, the workflow trims it down so you do not accidentally serve leftovers.
Filter nodes:
- Remove non-markdown files that slipped into the bucket.
- Exclude newsletter-type content such as previous issues, so you do not feature your own newsletter in your newsletter.
- Drop items that are older than the allowed time window, keeping coverage fresh and relevant.
The previous newsletter content passed in at the trigger step is used here to avoid re-covering the same stories.
4. LLM-powered top story selection
Once the candidates are filtered, it is time for the LLM to play editor.
A LangChain-powered node receives the combined raw content and runs a detailed prompt. The LLM:
- Evaluates all candidate stories.
- Ranks them and picks the top 4 stories for this issue.
- Outputs a rich “chain of thought” explanation that explains why each item was included or excluded.
The prompt is strict. It forces the LLM to:
- Enumerate every candidate.
- Justify its decisions for editorial review.
This reasoning is then posted to Slack so editors can quickly scan the logic, veto a pick, or suggest changes without digging into raw model output.
5. Writing each selected story section
With the top 4 stories chosen, the workflow now turns them into polished newsletter sections.
For each selected story, the pipeline:
- Resolves the story’s identifier.
- Aggregates content from S3 and any scraped external sources.
- Calls an LLM with a structured writing prompt.
The writing prompt enforces a consistent format:
- The Recap – 1 to 2 sentences that summarize the story.
- Unpacked – 3 bullet points that explain the key details.
- Bottom line – 2 sentences that give the takeaway.
The node returns markdown-ready content for each story, so you can drop it straight into your newsletter layout without extra formatting work.
6. Generating subject lines, pre-header, and intro
Next, the workflow handles the parts everyone sees first: the subject line and intro.
Dedicated LLM nodes:
- Create a subject line and pre-header text with constraints on word count and tone.
- Generate a short, on-brand intro that smoothly leads into the main stories.
- Produce alternative subject lines for A/B testing or editorial choice.
So instead of spending 20 minutes arguing over “Weekly AI Roundup” vs “This Week in AI,” you can let the model suggest options and pick your favorite.
7. Optional external scraping and image collection
When a selected story includes an
external-source-url, the workflow can optionally trigger a scraping sub-workflow for extra context.This sub-workflow can:
- Fetch the source page.
- Extract authoritative quotes or stats to enrich your summary.
- Harvest image URLs for potential hero images.
The image extraction logic:
- Filters for direct image links with file extensions such as
.jpg,.png, and.webp. - Deduplicates the results so you do not get the same image three times.
This gives you a curated list of images to choose from without manual hunting.
8. Slack approvals and human edits
Now comes the part where humans step in and keep everything on brand.
Before finalizing the issue, the workflow:
- Posts the selected stories and the LLM’s chain-of-thought reasoning to a Slack channel.
- Prompts an editor to approve or provide feedback.
Approval controls the next branch of the workflow:
- If everything is approved, the issue proceeds to assembly and publishing.
- If feedback is provided, an edit subflow updates the selected story JSON and can re-run the writer nodes as needed.
This keeps you in the loop without forcing you to manually manage every step in the pipeline.
9. Assembling and publishing the final newsletter
Once the content is approved, the workflow assembles the final issue.
It:
- Concatenates the intro, subject line, shortlist, and all story sections into a single markdown document.
- Converts that markdown to a file asset.
- Uploads it to Slack or pushes it to an email-sending service or CMS.
The workflow also keeps metadata and nightly logs for audit and rollback, so if something goes wrong, you can see exactly what happened and when.
Best practices for running this n8n newsletter template
To keep your AI newsletter pipeline reliable and affordable, a few practices go a long way.
- Use strict prompts and parsers
Structure LLM prompts with explicit schemas and use parser nodes to validate outputs. This keeps the workflow deterministic and reduces hallucinations that might otherwise sneak into your newsletter. - Keep sources canonical
Always preserve originalidentifiervalues andexternal-source-urlsin your JSON. This makes it easy to trace where each story came from and verify links later. - Rate limiting and retries
Add retry logic with exponential backoff for S3 downloads, HTTP scrapes, and LLM calls. Transient errors happen, and this keeps your run from failing just because one request had a moment. - Human-in-the-loop by design
Keep that Slack approval step. Especially early on, you want editorial control so the workflow accelerates your work instead of surprising your audience. - Monitoring and observability
Export run metadata and snapshots, including input identifiers and LLM outputs, to a log store. That way, if something looks off in a published issue, you can trace it back through the pipeline. - Cost controls on LLM usage
Batch LLM calls where possible and use cheaper models for early filtering. Reserve the more powerful (and more expensive) models for final story writing and subject-line generation.
Scaling and keeping things secure
As your newsletter grows, your pipeline needs to keep up without turning into a security risk.
For scaling, you can:
- Run heavy tasks such as scraping external sources and image downloads in separate worker workflows.
- Use a queue backed by a message broker to spread the load and avoid bottlenecks.
For security, make sure to:
- Store API keys and S3 credentials in n8n credential stores.
- Limit permissions to only the required buckets and endpoints.
- Keep outputs with sensitive content in a private artifact store rather than public buckets.
This keeps your automation fast, scalable, and safe as usage ramps up.
Common pitfalls to avoid
Even with a solid template, a few mistakes can trip you up. Watch out for:
- Unconstrained LLM outputs
Free-form outputs are fun until they break your workflow. Use structured output parsers and validators so the rest of the pipeline knows what to expect. - Link drift and accuracy issues
Always keepexternal-source-urlsverbatim from the original metadata. Editing them manually is a shortcut to broken links. - Skipping editorial checks
Full automation is tempting, but newsletters are public and brand-defining. Keep the Slack approval step so humans can catch tone or accuracy issues before they go out.
Putting it all together
This n8n-based AI newsletter pipeline gives you a full production flow: robust content ingestion, LLM-powered curation and writing, and Slack-based editorial approvals. It is modular, so you can:
- Swap storage backends if you move away from S3.
- Change LLM providers as new models appear.
- Extend the publishing step to more email platforms or CMSs.
In other words, your workflow can evolve as your stack and audience grow, without starting from scratch each time.
Ready to retire your copy-paste routine?
Duplicate the workflow, adapt the prompts to match your brand voice, plug in your S3 bucket and LLM credentials, and start automating your weekly issues. For a smooth rollout, import the template JSON into n8n and run it in dry-run mode for a single issue date to validate the outputs.Need help tailoring this architecture to your stack or content sources? Drop a comment or reach out to a professional automation consultant for a deeper walkthrough.
Call to action: Try this n8n newsletter template in your own instance this week. Run an end-to-end test on a sample date, review the Slack previews, then push a staged issue to a small test list before rolling it out to your full audience.
Automating an AI Newsletter with n8n (Step-by-Step)
Automating an AI Newsletter with n8n (Step-by-Step)
From Content Overload to Calm, Repeatable Systems
If you publish an AI newsletter, you already know the grind: chasing links, copying headlines, summarizing stories, checking for duplicates, formatting, and finally pushing everything into your email tool. By the time you hit send, you have spent hours on work that feels more manual than meaningful.
It does not have to stay that way.
With n8n, you can turn that recurring scramble into a calm, predictable workflow that runs in the background, surfaces the best AI stories, and hands you a polished, ready-to-review newsletter. Instead of wrestling with logistics, you can focus on judgment, strategy, and voice.
This guide walks you through a production-ready n8n workflow template that automates your AI newsletter pipeline. You will see how it:
- Ingests markdown and social content from storage
- Filters, enriches, and scores items
- Uses an LLM to pick top stories and craft a subject line
- Drafts Axios-style segments for each story
- Assembles a complete markdown newsletter
- Posts assets to Slack and storage for review and publishing
Think of this template as a starting point, not a finished product. Once it is running, you can refine prompts, plug in new sources, and keep evolving your automation as your newsletter grows.
Adopting an Automation Mindset
Before we dive into nodes and prompts, it helps to shift how you think about your newsletter. You are not just “sending emails” – you are running a content pipeline. That means every repetitive step is an opportunity to automate, standardize, and scale.
Why automate your AI newsletter with n8n?
- Save time – Let n8n handle content fetching, parsing, and first-draft writing so you can spend your energy on final edits and strategy.
- Stay consistent – Enforce the same structure, tone, and quality guidelines in every edition with reusable prompts and templates.
- Scale with confidence – Add more sources and let automated scoring and LLM selection surface the most relevant stories.
- Keep everything traceable – Preserve identifiers, sources, and assets for each story so you can audit, reuse, and link back easily.
Automation does not replace your editorial judgment. It amplifies it. You move from “doing everything by hand” to “orchestrating a system” that works for you every single week.
The Newsletter Pipeline: A High-Level Journey
The n8n workflow template follows a clear, modular flow. As you read through it, imagine your own content moving through these stages every time you publish.
- Content ingestion – Find and fetch markdown files and tweets from your storage bucket (S3 or R2).
- Filtering and metadata extraction – Remove out-of-scope items, pull metadata, and normalize content.
- Story selection – Use an LLM chain-of-thought process to choose top stories and propose a subject line.
- Section generation – Write tight, Axios-style segments for each selected story.
- Assembly and delivery – Compile the newsletter, save it as markdown, and send it to Slack or other channels.
Each phase is implemented as a set of n8n nodes. You can keep them as-is to get started, then gradually customize them as your needs evolve.
Phase 1: Content Ingestion – Gathering Your Raw Material
Every great newsletter starts with great sources. The first phase of the n8n workflow focuses on gathering everything you might want to include in a given edition.
Search your storage bucket by date
The workflow begins by querying your storage bucket (S3 or R2) for a date-specific prefix. This lets you target content that was created or published on the day you are writing the newsletter for.
In practice, you will configure S3/R2 nodes that:
- List markdown files that match the target date prefix
- Download those markdown objects for processing
Handle long-form and short-form content separately
The workflow also looks for tweets or social snippets stored under a different bucket prefix. Those are downloaded and parsed into plain text.
By keeping markdown and tweets separate at this stage, you preserve the flexibility to score and select them differently later on. Long-form posts, deep dives, and quick social updates can all feed into the same newsletter, but they do not have to be treated identically.
Phase 2: Filtering & Metadata – Turning Files Into Structured Stories
Once your content is in n8n, the next step is to clean and enrich it. This is where you start turning a pile of files into a set of structured story candidates.
Filter out irrelevant or duplicate content
Use filter nodes in n8n to:
- Exclude files that are prior newsletters
- Drop items that are out-of-scope for your AI newsletter
This keeps your pipeline focused and prevents your LLM from wasting tokens on content that should never make it into the current edition.
Pull metadata from your admin API
For each markdown object that passes your filters, the workflow calls your admin API to request metadata such as:
typesource-nameexternal-source-urls
These fields give you canonical identifiers, source names, and external links. Keeping them attached to each item will be essential for traceability and later editing.
Normalize content for downstream LLMs
After metadata is retrieved, the workflow extracts the raw text content from each markdown file. This ensures that downstream LLM chains receive normalized, clean inputs instead of inconsistent formats.
By the end of this phase, you have a consistent set of candidate stories, each with:
- Normalized text content
- Canonical identifiers
- External source URLs
Phase 3: Candidate Aggregation – Seeing the Big Picture
With content cleaned and annotated, the workflow aggregates everything into a single batch for analysis. This step unlocks smarter selection and grouping.
In this phase, n8n:
- Combines markdown content and tweets into a unified pool of candidates
- Preserves identifiers so multiple items can point to the same underlying event
This aggregation makes it possible for your LLM to recognize when several pieces of content are actually about the same story. It also ensures that whatever the model selects can be traced back to its original sources later.
Phase 4: LLM-Driven Story Selection – Let the Model Do the Heavy Lifting
Now comes one of the most transformative parts of the workflow: using an LLM to evaluate, score, and pick your top stories. Instead of manually scanning everything, you let the model do the first pass.
Configure a structured selection chain
The workflow uses a selection LLM chain, for example with LangChain, that is guided by a strict, well-crafted prompt. That prompt instructs the model to:
- Evaluate relevance and recency of each candidate
- Avoid duplicates and stories already covered in the previous newsletter
- Respect editorial constraints such as:
- Staying away from overly political content
- Observing date limits
- Ensuring each story has enough substance
Return reliable, structured JSON
The LLM returns a structured JSON payload that includes four chosen stories, each with:
- Identifiers
- Summaries
- External source links
To keep this reliable over time, the workflow uses an output parser that validates the model’s response against a schema. This protects you from “format drift” and ensures that every downstream node receives predictable data.
At this point, you have something incredibly valuable: an automatically curated short list of AI stories that passed your rules and are ready to be written up.
Phase 5: Iteration & Section Writing – Drafting Axios-Style Segments
With your four top stories selected, the workflow moves into writing mode. Instead of writing each section from scratch, you let an LLM produce structured, on-brand segments that you can review and tweak.
Iterate over each selected story
The workflow splits the selected stories and processes them one by one. For each story, n8n:
- Resolves identifiers to fetch the full content
- Collects additional external source material when available
- Passes the combined context into a second LLM prompt
Enforce a consistent newsletter format
The section-writing prompt is designed to keep your newsletter recognizable and easy to read. For every story, the LLM is instructed to produce:
- A section opener that starts with “The Recap:”
- An “Unpacked” list with exactly three bullets and specific formatting rules
- A concise “Bottom line” with two sentences of insight
Because the writing node runs per story, you end up with a set of consistent, reusable segments that can be dropped into your newsletter in any order.
Validate structure with an output parser
To keep everything machine-friendly, the workflow uses an output parser here as well. It checks that the LLM respects the required:
- Markdown structure
- Bullet formatting
- Link constraints
This is where your newsletter starts to feel almost finished. You have strong, structured segments that only need light editing instead of full rewrites.
Phase 6: Composing the Full Newsletter – From Segments to Send-Ready Draft
Once each story has a polished section, the workflow moves into assembly. This is where everything comes together into a single markdown file that looks and feels like a complete issue.
Aggregate sections and generate the intro
First, the workflow aggregates all the written sections. Then it runs a final node to generate the intro block. This intro usually includes:
- A dynamic greeting
- Two short paragraphs that set context and tone
- A bulleted list of the topics covered in this edition
The same LLM tooling can be used here, with a prompt that summarizes the selected stories and teases what is inside the issue.
Render, store, and share the newsletter
With the intro and sections in place, the workflow:
- Renders the full content as a markdown newsletter
- Saves the markdown file back to your storage bucket
- Optionally uploads the draft to Slack or another editorial channel for review and approval
At this point, you have moved from scattered content to a cohesive, ready-to-send AI newsletter, with n8n doing most of the heavy lifting.
Operational Best Practices: Keeping Your System Robust
Once you rely on automation, reliability matters. The following practices help keep your newsletter pipeline stable and trustworthy as you scale.
Versioning and identifiers
Always keep original identifiers and external-source URLs attached to each story object. This gives editors the ability to:
- Quickly review original sources
- Cross-check facts
- Maintain independence between automated text and original material
The workflow is designed to preserve these identifiers through every step so you never lose the connection between output and source.
Prompt engineering and guardrails
Strong prompts are the backbone of this system. For each LLM node:
- Be explicit about tone, length, and formatting
- Include clear style requirements
- Define blacklists and whitelists of phrases or topics where needed
Pair each prompt with an output parser that validates responses against a JSON schema. This reduces downstream errors and keeps your automation stable over time.
Human-in-the-loop review and approval
Automation should empower your editorial team, not bypass it. Add human checkpoints where they matter most. In this template, the workflow:
- Posts top stories and subject-line drafts to a Slack channel
- Optionally waits for approval or feedback before moving on
This hybrid approach lets you move fast while still maintaining editorial oversight and brand safety.
Error handling and retries
External APIs and file systems are not perfect. Use n8n’s built-in features to handle that gracefully:
- Configure onError workflows for critical steps
- Enable retries for network-dependent nodes
- Log failures and route problematic items to a remediation queue instead of dropping them
This way, a single failed request will not derail an entire newsletter edition.
Scaling Your Automated Newsletter
Once the core pipeline is running, you can start thinking bigger. Automation makes it easy to grow your newsletter without multiplying your workload.
- Parallelize writing nodes when you increase the number of stories per edition, while respecting rate limits for your LLM provider.
- Cache external-source fetches so you do not repeatedly scrape or request the same URLs.
- Monitor model quality by sampling generated sections, tracking editorial edits, and iterating on prompts as your standards evolve.
Over time, your system becomes a living asset that gets better with every issue you ship.
Security and Compliance in an Automated Workflow
As you automate more of your editorial process, it is important to treat security and privacy as first-class concerns.
- Store API keys using n8n credentials, not hard-coded values.
- If you process user-submitted content, make sure you have clear consent.
- Redact any PII before sending data to third-party LLMs.
- Use VPCs or private endpoints when connecting to storage and admin APIs where possible.
This lets you enjoy the benefits of automation while staying aligned with your organization’s security and compliance requirements.
Your Implementation Checklist
To turn this vision into a working system, you can follow a straightforward setup path. Use this checklist as your implementation roadmap in n8n:
- Set up an S3 or R2 storage bucket with clear, date-based file prefixes.
- Create n8n nodes that list and download objects from those prefixes.
- Implement metadata API calls and filters to exclude prior newsletters and out-of-scope content.
- Configure LangChain or other LLM nodes with strong prompts and output parsers for story selection.
- Add per-story iteration nodes to:
- Fetch full content for each selected story
- Write structured sections
- Generate the newsletter intro
- Aggregate all sections, render the final markdown, and post the draft to Slack or your editorial channel for approval.
- Save the final markdown back to storage and trigger your email-sending system.
Turning a Manual Grind Into a Growth Engine
Automating your AI newsletter with n8n is not just about convenience. It is about freeing yourself and your team to focus on higher-value work: sharper angles, better curation, deeper analysis, and new products around your content.
This workflow template shows that you can have both scale and quality. You get a repeatable pipeline that:
- Respects your editorial standards
- Keeps content traceable through identifiers and links
- Balances automation with human review
- Saves hours every publishing cycle
From here, you can keep iterating. Start with a small slice of your process, automate that, and then expand into new sources, richer prompts, and more
Create, Update & Get e-goi Subscriber in n8n
Create, Update & Get an e-goi Subscriber in n8n
If you spend a lot of time managing email subscribers, you know how quickly it can turn into a repetitive chore. Add a contact here, tweak a field there, double-check that everything synced correctly… it adds up.
That is exactly where this n8n workflow with the e-goi node comes in. In a single, simple flow you can create a contact, update it, then pull the record back to confirm everything worked – no manual clicking around in dashboards.
Let’s walk through what the template does, when you might want to use it, and how to set it up step by step, as if we were sitting together and wiring it up on your screen.
What this n8n + e-goi workflow actually does
This template is a straightforward three-step subscriber automation pattern in n8n using e-goi. In one run, it will:
- Create a new subscriber in a specific e-goi list.
- Update that subscriber’s details, like their first name.
- Fetch the updated subscriber from e-goi to confirm the changes.
All of that is handled by a short linear workflow built from four nodes:
- Manual Trigger – to start the workflow manually while you test.
- e-goi (create contact) – to add the subscriber to a list.
- e-goi (update contact) – to change any fields you like.
- e-goi (get contact) – to retrieve and verify the final contact data.
It is a small flow, but it shows you the full lifecycle of working with an e-goi subscriber inside n8n.
Why combine n8n with e-goi?
If you are already using e-goi for email marketing and automation, you probably want your subscribers to stay in sync with the rest of your tools. That is where n8n really shines.
n8n is a workflow automation platform that lets you connect APIs and apps without writing all the boilerplate code yourself. You drag nodes onto a canvas, set some parameters, and let it do the heavy lifting.
e-goi is your marketing hub for managing subscribers, lists, and campaigns. It handles email delivery and automation, but the data often needs to come from somewhere else: forms, CRMs, payment tools, or custom apps.
By using the e-goi node inside n8n you can:
- Build automated subscription flows that run in real time.
- Update subscriber profiles whenever something changes in another system.
- Keep everything consistent across your tech stack without manual exports and imports.
In short, n8n becomes the glue, and e-goi stays your email brain.
When is this template useful?
This simple pattern – create, update, then get – pops up in a lot of real-world workflows. You might use it when you want to:
- Import new leads, then enrich them later when more data comes in.
- Sync subscriber updates from a CRM and confirm that the changes actually landed in e-goi.
- Build a signup flow where you first store a minimal contact, then add more fields after verification or onboarding.
Think of this template as a starting point. You can drop it into bigger automations and plug it into forms, webhooks, or other apps.
What you need before you start
Before you hit “Execute”, make sure you have a couple of basics ready:
- An n8n instance (cloud or self-hosted).
- An e-goi account with API access and credentials.
- A target e-goi list where your subscribers will be stored.
Once those are in place, you are ready to wire everything up.
Step-by-step: building the workflow in n8n
Let us walk through the setup from scratch. You can build this visually in the editor or import the JSON later if you prefer.
1. Add and configure your e-goi credentials
First, tell n8n how to talk to e-goi:
- In n8n, go to Credentials.
- Click New and choose e-goi.
- Paste in your e-goi API key and any other required settings.
Once this is saved, any e-goi node in this workflow can authenticate securely with the e-goi API using that credential.
2. Drop in the Manual Trigger node
Next, add a Manual Trigger node to the canvas. This node is purely for testing and development. It lets you run the workflow on demand by clicking Execute in the editor.
Later, you can replace or supplement it with other triggers, like Webhook, Schedule, or anything else that makes sense for your use case.
3. Add the first e-goi node to create the contact
Now we create the subscriber in e-goi.
- Add a new e-goi node and connect it after the Manual Trigger.
- Set the operation to create (create contact).
- Select your e-goi credentials.
- Enter the list ID and the basic subscriber details.
For example, your parameters might look like this:
{  "list": 1,  "email": "nathan@testmail.com",  "additionalFields": {  "first_name": "Nathan"  }
}
In the visual editor, that translates to something like:
list: 1
email: nathan@testmail.com
additionalFields.first_name: Nathan
When this node runs successfully, e-goi returns a response that includes a
contact_id. That ID is important, because we will use it in the next nodes to update and fetch the same contact.4. Add the second e-goi node to update the contact
Now let us change something about that contact, like the first name.
- Add another e-goi node and connect it after the first one.
- Set the operation to update.
Instead of hardcoding the list and contact ID, use expressions to reference the output of the previous node. This keeps the workflow dynamic and reusable.
In the expression editor, you could use:
list: ={{$node["e-goi"].parameter["list"]}}
contactId: ={{$node["e-goi"].json["base"]["contact_id"]}}
Then set any fields you want to update. For example, changing the first name:
updateFields.first_name: NatWhen this node executes, it sends an update request to e-goi using the same contact ID that was returned from the create step.
5. Add the third e-goi node to get the contact
To confirm everything worked as expected, the last node fetches the subscriber again using the
getoperation.- Add a third e-goi node and connect it after the update node.
- Set the operation to get.
Again, reference the list and contact ID dynamically. This time, you will point to the output of the update node:
list: ={{$node["e-goi"].parameter["list"]}}
contactId: ={{$node["e-goi1"].json["base"]["contact_id"]}}
When you run the full workflow, this final node should return the updated contact, letting you visually confirm that the first name or any other fields were changed correctly.
Sample n8n workflow JSON
If you like working directly with JSON or want to import a starting point into n8n, the workflow structure will look roughly like this. Keep in mind that a real export from n8n will also include node IDs, positions on the canvas, and some additional metadata.
{  "nodes": [  {  "name": "On clicking 'execute'",  "type": "n8n-nodes-base.manualTrigger"  },  {  "name": "e-goi",  "type": "n8n-nodes-base.egoi",  "parameters": {  "list": 1,  "email": "nathan@testmail.com",  "additionalFields": {  "first_name": "Nathan"  }  }  },  {  "name": "e-goi1",  "type": "n8n-nodes-base.egoi",  "parameters": {  "list": "={{$node[\"e-goi\"].parameter[\"list\"]}}",  "contactId": "={{$node[\"e-goi\"].json[\"base\"][\"contact_id\"]}}",  "operation": "update",  "updateFields": {  "first_name": "Nat"  }  }  },  {  "name": "e-goi2",  "type": "n8n-nodes-base.egoi",  "parameters": {  "list": "={{$node[\"e-goi\"].parameter[\"list\"]}}",  "contactId": "={{$node[\"e-goi1\"].json[\"base\"][\"contact_id\"]}}",  "operation": "get"  }  }  ]
}
You can import this into n8n, attach your own credentials, tweak the parameters, and you are good to go.
Best practices for subscriber automation with e-goi in n8n
Once you have the basic workflow running, a few small habits will save you from headaches later.
- Double-check your list ID
Make sure the list ID you use actually exists in e-goi. You can confirm it in the e-goi UI or via their API before you run the workflow at scale. - Clean up input data
Validate and sanitize email addresses and required fields. This reduces the chance of API errors and keeps your lists clean. - Use expressions everywhere you can
The n8n expression editor is your friend. Reference values from previous nodes to keep the workflow flexible, instead of hardcoding IDs or emails. - Handle errors gracefully
Add Function or IF nodes after each e-goi call to catch and handle API errors or unexpected responses, instead of letting the workflow fail silently. - Respect rate limits
If you are processing a lot of contacts, be mindful of e-goi API rate limits. Use a Delay node or batch requests to avoid throttling.
Troubleshooting: what if something breaks?
Common issues you might see
- Authentication errors
Check that your API key is correct, active, and has the necessary permissions. - Invalid list ID
If e-goi complains about the list, confirm that the ID exists and that your account has access to it. - Missing
contact_id
If the update or get step fails, make sure you are reading the right JSON path from the create node, for examplebase.contact_id.
Debugging tips inside n8n
- Run the workflow node by node and inspect each node’s output in the n8n editor.
- Use a temporary Function node as a logger to print out any values you are referencing with expressions.
- Look closely at the e-goi API responses. Error messages and codes usually point directly to what went wrong.
Security, privacy, and compliance
Since you are working with subscriber data, it is worth keeping privacy and compliance in mind while you build automations.
- Store API keys securely using n8n Credentials, not in plain text fields or code.
- Avoid logging personal data in places that might be publicly accessible or shared.
- Make sure your flows align with regulations like GDPR, CAN-SPAM, and any local privacy laws that apply to your audience.
Where to go from here
With just a handful of nodes, you now have an end-to-end subscriber flow in n8n that can create, update, and verify e-goi contacts automatically. No more manual copy-paste, fewer mistakes, and a lot more time to focus on the fun parts of marketing and development.
Try the template yourself
Ready to play with it?
- Import the sample workflow into your n8n instance, or recreate it using the steps above.
- Add your e-goi credentials and set the correct list ID.
- Click Execute on the Manual Trigger and watch the contact flow through all three e-goi nodes.
If you would like a downloadable workflow file or want help tailoring this pattern to your own stack, feel free to reach out or drop a comment. This template is a great base you can extend with webhooks, CRMs, signup forms, and more.
AI Agent to Chat With YouTube
AI Agent to Chat With YouTube: Turn Every Video Into Actionable Insight
Most creators and marketers know the feeling: your YouTube channel is full of videos, comments, and thumbnails, yet you barely have time to scratch the surface of what is actually working. Hidden in that content are powerful insights about your audience, your next big idea, and the tweaks that can move your metrics.
This is where automation becomes more than a convenience. With an n8n-powered YouTube AI agent, you can transform scattered data into a focused, always-on system that listens, analyzes, and responds for you. In this guide, you will see how to use n8n, OpenAI, Apify, and Google APIs to build an AI agent that:
- Chats with you about any YouTube channel or video
- Pulls and analyzes comments for sentiment and ideas
- Transcribes videos for SEO and repurposing
- Critiques thumbnails to improve click-through rates
Think of this template as a starting point for a more automated, focused workflow. You can use it as-is, then gradually adapt and expand it as your needs and ambitions grow.
The Starting Point: A Common YouTube Problem
YouTube creators and marketing teams often face the same bottlenecks:
- Comments are rich with feedback, but reading them all is impossible.
- Long videos are packed with insights, but transcribing and summarizing them manually takes hours.
- Thumbnails are critical for clicks, yet most feedback is guesswork.
- Content planning is reactive instead of grounded in real viewer data.
When these tasks are manual, they become overwhelming. When they are automated, they turn into a repeatable system that works while you focus on strategy and creativity.
Shifting the Mindset: From Manual Grind to Automated Growth
Before diving into nodes and APIs, it helps to adopt a different mindset. Instead of asking, “How do I get through all this work?”, ask:
- “What can I safely hand off to automation?”
- “How can AI help me make better decisions, faster?”
- “What would I do with the time I get back?”
Automation with n8n does not replace your judgment. It amplifies it. By letting an AI agent handle repetitive research and analysis, you create space to focus on creative direction, relationships, and long-term strategy. Your YouTube AI agent becomes a partner that constantly watches your channel, surfaces patterns, and gives you the context you need to move faster.
What This YouTube AI Agent Can Do For You
Built on n8n, this workflow template turns your YouTube data into a conversational, on-demand assistant. With it, you can:
- Extract viewer sentiment and requests from comments so you can build content around what your audience truly wants.
- Transcribe videos to repurpose them into blog posts, show notes, LinkedIn content, and scripts.
- Analyze thumbnails using OpenAI to uncover design improvements that may lift click-through rates.
- Automate content planning driven by real viewer behavior instead of assumptions.
n8n acts as the automation backbone. It keeps everything modular and flexible, so you can add, swap, or remove tools without rebuilding the entire system.
The Tech Stack Behind Your AI Agent
Under the hood, this workflow combines several powerful services, each focused on a specific job:
- n8n – Orchestrates the workflow, connects all tools, and manages triggers and nodes.
- Google YouTube Data API – Fetches channels, videos, comments, and metadata.
- OpenAI – Analyzes transcripts, summarizes content, chats with you, and critiques thumbnails.
- Apify – Handles robust video transcription and scraping, especially helpful for longer videos.
- Postgres (or another database) – Stores results and chat memory so your agent can keep context over time.
Each of these tools is connected through n8n, so you can evolve your agent step by step without losing the overall structure.
Two Core Ways To Use This n8n YouTube AI Template
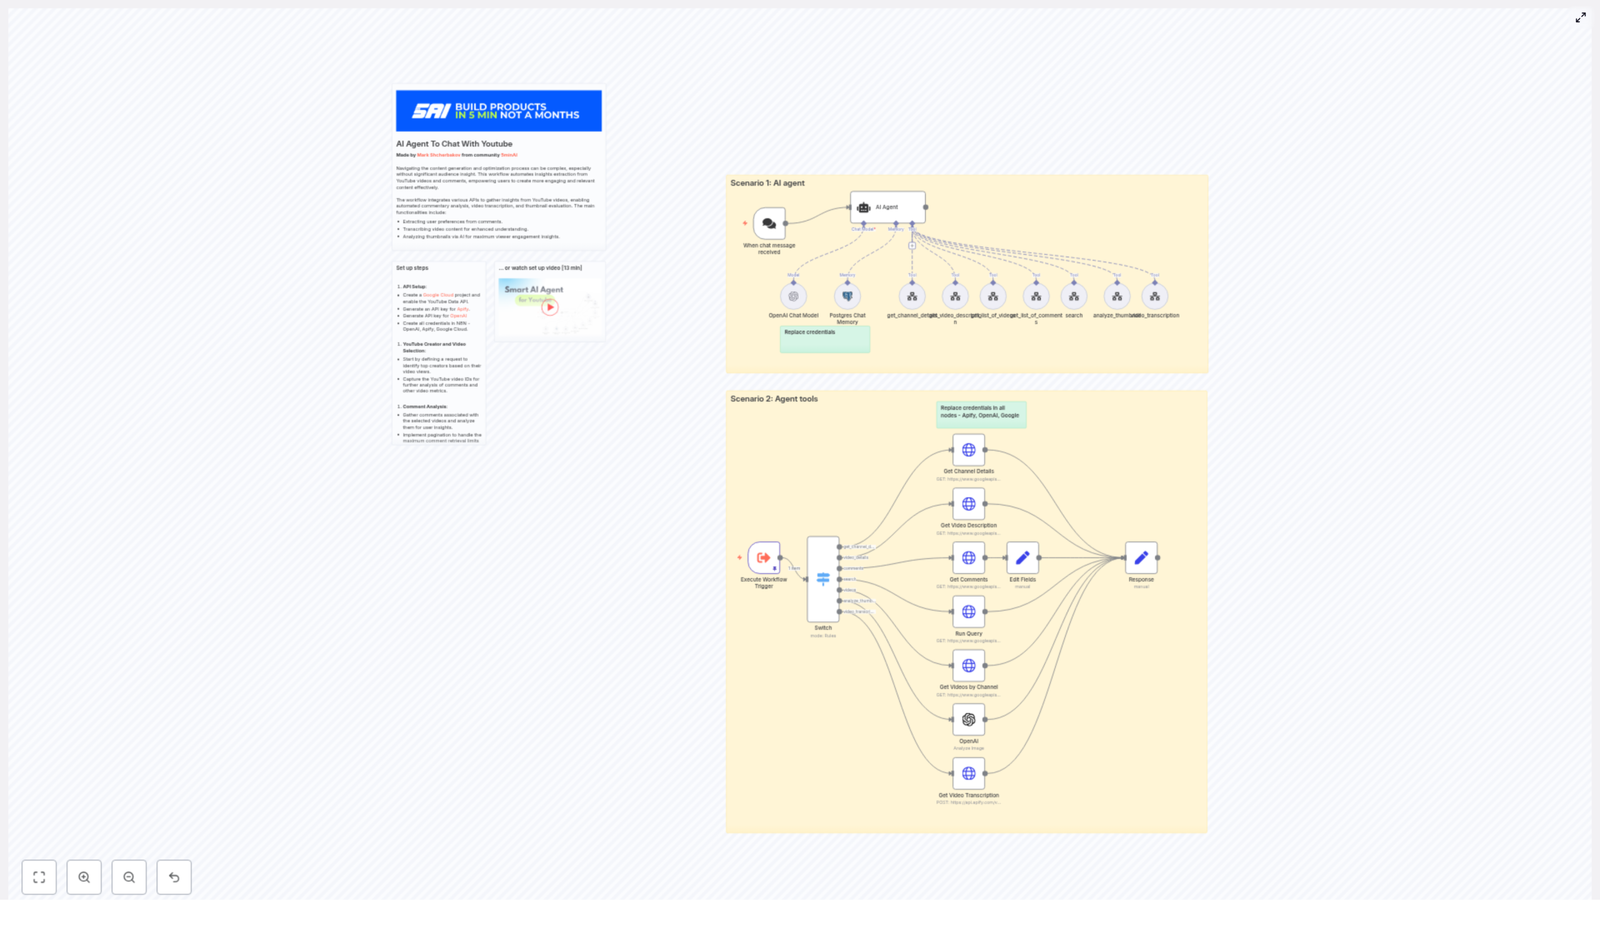
1. Interactive AI Chat Agent
Imagine typing a message like: “Analyze the latest video from @creator and give me the main themes and top comments.” The AI agent receives that request, figures out what data it needs, and then calls the right tools automatically.
Behind the scenes, the workflow performs these actions:
- Validate the request and extract the channel handle or video ID from your message.
- Run a channel lookup using a
get_channel_detailsstyle operation. - Fetch a list of videos with a
get_list_of_videosstep, filter out shorts (under 1 minute), and select the relevant video. - Retrieve video details via a
get_video_descriptioncall and pull top comments withget_list_of_comments. - Optionally transcribe the video using
video_transcriptionor send the thumbnail URL to ananalyze_thumbnailtool. - Aggregate the results and respond directly in chat using an OpenAI Chat Model node, so you get a clear, natural language answer.
This turns complex research tasks into a simple conversation, which is especially powerful when you are brainstorming ideas or doing quick checks before publishing your next video.
2. Agent Tools for Batch or Scheduled Analysis
Sometimes you do not want to ask questions manually. You want your agent to run on a schedule, collect data, and store it for later analysis. In that case, you can use the same workflow in a batch or scheduled mode.
In this scenario, an Execute Workflow Trigger node kicks off the automation. A Switch node then routes specific commands to dedicated tool nodes, such as:
- Get Channel Details
- Get Video Description
- Get Comments
- Run Query
- Get Videos by Channel
- Analyze Thumbnail
- Get Video Transcription
Each tool normalizes its response, and the workflow stores the data in Postgres so you can build dashboards, run long-term analysis, or feed insights into other systems.
Setting Up Your YouTube AI Agent in n8n
Step 1: Prepare Your API Credentials
To unlock automation, you first connect your tools. In practice, that means generating and configuring a few keys:
- Google YouTube Data API
Create a Google Cloud project, enable the YouTube Data API, and generate an API key or OAuth credentials depending on what access you need. - Apify
Sign up for Apify (or a similar transcription provider) and create an API token forvideo_transcriptiontasks. - OpenAI
Generate an OpenAI API key to handle analysis, summarization, and thumbnail critique. - Database
Prepare your Postgres (or equivalent) connection to store results and chat memory.
Inside n8n, configure credentials for:
- Google (typically via HTTP Query Auth)
- Apify
- OpenAI
- Your Postgres database
This initial setup is a one-time investment that unlocks ongoing automation.
Step 2: Design the n8n Workflow
With credentials ready, you can assemble the workflow that powers your AI agent. The template you use will roughly follow this structure:
- Chat Trigger node (When chat message received) to accept user requests and capture
chatInputtext. - Agent node (AI Agent) that uses OpenAI to interpret your request, plan which tools to call, and orchestrate those calls.
- Switch node to route each planned command to the appropriate tool node, such as:
get_channel_detailsvideo_detailscommentssearchvideosanalyze_thumbnailvideo_transcription
- HTTP Request nodes for the Google YouTube Data API endpoints:
/channels/videos/search/commentThreads
- Apify node to run a transcription act for long videos when you need a full transcript.
- OpenAI image resource node to analyze thumbnail images and provide structured feedback.
- Set nodes to shape the final response JSON so your chat output is clear and consistent.
- Postgres Chat Memory node to store session context and keep conversations memory-aware over time.
Once this is in place, you have a flexible framework you can refine, extend, and adapt to new use cases.
Step 3: Important Implementation Details That Make It Work Smoothly
To keep your agent efficient, accurate, and cost-conscious, pay attention to a few key details:
- Filter out YouTube Shorts
CheckcontentDetails.durationor the video length returned by the details node. Treat videos under 60 seconds as shorts and skip them if they are not relevant to your analysis. - Implement comment pagination
Use the YouTube API’spageTokenparameter to paginate through comments and fetch up to the available limits, especially when analyzing popular videos. - Control transcript size
Sanitize and truncate long transcripts before sending them to OpenAI. This keeps your prompts manageable and helps you control API costs. - Store intermediate data
Save results in Postgres so you can reuse them later and enable richer, memory-aware conversations with your AI agent.
These small design choices make a big difference in how sustainable and scalable your automation becomes.
Real-World Use Cases To Unlock With This Template
Content Ideation From Real Viewer Voices
Instead of guessing what to create next, you can let your audience tell you. Use the workflow to:
- Analyze the top 200 comments from a viral video.
- Use OpenAI to cluster comments into themes like requests, complaints, and feature ideas.
- Generate a content brief that includes:
- Suggested titles
- Key timestamps
- Potential follow-up videos
This moves you from “What should I post?” to “Here is exactly what my audience is asking for.”
Thumbnail A/B Improvements With AI Feedback
Your thumbnails are often the first impression viewers get. With this agent, you can:
- Send thumbnail images to OpenAI with a targeted prompt.
- Ask for critique on composition, CTA clarity, color contrast, and facial visibility.
- Aggregate suggestions across multiple videos to derive your own set of thumbnail design rules.
Over time, this feedback loop can guide you toward more consistent, higher-performing thumbnail choices.
SEO & Content Repurposing At Scale
Long-form videos are perfect for repurposing, but doing it manually is draining. With this workflow, you can:
- Transcribe long-form videos using Apify or another transcription provider.
- Summarize the content into:
- Blog posts
- Chapter timestamps
- LinkedIn posts
- Short-form video scripts
- Automatically generate repurposed content that supports discoverability and SEO.
This turns each video into a multi-channel asset, not just a single upload.
Best Practices To Keep Automation Efficient & Affordable
As you grow your automation, a few habits will help you stay in control of performance and cost:
- Keep prompts concise and batch similar tasks into a single OpenAI call where it makes sense.
- Use transcription selectively, focusing on high-engagement or strategically important videos.
- Cache results for channels and videos to avoid repeated API calls for the same data.
- Monitor quotas for both the YouTube Data API and Apify runs so you are not surprised by usage spikes.
These practices help you scale your AI agent without losing control of your budget.
Troubleshooting & Fine-Tuning Your Agent
As you experiment, you may hit a few bumps. Here are common issues and how to approach them:
- Comments return empty
Check ifcommentThreadspermissions are correctly configured and verify whether comments are disabled for that specific video. - The agent misunderstands a request
Encourage it to ask clarifying questions. The workflow is designed to support interactive clarification before running expensive tools, which keeps both accuracy and cost in check. - Credential errors
If the workflow breaks unexpectedly, methodically test and replace credentials for Apify, OpenAI, and Google. A single invalid credential can stop the entire flow.
Treat these moments as part of the learning curve. Each improvement makes your automation more robust and reliable.
Next Steps: From Template To Your Own Custom AI Assistant
You do not have to build everything from scratch. You can start with a ready-made n8n workflow template and a short setup video that walks you through the entire process.
Watch the 13-minute setup walkthrough to see the workflow in action and understand how the pieces fit together:
Setup video (13 min).Once you are ready:
- Download the workflow JSON template.
- Import it into your n8n instance.
- Replace the placeholder credentials with your own Google, OpenAI, Apify, and database details.
- Run the workflow and start experimenting with your own channel or client channels.
If you need help customizing it for your specific workflows, team structure, or content strategy, you can always reach out to a workflow specialist to guide the next iteration.
Bringing It All Together: Your YouTube Channel, Upgraded
Building a YouTube AI agent with n8n, OpenAI, Apify, and Google APIs is more than a technical project. It is a shift in how you run your channel or marketing operation. Instead of letting data pile up unused, you turn every video, comment, and thumbnail into a strategic asset.
With this template, you can:
- Optimize thumbnails with data-backed critiques.
- Mine comments for content ideas and audience insights.
- Repurpose transcripts into SEO-friendly and multi-channel content.
- Free up time for the creative and strategic work that only you can do.
Get started now: import the n8n workflow, plug in your Google, OpenAI, and Apify API credentials, and run the Execute Workflow Trigger. From there, experiment, refine, and make the agent truly your own.
If you want support, schedule a walkthrough
Automate Notion Updates with n8n & LangChain
Automate Notion Updates with n8n & LangChain (So You Can Stop Copy-Pasting Everything)
Imagine this: you open Notion to update a page and suddenly realize you are on version 37 of “Quarterly Roadmap – Final – FINAL”. You copy text from somewhere, paste it into Notion, clean it up, tweak the formatting, log what you did in a spreadsheet, and then ping your team in Slack when something breaks.
Now imagine never doing that again.
That is exactly what this n8n workflow template is for. It takes incoming content, runs it through LangChain components (embeddings and RAG), stores and searches vectors in Supabase, logs everything to Google Sheets, and screams for help in Slack when something goes wrong. All without you manually poking at Notion.
In this guide, you will see how the workflow works, why the architecture is useful, and how to set it up step by step so your Notion updates are handled by automation instead of your increasingly tired brain.
What This n8n Workflow Actually Does
At a high level, this template turns raw content into a smart, contextual Notion update message, then logs and monitors the whole process. The workflow:
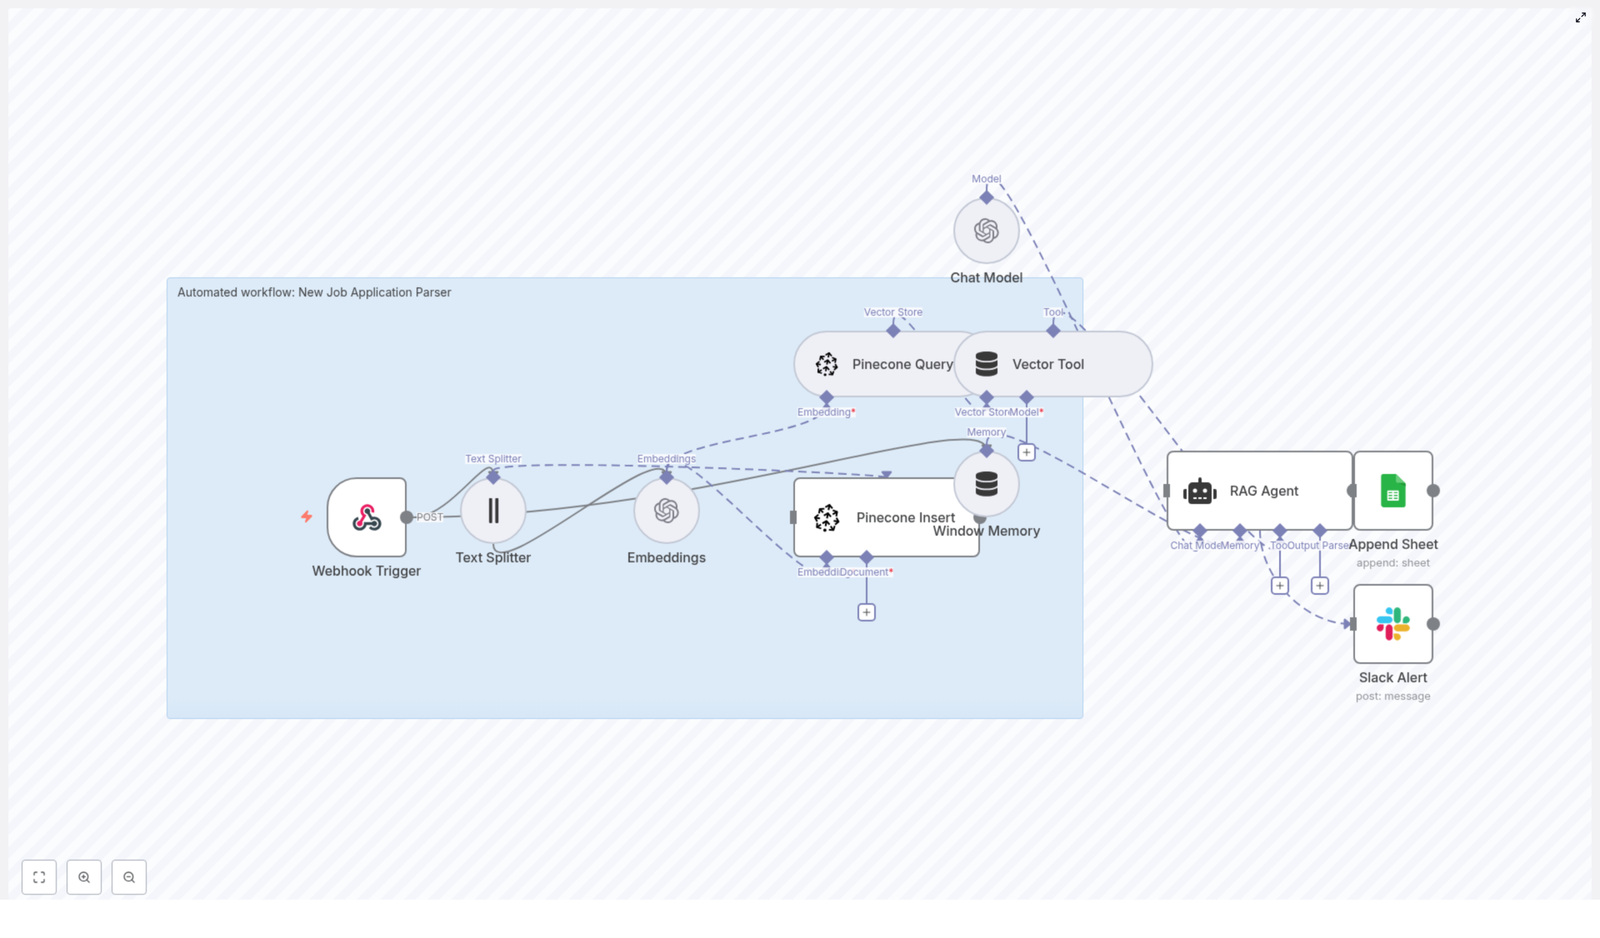
- Accepts data through a Webhook Trigger (
/notion-api-update) - Splits long text with a Text Splitter so it is friendly to embedding models
- Creates embeddings using OpenAI (
text-embedding-3-small) - Stores and queries vectors in a Supabase index named
notion_api_update - Exposes those vectors as a Vector Tool for a RAG Agent
- Uses Window Memory to keep short-term context for the agent
- Runs an Anthropic chat model via a Chat Model node for generation
- Lets the RAG Agent combine retrieval + generation to produce a Notion-ready update message
- Appends the result into a Google Sheet (
Logsheet) - Sends Slack alerts if the agent fails so you do not silently lose updates
In other words, it is a semantically-aware assembly line for your Notion content, wired together with n8n, LangChain, Supabase, Google Sheets, and Slack.
When This Workflow Is a Perfect Fit
This architecture shines when you are dealing with more than just a one-off Notion tweak and you want something closer to a production pipeline. It is especially useful if you need to:
- Accept updates programmatically via a webhook and enrich them with semantic search instead of keyword matching
- Store and retrieve contextual knowledge in a dedicated vector store, using Supabase as the backend
- Use a RAG (Retrieval-Augmented Generation) agent to turn raw data into human-readable, Notion-friendly summaries or update messages
- Maintain an audit trail in Google Sheets and get Slack notifications when something breaks
If your current process involves “someone remembers to do it manually”, this workflow is an upgrade.
How the n8n Workflow Fits Together
Here is the cast of nodes working behind the scenes:
- Webhook Trigger – Entry point for incoming POST requests on path
notion-api-update - Text Splitter – Uses
CharacterTextSplitterwithchunkSize: 400andchunkOverlap: 40to cut long content into overlapping chunks - Embeddings – Uses OpenAI model
text-embedding-3-smallto convert each chunk into a vector - Supabase Insert – Stores embeddings and metadata in the
notion_api_updateindex - Supabase Query – Performs similarity search against the same
notion_api_updateindex - Vector Tool – Wraps Supabase query results as a retrieval tool for the RAG Agent
- Window Memory – Keeps recent messages or context available to the agent
- Chat Model – Anthropic-based model used for text generation
- RAG Agent – Orchestrates retrieval + generation and outputs a nicely formatted Notion update log
- Append Sheet – Writes the agent output to the
Logsheet in Google Sheets - Slack Alert – Sends an error message to Slack if the RAG Agent hits a problem
Now let us walk through how to set it up without losing your patience.
Step-by-Step Setup Guide
1. Start With the Webhook Trigger
First, you need an entry point where other systems can send content.
- Add a Webhook node in n8n.
- Set the path to
/notion-api-update. - Configure it to accept POST requests with a JSON body.
The incoming payload should look something like this:
{  "title": "Page title",  "content": "Long text or blocks from Notion to process",  "metadata": { "source": "Notion" }
}
This is the raw material that the rest of the workflow will refine into a smart Notion update.
2. Tame Long Content With the Text Splitter
Long text is great for humans, less great for models that have token limits. So you split it.
- Add a Text Splitter node using
CharacterTextSplitter. - Configure:
chunkSize: 400– keeps each chunk small enough for efficient embeddings and retrievalchunkOverlap: 40– ensures context is preserved between chunks
This improves retrieval quality and reduces the risk of the model forgetting what it was talking about halfway through.
3. Generate Embeddings for Each Chunk
Next, each text chunk becomes a vector that you can store and search.
- Add an Embeddings node.
- Select the OpenAI model
text-embedding-3-small(or another OpenAI embeddings model if you prefer). - Make sure your OpenAI credential is configured in n8n as
OPENAI_API.
After this step, your text is represented as numeric vectors that are ready for semantic search in Supabase.
4. Store Vectors in Supabase
Now that you have embeddings, you need somewhere to keep them.
- Add a Supabase Insert node.
- Configure it with:
mode: insertindexName: notion_api_update
- Connect your Supabase credential in n8n as
SUPABASE_API.
Supabase will store both the vectors and any associated metadata, so later you can run nearest-neighbor queries to pull back the most relevant chunks.
5. Set Up Vector Retrieval for the RAG Agent
Retrieval is where the “R” in RAG comes from. You need to let the agent ask Supabase for context.
- Add a Supabase Query node that:
- Uses the same
notion_api_updateindex - Performs a similarity search based on the current query or content
- Uses the same
- Connect it to a Vector Tool node so the RAG Agent can call it as a retrieval tool.
This is how the agent finds “what it should know” before writing an update.
6. Configure Memory, Chat Model, and the RAG Agent
This is the brain of the operation where retrieval meets generation.
- Add a Window Memory node:
- Use it to store recent messages or context that the agent should remember during the interaction.
- Add a Chat Model node:
- Use an Anthropic model for generation.
- Ensure your Anthropic credential is set in n8n as
ANTHROPIC_API.
- Add a RAG Agent node:
- Provide a system prompt that defines its job, for example: “You are an assistant for Notion API Update”
- Set a prompt template that explains how to use the retrieved data to produce an actionable Notion update message or log entry.
- Attach the Vector Tool and Window Memory as resources so the agent can retrieve context and maintain state.
The result is an agent that knows where to look for context and how to turn that context into a clear, human-readable Notion update.
7. Log Everything to Google Sheets
Automation is fun, but audit logs are what keep future-you from wondering “what on earth happened yesterday”.
- Add a Google Sheets node configured in Append mode.
- Connect your Google Sheets OAuth credential as
SHEETS_API. - Provide:
- The target sheet ID
- The sheet name, for example
Log
- Map the
Statuscolumn (or similar) to the agent output, for example:{{$json["RAG Agent"].text}}
This gives you a running log of what the agent produced for each request.
8. Wire Up Slack Alerts for Errors
Even the best workflows occasionally trip over a missing credential or a weird input. Instead of silently failing, this one complains loudly in Slack.
- Add a Slack node for alerts.
- Connect your Slack credential as
SLACK_API. - Configure it to post to a channel such as
#alerts. - Use a message like:
Notion API Update error: {$json.error.message}
Now when the RAG Agent throws an error, the workflow routes execution to this Slack node so your team can fix issues quickly instead of discovering them days later.
Example Request to Trigger the Workflow
Once everything is wired up, you can trigger the workflow with a simple HTTP request:
POST https://your-n8n-instance/webhook/notion-api-update
Content-Type: application/json

{  "title": "Quarterly roadmap",  "content": "We added new objectives for Q4...",  "metadata": { "notion_page_id": "abc123" }
}
The workflow will ingest this content, embed and store it, retrieve context, generate an update message, log it to Google Sheets, and only bother you in Slack if something breaks.
Best Practices for Reliable Notion Automation
To keep this workflow running smoothly in production, pay attention to a few key details.
- Chunk sizing: Start with
chunkSize: 400andchunkOverlap: 40. If you are using larger models or very dense content, experiment with larger chunks to maintain semantic continuity. - Embedding model choice: Compact models like
text-embedding-3-smallare cost-efficient and usually good enough. If you need maximum semantic accuracy, consider switching to a higher capacity model and monitor cost vs quality. - Clear vector index naming: Use explicit index names like
notion_api_updateso you do not accidentally mix data from different workflows or domains. - Security: Protect the webhook with authentication or secret headers, and rotate API keys frequently. It is fun when your automation works, less fun when someone else is sending it random content.
- Observability: While testing, log intermediate values like vector IDs, similarity scores, and retrieved chunks. This makes it much easier to tune retrieval thresholds and debug weird agent behavior.
Common Pitfalls to Avoid
Before you declare victory, keep an eye out for these frequent troublemakers:
- Bad chunk settings If chunks are too large or too small, embeddings become less useful. Tune
chunkSizeandchunkOverlapbased on your content type. - Missing or broken credentials If embeddings, Supabase, Sheets, Slack, or Anthropic are not configured correctly in n8n, the workflow will fail. Double check:
OPENAI_APISUPABASE_APISHEETS_APISLACK_APIANTHROPIC_API
- RAG agent hallucinations If the agent gets too creative, tighten the instructions in the system prompt and ensure it has strong, relevant retrieval context. The better the context, the less it needs to “guess”.
Ideas for Extending the Workflow
Once the basic pipeline is humming along, you can extend it to automate even more of your Notion workflow.
- Direct Notion updates Add a Notion node to patch page content once the RAG Agent generates a Notion-compatible update. That way, the workflow does not just log updates, it applies them.
- Human approval step Insert an approval layer where the agent output is sent to email or Slack first. A human can review and approve before anything touches Notion.
- Automated vector cleanup Add a scheduled job that periodically purges or reindexes vectors in Supabase to keep storage lean and your knowledge base fresh.
Wrapping Up: From Manual Chaos to Automated Calm
This n8n + LangChain + Supabase workflow gives you a scalable, semantically-aware pipeline for processing and automating Notion updates. It combines:
- Webhooks for ingesting content
- Chunking and embeddings for semantic search
- Supabase as a vector store
- A RAG agent powered by Anthropic for intelligent text generation
- Google Sheets logging for traceability
- Slack alerts for robust error handling
The result is less repetitive copy-paste work and more time for things that actually require a human brain.
If you would like, I can:
- Provide a ready-to-import n8n workflow JSON with placeholders for your credentials, or
- Help you adapt the flow to update Notion pages directly and add human approval steps.
Tell me what you want to do next – export the n8n template, plug into Notion, or tune embeddings and retrieval – and I will outline the exact steps.
Backup n8n Workflows to Gitea (Step-by-Step)
Backup n8n Workflows to a Gitea Git Repository (Without Thinking About It)
If you have a bunch of n8n workflows running important automations, you probably do not want to lose them. Manually exporting and backing them up gets old fast, right?
This n8n workflow template takes that off your plate. It automatically pulls your workflows from n8n, turns them into JSON files, and syncs them to a Gitea repository on a schedule. It checks what changed, creates new files when needed, and updates existing ones only when there is a real difference.
In this guide, we will walk through what the template does, why you might want it, and how to set it up step by step. Think of it as version control and backup for your automations, running quietly in the background.
Why back up n8n workflows to Gitea?
Before diving into nodes and tokens, let us talk about why this is worth setting up at all.
- Git-based versioning – Every change to a workflow becomes a commit, so you can see who changed what and when, and roll back if something breaks.
- Off-site safety net – Your workflows live somewhere other than your n8n instance. If you lose the instance or a database, you still have the JSON files in Gitea.
- Hands-off automation – A scheduled n8n workflow keeps your backups fresh without you having to remember anything.
- Great for self-hosting – Gitea is lightweight, easy to self-host, and perfect for private repositories and internal automations.
So if you care about auditability, rollback, or just sleeping better at night, this template is a simple win.
What this n8n-Gitea backup template actually does
At a high level, the template:
- Runs on a schedule using a Schedule Trigger.
- Fetches all workflows from your n8n instance via the n8n (API request) node.
- Processes each workflow one by one using ForEach / splitInBatches.
- Checks Gitea to see if a corresponding JSON file already exists with GetGitea.
- Decides whether to create or update the file using the Exist and Changed logic.
- Base64-encodes pretty-printed JSON through Base64EncodeCreate and Base64EncodeUpdate nodes.
- Creates or updates the file in Gitea via PostGitea and PutGitea using the Gitea contents API.
The end result: each workflow in n8n gets a matching
.jsonfile in your Gitea repo, and only real changes result in new commits.When should you use this template?
This template is a great fit if you:
- Run production or business-critical workflows in n8n.
- Want Git-style history for your automations.
- Already use Gitea or want a private, self-hosted Git solution.
- Prefer automated backups over manual exports and imports.
If you are experimenting casually with n8n, you might not need this right away. But once your workflows start doing real work for your team, this kind of backup becomes very handy.
Key nodes in the template, explained like a human
Let us break down the main pieces of the workflow and what each one is responsible for.
Schedule Trigger
This node decides when the backup runs. You can set it to run hourly, daily, weekly, or whatever fits your needs. Once enabled, it kicks off the entire process automatically.
Globals node
The
Globalsnode is where you store your Gitea repository details in one place so you do not have to hardcode them all over the workflow:repo.url– your base Gitea URL, for example https://git.example.com.repo.owner– the user or organization that owns the repository.repo.name– the name of the repository that will store your workflow JSON files, for example workflows.
n8n (API request) node
This node talks to the n8n API and pulls down all your workflows. The template expects an array of workflows, each with a name and a JSON body. That JSON is exactly what ends up in your Git repository.
ForEach / splitInBatches
Instead of processing everything in one big lump, the workflow loops through each workflow individually. That keeps things manageable and lets the template handle each workflow file separately in Gitea.
GetGitea and Exist logic
The GetGitea node checks if there is already a file in the repository for the current workflow. The Exist node then branches the flow:
- If the file does not exist (404 from Gitea), it goes down the “create” path.
- If the file does exist, it heads to the “compare and maybe update” path.
Changed logic, PostGitea and PutGitea
When the file already exists, the template does not blindly overwrite it. Instead, it:
- Base64-encodes the current workflow JSON.
- Compares it with the existing file content using the Changed IF node.
- If the content is different, PutGitea updates the file using the
shathat Gitea returned from GetGitea. - If nothing changed, it simply skips the update, avoiding unnecessary commits.
For new workflows, the PostGitea node is used to create a fresh file in the repository.
Base64EncodeCreate / Base64EncodeUpdate
Gitea’s contents API expects file content in base64 format. These nodes handle the conversion:
- They pretty-print the workflow JSON so it is readable in Git.
- They convert that JSON string to bytes.
- They encode those bytes as base64 and return a payload ready for the HTTP Request nodes.
Each workflow is stored as
workflow-name.json, for examplemy-workflow.json.Step-by-step setup guide
Ready to get it running? Here is how to configure the template in a few steps.
1. Import the template and set your globals
- Import the n8n template into your n8n instance.
- Open the
Globalsnode and fill in:repo.url– your Gitea base URL, such as https://git.example.com.repo.owner– the user or organization that owns the repo.repo.name– the repository name that will store the workflow JSON files.
2. Create a Gitea personal access token and credential
Next, you need to give n8n permission to talk to your Gitea instance.
- In Gitea, create a Personal Access Token with repo read/write permissions.
- In n8n, create a new credential (for example an HTTP Header or generic credential).
- Add the following header:
Authorization: Bearer YOUR_PERSONAL_ACCESS_TOKEN - Assign this credential to the
GetGitea,PostGitea, andPutGiteaHTTP Request nodes.
3. Configure the n8n API node that retrieves workflows
The template includes an n8n API Request node that fetches all workflows from your instance. You just need to make sure it can authenticate correctly.
- Configure the node with the right base URL and authentication (API token or other n8n credentials).
- Confirm that the node returns an array of workflows, each with a name and JSON body.
Once this is set, the rest of the workflow can loop over and back up each workflow.
4. Understand and verify the create vs update behavior
It is helpful to know exactly what happens for each workflow, especially when testing:
- The workflow tries a GET request in Gitea for the corresponding file via
GetGitea. - If Gitea responds with 404, the
Existnode routes to the “create” path, andPostGiteacreates a new file. - If Gitea finds the file, the content is fetched and compared:
- The new workflow JSON is base64-encoded.
- The
ChangedIF node checks if the encoded content differs from what is already in the repository.
- If it changed,
PutGiteaupdates the file using the existing file’sshafromGetGitea. - If it did not change, no update is performed, and no new commit is created.
5. Run a manual test, then enable the schedule
- Run the workflow manually once.
- Inspect the node outputs to confirm:
- The n8n API node is returning workflows correctly.
- The Base64 encoding nodes are generating the right payload.
- The Gitea HTTP nodes are returning success responses.
- Check your Gitea repository to see the new or updated
.jsonfiles. - Once everything looks good, enable the Schedule Trigger so backups run automatically.
From this point on, the template quietly keeps your Gitea repo in sync with your n8n workflows and only commits when something actually changes.
Security tips and best practices
Since this workflow touches tokens and potentially sensitive automation logic, a bit of security hygiene goes a long way.
- Always store tokens as n8n credentials, not as plain text in variables or nodes.
- Use the minimum required scopes for your Gitea token, typically repo read/write only.
- Limit access to the backup repository, especially if workflow JSON contains sensitive logic or references.
- Avoid storing secrets directly inside workflows when possible, or consider encrypting sensitive environment variables or secrets before they end up in Git.
Troubleshooting common issues
If something is not working as expected, here are the most common problems and how to think about them.
Typical error codes and what they mean
- 401 / Unauthorized – Usually a credential issue. Double-check that:
- The Authorization header looks like
Bearer YOUR_TOKEN. - The token is valid and has repo read/write permissions.
- The Authorization header looks like
- 404 on GetGitea – This is often
an error. It simply means the file does not exist yet. The template treats this as the “create” path for new workflows. - Encoding mismatches – If updates keep happening when you do not expect them, make sure the Base64 encoding nodes are using the same pretty-printed JSON string each time. Even whitespace or formatting changes can affect comparisons.
Debugging tips inside n8n
- Run the workflow manually and inspect each node’s output to see exactly what is being sent to and returned from Gitea.
- Check the response bodies from the Gitea HTTP Request nodes. They often include detailed error messages.
- Temporarily adjust nodes to return raw content or extra fields so you can compare what n8n thinks the file looks like versus what Gitea has stored.
Ideas to customize the backup workflow
Once the basic setup is running, you can extend the template to better match your team’s workflow.
- Use subfolders per environment – Store files under paths like
prod/,staging/, ordev/to keep things organized. - Snapshot with timestamps – Instead of overwriting a single file, include a timestamp in the filename to keep a history of snapshots, for example
my-workflow-2025-01-01.json. - Branch-based workflow – Push changes to a feature or backup branch and open an automated pull request, instead of committing directly to the main branch.
- Integrate with CI or Git hooks – Trigger tests, validation scripts, or linters on workflow JSON before merging into your main branch.
Quick start checklist: how to use this template
- Import the backup template into your n8n instance.
- Fill in the
Globalsnode with your Gitea URL, owner, and repository name. - Create a Gitea Personal Access Token with repo read/write scope.
- Set up an HTTP Header (or generic) credential in n8n with:
Authorization: Bearer YOUR_PERSONAL_ACCESS_TOKEN - Attach that credential to the
GetGitea,PostGitea, andPutGiteanodes. - Configure the n8n API node so it can fetch your workflows from your n8n instance.
- Run the workflow manually once and check Gitea to confirm the JSON files are created or updated.
- Enable the Schedule Trigger so backups run automatically on your chosen interval.
After that, you can mostly forget about it. Your workflows will be versioned, backed up, and easy to restore if needed.
Ready to secure your automations?
If you are using n8n in any serious way, having your workflows backed up to Gitea is a low-effort, high-value safety measure.
Import the template, plug in your Gitea details and token, run a test backup, and you are done. If you get stuck at any point, you can always ask for help in the n8n community forum or check the official n8n and Gitea documentation for more API details.
Tip: If this template saves you time, consider sharing your tweaks or improvements with the community, or building out a more advanced versioned backup strategy that fits how your team works.
Note: This guide assumes you are at least somewhat familiar with n8n nodes and Gitea. The template itself includes sticky notes and an internal setup guide inside the workflow, so you will have hints right where you need them while configuring.
Automate Pinterest Analysis & AI Content Suggestions
Automate Pinterest Analysis & AI-Powered Content Suggestions
Want your Pinterest account to consistently generate audience insights and content ideas without hours of manual work? This guide walks you through an n8n workflow template that:
- Pulls Pins from the Pinterest API on a schedule
- Saves them into Airtable for ongoing tracking
- Uses AI to analyze trends and suggest new Pins
- Sends a clear, email-ready summary to your marketing team
By the end of this tutorial-style walkthrough, you will know exactly how the template works, how to configure each n8n node, and how to adapt it to your own Pinterest strategy.
What you will learn
This article is structured as a step-by-step lesson. You will learn how to:
- Explain why Pinterest analysis is a strong candidate for automation
- Understand each component of the n8n workflow template
- Connect n8n to the Pinterest API, Airtable, OpenAI, and Gmail
- Customize the AI prompt for better content suggestions
- Measure the impact of your automated Pinterest analysis
Why automate Pinterest analysis?
Reviewing Pins by hand is slow, difficult to repeat, and easy to forget. An automated Pinterest reporting workflow in n8n solves these problems by:
- Collecting data on a schedule The Schedule Trigger in n8n runs your workflow at a fixed time, so your team gets fresh Pinterest data every week, day, or month.
- Centralizing your data in Airtable Instead of scattered screenshots or exports, all Pins live in one Airtable table, ready for filtering, sorting, and historical analysis.
- Using AI to spot patterns An AI Agent (OpenAI or another LLM) identifies themes and trends in your Pins, then proposes new Pin ideas aligned with what works.
- Delivering ready-to-use insights A summarization LLM condenses the analysis into a short email, which is sent via Gmail to your marketing manager or content team.
The result is a repeatable Pinterest insights pipeline that runs in the background and keeps your content calendar aligned with real audience behavior.
How the n8n Pinterest template works (high-level overview)
Before we configure anything, let us look at the full workflow from start to finish. The template in n8n is built from these nodes:
- Schedule Trigger – starts the workflow at a set time (template uses weekly at 8:00am)
- HTTP Request – calls the Pinterest API to fetch Pins
- Code (JavaScript) – cleans and maps Pin fields, and tags them as
type: "Organic" - Airtable Upsert – stores or updates Pins in an Airtable table
- AI Agent (OpenAI) – analyzes Pins and proposes new content ideas
- Summarization LLM – compresses the analysis into a short summary
- Gmail (or email node) – emails the final report to your marketing manager
Think of it as a pipeline:
Schedule → Fetch Pins → Clean & store data → AI analysis → Summary → Email report.
What you need before you start
To use this n8n workflow template successfully, prepare the following:
- n8n instance Either n8n Cloud or a self-hosted instance with access to the internet.
- Pinterest API access A Pinterest app and an access token with permission to read Pins for the account you want to analyze.
- Airtable base and table Create an Airtable base with a table dedicated to Pinterest Pins. Ensure it has fields for ID, title, description, link, created date, and any other fields you want to track.
- OpenAI (or compatible LLM) credentials An API key configured in n8n so you can use the AI Agent and summarization nodes.
- Email credentials (Gmail or similar) Gmail OAuth credentials set up in n8n, or another email node configured with SMTP or OAuth.
Step-by-step: configuring the Pinterest analysis template in n8n
Step 1 – Set up the Schedule Trigger
The Schedule Trigger determines when your Pinterest analysis runs automatically.
- Open your n8n workflow and select the Schedule Trigger node.
- Choose the frequency that matches your needs:
- Weekly at 8:00am (the template default)
- Daily for fast-changing content calendars
- Monthly for higher-level strategic overviews
- Save the node so the workflow will start at the time you specify.
You can always run the workflow manually for testing, even with a weekly schedule configured.
Step 2 – Connect to the Pinterest API via HTTP Request
Next, you will pull Pins directly from Pinterest using an HTTP Request node.
- Open the HTTP Request node connected after the Schedule Trigger.
- Set the Method to
GET. - Set the URL to:
https://api.pinterest.com/v5/pins - Under Headers, add:
Authorization: Bearer <YOUR_PINTEREST_ACCESS_TOKEN> - Make sure your Pinterest token has appropriate read permissions for the account.
- Click Execute node in n8n to test the request.
If everything is set up correctly, you should see JSON data with fields similar to:
idtitledescriptionlinkcreated_at
This raw data is what you will normalize and store in Airtable.
Step 3 – Normalize Pinterest data with a Code node
The Code node prepares your Pinterest data so it fits neatly into Airtable.
In the template, a JavaScript Code node:
- Loops through each item returned by the Pinterest API
- Extracts only the fields you want to store (for example
id,title,description,link,created_at) - Adds a field like
type: "Organic"so you can later distinguish organic Pins from paid or promoted Pins
At a high level, the code follows this pattern:
// Pseudocode style example
return items.map(item => {  const pin = item.json;  return {  json: {  pin_id: pin.id,  title: pin.title,  description: pin.description,  link: pin.link,  created_at: pin.created_at,  type: "Organic"  }  };
});
You can adapt this mapping to match your Airtable field names and to include extra data if needed.
Step 4 – Upsert Pins into Airtable
With your data cleaned, the next step is to store it in Airtable.
- Open the Airtable node.
- Choose your Airtable credentials and select the base and table you created for Pinterest Pins.
- Set the operation to Upsert (or the template equivalent) so that:
- Existing Pins are updated if they already exist
- New Pins are inserted as new records
- Map fields from your Code node output to Airtable columns, for example:
pin_id→ Pin ID fieldtitle→ Titledescription→ Descriptionlink→ Linkcreated_at→ Created Attype→ Type (for example Organic)
Upserting is important because it prevents duplicate entries and allows your Airtable table to build a historical record of Pins over time.
Step 5 – Analyze Pins with an AI Agent
Once your data is in Airtable, the workflow sends it to an AI Agent node configured with OpenAI (or another LLM provider in n8n).
The AI Agent acts like a social media data analyst. Its tasks include:
- Summarizing key trends in your Pins, such as:
- Top-performing topics or themes
- Keywords and styles that appear frequently
- Types of content that likely drive engagement
- Recommending new Pin ideas tailored to your audience
- Providing ready-to-use suggestions such as titles, descriptions, and hashtags
Example AI prompt you can use
The template includes a prompt similar to the one below. You can adapt the wording to match your brand voice and needs:
You are a performance-driven social media analyst. Given the following table of Pins with titles, descriptions, links, creation dates, and performance metrics (if available), provide:
1) Top 3 content themes and why they are resonating.
2) Five specific new Pin ideas (one-line concept, suggested title, 3 suggested hashtags, recommended board).
3) Quick production notes for design or copy.
Keep the response concise - 6-10 bullets.
Make sure the node receives the relevant Airtable data, either by using the Airtable output directly or by transforming it into a structured prompt.
Step 6 – Generate a concise summary with a summarization LLM
The AI Agent output can be detailed, especially if it lists multiple themes and Pin ideas. To keep your email readable, the workflow uses a separate summarization LLM node.
This node:
- Takes the AI Agent response as input
- Produces a short, email-ready summary paragraph or a few bullets
- Focuses on the most important trends and recommended actions
For example, you might ask the summarization node to output:
- A short overview of top themes
- The 3-5 most actionable Pin ideas
That way, your marketing manager can scan the email in under a minute and still get real value.
Step 7 – Email the report to your marketing team
The final step is to deliver the summary to the right people.
- Open the Gmail (or other email) node at the end of the workflow.
- Configure it with your Gmail OAuth credentials or preferred email provider.
- Set the To address to your marketing manager, a team inbox, or a distribution list.
- Use the summarization LLM output as the email body.
- Optionally, include:
- A link to the Airtable base or specific view
- A subject line like “Weekly Pinterest Trends & New Pin Ideas”
After a full test run, your team will start receiving automated Pinterest analysis emails on the schedule you configured.
What kind of AI outputs can you expect?
When performance metrics like impressions, saves, and clicks are available, the AI can produce very specific and actionable insights. Examples include:
- Theme summaries For example: “Seasonal DIY home décor – high saves and clicks from the 25-34 age group.”
- Pin suggestions Five or more new Pin ideas, each with:
- A one-line concept
- A suggested title
- A brief description
- Three recommended hashtags
- A suggested board or category
- Design and copy notes For example: “Use 1:1 image crop, high-contrast text overlay, and a bright CTA color.”
These outputs can feed directly into your content planning process or design brief.
Customization tips for your Pinterest automation
The template is a starting point. Here are practical ways to tailor it:
- Add performance metrics Extend your Pinterest API calls to include metrics such as impressions, saves, and clicks. This gives the AI more context and leads to sharper recommendations.
- Segment by board Include board information in your Airtable schema. Then, either:
- Filter data by board before sending it to the AI, or
- Ask the AI to analyze which boards perform best and propose board-specific ideas.
- Adjust language and tone Edit the AI prompt so suggestions match your brand voice, for example:
- “Friendly and conversational”
- “Expert and authoritative”
- “Playful and bold”
- Customize email cadence Use:
- Weekly summaries for content creators
- Monthly or quarterly overviews for leadership and stakeholders
Security, privacy, and best practices
Because this workflow connects multiple tools and APIs, follow these guidelines:
- Secure credentials in n8n Always store API keys, tokens, and OAuth credentials in n8n’s Credentials section, not directly in node fields.
- Restrict Airtable access Limit Airtable base access to team members who actually need it, especially if performance metrics or sensitive data are included.
- Respect content rights When repurposing Pins or using user-generated content as inspiration, be mindful of image copyrights and platform policies.
- Monitor logs and rate limits Pinterest API enforces quotas. Use n8n’s execution logs to monitor workflow runs and adjust your schedule or pagination if you hit limits.
Limitations and things to keep in mind
While this workflow is powerful, it is not magic. A few important considerations:
- Data quality drives AI quality If you do not have performance metrics like impressions, saves, or clicks, the AI will infer trends based mainly on titles and descriptions. This can still be helpful, but is less reliable than metric-based analysis.
- Human review is still important AI-generated creative ideas should be reviewed to ensure they match your brand guidelines, legal requirements, and audience expectations.
How to measure the success of your Pinterest automation
To understand the impact of this n8n template, track:
- Volume of ideas vs. execution Number of AI-suggested Pins vs. Pins actually published.
Automated Job Application Parser with n8n & Pinecone
Automated Job Application Parser with n8n & Pinecone
This reference guide describes a production-ready n8n workflow template that automates job application parsing using OpenAI embeddings, Pinecone as a vector database, Google Sheets for structured logging, and Slack for operational alerts. The workflow accepts raw application payloads, splits and embeds text, indexes vectors in Pinecone, retrieves relevant context for retrieval-augmented generation (RAG), and persists structured results for recruiting teams.
1. Solution Overview
The automated job application parser is an end-to-end n8n workflow that:
- Ingests resumes and cover letters via an HTTP webhook.
- Splits unstructured text into manageable chunks for embedding.
- Generates semantic embeddings with OpenAI and stores them in Pinecone.
- Performs similarity search to retrieve relevant context for RAG.
- Uses an OpenAI chat model as a RAG agent to extract and summarize candidate data.
- Logs the parsed output into a Google Sheets “Log” worksheet.
- Emits Slack alerts if any step fails, so issues are surfaced quickly.
The workflow is designed for recruiting teams that process applications at scale and need consistent parsing, reliable searchability, and minimal manual intervention.
2. Architecture and Data Flow
The n8n template is organized as a linear but modular pipeline. At a high level, the execution path is:
- Webhook Trigger Receives a POST request with job application data (e.g. combined resume and cover letter text, candidate identifiers, and metadata).
- Text Splitter Splits the incoming application text into character-based chunks suitable for embedding.
- OpenAI Embeddings Calls an embedding model such as
text-embedding-3-smallfor each chunk. - Pinecone Insert Upserts the embeddings along with metadata into a Pinecone index (for example,
new_job_application_parser). - Pinecone Query + Vector Tool Queries the Pinecone index to fetch the most relevant chunks as context for downstream analysis.
- RAG Agent (OpenAI chat model) Uses the retrieved context and the original application text to extract structured fields, summarize the candidate profile, and produce a recommendation.
- Append Sheet (Google Sheets) Writes the parsed JSON fields into a central “Log” sheet as a new row.
- Slack Alert Handles error conditions by posting an alert message to a designated Slack channel with diagnostic details.
Each node is responsible for a clear transformation or action, which makes the workflow easier to debug, extend, and monitor.
3. Node-by-Node Breakdown
3.1 Webhook Trigger Node
Purpose: Entry point for new job applications.
- Method:
POST - Example path:
/new-job-application-parser - Typical payload fields:
- Raw application text (resume, cover letter, or combined text).
- Candidate identifiers (e.g.
candidate_id). - Optional metadata such as job ID, source, or filename.
This webhook can be integrated with a careers site, an Applicant Tracking System (ATS), or an email-to-webhook bridge. Ensure that the payload includes the full application text that needs to be analyzed. Any missing fields that are required downstream (for example, candidate ID) should be validated here or early in the flow, and failures should be routed to the Slack alert node.
3.2 Text Splitter Node
Purpose: Prepare long application documents for embedding by splitting into smaller text segments.
- Strategy: Character-based splitting.
- Recommended parameters:
chunkSize: 400 characters.chunkOverlap: 40 characters.
The Text Splitter node takes the raw application text from the webhook and outputs multiple items, one per chunk. Using overlap preserves continuity between chunks, which reduces the risk of splitting in the middle of important sentences or entities. This is especially relevant for resumes, where key skills and roles may span multiple lines.
Validation step: After configuration, confirm that the node outputs a reasonable number of chunks and that boundaries do not cut off crucial content. Adjust
chunkSizeandchunkOverlapif your typical resumes are significantly shorter or longer.3.3 OpenAI Embeddings Node
Purpose: Convert each text chunk into a numerical vector representation.
- Model example:
text-embedding-3-small - Input: Chunked text from the Text Splitter node.
- Output: Embedding arrays (vectors) associated with each chunk.
Embeddings capture the semantic meaning of each chunk, allowing accurate similarity search across different resumes and cover letters. The node typically runs in a loop over all chunks. For higher throughput and better cost efficiency, configure batching if available, so multiple chunks are embedded in a single API call.
Error handling: Monitor for rate limit errors or transient API failures. If an error is thrown, route the execution path to the Slack alert node with the error message and any available candidate metadata.
3.4 Pinecone Vector Store – Insert / Upsert Node
Purpose: Persist embeddings in Pinecone for future retrieval.
- Index name example:
new_job_application_parser - Operation: Insert or upsert vectors with metadata.
For each embedded chunk, the workflow writes a vector into Pinecone. The following metadata is recommended:
candidate_id– a stable identifier for the applicant.source_filename– original file name if available.chunk_index– ordinal index of the chunk within the document.- Original text snippet or a reference to it, depending on your storage strategy.
This metadata enables downstream reconstruction of the original text, traceability of retrieved context, and easier debugging. Pinecone indexes support fast nearest-neighbor queries, which are essential for later RAG operations.
Edge cases: If metadata fields are missing, decide whether to skip the insert or to insert with partial metadata. For compliance-sensitive environments, avoid storing unnecessary PII directly in metadata if not required for retrieval.
3.5 Pinecone Query Node & Vector Tool
Purpose: Retrieve relevant chunks from Pinecone and expose them as a context tool for the RAG agent.
- Input: Query text or embedding representing the current application.
- Output: A set of the most similar chunks, including their metadata and text.
When processing or re-processing an application, the workflow calls Pinecone to fetch the top matching vectors. These retrieved chunks are then passed into a Vector Tool node, which formats them as contextual input for the OpenAI chat model.
The RAG agent uses this context to ground its extraction and classification in the actual candidate submission, which significantly improves accuracy for skills, experience, and role fit assessment.
3.6 RAG Agent Node (OpenAI Chat Model)
Purpose: Execute retrieval-augmented generation to extract structured fields, summarize the candidate, and produce a recommendation.
The RAG agent receives:
- Retrieved context from the Vector Tool (Pinecone query results).
- The original application text.
- A system instruction and user prompt that define the output schema.
Sample system and user prompt:
System: You are an assistant for New Job Application Parser.

User: Process the following application data and return a JSON with fields:
name, email, phone, skills, years_experience, summary, recommended_status.

Context: {{retrieved_context}}

Application Text: {{application_text}}

Return only valid JSON.
The instruction to “Return only valid JSON” is critical. It ensures that the node output can be parsed reliably by n8n and mapped directly into Google Sheets columns. If the model occasionally returns invalid JSON, consider adding stricter instructions or post-processing validation in n8n.
The agent typically extracts:
- Contact details (name, email, phone).
- Skills and technologies.
- Years of experience.
- A concise summary of the candidate profile.
- A recommended status or score indicating role fit.
3.7 Google Sheets – Append Sheet Node
Purpose: Persist parsed results in a structured, queryable format.
- Target sheet example:
Log - Operation: Append new row per processed application.
Map the JSON fields from the RAG agent output into dedicated columns. Common columns include:
NameEmailPhoneRole Applied(if provided in the payload)SkillsYears ExperienceSummaryRecommended StatusRAG Agent Raw Textor full JSON for auditing.
Restrict access to the Google Sheet to authorized HR staff and ensure that spreadsheet sharing settings align with your security policies.
3.8 Slack Alert Node
Purpose: Provide immediate visibility into failures or anomalies in the workflow.
- Trigger conditions: Any node error, invalid JSON from the RAG agent, or failed write to Pinecone or Google Sheets.
- Typical message fields:
- Error message and stack information if available.
candidate_idor other identifying metadata.- Node name where the failure occurred.
Use Slack alerts to quickly triage issues and rerun affected items. This is particularly important when dealing with high-volume recruitment pipelines.
4. Configuration Notes and Best Practices
4.1 Metadata Strategy
Metadata is essential for traceability and reusability of embeddings. When inserting vectors into Pinecone, include fields such as:
candidate_id– to group all chunks belonging to the same candidate.source_filename– to reference the original file if needed.chunk_index– to reconstruct document order.
This metadata allows you to:
- Rebuild the original text sequence from chunks.
- Filter or aggregate search results by candidate or source.
- Comply with data deletion requests by targeting specific candidates.
4.2 Tuning Chunk Size and Overlap
Adjust
chunkSizeandchunkOverlapbased on your typical document length and the embedding model’s token limits.- Larger chunks preserve more context but risk exceeding model limits and may reduce retrieval granularity.
- Smaller chunks increase granularity but may lose context and require more embedding calls.
- Overlap helps maintain continuity and avoid cutting off sentences or entities across boundaries.
Start with
chunkSize = 400andchunkOverlap = 40, then validate on a sample set of resumes and adjust as necessary.4.3 Handling Rate Limits and Batching
Embedding APIs typically enforce rate limits. To operate reliably at scale:
- Use batch requests where supported so multiple chunks are embedded in one call.
- Configure retry logic or backoff in n8n if you encounter rate limit errors.
- Monitor usage to avoid unexpected cost spikes.
Batching is usually more cost-efficient and reduces latency for large volumes of applications.
4.4 Using n8n Window Memory
n8n’s Window Memory feature can store short-term state across related node executions. For this workflow, you can use it to:
- Maintain context for a candidate across multiple steps.
- Support follow-up actions that depend on previously processed data.
Configure Window Memory carefully to avoid storing unnecessary PII and to keep memory windows appropriately sized.
4.5 Error Handling Strategy
Implement a clear error handling path that routes failures to the Slack alert node. Recommended practices:
- Capture node error messages and include them in the Slack payload.
- Include
candidate_idand any relevant metadata for quick identification. - Optionally log errors to a separate Google Sheet or monitoring system for trend analysis.
Consistent error handling reduces downtime and helps maintain trust in the automation.
5. Security, Compliance, and Data Privacy
Candidate information is sensitive and often subject to legal and regulatory requirements. Apply the following guidelines:
- Encryption: Enable encryption in transit and at rest for Pinecone, Google Sheets, and any intermediate storage where possible.
- Access control: Limit access to the n8n instance, Pinecone index, and Google Sheets to authorized HR and technical staff only.
- Data minimization: Avoid storing unnecessary PII in logs or metadata, such as full Social Security numbers or other highly sensitive identifiers.
- Data retention and deletion: Define clear retention policies and implement processes to delete vectors and related records when candidates request data removal or when data retention periods expire.
6. Testing, Validation, and Quality Control
Before using the workflow in production, validate each step:
- Seed the system with several representative sample applications.
- Confirm that the RAG agent consistently extracts required fields (name, contact details, skills, experience, summary, and status).
- Set up automated tests that:
- Send synthetic webhook payloads.
- Assert that Pinecone receives embeddings.
- Verify that the correct columns are appended to the Google Sheets “Log” sheet.
- Monitor classification accuracy:
- Track false positives and false negatives in recommended statuses.
- Refine system prompts and examples to improve reliability.
7. Scaling and Cost Considerations
As application volume increases, optimize for performance and cost:
- Embedding frequency: If applications are updated frequently, consider embedding only new or changed sections rather than re-embedding entire documents.
- Pinecone index size: Use namespaces and upsert strategies to control index growth and to logically separate data (for example, by role or region).
- Model selection: Evaluate smaller or cheaper embedding models and chat models. In many cases, they provide acceptable quality at significantly lower cost.
Regularly review usage metrics and adjust parameters to maintain a balance between accuracy, latency, and budget.
8. Implementation Checkpoints in n8n
While building or debugging the template, verify the following checkpoints inside n8n:
- Webhook Trigger The webhook receives the POST payload and successfully passes the application text to the Text Splitter.
- Text
Build a New Job Application Parser in n8n
Build a New Job Application Parser in n8n
Imagine opening your inbox on a Monday morning and finding 143 new resumes and cover letters waiting for you. You blink twice, sip your coffee, and realize you are about to spend the next few hours copy-pasting names, emails, skills, and experience into a spreadsheet. Again.
Or, you could let an n8n workflow do that for you while you drink your coffee in peace.
This guide walks you through an n8n job application parser template that uses a scalable RAG (Retrieval-Augmented Generation) workflow with OpenAI embeddings, Pinecone, Google Sheets, and Slack. It ingests application data via a webhook, chunks and embeds the text, stores it in Pinecone, runs a RAG agent to parse structured fields, logs everything to Google Sheets, and pings Slack if something breaks.
Same job done, far less sighing.
Why automate job application parsing?
Hiring teams are often drowning in resumes and cover letters. Manually scanning each one to pull out:
- Name
- Phone
- Location
- Years of experience
- Primary skills
is slow, boring, and surprisingly easy to mess up. One missed digit in a phone number and your perfect candidate vanishes into the void.
An automated job application parser in n8n helps you:
- Speed up screening by extracting structured data automatically
- Maintain a clean, auditable log of applications in Google Sheets
- Trigger alerts when something needs human attention or fails
In short, you spend less time copying data and more time actually evaluating candidates.
How the n8n job application parser works
This template is built around a RAG workflow that takes incoming application text, turns it into embeddings, stores it in Pinecone, and uses a chat model to parse it into structured fields.
Key building blocks in the workflow
- Webhook Trigger (n8n) – receives incoming applications via HTTP POST
- Text Splitter – breaks long resumes and cover letters into manageable chunks
- OpenAI Embeddings (text-embedding-3-small) – converts chunks into numerical vectors
- Pinecone Insert – stores those vectors for fast semantic retrieval
- Pinecone Query + Vector Tool – fetches the most relevant chunks when parsing
- Window Memory – keeps short-term context for multi-step parsing or follow-ups
- Chat Model (OpenAI) + RAG Agent – performs the actual structured parsing
- Append Sheet (Google Sheets) – logs parsed results into a spreadsheet
- Slack Alert – notifies you when something goes wrong
Let us walk through how to set this up in n8n without needing a PhD in workflow orchestration.
Step-by-step: setting up the job application parser in n8n
1. Catch incoming applications with a Webhook Trigger
First, you need a way to get applications into n8n. Add a Webhook node and configure it as follows:
- Method:
POST - Path: something like
/new-job-application-parser
This endpoint can receive payloads from your:
- Job application form
- Applicant Tracking System (ATS)
- Email-to-webhook bridge
Once wired up, every new application will trigger the workflow automatically.
2. Slice the resume with the Text Splitter
Resumes and cover letters can be long walls of text. To get good embeddings and retrieval, you split them into smaller chunks using a Text Splitter node.
Use the character-based splitter with these recommended settings from the template:
- chunkSize:
400 - chunkOverlap:
40
This gives you chunks that are large enough to preserve meaning but small enough for efficient embedding and retrieval. If your typical CVs are epic novels, you can increase
chunkSizeto reduce the number of vectors per application.3. Turn text into vectors with OpenAI embeddings
Next, the template calls the OpenAI embeddings API for each chunk. It uses the
text-embedding-3-smallmodel, which is cost-efficient and good enough for most parsing tasks.Each chunk is converted into a fixed-length vector and later stored in Pinecone. Make sure your n8n OpenAI credentials are configured with a valid API key before you run the workflow.
4. Store embeddings in Pinecone
Now you need somewhere to put those vectors. Add a Pinecone Insert node and point it at a vector index, for example:
new_job_application_parserFor each embedding, store helpful metadata so you can trace it later. A typical metadata object might look like this:
{  "applicant_id": "12345",  "source": "cover_letter",  "original_text_snippet": "..."
}
Good metadata makes it easier to debug, audit, and perform more advanced queries in the future.
5. Retrieve relevant chunks with Pinecone Query and the Vector Tool
When the workflow needs to parse a new application or answer follow-up questions about it, it uses a Pinecone Query node.
The template converts the new application text (or question) into a query vector, then asks Pinecone for the most relevant chunks. The Vector Tool exposes this vector store as a retrieval tool for the RAG agent, so the chat model can pull in only the most useful context instead of reading the entire resume every time.
6. Keep context with Window Memory
Sometimes parsing is not a one-shot deal. You might have multiple files, follow-up questions, or multi-step logic. That is where Window Memory comes in.
This node keeps a rolling window of recent conversation or parsing context. It helps the RAG agent remember what it just saw, without having to reload everything from scratch each time.
7. Let the Chat Model + RAG Agent do the parsing
Now for the brain of the operation. The RAG Agent node uses an OpenAI chat model with a carefully designed system prompt.
In the template, the system message looks something like this:
Process the following data for task 'New Job Application Parser':

{{ $json }}

You are an assistant for New Job Application Parser
You should customize this system prompt to clearly specify:
- The expected output format (strict JSON)
- The fields you want extracted
- Any constraints or validation rules
A typical target schema might look like:
{  "name": "",  "email": "",  "phone": "",  "location": "",  "years_experience": "",  "primary_skills": ["", ""],  "summary": "",  "confidence": 0.0
}
The RAG agent uses the retrieved context from Pinecone plus your prompt instructions to fill these fields and return clean structured data.
8. Log everything in Google Sheets
Once the RAG agent has done its job, the results are too valuable to leave floating in memory. The template uses an Append Sheet node to push each parsed application into a Google Sheets document.
Configure it with a document ID like
SHEET_IDand a sheet name such asLog. Then map the parsed fields to your columns, for example:- Timestamp
- Applicant Name
- Primary Skills
- RAG Agent Text / Status
This gives you a simple, reviewable log that your team can filter, sort, and share without needing access to n8n itself.
9. Get Slack alerts when things break
No workflow is perfect, especially when APIs and rate limits are involved. To avoid silent failures, the template wires the onError output of the RAG Agent node to a Slack Alert node.
When something goes wrong, the workflow posts a message to a channel like
#alertswith the error details. That way you can catch issues like:- OpenAI rate limits
- Invalid payloads
- Pinecone indexing errors
and fix them before they quietly eat your applications.
Practical RAG prompt example
Prompt engineering is where a lot of the magic happens. Here is a practical example you can adapt for your own template:
System: You are a job application parsing assistant. Return only JSON with the fields:
name, email, phone, location, years_experience, primary_skills, summary, confidence.

User: Here is the applicant data and retrieved context: {{retrieved_context}}.
Now extract the required fields and set confidence between 0 and 1.
Keep the instructions strict about JSON-only output to make downstream processing in n8n more reliable.
Best practices and tuning tips
To get the most out of this n8n template, a bit of tuning goes a long way.
Chunking strategy
- Experiment with
chunkSizeandchunkOverlapbased on your average resume length. - Smaller chunks give more precise retrieval but increase storage and query costs in Pinecone.
- Larger chunks reduce cost but may dilute context for very specific questions.
Choosing an embeddings model
text-embedding-3-smallis a solid default for cost-effective parsing.- If your use case demands more subtle semantic understanding, consider upgrading to a higher-capacity embeddings model.
Use metadata wisely
- Always store an
applicant_idandsource(for exampleresume,cover_letter) with each vector. - This helps you trace which chunk belongs to which applicant and makes audits much easier.
Prompting the RAG agent
- Explicitly require strictly valid JSON output.
- Provide example responses in the system prompt so the agent knows the exact shape you expect.
- Include instructions on what to do when data is missing (for example set
nullor an empty string).
Deduplication
- Use
applicant_idto avoid inserting the same resume multiple times into Pinecone. - Consider adding logic in n8n to skip or update existing records instead of creating duplicates.
Security considerations
- Store API keys like
OPENAI_APIandPINECONE_APIin n8n credentials or environment variables, not in plain text. - Restrict access to your Google Sheets document and Pinecone index to only the people and services that need it.
Monitoring, scaling, and cost control
As volume grows, both embedding generation and vector storage can start to add up. A few things to watch:
- Vector count per application: Monitor how many vectors you generate per resume and adjust chunking if needed.
- Retention policies: For older applications you no longer need, consider deleting or archiving vectors in Pinecone.
- Batch operations: For high-volume pipelines, batch embedding and Pinecone inserts to reduce overhead.
- Rate limiting: Implement rate limiting or backoff strategies to avoid OpenAI throttling when traffic spikes.
Popular integrations and extensions
Once your core parser is running smoothly, you can extend it with more automation so even fewer tasks land on your plate.
- ATS integration: Trigger the webhook directly from your Applicant Tracking System whenever a candidate applies.
- Automated screening rules: Add a Rule or IF node that checks confidence scores and skill matches, then:
- Auto-reject low-confidence or poorly matched applications
- Route promising candidates directly to hiring managers
- Notifications and scheduling:
- Send Slack messages for high-value candidates
- Trigger calendar invites or follow-up tasks for shortlisted applicants
Wrapping up: from copy-paste chaos to calm automation
This n8n template gives you a ready-to-customize foundation for automated job application parsing. You get:
- Vector-based retrieval with Pinecone
- Semantic embeddings from OpenAI
- A flexible, visual orchestration layer in n8n
- A RAG agent that outputs structured, machine-friendly JSON
With a bit of prompt engineering and thoughtful metadata, you can have a reliable, auditable screening pipeline up and running in hours instead of weeks.
Next steps:
- Import the template into your n8n instance
- Connect your OpenAI and Pinecone credentials
- Configure your Google Sheet and map the parsed fields
- Test with staging data before pointing it at real candidates
If you would like a copy of the n8n workflow JSON or help tuning prompts and Sheet mappings, reach out or drop a comment. Your future self, no longer buried in resumes, will be grateful.
Template notes: remember to replace placeholders like
SHEET_ID,OPENAI_API, andPINECONE_APIwith real credentials. Always test thoroughly with staging data before using the workflow in production.