Automate Weekly Google Docs Summaries & Email Updates

Automate Weekly Google Docs Summaries & Email Updates

From Manual Chaos to Calm Clarity

Every week, the same cycle repeats. Projects move forward, documents are updated, and somewhere in the middle of it all, you or someone on your team spends precious time trying to piece together what actually changed. Scrolling through Google Docs, skimming comments, copying snippets into an email update – it works, but it drains your focus and energy.

If you have ever felt that your attention is being pulled away from meaningful work just to keep everyone “in the loop,” this is your moment to change that. Automation is not just about saving time, it is about reclaiming your attention so you can focus on strategy, creativity, and growth.

This is where n8n and a simple, powerful workflow step in. With an automated Google Docs summary and email update system, your Monday mornings can shift from “catch up” mode to “move forward” mode.

Imagining a Better Way to Work

Imagine starting each week with a clean, concise summary in your inbox that highlights what changed in your key Google Docs, who edited what, and what needs attention next. No manual tracking, no copying and pasting, no worries about missing something important.

Automation like this is not only about efficiency, it is about building a more focused, less reactive workday. By letting n8n and AI handle the routine, you create space for deeper thinking, better decisions, and more intentional collaboration.

This mindset shift – from “I have to do everything myself” to “I can design systems that support me” – is at the heart of modern, scalable workflows. And this weekly Google Docs summary automation is a great stepping stone into that world.

What This n8n Workflow Helps You Achieve

This n8n workflow template automatically:

  • Scans selected Google Docs every week
  • Detects what was updated in the last 7 days
  • Fetches both the content and key metadata for each document
  • Uses GPT-4 to generate a clear, professional summary
  • Sends a polished email update to your chosen recipients

The result is a recurring, reliable briefing that keeps your team aligned and informed, without anyone having to manually compile reports.

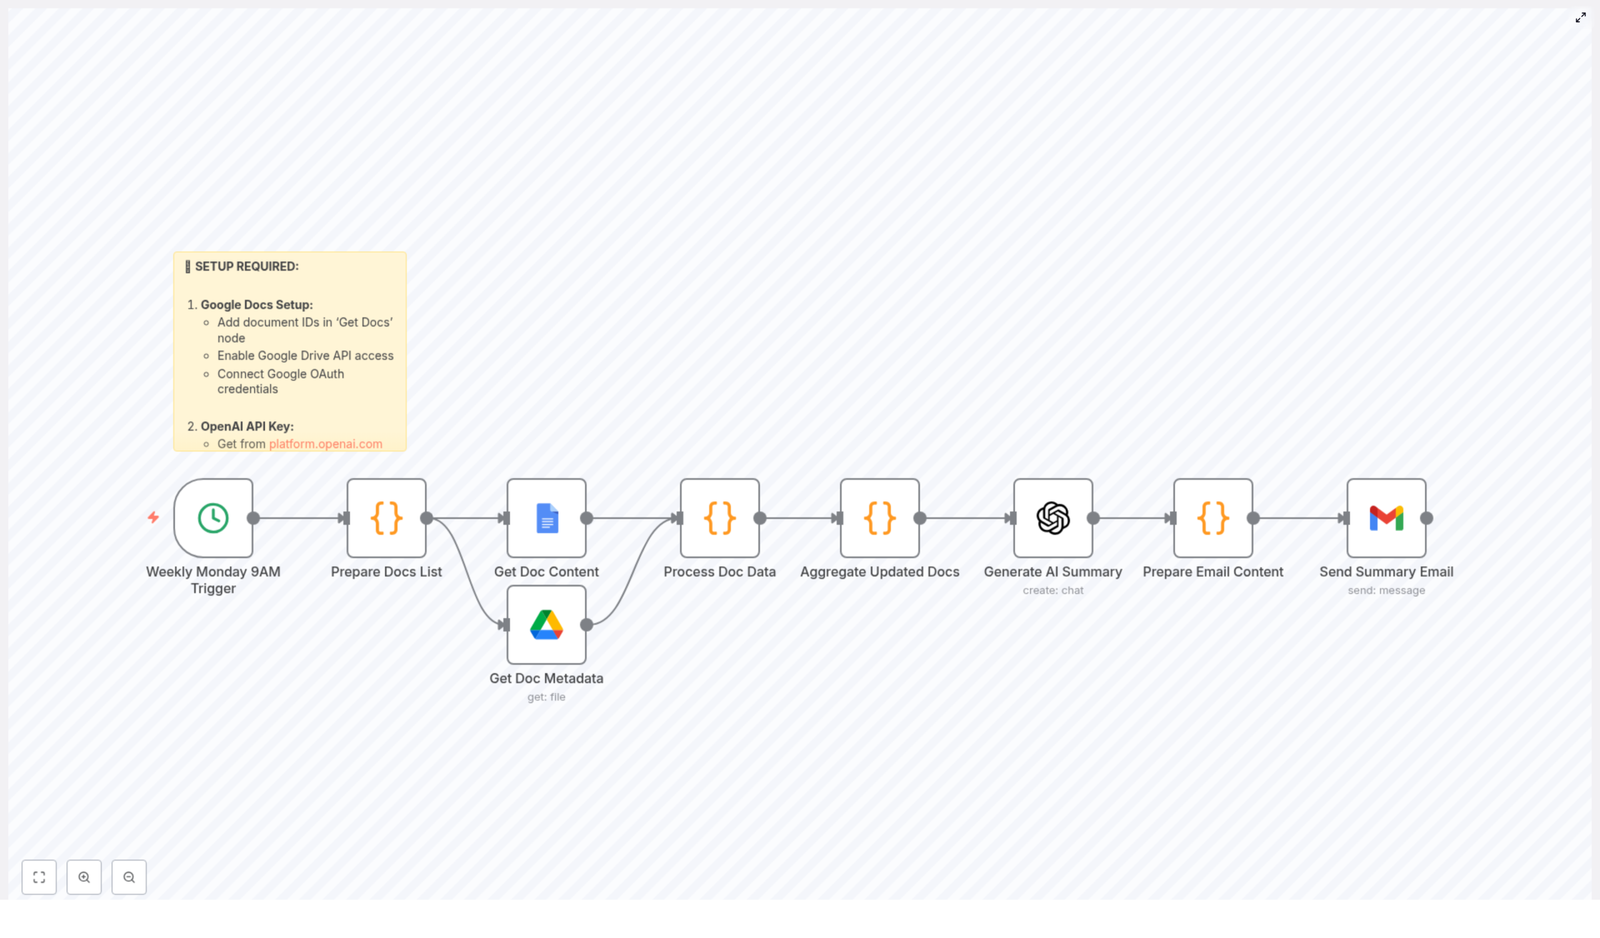
How the Workflow Flows Behind the Scenes

To understand the power of this template, it helps to see how the pieces fit together. This is the journey your data takes each week:

  • 1. Scheduled Trigger – A cron-based trigger in n8n activates every Monday at 9 AM (or whatever time you choose) to kick off the workflow.
  • 2. Document Selection – The workflow knows exactly which Google Docs to watch, based on the document IDs you configure.
  • 3. Timeframe Calculation – It calculates the relevant timeframe, typically “last 7 days,” to check for recent changes.
  • 4. Content & Metadata Retrieval – For each document, n8n retrieves the full text plus metadata such as modification date, last editor, and version information.
  • 5. Update Filtering – The workflow checks which documents actually changed within the defined period so you only see what is new and relevant.
  • 6. Clean Text Extraction – It processes the document content to extract clean text that is ready for summarization.
  • 7. Aggregation for AI – All updated document contents are combined into a single structured request that will be sent to the AI model.
  • 8. AI Summary Generation – GPT-4 creates a digestible, professional summary that highlights key changes, decisions, and action items.
  • 9. Email Formatting & Sending – The workflow turns the AI output into a polished email (both HTML and plain text) and sends it automatically to your chosen recipients.

Once this is set up, you do not have to think about it again. The system quietly works for you in the background, week after week.

Setting Up Your Automated Weekly Summary in n8n

You do not need to be a developer to put this into action. Follow these steps to configure the template and adapt it to your team.

1. Connect Google Docs and Enable Access

Start by wiring n8n to your Google Docs environment:

  • Use the “Get Doc Content” node to pull the full text of each document you want to track.
  • Add the “Get Doc Metadata” node to retrieve details like last modified date, last editor, and version.
  • Authenticate both nodes with your Google OAuth credentials so n8n can securely access your documents.
  • Make sure the Google Drive API is enabled in your Google Cloud settings, otherwise the nodes will not be able to communicate with your documents.

Once this is done, your workflow can see and understand the documents that matter most to your team.

2. Decide Which Documents to Monitor

Next, you tell the workflow where to focus:

  • Open the “Prepare Docs List” node in the template.
  • List each Google Doc you want to track by its document ID.
  • Optionally add names, categories, or labels so the final summary can group updates by project or theme.

This step puts you in control. You can start small with a few core documents and expand later as your automation strategy grows.

3. Configure AI Summarization with GPT-4

Now it is time to bring AI into the loop:

  • Connect the workflow to OpenAI’s GPT-4 model.
  • Enter your OpenAI API key in the relevant node so n8n can make requests on your behalf.
  • Customize the prompt to match your communication style, for example:
    • “Create a concise weekly summary of the following Google Docs updates.”
    • “Highlight key decisions, open questions, and next steps.”
    • “Use a professional, friendly tone suitable for a team status email.”

This is where you can shape the voice of your automated updates so they feel natural for your team and your culture.

4. Personalize Recipients and Email Content

With the summary generated, the next step is to deliver it to the right people:

  • Open the “Send Summary Email” node.
  • Add the email addresses of your team members or distribution lists.
  • Customize the subject line, for example “Weekly Google Docs Update” or “Monday Project Summary.”
  • Adjust the email body template so it reflects your brand, structure, and preferred greeting and sign-off.

Because the node sends both HTML and plain text versions, your summary will look good in most email clients.

5. Schedule the Workflow to Match Your Rhythm

Finally, choose when this automation should run:

  • The template is preconfigured with a cron trigger that runs every Monday at 9 AM.
  • If you prefer a different schedule, adjust the cron expression to match your team’s rhythm, for example:
    • Every Friday afternoon for end-of-week recaps
    • Twice a week for fast-moving projects

Once the schedule is set, your workflow is on autopilot. You can always come back later to refine timing as your needs evolve.

The Real Benefits: Time, Focus, and Momentum

The technical steps are straightforward, but the impact goes much deeper than a simple email.

  • Save hours every week by automating report creation instead of manually scanning and summarizing documents.
  • Keep everyone aligned with timely, relevant updates that arrive consistently without anyone having to remember to send them.
  • Use AI to surface what matters so key points, decisions, and action items are highlighted instead of buried in long documents.
  • Stay flexible with customizable document lists, email recipients, and summary prompts that you can tweak as your team grows.
  • Scale effortlessly by adding more documents, adjusting frequency, or expanding the workflow to other tools and processes.

Each small automation like this becomes part of a larger system that supports your work instead of constantly demanding your attention.

Use This Template as a Launchpad

Think of this n8n workflow template as a starting point, not a finished destination. Once it is running, you can:

  • Experiment with different prompts to refine the style and depth of your summaries.
  • Add filters or conditions to focus on specific projects or document categories.
  • Extend the workflow to log summaries in a database, post them to Slack, or archive them in another Google Doc.
  • Replicate the pattern for other tools, like summarizing tickets, CRM notes, or meeting transcripts.

Each improvement builds your automation skills and frees more of your time for the work that truly moves you and your business forward.

Take the Next Step with n8n

If you are ready to stop chasing updates and start receiving them automatically, this template is a simple, powerful way to begin. Set it up once, let it run, and feel the difference in how you start your week.

Do not have n8n set up yet? Visit the n8n website to get started and explore the wider world of automation workflows, integrations, and templates that can support your growth.

Your time is valuable. Let automation handle the repetitive work so you can focus on leading, creating, and building what comes next.

Effective Workflow for Creating Blog Posts from YouTube Transcripts

Effective Workflow for Creating Blog Posts from YouTube Transcripts

Turning YouTube videos into written blog posts is one of the most efficient ways to repurpose content, improve SEO, and reach a wider audience. With n8n, you can automate this entire process, from grabbing the video URL to publishing a polished article.

This guide explains how an n8n workflow template can automatically extract audio from a YouTube video, transcribe it, and generate a structured blog post using AI. The goal is to help you understand each part of the workflow so you can use, customize, and trust it in your own content strategy.

What You Will Learn

By the end of this tutorial-style walkthrough, you will understand:

  • How an n8n workflow takes a YouTube video URL and prepares it for processing
  • How the workflow downloads and reads the audio track from the video
  • How transcription works within the automation
  • How AI turns the raw transcript into a clear, SEO-friendly blog post
  • How the final output is assembled, including the original video link
  • Why automating video-to-blog conversion is valuable for content and SEO

Core Concept: Automating Video-to-Blog Conversion in n8n

At a high level, this n8n template follows a simple but powerful idea:

  1. Take a YouTube video URL as input
  2. Extract only the audio from the video
  3. Transcribe the spoken words into text
  4. Use AI to transform that transcript into a structured blog post
  5. Attach the original YouTube URL and return the final content

Each of these steps is handled by a specific part of the workflow. Understanding these parts will make it easier to adapt the template to your own tools, formats, or publishing process.


Step-by-Step: How the n8n Workflow Template Works

Step 1 – Capture the YouTube Video URL

Every run of the workflow starts with a YouTube video URL. In n8n, this can come from several possible triggers or inputs, for example:

  • A manual input when you execute the workflow
  • A form submission where someone pastes a YouTube link
  • An automated trigger from another system or integration

This step is simple but essential. The URL is the unique identifier that tells the workflow exactly which video to process. If the URL is wrong or missing, all later steps will fail, so the workflow is typically designed to accept and store this URL as the first piece of data.


Step 2 – Download the YouTube Audio Track

Once the workflow has the correct YouTube URL, the next goal is to extract the audio track from the video. In the template, this is handled using tools or services that can:

  • Connect to YouTube using the provided URL
  • Download only the audio portion, not the full video file
  • Save the audio in a common format, most often MP3

Focusing on audio instead of the full video has two key benefits:

  • Lower data usage – Audio files are smaller than video, so they download and upload faster.
  • Faster processing – Transcription services work directly on audio, so there is no need to handle large video files.

By the end of this step, the workflow has a downloadable audio file associated with the original YouTube link.


Step 3 – Read and Prepare the Audio File for Transcription

After the audio file is downloaded, the workflow needs to prepare it for the transcription service. In n8n, this generally means:

  • Reading the audio file from where it was stored or downloaded
  • Ensuring the file format is compatible with the transcription tool (typically MP3)
  • Making the file accessible to the next node in the workflow

This preparation step is mostly about proper file handling. The workflow keeps track of where the file lives and passes a reference to it forward so the transcription node can access it without issues.


Step 4 – Transcribe the Audio into Text

This is the central transformation in the workflow. The audio file is sent to a transcription service, often powered by AI and modern speech recognition technology. The transcription component will:

  • Process the MP3 audio file
  • Detect spoken language and convert speech to text
  • Return a full transcript of the video’s audio

Thanks to advances in AI, transcription is usually both fast and reasonably accurate, even for longer videos. The result is a raw text transcript that includes everything said in the video, but not yet organized like a blog post.


Step 5 – Use AI to Generate a Structured Blog Post

With the transcript ready, the workflow passes this text to an AI-based content generation step. Here, a language model analyzes the transcript and turns it into a readable article. In this part of the n8n workflow, the AI typically:

  • Identifies the main topics and themes in the transcript
  • Reorganizes content into logical sections and paragraphs
  • Improves clarity, flow, and readability
  • Generates a compelling blog title
  • Suggests categories and tags that fit the topic

The goal is to move from a raw, unstructured transcript to a polished, engaging blog post that feels like it was written for readers, not just copied from spoken language.

This step is also where SEO considerations can be added. The AI can be guided to use descriptive headings, clear keyword phrases related to the topic, and a structure that search engines can easily understand.


Step 6 – Append the Original Video URL and Prepare the Final Output

To make the blog post complete and transparent, the workflow attaches the original YouTube video URL to the final content. This is useful because:

  • Readers can watch the original video if they want more context
  • You maintain a clear link between the source material and the written article
  • It encourages cross-traffic between your video channel and your blog

In the final step of the workflow, n8n prepares the finished blog post for delivery. Depending on how you configure the template, this might involve:

  • Returning the content as a response in n8n for manual review
  • Sending it to a CMS or publishing platform via an integration
  • Storing it in a database or document system for later use

At this point, you have a complete article with:

  • A structured blog body based on the transcript
  • An AI-generated title, categories, and tags
  • The original YouTube video URL included for reference

Why Automate Blog Creation from YouTube Videos?

Automating this process with an n8n workflow template provides several practical benefits for creators, marketers, and teams.

Time Efficiency

Manual transcription and writing can be slow. Automation reduces repetitive work so you can focus on strategy, editing, and higher value tasks instead of copying content by hand.

Consistent Tone and Style

Using the same AI-driven process for each video helps maintain a standardized voice across all your blog posts. This consistency strengthens your brand and makes your content feel more cohesive.

SEO Optimization

Every video you publish can also become an SEO-friendly article. The AI can help generate relevant titles and tags, and the structured blog format makes it easier for search engines to index your content.

Improved Accessibility

Not everyone prefers or can access video content. Providing a written version makes your ideas available to a wider audience, including people who:

  • Have hearing impairments
  • Prefer reading over watching
  • Need to quickly scan content instead of viewing a full video

Quick Recap

Here is a short summary of how the n8n workflow template turns a YouTube video into a blog post:

  1. You provide a YouTube video URL.
  2. The workflow downloads the audio track from that video.
  3. The audio file is read and prepared for transcription.
  4. An AI transcription service converts the audio into text.
  5. A language model analyzes the transcript and generates a structured blog post with headings, title, categories, and tags.
  6. The original YouTube URL is added to the final article, which is then returned or sent to your chosen destination.

This end-to-end automation lets you repurpose your video content into written articles with minimal manual effort while keeping quality and structure high.


FAQ: Using an n8n Workflow for YouTube-to-Blog Automation

Do I need to download the full video file?

No. The workflow is designed to download only the audio track. This saves bandwidth and speeds up both download and transcription.

What format is the audio file?

The downloaded audio is typically stored as an MP3 file. This format is widely supported and works well with most transcription services.

Can I edit the AI-generated blog post?

Yes. The workflow produces a complete draft, but you can always review, refine, and adjust the content before publishing to match your style or add extra details.

Will the workflow always include the original YouTube link?

Yes. A dedicated step appends the video URL to the final output so readers can trace the content back to its source.


Start Using the n8n Template

Automating the conversion of YouTube videos into blog posts can transform your content strategy. With this n8n workflow template, you can quickly:

  • Scale your content production
  • Improve accessibility and SEO
  • Keep your brand voice consistent across formats

Ready to put this workflow into action and grow your audience with less manual work?

Maximizing the Power of YouTube Transcripts for Engaging Blogs

Maximizing the Power of YouTube Transcripts for Engaging Blogs

YouTube is packed with valuable content, from tutorials and interviews to deep-dive explainers. Yet a lot of that knowledge stays locked inside video format. By turning YouTube transcripts into well-structured blog articles, you can reach more people, improve your SEO, and get more value from every video you publish.

This guide walks you through how to convert YouTube video transcripts into engaging blog posts, how AI can help with the heavy lifting, and why this approach is so powerful for content creators and marketers.

What You Will Learn

By the end of this article, you will understand:

  • Why converting YouTube transcripts into blog posts is so effective
  • The overall process of going from video to polished article
  • How AI tools can refine raw transcripts into structured content
  • Which SEO elements to include so your blog posts perform better
  • The main benefits of this transcript-to-blog workflow for your content strategy

Core Idea: From Video to Readable Blog Content

The core workflow looks like this:

  1. Start from a YouTube video URL
  2. Extract and transcribe the audio into text
  3. Use AI to analyze and restructure that text into a clear article
  4. Optimize the result with SEO elements and formatting

At the heart of this process is the transcript. It captures everything that was said in the video, but in its raw form it is usually long, repetitive, and hard to skim. AI tools help transform that raw transcript into a clean, reader-friendly blog post with a logical flow, headings, and a strong title.

Why Turn YouTube Transcripts Into Blog Posts?

1. Make Content Easier to Read and Navigate

Transcripts are typically:

  • Unedited and full of filler words
  • Lacking structure, headings, or clear sections
  • Hard to scan for key points

By turning a transcript into a blog post, you reshape that same information into:

  • Organized sections with meaningful headings
  • Short paragraphs and bullet points
  • Clear introductions and conclusions

This makes it much easier for readers to find what they need and understand the main ideas quickly.

2. Improve SEO and Discoverability

Search engines index written content more effectively than video alone. When you convert your video into a blog article, you can:

  • Target relevant keywords related to your topic
  • Add meta descriptions and excerpts for better search results
  • Use headings and internal links to boost SEO structure

The result is more organic traffic and more ways for people to discover your video content through search.

3. Repurpose and Extend Your Content

Turning a single video into multiple content formats is a powerful content marketing strategy. A blog post created from a YouTube transcript can be:

  • Shared on social media and newsletters
  • Used as a resource page or show notes
  • Updated over time with new links, references, or examples

This helps you get maximum value out of each video you create.

4. Reach Different Audience Preferences

Not everyone wants to watch a video. Some people prefer reading, skimming, or searching a page for specific terms. A blog version of your video content:

  • Serves people who prefer text over video
  • Allows quick skimming for key points
  • Can be translated or localized more easily

Step-by-Step: Turning a YouTube Transcript Into a Blog Post

Let us walk through the process from start to finish. You can follow these steps manually or use automation and AI tools to speed things up.

Step 1 – Choose Your YouTube Video and Copy the URL

Start by identifying the video you want to convert into a blog post. This might be:

  • A popular tutorial on your channel
  • An in-depth interview or webinar
  • A product walkthrough or case study

Once you have selected the video, copy its YouTube URL. This link is the key input for tools that download the audio and start the transcription process.

Step 2 – Download the Audio and Create a Transcript

Next, extract the audio from the YouTube video and convert it into text. This usually involves two parts:

  1. Audio extraction – A tool takes the YouTube URL and downloads just the audio track.
  2. Transcription – Speech-to-text software listens to the audio and produces a written transcript.

Accuracy at this stage is very important. A high quality transcript preserves the original meaning, tone, and details of the video. If the transcription tool makes many mistakes, the blog post will require more editing later.

Step 3 – Use AI to Analyze and Refine the Content

Once you have the raw transcript, it is time to turn that long block of text into something that reads like a proper article. This is where AI content tools are especially useful.

An AI content strategist or similar AI agent can:

  • Read through the full transcript
  • Identify the main themes, sections, and arguments
  • Remove filler words, repeated phrases, and off-topic tangents
  • Reorganize ideas into a logical flow that suits a blog format

In addition to restructuring the content, AI can also generate key blog elements for you:

  • Title – A clear, engaging headline based on the main topic
  • Category – A suitable blog category for organizing your posts
  • Tags – Relevant keywords and labels that help readers and search engines understand the topic

The result is a refined draft that reads more like a natural article than a direct transcript.

Step 4 – Add SEO Elements and Format the Blog Post

With a structured draft in place, you can now optimize it for both readers and search engines. Focus on three main areas:

1. SEO Metadata

  • Meta description – Write a short summary (usually 140-160 characters) that describes what the article is about and encourages clicks from search results.
  • Excerpt – Prepare a slightly longer summary for your blog listing page or social previews.

2. On-page SEO

  • Use clear <h2> and <h3> headings that match how people search for your topic.
  • Include important keywords naturally throughout the text, such as “YouTube transcripts,” “blog posts,” “AI content,” and “content repurposing.”
  • Link to related articles or resources on your site to keep readers engaged.

3. Readability and Structure

  • Break long paragraphs into shorter ones.
  • Use bullet points and numbered lists where they make information easier to scan.
  • Bold key terms or phrases you want readers to notice.

These steps help your article perform better in search and make it more enjoyable to read.

Main Benefits of This Transcript-to-Blog Workflow

Putting this process in place brings several clear advantages.

  • Efficiency: Automating parts of the conversion process saves a significant amount of time compared to writing every blog post from scratch.
  • Content repurposing: You get more value out of each YouTube video by turning it into a written resource that can be shared, updated, and reused.
  • Improved SEO: Search engines can index your text-based content, which increases your visibility and can drive more organic traffic.
  • Audience reach: You serve both viewers who like video and readers who prefer articles, which broadens your overall audience.

Example: How This Might Look in Practice

Imagine you have a 20-minute YouTube tutorial on “How to Start a Podcast.” Using the process above, you could:

  1. Copy the video URL.
  2. Extract and transcribe the audio into text.
  3. Use AI to turn the transcript into a structured blog post with sections like “Choosing a Topic,” “Recording Equipment,” and “Publishing Your Episodes.”
  4. Add a strong title, such as “How to Start a Podcast: Step-by-Step Guide for Beginners,” plus a meta description and relevant tags.

The result is a full written guide that supports your video, brings in search traffic, and can be shared across your marketing channels.

Quick Recap

  • YouTube videos contain valuable information that many people never see in written form.
  • Transcripts capture everything said in the video but are not reader-friendly by default.
  • By extracting audio, transcribing it, and using AI to refine the text, you can turn any video into a polished blog post.
  • Adding SEO elements like meta descriptions, headings, and tags helps your content perform better in search.
  • This workflow saves time, repurposes content, and expands your audience reach.

FAQ: YouTube Transcripts to Blog Posts

Do I need perfect transcripts for this to work?

Higher quality transcripts lead to better blog posts and less manual editing. However, AI tools can often clean up minor transcription errors during the refinement stage. For best results, aim for accurate audio capture and a reliable transcription tool.

Can I use this approach for any type of video?

Yes, as long as the video is primarily spoken content. Tutorials, interviews, webinars, and explainers usually convert very well. Highly visual content with little narration may need extra context added manually.

Will the blog post be identical to the video script?

No, and that is the goal. The transcript is the starting point, but the final blog post should be edited, structured, and optimized so it reads like a natural article, not a raw script.

How does this help my overall content strategy?

This method lets you build a content library faster. Every time you publish a YouTube video, you can also publish a related blog post, which strengthens your brand presence, improves SEO, and gives your audience more ways to learn from you.

Conclusion: Turn Every Video Into a High-Value Blog

Transforming YouTube transcripts into thoughtful, well-crafted blog posts is a powerful way to expand your reach and make the most of your existing content. With a clear process and the help of AI tools, you can quickly convert spoken content into articles that are easy to read, search-friendly, and ready to share.

Take action today: Start collecting your YouTube video URLs, generate transcripts, and use AI-powered workflows to turn them into engaging blog posts that grow your online presence and drive more traffic.

Automate Personalized Email Campaigns with AI & Coupons

Automate Personalized Email Campaigns with AI & Coupons

From Overwhelmed Inbox To Intentional Communication

Your customers are already drowning in emails. Every day, their inbox fills with promotions, announcements, and newsletters that all look and sound the same. Most of them are deleted without a second glance.

Yet, inside that same inbox is a powerful opportunity. When you speak to people as individuals, acknowledge their experiences, and respond to their feedback, your emails stop feeling like noise and start feeling like a relationship.

This is where automation becomes more than a technical convenience. It becomes a way to free yourself from repetitive work so you can focus on strategy, creativity, and growth. With the right workflow, you can turn raw customer data into meaningful, timely, and personal messages at scale.

A Mindset Shift: Let Automation Do The Heavy Lifting

Many teams know that personalization matters, but they feel stuck. Manually reading feedback, deciding who deserves a coupon, and writing custom emails for each situation is simply not realistic when you have hundreds or thousands of customers.

Instead of treating automation as a rigid system, think of it as a flexible teammate. You design the rules and the experience, then let your tools carry out the work consistently, day after day.

With n8n and AI, you can:

  • Listen to customer feedback at scale
  • Respond with empathy and precision
  • Automate decisions around coupons and special offers
  • Save hours each week, while improving customer loyalty

The workflow template you are about to explore is not just a technical setup. It is a stepping stone toward a more focused, automated way of working, where your time is invested in improving the experience, not repeating the same tasks.

What This n8n Workflow Helps You Achieve

This n8n workflow connects your customer data, AI-powered analysis, and email delivery into one streamlined process. It uses LangChain with an OpenAI GPT-4 model to understand customer sentiment, generate personalized email content, and decide whether to include a coupon for unhappy customers.

In practical terms, the workflow will:

  • Read purchase and feedback data from an Excel file
  • Use AI to analyze each customer’s feedback and mood
  • Create tailored email headlines and body text
  • Choose between a standard email or a coupon email
  • Generate or fetch coupon codes for dissatisfied customers
  • Send polished HTML emails via SMTP

Once configured, this runs automatically. You gain a repeatable system that can handle more customers than any manual process, while still feeling personal and considerate.

The Journey: From Raw Data To Personalized Email

Step 1 – Preparing Customer Data For Personalization

Every powerful automation begins with clean, usable data. In this workflow, the journey starts by downloading and extracting purchase and feedback information from an Excel file.

This first step ensures that all relevant details are available to the AI. Purchase history, feedback content, and customer information are loaded and structured so the workflow can understand who each customer is and what they have experienced with your brand.

Think of this as setting the stage. The better your data is organized here, the more precise and meaningful your automated emails will become later.

Step 2 – Turning Feedback Into Insight With AI

Once the data is ready, the workflow moves into analysis. This is where LangChain and the OpenAI GPT-4 model come into play through the LangChain Information Extractor node.

The AI reviews each piece of customer feedback and determines the sentiment. Is the customer happy, neutral, or frustrated? Based on this understanding, it generates two key elements:

  • A personalized email headline tailored to the situation
  • A body text that speaks directly to the customer’s experience

If the feedback shows dissatisfaction, the AI does not just acknowledge it. It also flags that a coupon should be included as a goodwill gesture. This turns a negative moment into an opportunity to rebuild trust and deepen loyalty, all without manual review of every message.

Step 3 – Safeguarding Quality With Output Validation

Automation should never mean losing control over quality. Before any email is sent, the workflow validates the AI output.

This validation step checks that the generated content is not empty or invalid. If something is missing or incorrect, the workflow can prevent that message from being sent. This simple safeguard helps you maintain professionalism, avoid awkward blank emails, and protect your brand’s reputation while still benefiting from automation.

Step 4 – Choosing The Right HTML Email Template

With validated content in hand, the workflow now focuses on presentation. Two HTML templates are available:

  • A standard email template for satisfied or neutral customers
  • An email template that includes a dedicated coupon section for unhappy customers

Based on the AI’s earlier decision, the workflow automatically selects the appropriate template. The personalized headline and body text are then inserted into the chosen HTML layout.

This approach keeps your emails consistent, visually appealing, and aligned with your brand, while still adapting to each customer’s situation.

Step 5 – Generating Or Integrating Coupon Codes

Next, the workflow handles coupons. In the template, a placeholder node is used to fake coupon codes. This is intentional, so you can easily swap it for your own system.

In a real-world environment, you would connect this step to your existing coupon generation or discount management tool. The workflow then becomes a bridge between feedback and tailored offers, automatically delivering unique coupon codes to customers who need a little extra encouragement to stay engaged.

Step 6 – Sending The Final Email Via SMTP

The final step is delivery. Once the content and template are ready, the workflow sends the completed HTML email to the customer’s email address through SMTP.

n8n can send emails directly, but for ongoing campaigns and larger audiences, it is often wise to integrate a dedicated newsletter or email marketing platform. These tools make it easier to handle opt-outs, track performance, and analyze engagement, while n8n remains the engine that prepares and personalizes the content.

Why This Automated Approach Accelerates Growth

Implementing this workflow does more than save time. It creates a more responsive, human-centered experience for your customers while giving your team space to focus on higher-value work.

  • Enhanced customer experience: Customers feel heard when their feedback leads to a timely, relevant, and personalized response.
  • Higher conversion potential: Smart coupon usage can turn disappointed customers into loyal advocates who appreciate your willingness to make things right.
  • Efficient automation: Content creation, sentiment analysis, and email sending all run on autopilot, freeing you from repetitive tasks.

As you use this template, you can keep improving it. Adjust the wording, refine the AI prompts, tweak the coupon rules, or connect new data sources. Each small optimization compounds over time, turning your automated system into a powerful growth engine.

Using This Template As Your Starting Point

You do not need a full-scale automation strategy before you begin. This n8n template is designed as a practical first step. You can start small, test the flow with sample data, and gradually expand.

Here are a few ways to build on it once it is running:

  • Connect it to your live CRM or database instead of dummy Excel data
  • Refine the HTML templates to match your brand design more closely
  • Experiment with different AI prompts to adjust tone and style
  • Add additional branches for VIP customers, new users, or repeat buyers

Each experiment will teach you more about your audience and show you where automation can create even more value.

Take The Next Step Toward Smarter Automation

Personalized email marketing does not have to be overwhelming or manual. By combining n8n, AI, and a thoughtful coupon strategy, you can create a system that listens, responds, and nurtures relationships at scale.

This workflow template gives you a clear, guided path from raw customer data to meaningful, customized emails. It is a chance to reclaim your time, strengthen your customer relationships, and build a more intentional, automated marketing engine.

If you are ready to move from generic broadcasts to truly responsive communication, start with this template, adapt it to your needs, and let it inspire your next automation projects.

Start Building Your Automated Email Journey

Set up this n8n workflow, watch how it handles feedback and coupons for you, and then keep iterating. Each improvement brings you closer to a marketing system that runs smoothly in the background while you focus on strategy and growth.

Ready to transform your email campaigns with AI and automation? Explore the template below, try it in your own n8n instance, and continue to build a smarter, more personalized customer experience.

Personalize Marketing Emails with AI & Coupons

Personalize Marketing Emails with AI & Coupons (So You Can Stop Copy-Pasting)

Imagine This…

You open your laptop, coffee in hand, and stare at yet another spreadsheet of customers, purchases, and feedback. Your mission: write personalized marketing emails that sound human, remember what people actually bought, respond to their mood, and – if they are unhappy – win them back with a coupon.

After the third email, your creativity has left the chat. After the tenth, you are copying and pasting like a robot that needs a vacation.

This is exactly the kind of repetitive, soul-draining task that automation was invented for. Enter n8n, LangChain, and a neat workflow template that lets AI handle the heavy lifting of personalized email creation and coupon decisions.

What This n8n Workflow Actually Does

This workflow is an automated marketing assistant that:

  • Grabs customer data (purchase history and feedback) from a file
  • Uses AI to write personalized email headlines and body text
  • Analyzes sentiment to decide if a coupon is needed
  • Builds an HTML email, with or without a coupon code
  • Prepares everything for sending via SMTP or your newsletter tool

So instead of manually crafting every email, you set up the workflow once and let it scale your personalization efforts while you focus on more interesting work, like strategy, testing, or finally cleaning up that dashboard.

How the Workflow Flows (High-Level Overview)

Here is the journey your data takes inside this n8n + AI setup:

  1. Trigger & Data Load – You start the workflow manually, it downloads dummy customer data, and reads purchase history + feedback from an Excel file.
  2. AI-Powered Content – The workflow uses an Information Extractor and an OpenAI Chat Model node to analyze the feedback and create a personalized email headline and body.
  3. Content Sanity Check – It verifies that the AI output actually contains a “Headline” and “Body” before moving on.
  4. Coupon Logic – Based on sentiment, it decides if a coupon should be added and branches into:
    • a “no coupon” email path
    • a “yes coupon, please save this relationship” path
  5. HTML Email & Sending – It generates the final HTML email and sends it via SMTP, or hands it off to your usual newsletter platform.

Step-by-Step: Setting Up the n8n Email Personalization Workflow

1. Kick Things Off With a Trigger and Data Prep

The workflow starts with a simple trigger node that you run manually. This is your “go” button, perfect for testing or running campaigns in batches.

Once triggered, the workflow:

  • Downloads dummy customer data from a provided online source
  • Opens an Excel file that includes:
    • Purchase history
    • Customer feedback
  • Extracts the relevant fields so the AI has something meaningful to work with

This gives the system context like what the customer bought and how they felt about it, which is much more useful than “Dear valued customer who may or may not remember us.”

2. Let AI Write the Email (So You Do Not Have To)

The brain of this workflow is the combo of two n8n nodes:

  • Information Extractor
  • OpenAI Chat Model

Together, they handle the heavy thinking:

  • They read the customer feedback and purchase details
  • They generate a personalized headline and email body
  • They decide whether the customer is happy, neutral, or in “please fix this” territory
  • Based on that sentiment, they determine if a coupon should be offered

The result is an email that sounds tailored to each customer, instead of the classic “Hi there, we value your business” that everyone knows is sent to 10,000 people at once.

3. Quality Check So You Do Not Send Blank Emails

AI is powerful, but you still want a safety net. Before anything is sent, the workflow runs a validation step.

It checks if the AI output includes both:

  • Headline
  • Body

If either of these is missing or empty, the workflow stops. No half-finished emails, no “Subject: [headline_here]”, and no awkwardly blank content going out to customers.

4. Decide: Coupon or No Coupon?

This is where the workflow gets strategic. Based on the sentiment analysis from the AI, it splits into two paths:

  • Path 1 – Without Coupon
    If the customer seems satisfied or neutral, the workflow:
    • Generates a clean HTML email template
    • Inserts the personalized headline and body text
    • Prepares a simple, well-formatted email ready to send
  • Path 2 – With Coupon
    If the feedback looks unhappy or negative, the workflow:
    • Creates a coupon code
    • Merges that code into the AI-generated email content
    • Builds a more persuasive HTML email that highlights the coupon

The idea is simple: keep happy customers engaged with personalized content, and use targeted coupons to turn frustrated customers into loyal ones.

5. Send the Email (Or Hand It Off to Your Newsletter Tool)

Once the HTML email is ready, the final step is delivery.

The workflow uses SMTP settings to send the emails out. n8n is fully capable of sending emails directly, but in many real-world setups it is smarter to connect this workflow to your existing newsletter or email marketing tool.

Why?

  • Better opt-out handling and compliance
  • Built-in tracking and analytics
  • Centralized management of all campaigns

So you can use this workflow as the personalization engine, and let your usual email platform handle the sending, unsubscribes, and metrics.

Why This AI + n8n Email Setup Is Worth Your Time

Besides saving you from writing the same email 200 times in slightly different tones, there are some serious benefits:

  • Highly Personalized
    Every email is based on actual purchase history and feedback, not just a first name field. Customers get messages that feel relevant to their experience.
  • Fully Automated Workflow
    Content creation, personalization, coupon logic, and email generation all run on autopilot once configured. You set it up once and reuse it for campaigns.
  • Smarter Customer Retention
    Coupons are used strategically for unhappy customers, which helps turn negative experiences into second chances and long-term loyalty.
  • Easy to Customize
    Want a different tone, different coupon rules, or a new campaign angle? Adjust the workflow nodes, prompts, or branching logic instead of rebuilding from scratch.

Best Practices Before You Hit “Send to All”

Automation is powerful, but a few guardrails help keep everything safe and professional.

  • Protect Personal Data
    Avoid sending highly sensitive personal data into AI prompts. Keep things privacy-friendly and compliant with your local regulations.
  • Test Thoroughly
    Run the workflow on test data first. Check the AI output for tone, correctness, and formatting. Make sure the “Headline” and “Body” look good, and that coupons show up where they should.
  • Monitor Campaign Performance
    Use your email platform’s analytics to track:
    • Open rates
    • Click rates
    • Coupon redemptions

    This helps you see how well the AI-powered personalization is working in the real world.

  • Keep Refining Your AI Prompts
    If some emails feel too formal, too casual, or not quite on brand, tweak the prompts and settings in the AI nodes. Continuous improvement is where the real magic happens.

Wrapping Up: Turn Repetitive Work Into an Automated System

By combining n8n, LangChain, and OpenAI, you get a workflow that handles the chore-like parts of email marketing for you. It turns customer data into personalized, AI-written messages and uses coupons intelligently to repair damaged relationships and boost loyalty.

Instead of manually crafting every response, you design the system once, then let automation and AI do the repetition. Your customers get better emails, and you get your time back.

Ready to Try It Yourself?

If you are ready to level up your email marketing without burning out your typing fingers, give this AI-powered n8n workflow a spin. Use it to personalize campaigns, test coupon strategies, and scale your outreach without scaling your workload.

For more information and to access ready-to-use workflows, visit let-the-work-flow.com.


Note: The workflow image below shows a detailed visual map of the entire process.
AI Marketing Email Workflow

Automate Customs Tariff Number Research with API & Google Sheets

Automate Customs Tariff Number Research with API & Google Sheets

Why bother automating customs tariff numbers?

If you deal with international shipments, you already know how painful customs tariff number research can be. Manually checking codes for every single item is slow, repetitive, and honestly, pretty easy to mess up. One wrong number and you might be looking at delays, extra questions from customs, or even fines.

This n8n workflow template steps in as your quiet assistant in the background. It uses a dedicated customs tariff API to suggest the right codes for your products and connects directly to Google Sheets so you can work from a simple list instead of jumping between tools. Whether you need a quick answer for one product or want to process a whole spreadsheet of items, this workflow has you covered.

What this n8n workflow actually does

At a high level, the template helps you:

  • Look up a customs tariff number for a single item via a chat-style interface
  • Run bulk customs tariff research for many items stored in a Google Sheet
  • Get an automatic email when your bulk processing is finished

So you can keep working on other tasks while n8n does the heavy lifting in the background.

When should you use this template?

This workflow is a great fit if you:

  • Regularly ship products across borders and need tariff numbers for customs declarations
  • Manage item lists in Google Sheets and want to enrich them with customs tariff codes
  • Are part of a logistics, compliance, or operations team that wants fewer manual lookups
  • Need both one-off lookups and large batch processing in a single, flexible setup

In short, if you ever find yourself thinking, “There has to be a faster way to get these customs codes,” this template is for you.

How the workflow is structured

The template is organized into three main parts that work together:

  1. Manual Single Query – look up a single item via chat input
  2. Batch Query from Google Sheets – process a whole list of items
  3. Completion Notification – get an email when the batch is done

You can use each part independently depending on what you need at the moment.

1. Quick single-item lookup via chat

Let’s start with the most interactive part. Imagine you just need a customs tariff number for one product. Instead of opening a browser, searching for a website, and manually navigating through categories, you simply type a description into a chat interface in n8n.

The workflow takes that description and sends it to the Customs Tariff API, which returns a list of suggested tariff codes. The workflow then grabs the first suggestion and presents it as the result.

Key nodes for the single query

  • Chat Trigger – This node starts the workflow when you enter an item description. Think of it as your “Ask a question” entry point.
  • Customs Tariff API Query – Here the item description you typed is sent to the Customs Tariff API, which responds with suggested codes.
  • Output Customs Tariff Number – The workflow extracts the first suggested tariff code from the API response and outputs it for you.

It is perfect for those moments when you just want to quickly check one product without touching your spreadsheet.

2. Bulk customs tariff lookup from Google Sheets

Now for the real time saver. If you have a whole list of items, doing them one by one would be painful. This part of the workflow takes a Google Sheet and runs tariff number suggestions for every item in it.

Here is how it works in practice:

  1. You manually start the workflow when you are ready to process a batch.
  2. n8n reads all item descriptions from the first column of a specific Google Sheet.
  3. For each item, the workflow calls the same Customs Tariff API to get suggestions.
  4. It extracts the key details, such as the tariff code, description, and confidence score.
  5. It writes the resulting tariff numbers back into the sheet so your data stays in one place.

Key nodes for batch processing

  • Start Query – A manual trigger node that starts the batch processing when you are ready. No need to wait for a schedule if you want to control the timing.
  • Read Item Descriptions – Connects to your chosen Google Sheet and reads the item names or descriptions from the first column.
  • Loop Over Items – Iterates over each row so every item gets its own API request and result.
  • Customs Tariff API Query Batch – Sends each item description to the Customs Tariff API to get suggested tariff numbers.
  • Prepare Data – Cleans up and structures the response, pulling out the most relevant tariff code, the description, and the confidence score.
  • Write Customs Tariff to Sheet – Updates your Google Sheet with the returned tariff codes and related info, so you can immediately see the results next to each item.

The result is a Google Sheet that starts with just item descriptions and ends up enriched with customs tariff numbers and useful metadata, all without you manually searching for anything.

3. Automatic completion email so you stay in the loop

Batch jobs can take a bit of time, especially if your item list is long. Instead of constantly checking n8n or refreshing your sheet, this workflow sends you an email when everything is done.

Once all items are processed, the workflow aggregates the results and triggers an email notification. You get a clear signal that the job has finished, and you can jump back into your sheet to review the codes.

Key nodes for notifications

  • Aggregate – Collects the data from the batch process so the workflow knows when all items have been handled.
  • Send Completion Email – Sends a summary email to the address you configure, letting you know the batch has completed.

This is especially handy if you kick off a larger batch, go do something else, and just wait for the email to tell you your sheet is ready.

Why this workflow makes your life easier

Let’s break down the main benefits in simple terms:

  • Automation – Most of the repetitive work is handled for you. No more copy-paste between websites and spreadsheets.
  • Accuracy – The workflow uses a dedicated Customs Tariff API for suggestions, which helps reduce human error and keeps your classifications more consistent.
  • Seamless Google Sheets integration – You keep working in a tool you already know, and n8n works behind the scenes to enrich your data.
  • Notifications built in – Email alerts mean you do not need to babysit the process. Start a batch, walk away, and come back when it is done.
  • Scalability – It works just as well for a single urgent lookup as for hundreds of items in a list.

How to set it up and start using it

Getting started is mostly about connecting your accounts and pointing the workflow at the right sheet. Here is the basic setup flow:

  1. Connect Google Sheets
    Configure your Google Sheets credentials in n8n with the required access rights so the workflow can read and write to your spreadsheet.
  2. Connect Gmail for notifications
    Link your Gmail account in n8n so the workflow can send completion emails to your chosen address.
  3. Run single queries via chat
    When you want a quick lookup, use the chat trigger in the workflow, type your item description, and let the workflow return a suggested customs tariff number.
  4. Prepare your batch sheet
    Create or open a Google Sheet and put all your item descriptions in the first column. This is what the workflow will read from.
  5. Start the batch job
    Use the manual trigger for batch processing in n8n. The workflow will read the sheet, query the API for each item, update the sheet with tariff numbers, and then notify you by email when everything is complete.

Who benefits most from this template?

This workflow is especially useful for:

  • Businesses handling frequent international shipments
  • Logistics and warehouse teams preparing customs documents
  • Compliance officers who need consistent, auditable tariff classifications
  • Anyone maintaining product or item lists in Google Sheets and needing customs codes

By automating tariff research, you free up time and mental energy to focus on planning, customer communication, and higher value work.

Ready to streamline your customs tariff research?

If you are tired of searching for tariff numbers one by one, this n8n template gives you a practical, low-friction way to automate the process. You get the reliability of an API, the familiarity of Google Sheets, and the flexibility of n8n to adapt the workflow as your needs grow.

Set it up once, and you will keep saving time every time you add new products or update your item lists.

Automate your customs tariff number research today, reduce errors, and keep your import and export processes running smoothly.

Automate Customs Tariff Number Research with n8n Workflow

Automate Customs Tariff Number Research with n8n

If you have ever tried to look up customs tariff numbers by hand, you know it is not exactly a fun way to spend an afternoon. Lots of clicking, copying, pasting, and second-guessing. The good news is that you do not have to do it manually anymore.

In this guide, we will walk through an n8n workflow template that automates customs tariff number research for you. It connects an external Customs Tariff API with Google Sheets and even sends you an email when everything is done. You can use it for quick one-off lookups or to process long product lists in bulk.

Let us break it down in plain language so you know exactly what this workflow does, when to use it, and how it can make your life a lot easier.

What This n8n Workflow Actually Does

At its core, this workflow is all about turning product descriptions into customs tariff numbers without manual research. It does this in three main ways:

  • Single item lookup – Type in a product description and instantly get the top tariff suggestion from the Customs Tariff API.
  • Bulk processing from Google Sheets – Take a whole list of products from a sheet, send each one to the API, and write the result back into the same sheet.
  • Completion email – Get a notification in your inbox once all items have been processed.

You can use the parts together or separately, depending on whether you need a quick answer or a full batch of results.

When You Should Use This Template

This n8n workflow template is perfect if you:

  • Handle international shipments and need customs tariff numbers regularly.
  • Maintain product catalogs that must include accurate tariff codes.
  • Are tired of copying descriptions into external tools and then pasting results back into spreadsheets.
  • Want to automate repetitive customs classification tasks using Google Sheets and APIs.

If you ever thought, “There has to be a faster way to match these products with tariff numbers,” this workflow is that faster way.

How the Workflow Is Structured

The template is organized into three main branches that work together:

  1. Manual Single Query – for quick, on-demand lookups.
  2. Batch Query from List – for processing many items from a spreadsheet.
  3. Completion Notification – for getting an email summary once everything is done.

Let us walk through each part so you know exactly what is happening behind the scenes.

1. Quick Lookups with the Manual Single Query

Sometimes you just want to check one item, right? No spreadsheets, no batch jobs, just a fast answer. That is where the Manual Single Query branch comes in.

How it works

This part of the workflow uses a Chat Trigger in n8n. Here is what happens step by step:

  1. You open the workflow and use the Chat Trigger to enter a short description of your item, for example, “wireless Bluetooth headphones.”
  2. n8n sends that description to the Customs Tariff API.
  3. The API responds with one or more suggested customs tariff numbers, along with additional details.
  4. The workflow takes the first suggestion and outputs that as the main result.

This is ideal when you just need a quick customs tariff number for a single product, without setting up or editing any spreadsheets.

2. Bulk Automation with Batch Query from Google Sheets

Now for the more powerful part. If you have a long list of items, doing one query at a time is not realistic. That is exactly why the workflow includes a Batch Query from List branch that works with Google Sheets.

What this branch does

This branch starts with a manual trigger and then processes each item in a Google Sheet, one by one, using the Loop Over Items node in n8n.

Here is the flow in simple terms:

  1. The workflow is started manually.
  2. n8n reads product descriptions from a specific Google Sheet and sheet tab that you define.
  3. Using Loop Over Items, it goes through each row in the sheet.

Step-by-step processing for each row

For every item description in your sheet, the workflow does the following:

  1. Calls the Customs Tariff API with the current item description as input.
  2. Extracts and prepares data from the API response, including:
    • The suggested customs tariff code.
    • The description that matches the tariff number.
    • The match score or relevance indicator returned by the API.
  3. Updates the Google Sheet by writing the customs tariff number (and related details, if desired) into the row next to the original item description.

The outcome is a neatly enriched spreadsheet where each product now has a corresponding customs tariff number, all generated automatically.

This approach is ideal when you have large datasets, product catalogs, or shipment lists that need consistent and accurate customs classification without manual data entry.

3. Stay in the Loop with Completion Notifications

You probably do not want to sit and watch rows being processed one at a time. That is why the workflow includes a Completion Notification branch.

What happens at the end

After the batch process finishes, the workflow:

  • Collects and aggregates the overall results from the batch run.
  • Sends a notification email to the address you configured.

The email confirms that the process is complete, so you know it is safe to go back to your Google Sheet and start using the enriched data. It is a small touch, but it makes managing the workflow much smoother, especially if you are processing a long list.

Why This Workflow Makes Your Life Easier

So why bother setting this up instead of sticking with manual research? A few solid reasons:

  • Huge time savings – No more looking up each item individually. The workflow handles both single and batch queries automatically.
  • Fewer mistakes – By relying on a dedicated Customs Tariff API, you reduce the risk of typos or choosing the wrong code from memory.
  • Flexible usage – Use the Chat Trigger for quick checks or the Google Sheets integration for full-scale data enrichment.
  • Smooth integrations – It works directly with Google Sheets for input and output, and uses your preferred email service for notifications.

In short, you get a more reliable, repeatable process for customs tariff number research, without extra manual work.

Getting Started with the Template

Ready to try it out? Here is what you need to set up before running the workflow:

1. Connect Google Sheets

  • In n8n, connect your Google Sheets account.
  • Specify the target spreadsheet and the exact sheet tab that contains your item descriptions.
  • Make sure the column with product descriptions is clearly defined, so the workflow can read from it and write results back.

2. Configure the Customs Tariff API

  • Set up your API credentials inside n8n if the Customs Tariff API you use requires authentication.
  • Check that the endpoint, parameters, and any required headers are correctly configured in the API node.

3. Set Your Notification Email

  • Connect your email service in n8n, such as SMTP or another supported email provider.
  • Enter the email address where you want to receive completion notifications.

Once these pieces are in place, you can:

  • Run a single query using the Chat Trigger to test the API connection.
  • Start the batch process to enrich your Google Sheet with customs tariff numbers.

Wrapping Up

This n8n workflow template gives you a practical, low-friction way to automate customs tariff number research. Whether you are classifying a single new product or updating an entire catalog, it helps you:

  • Streamline your customs classification process.
  • Improve accuracy with consistent API-based results.
  • Save time by automating manual lookups in Google Sheets.

If customs tariff numbers are part of your daily work, this automation can quietly take a big chunk of that load off your plate.

Give this workflow a try and see how much smoother your customs classification can be.

Automate Senior Designer Job Searches on LinkedIn & Twitter

Automate Senior Designer Job Searches on LinkedIn & Twitter with n8n

What You Will Learn

In this guide you will learn how to:

  • Set up an automated senior designer job search using n8n
  • Collect job posts from LinkedIn and Twitter on a schedule
  • Filter roles by keywords, location, and time period
  • Extract job and poster details from LinkedIn job pages
  • Save all validated job listings into a Notion database

By the end, you will have a working n8n workflow that runs twice a day, finds relevant senior designer roles, and sends them straight to Notion so you can focus on applying instead of searching.

Concept Overview: How the Automation Works

This n8n workflow combines two main job sources and a single source of truth for saving results:

1. Data Sources

  • LinkedIn job search pages The workflow scrapes public LinkedIn job listings for senior designer roles that match your criteria.
  • Twitter job-related posts It also searches for tweets that mention senior designer hiring opportunities, filtered by keywords and location.

2. Processing & Filtering

  • Job posts are parsed to extract key fields like title, company, location, posting date, and URL.
  • Filters remove incomplete, irrelevant, or unwanted listings based on your keyword rules.
  • For LinkedIn, the workflow goes deeper to fetch full job descriptions and poster details from each job page.

3. Storage in Notion

  • All validated jobs from LinkedIn and Twitter are saved to a Notion database.
  • Each entry includes core job information plus metadata such as source platform and poster details (where available).

4. Automation Schedule

By default, the workflow runs twice a day:

  • 5:00 AM – LinkedIn job search and processing
  • 5:15 AM – Twitter job search and processing

You can adjust these times later using the n8n trigger nodes.


Step 1: Prepare Your Notion Database

The workflow needs a place to store all the job listings. You can either create your own database from scratch or start from a template.

  1. Create or duplicate a Notion database
  2. Include useful fields Make sure your database has properties for:
    • Job title
    • Company
    • Location
    • Job URL
    • Source (LinkedIn or Twitter)
    • Posting date
    • Job description (optional but helpful)
    • Poster name and profile URL (for LinkedIn, if you want this data)

Step 2: Connect Notion to n8n

Next, you will link your Notion workspace to n8n so that the workflow can write new job entries directly into your database.

  1. Open the workflow in n8n Import or open the provided template in your n8n instance.
  2. Locate the “Save to Notion” nodes In the workflow, find the nodes responsible for saving LinkedIn and Twitter jobs to Notion. These are usually labeled something like Save to Notion.
  3. Authenticate your Notion account Within each “Save to Notion” node:
    • Add or select your Notion credentials.
    • Grant n8n access to the database you created or duplicated earlier.
  4. Select your job database Configure each “Save to Notion” node to point to the same job database so that all listings are stored in one place.

Step 3: Customize Your Job Search Criteria

The power of this workflow comes from tailoring search filters to match your ideal roles. You will configure this in the “Set Search Criteria” and “Set Search” nodes.

Key Parameters to Adjust

Edit the following properties to match your preferences:

  • search_keywords Job titles and role-related keywords you want to include, for example:
    • senior product designer
    • product design lead
    • senior UX designer
    • AI designer
  • excluded_keywords Terms you want to filter out, such as:
    • contract
    • freelance
    • junior
    • intern

    This helps keep your list focused on permanent senior roles.

  • location Target locations, for example:
    • remote
    • San Francisco

    You can adapt this to your preferred cities, regions, or remote-only searches.

  • f_TPR (LinkedIn time period filter) Controls how recent the LinkedIn job postings should be. Example:
    • r86400 – last 24 hours

    Adjust this if you want a longer or shorter time window.

  • sortBy (LinkedIn sorting method) Tells LinkedIn how to order results. Common value:
    • DD – most recent first

By fine-tuning these values, you can choose how broad or narrow your job search should be across both LinkedIn and Twitter.


Step 4: Configure the Schedule and Rate Limits

Scheduling the Workflow

The template includes trigger nodes that define when each part of the workflow runs:

  • LinkedIn trigger Runs daily at 5:00 AM by default.
  • Twitter trigger Runs daily at 5:15 AM by default.

To change these times:

  1. Open each trigger node in n8n.
  2. Adjust the schedule to your preferred times or frequency.
  3. Save and activate the workflow once you are done.

Handling Rate Limits

LinkedIn and Twitter can restrict access if you send too many requests in a short time. The workflow uses Wait nodes to slow down requests and avoid rate limiting.

  • In the LinkedIn workflow, there is a delay of 10 seconds between certain requests.
  • Twitter processing also includes waits before saving to Notion.

You can adjust these waits if you see rate limit errors or want to be extra cautious.


Step 5: Understand the LinkedIn Workflow (Daily at 5 AM)

The LinkedIn branch of the workflow focuses on scraping public job listings and then enriching them with detailed information.

LinkedIn Processing Steps

  1. Trigger The workflow is scheduled to start at 5:00 AM every day (or at the time you configure).
  2. Search Job Listings An HTTP Request node sends a query to LinkedIn job search pages using:
    • Your search_keywords
    • Location filters
    • Time period filter (f_TPR)
    • Sorting method (sortBy)

    This returns raw HTML for job search result pages.

  3. Parse Job Cards A parsing node extracts structured data from the HTML, such as:
    • Job title
    • Company name
    • Location
    • Posting date
    • Job URL
  4. Filter Jobs The workflow removes any listings that are clearly incomplete, for example:
    • Missing job title
    • Missing company name

    Additional filters can be applied using your keyword rules.

  5. Delay Processing A Wait node introduces a 10 second delay between requests. This helps reduce the risk of hitting LinkedIn rate limits or triggering anti-scraping measures.
  6. Fetch Job Details For each remaining job:
    • The workflow loads the individual LinkedIn job page.
    • It extracts the full job description.
    • It identifies hiring team or poster information where available.
  7. Extract Poster Information From the job page, the workflow attempts to extract:
    • Poster name
    • Poster title
    • Poster LinkedIn profile URL

    These details are useful if you want to reach out directly.

  8. Save to Notion Finally, a “Save to Notion” node:
    • Creates a new entry in your Notion job database for each validated listing.
    • Stores job title, company, location, posting date, job URL, full description, and poster info.
    • Tags the record with the source as LinkedIn.

Step 6: Understand the Twitter Workflow (Daily at 5:15 AM)

The Twitter branch focuses on discovering hiring-related tweets that mention senior designer roles.

Twitter Processing Steps

  1. Trigger The workflow is scheduled to run at 5:15 AM daily (or at your configured time).
  2. Search Tweets A search node queries Twitter for tweets related to senior designer job posts. It uses:
    • Your search_keywords to find relevant roles.
    • Location filters to focus on acceptable regions or remote roles.
    • Additional filters to focus on hiring or job-related tweets.
  3. Parse & Filter Tweets The workflow extracts from each tweet:
    • Job title (if available or inferred)
    • Company (if mentioned)
    • Location (if mentioned or tagged)
    • Tweet URL

    It then filters out tweets containing any of your excluded_keywords, such as “intern” or “junior”.

  4. Validate Jobs Only tweets that appear to describe real job opportunities are kept. The workflow checks that:
    • There is a valid job title.
    • There is a company or clear employer reference.
  5. Wait & Save to Notion Before saving, the workflow includes waits to avoid hitting Twitter rate limits. Then, for each validated tweet:
    • A new entry is created in your Notion job database.
    • Key details like job title, company, location, tweet URL, and poster handle are stored.
    • The record is tagged with the source as Twitter.

Important Notes & Best Practices

  • LinkedIn scraping can break This workflow scrapes data from LinkedIn public pages. If LinkedIn changes its HTML structure or layout, your parsing logic may stop working. Be prepared to:
    • Review and update your parsing nodes periodically.
    • Test the workflow after major platform changes.
  • Respect platform terms of service Before scraping or using APIs, review the terms of service for LinkedIn and Twitter. Make sure your usage complies with their policies.
  • Use delays to avoid bans The Wait nodes are important. They:
    • Help you avoid IP bans.
    • Reduce the chance of hitting rate limits.

    If you encounter errors, consider increasing delay durations.

  • Fine-tune keywords for quality The relevance of your results depends heavily on:
    • Good search_keywords that match your ideal titles.
    • Strong excluded_keywords to remove noise like internships or junior roles.
    • Thoughtful location filters that reflect where you are willing to work.

Quick Recap

Here is a brief summary of what you set up:

  • A Notion database to collect all senior designer job opportunities.
  • n8n connections to Notion plus workflow nodes that:
    • Search LinkedIn job pages at 5 AM.
    • Parse and filter LinkedIn job cards.
    • Fetch full job descriptions and poster info from job pages.
    • Search Twitter for hiring-related tweets at 5:15 AM.
    • Parse and validate tweets as real job posts.
    • Save all validated jobs from both platforms into Notion.
  • Custom search criteria that match your ideal senior designer roles.
  • Rate limiting safeguards using Wait nodes.

FAQ

Can I change the job titles or focus on a different role?

Yes. Update the search_keywords field in the “Set Search Criteria” and “Set Search” nodes. For example, you can switch from “senior product designer” to “design manager” or another title.

How often should the workflow run?

Twice daily is a good starting point for fresh results without overloading platforms. You can increase or decrease the frequency by editing the trigger nodes, as long as you respect rate limits and platform policies.

What if I only want remote jobs?

Set the location field to “remote” or similar remote-related terms. You can also combine this with keyword filters like “remote” in the job title or description where applicable.

Do I need to know how to code?

No coding is required. You will configure existing n8n nodes, adjust fields like keywords and locations, and connect your Notion account. The logic is handled by the workflow template.


Start Automating Your Senior Designer Job Search

Instead of manually checking LinkedIn and Twitter every day, let n8n collect and organize senior designer job opportunities for you.

Connect your Notion database, customize your search criteria, set your preferred schedule, and activate the workflow. From there, you will receive a steady stream of curated roles that match your goals, so you can spend your time on thoughtful applications and interviews instead of endless searching.

Happy job hunting!

Automate Voice of Customer Feedback Analysis & Routing

Automate Voice of Customer Feedback Analysis & Routing

The Marketer Who Was Drowning in Feedback

By the time Emma opened her laptop each morning, her day already felt out of control.

As a Customer Marketing Manager at a fast-growing SaaS company, she was supposed to be the voice of the customer inside the business. In reality, she was buried in scattered feedback.

Support tickets lived in Zendesk. Sales notes were trapped in Pipedrive. Long email threads sat in Gmail. Urgent comments appeared in random Slack channels at 11:47 p.m. And when the product team asked, “What are customers actually saying about onboarding this month?” Emma could only reply with a frustrated, “Let me pull that together and get back to you.”

It took days. Sometimes weeks.

By then, the moment had passed, the opportunity was gone, and more feedback had already piled up.

Emma knew they needed a better way to handle Voice of Customer (VOC) feedback. Not just collecting it, but actually understanding it, routing it, and turning it into action. She had heard about n8n and AI-driven workflows, but everything she saw looked like a complex science project.

That changed when she discovered an n8n template for automated VOC AI analysis and routing.

Discovering an Automated VOC Workflow in n8n

One afternoon, after losing yet another hour copying Zendesk comments into a spreadsheet, Emma decided she had enough. She searched for “n8n voice of customer template” and found a workflow that promised exactly what she needed:

  • Collect feedback from Gmail, Slack, Pipedrive, and Zendesk
  • Use multiple AI agents to analyze and summarize it
  • Automatically route the feedback to the right people and tools

It was not just a simple integration. It was a complete VOC system built on n8n, OpenAI, and the tools her team already used.

Instead of another static “how to” guide, the template walked her through a clear structure. The workflow was built in three main phases, and Emma quickly realized each one mapped directly to her daily pain points.

Phase 1 – The Data Gathering Agent That Never Sleeps

Emma’s first challenge was obvious. Feedback was everywhere. Her team could not fix what they could not see.

In the template, the solution started with a Data Gathering Agent, an AI-driven part of the workflow dedicated to pulling in customer feedback from all her core channels.

Once configured, this agent automatically collected:

  • Gmail – It fetched emails sent after a specific date from her Customer Success Manager’s email address. That meant every new customer reply, complaint, or suggestion was captured without manual forwarding.
  • Slack – It searched messages across defined channels to find relevant customer communications. No more scrolling through #customer-feedback and #sales-wins hoping not to miss something important.
  • Pipedrive – It retrieved notes associated with customers, identified by person IDs. Sales insights stopped living in isolation and became part of the bigger VOC picture.
  • Zendesk – It pulled in support tickets and related data, so recurring issues and hidden patterns could finally be connected to the rest of the feedback.

The agent relied on tools configured within n8n, each with proper credentials and session memory. This memory allowed the system to retain context across interactions, which meant it could handle ongoing conversations instead of treating every message as a random, disconnected piece of text.

For Emma, this was the first turning point. Instead of chasing feedback, the feedback came to her, already collected in one automated workflow.

Phase 2 – AI That Turns Noise Into Signals

Of course, gathering feedback was only half the battle. Emma knew from painful experience that a giant pile of raw text was not helpful. It was just a more organized version of chaos.

The second phase of the n8n template was where the real magic happened: an AI Analysis Chain that transformed unstructured feedback into clear, actionable insights.

The workflow used two sequential AI chains, each with a specific job:

Signal Extraction Chain

Emma watched as the workflow compacted long customer messages into short, precise “signals.”

Instead of copying entire email threads or Slack conversations, the AI summarized each piece of feedback into a concise sentence or two that captured the core issue or sentiment. It stripped out filler, pleasantries, and repetition, leaving only what mattered.

For example, a long Zendesk ticket about a confusing onboarding flow turned into a single signal like:

“Customer is confused about step 3 of onboarding and cannot complete initial setup without support.”

These signals became the building blocks of Emma’s VOC understanding.

Clustering Chain

Once the signals were extracted, the second chain grouped them into meaningful, actionable topics.

The AI automatically clustered similar signals under themes such as:

  • Billing
  • Feature Requests
  • Onboarding
  • Performance

Each cluster included representative examples, so Emma and her team could see not just the label, but the actual customer language behind it.

Suddenly, patterns emerged:

  • Onboarding issues spiking after a new product change
  • Recurring performance complaints from a specific segment
  • Billing confusion tied to a recent pricing update

Instead of guessing what customers cared about, Emma had a structured, AI-assisted view of their voices, updated automatically.

Phase 3 – The Action & Routing Agent That Closes the Loop

Before this workflow, Emma’s biggest frustration was not just understanding feedback, but acting on it. Key issues died in spreadsheets, and important insights never reached the right owners.

The third phase of the template solved this with an Action & Routing Agent.

This AI agent took the clustered topics and applied preset routing rules to decide what to do next. It did not just tag feedback. It triggered real actions in the tools her team already lived in.

Depending on the topic and category, the workflow could automatically:

  • Create Zendesk tickets for product or performance issues that required follow-up from support or engineering.
  • Post billing or contract related issues to a dedicated Slack channel, so finance and account managers could jump in quickly.
  • Generate Notion tasks for onboarding or training topics that needed documentation updates or new help center articles.
  • Send email alerts to the Customer Success Manager for high-risk cases or important proposals that required a human response.
  • Flag unassigned topics that did not match any predefined category, so Emma could review and refine the routing rules over time.

Behind the scenes, the agent used tools integrated with Zendesk, Slack, Notion, and Gmail inside n8n. Once configured, it ran quietly and consistently, routing feedback to the right place without Emma lifting a finger.

This was the moment the workflow truly changed her day to day. VOC was no longer a passive report. It became an active, automated system that pushed the right information to the right people at the right time.

Setting Up the Workflow in n8n

Emma was not a developer, so she worried the setup would be too complex. The actual steps turned out to be straightforward, as long as she followed them carefully.

1. Configure Credentials

First, she connected all the tools the workflow needed:

  • Gmail credentials for accessing customer email threads
  • Slack credentials so the workflow could search specific channels
  • Pipedrive credentials to pull customer notes via person IDs
  • Zendesk credentials to read and create tickets
  • Notion credentials for creating tasks from feedback topics
  • OpenAI LLM node credentials to power the AI agents and analysis chains

Once these were in place, the data gathering and AI analysis layers had everything they needed to run.

2. Set Initial Parameters

Next, Emma opened the “Set: Initial Parameters” node in n8n and customized it for her company.

She updated the placeholder email address with her actual Customer Success Manager’s email and specified the Slack channel for billing alerts. This ensured that sensitive topics like billing landed in the correct internal space right away.

3. Update Slack Search Channel

To avoid pulling in random Slack chatter, she configured the Slack search node to look only at the channels where customer feedback typically appeared.

She set it to search a dedicated feedback channel plus a couple of sales and success channels where customer quotes and issues were often shared.

4. Activate the Workflow

With credentials and parameters in place, Emma did a quick review of the nodes, then clicked Activate.

From that point on, the n8n workflow handled the entire journey of VOC feedback:

  • Collecting it from Gmail, Slack, Pipedrive, and Zendesk
  • Summarizing and clustering it with AI
  • Routing it into Zendesk, Slack, Notion, or email based on rules

Her role shifted from manual collector to strategic reviewer. Instead of building reports from scratch, she could now refine rules, interpret insights, and work with product and success teams to act on what customers were saying.

How Emma’s Workflow (and Sanity) Improved

Within a few weeks, the impact was obvious.

  • Faster response times – Feedback that used to sit in inboxes was now automatically processed and routed. High risk cases reached the CSM instantly, and product issues became tracked Zendesk tickets without delay.
  • No more lost feedback – Because the workflow consolidated input from Gmail, Slack, Pipedrive, and Zendesk, customer concerns no longer slipped through the cracks or vanished in long threads.
  • Actionable insights, not raw text – The AI clustering and signal extraction gave Emma a clear, summarized view of what customers cared about. She could tell leadership, with confidence, which themes were trending and which needed immediate attention.
  • Flexible and extensible routing – As her company grew, Emma added new routing rules and integrations. The workflow adapted to new teams, new channels, and new processes without being rebuilt from scratch.

Instead of spending days collecting and cleaning data, Emma spent her time influencing roadmaps, improving onboarding, and helping the company respond faster and smarter to customer needs.

Want Help Adapting This n8n VOC Workflow?

Emma’s story is just one example of what is possible when you combine n8n, AI agents, and your existing tools into a single Voice of Customer system.

If you need help modifying this workflow, tailoring routing rules, or building additional automations with n8n, Make, Langchain, or Langgraph, you can reach out directly at:

thomas@pollup.net

From Raw Feedback to Real Change

This advanced automated workflow shows how AI-powered analysis and smart integrations in n8n can transform scattered, messy customer feedback into structured, actionable outcomes.

Instead of drowning in messages, you get a clear, automated system that listens, understands, and routes customer voices where they can actually make a difference.

Ready to streamline your customer feedback management?
Configure your credentials, adjust the parameters, and activate this workflow to start harnessing automated VOC analysis and routing today.

Automate YouTube Video Alerts to Slack with n8n

Automate YouTube Video Alerts to Slack with n8n: A Story of One Marketer’s Breakthrough

The Moment Alex Realized Manual Sharing Was Broken

By Tuesday afternoon, Alex was already tired.

As the marketing lead for a small but fast-growing startup, Alex had launched a new YouTube series to support product education and brand awareness. The content was great, the team was excited, and the Slack channel called #content-updates was supposed to be the central place where every new video was shared.

In theory, it was simple. Record video, upload to YouTube, copy the link, paste it into Slack, add a short description, and hit send. In reality, it was chaos.

Some days Alex forgot to share the link until hours after publishing. Other days, someone else on the team shared it first, but the message format looked messy or incomplete. Occasionally, a video was never shared at all, which meant sales, support, and leadership missed content that could have helped them.

Alex caught a comment in a meeting that stung a bit: “Wait, we posted a new video yesterday? I didn’t see anything in Slack.”

That was the moment Alex realized the system was broken. The problem was not YouTube or Slack. The problem was manual work.

Discovering n8n and the Idea of a Self-Running Workflow

That evening, while searching for ways to connect YouTube and Slack, Alex stumbled across n8n, an open-source workflow automation tool. The promise was compelling: create workflows that run on autopilot, connect services like YouTube and Slack, and remove manual effort from repetitive tasks.

Alex imagined a simple outcome: every time a new YouTube video was published, the team should see a clean, well-formatted notification in Slack. No copying links, no forgetting, no inconsistent messages.

Then Alex found exactly what was needed – an n8n workflow template that checks a YouTube channel’s RSS feed every 30 minutes and posts new video links directly to Slack.

It sounded like magic, but Alex wanted to understand how it actually worked.

Why This Automation Mattered So Much to Alex’s Team

Before touching the template, Alex wrote down the real reasons this automation needed to exist:

  • Free up time by removing the need to manually share every new video.
  • Keep the whole team instantly aware of fresh YouTube content.
  • Reduce the risk of missing or delaying important video announcements.

Slack was already the heartbeat of team communication. YouTube was becoming the company’s main content engine. Connecting them with automation was not a “nice to have” anymore, it was essential for keeping everyone aligned.

Rising Action: Piecing Together the Workflow in n8n

Alex opened n8n, loaded the template, and started exploring the workflow. It felt less like coding and more like assembling a story that ran every 30 minutes.

The Cast of Nodes in Alex’s Workflow

The template introduced Alex to a set of key nodes that would do all the heavy lifting:

  • Cron Trigger – This node would wake the workflow every 30 minutes to check for new videos.
  • HTTP Request – This node would fetch the YouTube RSS feed that lists recent uploads from the channel.
  • Code Node (Parse RSS) – JavaScript here would parse the RSS XML, extract details about each video, and figure out which one was new.
  • Code Node (Format Slack Message) – Another bit of code would take the video data and turn it into a structured Slack message.
  • Slack Node – This final node would actually post the formatted message into the selected Slack channel.

Alex realized that the workflow already had a clear logic: check regularly, fetch data, filter for new content, format a message, then send it to Slack. The story of a new video would now be told automatically.

The First Obstacle: Getting the YouTube RSS URL

Everything hinged on one important detail: the correct YouTube RSS feed URL. Without it, the HTTP Request node would have nothing useful to fetch.

Alex followed the steps carefully:

  1. Opened the company’s YouTube channel page in the browser.
  2. Right-clicked the page and selected View Page Source.
  3. Searched the source code for the channel ID, which looked like channel/UCxxxxxxxx.
  4. Used that ID to build the RSS URL in the exact format:
    https://www.youtube.com/feeds/videos.xml?channel_id=YOUR_CHANNEL_ID

Once Alex had the URL, it was pasted into the HTTP Request node inside n8n, replacing YOUR_CHANNEL_ID with the real channel ID. The first critical piece was now in place.

Connecting Slack: Bringing Notifications Where the Team Already Lives

Next, Alex needed to make sure that when the workflow found a new video, it could talk to the right people in the right place. That meant configuring the Slack node.

Inside n8n, Alex:

  • Connected the Slack account using OAuth, so n8n could securely post messages.
  • Chose the #content-updates channel as the destination for all video alerts.
  • Customized the bot appearance, adjusting the bot username and emoji icon so messages would stand out in the channel.

With the Slack node wired up, the workflow now had a voice.

The Turning Point: Understanding the Parsing Logic

Alex’s biggest concern was avoiding spam and duplicate posts. The team did not need the same video announced over and over again every 30 minutes. That is where the parsing logic became crucial.

Inside the Parse RSS code node, Alex saw JavaScript that did more than just read the feed. It extracted important details for each video, including:

  • Title
  • Video link
  • Published date
  • Description
  • Video ID

The code then applied a smart filter. It checked whether the newest video in the feed had been published within the last two hours. If the video was older than that, the workflow would not post it again.

This simple rule meant the workflow would behave like a considerate teammate. It would tell the channel about truly new content, not flood Slack with old links.

Crafting the Perfect Slack Announcement

Alex wanted the Slack message to do more than just drop a URL. It needed to be clear, visual, and actionable so that busy teammates could quickly decide whether to click and watch.

The Format Slack Message code node handled this elegantly. It built a Slack message using blocks, which allowed for a structured and engaging layout. The formatted message included:

  • The video title, displayed prominently.
  • The publish date, so the team could see how fresh the content was.
  • A short description pulled from the video details.
  • A clickable “Watch Now” button that linked directly to the YouTube video.

When Alex previewed the payload, it looked exactly like the kind of announcement a thoughtful marketer would write manually, only now it was generated automatically every time a new video appeared.

The First Automated Run: From Manual Chaos to Reliable Rhythm

With all the pieces connected, Alex activated the workflow.

The Cron Trigger was set to run every 30 minutes. Each time it fired, the workflow would:

  1. Wake up and start the process.
  2. Use the HTTP Request node to fetch the latest YouTube RSS feed.
  3. Run the Parse RSS code to extract video information and check if there was a new upload less than two hours old.
  4. If a new video existed, send its details to the Format Slack Message node to prepare a clean, structured message.
  5. Finally, pass that message to the Slack node, which would post it into the chosen Slack channel.

The first time a new video was uploaded after the workflow went live, something small but important happened. Instead of Alex scrambling to copy and paste links, a polished notification appeared in #content-updates within minutes of the video going live.

Team members reacted with emoji, asked questions, and shared the link further. No one asked, “Did we post this in Slack yet?” because the answer was now always “Yes.”

Resolution: What Changed for Alex and the Team

Within a week, Alex could feel the difference:

  • No more panicked last-minute sharing of YouTube links.
  • Consistent, professional Slack announcements for every new video.
  • More time to focus on strategy, content quality, and performance, instead of repetitive tasks.

The workflow had become part of the team’s invisible infrastructure. It quietly checked the YouTube channel every 30 minutes, filtered out old content, and surfaced new videos exactly where the team was already working.

The best part was the peace of mind. Alex no longer worried about forgetting to share a video or sending a messy, rushed message. n8n was handling the routine work, and the team was benefiting from timely, reliable updates.

Your Turn: Let n8n Share Your YouTube Videos to Slack Automatically

If you find yourself in Alex’s situation, manually copying links from YouTube to Slack and hoping you do not forget, you can let automation handle it instead.

With this n8n workflow template you can:

  • Automatically check your YouTube channel RSS feed every 30 minutes.
  • Detect newly published videos based on their publication time.
  • Format a clear, engaging Slack message with title, date, description, and a “Watch Now” button.
  • Post directly to your chosen Slack channel without lifting a finger.

All you need is your YouTube channel RSS URL, a connected Slack account, and a few minutes to plug your details into the template.

Set up this n8n workflow today so your team never misses another YouTube video update. Let your automation quietly handle the routine, while you focus on creating content that matters.