Automate Pinterest Analysis & AI Content Suggestions

Automate Pinterest Analysis & AI-Powered Content Suggestions

Imagine waking up on Monday, opening your inbox, and finding a clear list of Pinterest content ideas already tailored to what performs best on your account. No spreadsheets, no manual pin review, no guesswork. That is exactly what this n8n workflow template helps you do.

In this guide, we will walk through how to build an end-to-end automation that pulls Pinterest pin data, stores and normalizes it in Airtable, runs AI analysis on top, and then sends your marketing team simple, ready-to-use content suggestions.

What this Pinterest + n8n workflow actually does

At a high level, this workflow connects a few tools you might already be using and turns them into a repeatable content engine. Here is what it handles for you:

  • Pulls fresh Pinterest pin data from the Pinterest API on a schedule you choose
  • Normalizes that data and tags each pin (for example Organic vs Paid)
  • Stores and updates pin history in Airtable for long-term tracking
  • Uses an AI agent (like OpenAI) to analyze trends and performance
  • Generates specific, trend-based Pinterest content ideas
  • Sends a short, actionable summary to your team via email or Slack

So instead of wondering what to pin next, you get a steady stream of data-backed ideas delivered automatically.

Why automate Pinterest analysis at all?

If you have ever tried to manually scroll through your boards and figure out what is working, you know how time consuming and inconsistent it can be. One week you are on top of it, the next week it slips.

Automating Pinterest analysis with n8n and an AI agent helps you:

  • Get consistent, data-driven content suggestions on a regular schedule
  • Scale your analysis across hundreds of pins and multiple boards without extra effort
  • Feed insights directly into content calendars and team workflows via email or Slack

In short, you stop guessing and start using your Pinterest data in a systematic way.

Tools that power the workflow

This template leans on a few familiar tools, stitched together with n8n:

  • n8n (or a similar automation platform) to orchestrate the entire flow
  • Pinterest API v5 to pull pin metadata and performance details
  • Airtable as the central database for pin history and metrics
  • OpenAI or another LLM to act as your AI marketing analyst
  • Email or Slack so results reach stakeholders where they already work

Once connected, these tools create a loop that keeps learning from your pins and feeding you better ideas.

How the workflow fits together

Before we dive into the detailed steps in n8n, here is the overall pattern this template follows:

  1. Trigger the automation on a schedule (for example weekly at 8:00 AM)
  2. Call the Pinterest API to fetch pins (/v5/pins)
  3. Clean and tag the data so it is easy to analyze
  4. Upsert that data into Airtable for historical tracking
  5. Ask an AI agent to look for trends and suggest new pin ideas
  6. Summarize those ideas into a short, readable brief
  7. Deliver that brief to your marketing manager or team

Once you set this up, it quietly runs in the background and keeps your Pinterest strategy moving.

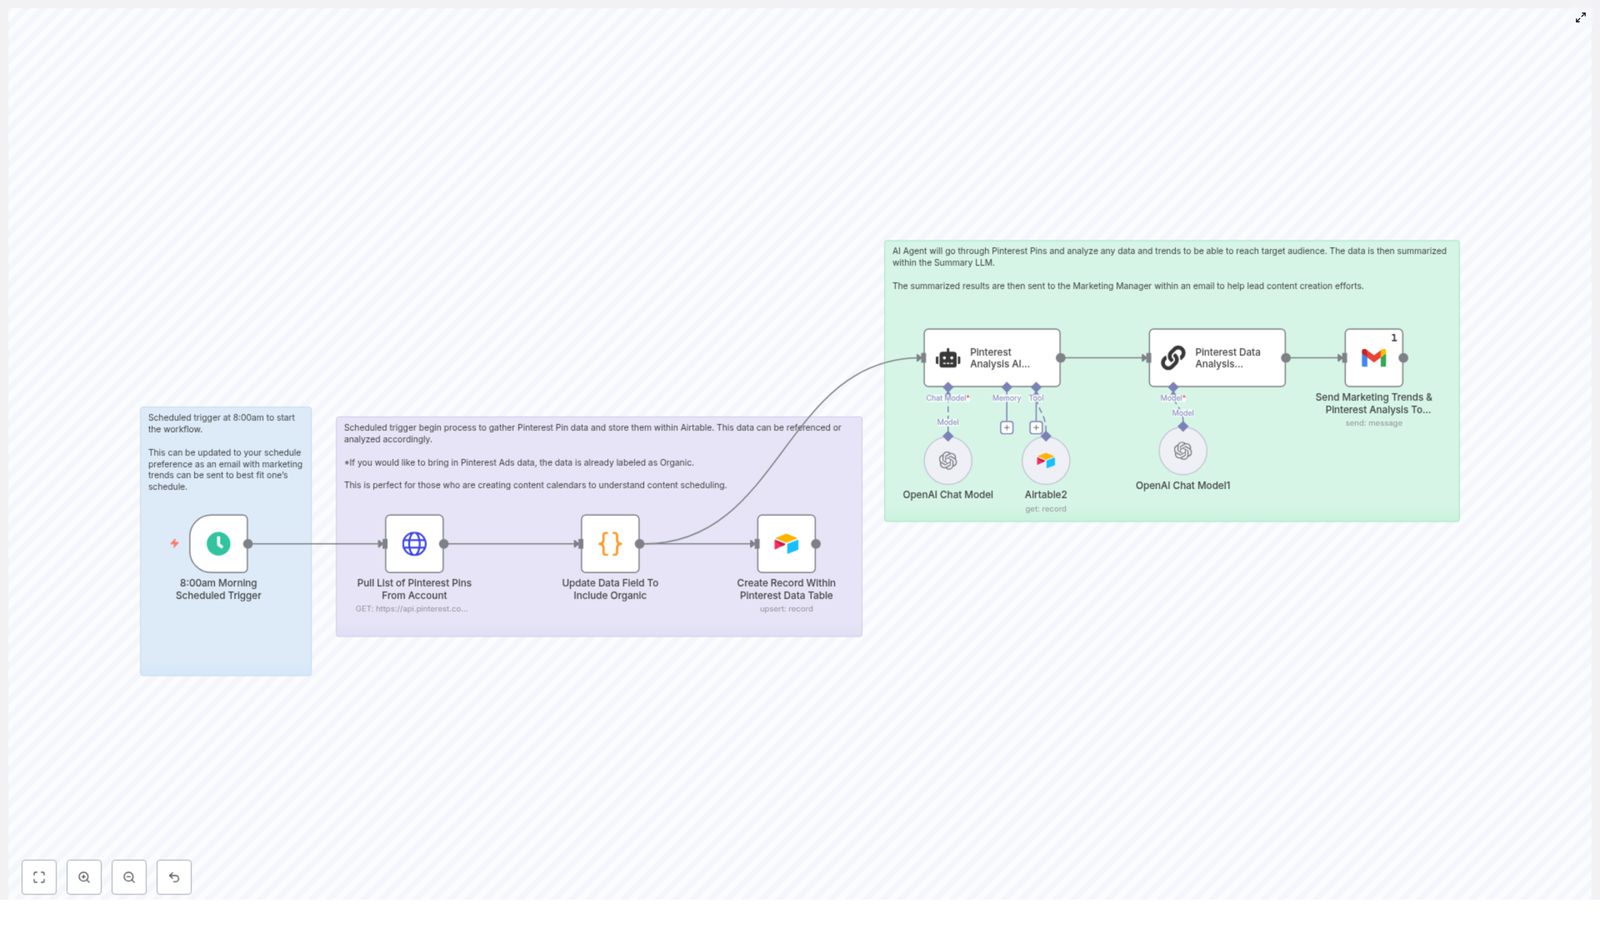
Step-by-step: building the n8n Pinterest workflow

1. Schedule the workflow

Start with a Schedule Trigger node in n8n. This is what controls how often your analysis runs.

Common choices:

  • Weekly at 8:00 AM for content planning
  • Bi-weekly if your volume is lower

In the example template, the trigger is set to run once a week at 8:00 AM, which fits neatly with most marketing planning cycles.

2. Fetch pin data from the Pinterest API

Next, add an HTTP Request node to call the Pinterest API. You will use a GET request to /v5/pins and authenticate with your Pinterest access token.

Basic configuration example:

GET https://api.pinterest.com/v5/pins
Header: Authorization: Bearer <YOUR_PINTEREST_ACCESS_TOKEN>

Make sure you are requesting the fields that matter for analysis, such as:

  • id
  • created_at
  • title
  • description
  • link
  • Any engagement metrics you can access (views, saves, clicks)

Those fields become the foundation for your Airtable records and AI insights.

3. Normalize and tag your pin data

Raw API responses are rarely analysis ready. This is where a small Code node comes in handy.

Use it to:

  • Map Pinterest fields into a consistent, row-based structure for Airtable
  • Tag each pin as Organic or Paid (or any other type labels you use)
  • Ensure the schema is predictable so you can analyze it later without headaches

The goal is simple: every pin should fit into a clean, repeatable format.

4. Upsert pins into Airtable

Once your data is normalized, connect an Airtable node to store it. You will want to upsert rows, which means:

  • Create new records for new pins
  • Update existing records if the pin already exists

At minimum, track these fields in your Airtable base:

  • pin_id (unique identifier)
  • created_at
  • title
  • description
  • link
  • type (Organic / Paid)
  • engagement metrics (views, saves, clicks) – when available

Over time, this turns Airtable into a living history of your Pinterest performance.

5. Let the AI agent analyze trends

Now for the fun part. With your Airtable records in place, you can point an AI agent at that dataset and ask it to behave like a marketing analyst.

A sample prompt you can use:

You are a marketing data analyst. Review the following pin records and identify 5 trend-based pin concepts that will reach our target audience. Consider top performers by saves and clicks, recurring keywords, post format, and posting time. For each suggested pin, include: idea title, one-sentence rationale, suggested keywords, and an ideal board or category.

A helpful pattern is to use a two-stage AI flow:

  1. First, have the AI agent generate a structured list of suggested pins based on the Airtable data
  2. Then, feed that list into a second LLM that focuses on summarization and formatting for email or Slack

This keeps the output both smart and easy to read.

6. Deliver the results to your team

Finally, use an Email or Slack node to send the summarized recommendations to your marketing manager or content team.

Keep the message:

  • Concise and scannable
  • Actionable, with clear next steps
  • Focused on a realistic number of ideas to execute

The end result is a small, high value brief instead of a wall of text.

What metrics should you track and why?

AI is only as good as the data you feed it. To get meaningful Pinterest recommendations, you will want to capture performance metrics over time. Useful metrics include:

  • Impressions or views – tells you how often your pins are being discovered
  • Saves – a strong intent signal on Pinterest and a key indicator of relevance
  • Clicks / CTR – shows how well pins drive traffic or deeper engagement
  • Audience or comment sentiment – gives qualitative feedback that can shape creative direction

Feeding these metrics into your Airtable base and AI analysis ensures that your content suggestions are tied to real performance, not just vague creative ideas.

Prompting tips for better AI content suggestions

Want your AI agent to feel less generic and more like a sharp strategist on your team? A few prompt tweaks go a long way.

  • Define success clearly For example, tell the AI you want to increase saves by 20 percent or improve CTR, not just “perform better.”
  • Ask for specific outputs Request a headline, short description, 3 keywords, suggested image style, and a posting schedule for each idea.
  • Limit the number of ideas 5 to 7 pin ideas per run is usually enough to keep your team focused instead of overwhelmed.
  • Include examples Share a few high performing pins as reference so the AI can mirror style, tone, and format.

Think of your prompt as the creative brief you would give a human strategist. The clearer it is, the better the output.

Best practices when scaling this workflow

As your Pinterest account grows, your automation should grow with it. Here are some practical tips:

  • Store raw API responses alongside the normalized Airtable fields so you can reprocess data if Pinterest changes its schema.
  • Version your AI prompts and keep a small changelog. That way you can track which prompt versions lead to better ideas or higher performance.
  • Respect API limits by paginating results and keeping an eye on rate usage, especially for large accounts.
  • Add a confidence or priority tag to AI suggestions so designers and marketers know which ideas to tackle first.

These small habits make the workflow more resilient and easier to maintain long term.

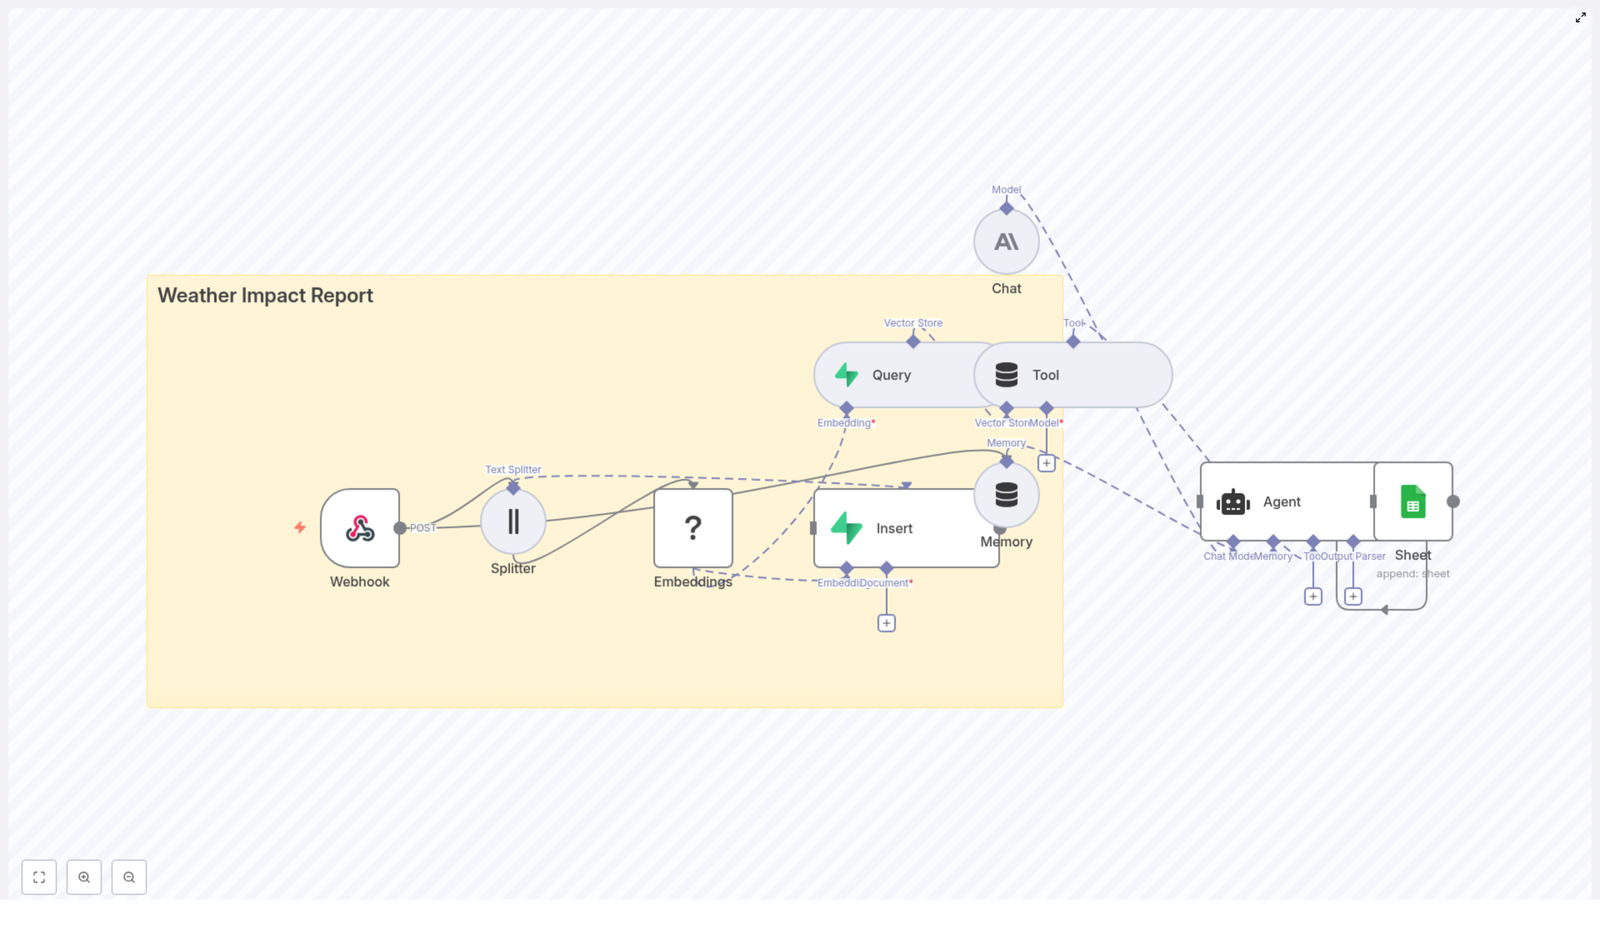
Sample n8n node mapping (conceptual)

If you are more visual, here is a quick conceptual map of the node sequence used in the template:

  1. Schedule Trigger (weekly)
  2. HTTP Request GET https://api.pinterest.com/v5/pins
  3. Code node to map, normalize, and tag results
  4. Airtable upsert node to store pin metadata and metrics
  5. AI Agent node for analysis and content suggestions
  6. Summarization LLM node to create an email-ready brief
  7. Email (or Slack) node to send the final summary

You can adapt or extend this sequence based on your stack, but this gives you a solid starting structure.

Security and privacy tips

Since this workflow touches APIs and potentially user-generated content, it is worth treating security carefully:

  • Store your Pinterest and AI credentials securely in n8n, not in plain text inside nodes.
  • Scope tokens to only the endpoints and permissions you actually need.
  • Rotate tokens on a regular schedule as part of your security hygiene.
  • When sending summaries via email or Slack, avoid including any personally identifiable information (PII) from comments or user profiles.

This keeps your automation both useful and compliant with privacy best practices.

What the marketing manager actually receives

So what does the output look like in real life? Here is a simple example of the kind of brief your manager might get:

Top trends: short how-to graphics and list-style pins get the most saves. Suggested pins: “10-Minute Meal Prep” (idea + image direction + 3 keywords), “Quick Workouts for Busy Parents” (idea + board), “Before & After DIY” (idea + rationale). Schedule: post Tue/Thu mornings. Priority: 3 new short-form pins this week.

In a few lines, they can see what is working, what to create next, and when to publish it.

Ready to automate your Pinterest strategy?

Automating Pinterest analysis with n8n and layering AI on top turns messy, manual guesswork into a repeatable, data-driven process. You get regular, high quality content ideas, your team spends less time in spreadsheets, and your boards stay active with pins that actually match what your audience responds to.

If you would like a starter template or a shortcut to get this running in your own stack, you do not have to build it all from scratch.

Get the starter workflow

AI Logo Sheet Extractor to Airtable

AI Logo Sheet Extractor to Airtable: How One Marketer Turned Chaos Into a Clean Database

By the time Mia opened her laptop on Monday morning, her inbox was already packed with logo sheets. Dozens of agencies, tools, and startups had sent over glossy image grids full of logos that needed to be added to her team’s Airtable database.

Her task sounded simple: keep an up-to-date catalog of tools, grouped by category, attributes, and similar products. In reality, it meant zooming into giant PNGs, squinting at tiny text, and typing the same names and categories into Airtable again and again.

It was slow, repetitive, and easy to mess up. A missed logo here, a duplicate entry there, and suddenly the “single source of truth” was not so trustworthy.

That was the week Mia discovered an n8n workflow template called AI Logo Sheet Extractor to Airtable, a setup that combined AI vision, LangChain agents, and Airtable upserts into a single automated pipeline. What started as a tedious data-entry problem turned into a clean, repeatable workflow that quietly worked in the background.

The Problem: Logo Sheets That Never End

Mia’s company relied on logo sheets for everything: competitor landscapes, partner showcases, internal tooling overviews, and investor decks. Agencies loved sending them as single images that grouped tools by category or use case.

For Mia, that meant:

  • Manually reading every logo on each sheet
  • Typing tool names into Airtable
  • Assigning attributes like “Agentic Application” or “Browser Infrastructure”
  • Trying to remember if a tool was already in the database

She knew this manual process was:

  • Slow and hard to scale when new sheets came in
  • Error-prone, with inconsistent naming and missed entries
  • Blocking downstream analytics and discovery, since the data was never fully up to date

Her team wanted to run queries such as “show all tools related to browser automation” or “find similar tools to X,” but the data model was constantly lagging behind reality.

So Mia set a goal: turn these image-based logo sheets into structured Airtable records automatically, with minimal manual cleanup.

Discovering the n8n AI Logo Sheet Extractor

One afternoon, while searching for “n8n Airtable logo sheet automation,” Mia landed on an n8n template that sounded almost too perfect: an AI Logo Sheet Extractor to Airtable. It promised to:

  • Take an uploaded logo-sheet image
  • Use an AI vision agent built with LangChain and OpenAI (gpt-4o in the example)
  • Extract tool names, attributes, and similar tools
  • Upsert everything into Airtable with deterministic hashes to avoid duplicates

Instead of manually reading and typing, Mia could simply upload an image and let the workflow populate her Airtable base with structured, queryable data.

Curious and slightly skeptical, she decided to set it up.

First Things First: Structuring Airtable So the Automation Can Work

Before the automation could shine, Mia needed to give it a solid foundation. The template recommended a simple, flexible data model in Airtable with two core tables: Attributes and Tools.

Airtable Data Model Mia Used

1. Attributes table

  • Name (single line text)
  • Tools (link to Tools table)

2. Tools table

  • Name (single line text)
  • Attributes (link to Attributes table)
  • Hash (single line text) – deterministic ID for upserts
  • Similar (link to Tools table)
  • Optional fields: Description, Website, Category

This structure would let her:

  • Tag each tool with multiple attributes
  • Link tools to other tools they are similar to
  • Use a stable hash as an ID so the workflow could update existing entries instead of creating duplicates

Once the base was ready, she connected her Airtable credentials in n8n and opened the template.

Inside the Workflow: How the Automation Actually Thinks

The n8n workflow Mia imported was not just a simple “upload and save” script. It was a small pipeline of specialized nodes that handled everything from file intake to AI parsing to Airtable upserts.

The Story Starts With a Simple Form

Mia’s experience began with a Form trigger. The workflow exposed a public form endpoint where she, or anyone on her team, could:

  • Upload a logo-sheet image file
  • Optionally provide a short context prompt, such as “These are AI infrastructure tools” or “This sheet shows CRM platforms by category”

Every time someone submitted this form, the trigger node kicked off the n8n workflow with the attached image and text.

The AI Agent Takes a Look

Next came the part Mia was most curious about: the AI retrieval and parsing agent.

The workflow used a LangChain/OpenAI-powered agent (gpt-4o in the example) with vision capabilities. This agent:

  • Performed OCR and visual recognition on the logo sheet
  • Read tool names wherever they were legible
  • Used the overall layout and optional prompt to infer attributes like “Agentic Application,” “Persistence Tool,” or “Browser Infrastructure”
  • Generated a structured JSON list of tools with attributes and similar tools

The expected structure looked like this:

{  "tools": [  {  "name": "ToolName",  "attributes": ["Attribute 1", "Attribute 2"],  "similar": ["OtherToolA", "OtherToolB"]  }  ]
}

Instead of Mia squinting at tiny logos, the AI agent did the hard visual work and returned data in a machine-friendly format.

Keeping the AI Honest: Structured Output Parsing

AI is powerful, but Mia knew it could sometimes be messy. That is where the Structured Output Parser node came in.

This node validated that the agent’s response matched the expected JSON schema. If the output did not conform, the workflow could catch the issue early instead of sending malformed data into Airtable.

Once validated, the workflow split the tools array so each tool could be processed individually. That allowed fine-grained control when creating attributes, tools, and relationships.

The Turning Point: From Raw AI Output to Clean Airtable Records

The next phase was the real test. Could the workflow reliably map AI output into Mia’s Airtable base without creating a mess of duplicates and inconsistencies?

Step 1: Creating or Reusing Attributes

For every attribute string returned by the agent, the workflow:

  • Checked the Attributes table in Airtable to see if that attribute already existed
  • Created a new record if it did not
  • Collected the Airtable record IDs for both new and existing attributes

These IDs were then attached to the relevant tool. That way, if multiple tools shared “Agentic Application” as an attribute, they all correctly linked to the same attribute record instead of creating duplicates.

Step 2: Deterministic Tool Upserts

Next, the workflow focused on the Tools table. To avoid clutter and duplicates, it used a deterministic hashing strategy:

  • Each tool name was normalized by trimming whitespace, converting to lowercase, and removing punctuation
  • An MD5 or similar deterministic hash was generated from this normalized name
  • The Hash field in Airtable stored this value as a stable key

Using that hash, the workflow’s Create/Upsert nodes could:

  • Update an existing tool if the hash already existed
  • Create a new tool if it did not

This gave Mia confidence that re-uploading a logo sheet, or uploading a slightly updated version, would not create a forest of duplicate tool records.

Step 3: Mapping “Similar” Relationships

The agent also returned a similar list for each tool, essentially a set of related or competitor tools. The workflow handled these by:

  • Resolving each “similar” tool name to an Airtable record ID
  • Storing those IDs in the Similar field of the corresponding tool

Over time, this created a network of related tools that Mia could query to explore clusters, competitor groups, and alternative solutions.

Fine Tuning the Workflow: Mia’s Best Practices

Once the automation was up and running, Mia started refining it based on real-world data. The template came with practical best practices that helped her get better results:

  • Normalize names for hashing Before hashing tool names, the workflow trimmed spaces, converted text to lowercase, and removed punctuation. This made hashes consistent and reduced accidental duplicates.
  • Improve the agent prompt Mia enriched the AI prompt with examples and edge cases, such as how to handle small logos, abbreviations, or combined icons. This gave the agent clearer guidance and more reliable output.
  • Use multiple passes when needed If the first run missed some logos on a crowded sheet, she could run a second pass with adjusted sensitivity or manually review a subset of tools.
  • Rate-limit and batch large sheets To avoid vision model timeouts or unexpected API costs, she split very large logo sheets into smaller segments.
  • Add human verification for critical data For high-stakes datasets, Mia added a manual review step in n8n before final upsert, so a human could quickly confirm or correct the AI’s output.

When Things Go Wrong: Troubleshooting in Real Life

Not every run was perfect at first. Mia bumped into a few common issues, all of which the template anticipated.

  • Malformed JSON from the agent Occasionally, the AI returned slightly malformed JSON. Tightening the structured-output prompt and relying on the strict parser helped. In some cases, she added a rescoring or retry step.
  • Missing logos or unreadable text Some logo sheets had tiny or low-contrast logos. Pre-processing the images with higher DPI, contrast adjustments, or slicing them into tiles improved recognition.
  • Duplicate attributes or tools When duplicates slipped in, Mia checked whether attribute strings were normalized before lookup in Airtable. Aligning that logic with the hashing strategy for tools reduced duplication.
  • Performance issues on big batches For large collections of images, she parallelized batch processing in n8n and used caching for attribute lookups to keep the workflow responsive.

Security, Privacy, and Stakeholder Trust

As the workflow became central to her team’s process, Mia had to answer a different question from her stakeholders: “Where is all this data going?”

To keep things secure and compliant, she followed the template’s guidance:

  • Stored Airtable Personal Access Tokens (PATs) securely in n8n credentials
  • Limited retention of raw images, only keeping what was necessary for processing
  • Reviewed how the AI provider handled image data
  • Paid special attention to logo sheets that might include identifiable people, aligning with relevant privacy and legal requirements

This gave her team confidence that the automation was not just efficient, but also responsible.

Where Mia Took It Next: Extensions and Ideas

Once the core workflow was stable, Mia started to see new possibilities. The template suggested several extensions, and she gradually implemented them:

  • Slack and email notifications Whenever new tools were added, n8n sent a short summary to a Slack channel so the team could see what changed.
  • Automatic enrichment She connected public APIs to fetch tool descriptions, websites, and even updated logos, enriching the Airtable records without extra manual work.
  • Dashboards and visualizations Using tools like Retool and Tableau, Mia built dashboards that showed similarity graphs and attribute heatmaps. The once-static logo sheets became interactive maps of the tooling landscape.
  • Validation agent For higher accuracy, she experimented with a validation agent that spot-checked new entries against known data sources.

The Resolution: From Manual Drudgery to a Reliable Automation

A few weeks after adopting the AI Logo Sheet Extractor, Mia noticed something remarkable. Her team was no longer stuck in manual transcription mode. Instead, they were exploring the data, running queries, and making decisions faster.

Logo sheets that once took hours to process now flowed through a simple pipeline:

  1. Upload via a public form
  2. AI agent performs visual extraction and contextual inference
  3. Structured output parser validates JSON
  4. Attributes are created or reused in Airtable
  5. Tools are upserted with deterministic hashes
  6. Similar relationships are mapped for future analysis

The result was a clean, rich Airtable base, ready for analytics, discovery, and integrations with the rest of their stack.

Try the n8n AI Logo Sheet Extractor Yourself

If you recognize Mia’s story in your own workflow, you do not have to stay stuck in manual mode.

Here is how to get started:

  • Clone the n8n workflow template
  • Connect your Airtable credentials and set up the two-table data model
  • Deploy the form trigger and upload a sample logo sheet
  • Review the AI output, tweak the prompt, and refine your normalization rules

Within a short time, you can turn scattered logo sheets into a structured, queryable Airtable base that supports analytics, discovery, and future integrations.

Try it now: deploy the template, upload a sample image, and watch structured tool and attribute records populate your Airtable base, just like they did for Mia.


Keywords: n8n automation, Airtable integration, logo sheet extraction, AI vision, LangChain, workflow automation, AI logo parser, n8n template.

Create, Update & Get e‑Goi Subscribers in n8n

Create, Update & Get e‑Goi Subscribers in n8n

Every growing business reaches a point where manual contact management starts holding it back. Copying data between tools, updating subscriber details by hand, and double checking that everything is correct can quietly eat up your day and drain your focus.

This n8n workflow template is a small but powerful step in the opposite direction. It shows you how to automatically create a subscriber in e‑Goi, update their data, and then retrieve the final contact details – all in one smooth, repeatable flow. Along the way you will use the built-in e‑Goi node and n8n expressions to pass IDs between nodes so your workflow stays dynamic, reusable, and ready to grow with you.

The problem: Manual steps that slow you down

When you handle contacts manually, you feel it everywhere:

  • Creating new subscribers one by one
  • Updating names or custom fields in multiple tools
  • Checking that the final record is actually correct

These tasks seem small, but they pile up. They interrupt deep work, introduce errors, and make it harder to scale your marketing or operations. If you have ever thought, “I will just do this by hand for now,” you already know how quickly “for now” becomes “forever.”

The possibility: Let automation handle the routine

Automation is not about replacing your judgment. It is about removing the friction between your ideas and your execution. When you let n8n handle repetitive tasks like creating and updating e‑Goi subscribers, you unlock:

  • More time for strategy, creativity, and meaningful work
  • Less context switching between tools and tabs
  • Reliable data that updates itself, without copy-paste mistakes
  • A foundation you can extend into more advanced automations later

Think of this workflow as your first building block. Once you see how easy it is to pass a contact ID from one node to the next, you will start to imagine entire systems that run with minimal intervention from you.

Mindset shift: Start small, build momentum

You do not need a massive automation strategy to get value from n8n. A single, well designed workflow can change how you work today and inspire what you build tomorrow.

This tutorial focuses on one clear outcome: create, update, and get an e‑Goi subscriber with zero manual steps in between. As you follow along, notice how each piece connects. That understanding will help you confidently adapt and extend the template for your own use cases.

What this n8n + e‑Goi workflow does

In practical terms, this workflow template will:

  • Create a new subscriber in your chosen e‑Goi list
  • Update that subscriber immediately after creation
  • Retrieve the final, updated contact details from e‑Goi

Behind the scenes, it uses expressions to pass the contact_id from one e‑Goi node to the next. That means you can run this workflow for any new contact without touching the configuration again.

What you need before you start

  • An n8n instance (cloud or self‑hosted)
  • An e‑Goi account with API access and an API key
  • A list ID in e‑Goi where new contacts will be created

Once you have these in place, you are ready to build a workflow that will save you time every single time it runs.

How the workflow is structured

The template is intentionally simple, so you can understand every part and then enhance it as you grow. It uses four nodes in a linear sequence:

  1. Manual Trigger – starts the workflow for testing
  2. e‑Goi node – operation: create (creates the contact)
  3. e‑Goi node – operation: update (updates the created contact)
  4. e‑Goi node – operation: get (retrieves the updated contact)

Each e‑Goi node receives parameters and the contact ID from the previous node. That pattern – create, update, get – is a core automation building block you can reuse in many other workflows.

Step 1: Add a Manual Trigger for fast feedback

Begin with a Manual Trigger node. This lets you run the workflow on demand while you are building and testing.

Later, you can replace this trigger with something that matches your real use case, such as:

  • A Webhook when someone submits a form
  • A Cron schedule for periodic syncs
  • Another app event that starts the automation

For now, keep it simple. The goal is to get a working flow, then evolve it.

Step 2: Create the e‑Goi contact

Next, add an e‑Goi node and set the operation to create (or create: contact, depending on your node version). This node will create the subscriber in your chosen list.

Configure the node with:

  • List: the numeric ID of the e‑Goi list where the contact will be added
  • Email: the subscriber email (hardcode a test address or pull from incoming data later)
  • Additional fields: first name, last name, and any custom fields you use

Example configuration used in the template:

{  "list": 1,  "email": "nathan@testmail.com",  "additionalFields": { "first_name": "Nathan" }
}

When this node runs successfully, e‑Goi returns a JSON response that includes a contact_id (or similar) in the payload. In the template, the contact ID is available at:

$node["e-goi"].json["base"]["contact_id"]

Remember this path. It is the key that allows the next nodes to stay fully dynamic and reusable.

Step 3: Update the same contact without manual lookups

Now that you have created a subscriber, you will update it automatically. Add a second e‑Goi node and set the operation to update (update: contact).

The power of this step is in how you pass values between nodes. Instead of hardcoding the contact ID, you use expressions to pull it from the previous node.

Example configuration:

{  "list": "={{$node[\"e-goi\"].parameter[\"list\"]}}",  "contactId": "={{$node[\"e-goi\"].json[\"base\"][\"contact_id\"]}}",  "updateFields": { "first_name": "Nat" }
}

What is happening here:

  • list: {{$node["e-goi"].parameter["list"]}} reuses the list parameter from the first e‑Goi node, so if you ever update the list ID in one place, everything stays in sync.
  • contactId: {{$node["e-goi"].json["base"]["contact_id"]}} pulls the ID returned by the create operation, so the update always targets the correct contact.
  • updateFields: contains the new values, for example changing the first name from “Nathan” to “Nat”.

With this pattern, you never need to manually copy or paste IDs again. The workflow carries them forward for you.

Step 4: Get the updated contact details

To confirm that everything worked and to have a final, clean record you can use elsewhere, add a third e‑Goi node and set the operation to get.

Configure it to use the list and the contact ID from the previous nodes:

{  "list": "={{$node[\"e-goi\"].parameter[\"list\"]}}",  "contactId": "={{$node[\"e-goi1\"].json[\"base\"][\"contact_id\"]}}"
}

This node returns the full contact details from e‑Goi. From here, you can:

  • Send the data to a CRM
  • Log it to Google Sheets
  • Trigger a notification in Slack or another chat tool

You now have a complete, automated loop: create, update, and verify a subscriber without touching the data yourself.

Understanding expressions and dynamic data in n8n

Expressions are what turn this from a static demo into a flexible automation. They let you reference values from previous nodes and keep everything connected.

Key expressions used in this template include:

  • {{$node["e-goi"].parameter["list"]}} – reuses the list parameter from the first e‑Goi node
  • {{$node["e-goi"].json["base"]["contact_id"]}} – reads the contact ID from the create response
  • {{$node["e-goi1"].json["base"]["contact_id"]}} – reads the contact ID from the update response

By relying on expressions instead of hard coded values, you make the workflow:

  • Reusable for any new contact
  • Safer because you avoid manual ID handling
  • Easier to maintain as your lists and fields evolve

Test your workflow and see it in action

Before you plug this into a live process, take a moment to test and observe how everything flows:

  1. Click the Manual Trigger node and run the workflow.
  2. Open the output of the create e‑Goi node and confirm that e‑Goi returned a contact_id.
  3. Check the update node to verify that the update succeeded and the new field values are present.
  4. Inspect the get node output to see the final contact record.

If the get node shows the updated name (for example “Nat”), you have a working automation. You have just replaced several manual steps with a single click.

Troubleshooting: Turn obstacles into learning

Every automation journey includes a few bumps. When something does not work the first time, it is an opportunity to understand your tools more deeply.

1. Missing contact_id in the response

Depending on the e‑Goi API version or node updates, the contact ID might appear in a slightly different path. If your expression is not finding it, open the raw JSON output of the create node and look for the ID field.

Common alternatives include:

  • $node["e-goi"].json["contact_id"]
  • $node["e-goi"].json["id"]

Adjust your expression to match the actual path you see. Once corrected, the rest of the workflow will follow.

2. Authentication or permission errors

If you see errors about authentication or permissions, double check:

  • Your e‑Goi credentials in n8n (API key and any required account details)
  • That your API key has permission to create, update, and read contacts

Once your credentials are correct, the nodes should run smoothly.

3. Rate limits and retries

If you plan to run this workflow frequently or at scale, e‑Goi may apply rate limits. To keep your automation resilient, consider:

  • Adding a Wait node between heavy operations
  • Using an IF node to detect errors and retry
  • Configuring a dedicated error workflow for handling rate limit responses

4. Field mapping mismatches

If some fields do not update as expected, confirm that the field keys you are sending match your e‑Goi configuration. For example, if you use first_name, make sure that is the exact key defined in your list or custom fields.

For custom fields, you can verify the correct keys through the e‑Goi UI or API documentation.

Best practices to keep your workflow future proof

As you move from a simple example to a production ready automation, a few habits will pay off quickly:

  • Use environment variables or credentials for sensitive values like API keys and list IDs.
  • Keep a short field naming guide for your e‑Goi account so everyone uses consistent keys.
  • Prefer expressions over hard coded values wherever possible to keep the workflow flexible.
  • Log responses or store results in a database or sheet for auditing and debugging.

These small steps help your workflow grow with your business instead of becoming something you are afraid to touch.

What a successful response looks like

After a successful create request, you may see a response similar to:

{  "base": {  "contact_id": "123456",  "email": "nathan@testmail.com",  "first_name": "Nathan"  }
}

In this case, you use base.contact_id to pass the ID to the update and get nodes, as shown earlier. Once you recognize this pattern, you can apply it to many other APIs and workflows.

Next steps: Turn this pattern into your own system

You now have a working, end to end e‑Goi contact workflow in n8n. The next step is to make it your own and connect it to the rest of your stack.

Here are a few ideas to extend this template:

  • Add an IF node to check if a contact already exists, then choose between create and update.
  • Send contact data to a CRM or Google Sheets node for reporting and analysis.
  • Trigger campaigns, tags, or follow up actions in e‑Goi based on contact attributes.

Each improvement you make is another step toward a more automated, focused workflow where your tools quietly support you in the background.

Bringing it all together

This simple chain of e‑Goi nodes in n8n – create, update, get – is more than a tutorial. It is a pattern you can reuse whenever you need to create something, modify it, and then confirm the final result.

By passing the list and contact ID dynamically with expressions, you free yourself from manual lookups and fragile, hard coded values. You gain a reliable building block you can plug into larger automations as your needs grow.

Ready to take the next step? Import the template into your n8n instance, connect your e‑Goi credentials, and run the manual trigger. Watch your first fully automated subscriber flow come to life, then iterate and expand it to match your vision.

Call to action: Try this workflow in your n8n instance today, subscribe for more n8n automation tutorials, or download the example template for a quick import and a faster start.

Build an AI Agent to Chat with YouTube (n8n Guide)

Build an AI Agent to Chat with YouTube in n8n

This guide documents a production-ready n8n workflow template that builds an AI agent capable of “chatting” with YouTube. The workflow integrates the YouTube Data API, Apify, and OpenAI to:

  • Query channels and videos
  • Aggregate and analyze comments
  • Trigger video transcription
  • Evaluate thumbnails with image analysis
  • Maintain conversational context in Postgres

The focus here is on a technical, node-level breakdown so you can understand, adapt, and extend the workflow in your own n8n instance.

1. Overview and Capabilities

The workflow exposes a chat-style interface on top of multiple YouTube-related tools. A single agent node orchestrates which tool to call based on user input. At a high level, the workflow can:

1.1 Core Features

  • Channel inspection Retrieve channel metadata by handle or URL, including:
    • channel_id
    • Channel title
    • Channel description
  • Video discovery Search or list videos for a given channel with sorting options (for example by date or viewCount).
  • Video detail enrichment Fetch detailed video information such as:
    • Title and description
    • Statistics (views, likes, etc.)
    • Content details including contentDetails.duration to help filter out Shorts
  • Comment aggregation Pull comment threads via the YouTube Data API, paginate across pages, flatten threads, and feed them into an LLM for sentiment and insight extraction.
  • Video transcription Trigger an Apify transcription actor (or equivalent provider) using the video URL, then analyze the resulting text.
  • Thumbnail and image analysis Send thumbnail URLs to OpenAI image analysis tools for design critique and optimization suggestions.
  • Conversation memory Persist chat context in a Postgres database so the agent can reference prior messages and previous tool outputs.

1.2 Intended Users

This template is designed for users who are already comfortable with:

  • n8n workflow design and credential management
  • REST APIs (in particular YouTube Data API)
  • LLM-based agents and prompt configuration

2. Architecture & Data Flow

The workflow is organized around an agent pattern. The agent receives user queries from a chat trigger, plans which tools to call, and then returns a synthesized answer.

2.1 High-Level Components

  • Chat Trigger A webhook-based entry point that accepts incoming chat messages and optional metadata (for example session identifiers).
  • OpenAI Chat Model Node The LLM that interprets user requests, calls tools, and generates responses.
  • Agent Node (LangChain-style) Wraps the OpenAI model and exposes a set of tools. It outputs a command specifying which tool to run next.
  • Switch Node (Tool Router) Routes agent commands such as get_channel_details, video_details, comments, search, videos, analyze_thumbnail, and video_transcription to the appropriate implementation nodes.
  • HTTP Request Nodes Implement the YouTube Data API calls and Apify calls. Each node is configured with query parameters and credentials.
  • OpenAI Image / Analysis Nodes Handle thumbnail and text analysis using OpenAI models.
  • Postgres Node (Optional Memory) Stores conversation history that the agent can reference across multiple requests.

2.2 Execution Flow

  1. Chat trigger receives a user message via webhook.
  2. Message and context are passed to the agent node.
  3. The agent decides which tool to call and outputs a command identifier.
  4. The Switch node evaluates this command and routes the execution to the appropriate HTTP or wrapper node.
  5. Tool results are returned to the agent, which may chain additional tools or respond directly to the user.
  6. Optionally, conversation state and results are persisted in Postgres for future interactions.

3. Prerequisites & Required Services

3.1 Platform Requirements

  • Running n8n instance (self-hosted or n8n Cloud)
  • Basic familiarity with n8n node configuration and credential management

3.2 External APIs and Keys

  • Google Cloud / YouTube Data API
    • Google Cloud project with the YouTube Data API enabled
    • API key for YouTube Data API requests
  • OpenAI
    • OpenAI API key
    • Access to the models you intend to use for text and image analysis (including multimodal if using image analysis)
  • Apify (or equivalent transcription provider)
    • Apify API token to run the transcription actor
  • Postgres (optional but recommended)
    • Postgres instance and credentials for storing chat memory

4. Setup & Configuration Steps

4.1 Configure API Credentials

  1. YouTube Data API
    • In Google Cloud Console, enable the YouTube Data API.
    • Create an API key and restrict it appropriately.
  2. OpenAI
    • Generate an API key in your OpenAI account.
    • Confirm that the account has access to the models used for both text and image analysis.
  3. Apify
    • Create an API token for the transcription actor.
  4. Add credentials to n8n
    • Open Credentials in n8n.
    • Create entries for YouTube API key, OpenAI, and Apify.
    • Reference these credentials in the corresponding HTTP Request and OpenAI nodes, replacing any placeholders in the imported workflow.

4.2 Import the Workflow Template

  1. Export or download the provided n8n workflow JSON/template.
  2. In n8n, use Import from file or Import from JSON to load the template.
  3. Confirm that the workflow includes:
    • Chat trigger node
    • OpenAI chat model node
    • Agent node
    • Switch (router) node
    • HTTP Request nodes for YouTube and Apify
    • Optional Postgres node for memory

4.3 Configure Chat Trigger & Agent

  1. Chat trigger
    • Set up the webhook URL that external clients will call.
    • Define the expected payload structure (for example message, session_id).
  2. Agent system prompt
    • Configure the agent node with a system prompt that defines it as a YouTube assistant.
    • Include clear instructions on when and how to call each tool, referencing their exact tool names such as get_channel_details, comments, video_transcription, etc.
  3. Postgres memory (optional)
    • Connect the agent to the Postgres node if you want persistent conversation memory.
    • Ensure the schema and retention policy are configured as required.

4.4 Update HTTP Request Nodes

For every HTTP Request node that calls YouTube or Apify:

  • Select the correct credential from the dropdown (YouTube API key, Apify token).
  • Verify base URL and resource paths match the APIs you are using.
  • Check query parameters such as:
    • part (for example snippet,contentDetails,statistics)
    • maxResults
    • order or sort values (for example date, viewCount)

4.5 Validate Common Flows

Before exposing the workflow to end users, test the main tool paths:

  • Channel details Use a handle or channel URL to test the get_channel_details command and confirm that the channel_id is correctly extracted.
  • Comments Call comments with a valid video_id. Confirm pagination is working and that the Edit Fields node is flattening threads correctly into a clean structure for analysis.
  • Transcription Trigger video_transcription for a video URL and verify that the Apify actor completes and returns text.
  • Thumbnail analysis Provide a thumbnail URL to the analyze_thumbnail tool and confirm OpenAI returns structured feedback.

5. Node-by-Node Functional Breakdown

5.1 Channel & Video Retrieval Tools

5.1.1 Channel Details Tool

Purpose: Convert a channel handle or URL into a canonical channel_id and retrieve channel metadata.

  • Input: Channel handle (for example @channelName) or full channel URL.
  • Process: HTTP Request node calls the YouTube Data API with appropriate parameters.
  • Output: channel_id, title, description, and related snippet data.

5.1.2 Videos Listing Tool

Purpose: Fetch a list of videos for a given channel_id.

  • Input: channel_id and sorting option (for example date or viewCount).
  • Process: HTTP Request node queries the YouTube Data API to list videos.
  • Output: Video IDs and associated metadata, which can be passed to the video details tool.

Note: YouTube search endpoints may return Shorts. To exclude Shorts, you should:

  1. Pass video IDs to the video details tool.
  2. Inspect contentDetails.duration for each video.
  3. Filter out entries with durations shorter than 60 seconds if you do not want Shorts.

5.1.3 Video Details Tool

Purpose: Enrich a set of video IDs with full details and statistics.

  • Input: One or more video_id values.
  • Process: HTTP Request node calls the videos endpoint with part fields like snippet, contentDetails, statistics.
  • Output: Detailed video metadata including duration, which is key for Shorts filtering.

5.2 Comments Aggregation & Analysis

5.2.1 Comments Fetch Tool

Purpose: Retrieve comment threads for a specific video.

  • Input: video_id.
  • Process:
    • HTTP Request node calls the commentThreads endpoint.
    • Configured to return up to 100 comments per request via maxResults.
    • Pagination is handled either within the node (looping over nextPageToken) or by the agent’s plan that repeatedly calls the tool until all pages are retrieved.
  • Output: Raw comment threads including top-level comments and replies.

5.2.2 Comment Flattening & Transformation

Purpose: Convert nested comment threads into a structure that is easy for the LLM to process.

  • Node type: Edit Fields node in n8n.
  • Behavior:
    • Flattens each thread into a single item or text blob.
    • Combines top-level comments with their replies.
    • Produces a clean representation (for example concatenated text) suitable for sentiment and theme analysis.

5.2.3 LLM-based Comment Analysis

Purpose: Use OpenAI to extract themes, pain points, sentiment, and actionable insights from the flattened comments.

  • Input: Structured or concatenated comment text from the Edit Fields node.
  • Process: OpenAI chat model node with a prompt tailored for comment analysis.
  • Output: Summaries, sentiment breakdown, and key insights that the agent can present back to the user.

5.3 Transcription Flow

5.3.1 Transcription Trigger Tool

Purpose: Request a full transcription for a given video using Apify or a similar transcription service.

  • Input: Video URL.
  • Process: HTTP Request node calls the Apify transcription actor with the video URL as input.
  • Output: A transcription text payload once the Apify actor finishes.

Usage notes:

  • Transcription cost is typically proportional to video length. Long videos can be more expensive.
  • Ensure the input URL is in a format accepted by the Apify actor.

5.3.2 Transcription Analysis

Purpose: Analyze the returned transcript for content repurposing

Automate Notion API Updates with n8n & RAG

Automate Notion API Updates with n8n & RAG

Every growing team reaches a point where manual tracking simply cannot keep up. Notion pages multiply, updates fly in from every direction, and important changes quietly slip through the cracks. If you have ever felt that you are spending more time monitoring Notion than actually acting on what matters, you are not alone.

This is exactly where automation can become a turning point. In this guide, you will walk through an n8n workflow template that transforms raw Notion API updates into structured insights using vector embeddings, Supabase, and a Retrieval-Augmented Generation (RAG) agent. You will see how each step fits together, not just as a technical setup, but as a practical system that frees your time and amplifies your focus.

By the end, you will have a working automation that processes Notion changes, enriches them with semantic embeddings, and creates useful outputs like logs, alerts, and synthesized summaries. More importantly, you will have a repeatable pattern you can adapt, extend, and build on as your automation journey continues.

The challenge: Notion is powerful, but noisy

Notion has become a central hub for docs, tasks, and knowledge across many teams. Yet as usage grows, so does the noise. Updates, comments, and edits arrive constantly. Manually reviewing every change is not sustainable, and relying on memory or ad-hoc checks risks missed insights and delayed reactions.

Automating Notion API updates with n8n helps you:

  • Extract and normalize content from Notion so it is ready for downstream processing
  • Index updates in a vector store for semantic search and intelligent augmentation
  • Use a RAG agent to generate summaries, suggestions, or next actions from raw changes
  • Log outcomes in Google Sheets and alert teammates in Slack when something needs attention

Instead of chasing updates, you can design a system that brings the right information to you, at the right time, in a format you can act on immediately.

From possibility to practice: a new mindset for automation

Before diving into nodes and configuration, it helps to adopt a different mindset. Automation is not about replacing your judgment. It is about creating space for it. Each workflow you build in n8n is a small investment that pays you back with every run.

This Notion API workflow template is one of those investments. It is a concrete example of how you can:

  • Turn unstructured updates into structured, searchable knowledge
  • Let an LLM handle the heavy lifting of summarization and reasoning
  • Create a traceable audit trail in Google Sheets
  • Get real-time awareness through Slack alerts when something goes wrong

Think of this template as a starting point, not a finished destination. You can import it, run it as-is, then gradually tweak prompts, add branches, and integrate more tools as your confidence grows.

High-level architecture: how the workflow fits together

To understand the power of this template, it helps to see the full picture. The n8n workflow connects your tools into a single flow that listens to Notion updates, enriches them with context, and produces meaningful outputs.

The workflow includes these core components:

  1. Webhook Trigger – Receives HTTP POST events from Notion or a middleware service.
  2. Text Splitter – Breaks long Notion content into manageable chunks.
  3. Embeddings (OpenAI) – Generates vector embeddings using text-embedding-3-small.
  4. Supabase Insert & Query – Stores embeddings and retrieves relevant context from a vector index.
  5. Window Memory – Maintains recent conversational context for the RAG agent.
  6. Vector Tool – Exposes vector search as a tool the RAG agent can call.
  7. Chat Model (Anthropic) – Provides the LLM reasoning engine.
  8. RAG Agent – Orchestrates retrieval, reasoning, and final responses.
  9. Append Sheet – Logs structured results to Google Sheets.
  10. Slack Alert – Sends error notifications if something breaks.

This combination gives you a robust pattern: ingest, enrich, retrieve, reason, and record. Once you understand the pattern, you can reuse it for many other workflows, not just Notion.

Step 1: Capture Notion events with a Webhook Trigger

Your journey starts with the entry point: an n8n Webhook node. Configure it to accept HTTP POST requests. This webhook will receive update events from Notion or any intermediary service you use to forward Notion changes.

In practice, you will:

  • Create a Webhook node in n8n and set the HTTP method to POST
  • Copy the webhook URL that n8n generates
  • Configure your Notion integration or middleware to send change events to that URL

This node is your automated gatekeeper. Every new Notion update passes through here, ready to be processed without you lifting a finger.

Step 2: Split long Notion content into usable chunks

Notion pages and blocks can contain long-form text. Feeding very long content directly into an embedding model can hurt performance and retrieval quality. The solution is to split content into smaller, meaningful pieces.

Use the Text Splitter node in n8n with a character-based strategy, for example:

  • chunkSize = 400
  • chunkOverlap = 40

This configuration keeps each chunk within the embedding model context limits and preserves enough overlap so that ideas are not cut off mid-thought. You end up with multiple coherent text chunks that can each be embedded and searched later.

Step 3: Create embeddings for each chunk

Next, you turn raw text into a format that a vector database can understand. Use the Embeddings node with OpenAI’s text-embedding-3-small model (or another supported provider) to generate embeddings for every chunk produced by the Text Splitter.

For each chunk, store:

  • The embedding vector
  • Key metadata such as Notion page ID, block ID, and timestamp

This metadata is crucial. It lets you trace any search result or summary back to the exact piece of original Notion content, which is essential for audits and follow-up actions.

Step 4: Persist and retrieve knowledge with Supabase

With embeddings generated, you need a place to store and query them. Supabase serves as the vector store in this workflow template.

Insert embeddings into Supabase

Use the Supabase Insert node to write embedding documents into a dedicated index or table, for example:

notion_api_update

Each record typically includes the embedding vector, the text chunk, and its metadata. Over time, this becomes a rich, searchable history of your Notion workspace changes.

Query Supabase for relevant context

Use the Supabase Query node to perform semantic searches. Given a query or an incoming event, this node returns the most relevant chunks from your index. These results become the context that powers your RAG agent’s reasoning.

At this point, you have transformed your Notion updates into a living knowledge base that you can query and build on.

Step 5: Add memory and tools for deeper reasoning

To make your RAG agent truly useful, it needs both short-term memory and access to tools that can retrieve information on demand.

Window Memory

The Window Memory node stores recent conversational context or previous messages. This allows your agent to maintain continuity across multiple events or calls. Instead of responding in isolation, it can remember what happened recently and build on that.

Vector Tool

The Vector Tool node wraps the Supabase Query so that the RAG agent can call it as needed. When the agent needs more context, it can use this tool to search your vector store and pull in the most relevant chunks.

Together, memory and tools turn your workflow from a simple pipeline into a flexible reasoning system.

Step 6: Power the workflow with a Chat Model and RAG agent

Now you bring everything together. The Chat Model node provides the LLM that performs natural language reasoning. In this template, Anthropic is used as the chat model, but you can adapt it to another provider if needed.

The RAG Agent node integrates three key pieces:

  • The Chat Model as the core reasoning engine
  • The Vector Tool for semantic retrieval from Supabase
  • Window Memory for conversational continuity

When a new Notion update arrives, the RAG agent:

  1. Receives the processed input and relevant metadata
  2. Queries Supabase via the Vector Tool to fetch related chunks
  3. Uses the Chat Model to synthesize a summary, decision, suggestion, or other output

To guide the agent, configure its system prompt to align with your goals. For example:

You are an assistant for Notion API Update.

You can refine this prompt over time to emphasize tone, level of detail, or specific actions you want the agent to take. This is one of the easiest and most powerful ways to evolve your workflow as your needs change.

Step 7: Log results and stay informed with Sheets and Slack

Automation is most valuable when it is transparent and traceable. The final steps in this template help you keep a clear record of what your workflow is doing and alert you when something breaks.

Append results to Google Sheets

Use the Append Sheet node to write structured outputs from the RAG agent into a Google Sheet. Typical columns might include:

  • Timestamp
  • Notion page ID
  • Summary or decision
  • Status or outcome

This sheet becomes your lightweight dashboard and audit log. Over time, you can analyze patterns, track performance, and share insights with stakeholders.

Send Slack alerts on errors

When something fails, you want to know quickly. Configure a Slack Alert node to send error notifications to a channel such as #alerts. Include the error message and, when useful, JSON debug output so engineers or operators can respond efficiently.

With this in place, you can trust your workflow to run in the background, knowing that you will be notified if it needs attention.

Configuration checklist: prepare your environment

Before you hit run, make sure these pieces are in place:

  • n8n Webhook URL: Expose n8n via tunneling (for example ngrok) or deploy it with a public domain so Notion can reach it.
  • OpenAI API key: Required for embeddings. Confirm the model name (text-embedding-3-small) and ensure compliance with your organization policies.
  • Supabase credentials: Configure your project and create a vector index or table named notion_api_update.
  • LLM key (Anthropic or other): Provide credentials for the Chat Model node.
  • Google Sheets OAuth: Grant access to the target spreadsheet (use your SHEET_ID and a specific Log sheet name).
  • Slack token: Enable the Slack node for error notifications and, optionally, success alerts.
  • Notion integration token & webhook routing: Configure Notion to POST change events to your n8n webhook endpoint.

Security and best practices as you scale

Automating private workspace content brings responsibility. As you expand this workflow or adapt it to new use cases, keep these practices in mind:

  • Store all API keys and credentials in n8n’s credential manager, not in plain text inside nodes.
  • Limit your Notion integration scope to only the pages and databases that are truly needed.
  • Encrypt sensitive data at rest. Supabase offers built-in protections, and you can configure row-level security policies where appropriate.
  • Sanitize or redact sensitive content before sending it to public destinations such as shared Google Sheets.
  • Rate-limit webhook consumers and validate incoming payloads to reduce the risk of spoofing or abuse.

Building with security in mind gives you the confidence to automate more of your workflows without sacrificing trust.

Troubleshooting: turning roadblocks into learning moments

Every automation journey includes a few bumps. When something does not work as expected, use it as a chance to deepen your understanding of the system.

  • If embeddings fail, double-check your OpenAI API quota and ensure the model name is set to text-embedding-3-small.
  • If Supabase queries do not return results, confirm that the notion_api_update index or table exists and that your Supabase credentials are correct.
  • If retrieval quality is poor, experiment with chunkSize and chunkOverlap in the Text Splitter to produce more coherent chunks.
  • Use the Slack Alert node to surface detailed error messages. Including JSON debug output can make diagnosing issues much faster.

Each fix you apply strengthens your workflow and builds your intuition for future automations.

Ideas to extend and customize your workflow

Once the base template is running, you can start shaping it to match your unique needs. Here are a few directions to explore:

  • Auto-tagging: Use the LLM to extract tags, topics, or categories from each update and write them back to Notion or a separate metadata table.
  • Change-diffing: Store previous content snapshots and generate summarized diffs for each update so you quickly see what changed.
  • Multi-model routing: Route different content types (for example technical docs vs meeting notes) to different prompts or LLMs optimized for those domains.
  • Realtime dashboards: Feed your summarized updates into a BI dashboard to give stakeholders a live view of what is happening in Notion.

Each enhancement builds on the same core pattern you have already implemented, making it easier to experiment and iterate.

Bringing it all together

This n8n workflow template is more than a collection of nodes. It is a practical pattern for turning continuous Notion updates into searchable, reasoned outputs using embeddings and a RAG agent. By combining reliable integration points like webhooks, Supabase, Google Sheets, and Slack with modern NLP capabilities, you create a system that surfaces insights instead of raw noise.

Most importantly, this is a reusable foundation. The skills you apply here translate directly to other automations across your stack. Every time you refine a prompt, adjust a chunk size, or extend the workflow, you are building your own automation toolkit.

Your next step: try, iterate, and grow

You do not need to design the perfect workflow on day one. Start by importing this template into your n8n instance, connect your keys, and run a simple test with a sample Notion event. Watch how the pieces interact, then adjust one thing at a time.

As you grow more comfortable, you can:

  • Refine the RAG agent prompt for your specific use case
  • Add new destinations or notifications
  • Scale embeddings and storage as your Notion workspace expands

Each improvement is a step toward a more focused, less reactive way of working, where automation handles the flow of information and you stay free to make the decisions that matter.

Ready to move from

Backup n8n Workflows to Gitea Repository

Backup n8n Workflows to a Gitea Repository

This guide documents a reusable n8n workflow template that automatically backs up all workflows from an n8n instance into a Gitea Git repository. The automation runs on a schedule, detects changes, and creates or updates JSON files in Gitea only when workflow definitions have been modified.

1. Overview

The template is designed for users who want a Git-based backup and versioning strategy for n8n workflows using a self-hosted or hosted Gitea instance. It uses the n8n API to list workflows, transforms each workflow into a pretty-printed JSON document, encodes it in base64, and interacts with Gitea via its HTTP API to manage files in a repository.

Primary capabilities

  • Scheduled execution at a configurable interval.
  • Retrieval of all workflows from the n8n instance via API.
  • Per-workflow synchronization to a repository file: <workflowName>.json.
  • Detection of file existence in Gitea and conditional creation or update.
  • Base64 encoding of pretty-printed JSON to match Gitea API requirements.
  • Change detection to avoid unnecessary commits and history noise.

Use cases

  • Version control for n8n workflow definitions.
  • Disaster recovery and restore from Git history.
  • Auditing workflow changes over time.
  • Sharing or promoting workflows between environments through Git workflows.

2. Architecture & Data Flow

The workflow uses a scheduled trigger to start the backup process, then passes through a series of nodes that handle configuration, API calls, encoding, and conditional logic. At a high level, the data flow is:

  1. Schedule Trigger starts the workflow on a fixed interval.
  2. Globals (Set) defines repository configuration such as URL, owner, and repository name.
  3. n8n API node retrieves a list of all workflows from the n8n instance.
  4. SplitInBatches / ForEach iterates over each workflow item.
  5. GetGitea (HTTP GET) queries Gitea to check if the corresponding JSON file already exists.
  6. Exist (IF) branches based on file existence:
    • If the file does not exist (404), the workflow prepares a create payload and issues a PostGitea (HTTP POST).
    • If the file exists, the workflow prepares an update payload, compares content, and conditionally calls PutGitea (HTTP PUT) only when content has changed.
  7. SetDataCreateNode / SetDataUpdateNode (Set) structure the data for encoding and Gitea API consumption.
  8. Base64EncodeCreate / Base64EncodeUpdate (Code) pretty-print the workflow JSON and produce base64-encoded content.
  9. Changed (IF) compares the existing base64 content with the new one to skip unchanged workflows.

All Gitea HTTP requests use a shared credential that injects an Authorization: Bearer <TOKEN> header. The n8n API node uses its own credential if the instance is secured with an API key or basic authentication.

3. Prerequisites

Required infrastructure

  • An operational n8n instance with API access enabled and permission to list workflows.
  • A Gitea instance (self-hosted or hosted) with:
    • An existing repository to store workflow JSON files.
    • Network reachability from the n8n instance.

Credentials and permissions

  • A Gitea personal access token with read and write permissions for the target repository.
  • Access to the n8n Credentials Manager to configure:
    • HTTP Header Auth credential for Gitea.
    • n8n API credential (if your n8n instance is protected by API key or basic auth).

4. Node-by-Node Breakdown

4.1 Schedule Trigger

  • Type: Trigger node.
  • Purpose: Executes the backup workflow at a fixed interval.
  • Default configuration: Runs every 45 minutes (you can adjust this interval to fit your backup policy).
  • Notes:
    • Ensure the schedule aligns with your expected workflow change frequency.
    • For testing, you can temporarily change it to a shorter interval or trigger manually.

4.2 Globals (Set)

  • Type
  • Purpose: Centralizes repository configuration values used by multiple HTTP nodes.
  • Fields to configure:
    • repo.url – Base URL of your Gitea instance, for example https://git.yourdomain.com.
    • repo.name – Name of the repository that will store workflow JSON files, for example workflows.
    • repo.owner – Repository owner or organization name.
  • Usage:
    • These values are referenced via expressions in subsequent HTTP nodes to build the Gitea API endpoints.
    • Changing the repository or owner only requires updating this node.

4.3 n8n (API)

  • Type: n8n API node (HTTP or dedicated n8n API integration, depending on your setup).
  • Purpose: Retrieves all workflows from your n8n instance.
  • Behavior:
    • Calls the n8n API endpoint that lists workflows.
    • Outputs an array of workflow objects, each containing metadata and the workflow definition.
  • Credentials:
    • If your n8n instance requires authentication, configure:
      • API key authentication, or
      • Basic auth credential (username and password).
    • Attach this credential to the n8n API node so it can successfully list workflows.

4.4 SplitInBatches / ForEach

  • Type: SplitInBatches node (often used as a ForEach pattern).
  • Purpose: Iterates over each workflow returned by the n8n API.
  • Behavior:
    • Processes workflows one at a time or in small batches.
    • Feeds each individual workflow into the Gitea-related nodes for file existence checks and updates.
  • Notes:
    • Batch size can be tuned for performance or API rate limits.
    • For large numbers of workflows, batching helps prevent timeouts or rate-limit issues.

4.5 GetGitea (HTTP Request GET)

  • Type: HTTP Request node.
  • Method: GET.
  • Purpose: Checks whether a JSON file for the current workflow already exists in the Gitea repository.
  • Endpoint pattern:
    • Constructed from repo.url, repo.owner, repo.name, and the workflow name.
    • Target file path: <workflowName>.json.
  • Expected results:
    • 200 OK: File exists. Response includes:
      • sha – the current file SHA in Gitea.
      • content – base64-encoded file content.
    • 404 Not Found: File does not exist in the repository.
  • Credentials:
    • Uses the HTTP Header Auth credential with:
      • Header name: Authorization.
      • Header value: Bearer YOUR_PERSONAL_ACCESS_TOKEN (including the space after Bearer).

4.6 Exist (IF)

  • Type: IF node.
  • Purpose: Branches the flow depending on whether the workflow file exists in Gitea.
  • Logic:
    • If the GET request succeeded (file found), follow the “file exists” branch.
    • If the GET request indicates a 404 (file missing), follow the “file does not exist” branch.
  • Resulting branches:
    • Non-existent file:
      • Passes data to SetDataCreateNode then Base64EncodeCreate and finally PostGitea.
    • Existing file:
      • Passes data to SetDataUpdateNode then Base64EncodeUpdate and then to Changed and PutGitea if needed.

4.7 SetDataCreateNode (Set)

  • Type: Set node.
  • Purpose: Prepares the data structure for creating a new file in Gitea.
  • Responsibilities:
    • Extracts the workflow JSON from the current item.
    • Sets any required fields for the create payload that the encoding node and HTTP POST will use.

4.8 SetDataUpdateNode (Set)

  • Type: Set node.
  • Purpose: Prepares the data structure for updating an existing file in Gitea.
  • Responsibilities:
    • Retrieves the existing file’s sha from the GetGitea response.
    • Combines the workflow JSON with the current file metadata to build an update-ready payload.

4.9 Base64EncodeCreate / Base64EncodeUpdate (Code)

  • Type: Code nodes.
  • Purpose: Transform workflow JSON into pretty-printed JSON and base64-encode it for the Gitea API.
  • Conceptual logic:
# Process (conceptual)
json_string = json.dumps(workflow_json, indent=4)
base64_string = base64.b64encode(json_string.encode('utf-8')).decode('utf-8')
# returned payload contains: content (base64 string)
  • Behavior:
    • Accepts the raw workflow JSON.
    • Pretty-prints it with indentation for human readability in the repository.
    • Encodes the result to base64 so it can be sent in the Gitea API request body.
    • For updates, also ensures the sha field is present so the PUT request is valid.
  • Output:
    • At minimum, a content field containing the base64-encoded JSON string.
    • For updates, a sha field that matches the current file version in Gitea.

4.10 PostGitea (HTTP Request POST)

  • Type: HTTP Request node.
  • Method: POST.
  • Purpose: Creates a new JSON file in the Gitea repository when it does not already exist.
  • Payload:
    • Includes the base64-encoded content from Base64EncodeCreate.
    • May include additional fields required by Gitea such as commit message, depending on your configuration.
  • Credentials:
    • Uses the same HTTP Header Auth credential as GetGitea and PutGitea.

4.11 Changed (IF)

  • Type: IF node.
  • Purpose: Determines whether the file content in Gitea differs from the newly encoded workflow content.
  • Logic:
    • Compares the existing base64 content from the GetGitea response with the new base64 content produced by Base64EncodeUpdate.
    • If the content is identical, the workflow skips the update to avoid unnecessary commits.
    • If the content is different, the workflow proceeds to PutGitea to commit an update.

4.12 PutGitea (HTTP Request PUT)

  • Type: HTTP Request node.
  • Method: PUT.
  • Purpose: Updates an existing JSON file in the Gitea repository when changes are detected.
  • Payload:
    • Includes:
      • content – the new base64-encoded JSON.
      • sha – the current file SHA from the previous GET response.
    • Gitea uses the SHA to detect conflicting updates and maintain history integrity.
  • Credentials:
    • Reuses the Gitea HTTP Header Auth credential.

5. Configuration Steps

5.1 Configure global repository variables

In the Globals (Set) node, define your Gitea repository details:

  • repo.url → for example https://git.yourdomain.com
  • repo.name → for example workflows
  • repo.owner → your Gitea username or organization name

These values are used to construct API URLs

Build a Weather Impact Report Pipeline with n8n

Build a Weather Impact Report Pipeline with n8n

Automating weather impact reporting is critical for organizations that depend on timely, accurate situational awareness. With n8n and modern language model tooling, you can implement a fully automated pipeline that ingests weather alerts, enriches them with semantic context, generates human-readable impact summaries, and logs everything for later analysis.

This article explains how to build a production-grade Weather Impact Report pipeline using n8n, LangChain-style components (text splitter, embeddings, vector store), Supabase with pgvector, Hugging Face embeddings, Anthropic chat, and Google Sheets. The focus is on architecture, key nodes, and best practices suitable for automation and data engineering professionals.

Business case for automating weather impact reports

Weather conditions directly influence supply chains, field operations, logistics, public events, and customer safety. Many teams still rely on manual workflows to collect alerts, interpret potential impacts, and communicate recommendations. These manual processes are slow, difficult to audit, and prone to inconsistency.

An automated n8n workflow can:

  • Ingest weather updates from multiple sources through webhooks or APIs
  • Use language models to summarize and interpret operational impact
  • Store semantic embeddings for efficient retrieval and context reuse
  • Maintain a structured, searchable audit trail in systems like Google Sheets

The result is a repeatable, observable pipeline that converts raw weather data into actionable intelligence with minimal human intervention.

High-level architecture of the n8n workflow

The Weather Impact Report pipeline uses a modular design that separates ingestion, enrichment, retrieval, and reporting. At a high level, the workflow includes:

  • Webhook (n8n) – entrypoint for POST events from weather feeds or ingestion services
  • Text Splitter – segments long advisories into manageable chunks for embedding
  • Embeddings (Hugging Face) – converts each text chunk into a semantic vector
  • Vector Store (Supabase + pgvector) – persistent storage and similarity search over embeddings
  • Tool / Query node – wraps the vector store as a retriever for LLM-based workflows
  • Memory and Chat (Anthropic) – maintains conversational context and generates the final impact summary
  • Agent with Google Sheets integration – orchestrates the response and writes a structured log entry

This architecture is extensible. You can plug in additional alerting channels, observability, or downstream systems without changing the core pattern.

Data ingestion: capturing weather events

1. Webhook node configuration

The workflow starts with an n8n Webhook node configured to accept POST requests. This endpoint is typically called by your weather provider, an internal integration service, or a scheduled polling script.

A representative JSON payload might look like:

{  "source": "NOAA",  "event": "Heavy Snow Warning",  "timestamp": "2025-01-28T06:30:00Z",  "text": "Heavy snow expected across County A, travel strongly discouraged..."
}

Security considerations at this layer are essential:

  • Protect the webhook with a secret token or signature validation
  • Restrict inbound traffic using IP allowlists or a gateway
  • Use n8n credentials management for any downstream API secrets

Once the payload is received, it flows into the processing segment for text preparation and embedding.

Preparing text for semantic processing

2. Splitting long advisories into chunks

Operational weather bulletins can be lengthy and often exceed typical token limits for embedding models or chat models. To handle this, the workflow uses a Splitter node that breaks the input text into smaller, overlapping segments.

A typical configuration might be:

  • chunkSize = 400 characters (or tokens, depending on implementation)
  • overlap = 40 to preserve context across boundaries

This approach keeps each chunk within model limits while maintaining local continuity, which improves the quality of semantic embeddings and downstream retrieval.

3. Generating embeddings with Hugging Face

Each text chunk is then passed to an Embeddings node configured with a Hugging Face embeddings model. The node converts text into high-dimensional numeric vectors that capture semantic meaning.

Recommendations:

  • Select a sentence-transformer style model that balances accuracy, latency, and cost
  • Standardize preprocessing (case normalization, whitespace handling) for consistent embeddings
  • Consider caching embeddings for identical or repeated texts to reduce cost

The output of this stage is a set of vectors, each associated with its original text chunk and metadata from the incoming payload.

Persisting and retrieving context with Supabase

4. Inserting vectors into a Supabase vector store

To support long-term retrieval and contextualization, the workflow writes embeddings into a Supabase table backed by Postgres and pgvector. Each record typically includes:

  • The embedding vector itself
  • Source system (for example NOAA)
  • Event type (for example Flood Advisory, Heavy Snow Warning)
  • Timestamp of the original event
  • Optional geospatial or region identifiers
  • The raw text snippet for reference

Supabase provides a convenient managed environment for Postgres plus vector search, which keeps operational overhead low while enabling efficient similarity queries.

5. Querying the vector index with a Tool node

When generating a new report or answering a query about current or historical conditions, the workflow needs to retrieve relevant past information. This is handled by:

  • A Query node that runs a similarity search against the pgvector index
  • A Tool node that exposes this query capability as a retriever to the Agent or Chat node

Key configuration parameters include:

  • Similarity threshold to control how close matches must be
  • Maximum number of results to return for each query
  • Optional filters on metadata (for example source, event type, region, time window)

This retrieval step ensures that the language model has access to relevant historical context and related advisories when composing impact reports.

LLM orchestration: memory, chat, and agent logic

6. Memory and Anthropic Chat nodes

To maintain continuity across multiple interactions and reports, the workflow employs a Memory node. This node stores recent conversations or prior generated reports so that the model can reason over ongoing conditions.

The Chat node, configured with an Anthropic model, receives:

  • The current weather payload and key metadata
  • Relevant chunks retrieved from the vector store
  • Any stored context from the Memory node

From this combined context, the Anthropic model generates a structured, human-readable weather impact summary. Typical outputs include:

  • Overall situation summary
  • Operational risks and potential disruptions
  • Impacted regions or assets
  • Recommended mitigation or response actions

Anthropic models are used here to prioritize controlled, high-quality outputs and safer behavior, which is important in risk-sensitive domains like weather-related operations.

7. Agent orchestration and Google Sheets logging

The Agent node coordinates the final stage of the workflow. It parses the Chat node response and maps it to a structured record that can be logged and consumed by downstream systems.

A typical schema for the log entry might include:

  • Report headline or title
  • Severity level inferred or mapped from the event
  • Affected areas or regions
  • Summary of expected impact
  • Recommended actions
  • Source, event type, and timestamp

The Agent then uses a Google Sheets node to append this data as a new row in a designated sheet. This provides:

  • An easily accessible dashboard for stakeholders
  • A durable audit trail of all generated reports
  • A simple dataset for later analytics or quality review

Illustrative payload and end-to-end flow

The following example shows a more detailed JSON payload flowing through the pipeline:

{  "source": "NOAA",  "event": "Flood Advisory",  "severity": "Moderate",  "areas": ["County A", "County B"],  "text": "Heavy rainfall expected - potential flooding on low-lying roads...",  "timestamp": "2025-01-28T06:30:00Z"
}

Processing steps:

  1. The webhook receives the payload and passes the text field to the Splitter.
  2. Chunks are generated, embedded via Hugging Face, and inserted into the Supabase vector table with metadata like severity and areas.
  3. When the Agent constructs a report, it queries the vector store to retrieve semantically similar events, possibly filtered to the same areas or severity range.
  4. The Anthropic Chat node uses both the current advisory and retrieved history to generate a nuanced impact report.
  5. The Agent writes a structured summary into Google Sheets as a new log entry.

Implementation best practices and optimization tips

Metadata and schema design

  • Always store rich metadata with vectors, including source, event type, timestamp, geolocation, severity, and region identifiers.
  • Design your Supabase table schema with clear indexes on frequently filtered fields such as timestamp and region.
  • Use consistent naming and typing for fields so that filters and queries remain predictable.

Chunking and embedding strategy

  • Tune chunkSize and overlap based on your dominant document type:
    • Short alerts or advisories may require smaller chunks.
    • Long technical bulletins or multi-part reports may benefit from larger chunks.
  • Normalize text prior to embedding to avoid unnecessary vector duplication.
  • Deduplicate identical content before sending it to the embedding model for cost control.

Performance, throttling, and cost control

  • Implement rate limiting or backoff strategies in n8n to stay within external API quotas for Hugging Face and Anthropic.
  • Batch embeddings and Supabase inserts where possible to improve throughput.
  • Use a lower-cost embedding model for broad similarity search and, if needed, a more expensive model for high-precision scenarios.

Security and compliance

  • Store all API keys and credentials using n8n’s secure credential management.
  • Enable row-level security in Supabase where appropriate, especially if multiple teams or tenants share the same database.
  • Secure the webhook endpoint with authentication and network controls.

Testing, validation, and quality assurance

Before promoting the workflow to production, validate each stage individually and then perform end-to-end tests.

Node-level testing

  • Simulate webhook payloads using representative JSON samples.
  • Verify that the Splitter is producing chunks of the expected size and overlap.
  • Inspect embeddings and Supabase inserts to confirm schema correctness and metadata presence.

End-to-end validation

  1. Send a synthetic or historical weather event to the webhook.
  2. Confirm that all chunks are embedded and stored in Supabase with correct metadata.
  3. Run a contextual query and manually inspect the retrieved snippets for relevance.
  4. Review the Anthropic Chat node output to ensure it is clear, actionable, and aligned with your operational guidelines.
  5. Check the Google Sheet for the appended row and validate field mappings and data consistency.

Scaling, monitoring, and observability

As event volume grows, you will need to ensure that the pipeline remains performant and observable.

  • Batching: Group embeddings and database writes to reduce overhead and improve throughput.
  • Partitioning: Partition Supabase vector tables by date or region to narrow the search space for common queries.
  • Metrics: Track key metrics such as:
    • Ingestion rate (events per minute or hour)
    • Average embedding time per chunk
    • Vector query latency and result counts
    • Agent or Chat node failures and timeouts
  • Observability stack: Export metrics and logs to systems such as Prometheus, Grafana, or Datadog for centralized monitoring.

Advanced extensions and enhancements

Once the core pipeline is stable, you can extend it with more advanced capabilities:

  • Geospatial filtering: Combine vector similarity with geospatial queries so that retrieval is limited to nearby or jurisdiction-specific impacts.
  • Alerting and incident management: Route high-severity or time-critical reports to Slack, SMS, or an incident management platform.
  • Feedback loop: Allow operators to rate generated reports as accurate or inaccurate, then store that feedback as additional metadata for future evaluation or fine-tuning workflows.
  • Multi-source data fusion: Ingest additional feeds such as radar, satellite imagery summaries, or social media signals to provide richer context to the Chat node.

Conclusion and next steps

Using n8n together with LangChain-style components, Supabase, Hugging Face embeddings, and Anthropic models, you can implement a complete Weather Impact Report pipeline that is flexible, auditable, and ready for production workloads.

A pragmatic rollout approach is:

  1. Implement the webhook and text splitting stages.
  2. Add embeddings and Supabase vector storage for retrieval.
  3. Integrate the Anthropic Chat node and Memory for contextual impact summaries.
  4. Finalize logging and reporting with the Agent and Google Sheets.

Once the core flow is working, refine chunking, retrieval parameters, and prompts to align with your operational standards.

Call to action: If you would like a tailored n8n workflow JSON that matches your weather data schema, preferred Hugging Face model, and Supabase table design, share your data format and expected traffic volume and I can draft a customized configuration for you.

AI Logo-Sheet Extractor to Airtable

AI Logo-Sheet Extractor to Airtable – Automate Logo Intelligence with n8n

Converting dense logo sheets into a structured, queryable dataset is a classic low-value, high-effort task. This guide presents a production-ready n8n workflow template that uses AI vision and language models to interpret a logo-sheet image, extract tools and attributes, and synchronize the results with Airtable. The article explains the architecture, node responsibilities, Airtable schema design, prompt strategy, and operational best practices so you can implement a reliable “upload-and-forget” automation in your own environment.

Use case and value proposition

This workflow is designed for teams that routinely handle visual catalogs of products or vendors and need to operationalize that information. Typical scenarios include:

  • Mapping competitive landscapes from conference slides or analyst reports
  • Building and maintaining a product taxonomy or AI tools catalog
  • Capturing vendor ecosystems from marketing one-pagers or pitch decks

Instead of manual transcription, the workflow uses an AI agent to interpret a single logo-sheet image and then normalizes, deduplicates, and links that data into Airtable. It is optimized for repeatability and can support scheduled imports as well as on-demand uploads from internal stakeholders.

Solution architecture

The automation is implemented as an n8n workflow that coordinates three primary components:

  • n8n workflow engine – orchestrates triggers, AI calls, data transformations, and Airtable operations.
  • AI Vision + LLM agent – analyzes the uploaded image, identifies tools or brands, and outputs structured JSON with attributes and competitor suggestions.
  • Airtable – acts as the system of record for tools and attributes, using deterministic hashes and record IDs for reliable upserts and relationships.

Logical flow overview

At a high level, the workflow performs the following steps:

  • Accepts a logo-sheet image through a form-based trigger.
  • Prepares and sends the image plus contextual prompt to an AI vision + LLM agent.
  • Parses the agent’s structured output into per-tool and per-attribute items.
  • Upserts attributes into Airtable and retrieves their record IDs.
  • Upserts tools into Airtable, including relationships to attributes and similar tools.
  • Ensures competitor mappings are persisted as linked records in Airtable.

Key n8n node groups and responsibilities

Trigger and input handling

  • FormTrigger (On form submission) Receives the uploaded logo-sheet image and an optional text prompt from a public or internal web form. The image should be high enough resolution to capture smaller logos but still within your file size limits. The prompt can include context such as: “This sheet compares enterprise AI infrastructure tools.”
  • Map Agent Input Normalizes the form input into a payload suitable for the AI agent. This node is the right place to inject additional hints like expected industries, categories, or naming conventions to improve extraction accuracy.

AI interpretation and structured output

  • Retrieve and Parser Agent (AI Vision + LLM) This node is the core of the workflow. It uses a vision-enabled LLM to inspect the image and return a JSON structure containing all detected tools. Each tool includes a name, a list of attributes, and a list of similar or competitor tools. A structured-output parser schema is used to enforce consistent JSON formatting and field names.

The expected JSON structure resembles the following:

{  "tools": [{  "name": "ToolName",  "attributes": ["Category","Feature","Platform"],  "similar": ["CompetitorA","CompetitorB"]  }]
}

Prompt design tip: instruct the agent to be conservative and list only logos it can clearly identify. Ask for short, standardized attribute labels, for example “Agentic Application” or “Browser Infrastructure”, to improve downstream deduplication in Airtable.

Data normalization and splitting

  • Split & Normalize After the agent returns the JSON payload, this node (or group of nodes) splits the tools array into individual items so that each tool can be processed independently. It also extracts and normalizes attribute strings into separate items for batch checking and creation in Airtable. This structure enables parallel operations and deterministic mapping back to each originating tool.

Airtable integration and upsert logic

  • Attributes upsert (Airtable) For every unique attribute string, the workflow checks the Airtable Attributes table and performs an upsert. At minimum, the table should include a Name field and a linked Tools field. The node returns the Airtable record ID (RecID) for each attribute, which is then used to replace raw attribute names with stable record links.
  • Tools upsert (Airtable) Before creating or updating tools, the workflow generates a deterministic hash for each tool name, for example an MD5 hash of the normalized name. This hash is used as a stable key to detect existing tools and avoid duplicates caused by casing or whitespace differences. The Tools table is then upserted with:
    • Name
    • Attributes (linked attribute RecIDs)
    • Similar (linked tool RecIDs)
    • Hash (used for matching)
  • Map Similar relationships When the AI output includes similar or competitor names, the workflow ensures that each referenced tool exists in Airtable (creating records if needed) and then links their RecIDs into the Similar field of the origin tool. Depending on your usage pattern, you can maintain these as unidirectional or manage bidirectional links through Airtable views or additional automations.

Recommended Airtable schema

For maintainability, keep the schema minimal yet fully relational. A typical configuration includes two primary tables.

Tools table

  • Name – single line text, required
  • Attributes – linked records to Attributes table, multiple allowed
  • Similar – linked records to Tools table, multiple allowed
  • Hash – single line text used for deterministic matching and upsert
  • Optional fields – for enrichment, such as:
    • Description
    • Website
    • Category (multi-select)

Attributes table

  • Name – single line text, required
  • Tools – linked records back to Tools table, typically managed automatically by Airtable when relationships are created

Prompt strategy and accuracy best practices

Prompt quality has a direct impact on the consistency and reliability of your Airtable data. Consider the following guidelines:

  • Provide domain context Indicate the domain or vertical in the prompt, for example “enterprise AI applications”, “developer tooling”, or “marketing technology”. This helps the model interpret ambiguous brand names correctly.
  • Request conservative extraction Ask the agent to only output tools and attributes it is confident about. This reduces hallucinations and spurious entries.
  • Standardize attribute labels Instruct the model to generate short, consistent attribute names, ideally in a normalized format that aligns with your existing taxonomy.
  • Improve image quality where needed For sheets with many small or low-contrast logos, provide a higher-resolution image or crop the sheet into segments and run the workflow multiple times.

Handling edge cases and data quality

For production use, it is important to manage failure modes and ambiguity explicitly. Some recommended patterns include:

  • False positives If the agent tends to invent tool names, introduce a second validation step that checks extracted names against an allowlist or a curated reference database.
  • Partial or ambiguous matches Use fuzzy matching or a human-in-the-loop review process for low-confidence items. n8n can route uncertain cases to a review queue or a notification channel.
  • Duplicate attributes Normalize attribute strings before upsert, for example by trimming whitespace and lowercasing, and optionally maintain a canonical attribute mapping table for further consolidation.
  • Incomplete similar relationships Periodically run reconciliation jobs that infer additional competitor links from multiple logo sheets or from other data sources.

Security, privacy, and governance

If the logo sheets include internal, confidential, or regulated information, align the implementation with your organization’s data policies:

  • Use AI providers that meet your compliance requirements.
  • Restrict access to the form trigger, Airtable base, and API keys.
  • Store credentials securely within n8n and rotate tokens regularly.
  • Monitor workflow executions and API usage for anomalies.

Scaling and performance considerations

When processing large volumes of logo sheets or very large images, consider the following optimization strategies:

  • Rate limiting Airtable writes Batch records where possible and introduce short delays between write operations to stay within Airtable’s rate limits.
  • Controlled parallelism Parallelize agent calls for multiple images but cap concurrency in n8n to avoid throttling from AI and Airtable APIs.
  • Caching attribute mappings Cache known attribute-to-RecID mappings in memory or in a lightweight datastore to reduce repeated Airtable lookups and improve throughput.

Debugging and operational checklist

When troubleshooting or hardening the workflow, use this checklist:

  • Verify that the AI agent returns valid, well-formed JSON that matches the expected schema. Use the structured output parser to enforce this.
  • Ensure attribute normalization (trimming, casing) occurs before matching or upserting into Airtable to prevent silent duplication.
  • Inspect Airtable API responses for rate limit, authentication, or permission errors.
  • Review n8n execution history to trace payload transformations and identify where unexpected values are introduced.

Example AI output

The following is a representative example of the structured JSON the agent might produce for a logo sheet:

{  "tools": [  {  "name": "Pinecone",  "attributes": ["Storage Tool","Memory management"],  "similar": ["Chroma","Weaviate"]  },  {  "name": "LangGraph",  "attributes": ["Framework Tool","Graph Management"],  "similar": ["LlamaIndex","Semantic Kernel"]  }  ]
}

This output is then normalized and translated into Airtable records with linked attributes and similar tools as described above.

Extending and customizing the workflow

Once the core pipeline is in place, it is straightforward to extend the workflow for additional business needs:

  • Add a secondary validation agent that cross-checks tool names against a domain-specific catalog or internal system.
  • Build Airtable dashboards and views to visualize categories, clusters, and competitor networks.
  • Integrate Slack or email notifications to alert teams when new tools are discovered or when an extraction run fails.

Conclusion and implementation next steps

This n8n workflow template turns static logo sheets into structured, relational data in Airtable with minimal manual effort. It is particularly valuable for teams building product taxonomies, tracking competitive landscapes, or maintaining up-to-date AI tooling inventories.

To adopt the automation in your environment:

  1. Import or recreate the n8n workflow in your instance.
  2. Connect your Airtable credentials and configure the recommended schema.
  3. Adjust the AI prompt to reflect your domain, naming conventions, and quality thresholds.
  4. Test with a high-resolution sample logo sheet and review the resulting Airtable records.

Ready to automate your logo sheets into Airtable? Deploy the template, connect your data sources, and start converting visual logo collections into searchable, linked records. If you need to adapt the prompt, schema, or matching logic for your specific industry or scale requirements, refine the workflow nodes accordingly.

Pro tip: For very dense logo sheets, run the workflow multiple times with different crops or slightly varied prompts and then aggregate the results in Airtable to improve overall coverage.

n8n + E-goi: Create, Update & Get a Subscriber

n8n + E-goi: Create, Update & Get a Subscriber

Picture this: you are copying the same email, first name, and list ID into E-goi for the hundredth time, wondering if this is really what your life has become. Good news – it does not have to be. With an n8n workflow and the E-goi node, you can make the robots do the boring stuff while you pretend it was all part of your grand strategy.

In this guide, we will walk through an n8n workflow template that handles three classic E-goi subscriber operations for you:

  • Create a new subscriber
  • Update that subscriber
  • Get the final contact details back out of E-goi

You will see how the nodes connect, how to configure each step, and how to use n8n expressions so data flows smoothly from one node to the next. This is useful whether you are a marketer trying to keep your lists clean or a developer who refuses to touch a manual export ever again.

Why automate E-goi subscriber management with n8n?

Manually managing subscribers is like doing data entry as a hobby. Automation is the opposite: it quietly handles the repetitive bits while you focus on campaigns, strategy, or literally anything else.

Using n8n with the E-goi node lets you:

  • Create new contacts automatically when someone signs up, fills a form, or appears in another system.
  • Update contact fields based on rules you define, like changing names, tags, or custom fields.
  • Retrieve contact details and pass them to the rest of your workflow, your CRM, or your reporting tools.

The result is synced contact data across CRMs, landing pages, sign-up forms, and whatever other tools you have glued together.

What this n8n + E-goi workflow template actually does

The template is a compact four-node workflow that looks simple on the outside but saves you from a lot of repetitive clicking:

  • Manual Trigger – lets you run the workflow on demand while you test or debug.
  • E-goi (create contact) – creates a new subscriber in a specific E-goi list.
  • E-goi1 (update contact) – updates that same subscriber with new data.
  • E-goi2 (get contact) – retrieves the final version of the contact so you can verify or use it downstream.

The workflow starts with a simple JSON payload that defines the subscriber you want to create:

{  "list": 1,  "email": "nathan@testmail.com",  "additionalFields": {"first_name": "Nathan"}
}

This object is used in the first E-goi node to create the contact. E-goi then returns a response that includes a contact_id. That contact_id is the star of the show, because the next nodes grab it via expressions and use it to update and fetch the same subscriber.

Node-by-node tour of the workflow

1. Manual Trigger – your testing remote control

The Manual Trigger node is simply there so you can run the workflow on demand while building and testing it. You click “Execute workflow,” it fires, and you see what happens.

Once everything works and you are ready for real automation, you can replace this with a:

  • Webhook trigger for real-time sign-ups
  • Schedule trigger for regular syncs
  • Any other trigger that fits your use case

2. E-goi (create contact) – adding a new subscriber

This node creates your new E-goi subscriber. It uses three main parameters:

  • list – the ID of the E-goi list where the contact should be added, for example 1.
  • email – the email address of the subscriber you want to create.
  • additionalFields – extra attributes like first name, last name, phone number, and other custom fields.

The sample configuration in the template looks like this:

list: 1
email: nathan@testmail.com
additionalFields: { first_name: "Nathan" }

When this node runs, E-goi returns a response object that includes contact_id under json.base.contact_id. That value is crucial because the following nodes use it to identify which subscriber to update and fetch.

3. E-goi1 (update contact) – changing subscriber details

Next comes the E-goi1 node, which performs the update operation. Instead of hard-coding IDs, it uses n8n expressions to pull data from the previous E-goi node. That way, the workflow adapts to whatever contact was just created.

The important parameters in the template are:

list: ={{$node["e-goi"].parameter["list"]}}
contactId: ={{$node["e-goi"].json["base"]["contact_id"]}}
operation: update
updateFields: { first_name: "Nat" }

Here is what is going on:

  • {{$node["e-goi"].parameter["list"]}} reuses the exact same list ID that you configured in the create node.
  • {{$node["e-goi"].json["base"]["contact_id"]}} reads the contact_id returned from the create operation response.

In this example, the subscriber’s first name is being updated from Nathan to Nat. You can extend updateFields with any other fields supported by your E-goi setup.

4. E-goi2 (get contact) – verifying the final result

The last node, E-goi2, retrieves the updated contact so you can confirm everything worked or send the data elsewhere.

Its configuration uses expressions again:

list: ={{$node["e-goi"].parameter["list"]}}
contactId: ={{$node["e-goi1"].json["base"]["contact_id"]}}
operation: get

This node:

  • Reads the list ID from the first E-goi node.
  • Uses the contact_id from the update node response.

After this “get” operation, you have the definitive contact object. From here, you can:

  • Log it for debugging
  • Send it to another tool or database
  • Trigger additional automations based on the contact’s data

How to set up and run the template in n8n

Ready to trade your copy-paste habit for automation? Here is the simplified setup guide.

  1. Import the workflow JSON
    Open your n8n instance, go to the editor, and import the provided workflow JSON file.
  2. Set up E-goi credentials
    In n8n, add your E-goi API key and account details in the credentials section so the E-goi nodes can authenticate.
  3. Adjust the create contact node
    Open the first E-goi node and update:
    • list to match the correct list ID in your E-goi account
    • email with a test email or dynamic value
    • additionalFields with the fields you want to store, like first_name or others
  4. Confirm the expressions in update and get nodes
    Check that the expressions in the update and get nodes still reference the right node names, such as e-goi and e-goi1. If you rename nodes, update the expressions accordingly.
  5. Run the workflow with the Manual Trigger
    Execute the workflow. Inspect the output of each node to verify:
    • The contact is created successfully
    • The update applies correctly
    • The final get operation returns the expected contact data

Troubleshooting when things get grumpy

Sometimes APIs wake up on the wrong side of the server. If your workflow misbehaves, start with these checks:

  • Invalid credentials
    If requests fail or you see authentication errors, double-check your E-goi API key in n8n credentials and confirm that your E-goi account has API access enabled.
  • Missing contact_id in the response
    Make sure the create contact operation actually succeeds. Look at the raw JSON response from the first E-goi node. The template expects contact_id at json.base.contact_id. If E-goi’s response structure is different in your account or version, adjust the expression path accordingly.
  • List ID errors
    If E-goi complains about the list, confirm that the list ID you are using really exists in your E-goi account and that your credentials have access to it.
  • Rate limits
    Running many executions in a short time can trigger E-goi rate limits. If that happens, add some rate limiting or retry logic so your workflow is more polite.
  • Expression errors
    If you rename a node and forget to update expressions, n8n will not find the referenced node. Update any expressions like {{$node["e-goi"].json[...]}} to match the new node names.

Best practices to level up your n8n + E-goi workflow

Once the basic template works, you can start improving it so it behaves more like a reliable teammate and less like a fragile demo.

  • Use a webhook trigger for real-time sign-ups
    Replace the Manual Trigger with a Webhook node to capture sign-ups from forms or landing pages instantly.
  • Add error handling
    Use n8n’s Error Workflow or extra Function nodes to catch failed requests, log errors, and send notifications when something breaks.
  • Clean up data before sending it
    Normalize fields in n8n first. For example, trim whitespace, validate email formats, or standardize name casing.
  • Use conditional updates
    Add an IF node so you only call the update operation when values have actually changed. That keeps your API usage lean.
  • Store the contact_id in your own systems
    Save the returned contact_id in your database or CRM. That way, you can reference the E-goi contact later without extra lookup calls.

Adding simple retry logic for reliability

APIs occasionally time out, just to keep everyone humble. To make your workflow more resilient, you can introduce a basic retry pattern.

One approach is to combine a Function node, a Delay node, or n8n’s built-in retry options. A simple pseudo-flow might look like:

  1. Create contact node → on failure → Delay (5 seconds) → retry create contact (up to 3 attempts)
  2. If it still fails after retries, send an error notification via Slack or email so a human can investigate.

This small addition can save you from silent failures when E-goi is having a temporary hiccup.

Where this template really shines: use cases

This workflow is a great starting point for many automation scenarios that touch E-goi subscribers, such as:

  • Syncing newsletter signups from a landing page or form directly into an E-goi list.
  • Keeping CRM and E-goi in sync by mirroring contact properties and custom fields between systems.
  • Enriching contact data from other services (for example, enrichment APIs or internal tools) and then updating E-goi with the latest information.

Wrapping up: a simple template with real impact

This n8n template gives you a clear, repeatable pattern for working with E-goi subscribers:

  • Create a contact
  • Update that contact
  • Fetch the final contact record

By using expressions to pass the contact_id and list ID between nodes, the workflow stays flexible and robust, even as you customize it for your own data model and logic.

Once you are comfortable with the basics, you can extend the workflow with different triggers, more fields, better error handling, and additional integrations. The goal is simple: let automation handle the repetitive bits so you do not have to.

Next steps and call to action

Ready to try it out?

  • Import the template into your n8n instance.
  • Plug in your E-goi credentials and list IDs.
  • Run a few tests, then connect it to your real sign-ups or CRM.

Want help customizing this n8n and E-goi workflow for your specific use case? Reach out to us or grab the template and experiment in your own environment. If you enjoy automation recipes like this, subscribe to our newsletter for more n8n templates and integration tutorials.

Tip: Have an E-goi response that looks nothing like the one in this example? Paste your E-goi response JSON and we can help you map the right expression paths to pull out contact_id or any other field you need.

Build a Visa Requirement Checker with n8n & Vector AI

Build a Visa Requirement Checker with n8n & Vector AI

Every time someone asks, “Do I need a visa for this trip?” you face the same challenge: searching, checking, and double checking official guidance. It is important work, but it can quickly become repetitive and time consuming.

What if that effort could be transformed into a reliable, automated system that works for you 24/7, while you focus on higher value tasks, strategy, or serving customers directly?

In this guide, you will walk through building a Visa Requirement Checker using an n8n workflow template that combines webhooks, text splitting, Cohere embeddings, a Weaviate vector store, an Anthropic chat model, and Google Sheets logging. Along the way, you will see how this setup can become a foundation for a more automated, focused way of working.

The problem: manual visa lookups drain time and focus

Visa rules are detailed, constantly changing, and often buried in long documents. Manually answering each question means:

  • Repeating the same searches dozens of times.
  • Risking human error or outdated information.
  • Spending hours on tasks that could be automated.

Whether you support travelers, run an agency, or manage internal mobility, this work is important, but it does not need to be manual. Automation can turn a fragile, ad hoc process into a dependable service that scales with your needs.

The shift: from reactive answers to an automated knowledge system

Instead of answering each question from scratch, imagine you:

  • Index your official visa guidance once.
  • Let an AI powered workflow retrieve and summarize the right rules for each query.
  • Log every interaction automatically for traceability and improvement.

This is the mindset shift: you are not just building a tool, you are building a reusable system. The n8n Visa Requirement Checker template is that system in a ready-to-use form. You can start small, then iterate and expand as your needs grow.

Why this n8n architecture unlocks reliable automation

The workflow uses a retrieval-augmented generation (RAG) pattern. Instead of relying on a language model to “guess” the answer, you store authoritative visa content as vectorized documents in Weaviate, then let an Anthropic chat model generate answers based on that trusted data.

Here is what this architecture gives you:

  • Accuracy by grounding answers in your own curated visa documents.
  • Context-aware responses thanks to embeddings and vector search.
  • Automation at scale with n8n orchestrating the entire flow, from webhook to logging.

n8n becomes your automation backbone. It collects requests, preprocesses text, indexes content, runs queries, calls the LLM, and records results. Once this is in place, you have a reusable pattern you can apply to many other knowledge-heavy workflows, not just visas.

High-level journey of the workflow

Here is the overall flow your Visa Requirement Checker will follow:

  1. Receive a visa query or document via a POST webhook.
  2. Split the incoming text into chunks for high quality embeddings.
  3. Generate embeddings with Cohere and insert them into Weaviate.
  4. When a user asks a visa question, query Weaviate for the most relevant documents.
  5. Use an Anthropic chat model to synthesize a clear, conversational answer.
  6. Log the full interaction to Google Sheets for auditing and analytics.

Each step is handled by a dedicated n8n node, so you always have full visibility and control. You are not locked into a black box. You can inspect, tweak, and extend the workflow as your automation skills grow.

Key n8n components that power the template

Let us walk through the core nodes that make this template work. Understanding them will help you customize and build on the workflow with confidence.

Webhook: your entry point for data and questions

Node: Webhook
Purpose: Receive incoming HTTP POST requests.

In the template, the path is set to visa_requirement_checker, so your endpoint looks like:

https://<n8n-host>/webhook/visa_requirement_checker

This is where you send both your source documents for indexing and your users’ questions. It is the front door of your automated system.

Splitter (Text Splitter): preparing content for better search

Node: Splitter
Purpose: Break long documents into smaller chunks to improve embedding quality and retrieval.

The template uses:

  • chunkSize: 400
  • chunkOverlap: 40

You can adjust these values based on how dense or legalistic your content is. The goal is to preserve context while keeping each piece manageable for embeddings.

Embeddings (Cohere): turning text into searchable vectors

Node: Embeddings
Purpose: Convert text chunks into vector representations.

In the template, the model is set to default using your Cohere API credential. This step is what makes your content searchable in a semantic way, not just by keywords.

Insert & Query (Weaviate): your vector knowledge base

Nodes: Insert and Query
Purpose:

  • Insert stores embeddings and metadata in a Weaviate index named visa_requirement_checker.
  • Query retrieves the most relevant chunks for a given user question.

This is where your visa guidance becomes a living, searchable knowledge base that can grow over time.

Tool (Vector Store wrapper): connecting search to reasoning

Node: Tool
Purpose: Wrap the vector store query as a tool that an Agent node can call.

By exposing Weaviate as a tool, you allow your Agent to perform retrievals as part of its reasoning process. This is a powerful pattern you can reuse for other automations.

Memory (Windowed Buffer): keeping conversations coherent

Node: Memory
Purpose: Maintain a recent history of the conversation or session.

This helps the system handle follow up questions and keep context, so users experience a more natural, human-like interaction.

Chat (Anthropic): generating clear, grounded answers

Node: Chat
Purpose: Use a language model to synthesize the final response.

The template uses the Anthropic credential to provide a safe, conversational agent that responds based on the evidence retrieved from Weaviate.

Agent: orchestrating tools, memory, and the model

Node: Agent
Purpose: Coordinate decision making across tools, memory, and the chat model.

The Agent receives:

  • Output from the vector store tool.
  • Recent conversation history from Memory.
  • Input from the Webhook JSON.

In the template, the promptType is set to define, with the input configured to use the webhook data. The Agent then calls the Chat node and formats the final answer.

Sheet (Google Sheets): building your audit trail and insights

Node: Sheet
Purpose: Append each processed interaction to a Google Sheet for traceability.

The node is configured with:

  • sheetName: Log
  • operation: append

This gives you a growing dataset you can use for audits, analytics, and continuous improvement of your automation.

Step-by-step: from raw documents to live visa checker

Now that you understand the pieces, let us walk through setting everything up. Treat this as a journey: you start by organizing your knowledge, then gradually bring it to life through automation.

1. Prepare your source documents

Begin with the most important part: your data. Gather official visa guidance such as:

  • Government websites.
  • Embassy or consulate pages.
  • Frequently asked questions and policy summaries.

For each document, record metadata like:

  • Country.
  • Visa type.
  • Last updated date.
  • Source URL.

This metadata is crucial. It keeps your answers traceable, so you always know where the information came from and how recent it is.

2. Configure your environment and credentials

Next, connect the services that will power your workflow. You will need:

  • A Cohere API key for generating embeddings.
  • A Weaviate host and API key, or a hosted Weaviate instance.
  • An Anthropic API key, or an alternative LLM credential if you adapt the template.
  • Google Sheets OAuth2 credentials for logging interactions.
  • An n8n instance with public or tunneled webhook access, for example via ngrok or n8n cloud.

Once these are in place, you have the foundation for a production-ready automation stack.

3. Import the n8n template workflow

Use the provided JSON template to import the Visa Requirement Checker into your n8n instance. After importing:

  • Check that all node connections follow the intended flow.
  • Open each node and update the credentials to match your own API keys and accounts.

At this point, you already have a working structure. The remaining steps are about feeding it data and starting to use it.

4. Index your visa content in Weaviate

To index content, send a POST request to the webhook with a document payload that includes a title, content, and metadata. For example:

{  "title": "Visa requirements for US citizens traveling to France",  "content": "Citizens of the United States can travel to France for tourism for stays up to 90 days without a visa...",  "metadata": {  "country": "France",  "visa_type": "tourism",  "source": "https://example.gov"  }
}

Here is what happens automatically:

  • The Webhook receives the document.
  • The Splitter node breaks the content into chunks.
  • The Embeddings node uses Cohere to vectorize each chunk.
  • The Insert node stores those vectors and metadata in the visa_requirement_checker Weaviate index.

Repeat this step for all your key visa documents. Over time, you build a rich knowledge base that your Agent can draw on.

5. Handle user questions and interaction flow

Once your content is indexed, your automation is ready to answer real questions. When a user asks something like:

“Do US citizens need a visa to visit France for 2 months?”

the workflow runs as follows:

  • The question arrives at the Webhook.
  • The Agent triggers a Query to Weaviate through the Tool node.
  • The Query node returns the most relevant chunks from your indexed documents.
  • The Chat node, powered by Anthropic, uses those chunks as context to craft a clear, concise answer that cites sources where appropriate.
  • The Agent formats the final response and sends it back.
  • The Sheet node appends the request and response to your Google Sheet log.

From the user’s perspective, they simply receive a direct, well grounded answer. From your perspective, you have a repeatable, scalable system that can handle many such questions without extra manual effort.

Designing your Google Sheets log for growth

A thoughtful logging structure turns your Visa Requirement Checker into a continuous improvement engine. A recommended schema for your Log sheet is:

  • Timestamp.
  • User question.
  • Answer.
  • Country.
  • Visa type.
  • Source URLs.
  • Agent notes / confidence.

With this data, you can review patterns, identify gaps in your content, and refine prompts or retrieval settings over time.

Best practices to keep your checker accurate and scalable

To get the most from this template and maintain trust in your answers, keep these practices in mind:

  • Chunking: Use a chunk size that preserves legal context without creating overly long embeddings. Values around 400 tokens or characters with small overlaps often work well for legal and policy text.
  • Metadata: Always store source URLs and last updated dates. This supports verifiable answers and helps you prioritize re-indexing.
  • Model safety: Use Anthropic or similar guardrails to reduce hallucinations. Encourage the model, via prompts, to quote or reference sources.
  • Re-indexing: Schedule periodic re-indexing for countries or visa types that change frequently.
  • Testing: Maintain a test set of common queries and edge cases to evaluate relevance and answer quality.
  • Rate limits and cost: Monitor API usage for Cohere and Anthropic so you can scale responsibly.

Troubleshooting: refining your automation as you go

As you experiment and grow your system, you may run into a few common issues. Use them as opportunities to refine your workflow:

  • No relevant results: Expand your document coverage or adjust Weaviate query parameters such as the vector or k value to retrieve more candidates.
  • Low-quality answers: Provide more context by retrieving additional chunks, or tweak the Chat prompt to emphasize quoting and careful reasoning.
  • Webhook issues: Confirm that your n8n host is reachable from the outside and that the webhook path matches visa_requirement_checker.

Designing a clear, trustworthy answer format

Users appreciate concise answers with transparent sources. When you define the Agent’s final output, consider a structure like this:

Answer: No - US citizens do not need a visa for tourism stays up to 90 days in France.
Sources:
- French Government (https://example.gov) - updated 2025-01-10
Confidence: High

This format keeps responses short, clear, and backed by evidence, which builds trust in your automated system.

Security and compliance: automate