Build an AI Calendar Agent with n8n & OpenAI

Ever wished you could just tell your calendar what to do and have it figure out the details for you? That is exactly what this n8n workflow template, called CalendarAgent, is built for. It uses OpenAI, a LangChain-style agent, and Google Calendar to turn natural language requests into real calendar events, complete with attendees and schedule summaries.

In this guide, we will walk through what the template does, when you might want to use it, and how it works under the hood. We will also cover setup, customization tips, testing ideas, and a few gotchas to watch out for.

What this AI calendar agent actually does

At a high level, the CalendarAgent template lets you manage your Google Calendar just by writing or saying what you want, in plain language. You can:

  • Create calendar events from natural language, like “Book a meeting tomorrow at 2 pm called Design Review.”
  • Add attendees to events, for example “Schedule a call with alex@example.com next Friday at 10 am.”
  • Check availability or summarize what is happening on or around a specific date.

Behind the scenes, the workflow uses an OpenAI Chat Model and a LangChain-style Calendar Agent node to understand your intent, then passes structured data into Google Calendar nodes that perform the actual API calls.

Why bother with an AI calendar agent?

Scheduling is one of those tasks that feels simple but eats up time. You have to:

  • Read messages or requests
  • Check your current availability
  • Create events with the right title, time, and duration
  • Add the correct attendees

All of that is repetitive, but it still needs context and attention. An AI calendar agent handles the repetitive parts and lets you interact with your calendar in a way that feels more natural. Instead of clicking through interfaces, you just say what you want.

This n8n template ties that all together by combining:

  • OpenAI Chat Model as the language model
  • Calendar Agent (LangChain-style agent node) to decide which calendar action to take
  • Google Calendar nodes to actually read and create events

If you are already using n8n for automation, this template drops right into your setup and instantly upgrades your scheduling workflow.

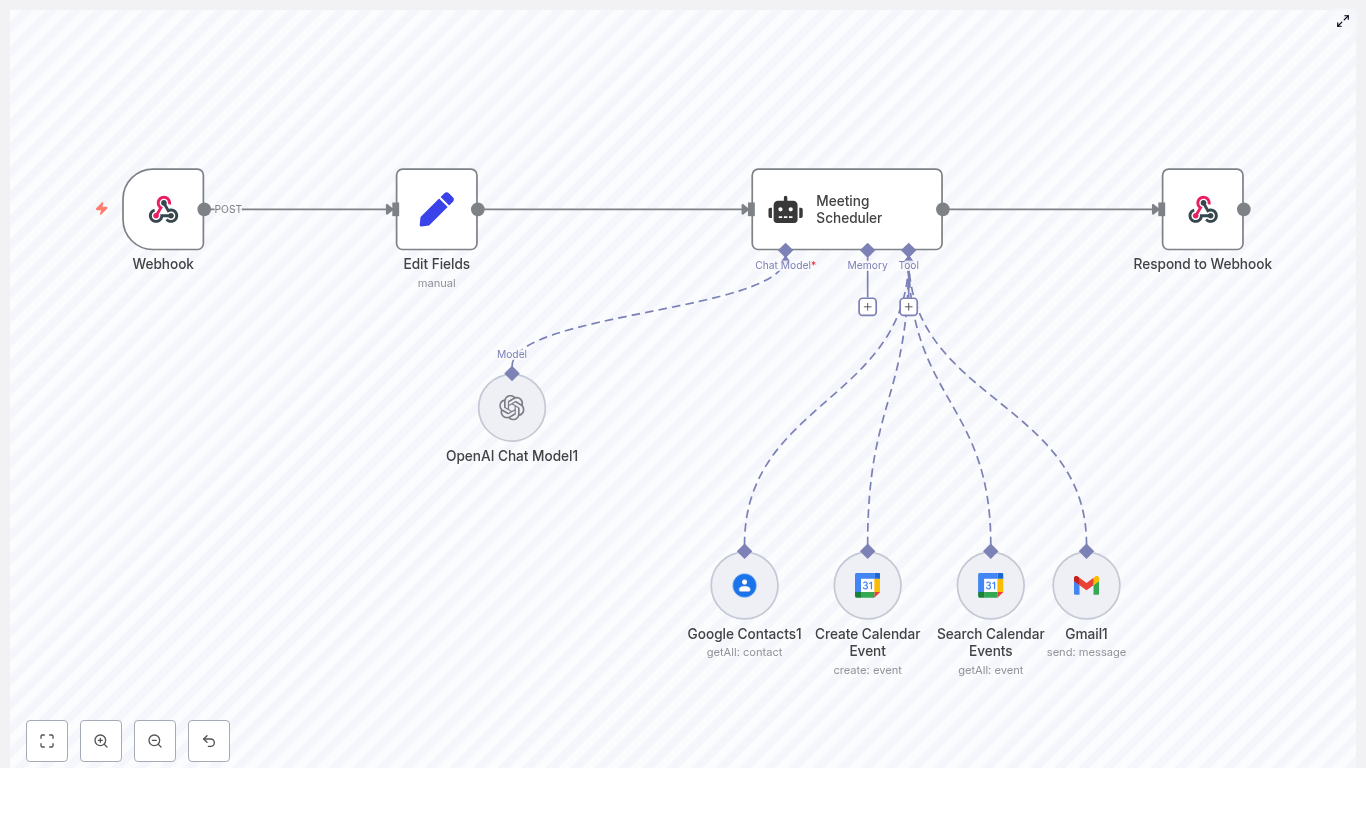
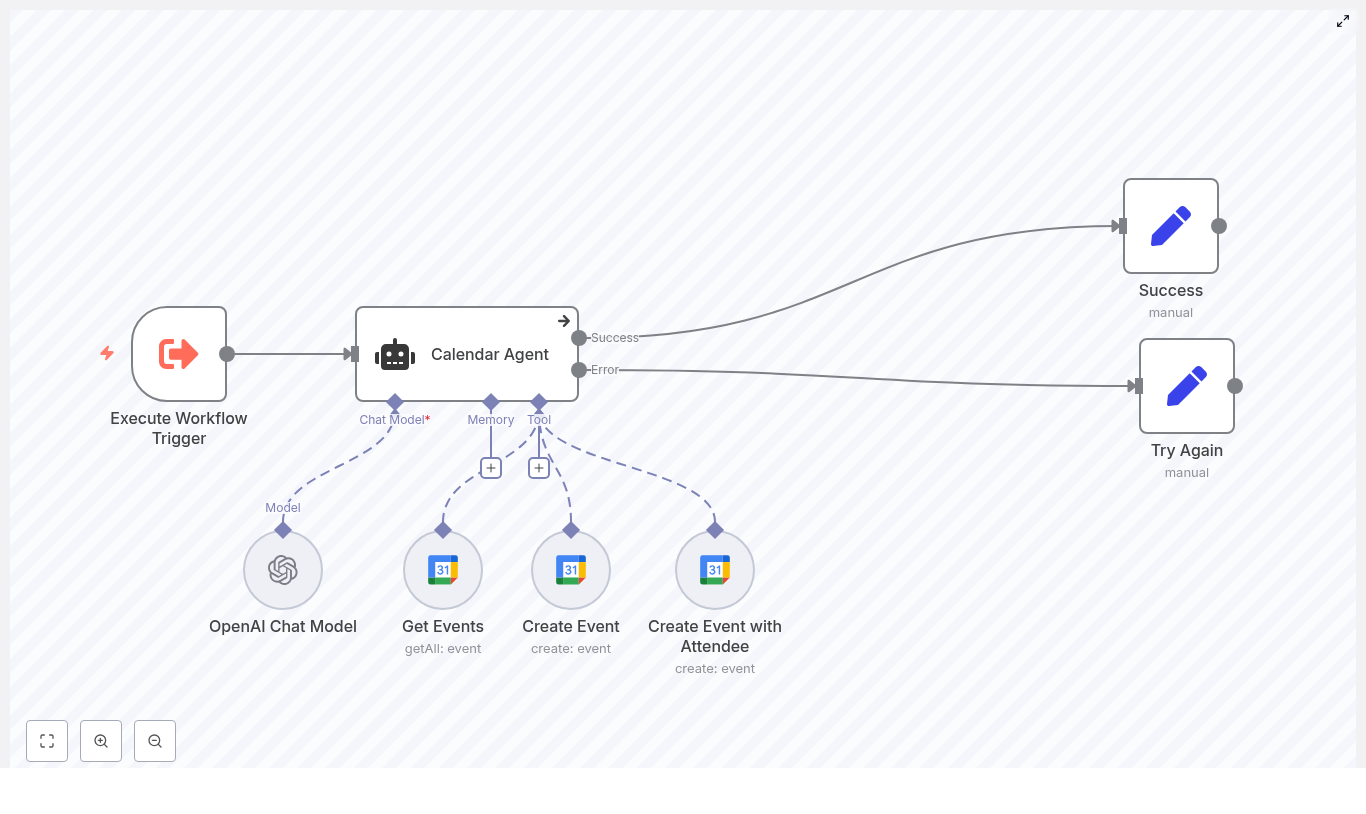
How the workflow is structured

The CalendarAgent template is built from several key nodes that work together. Here is an overview of the main pieces and what they do:

  • Execute Workflow Trigger – kicks off the workflow when input is received, for example from another workflow or a webhook.
  • Calendar Agent (LangChain agent) – the central brain. It reads the user’s request, looks at the current date and time, and chooses the right tool:
    • Get Events to summarize or check availability
    • Create Event to create an event without attendees
    • Create Event with Attendee to create an event and invite someone
  • OpenAI Chat Model – the language model that understands the user’s message and extracts structured information like start time, end time, event name, and attendee email.
  • Get Events – a Google Calendar node that fetches events around a specific date so the agent can describe availability or summarize the schedule.
  • Create Event – a Google Calendar node that creates events without attendees.
  • Create Event with Attendee – a Google Calendar node that creates events and adds an attendee email address.
  • Success and Try Again nodes – handle final user feedback, depending on whether the task worked or not.

Inside the logic: how the agent decides what to do

The magic of this workflow lives in the Calendar Agent node. It is configured with a system message that describes:

  • What tools it has access to
  • When to use each tool
  • Some simple business logic to keep things consistent

Here are a few key behaviors that are built into that agent prompt:

  • Default duration – if the user does not specify an end time, the event is set to last 60 minutes by default.
  • Attendee handling – if the user mentions someone to invite, the agent uses the Create Event with Attendee tool instead of the basic event tool.
  • Availability checks – when the user wants to see availability or a summary, the agent calls the Get Events tool with a one day buffer on both sides of the requested date. That means it looks one day before and one day after to capture nearby events reliably.

The agent uses the current date and time, along with these rules, to figure out the right action and fill in any missing details.

Extracting data from natural language

To move from a casual request like “Book a call with Sam next Tuesday at 4 pm” to a proper calendar event, the workflow needs structured fields. This is where the OpenAI Chat Model and n8n expressions come in.

The agent uses expressions such as:

{{$fromAI("starttime","the time the user asks for the event to start")}}
{{$fromAI("attendeeEmail","the email of the user asks the event to be scheduled with")}}

These expressions tell n8n to pull specific values from the AI response, such as:

  • starttime for when the event starts
  • attendeeEmail for the invitee’s email address

Those extracted values are then passed directly into the Google Calendar nodes, which actually create or read events through the Google Calendar API.

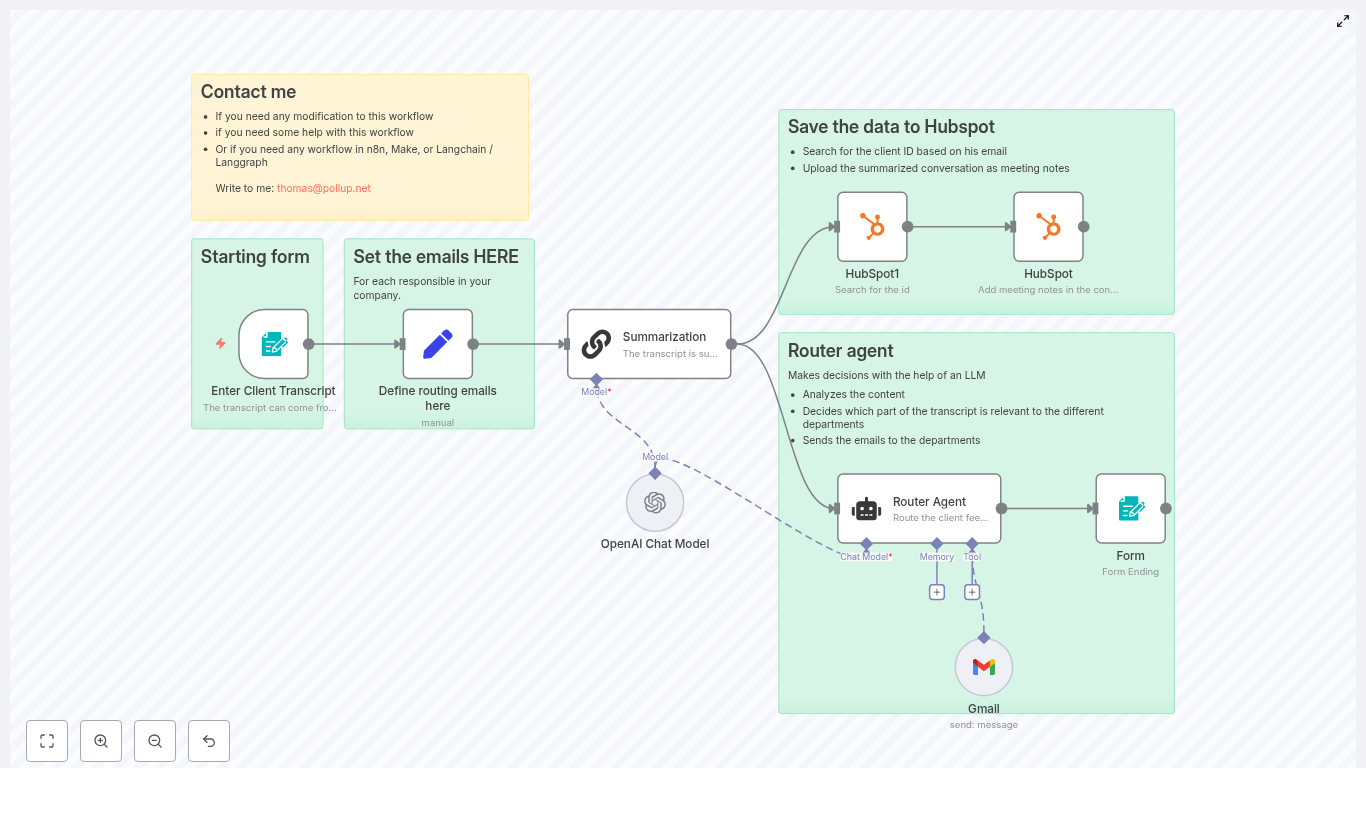
Error handling and user feedback

Not every request will be perfectly clear, and sometimes APIs misbehave. The workflow handles this by routing the Calendar Agent output into two branches:

  • Success node – used when the agent can confidently understand the request and the calendar action runs without issues. It returns a success message and details about the event or the retrieved schedule.
  • Try Again node – used when something is off, such as:
    • Ambiguous or incomplete input
    • Missing permissions
    • Google Calendar or OpenAI API errors

In those failure cases, the workflow returns a friendly fallback like “Unable to perform task. Please try again.” You can customize this message to better fit your tone or UX.

What you need before you start

To get this n8n AI calendar template up and running, you will need three things in place:

  1. OpenAI API credential
    Add your OpenAI API key inside n8n and connect it to the OpenAI Chat Model node used by the agent.
  2. Google Calendar OAuth2 credential
    Set up a Google OAuth credential in n8n with access to the calendar you want to manage. The template uses thataiBuddy3@gmail.com as an example, but you should replace this with your own account or the calendar you want the agent to control.
  3. Working n8n environment
    Make sure your n8n instance can reach both the OpenAI API and the Google Calendar API from its network environment.

When this template is especially useful

You might find this CalendarAgent template particularly handy if you:

  • Handle lots of meeting requests across email, chat, or support tools.
  • Want to let teammates or users schedule meetings by sending natural language requests into n8n.
  • Are building an internal assistant or chatbot that should “understand” calendar-related questions.
  • Need a reusable pattern for combining AI with Google Calendar in other workflows.

Customizing the CalendarAgent for your use case

The template works out of the box, but you can easily tailor it to match your workflow or organization.

  • Change the default event duration
    Do not like the 60 minute default? Adjust the agent system prompt and the logic that calculates the end time when none is provided.
  • Support multiple calendars
    If you manage more than one calendar, you can:
    • Expose a calendar selector in the trigger payload.
    • Map that value into the Google Calendar nodes to dynamically choose which calendar to use.
  • Richer attendee handling
    Expand beyond a single attendee by:
    • Allowing multiple email addresses.
    • Configuring calendar invites with RSVP behavior.
    • Making invites more robust to timezones by enhancing the extraction logic and node fields.
  • Add notifications
    After creating an event, you can trigger:
    • Email confirmations
    • Slack or other chat notifications
    • Internal logs or CRM updates

    This turns the template into a complete scheduling flow, not just a calendar writer.

How to test the workflow effectively

Once you have your credentials connected, it is worth doing a few structured tests to make sure everything behaves as you expect.

  1. Start with clear, simple requests
    Try something like:
    “Create a meeting called Project Sync on June 10 at 3 pm.”
    Then check that the event appears in the correct Google Calendar with the right title and time.
  2. Test attendee invites
    Use a request such as:
    “Schedule a 30 minute call with alice@example.com next Monday at 10 am.”
    Confirm that:
    • The event is created.
    • The attendee receives an invite (depending on your calendar settings).
  3. Try ambiguous input on purpose
    For example:
    “Set up a meeting next week.”
    See how the agent responds. You may get:
    • A request for clarification, or
    • A fallback “Try Again” style message.

    If the behavior is not what you want, you can refine the system prompt or adjust the extraction logic.

Security and privacy: what to keep in mind

Because this workflow touches both AI services and calendar data, it is worth being deliberate about security and privacy.

  • Limit OAuth scopes
    Give your Google credential only the minimum scopes required to read and create events. Avoid overly broad access if you do not need it.
  • Treat calendar data as sensitive
    Event descriptions, attendee emails, and dates can all be sensitive information. Store them carefully and avoid logging more than you need.
  • Watch API quotas and limits
    Both OpenAI and Google Calendar have usage limits. If your workflow will run frequently or at scale, consider:
    • Monitoring your API usage
    • Adding retry or backoff logic inside n8n for transient errors

Troubleshooting common issues

If something does not behave quite right, here are a few common problems and how to approach them:

  • Ambiguous times
    If the agent struggles with time interpretation, make sure your system message:
    • Clarifies how to use the current date context with {{$now}}
    • Encourages the model to infer or request timezone details when needed
  • Permissions or access errors
    When Google Calendar calls fail, double check:
    • Your OAuth scopes
    • The consent screen configuration
    • Which calendar the credential actually has access to
  • Parsing or extraction failures
    If the AI is not reliably returning the fields you expect, try:
    • Making the agent system message more explicit about the required fields.
    • Adding clearer examples of the format you want.
    • Introducing an extra clarification step in the workflow if the input is too vague.

Where to go from here

The CalendarAgent template is a compact, practical example of how you can combine language models with n8n automation and Google Calendar to simplify scheduling. With a few tweaks, it can easily become:

  • A booking assistant for sales or customer calls
  • An internal scheduler for interviews or team meetings
  • A building block inside a larger AI-powered assistant

To try it out:

  1. Import the template into your n8n instance.
  2. Connect your OpenAI and Google Calendar credentials.
  3. Run through the test scenarios above and adjust prompts or logic as needed.

If you want a quicker starting point, you can simply clone the template and customize it to match your organization’s naming conventions, timezones, or calendar structure.

Call to action: Give the CalendarAgent a spin in your n8n environment and see how much calendar friction you can remove. If you end up extending it or run into questions, share your version and you can iterate on the prompts and logic to get it working exactly the way you like.

n8n: YouTube Advanced RSS Feeds Generator

n8n: YouTube Advanced RSS Feeds Generator – A Story Of One Marketer’s Automation Breakthrough

Unlock automated RSS feeds for any public YouTube channel, without ever touching a Google API key. This is the story of how one overwhelmed marketer turned a messy manual process into a smooth, automated system using an n8n workflow that converts YouTube usernames, channel IDs, and video URLs into multiple RSS formats, powered by RSS-Bridge and a clever token workaround.

The Problem: One Marketer, Too Many YouTube Channels

When Lena joined a fast-growing media startup as a marketing lead, YouTube quickly became her biggest asset and her biggest headache. Her team followed dozens of creators, partner brands, and niche channels. Every new video could mean a content opportunity, a cross-promo, or a trend they needed to catch early.

But there was a catch. To track everything, Lena was:

  • Manually checking channels every morning
  • Copying links into spreadsheets
  • Trying to wire up various RSS tools that kept breaking

Her developers suggested using the official YouTube Data API, but that meant:

  • Setting up a Google Cloud project
  • Managing API keys and quotas
  • Constantly worrying about rate limits and maintenance

For quick, flexible monitoring of public channels, it felt like overkill.

What Lena really wanted was simple: “Give me reliable RSS feeds for any public YouTube channel, in multiple formats, without dealing with Google Cloud or custom code.”

The Discovery: An n8n Template That Promised a Shortcut

Lena had already been using n8n for email and CRM automations, so one late evening, while scrolling through community templates, a title caught her eye:

YouTube Advanced RSS Feeds Generator

The description sounded almost too good to be true:

  • Accepts a channel username, channel ID, video URL, or video ID
  • Resolves the channel ID using a lightweight third-party token method, no Google API key required
  • Generates 13 output RSS URLs, including:
    • 6 feed formats for channel videos
    • 6 feed formats for channel community posts
    • The official YouTube XML feed
  • Supports HTML, Atom, JSON, MRSS, Plaintext, and Sfeed via RSS-Bridge

If it worked, it could replace her daily manual checks with a single automated workflow.

Behind The Curtain: How The Workflow Actually Works

Lena was curious. She did not just want a magic box, she wanted to understand what was happening inside. So she opened the workflow in n8n and started to follow the nodes like a story.

The Entry Point: A Simple Form Trigger

At the beginning of the workflow sat a Form Trigger node. This was where the entire process started. It was designed to accept any of the following:

  • Channel username (for example @username or username)
  • Channel ID (starting with UC)
  • Video URL (like youtube.com/watch?v=... or youtu.be/...)
  • Video ID (the 11+ character video identifier)

Lena realized this meant her team could paste in almost anything they grabbed from YouTube, and the workflow would figure out the rest.

The First Challenge: Understanding The Input

Next came the Validation Code node. This was the “brain” that parsed the input and decided what type it was. It checked whether the user had submitted:

  • A username
  • A channel ID
  • A video URL
  • A raw video ID

Once the type was determined, the workflow passed the result to a Switch node. This node acted like a traffic controller:

  • If it was a username, route to username lookup
  • If it was a video ID, route to video-based lookup
  • If it was already a channel ID, skip lookups and go direct

So far, everything was still internal. No API keys, no Google Cloud setup, just smart parsing and routing.

The Clever Workaround: Temporary Token + Helper Service

The part that intrigued Lena the most was how the template resolved a channel ID without using the official YouTube API.

She found two key pieces:

  • Get Temporary Token – a lightweight HTTP request to a helper service that returns a token required by a public channel-info endpoint.
  • HTTP Request (commentpicker) – an HTTP node that uses this token to query a third-party helper service and retrieve channel metadata, including the channel ID.

This small chain effectively turned usernames or video IDs into a reliable channel ID, without any Google API key. It was a free third-party workaround, not an official integration, but for Lena’s use case it was exactly the low-friction solution she needed.

Turning Raw Data Into Feeds

Once the channel ID was resolved, the workflow finally started to generate the feeds Lena cared about.

The Set nodes came into play here. They were responsible for constructing feed URLs in different formats:

  • Official YouTube XML feed:
    • https://www.youtube.com/feeds/videos.xml?channel_id=...
  • 6 RSS-Bridge video feed formats:
    • HTML
    • Atom
    • JSON
    • MRSS
    • Plaintext
    • Sfeed
  • 6 RSS-Bridge community feed formats:
    • HTML
    • Atom
    • JSON
    • MRSS
    • Plaintext
    • Sfeed

To bring everything together, the workflow used Aggregate and Merge nodes. These combined all generated URLs into a single response payload. Finally, a node titled Format response as HTML table transformed that payload into a neat, clickable HTML table.

That table was sent back to the form responder, ready for Lena or anyone on her team to copy, click, or plug into other tools.

The Turning Point: Lena Runs Her First Test

Armed with a basic understanding of the workflow, Lena decided it was time to try it with a real channel.

Step 1: Import And Activate The Workflow

She imported the template into her n8n instance, checked the nodes, and activated it. For her first run, she chose to execute it manually.

Step 2: Open The Form And Paste A Channel

She opened the exposed form URL from the Form Trigger node and pasted:

https://www.youtube.com/@NewMedia_Life

She hit submit and watched the execution in n8n’s editor. The nodes lit up in sequence:

  • Form Trigger received the input
  • Validation Code identified it as a username-style channel URL
  • Switch sent it to the username resolution path
  • Get Temporary Token fetched the token
  • HTTP Request (commentpicker) returned the channel metadata
  • Set nodes built all the RSS URLs
  • Aggregate & Merge combined them
  • Format response as HTML table produced the final output

Step 3: The Result

The form response page now showed a tidy HTML table. Inside were:

  • 1 official XML feed for the channel’s videos
  • 6 RSS-Bridge video feeds in different formats
  • 6 RSS-Bridge community feeds in matching formats

For the first time, Lena had a complete set of feeds for a channel, including community posts, without touching Google Cloud. She could use:

  • The XML feed for standard RSS readers
  • The JSON or MRSS outputs for programmatic consumption in her automations

Why RSS-Bridge Became The Secret Weapon

As Lena explored the generated URLs, she noticed that most of them pointed to RSS-Bridge. She looked it up and realized why the template relied on it.

RSS-Bridge is an open-source project that converts many websites, including YouTube, into various feed formats. By pairing the official YouTube XML feed with RSS-Bridge URLs, the workflow gave her:

  • Flexible formats for different tools and readers
  • A way to consume both video uploads and community posts
  • Options for HTML previews, JSON for scripts, or MRSS for media-heavy workflows

It was not just about one feed anymore. It was about a complete, multi-format feed toolkit for each channel.

From One-Off Test To Repeatable Automation

Once the first test worked, Lena immediately started thinking bigger.

Scheduling And Notifications

She realized she could schedule this workflow in n8n to:

  • Check feeds for new videos on a regular interval
  • Send updates to Slack or Discord whenever a new video appeared
  • Email her editorial team with a daily digest of new uploads
  • Store feed data in a database for long term analysis

Caching And Performance

To avoid hitting the helper service too often, she considered:

  • Caching resolved channel IDs in a Set node or external database
  • Reusing stored IDs instead of resolving them every time
  • Adding delays or rate limiting if she bulk processed many channels

Advanced Filtering

The template also hinted at something more advanced. By extending RSS-Bridge query parameters, she could:

  • Filter videos by upload date
  • Limit by duration range
  • Filter by specific keywords

What started as a simple “get me a feed” workflow was slowly turning into a customizable YouTube monitoring system.

Limitations, Risks, And When To Use The Official API

Lena was happy, but she was also responsible. Before rolling this out across the company, she needed to understand the tradeoffs.

Common Issues She Had To Keep In Mind

  • Helper endpoint downtime: If the third-party channel resolver became unavailable, the workflow would fail. The fix would be to:
    • Switch to another helper service
    • Host an internal resolver microservice
  • Input not recognized: If someone pasted malformed data, the Validation Code node might not classify it correctly. The best practice was to:
    • Ensure channel IDs start with UC
    • Use clean, alphanumeric usernames
    • Stick to supported YouTube URL formats
  • Private or restricted channels: The workflow only worked for public channels. It did not bypass any permissions or provide admin access.

Security And Reliability Considerations

The template used a free third-party workaround for resolving channel information. That made setup easy but introduced a dependency that Lena did not fully control.

For mission-critical or large scale automations, she noted that it might be safer to:

  • Replace the helper token service with an internal microservice
  • Or migrate the resolution step to the official YouTube Data API using her own API key and quota management

Either way, the workflow structure would remain useful. She could simply swap out the resolution nodes and keep all the feed generation logic intact.

Best Practices Lena Adopted

As she integrated the template into her team’s stack, Lena followed a few best practices to keep everything stable and maintainable:

  • Validating and sanitizing all input inside the Validation Code node to avoid malformed requests
  • Respecting rate limits when bulk resolving channels, with caching and small delays
  • Monitoring the helper service for changes and keeping a backup resolver ready

These small steps helped keep the automation reliable as more teams started to rely on it.

The Resolution: From Manual Chaos To Structured Automation

Within a few weeks, Lena’s workflow had quietly become one of the most valuable pieces of automation in her marketing stack.

Her team no longer:

  • Manually checked dozens of YouTube channels daily
  • Copied and pasted video links into spreadsheets
  • Missed important community posts or uploads

Instead, they had:

  • Official YouTube XML feeds for each tracked channel
  • Additional RSS-Bridge feeds in formats tuned for different tools and scripts
  • Scheduled n8n workflows that pushed updates to Slack, email, and dashboards

All of this started with a single n8n template that took a simple input like @NewMedia_Life or a video URL, and returned a full suite of feeds in a clean HTML table.

Try The Same Workflow In Your Own Stack

If you find yourself in a situation like Lena’s, juggling multiple public YouTube channels and trying to track everything manually, this n8n template can save you hours every week.

How To Get Started

  1. Import the YouTube Advanced RSS Feeds Generator template into your n8n instance.
  2. Activate it, or run it manually for a first test.
  3. Open the exposed Form Trigger URL and paste:
    • A channel username or URL
    • A channel ID
    • A video URL
    • Or a raw video ID
  4. Submit and review the generated HTML table with all your RSS URLs.

From there, you can extend it just like Lena did: add scheduling, notifications, caching, or even swap in your own resolver or the official YouTube API if your needs grow.

Resources To Go Deeper

Next Step:

Automated Meeting Scheduler with n8n & OpenAI

Automated Meeting Scheduler with n8n & OpenAI

Manual meeting coordination is a classic time sink for operations and technical teams. Parsing free-text requests, checking calendars, avoiding conflicts, and sending confirmations all introduce friction and context switching. Using n8n with an OpenAI-based agent, you can automate this entire workflow end to end: interpret natural-language scheduling requests, validate availability in Google Calendar, create events, and send confirmation emails, all within a single orchestrated automation.

This guide walks through a production-ready meeting scheduler built on n8n. It uses an OpenAI agent (configured in a LangChain-like pattern) together with Google Contacts, Google Calendar, and Gmail. The result is a robust, extensible scheduling system that can be adapted to your internal processes and compliance requirements.

Business value of automated scheduling

For organizations that handle frequent customer calls, demos, or internal meetings, automating scheduling is a straightforward way to reduce operational overhead. An n8n-powered scheduler delivers:

  • Lower coordination overhead by eliminating back-and-forth emails to find suitable times.
  • Reduced double-bookings through automatic calendar conflict checks.
  • Centralized audit trail with a single, automated source of truth for invitations and responses.
  • Natural-language flexibility using AI to interpret unstructured scheduling requests from email, forms, or call transcriptions.

For automation professionals, this pattern is also a reusable blueprint for other AI-assisted workflows that blend natural language understanding with deterministic business logic.

Architecture overview

The workflow is implemented as an n8n pipeline that starts with a webhook trigger, hands off interpretation to an OpenAI agent, and then uses Google services as tools for contact lookup, availability checks, event creation, and notifications.

Core components and nodes

  • Webhook – Entry point for scheduling requests, accepting JSON payloads from forms, systems, or transcription services.
  • Edit Fields – Normalizes and maps incoming payloads into a consistent schema for the agent.
  • Meeting Scheduler (AI agent) – An OpenAI-driven agent configured with tool access to Google Contacts, Google Calendar, and Gmail.
  • OpenAI Chat Model – The underlying LLM that interprets the request and orchestrates tool calls.
  • Google Contacts – Resolves attendee information and email addresses from contact data.
  • Search Calendar Events – Queries Google Calendar for existing events to check availability.
  • Create Calendar Event – Creates the final meeting in the target Google Calendar.
  • Gmail – Sends confirmation or follow-up emails to the requester and other participants.
  • Respond to Webhook – Returns a structured response payload to the original caller or upstream system.

End-to-end flow: how the scheduler operates

1. Ingest scheduling requests via webhook

The process begins with the Webhook node, which exposes an HTTP endpoint. Any client that can send JSON can initiate a scheduling request. Typical sources include:

  • Web forms or internal tools submitting structured data.
  • Customer support systems sending ticket details.
  • Voice transcription services posting call transcripts.

Example request payload:

{  "requester": "alex@example.com",  "text": "Can we meet next Tuesday afternoon for a 30-minute product demo?",  "timestamp": "2025-09-10T09:00:00Z"
}

This payload contains the requester identity, the natural-language description of the meeting, and a reference timestamp that can help interpret relative time expressions such as “next Tuesday afternoon”.

2. Normalize and map fields for the agent

Raw inputs often vary across channels. The Edit Fields node standardizes these differences by mapping the incoming fields into a clean set of variables that the agent expects. Typical mappings include:

  • summary or description for the meeting topic.
  • Preferred start and end windows derived from the text or timestamp.
  • requester_email for follow-up and confirmation.
  • Optional metadata such as priority or meeting type.

Defining clear, consistent field names simplifies prompt engineering and reduces ambiguity in the agent’s decision logic.

3. Delegate interpretation and decisioning to the OpenAI agent

The Meeting Scheduler node is configured as an agent that can call specific n8n tools. It uses the OpenAI Chat Model as its language model, guided by a system message that defines its role and constraints.

Within this agent, you grant access to:

  • Google Contacts to resolve attendee details.
  • Search Calendar Events to validate availability.
  • Create Calendar Event to schedule meetings when appropriate.
  • Gmail to send confirmation or clarification emails.

The agent analyzes the natural-language text and any normalized fields, then decides:

  • Which contact(s) to invite using Google Contacts lookup.
  • Which time range(s) to query in Google Calendar for conflicts.
  • Whether it has sufficient information to create an event or should request alternative times.

This pattern combines flexible language understanding with explicit tool boundaries, which is a best practice for production-grade AI workflows.

4. Validate availability using Google Calendar

Before any event is created, the workflow checks the calendar. The agent calls the Search Calendar Events node with a timeMin and timeMax window that reflects the proposed slot, for example “next Tuesday afternoon” resolved into concrete timestamps.

Key behaviors at this stage:

  • If the Search Calendar Events node returns conflicting events, the agent can propose alternate windows and respond accordingly.
  • If no conflicts are detected, the workflow proceeds to event creation.

For high-volume environments, it is advisable to perform a final availability check immediately before creating the event to avoid race conditions.

5. Create the calendar event and send notifications

Once a free slot is confirmed, the agent triggers the Create Calendar Event node. This node writes the finalized meeting to Google Calendar, including:

  • Title or summary derived from the request context.
  • Start and end time in the correct timezone.
  • Attendees resolved via Google Contacts.
  • Optional description or agenda items.

After successful creation, the workflow uses the Gmail node to send confirmation emails. Typical patterns include:

  • A confirmation email to the requester with event details and calendar link.
  • An optional notification to the organizer or internal team.

Finally, the Respond to Webhook node returns a structured JSON response to the caller, indicating success or failure, the chosen time, and any relevant metadata. This makes integration with upstream systems straightforward.

Credential configuration and required permissions

For the workflow to run reliably, correct credentials and API scopes are essential. Configure the following in your Google Cloud and n8n environment:

  • Enable APIs in Google Cloud Console:
    • Google Calendar API
    • Gmail API
    • People API (for Google Contacts)
  • Create OAuth 2.0 Client credentials and add your n8n instance’s redirect URI.
  • In n8n, create:
    • Google OAuth credentials with scopes that cover Calendar and Contacts.
    • Gmail credentials for sending email, or a single Google OAuth credential that includes both calendar and Gmail scopes.
  • OpenAI access:
    • Provide your OpenAI API key to the OpenAI Chat Model node.

Validate that scopes include at least calendar.events and gmail.send to avoid runtime errors when creating events or sending emails.

Designing effective agent prompts and guardrails

The reliability of the workflow depends heavily on the agent’s system prompt. Clear, explicit instructions help constrain behavior and reduce unexpected actions. Recommended guidelines to include in the prompt:

  • Only search Google Contacts using the exact name field provided by the user.
  • Always check calendar availability via the designated calendar before creating any event.
  • Send a confirmation email to the requester after a successful booking.
  • Return a structured JSON response describing actions taken and any follow-up requirements.

Example system message for the agent configuration:

You are a meeting-scheduling assistant. Use the Google Contacts tool to find an attendee by the exact name provided. Check the specified Google Calendar for conflicts before creating an event. If the requested time is free, create the event and send a confirmation email to the requester. Always return a structured JSON response describing the action taken.

For production use, consider iterating on this prompt with real-world test cases and logging to refine behavior and error handling.

Implementation best practices

Time handling and consistency

  • Normalize timezones: Convert all incoming timestamps to the calendar’s canonical timezone before searching or creating events. This avoids subtle off-by-one-hour errors, especially around daylight saving changes.
  • Use reference timestamps: When interpreting phrases like “next Tuesday afternoon”, use the timestamp field from the payload as the reference point.

Concurrency and reliability

  • Avoid race conditions: If you anticipate concurrent requests, perform a final Search Calendar Events call just before Create Calendar Event to confirm that the time slot is still free.
  • Graceful fallbacks: When the agent is uncertain about the correct contact or time, instruct it to request clarification instead of making assumptions that could create incorrect invites.
  • Monitoring and observability: Add logging nodes or dedicated branches for error handling to track failed OAuth refreshes, API rate limits, or unexpected agent outputs.

Troubleshooting common issues

If events are not being created or emails are not sent as expected, verify the following:

  • Scopes and credentials:
    • Confirm that the Google OAuth token includes calendar.events and gmail.send scopes.
    • Ensure that the correct Google account is connected in n8n.
  • Payload integrity:
    • Inspect the output of the Webhook and Edit Fields nodes to confirm that fields are correctly mapped and formatted.
  • Agent behavior:
    • Review agent logs or debug output to confirm that it is calling Google Contacts, Calendar, and Gmail as intended.
    • Check the system prompt for overly vague instructions that might lead to skipped actions.

Security and privacy considerations

Meeting scheduling often involves personal data, including email addresses, names, and potentially sensitive topics in the request text. Treat this workflow as part of your broader security architecture.

  • Secure the webhook endpoint:
    • Use secret tokens, signatures, or IP allowlists to prevent unauthorized requests.
  • Limit credential scope:
    • Grant only the minimum required Google API scopes and store credentials securely within n8n.
  • Data transparency:
    • Inform users where their data is stored, including calendar entries and email notifications, and comply with relevant data protection regulations.

Extending and customizing the workflow

Once the core scheduler is stable, you can iterate and extend it to better match your organization’s processes.

  • Slot selection interfaces:
    • Integrate a UI that lets invitees choose from AI-proposed slots before finalizing the event.
  • ICS support:
    • Attach ICS files to confirmation emails for recipients who do not use Google Calendar.
  • Context enrichment:
    • Extend the agent to summarize the meeting agenda and attach relevant documentation or links automatically.

Conclusion and next steps

By combining n8n’s workflow orchestration with an OpenAI-driven agent and Google’s productivity APIs, you can build a sophisticated, natural-language meeting scheduler that significantly reduces operational friction. The pattern scales from simple one-on-one bookings to more complex internal scheduling scenarios while remaining transparent and auditable.

Use the template described here as a foundation, then refine the agent prompt, error handling, and logging to align with your organization’s standards. Over time, this workflow can evolve into a central scheduling service for multiple teams and tools.

Call to action: Deploy this workflow in your n8n instance, import the template, connect your Google and OpenAI credentials, and test with representative scheduling requests. For a downloadable template or tailored support in adapting this flow to your environment, subscribe to our newsletter or contact our team.

Build an AI Email Assistant with n8n & Gmail

Build an AI Email Assistant with n8n & Gmail

Your inbox does not have to run your day. With the right automation, it can quietly support your focus instead of constantly demanding it. In this guide, you will turn a busy Gmail inbox into a calm, organized system using an n8n workflow template that listens for new messages, classifies them with LangChain and OpenAI, labels and organizes them, drafts replies, and taps into Supabase and Google Sheets for context-aware responses.

Think of this workflow as your first step toward a more automated, intentional workday. You stay in control, while your AI email assistant handles the repetitive parts.

From inbox overload to intentional focus

Email is often where focus goes to die. Messages pile up, priorities blur, and important conversations get buried under newsletters and notifications. You probably know the feeling of:

  • Spending too much time sorting, labeling, and triaging messages
  • Writing the same types of replies over and over
  • Missing opportunities because your inbox is simply too full

Automation with n8n, Gmail, and AI gives you a different path. Instead of reacting to every new email, you can design a system that:

  • Surfaces what truly needs your attention
  • Prepares thoughtful draft replies for you
  • Organizes and labels messages for future workflows and reporting

The workflow you are about to build is not just a technical exercise. It is a mindset shift: from manual, reactive work to deliberate, automated systems that support your growth.

What an AI email assistant can do for you

This n8n AI email assistant template is built to remove friction from your daily communication, while keeping you firmly in the loop. Once configured, it can:

  • Automatically categorize incoming Gmail messages into clear buckets such as Reply Required, Action Required, Invoices, and Marketing
  • Create draft replies using OpenAI, ready for your quick review or approval
  • Apply Gmail labels and mark messages as read to keep your inbox clean and searchable
  • Use context from Google Sheets or a Supabase vector store to personalize and enrich responses

Instead of wondering where to start every time you open Gmail, you will see a curated, labeled inbox and a set of AI-generated drafts that move conversations forward faster.

How the n8n email assistant template works

At its core, this workflow is a set of n8n nodes working together to watch your Gmail, understand each message, and respond intelligently. Here is the high-level flow you will be building:

  • Gmail Trigger – Listens for new incoming emails
  • Set (Get Message Info) – Extracts key fields like From, Subject, Body, and Message ID
  • LangChain Text Classifier – Classifies the message into categories you define
  • Gmail nodes – Add labels, mark messages as read, and manage drafts
  • OpenAI Chat Model nodes – Generate professional draft replies
  • AI Agent – Coordinates drafting, storing Gmail drafts, labeling, and marking messages as read
  • Google Sheets – Optionally enrich replies with lead or account data
  • Embeddings + Supabase Vector Store – Store and query contextual data to make replies smarter

Individually, these are simple building blocks. Together, they form a powerful pattern you can reuse across many workflows: trigger, enrich, classify, act, and store context.

Step-by-step: building your AI email assistant in n8n

Now let us turn the concept into a working automation. You can follow these steps using the provided n8n template or recreate the flow node by node. Either way, you will end up with a repeatable system you can refine over time.

1. Start with the Gmail Trigger

Begin by adding a Gmail Trigger node. This node is the entry point of your workflow and will fire whenever a new email arrives that matches your criteria.

Configure it as follows:

  • Connect your Gmail OAuth2 credentials in n8n
  • Choose your preferred trigger mode, such as polling at a specific interval or using push / webhook if available
  • Set filters to limit which emails are processed, for example:
    • Only unread messages
    • Messages with specific labels

This filtering step is crucial. It keeps your automation focused and prevents the workflow from processing every single message in your account.

2. Extract the message data you care about

Next, add a Set node, often called Get Message Info in this template. This is where you map the raw Gmail trigger data into clear, reusable fields.

From the trigger payload, extract values such as:

  • From
  • Subject
  • Body
  • Message ID

These fields will feed into your AI prompts, classification logic, and Gmail operations. Clean, well-structured data here makes the rest of the workflow easier to maintain.

3. Classify each email with LangChain

With the message details ready, connect a LangChain Text Classifier node. This is where your workflow starts to think about each email, instead of treating them all the same.

Configure the classifier to evaluate the email content against predefined categories, for example:

  • Reply Required
  • Action Required
  • Marketing Emails
  • Invoices

Provide clear category descriptions in your classifier configuration, such as:

  • “Does this message require a reply?”
  • “Is this a marketing email?”

The classifier output lets your workflow branch intelligently. You might, for instance:

  • Send marketing emails to a specific label without drafting replies
  • Only generate AI drafts for messages that truly require a response
  • Route invoices into a finance-related label for later processing

4. Label and route messages in Gmail

Once an email has been classified, you can use the result to organize your inbox automatically. Connect the classification outputs to Gmail addLabels nodes.

Examples of useful label logic include:

  • Apply a Reply Required label when the classifier says a response is needed
  • Attach an Invoices label to financial or billing messages
  • Keep marketing or low-priority messages grouped under a dedicated label

These labels are more than visual tags. They become anchors for future automations, filters, and dashboards.

5. Generate AI draft replies with OpenAI

For messages that need a response, it is time to let AI help you write. Route the relevant branches into an OpenAI Chat Model node or into an AI Agent that wraps the chat model and Gmail tools.

Provide a focused system prompt. For example:

You are a helpful assistant. Write a brief, professional reply to the email below. Keep it under 5 sentences and include any requested next steps.

From: {{ $json.From }}
Subject: {{ $json.Subject }}
Body: {{ $json.Body }}

Let the model generate both the subject and body of the reply. Then use n8n’s $fromAI helper to map the model outputs into the fields required by the Gmail Draft node.

This is where the time savings become very tangible. Instead of starting from a blank screen, you review and tweak a solid draft that already reflects the original message and your instructions.

6. Save the draft, mark the email as read, and finalize labels

With your AI-generated reply ready, add a Gmail tool node to create an actual draft in Gmail. Map the AI-generated subject and message body into the appropriate fields.

After the draft is created, chain additional Gmail operations to:

  • Mark the original message as read, once it has been processed
  • Add any final labels that indicate the email has been handled or is awaiting your quick review

These steps help your inbox reflect reality. You will see at a glance which emails have drafts waiting, which ones are fully processed, and where your attention is still required.

7. Personalize replies with Google Sheets and Supabase

To move from generic replies to deeply relevant responses, integrate your existing data sources.

Use a Google Sheets node to pull rows that match the sender or subject. This can provide:

  • Lead details
  • Account status
  • Customer preferences or notes

For more advanced context, connect Embeddings (OpenAI) with a Supabase Vector Store:

  • Create embeddings from email texts, documents, or previous interactions
  • Store them in Supabase for long-term semantic search
  • Query relevant entries at runtime to give the AI concrete policies, past conversations, or FAQs to reference

This combination turns your email assistant into a context-aware companion that can respond with the nuance of your existing knowledge base.

Prompting tips for better AI email replies

Strong prompts are the difference between average and excellent AI responses. As you refine your workflow, experiment with:

  • Always including a clear system instruction that defines role, tone, and length constraints
  • Passing structured context such as From, Subject, Body, and any row lookups from Google Sheets
  • Testing with multiple real examples, such as common customer questions, invoice notices, and marketing emails
  • Iterating on your classifier categories and prompts as you see how the model behaves

Think of prompting as an ongoing design process. Each small improvement compounds into more accurate, more helpful replies.

Security and privacy: build with confidence

Automating email means handling sensitive information, so it is important to design responsibly. As you implement this n8n template, keep these practices in mind:

  • Limit the data you send to OpenAI and other external services, and redact personally identifiable information if it is not required
  • Use least-privilege credentials for Gmail and Google Sheets so the workflow only has access to what it truly needs
  • Store API keys, OpenAI secrets, and Supabase credentials securely using n8n’s credentials storage
  • Log actions thoughtfully and avoid storing unnecessary sensitive content in external vector stores

By designing with privacy in mind from the start, you can scale your automation without compromising trust.

Testing, debugging, and building confidence

Before you let your new assistant touch your main inbox, give it a safe space to grow.

  • Start with a test Gmail account or a small subset of emails
  • Add debug nodes or manually execute nodes in n8n to inspect outputs at each step
  • Use temporary labels such as n8n-test so you can quickly identify which messages the workflow has touched

This gradual approach lets you adjust prompts, labels, and thresholds until you are happy with the results, then confidently roll it out to your primary account.

Common pitfalls and how to overcome them

Every automation journey includes a few bumps. Here are typical issues and how to address them:

  • Duplicate triggers
    If messages are processed more than once, tighten your Gmail Trigger filters. Use labels or the “mark as read” step to ensure that already-processed emails do not fire the workflow again.
  • Model hallucinations
    If AI replies occasionally invent details, constrain your prompts. Explicitly instruct the model to only use verified data from Google Sheets or the vector store, and to say when information is not available.
  • Rate limits
    When you hit OpenAI or Gmail rate limits, consider batching operations, adding delays, or throttling your workflow. Monitor usage so you can scale gracefully.

Each fix strengthens your workflow and teaches you something valuable for future automations.

Advanced ideas to grow your automation

Once the core template is running smoothly, you can extend it to match your unique workflow and goals. For example, you can:

  • Auto-reply to low-risk messages, such as simple confirmations, while saving drafts for higher-risk or sensitive conversations that need human review
  • Integrate Slack or Microsoft Teams notifications for messages classified as urgent, so the right person is alerted instantly
  • Create a runtime dashboard in Google Sheets or Notion that lists processed messages, categories, and AI decisions for easy auditing
  • Use supervised data to fine-tune your classification thresholds and category definitions over time

Every improvement you make here becomes a reusable pattern for future automations in sales, support, operations, and more.

Bringing it all together

This n8n AI email assistant template brings together Gmail, LangChain, OpenAI, Google Sheets, and Supabase into one cohesive workflow. It listens to new messages, classifies them, labels and organizes them, generates AI-powered draft replies, and stores context for smarter responses in the future.

The result is not just a tidier inbox. It is a foundation for a more focused, scalable way of working. You reclaim time, reduce cognitive load, and build a system that grows with you.

To start using the exact workflow described here, import the provided n8n JSON into your n8n instance. Then connect your Gmail, OpenAI, Google Sheets, and Supabase credentials, and test everything with a dedicated inbox first.

Your next step: experiment, customize, and expand

You now have a practical path from idea to implementation. The most important step is the next one you take.

  • Import the n8n AI email assistant template
  • Adjust classifier categories to reflect your real-world priorities
  • Refine AI prompts so replies sound like you or your brand
  • Iterate as you observe how the system behaves on real emails

Every small tweak is an investment in a workflow that serves you, your team, and your customers better.

Happy automating, and enjoy the feeling of opening an inbox that finally works for you.

Automate Client Feedback with n8n, LangChain & HubSpot

Automate Client Feedback with n8n, LangChain & HubSpot

Modern support, success, and product teams need a reliable way to capture client conversations, extract the key information, and push it into their CRM and internal communication channels with minimal manual work. This guide documents a reusable n8n workflow template that integrates LangChain, OpenAI, HubSpot, and Gmail (or Mailjet) to automate transcript intake, summarization, CRM note creation, and routing to the correct internal team.

1. Workflow overview

This n8n automation is built around a linear data flow:

  1. Capture the client email address and transcript via an n8n Form Trigger.
  2. Load a configurable list of routing targets (department email addresses) in a Set node.
  3. Use a LangChain summarization node with OpenAI to produce a 2-3 sentence summary.
  4. Invoke a LangChain Router Agent to determine which department should be notified and to generate an HTML email body and subject line.
  5. Use HubSpot nodes to look up the contact and store the summary as a meeting engagement.
  6. Send the generated HTML email to the selected department via Gmail or Mailjet.
  7. Return a completion message to the user through the form response.

The result is a standardized, repeatable process that turns raw client transcripts into structured meeting notes in HubSpot and delivers context-rich notifications to the right internal stakeholders.

2. Architecture and data flow

2.1 High-level architecture

  • Input layer: n8n Form Trigger node collects client email and transcript text.
  • Configuration layer: Set node defines routing targets (Support, Product, Administrative, Commercial).
  • LLM processing layer:
    • LangChain summarization node using OpenAI for concise summaries.
    • LangChain Router Agent using OpenAI (for example, gpt-4o-mini) for intent-based routing and email generation.
  • CRM integration layer: HubSpot nodes to search contacts and create meeting engagements.
  • Notification layer: Gmail or Mailjet node to send HTML emails to the routed department.
  • Response layer: Form completion response in n8n confirming that the workflow executed.

2.2 Data objects and transformations

  • Input fields:
    • client_email (string) – the email address of the client.
    • transcript (string) – full conversation or call transcript.
  • Derived fields:
    • summary (string) – 2-3 sentence LLM-generated summary, same language as the transcript.
    • target_department_email (string) – one of the configured routing emails.
    • email_subject (string) – concise subject line for the internal team.
    • email_body_html (string, HTML) – formatted email body including:
      • Client email prefixed with FROM CLIENT:
      • Original conversation content.
  • HubSpot payload:
    • Contact identifier: looked up by client_email.
    • Engagement type: meeting.
    • Engagement body: summary as the meeting notes text.

3. Node-by-node breakdown

3.1 Form Trigger – client transcript intake

Node type: Form Trigger
Purpose: Collect the client email and the raw conversation transcript.

Key configuration:

  • Define form fields for:
    • Email – client email address.
    • Transcript – full conversation or call transcript text.
  • Expose the form URL to either:
    • Internal support staff who manually paste transcripts, or
    • A transcript provider integration (for example, Fireflies, Zoom, or similar) that can post transcripts into the form endpoint.

Data output: The node outputs a JSON object containing client_email and transcript, which is then passed to subsequent nodes.

3.2 Set node – department routing configuration

Node type: Set
Purpose: Store a centralized mapping of department names to routing email addresses.

Key configuration:

  • Define fields for each routing target, for example:
    • support_email
    • product_email
    • administrative_email
    • commercial_email
  • Use static values or environment variables for email addresses to avoid hardcoding them in prompts.

Benefit: This keeps routing logic maintainable. Updating addresses does not require any changes to the LangChain agent configuration, only to this node.

3.3 LangChain summarization node – transcript summarization

Node type: LangChain (Summarization)
Backend: OpenAI model (for example, gpt-4o-mini or similar)
Purpose: Generate a compact, human-readable summary of the transcript.

Key configuration:

  • Input text: Pass the full transcript from the Form Trigger node.
  • Prompt: Instruct the LLM to:
    • Produce a 2-3 sentence summary.
    • Return the summary in the same language as the input transcript.
  • Output field: Store the result in a field such as summary for later use by the HubSpot node.

Usage: This summary is used as the body of a meeting engagement in HubSpot, providing a concise, searchable record of the interaction.

3.4 LangChain Router Agent – intent-based routing and email generation

Node type: LangChain Agent (Router Agent)
Backend: OpenAI model (for example, gpt-4o-mini)
Purpose: Analyze the conversation content, choose the most appropriate department, and generate an HTML email body and subject line.

Inputs:

  • Full transcript text.
  • Client email address (client_email).
  • Routing email addresses from the Set node:
    • support_email
    • product_email
    • administrative_email
    • commercial_email

System message / instructions: Configure the Router Agent with a system prompt that explicitly instructs it to:

  • Select exactly one person or team to notify from:
    • Product
    • Administrative / invoicing
    • Support
    • Commercial
  • Prepend the client email to the message body with the label FROM CLIENT:.
  • Return:
    • An HTML-formatted email body that includes the client conversation.
    • A clear, concise subject line tailored to the selected department.

Typical outputs:

  • target_department_email – one of the configured routing emails.
  • email_subject – LLM-generated subject.
  • email_body_html – LLM-generated HTML content with:
    • FROM CLIENT: <client_email>
    • The conversation transcript or a formatted version of it.

Routing accuracy advantages: Compared to keyword-based routing, the LLM can interpret intent, tone, and context, so it is more robust when clients use varied phrasing or mix topics. It reduces misrouted tickets and ensures that each issue is handled by the most relevant team.

3.5 HubSpot nodes – search and meeting note creation

Node types: HubSpot Search, HubSpot Create (Engagement)
Purpose: Store the summarized conversation as a meeting note on the correct HubSpot contact.

Step 1: Contact lookup

  • Use a HubSpot search node to query contacts by client_email.
  • If a contact exists, capture its internal identifier for use in the engagement creation step.

Step 2: Create meeting engagement

  • Use a HubSpot node configured to create an engagement of type meeting.
  • Set the engagement body to the summary produced by the LangChain summarization node.
  • Associate the engagement with the found contact.

Result: HubSpot becomes the single source of truth for client interactions, with structured meeting notes that are searchable and available to all customer-facing teams.

3.6 Gmail or Mailjet node – notification delivery

Node type: Gmail or Mailjet (Email send)
Purpose: Deliver the LLM-generated HTML email to the selected internal department.

Key configuration:

  • To: Use target_department_email from the Router Agent output.
  • Subject: Use email_subject generated by the agent.
  • Body: Use email_body_html as the HTML content.

The body should already include the label FROM CLIENT: followed by the client email and the original conversation content, so that the receiving team immediately understands the context.

3.7 Form completion – user feedback

Node type: Form Trigger response / terminal node
Purpose: Return a confirmation message or record that the workflow finished successfully.

This can be as simple as a text confirmation to the staff member or system that submitted the transcript, indicating that the feedback has been processed and routed.

4. Configuration notes and credentials

4.1 Credentials and connections

  • OpenAI / LangChain:
    • Configure OpenAI credentials in n8n for both the summarization node and the Router Agent.
    • Use models such as gpt-4o-mini or another supported model, depending on your performance and cost requirements.
  • HubSpot:
    • Use scoped API credentials with access to contacts and engagements.
    • Ensure the HubSpot nodes are pointed at the correct portal and environment.
  • Gmail / Mailjet:
    • Set up OAuth (for Gmail) or API keys (for Mailjet).
    • Verify sending domains and from-address policies as required.

4.2 Prompt design and routing logic

  • Keep all routing email addresses in the Set node, not directly in the prompt.
  • In the Router Agent system message, explicitly:
    • List the available departments and their email variables.
    • Specify that only one department must be selected per conversation.
    • Instruct the agent to always prepend FROM CLIENT: and the client email to the email body.

4.3 Handling edge cases

While the workflow is designed for straightforward routing, keep in mind:

  • Multi-topic conversations: A single transcript may contain product feedback and billing questions. The existing approach instructs the agent to choose only one department. If needed, you can refine the prompt to prefer certain categories or adjust expectations around routing.
  • Missing contacts in HubSpot: If the HubSpot search does not find a contact, you can:
    • Log the event for follow-up, or
    • Extend the workflow to create a new contact before creating the meeting engagement.
  • Invalid email addresses: If the client email is malformed, the HubSpot search and email routing may fail. Use n8n validation or a simple function node to check email format before proceeding.

5. Testing and validation strategy

Before deploying this n8n workflow into production, test it with a representative set of transcripts.

5.1 Test scenarios

  • Product feedback: Feature requests, UX complaints, usability issues.
  • Support issues: Bug reports, error messages, troubleshooting requests.
  • Administrative inquiries: Invoicing questions, payment failures, billing corrections.
  • Commercial requests: Pricing questions, contract negotiations, discount discussions.

5.2 Validation checklist

  • Verify that the Router Agent:
    • Chooses exactly one department for each input.
    • Uses the correct department email from the Set node.
    • Includes FROM CLIENT: plus the correct client email in the email body.
  • Confirm that HubSpot:
    • Finds the correct contact by email.
    • Creates a meeting engagement with the LLM-generated summary as the body.
  • Check that the selected department:
    • Receives a properly formatted HTML email.
    • Sees both the client attribution and the conversation context clearly.

6. Security and privacy considerations

Client transcripts may contain sensitive or personally identifiable information. When running this workflow in production, follow standard security and privacy practices:

  • Only send data to LLM providers and third-party services that meet your data protection and contractual requirements.
  • Mask or strip highly sensitive data, such as payment card numbers or full identity documents, before sending content to OpenAI or email providers.
  • Use scoped, least-privilege API keys for HubSpot and Gmail / Mailjet, and rotate them regularly.
  • Secure any public endpoints associated with the Form Trigger and log only the minimum data necessary for troubleshooting.

7. Tips to improve routing accuracy

  • Iterate on prompts:

Monitor LinkedIn Updates for HubSpot Clients with n8n

Monitor LinkedIn Updates for HubSpot Clients with n8n

This guide teaches you how to build and understand an n8n workflow that:

  • Monitors LinkedIn activity and job changes for HubSpot contacts
  • Saves a baseline and updates in Google Sheets
  • Sends alert emails via Gmail when something changes

It is especially useful for sales and customer success teams that want automatic notifications when clients post on LinkedIn or change their job titles.


What you will learn

By the end of this tutorial, you will be able to:

  • Connect HubSpot, LinkedIn (via RapidAPI), Google Sheets, and Gmail in n8n
  • Fetch HubSpot owners and their contacts using pagination
  • Maintain a Google Sheets record of each contact’s LinkedIn URL, last post, and current position
  • Use RapidAPI to find LinkedIn profiles and pull profile data
  • Compare new LinkedIn data with stored data and detect changes
  • Send a digest email to each HubSpot owner summarizing updates
  • Scale the workflow safely and troubleshoot common issues

Why automate LinkedIn monitoring in n8n?

Checking LinkedIn manually for dozens or hundreds of clients is slow and unreliable. You might miss an important job change or a post that is a perfect trigger for outreach.

With an automated n8n workflow you can:

  • Track LinkedIn changes in near real time, without manual work
  • Give account owners timely signals to start conversations
  • Centralize data in Google Sheets for reporting and follow-up
  • Free up time for higher-value work instead of profile checking

In this setup, n8n acts as the automation hub that connects:

  • HubSpot for owners and contacts
  • LinkedIn via RapidAPI for profile search and data
  • Google Sheets for storing baseline and updates
  • Gmail for sending alert emails

Relevant keywords for this tutorial: n8n, HubSpot, LinkedIn, Google Sheets, RapidAPI, Gmail alerts, workflow automation.


Concept overview: how the workflow is structured

Before we dive into the steps, it helps to see the big picture. The workflow is organized into several logical stages:

  1. Get HubSpot owners
    Use the HubSpot Owners API to retrieve all owners who are responsible for contacts.
  2. Get contacts for each owner
    For each owner, use the HubSpot Contacts Search API with pagination to fetch their contacts.
  3. Sync contacts with Google Sheets
    Make sure every contact has a row in a Google Sheet and read any existing LinkedIn data.
  4. Find or confirm LinkedIn profile URLs
    Use RapidAPI to search for LinkedIn profiles or to enrich existing LinkedIn URLs.
  5. Retrieve LinkedIn posts and position details
    Call RapidAPI endpoints to get latest posts and current positions for each profile.
  6. Compare with stored data and update the sheet
    Detect changes in last post or job title, then update Google Sheets and flag changes.
  7. Send a Gmail digest per owner
    Aggregate all changes per owner and email them a summary of what changed for their contacts.

Next we will walk through each stage in a more instructional, step-by-step way.


Prerequisites and setup checklist

Before building the workflow in n8n, make sure you have:

  • An n8n instance (self-hosted or cloud)
  • Access to a HubSpot account with API access and OAuth scopes for owners and contacts
  • A Google account with access to Google Sheets
  • A Gmail account for sending alerts
  • A RapidAPI account and key for LinkedIn-related endpoints

In n8n you will create and configure the following credentials:

  • HubSpot OAuth2
  • Google Sheets OAuth2
  • Gmail OAuth2
  • RapidAPI (HTTP Header or similar)

Step 1 – Fetch HubSpot owners and their contacts

1.1 Get the list of HubSpot owners

Start with a HubSpot node that calls the endpoint /crm/v3/owners:

  • Set the resource to Owners
  • Use the Get All operation or a custom API call
  • Use your HubSpot OAuth2 credentials with the required scopes

This gives you a list of owners that you will loop through. Each owner will receive their own digest email at the end.

1.2 Retrieve contacts per owner with pagination

For each owner, you need to query their contacts. HubSpot search returns a limited number of records per page, so pagination is essential.

Use the HubSpot endpoint /crm/v3/objects/contacts/search with:

  • A filter on hubspot_owner_id to get only contacts for the current owner
  • A page size up to 200 items per page
  • The after parameter to handle pagination

In n8n this usually involves:

  • Storing an incremental counter, for example sofar, to track how many contacts you have processed
  • Looping while HubSpot returns more pages, updating the after parameter each time
  • Appending contacts from each page into an array that you will use later

Important tips for this step:

  • Make sure HubSpot OAuth2 has scopes for reading contacts and owners.
  • Add delay nodes if you have many owners or contacts, to avoid rate limit issues.
  • Test pagination with a small owner first to confirm your after and sofar logic is correct.

Step 2 – Prepare and use Google Sheets as your baseline

2.1 Create the Google Sheet structure

Create a Google Sheet that will store one row per HubSpot contact. At minimum include these columns:

  • email
  • linkedin_url
  • last post
  • current position
  • date (for when the last check or update happened)

This sheet will act as both baseline and history. It lets you compare what you saw last time with what you see now.

2.2 Configure Google Sheets in n8n

In n8n:

  • Set up Google Sheets OAuth2 credentials
  • Use a configuration or Set node to store the sheet URL, so it is easy to reuse

2.3 Ensure each contact has a row

For every HubSpot contact you retrieved:

  • Use a Google Sheets node with an appendOrUpdate style operation
  • Use the email column as the unique key

The goal is:

  • If a contact does not exist in the sheet, create a new row with at least their email
  • If a contact already exists, update the row instead of duplicating it

2.4 Read the existing row for comparison

Next, use a Google Sheets get rows or similar operation to:

  • Fetch the row for the current contact
  • Read the existing values for linkedin_url, last post, and current position

These values will be used later to detect changes in LinkedIn posts or job titles.


Step 3 – Find and validate LinkedIn profile URLs with RapidAPI

3.1 Configure RapidAPI credentials

In n8n, create a credential for RapidAPI that includes your API key, usually sent in an HTTP header such as X-RapidAPI-Key. Also set the correct host header for the LinkedIn API you are using.

Keep in mind:

  • RapidAPI often has rate limits, so you may need delay nodes between calls
  • API calls may incur costs depending on your RapidAPI plan

3.2 Strategy when no LinkedIn URL is stored

If the Google Sheet row does not have a linkedin_url, the workflow tries to find it using the contact’s details:

  • Search by first name, last name, and company using a LinkedIn search endpoint on RapidAPI
  • Parse the search results to find the most likely profile URL for that person

If a suitable URL is found, the workflow can write that linkedin_url back into the sheet so it is available for future runs.

3.3 Strategy when a LinkedIn URL already exists

If the row already contains a linkedin_url, the workflow:

  • Uses a RapidAPI endpoint that takes the profile URL as input
  • Retrieves detailed profile information and recent activity

If RapidAPI fails to find or resolve the profile, you can choose to:

  • Leave the existing row unchanged
  • Log the error for troubleshooting
  • Retry in a later run

Step 4 – Retrieve LinkedIn posts and position data

Once the profile is identified (either found via search or confirmed via URL), use the relevant RapidAPI LinkedIn endpoint to pull profile data.

The example workflow typically extracts:

  • The latest post text from the user’s recent LinkedIn posts
  • The current position title from the user’s profile positions

These two pieces of information are then compared to the values stored in Google Sheets:

  • last post column in the sheet
  • current position column in the sheet

You can also store additional fields if your RapidAPI response includes them, but the core logic focuses on post text and job title.


Step 5 – Compare LinkedIn data and update Google Sheets

5.1 Detect changes

For each contact, the workflow compares:

  • New latest post text vs. the last post stored in the sheet
  • New current position title vs. the current position stored in the sheet

If either value is different, the workflow:

  • Updates the corresponding columns in the Google Sheet
  • Updates the date column to indicate when the change was detected
  • Sets flags such as post_updated or position_updated for later use

5.2 Build a dataset for notifications

As the workflow processes contacts, it collects all updates in a single dataset keyed by email. This dataset includes:

  • Contact email
  • Whether a post changed, a position changed, or both
  • Possibly the new post text or new job title
  • The associated HubSpot owner

This aggregation is important so that each owner receives one digest email summarizing all changes for their contacts, instead of many small emails.


Step 6 – Generate digest and send Gmail notifications

6.1 Create a human-readable digest

Use a Code node in n8n to transform the collected update data into a readable summary. For example, the digest can include sections like:

  • Contacts with new LinkedIn posts listing email addresses and possibly excerpts
  • Contacts with job title changes listing old and new positions

The Code node loops through the aggregated dataset and builds a text or HTML string that will become the email body.

6.2 Send the email using Gmail

Next, add a Gmail node configured with OAuth2 credentials:

  • Set the recipient to the owner’s email address, which you can define in a Set node or map from HubSpot owner data
  • Use a clear subject line, for example “LinkedIn updates for your HubSpot contacts”
  • Use the digest text from the Code node as the email body

Before running this at scale, test with a small subset of contacts and one owner to confirm that:

  • The email content is correct
  • Only the relevant updates are listed
  • The formatting is readable

Scaling, reliability, and best practices

Run owners independently

For larger teams, it is often better to process owners in isolation:

  • Use n8n’s “each” execution mode or similar patterns to run one owner per execution
  • This prevents a single long-running workflow from blocking everything

Respect API rate limits

Both HubSpot and RapidAPI can enforce rate limits. To avoid problems:

  • Add Delay nodes between API calls when processing many contacts
  • Monitor execution times and API responses for rate-limit errors
  • Use n8n’s scheduling to spread calls over time if needed

Logging and error handling

To make the workflow easier to maintain:

  • Wrap sensitive sections in try/catch blocks inside Code nodes
  • Write error details to a separate Google Sheet or logging service
  • Include the contact email and owner in error logs for easier debugging

Security of credentials

Keep your credentials safe:

  • Always store API keys and OAuth tokens in n8n’s credential store
  • Do not hardcode secrets directly into nodes or Code nodes
  • Limit scopes for OAuth apps to only what is needed

Troubleshooting common issues

  • Empty RapidAPI search results
    Check that:
    • The RapidAPI host header is correct
    • You are passing the right query parameters, such as firstName, lastName, and company
    • Your RapidAPI key is valid and has quota
  • Pagination appears stuck
    Verify that:
    • You increment your after or sofar parameter correctly
    • You stop the pagination loop when there are no more results from HubSpot
    • You are not accidentally reusing the same page token
  • Authentication errors
    For HubSpot, Gmail, or Google Sheets:
    • Reauthorize the OAuth2 credentials in n8n
    • Check that the required scopes (contacts,

n8n Webhook → GraphQL Country Lookup

n8n Webhook → GraphQL Country Lookup: Turn a Simple API Into a Powerful Automation

Every automation journey starts with a small, practical step. This n8n workflow is one of those steps. It takes a simple idea – look up country information from a code – and turns it into a reusable, reliable building block you can plug into bigger systems.

In this guide, you will walk through a compact n8n workflow that:

  • Accepts a country code through a webhook
  • Queries a public GraphQL API for country details
  • Returns a clear, human friendly response

It is a tiny workflow with big potential. Use it for quick lookups, demos, internal tools or as the first step toward more advanced automations that save you time and mental energy.

From Manual Lookups To Automated Clarity

Think about how often you or your team need country related information. It might be when:

  • Enriching user profiles with country details on signup
  • Validating customer data in forms or CRMs
  • Building small internal tools for support or sales
  • Creating demos or prototypes that need geographic context

Doing this manually or writing custom scripts every time is distracting and repetitive. With n8n and this GraphQL country lookup template, you turn a boring task into a reusable microservice.

The mindset shift is simple but powerful: instead of asking “How do I do this again?” you start asking “How can I automate this so I never have to think about it again?”

The Mindset: Start Small, Build Momentum

You do not need a massive, complex automation to see value. This workflow is intentionally small. It is made of only four nodes, yet it teaches you how to:

  • Receive external data through a Webhook
  • Call a GraphQL API from n8n
  • Parse JSON responses in a Function node
  • Shape the output to match your needs

Once you understand this pattern, you can reuse it everywhere. Today it is country information. Tomorrow it might be user enrichment, CRM syncing or internal dashboards. Each small workflow builds your confidence and frees more of your time for deep, meaningful work.

What This n8n Workflow Actually Does

At its core, the template connects a webhook to a public GraphQL API and formats the response. The node chain looks like this:

  1. Webhook – receives an HTTP GET request with a code query parameter, for example ?code=us
  2. GraphQL – calls https://countries.trevorblades.com/ with a query that uses this country code, converted to uppercase
  3. Function – parses the GraphQL JSON response and extracts the country object
  4. Set – builds a human friendly string that includes the country name, emoji and phone code

The result is a neat response like:

The country code of United States 🇺🇸 is 1

Simple, clear, and ready to plug into other systems.

What You Need Before You Start

You only need a few basics to follow along and adapt this workflow:

  • An n8n instance (cloud or self hosted)
  • Basic familiarity with n8n nodes and expressions
  • Optional tools like curl or a browser to test the webhook URL

If you are new to n8n, this is a perfect first template to explore. If you are experienced, it is a fast way to spin up a handy microservice.

Step 1: Receiving Data With The Webhook Node

The journey starts with the Webhook node. This is your workflow’s entry point, the place where other apps, scripts or services send the country code.

The Webhook node in this template is configured to:

  • Accept an HTTP GET request
  • Expose the query parameter code at query.code

So if you call:

https://your-n8n-host/webhook/webhook?code=us

the Webhook node will make us available to the rest of the workflow as {{$node["Webhook"].data["query"]["code"]}}.

This pattern is very powerful. Once you are comfortable with it, you can trigger workflows from almost anywhere with a simple HTTP request.

Step 2: Querying The GraphQL API

Next, the GraphQL node turns that country code into real data. It calls the public API at https://countries.trevorblades.com/ and injects the incoming code into a GraphQL query.

The node uses an expression to uppercase the code, because the API expects uppercase country codes:

query {  country(code: "{{$node["Webhook"].data["query"]["code"].toUpperCase()}}") {  name  phone  emoji  }
}

This query requests three fields:

  • name – the full country name
  • phone – the phone calling code, for example 1 for the US
  • emoji – the country flag emoji

At this point, you already have a working Webhook to GraphQL integration. You are no longer manually looking up country data, n8n is doing it for you.

Step 3: Parsing The GraphQL Response In A Function Node

The GraphQL node returns its data as a JSON string inside items[0].json.data. To make this easy to use in later nodes, the template uses a Function node to parse and simplify the response.

The Function node runs this code:

items[0].json = JSON.parse(items[0].json.data).data.country;
return items;

This does two things:

  1. Parses the JSON string into a real JavaScript object
  2. Replaces the node’s JSON payload with the country object itself

After this step, you can directly reference values like:

  • {{$node["Function"].data["name"]}}
  • {{$node["Function"].data["emoji"]}}
  • {{$node["Function"].data["phone"]}}

This pattern of parsing and shaping API responses is central to building more advanced automations. Once you master it here, you can apply it to many other APIs.

Step 4: Crafting A Friendly Message With The Set Node

Finally, the Set node turns raw data into a clear, readable message. In the template, the Set node uses an expression like:

=The country code of {{$node["Function"].data["name"]}} {{$node["Function"].data["emoji"]}} is {{$node["Function"].data["phone"]}}

You can keep this wording as is or adjust it to match your use case. For example, you might prefer:

  • The phone code for [name] is [phone]
  • Or a structured JSON response instead of a single string

The important part is that you are in control. You decide how the data is presented, and you can change it at any time without touching the underlying API or infrastructure.

How To Test Your Workflow

Once the nodes are configured or you have imported the template, testing is quick:

  1. Import the workflow JSON into n8n using Workflow → Import from file or by pasting the JSON
  2. Activate or execute the workflow in n8n so the Webhook is listening
  3. Call the webhook URL shown in the Webhook node

For example, using curl:

curl "https://your-n8n-host/webhook/webhook?code=us"

Replace https://your-n8n-host and the path to match your n8n instance and webhook configuration. You should receive a response similar to:

The country code of United States 🇺🇸 is 1

At this moment, you have created a small but real API service using n8n. This is a foundation you can build on.

Taking It Further: Turn A Demo Into A Real Tool

Once the basic workflow is running, you can start shaping it into something that fits your real world needs. Here are some ideas to grow it from a demo into a reliable tool.

Return Structured JSON For Easier Integration

If you plan to call this workflow from other systems or frontends, a JSON response is often more useful than plain text. You can:

  • Replace the Set node content with a JSON object
  • Or use an HTTP Response node to send a structured JSON payload

For example, you might return:

{  "name": "United States",  "emoji": "🇺🇸",  "phone": "1"
}

This makes it easy for other services to consume and display the data in their own interfaces.

Add Error Handling To Make It Robust

Production ready automations are not only functional, they are resilient. You can strengthen this workflow by handling common error cases:

  • Check that query.code exists in the Webhook node and return a clear error if it is missing
  • Handle cases where the GraphQL API returns null for an unknown country code
  • Use an IF node or Merge node to branch on errors and return appropriate HTTP status codes like 4xx or 5xx

These small improvements turn a neat demo into a dependable service that your team can trust.

Protect Your Webhook: Security Considerations

Even simple workflows deserve good security practices, especially when exposed over the internet. Consider:

  • Restricting access to the webhook endpoint with an IP allowlist
  • Requiring an API key via a header or query parameter
  • Ensuring your n8n instance uses HTTPS and stays up to date

Building secure habits early will pay off as your automation library grows.

Plan For Growth: Rate Limiting And Caching

If you expect a high volume of requests, you can optimize your workflow to be lighter on external services and faster for users:

  • Cache results in a database, Redis or another storage node
  • Reuse cached country data instead of calling the public GraphQL API every time
  • Reduce the risk of hitting rate limits on the external API

With caching in place, your simple lookup service becomes both efficient and scalable.

Advanced Ideas To Expand Your Automation Skills

Once you are comfortable with the basics, this workflow can grow in several directions. Here are a few ideas to explore and experiment with:

  • Accept both 2 letter and 3 letter country codes, then normalize them before making the GraphQL call
  • Extend the GraphQL query to include more fields such as capital, currency, languages and continent
  • Use the workflow as a microservice inside a larger automation, for example to enrich user profiles with country details on signup

You can also modify the GraphQL query directly. For instance, to fetch additional fields:

query {  country(code: "{{$node["Webhook"].data["query"]["code"].toUpperCase()}}") {  name  phone  emoji  capital  currency  languages { name }  }
}

Each enhancement is another step in your automation journey, and each step builds your confidence to tackle more ambitious workflows.

Troubleshooting: Learning From What Breaks

Every builder runs into issues. When something fails, it is not a setback, it is an opportunity to understand n8n more deeply. If your workflow is not behaving as expected, check:

  • Is the Webhook node active and is the path exactly the one you are calling?
  • Can your n8n instance reach https://countries.trevorblades.com/ from its network environment?
  • Did you rename any nodes? If so, update expressions like {{$node["Webhook"].data[...]}} and {{$node["Function"].data[...]}} accordingly
  • Have you inspected node execution logs in n8n to see the raw payloads and responses?

Each debugging session makes you faster and more confident the next time you build or adjust a workflow.

From One Template To A Library Of Automations

This compact n8n workflow is more than a country lookup. It is a pattern you can reuse:

  • Receive a request
  • Call an external API
  • Transform the response
  • Return exactly what you need

Once you see how quickly you can glue a webhook to a GraphQL API and shape its output, you start spotting similar opportunities everywhere in your work.

Use this template as a stepping stone. Import it, run it, break it, fix it, and then extend it with caching, error handling or JSON responses. Each improvement is a small investment in a more focused, less repetitive workday.

Call to action: Import the workflow into your n8n instance, try a few country codes, and then customize it. Turn it into a microservice, wire it into your signup flow, or use it as a reference for your next API integration. If this helped you move one step closer to a more automated workflow, consider subscribing for more n8n tutorials and templates.

Happy automating, and keep building.

Automate Gmail Replies with n8n & OpenAI

Automate Gmail Replies with n8n & OpenAI Assistant

This guide teaches you how to use an n8n workflow template to turn labeled Gmail threads into AI-generated reply drafts using the OpenAI Assistant. You will learn what each node does, how data flows through the workflow, and how to customize prompts, schedules, and labels for your own use.

What you will learn

  • Why automating Gmail reply drafts with n8n and OpenAI is useful
  • How the workflow checks labeled threads and prepares AI-powered replies
  • How to configure each n8n node, from Schedule Trigger to Gmail draft creation
  • How to set up prompts, credentials, labels, and basic troubleshooting
  • Ideas for advanced customizations, security, and cost management

Why automate Gmail reply drafting with n8n?

Handling a large volume of email is time consuming. Writing similar replies over and over can drain your focus.

With this n8n workflow template, you can:

  • Let AI create a first-pass reply draft for labeled emails
  • Keep human oversight by reviewing and editing drafts before sending
  • Maintain a consistent tone, style, and structure in your replies
  • Save time on repetitive composition while still controlling the final message

The workflow only acts on Gmail threads that have a specific label, so you stay in control of which emails are processed by the OpenAI Assistant.


Concept overview: How the workflow works

At a high level, the template follows this sequence:

  1. Run on a schedule (for example, every minute)
  2. Find Gmail threads that have a specific label (your trigger label)
  3. Loop through each of those threads one by one
  4. Get the latest message in each thread
  5. Send that message content to your OpenAI Assistant in n8n
  6. Convert the assistant reply from Markdown to HTML
  7. Build a raw email message in RFC-822 style and encode it in base64
  8. Create a Gmail draft reply in the original thread
  9. Remove the trigger label so the thread is not processed again

Next, we will walk through each step inside n8n so you understand how to configure and adapt it.


Step-by-step: Building and understanding the n8n workflow

Step 1: Schedule when the workflow runs

Node: Schedule Trigger

Use the Schedule Trigger node to control how often n8n checks for labeled threads.

  • Typical setting: Every 1 minute, so new labeled emails are picked up quickly
  • Low volume tip: Increase the interval (for example, every 5 or 15 minutes) to reduce API usage and avoid hitting Gmail or OpenAI quotas

Once the trigger fires, it passes control to the next node that queries Gmail.

Step 2: Fetch Gmail threads with a specific label

Node: Gmail (resource: thread, operation: list)

Here you tell n8n which threads to process by filtering on a Gmail label. The typical setup is:

  • Create a dedicated Gmail label, for example ai-draft
  • In the Gmail node, set Resource to thread
  • Use the labelIds filter and supply your label ID (mapped from the label you created)

Only threads that have this label will be passed to the rest of the workflow. You can manually apply this label in Gmail whenever you want an AI-generated draft for that conversation.

Step 3: Loop through each thread individually

Node: SplitInBatches

The SplitInBatches node takes the list of threads from Gmail and processes them one at a time. This is helpful because:

  • Each thread is handled separately, which keeps data mapping clean
  • You can better control concurrency and avoid rate limits

In practice, the node outputs a single thread per iteration, and the workflow continues until all threads in the batch have been handled.

Step 4: Get the content of the latest message in the thread

You have two main patterns for retrieving the last message. The template can use either of these approaches.

Option A: Directly get a single message

Node: Gmail (operation: get message)

In this pattern, you already know which message to fetch (for example, by ID or from the thread data). The node returns the full message payload, including:

  • Headers (From, To, Subject, etc.)
  • Body text or HTML
  • Other metadata

This payload is then forwarded to the OpenAI Assistant node.

Option B: Get all messages in the thread, then keep the last one

Nodes: Gmail (get thread messages) + Limit

Alternatively, you can:

  1. Use the Gmail node to fetch all messages in the thread
  2. Add a Limit node configured with lastItems to keep only the latest message

This approach ensures that the AI is always replying to the most recent email in the conversation, which is very important for multi-message threads.

Step 5: Send the message content to the OpenAI Assistant

Node: LangChain / OpenAI Assistant

Now that you have the last message, you can send it to your configured OpenAI Assistant. In the LangChain/OpenAI node:

  • Set assistantId to the ID of the assistant you created in OpenAI
  • Map the email message body (and optionally subject, sender, etc.) into the assistant input
  • Provide a clear system or role prompt that explains how the assistant should draft the reply

The assistant will return a suggested reply, often in Markdown format. You will use this output in later nodes to build the Gmail draft.

Step 6: Map key fields for later nodes

Node: Set

To make the rest of the workflow easier to manage, use a Set node to store important values in clearly named fields. For example:

  • response → the assistant output (reply text)
  • threadId → the original Gmail thread ID
  • to → the sender address from the From header
  • subject → the original email subject

This step keeps your data organized and makes the email-building step more straightforward.

Step 7: Convert the AI response from Markdown to HTML

Node: Markdown

Many assistants return text formatted in Markdown. Gmail drafts, however, expect HTML for rich formatting.

Use the Markdown node to:

  • Take the response field as input
  • Convert it into HTML
  • Output safe HTML that preserves lists, bold text, links, and other formatting

The resulting HTML will be used as the body of the Gmail draft.

Step 8: Build the raw email message

Node: Set

Gmail’s drafts API expects a raw RFC-822 style message that includes headers and body. In another Set node, create a text field that represents the full email, for example:

To: {{ $json.to }}
Subject: {{ $json.subject }}
Content-Type: text/html; charset="utf-8"

{{ $json.response }}

Key points:

  • The To header uses the original sender address
  • The Subject matches the original thread subject
  • Content-Type is set to text/html; charset="utf-8"
  • The body contains the HTML version of the assistant’s reply

Step 9: Encode the raw message in base64

Node: Code

The Gmail API requires the raw message field to be URL-safe base64 encoded. Use a Code node that relies on Node’s Buffer to perform this encoding.

Typical logic inside the Code node:

  • Read the raw email string
  • Convert it to base64 using Buffer
  • Output an encoded field with the base64 or base64url value

If your client or library requires base64url, make sure to apply the required character replacements.

Step 10: Create a Gmail draft in the original thread

Node: HTTP Request

To create the actual Gmail draft, use an HTTP Request node that calls the Gmail drafts API:

  • Method: POST
  • URL: https://www.googleapis.com/gmail/v1/users/me/drafts

Set the JSON body to something like:

{  "message": {  "raw": "{{ $json.encoded }}",  "threadId": "{{ threadId }}"  }
}

This creates a draft reply attached to the original Gmail thread, which you can then review and send directly from your inbox.

Step 11: Remove the trigger label so the thread is not reprocessed

Node: Gmail (resource: thread, operation: removeLabels)

Finally, remove the AI trigger label from the thread. This prevents the same conversation from being processed again in the next scheduled run.

Configure the Gmail node to:

  • Operate on the thread resource
  • Use the removeLabels operation
  • Specify the label ID of your trigger label (for example, ai-draft)

At this point, the workflow has created a draft and cleaned up the label, so the loop can continue with the next thread.


Prompt examples for the OpenAI Assistant

Your prompt has a huge impact on the quality, tone, and length of the AI-generated reply. Below are some ready-to-use examples you can plug into the Ask OpenAI Assistant node and then adapt to your needs.

  • Professional short reply:
    “You are a professional assistant. Read the user message and draft a concise, polite reply (3-5 sentences) summarizing next steps and questions if needed.”
  • Detailed support reply:
    “You are a friendly support agent. Use the last customer message to draft a helpful, empathetic response with an actionable next step and a closing line offering further help.”
  • Custom signature:
    “Add this signature at the end: \n-\nJohn Doe\nCustomer Success”

Combine these ideas or customize them to match your brand voice, internal guidelines, or different types of emails.


Configuration and credentials you need

Before the workflow can run end to end, make sure you have the following configured:

  • n8n instance: A secure n8n setup where you have permission to create and edit workflows.
  • Gmail OAuth2 credentials: Create OAuth2 credentials in Google Cloud and grant at least these scopes:
    • https://www.googleapis.com/auth/gmail.modify
    • https://www.googleapis.com/auth/gmail.compose

    Broader scopes may be used if your use case requires them.

  • OpenAI API key: Add your OpenAI API key to n8n and configure your assistant (assistantId) in the LangChain/OpenAI node.
  • Gmail label: Create a label such as ai-draft and apply it to any emails you want the workflow to process.

Testing the workflow and basic troubleshooting

How to test

  1. In Gmail, pick a test conversation and manually add your trigger label (for example, ai-draft).
  2. In n8n, run the workflow manually or wait for the Schedule Trigger to execute.
  3. Check the execution details in n8n to see if all nodes run successfully.
  4. Open Gmail and confirm that a new draft reply appears in the original thread.

If something goes wrong

  • No drafts created:
    • Verify that the Gmail label is correctly applied and that the label ID is correct in the workflow
    • Check the Code node to ensure the raw message is properly base64 or base64url encoded
    • Confirm that Gmail API quotas have not been exceeded
  • Malformed or broken HTML:
    • Inspect the output of the Markdown node
    • Adjust your assistant prompt so it produces cleaner Markdown
    • Optionally sanitize or post-process the HTML before building the raw email
  • Errors in n8n:
    • Open the execution log and inspect each node’s input and output
    • Check that all credentials (Gmail, OpenAI) are valid and authorized

Security, privacy, and best practices

Automating email with AI involves sensitive data. Keep these guidelines in mind:

  • Review your data policies before sending sensitive or personally identifiable information to third-party AI services.
  • Limit the assistant to processing only emails you control or have explicit permission to handle.
  • Use dedicated service accounts or OAuth credentials for automations and rotate keys regularly.
  • Where possible, log only metadata (for example, timestamps, IDs) instead of full message content.

Costs, quotas, and rate limits

Both OpenAI and Gmail APIs have usage limits and potential costs.

  • OpenAI: Billing is token based. Monitor token usage in your OpenAI account and set limits or alerts so you stay within budget.
  • Gmail: API quotas apply per project and per user. Use reasonable schedule intervals, and avoid unnecessarily frequent checks to prevent hitting limits.

Adjusting the Schedule Trigger and batching logic can significantly reduce the chance of quota issues.


Advanced customizations

Once the core workflow works, you can extend it for more advanced scenarios:

  • Auto-send for trusted workflows: Add a conditional step that sends drafts automatically for specific categories or from specific senders. Use this only when you are confident in the AI output.
  • Multi-language replies: Detect the language of the incoming message and route it to different assistants or prompts tailored to that language.
  • Attachment-aware replies: Extend the workflow to fetch and analyze attachments, then include summaries or references to those attachments in the prompt.
  • Audit trail: Save AI-generated replies and related metadata

Fetch All HubSpot Contacts with n8n

Fetch All HubSpot Contacts with n8n

Automating how you pull contact data from HubSpot into your other tools can remove a lot of manual effort and keep your systems in sync. In this tutorial you will learn, step by step, how to use an n8n workflow template to fetch all HubSpot contacts with the HubSpot node configured to getAll: contact.

The workflow starts with a simple Manual Trigger, then calls HubSpot, handles pagination for you, and prepares the data for export or further processing.


Learning goals

By the end of this guide you will be able to:

  • Understand why automating HubSpot contact exports with n8n is useful
  • Configure a basic n8n workflow to fetch all HubSpot contacts
  • Use the HubSpot node with the getAll operation and handle pagination
  • Test and inspect the returned contact data in n8n
  • Extend the workflow to export, filter, enrich, or back up contacts
  • Apply best practices for performance, reliability, and security

Why automate fetching HubSpot contacts?

Having a single, consistent view of your contacts is essential for marketing, sales, and reporting. If data is copied manually or inconsistently, you risk duplicates, outdated information, and incomplete analytics.

Using n8n to automate contact retrieval from HubSpot helps you:

  • Keep downstream tools up to date without manual exports
  • Avoid duplication and data drift across systems
  • Enable near real-time reporting and dashboards
  • Build repeatable backups of your contact database

Typical automation scenarios include:

  • Exporting HubSpot contacts to Google Sheets or a database
  • Filtering and enriching contacts before they reach your CRM or data warehouse
  • Scheduling regular or incremental syncs for analytics and backups

What you will build in n8n

You will build a minimal but practical workflow template that:

  • Starts with a Manual Trigger (you can later switch to a schedule)
  • Uses the HubSpot node to getAll contacts
  • Relies on n8n to handle HubSpot pagination and fetch every contact
  • Prepares you for next steps like exporting, filtering, or enriching the data

The same pattern can be reused for scheduled syncs, daily backups, or feeding a custom CRM.


Prerequisites

Before you start building the workflow, make sure you have:

  • An n8n instance (cloud or self-hosted)
  • A HubSpot account with either:
    • API key (deprecated, not recommended for new setups), or
    • Private app access token (recommended)
  • HubSpot credentials set up in n8n so the HubSpot node can authenticate

Key concepts before you build

Manual Trigger vs Schedule Trigger

In n8n, a Manual Trigger lets you run a workflow on demand from the editor. It is ideal for development, testing, and one-off exports. A Schedule Trigger runs the same workflow automatically at intervals, such as every hour or once a day. You can start with a Manual Trigger, then later swap it for a Schedule Trigger when you are confident in the workflow.

The HubSpot node and the getAll operation

The HubSpot node is n8n’s integration with the HubSpot API. When you set:

  • Resource: contact
  • Operation: getAll

you are telling n8n to retrieve contacts from HubSpot. With Return All set to true, n8n automatically manages HubSpot’s paged responses and keeps requesting more pages until all contacts are returned.

Handling pagination and large datasets

HubSpot does not send all contacts in a single response. Instead it returns them in pages. The HubSpot node in n8n can:

  • Fetch every page when Return All is true
  • Limit the number of contacts per run when Return All is false and a limit is set

For smaller or moderate datasets, Return All = true is simple and effective. For very large accounts or performance-sensitive workflows, you may choose to work in batches by setting a limit and running the workflow multiple times or using incremental sync logic.


Step-by-step: build the workflow in n8n

Step 1: Add a trigger node

  1. Open your n8n editor and create a new workflow.
  2. Add a Manual Trigger node from the nodes panel.

Use the Manual Trigger while you are building and testing. Once the workflow behaves as expected, you can replace it with a Schedule Trigger to automate the process.

Step 2: Add and configure the HubSpot node

  1. Drag a HubSpot node onto the canvas.
  2. Connect the Manual Trigger node to the HubSpot node.
  3. Open the HubSpot node settings and configure:
    • Resource: contact
    • Operation: getAll
    • Return All: true
    • Credentials: choose your HubSpot credential (API key or private app token)

This configuration tells n8n to call the HubSpot Contacts API, use your stored credentials, and automatically follow all pages until every contact is retrieved.

Step 3: Test the HubSpot node

  1. Click Execute Node on the HubSpot node, or run the workflow from the top right.
  2. Wait for the execution to complete. The node will output an array of contact objects.
  3. Inspect one or more items in the node output. Look for fields such as:
    • email
    • firstname
    • lastname
    • lifecycle stage
    • company or related properties

Verifying the available properties now will make it easier to map them later to spreadsheets, databases, or other tools.


Working with large datasets and pagination

HubSpot enforces limits on how many records are returned in a single call. The HubSpot node in n8n abstracts this for you.

  • Return All = true n8n automatically:
    • Requests the first page of contacts
    • Follows the pagination cursor or offset that HubSpot returns
    • Loops through until no more pages are available
    • Outputs a single combined list of all contacts
  • Return All = false You specify a limit:
    • n8n fetches only that number of contacts per run
    • You can process data in smaller batches for performance or rate limit reasons

If you are working with very large HubSpot accounts, consider combining batching with incremental syncs based on a “last modified date” property to avoid repeatedly exporting unchanged data.


Practical next steps after fetching contacts

Once the HubSpot node is returning contacts correctly, you can extend the workflow. Below are common patterns you can add as additional nodes.

1. Export contacts to Google Sheets

  1. Add a Set node after the HubSpot node to flatten the contact object. Map only the fields you need, for example:
    • email
    • firstname
    • lastname
    • lifecycle stage
  2. Add a Google Sheets node.
    • Use operations like “Create Row” or “Update Row” depending on your use case.
    • Map the fields from the Set node to the appropriate spreadsheet columns.

This gives you a live or regularly updated sheet of all HubSpot contacts that can be shared across teams.

2. Load contacts into a database

  1. After the HubSpot node, optionally use a Set node to shape the data into the schema your database expects.
  2. Add a database node such as PostgreSQL or MySQL.
  3. Use an Insert or Upsert operation.
    • Choose a unique key, often the contact’s email or HubSpot contact ID.
    • Configure the query or upsert key to avoid duplicates.

This pattern is useful when you want to maintain a CRM mirror or a data warehouse table for reporting.

3. Filter and enrich contacts

  1. Add an IF node or Function node after the HubSpot node to filter contacts. Examples:
    • Only include contacts with a lifecycle stage of “Marketing Qualified Lead”.
    • Exclude contacts without an email address.
  2. For enrichment, call an external API or another system:
    • Add an HTTP Request node to hit an enrichment API.
    • Merge the new data back into each contact record.

Filtering and enrichment let you build smarter automations, such as sending only high quality leads to sales tools or personalization engines.


Example workflow: export all contacts to CSV

If your goal is a simple CSV export of every HubSpot contact, you can build a short workflow like this:

  1. HubSpot node
    • Resource: contact
    • Operation: getAll
    • Return All: true
  2. Set node Normalize the output by selecting and renaming fields to a flat structure, for example:
    • email
    • firstname
    • lastname
    • company
  3. Spreadsheet File node
    • Configure it to create or append to a CSV file.
    • Map the Set node fields to CSV columns.
  4. Optional: Storage or delivery
    • Use a Google Drive or S3 node to store the CSV in cloud storage.
    • Use the Email node to send the CSV as an attachment.

This gives you a repeatable backup and an easy way to hand off contact data for reporting or offline analysis.


Error handling and retry strategy

To make your workflow more reliable, add basic error handling and logging.

  • Node-level retry Enable retries on the HubSpot node to automatically handle transient network issues or temporary HubSpot errors.
  • IF node for validation Add an IF node that checks whether the response contains the expected data. If the response is incomplete or malformed, route the execution to an error branch.
  • Error logging In the error branch you can:
    • Write error details to a Google Sheet or database table.
    • Send a notification to a Slack channel or email address.

These patterns help you detect issues early and keep a record of any failed runs.


Best practices for HubSpot contact automations

  • Use private app tokens Prefer HubSpot private app tokens over deprecated API keys for better security and more granular scopes.
  • Respect rate limits Avoid running full exports too frequently. Use incremental sync strategies when possible, such as filtering by a last modified date field.
  • Keep workflows modular Separate your workflow into logical stages:
    • Fetch (HubSpot node)
    • Transform (Set, Function, IF nodes)
    • Load (Google Sheets, database, CSV, etc.)

    This improves readability and makes it easier to reuse parts of the workflow.

  • Protect sensitive data Mask or encrypt sensitive contact fields when storing them outside HubSpot, especially in logs, spreadsheets, or external systems.

Troubleshooting common issues

  • No contacts returned
    • Check that the correct HubSpot credentials are selected in the node.
    • Verify that the credential has the necessary API scopes to read contacts.
  • Missing or unexpected fields
    • Inspect the HubSpot node output in n8n to see exactly which properties are returned.
    • Remember that HubSpot schemas can vary between accounts based on custom properties and configuration.
  • Partial responses or intermittent errors
    • Check HubSpot rate limit headers and logs.
    • Consider adding short delays between requests or reducing frequency of full exports.
    • Ensure node-level retries are configured for transient errors.

Security considerations

Handling HubSpot tokens and contact data safely is essential.

  • Store HubSpot tokens only in n8n credentials, never in plain text within nodes.
  • Limit credential scopes to only what the workflow requires.
  • Restrict who can access these credentials within your n8n instance.
  • Rotate tokens periodically and review workflow execution logs for unusual activity.

Use cases and automation ideas

Once you have a reliable “fetch all contacts” workflow, you can build many automations on top of it:

  • Daily or weekly backup of contacts to a data lake or cloud storage
  • Sync HubSpot contacts to an in-house CRM for custom sales workflows
  • Send Slack or email notifications when new Marketing Qualified Leads appear
  • Run enrichment pipelines to append firmographic or behavioral data before sales outreach

Recap and next steps

In this tutorial you learned how to:

  • Set up a Manual Trigger workflow in n8n
  • Configure the HubSpot node to getAll contacts with automatic pagination
  • Inspect and validate the returned contact data
  • Extend the workflow to export contacts to CSV, Google Sheets, or databases

n8n & HubSpot: Fetch All Contacts with a Manual Trigger

n8n & HubSpot: Fetch All Contacts with a Manual Trigger

Let’s walk through a simple n8n workflow that pulls every contact from HubSpot with a single click, using a Manual Trigger and the HubSpot node.

What this n8n + HubSpot workflow actually does

At its core, this workflow is a tiny but powerful helper. You click a button, it talks to HubSpot, and it hands you all your contacts in one go.

Here is what happens behind the scenes:

  • A Manual Trigger node starts the workflow whenever you feel like running it.
  • A HubSpot node is set to the contact resource with the getAll operation, which retrieves every contact from your HubSpot account.

From there, you can do whatever you like with the data: export it, transform it, push it to a data warehouse, or feed it into another system.

Why bother automating HubSpot contact exports?

If you have ever downloaded CSVs from HubSpot over and over, you already know why this matters. Automation saves you from repetitive clicks and messy copy-pasting.

This workflow is especially handy if you:

  • Need to consolidate leads across different tools or teams
  • Send CRM data to a data warehouse for analytics
  • Prepare one-off or recurring exports for reporting or audits

n8n gives you a flexible, self-hosted automation platform with a native HubSpot node, so connecting to your CRM is straightforward and stays under your control.

When to use this template

You’ll get the most value from this workflow template when you:

  • Want a quick, on-demand export of all HubSpot contacts
  • Are setting up a new integration and need to inspect the raw contact data structure
  • Plan to build a more advanced pipeline but want to start with a simple, reliable base
  • Need a repeatable way to sync contacts into spreadsheets, BI tools, or internal databases

Think of it as your starting point. You can always swap the Manual Trigger for a Cron node, add transformations, or connect it to other services once you are happy with the basic flow.

What you need before you start

Before building the workflow, make sure you have:

  • An n8n instance (cloud or self-hosted)
  • HubSpot credentials with the right permissions (API key or OAuth app)
  • Basic familiarity with how n8n nodes work and how to connect credentials

Step-by-step: Build the workflow in n8n

Let’s put the workflow together from scratch. It only takes a few minutes.

1. Create and save a new workflow

Open your n8n instance and create a new workflow. Give it a name you will recognize later, then hit save. Saving early avoids losing changes if your browser or session misbehaves.

2. Add the Manual Trigger node

Search for the Manual Trigger node and drop it on the canvas. This node lets you run the workflow on demand by clicking Execute.

Later on, if you want this to run automatically on a schedule, you can replace the Manual Trigger with a Cron node or another trigger.

3. Add and connect the HubSpot node

Next, add a HubSpot node to the canvas. Connect the output of the Manual Trigger node to the input of the HubSpot node so the data flows in the right direction.

4. Configure HubSpot credentials

Click on the HubSpot node and choose existing credentials or create new ones. n8n supports both API keys and OAuth, but:

  • OAuth is recommended for production, since it follows security best practices and handles token refresh automatically.

Make sure the connected account has permission to read contacts.

5. Set the resource and operation

In the HubSpot node settings, configure it like this:

  • Resource: contact
  • Operation: getAll
  • Return All: true

Setting Return All to true tells n8n to automatically follow HubSpot’s pagination and give you every contact, not just the first page.

6. (Optional) Choose which contact properties to fetch

You do not always need every field. To limit what comes back:

  • Open Additional Fields
  • Use the Properties option to list the fields you care about, for example: email, firstname, company, lifecyclestage, and so on.

Pulling only the properties you need keeps the payload smaller, speeds things up, and makes downstream processing easier.

7. Run the workflow and inspect the output

Click Execute Workflow. The Manual Trigger will fire, the HubSpot node will call the API, and you should see an array of contacts in the HubSpot node output.

Open the node output panel to:

  • Check the data structure
  • Verify that the expected fields are present
  • Confirm that all contacts are being returned

Once this looks right, you can confidently plug the node into other parts of your automation.

Handling pagination and large HubSpot contact lists

When you set Return All to true, the HubSpot node will handle pagination for you and merge the results. That is perfect for small and medium lists, but what if you have tens of thousands of contacts?

For very large datasets, keep these tips in mind:

  • Limit properties to only what you need, to reduce payload size.
  • Process in batches using the SplitInBatches node if you are writing to external systems, which helps avoid timeouts and sudden bursts that hit rate limits.
  • Add error handling and retries using the Error Trigger node or the built-in retry settings on individual nodes.

This way, your workflow stays stable even when your contact list grows.

Example n8n workflow JSON

If you prefer to start from a ready-made template, here is a minimal JSON representation of the workflow:

{  "nodes": [  {  "name": "On clicking 'execute'",  "type": "n8n-nodes-base.manualTrigger"  },  {  "name": "Hubspot",  "type": "n8n-nodes-base.hubspot",  "parameters": {  "resource": "contact",  "operation": "getAll",  "returnAll": true  }  }  ]
}

You can paste or import this JSON into n8n, then open the HubSpot node and configure your credentials before running it.

Popular ways to extend this template

Once you can reliably pull all HubSpot contacts into n8n, the fun part begins. Here are some common enhancements you can build on top of this workflow.

1. Export contacts to Google Sheets or CSV

Want a simple spreadsheet export?

  • Add a Set node after the HubSpot node to clean up or rename fields.
  • Then connect a Google Sheets node to append rows to a sheet, or use the Write Binary File node to create a CSV file.

2. Sync only new or updated contacts

If you do not want to pull everything every time, you can:

  • Use the HubSpot node with a filter, for example createdAt > lastRun.
  • Store the last run timestamp in a database or a variable so the next run only fetches new or updated contacts.

This is ideal for incremental syncs into other systems.

3. Load contacts into a data warehouse

For analytics or BI use cases, you can:

  • Map HubSpot fields to your warehouse schema using Set or Function nodes.
  • Push the transformed data to BigQuery, Snowflake, or another data store using the relevant integration nodes or the HTTP Request node.

Use cases this workflow is perfect for

Here are a few practical scenarios where this n8n and HubSpot contact export template shines:

  • Daily or weekly contact exports to reporting systems
  • One-time migrations when moving away from HubSpot or into a new CRM
  • Real-time or near real-time syncs when combined with webhooks or scheduled runs
  • Cleaning and enrichment flows where you append data from enrichment APIs

Troubleshooting common issues

Running into problems? Here are a few quick checks.

Authentication problems

If the HubSpot node fails with authentication errors:

  • Double-check your HubSpot credentials in n8n.
  • Make sure the correct scopes are granted.
  • If using OAuth, confirm that the refresh token is valid and that n8n can reach HubSpot from your network.

Empty or missing results

If you are getting no contacts back:

  • Verify that your HubSpot account actually has contacts.
  • Check that you did not apply overly strict property filters.
  • Try fetching a single contact directly from the HubSpot UI or API to confirm everything is connected correctly.

Rate limits and timeouts

Seeing 429 errors or timeouts?

  • HubSpot enforces API rate limits, so consider slowing down requests.
  • Implement exponential backoff or retries in your workflow.
  • Use batching (for example with SplitInBatches) to smooth out traffic to external systems.

Security tips and best practices

Since you are working with CRM data, it is worth tightening security from the start:

  • Prefer OAuth over API keys for production connections.
  • Only fetch the properties you actually need.
  • Secure your n8n instance with HTTPS, a firewall, and role-based access where possible.
  • Store credentials using n8n’s credential manager and avoid hardcoding tokens in nodes.

Final tips before you go live

A good way to approach this workflow is to start small and iterate:

  • Begin by fetching just a few key properties and confirm that everything looks right.
  • Once it is stable, expand to more fields and add your downstream systems.
  • Set up observability, for example logging nodes, notifications for failures, and a plan for rotating credentials.

That way, your simple manual export can grow into a reliable, production-grade automation.

Ready to try it in your own n8n instance?

You can import this workflow template, connect your HubSpot credentials, and click Execute to pull your contacts in just a few minutes.

If you want help tailoring it, for example exporting to Google Sheets, generating CSVs, or streaming records into your data warehouse, you can reach out for a step-by-step walkthrough or bring in a consultant to build a full production integration.

Call to action: Import the workflow, plug in your HubSpot credentials, and run it once to see your contacts flow into n8n. From there, you can customize it into the exact export or sync pipeline you need.