Auto-Tag Photos With n8n & AI (Nano Banana)

Auto-Tag Photos With n8n & AI (Nano Banana)

Managing large photo collections across cloud storage quickly becomes unmanageable without automation. The Nano Banana workflow template for n8n provides an end-to-end automation that analyzes images stored in Google Drive, generates descriptive filenames using an image-capable AI model, and uses an AI agent to decide how files should be organized or removed.

This reference-style guide documents the workflow in a technical, implementation-focused way. It covers the overall architecture, each node in the pipeline, configuration details, and operational considerations for running the workflow at scale.

1. Workflow Overview

The Nano Banana workflow is an n8n automation that:

  • Scans a target folder in Google Drive for image files.
  • Processes files in batches to respect API rate limits.
  • Calls an image-capable large language model (LLM) via HTTP to:
    • Generate a concise, descriptive filename for each image, or
    • Return a deletion signal for low-quality or unusable images.
  • Renames files in Google Drive according to the model output.
  • Aggregates existing folder metadata and passes it to an AI agent.
  • Uses the agent to decide whether to:
    • Move files into existing folders,
    • Create new folders and move files there, or
    • Delete files that should not be kept.

The design separates concerns between:

  • Vision model (image-capable LLM) for content understanding and filename generation.
  • Reasoning agent for folder selection, folder creation, and delete/move decisions.

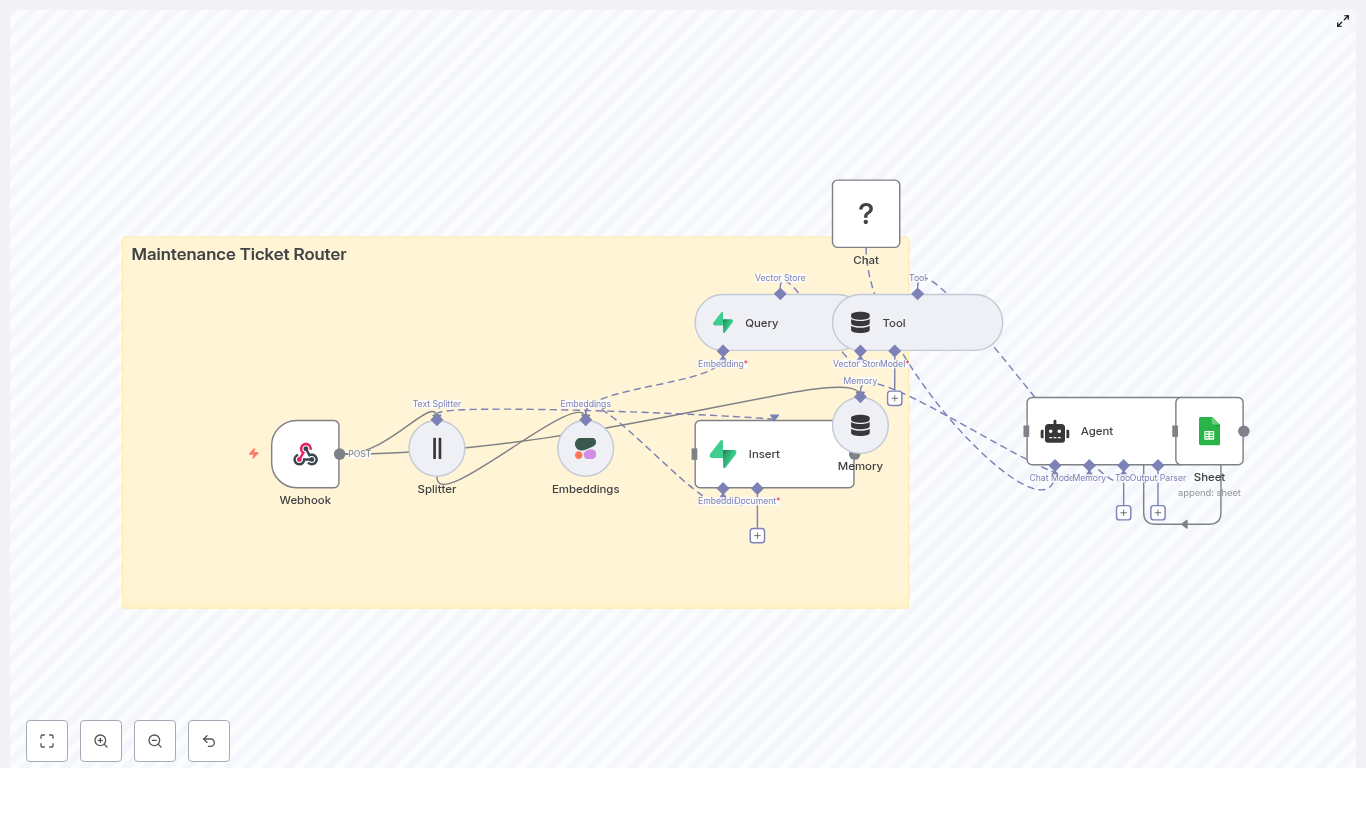
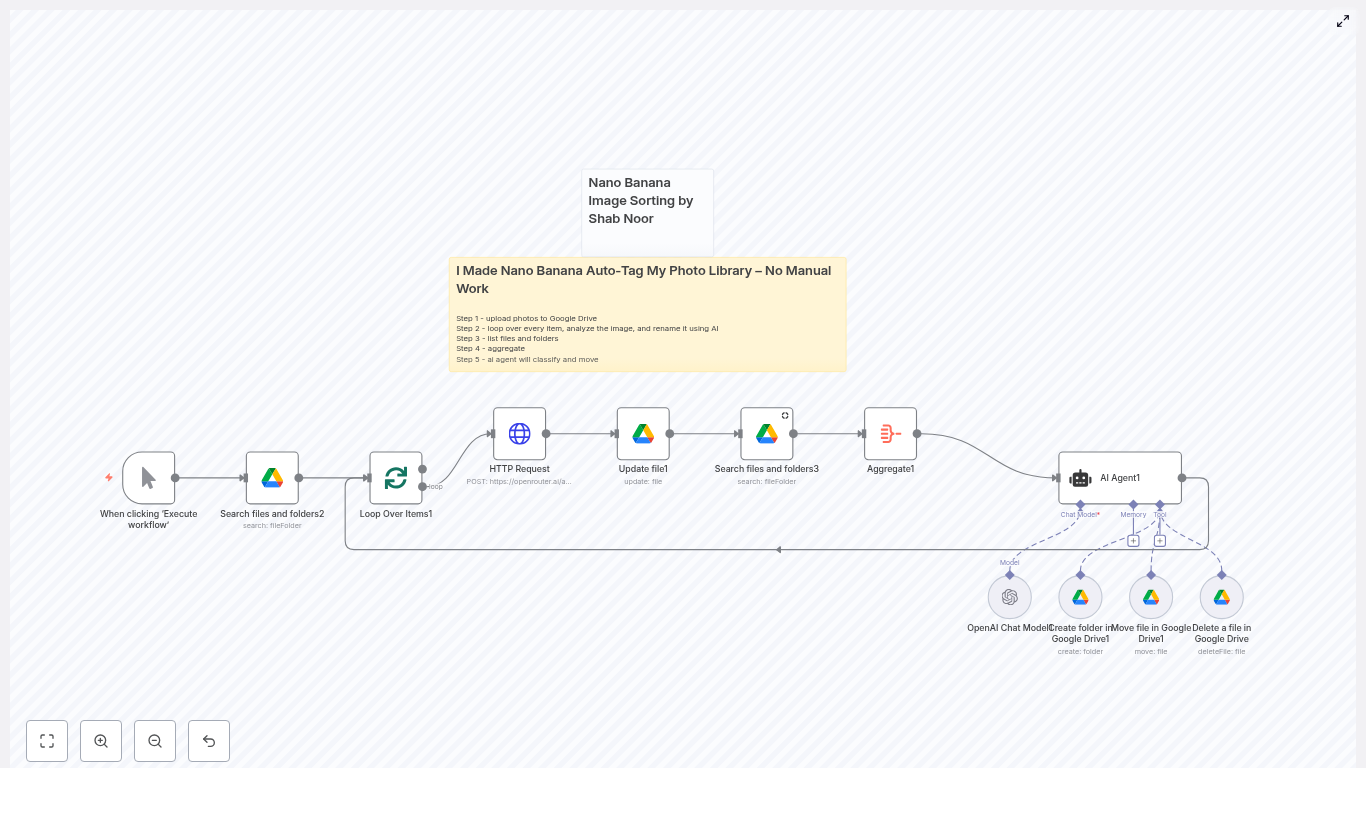
2. Architecture & Data Flow

2.1 High-Level Execution Flow

  1. Trigger workflow manually or on a schedule.
  2. Query Google Drive for files in a specified root folder.
  3. Split the file list into batches.
  4. For each file in a batch:
    1. Generate a public or accessible download URL.
    2. Send the URL and instructions to an image-capable LLM.
    3. Receive a suggested filename or a DELETE signal.
    4. Rename the file or mark it for deletion.
  5. Aggregate current folder IDs and names under the photo root.
  6. Invoke an AI agent with:
    • Updated filename,
    • File ID,
    • Existing folder metadata.
  7. Allow the agent to:
    • Move the file to a matching folder,
    • Create a new folder and move the file, or
    • Delete the file entirely.

2.2 Core Components

  • Trigger layer: Manual Trigger or Cron node.
  • Storage integration: Google Drive nodes for listing, updating, moving, creating folders, and deleting files.
  • Batch control: SplitInBatches node to process files in controlled chunks.
  • Vision model integration: HTTP Request node calling an image-capable model (for example, google/gemini-2.5-flash-image-preview:free via OpenRouter).
  • Aggregation: Aggregate node to collect folder metadata.
  • Decisioning agent: AI agent node with tools for folder creation, file move, and file deletion, using a reasoning model (for example, gpt-4.1-mini).

3. Node-by-Node Breakdown

3.1 Trigger: Manual or Scheduled Execution

Node type: Manual Trigger or Cron

The workflow is typically developed and tested with the Manual Trigger node. For production use, replace or supplement it with a Cron node to execute on a fixed schedule.

  • Manual Trigger:
    • Useful for initial setup, debugging, and one-off runs.
    • Runs the entire pipeline on demand.
  • Cron:
    • Configure to run every few minutes, hourly, or daily depending on ingestion rate.
    • Ensures newly added photos are processed without manual intervention.

Scheduled execution keeps the Google Drive photo library continuously organized with near real-time tagging and sorting.

3.2 Google Drive: Search Files and Folders

Node type: Google Drive

Operation: List or Search Files

This node retrieves the list of files to process from a specific Google Drive folder that acts as the photo root.

  • Key configuration:
    • Resource: File
    • Operation: List or Search
    • Folder ID: Set to your photos root folder. Cache or hard-code this ID for consistency.
    • Filters: Restrict results to files only and, optionally, to image MIME types if desired.
  • Output:
    • Each item represents a file, typically including:
      • id (file ID in Drive)
      • name (current filename)
      • mimeType
      • Folder or parent references

Ensure that the Google Drive credentials used by this node have at least read access to the target folder and write access if you plan to rename or move files.

3.3 SplitInBatches: Batch Processing Control

Node type: SplitInBatches

The SplitInBatches node takes the list of files returned by the Google Drive node and processes them in configurable chunks. This is essential for:

  • Preventing workflow timeouts.
  • Respecting rate limits for:
    • OpenRouter or other LLM providers, and
    • Google Drive API quotas.

Configuration suggestions:

  • Batch size: Start with 5 to 10 files per batch.
  • Increase gradually once you have observed typical latency and error rates.

The node iterates over batches, feeding each group of items into the image-analysis portion of the workflow before continuing to the next batch.

3.4 HTTP Request: Image-Capable LLM Call

Node type: HTTP Request

This node integrates with an image-capable LLM via HTTP. In the provided template, it uses OpenRouter with the model google/gemini-2.5-flash-image-preview:free. The model receives:

  • A textual instruction (prompt) specifying filename rules.
  • An image URL pointing to the file in Google Drive.

Example JSON request body:

{  "model": "google/gemini-2.5-flash-image-preview:free",  "messages": [  {  "role": "user",  "content": [  {  "type": "text",  "text": "Analyze this image, and based on what you find, output a suggested file name in this format: blah-blah-blah - the file name should be descriptive enough to find in search, and use up to 6 or 7 words. If the main subject is too blurry, output DELETE"  },  {  "type": "image_url",  "image_url": {  "url": "https://drive.google.com/uc?export=download&id={{ $json.id }}"  }  }  ]  }  ]
}

Key points:

  • Model: You can substitute another image-capable model, but keep the prompt semantics consistent.
  • Image URL:
    • Uses Google Drive’s download URL pattern: https://drive.google.com/uc?export=download&id={{ $json.id }}.
    • Requires that the Drive file be accessible via the configured credentials or link-sharing configuration.
  • Prompt behavior:
    • The model is instructed to:
      • Return a descriptive filename with hyphen-separated words, up to 6 or 7 words.
      • Return exactly DELETE when the main subject is too blurry or the image is unusable.

Error handling considerations:

  • Handle HTTP errors (4xx/5xx) with retries or a fallback path.
  • Deal with permission issues if the generated URL is not accessible to the model provider.
  • Guard against malformed responses by validating that the model output is a single string and not empty.

3.5 Google Drive: Rename File

Node type: Google Drive

Operation: Update or Rename File

This node takes the filename suggested by the image model and updates the corresponding file in Google Drive. The logic typically looks like:

  • If the model response is DELETE (case-insensitive), mark the file for deletion instead of renaming.
  • Otherwise, use the response as the new filename.

Configuration notes:

  • File ID: Map from the previous node’s output (for example, {{$json["id"]}}).
  • New name: Use the model output, which should already be:
    • Lowercase,
    • Hyphen-separated,
    • Short (up to 6 or 7 words).

To avoid accidental deletions, you can implement a conditional branch:

  • If result equals DELETE, route the item to a delete or review path.
  • Else, route it to the rename path.

3.6 Aggregate: Folder IDs and Names

Node type: Aggregate

The Aggregate node collects metadata about existing folders under the photo root in Google Drive. This gives the AI agent a complete view of possible destinations for each file.

Typical aggregated fields:

  • folderId
  • folderName

The output is usually a single item containing an array of folder objects. This single aggregated structure is then passed to the AI agent node together with each file’s updated filename and file ID.

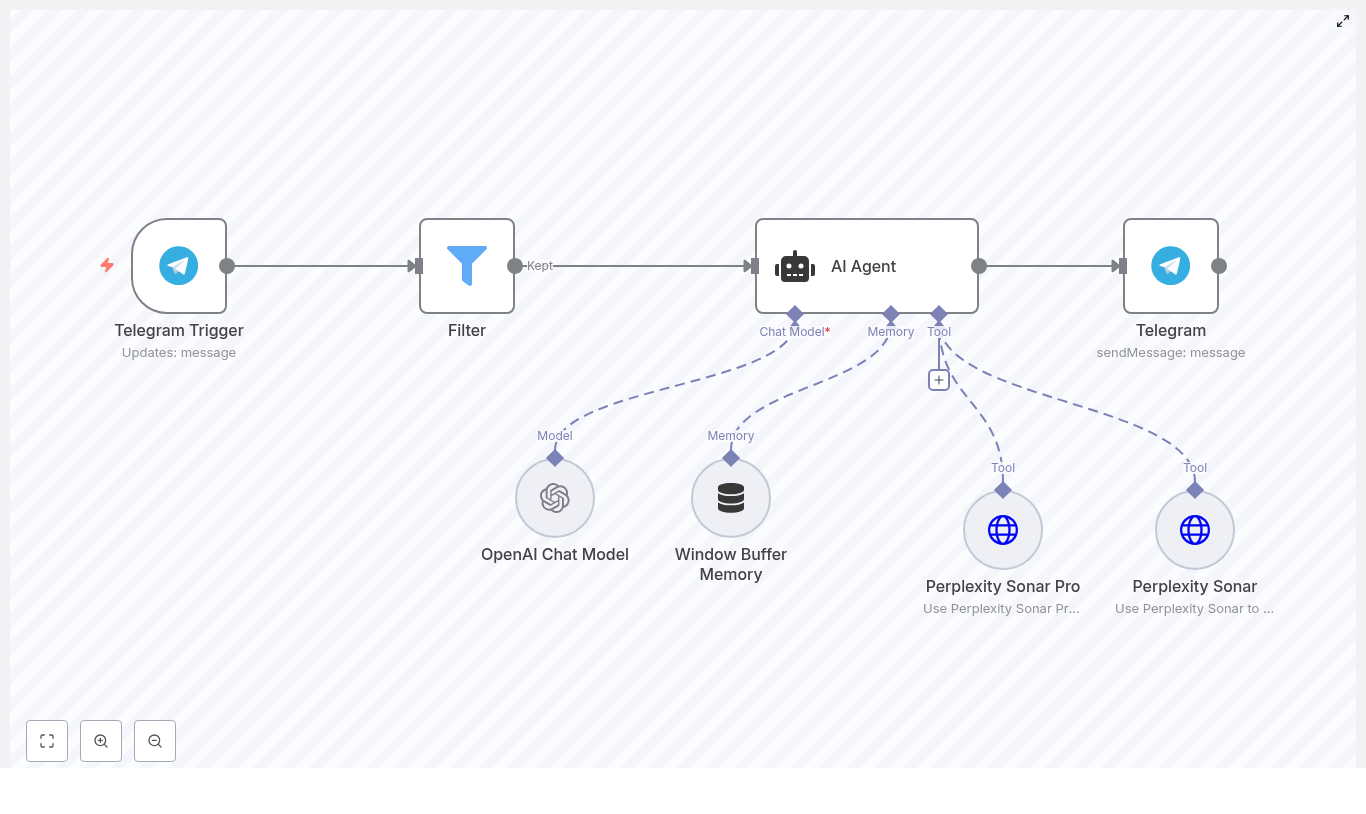
3.7 AI Agent: Folder & Deletion Decisions

Node type: AI Agent (LangChain-style in n8n)

This node orchestrates higher-level decisions using a reasoning model and a set of tools. It receives:

  • The file’s updated descriptive filename.
  • The file ID.
  • The list of existing folder names and IDs.

Typical agent rules:

  • If the filename contains location or category keywords that match an existing folder name:
    • Move the file to that folder.
  • If there is no strong match:
    • Create a new folder with a generic but meaningful category name (for example, beach-trips, receipts-2024).
    • Move the file into that new folder.
  • If the filename is exactly DELETE:
    • Delete the file using the Delete File tool.

Tools exposed to the agent typically include:

  • Create Folder (Google Drive).
  • Move File (Google Drive).
  • Delete File (Google Drive).
  • Language model for reasoning, such as gpt-4.1-mini.

This hybrid approach lets the vision model focus purely on image understanding, while the agent handles longer-context reasoning and file system operations.

4. Configuration Notes & Best Practices

4.1 Prompt Engineering for the Image Model

Precise prompts significantly impact filename quality and consistency. Recommended guidelines:

  • Specify the exact format:
    • Hyphen-separated words.
    • All lowercase.
    • Limit to 6 or 7 words.
  • Be explicit about deletion criteria:
    • Instruct the model to return the single word DELETE if the main subject is too blurry or the image is unusable.
  • Optionally, include instructions for category tokens or confidence scores if the model supports them, though the core template uses a simple single-string output.

Concise example prompt:

Analyze this image and return a single proposed filename using up to 6 dashed words, all lowercase. If image is unusable or main subject is too blurry, return exactly DELETE.

4.2 Batch Sizes & Rate Limits

Since the workflow calls both an LLM API and the Google Drive API, you should tune the SplitInBatches node with rate limits in mind:

  • Start with 5 to 10 files per batch.
  • Measure:
    • Average LLM response time.
    • Google Drive API latency and error responses.
  • Increase batch size only if:
    • You stay within rate limits.
    • Workflow execution time remains acceptable.

4.3 Security & Permissions

  • Google Drive credentials:
    • Use a service account or OAuth client with the minimal scopes required.
    • Restrict access to only the folders involved in the workflow where possible.
  • Auditing:
    • Log transitions such as:
      • Old filename → new filename.
      • Original folder → new folder.
      • Deletion decisions.
    • Keep logs in a separate system (for example, a spreadsheet, database, or logging service) to enable rollbacks or manual review.

4.4 Error Handling & Retries

Real-world environments require robust error handling. Recommended patterns:

  • Network and API errors:
    • Add retry logic for transient failures from OpenRouter or Google Drive.
    • Use exponential backoff where supported by n8n.
  • Dead-letter handling:
    • Route items that fail repeatedly to a dedicated “review” folder or queue.
    • Allow manual inspection and reprocessing after issues are resolved.
  • Classification failures

Build a Deep Research Agent with n8n & Perplexity

Build a Deep Research Agent with n8n & Perplexity

This guide explains how to implement a production-grade Deep Research Agent in n8n using Telegram, OpenAI, and Perplexity Sonar / Sonar Pro. The workflow converts Telegram messages into structured research queries, routes them through an agent-style orchestration layer, enriches responses with live web intelligence, and returns concise, cited answers back to Telegram.

The architecture is suitable for automation professionals who need on-demand research, market and competitive monitoring, or fast fact-checking directly inside a chat interface.

Solution architecture overview

At a high level, the workflow implements a LangChain-style agent pattern on top of n8n. Each node has a clearly defined responsibility:

  • Telegram Trigger – receives user messages and initiates the workflow.
  • Filter – enforces access control and prevents unauthorized or abusive use.
  • AI Agent – orchestrates the OpenAI chat model, short-term memory, and external tools.
  • Perplexity Sonar / Sonar Pro – provides real-time web lookups and multi-source synthesis.
  • Telegram (sendMessage) – delivers the final, formatted answer back to the originating chat.

The design separates reasoning, memory, and web intelligence. OpenAI is used for reasoning and formatting, Perplexity handles external knowledge retrieval, and n8n coordinates the full interaction lifecycle, including access control, error handling, and delivery.

Why this pattern works for deep research

This architecture follows several best practices for building reliable research agents:

  • Separation of concerns: The chat model focuses on reasoning, synthesis, and natural language output, while Perplexity handles live search and citations.
  • Short-term conversational memory: A Window Buffer memory keeps recent turns for each Telegram user, which improves follow-up queries without persisting excessive history.
  • Controlled exposure: The Filter node restricts access to defined users, groups, or specific command patterns, which is important for cost management and abuse prevention.
  • Tool-aware prompting: The agent is explicitly instructed when to invoke Sonar vs Sonar Pro, and how to present sources.

The result is an agent that behaves like a focused research assistant, combining generative reasoning with verifiable, linkable sources.

Core workflow components in n8n

Telegram Trigger configuration

The entry point is a Telegram Trigger node that listens for messages in a bot-enabled chat.

  1. Create a Telegram bot with BotFather and obtain the bot token.
  2. Add the Telegram credentials in n8n using that token.
  3. Configure the Telegram Trigger node with typical settings such as:
    • Webhook-enabled: yes
    • Update type: message
    • Session key mapping: map chat.id to the session key so that each chat has its own memory context.

Mapping chat.id to the session key is crucial. It ensures that the Window Buffer memory later in the flow maintains a separate short-term context per user or chat, which is essential for coherent follow-up questions.

Access control with the Filter node

Before invoking any AI tools, the workflow should validate whether the incoming message is allowed to use the research agent.

Use the Filter node to implement access control logic, for example:

  • Allow only specific Telegram user IDs or group IDs.
  • Restrict usage to messages starting with a command prefix such as /research.
  • Optionally check chat type (private vs group) or simple role-based logic.

A typical configuration is a numeric comparison against a known user ID, but you can extend this condition set as your deployment grows. This step is key to cost control and to prevent public abuse of the agent.

AI Agent node (LangChain-style orchestration)

The AI Agent node is the core of the workflow. It coordinates the language model, memory, and tools. Configure it with:

  • Chat model: an OpenAI chat model such as gpt-4o-mini or an equivalent model suitable for reasoning and formatting.
  • Memory: Window Buffer Memory to store a limited number of recent turns per session, using the Telegram chat.id as the key.
  • Tools: connections to Perplexity Sonar and Perplexity Sonar Pro for external web queries.

The effectiveness of this node depends heavily on the system prompt and tool-selection strategy. A representative system instruction might look like:

System: You are a research-focused assistant. Use Sonar for quick facts and Sonar Pro for deep, multi-source synthesis. Always include clickable citations when using a tool.

Within the agent configuration, define when to call each tool. For example:

  • Use Sonar for straightforward factual questions and single-entity lookups.
  • Use Sonar Pro for comparative questions, multi-source synthesis, or broader research tasks.

Memory should be scoped carefully to keep context relevant and to avoid unnecessary token usage, especially in long-running chats.

Perplexity Sonar and Sonar Pro tool nodes

Perplexity provides the external web intelligence layer. In n8n, you configure Sonar and Sonar Pro as HTTP-based tool endpoints using your Perplexity API keys.

Key configuration points:

  • Authentication: store Perplexity API keys in secure n8n credentials and reference them in the tool nodes.
  • Query payload: pass the user’s query or the agent’s tool call arguments in the JSON body.
  • max_tokens: set an appropriate response length for each tool. Sonar responses can be shorter, while Sonar Pro may require more tokens for synthesis.

Practical usage guidelines:

  • Sonar: optimized for fast, single-source lookups and quick fact retrieval.
  • Sonar Pro: designed for multi-source analysis and structured summaries, better suited for research-style questions.

The AI Agent node will call these tools dynamically as needed, then integrate the results into a final, human-readable answer that includes citations.

Telegram sendMessage node

Once the AI Agent has produced a final response, a Telegram (sendMessage) node sends it back to the originating chat.

Implementation details:

  • Use the original chat.id from the Telegram Trigger as the target chat.
  • Include the formatted answer from the AI Agent, including any clickable citations returned by Perplexity.
  • If outputs are long, consider:
    • Splitting the response into multiple messages, or
    • Attaching files (for example, text or CSV) for very large summaries.

Prompting and tool usage best practices

Careful prompt design significantly improves the reliability and cost profile of the research agent. Recommended practices include:

  • Keep the system prompt concise, but explicit about:
    • When to use Sonar vs Sonar Pro.
    • How to present citations and links.
    • Expectations for brevity and clarity.
  • Require sources after web lookups. For example:
    If you used Sonar or Sonar Pro, list up to 3 clickable source URLs at the end of your answer.
  • Control Sonar Pro usage to manage cost. Instruct the model to reserve Sonar Pro for queries that include terms such as:
    • “compare”
    • “research”
    • “market”
    • “synthesize”
  • Normalize incoming queries before passing them to the agent:
    • Trim irrelevant tokens or command prefixes.
    • Use memory to detect follow-up questions.
    • Avoid repeated web calls for identical or near-identical questions within a short time window.

Error handling, monitoring, and rate limit strategy

Any production research agent must be resilient to transient failures and API rate limits. In n8n, consider the following patterns:

  • Retries with backoff:
    • Configure retry logic for Perplexity and OpenAI calls.
    • Use exponential backoff to avoid amplifying rate-limit issues.
  • Centralized logging:
    • Record errors and failed calls in a persistent store or a logging system.
    • Optionally send alerts to a Slack channel or similar for rapid debugging.
  • Graceful user messaging:
    • On failure, return a clear fallback message, for example:
      Sorry, I’m having trouble fetching sources - try again in a minute.

Monitoring token usage, error rates, and response times over time will help you refine the configuration and prompts.

Security and privacy considerations

Because this workflow processes user queries that may contain sensitive information, apply standard security and privacy practices:

  • Minimize logged data: avoid logging raw user content unless explicitly required for debugging. Redact or anonymize where possible.
  • Environment-specific credentials: use separate OpenAI and Perplexity credentials for staging and production, and store them securely in n8n.
  • Access control: leverage the Filter node to restrict who can access the agent, and rotate API keys regularly.

These measures reduce the risk of data exposure and help maintain compliance with internal security policies.

Scaling and cost optimization

As usage grows across teams or user groups, API costs and performance become more important. To scale efficiently:

  • Introduce caching:
    • Use a cache layer such as Redis for frequently repeated queries.
    • Return cached responses instead of calling Perplexity again for the same question within a defined TTL.
  • Throttle Sonar Pro:
    • Apply heuristics to restrict Sonar Pro to long, comparative, or research-heavy queries.
    • Fallback to Sonar or the base model for simple lookups.
  • Tiered model usage:
    • Use smaller or cheaper chat models for routine queries.
    • Escalate to larger models only for complex synthesis or critical use cases.

These patterns help maintain predictable costs while preserving response quality for high-value questions.

Example research prompts

Here are sample queries that demonstrate when to use each Perplexity tool:

Quick lookup with Sonar
What is the current population of Kyoto and the main sources?

Deep synthesis with Sonar Pro
Compare the latest quarterly earnings and guidance for Company A vs Company B and list 3 supporting sources.

By guiding users on how to phrase their questions, you can further optimize tool selection and cost.

Testing, validation, and iteration

Before rolling out to a broader audience, validate the workflow thoroughly:

  1. Test in a private Telegram chat and probe edge cases, such as ambiguous questions, multi-step follow-ups, and long queries.
  2. Simulate rate-limit scenarios for OpenAI and Perplexity to verify that retry and fallback logic behaves as expected.
  3. Measure resource usage:
    • Track average tokens and API calls per query.
    • Use these metrics to estimate monthly costs and refine tool usage rules.

Iterate on prompts, filters, and caching strategies based on real usage patterns.

Extending the Deep Research Agent

The Telegram-based implementation is only one deployment option. The same pattern can be extended to other communication channels and automation scenarios, such as:

  • Adding Slack triggers for research inside team workspaces.
  • Sending results via email for longer-form reports.
  • Scheduling monitoring jobs that periodically run research queries and push updates.
  • Producing structured outputs such as CSV or PDF summaries for downstream analytics or reporting.

Because the core logic is encapsulated in n8n, you can reuse the same agent configuration across multiple channels with minimal changes.

Next steps

This n8n Deep Research Agent pattern combines automation, live web intelligence, and generative reasoning into a single, reusable workflow. It is particularly effective for teams that need fast, cited answers inside a chat interface without manually switching between tools.

To get started:

  • Import or build the workflow in your n8n instance.
  • Connect your OpenAI and Perplexity credentials.
  • Configure the Telegram Trigger and Filter nodes for your test environment.
  • Run a series of queries in a private Telegram chat and refine prompts, filters, and tool usage.

If you prefer a faster setup path, you can use a starter template and adapt it to your environment and access policies.

Action point: Deploy the template, test it in a private chat, and share feedback or questions to receive guidance on tailoring the workflow to your specific use case.

n8n + Phantombuster to Airtable: Save Phantom Output

How a Frustrated Marketer Turned Phantombuster Chaos Into an Airtable Lead Machine With n8n

On a rainy Tuesday evening, Emma stared at yet another CSV export from Phantombuster. Her coffee was cold, her Airtable base was a mess, and the marketing team was already asking for “just one more” updated lead list.

Every week it was the same routine. Run a Phantombuster agent, download the output, open the file, clean the headers, paste everything into Airtable, fix broken rows, double check emails, and hope nothing got lost along the way. It worked, technically, but it was slow, fragile, and painfully manual.

Emma knew there had to be a better way to connect Phantombuster to Airtable. She wanted a workflow that would automatically pull the latest agent output and turn it into clean, structured records in her base – without her touching a single spreadsheet.

That is when she discovered an n8n workflow template that promised exactly what she needed: a simple automation that saves Phantombuster output straight into Airtable.

The Problem: Great Scraping, Broken Process

Emma’s team relied heavily on Phantombuster for:

  • Scraping LinkedIn profiles and contact data
  • Collecting leads from social platforms and websites
  • Running recurring agents that produced JSON output

The data quality was solid, but the process of getting it into Airtable was not.

She needed to:

  • Automatically capture leads scraped by Phantombuster into Airtable
  • Keep one centralized, always-up-to-date dataset
  • Avoid endless copy and paste between exports and tables
  • Prepare data for CRM imports and enrichment tools

Her goal was clear. She wanted Phantombuster’s scraping power, n8n’s automation, and Airtable’s organization working together in a single, reliable pipeline.

The Discovery: An n8n Workflow Template That Glued It All Together

While searching for “n8n Phantombuster Airtable automation,” Emma landed on a template that did exactly what she had been trying to hack together manually. The description was simple but powerful: use n8n to fetch Phantombuster output and append it directly to Airtable.

The heart of the workflow was built around four n8n nodes:

  • Manual Trigger – to start the workflow on demand while testing
  • Phantombuster – using the getOutput operation to fetch the latest agent run
  • Set – to map and transform the JSON fields into clean, named values
  • Airtable – to append records into a chosen table

It was exactly what she needed, but she still had to wire it up to her own accounts and data structure. That is when her real journey with this template began.

Setting the Stage: What Emma Needed Before She Could Automate

Before she could press “Execute,” Emma made sure she had the basics in place:

  • An n8n instance, running in the cloud
  • A Phantombuster account with an agent that produced JSON output
  • An Airtable account with a base and table ready for leads
  • API credentials already configured in n8n for both Phantombuster and Airtable

With the prerequisites sorted, she opened n8n and started building.

Rising Action: Building the Workflow That Would Replace Her Spreadsheets

Step 1 – Starting With a Simple Manual Trigger

Emma began with a Manual Trigger node. She liked the control it gave her. Instead of setting up a schedule right away, she could run the workflow manually as many times as she wanted while she debugged and refined it.

The plan was easy. Once everything worked, she could later swap the Manual Trigger for a Scheduler node and have the workflow run automatically every few hours or once a day.

Step 2 – Pulling Phantombuster Output With getOutput

Next, she added the Phantombuster node. This was the engine that would pull in the latest scraped data.

She configured it like this:

  • Set the operation to getOutput
  • Selected her Phantombuster credentials with the API key
  • Entered the Agent ID of the specific phantom whose results she wanted

She executed the workflow up to this node and inspected the output in n8n’s debug view. The JSON structure looked familiar, with keys such as general, details, and jobs. That meant she could now start mapping those fields to something Airtable would understand.

Step 3 – Turning Messy JSON Into Clean Fields With the Set Node

To make the data usable in Airtable, Emma added a Set node. This was where she would define exactly which data points she wanted to store, and how they should be named.

Using n8n expressions, she mapped values from the Phantombuster JSON like this:

Name: ={{$node["Phantombuster"].json["general"]["fullName"]}}
Email: ={{$node["Phantombuster"].json["details"]["mail"]}}
Company: ={{$node["Phantombuster"].json["jobs"][0]["companyName"]}}

In the Set node she:

  • Created fields like Name, Email, and Company
  • Used expressions that referenced the output of the Phantombuster node
  • Tested each expression using the preview to ensure values resolved correctly

She also kept a few important rules in mind:

  • If Phantombuster returned an array of profiles, she would need to handle each item separately
  • She could use SplitInBatches or Item Lists if she needed to break arrays into multiple items
  • She could add conditional expressions or fallback values to avoid writing null into Airtable

This was the moment when her raw scraped data started looking like real, structured lead records.

Step 4 – Sending Leads Straight Into Airtable

With clean fields ready, Emma added the final piece: an Airtable node.

She configured it to:

  • Use the append operation
  • Select her Airtable credentials
  • Choose the correct base and table for leads

Then she mapped fields from the Set node to Airtable columns:

  • Airtable column “Name” <- Set node field “Name”
  • Airtable column “Email” <- Set node field “Email”
  • Airtable column “Company” <- Set node field “Company”

When this node ran, it would append each item that reached it as a new record in Airtable. She just had to make sure that if Phantombuster returned an array of profiles, her workflow split them into separate items before they hit the Airtable node.

The Turning Point: Handling Arrays and Multiple Records Without Breaking Anything

The first time Emma tested the workflow with a bigger Phantombuster run, she noticed something important. Instead of a single profile, she now had a whole list of them in the JSON output.

If she sent that entire array directly to Airtable, it would not create one record per profile. Airtable needed one n8n item per record.

To fix this, she explored two approaches that n8n supports for handling arrays:

Option 1 – Using a Function Node to Expand the Array

Emma added a Function node right after Phantombuster. Inside it, she wrote a small JavaScript snippet that transformed the array of profiles into multiple items that n8n could pass downstream, one per profile.

// items[0].json contains the Phantombuster payload
const payload = items[0].json;
const profiles = payload.profiles || payload.results || [];
return profiles.map(p => ({ json: {  Name: p.fullName || p.name,  Email: p.email || p.contact,  Company: (p.jobs && p.jobs[0] && p.jobs[0].companyName) || ''
}}));

This way, each profile became its own item with Name, Email, and Company already set. She could then send these directly to the Airtable node or through another Set node if she wanted to refine the mapping further.

Option 2 – Using SplitInBatches for Simpler Flows

In other workflows, Emma preferred not to write custom code. For those cases, she learned she could use the built-in SplitInBatches node to:

  • Take an array from Phantombuster
  • Split it into smaller chunks or single items
  • Process each item one by one through Set and Airtable

Both options achieved the same goal: ensuring Airtable received exactly one record per profile scraped.

Testing, Debugging, and That First Perfect Run

Before she trusted the automation with live campaigns, Emma walked carefully through a testing checklist.

  • Step 1: Execute the Manual Trigger and inspect the Phantombuster node output in n8n’s debug view to confirm the JSON structure.
  • Step 2: Check the Set node or Function node to ensure each field (Name, Email, Company) resolved correctly and did not return null unexpectedly.
  • Step 3: Run the full workflow and open Airtable to verify that new records appeared in the right table with the right values.

When something broke, she knew where to look:

  • Phantombuster rate limits or incorrect Agent ID
  • Missing or renamed Airtable columns
  • Credential misconfigurations in n8n

After a few tweaks, she watched a full batch of leads appear in Airtable, perfectly formatted, no CSV in sight. That was her turning point. The workflow was finally doing the job she used to do manually.

Refining the System: Best Practices Emma Added Over Time

Once the basic pipeline worked, Emma started thinking like an automation architect instead of a spreadsheet firefighter. She added a few best practices to make her setup more robust.

  • Descriptive Airtable columns that matched the Set node field names to reduce mapping confusion
  • De-duplication logic by using the Airtable “search” operation in n8n to check if an email already existed before creating a new record
  • Error handling so nodes could continue on fail, while sending a Slack or email notification if something went wrong
  • Secure credential management and periodic API key rotation for both Phantombuster and Airtable

She also kept a small JSON snippet of the workflow structure as a reference whenever she needed to replicate or modify it:

{  "nodes": [  { "name": "Manual Trigger" },  { "name": "Phantombuster", "operation": "getOutput", "parameters": { "agentId": "YOUR_AGENT_ID" } },  { "name": "Set", "values": [ { "Name": "=..." }, { "Email": "=..." } ] },  { "name": "Airtable", "operation": "append", "parameters": { "table": "Leads" } }  ]
}

Going Further: Advanced Automation Tricks She Picked Up

As her confidence with n8n grew, Emma started enhancing the workflow with more advanced techniques.

  • Data enrichment before saving She added extra API calls between the Set and Airtable nodes, for example to enrichment tools like Clearbit, to pull in more company details before writing to Airtable.
  • Avoiding rate limits She inserted small Delay nodes or used SplitInBatches to spread out requests when dealing with large lists, so neither Phantombuster nor Airtable hit their rate limits.
  • Handling large datasets For very big exports, she sometimes wrote data to CSV or Google Sheets first and then imported into Airtable in larger chunks.

Her once simple “save Phantombuster output in Airtable” automation had evolved into a scalable lead ingestion pipeline.

The Resolution: From Manual Exports to a Fully Automated Lead Pipeline

What started as Emma’s late-night frustration with CSV files turned into a smooth, automated workflow that her whole team now relied on.

By combining:

  • Phantombuster for scraping and data collection
  • n8n for flexible, visual automation
  • Airtable for a user-friendly, filterable database

She built a pipeline that could:

  • Pull the latest Phantombuster output with getOutput
  • Map and transform JSON fields using Set or Function nodes
  • Split arrays into multiple items so each profile became its own record
  • Append clean, structured leads directly into Airtable

With a few extra touches like de-duplication, error handling, and batching, the workflow scaled gracefully as her campaigns grew.

Try it yourself: spin up your n8n instance, plug in your Phantombuster agent ID and Airtable credentials, and run the workflow. Start with a Manual Trigger, validate the output, then switch to a Scheduler when you are ready to automate everything.

If you want a ready-to-use version of the workflow that Emma used as her starting point, you can grab the template below and customize the field mapping for your own Phantombuster agents.

Want more stories like Emma’s and practical automation walkthroughs? Subscribe to our newsletter for weekly n8n recipes, integration ideas, and step-by-step templates you can plug into your own stack.

How to Run Icypeas Bulk Email Searches in n8n

How to Run Icypeas Bulk Email Searches in n8n

Imagine opening your laptop in the morning and seeing a ready-to-use list of verified email addresses, already pulled from your contacts, neatly processed, and waiting for your next campaign. No copying, no pasting, no repetitive lookups. That is the kind of shift this n8n workflow can unlock for you.

In this guide, you will learn how to use an n8n workflow template to run Icypeas bulk email searches directly from a Google Sheet. You will read contact data, generate the required API signature, and trigger a bulk email-search request to Icypeas – all inside a single automated flow.

This is more than a technical tutorial. Think of it as a small but powerful step toward a more automated, focused way of working, where tools handle the busywork so you can concentrate on strategy, relationships, and growth.

The problem: Manual email discovery slows you down

Finding and verifying email addresses one by one might feel manageable at first. But as your outreach grows, the manual work starts to steal your time, energy, and focus. Every extra lookup is a tiny distraction that pulls you away from higher-value tasks like crafting better campaigns, refining your offer, or talking to customers.

If you are dealing with dozens or hundreds of contacts, manual email discovery quickly becomes:

  • Time consuming and repetitive
  • Error prone and inconsistent
  • Hard to scale across multiple lists or campaigns

Automation with n8n and Icypeas gives you a different path. Instead of chasing data, you design a workflow once and let it run whenever you need it. Your role shifts from “doer of tasks” to “designer of systems.”

The mindset shift: From tasks to workflows

Before we dive into the n8n template, it helps to adopt a simple mindset: every repetitive task is a candidate for automation. If you can describe the steps, you can often delegate them to a workflow.

This Icypeas bulk email search setup is a perfect example. You already know the steps:

  • You collect contact details in a spreadsheet
  • You send data to an email discovery tool
  • You wait for results and download them

n8n lets you turn those steps into a repeatable system. Once built, you can:

  • Trigger searches from any Google Sheet
  • Run bulk email lookups on a schedule
  • Reuse and adapt the workflow for new campaigns or data sources

Think of this template as a starting point. You can use it as-is, then gradually expand it to fit your unique outreach process.

What this n8n + Icypeas workflow does

At a high level, the workflow automates bulk email searches using Icypeas, powered by data from Google Sheets. Here is what happens under the hood:

  • Trigger – You start the workflow manually in n8n or run it on a schedule.
  • Read contacts – A Google Sheets node pulls rows with firstname, lastname, and company.
  • Generate signature – A Code node builds the HMAC signature Icypeas requires, using your API secret.
  • Send request – An HTTP Request node submits a bulk email-search job to Icypeas.
  • Receive results – Icypeas processes the task and makes the results available for download via the dashboard and by email.

Once set up, this flow can save hours of manual work every month, especially if you run regular outreach campaigns or maintain large prospect lists.

What you need before you start

To follow along and use the n8n template effectively, make sure you have:

  • An n8n instance (cloud or self-hosted)
  • An Icypeas account with:
    • API Key
    • API Secret
    • User ID

    You can find these in your Icypeas profile.

  • A Google account with a Google Sheet containing your contacts
  • HTTP Request credentials configured in n8n

Once this is in place, you are ready to turn a simple spreadsheet into a powerful, automated email search engine.

Step 1: Prepare your Google Sheet for automation

Your Google Sheet is the starting point of the workflow. Clear structure here leads to smooth automation later.

Create a sheet with column headers that match what the n8n Code node expects. For the template and example code below, use these headers:

  • firstname
  • lastname
  • company

Example rows:

firstname,lastname,company
Jane,Doe,ExampleCorp
John,Smith,AnotherInc

The included code maps each row as [firstname, lastname, company]. If you ever change the column order or add more fields in the Code node, make sure your sheet headers and mapping stay aligned.

This is a great moment to think ahead: how will you use these results later? Clean, consistent data here will pay off when you integrate this workflow with your CRM, email platform, or reporting system.

Step 2: Read your contacts with the Google Sheets node

Next, bring your contact data into n8n.

Add a Google Sheets node and configure it with your Google credentials and the document ID of your sheet. Set the range to cover all rows you want to process, or leave the range blank to read the entire sheet.

The node will output one item per row, with fields such as:

  • $json.firstname
  • $json.lastname
  • $json.company

At this point, you have turned your spreadsheet into structured data that can flow through any automation you design. This is a key mindset shift: your sheet is no longer just a static file, it is a live data source for your workflows.

Step 3: Generate the Icypeas API signature with a Code node

Icypeas protects its API with signed requests. That might sound technical, but in practice it is just another repeatable step that you can automate with a single Code node.

Add a Code node after your Google Sheets node. This node will:

  • Create a timestamp
  • Generate a signature using HMAC-SHA1 of method + url + timestamp, all lowercased before hashing
  • Build an api object containing:
    • key
    • signature
    • timestamp
    • userId
  • Create a data array with the records to search

Here is the example JavaScript used in the Code node (trimmed for clarity, but technically complete):

const API_BASE_URL = "https://app.icypeas.com/api";
const API_PATH = "/bulk-search";
const METHOD = "POST";

// Replace with your credentials
const API_KEY = "PUT_API_KEY_HERE";
const API_SECRET = "PUT_API_SECRET_HERE";
const USER_ID = "PUT_USER_ID_HERE";

const genSignature = (url, method, secret, timestamp = new Date().toISOString()) => {  const Crypto = require('crypto');  const payload = `${method}${url}${timestamp}`.toLowerCase();  return Crypto.createHmac("sha1", secret).update(payload).digest("hex");
};

const apiUrl = `${API_BASE_URL}${API_PATH}`;
const data = $input.all().map(x => [x.json.firstname, x.json.lastname, x.json.company]);

$input.first().json.data = data;
$input.first().json.api = {  timestamp: new Date().toISOString(),  secret: API_SECRET,  key: API_KEY,  userId: USER_ID,  url: apiUrl
};

$input.first().json.api.signature = genSignature(  apiUrl,  METHOD,  API_SECRET,  $input.first().json.api.timestamp
);

return $input.first();

Important points:

  • Replace PUT_API_KEY_HERE, PUT_API_SECRET_HERE, and PUT_USER_ID_HERE with your actual Icypeas credentials.
  • If you are running self-hosted n8n, enable the crypto module so that require('crypto') works:
    • Go to Settings > General > Additional Node Packages
    • Add crypto
    • Restart your n8n instance

Once this step is in place, you have automated the entire signing process. No more manual signature calculations, no risk of typos, and no extra tools needed.

Step 4: Configure the HTTP Request node to trigger the bulk search

Now you are ready to send the bulk email-search job to Icypeas.

Add an HTTP Request node after the Code node and configure it as follows:

Core configuration

  • URL: Use the value generated in the Code node, for example:
    {{$json.api.url}}
  • Method: POST
  • Body: Send as form parameters

Body parameters (form data)

Add these as key/value pairs in n8n:

  • task = email-search
  • name = Test (or any descriptive job name)
  • user = {{$json.api.userId}}
  • data = {{$json.data}}

Authentication and headers

  • Authentication: Use a header-based auth credential. Set the Authorization header value as an expression combining your key and signature:
    {{ $json.api.key + ':' + $json.api.signature }}
  • Custom header: Add:
    • X-ROCK-TIMESTAMP with value {{ $json.api.timestamp }}

With this node in place, pressing “Execute Workflow” in n8n will send your entire batch of contacts to Icypeas in one automated step.

Step 5: Run the workflow and retrieve your results

Now comes the rewarding part: seeing your automation in action.

  1. Run the workflow manually in n8n or let your trigger start it.
  2. The HTTP Request node sends the bulk-search job to Icypeas.
  3. Icypeas queues and processes your request.

When the processing is complete, you can access the results in two ways:

Keep in mind that the HTTP Request node is responsible for starting the job, not downloading the final files. The processed results are available from the Icypeas back office once the job is done.

At this stage, you have successfully turned a manual lookup process into a repeatable, scalable workflow. From here, you can expand it to push results into your CRM, enrich your records, or trigger follow-up automations.

Troubleshooting and fine tuning your workflow

Every new automation is a learning opportunity. If something does not work right away, use it as a chance to understand your tools better and refine your setup. Here are common issues and how to solve them.

1. Signature mismatch errors

If Icypeas reports a signature mismatch, double check:

  • The payload used for the signature is exactly:
    method + url + timestamp
  • You convert the entire payload to lowercase before hashing.
  • The timestamp in the payload matches the value of the X-ROCK-TIMESTAMP header.

Even small differences in spacing or casing can cause mismatches, so keep the format precise.

2. Wrong column mapping or malformed data

If the data Icypeas receives looks incorrect or incomplete:

  • Confirm that your Google Sheet headers are exactly:
    • firstname
    • lastname
    • company
  • Check that the Code node maps the data as:
    [x.json.firstname, x.json.lastname, x.json.company]
  • Verify the range in the Google Sheets node to ensure all rows are being read.

Once the mapping is correct, you can confidently scale up to larger lists.

3. Self-hosted n8n and the crypto module

If you see errors related to require('crypto') in the Code node:

  • Open your n8n settings.
  • Go to Settings > General > Additional Node Packages.
  • Add crypto to the list.
  • Restart your n8n instance.

After that, the Code node should be able to generate the HMAC signature without issues.

4. Handling rate limits and large tasks

If you work with very large datasets, you might notice longer processing times or hit rate limits. In that case, consider batching your data.

Use the SplitInBatches node after the Google Sheets node to send smaller chunks to Icypeas, for example 50 to 200 records per job. After each batch, you can add a short pause or delay to respect Icypeas processing capacity and rate limits.

This pattern improves reliability, reduces timeout risk, and keeps your automation stable as your lists grow.

Security best practices for your automated workflow

As you automate more of your work, it is important to protect your credentials and data. A few simple habits can go a long way.

  • Keep your API_SECRET private and never commit it to public repositories.
  • Use n8n credentials to store sensitive values like headers and API keys instead of hard-coding them into nodes.
  • If you work in a team, restrict access to your n8n instance and rotate keys periodically.

These practices help you build a trustworthy automation foundation you can rely on as you scale.

Scaling up: Batch processing pattern for large sheets

Once you are comfortable with the basic flow, you can extend it to handle much larger lists while keeping performance steady.

A common pattern is to use a SplitInBatches node after reading from Google Sheets:

  • Split your contacts into batches of 50 to 200 records.
  • For each batch, run the Code node and HTTP Request node to create a separate Icypeas bulk-search job.
  • Optionally add a pause or delay between batches to respect processing and rate limits.

This approach turns your workflow into a robust engine that can process thousands of contacts without overwhelming any single step

TTS Voice Calls + Email Verification (n8n & ClickSend)

TTS Voice Calls + Email Verification with n8n and ClickSend

Imagine turning a clunky, manual verification process into a smooth, automated experience that runs in the background while you focus on real work. That is exactly what this n8n workflow template helps you do.

In this guide, you will walk through a complete journey: from the frustration of scattered verification steps to a streamlined system that uses text-to-speech (TTS) voice calls and email verification in one unified flow. Along the way, you will see how this template can become a foundation for deeper automation, better security, and more freedom in your day.

The problem: scattered verification and lost time

Many teams start with simple verification: maybe a one-off email, a manual phone call, or a basic SMS. It works at first, but as you grow, the cracks begin to show:

  • Users in different regions cannot rely on SMS or prefer not to share mobile apps.
  • Manual checks eat into your time or your support team’s bandwidth.
  • Security depends on a single factor, which can be unreliable or easy to miss.

Every extra step you do by hand is energy you could spend on building your product, supporting customers, or scaling your business. Verification should protect your users, not drain your focus.

The mindset shift: let automation do the heavy lifting

When you start thinking in workflows instead of one-off tasks, you unlock a different way of working. Instead of asking “How can I verify this user right now?”, you begin asking “How can I design a system that verifies every user, every time, without me?”

n8n gives you that power. With a single workflow, you can:

  • Collect user details once through a form.
  • Trigger both TTS voice calls and email verification automatically.
  • Handle success or failure without manual intervention.

This is more than a tutorial. It is a template for how you can think about automation: start small, get one process working, then extend and refine it. Each workflow you build is a stepping stone toward a more focused, automated business.

The solution: a combined TTS voice call + email verification flow

The workflow you will use here brings together TTS voice calls and email verification in a single n8n automation. It uses:

  • n8n for workflow orchestration and form handling
  • ClickSend for TTS voice calls via their voice API
  • SMTP for sending email verification codes

The result is a two-step verification flow that is both accessible and secure, ideal for signups, transactions, or two-factor authentication.

What this n8n workflow actually does

At a high level, the workflow follows this path:

  • Collects user data from a form: phone number, language, voice preference, email, and name.
  • Generates a numeric code for the TTS voice call and formats it for clear pronunciation.
  • Places a TTS voice call using the ClickSend /v3/voice/send API.
  • Asks the user to enter the voice code and validates it.
  • If the voice code is correct, generates and sends a second verification code via email (SMTP).
  • Validates the email code and shows either a success or failure page.

This is a robust, two-step verification process that you can plug into signups, payment flows, or secure account actions. From here, you can iterate, customize, and extend as your needs grow.

Prerequisites: what you need to get started

Before you import and customize the template, make sure you have:

  • An n8n instance (cloud or self-hosted) with Form Trigger support.
  • A ClickSend account and API key (sign up at ClickSend, get your username and API key, and some test credits).
  • SMTP credentials for sending verification emails.
  • A basic understanding of HTTP requests and simple JavaScript for n8n Code nodes.

With these in place, you are ready to build a verification system that runs on its own.

Step 1: set up ClickSend credentials in n8n

Your journey starts by connecting n8n to ClickSend so you can place TTS calls automatically.

  1. Create or log in to your ClickSend account.
  2. Locate your username and API key in the ClickSend dashboard.
  3. In the n8n workflow, open the Send Voice HTTP Request node.
  4. Configure Basic Auth:
    • Username: your ClickSend username
    • Password: your ClickSend API key

Once this is done, n8n can call the ClickSend voice API on your behalf, without you touching a phone.

Step 2: build the form trigger that starts everything

Next, you create the entry point of your flow: an n8n Form Trigger that collects user details.

Use the Form Trigger node to capture:

  • To (phone number, including country code)
  • Voice (for example, male or female)
  • Lang (supported languages such as en-us, it-it, en-gb, etc.)
  • Email
  • Name

When the user submits this form, the workflow is triggered automatically. You collect everything you need in one step, then let the automation handle the rest.

Step 3: generate and manage verification codes

With the form in place, the workflow needs two codes: one for the voice call and one for email.

In the template, this is handled with Set nodes:

  • Set voice code node Generates a numeric code that will be spoken during the TTS voice call.
  • Set email code node Creates a separate email verification code, but only after the voice code is successfully validated.

This separation keeps your logic clean: the user must pass voice verification before moving on to email verification.

Refining the message: improving TTS clarity with a Code node

Raw numeric codes like 12345 can be hard to understand over a call. Spacing the digits improves clarity significantly.

The template uses an n8n Code node to transform the code from something like 12345 into 1 2 3 4 5 before sending it to ClickSend.

// Example n8n Code node script
for (const item of $input.all()) {  const code = item.json.Code;  const spacedCode = code.split('').join(' ');  item.json.Code = spacedCode;
}
return $input.all();

This small improvement goes a long way for user experience, and it is a great example of how tiny automation tweaks can create a more professional, reliable flow.

Step 4: send the TTS voice call with ClickSend

Now the workflow is ready to place a voice call using ClickSend’s /v3/voice/send API.

In the Send Voice HTTP Request node:

  • Use POST and set the body type to JSON.
  • Enable Basic Auth using your ClickSend username and API key.
  • Ensure Content-Type is application/json.

A sample JSON body looks like this:

{  "messages": [  {  "source": "n8n",  "body": "Your verification number is {{ $json.Code }}",  "to": "{{ $('On form submission').item.json.To }}",  "voice": "{{ $('On form submission').item.json.Voice }}",  "lang": "{{ $('On form submission').item.json.Lang }}",  "machine_detection": 1  }  ]
}

Key details:

  • machine_detection: 1 attempts to skip answering machines.
  • body uses the spaced code for clearer TTS pronunciation.
  • The to, voice, and lang fields are pulled from the Form Trigger node.

Once this node is configured, your workflow can dial users automatically and read out their verification code.

Step 5: verify the voice code

After the call, the user needs a way to confirm they received the correct code. This is done through another form-based step.

  • Verify voice code (Form) Presents a simple form where the user enters the code they heard in the call.
  • Is voice code correct? (If) Compares the entered code to the original voice code.

If the code matches, the workflow continues to email verification. If not, you can show a failure page, log the attempt, or offer another try. This is where you can start adding your own logic for retries and limits.

Step 6: send and confirm the email verification code

Once the voice step is successful, the workflow moves on to email verification.

  • Set email code (Set) Generates a separate code for email verification.
  • Send Email (SMTP) Uses your SMTP credentials to send the verification code to the user’s email address.

The user then receives the email and is asked to enter the code in another form:

  • Verify email code (Form) Collects the email verification code from the user.
  • Is email code correct? (If) Compares it to the stored email code and routes to either a success or failure page.

At this point, your two-factor verification is complete. All of it handled by n8n, ClickSend, and SMTP, without manual intervention.

Node-by-node summary of the n8n workflow

Here is a quick recap of the main nodes and their roles:

  • On form submission (Form Trigger) Starts the workflow and collects phone number, language, voice preference, email, and name.
  • Set voice code (Set) Creates the numeric code for the TTS call.
  • Code for voice (Code) Adds spaces between digits to make the code easier to understand over the call.
  • Send Voice (HTTP Request) Calls ClickSend’s /v3/voice/send endpoint to start the TTS voice call.
  • Verify voice code (Form) Collects the code that the user heard and typed in.
  • Is voice code correct? (If) Validates the voice code and branches the flow.
  • Set email code (Set) Generates the email verification code after voice verification passes.
  • Send Email (SMTP) Sends the email with the verification code using your SMTP credentials.
  • Verify email code (Form) Lets the user submit the email code.
  • Is email code correct? (If) Final decision node that shows success or failure pages.

Once you understand this structure, you can start to edit and expand it to fit your exact use case.

Testing your verification journey end to end

Before rolling this out to users, walk through the full flow yourself:

  1. Submit the initial form with a valid phone number and email.
  2. Confirm that you receive a TTS voice call that speaks the spaced verification number.
  3. Enter the code into the voice verification form. If correct, the workflow should send an email code.
  4. Open the email, copy the code, and submit it via the email verification form.
  5. Verify that you see the success page, or the failure page if you intentionally use an incorrect code.

This test run is more than a check. It is a moment to see your new automated system in action and to spot small improvements you might want to make, such as copy changes, timeouts, or styling.

Security and reliability best practices

As you refine this workflow, keep security and reliability in mind:

  • Do not hardcode production API keys in workflows. Use n8n credentials or environment variables.
  • Set code expiry (for example, 5-10 minutes) and limit verification attempts to reduce fraud.
  • Enable rate limiting and logging to detect suspicious activity.
  • Ensure your SMTP configuration uses authentication and TLS for secure email delivery.
  • Follow local regulations and Do-Not-Call lists when placing voice calls.

These practices help you scale safely as more users rely on your verification system.

Troubleshooting common issues

If something does not work as expected, start with these checks:

  • Voice call not received Verify ClickSend credits, API credentials, and phone number format (including country code). Check ClickSend logs for delivery status.
  • Poor digit clarity Adjust the Code node to change spacing or add pauses, or try a different TTS voice or language setting.
  • Email not delivered Confirm SMTP credentials, review spam or promotions folders, and consider using a more reliable email provider for production traffic.
  • Form fields mismatched Double-check that the field names in the Form Trigger match the references in your nodes, such as $('On form submission').item.json.To.

Each fix you apply makes your automation more stable and future proof.

Extending the workflow: your next automation steps

Once this template is running, you have a powerful base to build on. Here are some ideas to grow from here:

  • Store verification attempts and timestamps in a database such as Postgres or MySQL to enforce expiration and retry limits.
  • Add SMS as an alternative channel using the ClickSend SMS API for users who prefer text messages.
  • Localize messages and voice languages based on user locale for a more personal experience.
  • Record calls or log delivery status for auditing and support.

Each extension is another step toward a more automated, resilient system that works for you, not the other way around.

From template to transformation

By combining TTS voice calls and email verification in one n8n workflow, you create a verification strategy that is flexible, accessible, and scalable. With ClickSend handling the voice layer and SMTP delivering email codes, you get a robust two-step flow that is easy to test, adjust, and extend.

This template is not just a technical shortcut. It is a practical way to reclaim time, reduce manual work, and build trust with your users. Start with this workflow, then keep iterating. Add logging, analytics, localization, or new channels as your needs evolve.

Take the next step: import the workflow into n8n, plug in your ClickSend and SMTP credentials, run a few test verifications, and customize the messages and timeouts for your audience. Use it as a starting point to automate more of your user lifecycle.

If you want help tailoring the template to your product or want to explore more automation ideas, you can reach out, subscribe for updates, or request a walkthrough.

Call to action: Download the template, subscribe for more n8

Faceless YouTube Generator: n8n AI Workflow

Faceless YouTube Generator: Build an AI-powered n8n Workflow

If you have a YouTube idea list a mile long but no time (or desire) to be on camera, this one is for you. This Faceless YouTube Generator template for n8n helps you automatically create short, faceless YouTube videos using AI. Think of it as a little production studio that runs in the background while you do other things.

In this guide, we will walk through what the workflow actually does, when it makes sense to use it, and how all the tools fit together: RunwayML, OpenAI, ElevenLabs, Creatomate, Replicate, Google Drive, Google Sheets, and YouTube. You will also see configuration tips, cost considerations, and a few ideas to help you scale without headaches.

What this n8n faceless YouTube workflow actually does

At a high level, this automation turns a single row in Google Sheets into a fully edited, captioned YouTube Short, then uploads it for you. No manual editing, no recording, no timeline juggling.

Here is the journey from spreadsheet to YouTube:

  1. You add a new row in Google Sheets with a title, scenes, style, and caption info.
  2. n8n catches that change via a webhook and checks if the row should be processed.
  3. An LLM writes a tight 4-scene video script with strict character limits.
  4. AI turns each scene into an image prompt, then generates images with OpenAI.
  5. RunwayML converts those images into short 5-second vertical videos.
  6. ElevenLabs creates a voiceover and matching background ambience.
  7. Creatomate merges all clips and audio into one polished MP4.
  8. Replicate adds subtitles and exports a captioned version.
  9. The final video is uploaded to YouTube and the Google Sheet row is updated.

The result is a repeatable pipeline you can trigger simply by filling a spreadsheet cell.

Why use a faceless YouTube automation workflow?

Faceless channels and YouTube Shorts are great if you want to:

  • Publish content consistently without showing your face
  • Test ideas quickly without spending hours editing
  • Scale to dozens or hundreds of videos with minimal effort
  • Lean on AI for scripts, visuals, and audio while you focus on strategy

Instead of manually stitching together clips, generating images, recording voiceovers, and uploading each video one by one, this n8n workflow does the heavy lifting for you. You stay in control of the concepts, titles, and style, and the automation handles production.

When this template is a good fit

You will get the most value from this n8n template if you:

  • Run or plan to start a faceless YouTube channel or Shorts channel
  • Like working from simple spreadsheets and templates
  • Are comfortable using external APIs like OpenAI, ElevenLabs, RunwayML, and Creatomate
  • Want a repeatable, scalable way to produce short-form content

If you prefer to manually edit every frame or record live footage, this might be more of a helper than a full solution. But if your goal is volume, experimentation, and consistency, it can feel like a superpower.

How the workflow is structured in n8n

The template is organized into clear phases so you can understand or tweak each part. Let us walk through the main building blocks and integrations.

1. Triggering from Google Sheets with a webhook

The whole process starts in Google Sheets. You add or update a row with columns like:

  • Video title
  • Scene ideas or structure
  • Style or mood
  • Caption or description info

n8n listens to changes through a Webhook node. When a row changes, the webhook fires and passes the row data into the workflow. A filter node then checks a specific column (for example, a status column set to “To Do”) so only eligible rows trigger the automation. That way you can prep multiple ideas in your sheet but only process the ones you are ready for.

2. Script generation with an LLM

Next up is the script. The workflow uses a central agent called something like “Write Video Script”, powered by an LLM such as gpt-4.1-mini or an Anthropic model.

The interesting part is the length control. A small JavaScript tool is used inside the workflow to enforce an exact character range for the video_script output. The target is:

  • 4 scenes in total
  • Each scene designed to fit a 5-second clip
  • Full narration kept between 213 and 223 characters

Why so strict? Because consistent pacing makes your videos feel intentional and keeps audio and visuals in sync. If the script is too long or too short, the workflow will simply retry the generation until it lands within that range.

One small tip: when you write titles in your sheet, keep them short and list-friendly, for example “3 Ways To Sleep Better” or “Top 5 Productivity Hacks”. If the title is not list-style, the script generator will usually reshape it into a list anyway to keep the pacing smooth.

3. Turning scenes into images with OpenAI and Google Drive

Once the script is ready, each scene is converted into an image prompt. A dedicated Image Prompt Generator node takes the scene text and adds brand or style context so your visuals feel consistent over time.

The workflow then calls OpenAI’s image model, gpt-image-1, to create one image per scene. To keep everything organized and reproducible, the generated images are uploaded to Google Drive. This serves two purposes:

  • You have a permanent copy of every asset the workflow generates
  • Later nodes, like RunwayML and Creatomate, can easily access those URLs

If you ever want to tweak your visuals or reuse them in another project, they are all there in Drive.

4. Generating short clips with RunwayML

Now comes the motion. For each image, the workflow calls RunwayML’s Image-to-Video endpoint. This turns your static images into short video clips. Typical settings look like:

  • Vertical format, for example 768x1280
  • Clip length of 5 seconds per scene

The workflow loops through every scene image, sends it to Runway, then waits for the tasks to finish. Since these tasks can take a few seconds, a polling node checks the status and collects the final video URLs once they are ready. Those URLs are stored for the merge step later.

If you run into missing video URLs, it usually means the merge step tried to run before Runway finished. In that case, double-check the polling logic and any wait times between checks.

5. Sound design and voiceover with ElevenLabs

A faceless video still needs personality, and that is where audio comes in. The workflow uses ElevenLabs in two different ways:

  • Background audio A sound-generation call to the ElevenLabs Sound API creates subtle ambience. You can define the vibe through a style prompt, for example “soft lo-fi textures” or “cinematic ambience”. The idea is to keep it light so it supports the voiceover instead of overpowering it.
  • Voiceover ElevenLabs Text-to-Speech (TTS) takes the script and turns it into a natural-sounding narration. You pick the voice model that fits your channel and optionally tweak speech rate to better match YouTube Shorts pacing.

If you notice audio and video drifting out of sync, check that each video clip is exactly 5 seconds and that your TTS output duration is consistent. You can also add a small step to normalize audio length or pad short clips with ambience.

6. Merging everything into one video with Creatomate

With your clips and audio ready, the workflow hands everything off to Creatomate. This is where the final video is assembled.

You provide a predefined Creatomate template that knows:

  • Where to place each scene clip
  • How to line up the background audio and voiceover
  • Any overlays, branding, or CTAs you want to show

The workflow injects the collected video URLs and audio files into that template and triggers a render. Creatomate then outputs a single MP4 that is ready for captions and upload.

Over time, you can experiment with multiple Creatomate templates, for example different layouts, fonts, or dynamic text overlays for your branding and calls-to-action.

7. Adding captions with Replicate and uploading to YouTube

Captions are important for watch time, especially on mobile where many people scroll with the sound off. To handle this, the workflow sends the merged video to a Replicate autocaption model.

Replicate generates subtitles, burns them into the video, and returns a captioned MP4. Since some outputs on Replicate are not stored forever, the workflow downloads this final file and saves it, typically to Google Drive, so you always have a copy.

Finally, the video is uploaded to YouTube through the YouTube node. You can configure the upload settings to mark videos as:

  • Unlisted
  • Private
  • Or adjust them manually later

Once upload is complete, the workflow updates the original Google Sheets row with status info and metadata, such as the YouTube video link. That sheet becomes your simple control panel and log of what has been published.

Configuration tips, costs, and best practices

Handling API keys and rate limits

Each external service in this workflow needs its own API key. Wherever you see a placeholder like YOUR_API_TOKEN, replace it with your real credentials for:

  • OpenAI (for images and LLM)
  • RunwayML
  • ElevenLabs
  • Creatomate
  • Replicate
  • Google (Drive, Sheets, YouTube)

To avoid hitting rate limits, especially when you scale up, it helps to:

  • Limit how many workflow executions run in parallel
  • Add small waits between heavy steps like video generation
  • Batch process rows during quieter hours to reduce contention

Keeping 5-second scenes consistent

The entire template is built around short, 5-second scenes. That is why the script length is so tightly controlled and why each Runway clip is generated at a fixed duration.

To keep things running smoothly:

  • Use list-style titles in your sheet so the LLM naturally creates 3 or 4 punchy points
  • Make sure your RunwayML settings always return exactly 5-second clips
  • If you change the timing, update the character limits and audio timing logic to match

Storage and file persistence

Some providers, including Replicate, do not store generated files forever. To avoid surprises later, the workflow is designed to:

  • Download important assets, especially the final captioned MP4
  • Save them to Google Drive for long-term access
  • Keep URLs handy for Creatomate and any other tools that need them

This gives you a clean archive of all your videos and intermediate assets, which is handy if you ever want to re-edit, reuse, or audit them.

What this workflow is likely to cost

Exact pricing depends on your usage and provider plans, but here are the main cost areas to consider when estimating per-video cost:

  • Image generation (OpenAI gpt-image-1) Charged per image generated.
  • Video generation (RunwayML) Charged per clip, often around $0.25 per clip depending on the model and settings.
  • Sound and TTS (ElevenLabs) Typically billed per request or per minute of audio.
  • Creatomate rendering Charged per render based on your Creatomate plan.
  • Replicate captioning Charged per prediction or per run of the caption model.

Because everything is automated, you can easily track how many videos you are producing and map that to your monthly costs.

Troubleshooting common issues

Script not matching the character limit

If the generated script does not land in the 213 to 223 character range, the workflow is set up to retry. If it keeps failing, check:

  • That your LLM prompt clearly states the character constraint
  • That your sheet titles are not overly long or complex
  • Any custom logic you added to the JavaScript tool that counts characters

Missing or incomplete video URLs from RunwayML

Runway tasks take a bit of time to complete. If the merge step runs too early, it might find missing URLs. To fix this:

  • Use the polling node provided in the template to repeatedly check task status
  • Add a delay or increase the wait time between polls if needed
  • Log any failed tasks so you can see what went wrong

Audio and video out of sync

Sync issues almost always come down to timing mismatches. Here is what to double-check:

  • Each Runway clip is exactly 5 seconds long
  • The total script length and TTS voice speed match your total video duration
  • Any extra padding or trimming steps you added in Creatomate are consistent

If your audio is shorter than the video, you can loop or extend background ambience. If it is longer, consider slightly faster TTS or shorter scripts.

Ideas to optimize and experiment

Once the core workflow is stable, you can start using it as a testing ground for your content strategy.

  • A/B test your hooks Try different first-scene scripts or thumbnail-style image prompts to see what gets better retention and click-through.
  • Play with different voices Experiment with multiple ElevenLabs voices and slightly faster speech rates to match the snappy feel of YouTube Shorts.
  • Upgrade your branding Build multiple Creatomate templates that add dynamic text overlays, logos, and CTAs so your videos are instantly recognizable.
  • Batch your content Queue several rows in Google Sheets and let the workflow run during off-peak hours to reduce API contention and potentially lower costs.

Ethical and legal things to keep in mind

Automated content is powerful, so it is important to stay on the right side of ethics and law. A few reminders:

  • Make sure you have rights to any assets you use or generate
  • Disclose AI-generated content where required by platforms or local regulations
  • Get permission before using recognizable likenesses or trademarks

Handle Ko-fi Payment Webhooks with n8n

Receive and Handle Ko‑fi Payment Webhooks with n8n

Ko‑fi is a popular platform for donations, memberships, and digital shop sales. For automation professionals, the real value emerges when these payment events are processed automatically and integrated into downstream systems. This article presents a production-ready n8n workflow template that receives Ko‑fi webhooks, validates the verification token, and routes events for donations, subscriptions, and shop orders to the appropriate logic.

The guide focuses on best practices for webhook handling in n8n, including secure token validation, structured payload mapping, type-based routing, and reliable integration patterns.

Why automate Ko‑fi webhooks with n8n?

Ko‑fi can send webhook events for each relevant transaction type, including:

  • One‑time donations
  • Recurring subscription payments
  • Shop orders for digital or physical products

Manually processing these notifications does not scale and introduces delays and errors. With an automated n8n workflow you can:

  • Immediately post thank‑you messages to collaboration tools such as Slack or Discord
  • Synchronize donors and subscribers with your CRM, email marketing system, or data warehouse
  • Trigger automatic fulfillment for shop orders, including license key delivery or access provisioning

By centralizing this logic in n8n, you gain a single, auditable workflow for all Ko‑fi payment events.

Workflow architecture overview

The n8n workflow is designed as a secure, extensible entry point for all Ko‑fi webhooks. At a high level it:

  1. Receives HTTP POST requests from Ko‑fi using a Webhook node
  2. Normalizes the incoming payload and stores your Ko‑fi verification token
  3. Validates the verification token before any business logic runs
  4. Routes events by type (Donation, Subscription, Shop Order) via a Switch node
  5. Performs additional checks for subscriptions, such as detecting the first payment
  6. Maps the relevant fields for each event type for use in downstream integrations

Key n8n nodes in this template

  • Webhook: Entry point for Ko‑fi POST requests
  • Set (Prepare): Stores the verification token and cleans up the incoming body
  • If (Check token): Compares the provided verification_token with your stored value
  • Switch (Check type): Routes based on body.type (Donation, Subscription, Shop Order)
  • Set nodes for each type: Extract and normalize key fields like amount, currency, donor name, and email
  • If (Is new subscriber?): Detects first subscription payments using is_first_subscription_payment
  • Stop and Error: Terminates processing for invalid or unauthorized requests

Configuring Ko‑fi and n8n

The first part of the setup connects Ko‑fi to n8n and ensures that only trusted requests are processed.

1. Create the Webhook endpoint in n8n

  1. Add a Webhook node to your n8n workflow.
  2. Set the HTTP Method to POST.
  3. Copy the generated webhook URL. This URL will be registered in Ko‑fi as the webhook target.

Keep the workflow in test mode or manually execute the Webhook node while you configure Ko‑fi so you can inspect example payloads.

2. Register the webhook in Ko‑fi

  1. In your Ko‑fi dashboard, navigate to Manage > Webhooks.
  2. Paste the n8n Webhook URL into the webhook configuration.
  3. Under the Advanced section, locate and copy the verification token.

This verification token is the shared secret that n8n will use to validate incoming requests.

3. Store and normalize data in the Prepare node

Next, add a Set node, often labeled Prepare, directly after the Webhook node. Use it to:

  • Store your Ko‑fi verification token as a static value inside the workflow (or from environment variables, depending on your security model)
  • Normalize the incoming payload into a consistent structure, for example under a body property

Ko‑fi sometimes places the main payload under data depending on configuration. In the Prepare node, map the relevant fields so that later nodes can reliably access:

  • body.type
  • body.amount
  • body.currency
  • body.from_name
  • body.email
  • body.timestamp

Standardizing the structure at this stage simplifies all downstream logic and makes the workflow easier to maintain.

Securing the webhook with token validation

4. Implement the verification token check

Before processing any business logic, validate the request using an If node:

  • Compare $json.body.verification_token with the token stored in the Prepare node.
  • If they match, continue to the routing logic.
  • If they do not match, route to a Stop and Error node.

The Stop and Error node should terminate the execution and return a clear error message. This protects your workflow from unauthorized or spoofed requests and is a critical security best practice for any webhook-based integration.

Routing events by Ko‑fi payment type

5. Use a Switch node to branch logic

Once the token is validated, add a Switch node to route processing based on $json.body.type. Configure rules for each of the standard Ko‑fi event types:

  • Donation
  • Subscription
  • Shop Order

Each case in the Switch node should lead to a dedicated branch that handles mapping and downstream actions for that specific event category.

6. Map fields for each event type

In each branch, use a dedicated Set node to extract and normalize the payload fields you care about. A typical mapping looks like this:

Example JSON mapping in a Set node

{  "from_name": "={{ $json.body.from_name }}",  "message": "={{ $json.body.message }}",  "amount": "={{ $json.body.amount }}",  "currency": "={{ $json.body.currency }}",  "email": "={{ $json.body.email }}",  "timestamp": "={{ $json.body.timestamp }}"
}

By standardizing the data shape for each event type, you can reuse the same downstream nodes for notifications, storage, or analytics with minimal additional configuration.

Handling subscription payments

Subscription events often require more nuanced logic than one‑time donations. Ko‑fi may include a flag such as is_first_subscription_payment in the payload.

To support subscriber onboarding flows:

  • Add an If node in the Subscription branch that checks $json.body.is_first_subscription_payment.
  • If the flag is true, trigger first‑time subscriber actions, such as:
    • Sending a welcome email
    • Assigning a role in your membership or community system
    • Delivering exclusive content or access credentials
  • If the flag is false, route the event to your standard recurring billing logic, such as updating MRR metrics or logging payment history.

This structure keeps your onboarding logic explicit and easy to extend as your subscription offering evolves.

Typical downstream integrations

Once the Ko‑fi events are normalized, you can connect them to virtually any system supported by n8n. Common patterns include:

  • Real‑time notifications: Post formatted messages to Slack or Discord channels including donor name, amount, currency, and message.
  • Data synchronization: Insert or update records in Google Sheets, Airtable, or a CRM to maintain a single source of truth for supporters.
  • Email automation: Send receipts or personalized thank‑you emails via SMTP, SendGrid, Mailgun, or other email providers.
  • Order fulfillment: Call your fulfillment API, e‑commerce backend, or licensing system to automatically deliver products or services for shop orders.

Because all event types pass through the same template, you can maintain consistent logging, error handling, and monitoring across your entire Ko‑fi automation stack.

Security and reliability best practices

Validate the verification token for every request

Never bypass token validation. Always verify the verification_token before any action is performed. This prevents external actors from triggering your workflow or manipulating your downstream systems.

Implement idempotency for webhook processing

Webhook providers can resend events, for example after timeouts or transient errors. To avoid duplicate side effects:

  • Store a unique event identifier or a composite key such as event_id or timestamp + amount + email.
  • Use an If node or database lookup to check whether the event has already been processed.
  • Skip or log duplicates instead of re‑executing actions like charging, fulfilling, or emailing.

Log events and processing outcomes

Maintain a secure log of incoming Ko‑fi events and their processing status. You can store this in a database, a log index, or a spreadsheet. Detailed logs help with:

  • Investigating failed deliveries or integration errors
  • Tracking behavior after Ko‑fi payload format changes
  • Auditing supporter interactions across systems

Graceful error handling and HTTP responses

Design the workflow to return meaningful HTTP statuses to Ko‑fi:

  • 200 OK for successful processing
  • 400 Bad Request for invalid payloads
  • 401 Unauthorized when the verification token check fails

Use the Stop and Error node to halt processing and record the error in the n8n execution history. This improves transparency and simplifies debugging.

Testing the Ko‑fi webhook workflow

Before deploying to production, validate the workflow end to end.

  1. Activate the workflow in n8n.
  2. Use the Ko‑fi dashboard webhook tester, or tools such as curl or Postman, to send example payloads to the Webhook URL.
  3. Ensure the verification_token in the test payload matches the value stored in your Prepare node.
  4. Test each branch individually:
    • Donation events
    • Subscription events, including first and subsequent payments
    • Shop Order events
  5. Confirm that each event triggers the expected notifications, database updates, or fulfillment actions.

Troubleshooting common issues

  • No workflow execution: Verify that the workflow is active and that the Webhook URL in Ko‑fi exactly matches the URL shown in n8n.
  • Token validation failures: Re‑copy the verification token from Ko‑fi and ensure there is no extra whitespace or formatting in the Prepare node.
  • Missing or unexpected fields: Inspect the raw webhook body in the n8n execution logs. Ko‑fi may nest the payload under a data property, so adjust your Prepare node mappings accordingly.

Advanced patterns for high‑volume setups

For more complex or high‑throughput environments, consider the following enhancements:

  • Enriched notifications: Attach donor avatars or links to their Ko‑fi profile in Slack/Discord messages for more engaging recognition.
  • Tier‑aware access control: Automatically assign roles or entitlements based on subscription tiers in your membership platform or community tool.
  • Asynchronous processing: Use an external queue such as Redis, RabbitMQ, or a database table to enqueue heavy tasks and process them in background workflows. This keeps webhook response times low and improves reliability.

Conclusion

Automating Ko‑fi webhooks with n8n provides a robust foundation for handling donations, subscriptions, and shop orders at scale. By combining secure token validation, structured payload mapping, and type‑based routing, you can build a workflow that is both reliable and easy to extend.

To get started, create the Webhook node, configure Ko‑fi with the generated URL, store your verification token, and implement the routing logic for each event type. Once the core template is in place, you can layer on integrations with your preferred notification, CRM, email, and fulfillment systems.

After enabling the workflow, send test events from Ko‑fi and refine the downstream actions until they match your operational requirements. If you prefer a ready‑made starting point, you can export the nodes described here or use the linked template and adapt it to your infrastructure.

Call to action: If this guide was useful for your automation setup, consider supporting the author on Ko‑fi or sharing your implementation with your network. If you have questions or need help tailoring this workflow to a specific stack, feel free to reach out or leave a comment.

Automate VC Funding Alerts with n8n, Perplexity & Airtable

Automate VC Funding Alerts with n8n, Perplexity & Airtable

Tracking early-stage startup funding manually is inefficient and difficult to scale. TechCrunch, VentureBeat, and other outlets publish dozens of funding-related stories every day, and high-value opportunities can be missed in the noise. This article presents a production-grade n8n workflow template that continuously monitors TechCrunch and VentureBeat news sitemaps, scrapes article content, applies AI-based information extraction, and stores structured funding data in Airtable for downstream analysis and outreach.

Why automate startup funding monitoring?

For venture capital teams, corporate development, market intelligence, and tech journalists, timely and accurate funding data is critical. Manual review of news feeds and newsletters is:

  • Slow and reactive
  • Prone to human error and inconsistency
  • Hard to scale across multiple sources and time zones

An automated pipeline built with n8n, AI models, and Airtable provides a more robust approach:

  • Faster signal detection – Identify funding announcements shortly after publication by polling news sitemaps on a schedule.
  • Consistent structured output – Capture company name, round type, amount, investors, markets, and URLs in a normalized schema.
  • Scalable research workflows – Feed structured records into Airtable, CRMs, or analytics tools for prioritization, enrichment, and outreach.

Workflow overview

The n8n template implements a complete funding-intelligence pipeline that:

  • Polls TechCrunch and VentureBeat news sitemaps.
  • Parses XML into individual article entries.
  • Filters likely funding announcements via keyword logic.
  • Scrapes and cleans article HTML content.
  • Merges articles from multiple sources into a unified stream.
  • Uses LLMs (Perplexity, Claude, Llama, Jina) to extract structured funding data.
  • Performs additional research to validate company websites and context.
  • Normalizes and writes final records into Airtable.

The following sections provide a detailed breakdown of each stage, with a focus on automation best practices and extensibility.

Core architecture and key n8n nodes

Data ingestion from news sitemaps

The workflow begins with HTTP Request nodes that query the public news sitemaps for each source, for example:

  • https://techcrunch.com/news-sitemap.xml
  • https://venturebeat.com/news-sitemap.xml

An XML node then parses the sitemap into JSON. Each <url> entry becomes a discrete item that n8n can process independently. This structure is ideal for downstream filtering and enrichment.

Splitting feeds and filtering for funding-related content

Once the sitemap is parsed, the workflow uses Split In Batches or equivalent splitting logic to handle each URL entry as a separate item. A Filter node (or IF node, depending on your n8n version) evaluates the article title and URL for relevant patterns such as:

  • raise
  • raised
  • raised $ or closes $

This early filtering step is critical. It eliminates unrelated news and reduces unnecessary HTML scraping and LLM calls, which improves both performance and cost efficiency.

HTML scraping and content normalization

For articles that pass the filter, the workflow issues a second HTTP Request to fetch the full article HTML. An HTML node then extracts the relevant content using CSS selectors that are tuned for each source. For example:

  • TechCrunch: .wp-block-post-content
  • VentureBeat: #content

The HTML node returns a clean article title and body text, stripping layout elements and navigation. This normalized text becomes the input for the AI extraction stage.

Preparing content for AI-based extraction

Merging multi-source article streams

After scraping from each publisher, the workflow uses a Merge node to combine the TechCrunch and VentureBeat items into a single unified stream. This simplifies downstream logic, since the AI step and Airtable writing logic can operate on a common schema regardless of the source.

Structuring the AI input payload

A Set node prepares a compact and clearly labeled input for the language model, for example:

  • article_title – the cleaned title
  • article_text – the full body text
  • source_url – the article URL

Using a concise and explicit payload improves prompt clarity and model performance, and keeps logging and debugging manageable.

AI-driven funding data extraction

Information extraction with LLMs

The core intelligence in this template is an LLM information extraction step. The workflow can be configured with different providers, such as:

  • Anthropic Claude 3.5
  • Perplexity (via OpenRouter)
  • Llama-based models
  • Jina DeepSearch (used in the reference template)

A carefully designed prompt instructs the model to output a structured JSON object with fields like:

  • company_name
  • funding_round
  • funding_amount
  • currency (if available)
  • lead_investor
  • participating_investors
  • market / industry
  • press_release_url
  • website_url
  • founding_year
  • founders
  • CEO
  • employee_count (where mentioned)

By placing the extraction logic in a single, well-structured prompt, the workflow avoids brittle regex-based parsing and can handle a wide variety of article formats.

Schema validation and auto-fixing

LLM outputs are not always perfectly formatted. To increase robustness, the template uses an output parser or validation node that checks the model response against a JSON schema. This component can:

  • Ensure numeric fields (such as funding amount) are real numbers.
  • Validate date formats (for example, ISO 8601).
  • Repair minor formatting issues or re-request clarification from the model.

This schema-based approach significantly improves reliability when model output is noisy or partially incorrect.

Website discovery and enrichment

Two-step enrichment strategy

Certain models, particularly some Llama variants, may be less consistent at producing perfectly structured JSON in a single pass. The template addresses this through a two-step enrichment pattern:

  1. Website and context discovery – One LLM call focuses on identifying the company website and other authoritative links based on the article content.
  2. Final structured extraction – A second extraction step consolidates all known information into the target schema, now including the verified website URL and additional context.

This staged design separates discovery from final structuring, which often yields higher accuracy and more reliable URLs.

Deep research with Perplexity

For teams that require richer context, the workflow can issue a deep research request to Perplexity. This optional step returns:

  • An expanded narrative summary of the company and funding round.
  • Additional market or competitive context.
  • Source citations that can be stored alongside the record.

These research notes are valuable for analysts, journalists, or investors who want more than just core funding fields.

Persisting results in Airtable

Once the funding data is normalized, a final Airtable node writes each record into a configured base and table. Typical fields include:

  • Company name and website
  • Funding round type and amount
  • Currency and date
  • Lead and participating investors
  • Source article URL and press release URL
  • Market, founders, and other metadata

Storing results in Airtable provides a flexible interface for:

  • Review and quality control.
  • Tagging and prioritization by the investment or research team.
  • Triggering follow-up automation, such as Slack alerts, outreach sequences, or CRM updates.

Advantages of AI-based extraction vs rule-based scraping

Traditional scraping pipelines often rely on rigid selectors and regular expressions that break when article layouts change or phrasing varies. By contrast, using modern LLMs within n8n enables the workflow to:

  • Interpret context and infer missing details when they are clearly implied in the text.
  • Normalize money formats such as $5M, five million dollars, or €3 million into standardized numeric and currency fields.
  • Return citations and URLs that allow humans to quickly verify each extracted field.

This approach reduces maintenance overhead and improves resilience across different publishers and article templates.

Setup and prerequisites

To deploy this n8n workflow template, you will need:

  • n8n instance (self-hosted or n8n Cloud) with permission to install and use community nodes.
  • Network access to TechCrunch and VentureBeat news sitemaps (no authentication required).
  • LLM API credentials for your preferred provider, such as:
    • Anthropic (Claude)
    • OpenRouter / Perplexity
    • Jina DeepSearch
  • Airtable account with a base and table configured to receive the target fields.
  • Basic familiarity with n8n expressions and JavaScript for minor transformations, for example using expressions like {{$json.loc}} in Set or Merge nodes.

Customization strategies

Adjusting coverage and sources

  • Keyword tuning – Refine the Filter node conditions to match your coverage priorities. Examples include raised, secures funding, closes $, or sector-specific phrases.
  • Additional publishers – Extend the workflow with more sitemaps or RSS feeds, such as The Information or Bloomberg, using the same ingestion and filtering pattern.

Deeper enrichment and downstream workflows

  • Third-party enrichment – Add integrations with Crunchbase, Clearbit, or internal data warehouses to append headcount, location, or tech stack information.
  • Real-time alerts – Connect Slack, email, or other notification nodes to alert sector owners when a high-value or strategic round is detected.

Troubleshooting and best practices

  • Rate limiting and quotas – Respect publisher rate limits and your LLM provider quotas. Configure polling intervals, implement retry with backoff, and consider caching responses for repeated URLs.
  • Reducing false positives – If non-funding articles slip through, tighten the keyword filters or introduce a lightweight classifier step that asks an LLM to confirm whether an article is genuinely a funding announcement before full extraction.
  • Schema enforcement – Use JSON schema validation to ensure that numeric and date fields are correctly typed and formatted. This is particularly important if the data will feed analytics or BI tools.

Privacy, legal, and ethical considerations

The workflow should only process publicly available information. When storing or distributing data about individuals (for example, founders or executives), comply with your organization’s privacy policies and applicable regulations such as GDPR or CCPA. Always maintain clear citation links back to the original articles and sources so that any extracted claim can be audited and verified.

Conclusion and next steps

This n8n workflow template converts unstructured, real-time news coverage into a structured funding intelligence asset. It is particularly valuable for VC scouts, journalists, corporate development teams, and market researchers who need continuous visibility into which startups are raising capital and under what terms.

Deployment is straightforward: import the template, connect your LLM and Airtable credentials, tune your filters and schema, and you can move from manual news monitoring to automated funding alerts in hours instead of days.

Call to action: Use the template as-is or schedule a short working session with an automation specialist to adapt the workflow to your specific sources, sectors, and KPIs. [Download template] • [Book a demo]

n8n RAG Workflow for Transaction Logs Backup

n8n RAG Workflow for Transaction Logs Backup

This guide teaches you how to set up and understand a production-ready n8n workflow that turns raw transaction logs into a searchable, semantic backup.

You will learn how to:

  • Receive transaction logs through an n8n Webhook
  • Split and embed logs using a Text Splitter and Cohere embeddings
  • Store and query vectors in a Supabase vector table
  • Use a RAG Agent with OpenAI to answer natural language questions about your logs
  • Track executions in Google Sheets and send Slack alerts on errors

By the end, you will understand each component of the workflow and how they fit together so you can adapt this template to your own environment.


Concept overview: What this n8n workflow does

This n8n workflow implements a Retrieval-Augmented Generation (RAG) pipeline for transaction logs. Instead of just storing logs as raw text, it turns them into vectors and makes them queryable by meaning.

High-level capabilities

  • Receives transaction logs via a POST Webhook trigger
  • Splits long log messages into manageable chunks for embeddings
  • Creates semantic embeddings using the Cohere API
  • Stores vectors and metadata in a Supabase vector table named transaction_logs_backup
  • Provides a Vector Tool that feeds data into a RAG Agent using OpenAI Chat
  • Appends workflow results to a Google Sheet and sends Slack alerts when errors occur

Why use RAG for transaction log backups?

Traditional log backups usually involve:

  • Flat files stored on disk or in object storage
  • Database rows that require SQL or log query languages

These approaches work, but they are not optimized for questions like:

  • “Show failed transactions for customer X in the last 24 hours.”
  • “What errors are most common for payment gateway Y this week?”

A RAG workflow improves this by:

  • Embedding logs into vectors that capture semantic meaning
  • Indexing them in a vector store (Supabase) for similarity search
  • Using a language model (OpenAI) to interpret the retrieved context and answer natural language questions

The result is a backup that is not only stored, but also easy to search for audits, troubleshooting, anomaly detection, and forensic analysis.


Prerequisites and setup checklist

Before you import and run the template, make sure you have the following in place:

  • Access to an n8n instance (self-hosted or cloud) with credential support
  • A Cohere API key configured in n8n (for embeddings)
  • A Supabase project with:
    • Vector extension enabled
    • A table or index named transaction_logs_backup for embeddings and metadata
  • An OpenAI API key configured in n8n (for the Chat Model)
  • Google Sheets OAuth credentials configured in n8n (the Sheet ID will be used by the Append Sheet node)
  • A Slack API token with permission to post messages to the desired alert channel

Step-by-step: How the workflow runs in n8n

In this section, we will walk through each node in the workflow in the order that data flows through it.

Step 1 – Webhook Trigger: Receiving transaction logs

The workflow begins with a POST Webhook trigger named transaction-logs-backup. Your application sends transaction logs as JSON payloads to this webhook URL.

Example payload:

{  "transaction_id": "abc123",  "user_id": "u456",  "status": "FAILED",  "timestamp": "2025-09-01T12:34:56Z",  "details": "...long stack trace or payload..."
}

Typical fields include:

  • transaction_id – a unique identifier for the transaction
  • user_id – the user or account associated with the transaction
  • status – for example, SUCCESS or FAILED
  • timestamp – ISO 8601 formatted date and time
  • details – the long log message, stack trace, or payload

Security tip: Keep this webhook internal or protect it with an auth token or IP allowlist to prevent abuse.

Step 2 – Text Splitter: Chunking large logs

Many transaction logs are long and exceed token or size limits for embedding models. The Text Splitter node breaks the log text into smaller segments.

Typical configuration:

  • Splitter type: Character based
  • chunkSize: 400
  • chunkOverlap: 40

How it helps:

  • chunkSize controls the maximum length of each chunk. In this example, each chunk has about 400 characters.
  • chunkOverlap ensures some characters overlap between chunks so context is preserved across boundaries.

You can adjust these values based on:

  • Typical log length in your system
  • Token limits and cost considerations for your embedding model

Step 3 – Embeddings (Cohere): Turning text into vectors

After chunking, each text segment is converted into a vector using a Cohere embeddings model. The workflow is configured to use:

  • Model: embed-english-v3.0

Configuration steps in n8n:

  • Set up a Cohere API credential in n8n
  • In the Embeddings node, select the Cohere credential and specify the embedding model

Cohere embeddings provide high-quality semantic representations of English text, which is ideal for logs that contain error messages, stack traces, and human-readable descriptions.

Step 4 – Supabase Insert: Storing vectors and metadata

Once the embeddings are generated, they are stored in a Supabase vector table named transaction_logs_backup. Each row typically contains:

  • The original text chunk (document_text)
  • The embedding vector (embedding)
  • Metadata such as transaction_id, status, and timestamp

Example minimal table definition:

-- Minimal table layout
CREATE TABLE transaction_logs_backup (  id uuid PRIMARY KEY DEFAULT gen_random_uuid(),  document_text text,  embedding vector(1536), -- match your model dims  transaction_id text,  status text,  timestamp timestamptz
);

-- create index for vector similarity
CREATE INDEX ON transaction_logs_backup USING ivfflat (embedding vector_l2_ops) WITH (lists = 100);

Important details:

  • The vector dimension vector(1536) must match the embedding model output size. Adjust this if you use a different model.
  • The IVFFLAT index with vector_l2_ops enables fast similarity search on embeddings.
  • Metadata fields let you filter or post-process results (for example, only failed transactions, or a specific time range).

Step 5 – Supabase Query: Retrieving relevant logs

When you want to query the logs, the workflow uses a Supabase Query node to fetch the top matching vectors based on similarity. This node:

  • Accepts a query embedding or text
  • Runs a similarity search against the transaction_logs_backup table
  • Returns the most relevant chunks and their metadata

These results are then passed into the RAG layer as contextual information for the language model.

Step 6 – Vector Tool, Window Memory, and Chat Model

To build the RAG pipeline in n8n, the workflow combines three key components:

Vector Tool

  • Acts as a bridge between Supabase and the agent
  • Exposes the Supabase vector store as a retriever
  • Supplies relevant log chunks to the RAG Agent when a query is made

Window Memory

  • Maintains a short history of recent conversation or queries
  • Gives the agent context about prior questions and answers
  • Helps the agent handle follow-up questions more intelligently

Chat Model (OpenAI)

  • Uses an OpenAI Chat model to generate responses
  • Requires an OpenAI API key configured in n8n
  • Receives both:
    • Context from the Vector Tool (retrieved log chunks)
    • Context from the Window Memory (recent conversation)

Step 7 – RAG Agent: Retrieval plus generation

The RAG Agent orchestrates the entire retrieval and generation process. It:

  • Uses a system prompt such as: “You are an assistant for Transaction Logs Backup”
  • Calls the Vector Tool to fetch relevant log chunks from Supabase
  • Incorporates Window Memory to maintain conversation context
  • Passes all context to the OpenAI Chat model to generate a human-friendly answer or structured output

Typical use cases for the RAG Agent include:

  • Answering questions about failed transactions
  • Summarizing error patterns over a time range
  • Explaining the root cause of a recurring issue based on logs

Step 8 – Append Sheet: Tracking results in Google Sheets

When the RAG Agent successfully completes its work, the workflow uses an Append Sheet node to log the outcome.

Configuration highlights:

  • Target Google Sheet name: Log
  • Requires Google Sheets OAuth credentials and the correct SHEET_ID
  • Can store fields such as:
    • Transaction ID
    • Status
    • Timestamp
    • Agent response or summary

This gives you a lightweight, human-readable record of what the workflow processed and how the agent responded.

Step 9 – Slack Alert: Handling errors

If any part of the workflow fails, an error path triggers a Slack node that sends an alert to a designated channel.

Typical configuration:

  • Channel: #alerts
  • Message content: includes the error message and possibly metadata about the failed execution

This ensures that operators are notified quickly and can investigate issues in n8n or the connected services.


End-to-end flow recap

Here is the entire process in a concise sequence:

  1. Your application sends a transaction log as JSON to the n8n Webhook.
  2. The Text Splitter breaks the log into smaller chunks.
  3. The Cohere Embeddings node converts each chunk into a vector.
  4. The Supabase Insert node stores vectors and metadata in the transaction_logs_backup table.
  5. When you query logs, the Supabase Query node retrieves the top matching vectors.
  6. The Vector Tool passes these vectors to the RAG Agent, together with context from Window Memory.
  7. The RAG Agent uses an OpenAI Chat model to generate a context-aware answer.
  8. The Append Sheet node logs the result to a Google Sheet for tracking.
  9. If an error occurs at any point, a Slack alert is sent to #alerts.

Best practices for a robust RAG log backup

Security

  • Protect the Webhook with a token or IP whitelist.
  • Avoid exposing the endpoint publicly without authentication.

Privacy

  • Do not embed highly sensitive PII directly.
  • Consider hashing, masking, or redacting fields before storing or embedding logs.

Chunking strategy

  • Experiment with chunkSize and chunkOverlap for your specific logs.
  • Too-large chunks can waste tokens and reduce retrieval accuracy.
  • Too-small chunks can lose important context.

Metadata usage

  • Store fields like transaction_id, timestamp, status, and source system.
  • Use metadata filters to narrow search results at query time.

Cost management

  • Embedding and storing every log can be expensive.
  • Consider:
    • Batching inserts to Supabase
    • Retention policies or TTLs for older logs
    • Cold storage for very old or low-value logs

Testing and debugging the workflow

To validate your setup, start small and inspect each stage:

  • Use controlled payloads Send a few well-understood test logs to the Webhook and observe the execution in n8n.
  • Check Text Splitter output Confirm that chunks are logically split and not cutting through critical information in awkward places.
  • Validate embeddings Inspect the Embeddings node output to ensure vectors have the expected shape and dimension.
  • Test Supabase similarity search Run sample queries against Supabase and check if known error messages or specific logs are returned as top results.
  • Review agent answers Ask the RAG Agent questions about your test logs and verify that the responses match the underlying data.

Scaling and maintenance

As your volume of logs grows, plan for scalability and ongoing maintenance.

Performance and throughput

  • Use job queues or batch processing for high-throughput ingestion.
  • Batch multiple log chunks into a single Supabase insert operation where possible.

Index and embedding maintenance

  • Monitor Supabase index performance over time.
  • If you change embedding models, consider:
    • Recomputing embeddings
    • Rebuilding or reindexing the vector index

Retention and storage strategy

  • Implement TTL or retention rules for old logs.
  • Move older entries to cheaper storage if you only need them for compliance.

Extension ideas for more advanced use cases

Once you have the base workflow running, you can extend it in several useful ways:

Build a Maintenance Ticket Router with n8n & Vector Search

Build a Maintenance Ticket Router with n8n & Vector Search

Imagine if every maintenance request that came in just quietly found its way to the right team, with the right priority, without you or your colleagues having to manually triage anything. That is exactly what this n8n workflow template helps you do.

In this guide, we will walk through how to build a smart, scalable Maintenance Ticket Router using:

  • n8n for workflow automation
  • Vector embeddings (Cohere or similar)
  • Supabase as a vector store
  • LangChain tools and an Agent
  • Google Sheets for logging and auditing

We will keep things practical and friendly, so you can follow along even if you are just getting started with vector search and AI-driven routing.

What this n8n template actually does

At a high level, this workflow turns unstructured maintenance requests into structured, actionable tickets that are routed to the right team. It reads the incoming ticket, understands what it is about using embeddings and vector search, checks for similar historical tickets, and then lets an Agent decide on:

  • Which team should handle it
  • What priority it should have
  • What follow-up actions to trigger (like sending notifications or creating tickets elsewhere)

Finally, it logs the whole decision in Google Sheets, so humans can review what the automation did at any time.

When should you use a smart ticket router?

If your maintenance requests are simple and always follow the same pattern, static rules and keyword filters might be enough. But real life is rarely that neat, right?

Modern maintenance tickets usually look more like free-form messages:

  • “The AC is making a weird rattling noise near the conference room on floor 3.”
  • “Water dripping from ceiling above storage, might be a pipe issue.”
  • “Elevator keeps stopping between floors randomly.”

These descriptions are full of context and nuance. Simple keyword rules like “if ‘water’ then Plumbing” or “if ‘AC’ then Facilities” can miss edge cases or misclassify ambiguous tickets.

This is where a vector-based approach shines. By using embeddings, you are not just matching words, you are matching meaning. The workflow compares each new request with similar past tickets and known mappings so it can route more accurately and adapt over time.

How the workflow fits together

Let us zoom out before we dive into the individual nodes. The template follows this general flow:

  1. Receive ticket via a Webhook in n8n.
  2. Split long text into smaller chunks for better embeddings.
  3. Generate embeddings using Cohere (or another embeddings provider).
  4. Store vectors in a Supabase vector store for future similarity search.
  5. Query similar tickets from the vector store when a new ticket arrives.
  6. Use a Tool and Agent (via LangChain) to decide routing and actions.
  7. Log the decision in Google Sheets or your preferred system.

Now let us break down each piece and why it matters.

Key components of the Maintenance Ticket Router

1. Webhook – your entry point

The Webhook node is where new tickets enter the workflow. It exposes a public endpoint that can receive data from:

  • Web forms and internal tools
  • IoT devices or building management systems
  • External ticketing or helpdesk platforms

Security is important here. You will typically want to protect this endpoint with:

  • Header tokens or API keys
  • IP allowlists
  • Signed requests

Everything starts here, so make sure the incoming payload contains at least an ID, a description, and some reporter metadata.

2. Text Splitter – prepping descriptions for embeddings

Maintenance requests can be short, but sometimes they are long, detailed, and full of context. Embedding very long text directly is not ideal, so the Text Splitter node breaks descriptions into manageable chunks.

Typical settings that work well:

  • chunkSize: around 300-500 characters
  • chunkOverlap: around 50-100 characters

The overlap ensures that context is not lost between chunks, which helps the embeddings model understand the full picture.

3. Embeddings (Cohere or similar)

The Embeddings node is where the “understanding” happens. Here you pass each text chunk to a model like Cohere, which returns a dense vector representation of the text.

Because these vectors capture semantic meaning, you can later compare tickets based on how similar they are, not just whether they share the same words. This is the core of vector-based routing.

4. Vector Store on Supabase

Once you have embeddings, you need a place to store and search them. Supabase gives you a Postgres-backed vector store that integrates nicely with n8n.

You will use it to:

  • Insert vectors for new tickets
  • Query for the closest matches when fresh requests arrive

It is a cost-effective, straightforward option for small and medium workloads, and you can always switch to a more specialized vector database later if you need advanced features.

5. Query & Tool nodes – turning search into a usable tool

To make the vector store actually useful for routing, you query it whenever a new ticket comes in. The Query node retrieves the top similar tickets or mappings, along with metadata like team, confidence, and previous resolutions.

Then you wrap this query logic in a Tool node. This lets a LangChain Agent call the vector store “on demand” during its decision-making process. The Agent can then say, in effect, “show me the most similar tickets and how they were handled.”

6. Memory & Agent – the brain of the router

The Agent is powered by a language model and acts as the decision-maker. It takes into account:

  • The incoming ticket content
  • Search results from the vector store
  • Recent history stored in Memory
  • Your explicit routing rules

Memory helps the Agent keep track of recent patterns, which can be useful if multiple related tickets appear in a short time window.

Based on all of this, the Agent decides:

  • Which team gets the ticket (Facilities, Plumbing, IT, etc.)
  • What priority level to assign
  • Which automated actions to trigger

7. Google Sheets – simple logging and auditing

Finally, the Sheet node (Google Sheets) stores the Agent’s decision. It is a simple but powerful way to:

  • Keep an audit trail of routing decisions
  • Build quick dashboards for supervisors
  • Review and improve your prompts over time

Once you are happy with the routing logic, you can replace or complement Sheets with a full ticketing system like Jira or Zendesk via their APIs.

Step-by-step: building the workflow in n8n

Let us walk through the actual build process. You can follow these steps directly in n8n.

  1. Create the Webhook
    In n8n, add a Webhook node and configure it with:
    • Method: POST
    • Path: something like /maintenance_ticket_router

    Set up authentication, for example a header token or basic auth, so only trusted systems can send data.

    Test it with a sample JSON payload:

    {  "id": "123",  "description": "HVAC unit making loud noise on floor 3",  "reported_by": "alice@example.com"
    }
  2. Split long descriptions
    Add a Text Splitter node and connect it to the Webhook. Configure:
    • chunkSize: for example 400
    • chunkOverlap: for example 40

    This ensures each description is broken into embeddings-friendly pieces without losing important context.

  3. Generate embeddings
    Add a Cohere Embeddings node (or your preferred embeddings provider) and feed in the text chunks from the Text Splitter.
    Use a stable embeddings model and make sure each chunk gets converted into a vector.
  4. Index vectors in Supabase
    Add a Supabase vector store Insert node. Use an index name such as maintenance_ticket_router and store metadata like:
    • ticket_id
    • reported_by
    • timestamp
    • A reference to the full ticket text

    Over time this becomes your historical database of tickets for similarity search.

  5. Query similar tickets on arrival
    After embedding the new ticket, add a Query node targeting the same Supabase index. Configure it to return the top N nearest neighbors along with their metadata, for example:
    • Previously assigned team
    • Resolution notes
    • Similarity score or confidence

    These results give context for the Agent’s decision.

  6. Set up Tool + Agent for routing decisions
    Wrap the vector store query in a Tool node so your LangChain Agent can call it as needed.

    Then configure the Agent with a clear prompt that includes:

    • The ticket description and metadata
    • Search results from the vector store
    • Your routing rules, for example:
      • HVAC issues → Facilities
      • Water leaks → Plumbing

    The Agent should respond with the target team, priority, and any actions like:

    • “create a ticket in Jira”
    • “notify a specific Slack channel”
  7. Log everything in Google Sheets
    Finally, add a Google Sheets node to append a row with:
    • Ticket ID
    • Assigned team
    • Priority
    • Reason or rationale from the Agent

    This sheet becomes your human-auditable log and a quick way to monitor how well the router is working.

Designing the Agent prompt and routing rules

The quality of your routing depends heavily on how you prompt the Agent. You want the prompt to be:

  • Concise
  • Deterministic
  • Strict about output format

Few-shot examples are very helpful here. Show the Agent how different ticket descriptions map to teams and priorities. Also specify exactly what JSON shape you expect, so downstream nodes can parse it reliably.

An example output format might look like this:

{  "team": "Facilities",  "priority": "High",  "reason": "Similar to ticket #456: HVAC fan failure on floor 3",  "actions": ["create_jira", "notify_slack_channel:facilities"]
}

Make sure you validate the Agent’s output. You can use a schema validator node or a simple parsing guard to catch malformed responses or unexpected values before they cause issues downstream.

Security and data privacy considerations

Because this workflow touches potentially sensitive operational data, it is worth taking security seriously from the start:

  • Secure the Webhook with tokens, restricted origins, or signed payloads.
  • Keep Supabase and embeddings API keys safe and rotate them periodically.
  • Redact or anonymize PII before creating embeddings if your policies require it.
  • Limit how long you keep logs and memory in sensitive environments.

These steps help you stay compliant while still benefiting from AI-driven routing.

Testing, evaluation, and iteration

Before you trust the router in production, run a batch of historical tickets through the workflow and compare the Agent’s decisions to your existing ground truth.

Useful metrics include:

  • Accuracy of team assignment
  • Precision and recall for priority levels

If you see misclassifications, adjust:

  • Your prompt examples and routing rules
  • The number and diversity of tickets in the vector index

Adding more labeled historical tickets to the vector store usually improves retrieval quality and therefore routing decisions.

Scaling and operational tips

Once your router is working well for a small volume, you might want to scale it up. Here are some practical tips:

  • Batch inserts into the vector store if you have high throughput, rather than inserting every single ticket immediately.
  • Use caching for repeated or very similar queries to save on embedding and query costs.
  • Monitor Supabase and model usage to keep an eye on costs; adjust chunk sizes and embedding frequency if needed.
  • If you outgrow Supabase, consider a specialized vector database like Pinecone or Weaviate for advanced features such as hybrid search or very large-scale deployments.

Common pitfalls to avoid

A few things tend to trip people up when they first build an AI-driven router:

  • Overfitting prompts to just a handful of examples. Make sure your examples cover a broad range of scenarios.
  • Storing raw PII in embeddings without proper governance or redaction.
  • Relying only on embeddings. For safety-critical routing, combine retrieval with some rule-based checks or guardrails.

Addressing these early will save you headaches later on.

Ideas for next steps and enhancements

Once you have the basic workflow running smoothly, you can start layering on more sophistication:

  • Connect the Google Sheets node to your real ticketing platform (Jira, Zendesk, etc.) to auto-create tickets via API.
  • Add a human-in-the-loop review step for borderline or low-confidence decisions.
  • Incorporate SLAs and escalation logic directly into the Agent’s reasoning.
  • Experiment with multi-modal inputs, for example photos of issues or sensor data, and store multimodal embeddings for richer retrieval.

Wrapping up

By combining n8n’s automation capabilities with embeddings, a vector store, and a language model Agent, you can build a powerful Maintenance Ticket Router that:

  • Improves routing accuracy
  • Reduces manual triage work
  • Helps teams respond faster and more consistently

You do not have to build everything perfectly from day one. Start small: focus on logging, retrieval, and a simple prompt, then iterate as you learn from real data.

When you are ready to try this in your own environment, export the template, plug in your API keys (Cohere, Supabase, Hugging Face, Google Sheets), and run a small test set of tickets. You can also download the workflow diagram and use it as a blueprint for your own instance.

Call to action: Give this workflow a spin in n8n today. If you need a more customized setup, consider working with a workflow automation expert to tailor the router to your ticketing stack and internal processes.