Automate Industrial IoT KPI Emails with n8n

Automate Industrial IoT KPI Emails with n8n

This tutorial walks you through how to build an Industrial IoT KPI email automation in n8n using embeddings, a Redis vector store, and an AI agent that logs results to Google Sheets. You will see how incoming telemetry or KPI payloads are captured, embedded, stored, searched semantically, and finally turned into clear KPI emails for your operations team.

What you will learn

By the end of this guide, you will be able to:

  • Explain the architecture of an Industrial IoT KPI email workflow in n8n
  • Configure a webhook to receive KPI or telemetry data from your IIoT platform
  • Split and embed text, then store it in a Redis vector database
  • Use semantic search to retrieve relevant historical context for new KPI events
  • Set up an AI chat agent to generate KPI summary emails with recommendations
  • Log every email and its metadata to Google Sheets for auditing and analysis

Core concepts and architecture

Why this architecture for Industrial IoT KPI emails?

Industrial environments generate a large amount of telemetry and KPI data. The goal of this workflow is to surface that data in the form of timely, context-aware KPI emails that operations teams can actually use.

To achieve this, the architecture combines several key building blocks:

  • n8n for low-code workflow automation and orchestration
  • Text splitting to break long KPI messages or logs into smaller chunks for accurate embeddings
  • Embeddings (Cohere or similar) to convert KPI text into semantic vectors
  • Redis vector store to store and query those vectors at high speed
  • OpenAI or another LLM chat agent to generate or enrich KPI email content
  • Google Sheets to log each email and its metadata for audit, compliance, and reporting

In short, n8n coordinates the flow, embeddings and Redis provide semantic memory, and the LLM turns that memory into actionable KPI summaries.

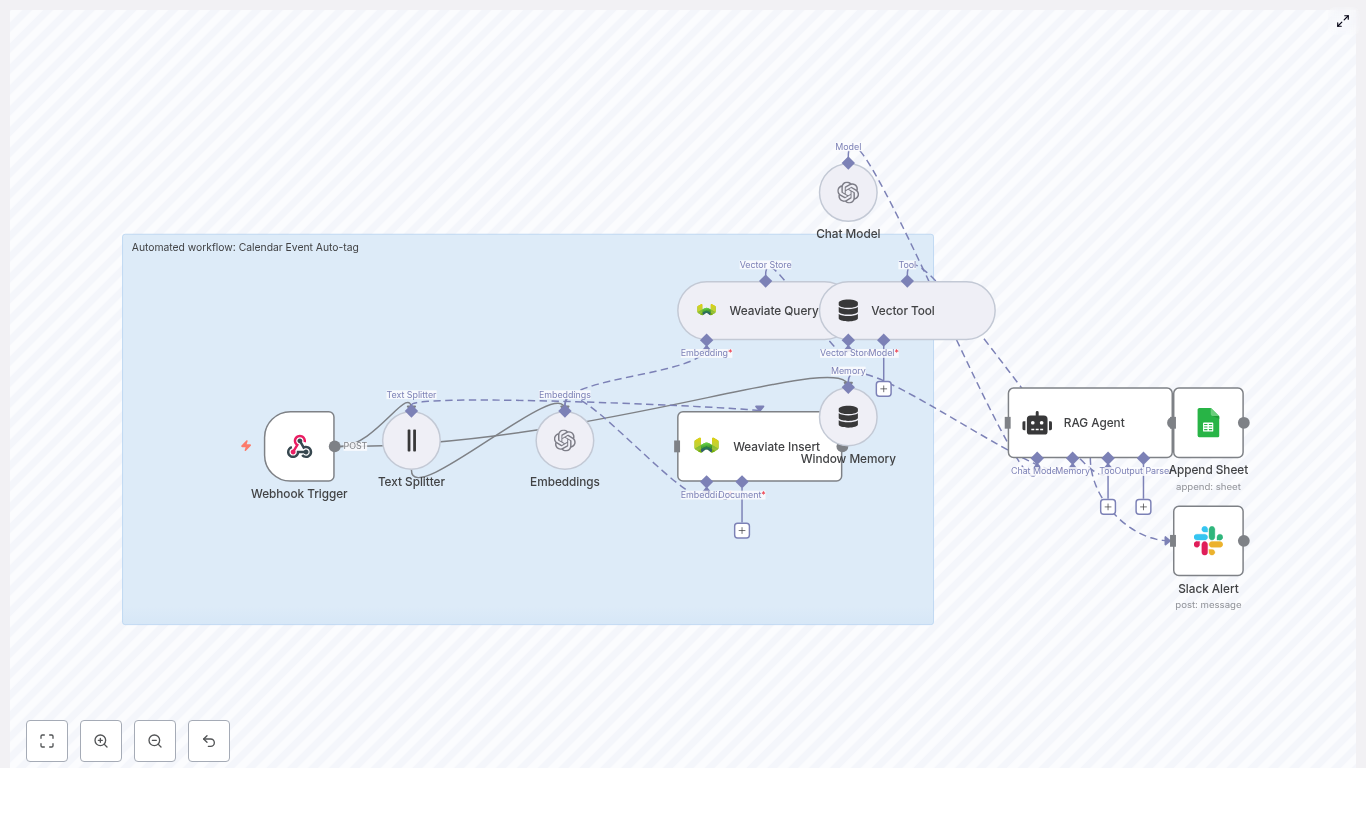
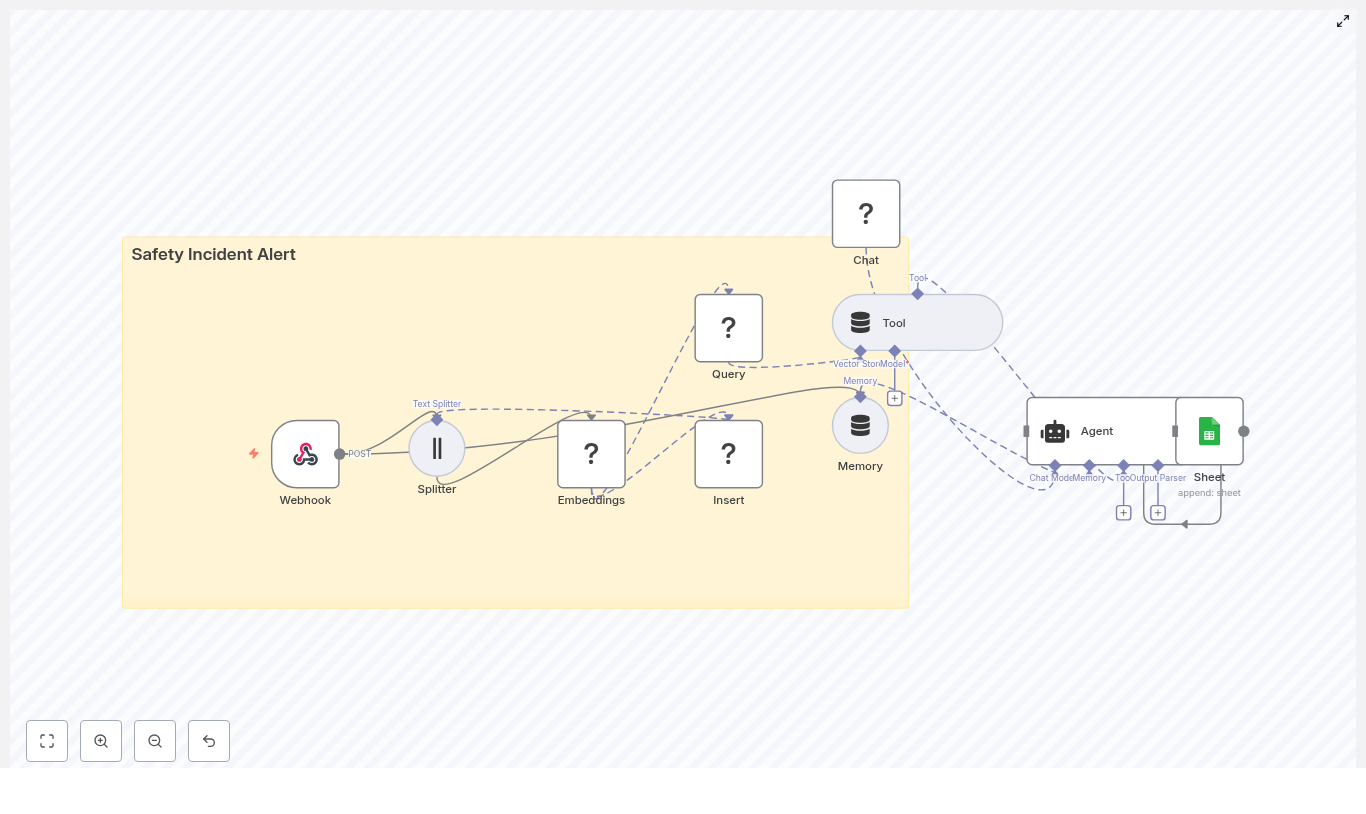
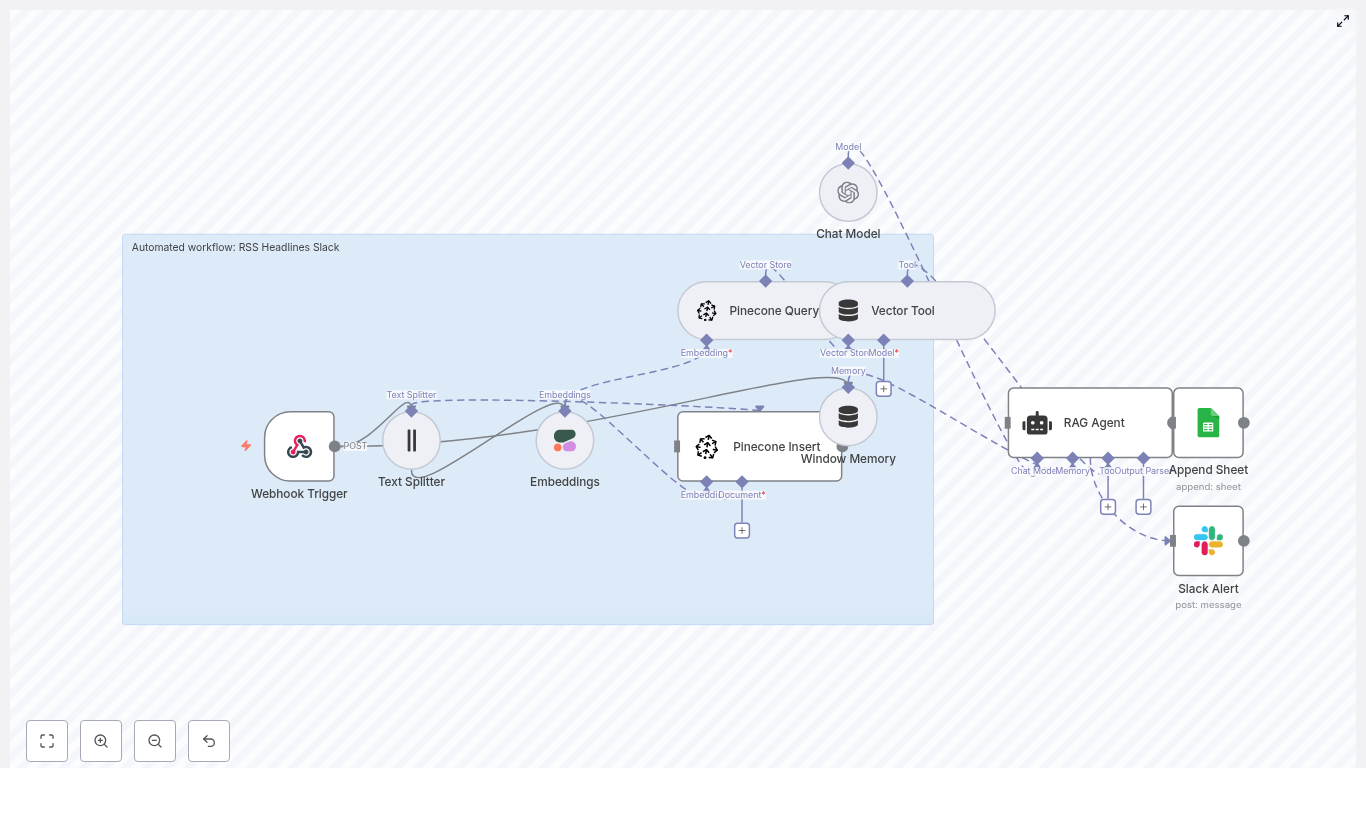
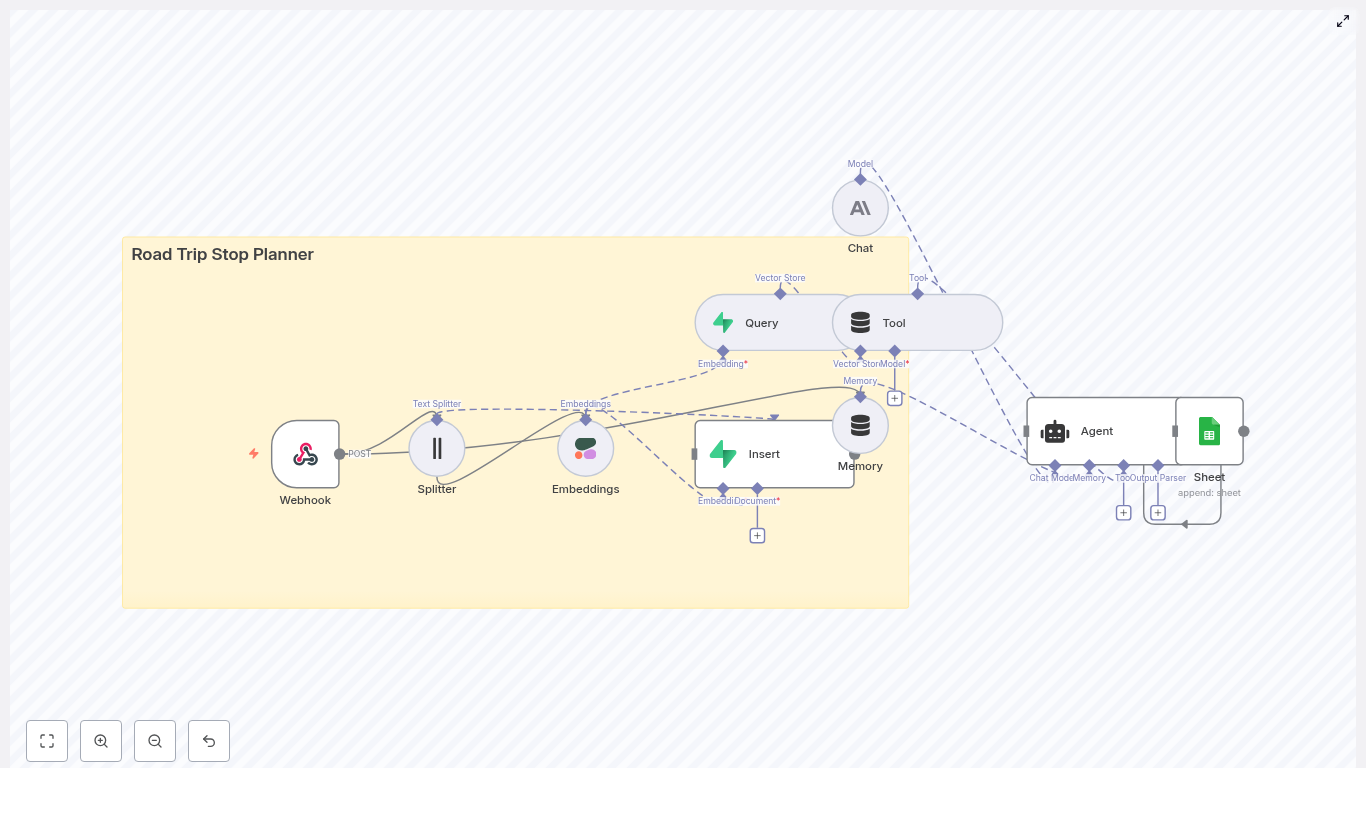
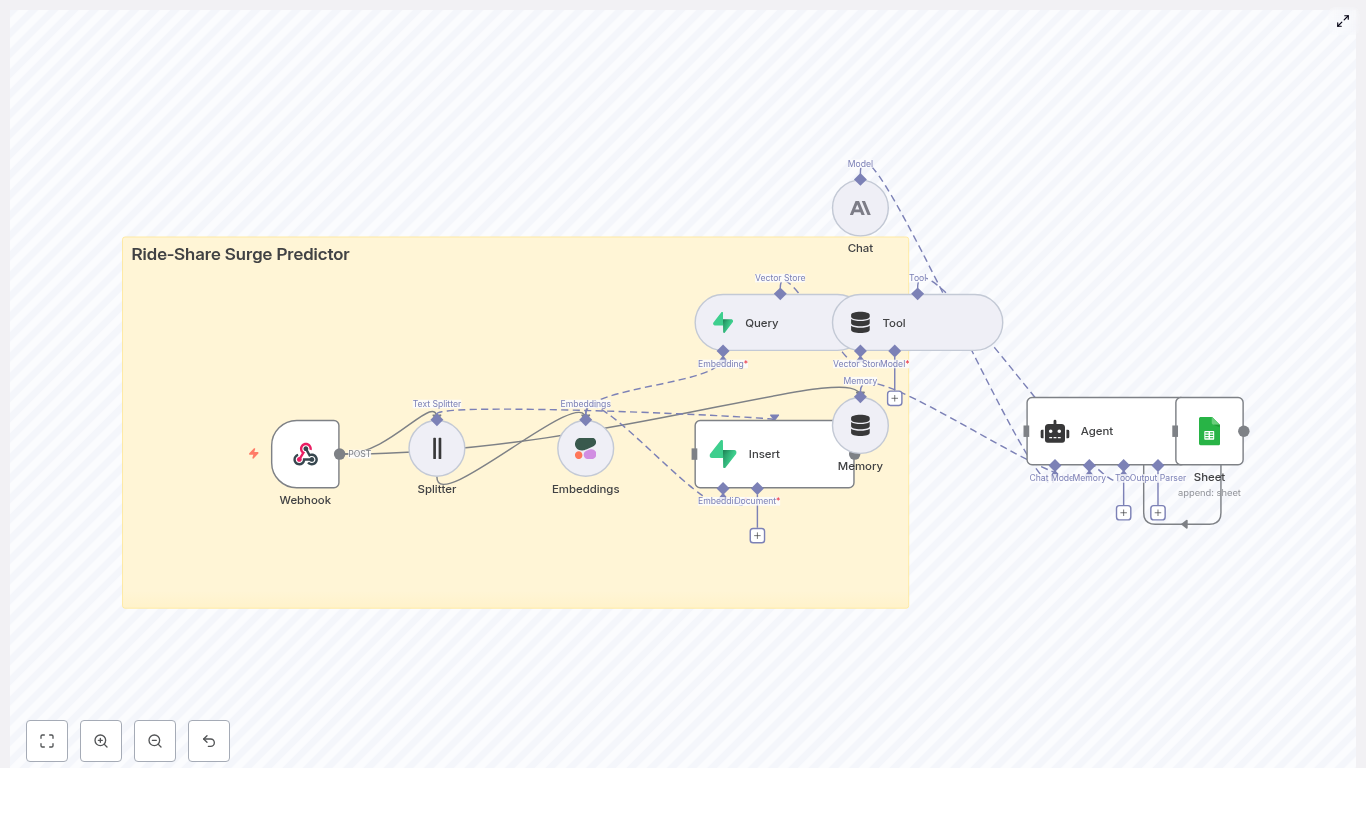
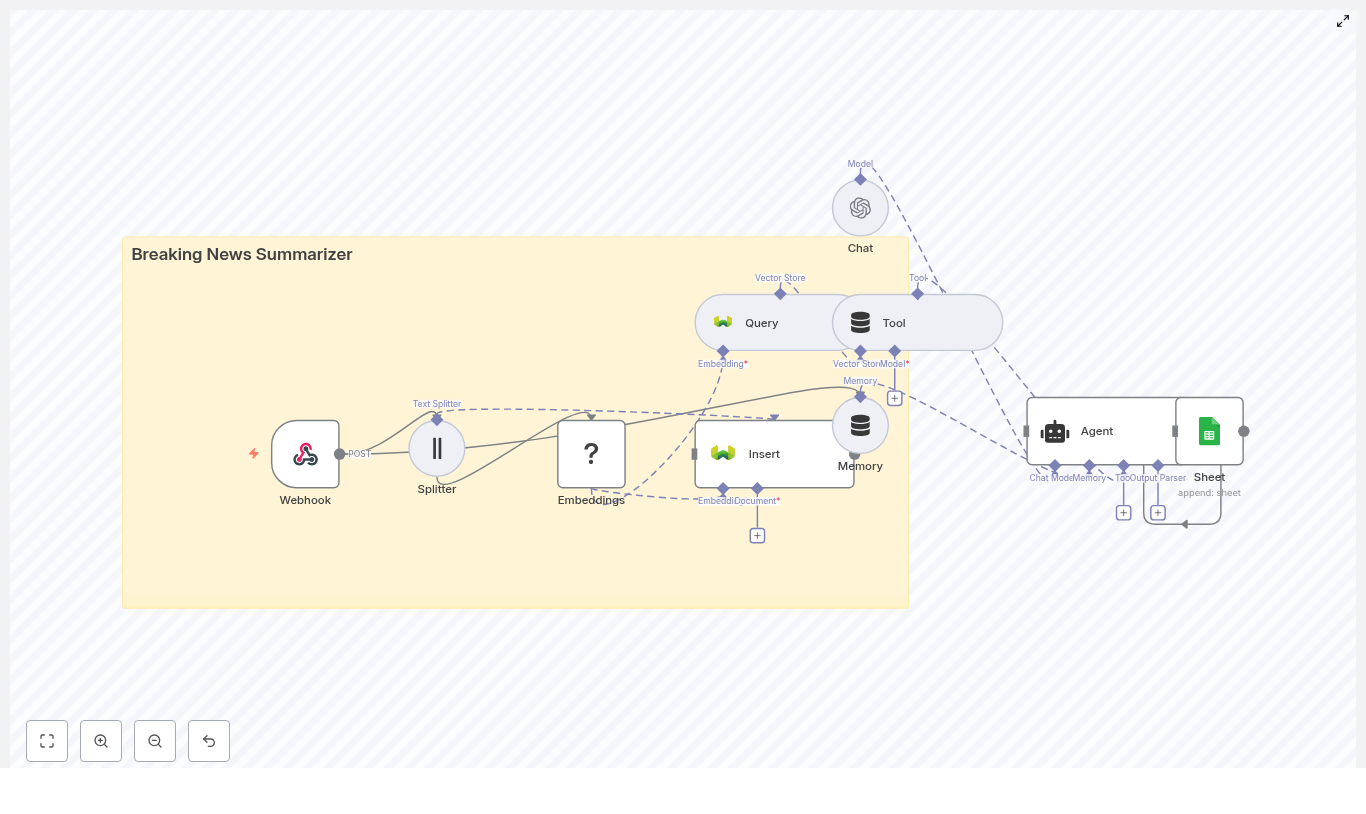
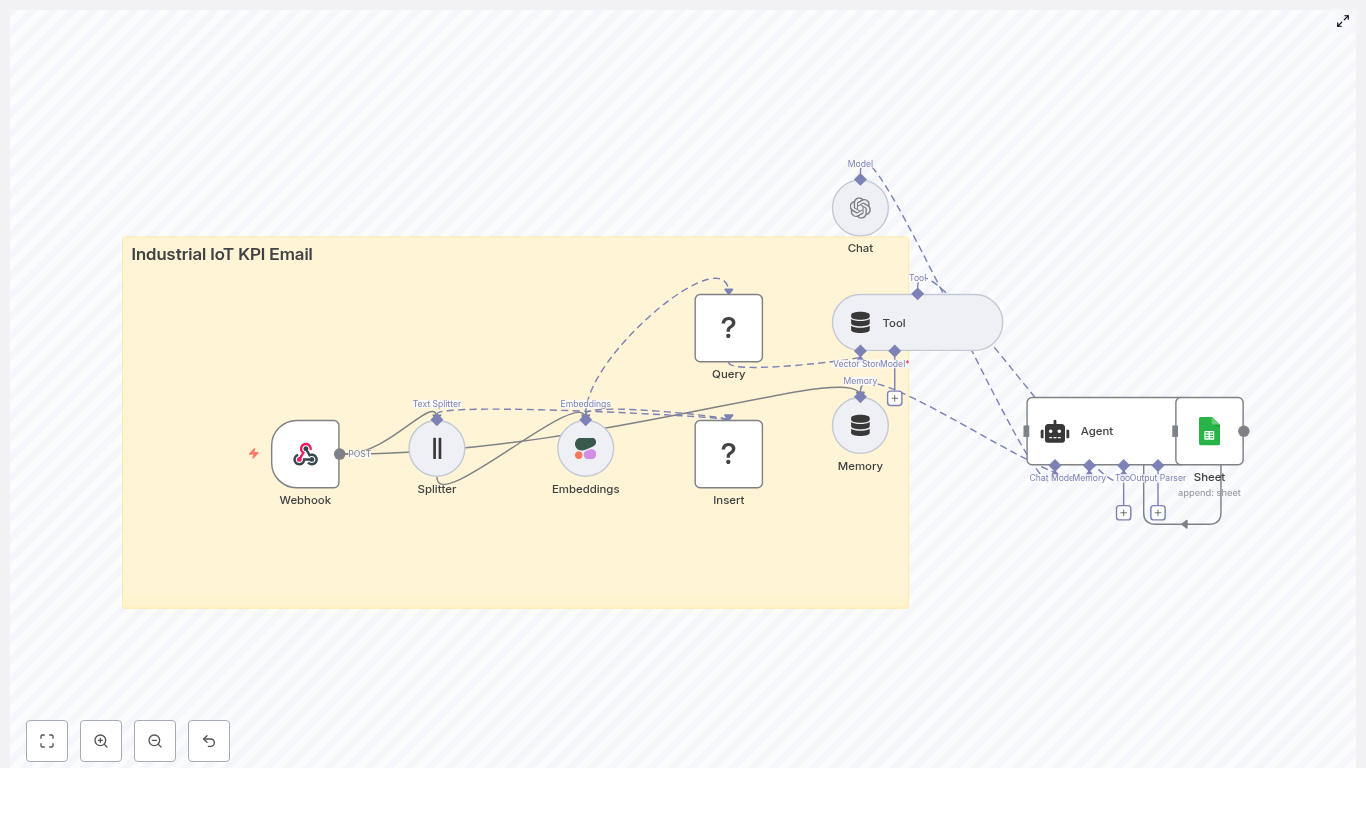
High level workflow overview

The complete n8n workflow follows this logical sequence:

  1. Webhook receives KPI or telemetry payloads via HTTP POST.
  2. Text Splitter breaks long KPI messages or logs into smaller chunks.
  3. Embeddings (Cohere) generates a vector for each text chunk.
  4. Insert into Redis vector store to index vectors along with metadata.
  5. Query Redis to find semantically similar past events when needed.
  6. Tool and memory nodes expose the vector store to the agent and keep short term conversation history.
  7. Chat model and agent use the retrieved context to write a KPI email and suggested actions.
  8. Google Sheets logs the generated email and metadata for auditing and tracking.

Prerequisites

Before you start building this in n8n, make sure you have:

  • An n8n instance (self hosted or n8n cloud)
  • API keys for Cohere (or another embedding provider) and OpenAI (or another LLM)
  • A Redis instance that supports vector operations, or a compatible vector database endpoint
  • A Google account with Sheets API credentials (OAuth) with permission to append rows
  • Basic familiarity with webhooks and JSON payloads from your Industrial IoT platform

Step by step: building the workflow in n8n

This section walks through each major node in the n8n template and explains how to configure it. You can follow along in your own n8n instance or adapt these steps to your environment.

Step 1 – Capture KPI data with a Webhook node

The entry point of the workflow is a Webhook node that accepts KPI or telemetry payloads from your IIoT gateway or platform.

  • HTTP method: set to POST
  • Path: choose a clear path such as /kpi-ingest
  • Authentication: configure IP allowlisting, header tokens, or signatures as required by your security policies

Your IIoT platform will send JSON payloads to this webhook whenever a KPI event or anomaly occurs.

Step 2 – Split long KPI messages into chunks

Many IIoT payloads include long text fields such as logs, descriptions, or alert messages. To embed these effectively, you first need to split them into smaller pieces.

Add a Text Splitter node connected to the Webhook:

  • Select the text field to split, for example message or raw_message
  • Choose a splitting method such as character based or sentence based
  • Use typical settings like:
    • Chunk size: 400 characters
    • Chunk overlap: 40 characters

The overlap helps maintain context between chunks so the embeddings preserve meaning across boundaries.

Step 3 – Generate embeddings for each chunk

Next, convert each chunk into a semantic vector using a Cohere embeddings node (or another embedding provider supported by n8n).

Connect the Text Splitter output to an Embeddings (Cohere) node and configure:

  • The field that contains the chunk text
  • The appropriate embedding model name or size

For each chunk, the node returns a dense vector that captures the semantic content of the text. Make sure to keep the original chunk text and important metadata (such as device ID, timestamp, KPI name) in the node output so you can store everything together in the vector database.

Step 4 – Store vectors in a Redis vector database

With embeddings generated, the next step is to index them in Redis so you can perform semantic searches later.

Add a node that inserts into your Redis vector store and configure it to:

  • Use your Redis connection or credentials
  • Specify the index or collection name for KPI vectors
  • Store:
    • The embedding vector
    • The original chunk text
    • Metadata such as:
      • device_id
      • timestamp
      • kpi_name or KPI type

Indexing this metadata alongside the vectors is critical for later filtering and precise retrieval.

Step 5 – Query the vector store and expose it as a tool

Once your vector store has data, you can query it whenever a new KPI event arrives or on a schedule, for example for daily KPI summaries.

Add a Query (Redis) node that:

  • Takes a new KPI text input, such as the latest anomaly message
  • Embeds this input (often using the same embedding model) or uses a precomputed vector
  • Performs a similarity search against the stored vectors
  • Returns the most relevant historical events, descriptions, or documentation

In the n8n template, this vector store is exposed to the AI agent as a Tool. That means the agent can call this tool dynamically to retrieve supporting context whenever it needs more information to write a better KPI email.

Step 6 – Configure memory and the AI chat agent

To generate useful, context rich KPI emails, you will connect an LLM to an Agent node and give it access to both memory and the vector store tool.

Set up the following:

  • Memory buffer:
    • Use a memory node to keep a short history of recent messages and system prompts
    • This helps the agent maintain continuity between multiple KPI events or follow up questions
  • Chat model (OpenAI or similar):
    • Configure your API credentials
    • Choose a suitable chat model
    • Provide a clear system prompt, for example:
      • “You are an Industrial IoT KPI assistant. Generate concise, actionable KPI summaries and recommended next steps for operations teams.”
  • Agent node:
    • Connect the chat model
    • Enable the vector store tool so the agent can query Redis for relevant context
    • Attach the memory buffer so the agent can recall recent interactions

When triggered, the agent uses the incoming KPI data plus related historical context from the vector store to compose a clear KPI email with recommended actions.

Step 7 – Log generated emails to Google Sheets

The final step in the workflow is to keep an audit trail of all generated KPI emails and their key attributes.

Add a Google Sheets node configured to:

  • Use OAuth credentials with at least append access
  • Point to a specific spreadsheet and worksheet
  • Append a new row for each generated email including:
    • Email body or summary
    • Recipient or distribution list
    • Device ID and KPI name
    • Timestamp and any action taken

This sheet becomes a simple but powerful log that operations, reliability, or compliance teams can review later.

Sample KPI payload structure

To get the most out of this workflow, design your IIoT payloads so they include the key fields that are useful for filtering, context, and reporting.

A typical JSON payload might look like:

  • device_id
  • timestamp
  • kpi_name (for example bearing_temp_avg)
  • kpi_value and threshold values
  • raw_message or log snippet for embedding
{  "device_id": "pump-42",  "timestamp": "2025-08-01T12:00:00Z",  "kpi_name": "vibration_rms",  "kpi_value": 3.2,  "threshold": 2.5,  "message": "RMS vibration exceeded threshold for pump-42. Recent pattern: spike every 5 minutes."
}

Fields like device_id, timestamp, and kpi_name should be stored alongside embeddings in Redis so you can filter and interpret search results correctly.

Best practices for reliable KPI email automation

Metadata and indexing

  • Always index metadata such as device IDs, timestamps, KPI names, and severity levels alongside embeddings.
  • Use this metadata in your Redis queries to narrow results (for example, same device or similar time window).

Chunking strategy

  • Start with a chunk size around 400 characters and an overlap of about 40 characters, then adjust based on your data.
  • For very structured logs, you may experiment with line based or sentence based splitting instead of pure character based splitting.

Performance, rate limits, and batching

  • Batch embedding requests where possible to reduce API overhead and costs.
  • Monitor your embedding and LLM provider rate limits and back off or queue requests as needed.

Security considerations

  • Secure your webhook with signatures, tokens, and IP restrictions.
  • Store all API keys and secrets in environment variables or n8n credentials, not in plain text.
  • Restrict Redis access to trusted networks or use authentication and TLS.

Monitoring and error handling

  • Add error branches in n8n to capture failures in embedding generation, Redis operations, or Google Sheets writes.
  • Log errors to a dedicated monitoring tool or a separate sheet for quick debugging.

Troubleshooting common issues

  • Irrelevant embedding matches: Check the quality of the input text and your chunking settings. Noisy or very short chunks often produce poor matches. Increase overlap or clean up the text before embedding.
  • Slow Redis inserts or queries: This often points to network latency. Consider deploying Redis close to your n8n instance or using a managed Redis service optimized for vector workloads.
  • Missing rows in Google Sheets: Verify OAuth scopes, confirm you are using the correct spreadsheet and worksheet, and ensure the account has append permissions.
  • Unexpected or low quality agent output: Refine the system prompt, give clearer instructions, and ensure the agent is actually retrieving useful context through the vector store tool.

Scaling and production readiness

For high volume Industrial IoT environments, consider these production focused enhancements:

  • Managed vector database: Use Redis Enterprise or another managed vector database like Pinecone for higher throughput and resilience.
  • Asynchronous processing: Accept webhook events quickly, then push heavy embedding and indexing work to background workers or queues.
  • Cost optimization: Cache frequent queries, reuse embeddings when possible, and consider more cost efficient embedding models for high volume workloads.
  • Observability: Instrument your workflow with metrics such as success rate, average latency, and cost per processed event.

Example Industrial IoT use case

Imagine a manufacturing operations team that wants a daily KPI email summarizing anomalies and recommended actions.

With this n8n workflow in place:

  • The IIoT platform sends anomaly alerts to the webhook.
  • The workflow embeds the anomaly descriptions and stores them in Redis with device and KPI metadata.
  • For each new anomaly, the vector store is queried for similar past issues and their resolutions.
  • The LLM agent uses this context to generate a concise KPI email that:
    • Describes the current anomaly
    • Highlights similar historical events
    • Recommends immediate next steps for operators
  • Each email and its underlying context are logged to Google Sheets for postmortem reviews and regulatory documentation.

Recap and next steps

What you have built

You have seen how to design and implement an Industrial IoT KPI email pipeline in n8n that:

  • Ingests KPI payloads via a webhook
  • Splits and embeds KPI messages into semantic vectors
  • Stores and queries those vectors in a Redis based vector store
  • Uses an AI agent to generate contextual KPI emails with recommended actions
  • Logs every email and key metadata to Google Sheets for auditing

How to get started with the template

To try this in your own environment:

  1. Import the provided n8n workflow template into your n8n instance.
  2. Connect your Cohere (or other embedding) and OpenAI (or other LLM) API keys.
  3. Configure your Redis vector store connection and Google Sheets credentials.
  4. Send a sample KPI payload from your IIoT platform or a test tool to the webhook.
  5. Iterate on chunk sizes, prompts, and query filters until the KPI emails match your operational needs.

FAQ

Can I use a different

Calendar Event Auto-Tag with n8n and Weaviate

Calendar Event Auto-Tag with n8n and Weaviate

Ever stared at your calendar thinking, “What on earth is Project Sync – Final Final v3 and why did I tag it as ‘Other’ again?” If you are tired of manually tagging events, second-guessing what they were about, and living in fear of your own calendar filters, this workflow is for you.

In this guide, you will set up an automated calendar event tagging system using an n8n workflow that plugs into OpenAI embeddings and Weaviate. It takes your raw event data, stores it in a vector database, uses a RAG agent to figure out smart tags, logs the results in Google Sheets, and even pings Slack when something breaks. Think of it as a very polite robot assistant that loves metadata and never forgets a meeting.

What this n8n workflow actually does

At a high level, this calendar event auto-tag workflow in n8n:

  • Receives calendar event payloads through a Webhook Trigger
  • Splits long descriptions into chunks using a Text Splitter
  • Generates OpenAI embeddings for each text chunk
  • Stores those vectors in Weaviate as a vector store
  • Runs similarity queries to find related past events
  • Uses a RAG agent with memory to propose meaningful tags
  • Logs everything neatly into Google Sheets
  • Sends a Slack alert if something goes wrong

The result: consistent, searchable, analytics-friendly tags on your calendar events, without you repeatedly clicking dropdowns and wondering why “Internal” and “Team” are two separate tags.

Why bother auto-tagging calendar events?

Manual tagging is one of those tiny tasks that seems harmless until you are doing it for the 200th time in a week. Automation steps in to save your sanity and your team’s time.

Auto-tagging helps you:

  • Keep labels consistent across events, teams, and time zones
  • Improve search and filtering in calendars, CRMs, and reporting tools
  • Enable analytics based on standardized tags like “Sales”, “Interview”, or “Internal”
  • Reduce admin workload so humans can stop playing “Guess That Meeting” and do actual work

With this n8n workflow, you get a reusable, scalable pipeline that your future self will be very grateful for.

How the architecture fits together

The workflow is built around n8n as the automation engine and combines several tools into a single pipeline:

  • Webhook Trigger – receives incoming calendar event payloads (POST)
  • Text Splitter – breaks long event descriptions into chunks for better embeddings
  • OpenAI Embeddings – converts text chunks into vector representations
  • Weaviate Vector Store – stores those vectors and acts as a retrieval store
  • Weaviate Query + Vector Tool – fetches relevant context for new events
  • Window Memory – keeps short-term context for the RAG agent
  • RAG Agent – uses a chat model plus retrieved context to propose tags and analysis
  • Append Sheet (Google Sheets) – logs the RAG agent output to a Log sheet
  • Slack Alert – notifies your ops or data team when errors occur

Under the hood, this is a classic n8n workflow + vector store + RAG agentcalendar event auto-tagging.

Quick setup overview

Before diving into each node, here is the high-level flow from start to finish:

  1. Calendar sends event data to your n8n webhook
  2. Event text is split into chunks
  3. Chunks are turned into OpenAI embeddings
  4. Embeddings are saved in Weaviate with event metadata
  5. New events trigger similarity queries against Weaviate
  6. A RAG agent uses that context to decide tags
  7. Results are logged to Google Sheets
  8. Any errors fire a Slack alert

Now let us walk through each step in more detail so you can recreate the workflow in n8n.

Step 1 – Create the Webhook Trigger in n8n

Start by setting up the entry point for your data.

In n8n:

  • Add a Webhook node
  • Set the method to POST
  • Configure a path like /calendar-event-auto-tag
  • Secure it using an API key, IP whitelist, or your preferred security method

This webhook trigger is where your calendar provider or middleware sends event payloads. Each payload should include details like the title, description, attendees, times, and any other fields you want to use for tagging.

Step 2 – Split event text for better embeddings

Long event descriptions can be messy, especially when they include agendas, notes, or entire email threads. To keep embeddings accurate, you want to break them into smaller, overlapping pieces.

Add a Text Splitter node and configure it to chunk:

  • Event titles
  • Descriptions
  • Attendee lists or other relevant text fields

Recommended chunk settings:

  • Chunk size: 400 characters
  • Overlap: 40 characters

This chunking strategy helps the OpenAI embeddings capture context while staying consistent for insertion into the vector store.

Step 3 – Generate OpenAI embeddings for each chunk

Next, convert those text chunks into vectors that Weaviate can store and search.

In n8n:

  • Add an OpenAI Embeddings node
  • Use a model such as text-embedding-3-small
  • Make sure your OpenAI API credentials are correctly configured in n8n

Each chunk becomes a separate document with its own embedding. These embeddings are what power similarity search in your Weaviate vector store.

Step 4 – Insert vectors into Weaviate

Now that you have embeddings, it is time to store them in Weaviate so you can query them later.

Configure a Weaviate Insert node with:

  • An index (class) name like calendar_event_auto-tag
  • Fields for the embedding vector
  • Metadata fields such as:
    • event_id
    • source (calendar name or account)
    • start_time and end_time
    • original_text (the text chunk)

This metadata is extremely useful later when you want to filter, debug, or refine retrieval behavior.

Step 5 – Query Weaviate for similar events

Once vectors are in place, your workflow can start acting smart instead of just storing data.

When a new event comes in and you generate its embeddings, you can optionally:

  • Use a Weaviate Query node to search for similar past events
  • Return the top N similar documents based on vector similarity

Those retrieved documents give the RAG agent historical context. That way, if you have consistently tagged similar meetings as “Sales” or “Interview”, the agent can follow that pattern instead of reinventing your taxonomy every time.

Step 6 – Configure the RAG agent with memory and tools

This is where the magic happens. The RAG agent takes context from Weaviate, your event text, and your instructions, then outputs structured tags.

In n8n:

  • Set up Window Memory to keep short-term context for the agent
  • Connect the retrieved Weaviate results to a Vector Tool that the agent can call
  • Create a RAG Agent node using a chat model

In the agent’s system prompt, clearly state the goal. For example, you might instruct it to classify events into tags such as:

  • Meeting
  • Interview
  • Sales
  • Follow-up
  • Internal
  • Personal
  • Other

Also tell the agent to return output in clean JSON with tags and confidence scores. This keeps your workflow deterministic and easier to debug.

Recommended RAG agent prompt

{  "system": "You are an assistant that assigns consistent tags to calendar events. Use the provided context from past events when available. Reply only with valid JSON containing 'tags' (array of strings) and 'confidence' (0-1).",  "user": "Event: {{event_text}}\nContext: {{retrieved_context}}"
}

You can tweak the tag list or confidence behavior later, but this is a solid starting point for your calendar event auto-tag setup.

Step 7 – Log results and handle errors like a pro

Once the RAG agent has done its job, you want a permanent record of what it decided. That makes it easier to audit, retrain, or build dashboards later.

Add an Append Sheet node for Google Sheets and configure columns such as:

  • Timestamp
  • Event ID
  • Suggested Tags
  • RAG Agent Response (raw JSON output)

This gives you a running log of all classifications, perfect for analytics, QA, or training a future supervised model.

To keep operations smooth, also connect a Slack Alert node that triggers on errors. Send messages to an #alerts channel with error details so someone can jump in quickly when something breaks instead of discovering a silent failure two weeks later.

Design tips for reliability and performance

To keep your n8n workflow and vector store happy, consider these best practices:

  • Rate-limit the webhook consumer so calendar sync bursts do not overwhelm your workflow.
  • Normalize text before embeddings, such as lowercasing and removing punctuation, to improve similarity matching.
  • Persist a small semantic index of common tags to improve recall and keep classifications consistent.
  • Use schema.org-style metadata in stored documents so you can filter by event type, organizer, or other structured fields during retrieval.
  • Keep the RAG agent deterministic by enforcing a JSON schema and validating the response in n8n before writing to Sheets.

These small tweaks make your n8n workflow more predictable and easier to scale.

Troubleshooting common issues

Embeddings look irrelevant

If your similarity results feel random, check:

  • Your chunking strategy. Try adjusting chunk size (up or down from 400) and overlap.
  • That you are using the intended OpenAI embedding model and not a different one by mistake.

Weaviate insert or query fails

When Weaviate acts up, verify:

  • Network connectivity from n8n to your Weaviate instance
  • Credentials and API keys
  • That the Weaviate schema for calendar_event_auto-tag (or your chosen class name) exists and matches the metadata you are sending

RAG agent returns unstructured text

If your agent suddenly gets chatty and forgets the JSON rule:

  • Strengthen the system prompt to require strict JSON only
  • Add a JSON parse step in n8n and validate the response
  • On parse failure, route the output to a human review queue and send a Slack alert so someone can fix the event manually

Privacy, PII, and governance

Calendar data often includes personal information, so treat it carefully. Before sending anything to OpenAI or Weaviate:

  • Mask or redact sensitive fields like emails and phone numbers when required by your data policy
  • Align vector and log retention with your compliance rules
  • Make sure your use of third-party services matches your organization’s privacy and governance standards

Automation is great, but not at the cost of leaking your CEO’s private dentist appointments.

Extensions and next steps

Once your calendar event auto-tag workflow is running smoothly, you can extend it in several useful ways:

  • Write tags back to the calendar using your provider’s API after a quick verification pass.
  • Train a supervised classifier on the labeled data in Google Sheets to reduce reliance on model calls over time.
  • Build a review UI where admins can approve or edit suggested tags before they are saved.

This workflow is a flexible foundation for more advanced automation, analytics, and human-in-the-loop review flows.

Wrapping up

You now have an end-to-end design for a robust n8n workflow that:

  • Starts with a webhook trigger
  • Uses OpenAI embeddings and a Weaviate vector store
  • Leverages a RAG agent to classify calendar events
  • Logs outcomes to Google Sheets and alerts via Slack on errors

It scales with your data, integrates nicely with other tools, and dramatically cuts down on repetitive tagging work. You can adjust chunking, vector store capacity, and model choices as your usage grows, or plug in extra nodes for analytics, review, and calendar write-back.

To get started, set up your webhook and OpenAI credentials in n8n, then follow the steps above to wire in Weaviate, the RAG agent, Google Sheets logging, and Slack alerts. If you prefer not to build everything from scratch, you can use a ready-made n8n template and customize the prompts and schema to match your tagging strategy.

Call to action: Try this workflow on a test calendar for 7 days. Let it auto-tag your events, review the suggestions in Google Sheets, and refine the prompt and vector schema based on what you see. Need help? Book a consultation or grab the starter n8n template from our repo.

Safety Incident Alert Workflow in n8n

Safety Incident Alert Workflow in n8n: Turn Chaos Into Clarity With Automation

Every safety incident is a critical moment. How quickly you capture it, understand it, and respond can protect people, prevent future issues, and build a culture of trust. Yet many teams still rely on manual reporting, scattered spreadsheets, and delayed follow-ups that consume time and energy.

Automation gives you a different path. With n8n, you can turn each incident into a structured, intelligent, and instantly actionable event. In this guide, you will walk through a Safety Incident Alert workflow in n8n that:

  • Captures incident data via a webhook
  • Transforms text into embeddings with Hugging Face
  • Stores and queries context in a Redis vector store
  • Uses LangChain tools and memory for AI reasoning
  • Logs final alerts to Google Sheets for reporting and audits

Think of this template as a starting point for a more automated, focused way of working. Once it is in place, you can spend less time chasing data and more time making informed decisions that move your team and business forward.

From Manual Headaches To Automated Confidence

Manual safety incident reporting often looks like this: emails buried in inboxes, inconsistent details, delays in notifying the right people, and a patchwork of logs that are hard to search or analyze.

Automating safety incident alerts with n8n turns that chaos into a clear, repeatable flow. An automated pipeline:

  • Delivers immediate alerts to the right stakeholders
  • Structures and enriches freeform text for search and analysis
  • Maintains an auditable, centralized log for compliance
  • Enables AI-driven triage and recommendations, even as your volume grows

Instead of reacting under pressure, you can design a system that works for you in the background, 24/7. This is not just about technology, it is about freeing your team to focus on higher-value work.

Adopting An Automation Mindset

Building this workflow is more than a technical exercise. It is a mindset shift. Each incident that flows through your n8n pipeline is a reminder that:

  • Repetitive tasks can be delegated to automation
  • Data can be captured once and reused many times
  • AI can help you see patterns and insights you might miss manually
  • Your workflows can evolve and improve over time, not stay frozen

Start with this Safety Incident Alert template, then keep iterating. Add new channels, refine prompts, expand your logs, and integrate with other tools. Every small improvement compounds into a more resilient, proactive safety process.

How The n8n Safety Incident Alert Workflow Works

This n8n workflow connects several powerful components into one seamless pipeline. At a high level, it includes:

  • Webhook – Receives incoming incident reports as POST requests
  • Text splitter – Breaks long descriptions into manageable chunks
  • Hugging Face embeddings – Converts text into vector representations
  • Redis vector store – Stores and retrieves vectors and metadata
  • LangChain tools and agent – Uses AI to reason, triage, and summarize
  • Memory – Keeps recent context for more informed decisions
  • Google Sheets – Logs structured incidents for reporting and audits

Each part plays a role in turning raw, freeform incident descriptions into consistent, searchable, and actionable insights.

Step-by-Step Journey: Building The Safety Incident Alert Workflow

1. Start At The Source With A Webhook

Every automated journey begins with a clear entry point. In this case, that is an n8n Webhook node.

Configure the Webhook node to accept POST requests on a path such as /safety_incident_alert. This endpoint can be called from your mobile app, internal form, or any third-party system that reports incidents.

A typical JSON payload might look like:

{  "reporter": "Jane Doe",  "location": "Warehouse 3",  "severity": "high",  "description": "Forklift collision with shelving, one minor injury. Immediate area secured."
}

By standardizing how incidents enter your system, you create a solid foundation that everything else can build on.

2. Prepare Text For AI With Smart Splitting

Incident descriptions can be long and detailed. To help your AI models understand them more effectively, use a text splitter node.

Configure the splitter (character-based or sentence-based) with a chunk size such as 400 characters and an overlap of around 40 characters. This approach:

  • Improves the quality of embeddings for long descriptions
  • Preserves context across chunks
  • Makes semantic search more accurate and reliable

This step might feel small, yet it directly impacts the quality of your downstream AI analysis.

3. Transform Descriptions Into Embeddings With Hugging Face

Next, connect your split text to a Hugging Face embeddings node (or your preferred embeddings provider). This is where raw language becomes structured, machine-understandable data.

In this node:

  • Select a model optimized for semantic search or similar tasks
  • Pass in the text chunks from the splitter
  • Store the resulting vectors along with useful metadata, such as:
    • Timestamp
    • Reporter
    • Location
    • Severity
    • Original text or incident ID

These embeddings will power similarity search and contextual recommendations later in the workflow.

4. Build Long-Term Memory With Redis Vector Store

To make past incidents searchable and reusable, use the Redis vector store node to insert your embeddings.

Key configuration points:

  • Choose an index name, for example safety_incident_alert
  • Store metadata fields like reporter, location, severity, and timestamp for filtered retrieval
  • Set the node to mode: insert so each chunk becomes a separate vector record

Over time, this builds a rich, semantic archive of incidents that your AI agent can query to spot patterns, find similar cases, and suggest better actions.

5. Enable Context-Aware Intelligence With Query And Tool Nodes

Embeddings are powerful only if you can retrieve them when needed. To give your AI agent that power, configure a Redis query node.

This node should:

  • Search the Redis vector store for the most relevant chunks based on the new incident
  • Optionally filter by metadata such as severity or location

Connect the query result to a Tool node (vector store tool). This tool becomes part of your LangChain agent’s toolkit, allowing the agent to call it during processing whenever it needs additional context.

This is what enables statements like “similar incidents in this warehouse” or “previous high severity forklift incidents” to be surfaced automatically.

6. Add Memory And An AI Agent For Triage

To move from simple data retrieval to intelligent triage, you will combine memory and a chat/agent setup.

First, add a conversation memory node, such as window-based memory. This keeps recent alerts or interactions in scope, which is useful for follow-up decisions and multi-step workflows.

Then configure a language model chat node (using Hugging Face or another provider). Finally, wire these into an Agent node that defines how to:

  • Accept the incident report as input
  • Call the Redis vector store tool when needed
  • Use memory for continuity
  • Produce a clear, structured alert as the final output

This is where your workflow begins to feel truly intelligent, not just automated. The agent can summarize incidents, confirm severity, and suggest actions informed by both the current report and historical context.

7. Log Everything In Google Sheets For Visibility And Audits

To close the loop, you want a reliable record of every incident. The Google Sheets node gives you a simple, accessible place to store that log.

Configure the node to append a new row to a sheet named Log (or your preferred name), and include fields such as:

  • Timestamp
  • Incident ID
  • Reporter
  • Location
  • Severity
  • AI-generated summary
  • Recommended actions
  • Status

With this in place, your team gains a single source of truth that is easy to filter, share, and audit, without manual data entry.

Crafting A Reliable Agent Prompt

A strong prompt is key to consistent AI behavior. Here is a pattern you can use and adapt:

Prompt: You are a safety incident triage assistant. Given the incident report and any retrieved context, produce:
1) A concise incident summary (1-2 sentences)
2) Severity confirmation and suggested actions
3) Any related past incidents (when found)

Report: {{description}}
Metadata: Reporter={{reporter}}, Location={{location}}, Severity={{severity}}
Context: {{retrieved_chunks}}

Feel free to refine this over time. Small prompt improvements can significantly enhance the clarity and usefulness of your AI-generated alerts.

Security And Compliance: Automate Responsibly

Safety data is sensitive. As you automate, keep security and compliance at the center of your design:

  • Secure the webhook with authentication, such as API keys or HMAC signatures, to prevent spoofed reports
  • Encrypt personally identifiable information (PII) in transit and at rest if incident reports include personal details
  • Restrict Redis access using network controls, strong credentials, and regular rotation
  • Limit who can access the Google Sheet, log access when possible, and allow write permissions only to the service account

By treating security as a first-class requirement, you build trust in your automated system from day one.

Testing, Monitoring, And Continuous Improvement

A powerful workflow is not something you set once and forget. It grows with your needs. Start by testing the pipeline with realistic examples:

  • Send payloads with long descriptions
  • Try edge cases such as missing fields or unusual wording
  • Include scenarios that might cause errors or unexpected outputs

Monitor the workflow for:

  • Webhook latency and failure rates
  • Embedding or vector store errors
  • Agent timeouts or hallucinations, and validate the outputs regularly
  • Google Sheets append errors and quota limits

As you observe how the system behaves, adjust chunk sizes, prompts, metadata, and error handling. Each iteration makes your automation more robust and aligned with how your team actually works.

Best Practices To Get Even More Value

To keep your Safety Incident Alert workflow efficient and scalable, consider these practical tips:

  • Keep chunk sizes consistent and experiment with overlap settings to find the best retrieval quality
  • Re-embed older records periodically when you upgrade your embedding model, so your historical data benefits from improvements
  • Store rich, structured metadata to enable filtered semantic searches, for example by location, severity, or time range
  • Limit what you store in memory to recent and relevant items to control cost and latency

These small optimizations help your n8n workflow stay fast, accurate, and maintainable as your incident volume grows.

The Benefits You Unlock With This Workflow

Once this Safety Incident Alert workflow is live, you will notice the difference in your daily operations:

  • Faster response – Time-to-action drops as incidents are captured and triaged automatically
  • Better traceability – Every incident is logged in a structured, searchable format
  • Deeper insights – Semantic search across past reports helps surface patterns and related incidents
  • Smarter decisions – AI-driven triage and recommendations give you a more informed starting point

Most importantly, you gain peace of mind. Instead of worrying about what might have been missed, you can trust that your workflow is doing the heavy lifting and that you have the data you need to keep people safe.

Your Next Step: Turn This Template Into Your Own System

You do not need to build everything from scratch. The Safety Incident Alert workflow template gives you a ready-made foundation that you can adapt to your environment.

To get started:

  1. Clone the workflow template into your n8n instance
  2. Configure your API keys and credentials:
    • Hugging Face (or your embeddings provider)
    • Redis vector store
    • Google Sheets
  3. Deploy the webhook and send a few test incident reports
  4. Review the AI outputs, the Redis entries, and the Google Sheets log
  5. Iterate on prompts, metadata, and alert formatting until it fits your team perfectly

If you want to go further, you can integrate this workflow with Slack, SMS, or your existing incident management system so that alerts reach people where they already work.

Call to action: Try this Safety Incident Alert workflow in n8n today. Deploy the webhook, send a sample report, and watch your Google Sheet start to populate with structured, AI-enriched incidents. Use it as a launchpad to automate more of your safety processes, and keep refining it as your needs grow. If you need help with custom configuration or troubleshooting, reach out for a tailored setup.

Keywords: safety incident alert, n8n workflow, LangChain, Redis vector store, Hugging Face embeddings, Google Sheets logging, incident reporting automation, safety automation template.

Automate RSS Headlines to Slack with n8n & RAG

Imagine getting the most important news, competitor updates, or industry signals delivered straight into Slack, already summarized, enriched with context, and neatly logged for later. No more skimming endless RSS feeds or drowning in headlines that all look the same.

That is exactly what the “RSS Headlines Slack” n8n workflow template is built to do. It pulls in RSS items, turns them into embeddings with Cohere, stores them in Pinecone for semantic search, runs a RAG agent with OpenAI to interpret them, logs results to Google Sheets, and keeps you in the loop with Slack alerts if anything breaks.

Let’s walk through how it works, when you might want to use it, and how to get it running without a headache.

What this n8n template actually does

At its core, this workflow is an automated RSS-to-Slack pipeline with RAG and logging. Instead of just dumping raw headlines into a channel, it:

  • Ingests RSS items via a Webhook Trigger
  • Splits the text into chunks for stable embeddings
  • Generates embeddings with Cohere’s embed-english-v3.0
  • Stores and queries vectors in a Pinecone index
  • Uses a RAG agent with OpenAI to add context, summaries, or classifications
  • Logs each processed item to a Google Sheet for tracking and analysis
  • Alerts you in Slack if something goes wrong

So instead of “yet another RSS feed,” you get a smart, searchable, and auditable alerting system that plugs right into your team’s daily workflow.

When this workflow is a perfect fit

Think about any situation where you need to stay on top of fast-moving information, but you do not want to manually read every single headline. This template shines when you are dealing with:

  • Competitive intelligence – Track product updates, press releases, or blog posts from competitors.
  • Industry monitoring – Follow niche news, regulations, or market trends.
  • PR and comms – Keep an eye on mentions, announcements, or coverage.
  • Newsroom workflows – Surface relevant stories for editors or analysts.

If you are already living in Slack and using RSS feeds somewhere in your stack, this workflow helps you cut noise, avoid duplicates, and get context at a glance.

Why it makes your life easier

Instead of manually checking feeds and copying links into Slack, this n8n template:

  • Prevents headline overload by de-duplicating similar stories with semantic search.
  • Adds meaning using a RAG agent that can summarize, classify, or tag each item.
  • Creates an audit trail in Google Sheets so you can review, analyze, or export data later.
  • Notifies you on errors in Slack so you do not quietly miss important updates.

In short, it takes a firehose of RSS data and turns it into a stream of useful, contextual alerts.

How the n8n workflow is structured

This template is an n8n workflow made up of several key nodes that each handle one part of the process.

1. Webhook Trigger: your RSS entry point

The workflow starts with a Webhook Trigger node that receives incoming RSS notifications as a POST request.

You can use:

  • An RSS-to-webhook service
  • Or another n8n workflow that polls an RSS feed and forwards new items

The payload should ideally include:

  • headline
  • url
  • summary
  • pubDate or published timestamp

2. Text Splitter: prepping content for embeddings

Some RSS items contain more than just a short headline. To make embeddings reliable, the workflow uses a Text Splitter node.

It uses a character-based splitter with:

  • Chunk size: 400 characters
  • Chunk overlap: 40 characters

This keeps context across chunk boundaries while staying within model limits so your embeddings are accurate and stable.

3. Embeddings (Cohere): turning text into vectors

Next, each chunk goes into the Embeddings (Cohere) node.

Here the workflow uses Cohere’s embed-english-v3.0 model to convert text into vector embeddings. These embeddings are what make semantic search and similarity checks possible later on.

4. Pinecone Insert and Query: memory for your headlines

Once embeddings are generated, the workflow talks to Pinecone, a vector database.

  • Insert: Embeddings are stored in a Pinecone index named rss_headlines_slack.
  • Metadata: Each vector keeps useful metadata like headline, URL, timestamp, and source.
  • Query: Before inserting or when enriching, the workflow can query Pinecone to find near-duplicates or pull in context.

This is what lets the system avoid repeated alerts for essentially the same story and gives the RAG agent more context to work with.

5. Window Memory and Vector Tool: context for the RAG agent

The workflow then uses two tools to feed context into the RAG agent:

  • Window Memory: Keeps a short rolling buffer of recent context so the agent can “remember” a bit of what happened earlier in the workflow.
  • Vector Tool: Connects directly to the Pinecone index so the agent can retrieve relevant embeddings while reasoning.

Together, they help the agent generate responses that are grounded in actual stored data, not just the current input.

6. Chat Model (OpenAI) and RAG Agent: adding intelligence

Now the fun part. The workflow uses a Chat Model (OpenAI) together with a RAG Agent.

The RAG agent uses:

  • Your configured OpenAI chat model
  • The Vector Tool to pull relevant vectors from Pinecone

Based on the prompt you provide, the agent can:

  • Summarize the article or headline
  • Classify tone or sentiment
  • Assign a priority level
  • Detect topics or tags

You control this behavior through prompt design, which we will touch on in a moment.

7. Append Sheet (Google Sheets): logging everything

After the agent does its work, the output is written to a Google Sheet using an Append Sheet node.

Typically this goes into a sheet named something like “Log”, where each row might include:

  • Headline
  • URL
  • Published date
  • Summary or classification from the RAG agent
  • Status, tags, or priority

This gives you a persistent audit trail you can review, filter, or export for analytics.

8. Slack Alert: catching issues early

If something goes wrong, you do not want to silently miss stories. That is why the workflow includes a Slack Alert node.

When the RAG agent errors out or the workflow detects an issue, it posts a message to a channel you choose, for example #alerts. That way, you or your team can jump in quickly and fix things.

How data flows through the workflow

To recap the journey of a single RSS item, here is the flow from start to finish:

  1. An RSS item triggers the Webhook node.
  2. The text is split into chunks by the Text Splitter.
  3. Chunks are sent to Cohere to generate embeddings.
  4. Embeddings are inserted into Pinecone and also used to query for similar vectors.
  5. The RAG agent, powered by OpenAI + Vector Tool + Window Memory, enriches or summarizes the item.
  6. Results are appended to Google Sheets for logging.
  7. If something fails, a Slack alert is sent so you can respond.

Configuring the workflow: what you need to set up

API keys and environment setup

To keep everything secure and maintainable, store all credentials in the n8n credentials manager instead of hard-coding them.

You will need credentials for:

  • OpenAI API (for the chat model)
  • Cohere API (for embeddings)
  • Pinecone (for vector storage and search)
  • Google Sheets OAuth2 (for logging)
  • Slack (for alerts)

For Google Sheets, use a scoped service account with only the access it needs, not your personal account with broad permissions.

Pinecone index configuration

Before you run the workflow, make sure Pinecone is set up correctly.

  • Create an index named something like rss_headlines_slack.
  • Choose the dimensionality that matches the Cohere embed-english-v3.0 model. Check Cohere’s model documentation for the exact dimension size.
  • Use metadata fields such as:
    • headline
    • url
    • source
    • published_at

These metadata fields make it easier to filter and interpret query results later.

De-duplication with semantic similarity

No one wants to see the same story three times just because different feeds phrased it slightly differently.

To avoid that, use semantic similarity thresholds when querying Pinecone before inserting new vectors.

For example:

  • Query Pinecone for similar items using the new embedding.
  • If the top match has a similarity score above something like cosine > 0.95, treat it as a near-duplicate.
  • In that case, you can either skip insertion or tag the item as a duplicate in your logs.

Prompt engineering for the RAG agent

The power of this workflow really comes from how you instruct the RAG agent. A good prompt means cleaner, more structured output.

Some tips:

  • Use a concise system message that clearly defines the agent’s role, for example “You are an assistant that classifies and summarizes news headlines for a Slack-based monitoring system.”
  • Ask for structured output such as:
    • status (e.g., “relevant”, “ignore”)
    • summary
    • tags or topics
    • priority

Structured responses are easier to append to Google Sheets and to use for downstream automations.

Ideas for enhancing and customizing the template

Once you have the basic workflow running, you can tweak it to better match your use case.

  • Keyword filtering
    Insert a node to either discard or prioritize items that match certain high-value keywords, like specific product names or competitors.
  • Content enrichment
    Instead of just embedding the RSS summary, add a step to fetch the full article text first. That gives you richer embeddings and better RAG results.
  • Multi-channel delivery
    Send high-priority items not only to Slack but also to email, a ticketing system, or other tools your team uses.
  • Analytics pipeline
    Periodically export your Google Sheet to BigQuery or another warehouse to analyze trends over time.

Testing and monitoring your setup

Before you point production feeds at this workflow, it is worth doing a safe test run.

  • Start with a dev environment or a test n8n instance.
  • Use a sample RSS feed so you can predict the kind of content you will see.
  • Leverage the n8n execution history to inspect outputs at each node.
  • Verify that Slack alerts fire correctly when you intentionally break something.
  • Monitor Pinecone usage so you do not run into unexpected costs.

Security and cost considerations

A few practical things to keep in mind when you move this into real-world use:

  • Limit API key scope
    Give each API key or service account the minimum permissions it needs.
  • Rate limit incoming webhooks
    Prevent abuse or accidental overload by setting sensible rate limits on the Webhook Trigger.
  • Sanitize incoming content
    RSS feeds can contain messy or unexpected data. Clean and validate inputs before passing them along.
  • Control embedding and vector costs
    Embedding APIs and vector databases typically bill per request or per stored vector. To manage cost:
    • Batch requests when possible
    • Keep chunk sizes reasonable
    • Use de-duplication to avoid storing repeated content

Quickstart: get up and running fast

Ready to try it out? Here is a short checklist to get this n8n template working.

  1. Import the template into your n8n instance.
  2. Configure credentials for:
    • Cohere
    • Pinecone
    • OpenAI
    • Google Sheets
    • Slack
  3. Create a Pinecone index with the correct dimensionality for Cohere’s embed-english-v3.0 model.
  4. Point your RSS service or RSS-to-webhook tool to the workflow’s Webhook URL.
  5. Test with a sample item, then check:
    • n8n execution logs
    • Your Google Sheet log
    • Slack alerts and any test messages

Common troubleshooting tips

If something is not working the way you expect, here are a few quick checks.

  • No data in Pinecone
    Make sure the Embeddings node

Road Trip Stop Planner with n8n & AI

Build an AI-Powered Road Trip Stop Planner with n8n

Designing a memorable road trip requires more than simple point-to-point routing. It involves aligning routes, pacing, and stops with individual preferences and constraints. This article presents a reusable n8n workflow template that transforms unstructured trip descriptions into high-quality, AI-driven recommendations. The solution integrates text splitting, Cohere embeddings, a Supabase vector store, Anthropic’s chat models, and Google Sheets logging to deliver a robust, production-ready “Road Trip Stop Planner.”

Why augment route planning with AI and embeddings?

Conventional route planners optimize for distance and travel time. They rarely capture user intent such as scenery preferences, activity types, or travel style. By introducing AI and vector search into the pipeline, you can:

  • Translate free-form trip notes into structured, queryable representations
  • Leverage similarity search to surface relevant, context-aware stops
  • Retain user preferences over time for increasingly personalized itineraries
  • Iterate quickly on recommendations using logged sessions and analytics

The core idea is to convert user input into embeddings, store them in a vector database, and then use an agent-driven LLM to synthesize those results into practical itineraries.

Solution architecture at a glance

The n8n workflow implements an end-to-end data flow from incoming request to final recommendation. At a high level, the architecture consists of:

  • Webhook – Accepts trip submissions from external clients
  • Text Splitter – Prepares long inputs for embedding
  • Cohere Embeddings – Generates semantic vectors
  • Supabase Vector Store – Persists and indexes embeddings
  • Query & Tool Node – Retrieves relevant context for the agent
  • Anthropic Chat & Memory – Maintains conversation context and generates responses
  • Agent – Orchestrates tools, memory, and LLM to produce the itinerary
  • Google Sheets – Logs sessions for audit and analytics

This modular design makes it straightforward to extend or swap components, for example by changing the LLM provider or adding new tools.

Data flow in detail

1. Ingesting trip requests with a Webhook

The workflow starts with an n8n Webhook node configured to accept POST requests. This provides a simple API endpoint that mobile apps, web forms, or backend services can call. A typical JSON payload looks like:

{  "user_id": "12345",  "trip": "San Francisco to Los Angeles via Highway 1. Interested in beaches and scenic viewpoints.",  "date_range": "2025-06-20 to 2025-06-25"
}

The webhook passes this payload into the workflow, where it becomes the basis for both embeddings and downstream AI reasoning.

2. Preparing content with a character-based text splitter

Long, unstructured trip descriptions are rarely optimal for direct embedding. The workflow uses a character-based text splitter node to segment the input into manageable chunks. Recommended configuration:

  • chunkSize: 400 characters
  • chunkOverlap: 40 characters

This approach preserves local context while controlling token usage and embedding cost. The overlap helps ensure that important details are not lost at chunk boundaries.

3. Generating semantic embeddings with Cohere

Each text chunk is then passed to a Cohere Embeddings node. The model converts the text into high-dimensional vectors that capture semantic relationships rather than exact wording. To maintain predictable retrieval behavior, use a single embedding model consistently for both write (insert) and read (query) operations.

The resulting vectors are enriched with metadata such as:

  • user_id
  • original_text
  • date_range

This metadata becomes important for filtering and analytics in later stages.

4. Persisting vectors in Supabase

After embedding, the workflow inserts each vector into a Supabase project configured with a vector store. A dedicated index, for example road_trip_stop_planner, is used to keep the data organized and queryable.

Best practice is to store both the vector and all relevant metadata in the same row. This enables:

  • Efficient similarity search on the embedding
  • Filtering by user, date, or other attributes
  • Traceability back to the original text input

5. Querying the vector store and exposing it as a tool

When a user requests recommendations, the new query text is embedded with the same Cohere model. The workflow then performs a similarity search against the Supabase vector index. The top results are returned as the most relevant trip notes, historical preferences, or related content.

These results are wrapped in a Tool node that the agent can call. In practice, the Tool node abstracts the retrieval logic and presents the agent with structured context, such as stop descriptions, tags, or previous user feedback.

6. Maintaining conversation context with Anthropic Memory & Chat

To support multi-turn interactions and evolving user preferences, the workflow includes a memory buffer. This memory captures:

  • Recent user questions and clarifications
  • Previously suggested stops and user reactions
  • Corrections or constraints (for example, “avoid long hikes”)

The Anthropic chat model acts as the underlying LLM, consuming both the retrieved vector store context and the memory state. It is responsible for generating natural, coherent, and instruction-following responses that align with the user’s trip objectives.

7. Orchestrating decisions with the Agent node

The Agent node in n8n brings together tools, memory, and the LLM. It is configured to:

  • Call the vector store Tool for relevant context
  • Use the memory buffer to track the ongoing conversation
  • Generate a final response in the form of a structured itinerary or recommendation set

Typical outputs include:

  • A list of primary recommended stops with approximate distances and suggested visit durations
  • Contingency options for detours or schedule changes
  • Personalized notes, such as packing suggestions or timing tips

The agent’s configuration and prompt design determine how prescriptive or exploratory the recommendations are, which can be tuned based on user feedback.

8. Logging and analytics with Google Sheets

For observability and continuous improvement, the workflow appends each planning session to a Google Sheet. The Google Sheets node typically records:

  • user_id
  • Timestamp of the request
  • Original trip description
  • Final agent response

This log enables manual review, A/B testing of prompts, monitoring of failure patterns, and downstream analytics. It also provides a straightforward audit trail for support or QA teams.

Deployment requirements and configuration

To run this n8n workflow template in production, you will need:

  • An n8n server or n8n cloud instance
  • A Cohere API key for generating embeddings
  • A Supabase project with vector store capabilities enabled
  • An Anthropic API key (or another chat-capable LLM configured similarly)
  • Google Sheets OAuth credentials for logging and analytics

In n8n, configure credentials or environment variables for each external service. Before going live, ensure that:

  • The webhook endpoint is reachable and correctly secured
  • Google Sheets scopes allow append access to the target spreadsheet
  • Supabase schema and indexes are aligned with the vector store configuration

Optimization strategies and best practices

Embedding and chunking choices

  • Chunk size: 400 characters with 40-character overlap is a balanced default. Smaller chunks can reduce noise but will increase the number of embeddings and storage.
  • Model consistency: Use the same Cohere embedding model for both insert and query operations to avoid distribution mismatches.

Index and data governance

  • Namespace indexes per project or version, for example road_trip_stop_planner_v1, to simplify migrations and rollbacks.
  • Include rich metadata such as location tags, trip themes, or user segments to enable more precise filtering and experimentation.

Privacy, security, and cost control

  • Privacy: Remove or encrypt sensitive PII before generating embeddings if long-term storage is required.
  • API security: Store all external API keys in n8n credentials, not in plain text. Protect the webhook endpoint with secret headers or tokens, and consider IP allowlists for production.
  • Rate limits and cost: Monitor Cohere and Anthropic usage. Batch embedding requests where possible and tune chunk sizes to balance accuracy with cost.

Troubleshooting common issues

Issue: Weak or irrelevant recommendations

This typically stems from suboptimal chunking or insufficient metadata. To improve relevance:

  • Experiment with smaller chunk sizes and reduced overlap
  • Add richer metadata such as geographic coordinates, stop categories, or user preference tags
  • Verify that the same embedding model is used for both insertion and querying

Issue: Slow vector queries

If responses are slow, investigate:

  • Supabase instance sizing and performance settings
  • Limiting the number of nearest neighbors returned (top-K)
  • Implementing caching for repeated or similar queries

Issue: Security and access concerns

For secure production deployments:

  • Keep all secrets in n8n credentials or environment variables
  • Use a shared secret or token in request headers to protect the webhook
  • Consider IP whitelisting or API gateway protection for the public endpoint

Example agent prompt for road trip planning

The agent’s behavior is heavily influenced by its prompt. Here is a sample instruction you can adapt:

"User is driving SF to LA, prefers beaches and scenic viewpoints. Suggest 5 stops with brief descriptions and recommended time at each stop. Prioritize coastal routes and include at least one kid-friendly stop."

Adjust the prompt to control the number of stops, level of detail, or constraints such as budget or accessibility.

Extending the Road Trip Stop Planner

The workflow is designed to be extensible. Common enhancements include:

  • Map integrations: Connect to Mapbox or Google Maps APIs to generate clickable routes, visual maps, or distance calculations.
  • User profiles: Store persistent user preferences in relational tables, then use them as filters or additional context for the agent.
  • Feedback loops: Let users rate suggested stops, then incorporate ratings into the ranking logic or embedding metadata.
  • Rich media metadata: Attach photos or short video notes as additional metadata to refine embeddings and improve stop selection.

Conclusion

This n8n-based Road Trip Stop Planner illustrates a practical pattern for turning free-text trip notes into actionable, tailored itineraries using embeddings, vector search, and an AI agent. The workflow is modular, auditable, and well suited for iterative improvement as your dataset and user base grow.

Ready to implement it? Deploy the workflow to your n8n instance, configure the required API credentials, and send a sample trip payload to the webhook endpoint. From there, you can refine prompts, adjust chunking, and evolve the planner into a fully personalized travel assistant.

Call to action: Export this template into your n8n environment, run a test trip, and share your findings so the planner can be continuously improved.

Ride-Share Surge Predictor with n8n & Vector AI

Ride-Share Surge Predictor with n8n & Vector AI

Dynamic surge pricing is central to balancing marketplace liquidity, driver earnings, and rider satisfaction. The n8n template “Ride-Share Surge Predictor” provides a production-grade workflow that ingests real-time ride data, converts it into vector embeddings, stores it in Supabase, and applies an LLM-driven agent to produce context-aware surge recommendations with full logging and traceability.

This article explains the architecture, the key n8n nodes, and practical implementation details for automation and data teams who want to operationalize surge prediction without building a custom ML stack from scratch.

Business context and objectives

Modern ride-share operations generate a continuous stream of heterogeneous events, including:

  • Driver locations and availability
  • Rider trip requests and demand scores
  • Weather and traffic conditions
  • Local events and anomalies

The goal of this workflow is to transform these incoming signals into a searchable knowledge base that supports:

  • Fast semantic retrieval of similar historical conditions using vector search
  • Automated, explainable surge pricing recommendations
  • Extensibility for new data sources such as traffic feeds, public event APIs, and custom pricing rules

By combining embeddings, a vector store, conversational memory, and an LLM-based agent inside n8n, operators gain a flexible, API-driven surge prediction engine that integrates cleanly with existing telemetry and analytics stacks.

End-to-end workflow overview

The n8n template implements a streaming pipeline from raw events to logged surge recommendations. At a high level, the workflow performs the following steps:

  1. Ingest ride-related events through a Webhook node.
  2. Preprocess and chunk large text payloads using a Text Splitter.
  3. Embed text chunks into vectors with a Cohere Embeddings node.
  4. Persist embeddings and metadata into a Supabase vector store.
  5. Retrieve similar historical events via a Query node and expose them to the agent as a Tool.
  6. Maintain context with a Memory node that tracks recent interactions.
  7. Reason with an LLM Agent (Anthropic or other provider) that synthesizes context into a surge multiplier and rationale.
  8. Log all predictions, inputs, and references to Google Sheets for monitoring and auditing.

This architecture is designed for low-latency retrieval, high observability, and easy iteration on prompts, metadata, and pricing logic.

Key n8n nodes and integrations

Webhook – ingest real-time ride events

The Webhook node is the primary entry point for the workflow. Configure it to accept POST requests from your ride telemetry stream, mobile SDK, event bus, or data router.

Typical payload fields include:

  • timestamp – ISO 8601 timestamp of the event
  • city – operating city or market
  • driver_id – pseudonymized driver identifier
  • location.lat and location.lon – latitude and longitude
  • demand_score – model or heuristic output representing demand intensity
  • active_requests – number of active ride requests in the area
  • notes – free-form context such as weather, events, or incidents

Example payload:

{  "timestamp": "2025-08-31T18:24:00Z",  "city": "San Francisco",  "driver_id": "drv_123",  "location": {"lat": 37.78, "lon": -122.41},  "demand_score": 0.86,  "active_requests": 120,  "notes": "Multiple concert events nearby, heavy rain starting"
}

Text Splitter – normalize and chunk rich text

Some events contain long textual descriptions such as incident reports, geofence notes, or batched updates. The Text Splitter node breaks these into smaller segments to improve embedding efficiency and retrieval quality.

In this template, text is split into 400-character chunks with a 40-character overlap. This configuration:

  • Controls embedding and storage costs by avoiding overly large documents
  • Preserves semantic continuity through modest overlap
  • Improves the granularity of similarity search results

Cohere Embeddings – convert text to vectors

The Embeddings (Cohere) node transforms each text chunk into a high-dimensional vector representation. These embeddings power semantic similarity and contextual retrieval.

You can substitute Cohere with another supported embedding provider, but the overall pattern remains the same:

  • Input: normalized text chunks and relevant metadata
  • Output: embedding vectors plus references to the source text and attributes

Supabase Vector Store – persistent semantic memory

Insert – write embeddings to Supabase

Using the Insert node, the workflow stores embeddings in a Supabase project configured as a vector store. The recommended index name in this template is ride-share_surge_predictor.

A suggested Supabase table schema is:

id: uuid
embedding: vector
text: text
metadata: jsonb (city, timestamp, event_type, demand_score)
created_at: timestamptz

Metadata is critical for operational filtering. For example, you can query only by a given city or time window, or restrict retrieval to specific event types.

Query – retrieve similar historical events

When the agent needs historical context to evaluate a new event, the workflow uses a Query node to run a similarity search on the Supabase index. The query typically filters by:

  • City or region
  • Time range
  • Demand profile or event type

The query returns the most relevant documents, which are then passed to the reasoning layer.

Tool – expose the vector store to the agent

The Tool node wraps the vector search capability as a retriever that the LLM agent can call when constructing a surge recommendation. This pattern keeps the agent stateless with respect to storage while still giving it access to a rich, queryable history of past conditions and outcomes.

Memory – maintain short-term conversational context

To handle bursts of activity or related events arriving in quick succession, the workflow uses a Memory node that stores a windowed buffer of recent interactions.

This short-term context helps the agent:

  • Consider recent predictions and outcomes when generating new multipliers
  • Avoid contradictory recommendations within a small time horizon
  • Maintain consistency in reasoning across related events

For cost control and prompt efficiency, keep this memory window relatively small, for example the last 10 to 20 interactions.

Chat + Agent – LLM-driven surge reasoning

The core decision logic resides in the Chat and Agent nodes. The agent receives a structured prompt that includes:

  • The current event payload
  • Relevant historical events retrieved from Supabase
  • Recent interaction history from the Memory node
  • Business rules and constraints, such as minimum and maximum surge multipliers or special event overrides

Using an LLM such as Anthropic (or any other n8n-supported model), the agent produces:

  • A recommended surge multiplier
  • A confidence score or qualitative confidence descriptor
  • A rationale that explains the decision
  • References to the retrieved historical events that influenced the recommendation

You can swap the underlying LLM to match your preferred provider, latency profile, or cost envelope without changing the overall workflow design.

Google Sheets – logging, auditability, and analytics

Every prediction is appended to a Google Sheets document for downstream analysis and governance. Typical logged fields include:

  • Raw input features (city, timestamp, demand score, active requests, notes)
  • Recommended surge multiplier
  • Model confidence or certainty
  • Key references from the vector store
  • Timestamp of the prediction

This logging layer supports monitoring, A/B testing, incident review, and compliance requirements for pricing decisions. You can also mirror this data into your central data warehouse or BI tools.

Decision flow inside the surge predictor

When a new ride-share event reaches the Webhook, the agent follows a consistent decision flow:

  1. Embed the event text and associated notes into a vector representation.
  2. Run a vector search in Supabase to find similar past events, typically constrained by city and demand profile.
  3. Retrieve recent interaction history from the Memory node to understand short-term context.
  4. Construct a prompt for the LLM that includes:
    • Current event data
    • Similar historical events and their outcomes
    • Recent predictions and context
    • Business rules such as allowed surge ranges and special-case handling
  5. Generate a surge multiplier, confidence estimate, explanation, and referenced documents.
  6. Write the full result set to Google Sheets and optionally push notifications to dashboards or driver-facing applications.

This pattern ensures that surge pricing is both data-informed and auditable, with clear traceability from each recommendation back to its underlying context.

Implementation guidance and scaling considerations

Supabase and vector search performance

  • Use a dedicated Supabase project for vector storage and enable approximate nearest neighbor (ANN) indexing for low-latency queries.
  • Design metadata fields to support your most common filters, such as city, region, event type, and time buckets.
  • Monitor query performance and adjust index configuration or dimensionality as needed.

Embedding and LLM cost management

  • Batch embedding inserts when processing high traffic volumes to reduce API overhead.
  • Filter events upstream so only high-impact or anomalous events are embedded.
  • Cache frequent or repeated queries at the application layer to avoid redundant vector searches.
  • Keep the Memory window compact to minimize prompt size and LLM token usage.
  • Define thresholds that determine when to call the LLM agent versus applying a simpler rule-based fallback.

Data privacy, security, and governance

Ride-share data often includes sensitive information. To maintain compliance and trust:

  • Remove or pseudonymize PII such as exact driver identifiers before embedding.
  • Use metadata filters in Supabase to query by city or zone without exposing raw identifiers in prompts.
  • Maintain immutable audit logs for pricing-related predictions, either in Google Sheets or a secure logging pipeline.
  • Align retention policies with local regulations on location data storage and access.

Extending the template for advanced use cases

The n8n surge predictor template is designed as a foundation that can be extended to match your operational needs. Common enhancements include:

  • Enriching the vector store with:
    • Public event calendars and ticketing feeds
    • Weather APIs and severe weather alerts
    • Traffic congestion or incident data
  • Building an operations dashboard that surfaces:
    • High-confidence surge recommendations
    • Associated rationales and references
    • Key performance indicators by city or time of day
  • Implementing a feedback loop where:
    • Driver acceptance rates and rider conversion metrics are captured
    • These outcomes are fed back into the vector store as additional context
    • Future predictions incorporate this feedback to refine surge behavior over time

Troubleshooting and tuning

When operationalizing the workflow, the following issues are common and can be mitigated with targeted adjustments:

  • Low relevance in vector search results Adjust:
    • Chunk size or overlap in the Text Splitter
    • Embedding model choice or configuration
    • Metadata filters to ensure appropriate scoping
  • Slow query performance Consider:
    • Enabling or tuning ANN settings in Supabase
    • Reducing vector dimensionality if feasible
    • Indexing key metadata fields used in filters
  • Higher than expected inference or embedding costs Mitigate by:
    • Reducing embedding frequency and focusing on high-value events
    • Implementing caching and deduplication
    • Using a more cost-efficient LLM for lower-risk decisions

Getting started with the n8n template

To deploy the Ride-Share Surge Predictor workflow in your environment:

  1. Import the template into your n8n instance.
  2. Configure integrations:
    • Set up Cohere or your chosen embedding provider.
    • Provision a Supabase project and configure the vector table and index.
    • Connect an LLM provider such as Anthropic or an alternative supported model.
    • Authorize Google Sheets access for logging.
  3. Set up the Webhook endpoint and send sample payloads from your event stream or a test harness.
  4. Validate outputs in Google Sheets, review the predictions and rationales, and iterate on:
    • Prompt instructions and constraints
    • Metadata schema and filters
    • Chunking and embedding parameters
  5. Run a controlled pilot in a single city or zone before scaling to additional markets.

Call to action: Import the Ride-Share Surge Predictor template into your n8n workspace, connect your data sources and AI providers, and launch a pilot in one city to validate performance. For guided configuration or prompt tuning, reach out to your internal platform team or consult our expert resources and newsletter for advanced automation practices.

By combining vector search, short-term memory, and LLM-based reasoning within n8n, you can deliver surge pricing that is more adaptive, transparent, and defensible, without the overhead of building and maintaining a bespoke machine learning platform.

Automated Return Ticket Assignment with n8n & RAG

Automated Return Ticket Assignment with n8n & RAG

This guide describes how to implement an automated Return Ticket Assignment workflow in n8n using a Retrieval-Augmented Generation (RAG) pattern. The workflow combines:

  • n8n for orchestration and automation
  • Cohere embeddings for semantic vectorization
  • Supabase as a vector store and metadata layer
  • LangChain-style RAG logic (vector tools + memory)
  • OpenAI as the reasoning and decision layer
  • Google Sheets for logging and reporting
  • Slack for error notifications

The result is a fault-tolerant, production-ready pipeline that receives return tickets, enriches them with contextual knowledge, and outputs structured assignment recommendations.

1. Use case and automation goals

1.1 Why automate return ticket assignment?

Manual triage of return tickets is slow, inconsistent, and difficult to scale. Different agents may apply different rules, and important policies or historical cases can be overlooked. An automated assignment workflow helps you:

  • Reduce manual workload for support teams
  • Apply consistent routing logic across all tickets
  • Leverage historical tickets and knowledge base (KB) content
  • Surface relevant context to agents at the point of assignment

By combining vector search for context with a reasoning agent, the workflow can ingest documents, use conversational memory, and generate accurate, explainable assignment decisions.

1.2 Target behavior of the workflow

At a high level, the workflow:

  1. Receives a return ticket payload via a webhook
  2. Optionally splits long descriptions or documents into chunks
  3. Generates embeddings for the chunks with Cohere
  4. Stores and queries vectors in Supabase
  5. Exposes vector search to a RAG-style agent with short-term memory
  6. Uses OpenAI to decide assignment and priority based on retrieved context
  7. Logs decisions in Google Sheets for auditing
  8. Notifies a Slack channel on errors or failures

2. Workflow architecture overview

The provided n8n template implements the following architecture:

  • Trigger: Webhook (HTTP POST) receives ticket data
  • Preprocessing: Text Splitter node chunks large input text
  • Embedding: Cohere embeddings node converts text to vectors
  • Storage & retrieval: Supabase Insert and Supabase Query nodes manage vector data
  • RAG tooling: Vector Tool node exposes Supabase to the agent
  • Memory: Window Memory node tracks recent interactions
  • Reasoning: OpenAI Chat Model + RAG Agent node generates assignment decisions
  • Logging: Google Sheets Append node records outputs
  • Alerting: Slack node sends error alerts

Conceptually, the data flow can be summarized as:

Webhook → Text Splitter → Cohere Embeddings → Supabase (Insert/Query)
→ Vector Tool + Window Memory → OpenAI RAG Agent → Google Sheets / Slack

3. Node-by-node breakdown

3.1 Webhook Trigger

3.1.1 Purpose

The Webhook Trigger is the external entry point to the workflow. It receives ticket payloads from your ticketing system or any custom application that can send HTTP POST requests.

3.1.2 Configuration

  • HTTP Method: POST
  • Path: /return-ticket-assignment
  • Response: Typically JSON, with an HTTP status that reflects success or failure of the assignment process

3.1.3 Expected payload structure

The template expects a JSON payload with ticket-specific fields, for example:

{  "ticket_id": "12345",  "subject": "Return request for order #987",  "description": "Customer reports damaged product...",  "customer_id": "C-001"
}

A more complete example:

{  "ticket_id": "TKT-1001",  "subject": "Return: screen cracked on arrival",  "description": "Customer states the screen was cracked when they opened the box. They attached photos. Requested return and replacement.",  "customer_tier": "gold"
}

3.1.4 Edge cases and validation

  • Ensure description is present and non-empty, since it is used for embeddings.
  • If optional fields like customer_tier or customer_id are missing, the agent will simply reason without them.
  • On malformed JSON, configure the workflow or upstream system to return a clear 4xx response.

3.2 Text Splitter

3.2.1 Purpose

The Text Splitter node breaks long ticket descriptions or attached document content into smaller chunks. This is important for:

  • Staying within token limits of embedding models
  • Preserving semantic coherence within each chunk
  • Improving retrieval quality from the vector store

3.2.2 Typical configuration

  • Chunk size: 400 characters
  • Chunk overlap: 40 characters

The 400/40 configuration is a practical default. You can tune it later based on your content structure and retrieval performance.

3.2.3 Input and output

  • Input: Ticket description and optionally other long text fields or KB content
  • Output: An array of text chunks, each passed to the Embeddings node

3.3 Embeddings (Cohere)

3.3.1 Purpose

The Embeddings node converts each text chunk into a numerical vector representation. These embeddings capture semantic similarity and are used to find relevant knowledge base articles, historical tickets, or policy documents.

3.3.2 Model and credentials

  • Provider: Cohere
  • Model: embed-english-v3.0
  • Credentials: Configure Cohere API key in n8n credentials, not in the workflow itself

3.3.3 Input and output

  • Input: Text chunks from the Text Splitter node
  • Output: A vector embedding for each chunk, along with any metadata you pass through (for example ticket_id)

3.3.4 Error handling

  • Handle rate limit errors by adding retry logic or backoff in n8n if required.
  • On failure, the downstream Slack node can be used to surface the error to engineering or operations.

3.4 Supabase Insert and Supabase Query

3.4.1 Purpose

Supabase acts as the vector store and metadata repository. Two node modes are typically used:

  • Insert: Persist embeddings and metadata
  • Query: Retrieve semantically similar items for a given ticket

3.4.2 Insert configuration

  • Target table / index name: return_ticket_assignment
  • Stored fields:
    • Vector embedding
    • Source text chunk
    • ticket_id or other identifiers
    • Timestamps or any relevant metadata (for example type of document, policy ID)

3.4.3 Query configuration

The Query node takes the embedding of the current ticket description and searches the return_ticket_assignment index for the most relevant entries. Typical parameters include:

  • Number of neighbors (top-k results)
  • Similarity threshold (if supported by your Supabase setup)

The query results provide the contextual documents that will be passed to the RAG agent as external knowledge.

3.4.4 Integration specifics

  • Configure Supabase credentials (URL, API key) via n8n credentials.
  • Ensure the vector column type and index are properly configured in Supabase for efficient similarity search.

3.5 Vector Tool and Window Memory

3.5.1 Vector Tool

The Vector Tool node exposes the Supabase vector store as a callable tool for the RAG agent. This allows the agent to:

  • Invoke vector search during reasoning
  • Dynamically fetch additional context if needed

The tool uses the same Supabase query configuration but is wrapped in a format that the RAG agent can call as part of its toolset.

3.5.2 Window Memory

The Window Memory node maintains short-term conversational or interaction history for the agent. It is used to:

  • Keep track of recent assignment attempts or clarifications
  • Prevent the agent from losing context across retries within the same workflow run

Typical configuration includes:

  • Maximum number of turns or tokens retained
  • Scope limited to the current ticket processing session

3.6 Chat Model (OpenAI) and RAG Agent

3.6.1 Purpose

The Chat Model node (OpenAI) combined with a RAG Agent node is the reasoning core of the workflow. It:

  • Receives the original ticket payload
  • Uses the Vector Tool to fetch contextual documents from Supabase
  • Consults Window Memory to maintain short-term context
  • Generates a structured assignment decision

3.6.2 Model and credentials

  • Provider: OpenAI (Chat Model)
  • Model: Any supported chat model suitable for structured output
  • Credentials: OpenAI API key configured in n8n credentials

3.6.3 System prompt design

The system prompt should enforce deterministic, structured output. A sample system prompt:

You are an assistant for Return Ticket Assignment. Using the retrieved context and ticket details, decide the best assigned_team, priority (low/medium/high), and one-sentence reason. Return only valid JSON with keys: assigned_team, priority, reason.

3.6.4 Output schema

The agent is expected to return JSON in the following format:

{  "assigned_team": "Returns Team",  "priority": "medium",  "reason": "Matches damaged item policy and customer is VIP."
}

3.6.5 Edge cases

  • If the agent returns non-JSON text, add validation or a follow-up parsing node.
  • On model errors or timeouts, route execution to the Slack alert path and return an appropriate HTTP status from the webhook.
  • For ambiguous tickets, you can instruct the agent in the prompt to choose a default team or flag for manual review.

3.7 Google Sheets Append (Logging)

3.7.1 Purpose

The Google Sheets Append node records each assignment decision for auditing, analytics, and model performance review.

3.7.2 Configuration

  • Spreadsheet: Your reporting or operations sheet
  • Sheet name: Log
  • Columns to store:
    • ticket_id
    • assigned_team
    • priority
    • Timestamp
    • Raw agent output or reason

3.7.3 Usage

Use this log to:

  • Review incorrect assignments (false positives / false negatives)
  • Identify patterns in misclassification
  • Refine prompts, chunking, and retrieval parameters

3.8 Slack Alert on Errors

3.8.1 Purpose

The Slack node sends real-time notifications when the RAG Agent or any critical node fails. This keeps engineers and operations aware of issues such as:

  • Rate limits from OpenAI or Cohere
  • Supabase connectivity problems
  • Unexpected payloads or parsing errors

3.8.2 Configuration

  • Channel: For example #alerts
  • Message content: Include ticket ID, error message, and a link to the n8n execution if available

3.8.3 Behavior

When an error occurs, the workflow:

  • Sends a Slack message to the configured channel
  • Can return a non-2xx HTTP status code from the webhook to signal failure to the caller

4. Configuration notes and operational guidance

4.1 Security and credentials

  • API keys: Store Cohere, Supabase, OpenAI, Google Sheets, and Slack credentials in n8n’s credentials manager, not in node parameters or raw JSON.
  • Webhook protection:
    • Restrict access by IP allowlist from your ticketing system.
    • Optionally sign requests with HMAC and verify signatures inside the workflow.
  • Data privacy:
    • Redact or avoid embedding highly sensitive PII.
    • Use hashing or minimal metadata where possible.

4.2 Scaling considerations

  • For high ticket volumes, consider batching embedding operations or using worker queues.
  • Monitor

Automated Resume Screening with n8n & Weaviate

Automated Resume Screening with n8n & Weaviate

Hiring at scale demands speed, consistency, and a clear audit trail. This instructional guide walks you through an n8n workflow template that automates first-pass resume screening using:

  • n8n for workflow orchestration
  • Cohere for text embeddings
  • Weaviate as a vector database
  • A RAG (Retrieval-Augmented Generation) agent for explainable scoring
  • Google Sheets for logging
  • Slack for alerts

You will see how resumes are captured via a webhook, split into chunks, embedded, stored in Weaviate, then evaluated by a RAG agent. Final scores and summaries are written to Google Sheets and any pipeline issues are surfaced in Slack.


Learning goals

By the end of this guide, you should be able to:

  • Explain why automated resume screening is useful in high-volume hiring
  • Understand each component of the n8n workflow template
  • Configure the template to:
    • Ingest resumes via webhook
    • Split and embed text with Cohere
    • Store and query vectors in Weaviate
    • Use a RAG agent to score and summarize candidates
    • Log results to Google Sheets and send Slack alerts
  • Apply best practices for chunking, prompting, and bias mitigation
  • Plan monitoring, testing, and deployment for production use

Why automate resume screening?

Manual resume review does not scale well. It is slow, inconsistent, and prone to bias or fatigue. Automating the first-pass screening with n8n and a RAG pipeline helps you:

  • Increase throughput for high-volume roles
  • Apply consistent criteria across all candidates
  • Improve explainability using retrieval-based context from resumes
  • Maintain audit logs for later review and compliance

Recruiters can then spend more time on interviews and candidate experience, while the workflow handles the repetitive early filtering.


Concepts you need to know

What is a RAG (Retrieval-Augmented Generation) agent?

A RAG agent combines two steps:

  1. Retrieve relevant context from a knowledge source (here, Weaviate with embedded resume chunks).
  2. Generate an answer or decision using a chat model that is grounded in that retrieved context.

In this template, the RAG agent uses resume chunks as evidence to score and summarize each candidate.

What is a vector store and why Weaviate?

A vector store holds numerical representations (vectors) of text so that you can perform semantic search. Weaviate is used here because it:

  • Stores embeddings along with metadata (candidate ID, chunk index, resume section)
  • Supports fast, semantic similarity queries
  • Integrates well as a tool for RAG-style workflows

What are embeddings and why Cohere?

Embeddings convert text into vectors that capture semantic meaning. The template uses a high-quality language embedding model such as embed-english-v3.0 from Cohere to represent resume chunks in a way that supports accurate semantic search.

What is window memory in this workflow?

Window memory in n8n keeps a short history of interactions or context for the RAG agent. It helps the agent stay consistent across multiple related questions or steps in the same screening session.


Workflow architecture overview

The n8n workflow template ties all components together into a single automated pipeline. At a high level, it includes:

  • Webhook Trigger – Captures incoming resumes or resume text via POST.
  • Text Splitter – Breaks resumes into smaller overlapping chunks.
  • Embeddings (Cohere) – Converts each chunk into a dense vector.
  • Weaviate Vector Store – Stores vectors and associated metadata for semantic search.
  • Window Memory – Maintains short-term context for the RAG agent.
  • RAG Agent (Chat Model + Tools) – Uses Weaviate as a retrieval tool and generates scores and summaries.
  • Append Sheet (Google Sheets) – Logs structured screening results.
  • Slack Alert – Sends notifications when errors or suspicious outputs occur.

In the next sections, you will walk through how each of these parts is configured in n8n and how they work together end to end.


Step-by-step: building the n8n resume screening workflow

Step 1: Collect resumes with a Webhook Trigger

Start by setting up the entry point of the workflow.

  1. Add a Webhook Trigger node in n8n.
  2. Configure it to accept POST requests from:
    • Your ATS (Applicant Tracking System)
    • Or any form or service that uploads resumes
  3. Ensure the incoming payload contains:
    • Candidate metadata (for example, name, email, role applied for)
    • Either:
      • The full resume text, or
      • A URL to the resume file that your workflow can fetch and parse

This node is the gateway into your automated screening pipeline.

Step 2: Preprocess and split resume text

Long resumes must be broken into smaller pieces before embedding so that retrieval remains efficient and accurate.

  1. Add a Text Splitter node after the webhook.
  2. Configure it with recommended starting values:
    • Chunk size: 400 characters
    • Chunk overlap: 40 characters

The overlap ensures that important information that crosses chunk boundaries is not lost. This balance keeps embedding costs manageable while preserving enough context for the RAG agent.

Step 3: Generate embeddings with Cohere

Next, convert each text chunk into an embedding.

  1. Add an Embeddings node configured to use a Cohere model, for example:
    • embed-english-v3.0
  2. For each chunk, store useful metadata:
    • Candidate ID or unique identifier
    • Chunk index (position of the chunk within the resume)
    • Optional section label, such as experience or education

This metadata will later allow targeted retrieval, such as focusing only on experience-related chunks when assessing specific skills.

Step 4: Store vectors in a Weaviate index

Now you need a place to store and query these embeddings.

  1. Set up a Weaviate Vector Store or connect to an existing instance.
  2. Create or use a class/index, for example:
    • resume_screening
  3. In n8n, add a node that inserts vectors and metadata into Weaviate.

Weaviate will then provide near real-time semantic search over your resume chunks. This is what the RAG agent will query when it needs evidence to support a screening decision.

Step 5: Retrieve relevant chunks for evaluation

When you want to evaluate a candidate against specific criteria, you query Weaviate for the most relevant chunks.

  1. Add a Weaviate Query node.
  2. Formulate a query that reflects your screening question, for example:
    • "Does this candidate have 5+ years of Python experience?"
    • "Does this candidate have strong API and database experience?"
  3. Configure the node to return the top matching chunks and their metadata.

The RAG agent will treat this vector store as a tool, using the retrieved chunks as context when generating its final score and summary.

Step 6: Configure the RAG agent for scoring and summarization

With relevant chunks in hand, the next step is to guide a chat model to produce structured, explainable results.

  1. Add a chat model node (for example OpenAI or another LLM) and configure it as a RAG agent that:
    • Uses Weaviate as a retrieval tool
    • Reads from the window memory if used
  2. Provide a clear system prompt, for example: “You are an assistant for Resume Screening. Use retrieved resume chunks to answer hiring criteria and produce a short summary and score (1-10). Explain the reasoning with citations to chunks.”
  3. Ask the agent to output a structured result that includes:
    • A numeric score (for example 1-10) for technical fit
    • A short summary of strengths and risks
    • Recommended next action (for example advance, hold, reject)
    • Citations to chunk IDs or indexes used as evidence

Using a structured format makes it easier for n8n to parse and route the output to Google Sheets or other systems.

Step 7: Log results and send alerts

The final stage of the workflow handles observability and auditability.

  1. Append results to Google Sheets:
    • Add an Append Sheet node.
    • Map fields from the agent output into columns such as:
      • Candidate name and email
      • Role
      • Score
      • Summary
      • Citations or chunk IDs
      • Decision or recommended action
  2. Configure Slack alerts:
    • Add a Slack node to send messages when:
      • The workflow encounters an error
      • The agent output appears suspicious or low confidence, if you add such checks
    • Point alerts to a channel where recruiters or engineers can review issues.

This combination of logging and alerts gives you both traceability and early warning when the pipeline needs human attention.


Configuration tips and best practices

Choosing a chunking strategy

Chunk size and overlap have a direct impact on retrieval quality and cost.

  • Smaller chunks:
    • More precise retrieval
    • More vectors, higher storage and query overhead
  • Larger chunks:
    • Fewer vectors, lower cost
    • More mixed content per chunk, sometimes less precise

For resumes, a practical range is:

  • Chunk size: 300-600 characters
  • Chunk overlap: 10-100 characters

Start with the recommended 400 / 40 settings and adjust based on retrieval quality and cost.

Selecting and tuning embeddings

When choosing an embedding model:

  • Use a model optimized for semantic similarity in your language.
  • Test a few examples to confirm that similar skills and experiences cluster together.
  • Fine tune thresholds for similarity or cosine distance that determine:
    • Which chunks are considered relevant
    • How many chunks you pass into the RAG agent

These thresholds can significantly affect both accuracy and cost.

Prompt engineering for reliable scoring

Your system prompt should be explicit about what “good” looks like. Consider specifying:

  • Which criteria to evaluate:
    • Specific skills and tools
    • Years of experience
    • Domain or industry background
    • Optional signals like leadership or communication
  • The output format:
    • Numeric score and its meaning
    • 2-3 sentence summary
    • List of cited chunk IDs
  • The requirement to base every conclusion on retrieved chunks, not assumptions.

Clear prompts lead to more consistent and explainable results.

Bias mitigation strategies

Automated screening must be handled carefully to avoid amplifying bias. Some practical steps include:

  • Strip unnecessary demographic information before embedding:
    • Names
    • Addresses
    • Other personal identifiers that are not required for screening
  • Use standardized evaluation rubrics and:
    • Provide the agent with human-reviewed examples
    • Calibrate prompts and scoring rubrics based on those examples
  • Maintain detailed logs and:
    • Perform periodic audits for disparate impact on different groups

Monitoring, testing, and evaluation

To ensure the screening system performs well over time, track key metrics and regularly test against human judgments.

Metrics to monitor

  • Precision of pass/fail decisions at first pass
  • False negatives (qualified candidates incorrectly rejected)
  • Latency per screening from webhook to final log
  • API costs for embeddings and chat model calls

Testing with human reviewers

Run A/B tests where you:

  • Have human recruiters create shortlists for a set of roles.
  • Run the same candidates through the automated workflow.
  • Compare:
    • Scores and decisions from the RAG agent
    • Human judgments and rankings

Use these comparisons to adjust scoring thresholds, prompts, and retrieval parameters until the automated system aligns with your hiring standards.


Security, privacy, and compliance

Because resumes contain personal information, security and compliance are critical.

  • Encrypt data at rest and in transit:
    • Within Weaviate
    • In any external storage or logging systems
  • Minimize PII in embeddings:
    • Keep personally identifiable information out of vector representations when possible.
    • If you must store PII, ensure access controls and retention policies meet regulations such as GDPR.
  • Restrict access:
    • Limit who can view Google Sheets logs
    • Limit who receives Slack alerts with candidate details

Build an n8n Image Captioning Workflow with Weaviate

Overview

This documentation-style guide describes a production-ready n8n image captioning workflow template that integrates OpenAI embeddings, a Weaviate vector database, a retrieval-augmented generation (RAG) agent, and downstream integrations for Google Sheets logging and Slack error alerts. The workflow is designed for teams that need scalable, context-aware, and searchable image captions, for example to improve alt text accessibility, auto-tag large image libraries, or enrich metadata for internal search.

The template focuses on text-centric processing. Images are typically pre-processed outside of n8n (for example via OCR or a vision model), and the resulting textual description is sent into the workflow, where it is chunked, embedded, indexed in Weaviate, and then used as context for caption generation via a RAG pattern.

High-level Architecture

The workflow is organized into several logical stages, each implemented with one or more n8n nodes:

  • Ingress: Webhook Trigger node that receives image-related payloads (ID, URL, OCR text, metadata).
  • Pre-processing: Text Splitter node that chunks long text into smaller segments.
  • Vectorization: Embeddings node (OpenAI text-embedding-3-small) that converts text chunks into dense vectors.
  • Persistence & Retrieval: Weaviate Insert and Weaviate Query nodes that store and retrieve embeddings for semantic search.
  • RAG Context: Window Memory node plus a Vector Tool that provide short-term conversation history and external vector context to the RAG agent.
  • Caption Generation: Chat Model node (Anthropic) combined with a RAG Agent that synthesizes final captions.
  • Logging: Google Sheets Append node that records generated captions and status for audit and review.
  • Monitoring: Slack node that sends error alerts to a specified channel.

This pattern combines long-term vector storage with retrieval-augmented generation, which allows captions to be both context-aware and scalable across large image collections.

Use Cases & Rationale

The workflow is suitable for:

  • Enriching or generating alt text for accessibility.
  • Creating concise and extended captions for social media or content management systems.
  • Auto-tagging and metadata enrichment for digital asset management.
  • Building a searchable corpus of image descriptions using vector search.

By indexing OCR text or other descriptive content in Weaviate, you can later perform semantic queries to retrieve related images, then use the RAG agent to generate or refine captions with awareness of similar content and prior context.

Data Flow Summary

  1. Client sends a POST request with image identifiers and text (for example, OCR output) to the Webhook Trigger.
  2. The text is split into overlapping chunks by the Text Splitter node.
  3. Each chunk is embedded via the OpenAI Embeddings node.
  4. Resulting vectors and associated metadata are inserted into Weaviate using the Weaviate Insert node.
  5. When generating or refining a caption, the workflow queries Weaviate for similar chunks via the Weaviate Query node.
  6. The Vector Tool exposes the retrieved chunks to the RAG agent, while Window Memory provides short-term conversational context.
  7. The Chat Model (Anthropic) and RAG Agent synthesize a concise alt-text caption and a longer descriptive caption.
  8. Results are appended to a Google Sheet for logging, and any errors trigger a Slack alert.

Node-by-Node Breakdown

1. Webhook Trigger

Node type: Webhook
Purpose: Entry point for image-related data.

Configure the Webhook node to accept POST requests at a path such as /image-captioning. The incoming JSON payload can include an image identifier, optional URL, OCR text, and metadata. A typical payload structure is:

{  "image_id": "img_12345",  "image_url": "https://.../image.jpg",  "ocr_text": "A woman walking a dog in a park on a sunny day",  "metadata": {  "source": "app-upload",  "user_id": "u_789"  }
}

Recommended pattern:

  • Perform heavy compute tasks (OCR, vision models) outside n8n (for example in a separate service or batch job).
  • Post only the resulting text and metadata to this webhook to keep the workflow responsive and resource-light.

Security considerations:

  • Protect the endpoint using HMAC signatures, API keys, or an IP allowlist.
  • Validate payload structure and required fields (for example, image_id and ocr_text or equivalent text field) before further processing.

2. Text Splitter

Node type: Text Splitter (CharacterTextSplitter)
Purpose: Break long text into smaller, overlapping chunks for more stable embeddings.

Configure the Text Splitter with parameters similar to:

  • chunkSize = 400
  • chunkOverlap = 40

This configuration keeps each chunk small enough for efficient embedding while preserving local context via overlap. It is particularly useful when OCR output or metadata descriptions are long, or when you want to index multiple descriptive sections per image.

Edge cases:

  • If the incoming text is shorter than chunkSize, the node will output a single chunk.
  • Empty or whitespace-only text will result in no meaningful chunks, which will later cause empty embeddings; handle this case explicitly if needed.

3. Embeddings (OpenAI)

Node type: OpenAI Embeddings
Purpose: Convert each text chunk into a numeric vector representation.

In the template, the Embeddings node is configured to use the OpenAI model:

  • model = text-embedding-3-small

Configuration notes:

  • Store OpenAI API credentials securely using n8n Credentials and reference them in this node.
  • Ensure that the embedding dimensionality expected by Weaviate matches the chosen model (for example, schema vector dimension must be consistent with text-embedding-3-small).
  • Handle API errors gracefully, for example by using n8n error workflows or by routing failed items to a Slack alert.

Common issues:

  • If the input text is empty or non-informative (for example, placeholders), embeddings may be unhelpful or empty. Validate input upstream.
  • Rate limits from OpenAI can cause transient failures. Consider adding retries or backoff logic via n8n error handling.

4. Weaviate Insert

Node type: Weaviate Insert
Purpose: Persist embeddings and associated metadata into a Weaviate index for later semantic retrieval.

Configure a Weaviate class (index) such as image_captioning with fields like:

  • image_id (string)
  • chunk_text (text)
  • metadata (object/map)
  • embedding (vector) – typically handled as the object vector in Weaviate

The Weaviate Insert node should map the embedding output and metadata from the previous nodes into this schema.

Best practices:

  • Use batch insertion where available to reduce API overhead and improve throughput.
  • Include provenance in metadata, such as user_id, source, and timestamps, so you can filter or re-rank results later.

Error handling:

  • If inserts fail, verify that:
    • The class schema exists and is correctly configured.
    • The vector dimensionality matches the OpenAI embedding model.
    • Authentication and endpoint configuration for Weaviate are correct.

5. Weaviate Query & Vector Tool

Node types: Weaviate Query, Vector Tool
Purpose: Retrieve semantically similar chunks and expose them as a tool to the RAG agent.

For caption generation, the workflow queries Weaviate to fetch the most relevant chunks based on a query vector or query text. Typical parameters include:

  • indexName = image_captioning
  • top_k = 5 (number of similar chunks to retrieve)

The retrieved results are passed into a Vector Tool, which the RAG agent can invoke to obtain external context during generation.

Filtering and precision:

  • If you see too many unrelated or overly similar results, add metadata-based filters (for example, filter by image_id, source, or time ranges) to narrow the search space.
  • Adjust top_k to balance recall vs. noise. Higher values give more context but can introduce irrelevant chunks.

6. Window Memory

Node type: Window Memory
Purpose: Maintain short-term conversational context for the RAG agent across multiple turns.

The Window Memory node stores a limited window of recent exchanges, which is especially useful in session-based flows where a user iteratively refines captions or requests variations. This context is provided alongside the retrieved vector data to the RAG agent.

Usage notes:

  • Tune the memory window size based on your typical conversation length and token budget.
  • For single-shot caption generation, memory impact will be minimal but still safe to keep for future extensibility.

7. Chat Model & RAG Agent

Node types: Chat Model (Anthropic), RAG Agent
Purpose: Use a large language model with retrieval-augmented context to generate final captions.

The template uses Anthropic as the chat model backend. The RAG agent is configured with a system message similar to:

“You are an assistant for Image Captioning”

The agent receives three main inputs:

  • Window Memory (short-term conversational context).
  • Vector Tool results (retrieved chunks from Weaviate).
  • The current user instruction or prompt.

Using these, it composes:

  • A short, alt-text-style caption.
  • A longer descriptive caption suitable for metadata or search enrichment.

Prompt template example:

System: You are an assistant for Image Captioning. Use the retrieved context and memory to produce a single concise descriptive caption.

User: Given the following context chunks:
{retrieved_chunks}

Produce (1) a short caption suitable for alt text (max 125 chars) and 
(2) a longer descriptive caption for metadata (2-3 sentences).

Quality tuning:

  • If captions are too generic, strengthen the system message or include more explicit formatting and content instructions.
  • If important details are missing, increase top_k in Weaviate Query or adjust chunking parameters to preserve more context.

8. Google Sheets Append

Node type: Google Sheets (Append Sheet)
Purpose: Persist caption results and status for auditing, QA, or manual review.

Configure the Append Sheet node to target a specific SHEET_ID and sheet name (for example, Log). Typical columns include:

  • image_id
  • caption (or separate columns for short and long captions)
  • status (for example, success, failed)
  • timestamp

Notes:

  • Ensure Google credentials are set via n8n Credentials and that the service account or user has write access to the target sheet.
  • Use this log as a source for manual review, A/B testing of prompts, or backfilling improved captions later.

9. Slack Alert for Errors

Node type: Slack
Purpose: Notify operations or development teams when the workflow encounters errors.

Configure the Slack node to send messages to an alerts channel, for example #alerts. Use the node error message placeholder to include details, such as:

{$json.error.message}

This helps you quickly detect and respond to issues like API rate limits, Weaviate outages, or schema mismatches.

Configuration & Credentials

Core Credentials

  • OpenAI: API key configured in n8n Credentials, used by the Embeddings node.
  • Anthropic: API key configured for the Chat Model node.
  • Weaviate: Endpoint, API key or authentication token configured for Insert and Query nodes.
  • Google Sheets: OAuth or service account credentials for the Append Sheet node.
  • Slack: OAuth token or webhook URL for sending alerts.

Webhook & Security

  • Use HTTPS for the webhook URL.
  • Validate signatures or API keys on incoming requests.
  • Sanitize text inputs to avoid injection into prompts or logs.

Practical Tips & Best Practices

  • Offload heavy compute: Run OCR and vision models outside n8n and send only text payloads to the webhook to keep the workflow lightweight.
  • Optimize chunking: Tune chunkSize and chunkOverlap based on typical text length. Larger chunks capture more context but can dilute vector specificity.
  • Metadata usage: Store provenance (user, source, timestamps) in Weaviate metadata to enable targeted queries and analytics.
  • Monitoring Weaviate: Track health, latency, and storage usage. Plan capacity for expected vector counts and query load.
  • Rate limiting: Respect OpenAI and Anthropic rate limits. Implement retry or exponential backoff strategies using n8n error workflows or node-level settings.
  • Accessibility focus: When captions are used as alt text, favor clear, factual descriptions over creative language.

Troubleshooting Guide

  • Empty or missing embeddings:
    • Confirm that ocr_text or equivalent input text is not empty.
    • Check that the Text Splitter is producing at least one chunk.
  • Poor caption quality:
    • Increase top_k in the Weaviate Query node to provide more context.
    • Refine the RAG agent system prompt with clearer instructions and examples.
  • Weaviate insert failures:
    • Verify that the class schema fields and vector dimension match the embedding model.
    • Check authentication, endpoint configuration, and any network restrictions.
  • Slow performance:
    • Batch inserts into Weaviate where possible.
    • Use asynchronous processing so the webhook can acknowledge requests quickly and offload work to background jobs.
  • Too many similar or irrelevant results:

Build a Breaking News Summarizer with n8n

Build a Breaking News Summarizer with n8n: Turn Information Overload Into Insight

News never sleeps, but you do not have to chase every headline manually. With the right workflow, you can turn a flood of articles into clear, focused briefings that arrive on autopilot. This is where n8n, LangChain, Weaviate, and modern text embeddings come together to create a powerful, reusable system.

In this guide, you will walk through a production-ready Breaking News Summarizer built in n8n. It ingests articles, splits and embeds them, stores them in a vector database, and uses an intelligent agent to generate concise, contextual summaries and logs. More importantly, you will see how this template can become a stepping stone toward a more automated, calm, and strategic way of working.

The Problem: Drowning In Headlines, Starving For Clarity

If you work with information, you already feel it:

  • Endless news feeds and alerts competing for your attention
  • Long articles that take time to read but offer only a few key insights
  • Important context scattered across dozens of past stories

Journalists, product teams, analysts, and knowledge workers all face the same challenge. You need timely, trustworthy briefings, not another tab full of open articles.

Manually scanning and summarizing every piece of breaking news does not scale. It pulls you away from deep work, strategic thinking, and higher value tasks. This is exactly the type of problem automation is meant to solve.

The Shift: From Manual Monitoring To Automated Insight

Imagine a different workflow:

  • New articles arrive in a single place, automatically
  • They are summarized into short, actionable overviews
  • Relevant background from older stories is pulled in when needed
  • Everything is logged for your team to review and track

Instead of reacting to every headline, you receive clean, contextual summaries that help you act faster and with more confidence. That is the mindset shift behind this n8n template. It is not just about saving time, it is about building a system that supports your growth and your focus.

A breaking news summarizer helps you:

  • Convert long-form news into short, actionable summaries
  • Retain context by searching past articles via vector search
  • Automate distribution and logging so your whole team stays aligned

Once you have this in place, you can extend it to other use cases: product update digests, competitor monitoring, internal knowledge briefings, and more. The template you are about to build is a strong foundation for that journey.

The System: How n8n, LangChain, And Weaviate Work Together

At the heart of this workflow is a simple idea: capture, understand, and reuse information automatically. The n8n workflow connects several components, each playing a specific role:

  • Webhook (n8n) – receives incoming news content via POST
  • Text Splitter – breaks long articles into manageable chunks
  • Embeddings (Hugging Face) – converts text chunks into dense vectors
  • Weaviate vector store – stores vectors and metadata for fast semantic retrieval
  • Query + Tool – performs similarity search against Weaviate
  • Agent (LangChain) with Chat (OpenAI) – generates final summaries using retrieved context and memory
  • Memory buffer – keeps recent interactions so multi-step stories stay coherent

A Google Sheets node then logs each summary, making it easy for teams to review, audit, and refine their process over time.

This architecture is modular and future-friendly. You can swap out embeddings models, change vector stores, or experiment with different LLMs without redesigning everything from scratch.

The Journey: Building Your Breaking News Summarizer In n8n

Let us walk through the workflow step by step. As you go, think about how each step could be adapted to your own data sources, teams, and goals.

Step 1: Capture Incoming News With A Webhook

Your automation journey starts by giving news a reliable entry point.

In n8n, create a POST Webhook to accept incoming JSON payloads. This can come from:

  • RSS scrapers
  • Webhooks from news APIs
  • Internal tools or manual uploads

Example payload:

{  "title": "Breaking: Market Moves",  "url": "https://news.example/article",  "content": "Full article HTML or plain text...",  "published_at": "2025-09-01T12:00:00Z"
}

Configure authentication or secrets on the webhook if your source requires it. This keeps your pipeline secure while ensuring new articles flow in automatically.

Step 2: Split Articles For Reliable Embeddings

Long articles need to be broken down before they can be effectively embedded. This step sets up the quality of your semantic search later on.

Use a Text Splitter node to divide articles into chunks of roughly 300-500 characters, with a small overlap of around 40-50 characters. In the example workflow, the splitter uses:

  • chunkSize = 400
  • chunkOverlap = 40

This balance helps avoid token truncation and preserves enough context for meaningful semantic search. You can always tune these values later as you learn more about your content.

Step 3: Turn Text Into Embeddings With Hugging Face

Next, you transform each chunk into a numerical representation that models can understand.

Add a Hugging Face embeddings node and connect it to the splitter output. Choose a model optimized for semantic search, such as those from the sentence-transformers family.

Alongside each embedding, store useful metadata, for example:

  • Article ID
  • Chunk index
  • Source URL
  • Published date

This metadata becomes invaluable later when you filter search results or trace where a summary came from.

Step 4: Store Your Knowledge In Weaviate

Now you need a place to keep all these embeddings so they can be searched quickly and intelligently.

Use Weaviate as your vector database. Create an index (class) with a clear name, such as breaking_news_summarizer. Then use the Insert node to write documents that include:

  • The embedding vectors
  • The original text chunk
  • The metadata you defined earlier

Later, a Query node will read from this index to retrieve relevant chunks when new articles arrive. At this point you are not just storing data, you are building a searchable memory for your news workflow.

Step 5: Retrieve Relevant Context For Each New Article

When a fresh article hits your webhook, you want your system to remember what has happened before. This is where semantic search comes in.

Configure a Query + Tool setup that runs a similarity search against Weaviate. When a new article is processed, the workflow:

  • Embeds the new content
  • Queries Weaviate for similar past chunks or articles
  • Returns relevant context as a tool that the agent can call

This retrieved context might include related stories, previous updates on the same event, or background information that helps the summary feel grounded instead of isolated.

Step 6: Configure The LangChain Agent With Chat And Memory

Now you are ready to bring intelligence into the loop.

Wire a LangChain Agent to a Chat model, such as an OpenAI chat model or another LLM. Provide it with:

  • The Weaviate query as a Tool
  • A Memory buffer that stores recent interactions

This enables the agent to:

  • Ask the vector store for related context when needed
  • Use recent memory for continuity across multiple updates to the same story
  • Generate concise summaries in predefined formats, such as 50-80 words or bullet points

Design your prompts carefully, focusing on accuracy, neutrality, and clear attribution. For example:

"Summarize the following news article in 3-5 bullet points. 
If context from past articles is relevant, incorporate it with a single-line source attribution."

By constraining the format and expectations, you help the agent produce consistent, trustworthy summaries that your team can rely on.

Step 7: Log, Share, And Grow Your Workflow

Finally, you want your summaries to be visible, trackable, and easy to review.

Use a Google Sheets node to append each final summary to a dedicated sheet, for example a Log tab. Include fields such as:

  • Title
  • URL
  • Summary
  • Timestamp
  • Any relevant tags or metadata

From here, you can expand distribution as your needs grow. For instance, you can:

  • Send summaries to Slack channels for real-time team updates
  • Email a daily digest to stakeholders
  • Post briefings to an internal dashboard or API

This is where your automation starts to create visible impact. Your team sees consistent, structured summaries and you gain the space to focus on interpretation, strategy, and decision making.

Leveling Up: Best Practices For A Production-Ready n8n News Workflow

Once your Breaking News Summarizer is running, you can refine it to make it more robust and cost effective.

  • Optimize chunk size and overlap: Larger chunks preserve more context but increase token usage and cost. Tune these values based on your typical article length and complexity.
  • Use semantic filtering: Combine metadata filters (date, source, topic) with vector similarity to reduce noise and surface only the most relevant context.
  • Control costs: Apply rate limiting on embedding calls and LLM queries, especially if you process high volumes of news.
  • Version your Weaviate schema: Keep track of changes to your vector schema so you can upgrade safely without breaking existing data.
  • Add fact-checking for sensitive topics: For elections, health, or financial news, consider adding a verification step that cross checks key facts against trusted sources.

Troubleshooting: Turning Friction Into Learning

As you test and expand your workflow, you may hit a few bumps. Each issue is an opportunity to better understand your data and improve your automation.

Embeddings Look Noisy Or Irrelevant

If search results feel off-topic:

  • Try a different embeddings model, some perform better on news-style text
  • Increase chunk overlap so each piece retains more context
  • Ensure your text splitter cleans out noisy HTML, boilerplate, or navigation text

The Agent Hallucinates Or Adds Extra Details

To reduce hallucinations:

  • Provide clear, retrieved context from Weaviate whenever possible
  • Constrain the prompt so the model answers only based on provided text
  • Consider a verification step that checks key facts against original sources

Weaviate Returns Few Or No Results

If retrieval feels too sparse:

  • Check index health and confirm embeddings are actually being written
  • Inspect your similarity or distance threshold and lower it if needed
  • Increase the number of results returned per query to capture more candidates

Security, Privacy, And Responsible Automation

As your automation grows more powerful, it is important to keep security and compliance in focus.

  • Protect webhook endpoints with authentication, secrets, and IP restrictions where appropriate.
  • Scrub or anonymize PII before storing embeddings if privacy rules apply to your data.
  • Secure Weaviate and Google Sheets with proper credentials and role-based access control, so only the right people can view or modify data.

Building trust into your workflow from day one makes it much easier to scale it across teams and use cases later.

From Template To Transformation: Your Next Steps

You now have a clear path to turn chaotic news streams into structured, contextual summaries using n8n, LangChain, Hugging Face embeddings, Weaviate, and an LLM agent. The real power of this setup is not only in what it does today, but in what it can grow into as you iterate.

To get started quickly:

  • Import the n8n Breaking News Summarizer template into your n8n instance.
  • Replace placeholder credentials for Hugging Face, Weaviate, OpenAI, and Google Sheets.
  • Tune chunk size, your embedding model, and prompt templates to match your content and tone.

Then, run it on a sample RSS feed or news API. Watch how your summaries look, adjust, and improve. Each iteration brings you closer to a workflow that feels like a natural extension of how you and your team think.

Call to action: Treat this template as your launchpad. Start small, connect one or two news sources, and refine your prompts. As you gain confidence, expand to more feeds, more channels, and more use cases. If you share your requirements, such as volume, sources, or desired summary length, this workflow can be adapted and extended to fit your exact needs.


Keywords: n8n breaking news summarizer, n8n automation template, LangChain news summarization, Weaviate vector database, Hugging Face embeddings, webhook news ingestion, text splitter, Google Sheets logging.