Build a Discord Guild Welcome Bot with n8n & Weaviate

Build a Discord Guild Welcome Bot with n8n & Weaviate

Automating welcome messages for new Discord guild members is a powerful way to create a friendly first impression and standardize onboarding. In this guide you will learn, step by step, how to build a smart Discord welcome bot using:

  • n8n for workflow automation
  • OpenAI embeddings for semantic search
  • Weaviate as a vector database
  • Hugging Face chat models for natural language
  • Google Sheets for logging and analytics

The workflow you will build listens to Discord events, processes and stores onboarding content as vectors, retrieves relevant context for each new member, generates a personalized welcome message, and logs the interaction for later review.


Learning Goals

By the end of this tutorial you should be able to:

  • Explain how embeddings and a vector store help create context-aware Discord welcome messages
  • Configure an n8n webhook to receive Discord guild member join events
  • Split long onboarding documents into chunks suitable for embedding
  • Store and query embeddings in Weaviate with guild-specific metadata
  • Use an agent pattern in n8n to combine tools, memory, and a Hugging Face chat model
  • Log each welcome event to Google Sheets for monitoring and analytics

Concepts You Need To Know

n8n Workflow Basics

n8n is a workflow automation tool that lets you connect APIs and services using nodes. Each node performs a specific task, such as receiving a webhook, calling an API, or writing to a Google Sheet. In this tutorial, you will chain nodes together to create a complete Discord welcome workflow.

Embeddings and Vector Stores

Embeddings are numerical representations of text that capture semantic meaning. Similar pieces of text have similar vectors. You will use OpenAI embeddings to convert guild rules, onboarding guides, and welcome templates into vectors.

Weaviate is a vector database that stores these embeddings and lets you run similarity searches. When a new member joins, the bot will query Weaviate to find the most relevant chunks of content for that guild.

Agent Pattern in n8n

The workflow uses an agent to orchestrate several components:

  • A tool for querying Weaviate
  • A memory buffer for short-term context
  • A chat model from Hugging Face to generate the final welcome text

This agent can decide when to call the vector store, how to use past context, and when to log events.

Why This Architecture Works Well

This setup lets your bot:

  • Reference current server information such as rules, channels, and roles
  • Handle multiple guilds with different onboarding content
  • Keep a short history of interactions to avoid repetitive messages
  • Log each welcome event to Google Sheets for transparency and analysis

Using embeddings and Weaviate gives you semantic recall of your latest docs, while the agent pattern provides flexibility in how the bot uses tools and context.


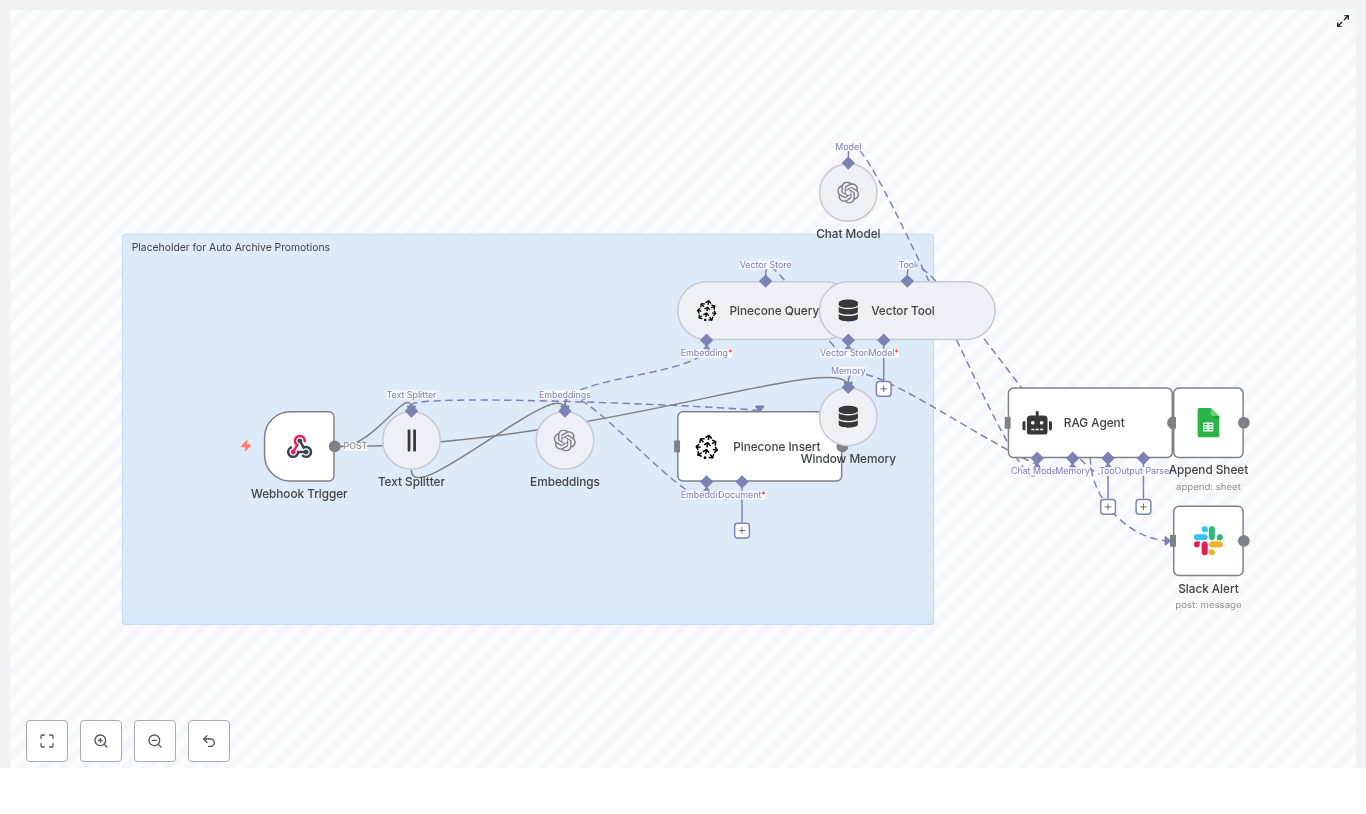
High-Level Architecture

Before you build the workflow, it helps to see how the pieces connect. The core components are:

  • Webhook (n8n) – receives Discord gateway events or events from an intermediary service
  • Text Splitter – breaks long onboarding texts into manageable chunks
  • Embeddings (OpenAI) – converts chunks into vectors
  • Weaviate Vector Store – stores embeddings and supports similarity search
  • Query Tool – exposes Weaviate queries as a tool the agent can call
  • Memory Buffer – stores short-term context for the agent
  • Chat Model (Hugging Face) – generates the welcome message
  • Agent – coordinates tools, memory, and the chat model
  • Google Sheets – logs each welcome event

Next, you will walk through each part in a teaching-friendly, step-by-step order.


Step 1 – Capture Discord Events with an n8n Webhook

1.1 Configure the Webhook Node

First, set up a Webhook node in n8n. This will be the entry point for your workflow whenever a new member joins a Discord guild.

You can either:

  • Send Discord gateway events directly to the n8n webhook, or
  • Use a lightweight intermediary such as a Cloudflare Worker or a minimal server that receives the Discord event, simplifies the payload, and forwards it to n8n

1.2 Example Payload

A simplified JSON body that your webhook might receive could look like this:

{  "guild_id": "123456789",  "user": {  "id": "987654321",  "username": "newcomer"  },  "joined_at": "2025-08-01T12:34:56Z"
}

Make sure your webhook is configured to parse this payload so the rest of the workflow can access guild_id, user.id, user.username, and joined_at.


Step 2 – Prepare Onboarding Content with a Text Splitter

2.1 Why Split Text?

Guild rules, welcome guides, or onboarding documents are usually longer than what an embedding model can handle at once. Splitting these documents into chunks makes them easier to embed and improves search quality.

2.2 Recommended Split Settings

Use a Text Splitter node in n8n to break your content into overlapping chunks. A good starting configuration is:

  • Chunk size: about 400 characters
  • Chunk overlap: about 40 characters

The overlap helps preserve context between chunks so that important sentences are not cut in a way that loses meaning. This leads to better semantic search results later when you query Weaviate.


Step 3 – Create Embeddings with OpenAI

3.1 Configure the Embeddings Node

Next, connect the Text Splitter output to an OpenAI Embeddings node.

  • Store your OpenAI API key in n8n credentials for security
  • Select a robust embedding model such as text-embedding-3-small or the latest recommended model in your account
  • Map each text chunk from the splitter node into the embeddings node input

The node will output vector representations for each chunk. These vectors are what you will store in Weaviate.


Step 4 – Store Embeddings in Weaviate

4.1 Designing the Weaviate Schema

Set up a Weaviate collection to store your guild onboarding content. For example, you might use an index name such as:

discord_guild_welcome_bot

Each document stored in Weaviate should include:

  • guild_id – to identify which guild the content belongs to
  • source – for example “rules”, “welcome_guide”, or “faq”
  • chunk_index – an integer to track the position of the chunk in the original document
  • The actual text content and its embedding vector

4.2 Inserting Data

Use an n8n node that connects to Weaviate and inserts each chunk plus its embedding into the discord_guild_welcome_bot index. Make sure your Weaviate credentials and endpoint are correctly configured in n8n.

Once this step is complete, your guild rules and onboarding docs are stored as searchable vectors.


Step 5 – Query Weaviate as a Tool for the Agent

5.1 When to Query

When a new member joins, the workflow needs to retrieve the most relevant content for that guild. You will configure a query node that runs a similarity search in Weaviate based on the guild ID.

5.2 Filtering by Guild

In your Weaviate query, use a metadata filter on guild_id to ensure that only content for the current guild is returned. This is crucial if you plan to support multiple guilds in the same Weaviate instance.

5.3 Expose the Query as a Tool

Wrap the Weaviate query in a tool that your agent can call. For example, the tool might be described as:

  • “Retrieve the top N relevant onboarding chunks for a given guild.”

The agent can then ask something like, “What should I mention in the welcome message for this guild?” and use the tool to get domain-specific context when needed.


Step 6 – Add a Memory Buffer for Context

6.1 Why Use Memory?

Short-term memory helps your bot avoid repetitive responses and maintain continuity in multi-step interactions, such as when a moderator follows up with the bot after the initial welcome.

6.2 What to Store

Configure a Memory Buffer in your agent setup to keep recent conversation snippets, such as:

  • The last welcome message sent
  • The new member’s primary role or tags

Keep the memory window small so it remains efficient but still useful for context.


Step 7 – Connect a Hugging Face Chat Model

7.1 Choosing a Model

Use a Hugging Face conversational model or any chat-capable model supported by n8n. The model will generate the final welcome message, using the retrieved context from Weaviate and the information from the webhook.

7.2 Prompting Strategy

Keep your prompts clear and instructive. You can use a system prompt pattern like this:

System: You are an assistant that writes warm, concise Discord welcome messages. 
Keep messages under 120 words and include the server's top 2 rules 
and a link to the #start-here channel when available.

User: New user data + retrieved context chunks

Assistant: [Polished welcome message]

Pass the context chunks, guild metadata (name, rules, onboarding links), and the new user information into the model. Your agent can also instruct the model to produce a source list or reference the chunks used, which is helpful if moderators review the message later.


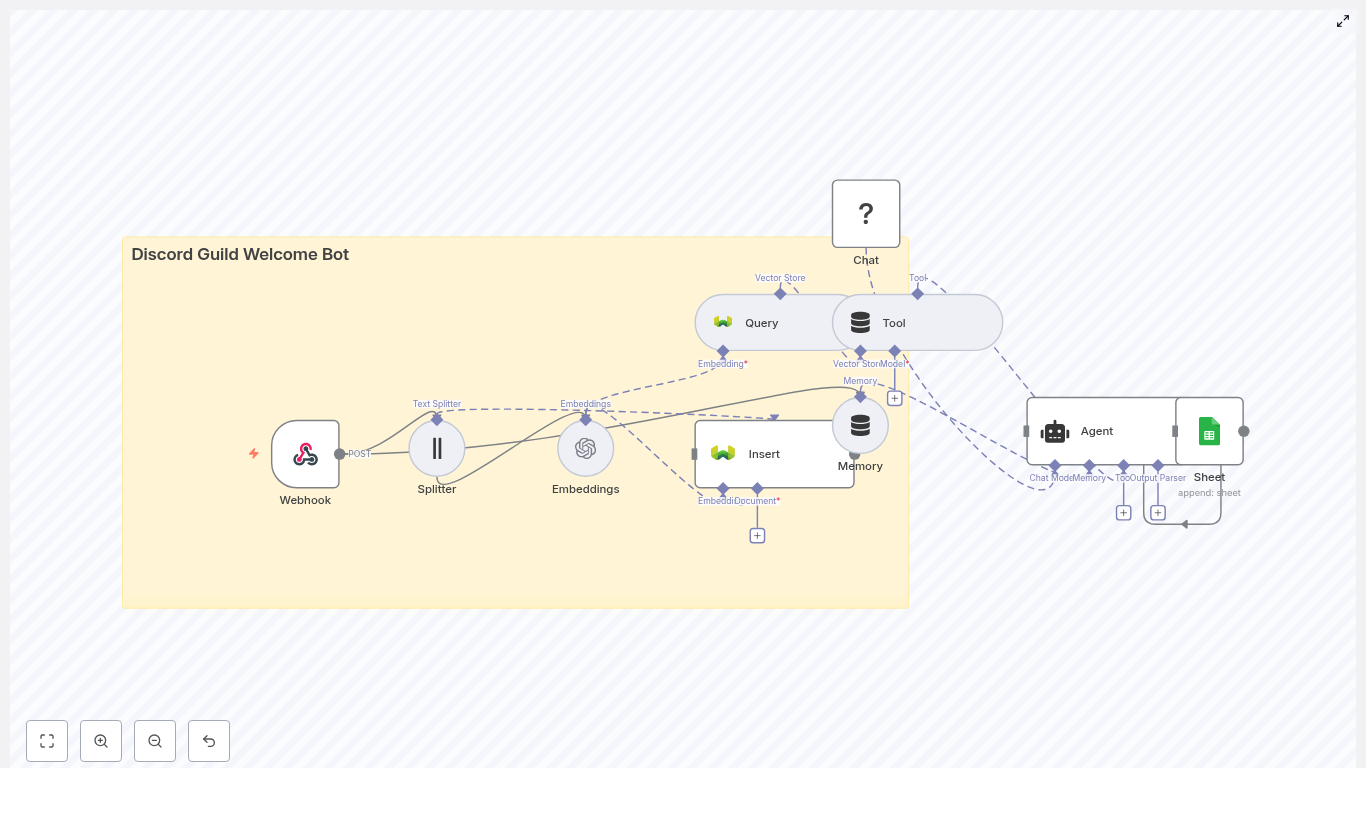
Step 8 – Orchestrate with an Agent and Log to Google Sheets

8.1 Agent Flow in n8n

The agent node is responsible for coordinating the entire process. Its typical flow looks like this:

  1. Receive the webhook payload with guild_id, user.id, and user.username
  2. Call the Weaviate query tool if additional context is needed
  3. Consult the memory buffer for recent interactions
  4. Send all relevant data to the Hugging Face chat model to generate the welcome message
  5. Return the final message to be posted to Discord or passed to another system

8.2 Logging with Google Sheets

To keep an audit trail and enable analytics, add a Google Sheets node at the end of the workflow. Configure it to append a new row for each welcome event with fields such as:

  • Timestamp
  • guild_id
  • user_id
  • message_preview (for example, the first 80-100 characters of the welcome message)

This log will help you track bot activity, monitor message quality, and analyze onboarding trends over time.


Configuration Tips and Best Practices

  • Security: Never expose API keys in plain text. Use n8n credential stores and protect your webhook with a secret token or short-lived signature.
  • Rate limits: Respect Discord and external API rate limits. Batch operations where possible and implement retry or backoff strategies in n8n.
  • Guild filtering: Always filter Weaviate queries by guild_id so that content stays relevant and separated between servers.
  • Chunking strategy: Adjust chunk size and overlap for different content types. For example, rule-heavy or code-heavy docs may benefit from slightly different chunk settings than FAQ-style text.
  • Explainability: Store source chunk IDs or short excerpts alongside generated messages. This helps moderators understand why certain information was included.

Testing and Monitoring Your Workflow

Testing Steps

Before using the bot in a production guild, test it thoroughly:

  1. Use a sandbox or test guild and send sample webhook events to n8n
  2. Verify that the Text Splitter creates reasonable chunks
  3. Confirm that embeddings are being created and inserted into Weaviate correctly
  4. Check that Weaviate queries return relevant chunks for the test guild
  5. Run the agent end to end and inspect the generated welcome message
  6. Ensure that each event is logged correctly in Google Sheets

Ongoing Monitoring

Monitor your workflow logs for:

  • Failed API calls or timeouts
  • Embedding quality issues (for example, irrelevant chunks being returned)
  • Changes in guild rules or docs that require re-indexing or refreshing embeddings

Scaling and Advanced Extensions

  • Multi-guild support: Use separate Weaviate collections or metadata-scoped indices for each guild to keep queries fast and isolated.
  • Personalized welcomes: Incorporate roles, interests, or onboarding survey results to tailor messages to each new member.
  • Follow-up automation: Trigger delayed messages, such as a 24-hour check-in, using the same agent and memory setup.
  • Analytics: Use the Google Sheets log or export data to BigQuery to analyze acceptance rates, message edits, and moderator overrides.

Quick FAQ and Recap

What does this n8n workflow actually do?

It receives a Discord join event, retrieves relevant onboarding content from Weaviate using embeddings, generates a personalized welcome message with a Hugging Face chat model, and logs the interaction to Google Sheets.

Why use embeddings and Weaviate instead of static messages?

Embeddings and a vector store let the bot dynamically reference up-to-date rules, channels, and guild-specific documents, which makes welcome messages more accurate and context-aware.

Can this setup handle multiple Discord guilds?

Yes. By tagging content with guild_id and filtering queries accordingly, the same workflow can serve multiple guilds with different onboarding content.

How do I keep the bot’s knowledge current?

Whenever you update rules or onboarding docs, re-run the splitting and embedding steps for that guild and re-insert or update the vectors in Weaviate.

Where are events logged?

Each welcome event is appended to a Google Sheets spreadsheet with key fields like timestamp, guild ID, user ID, and a message preview.


Conclusion and Next Steps

By combining n8n with OpenAI embeddings, Weaviate, a Hugging Face chat model, and Google Sheets, you can build a smart, context-aware Discord welcome bot that scales across multiple guilds and remains easy to manage.

This architecture provides:

  • Semantic recall of your latest server documentation

Auto Reply to FAQs with n8n & Pinecone

Auto Reply to FAQs with n8n, Pinecone, Cohere & Anthropic

Imagine if your FAQ page could actually talk back to your users, give helpful answers, and never get tired. That is exactly what this n8n workflow template helps you do.

In this guide, we will walk through how the template uses n8n, Pinecone, Cohere, and Anthropic to turn your documentation into a smart, automated FAQ assistant. It converts questions into embeddings, stores them in Pinecone, pulls back the most relevant content, and uses a Retrieval-Augmented Generation (RAG) agent to answer with context. On top of that, it logs everything and alerts your team when something breaks.

We will cover what the workflow does, when to use it, and how each part fits together so you can confidently run it in production.

What this n8n FAQ auto-reply template actually does

At a high level, this template turns your existing FAQ or documentation into an intelligent auto-responder. Here is what it handles for you:

  • Receives user questions from your site, chat widget, or support tools via a webhook
  • Splits your FAQ content into smaller chunks for precise search
  • Uses Cohere to generate embeddings for those chunks
  • Stores and searches those embeddings in a Pinecone vector index
  • Uses a RAG agent with Anthropic’s chat model to craft answers from the retrieved content
  • Keeps short-term memory for follow-up questions
  • Logs every interaction to Google Sheets
  • Sends Slack alerts when something goes wrong

The result is a reliable, scalable FAQ auto-reply system that is far smarter than simple keyword search and much easier to maintain than a custom-coded solution.

Why use a vector-based FAQ auto-reply instead of keywords?

You have probably seen how keyword-based search can fail pretty badly. Users phrase questions differently, use synonyms, or write full sentences, and your system tries to match literal words. That is where vector search comes in.

With embeddings, you are not matching exact words. You are matching meaning. Vector search captures semantic similarity, so a question like “How do I reset my login details?” can still match an FAQ titled “Change your password” even if the wording is different.

By combining:

  • Pinecone as the vector store
  • Cohere as the embedding model
  • Anthropic as the chat model for answers
  • n8n as the orchestration layer

you get a production-ready RAG pipeline that can answer FAQs accurately, with context, and at scale.

When this template is a good fit

This workflow is ideal for you if:

  • You have a decent amount of FAQ or documentation content
  • Support teams are repeatedly answering similar questions
  • You want quick, accurate auto-replies without hallucinated answers
  • You care about traceability, logging, and error alerts
  • You prefer a no-code or low-code approach over building everything from scratch

It works especially well for web apps, SaaS products, internal IT helpdesks, and knowledge bases where users ask variations of the same questions all day long.

How the architecture fits together

Let us zoom out for a second and look at the overall pipeline before diving into the steps. The template follows a clear flow:

  • Webhook Trigger – receives incoming user questions with a POST request
  • Text Splitter – chunks long FAQ docs into smaller pieces
  • Embeddings (Cohere) – turns each chunk into a vector
  • Pinecone Insert – stores those vectors and metadata in a Pinecone index
  • Pinecone Query + Vector Tool – searches for the best matching chunks when a question comes in
  • Window Memory – keeps a short history of the conversation
  • Chat Model (Anthropic) + RAG Agent – builds the final answer using retrieved context
  • Append Sheet (Google Sheets) – logs everything for review and analytics
  • Slack Alert – pings your team if the agent fails

Now let us walk through how each of these pieces works in practice.

Step-by-step walkthrough of the n8n workflow

1. Webhook Trigger: catching the question

The whole workflow starts with an n8n Webhook node. This node listens for POST requests from your website, chat widget, or support system.

Your payload should at least include:

  • A unique request ID
  • The user’s question text

This makes it easy to plug the workflow into whatever front-end you are already using, and it gives you a clean entry point for every conversation.

2. Text Splitter: chunking your FAQ content

Long FAQ pages or documentation are not ideal for retrieval as a single block. That is why the workflow uses a Text Splitter node to break content into smaller chunks.

A typical configuration is:

  • Chunk size of around 400 characters
  • Overlap of about 40 characters

This chunking improves precision during search. Instead of pulling back an entire page, the system can surface the most relevant paragraph, which leads to more focused and accurate RAG responses.

3. Generating embeddings with Cohere

Once you have chunks, the next step is to turn them into vectors. The template uses Cohere’s English embedding model, specifically embed-english-v3.0, to generate dense embeddings for each chunk.

Along with the embedding itself, you should attach metadata such as:

  • Source URL or document ID
  • Chunk index
  • The original text
  • Product or feature tags
  • Locale or language

This metadata is crucial later for filtering, debugging, and understanding where an answer came from.

4. Inserting vectors into Pinecone

Next, the workflow uses a Pinecone Insert node to store embeddings in a vector index, for example called auto_reply_to_faqs.

Best practice here is to:

  • Use a consistent namespace for related content
  • Store metadata like product, locale, document type, and last-updated timestamps
  • Keep IDs consistent so you can easily re-index or update content later

By including locale or product in metadata, you can later scope queries to, say, “English only” or “billing-related docs only”.

5. Querying Pinecone and using the Vector Tool

When a user question comes in through the webhook, the workflow embeds the question in the same way as your FAQ chunks, then queries Pinecone for the closest matches.

In this step:

  • The question is converted into an embedding
  • Pinecone is queried for the nearest neighbors
  • The Vector Tool in n8n maps those results into the RAG agent’s toolset

Typically you will return the top 3 to 5 matches. Each result includes:

  • The similarity score
  • The original text chunk
  • Any metadata you stored earlier

The RAG agent can then pull these chunks as context while generating the answer.

6. Window Memory: keeping short-term context

Conversations are rarely one-and-done. Users often ask follow-ups like “What about on mobile?” or “Does that work for team accounts too?” without repeating the full context.

The Window Memory node solves this by storing a short history of the conversation. It lets the model understand that the follow-up question is connected to the previous one, which is especially helpful in chat interfaces.

7. RAG Agent with Anthropic’s chat model

This is where the answer gets crafted. The RAG agent coordinates between the retrieved context from Pinecone and the Anthropic chat model to produce a final response.

You control its behavior through the system prompt. A good example prompt is:

“You are an assistant for Auto Reply to FAQs. Use only the provided context to answer; if the answer is not in the context, indicate you don’t know and offer to escalate.”

With the right instructions, you can:

  • Ask the model to cite sources or reference the original document
  • Tell it to avoid hallucinations and stick to the given context
  • Keep responses on-brand in tone and style

8. Logging to Google Sheets and sending Slack alerts

For observability and continuous improvement, the workflow logs each processed request to a Google Sheet. Useful fields to store include:

  • Timestamp
  • User question
  • Top source or document used
  • Agent response
  • Status or error flags

On top of that, a Slack Alert node is configured to notify your team if the RAG agent fails or if something unexpected happens. That way, you can quickly troubleshoot issues instead of discovering them days later.

Configuration tips and best practices

Here are some practical settings and habits that tend to work well in real-world setups:

  • Chunk size: 300 to 500 characters with about 10 to 15 percent overlap usually balances context and precision.
  • Embedding model: use a model trained for semantic search. Cohere is a great starting point, but you can experiment with alternatives if you want to trade off cost and relevance.
  • Top-k retrieval: start with k = 3. Increase if questions are broad or users need more context in responses.
  • Metadata: store locale, document type, product area, and last-updated timestamps. This helps with filtered queries and avoiding stale content.
  • System prompt: be explicit. Tell the model to rely on context, not invent facts, and to say “I don’t know” when the answer is missing.

Monitoring, costs, and security

Monitoring and cost awareness

There are three main cost drivers and monitoring points:

  • Embedding generation (Cohere) – used when indexing and when embedding new questions
  • Vector operations (Pinecone) – index size, inserts, and query volume all matter
  • LLM calls (Anthropic) – usually the biggest cost factor per response

To keep costs under control, you can:

  • Cache embeddings when possible
  • Avoid re-indexing unchanged content
  • Monitor query volume and set sensible limits

Security checklist

Since you may be dealing with user data or internal docs, security matters. At a minimum, you should:

  • Secure webhook endpoints with API keys, auth tokens, and rate limiting
  • Encrypt any sensitive metadata before inserting into Pinecone, especially if it contains PII
  • Use proper IAM policies and rotate API keys for Pinecone, Cohere, and Anthropic

Scaling and running this in production

Once you are happy with the basic setup, you can start thinking about scale and operations. Here are some features that help production workloads:

  • Batch indexing: schedule periodic re-indexing jobs so new FAQs or updated docs are automatically picked up.
  • Human-in-the-loop: flag low-confidence or out-of-scope answers for manual review. You can use this feedback to refine prompts or improve your documentation.
  • Rate limiting and queueing: use n8n’s queueing or an external message broker to handle traffic spikes gracefully.
  • Multi-lingual support: either maintain separate indexes per language or store locale in metadata and filter at query time.

Quick reference: n8n node mapping

If you want a fast mental model of how nodes connect, here is a simplified mapping:


Webhook Trigger -> Text Splitter -> Embeddings -> Pinecone Insert

Webhook Trigger -> Text Splitter -> Embeddings -> Pinecone Query -> Vector Tool -> RAG Agent -> Append Sheet

RAG Agent.onError -> Slack Alert  

Common pitfalls and how to avoid them

Even with a solid setup, a few common issues tend to show up. Here is how to stay ahead of them:

  • Hallucinations: if the model starts making things up, tighten the system prompt and remind it to use only the retrieved context. Tell it to explicitly say “I don’t know” when information is missing.
  • Stale content: outdated answers can be worse than no answer. Re-index regularly and use last-updated metadata to avoid serving old information.
  • Poor relevance: if results feel off, experiment with chunk sizes, try different embedding models, and test using negative examples (queries that should not match certain docs).

Wrapping up

By combining n8n with Cohere embeddings, Pinecone vector search, and a RAG agent powered by Anthropic, you get a scalable, maintainable way to auto-reply to FAQs with high relevance and clear traceability.

This setup reduces repetitive work for your support team, improves response quality for users, and plugs neatly into tools you already know, like Google Sheets and Slack.

Ready to try it out? Export the n8n template, plug in your Cohere, Pinecone, and Anthropic credentials, and start indexing your FAQ content. You will have an intelligent FAQ assistant running much faster than if you built everything from scratch.

If you want a more guided setup or a custom implementation for your documentation, our team can help with a walkthrough and tailored consulting.

Contact us to schedule a demo or request a step-by-step implementation guide tuned to your specific docs.

Find template details here: https://n8nbazar.ai/template/automate-responses-to-faqs

Auto Archive Promotions: n8n RAG Workflow Guide

Auto Archive Promotions: n8n RAG Workflow Guide

Imagine this: your marketing team has launched its fifth promo campaign this week, your inbox is a graveyard of “Final_Final_v7” docs, and someone just asked, “Hey, do we have the copy from that Valentine’s campaign in 2022?”

If your current system involves frantic searching, random spreadsheets, and mild existential dread, it might be time to let automation rescue you. That is exactly what the Auto Archive Promotions n8n workflow template is here to do.

This guide walks you through how the template works, how it uses RAG (Retrieval-Augmented Generation), OpenAI embeddings, Pinecone, Google Sheets, and Slack, and how to set it up in a way that stops repetitive archiving tasks from eating your soul.


What this n8n workflow actually does

The Auto Archive Promotions workflow is built for teams that constantly produce promotional content like emails, social posts, and special offers. Instead of manually filing these into folders you will never open again, this workflow:

  • Ingests promotional content via a Webhook Trigger
  • Splits long text into smart chunks with a Text Splitter
  • Converts each chunk into OpenAI embeddings using text-embedding-3-small
  • Stores those vectors in a Pinecone index for semantic search
  • Uses a RAG Agent and Window Memory to answer questions about past promotions
  • Logs everything to Google Sheets for visibility
  • Sends Slack alerts if something breaks so you do not have to guess where it failed

The result: your promotional content becomes searchable, auditable, and reusable, without anyone having to copy and paste text into a spreadsheet at 6 p.m. on a Friday.


The tech behind the magic

Here are the core pieces that make the Auto Archive Promotions workflow tick:

  • n8n – the visual automation platform that orchestrates all the steps.
  • Webhook Trigger – receives promotion payloads via HTTP POST at a specific path.
  • Text Splitter – breaks long content into chunks (in this template: chunk size 400, overlap 40).
  • OpenAI Embeddings – uses the text-embedding-3-small model to turn text chunks into dense vectors.
  • Pinecone – the vector database that stores those embeddings in the auto_archive_promotions index.
  • RAG Agent – combines retrieved vectors with a chat model to answer context-rich questions.
  • Window Memory – keeps short-term conversational context for the RAG Agent.
  • Google Sheets – append-only log of processed promotions (sheet name: Log).
  • Slack – sends alerts to a channel like #alerts when something goes wrong.

How the Auto Archive Promotions workflow runs

Step 1: Promotions arrive via Webhook

Everything starts with a Webhook Trigger node in n8n.

  • The workflow listens for POST requests on the path auto-archive-promotions.
  • Your marketing system or ingestion pipeline sends promotion data, such as:
    • Subject or title
    • Body text
    • Metadata like IDs, dates, or campaign names

In other words, every time a new promotion is created, it can be automatically shipped to this endpoint instead of being lost in someone’s drafts folder.

Step 2: Text gets chopped into smart chunks

Promotional content is often longer than we remember when we wrote it. To handle this, the workflow uses a Text Splitter node.

  • Configured with:
    • chunkSize = 400 characters
    • chunkOverlap = 40 characters
  • The overlap keeps context flowing between chunks, so the model understands that “this offer” in one chunk still refers to the discount mentioned in the previous chunk.

This chunking step makes embeddings more accurate and retrieval far more useful later on.

Step 3: OpenAI turns text into embeddings

Each text chunk is then passed to the OpenAI Embeddings node using the model text-embedding-3-small.

  • The model converts each chunk into a dense vector that represents its semantic meaning.
  • These vectors are ideal for similarity search, which is what allows you to later ask things like “Show me promotions about free shipping” and get relevant results.

So instead of relying on simple keyword matches, your system can understand meaning, not just exact words.

Step 4: Vectors are stored in Pinecone

Once embeddings are generated, the workflow sends them to Pinecone.

  • Vectors and metadata are inserted into a Pinecone index named auto_archive_promotions.
  • Typical metadata includes:
    • Promotion ID
    • Source or channel
    • Date
    • A short snippet of the content for quick manual inspection

This is your long-term memory for promotional content, neatly indexed and ready for semantic search.

Step 5: RAG Agent answers questions using Pinecone

When someone needs information, the workflow does not just shrug and hand over a massive list of entries. Instead, it uses a combination of vector search and a RAG agent.

  • Pinecone Query retrieves the most relevant vectors for a given query.
  • A Vector Tool passes this retrieved context to the RAG Agent.
  • The RAG Agent uses:
    • The retrieved context from Pinecone
    • A chat model, such as an OpenAI chat model
    • Window Memory to keep short-term interaction context

The outcome: the agent can summarize campaigns, answer questions, and surface related promotions with relevant context, instead of giving you a random wall of text.

Step 6: Logging and alerts keep things sane

To avoid “black box” automation, the workflow keeps track of what it does and complains loudly when it cannot do it.

  • On success:
    • The workflow appends a row to a Google Sheet named Log.
    • The sheet ID is set in the Google Sheets node configuration.
    • You get an append-only audit trail of processed promotions.
  • On error:
    • Any node failure routes to a Slack Alert node.
    • A message is posted to a channel like #alerts with details about the error.
    • Your team can quickly triage issues instead of discovering them days later.

Configuration tips for better results

Once the workflow is running, a few tweaks can make it go from “works” to “actually helpful.”

Dial in your text splitting

  • For marketing copy, a chunk size between 300 and 500 characters with 20 to 50 characters overlap is usually a solid starting point.
  • The template uses 400 and 40, which is a good balance between context and efficiency.

Store meaningful metadata

  • Include details such as:
    • Promotion ID
    • Campaign name
    • Author or owner
    • Date
    • Content type (email, social, landing page, etc.)
  • Richer metadata makes it easier to filter, audit, and analyze promotions later.

Organize your Pinecone indexes

  • Use a dedicated Pinecone index per content domain, for example:
    • auto_archive_promotions for marketing content
    • Another index for support articles or documentation
  • This keeps vector search focused and prevents unrelated content from polluting results.

Handle rate limits gracefully

  • Configure rate limiting and retries in n8n for your embedding provider.
  • Use exponential backoff so your workflow does not panic when the API says “please slow down.”

Secure your webhook

  • Protect the Webhook Trigger so not just anyone can POST promotions.
  • Use:
    • Authentication tokens
    • IP allow-lists
    • Other security controls appropriate for your environment

Security and privacy considerations

Embeddings and vector stores may contain sensitive content, so treat them like any other system that stores marketing and customer data.

  • Avoid storing PII in plaintext either in vectors or metadata unless you have:
    • Clear retention policies
    • Encryption in place
  • Use scoped API keys for both Pinecone and OpenAI.
  • Rotate credentials regularly to reduce risk.
  • Follow your organization’s data governance and compliance rules.

Automation should save time, not create new security headaches.


Why this workflow is worth the setup

Once you have Auto Archive Promotions running, the benefits add up quickly:

  • Automated archival and audit trails for all promotional content.
  • Semantic search to quickly find past campaigns, messaging themes, or offers.
  • RAG-powered summarization and Q&A that helps marketing and compliance teams get answers without digging through folders.
  • Real-time alerts when the pipeline fails so engineers can fix issues before anyone notices missing data.

Instead of recreating similar promotions from scratch, you can reuse and refine what already worked.


How to extend the Auto Archive Promotions template

The template is intentionally modular, so you can bolt on more functionality as your needs grow.

  • Support attachments:
    • Extract text from PDFs or images before sending content to the Text Splitter.
    • Great for archiving promo decks, flyers, or visual assets with text.
  • Automated classification:
    • Add a classification step before indexing.
    • Tag promotions by:
      • Offer type
      • Channel
      • Urgency or priority
  • Versioning:
    • Store original content snapshots in an object store like S3.
    • Reference those snapshots from the vector metadata for full traceability.
  • Reporting:
    • Use the Google Sheets Log sheet as a data source for dashboards.
    • Track:
      • Volume of promotions over time
      • Top campaigns
      • Processing latency and failures

Troubleshooting: when automation gets grumpy

Issue: Missing vectors in Pinecone

If you are not seeing data where you expect it in Pinecone:

  • Verify that the Embeddings node is actually returning vectors.
  • Confirm the Pinecone Insert node is receiving both:
    • The vector
    • The associated metadata
  • Double check:
    • Pinecone credentials
    • Index name is exactly auto_archive_promotions

Issue: Webhook not receiving requests

If your promotions never seem to arrive in n8n:

  • Confirm your POST requests are targeting /auto-archive-promotions.
  • Make sure your n8n instance is reachable from the source system.
  • If you run n8n locally, expose it via a secure tunnel like ngrok for external systems.

Issue: RAG Agent gives irrelevant answers

When the agent starts hallucinating about campaigns you never ran, try:

  • Improving metadata richness so queries can be better filtered.
  • Increasing the number of candidate vectors returned in the Pinecone query.
  • Tuning the chunk overlap or chunk size for better context.
  • Checking the Window Memory to ensure it is not cluttered with outdated or irrelevant context.

Quick reference: workflow variables to verify

  • Webhook path: auto-archive-promotions
  • Text Splitter: chunkSize=400, chunkOverlap=40
  • Embeddings model: text-embedding-3-small
  • Pinecone index: auto_archive_promotions
  • Google Sheet: append to sheet named Log
  • Slack channel: #alerts

Wrapping up: from manual chaos to searchable history

The Auto Archive Promotions workflow shows how n8n, embeddings, vector stores, and RAG can team up to turn messy promotional content into a structured, searchable knowledge base.

By automating ingestion, indexing, and retrieval, you:

  • Cut down on manual busywork
  • Improve compliance and auditability
  • Unlock semantic search and AI-driven assistants for your marketing history

In short, you get to stop digging through old folders and start asking useful questions like “What promotions worked best for our last holiday campaign?” and actually get answers.

Try the template in your n8n instance

Ready to retire your “random promo archive” spreadsheet?

  • Set up your OpenAI and Pinecone credentials.
  • Configure your Google Sheets sheet ID for the Log sheet.
  • Secure the Webhook Trigger endpoint.

If you want help implementing this workflow, extending it with attachments or classification, or integrating it into your broader automation stack, reach out to our team or subscribe to our newsletter for more n8n and AI automation guides.

Automate POV Historical Videos with n8n

Automate POV Historical Videos with n8n: A Story of One Creator’s Breakthrough

By the time the third coffee went cold on her desk, Lena knew something had to change.

Lena was a solo creator obsessed with history. Her YouTube Shorts and TikTok feed were filled with first-person “guess the discovery” clips, each one a short POV glimpse into moments like the printing press, the light bulb, or the first vaccine. Viewers loved trying to guess the breakthrough, but there was a problem: every 25-second video took her hours to make.

She had to brainstorm a concept, write a script, prompt an image model until the visuals looked right, record and edit a voiceover, then manually stitch everything together in an editor. It was creative, yes, but it was also painfully slow. While she was polishing one video, other creators were publishing ten.

One night, after wrestling with yet another timeline in her editor, Lena stumbled across an n8n workflow template that promised something bold: fully automated POV historical shorts with AI-generated images, voiceover, and rendering, all orchestrated from a single Google Sheet.

This is the story of how she turned that template into her production engine, and how you can do the same.

The Problem: Creativity at War With Time

Lena’s format was simple but demanding. Each short followed a structure:

  • Five scenes, 5 seconds each, for a total of 25 seconds
  • POV visuals that stayed consistent across scenes (same hands, same clothing, same setting)
  • A voiceover that hinted at a historical discovery without giving it away

Her audience loved the suspense. They got detailed clues about a time period and setting, but the final reveal always came in the comments. Still, the manual production process meant she could only publish a few videos per week. She wanted dozens per day.

That is when she realized automation might be the only way to scale her creativity without burning out.

The Discovery: An n8n Workflow That Thinks Like a Producer

What caught Lena’s eye was a template that described almost exactly what she needed: a full pipeline that went from a simple topic in Google Sheets to a rendered vertical short.

The workflow combined several tools she already knew about, but had never wired together:

  • Google Sheets & Google Drive for orchestration and storage
  • n8n as the automation backbone
  • Replicate for AI image generation
  • OpenAI (or another LLM) for structured prompts and scripts
  • ElevenLabs for AI voiceovers
  • Creatomate for final video rendering

The promise was simple: once the pipeline was set up, she would only need to drop new topics into a spreadsheet. n8n would handle the rest.

Setting the Stage: How Lena Prepared Her Sheet and Schedule

Lena started with the least intimidating part: a Google Sheet.

She created columns for Theme, Topic, Status, and Notes. Her editorial guidelines looked like this:

  • Theme: Science History, Medical Breakthroughs, Inventions
  • Topic: Internal clue like “Printing Revolution – Gutenberg” (never shown to viewers)
  • Status: Pending / Generated / Published
  • Notes: Extra instructions such as “avoid modern faces” or “keep props period-accurate”

In n8n, she connected a Schedule Trigger to that sheet. Every hour, the workflow would wake up and look for rows where Status = Pending. Each of those rows represented a video idea. This meant non-technical collaborators, or even future interns, could queue videos just by adding rows.

The Rising Action: Teaching the Workflow to Write and Imagine

From Topic to Structured Scenes

Once the Schedule Trigger grabbed a “Pending” row, the real magic began. The workflow passed the Theme and Topic into a LLM prompt generator node, built with an OpenAI or Basic LLM Chain node in n8n.

Lena carefully designed the prompt so the LLM would return a structured output with five scene objects. Each scene had three parts:

  • image-prompt for Replicate
  • image-to-video-prompt with a short motion cue
  • voiceover-script for ElevenLabs

She learned quickly that consistency was everything. To keep the POV visuals coherent, every scene prompt repeated specific visual details. For example:

  • “Your ink-stained hands in a cream linen sleeve”
  • “The same linen cream shirt with rolled sleeves and a leather apron”

She made sure the LLM prompt always emphasized:

  • Visible body details like hands, forearms, fabric color, and accessories
  • The historical time period and cultural markers, such as “mid-15th century, Mainz, timber beams, movable type”
  • POV framing instructions like “from your torso level” or “POV: your hands”
  • Mood and textures such as candlelight, ink stains, parchment, wood grain
  • Camera motion hints like “slow push-in on hands” or “gentle pan across the printing press”

These details would later guide Replicate and Creatomate to keep the story visually coherent.

Splitting the Story Into Parallel Tasks

The LLM returned a neat block of structured data, but n8n still needed to treat each scene individually. Lena added a Structured Output Parser node to convert the LLM’s response into clean JSON that n8n could work with.

From there, she used a Split node. This was the turning point where the workflow stopped thinking of the video as one big chunk and started handling each scene as its own item. That split allowed n8n to generate images and audio in parallel, saving time and keeping the workflow modular.

The Turning Point: When AI Images and Voices Come Alive

Replicate Steps In: Generating POV Images

For each scene, n8n sent the image-prompt to Replicate using an HTTP Request node. Lena chose a model like flux-schnell and set the parameters recommended by the template:

  • Aspect ratio: 9:16 for vertical phone screens
  • Megapixels: 1 for fast drafts, higher for more fidelity
  • Num inference steps: low for speed, higher (around 20-50) for more detail

She noticed that if she forgot to repeat key POV details, the character’s hands or clothing sometimes changed between scenes. Whenever that happened, she went back to her prompt design and strengthened the recurring descriptors, using the exact same phrase each time, such as “linen cream shirt with rolled sleeves and leather apron.”

Waiting for Asynchronous Magic

Replicate did not return final images instantly. To handle this, Lena added a short Wait node, then a follow-up request to fetch the completed image URLs. Once all scenes had their URLs, n8n aggregated them into a single collection. Now the workflow had five image URLs ready to use.

Giving the Scenes a Voice with ElevenLabs

Next came the sound.

Lena configured a Loop in n8n to iterate over the five voiceover-script fields. For each script, an HTTP Request node called ElevenLabs and generated an MP3 file. She then uploaded each audio file to a specific folder on Google Drive, making sure the links were accessible to external services like Creatomate.

Timing was crucial. Every scene was exactly 5 seconds, so Lena aimed for voiceover scripts that would play comfortably in about 3.5 to 4 seconds. She kept each script to roughly 10-18 words, depending on the speaking rate, and used ElevenLabs voice controls to keep pacing and energy consistent across all five clips.

Whenever she saw black gaps or silent stretches in early tests, she knew the script was too long or too short. A quick adjustment to the word count or speaking speed fixed it.

Bringing It All Together: Creatomate Renders the Final Short

At this point, n8n had:

  • Five image URLs generated by Replicate
  • Five audio URLs from ElevenLabs, stored in Google Drive

The next step felt like assembling a puzzle.

Lena used n8n to merge these assets into a single payload that matched the expected format for Creatomate. The template she used in Creatomate was designed for vertical shorts: five segments, each 5 seconds long. Each segment received one image and one audio file.

With another HTTP Request node, n8n called Creatomate, passed in the payload, and waited for the final video render. When the job finished, Creatomate returned a video URL. n8n then updated the original Google Sheet row with:

  • The final video link
  • An updated Status (for example, from Pending to Generated)
  • Additional metadata like title and description

Automation Learns to Write Hooks: SEO and Titles on Autopilot

Lena wanted more than just a finished video. She needed titles and descriptions that would drive clicks and engagement without spoiling the mystery.

So she added another LLM node at the end of the workflow. Once the video was rendered, n8n sent the Theme, Topic, and a short summary of the scenes to the LLM and asked for:

  • A viral, curiosity-driven title that hinted at the discovery but did not reveal it
  • A short, SEO-friendly description that ended with a call to guess the discovery
  • Relevant hashtags, including #shorts and the theme keyword

The output went straight into the Google Sheet, ready to be copy-pasted into YouTube Shorts or TikTok. Lena no longer had to sit and brainstorm hooks for every upload.

Behind the Scenes: Trade-offs, Pitfalls, and Fixes

Balancing Quality, Speed, and Cost

As Lena scaled up production, she had to make decisions about quality and budget. She found that:

  • Higher megapixels and more inference steps improved image quality, but also increased cost and latency
  • Batching image and audio calls sped up throughput, but she had to watch API rate limits carefully
  • Storing intermediate assets in Google Drive made it easy to share and debug, but she needed to periodically delete old files to control storage costs

Common Issues She Ran Into

Inconsistent Character Details

Whenever hands or clothing looked different between scenes, she knew the prompts were too loose. The fix was always the same: repeat the exact same descriptive phrase for the recurring details in every scene prompt.

Black Gaps or Empty Frames

If Creatomate rendered black frames or cut off scenes early, it usually meant the voiceover duration did not match the scene length. Keeping scripts slightly under 4 seconds, and adjusting ElevenLabs pace, resolved this.

Rate Limits and Slow Runs

On days when she queued many videos, APIs like Replicate or ElevenLabs sometimes hit rate limits. She added Wait nodes and used polling with gentle backoff. Running image generation in parallel helped, as long as she kept batch sizes within the API’s comfort zone.

Lena’s Final Routine: From Idea to Automated Short

After a few iterations, Lena’s workflow settled into a simple rhythm. Her “to do” list for each new batch of videos looked like this:

  1. Confirm API keys and quotas for Replicate, ElevenLabs, Creatomate, and Google APIs
  2. Add a new row in Google Sheets with Theme, Topic, and Status set to Pending
  3. Run a quick test on a single scene if she changed prompt styles, to verify visual and audio consistency
  4. Tune voice pace and scene duration if she noticed any black frames or awkward pauses

Everything else happened automatically. The schedule trigger picked up new topics, the LLM generated structured prompts and scripts, Replicate and ElevenLabs created visuals and audio, Creatomate rendered the final vertical short, and the LLM wrote a title and description tailored for “guess the discovery” engagement.

Where She Took It Next

Once Lena trusted the pipeline, she started experimenting with upgrades:

  • Using higher resolution and subtle motion effects like parallax layers for a more polished look
  • Testing adaptive scripts that could add more clues based on viewer performance or comments
  • Planning to connect YouTube and TikTok APIs so n8n could upload and schedule posts automatically

What began as a desperate attempt to reclaim her time became a full production system that scaled her creativity instead of replacing it.

Your Turn: Step Into the POV

If you see yourself in Lena’s story, you are probably juggling the same tension between ambitious ideas and limited hours. This n8n template gives you a practical way out. You keep control of the creative direction, while the workflow handles the repetitive parts.

To recap, the pipeline you will be using:

  • Reads “Pending” topics from a Google Sheet via a Schedule Trigger
  • Uses an LLM to generate five scenes with image prompts, motion hints, and voiceover scripts
  • Splits scenes, calls Replicate for images, and waits for the final URLs
  • Loops through voiceover scripts, calls ElevenLabs for audio, and stores MP3s on Google Drive
  • Aggregates images and audio, then calls Creatomate to render a 25-second vertical POV short
  • Generates SEO-friendly titles and descriptions, updates your sheet, and marks the video as ready

Ready to scale your own historical POV shorts? Import the n8n template, connect your API keys, and start filling your Google Sheet with themes and topics. The workflow will handle the rest.

If you would like a copy of the prompt library and the Creatomate template that powered Lena’s transformation, subscribe to the newsletter or reach out for a starter pack and hands-on setup help.

Produced by a team experienced in automation and short-form video production. Follow for more guides on AI-driven content pipelines, n8n workflow templates, and scalable creative systems.

Auto-Tag Blog Posts with n8n, Embeddings & Supabase

How One Content Team Stopped Drowning In Tags With n8n, Embeddings & Supabase

By the time the marketing team hit their 500th blog post, Lena had a problem.

She was the head of content at a fast-growing SaaS company. Traffic was climbing, the editorial calendar was full, and the blog looked busy. But under the surface, their content library was a mess. Posts about the same topic had completely different tags. Some had no tags at all. Related posts never showed up together. Search results were weak, and the SEO team kept asking, “Why is it so hard to find our own content?”

Lena knew the answer. Manual tagging.

The pain of manual tags

Every time a new article went live, someone on her team had to skim it, guess the right tags, try to remember what they used last time, and hope they were consistent. On busy weeks, tags were rushed or skipped. On slow weeks, they overdid it and created more variants of the same idea.

The consequences were starting to hurt:

  • Taxonomy drifted, with multiple tags for the same topic
  • Discoverability suffered, since related posts were not linked together
  • Recommendation widgets pulled in random content
  • Editors spent precious time doing repetitive tagging instead of strategy

What Lena needed was simple in theory: a way to automatically tag blog posts in a consistent, SEO-friendly way, without adding more work to her already stretched team.

That is when she found an n8n workflow template that promised exactly that: auto-tagging blog posts using embeddings, Supabase vector storage, and a retrieval-augmented generation (RAG) agent.

The discovery: an automation-first approach

Lena had used n8n before for basic automations, but this template looked different. It was a complete, production-ready pipeline built around modern AI tooling. The idea was to plug it into her CMS, let it process every new article, and get consistent, high-quality tags back automatically.

The promise was clear:

  • Use semantic embeddings to understand content, not just keywords
  • Store vectors in Supabase for fast, reusable search
  • Use a RAG agent to generate tags that actually match the article
  • Log everything to Google Sheets, and alert on errors via Slack

If it worked, Lena would not just save time. She would finally have a consistent taxonomy, better internal linking, and smarter recommendations, all powered by a workflow she could see and control in n8n.

Setting the stage: connecting the CMS to n8n

The first step in the template was a Webhook Trigger. This would be the entry point for every new blog post.

Lena asked her developer to add a webhook call from their CMS whenever a post was published. The payload was simple, a JSON object that looked like this:

{  "title": "How to Build an Auto-Tagging Pipeline",  "content": "Full article HTML or plain text...",  "slug": "auto-tagging-pipeline",  "published_at": "2025-08-01T12:00:00Z",  "author": "Editor Name",  "url": "https://example.com/auto-tagging-pipeline"
}

The Webhook Trigger node in n8n listened for this event and expected fields like title, content, author, and url. For security, they configured authentication on the webhook and used a shared secret so only their CMS could call it.

Now, every new article would automatically flow into the workflow the moment it went live.

Rising action: teaching the workflow to “read”

Once Lena could send posts to n8n, the real challenge began. The workflow had to understand the content well enough to generate tags that made sense.

Breaking long posts into meaningful pieces

The template’s next node was the Text Splitter. Lena’s blog posts were often long, detailed guides. Sending the entire article as one block to an embedding model would be inefficient and less accurate, so the Text Splitter broke the content into smaller chunks.

The recommended settings in the template were:

  • Chunk size: 400 characters
  • Chunk overlap: 40 characters

This struck a balance between preserving context and keeping embedding costs under control. Overlap ensured that ideas crossing paragraph boundaries were not lost. Lena kept these defaults at first, knowing she could adjust chunk size later if latency or costs became an issue.

Turning text into vectors with embeddings

Next came the Embeddings node. This was where the workflow translated each text chunk into a semantic vector using a model like text-embedding-3-small.

For each chunk, the workflow stored important metadata alongside the vector:

  • The original text chunk
  • The post ID or slug
  • The position index, so chunks could be ordered
  • The source URL and publish date

To keep costs manageable, the template supported batching embeddings so multiple chunks could be processed in a single API call. Lena enabled batching to reduce the number of calls to the embedding API and keep the operation affordable as their content library grew.

The turning point: Supabase and the RAG agent take over

Once embeddings were generated, Lena needed a place to store and query them. This is where Supabase and the RAG agent came into play, turning raw vectors into useful context for tag generation.

Building a vector memory with Supabase

The template’s Supabase Insert node pushed each embedding into a Supabase vector index. The example index name was auto-tag_blog_posts, which Lena kept for clarity.

Her developer created a table with a schema that matched the template’s expectations:

  • id (unique)
  • embedding (vector)
  • text (original chunk)
  • post_id or slug
  • metadata (JSON)

The metadata field turned out to be especially useful. They used it to store language, content type, and site section, which later allowed them to filter vector search results and keep tag generation focused on relevant content.

Retrieving context with the Supabase Query + Vector Tool

When it was time to actually generate tags, the workflow did not just look at the current post in isolation. Instead, it queried the vector store for similar content, using the Supabase Query + Vector Tool node.

This node wrapped Supabase vector queries inside n8n, making it easy to retrieve the most relevant chunks. The template recommended returning the top K documents, typically between 5 and 10, so the RAG agent had enough context without being overwhelmed.

By pulling in related content, the workflow could suggest tags that matched both the article and the overall taxonomy of the blog.

Orchestrating intelligence with Window Memory, Chat Model, and RAG Agent

The heart of the system was the combination of Window Memory, a Chat Model, and the RAG Agent.

  • Window Memory preserved short-term context across the RAG run, so the agent could “remember” what it had already seen and decided.
  • The Chat Model, such as an Anthropic model, acted as the LLM that transformed retrieved context and article content into tag suggestions. It also validated tags against Lena’s taxonomy rules.
  • The RAG Agent orchestrated everything, from retrieval to reasoning to output parsing, ensuring the model had the right information at the right time.

To keep outputs consistent, Lena spent time refining the prompt. She used a structure similar to the template’s example:

System: You are an assistant that generates SEO-friendly tags for blog posts.
Instructions: Given the post title, a short summary, and retrieved context, return 3-7 tags.
Formatting: Return JSON like { "tags": ["tag1","tag2"] }
Avoid: Personal data, brand names unless present in content.

Inside the prompt, she also added guidance like:

“Return 3-7 tags balanced between broad and specific terms. Avoid duplicates and use lowercase, hyphenated two-word tags when appropriate.”

After a few iterations, the tags started to look uncannily like something her own team would have chosen on a good day.

Keeping score: logging, alerts, and control

Lena did not want a black box. She wanted visibility. The template addressed that too.

Logging results with Google Sheets

The workflow included an Append Sheet node that wrote each post and its generated tags to a Google Sheet. This gave Lena an audit trail where she could quickly scan outputs, spot patterns, and compare tags across posts.

It also turned into a training tool. New editors could see how the system tagged posts and learn the taxonomy faster.

Slack alerts for failures

Of course, no system is perfect. If the RAG agent failed, or if something went wrong upstream, the workflow sent a message to a designated Slack channel using a Slack Alert node.

This meant that instead of silently failing, the process raised a flag. Editors could then step in, review the post manually, and investigate what went wrong in the workflow.

Refining the system: best practices Lena adopted

Once the core pipeline was working, Lena started to refine it based on real-world usage. The template’s best practices helped guide those decisions.

Taxonomy and normalization

Lena and her team created a canonical tag list. They used the RAG agent to prefer existing tags when possible, and only introduce new ones when truly needed.

In a post-processing step, they normalized tags by:

  • Converting everything to lowercase
  • Applying consistent singular or plural rules
  • Removing duplicates and near-duplicates

This kept the tag set clean, even as the system processed hundreds of posts.

Managing cost and performance

Embeddings were the main recurring cost, so Lena applied a few strategies to keep spend in check:

  • Embed only new or updated content, not every historical post repeatedly
  • Use smaller embedding models for bulk operations where ultra-fine nuance was not critical
  • Cache frequently requested vectors and reuse them when re-running tags on the same content

These optimizations allowed the team to scale the system without blowing their budget.

Quality control and human-in-the-loop

Even with automation, Lena wanted human oversight. She set up a simple review routine:

  • Editors periodically reviewed the Google Sheet log for a sample of posts
  • A small set of “ground-truth” posts was used to measure tag precision and recall
  • Prompts were adjusted when patterns of weak or irrelevant tags appeared

Over time, the system’s output became more reliable, and the amount of manual correction dropped significantly.

When things go wrong: troubleshooting in the real world

Not every run was perfect. Early on, Lena ran into a few problems that the template’s troubleshooting guide helped her solve.

When no tags are generated

If a post went through the workflow and came back with no tags, Lena checked:

  • Whether the webhook payload actually contained the article content and reached the Text Splitter node
  • If the embeddings API returned valid vectors and the Supabase Insert succeeded
  • Whether the RAG agent’s prompt and memory inputs were correctly configured, sometimes testing with a minimal prompt and context for debugging

In most cases, the issue was a misconfigured field name or a small change in the CMS payload that needed to be reflected in the n8n workflow.

When tags feel off or irrelevant

Sometimes the system produced tags that were technically related but not quite right for the article. To fix this, Lena tried:

  • Increasing the number of retrieved documents (top K) from the vector store to give the agent more context
  • Refining the prompt with stricter rules and examples of good and bad tags
  • Filtering Supabase vector results by metadata such as language or category to reduce noise

Each small adjustment improved tag quality and made the output more aligned with the brand’s content strategy.

Looking ahead: extending the auto-tagging system

Once Lena trusted the tags, the workflow became more than a simple helper. It turned into a foundation for other features.

Using the same pipeline, her team started to:

  • Automatically update their CMS taxonomy with approved tags
  • Drive related-post widgets on the blog using shared tags
  • Feed tags into analytics to detect topic trends and content gaps
  • Experiment with an internal UI where editors could see tag suggestions and approve or tweak them before publishing

The original problem of messy, manual tags had transformed into a structured, data-driven content system.

Security and privacy in the workflow

Because the workflow relied on third-party APIs, Lena’s team took privacy seriously. Before sending content for embeddings, they made sure:

  • Personal data was removed or anonymized
  • Webhook endpoints were secured with shared secrets or JWTs
  • API keys and secrets were stored as environment variables and rotated regularly

This kept the system compliant with internal policies and external regulations while still benefiting from advanced AI tooling.

The resolution: from chaos to clarity

A few months after implementing the n8n auto-tagging template, Lena looked at the blog’s analytics dashboard with a sense of relief.

Tags were consistent. Related posts were actually related. Internal search surfaced the right content more often. The SEO team reported better visibility for key topics, and the editorial team had reclaimed hours each week that used to be spent on tedious manual tagging.

The workflow was not magic. It was a carefully designed system built with n8n, embeddings, Supabase vector storage, and a RAG agent, combined with thoughtful prompts, monitoring, and human oversight.

But to Lena and her team, it felt like magic compared to where they started.

Want to follow Lena’s path?

If you are facing the same tagging chaos, you can replicate this journey with your own stack.

To get started:

  • Clone the n8n auto-tagging template
  • Connect your OpenAI embeddings and Supabase credentials
  • Wire up your CMS to the workflow via a secure webhook
  • Run a few posts through the pipeline and review the tags in Google Sheets

From there, refine your prompt, tweak chunking sizes, and adjust your Supabase metadata filters until the tags feel right for your content.

Suggested next steps: connect your CMS webhooks, set environment variables for API keys, and run tests on a staging dataset before enabling production runs. If you need a checklist or a tailored implementation plan for your CMS, reach out to your team’s automation lead or create a simple internal doc that outlines your taxonomy rules, review process, and rollout plan.

Disaster API SMS: Automated n8n Workflow

Disaster API SMS: Automated n8n Workflow

Picture this: a major incident hits, your SMS inbox explodes, and you are stuck copying messages into spreadsheets, searching old threads, and trying to remember who said what three hours ago. Meanwhile, your coffee is cold and your patience is running on fumes.

That is exactly the kind of repetitive chaos this n8n workflow is built to eliminate. Instead of manually wrangling messages, it quietly ingests emergency SMS or API payloads, turns them into searchable vectors, and uses a RAG (Retrieval-Augmented Generation) agent to craft context-aware responses. It even logs everything and yells at you in Slack when something breaks. Automation: 1, tedious work: 0.

What this Disaster API SMS workflow actually does

This production-ready n8n template is designed for emergency and disaster-response scenarios where every message matters and every second counts. At a high level, the workflow:

  • Receives incoming SMS or POST requests via a webhook endpoint
  • Splits and embeds message content for efficient semantic search
  • Stores embeddings in a Supabase vector store for contextual retrieval
  • Uses a RAG agent (Anthropic chat model plus vector tool) to generate informed, context-aware responses
  • Appends outputs to Google Sheets for audit logging
  • Sends error alerts to Slack when something goes wrong

In other words, it takes raw emergency messages, makes them smart and searchable, and keeps a paper trail while you focus on actual decision making instead of copy-paste gymnastics.

High-level architecture (aka: what is under the hood)

Here is how the main building blocks fit together inside n8n:

  • Webhook Trigger – Listens for POST requests on the path /disaster-api-sms and captures incoming payloads.
  • Text Splitter – Breaks long messages into overlapping chunks for better embedding quality (chunkSize = 400, chunkOverlap = 40).
  • Embeddings (Cohere) – Uses embed-english-v3.0 to turn each chunk into a vector representation.
  • Supabase Insert – Stores those vectors in a Supabase vector index named disaster_api_sms.
  • Supabase Query + Vector Tool – Pulls the most relevant chunks back out when you need context and exposes them to the agent.
  • Window Memory – Keeps short-term conversation history so the agent does not forget what just happened.
  • Chat Model (Anthropic) – Generates responses using an Anthropic chat model.
  • RAG Agent – Orchestrates retrieval, memory, and generation with a system prompt tailored for Disaster API SMS.
  • Append Sheet – Writes agent outputs to a Google Sheet (for audits, reports, and “what did we decide?” questions).
  • Slack Alert – Sends concise error messages to your #alerts channel if any node fails.

Why use n8n for Disaster API SMS automation?

In disaster response, every incoming SMS or API call can contain something critical: location details, status updates, or requests for help. Manually tracking and searching all that is not only painful, it is risky.

This n8n template helps you:

  • Process messages in near real-time via webhooks
  • Store information in a way that is searchable by meaning, not just keywords
  • Generate context-aware responses using RAG, not just generic canned replies
  • Maintain audit logs automatically for post-incident reviews
  • Get alerted the moment something breaks instead of discovering it two hours later

If you are tired of being the human router for incoming messages, this workflow is your excuse to let automation take over the grunt work.

How the n8n workflow runs behind the scenes

Step 1: Incoming message hits the webhook

An SMS gateway or external service sends a POST request to the webhook path /disaster-api-sms. The Webhook Trigger node captures the entire payload, such as:

  • Message text
  • Sender ID
  • Timestamp
  • Any extra metadata your provider includes

This is the raw material that flows through the rest of the pipeline.

Step 2: Chunking and embedding the content

Long messages can be tricky for embeddings, so the workflow uses a Text Splitter node to divide the text into overlapping chunks:

  • chunkSize = 400 characters
  • chunkOverlap = 40 characters

Each chunk is passed into the Cohere Embeddings node using the embed-english-v3.0 model. The result is a set of vector embeddings that capture the semantic meaning of each piece of text. These vectors are then inserted into Supabase under the index name disaster_api_sms, which makes the messages searchable by similarity instead of just exact text matches.

Step 3: Retrieving context from Supabase

When you need to generate a response or analyze a message, the workflow uses the Supabase Query node to search for the most relevant chunks in the vector store. This query returns top-k similar embeddings and their associated content.

The Vector Tool node exposes this retrieved context to the RAG Agent as a tool it can call. That means the agent is not just guessing, it is actively looking up relevant information from your stored messages.

Step 4: RAG Agent crafts a context-aware response

Now the fun part. The RAG Agent pulls together:

  • The retrieved vectors from Supabase
  • Short-term conversation history from the Window Memory node
  • The Anthropic Chat Model for language generation

The agent is configured with a system prompt set to:

You are an assistant for Disaster API SMS

The inbound JSON payload is included in the prompt, so the agent knows exactly what kind of message it is dealing with. The result is a context-aware output that can be used for replies, summaries, or internal notes.

Step 5: Logging, auditing, and error alerts

Once the response is generated, the workflow uses the Append Sheet node to add a new row to a Google Sheet with the sheet name Log. This gives you a persistent audit trail of what came in and what the system produced.

If anything fails along the way, the workflow routes the error to the Slack Alert node. That node posts a concise error message to your #alerts channel so you can investigate quickly instead of wondering why things suddenly went quiet.

Setup checklist before importing the n8n template

Before you bring this workflow into your n8n instance, line up the following credentials and services. Think of it as the pre-flight checklist that saves you from debugging at midnight.

  • Cohere API key for the embed-english-v3.0 embeddings model
  • Supabase account with:
    • A service key
    • A vector-enabled table or index named disaster_api_sms
  • Anthropic API key for the Chat Model used by the RAG agent
  • Google Sheets OAuth2 credentials plus the target spreadsheet ID used by the Append Sheet node
  • Slack API token with permission to post to the #alerts channel
  • SMS gateway (for example Twilio) configured to send POST requests to your webhook URL
    You can optionally add a Twilio node to send programmatic SMS replies.

Security and reliability best practices

Emergency data is sensitive, and production workflows deserve more than “hope it works.” Here are recommended security and reliability practices for this Disaster API SMS setup:

  • Secure the public webhook by validating HMAC signatures, using secret tokens, or restricting allowed IP ranges from your SMS gateway.
  • Store all API keys and secrets in n8n credentials, not directly inside nodes or logs.
  • Redact or minimize sensitive PII before storing it as vectors. Embeddings are hard to reverse, but you should still treat them as sensitive.
  • Rate-limit inbound requests so sudden spikes do not overwhelm Cohere or your Supabase instance.
  • Enable retry and backoff for transient errors, such as network hiccups when connecting to Cohere or Supabase, and consider dead-letter handling for messages that repeatedly fail.

Scaling and cost considerations

Automation is great until the bill arrives. To keep costs under control while scaling your Disaster API SMS workflow, keep an eye on these areas:

  • Embedding calls – Cohere charges per token or embedding. Batch small messages when possible and avoid re-embedding content that has not changed.
  • Vector storage – Supabase costs will grow with the number of stored vectors and query volume. Use TTL or pruning policies to remove outdated disaster messages that are no longer needed.
  • LLM usage – Anthropic chat requests are not free. Cache RAG responses where appropriate and only call the model when you genuinely need generated output.
  • Parallelization – Use n8n concurrency settings to control how many embedding or query operations run at the same time so you do not overload external services.

Troubleshooting and monitoring the workflow

Things will occasionally break. The goal is to notice quickly and fix them without a detective novel worth of log reading.

  • Use n8n execution logs to inspect node inputs and outputs and pinpoint where a failure occurs.
  • Log key events, such as ingestion, retrieval, and responses, to a central location. Google Sheets, a database, or a dedicated logging service all work well for audits.
  • Watch Slack alerts from your #alerts channel for runtime exceptions, and integrate with PagerDuty or Opsgenie if you need full on-call escalation.

Customizing and extending your Disaster API SMS automation

Once you have the core workflow running, it is easy to extend it to match your exact operations. Some popular enhancements include:

  • Adding a Twilio node to send automatic SMS acknowledgments or follow-up messages.
  • Integrating other embedding providers such as OpenAI or Hugging Face, or using fine-tuned models for highly domain-specific embeddings.
  • Implementing more advanced retrieval patterns, for example:
    • Filtering by metadata
    • Restricting to a specific time window
    • Prioritizing messages based on location relevance
  • Building a dashboard that shows recent messages, response times, and overall system health.

Example: validating webhook requests

Before you let any incoming request into the rest of the flow, you can run a quick validation step. Here is a simple pseudo-code snippet that could be implemented in a pre-check node:

// Pseudo-logic executed in a pre-check node
if (!verifySignature(headers['x-signature'], body, SECRET)) {  throw new Error('Invalid webhook signature');
}
if (!body.message || body.message.length === 0) {  throw new Error('Empty message payload');
}
// Continue to Text Splitter and downstream nodes

This kind of guardrail helps ensure you are not wasting resources on junk or malformed requests.

Bringing it all together

The n8n Disaster API SMS workflow gives you a solid, production-ready foundation for handling emergency messages. It ingests SMS and API payloads, turns them into searchable embeddings, uses RAG for context-aware responses, and keeps everything logged and monitored.

Instead of juggling messages, spreadsheets, and ad hoc notes, you get a repeatable, auditable, and scalable automation pipeline that lets you focus on actual incident response.

Ready to ship it?

  • Import the template into your n8n instance
  • Connect your credentials for Cohere, Supabase, Anthropic, Google Sheets, and Slack
  • Run end-to-end tests using a test SMS or a curl POST to /webhook/disaster-api-sms

Want the template or help customizing it?

If you would like this workflow exported as a downloadable n8n file, or you need help tailoring it to your specific SMS provider, get in touch or subscribe for detailed setup guides, customization ideas, and troubleshooting tips. Your future self, who is not manually copying messages into spreadsheets, will be very grateful.