
Convert CSV to JSON with an n8n Webhook (Step-by-step)
If you ever find yourself staring at a CSV file thinking, “I just want this as JSON already,” this guide is for you. In this walkthrough, you’ll learn how to build a flexible CSV-to-JSON webhook in n8n that can:
- Accept CSV as a file upload or raw text
- Handle different delimiters like commas and semicolons
- Return clean JSON that is ready for APIs, databases, or other workflows
- Gracefully handle errors and even ping you in Slack when something breaks
We’ll go through the full n8n workflow template step by step, plus talk about how to make it production-ready. Think of this as your starter kit for a CSV-to-JSON microservice.
What this n8n workflow actually does
At a high level, this workflow exposes a webhook endpoint that converts CSV to JSON on demand. A client sends CSV data to the webhook, and n8n responds with a structured JSON payload.
It supports three main input styles:
- A CSV file upload (binary data)
- Raw CSV text in the request body
- JSON that is already structured (for which the workflow can simply pass through or adapt)
Behind the scenes, the workflow:
- Receives the request in a Webhook node
- Uses a Switch node to figure out what kind of input it got
- Extracts CSV content if a file was uploaded
- Normalizes everything into a single CSV string field
- Parses that CSV into JSON with a Code node
- Validates and aggregates the result
- Returns a JSON response, or a clear error message if something goes wrong
- Optionally notifies a Slack channel when errors happen
Why use n8n for CSV to JSON conversion?
n8n is an open-source automation platform that is really good at gluing systems together. Instead of spinning up a custom service every time you need to transform CSV, you can let n8n handle it for you.
This CSV-to-JSON webhook template is especially handy when you:
- Need a quick API endpoint that accepts CSV and returns JSON
- Want to feed CSV data into other tools, APIs, or databases
- Have different clients sending data in different formats (file uploads vs raw text)
- Prefer to maintain your logic visually in a workflow instead of code-only services
In short, you get a lightweight data transformation pipeline without having to maintain a separate app or server.
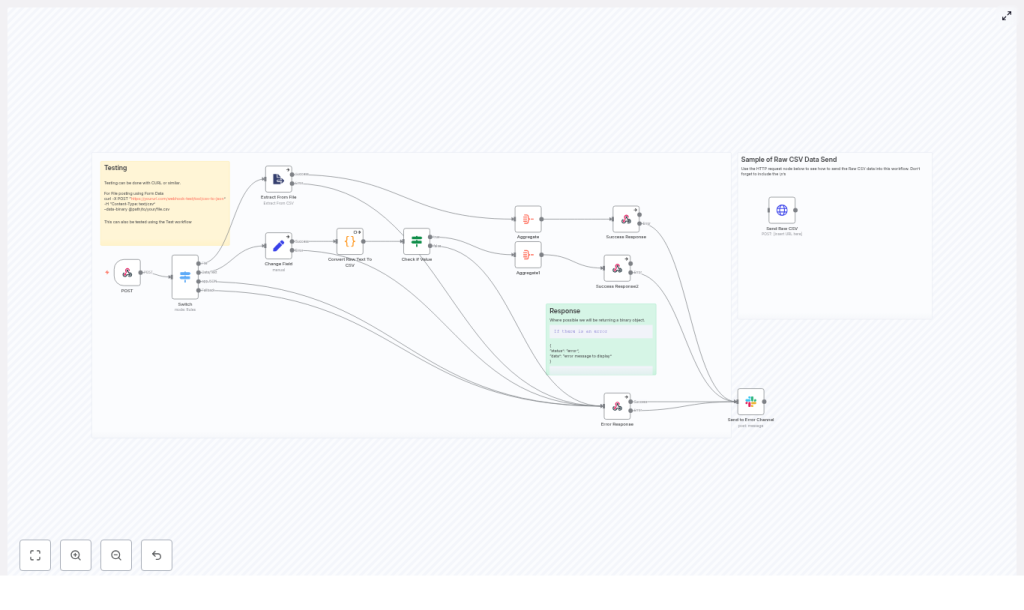
Workflow architecture at a glance
Here is the main cast of nodes in this n8n template:
- Webhook (POST) – entry point that receives CSV or JSON
- Switch – routes the execution based on input type
- Extract From File – pulls CSV text out of uploaded files
- Set (Change Field) – maps incoming data into a single CSV field
- Code (Convert Raw Text To CSV) – parses CSV text into JSON
- If / Check – validates that parsing worked as expected
- Aggregate – combines parsed rows into a JSON array
- RespondToWebhook – sends success or error responses
- Slack (optional) – notifies your team when something fails
Let’s unpack how each part works, and how you can tweak it.
Step-by-step: building the CSV-to-JSON webhook
1. Webhook node: accepting the request
Start with a Webhook node configured to accept POST requests. In the node settings:
- Set the HTTP method to POST
- Set responseMode to
responseNodeso that a later node controls the final HTTP response - Enable file uploads by configuring a binary property
The template uses the binary property name data. That means if a client uploads a file, it will be available under the binary field data for downstream nodes.
2. Switch node: routing by input type
Next comes a Switch node that decides how to handle the incoming request. It checks:
- Whether there is binary file data present
- The
Content-Typeheader, usually via$json.headers['content-type']
Common branches you will want:
- File upload – if binary data is present, treat the input as a CSV file
- Raw CSV text – if
Content-Typeistext/plain - JSON payload – if
Content-Typeisapplication/json
This routing step lets the same webhook endpoint handle multiple formats without forcing all clients to behave the same way.
3. Extract From File: reading CSV content from uploads
If the request contains a CSV file, it flows into an Extract From File node (or an equivalent Binary to Text conversion). This node reads the binary content from the data field and outputs it as text.
The important part is that, after this node, you have a plain string that contains the CSV data. That string can then be passed to the parser just like raw text from the request body.
4. Set node: normalizing raw CSV text
When CSV is sent directly as text, you want to standardize where that text lives in the item. A Set node is perfect for this.
For example, if the raw text is in $json.body, you can map it into a dedicated field like csv:
- Create a new field named
csv - Set its value to
{{$json.body}}(or whatever property holds the CSV string)
By the time the data reaches the Code node, everything – whether it started as a file or raw text – is available as a single CSV string in a consistent field. That keeps the parsing logic much simpler.
5. Code node: converting CSV text into JSON
This is where the actual CSV-to-JSON magic happens. The Code node uses JavaScript to turn the CSV string into an array of JSON objects.
The template uses a straightforward parser that:
- Reads the CSV from the
csvfield - Splits the file into lines
- Uses the first line as headers
- Splits each subsequent line into values and maps them to the headers
- Supports both comma and semicolon delimiters via a regular expression
Here is the exact code used in the workflow:
const csvData = $input.all()[0]?.json?.csv;

// Use a regex to split on either ',' or ';'
const lines = csvData.split("\n");
const headers = lines[0].split(/,|;/);

const jsonData = lines.slice(1).map((line) => {  const data = line.split(/,|;/);  let obj = {};  headers.forEach((header, i) => {  obj[header] = data[i];  });  return obj;
});

if (jsonData.length === 0) {  throw new Error("No data to process");
}

return jsonData;
A couple of important notes about this approach:
- It is intentionally simple and works well for many basic CSV files.
- It does not handle quoted fields that contain commas, semicolons, or newlines.
- It also does not fully cover edge cases like escaped quotes.
If you need full CSV compatibility, you can either:
- Use a proper CSV parsing library like
csv-parsein a server-side context and call it from n8n, or - Implement a more robust parser inside a Function or Code node using a zero-dependency CSV parser
6. Validation, aggregation, and building the response
Once the CSV has been parsed, the workflow performs a quick sanity check and then prepares the final JSON response.
Typical steps here include:
- An If or Check node that verifies the parser returned items and did not throw an error.
- Aggregate nodes that combine the individual items into a single JSON array, which is usually more convenient for clients to consume.
- A RespondToWebhook node that sends the aggregated JSON back to the caller.
Because the Webhook node is configured with responseMode = responseNode, this RespondToWebhook node is what ultimately controls the HTTP response that the client sees.
7. Error handling and Slack notifications
Things will break occasionally, especially when clients send malformed CSV. The workflow is wired so that error paths lead into a dedicated RespondToWebhook node that returns a standardized error payload, such as:
{  "status": "error",  "data": "There was a problem converting your CSV. Please refresh the page and try again."
}
This gives your clients a predictable format for handling failures.
If you want extra visibility, you can also plug in a Slack node on the error branch. That way, whenever a conversion fails, your team gets a message in Slack and can investigate.
How to test your CSV-to-JSON webhook
Once the workflow is active, you will want to verify that it behaves correctly for both file uploads and raw text. Here are two quick curl examples you can use from the command line.
Test with a CSV file upload
For sending a CSV file directly:
curl -X POST "https://yoururl.com/webhook/tool/csv-to-json" \ -H "Content-Type: text/csv" \ --data-binary @path/to/your/file.csv
Replace https://yoururl.com/webhook/tool/csv-to-json with your actual webhook URL and @path/to/your/file.csv with the path to your CSV file.
Test with raw CSV text in the body
To send CSV directly as plain text:
curl -X POST "https://yoururl.com/webhook/tool/csv-to-json" \ -H "Content-Type: text/plain" \ --data-binary $'album,year,US_peak_chart_pos\nElephant,2003,6\nIcky Thump,2007,2'
This sends a small CSV snippet inline. It is perfect for quick testing while you tweak the workflow.
Making it production-ready
Once you have the basic CSV-to-JSON conversion working, you will probably want to harden it a bit before exposing it to real users or external systems.
Improve CSV parsing robustness
The simple regex-based approach in the Code node is great for demos and straightforward files, but production data can be messy. Consider:
- Quoted fields that contain commas or semicolons inside them
- Fields with escaped quotes, such as
"He said ""Hello""" - Different newline styles like
\r\nvs\n
For those cases, a dedicated CSV parser is a safer bet. You can:
- Use a library like
csv-parsein a server-side environment and integrate it with n8n, or - Embed a lightweight CSV parsing implementation in a Function node
Handle large files and performance
Very large CSV files can be challenging if you try to load everything into memory inside a single workflow run. To keep performance under control:
- Set sensible file size limits on uploads
- Consider streaming the CSV outside n8n and only sending processed chunks in
- Store large files in object storage and trigger a separate workflow to process them asynchronously
This kind of design helps you avoid timeouts and memory pressure when clients send massive datasets.
Security and access control
Since this workflow exposes a webhook endpoint, you will want to protect it, especially if it is on the public internet. Some good practices:
- Require authentication, for example with an API key, bearer token, or n8n’s built-in auth options
- Restrict and validate accepted
Content-Typeheaders - Sanitize all inputs and reject unexpected or malformed CSVs politely
- Validate that required headers or columns are present before processing
Content-Type based routing
Reliable Content-Type detection makes the Switch node more accurate. The workflow typically checks:
$json.headers['content-type'] === 'text/plain'for raw CSV text$json.headers['content-type'] === 'application/json'for JSON bodies- The presence of binary data to treat the request as a file upload
This keeps your routing logic predictable and easier to maintain.
What you can do after converting CSV to JSON
Once your CSV data is in JSON form, you can plug it into almost anything. Some popular follow-up steps in n8n include:
- Validating and normalizing fields such as dates, numbers, and enums
- Enriching rows with lookup calls to APIs or databases
- Inserting the data into a database table
- Sending the JSON to another API endpoint
- Streaming parsed objects into a message queue or data warehouse
The CSV-to-JSON webhook becomes a reusable building block that you can drop into larger automation workflows.
Troubleshooting: when things are not working
If the output is not what you expect, here are a few quick checks:
- Empty output? Inspect the raw CSV body in the Webhook node to confirm that headers and newlines are present.
- Parsing errors? Add
console.logstatements or throw descriptive errors in the Code node to see exactly where it fails. - Weird delimiters or formats? Test with multiple CSV examples, including semicolon-delimited files, missing cells, or extra columns, and adjust the parser accordingly.
Pre-launch checklist
Before you put this CSV-to-JSON webhook into production, run through a quick checklist:
- Authentication and rate limiting are configured
-
