
Copper Person Sync with n8n and Slack: A Simple, Time-Saving Workflow
Ever find yourself typing the same contact details into Copper, then into your other tools, then pinging your team on Slack to say, “Hey, this person is set up”? It adds up, right?
This n8n workflow template does that whole routine for you. It creates a person in Copper CRM, updates their details, grabs the final record to double-check everything, and then sends a friendly confirmation straight into Slack.
In this guide, we’ll walk through what the workflow does, when it’s useful, and how each node works, so you can plug it into your own setup with confidence.
What this Copper person sync workflow actually does
At a high level, this n8n workflow:
- Creates a new person in Copper CRM
- Updates that person with extra information, like a phone number
- Fetches the final person record from Copper to confirm the data
- Sends a Slack notification with the person’s details
It is a neat, linear flow that shows off a common CRM automation pattern: create → update → verify → notify.
When should you use this workflow?
This template is perfect if you:
- Regularly add new contacts to Copper and want to avoid manual data entry
- Need your team to know when a new person is created or updated
- Want a reliable, auditable process around contact creation
- Plan to trigger downstream automations based on new or updated people in Copper
You can use it as-is for quick tests, or as a starting point for more advanced workflows that hook into forms, landing pages, or other tools.
Why automate Copper person management with n8n?
Manually managing contacts is one of those tasks that feels small but eats your day. Automation with n8n helps you:
- Keep data consistent across Copper, Slack, and any other tools you plug in
- Trigger follow-up actions automatically, like tasks, notifications, or reporting
- Save time for more strategic work instead of copy-pasting emails and phone numbers
- Maintain a clear trail of how and when contact records are created or changed
Once this is set up, you do not have to worry about “Did I remember to update Copper?” or “Did I tell the team about this new contact?” The workflow handles that for you.
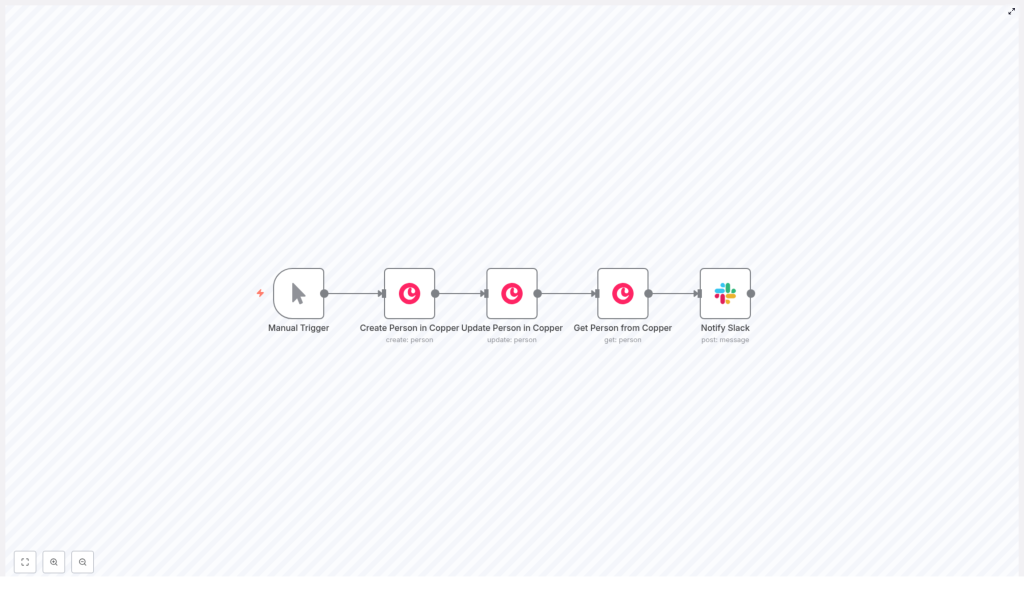
Quick tour of the workflow structure
This template uses five n8n nodes connected in a straight line:
- Manual Trigger – starts the workflow on demand
- Create Person in Copper – creates the initial person record
- Update Person in Copper – adds or updates fields like phone numbers
- Get Person from Copper – pulls the final person record from Copper
- Notify Slack – posts a confirmation message in a Slack channel
Visually, it looks like this:
Manual Trigger → Create Person in Copper → Update Person in Copper → Get Person from Copper → Notify Slack
Let’s walk through each node so you know exactly what is happening at each step.
Step-by-step: how each node works
1. Manual Trigger
The workflow starts with a Manual Trigger node. This is ideal while you are building or testing, because you can just hit “Execute workflow” in n8n whenever you want to run it.
Once you are happy with it, you can swap this node out for something more automated, like:
- A Webhook that listens to events from your app or website
- A Cron or scheduler node that runs on a schedule
- A trigger from another tool, like Google Sheets or Typeform
2. Create Person in Copper
Next up is the Create Person in Copper node. This is where the workflow calls Copper’s API to create a new person resource.
In the example template, it is configured with:
- Resource:
person - Fields:
name = "Harshil"emails = [{ email: "harshil@n8n.io", category: "work" }]
When this node runs, Copper returns the full person object. The important part here is the person id, which we will reuse in the next nodes. n8n makes that easy by exposing the returned data as $json so you can reference it in expressions.
3. Update Person in Copper
Right after creating the person, the workflow moves to the Update Person in Copper node. This step is useful when you want to add more details or adjust fields right after creation.
In the template, the node is set up to update the person’s phone number:
- Resource:
person - Operation:
update - personId:
={{$json["id"]}}(this grabs the id from the previous node) - updateFields:
phone_numbers = { phoneFields: [{ number: "1234567890", category: "work" }] }
The key detail is the expression used for personId:
{{$json["id"]}}
This tells n8n to take the id from the JSON output of the previous node (the one that created the person) so you always update the correct record.
4. Get Person from Copper
To make sure everything looks right in Copper, the next node is Get Person from Copper. This node fetches the person by id and gives you the final, updated contact record.
Configuration is straightforward:
- Resource:
person - Operation:
get - personId:
={{$json["id"]}}(again, using the id from the previous step)
This step is helpful if you want to:
- Double-check that Copper stored the data as expected
- Use the final person object in later nodes or other systems
- Pass a clean, verified record into Slack or reporting tools
5. Notify Slack
Finally, the Notify Slack node sends a confirmation message to a Slack channel of your choice. This is the “Hey team, this person is ready in Copper” moment.
In the template, the node posts a simple message:
- Resource:
message - Operation:
post - Channel:
#general - Text:
Person processed in Copper: {{$json["id"]}}
The text field uses an expression again so the message includes the actual person id that was just processed.
Sample n8n workflow template (JSON)
Want to get hands-on quickly? Here is the trimmed JSON for the workflow template described above. You can import it directly into n8n and customize it for your own use case.
{  "name": "Copper Person Sync Workflow",  "nodes": [  {"name": "Manual Trigger", "type": "n8n-nodes-base.manualTrigger"},  {"name": "Create Person in Copper", "type": "n8n-nodes-base.copper", "parameters": {"name": "Harshil", "resource": "person", "additionalFields": {"emails": {"emailFields": [{"email": "harshil@n8n.io", "category": "work"}]}}}},  {"name": "Update Person in Copper", "type": "n8n-nodes-base.copper", "parameters": {"personId": "={{$json[\"id\"]}}", "resource": "person", "operation": "update", "updateFields": {"phone_numbers": {"phoneFields": [{"number": "1234567890", "category": "work"}]}}}},  {"name": "Get Person from Copper", "type": "n8n-nodes-base.copper", "parameters": {"personId": "={{$json[\"id\"]}}", "resource": "person", "operation": "get"}},  {"name": "Notify Slack", "type": "n8n-nodes-base.slack", "parameters": {"resource": "message", "operation": "post", "channel": "#general", "text": "Person processed in Copper: {{$json[\"id\"]}}"}}  ]
}
Once imported, you can swap out the sample name, email, phone number, and Slack channel with your own values, or better yet, map them dynamically from other nodes.
Getting set up: required credentials
Before you hit run, you will need a few things in place in your n8n environment.
- n8n instance
Use either a self-hosted n8n setup or n8n cloud, whichever you prefer. - Copper credentials
Add your Copper API credentials in n8n. You will need:- A valid Copper API key
- Any required Copper API configuration for your account
- Slack credentials
In Slack, create an app or use an existing bot token that has thechat:writescope. Install it to your workspace, then add those credentials to n8n. - Slack channel configuration
In the Slack node, set the channel (for example#general). For more reliability, especially in larger workspaces, you can use the channel ID instead of the name.
Best practices for a reliable Copper – n8n – Slack workflow
Once the basic template is running, a few tweaks can make it production-ready.
- Use expressions instead of hardcoding
For real-world usage, avoid fixed values like a single name or email. Map data from previous nodes or external triggers so each run handles different people automatically. - Add error handling
Use an IF node or a dedicated error workflow to catch failed API calls and notify an admin or log the error. This is especially important if you are creating or updating many contacts. - Respect API rate limits
Copper’s API has rate limits. If you are processing large batches, add delays or queueing logic in n8n to avoid hitting those limits. - Protect sensitive data
Store API keys and other secrets in environment variables or n8n’s credentials system, not directly in node parameters or plain text.
Troubleshooting common issues
If something does not work on the first try, here are a few quick checks.
- Authentication problems
Double-check that your Copper API key and Slack token are correct and that the necessary scopes and permissions are granted. - Missing or unexpected fields
Look at the node output in n8n’s UI. Confirm that keys likeid,emails, andphone_numbersare actually present in the Copper response. - Expression errors
If an expression like{{$json["id"]}}is failing, use the Debug panel and run nodes individually. Make sure you are referencing the correct node output and that the field exists.
Ideas for extending this n8n Copper workflow
Once you have the basic person sync working, you can easily layer on more automation. For example, you could:
- Check for existing people by email before creating a new one, to avoid duplicates
- Enrich contacts with third-party APIs like Clearbit or Hunter before sending them to Copper
- Automatically create tasks or opportunities in Copper when certain conditions are met
- Log processed contacts to a Google Sheet or database for reporting and analytics
This template is a solid building block. You can plug it into lead capture forms, onboarding flows, or any other process where new people enter your system.
Wrapping up
This Copper person sync workflow is a simple but powerful example of what n8n can do for your CRM processes. It shows how to:
- Create a person in Copper
- Update their details with additional fields
- Verify the final record
- Notify your team in Slack
From here, you can adapt the pattern to match your own stack and processes, while keeping everything consistent and automated.
Want to try it yourself? Import the template into n8n, connect your Copper and Slack credentials, and run a test. If you need more detailed guidance or want help tailoring the workflow to your specific use case, feel free to reach out or subscribe for more automation tips.
Call to action: Import the workflow, automate your Copper contact management, and let n8n handle the busywork. If you have a particular scenario in mind, share your use case and we will happily suggest improvements.
